Last Updated on July 5, 2021
In this tutorial, you will learn how to apply OpenCV OCR (Optical Character Recognition). We will perform both (1) text detection and (2) text recognition using OpenCV, Python, and Tesseract.
A few weeks ago I showed you how to perform text detection using OpenCV’s EAST deep learning model. Using this model we were able to detect and localize the bounding box coordinates of text contained in an image.
The next step is to take each of these areas containing text and actually recognize and OCR the text using OpenCV and Tesseract.
To learn how to build your own OpenCV OCR and text recognition system, just keep reading!
- Update July 2021: Added section on alternatives to Tesseract OCR, including cloud-based OCR engines and the EasyOCR Python package.
Looking for the source code to this post?
Jump Right To The Downloads SectionOpenCV OCR and text recognition with Tesseract
In order to perform OpenCV OCR text recognition, we’ll first need to install Tesseract v4 which includes a highly accurate deep learning-based model for text recognition.
From there, I’ll show you how to write a Python script that:
- Performs text detection using OpenCV’s EAST text detector, a highly accurate deep learning text detector used to detect text in natural scene images.
- Once we have detected the text regions with OpenCV, we’ll then extract each of the text ROIs and pass them into Tesseract, enabling us to build an entire OpenCV OCR pipeline!
Finally, I’ll wrap up today’s tutorial by showing you some sample results of applying text recognition with OpenCV, as well as discussing some of the limitations and drawbacks of the method.
Let’s go ahead and get started with OpenCV OCR!
How to install Tesseract 4
Tesseract, a highly popular OCR engine, was originally developed by Hewlett Packard in the 1980s and was then open-sourced in 2005. Google adopted the project in 2006 and has been sponsoring it ever since.
If you’ve read my previous post on Using Tesseract OCR with Python, you know that Tesseract can work very well under controlled conditions…
…but will perform quite poorly if there is a significant amount of noise or your image is not properly preprocessed and cleaned before applying Tesseract.
Just as deep learning has impacted nearly every facet of computer vision, the same is true for character recognition and handwriting recognition.
Deep learning-based models have managed to obtain unprecedented text recognition accuracy, far beyond traditional feature extraction and machine learning approaches.
It was only a matter of time until Tesseract incorporated a deep learning model to further boost OCR accuracy — and in fact, that time has come.
The latest release of Tesseract (v4) supports deep learning-based OCR that is significantly more accurate.
The underlying OCR engine itself utilizes a Long Short-Term Memory (LSTM) network, a kind of Recurrent Neural Network (RNN).
In the remainder of this section, you will learn how to install Tesseract v4 on your machine.
Later in this blog post, you’ll learn how to combine OpenCV’s EAST text detection algorithm with Tesseract v4 in a single Python script to automatically perform OpenCV OCR.
Let’s get started configuring your machine!
Install OpenCV
To run today’s script you’ll need OpenCV installed. Version 3.4.2 or better is required.
To install OpenCV on your system, just follow one of my OpenCV installation guides, ensuring that you download the correct/desired version of OpenCV and OpenCV-contrib in the process.
Install Tesseract 4 on Ubuntu
The exact commands used to install Tesseract 4 on Ubuntu will be different depending on whether you are using Ubuntu 18.04 or Ubuntu 17.04 and earlier.
To check your Ubuntu version you can use the lsb_release
command:
$ lsb_release -a No LSB modules are available. Distributor ID: Ubuntu Description: Ubuntu 18.04.1 LTS Release: 18.04 Codename: bionic
As you can see, I am running Ubuntu 18.04 but you should check your Ubuntu version before continuing.
For Ubuntu 18.04 users, Tesseract 4 is part of the main apt-get repository, making it super easy to install Tesseract via the following command:
$ sudo apt install tesseract-ocr
If you’re using Ubuntu 14, 16, or 17 though, you’ll need a few extra commands due to dependency requirements.
The good news is that Alexander Pozdnyakov has created an Ubuntu PPA (Personal Package Archive) for Tesseract, which makes it super easy to install Tesseract 4 on older versions of Ubuntu.
Just add the alex-p/tesseract-ocr
PPA repository to your system, update your package definitions, and then install Tesseract:
$ sudo add-apt-repository ppa:alex-p/tesseract-ocr $ sudo apt-get update $ sudo apt install tesseract-ocr
Assuming there are no errors, you should now have Tesseract 4 installed on your machine.
Install Tesseract 4 on macOS
Installing Tesseract on macOS is straightforward provided you have Homebrew, macOS’ “unofficial” package manager, installed on your system.
Just run the following command and Tesseract v4 will be installed on your Mac:
$ brew install tesseract
2020-07-21 Update: Tesseract 5 (alpha release) is available. Currently, we recommend sticking with Tesseract 4. If you would like the latest Tesseract (as of this writing it is 5.0.0-alpha), then be sure to append the --HEAD
switch at the end of the command.
If you already have Tesseract installed on your Mac (if you followed my previous Tesseract install tutorial, for example), you’ll first want to unlink the original install:
$ brew unlink tesseract
And from there you can run the install command.
Verify your Tesseract version
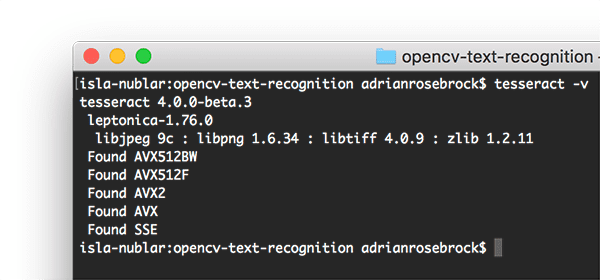
Once you have Tesseract installed on your machine you should execute the following command to verify your Tesseract version:
$ tesseract -v tesseract 4.0.0-beta.3 leptonica-1.76.0 libjpeg 9c : libpng 1.6.34 : libtiff 4.0.9 : zlib 1.2.11 Found AVX512BW Found AVX512F Found AVX2 Found AVX Found SSE
As long as you see tesseract 4
somewhere in the output you know that you have the latest version of Tesseract installed on your system.
Install your Tesseract + Python bindings
Now that we have the Tesseract binary installed, we now need to install the Tesseract + Python bindings so our Python scripts can communicate with Tesseract and perform OCR on images processed by OpenCV.
If you are using a Python virtual environment (which I highly recommend so you can have separate, independent Python environments) use the workon
command to access your virtual environment:
$ workon cv
In this case, I am accessing a Python virtual environment named cv
(short for “computer vision”) — you can replace cv
with whatever you have named your virtual environment.
From there, we’ll use pip to install Pillow, a more Python-friendly version of PIL, followed by pytesseract
and imutils
:
$ pip install pillow $ pip install pytesseract $ pip install imutils
Now open up a Python shell and confirm that you can import both OpenCV and pytesseract
:
$ python Python 3.6.5 (default, Apr 1 2018, 05:46:30) [GCC 7.3.0] on linux Type "help", "copyright", "credits" or "license" for more information. >>> import cv2 >>> import pytesseract >>> import imutils >>>
Congratulations!
If you don’t see any import errors, your machine is now configured to perform OCR and text recognition with OpenCV
Let’s move on to the next section (skipping the Pi instructions) where we’ll learn how to actually implement a Python script to perform OpenCV OCR.
Install Tesseract 4 and supporting software on Raspberry Pi and Raspbian
Note: You may skip this section if you aren’t on a Raspberry Pi.
Inevitably, I’ll be asked how to install Tesseract 4 on the Rasberry Pi.
The following instructions aren’t for the faint of heart — you may run into problems. They are tested, but mileage may vary on your own Raspberry Pi.
First, uninstall your OpenCV bindings from system site packages:
$ sudo rm /usr/local/lib/python3.5/site-packages/cv2.so
Here I used the rm
command since my cv2.so
file in site-packages
is just a sym-link. If the cv2.so
bindings are your real OpenCV bindings then you may want to move the file out of site-packages
for safe keeping.
Now install two QT packages on your system:
$ sudo apt-get install libqtgui4 libqt4-test
Then, install tesseract via Thortex’s GitHub:
$ cd ~ $ git clone https://github.com/thortex/rpi3-tesseract $ cd rpi3-tesseract/release $ ./install_requires_related2leptonica.sh $ ./install_requires_related2tesseract.sh $ ./install_tesseract.sh
For whatever reason, the trained English language data file was missing from the install so I needed to download and move it into the proper directory:
$ cd ~ $ wget https://github.com/tesseract-ocr/tessdata/raw/master/eng.traineddata $ sudo mv -v eng.traineddata /usr/local/share/tessdata/
From there, create a new Python virtual environment:
$ mkvirtualenv cv_tesseract -p python3
And install the necessary packages:
$ workon cv_tesseract $ pip install opencv-contrib-python imutils pytesseract pillow
You’re done! Just keep in mind that your experience may vary.
Understanding OpenCV OCR and Tesseract text recognition
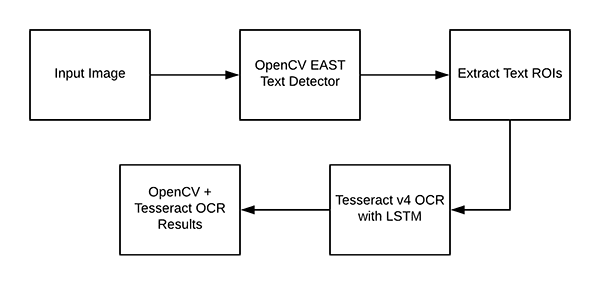
Now that we have OpenCV and Tesseract successfully installed on our system we need to briefly review our pipeline and the associated commands.
To start, we’ll apply OpenCV’s EAST text detector to detect the presence of text in an image. The EAST text detector will give us the bounding box (x, y)-coordinates of text ROIs.
We’ll extract each of these ROIs and then pass them into Tesseract v4’s LSTM deep learning text recognition algorithm.
The output of the LSTM will give us our actual OCR results.
Finally, we’ll draw the OpenCV OCR results on our output image.
But before we actually get to our project, let’s briefly review the Tesseract command (which will be called under the hood by the pytesseract
library).
When calling the tessarct
binary we need to supply a number of flags. The three most important ones are -l
, --oem
, and --psm
.
The -l
flag controls the language of the input text. We’ll be using eng
(English) for this example but you can see all the languages Tesseract supports here.
The --oem
argument, or OCR Engine Mode, controls the type of algorithm used by Tesseract.
You can see the available OCR Engine Modes by executing the following command:
$ tesseract --help-oem OCR Engine modes: 0 Legacy engine only. 1 Neural nets LSTM engine only. 2 Legacy + LSTM engines. 3 Default, based on what is available.
We’ll be using --oem 1
to indicate that we wish to use the deep learning LSTM engine only.
The final important flag, --psm
controls the automatic Page Segmentation Mode used by Tesseract:
$ tesseract --help-psm Page segmentation modes: 0 Orientation and script detection (OSD) only. 1 Automatic page segmentation with OSD. 2 Automatic page segmentation, but no OSD, or OCR. 3 Fully automatic page segmentation, but no OSD. (Default) 4 Assume a single column of text of variable sizes. 5 Assume a single uniform block of vertically aligned text. 6 Assume a single uniform block of text. 7 Treat the image as a single text line. 8 Treat the image as a single word. 9 Treat the image as a single word in a circle. 10 Treat the image as a single character. 11 Sparse text. Find as much text as possible in no particular order. 12 Sparse text with OSD. 13 Raw line. Treat the image as a single text line, bypassing hacks that are Tesseract-specific.
For OCR’ing text ROIs I’ve found that modes 6
and 7
work well, but if you’re OCR’ing large blocks of text then you may want to try 3
, the default mode.
Whenever you find yourself obtaining incorrect OCR results I highly recommend adjusting the --psm
as it can have dramatic influences on your output OCR results.
Project structure
Be sure to grab the zip from the “Downloads” section of the blog post.
From there unzip the file and navigate into the directory. The tree
command allows us to see the directory structure in our terminal:
$ tree --dirsfirst . ├── images │ ├── example_01.jpg │ ├── example_02.jpg │ ├── example_03.jpg │ ├── example_04.jpg │ └── example_05.jpg ├── frozen_east_text_detection.pb └── text_recognition.py 1 directory, 7 files
Our project contains one directory and two notable files:
images/
: A directory containing six test images containing scene text. We will attempt OpenCV OCR with each of these images.frozen_east_text_detection.pb
: The EAST text detector. This CNN is pre-trained for text detection and ready to go. I did not train this model — it is provided with OpenCV; I’ve also included it in the “Downloads” for your convenience.text_recognition.py
: Our script for OCR — we’ll review this script line by line. The script utilizes the EAST text detector to find regions of text in the image and then takes advantage of Tesseract v4 for recognition.
Implementing our OpenCV OCR algorithm
We are now ready to perform text recognition with OpenCV!
Open up the text_recognition.py
file and insert the following code:
# import the necessary packages from imutils.object_detection import non_max_suppression import numpy as np import pytesseract import argparse import cv2
Today’s OCR script requires five imports, one of which is built into OpenCV.
Most notably, we’ll be using pytesseract
and OpenCV. My imutils
package will be used for non-maxima suppression as OpenCV’s NMSBoxes
function doesn’t seem to be working with the Python API. I’ll also note that NumPy is a dependency for OpenCV.
The argparse
package is included with Python and handles command line arguments — there is nothing to install.
Now that our imports are taken care of, let’s implement the decode_predictions
function:
def decode_predictions(scores, geometry): # grab the number of rows and columns from the scores volume, then # initialize our set of bounding box rectangles and corresponding # confidence scores (numRows, numCols) = scores.shape[2:4] rects = [] confidences = [] # loop over the number of rows for y in range(0, numRows): # extract the scores (probabilities), followed by the # geometrical data used to derive potential bounding box # coordinates that surround text scoresData = scores[0, 0, y] xData0 = geometry[0, 0, y] xData1 = geometry[0, 1, y] xData2 = geometry[0, 2, y] xData3 = geometry[0, 3, y] anglesData = geometry[0, 4, y] # loop over the number of columns for x in range(0, numCols): # if our score does not have sufficient probability, # ignore it if scoresData[x] < args["min_confidence"]: continue # compute the offset factor as our resulting feature # maps will be 4x smaller than the input image (offsetX, offsetY) = (x * 4.0, y * 4.0) # extract the rotation angle for the prediction and # then compute the sin and cosine angle = anglesData[x] cos = np.cos(angle) sin = np.sin(angle) # use the geometry volume to derive the width and height # of the bounding box h = xData0[x] + xData2[x] w = xData1[x] + xData3[x] # compute both the starting and ending (x, y)-coordinates # for the text prediction bounding box endX = int(offsetX + (cos * xData1[x]) + (sin * xData2[x])) endY = int(offsetY - (sin * xData1[x]) + (cos * xData2[x])) startX = int(endX - w) startY = int(endY - h) # add the bounding box coordinates and probability score # to our respective lists rects.append((startX, startY, endX, endY)) confidences.append(scoresData[x]) # return a tuple of the bounding boxes and associated confidences return (rects, confidences)
The decode_predictions
function begins on Line 8 and is explained in detail inside the EAST text detection post. The function:
- Uses a deep learning-based text detector to detect (not recognize) regions of text in an image.
- The text detector produces two arrays, one containing the probability of a given area containing text, and another that maps the score to a bounding box location in the input image.
As we’ll see in our OpenCV OCR pipeline, the EAST text detector model will produce two variables:
scores
: Probabilities for positive text regions.geometry
: The bounding boxes of the text regions.
…each of which is a parameter to the decode_predictions
function.
The function processes this input data, resulting in a tuple containing (1) the bounding box locations of the text and (2) the corresponding probability of that region containing text:
rects
: This value is based ongeometry
and is in a more compact form so we can later apply NMS.confidences
: The confidence values in this list correspond to each rectangle inrects
.
Both of these values are returned by the function.
Note: Ideally, a rotated bounding box would be included in rects
, but it isn’t exactly straightforward to extract a rotated bounding box for today’s proof of concept. Instead, I’ve computed the horizontal bounding rectangle which does take angle
into account. The angle
is made available on Line 41 if you would like to extract a rotated bounding box of a word to pass into Tesseract.
For further details on the code block above, please see this blog post.
From there let’s parse our command line arguments:
# construct the argument parser and parse the arguments ap = argparse.ArgumentParser() ap.add_argument("-i", "--image", type=str, help="path to input image") ap.add_argument("-east", "--east", type=str, help="path to input EAST text detector") ap.add_argument("-c", "--min-confidence", type=float, default=0.5, help="minimum probability required to inspect a region") ap.add_argument("-w", "--width", type=int, default=320, help="nearest multiple of 32 for resized width") ap.add_argument("-e", "--height", type=int, default=320, help="nearest multiple of 32 for resized height") ap.add_argument("-p", "--padding", type=float, default=0.0, help="amount of padding to add to each border of ROI") args = vars(ap.parse_args())
Our script requires two command line arguments:
--image
: The path to the input image.--east
: The path to the pre-trained EAST text detector.
Optionally, the following command line arguments may be provided:
--min-confidence
: The minimum probability of a detected text region.--width
: The width our image will be resized to prior to being passed through the EAST text detector. Our detector requires multiples of 32.--height
: Same as the width, but for the height. Again, our detector requires multiple of32
for resized height.--padding
: The (optional) amount of padding to add to each ROI border. You might try values of0.05
for 5% or0.10
for 10% (and so on) if you find that your OCR result is incorrect.
From there, we will load + preprocess our image and initialize key variables:
# load the input image and grab the image dimensions image = cv2.imread(args["image"]) orig = image.copy() (origH, origW) = image.shape[:2] # set the new width and height and then determine the ratio in change # for both the width and height (newW, newH) = (args["width"], args["height"]) rW = origW / float(newW) rH = origH / float(newH) # resize the image and grab the new image dimensions image = cv2.resize(image, (newW, newH)) (H, W) = image.shape[:2]
Our image
is loaded into memory and copied (so we can later draw our output results on it) on Lines 82 and 83.
We grab the original width and height (Line 84) and then extract the new width and height from the args
dictionary (Line 88).
Using both the original and new dimensions, we calculate ratios used to scale our bounding box coordinates later in the script (Lines 89 and 90).
Our image
is then resized, ignoring aspect ratio (Line 93).
Next, let’s work with the EAST text detector:
# define the two output layer names for the EAST detector model that # we are interested in -- the first is the output probabilities and the # second can be used to derive the bounding box coordinates of text layerNames = [ "feature_fusion/Conv_7/Sigmoid", "feature_fusion/concat_3"] # load the pre-trained EAST text detector print("[INFO] loading EAST text detector...") net = cv2.dnn.readNet(args["east"])
Our two output layer names are put into list form on Lines 99-101. To learn why these two output names are important, you’ll want to refer to my original EAST text detection tutorial.
Then, our pre-trained EAST neural network is loaded into memory (Line 105).
I cannot emphasize this enough: you need OpenCV 3.4.2 at a minimum to have the cv2.dnn.readNet
implementation.
The first bit of “magic” occurs next:
# construct a blob from the image and then perform a forward pass of # the model to obtain the two output layer sets blob = cv2.dnn.blobFromImage(image, 1.0, (W, H), (123.68, 116.78, 103.94), swapRB=True, crop=False) net.setInput(blob) (scores, geometry) = net.forward(layerNames) # decode the predictions, then apply non-maxima suppression to # suppress weak, overlapping bounding boxes (rects, confidences) = decode_predictions(scores, geometry) boxes = non_max_suppression(np.array(rects), probs=confidences)
To determine text locations we:
- Construct a
blob
on Lines 109 and 110. Read more about the process here. - Pass the
blob
through the neural network, obtainingscores
andgeometry
(Lines 111 and 112). - Decode the predictions with the previously defined
decode_predictions
function (Line 116). - Apply non-maxima suppression via my imutils method (Line 117). NMS effectively takes the most likely text regions, eliminating other overlapping regions.
Now that we know where the text regions are, we need to take steps to recognize the text! We begin to loop over the bounding boxes and process the results, preparing the stage for actual text recognition:
# initialize the list of results results = [] # loop over the bounding boxes for (startX, startY, endX, endY) in boxes: # scale the bounding box coordinates based on the respective # ratios startX = int(startX * rW) startY = int(startY * rH) endX = int(endX * rW) endY = int(endY * rH) # in order to obtain a better OCR of the text we can potentially # apply a bit of padding surrounding the bounding box -- here we # are computing the deltas in both the x and y directions dX = int((endX - startX) * args["padding"]) dY = int((endY - startY) * args["padding"]) # apply padding to each side of the bounding box, respectively startX = max(0, startX - dX) startY = max(0, startY - dY) endX = min(origW, endX + (dX * 2)) endY = min(origH, endY + (dY * 2)) # extract the actual padded ROI roi = orig[startY:endY, startX:endX]
We initialize the results
list to contain our OCR bounding boxes and text on Line 120.
Then we begin looping over the boxes
(Line 123) where we:
- Scale the bounding boxes based on the previously computed ratios (Lines 126-129).
- Pad the bounding boxes (Lines 134-141).
- And finally, extract the padded
roi
(Line 144).
Our OpenCV OCR pipeline can be completed by using a bit of Tesseract v4 “magic”:
# in order to apply Tesseract v4 to OCR text we must supply # (1) a language, (2) an OEM flag of 1, indicating that the we # wish to use the LSTM neural net model for OCR, and finally # (3) an OEM value, in this case, 7 which implies that we are # treating the ROI as a single line of text config = ("-l eng --oem 1 --psm 7") text = pytesseract.image_to_string(roi, config=config) # add the bounding box coordinates and OCR'd text to the list # of results results.append(((startX, startY, endX, endY), text))
Taking note of the comment in the code block, we set our Tesseract config
parameters on Line 151 (English language, LSTM neural network, and single-line of text).
Note: You may need to configure the --psm
value using my instructions at the top of this tutorial if you find yourself obtaining incorrect OCR results.
The pytesseract
library takes care of the rest on Line 152 where we call pytesseract.image_to_string
, passing our roi
and config string
.
? Boom! In two lines of code, you have used Tesseract v4 to recognize a text ROI in an image. Just remember, there is a lot happening under the hood.
Our result (the bounding box values and actual text
string) are appended to the results
list (Line 156).
Then we continue this process for other ROIs at the top of the loop.
Now let’s display/print the results to see if it actually worked:
# sort the results bounding box coordinates from top to bottom results = sorted(results, key=lambda r:r[0][1]) # loop over the results for ((startX, startY, endX, endY), text) in results: # display the text OCR'd by Tesseract print("OCR TEXT") print("========") print("{}\n".format(text)) # strip out non-ASCII text so we can draw the text on the image # using OpenCV, then draw the text and a bounding box surrounding # the text region of the input image text = "".join([c if ord(c) < 128 else "" for c in text]).strip() output = orig.copy() cv2.rectangle(output, (startX, startY), (endX, endY), (0, 0, 255), 2) cv2.putText(output, text, (startX, startY - 20), cv2.FONT_HERSHEY_SIMPLEX, 1.2, (0, 0, 255), 3) # show the output image cv2.imshow("Text Detection", output) cv2.waitKey(0)
Our results are sorted
from top to bottom on Line 159 based on the y-coordinate of the bounding box (though you may wish to sort them differently).
From there, looping over the results
, we:
- Print the OCR’d
text
to the terminal (Lines 164-166). - Strip out non-ASCII characters from
text
as OpenCV does not support non-ASCII characters in thecv2.putText
function (Line 171). - Draw (1) a bounding box surrounding the ROI and (2) the result
text
above the ROI (Lines 173-176). - Display the output and wait for any key to be pressed (Lines 179 and 180).
OpenCV text recognition results
Now that we’ve implemented our OpenCV OCR pipeline, let’s see it in action.
Be sure to use the “Downloads” section of this blog post to download the source code, OpenCV EAST text detector model, and the example images.
From there, open up a command line, navigate to where you downloaded + extracted the zip, and execute the following command:
$ python text_recognition.py --east frozen_east_text_detection.pb \ --image images/example_01.jpg [INFO] loading EAST text detector... OCR TEXT ======== OH OK
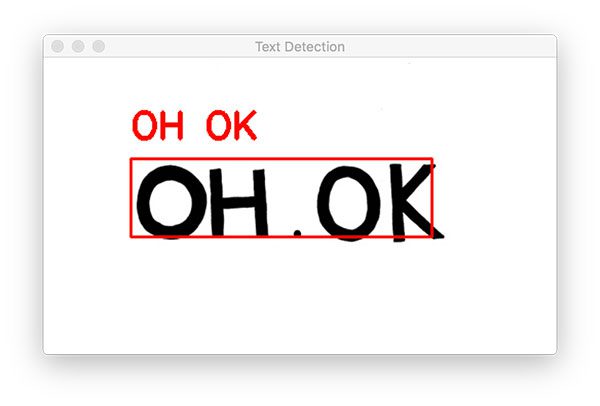
We’re starting with a simple example.
Notice how our OpenCV OCR system was able to correctly (1) detect the text in the image and then (2) recognize the text as well.
The next example is more representative of text we would see in a real- world image:
$ python text_recognition.py --east frozen_east_text_detection.pb \ --image images/example_02.jpg [INFO] loading EAST text detector... OCR TEXT ======== ® MIDDLEBOROUGH
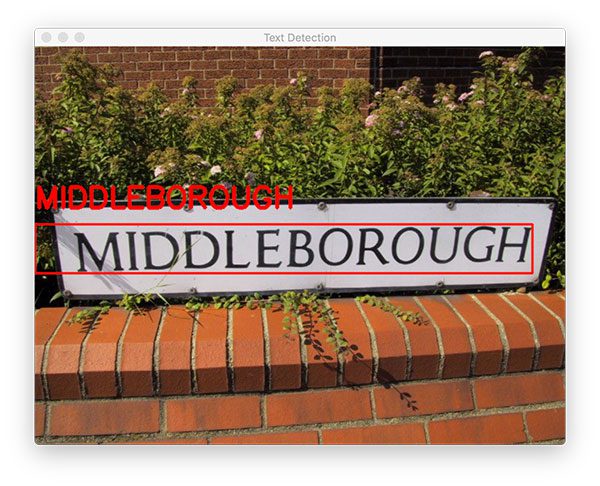
Again, notice how our OpenCV OCR pipeline was able to correctly localize and recognize the text; however, in our terminal output we see a registered trademark Unicode symbol — Tesseract was likely confused here as the bounding box reported by OpenCV’s EAST text detector bled into the grassy shrubs/plants behind the sign.
Let’s look at another OpenCV OCR and text recognition example:
$ python text_recognition.py --east frozen_east_text_detection.pb \ --image images/example_03.jpg [INFO] loading EAST text detector... OCR TEXT ======== ESTATE OCR TEXT ======== AGENTS OCR TEXT ======== SAXONS
In this case, there are three separate text regions.
OpenCV’s text detector is able to localize each of them — we then apply OCR to correctly recognize each text region as well.
Our next example shows the importance of adding padding in certain circumstances:
$ python text_recognition.py --east frozen_east_text_detection.pb \ --image images/example_04.jpg [INFO] loading EAST text detector... OCR TEXT ======== CAPTITO OCR TEXT ======== SHOP OCR TEXT ======== |.
In the first attempt of OCR’ing this bake shop storefront, we see that “SHOP” is correctly OCR’d, but:
- The “U” in “CAPUTO” is incorrectly recognized as “TI”.
- The apostrophe and “S” is missing from “CAPUTO’S’.
- And finally, “BAKE” is incorrectly recognized as a vertical bar/pipe (“|”) with a period (“.”).
By adding a bit of padding we can expand the bounding box coordinates of the ROI and correctly recognize the text:
$ python text_recognition.py --east frozen_east_text_detection.pb \ --image images/example_04.jpg --padding 0.05 [INFO] loading EAST text detector... OCR TEXT ======== CAPUTO'S OCR TEXT ======== SHOP OCR TEXT ======== BAKE
Just by adding 5% of padding surrounding each corner of the bounding box we’re not only able to correctly OCR the “BAKE” text but we’re also able to recognize the “U” and “’S” in “CAPUTO’S”.
$ python text_recognition.py --east frozen_east_text_detection.pb \ --image images/example_05.jpg --padding 0.25 [INFO] loading EAST text detector... OCR TEXT ======== Designer OCR TEXT ======== a
YoungCrCy
Hello,Adrian,thanks for your amazing work,Ican this work be a real-time work?
Adrian Rosebrock
Technically you could use it in a live stream application but I wouldn’t recommend applying it to every frame of the video stream. Instead, fine ones that are stable where you would believe the OCR to be most accurate. Secondly, running OCR on every single frame is also computationally wasteful.
Haqkiem
ouhh really? but can u explain why is it “computationally wasteful”? the concept is just the same with your previous face recognition right? but OCR is much simpler since we don’t need to train datasets. Correct me if im wrong.
Adrian Rosebrock
No, you still need to run the forward pass of the network which is still a computationally expensive operation. It is certainly faster than trying to train the network from scratch but it will still be slow. I would suggest you give it a try yourself 🙂
Shreyans Sharma
Hi Adrian, I would really appreciate if you could suggest some way to distinguish handwritten text from printed text in a scanned document.
I have tried using MXNet paragraph and line segmentation but that does not distinguish both the classes.
Your help would be really appreciated.
Thanks
Adrian Rosebrock
A few ideas come to mind:
1. Local Binary Patterns on each individual character
2. Train a simple, shallow CNN on lines of handwritten text vs. scanned typed text
Lucas Guimarães
Hi Adrian, this is a great post! Thanks for sharing!
I have the same trouble. I am working in a project where I am OCRizing documents that are scanned but they have handwritten dates which are very important to me. What I did first was define the text region, then apply line segmentation and send each line to the Tesseract network to extract the text. The problem is date these dates are in the middle of some specific line that has other important information and the neural net is getting really confused when trying to predict the dates and sometimes the of the text.
I think your suggestion of training a simple CNN would work but I’m still a king of newbie. How could I do that? Would it be retraining the Tesseract NN? Do I have to find this lines in each document I run, or the neural net would recognize them by itself?
I also would like to know if my approach is good:
1-Define text region and crop the image;
2-Apply line segmentation
3-Send each line to Tesseract
Thank you again!
Lucas from Brazil ?
Adrian Rosebrock
Training your own NN for OCR can be a huge pain. Most of the time I recommend against it. Have you tried Google’s Vision API yet? It works really well as an off-the-shelf OCR system.
Sara
Thanks for such a great post , i needed to ask one thing that how to find the stable frame in a live video ?
Adrian Rosebrock
Have you tried using a video stabilization algorithm? That would be my primary suggestion.
david zhang
Your blog is great!
Adrian Rosebrock
Thanks so much, David!
Jorge Paredes
Great post following OpenCV EAST Text Detector…..
Also, you read our minds:
“Inevitably, I’ll be asked how to install Tesseract 4 on the Rasberry Pi…”
😉
Thanks!!
Adrian Rosebrock
Thanks Jorge 🙂
Abdulmalik Mustapha
Nice post. I really could use this for my project really thanks for posting this article. But could you please do tutorial post on how to do handwritten recognition with OpenCV and Deep Learning using the MNIST Dataset. That could help alot!
Adrian Rosebrock
Hey Abdulmalik — I actually cover that exact topic inside Deep Learning for Computer Vision with Python.
ygreq
Man oh man! I gotta start learning this. You have so many gems here.
May I ask if you also did a tutorial on correcting perspective, skewing and so on of a document? In the end the script would take many pics made with the phone for example and correct them accordingly.
Something similar on how the mobile app Office Lens works.
Something about what I am thinking is here: https://blogs.dropbox.com/tech/2016/08/fast-and-accurate-document-detection-for-scanning/
Thank you for all your effort!
ygreq
ygreq
This is a presentation of the mobile app I was referring: https://www.youtube.com/watch?v=qbobZ43II38
Adrian Rosebrock
The primary perspective transform tutorial I refer readers to is this one. I’m not sure if that will help you, but wanted to link you to it just in case.
ygreq
My, my! this could be it. Let’s see if my zero knowledge takes me anywhere. ;))
Thank you so much!
Anthony The Koala
Dear Dr Adrian,
The above examples work for fonts with serifs eg Times Roman and without serifs, eg Arial,
Can OCR software be applied to detecting characters of more elaborate fonts, such as Old English fonts used for example in the masthead for the Washington Post,https://www.washingtonpost.com/ ? There are other examples of Old English fonts at https://www.creativebloq.com/features/old-english-fonts-10-of-the-best .
To put it another way, do you need to train or have a dataset for fancy fonts such as Old English in order to have recognition of fonts of that type?
Thank you,
Anthony of Sydney :
Adrian Rosebrock
For the best accuracy, yes, you would want to train on a dataset that is representative of what your expect your OCR system to recognize. It’s unrealistic to expect any OCR system to perform well on data it wasn’t trained on.
Walid
Hi Adrian
Thanks a lot, I am having this error
AttributeError: module ‘cv2.dnn’ has no attribute ‘readNet’
Python 3.5.5+OpenCV 3.3.0′ +Ubuntu 16
Itried net=cv2.dnn.readNetFromTorch(args[“east”])
but still could not run the code
Can you please help ?
Walid
Adrian Rosebrock
Hey Walid — you need at least OpenCV 3.4.2 for this blog post. OpenCV 4-pre will also work.
Walid
Thanks now it work 🙂
Adrian Rosebrock
Awesome, I’m glad to hear it, Walid! 🙂
Dany
Hi Adrian, I have the same error because I run in 3.4.1 OpenCV. I follow step by step your guide to install on Ubuntu 18.04. It’s possible to upgrade or I need to recompile?
Adrian Rosebrock
You will need to re-compile and re-install although stay tuned for tomorrow’s blog post where I’ll be discussing a super easy way to install OpenCV 😉
Dany
Using virtualenv it’s possible to create a new enviroment and recompile inside OpenCv 3.4.3?
Thanks for your work.
Adrian Rosebrock
Yes. Create a new Python virtual environment and then follow one of my OpenCV install guides.
Anand
HI Adrian, i’m using opencv version 4.1.0 and encountered this trouble
Fred
Hey Adrian,
Great post!! Have you ever attempted to train Tesseract v4 with a custom font? I’ve had poor results with my dataset..
Cheers
Fred
Adrian Rosebrock
Hey Fred — sorry, I have not trained Tesseract v4 with a custom font.
Walid
Hi Adrian
I am having different (less accurate results)
/example_02.jpg –padding 0.05
[INFO] loading EAST text detector…
OCR TEXT
========
l NuDDLEBOROUGha
Any clue?
Thanks a lot
Adrian Rosebrock
It could be a slightly different Tesseract version. OpenCV itself wouldn’t be the root cause. Unfortunately as I said in the “Limitations and Drawbacks” section, OCR systems can be a bit temperamental!
mohamed
I expected this to be your next step
I really did not know that the development of the project “Tesseract” has become so advanced.
Thank you Adrian!
{Really a wonderful glimpse}
Adrian Rosebrock
Thanks Mohamed 🙂
DanB
Awesome write up!
I ran into an issue were tesseract 4.0.0 does not support digits only white listing. Is there a separate trained network for numerical digits only?
Adrian Rosebrock
Hey Dan — where did you run into the “no digits only” issue?
DanB
There seemed to be a feature of prior versions of tesseract that allowed you to whitelist specific characters.
I was testing the pretrained OCR network on number signs, but the code was unable to recognize anything 🙁 I’m guessing I will need to train my own network?
Adrian Rosebrock
Thanks for the clarification. I recall a similar functionality as well, but unfortunately I cannot recall the exact command to whitelist only specific characters.
DanB
A follow up to this with a github issue ticket on the tesseract repo explaining more…https://github.com/tesseract-ocr/tesseract/issues/751
Adrian Rosebrock
Thank you for the followup Dan!
papy
Good work Adrian, Am currently working of the recognition of license plates using Python + Tesseract OCR. but am having issues training the .trandata file to correctly recognize my countries license plate. Any advice, links or video to help me train this dataset will be of great help.
Thanks
Adrian Rosebrock
I wouldn’t recommend using Tesseract for Automatic License Plate Recognition. It would be better to build your own custom pipeline. In fact, I demonstrate how to build such an ANPR system inside the PyImageSearch Gurus course.
Nigel
Can I see where you demonstrated it? Can I work with your tutorials in making my own model (model or plate in our country)?
Adrian Rosebrock
Hey Nigel — as I mention, I cover ANPR inside the PyImageSearch Gurus course. The course will teach you how to create ANPR systems for your own country as well.
Andrews
Hi Adrian, thanks for your tutorials, they are helping me a lot. I work in a project that i don’t know where to start, if have any tip, I will appreciate a lot.Here is the stackOverflow link:
https://stackoverflow.com/questions/52377025/how-can-i-use-opencv-to-process-a-market-leaflet-to-extract-product-and-promotio
Adrian Rosebrock
Your project is very challenging to say the least. It sounds like you may be new to the world of computer vision and OpenCV. I would suggest first working through Practical Python and OpenCV to help you learn the fundamentals. Walk before you run, otherwise you’ll trip yourself up. You’ll also want to further study object detection. This guide will help you get up to speed.
Trami
Hi adrian. I just wonder how i can use your method to recgonize the digits in the meter with a acceptable accuracy
Adrian Rosebrock
Recognizing water meters is an entirely different beast since the numbers may be partially obscured, dirt/dust on the meter itself, and any number of possible lighting problems. You could try using Tesseract here but I wouldn’t expect too high of accuracy. I’ll try to do a water meter recognition post in the future or include it in a new book.
Trami
Thank for so much. could you give me some advice about the the problems on recognizing the meter ?
Vikas
Hi Adrian, Thanks a lot for the post. Could you please let me know if you have already worked on the OCR code for meter reading ? I am looking for a solution for gas meter reading.
Adrian Rosebrock
Sorry, I do not. Jeff Bass, a PyImageConf speaker, may be able to help though. Be sure to see his GitHub repo.
Sanda
Thank you so much
Really appreciated
Adrian Rosebrock
Thanks Sanda, I’m glad you enjoyed the post!
Dilshat
I have an error during run the “text_recognition.py” as follows:
Traceback (most recent call last):
pytesseract.pytesseract.TesseractNotFoundError: tesseract is not installed or it’s not in your path
How can I fix this?
Thanks.
EDIT:
I fixed above problem by changing the ‘pytesseract.py’ as follows:
tesseract_cmd = ‘tesseract’
to
tesseract_cmd = ‘C:\\Program Files (x86)\\Tesseract-OCR\\tesseract’
Thanks for the great code!
Chen
Hi Adrian,
I have download the source code in my window computer. also install some relevant library.
i try to execute your source code.
python text_recognition.py –east frozen_east_text_detection.pb \
–image images/example_01.jpg
[INFO] loading EAST text detector…
OCR TEXT
Chen
but it show error:unrecognized arguments:\
Adrian Rosebrock
I assume you are referring to command line arguments? If so, refer to this tutorial to help you get up to speed with command line arguments.
Adrian Rosebrock
Tesseract does assume reasonable lighting conditions and if you’re images are blurry it can get much worse for sure. I’m glad to hear GCP’s solution is working for you though! I personally have never trained a Tesseract model from scratch so I unfortunately do not have any guidance there.
Aveshin Naidoo
Good day. Great blog post as per usual. Question: Would it be possible to run two virtual environments on a Raspberry Pi 3 with a 16 GB card and Rasbian OS. The current virtual environment has a previous version of OpenCV and Python + Tesseract as followed from one of your previous tutorials. I’m worried about space limitations and don’t want the long OpenCV installation to fail midway. Thanks.
Aveshin Naidoo
I forgot what to add what I want the second virtual environment for. The new one will hold the EAST text detector and a new version of OpenCV, plus python and Tesseract 4
Adrian Rosebrock
Keep in mind that Tesseract is a binary, it’s not a Python package — I think you’re confusing the
tesseract
command with thepytesseract
Python package. You can create two Python virtual environments if you want but you’ll only have one version of the actual Tesseract binary itself which shouldn’t be na issue since Tesseract v4 also includes the v3 engine.Alex
Hello Adrian, another very good tutorial thanks! Would you recommend it for a license plate reader or in this case is it better to stick with normal segmentation and a KNN?
Adrian Rosebrock
Hey Alex, I wouldn’t recommend using Tesseract for Automatic License Plate Recognition. It would be better to build your own custom pipeline. In fact, I demonstrate how to build such an ANPR system inside the PyImageSearch Gurus course.
Niklas Wilke
Hi Adrian, even though not related to this post i had thought about NN/AI security.
I’m not currently working on CV myself so im unsure if im up to date but you would probably know.
There were methods (like pixel attacks) that allowed someone who was familiar with the architecture of a CNN to create images or modify images to get a desired output.
=> change x , let the the model classify an airplane as a fish.
The big “let down” here is that i could only do that with my own NN so its pretty pointless and the security risk pretty low. But now that i think about how CV is implemented by semi-experts and without clear rules and standards i would imagine a lot of CV software solutions out there and those that are about to be build will make use of the state of the art nets of the big researchers and will base their nets on that. They probably tweak and modify it but the core structure might remain the same.
Now my question:
Would those slightly modified implementations still be a valid target for pixel manipulation attacks or other attack forms, given i base them on the 5-6 biggest nets out there or will the net as soon as any modification (for example add a label class to the main pool) has been made , be safe of those attacks ?
Im not concerned about the “sure but you can easily avoid this by … ” solution, im concerned about semi-expert who implement stuff in small businesses or in areas where nobody can really judge their work as long as it seems to be working in my desired business case.
Thanks for reading through this,
best regards
Niklas
Daniel
Thank you so much for this post! ??
Adrian Rosebrock
Thanks Daniel, I’m glad you enjoyed it!
loch
HI adrian
your code work perfectly , earlier i had opencv 3.2.0 where camera release function perfectly
but after upgrading to opencv 3.4.2 to run the programme the camera release( capture.release() ) function not working can u give me a solution to release the camera thank you
Adrian Rosebrock
I’m not sure why your camera may have stopped working in between OpenCV 3.2 and OpenCV 3.4.2. That is likely a great question for the OpenCV GitHub Issues page.
Tran
Hi, just an idea. We can next use a translator to translate the text and print it to the image in place of the OCR text.
Adrian Rosebrock
You’re absolutely right Tran 🙂
seventheefs
Hi Adrian, nice work!!!
Could you please indicate to me what are the steps that i should use to make it work on arabic text?
Adrian Rosebrock
You would want to take a look at Tesseract’s language packs.
taysir
I am also looking for a powerful Python library for the detection of Arabic characters
vinay
how to install tesseract + python bindings and iam getting workon command not found .please help me out.
Adrian Rosebrock
Hey Vinay, do you have virtualenv and virtualenvwrapper installed on your system? Did you install OpenCV using Python virtual environments? If not, you can skip the “workon” command.
liu
Hi,I got a problem.The code can detect some texts like “AB” or “CD”,etc.but it can’t recognize a single character like ‘A’,’B’,etc.Does anyone know how to recognize a single character or provide another model _detection.pb like east? Great thanks.
keertika
Hey Adrian,I am running this code on Jupyter notebook (pyhton 3.6.+conda 4.5.11+opencv 3.4). I get an error unrecognised error.
keertika
I got it fixed !!
Adrian Rosebrock
Congrats on resolving the issue!
K
How do i run this program in anaconda prompt ?
K
hey,Adrian
I get the following error
AttributeError: module ‘cv2.dnn’ has no attribute ‘readNet’
Adrian Rosebrock
Make sure you’re using OpenCV 3.4.2 or greater.
Oyekanmi Oyetunji
Hi Adrian
Thanks for the tutorial..
I really like what you’re doing up here…
I need your help
I have raspbian with opencv pre-compiled.. Which I got when I bought a bundle from you…
Can I install tesaract straight up on it… Or do I have to uninstall opencv..
I’d appreciate a quick response please…
Thanks..
Adrian Rosebrock
No need to uninstall OpenCV! You can simply install Tesseract as I recommend in this guide.
Vittorio
Hi Adrian!
Thank for the very useful tutorial (as always:))
In my project, I would need to recognize single RANDOMIC characters from a car chassis.
Do you think I should try a different solution or it should be good the one explained by this post?
Thx
Adrian Rosebrock
Hey Vittorio, do you have any examples of RANDOMIC characters? I’m not sure what they look like off the top of my head.
Royce Ang
Hi,I am beginner on this field and I would like to know how to detect letter and number of license plate with this? is it possible?
sorry if i asked wrong question.
Adrian Rosebrock
Hey Royce, I would actually recommend working through the PyImageSearch Gurus course where I cover automatic license plate recognition in detail (including code).
Steven
Hi Adrian,
Great post. I do have to ask: How did you decide on the “Saxon’s Estate Agents” image? Of the many billions of images to choose from online, this is a rather peculiar one. This image was shot in the same town where I am doing my PhD. 🙂
Adrian Rosebrock
Hah! That’s so cool! I found the image when I searched for storefronts — that was one of the images that popped up!
ranjeet singh
Its not working on this image where I want to detect IMEI number
Pic – https://starofmysore.com/wp-content/uploads/2017/07/news-9-imei.jpg
Even when I align image correctly, it detects word ‘imei’ but does not capture IMEI number.
What should I do?
Adrian Rosebrock
Hey Ranjeet, make sure you read the “Limitations and Drawbacks” section of this tutorial. OCR systems will fail in certain situations. You may want to try creating your own custom digit detector for the actual number.
jim421616
Hi, Adrian. I got the installation on my RPi first time (!) but when I issue tesseract –help-oem or -psm or -l, I get the following error:
tesseract: error while loading shared libraries: libtesseract.so.4: cannot open shared object file: No such file or directory.
I’m in the virtual env cv_tesseract when I issue the command, but I get the same error message when I’m not in it too.
Any suggestions?
Adrian Rosebrock
Hey Jim — have you tried posting on the official Tesseract GitHub Issues page? They would be able to provide more targeted advice to your specific system.
juancruzgassoloncan@gmail.com
Hi Jim
try
$ sudo ldconfig
and then test with
$ tesseract –version
That work for me on my Raspbian
Gary Chris
Hello! Adrian, im having this issue when im running the code
…
AttributeError: module ‘cv2.dnn’ has no attribute ‘readNet’
How to resolve this? Hope you can help me 🙁
Adrian Rosebrock
Make sure you are using OpenCV 3.4.2 or greater.
Sangam
Hello Adrian – I have come up with an issue that I am not able to get past. I am getting “AttributeError: ‘module’ object has no attribute ‘readNet’ ” with the line “net = cv2.dnn.readNet(args[“east”])”. This is line 109 in the code that I have downloaded. My opencv version 4.0.0-alpha.
WIll you be able to help me out with it?
Thanks
Adrian Rosebrock
I would suggest trying with OpenCV 3.4.2 and see if that resolves the issue.
Vagner
Congratulations on the article.
Is there anything about comparing signatures, to find possible scams, using opencv and algorithms like gsurf, harrison or something?
Adrian Rosebrock
Sorry, I do not have much experience with signature verification or recognition so I unfortunately cannot recommend any resources.
Dorra
Hi Doctor Adrian
Both scripts of “OpenCV Text Detection” and “OpenCV OCR and text recognition with Tesseract” make use of the serialized EAST model ( frozen_east_text_detection.pb ) can you send me the source code of (frozen_east_text_detection.py) I want undrestand how it work.
Thanks for your help
bahman
this is a good work
Adrian Rosebrock
Thanks Bahman!
KISHORE K
hi Adrian, i am getting only the first word of the image ,for example in image3 i am getting only estate and its not reading agents and saxons . can you please help me?..
Your comment is awaiting moderation.
Adrian Rosebrock
Click on the window opened by OpenCV and press any key on your keyboard to advance execution of the script.
Charley
Hi Adrian, great tutorial! I was wondering if it was possible to use this model to search for a particular word? Or should I train a new model to look for the work specifically?
Thank you again
Adrian Rosebrock
I would suggest you use the approach used in this post. Apply the text detector, OCR it, and then see if the OCR’d text is the word you are looking for.
Polefish
I was playing around with your code just to learn. Now I was trying to draw a rectangle over the whole results list and I feel like I did it the most complicated way. How would you draw one big bounding box that surrounds the whole results text?
Adrian Rosebrock
You would use the
cv2.rectangle
function. Be sure to refer to this tutorial for more information.Ferry Djaja
Hi Adrian
Would it be possible to detect and read the electricity meter with this approach? If not, what else can be done?
Thanks
Ferry
Adrian Rosebrock
Hey Ferry — have you tried with your electricity meter images? Give it a try first and see how it performs. I can’t really provide any guidance without first seeing your images.
Aliff Mustaqim
Hi Adrian, great post !
However, I have slight problem happened.
It shows:
orig = image.copy()
AttributeError: ‘NoneType’ object has no attribute ‘copy’
How I can solve this problem? Thanks.
Adrian Rosebrock
Double-check your path to he input image. The image path is likely invalid (the image does not exist). You can read more about NoneType errors in OpenCV, including how to solve them, here.
Bhavya
Hi Adrian,
Can you please suggest how to print the text from video. I am very new to openCV. It would be very helpful.
Thank you,
Bhavya
bharath
can we use raspberrypi camera to get the images and process it
?
Adrian Rosebrock
You can use the Raspberry Pi camera to capture frames and OCR them; however, it will take at least 15-20 seconds to process each frame (depending on the frame dimensions). The Pi is too underpowered.
Mohamed Akrem
can you give me the link for this process please ??
Adrian Rosebrock
To what process?
Mohamed Akrem
all i want is to change the code you writed there , for that the pi camera will capture every 30 seconds for example and after that i want to do it with pushbutton , this is because i have a project OCR for visually impaired persons , when they click on the button the camera should detect and give the text as vocal ,
but right now i just did what you did , and this happens even when i capture an image with the pi camera , but the process must happen only when i run the command that you did there , i want the camera to capture and then send the photo to the pi and giving the text , can you help me with that? im so lost.
Adrian Rosebrock
What you could do is insert a
time.sleep(30)
inside the mainwhile
loop of your script used to capture frames. That would pause execution for 30 seconds, then after 30 seconds, grab another frame.amal
what’re changes to make this code work in real time?
amal
i know it wistful as you said but i have to do it 🙁
Sajjad Manal
Hi Adrian, Thanks for this wonderful tutorial. Can you also tell how get all detection in one image (I am getting 10 images for 10 words detected separately.) to save the final result? Also, if you can suggest how to save the position(x,y coordinates) of the final detection(bounding box) along with the text detected?
Adrian Rosebrock
You can move the
cv2.imshow
andcv2.waitKey
call and put it at the end of the loop. I get the impression that you may be new to the world of OpenCV and image processing — that’s okay, but I would encourage you to read through Practical Python and OpenCV first to help get you up to speed.Sajjad Manal
Hello Adrian,
Curious to know how to run this script for large number of images in one go, say 100 images? Also, is it possible to have all the text detected for a single image in one final single output? Similarly, for each of the 100 input images.
Adrian Rosebrock
You would use the
paths.list_images
function to loop over all input images in a given directory. I use that function in a good many of tutorials here on PyImageSearch but I would recommend starting with this one as an example.Mrchelseaz
I don’t know what I am doing wrong but I’ve tired this about 100 times now and keep getting he ‘Nonetype’ error where the image.copy() is used [line 83]. Do I need to add the location to the image on the preceding line[line 82]? Coz I’ve done that now in at least 8 different ways and still keep getting that error.
Also, where does the code actually refer to the image location and also the location for the east code? If I’ve followed the code correctly, then this should be line 88 for image location and line 111 for east file. So, do I change the string value to the locations for the respective file?
Any help on this matter will be highly appreciated. Thanks for sharing the code though. Coming from a different coding language, this page has been a lot of help to translate the image processing principles.
Adrian Rosebrock
Double-check your path to the input image. 99.9% likely that your input image is incorrect causing “cv2.imread” to return “None”, hence the error. You should also read this tutorial on NoneType errors and how to resolve them.
Akhilesh
Hi Adrian, I installed tesseract 4.0 on my windows machine.The execution time is too slow around 1.5 sec per image for pytesseract.Can you suggest to improve the speed of tessseract ??
Adrian Rosebrock
It’s not the speed of Tesseract, it’s the speed of the EAST text detector. You should look into running the EAST text detector on your GPU.
jo
Hi Adrian , T4 is a winner. Accuracy amazing !
Is there a tutorial how to accelerate EAST using GPU ?
Thanks a lot
Adrian Rosebrock
Awesome, I’m glad that worked! As for using EAST on the GPU, try using “pycaffe”, the Caffe bindings for Python. Provided Caffe is compiled with GPU support it should work.
Gary Zheng
Hi Adrian, does it also support number recognition?
Adrian Rosebrock
Yes, Tesseract supports number recognition. Give it a try!
Kim
Thanks for your post, Adrian.
I wonder if there is any algorithm that could recognize text equation and give me the answer.
Abed Eljalil Berjawi
Dear Dr. Rosebrock,
The code works perfectly.
I have a question: How can I apply this on the camera directly (continuous recording)? Is there any tutorial?
Regards,
Abed Eljalil.
Adrian Rosebrock
You would want to start by accessing your camera. Once you can do that the code here can be utilized — just apply the EAST detector to each frame.
Adam
Hello Adrian
How I can make the raspberry pi say the word in a real-time just when I press a push button.
Thank you.
Adrian Rosebrock
Take a look at “text to speech” libraries. Google’s gTTS would be a good one to start with. I’ll also be covering a similar topic in my upcoming Computer Vision + Raspberry Pi book, stay tuned!
thushar
Hi Adrian,
I am working on Beaglebone black which is a linux debian. Can you share the steps to install tesseract OCR and open cv.
Thank you.
Adrian Rosebrock
Ubuntu is Debian based. You can use the Ubuntu install instructions to install Tesseract + OpenCV on your system.
Khaerul Umam
Are you got error on add-apt-repository? If yes, you can install them first by
sudo apt-get install software-properties-common
Hope it helps
murphy
hello Adrian
I download your project just to see how it performance, but I found it only recognize five letters and then stop. why is that happen?
I use win 7.
thx for your time.
Adrian Rosebrock
Were you using your own custom images? Or the images included in this tutorial?
Abobakr
hello Adrian;
thank you for your help and support , i am really impressed with this post, but i need your help on something i need to detect text from receipts. when i used your script it didn’t work well on my image it detects the words from right to left and it doesn’t detect every work sometimes half of the word , could you give me a guidelines to work on
Ted
Using a stylized font with exaggerated serifs (not as exaggerated as Old English typface typical of newspaper brands). The Tesseract text detection bounding boxes are cutting off significant parts of some letters rendering the text recognition inaccurate. Even when embedding the very font by using a trainingdata file trained by ocr7.com and using perfect text examples created using the very same font, this problem occurs. Is it possible to tweak tesseract’s bounding box parameters?
Shouldn’t Tesseract produce excellent results when exclusively using training data created with the one font it is asked to detect/recognize?
Your text detection tutorial describes how to do so, but I don’t believe that part of the text recognition process is exposed when using tesseract to do all processing. Thanks.
Adrian Rosebrock
That might not be an issue with Tesseract itself, but rather the arguments you’re passing into the Tesseract binary. See the “–oem” and “–psm” arguments — you may need to change those.
vinay
sir i want to find the coordinates of the box which is around the test,can you help me with that.
Adrian Rosebrock
What do you mean by “around the test”?
Saketh
Hello Adrian,very interesting i follow all the examples in this i am facing the error as follows please help me out for my project:
numpy.ndarray’ object has no attribute ‘split’ in line 152 please help me out asap
Adrian Rosebrock
Can you share more details on your system? What OS are you using? What Python, Tesseract, etc. versions?
Alex
Hello, I have the same problem. My OS is Windows 10, the version of python is 3.6 and the version of Tesseract is 4.1.0.
I also put this line in my code
pytesseract.pytesseract.tesseract_cmd = r’C:\Users\Alex\Tesseract-OCR\tesseract.exe’
but still doesn’t work.
Adrian Rosebrock
Sorry, I’m not a Windows users and do not officially support Windows here on the PyImageSearch blog.
I hope another reader can help you with the problem!
Amanda
Thanks Adrian for the wonderful code!
To anyone else who encountered this problem on Windows10, it may be because you’ve been using the outdated version of Pytesseract. This bug has been fixed in v0.1.8 and later. I am using a conda environment (and thus conda install), which does not directly support Pytesseract (thus requiring conda forge). After struggling for quite some time this is how I resolved it in the command line prompt:
conda activate myenv
conda uninstall pytesseract
conda install -c phygbu pytesseract #this installs pytesseract v0.2.4
Hope this helps!
Adrian Rosebrock
Thanks for sharing, Amanda!
Phil
Hello Adrian, your tutorial is helpful and amazing. I began to learn ML and CV recently , and I am unfamiliar with Linux too. When I came to the last step, I got ” ImportError: No module named imutils.object_detection”. I have searched this error on google, but I still don’t know how to fix it. Can you help me ?
Adrian Rosebrock
You need to install the imutils library:
$ pip install --upgrade imutils
Arjun Pal
I’m trying to do something like this, except get a bounding box around every single text character, rather than full words. How would I be to do this?
Adrian Rosebrock
Sorry, I don’t have any tutorials for extracting just a single text character.
aman
hey adrian, could you tell me an affective way of ectracting a whole paragraph text from an image.the psm -6 does not work, i have tried that.what else can be done??
Mohamed Akrem
thanks a lot man you’re awesome
Manish Agarwal
Hi Adrian,
Is there a accurate model available for OCR of Dot Matrix printed text ?
Thanks
Manish
Adrian Rosebrock
Sorry, I don’t know of one.
Scott
Hello Adrian, thanks for sharing. It’s a really nice work! And I have a question, could you please help me answer it?
You said that “The underlying OCR engine itself utilizes a Long Short-Term Memory (LSTM) network, a kind of Recurrent Neural Network (RNN).”, but we use the EAST text detector to find text frame in pictures, which based on CNN, right? So, what you mean about “the underlying OCR engine”?
Thanks for your time 😀
Scott
* What do you mean by “the underlying OCR engine”?.
thanks
Adrian Rosebrock
1. The EAST text detector is a deep learning model that is used to detect the presence of text in an image. EAST simply detect text, it doesn’t recognize it or OCR it.
2. The “underlying OCR engine” is the algorithm used by Tesseract. Tesseract is responsible for the actual OCR.
Mohamed Akrem
Hi adrian , can you please tell me how to apply all this in raspberrypi ? i mean the capture is from the camera that i have and then the detection and the text appear for me
Adrian Rosebrock
I would suggest you start by learning how to access the Raspberry Pi camera module.
Haruo
Hi, Adrain.
Great tutorial and many thanks.
I am a novice in the image processing field. After carefully following all the installation steps and the compiling the code, I was able to run the code succesfully.
One can simply use your tutorial and start working out of the box with minimal time.
I do have some doubts.
1. I would like to know more on the min-confidence parameter.
2. What type of algorithm/ method does imutils method use for the non-maxima supression.
3. The detected text area in the form of rectangle is stored in the variable boxes, in the form of Nx4 matrix, where N is the number of text boxes detected, with each row containing the co-ordinate of each rectangle boxes. [ Please clarify if my assumption is wrong. ]
4. Is there any officail fixed dimensions (like pixels or length or width) of the image that want to use for text detection. [ I tried googling “Official ICDAR dataset format” , couldn’t get any result. ]
5. I have seen in some papers that, the performance of the method for text-detection is computed on the area of detected text. So, how should I approach for the evaluation process in my image dataset to use values stored in ‘boxes’. Is there any specific open source tools that I could fed the values of boxes. [ then again, I have to define the co-ordinates of text area in the image manually, it seems, but how? ]
Sorry, for asking too many questions.
Your works helped me a lot. Thabk you again.
Regards,
Haruo
Adrian Rosebrock
Hey Haruo, I’m happy to help out as much as I can but keep in mind that PyImageSearch is a free resource and you’re asking for my help for free. For this many questions I politely ask that you join the PyImageSearch Gurus course which has dedicated community forums. I interact in the forums daily and can spend much more time answering questions in there than I can in the comments section. I hope you understand and hope to see you in the course.
Haruo
Hi Adrian, right now I working on other area, I just need a small test on image as of now. However, once I complete my current pending works, I would be coming back to image processing area to explore more. Will see you at that time. Thank you for your response.
Haruo
Hi Adrian, right now I am working on other area, I just need a small test on image as of now. However, once I complete my current pending works, I would be coming back to image processing area to explore more. Will see you at that time. Thank you for your response.
Gordon
Hello Adrian,
Currently i am facing some issue whereby my scripts will run tesseract (with thread) on the video frame every 6 secs to extract the information on the video frame.
But, everytime when the video almost ends, the process will slow down significantly and all the cpu cores usage will suddenly spike to 100%. Then, there will be processes
produced (which ends up in zombies processes) and a lot of xxx.png and xxx_out.txt produced in the /tmp directory. Do you or anyone else ever face this issue? Hope to hear from you guys soon.
Thanks in advance and have a nice day.
Regards,
Gordon
Adrian Rosebrock
That is odd but unfortunately I’m not sure what the problem is there. I wish I could be of more help but unfortunately without having physical access to the Pi or the code I can’t really diagnose.
Gabriel
Hello Adrian! The proyect works fine and thank you for sharing this proyect to us! Now i have a question, can you this proyect but via streaming video using the camera? I mean, that when i focus a word, letter or number, it prints it on terminal? Thanks
Adrian Rosebrock
Yes, that’s absolutely possible. Have you accessed your webcam before using OpenCV? What is your experience level with OpenCV?
John Henderson
HI Adrian, I think this blog post is awesome and I was wondering if it is possible to take the ROI’s (each word) and the x,y coordinates of each ROI and import them to a new white image that has the same dimensions as the original scanned image? I’m trying to build a document scanner and I’m having issues preserving the placement of each word. Thanks!
Adrian Rosebrock
Yes, that’s absolutely possible. You would use NumPy to create an empty array the same size as your input image. You already have the (x, y)-coordinates of each ROI so you would use NumPy array slicing to take the ROI from the original image and place it into the output image. If you’re new to Python/OpenCV and would like to learn how to perform such slicing operations definitely refer to Practical Python and OpenCV where I teach the basics. After going through the text you will be able to solve the problem.
Azat
Hi, Adrian, How did you find RCNN to recognize texts? have you tried before and is it works well ?
Mohamed Akrem
Hi adrian , this code works for me very well on my raspberry pi , thank you very much , but in addition i want this whole process start after i click on a pushbutton that i inserted in Rpi , is that possible? if yes tell me how please.
Gary Zheng
hey Adrian, i run this code to some pictures and it shows the red box but not any text. What could be causing that?
Kalaiselvan Panneerselvam
Iam trying to retrieve texts from a noisy and rusted iron plates. Tesseract v4 fails to read the text most of the times. What is the best way to perform to OCR. I tried cloud api like amazon rekognition but i trying to built it as a mobile app where ocr is performed with mobile phone in low bandwidth or with no internet connection.
Kotesh
Hey Adrian I run this code for text recognition but here the next is number but it is not recognising the numbers. I tried with making changes in oem and psm but no change.
can you please help me how to detect numbers with this code.
The numbers are not handwritten digits .
guruprasaad
I have a doubt in mind , can i use tessaract to detect and extract alphanumeric characters like (!@#$%^&*()_+) ?
Thanks in advance
Adrian Rosebrock
Yes you can.
Jay Iyer
I am going to attempt running this in google colab. Anything I must be aware of or any specific advice on doing it there.
I was going to paste the py code into a notebook.
Adrian Rosebrock
If you are going to use Google Colab you’ll want to hardcode any command line arguments as a dictionary. See this post for more details.
Aish
I got an error in image.copy() command. hiw should I overcome it?
Adrian Rosebrock
What is the error you received? Without knowing the error I cannot provide any suggestions.
Amar
Dear sir, thanks for the article. I have been working on extracting text from scanned PDF files and I have used other python based libraries and tools to achieve the same. I will definitely give this one a try also.
As a next step in my project I would like to overlay the text to the scanned PDF so that the PDF itself becomes searchable. Would you be kind enough to guide me on how to do that programmatically on windows.
Regards
Amar
Adrian Rosebrock
Sorry, I don’t know how to programmatically overlay a PDF with text. There may be Python libraries for that, but you’ll need to do your own research.
Allan
Hi, Adrian,
I was testing the script provided on the download corner. But, I don’t know what’s going on, It won’t loop to all words in the image (example_03.jpg). It’s stuck in the first word and won’t recognize the next word after that. I haven’t changed anything in the code and just execute using the given command (python text_recognition.py –east frozen_east_text_detection.pb –image images/example_03.jpg).
I have tried waiting for it like 5 minutes but it’s stuck in the first word (“ESTATE”). Am I missing something?
BTW I’m using OpenCV 3.4.2.16 and Tesseract 4.0
Hope you could give me some advice. Thank you!
Adrian Rosebrock
Click on the window opened by OpenCV and press any key on your keyboard to advance execution (the “cv2.waitKey(0)” call prevents execution from continuing until a key is pressed).
Madan
So can you use this to recognize number plate ??
Adrian Rosebrock
ANPR systems are more advanced than just OCR. They also include localization components as well. Refer to the PyImageSearch Gurus course for more details.
Dinusha
Hi
I have tested this work fine without any problem for letters. But my problems when it is going to recognize numbers ocr giving some wrong values compare with letters. What kind of configuration should I change to improve accuracy of recognizing numbers?
Akhil Kumar
Hi Adrian,
I need to ocr pages of a Hindi book. I have scanned all pages of the book. I did try ocr in Matlab. It is working fine but the only problem is that I don’t know any method to detect new paragraph in the image which on detection will insert a new line in the scanned text. Is there any method to do so in Tesseract?
Regards,
Akhil
Mrinal singh walia
hello Adrian, can you tell me how can I produce a txt or pdf or excel output of the detected text using tesseract ocr?
Adrian Rosebrock
You mean like this OpenCV OCR guide?
Kiran
After detecting the text using east algorithm can we use this post (ocr, tesseract) to recognise the text.
Adrian Rosebrock
See this tutorial.
Jarl
Hi
Where does frozen_east_text_detection.pb come from? and how is it generated?
Jarl
Adrian Rosebrock
See the previous tutorial in the series.
miha21350
Hi Adrian!
Thank you so so much for making this guide that I have been searching for weeks.
I only have one question.
Can this code be used on a live webcam (for example a robot moving and stoping when it sees a letter)?
If so can you or somebody else please point me to the code that I have to add to the program.
Thank you so much.
Adrian Rosebrock
Technically yes, it can, but this model would require a GPU in order to run in real-time. It would be very slow on a CPU.
Sharath
Hi Adrian,
Thank you for the tutorial. It help me a lot. Is it possible to draw bounding boxes for entire row of text rather than splitting the bounding box word by word?
Bosco Yew
Hello Adrian, thanks for this great tutorial.
May i know this model can extract the handwritten text in image or not?
Ajay Murala
HI Adrian,
I am working on OCR application using openCv and tesseract model.
I have created the python application and converted to an executable.
When I run the exe in my PC, it gives the results (this is because I have tesseract installed). When I run the exe on other machine where tesseract is not installed, it does not work. I understand this becuase tesseract is not installed there.
How to bundle the tessercat when building the application or exe?
Please suggest.
Thank you
Leo Strewlitz
Hi Adrian,
I tested your software and it runs. But I have problem with matrix 4×4 numbers, black, without other objects , on the white background. Only 3 numbers are recognized.
My question is: How can I set options for tessarct binary ( flags). The three most important ones are -l , –oem , and –psm . Is it made before I run python file or is it made in python code?Please explain me.
Thanks and best regards
Leo
Bakshish
Hi Adrian!
Thank you so much for this in depth tutorial, it was easy to follow and understand even though I’m very new to python. After I run the program, is there any way to stop and get back to the terminal?
As of now, it just stops after the program is run once thus causing me to open a new terminal every time. Thanks!
Adrian Rosebrock
Click on the window opened by OpenCV and press a key on your keyboard. That will make the script exit.
Alex
Hi Adrian,
Many thanks for this great article. I have a use case where I don’t know beforehand the language of the documents I try to OCR. How would you tackle this problem ?
Taka
Hi Adrian Rosebrock ,
Thank you.
It would be very helpful if you could write this blow for Windows user.
Adrian Rosebrock
See my FAQ — I do not officially support Windows.
Alex
Hi Adrian,
How do we modify the dnn call to accept preprocessed images using the thresholding techniques outlined in “Using Tesseract OCR with Python”. If I try put a thresholded image with small modification to your source code I get an error in:
‘cv::dnn::ConvolutionLayerImpl::getMemoryShapes’
stating that:
“Number of input channels should be multiples of 3 but got 1”
Which from what I gather means the image needs to be in RGB rather than grayscale to use this function, is it possible to feed it a grayscale image?
Cheers!
Adrian Rosebrock
You can stack the grayscale image to create an RGB image:
image = np.stack([gray] * 3)
Kei
Hi man,
Thanks for the great post. At the moment, I am trying to recognize odometer values in images.
Methodology:
– I used YOLO to detect the region of interest in the image,
– After that, I used the idea in this post to try to read the digits out.
However, the results were worst. Tesseract could not able to determine the digits. I think that the layout of the odometer gauge is varied, making it difficult for the algorithm. Do you have any suggestions for such cases? Highly appreciate it.
Burak
Thanks for this comprehensive work and elaborating the things smoothly and explicitly.
Great work!
Adrian Rosebrock
Thanks Burak!
Jihad
Hi Adrian thank you for this amazing tutorial, i’m looking for a way to OCR tables from scanned financial documents i have tried your code here but it did not work properly do you have any suggestion as to how i might approach this project?
steve gale
I posted a couple of days ago about having an opencv error, could not find cv2.INTER_AREA.
as expected, my own stupid fault.
Having followed “how to install opencv on raspberry PI 4 and Buster” it worked. I stopped at the PI4 because I have a PI3… As my late father used to say “a senior moment”.
To get Tesseract to work I saw a previous post which said to run “sudo ldconfig”
So the “OH OK” example works, now to try it on my own text.
Thanks Adrian for another great blog
Adrian Rosebrock
Congrats on resolving the issue, Steven! And there’s no stupid error as long as we learn from it 🙂 Thanks for coming back and providing the solution.