Today’s blog post was inspired by PyImageSearch reader, Emmanuel. Emmanuel emailed me after last week’s tutorial on object detection with deep learning + OpenCV and asked:
Hi Adrian,
I really enjoyed last week’s blog post on object detection with deep learning and OpenCV, thanks for putting it together and for making deep learning with OpenCV so accessible.
I want to apply the same technique to real-time video.
What is the best way to do this?
How can I achieve the most efficiency?
If you could do a tutorial on real-time object detection with deep learning and OpenCV I would really appreciate it.
Great question, thanks for asking Emmanuel.
Luckily, extending our previous tutorial on object detection with deep learning and OpenCV to real-time video streams is fairly straightforward — we simply need to combine some efficient, boilerplate code for real-time video access and then add in our object detection.
By the end of this tutorial you’ll be able to apply deep learning-based object detection to real-time video streams using OpenCV and Python — to learn how, just keep reading.
Real-time object detection with deep learning and OpenCV
Today’s blog post is broken into two parts.
In the first part we’ll learn how to extend last week’s tutorial to apply real-time object detection using deep learning and OpenCV to work with video streams and video files. This will be accomplished using the highly efficient VideoStream
class discussed in this tutorial.
From there, we’ll apply our deep learning + object detection code to actual video streams and measure the FPS processing rate.
Object detection in video with deep learning and OpenCV
To build our deep learning-based real-time object detector with OpenCV we’ll need to (1) access our webcam/video stream in an efficient manner and (2) apply object detection to each frame.
To see how this is done, open up a new file, name it real_time_object_detection.py
and insert the following code:
# import the necessary packages from imutils.video import VideoStream from imutils.video import FPS import numpy as np import argparse import imutils import time import cv2
We begin by importing packages on Lines 2-8. For this tutorial, you will need imutils and OpenCV 3.3.
To get your system set up, simply install OpenCV using the relevant instructions for your system (while ensuring you’re following any Python virtualenv commands).
Note: Make sure to download and install opencv and and opencv-contrib releases for OpenCV 3.3. This will ensure that the deep neural network (dnn
) module is installed. You must have OpenCV 3.3 (or newer) to run the code in this tutorial.
Next, we’ll parse our command line arguments:
# construct the argument parse and parse the arguments ap = argparse.ArgumentParser() ap.add_argument("-p", "--prototxt", required=True, help="path to Caffe 'deploy' prototxt file") ap.add_argument("-m", "--model", required=True, help="path to Caffe pre-trained model") ap.add_argument("-c", "--confidence", type=float, default=0.2, help="minimum probability to filter weak detections") args = vars(ap.parse_args())
Compared to last week, we don’t need the image argument since we’re working with streams and videos — other than that the following arguments remain the same:
--prototxt
: The path to the Caffe prototxt file.--model
: The path to the pre-trained model.--confidence
: The minimum probability threshold to filter weak detections. The default is 20%.
We then initialize a class list and a color set:
# initialize the list of class labels MobileNet SSD was trained to # detect, then generate a set of bounding box colors for each class CLASSES = ["background", "aeroplane", "bicycle", "bird", "boat", "bottle", "bus", "car", "cat", "chair", "cow", "diningtable", "dog", "horse", "motorbike", "person", "pottedplant", "sheep", "sofa", "train", "tvmonitor"] COLORS = np.random.uniform(0, 255, size=(len(CLASSES), 3))
On Lines 22-26 we initialize CLASS
labels and corresponding random COLORS
. For more information on these classes (and how the network was trained), please refer to last week’s blog post.
Now, let’s load our model and set up our video stream:
# load our serialized model from disk print("[INFO] loading model...") net = cv2.dnn.readNetFromCaffe(args["prototxt"], args["model"]) # initialize the video stream, allow the cammera sensor to warmup, # and initialize the FPS counter print("[INFO] starting video stream...") vs = VideoStream(src=0).start() time.sleep(2.0) fps = FPS().start()
We load our serialized model, providing the references to our prototxt and model files on Line 30 — notice how easy this is in OpenCV 3.3.
Next let’s initialize our video stream (this can be from a video file or a camera). First we start the VideoStream
(Line 35), then we wait for the camera to warm up (Line 36), and finally we start the frames per second counter (Line 37). The VideoStream
and FPS
classes are part of my imutils
package.
Now, let’s loop over each and every frame (for speed purposes, you could skip frames):
# loop over the frames from the video stream while True: # grab the frame from the threaded video stream and resize it # to have a maximum width of 400 pixels frame = vs.read() frame = imutils.resize(frame, width=400) # grab the frame dimensions and convert it to a blob (h, w) = frame.shape[:2] blob = cv2.dnn.blobFromImage(cv2.resize(frame, (300, 300)), 0.007843, (300, 300), 127.5) # pass the blob through the network and obtain the detections and # predictions net.setInput(blob) detections = net.forward()
First, we read a frame
(Line 43) from the stream, followed by resizing it (Line 44).
Since we will need the width and height later, we grab these now on Line 47. This is followed by converting the frame
to a blob
with the dnn
module (Lines 48 and 49).
Now for the heavy lifting: we set the blob
as the input to our neural network (Line 53) and feed the input through the net
(Line 54) which gives us our detections
.
At this point, we have detected objects in the input frame. It is now time to look at confidence values and determine if we should draw a box + label surrounding the object– you’ll recognize this code block from last week:
# loop over the detections for i in np.arange(0, detections.shape[2]): # extract the confidence (i.e., probability) associated with # the prediction confidence = detections[0, 0, i, 2] # filter out weak detections by ensuring the `confidence` is # greater than the minimum confidence if confidence > args["confidence"]: # extract the index of the class label from the # `detections`, then compute the (x, y)-coordinates of # the bounding box for the object idx = int(detections[0, 0, i, 1]) box = detections[0, 0, i, 3:7] * np.array([w, h, w, h]) (startX, startY, endX, endY) = box.astype("int") # draw the prediction on the frame label = "{}: {:.2f}%".format(CLASSES[idx], confidence * 100) cv2.rectangle(frame, (startX, startY), (endX, endY), COLORS[idx], 2) y = startY - 15 if startY - 15 > 15 else startY + 15 cv2.putText(frame, label, (startX, y), cv2.FONT_HERSHEY_SIMPLEX, 0.5, COLORS[idx], 2)
We start by looping over our detections
, keeping in mind that multiple objects can be detected in a single image. We also apply a check to the confidence (i.e., probability) associated with each detection. If the confidence is high enough (i.e. above the threshold), then we’ll display the prediction in the terminal as well as draw the prediction on the image with text and a colored bounding box. Let’s break it down line-by-line:
Looping through our detections
, first we extract the confidence
value (Line 60).
If the confidence
is above our minimum threshold (Line 64), we extract the class label index (Line 68) and compute the bounding box coordinates around the detected object (Line 69).
Then, we extract the (x, y)-coordinates of the box (Line 70) which we will will use shortly for drawing a rectangle and displaying text.
We build a text label
containing the CLASS
name and the confidence
(Lines 73 and 74).
Let’s also draw a colored rectangle around the object using our class color and previously extracted (x, y)-coordinates (Lines 75 and 76).
In general, we want the label to be displayed above the rectangle, but if there isn’t room, we’ll display it just below the top of the rectangle (Line 77).
Finally, we overlay the colored text onto the frame
using the y-value that we just calculated (Lines 78 and 79).
The remaining steps in the frame capture loop involve (1) displaying the frame, (2) checking for a quit key, and (3) updating our frames per second counter:
# show the output frame cv2.imshow("Frame", frame) key = cv2.waitKey(1) & 0xFF # if the `q` key was pressed, break from the loop if key == ord("q"): break # update the FPS counter fps.update()
The above code block is pretty self-explanatory — first we display the frame (Line 82). Then we capture a key press (Line 83) while checking if the ‘q’ key (for “quit”) is pressed, at which point we break out of the frame capture loop (Lines 86 and 87).
Finally we update our fps counter (Line 90).
If we break out of the loop (‘q’ key press or end of the video stream), we have some housekeeping to take care of:
# stop the timer and display FPS information fps.stop() print("[INFO] elapsed time: {:.2f}".format(fps.elapsed())) print("[INFO] approx. FPS: {:.2f}".format(fps.fps())) # do a bit of cleanup cv2.destroyAllWindows() vs.stop()
When we’ve exited the loop, we stop the fps
counter (Line 93) and print information about the frames per second to our terminal (Lines 94 and 95).
We close the open window (Line 98) followed by stopping the video stream (Line 99).
If you’ve made it this far, you’re probably ready to give it a try with your webcam — to see how it’s done, let’s move on to the next section.
Real-time deep learning object detection results
To see our real-time deep-learning based object detector in action, make sure you use the “Downloads” section of this guide to download the example code + pre-trained Convolutional Neural Network.
From there, open up a terminal and execute the following command:
$ python real_time_object_detection.py \ --prototxt MobileNetSSD_deploy.prototxt.txt \ --model MobileNetSSD_deploy.caffemodel [INFO] loading model... [INFO] starting video stream... [INFO] elapsed time: 55.07 [INFO] approx. FPS: 6.54
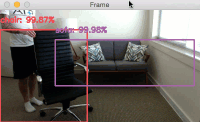
Provided that OpenCV can access your webcam you should see the output video frame with any detected objects. I have included sample results of applying deep learning object detection to an example video below:
Notice how our deep learning object detector can detect not only myself (a person), but also the sofa I am sitting on and the chair next to me — all in real-time!
The full video can be found below:
What's next? We recommend PyImageSearch University.
86+ total classes • 115+ hours hours of on-demand code walkthrough videos • Last updated: April 2025
★★★★★ 4.84 (128 Ratings) • 16,000+ Students Enrolled
I strongly believe that if you had the right teacher you could master computer vision and deep learning.
Do you think learning computer vision and deep learning has to be time-consuming, overwhelming, and complicated? Or has to involve complex mathematics and equations? Or requires a degree in computer science?
That’s not the case.
All you need to master computer vision and deep learning is for someone to explain things to you in simple, intuitive terms. And that’s exactly what I do. My mission is to change education and how complex Artificial Intelligence topics are taught.
If you're serious about learning computer vision, your next stop should be PyImageSearch University, the most comprehensive computer vision, deep learning, and OpenCV course online today. Here you’ll learn how to successfully and confidently apply computer vision to your work, research, and projects. Join me in computer vision mastery.
Inside PyImageSearch University you'll find:
- ✓ 86+ courses on essential computer vision, deep learning, and OpenCV topics
- ✓ 86 Certificates of Completion
- ✓ 115+ hours hours of on-demand video
- ✓ Brand new courses released regularly, ensuring you can keep up with state-of-the-art techniques
- ✓ Pre-configured Jupyter Notebooks in Google Colab
- ✓ Run all code examples in your web browser — works on Windows, macOS, and Linux (no dev environment configuration required!)
- ✓ Access to centralized code repos for all 540+ tutorials on PyImageSearch
- ✓ Easy one-click downloads for code, datasets, pre-trained models, etc.
- ✓ Access on mobile, laptop, desktop, etc.
Summary
In today’s blog post we learned how to perform real-time object detection using deep learning + OpenCV + video streams.
We accomplished this by combing two separate tutorials:
The end result is a deep learning-based object detector that can process approximately 6-8 FPS (depending on the speed of your system, of course).
Further speed improvements can be obtained by:
- Applying skip frames.
- Swapping different variations of MobileNet (that are faster, but less accurate).
- Potentially using the quantized variation of SqueezeNet (I haven’t tested this, but imagine it would be faster due to smaller network footprint).
In future blog posts we’ll be discussing deep learning object detection methods in more detail.
In the meantime, be sure to take a look at my book, Deep Learning for Computer Vision with Python, where I’ll be reviewing object detection frameworks such as Faster R-CNNs and Single Shot Detectors!
If you’re interested in studying deep learning for computer vision and image classification tasks, you just can’t beat this book — click here to learn more.
Download the Source Code and FREE 17-page Resource Guide
Enter your email address below to get a .zip of the code and a FREE 17-page Resource Guide on Computer Vision, OpenCV, and Deep Learning. Inside you'll find my hand-picked tutorials, books, courses, and libraries to help you master CV and DL!
wow! this is really impressive, will it be able to run on a RPI 3?
Please see my reply to “Flávio”.
I have done cascade training for object detection. Can you explain how you generate the three models protext caffe etc used in your project
It’s too complicated of a process to explain in a single blog post. You should read this post to understand the fundamentals of deep learning object detection. I then cover how to train your own custom deep learning object detections inside Deep Learning for Computer Vision with Python.
Hi Adrian,
Thank you for helpful post. I am working now with tensorflow model. So in your post you showed with MobileNetSSD caffemodel. I already done object detection with tensorflow model but my goal is to create OpenCV tracker using my trained tensorflow model for tracking. Can you suggest some example or source code.
Thanks before hand
You mean something like this?
Hey Adrian, Can you please send me documentation of “real time object detection ”
regarding what methods and algorithms used..And how it is different from other models?
The method and algorithm used is documented in this post and in in this one.
Hi, Adrian. Thanks a lot for another great tutorial. Have you got a real-time example working on a Pi 3? (Maybe skipping frames?) I’m just using a Pi (for OpenCV and DL) and I’d like to know to what extent is it’d be usable. What about the frame rate? Nice work as always. Cheers.
I haven’t applied this method to the Raspberry Pi (yet) but I will very soon. It will be covered in a future blog post. I’ll be sharing any optimizations I’ve made.
have you done it?
Yes. Refer to this post.
Hello Adrian,
Very helpful post. Is it possible to only for one type of class, that is only for the detection of persons?
Yes. See see this post.
Hi Adrian.
Excelent, you are a great developer! But, I want to know how develop a face-tracking with opencv and python in the Backend, but capturing video en canvas with HTML5 real-time and after draw and object depending of the Backend´s Response, for example, a Moustache. Too, this tracking has support with head movement and Moustache adapts.
Thanks.
hi what’s the best FPS on say a typical Macbook assuming u used threading and other optimisations?
in particular, does it mean if i used N threads to process the frames, the FPS will be N times better?
does the dnn module use any threading / multi-core underneath the hood?
No, the threading here only applies to polling of frames from the video sensor. The threading helps with I/O latency on the video itself. If you’re looking to speedup the actual detection you should push the object detection to the GPU (which I think can only be done with the C++ bindings of OpenCV).
Hello Adrian,
I plan to use jetson TX2 to do the object detection with deeplearning.
i don’t know if there will be faster if just port the above code to tx2?
can i have better performance by using tx2 for the upper code with opencv’s deep learning library?
or do you have any suggestions to make the object detection faster on tx2, what framework and training net is better? use mxnet + mobielnet?
I haven’t tried this code with the TX2 yet, but yes, in general this should run faster on the TX2 provided you can run the model on the GPU directly. I would suggest using the code as is and then obtaining your benchmark. From there it will be possible to provide suggestions. The model included in the blog post uses the MobileNet framework.
Use C++ binding for opencv will speedup the detection on TX2 lot than python binding? do you have a bench mark?
Sorry, I do not have a benchmark for the TX2 and Python or C++ bindings.
hello,what should i do if i want to apply the detection code to a local video on my computer??
You can use the
cv2.VideoCapture
function and provide the path to your input video. If you’re new to working with OpenCV I would recommend going through Practical Python and OpenCV where I teach the fundamentals. I hope that helps point you on the right path!Hi Adrian,
I replaced the caffe model I trained myself, but I didn’t show a rectangular box. I want to know what the reason is, I look forward to your reply
Best wishes!
thank you!
The code in this post filters out “weak” detections by discarding any predictions with a confidence of less than 20%. You can try to set the confidence to zero just to see if your detections are being filtered out.
If not, your network is simply not returning predictions for your input image. You should consider training your network with (1) more data and (2) data that more closely resembles the test images.
I used my MacBook Pro to collect the results to this blog post — approximately 5-7 FPS depending on your system specs.
Thanks
its so much help
and i needs to detect only helmet in realtime
Hi interesting thought, did it work
Thanks for awesome Tutorials .
I have question about: can I track the location of the chair in video, I mean if the chair moving can I track its location.
Thanks
I would suggest using object detection (such as the method used in this post) to detect the chair/object. Then once you have the object detected pass the location into an object tracking algorithm, such as correlation tracking.
I hope it will cover with an example in new Deep Learning Book
Thanks
Thanks for the tutorial man. The method is quite effective, running better on a CPU. I am still trying to figure out how i can use a video as my source instead of the webcam.
Thanks Sydney, I’m glad it worked for you 🙂
As far as working with video files, take a look at this post.
great article! continue the great way!
Thanks Ashraf 🙂
Thanks. I waited for 18 Sep to read this blog!
Just one questions , isnt 0.2 so low as confidence?
would not this result in low precision?
With object detection we typically have lower probabilities in the localization. You can tune the threshold probability to your liking.
Hey Mate,
Many thanks for the great example code – just what I needed :)..
How would this perform on a Pi 3? I intend testing it asap, but I would guess the classification function would be really slow (I was getting up to 4 seconds on your previous tutorial using cv DNN)? Any views on how to compensate for the slower processor?
Do you believe that this code would be too much for the Pi3?
-J
Hi Jacques — please see my reply to “Flávio”. I haven’t yet tried the code on the Raspberry Pi but will be documenting my experience with it in a future blog post.
Hey Adrian,
Once we have detected an object, how difficult you think will it be to segment it in real time using deep learning? Share ur insight pls.
Object detection and object segmentation are two totally different techniques. You would need to use a deep learning network that was trained to perform object segmentation. Take a look at DeepMask.
Hi,
I tried to run the code, but got this:
File “C:\ProgramData\Miniconda33\lib\site-packages\imutils\convenience.py”, line 69, in resize
(h, w) = image.shape[:2]
AttributeError: ‘NoneType’ object has no attribute ‘shape’
It sounds like OpenCV cannot access your webcam. I detail common causes for NoneType errors in this blog post.
i solve this problem with enabling camera with typing in terminal,
sudo modprobe bcm2835-v412
but image frame capturing is so slow.
What can i do for capturing every famre per every second ?
This method can run in real-time. What are the specs of the system you are using? And what is your target FPS rate?
Hi, have you resolved this problem? I got this problem too.
But when I changed src=1 to src=0 in line “vs = VideoStream(src=1).start()”, it just worked!
Hope this could be helpful to you if it still bothers you.
Thank you for mentioning this. I used
src=1
because I have two webcams hooked up to my system. Most people should be usingsrc=0
as they likely only have one webcam. I will update the blog post.you can try change Line35 :vs = VideoStream(src=0).start() to vs = VideoStream(usePiCamera=args[“picamera”] > 0).start()
and add ap.add_argument(“-pi”, “–picamera”, type=int, default=-1,
help=”whether or not the Raspberry Pi camera should be used”) after Line 14
it‘s work for me
I get the AttributeError: ‘NoneType’ object has no attribute ‘shape error as well and I tried the solution recommended by Enjoy (since I am getting this error with src=0) but the code does not run on my pi3. Every time run this code the OS crashes and pi reboots. Not sure what I am doing wrong here. Any help is appreciated.
Are you using a USB camera or the Raspberry Pi camera module? Please make sure OpenCV can access your webcam. I detail these types of NoneType errors and why they occur in this post.
I’ll also be doing a deep learning object detection + Raspberry Pi post later this month.
I am using the raspberry pi camera. And I can access the camera fine, since I tested it with your pi home surveillance code.
Also I forgot to mention that I tried the following from your unifying pi camera and cv2 video capture post with the appropriate argument.
# initialize the video stream and allow the cammera sensor to warmup
vs = VideoStream(usePiCamera=args[“picamera”] > 0).start()
Hi Abhi — thank you for the additional comments. Unfortunately, without direct access to your Raspberry Pi I’m not sure what the exact issue is. I’ll be covering object detection using deep learning on the Raspberry Pi the week of October 16th. I would suggest checking the code once I post the tutorial and see if you have the same error.
Thanks for the post! I was having the same ‘NoneType’ error. I changed the camera source but that didn’t fix it. I added your argument update, along with adding –pi=1 to the command line and it worked. Thanks to the author (and everyone else who have posted) – it’s great to have help when you start.
Thanks for the comment. I’ll be covering how to perform real-time object detection with the Raspberry Pi here on the PyImageSearch blog in the next couple of weeks.
can you please mention the modifications??
I also encountered this problem. Did you solve it? Can you exchange it? Thank you verymuch
hi .
i want to get position of Specified object in image . all examples are about multi object detection . but i want to get position of only one object . for example i want to get position of a book in image , not all object in image . only one of them . how can i do that ?
First, you would want to ensure that your model has been trained to detect books. Then you can simply ignore all classes except the book class by checking only the index and probability associated with the book class. Alternatively you could fine-tune your network to apply detect books.
Thanks for great tutorial.
Is it running on the cpu? If so, is there a parameter we can change to gpu mode?
kevin
This runs on the CPU. I don’t believe it’s possible to access the GPU via the Python bindings. I would suggest checking the OpenCV documentation for the C++ bindings.
Hi Adrian .
Its really a great tutorial .You are the Rock star of Computer Vision .
I have also implemented a Faster-RCNN with VGG16 and ZF network on my own Sports videos to detect logos in the video.I am getting good accuracy with both the networks,but I am able to processed only 7-8 frames/sec with VGG16 and 14-15 frames/sec with ZF network .To process the video in real time,I am skipping every 5th frame. I have compared the results in both the cases (without skipping frames and skipping every 5th frame) having almost same accuracy .Can you guide me that I am doing right thing or not ? What can be the optimal value of skipping the frame to process in real time without hurting the accuracy.
There is no real “optimal” number of frames to skip — you are doing the skip frames correctly. You normally tune the number of skip frames to give you the desired frame processing rate without sacrificing accuracy. This is normally done experimentally.
Hi Adrian, how do you modify the code (from lines 39-54) to skip every nth frame? thanks,
Hi Arvind,
I have replaced the zf_test.prototxt and ZF_faster_rcnn_final.caffemodel files for use with ZF, but I can’t get it working.
Can you teach me how to change the code to get it working like tutorial above (Real-time object detection) ?
Thx !
Hi I’m just curious how you trained your caffe model because I feel like the training process you used could be really good. thanks!
Please see my reply to “Thang”.
This is very interesting, thank you. Unless I missed it, you aren’t using prior and posterior probabilities across frames at all. I appreciate that if an object doesn’t move then there is no more information to be extracted but if it were to move slightly but change because of rotation or some other movement then there is some independence and the information can be combined. We can see this when you turn the swivel-chair; the software loses track of it when it’s face on (t=28 to t=30). Is this something that can be done or is it too difficult?
PS Can you explain why the human-identification is centred correctly at the start of the full video but badly off at the end please? It’s almost as if the swivel chair on the left of the picture is pushing the human-box off to the right, but I can’t see why it would do that.
I’m only performing object detection in this post, not object tracking. You could apply object tracking to detected objects and achieve a smoother tracking. Take a look at correlation tracking methods.
As for the “goodness” of a detection this is based on the anchor points of the detection. I can’t explain the entire Single Shot Detector (SSD) framework in a comment, but I would suggest reading the original paper to understand how the framework is used. Please see the first blog post in the series for more information.
I ran it on my Pi3 last night. works nicely! Each frame takes a little over a second to classify. The rate is quite acceptable. Cool work and looking forward to any optimisations that you think will work..
How much do you think rewriting the app in C++ will increase the performance on the Pi? I know CV is C/C++, but I am keen to profile the diff in a purely compiled language.
In general you can expect some performance increases when using C/C++. Exactly how much depends on the algorithms that are being executed. Since we are already using compiled OpenCV functions the primary overhead is the function call from Python. I would expect a C++ program to execute faster but I don’t think it will make a substantial difference.
Great example code! Thank you. How would you modify the code to read an mp4 file instead of the camera?
You would swap out the VideoStream class for a FileVideoStream.
Can you please explain a little what do you mean by swap out the VideoStream class? As i was trying to use this code for mp4 file and got an error. Please take a look:
[INFO] loading model…
[INFO] starting video stream…
Traceback (most recent call last):
File “new.py”, line 49, in
frame = imutils.resize(frame, width=400)
…
(h, w) = image.shape[:2]
AttributeError: ‘tuple’ object has no attribute ‘shape’
If possible can you tell me where i have to modify the code ?
By “swapping out” the VideoStream class I mean either:
1. Editing the videostream.py classes and subclasses in your site-packages directory after installing imutils
2. Or more easily, copying the code and storing it in your project and then importing your own implementation of VideoStream rather than the one from imutils
Looking at your error, it appears your call to .read() of VideoStream is returning tuple, not an image. You would need to debug your code to resolve this. Using “print” statements can he helpful here.
Many thanks, but can you show me how to program trained file as in your project you used MobileNetSSD_deploy.caffemodel file.
As I mention in the previous post the MobileNet SSD was pre-trained. If you’re interested in training your own deep learning models, in particular object detectors, you’ll want to go through the ImageNet Bundle of Deep Learning for Computer Vision with Python.
Hi Adrian,
Thanks for the great series of articles.
I’ve tried this on an Odroid XU4 (which is more powerful than the RPi – better CPU, better GPU, USB3) – with OpenCV compiled with NEON optimizations and OpenCL enabled (Odroid XU4 has OpenCL working, and GPU in theory should reach 60GFlops).
Do you know if OpenCL is actually used by net.forward()? It would be interesting to benchmark GPU vs GPU if OpenCL is indeed used.
I was able to run detection at 3fps (3.01 fps to be exact :D) with no optimizations and 640×480 resolution (no resize in the code), but I am confident I can reach >5fps with some optimizations, because:
* I have my board underclocked to 1.7Ghz (stock is 2 Ghz, but I can try overclocking up to 2.2 Ghz)
* I think I/O was the bottleneck, since even underclocked, CPU cores were used ~60%; adding some threading and buffering to the input should speed things up
* to remove some delay from GTK, I used gstreamer output to tcpsink, and viewed the stream with VLC. This would also work great in the “security camera” scenario, where you want to see a stream remotely over the web.
(PS: with gstreamer – from command line – I can actually use the hw h264 encoder in the odroid; but the exact same pipeline – well, except the appsink detour – is not working in opencv python; this would be useful to save the CPU for detection and still have h264 streaming, IF I can make it work…)
I can’t wait to see your optimizations for the RPi, I’ll keep you posted with the framerate I can get on my Odroid 🙂
I’m not sure if OpenCL is enabled by default, that’s a good question. And thanks for sharing your current setup! I’ll be doing a similar blog post as this one for the Raspberry Pi in the future — I’ll be sure to read through your comments and share optimizations and discuss which ones did or did not work (along with an explanation as to why). Thanks again!
So I was wrong – webcam was not the bottleneck. Even with threading, I still get 3fps max. I timed and indeed net.forward() takes 300ms. So the only way I may speed this up is getting the CPU to 2 or 2.2Ghz, and trying to write it in C++…
FYI, When I switched my face tracking/detector code on RPi3 from Python to C++, I got more than 300% extra FPS improvement, now with multiple faces tracked and resolution 640×480 I easily maintain 10-15FPS on an optimised OpenCV 3.3.1.
Now I’m exploring how to use Movidious stick VPU 12 Shaves to boost the performance further and get similar FPS with much higher resolutions…
Could you share your C++ code? I want to make a benchmark on TX2 with opencv3.4 compared to python bindings.
Thanks
For comparison:
Running the script from this blog post gave 0.4 fps on Raspberry Pi 3.
Demo that comes with Movidius Compute Stick running SqueezeNet gives 3 fps, though having inference in separate thread from video frames display assures a nice smooth experience. Just mind that it does not support Raspbian Stretch yet, so use archived card img’s (that’s due to built in Python 3.4 vs 3.5).
Thanks for sharing Tom!
With C++, as expected, performance is very similar.
I’ve tried using Halide dnn, but CPU target didn’t really get an output (I lost patience after >10s), and OpenCL target resulted in a crash due to some missing function in some library…
So 3 fps is as best as I could get in the end.
With CPU at 2GHz, it scales it down to 1.8Ghz due to heat.
But still, cores don’t get used 100% – any idea why? As you can see from here: https://imgur.com/a/D9tdp max usage stays just below 300% from the max 400%, and no core gets used more than 80% – do you know if this is an OpenCV thing?
Hi Adrian, I tried running the code and got this : AttributeError: ‘module’ object has no attribute ‘dnn’
Any ideas what’s the issue? Thanks in advance!
Just to add on I’ve downloaded OpenCV 3.3’s zip file here. Did i download at the wrong place, or did i download it the wrong way? What i did was just download the zip file from that website and added into my Home from the archive manager. Sorry for bothering!
Once you download OpenCV 3.3 you still need to compile and install it. Simply downloading the .zip files is not enough. Please see this page for OpenCV install instructions on your system.
hi adrian since you have no instructions for how to run this on windows platform, does that mean opencv and this tutorial is not compatible with windows platform? If it is possible, got any links where they talk how to set it up, so I can finish this tutorial? Thanks 🙂
I don’t support Windows here PyImageSearch blog, I really recommend Unix-based systems for computer vision and especially deep learning. That said, if you have OpenCV 3.3 installed on your Windows machine this tutorial will work. The official OpenCV website provides Windows install instructions.
Hi Adrian, thanks for your many interesting and useful posts!
I missed this post and I did try to adapt your previous post to do what you did here by myself, searching docs and more examples, to read frames from a stream coming from an ONVIF surveillance camera that streams rtsp h264 video.
I’m having trouble with rtsp part: on Windows I get warnings from the cv2.VideoCapture() call ([rtsp @ 000001c517212180] Nonmatching transport in server reply – same from your imutils.VideoStream), on linux I get nothing but the capture isn’t detected as open.
Any advice about this? I already tried to check my ffmpeg installation, copied it to the same folder from which my python’s loading opencv dlls and if I try ffplay it can stream from the camera (after a few warnings: “‘circular_buffer_size’ option was set but it is not supported on this build (pthread support is required)” )
I was able to use ffserver to convert the rtsp stream from rtsp/h264 to a mjpeg stream, but it consumes more CPU than running the dnn… any advice?
Roberto
Update: I suspect the reason is explained here: http://answers.opencv.org/question/120699/can-opencv-310-be-set-to-capture-an-rtsp-stream-over-udp/
It’s been a long time since I’ve tried RTSP. I’ve made a note to cover this in a future blog post. Thanks for the comments!
I continued my research on a solution or workaround and found OpenCVmerged this patch about 3 days ago: https://github.com/opencv/opencv/pull/9292/files
I’ll have to find some nightly builds and test it again 🙂
Thanks for sharing, Roberto!
Hi Adrian,
Yesterday I leave a reply about the error like:
AttributeError: ‘NoneType’ object has no attribute ‘shape’
But today I read the board carefully, found that someone has encountered the same problem.
And I already resolve the problem .
Thanks.
Thanks for the update, Lin!
Change
src=0
and then read this post on NoneType errors.Hi Adrian. Thanks for your great job. Im thinking about the possibility of applying the recognition only for people in real time on the video stream of four security cameras in mosaic. It would be like having someone watching four cameras at a time and triggering alerts if people are detected in x consecutive frames. Maybe send an email with the pix. What do you think about this and how can be implemented?
You would need to have four video cameras around the area you want to monitor. Depending on how they are setup you could stream the frames over the network, although this would include a lot of I/O latency. You might want to use a Raspberry Pi on each camera to do local on-board processing, although I haven’t had a chance to investigate how fast this code would run on the Raspberry Pi. You also might want to consider doing basic motion detection as a first step.
I was referring to using the mosaic of the four cameras as a single image and running the CNN detector of this post on that image only for the person category. Do you think it would be possible? And what observation or suggestion would you make?
Ah, got it. I understand now.
Yes, that is certainly possible and would likely work. You might get a few false detections from time to time, such as if there are parts of a person moving in each of the four corners and a classification is applied across the borders of the detections. But that is easily remedied since you’ll be constructing the mosaic yourself and you can filter out detections that are on the borders.
So yes, this approach should work.
Thanks for the feedback Adrian!!!
WHY ?
Traceback (most recent call last):
…
(h, w) = image.shape[:2]
AttributeError: ‘NoneType’ object has no attribute ‘shape’
Please see my reply to “Lin” above. Change
src=0
in theVideoStream
class. I’ve also updated the blog post to reflect this change.Hi Adrian!
Thanks for the another great post and tutorial!
As you’ve maybe noticed, bounding boxes are inaccurate – they’re very wide comparing to the real size of object. It happens due to the following thing: you’re using blobFromImage finction, but it takes a central crop from the frame. And this central crop goes to the ssd model. But later you multiply unit box coordinates by full frame size. To fix it you can simply pass cv.resize(frame, (300,300)) as first parameter of blobFromImage() and all will be ok
Thank you for pointing this out, Aleksandr! I’ve updated the code in the blog post. I’ll also make sure to do a tutorial dedicated to the parameters of
cv2.blobFromImage
(and how it works) so other readers will not run into this issue as well. Thanks again!OpenCV: out device of bound (0-0): 1
OpenCV: camera failed to properly initialize!
Please double-check that you can access your webcam/USB camera via OpenCV. Based on your error messages you might have compiled OpenCV without video support.
Nice tutorial, I managed to make it run in rpi but it detects objects with error, my television appeared as a sofa and the fan like chair. What could it be?
In rpi it was very slow, would it need some kind of optimization?
I’ll be covering deep learning-based object detection using the Raspberry Pi in the next two blog posts. Stay tuned!
Hi Adrian,
Nice tutorial, thank you so much.
Besides, can the same code accept rtsp/rtmp video stream?
If the answer is “No”, do you know any python module that can support rtsp/rtmp as video stream input? Many thanks.
This exact code couldn’t be used, but you could explore using the
cv2.VideoCapture
function for this.Hie Adrian. Any pointers on how i can implement this as a web based application?
Are you trying to build this as a REST API? Or trying to build a system that can access a user’s webcam through the browser and then apply object detection to the frame read from the webcam?
I want to be able to upload a video using a web interface, then perform object detection on the uploaded video showing results on the webpage.
Can you elaborate on what you mean by “showing the results”? Do you plan on processing the video in the background and then once it’s done show the output video to the user? If you can explain a little more of what exactly you’re trying to accomplish and what your end goal is myself and others can try to provide suggestions.
Ok. I need to run the application on google cloud platform and provide an interface for users to upload their own videos.
Have users upload the videos and then bulk process the videos in the background and save the annotations. You can either then (1) draw the bounding boxes on the resulting images or (2) generate a new video via cv2.VideoWriter with the bounding boxes drawn on top of them.
how can I integrate rest API to flask python to get the object detection output in real-time?
I don’t want to see the video feed.
Hi Adrian,
As mentioned above, I am getting 3fps on detection (~330ms in net.forward()), and I’m saving the output via a gstreamer pipeline (convert to h264, then either store in file, or realtime streaming with hls).
In order to improve the output fps, I decided to read a batch of 5 frames, do detection on the first, then apply the boxes and text to all 5 before sending them to the gst pipeline.
Using cv2.VideoCapture, I end up with around the half the previous framerate (so an extra 300-350ms spent in 4xVideoCapture.read()), which I am not very happy with.
So I decided to modify imutils.WebcamVideoStream to do 5 reads, and I have (f1, f2, f3, f4, f5) = MyWebcamVideoStream.read() – using this approach I only lose ~50ms and I can get close to 15fps output. However, the problem here is that the resulting video has frames out of order. I tried having the 5 read() protected by a Lock, but without much success.
Any suggestion on how I can keep the correct frame order with threaded WebcamVideoStream?
Thanks.
The
WebcamVideoStream
class is threaded so I would suggest using a thread-safe data structure to store the frames. Something like Python’sQueue
class would be a really good start.Thanks Adrian,
I figured out what the problem was: reading 5 frames was actually taking longer than net.forward(), so WebcamVideoStream was returning the same 5 frames as before; by reducing the batch to 4 frames, and also synchronising the threads, I managed to get 2.5 fps detected + extra 3 frames for each detection for a total of 10fps webcam input/ pipeline output.
Congrats on resolving the issue! The speed your getting is very impressive, I’ll have to play around with the Odroid in the future 🙂
Thanks Adrian
Since there are many here who, like me, would like to use this for a security camera, I would like to share my end script, maybe somebody else would find it useful: http://paste.debian.net/988135/
It reads the input from a .json file, such as: http://paste.debian.net/988136/
* gst_input defines the source (doesn’t actually have to be gst, “0” will work for /dev/video0 webcam)
* gst_output defines the output
* batch_size defines the number of frames read at once. On my system, 4 was optimal (reading 4 frames took similar amount of time to detection on 1 frame)
* base_confidence defines the minimum confidence for an object to be considered
* detect_classes contains “class_name”:”confidence” that you want to track (e.g. ‘person’). Note that confidence here can be lower than “base_confidence”
* detect_timeout defines a time (in s) since a class is considered “detected” again. E.g. if detect_time = 10s, and same class was detected 2s ago, it won’t be considered “detected” again
* detect_action contains a script to be executed on detection. Script needs to have as input “class”, “confidence”, and “filename”
The output video (e.g. the HLS stream in the json example above) contains all classes detected w/ surrounding boxes and labels. Of course, detection is done only on the 1st frame out of batch_size, but all frames have the boxes and labels.
On detecting a class specified in “detect_classes”, the script saves the image in a ‘detected’ folder (in the format timestamp_classname.jpg), then executes the action specified.
In my case, I can always watch the stream online and see what the camera detects, but I can choose to have an action taken (e.g. send email/notification with a picture) when certain objects are detected.
With ~330ms net.forward() and a batch of 4, I can achieve reliably 10fps output.
If somebody has suggestions on how I can improve this, please leave a comment 🙂
Awesome, thanks for sharing memeka!
hi Adrian,
thank you so much for your tutorial! I am a big fan!
I was wondering can I use pre recorded video clips instead of live camera to feed the video stream? Could you suggest how I can achieve this please?
Yes. Please see my reply to “Hubert de Lassus”.
How can I provide the –prototxt and –model direct argument in source code?
args = vars(ap.parse_args())
Please read up on command line arguments. You need to execute the script via the command line — that is where you supply the arguments. The code DOES NOT have to be edited.
When the network was trained did the training data have bounding boxes in it? Or was it trained without and OpenCV can just get the bounding boxes by itself?
When you train an object detector you need the class labels + the bounding boxes. OpenCV cannot generate the bounding boxes itself.
Are the bounding boxes drawn on the training data or is there some other method of doing it?
The bounding boxes are not actually drawn on the raw image. The bounding box (x, y)-coordinates are saved in a separate file, such as a .txt, .json, or .xml file.
Thank you Adrian for your help.
Hi,
I got the detector to work on the video with the help of your another blog (https://pyimagesearch.com/2017/02/06/faster-video-file-fps-with-cv2-videocapture-and-opencv/).
But I have a couble of supplementary questions.
1. How can I easily get a saved video where recognizations are displayed (Can I use cv2.imwrite)?
2. How can I remove the unnecessary labels I do not need (cat, bottle etc). Removing only the label name produces an error code.
3. How do I adjust the code so that only the detections with an accuracy of more than 70-80% are displayed.
4. Do you know ready models for identifying road signs, for example?
Ok, I found a point for adjusting the accuracy of the detection: ap.add_argument(“-c”, “–confidence”, type=float, default=0.2 <—
Also I found your blog (https://pyimagesearch.com/2016/02/22/writing-to-video-with-opencv/), but I could not find the right settings for me… I get error:
…argument -c/–codec: conflicting option string: -c
You need to update your command line arguments. If you have conflicting options, change the key for the command line arguments. I would suggest reading up on command line arguments before continuing.
To address your other questions:
1. Answered from your comment.
2. You cannot remove just the label name. Check the index of the label (i.e.,
idx
) and ignore all that you are uninterested in.3. Provide
--confidence 0.7
as a command line arguments.4. It really depends on the road signs. Most road signs are different in various countries.
hi,
great work, nice tutorial
just one question, i tried to run this code in my system, it works nice but have delay 5 to 8 sec to detect objects.
how to overcome this problem.
What are the specs of your system? 5-8 seconds is a huge delay. It sounds like your install of OpenCV may not be optimized.
hi,
im using reaspbeyy pi 3- code runs fine but have delay of 5 to 8 sec.
how to resolve this problem
I will be discussing optimizations and how to improve the frames per second object detection rate on the Raspberry Pi in future posts. I would suggest starting here with a discussion on how to optimize your OpenCV + Raspberry Pi install.
I have reimplemented the same, but with using sddcaffe for python.When i detector is applied on every second frame then on my system I can get 12 to 14 frames per second. My code is available here
https://github.com/inayatkh/realTimeObjectDetection
Thanks for sharing, Inayatullah!
I’m using Raspberry Pi 3,
Code runs fine but slower operation
hi adrin
how can i assign a unique id number to each and every human object
What you’re referring to is called “object tracking”. Once you detect a particular object you can track it. I would suggest researching correlation trackers. Centroid-based tracking would be the easiest to implement.
Hi Adrian.
Thank you for this post.
I followed you and made it with Rpi3
But too slow…
How can I fix it?
and when I started real_time_~.py
I got this message.
[INFO] loading model…
[INFO]starting video stream…
** (Frame:3570): WARNING **: Error retrieving accessibility bus address: org.freedesktop.DBus.Error.ServiceUnknown: The name org.a11y.Bus was not provided by any .service files
what should I do??
Please see this post on optimizing the Raspberry Pi for OpenCV. The commenter “jsmith” also has a solution.
For what it’s worth, this is NOT an error message. It’s just a warning from the GUI library and it can be ignored.
I don’t get it. I have the same error and the page didn’t say anything. Can you tell me a command I can put in to bypass it if it is not a real error.
Here is a direct link to the comment I am referring to. Give the solution a try and let us know if it works. I am curious myself.
First of all – thank you forbthia tutorial – very informative. Maybe i missed this but do you have any tutorials on real time custom object detection? I want to add additinal object that is not included in the trained model…
Hi Dim — I cover object detection in detail inside the PyImageSearch Gurus course. I would suggest starting there.
Great work sir.
but while I am trying to run code it gives me error:
AttributeError: module ‘cv2’ has no attribute ‘dnn’
how to solve this error?
I am using OpenCV 3.2.0 version.
Thanks in advance..
The
dnn
module is only available in OpenCV 3.3 and newer. Please upgrade to OpenCV 3.3 and you’ll be able to run the code.Thank you for this awesome tutorial, this works quite nice on my laptop computer whereas it has too much delay on odroid (which I might try out the optimized opencv you’ve posted)
but Is there a way to retrain the exact model but with fewer classes?? since I only need two of those classes.
You would need to apply fine-tuning to reduce the number of classes or you can just ignore the indexes of classes you don’t care about. However, keep in mind that the total number of classes isn’t going to significantly slow down the network. Yes, less classes means less computation — but there is a ton of computation and depth earlier in the network.
Hi Adrian
Thanks for the wonderful tutorial. I have a small question. I got an error when running codes:
AttributeError: ‘module’ object has no attribute ‘dnn’
I have installed the opencv3.3.0, and it works. How can I deal with it?
Thank you.
Hmm, I know you mentioned having OpenCV 3.3 installed but it sounds like you may not have it properly installed. What is the output o:
This is very motivational post to try this technique. Thank you Adrian.
How difficult it would be to switch to TensorFlow instead?
TensorFlow instead of Caffe? That depends on the model. You would need a TensorFlow-based model trained for object detection. As far as I understand, the OpenCV loading capabilities of pre-trained TensorFlow models is still in heavy development and not as good as the Caffe ones (yet). For what it’s worth, I’ll be demonstrating how to train your own custom deep learning object detectors and then deploy them inside Deep Learning for Computer Vision with Python.
Thank you.
thanks very much for the tutorial … how train the SSD for custome data like hand detection ?
I am covering how to train your own custom deep learning object detectors (such as Faster R-CNN and SSD) inside my book, Deep Learning for Computer Vision with Python.
hi Adrian,
we are doing a final year B.E project in which we need to give the movement to the Robot depending upon the object that Robot has detected , in such way that that Robot will approach the detected object. Any Idea how to achieve this?. Thanks
Congrats on doing your final B.E. project, that’s very exciting. Exactly how you achieve this project is really dependent on your robot and associated libraries. Are you using a Raspberry Pi? If so, take a look at the GPIO libraries to help you get started.
Adrian, this is amazing. But what if we want to detect something else besides a chair etc. How could we make our own detector?
Hi John — I’m actually covering how to train your own deep learning-based object detectors inside Deep Learning for Computer Vision with Python. Be sure to take a look!
will this work on mobile phones? because im currently working with object detection also but im using mobile phones for it
This code is for Python so you would need to translate it to the OpenCV bindings for the programming language associated with your phone, typically Java, Swift, or Objective-C.
Hi Adrian,
Can I use other caffe model to run this python code? e.g. yolov2, etc?
OpenCV 3.3’s “dnn” module is still pretty new and not all Caffe models/layers are supported; however, a good many are. You’ll need to test with each model you are interested in.
Hi Adrian! I’m back!
Thank you for the answer again.
Now, I’m trying to use this program for my school project.
I want to make a sushi detection machine.
So I need to have the pre-trained data(sushi images caffemodel).
How can I get it? How can I train and get my own data?
please let me know. Thank you
Have a good day.
Hi Justin — I would like to refer you over to my book, Deep Learning for Computer Vision with Python where I discuss how to train your own custom deep learning classifiers in detail.
Hi i just want to ask what are the possible algorithms that you’ve used in doing it THANKS
Hi Win — this blog post was part of a two part series and I detailed MobileNet Single Shot Detectors (the algorithm used) in the prior week’s blog post. You can access that blog post here: Object detection with deep learning and OpenCV.
Hello Adrian,
I saw the latest openCV version 3.4 was released. An in the release note, it says that ” In particular, MobileNet-SSD networks now run ~7 times faster than in OpenCV 3.3.1. ”
So I thought if I use the opencv3.4 for your real_time_object_detection.py code, the fps will increase a lot. But in fact, it seems that there no significantly improvement with 3.4.
1. I used the TX2 platform for the test, one is for opencv3.3 binding with python3.5. the other test is opencv3.4 binding with opencv3.4 with CUDA support (http://www.jetsonhacks.com/2017/04/05/build-opencv-nvidia-jetson-tx2/)
Do you know where is the problem?
2. My goal is to reach the 24 fps for object detection on an embedded platform, Now I am trying mobilenet-ssd on tx2 with opencv dnn lib, but seems there is a big gap. Do you have any suggestions?
Thanks very much. waiting for your replay….
on TX2 with opencv3.4 with CUDA support, only ~5fps for 400*400
nvidia@tegra-ubuntu:~/Downloads/real-time-object-detection$ python real_time_object_detection.py –prototxt MobileNetSSD_deploy.prototxt.txt –model MobileNetSSD_deploy.caffemodel
[INFO] loading model…
[INFO] starting video stream…
[INFO] elapsed time: 64.09
[INFO] approx. FPS: 5.30
the same issue with me, did you know what a reason?
Hi, please i was wondering if there is a way I could count the number of detection in any image that is passed through the network. Thansk
Count the number of detections per object? Or for all objects?
In either case I would use a Python dictionary with the object index as the key and the count as the value. You can then loop over the detections, check to see if the detection passes the threshold, and if so, update the dictionary.
At the end of the loop you’ll have the object counts. To obtain the number of ALL objects in the image just sum the values of the dictionary.
Hey Adrian, I was trying this approach of yours but it doesn’t work. For eg. I open my webcam the am the only person (and object) detected. The confidence is above 90% and the counter just keeps going up. Let’s say there are 4 people in the video stream I am passing to the dnn. I’ve implemented if (CLASSES[idx]==”person”): so that only humans get marked. Now in this case as soon as a person is detected with a 90% confidence, the counter just keeps going up.
How do I solve this?
You nee to reset your dictionary at the end of your loop. I assume you are counting on a per-frame basis, right? If you do not reset your dictionary, then yes, the counter will keep going up.
I assume by resetting my dictionary you are referring to the dict.clear() method which just empties the whole dictionary. I don’t see how does that help me in a video stream. I need to count the number of detections and show them on the output screen at all times which means I need to save them in a variable.
In that case you would need to apply object tracking methods so you don’t accidentally “recount” objects that were already counted. Be sure to take a look at object tracking algorithms such as “centroid tracking” and “Correlation tracking”.
Hallo adrian,
i have an project to detect an object from ycbcr video streaming and cropping the object.
do you have a tutorial that can help me? thanks a lot adrian..
I would suggest basic template matching to get you started.
Thank you for your great help. Could you explain how we can count passenger with bus embed overhead camera
I would start with simple motion detection as a starter. From there you might want to consider training an object detector for overhead views of people.
Hi sir,
I would like detect whether in webcam mobile phone is showing or not..whether this program will help me or not sir..If it so how can i do it?help me sir.
I stumbled upon your website. This is just awesome and thank you for the detailed description. I am getting some ideas on how I can apply your iconcepts/code to other areas 🙂
I am thinking to apply this on my project which is to highlight text on a computer screen. The idea is simple an user points his mouse to a text which may be in a word document or pdf or picture on his computer screen. If there exists a same word across his screen that will be highlighted. I know this is different but this still using the real time screen recording video stream and tracking the highlighted words. Do you think this can be achieved or do you have any good ideas ? Thanks again
This seems doable, especially if the fonts are the same. There are many ways to approach this problem but if you’re just getting started I would use multi-scale template matching. More advanced solutions would attempt to OCR both texts and compare words.
I am trying to use this code for googlenet. But it is not working and i can’t find the changes. Can you please suggest me some changes in the code for implement bvlc_googlenet.caffemodel and bvcl_googlenet.prototxt .
Hi Sagar — I’m not sure what you mean by “it’s not working and I can’t find the changes”. Could you elaborate?
I am using my MacBook Pro and within VirtualBox Ubuntu doing all of the tutorials. For some reason, I keep getting the message: “no module named imutils.video.” Any idea why this may be? I did the tutorial on drawing the box around the red game and that worked.
Make sure you install imutils into your Python virtual environment:
Hey Adrian! The code is just wonderful, but i have one question. Once we have tracked these objects how could be track them? I saw your blog for tracking a ball but how will we track so many detected objects from their coordinates.
Once you have an object detected you can apply a dedicated tracking algorithm. I’ll be covering tracking algorithms here on the PyImageSearch blog, but in the meantime take a look at “correlation tracking” and “centroid tracking”. Centroid tracking is by far the easiest to implement. I hope that helps!
I tried calling the protext and model through file system. But it gives me an error on reading the model file. Can you please guide me on how to read the files through file system, instead of passing them as arguements?
If you do not want to parse command line arguments you can hardcode the paths in your script. You’ll want to delete all code used for command line arguments and then create variables such as:
And from there use the hardcoded paths.
This is really overkill though and if you read up on command line arguments you’ll be able to get the script up and running without modifying the code.
It might also be helpful to see the command you are trying to execute.
It’s a user oriented application, like snapchat uses learning. I can’t have user passing parameters, user needs to remain ignorant of what is happening in the code.
In that case you should hardcode the parameters. How you package up and distribute the project is up to you but a configuration file or hardcoded values are your best bet.
Dear Zaira, I am facing same issue. can you please guide me how you run this code after getting this isuue.
hello ardian, i’m wondering, how does the SSD doing the image pre-processing step? So they can detect the region proposal. sorry for my fool question
Which pre-processing step are you referring to? Calling
cv2.dnn.blobFromImage
on the input frame pre-processes the frame and prepares it for prediction.Hello Adrian,
Thanks for great tutorial. I have a question regarding the number of classes. Is there any model from Caffe that we can use for more classes? If so, can you please point me where I can download use in a way that described in this tutorial. Thanks!
Hey Tarik — what you are referring to is “transfer learning”, in particular “fine-tuning”. I cover these methods in detail inside Deep Learning for Computer Vision with Python.
How can I train new objects? I do not see the image database!
For training networks for your own custom objects please take a look at this GitHub repo. The model used in this blog post was pre-trained by the author of the GitHub I just linked to. If you’re interested in training your own custom object detectors from scratch I would also refer you to Deep Learning for Computer Vision with Python.
Hey! This was pretty neat and I am looking forward to taking it further from here.
I have a few things to clarify: entering `q` in the console doesn’t seem to quit the program. I believe entering `q` is supposed to break out of the `While` loop but it doesn’t seem to do so.
Also, out of curiosity, did you develop algorithms for MobileNet SSD? And is it only trained for specific objects as mentioned when defining a class?
You need to click on the active window opened by OpenCV and then hit the `q` key. This will close the window.
I did not train this particular MobileNet SSD. A network can only predict objects that it was trained on. However, I do train SSDs (and other deep learning object detection algorithms) inside Deep Learning for Computer Vision with Python.
For autonomous RC car, I might need a model that detects STOP/START etc signs. Wondering if you know of any existing model that I could use?
I don’t know of a pre-trained model off the top of my head. And realistically, the accuracy of the model will depend on your own stop/start signs. You will likely need to train your model from scratch.
The issue I dont have any experience in machine learning. Do you have any guide for beginners?
If you are brand new to computer vision and deep learning I would recommend the PyImageSearch Gurus course to help you get up to speed. If you have prior Python experience I would recommend Deep Learning for Computer Vision with Python where I start by discussing the fundamentals of machine learning and then work to more advanced deep learning examples.
I hope that helps!
im very new to this. Im attempting to detect multiple objects and find their distance from the camera of a moving vehicle. Where do you suggest i start?
Also, the error im getting when i run the above code is “error:the following arguments are required: – p/–prototxt, -m/–model
How do i enter those?
Thanks
The reason you are getting this error is because you are not supplying the command line arguments. Please see the blog post for examples on how to execute the script. I would also suggest reading up on command line arguments.
thanks. I got it to work. HOw can I use this for a moving camera if it is, say, attached to a vehicle?
Im attempting to detect multiple objects and find their distance from the camera of a moving vehicle.
May I know how did you solve it? I’ve read the command line arguments page and can’t get any clue.
thank you for this question. if did you resolve it, can you tell me how ? ( the distance )
if I want to change the size of the class ( i want to detect only person and cat), what would I have to change to get rid of this error?
label = “{}: {:.2f}%”.format(CLASSES[idx],
confidence * 100)
list index out of range
There are a few ways to do this. If you want to truthfully recognize only “person” and “cat” you should consider fine-tuning your network. This will require re-training the network. If you instead want to ignore all classes other than “person” and “cat” you can check
CLASSES[idxs]
and see if the predicted label is “person” or “cat”.thank you so much. This works.
hi latha, can you tell me which part of the coding did u change? Can you show me?
if I want to get the x and y coordinates of the detected object, how can I do it?
Please see Line 69 where the starting and ending (x, y)-coordinates of the bounding box are computed.
I gotta say this works amazingly. In fact, it even works to some extent on a dynamic camera if it’s attached to the front of a vehicle on a highway(if one reduces the confidence level)
you’re a life saver.
Thanks Ramky, I’m glad the script is working for you 🙂
Did anyone had any issue related to open cv? It ran the first time but since then I haven’t been able to run it as I keep getting this error:
`ImportError: No module named cv2`
Upon running `pip install python-opencv`, it gives the following error:
` Could not find a version that satisfies the requirement python-opencv (from versions: )
No matching distribution found for python-opencv`
Anyone?
Please follow one of my tutorials for installing OpenCV.
I did and I got the this error:
`real_time_object_detection_OLD.py: error: the following arguments are required: -p/–prototxt, -m/–model`
Pleas see my reply to Akshra on December 28, 2017. You need to supply the command line arguments to the script.
When we use cv2.dnn.blobFromImage to convert a image array to a blob, 0.007843 means the multiplier on the image, why this value so small? I found that default value is 1.0.
Take a look at this blog post where I discuss the parameters to cv2.dnn.blobFromImage, what they mean, and how they are used.
Hello Adrian,
Is it possible to use a different model instead of MobileSSD? I find it’s very bad at detecting cars, trucks and the likes using footage from a dash cam.
As per the tutorial, I would like to track the object whilst providing a label and bounding box, and be able to apply better detection algorithms/methods.
Any suggestions on which tools to use and how?
Thanks.
Right now this is the primary, pre-trained model provided by OpenCV. You cannot take a network trained using MobileNet + SSD and then swap in Faster R-CNN. You would need to re-train the network. Again, I cover this inside Deep Learning for Computer Vision with Python.
As for tracking, please see my reply to “Eng.AAA” on September 18, 2017.
I hope that helps!
I would like to replace the MobileNet architecture with the VGG16 network architecture. Is this a possible cause in that I would be able to detect objects in a video at a better mAP?
I have replaced the protobuf files for use with VGG16, but I can’t get it working. Does your book detail how I could use this network to get it working like your tutorial above, but as I had said, to a better precision rate?
I wouldn’t recommend swapping in VGG, instead use a variant of ResNet. From there you will need to retrain the entire network. You cannot hot-swap the architectures. My book details how to train custom object detectors from scratch on your own datasets. This enables you to create scripts like the one covered in this blog post.
Hello there! Loving the tutorial ! I just have one question. When i run the code you sent me via email, i get this error:
AttributeError : ‘NoneType’ object has no attribute ‘shape’
Any help would be appreciative! Thank you!
If you’re getting an error related to “NoneType” I’m assuming the traceback points to where the image is read from your camera sensor. Please take a look at this blog post on NoneType errors and how to resolve them.
Hi Adrian…..
Thank You for sharing this wonderful knowledge. I tried the code above and execute the command accordingly. But I got this reply on my command line:
[INFO] loading model
…
net = cv2.dnn.readNetFromCaffe(args[“prototxt”], args[“model”])
cv2.error: /home/pi/opencv-3.3.0/modules/dnn/src/caffe/caffe_io.cpp:1113: error: (-2) FAILED: fs.is_open(). Can’t open “MobileNetSSD_deploy.prototxt.txt” in function ReadProtoFromTextFile
Help me with this problem Sir…
Thank You.
Double-check your path to the input prototxt and model weights (and make sure you use the “Downloads” section of this blog post to download the code + additional files). The problem here is that your input paths are incorrect.
Hi Adrian, may i know how do i create/tained my own caffe model file? let say for example, i would like to create a new set of pills for hospitality. How can i do it? The second thing would be if there was a new set of pills that comes in, do i have to recreate a whole new caffee model file or i can use the same one?
Hey Dan, great questions.
1. If you want to train your own object detectors you can either (1) see this GitHub repo of the developer who trained the model used in this example or (2) take a look at my book, Deep Learning for Computer Vision with Python where I discuss training your own custom object detectors in detail.
2. If you want to add new objects that you want to recognize/detect you would need to either re-train from scratch or apply transfer learning.
hi, honestly i dont mind ordering the book however I feel that its kind of wasted for me to spent so much because i would only be using it once as its more of like a school project. Once its over, i wont have to do this anymore.
Is there anyway that I am able to get the content on training my own custom object detectors only? Thankyou
If you’re using it for a one-off school project than DL4CV might not be the best fit for you. Training your own custom CNN-based object detectors can be challenging and requires knowledge of a large number of deep learning concepts (all of which the book covers). If you want to share a bit more about your school project and your experience with machine learning/deep learning. I can continue to let you know if the book would be a good fit for you. Or in the absolute worst case I can let you know if your school project is feasible.
Hi Adrian,
I want to ask you a simple question. It may sounds.
How can we save the detected result as video file like .mp4 or .avi. As i know we can use cv2.VideoWriter function for this with different codes. Can you help if possible with an example ?
I have two tutorials on using cv2.VideoWriter to write video to disk. You can use them to modify this script to save your video. Take a look at this tutorial to get started. Then from there read this one on only saving specific clips.
Hello ,
After running the command I am getting this
python real_time_object_detection.py \
> –prototxt MobileNetSSD_deploy.prototxt.txt \
> –model MobileNetSSD_deploy.caffemodel
[INFO] loading model…
[INFO] starting video stream…
VIDEOIO ERROR: V4L2: Pixel format of incoming image is unsupported by OpenCV
Unable to stop the stream: Device or resource busy
…
(h, w) = image.shape[:2]
AttributeError: ‘NoneType’ object has no attribute ‘shape’
So what this error means ?
It sounds like OpenCV cannot access your webcam. When you try to read a frame from the webcam it is returning “None”. You can read more about NoneType errors here.
Hello Adrian,
I tried this tutorial and its working very well.
But can you please tell me what I need to do If a want to add more objects like watch , wallet so in short how can I provide my own trained model ?
Hey Atul — you would need to:
1. Gather images of objects you want to detect
2. Either train your model from scratch or apply transfer learning, such as fine-tuning
I discuss easy methods to gather your own training dataset here. I then discuss training your own deep learning-based object detectors inside Deep Learning for Computer Vision with Python.
Can you please guide me how can I train my own model from scratch or applytransfer learning ?
Hi Atul — please see my previous comment. Training your own models from scratch is covered inside Deep Learning for Computer Vision with Python.
Hi Adrian,
This might look like a really simple question, but I can’t figure it out:
$ python3 real_time_object_detection.py \ –prototxt MobileNetSSD_deploy.prototxt-txt \ –model MobileNetSSD_deploy.caffemodel
usage: real_time_object_detection.py [-h] -p PROTOTXT -m MODEL [-c CONFIDENCE]
real_time_object_detection.py: error: the following arguments are required: -p/–prototxt, -m/–model
I get this error when I try to run it on the terminal, I don’t understand it because supposedly I define those arguments when I run it, why is this happening?
Thanks so much,
Marta.
It looks like you have properly passed in the command line arguments so I’m not actually sure why this is happening. Can you try replacing
--prototxt
with-p
and--model
with-m
and see if that helps? Again, the command line arguments look okay to me so I’m not sure why you are getting that error.i keep getting this error thanks.
usage: deep_learning_object_detection.py [-h] -i IMAGE -p PROTOTXT -m MODEL
[-c CONFIDENCE]
deep_learning_object_detection.py: error: the following arguments are required: -i/–image, -p/–prototxt, -m/–model
[Finished in 7.0s]
Hey Ope, I have covered in this in a few different replies. Please ctrl + f and search the comments for your error message. See my reply to “Akshra” on December 28, 2017 for the solution.
Hello Adrian,
This tutorial is amazing.
But is it possible to using this code for a video that i have?
How to change it so it can working with the video not my webcam?
There are a number of ways to accomplish this. You can use the FileVideoStream class I implemented or you can use a non-thread version using cv2.VideoCapture (also discussed in the post I linked to).
Hi Adrian,
Here in this tutorial, we have used a pre-trained caffee model. What about we want to train the model according to our requirement? Is there any tutorial which explains how to train the caffee model according to our own requirement? You response will be very useful.
Thanks!
Hey Amit, thanks for the comment. If you want to train your own custom deep learning-based object detector please refer to the GitHub of the author who trained the network. Otherwise, I cover how to train your own custom deep learning object detectors inside Deep Learning for Computer Vision with Python.
how much time will be take to complete this process on raspberry pi 3
python real_time_object_detection.py –prototxt MobileNetSSD_deploy.prototxt.txt –model MobileNetSSD_deploy.caffemodel
[INFO] loading model…
[INFO] starting video stream…
I have provided benchmarks and timings of the code used here over in this blog post.
I am using PICam and I got tthe error like this
[INFO] loading model…
[INFO] starting video stream…
Traceback (most recent call last):
File “real_time_object_detection.py”, line 47, in
frame = imutils.resize(frame, width=400)
File “/home/pi/.virtualenvs/cv/lib/python3.5/site-packages/imutils/convenience.py”, line 69, in resize
(h, w) = image.shape[:2]
AttributeError: ‘NoneType’ object has no attribute ‘shape’
Hey Deepak — make sure you read the comments and/or do a ctrl + f and search the page for your error. I have addressed this question a number of times in the comments section. See my reply to “Atul Soni” on January 13, 2018 to start. Thanks!
hey Deepak, you found a solution for this error?
Hey Adrian,
Do you have any pre-trained models for detecting drones outside?
Sorry, I do not.
Do you know how I can take the data that I get from tracking objects and use that towards another program? For example, I want to try and do find open parking spaces at my school and I want to be able to track cars to find if there is an open space or not.
I think that depends on what you mean by “use that towards another program”? The computer vision/deep learning aspect of this would be detecting the open parking spaces. Once you detect an open parking spot it’s up to you what you do with the data. You could send it to mobile devices who have downloaded your parking monitor app. You could send it to a server. It’s pretty arbitrary at that point. I would suggest focusing on training a model to recognize open parking spots to get started.
Im getting the following error :
usage: real_time_object_detection.py [-h] -p PROTOTXT -m MODEL [-c CONFIDENCE]
real_time_object_detection.py: error: the following arguments are required: -p/–prototxt, -m/–model
what can i do
To start I would suggest going back to the “Real-time deep learning object detection results” section of this post where I demonstrate how to execute the script. You need to supply the command line arguments to the script when you execute it. If you’re new to command line arguments I would encourage you to read up on them before continuing.
Hi Adrian! Good job on this tutorial. I have a question. How can I remove the other Classes, for example I only want to detect the Chair. If it is possible how can I do it. I’m receiving error and freezes the frame when i try to remove the other classes on Line 22 real_time_object_detection.
Hey Jimmy — you don’t want to remove any of the classes in Line 22. Instead, when you’re looping over the detected objects, use an “if” statement, such as
Hi there! i tried using that statement under Line 70 but the other classes still appears when I run the code.
Make sure you double-check your code. If you properly make the check you’ll only be examining “chair” objects — all others will be ignored.
Hi, thanks for your great article.
If i input video with Pi camera, detection is very good. it works very well. I think because the image is very detailed, less noise.
But i input a stream HD camera CCTV. Most detection is good, but sometime detection is wrong. This is url image wrong:
https://imgur.com/7Q6ijy7
https://imgur.com/OOaJAqh
P/s: I have change code line 48, 49 from 300 to 400. I test that if the 300 to only find the large person image. But i change to 400 then detection small image of person.
blob = cv2.dnn.blobFromImage (cv2.resize (frame, (400, 400)),
0.007843, (400, 400), 127.5)
I do monitoring CCTV system with alert when detection person. But I was often falsely alarmed by the non-person detection
How to detection more accurately?
There are a few things you can do here, such as increasing the minimum required confidence for a detection from 20% to 50% or even 75%.
Provided you have enough example data from your cameras you may want to try (1) training a MobileNet + SSD from scratch or (2) fine-tuning the network.
Hi,
I think should output cv2.imshow(“Frame”, cv2.resize(frame, (300, 300))) with frame same input dnn: cv2.resize(frame, (300, 300)).
Because if not then the dnn will look at the image with a different ratio not same real frame, For example, the image of a person will be pulled higher.
When I used readNetFromDarknet method, the detection (=net.foward()) array is very different (with shape (845,6)) from that of Caffe model (which has shape (1,1,1,7)). Could you please guide me on how to proceed with the Darknet model detection array? Also, could you please provide some reference to have a deeper understanding of net.forward? Thanks!
Hey Vijay — I haven’t tried the readFromDarknet methdo so I’m not sure about the method. I’ll give it a try in the future and if need be, write a blog post on it. I discuss how deep learning object detection works inside Deep Learning for Computer Vision with Python — this will help you gain insight into what is going on inside a deep learning object detection model.
Hi Vijay, did you fond a workaround for that dimension problem. I’ve been trying exactly the same thing for hours. I wish you could give some direction. Thank you!
Hello Adrian,
Thanks for the putting this great article.
I have one question here. If i want to detect the Tree and Buildings. How can i detect that? Is there any simple solution or it will take some efforts.
Could you please help me in this?
It will likely take a bit of effort as you’ll need to train an object detector to recognize trees and buildings. You might want to try a HOG + Linear SVM detector or a deep learning-based object detector which I cover inside Deep Learning for Computer Vision with Python.
Hi Adrian,
Could you please suggest me some tutorial in which it has been explained how to create regression box for the detected objects.
Thanks,
Amit
Hi.
Great tutorial, I was able to make it work with not much trouble using a conda enviroment (install opencv using conda to avoid any problem).
What do i need to do to:
1) save the number of persons in the video stream (as a people counter)
2) how to make it work with a previously recorded video?
Thanks!
1. To build a people counter you would want to apply a tracking algorithm so you do not double-count people. Take a look at correlation tracking or even centroid tracking.
2. You can use this with pre-recorded video by using the
cv2.VideoCapture
function or my FileVideoStream class.If you’re interested in learning more about the fundamentals of OpenCV, take a look at my book, Practical Python and OpenCV.
How do we put another training set instead of the one you put on the code…pls hello me.. because it’s not recognizing every thing.
Unfortunately, it’s not that simple. You would need to train your own object detector from scratch or apply fine-tuning to an existing model.
I have downloaded the code from your page. When I executed it in my raspberry pi, i got this error.
usage: real_time_object_detection.py [-h] -p PROTOTXT -m MODEL [-c CONFIDENCE]
real_time_object_detection.py: error: argument -p/–prototxt is required
I don’t know how to proceed on further. Can you send me the procedure to detect objects?
I’ve addressed this question a handful of times in the comments. See my replies to Zaira Zafar, AMRUDESH, and tiago.
Hi Adrian,
I’d like to know how long it took to train your object pool in the real time object detection system. Also, what did you use for training? Also could you explain the caffe model file in it.
What are the advantages of using a blob here?
The “blob” contains the frame we are passing through the deep neural network. OpenCV requires the “blob” to be in a specific format. You can learn more about it here.
Hey how long did it take you to train the network? Also, what did u train it on?
See my response to “Nicolas” on December 23, 2017.
hi Adrian i am your big fan and also follower i want to know can i detect my own object in real time using this program if yes please let me know
What is “your own object”? Is it an object class that the SSD was already trained on? If so, yes. If not, you would need to train your own SSD from scratch or apply fine-tuning.
Can you make tutorial about how can we train our mobilenet_ssd with our dataset , thanks !
Hey Tahirhan — I actually already cover how to train your own SSDs inside Deep Learning for Computer Vision with Python.
i have one question sir
how can i run
python real_time_object_detection.py \
–prototxt MobileNetSSD_deploy.prototxt.txt \
–model MobileNetSSD_deploy.caffemodel
this command in windows cmd
The command should run just fine on the Windows command line. Did you try running it?
Dear Adrian,
I’m amazed by your example code.
It took me less than 5min to demo real time object detection to my kids thanks to you!
Thank you for that!
I’m running it on my laptop and it takes a bit of CPU.
I have a NVIDIA GeForce GPU on my laptop.
Is there a way to redirect some of the computation intensive task to this GPU to offload main CPU?
Wish you a good day
Congrats on getting up and running with real-time object detection so quickly, great job! The models used with OpenCV + Python are not meant to be used on the GPU (easily). This is a big feature request for OpenCV so I imagine it will come soon.
Hi, I’m Richard. Is it possible to run your code in pycharm. I’m having these errors:
usage: real_time_object_detection.py [-h] -p MOBILENETSSD_DEPLOY.PROTOTXT -m
MOBILENETSSD_DEPLOY.CAFFEMODEL
[-c CONFIDENCE]
real_time_object_detection.py: error: the following arguments are required: -p/–MobileNetSSD_deploy.prototxt, -m/–MobileNetSSD_deploy.caffemodel
You can use PyCharm to execute the code, but you’ll need to update the command line arguments in the project settings. See this StackOverflow thread for more details.
sir,object detection demo can we do without using internet connection
Yes. Just download the code and run it. You don’t need an internet connection once the code is downloaded.
can i use another model instead of caffe
Right now the OpenCV bindings are most stable with Caffe models, but you can potentially use TensorFlow or Torch as well.
Thanks Adrian, the tutorial is very easy and your explanation very helpful. However, the object detector has plenty of false negatives and false positives. Is there a way to improve the detection or to plug in a better model. I understand there are constraints. I look forward to hearing from you.
Gal
You may want to consider tuning the minimum confidence parameter to help filter out false negatives. Depending on your dataset and use case you may want to gather example images of classes you want to recognize from your own sensors (such as where the system will be deployed) and then fine-tune the model on these example images.
Hi Adrian,
A big thanks for all your post, I follow them regularly..and you have done a superb work in deep learning. One Concept idea which I developed was using my voice message as a input, my drone search and reply me with a voice message for the detected object. Would like to share my drone video.(https://dms.licdn.com/playback/C5100AQGI8Yxgy8JTrg/442b93fc59874c00aae4de3480dcc90b/feedshare-mp4_500/1479932728445-v0ch3x?e=1519722000&v=alpha&t=vBxMhCBwvc9TLuesd-ME7keC2Plc-2iVCx-QlOS8lz8)
Keep up the good work.
what modification is needed if i want to only detect the motion? my purpose is to use deep learning techniques to detection of motion NOT THE CLASSIFICATION. please help
Is there a particular reason you want to use deep learning for motion detection? Basic motion detection can be accomplished through simple image processing functions, as I discuss in this blog post.
Hi Adrian,
gr8 tutorial. I just need small clarification. I want to add/detect an object/ thing which is not there in the class list given by you. So, what should be the criteria to add/detect them in the video? For example, I want to detect my mobile. So, to detect it, I need to add a class called ‘Mobile’ in the class list. After that Do I need to do any additions in ‘MobileNetSSD_deploy.prototxt’ file? Guide me in developing the code. Thanks
The .prototxt file does not have to be updated, but you DO need to either re-train the network from scratch or fine-tune the network to recognize new classes. I discuss how to train and fine-tune your own object detection networks inside Deep Learning for Computer Vision with Python.
i got error, and dunno why.
box = detections[0, 0, i, 3:7] * np.array([w, h , w, h])
^
SyntaxError: invalid syntax
pls help.
Make sure you use the “Downloads” section of this post to download the source code instead of copying and pasting it. It looks like you likely introduced a syntax error when copying and pasting the code.
hey bro,
Hey how long did it take to complete this program, bcz i didnt get any output. could u pls explain to solve this..very urgent
after i running this command(below), it look loke this even after 2 hour
python real_time_object_detection.py –prototxt MobileNetSSD_deploy.prototxt.txt –model MobileNetSSD_deploy.caffemodel
[INFO] loading model…
[INFO] starting video stream…
Hey Hashir — Is the script will run indefinitely until you click on the the open click and press the “q” key on your keyboard.
sorry bro, i didnt get any proper result after pressing q on my keyboard
You need to click the open window opened by OpenCV and then press the “q” key on your keyboard.
is opencv 3.3 or above is mandotary? i am coding all my cv coding in opencv 2.10.. Can u please help to find how can i convert this code to support in cv2
Yes, OpenCV 3.3+ is mandatory for the deep neural network (dnn) module. The code cannot be converted to OpenCV 2.4. You need ti use OpenCV 3.3+.
hi iam using tensorflow for object detection but my model not detecting object from live camera but it can detect the object from prevideo
Hi, when i try to run this code it tells me : usage: real_time_object_detection.py [-h] -p PROTOTXT -m MODEL [-c CONFIDENCE]
real_time_object_detection.py: error: the following arguments are required: -p/–prototxt, -m/–model Do you know what to do?
Ps. Great article
You need to download the source code to the post, open up a terminal, navigate to where you downloaded it, and execute the script, ensuring you supply the command line arguments. If you’re new to command line arguments, that’s okay, but you should read up on them before trying to execute the script.
And how to navigate to where I downloaded it?
Ps. Can we contact on mail or messanger? I have some questions.
You need to use the “cd” command. If you’re new to the terminal and Unix/Linux environments that’s totally okay, but I would recommend that you spend a few days learning the fundamentals of how to use the command line before you try executing this code.
Hi Adrian,
How to use IP camera instead of webcam?
Thanks
I do not have any tutorials on IP cameras yet but I’ll try do one soon. Depending on your webcam and IP stream it’s either very easy and straightforward or quite complicated.
Hi Adrian, I tried the code but i am facing a problem. I have asked the question in stackoverflow.
Link to my question is https://stackoverflow.com/questions/44020713/an-exception-has-occurred-use-tb-to-see-the-full-traceback-python
Kindly check and answer please.
(email removed my spam filter)
Hi Andrian, I did try to follow your tutorial at: https://pyimagesearch.com/2016/12/26/opencv-resolving-nonetype-errors/
And others but I still have that error:
File “real_time_object_detection.py”, line 59, in
…
(h, w) = image.shape[:2]
AttributeError: ‘tuple’ object has no attribute ‘shape’
Double-check that OpenCV can access your USB camera or webcam. Based on the error, it looks to me like OpenCV is unable to access the video stream.
How can i use other training image data sets to train the data..
for example.. if i want to detect a UAV in the image, what open source training data are available for this?
I believe Stanford has a pretty cool UAV dataset.
Hi Adrian, I’d just like to know how do I reduce the number of classes you provided in the CLASSES array. I’d only like to detect Humans and Cars. What are the Necessary changes that I have to make?
I tried simply deleting those elements from the CLASSES array but that seems to have broken the code.
Thanks
Ahh Never mind. It was a bummer on my part. The code runs just fine
You don’t want to delete elements from the CLASSES array. That will cause an error. Instead, filter on the
idx
of the detection. See my reply to “latha” December 28, 2017.Hello excellent tutorial ..
first of all forgive me for my bad English. I wanted to know how can you reconnect the camera when there is an error? and second, how can the code be modified so that it recognizes only people? Thank you
1. Can you elaborate on what you mean by “reconnect the camera when there is an error”? I’m not sure what you mean.
2. See my reply to “latha” December 28, 2017.
Oksy Sir, I’ve successfully done the obsctacle detection using my logitech webcam and open cv on my raspberry pi 3. I now would like to ask you, how do I do obstacle avoidance if I mount my webcam on a bot which is running autonomously by maybe reducing its speed when obstacle is detected or change its path when it detects it. Please help me out with it sir.
You can respond to this on my email address: (email removed by spam filter) as soon as possible.
Thank You so much.
I am getting a segmentation fault while running the code. I have installed opencv version 3 with dnn = on, successfully. any explaination for this?
Sorry, I’m not sure what would be causing this issue. Can you pinpoint exactly which line is causing the error?
while executing the above code i get the following error
Can’t open “MobileNetSSD_deploy.prototxt.txt”) in ReadProtoFromTextFile, file /home/pi/opencv-3.3.0/modules/dnn/src/caffe/caffe_io.cpp, line 1113 “MobileNetSSD_deploy.prototxt.txt” in function ReadProtoFromTextFile
can anyone help me out in solving this
Your path to the .prototxt file is incorrect. Double-check your file paths and be sure you read up on command line arguments before continuing.
Hi Adrian,
Thx for all those tutorials, its helping a lot to learn how to use python and opencv!
I’m able to make this program works but i’m wondering how to do an action with the answer. (do something if there is one person detected, do something else if there is two etc…).
Hope you are still having fun with deep learning.
Math
You would want to add an “if” statement in the “for” loop on Line 56 that loops over the detections. More specifically, after Line 63, you would want to do something like this:
Working perfectly, thank you!
Is it possible to count the number of person in the screen? ( if there is one person print 1, if there is two, print 2)
Math
Yes. Maintain a dictionary for each frame that maintains:
1. The key of the dictionary as the detected class
2. The value as the number of objects
You can loop over each of the detected objects and update the dictionary.
Hi Adrian
Sounds logic but i’m a little bit confuse about how it will look in the code.. can you show me a little example?
Thank again for yout time.
Math
Sorry, I’m absolutely happy to help point you in the right direction but I cannot write code for you. Take a little bit of time to work with Python dictionaries and create a simple script that can count the number of words in a sentence. The same method applies here. Loop over the detected objects and count the number of objects for each class. I have faith in you and I’m confident you can do it! 🙂
Hii Adrian….I need a help…….when I give a video as the input (original video length:5 sec) it runs for about 3 minutes…..what is the reason for this..? Can u plzz help me with this..
Most video files will play between 18-24 FPS. This method can only run at ~6-7 FPS on most standard CPUs. That said, 3 minutes for about 5 seconds of video is an incredibly long time. What type of hardware are you trying to run this code and object detector on?
ubuntu 16.04
16gb ram
64 bit os
Given your system specs the object detector should certainly be running at a higher frame rate. How large (in terms of width and height) are your input images?
the resolution of video is 640*352
640×352 should be easily processable by a standard laptop/desktop. To be honest I think there might be an install/configuration problem with your version of OpenCV. Try to re-compile and re-install OpenCV, ideally on a fresh install of an operating system.
Is there any method to give 1 FPS as the input from the video…
Hello Sir, how to estimate speed of multiple vehicles using opencv python?
There are a few ways to build such a project. The first is to calibrate your camera. You will then need a method to localize the vehicle. Then apply an object tracking algorithm for each object in the video. Given a calibrated camera and known FPS you can determine how far, and therefore, how fast, an object has moved between subsequent frames in a video. It’s a bit of a tricky process so you’ll want to take your time with it.
I have to count the number of objects in each frame of the video and if the number of objects is less than the previous count ..i have to notify that there is missing of objects..can u help me to do this..plzz
You will be able to accomplish this using the source code of this post with only tiny modifications. Create a dictionary that counts the number of objects in subsequent frames. If the counts for each object differs, send the alert.
thank you:)
Hello Adrian,
I installed everything on an Ubuntu machine with no errors, however when I run the script I get the following error. Any ideas on how to fix that?
python real_time_object_detection.py \
> –prototxt MobileNetSSD_deploy.prototxt.txt \
> –model MobileNetSSD_deploy.caffemodel
…
AttributeError: module ‘cv2’ has no attribute ‘dnn’
Cheers,
Alina
Hey Alina — you need to install OpenCV 3.3 or greater. Previous versions of OpenCV did not include the “dnn” module. Double-check your OpenCV version and upgrade if necessary.
You were right, I had installed opencv 3 in the beginning. Could you I ask you a question?
I am trying to give a webm video file as an input, but it throws me an error. What tut can I watch so I can make this work? Would I need to make any changes at the code apart from the part of the giving input stream?
1. Nice, I’m glad the OpenCV issue was resolved.
2. Without knowing exactly what the error is I cannot provide any guidance. Please keep in mind that I can only provide suggestions or help if you can tell me exactly what issue you are running into.
Hai adrian , i get stuck here
[INFO] loading model…
…
(h, w) = image.shape[:2]
AttributeError: ‘NoneType’ object has no attribute ‘shape’
I’ve seen comment atul soni, I have also tried it with the explanation you gave, I have checks for whether picamera works, I also had to install libjpeg but still can’t. How to solve it? Thank you
How did you check and confirm that the Python “picamera” module works?
Thanks before adrian , i ty this tutorial from your post
https://pyimagesearch.com/2015/03/30/accessing-the-raspberry-pi-camera-with-opencv-and-python/
can you help me, where is the problem?
thankyou
When you ran the previous tutorial, did it work? If so, you need to update Line 35 to be:
vs = VideoStream(usePiCamera=True).start()
Thanks adrian, it worked!. But there is a problem when doing streaming, frame are displayed very slowly. Is there any way to speed up his fps on a raspberry?
The Pi by itself isn’t suitable for real-time detection using these deep learning models. I provide some benchmarks and explain why in this blog post. For additional speed, try the Movidius NCS.
Hi Adrian,
i would like to apologize in advance, because my English isn’t the best it could be, but I really wanted to tell you how much I appreciate your tutorials. They really helped me to deepen my knowledge in the field of OpenCV.
In a personal project of mine, where I try to incorporate your code in an ROS node I have to face the problem of converting your while loop – where the whole frame processing is taken place into a function.
But I really struggle to create the appropriate return statement to receive the same results.
Thanks in advance for your response.
Cheers
Hi Anthony — thanks for the comment, and no worries, your English is very easy to understand.
You mentioned a problem with the “while” loop and trying to return a particular result. Could you elaborate more on what the specific issue is with the “while” loop and what you are trying to accomplish?
Hi Adrian
I executed the code but got an error stating that ‘module’ object has no attribute ‘dnn’
Im using opencv 3.3 and also have opencv_contrib3.3
module folder have dnn folder also
yet Im getting error
Could u please help me out of it.
Thank you
Hey Aman — it sounds like, for whatever reason, your version of OpenCV does not include the “dnn” module. Perhaps you are using a previous version of OpenCV accidentally? To confirm your OpenCV version open up a Python shell and check:
Hi, I run your project on my Ubantu16.04 No errors occurred, but the window called
‘ Frame ‘ is full of green. Nothing can be shown from my notebook front camera. Actually, my camera runs normally under the Win10 system.
How to solve my problem? I will be grateful if you can help me!
Hey Yin — are you using the code + model included with this blog post? Or a different model + code?
It sounds like there are hundreds if not thousands of detections coming from your model. This could be due to false-positives or a bug in your model. Double-check your confidence threshold used to filter out weak predictions as well (you may need to increase the threshold).
Yes, I use the code + model included with this blog post.
Increasing the threshold can’t solve the problem.
I think maybe there are something wrong with my notebook front camera drive under Linux system. Because I can’t get full video from my camera, Only the top half of the video is shown, the bottom half is all green and no signal.
Unfortunately it does sound like there is a problem with your laptop camera. I would also suggest getting your hands on a USB camera as well so you can debug further.
Thank you very much!
I have solved the problem.
By the way, if I want to get the video stream with an external camera instead of notebook front camera, can you recommend one? So I can detect other places rather than objects in front of my computer.
Nice, congrats on resolving the problem. As far as a USB camera goes, I really like my Logitech C920. It’s plug and play compatible with most systems.
Hi Yin,
can you share how did you solve the problem? I´m facing the same issue but can´t find a solution. I´m working with Ubuntu 16.04 and the webcam works allright in windows 10 and in guvcview in Ubuntu.
Thanks!!
Hi, Daniel. First you should check the connection between your front camera and Ubuntu VM, they should be connected via USB3.0. And then install cheese in your ubuntu shell by this command:
$ sudo apt-get install cheese
$ cheese
It may display captured video by your front camera.
Hi Yin,
thanks for your advice, it solved the problem!
Awesome, I’m glad it worked! 🙂
As always your tutorials are very clear thank you. I tried it on the raspberry although the rendering is a little slow, that’s not a problem because I want to count(e.g: each 5 fsp) the number of cats. Please can you help me with the syntax to add.
Thank you in advance
Hey Abdoul, just to clarify from your comment, are you trying to increase the FPS processing rate of the object detection? Or count the total number of cats in each frame? The reason I ask is because I don’t know what you mean by “each 5 fsp” which I interpreted as a typo of “5 FPS” so I’m a bit confused on what you are trying to accomplish.
Hi,
I am trying to run your code on the nvidia jetson setup. The code only uses CPU and the GPU utilization is zero. the fps is only 5
1. Can you tell me if there is a way to assign specific tasks ( like inference ) to GPU using opencv ?
Thanks
This may be a silly question, but I assume you compiled OpenCV with GPU and OpenCL support already?
Yes.. compiled with both gpu and opencl support.
If I use SSD mobilenet in tensorflow and opencv, the GPUs are utilized to maximum capacity.
Is there an option to set/enable GPU for inferences ?
My understanding (which could be incorrect) is that OpenCL should help determine the most optimized way to run the code. Perhaps my understanding is incorrect. In that case I would suggest opening an issue on the official OpenCV GitHub page. Once you do, definitely post the link back so others, myself included, can learn from it.
Hi, Adrian Rosebrock
if we assume that the reason is: compiled OpenCV with GPU and OpenCL as you mentioned above.
my question: how to compile the OpenCV with GPU only
Hello,
Really useful article, I was all setup in one day!
SSD seems to reduce the confidence levels for small sized objects any suggestion to improve this.
There are a few ways to handle small-sized objects with SSDs. The “hack” recommended by the others is to increase the resolution of the image passed into the network. This will slow down inference time but will help when detecting smaller objects.
Hi Adrian, this is a really nice article. Any suggestions to add more classes inside the model so that we can detect more object?
thank you if you can answer my questions.
Hey Lee, I would suggest skimming the comments as I’ve addressed how to add more networks to the model. The gist is that you have two options:
1. Train a network from scratch
2. Apply fine-tuning
I cover both inside Deep Learning for Computer Vision with Python.
hello adryan,how can i training my data ? example i will train my book object.. thank you
Hey Beta, it’s awesome to hear that you would like to train your own custom deep learning object detector. I actually cover how to train your own deep learning object detectors inside Deep Learning for Computer Vision with Python. I would suggest starting there.
Hey Adrian!
Any ideas on how can I “count” the number of detections? Let’s say I had 3 people walk into the frame from one side and exit from the other side, so how can I count those 3 people and like save that count to a variable?
See my reply to “Ife Ade” on October 31, 2017.
Hello adrian, how can i know the position of the object?
example i will detection fire/flame. I will used the position and send it to servo and then pointed on that…
Thank you
Object detection will give you the (x, y)-coordinates of an object in a frame. Are you trying to move a servo for object tracking? If so, you can move the servo relative to where the object is moving. See this blog post for more information.
hello Adrian, I tried running the detection on local video file as the input using the opencv video capture function, however, faced some errors as mentioned below.
File “C:\Users\Raghav\Anaconda3\lib\site-packages\imutils\convenience.py”, line 69, in resize
(h, w) = image.shape[:2]
AttributeError: ‘tuple’ object has no attribute ‘shape’
Your help would be highly appreciated. Thanks
OpenCV is unable to access your webcam. See this blog post for more information on “NoneType” errors.
hello
i used arducam mini 2mp it is working for this?
I’ve heard that Arducam is making Raspberry Pi compatible cameras due to demand, but that’s all I know. I haven’t tried any of the Arducam cameras with my Raspberry Pi.
Hi Adrian, I tried to use bvlc_googlenet because i wanted to detect a soccer ball because i am making robo-keeper for my graduation project and i want to detect the ball through each frame and it`s Co-ordinates but it gives me an error ” Can’t open “bvlc_googlenet.prototxt”
Double check the filepath for your
.prototxt
file. That’s my best guess. I’ve also heard of cases where the prototxt needs to be modified to be compatible with OpenCV’s DNN module.can i try it with googlenet model and sustain the sliding window?
Yes, you can use the traditional sliding window + image pyramid technique. I cover how to perform this inside Deep Learning for Computer Vision with Python.
Hey! Great post.
When i’m executing the code i’m getting an error –
ImportError: No module named imutils.video
How do I rectify it?
Make sure you install the “imutils” library on your system:
$ pip install imutils
If you are using Python virtual environments do not forget to use the “workon” command to access the virtual environment first.
Hi Adrian ,,
This blog was just mindblowing.
I was thinking if I want to detect a cup , how should I train the model ?
Hi Ann — thanks for the comment. I’m so happy to hear you are enjoying the PyImageSearch blog! If you want to train your own model to detect a cup, I would recommend you:
1. Use this blog post to build your own deep learning dataset of “cup” images
2. Follow the instructions inside Deep Learning for Computer Vision with Python to train your own deep learning object detector
Thanks,
You’re really helping many to understand how deep learning works.
I suggest that you should make a course on deep learning in Udemy.
If you already have any course or youtube tutorials. Then plz tell me
I offer a book/complete self-study program on deep learning called Deep Learning for Computer Vision with Python. The book is sold through my website, PyImageSearch. Give it a look and let me know if you have any questions.
Dear Adrian,
I thank you a lot for such a nice learning environment.
I have a question, How can I change this code to detect object from video file not live? I know your previous lectures are from file but they are not with deep learning.
I tried a lot to do, but now it only open the video like picture and freez
You would need to use the
cv2.VideoCapture
class and supply the path to the input file. Here is an example of reading frames from a video file. I hope that helps!Hi Adrian,
First off I’d like to thank you for your wonderful tutorials. It is very helpful for a python and opencv beginner like myself (computer programming beginner actually).
I’d like to ask a question about this code… Specifically about its usage with pre-recorded videos rather than live stream.
I am trying to run the code to detect a 40 second test video… however it is taking approximately 5 minutes for it to process (it appears to slow down the video in order to detect it). At first I thought it’d be harder for the code to detect a livestream rather than a pre-recorded video; however, obviously this is not the case, as you’ve proved it can detect livestream videos in real time. Can you explain why this may be so? Both my webcam and test videos are 30FPS, 1280w/720h resolution, so I had expected that the recorded video would have ran the same if not faster.
Note: For clarification, I have read the comments on your other tutorial on the “faster video processing with threading”, however, I am on the newer version of python/openCV and the “slow” cv2.videocapture is faster.
I hope to get a reply on this likely very beginner question.
Kind regards
It’s actually not always the cause that processing a recorded video will be faster. Recorded videos are normally compressed in some manner and depending on which video codec you are using and which video libraries you have installed it may actually take longer to process a video file rather than a true video stream. Without knowing what file format or your system configuring I’m unfortunately not able to give further advice but I hope that at least points you in the right direction.
Hello Adrian – Great post! I want to add some other objects like Phone, laptop, ball, … etc. Does it require some other model. Which model I should use? If I have this datasets than how I trained it?
Hi Aagam — please refer to this blog post on deep learning object detection to get you started. From there, I would suggest working through Deep Learning for Computer Vision with Python where I discuss how to train your own deep learning object detectors in detail.
Hi Sir, After downloading code, I run “python real_time_object_detection.py –prototxt MobileNetSSD_deploy.prototxt.txt –model MobileNetSSD_deploy.caffemodel” command in cmd. It opens webcam and recognizing object but in green frame. My webcam working fine while accessing normally but showing green frame while running the code.
Hey Ajay, that sounds like a driver issue with your webcam/a problem with OpenCV accessing your webcam. Since your webcam is working normally it’s most likely an OpenCV-specific issue. What model of webcam are you using and on which OS?
Hi Sir, I am using Intel RealSense 3D camera which comes in-built with my windows 10 based lenovo laptop. Thanks !
Sorry, I’m not familiar with the Intel RealSense 3D camera. I would suggest contacting Intel support or posting on their developer forums. Sorry I couldn’t be of more help here!
It’s okay, anyway your blogs are too good on Computer Vision and Neural Networks. Thanks for the help 🙂
hi, what do I have to do to get the code to only detect one object. For example, bird. I have tried deleting the classes but get errors and am unsure what to do.
All I want to detect is bird.
This blog post will solve your exact problem. 🙂
Thanks! What I am doing is checking to see if ‘bird’ is detected. So even if I ignore all other objects, they are still apart of the CLASSES[idx] so if I do
If CLASSES[idx] == “bird”:
bird is only detected when it is the only thing in the camera view.
If I put a picture a car next to it, It only detects the bird on screen it does not print ‘bird detected’ because it sees the car as well.
Is there a way so that the only thing possible is “Bird”?
thanks!
I think you have a problem with your implementation of class filtering. The code in the post I linked to above will enable you to ignore all classes except the ones that you want. Make sure you are using the “Downloads” section of the blog post to download the code rather than implementing it on your own.
usage: real_time_object_detection.py [-h] -p PROTOTXT -m MODEL [-c CONFIDENCE]
real_time_object_detection.py: error: unrecognized arguments: caffemodel
what to do..
thanks in advance
Make sure you read this blog post on command line arguments — it will help you resolve the error.
Dear Adrian,
Using tensorflow transfer learning I created my custom object detector. It’s work pretty well with the web cam but the problem is when I am run the code using the live feed from the IP cam it does not detect as expected.Kindly guide me to solve this problem.
By the way earlier there was a delay in live streaming but thanks to your post Real time object detection with deep learining and opencv now there is no delay. ?
You should be able to take Line 35:
vs = VideoStream(src=0).start()
And modify it to be:
vs = VideoStream(src="rtsp://192.168.1.2:8080/out.h264").start()
Under the hood VideoStream is threading the
cv2.VideoCapture
object so you’ll want to research thecv2.VideoCapture
function and whatever particular stream you are using.Hi Adrian,
First of all thank you for your excellent tutorials. I am new to python and completely rookie for the concepts of image recognition, deep learning, etc. Despite that I was able to somewhat follow your code and get it running on my Ubuntu VM with a USB camera in a few hours. This is really great and motivating.
My goal is to get this setup running on a RaspberryPI board with a USB camera and what I want to do is to control a dog repellent circuit when the python program detects a dog (which will be my dog at home that I don’t want near our main door as she scratches it when I leave her alone). Probably your code will work just fine to meet my goal, but what I had in my mind in the beginning was to train a simple model with some images (or video) of my dog only so that I will have a very limited trained set for one target (i.e. my dog). It will be enough if the algorithm just detects my dog and does not care about detecting any other objects.
Is there a lightweight (that will run on a raspberryPI board) library that I can use to train a basic model? I may be using the terminology wrong here, but I hope I was able to make myself clear.
Thanks again!
There lots of models that can run on the Raspberry Pi, ranging from simple “toy” models for educational purposes all the way up to state-of-the-art networks like SqueezeNet and MobileNet. My suggestion would be to start with this post to train your own model. From there you should go through Deep Learning for Computer Vision with Python to learn how to train more advanced methods. I hope that helps point you in the right direction!
When i run it , i found this error.
Can you kindly give advise for it.
usage: real_time_object_detection.py [-h] -p PROTOTXT -m MODEL [-c CONFIDENCE]
real_time_object_detection.py: error: the following arguments are required: -p/–prototxt, -m/–model
Make sure you read this blog post on command line arguments — it will help you resolve the error.
Hi Adrian,
When I run the code (using Spyder on Windows), I got SystemExit: 2. I understood that it had something to do with argparse module.
What I did is simply downloaded your code, opened it in Anaconda’s Spyder, and then run it.Is there anything else I should be running along with main code that I downloaded, or is there some blatant mistake that I might be making here?
Thanks.
Hi Adrian,
Sorry to spam this comment section. I found the problem and fixed it (it was the argparse module). These two comments by me should probably be removed from thread as they are do not contribute to anything.
Thanks!
Congrats on resolving the issue, Denis. I think the comments should stay as other readers may have this question as well.
I would recommend those reading this comment to read up on command line arguments as they can avoid any headaches if you are running into errors with them.
Thanks again, Denis! 🙂
I just want to say THANK YOU !!!!!!!!!!!!
And thank you Rusiru for being a PyImageSearch reader 🙂
Sir can you please tell me how to modify this code to only detect persons.
See this blog post.
Thank you sir. Can we use caffe model to track objects as well?
Deep learning-based object tracking algorithms do exist but I would suggest taking a look at correlation filters to get you started.
Great Tutorial! Is this tutorial for R-CNN? If not do you know how can I build an image detector using R-CNN?
The method used here is a Single Shot Detector (SSD). I will have a Faster R-CNN example soon.
please how can i use already recorded video as input instead of webcam
You can use the “cv2.VideoCapture” or “FileVideoStream” functions. Refer to this tutorial.
How can I create a caffe model?
Training your own Caffe model is not exactly an easy process, and furthermore, there seems to be a lot of misconceptions in the comments of this post on how object detection actually works. You should start by reading this post which covers deep learning object detection fundamentals and then provides resources to help you train your models.
Hello how are you? Could you tell me how to enlarge the size of the video window? She is very young in my macbook pro.
OpenCV provides very limited GUI functionality. There is no ability to resize the window or move it around. You could use the “cv2.imresize” function to enlarge the output image prior to displaying it.
hi bro,
can i use my own yolo weight datasets for detecting object in opencv
I have a doubt about fps, will me running this code just for just a image(single frame)and the fps that it will receive, will the same as the fps for a video stream.
In theory it should be right?
Want to try and test for different inference boards the fps performance, and in for one of the boards, I am not able to establish a video stream, thats why the doubt.
It will give you an approximation but I would suggest running for at least 30 frames to obtain a more reasonable estimation. Another hack you could do is loop over the same image/frame 30 times within the FPS counter but keep in mind that won’t take into account any I/O latency from grabbing a new frame from the camera sensor.
Hi Adrian,
Your tutorials have been nothing but amazing! Thank you for that.
I am currently working on an autonomous vehicle design for platooning purposes with Raspberry Pi and Pi cam. It got me thinking on how can the autonomous vehicle(slave) detect the movement of the master vehicle (assuming master-slave configuration) which I am following while it’s curving, say about 60 degrees.
Any idea on this? Thanks again
There are a few ways to approach this problem, but a potentially easy one would be to place an easily identifiable marker on the master and then detect the marker from the slave, that way it can be detected and tracked.
Hi Adrian,
I want to run this real time object detection for input video and save output .But while running the script , I am getting following error.
…
File “real_time_people_detection.py”, line 50, in
(h, w) = frame.shape[:2]
AttributeError: ‘NoneType’ object has no attribute ‘shape’
I have seen all query and separate blog you have written to resolve this issue.
I have provided the correct path for my input video file , My system is Ubuntu 16.04 , I install codec ffmpeg and X264 and I reinstall opencv followed by your blog.But still I am facing the same issue and imshow and output video is very fast. I am using video file formate .mkv and .mp4. Below is the line of code I wrote for video output.
out = cv2.VideoWriter(‘output.mp4’,cv2.VideoWriter_fourcc(‘M’,’J’,’P’,’G’), 30, (640,480),True)
I also checked with below one.
fourcc = cv2.VideoWriter_fourcc(*’XVID’)
out = cv2.VideoWriter(‘output1.avi’,fourcc, 30.0, (640,480))
I have seen all the solution that is discussed in your blog and other blog also to solve this problem but i didn’t get success.
Please help me to solve this.
Thanks in advance.
Just to fully understand the problem — you used a separate Python script and the “cv2.VideoWriter” function to create an output video file and now you are trying to take that output video file and run it through a separate Python script?
usage: real_time_object_detection.py [-h] -p PROTOTXT -m MODEL [-c CONFIDENCE]
real_time_object_detection.py: error: the following arguments are required: -p/–prototxt, -m/–model
An exception has occurred, use %tb to see the full traceback.
these are the error about model so where to add this model in spyder-anaconda
Hey Mayur, make sure you are reading the comments to this blog post or at least doing a ctrl + f and searching for your error on the page. I’ve addressed the question a number of times. You need to provide the command line arguments to the script.
Hello Sir,
Your blogs are great but regarding this blog, I really need to ask 1 question i.e How we can customize the model to train for the specific thing, for example, tanks etc
You would need to train or fine-tune a model. I discuss the fundamentals of deep learning object detection here. And when you’re ready to train your own model I would suggest working through Deep Learning for Computer Vision with Python.
This blog is great ad it really works for me but I need to ask:
How I used cifer 100 insteed of caffemodel?
You would need to use a Caffe model already trained on CIFAR-100. Do you have such a model? If not, you would want to train your model on CIFAR-100 first.
Hey Adrian, Can you please share regarding the pedestrian detection and vehicle in low light or night vision? Thank you.
hi @Adrian Rosebrock
nice tutorial ,i have one question instead of detecting pretrained object
How can i develop my own model to detect my own object ?
Hey Usuf — You should read this post to understand the fundamentals of deep learning object detection. Then take a look at Deep Learning for Computer Vision with Python where I demonstrate how to train your own custom learning object detectors. I hope that helps point you in the right direction!
thanks for the hope
It is very impressive tutorial.
It is very very useful.
Thank you very much.
Thanks Rick, I’m glad you liked it 🙂
Hello Adrian!
Congratulation for your nice job!
I would like to ask you if it’s possible to stream through wifi camera (url stream) instead of usb camera.
Thank you!
Yes, OpenCV provides functionality for IP camera streaming via the
cv2.VideoCapture
function. I don’t have any tutorials that demonstrate how to do that (yet), but that should at least give you a starting point!Hey Adrian, awesome post it helps a lot. I am running at 1.25 fps anyway I can make it faster?
What hardware are you running the object detector on?
Hi Adrian,
I tried to run this code through commmand line. However, It asks me to give it two arguments. I tried many ways including giveing the path and file name, but It doesn’t run. Can you please make a short video regarding this? It would be a great help if you teach 1 more guy into image reconlgnition. Thanks in adbance
It sounds like you may not have experience in command line arguments. Read this tutorial and you’ll be all set and up to speed 🙂
Hello Adrian
when i run the code it shows that Import Error: no module named imutils.video
Any idea on how to solve this issue?
You need to install the imutils library:
$ pip install imutils
even after $ the pip install imutils
i faced the same problem –
from imutils.video import VideoStream
ImportError: No module named imutils.video
or do i need to reinstall all the stuff?
I don’t think you are installing “imutils” correctly. Run “pip freeze” and ensure “imutils” is listed in your set of installed Python packages.
If you are using python3, then don’t forget to change “python…” to “python3…” to run the script.
Hi Adrain
Is it possible to identify a person with their names instead of having simply person with their confidence score.
Yes. See this tutorial on face recognition.
Hey,
congrats! I really like the projects your posting!
Because I recently got an Android phone, would it be possible to like run this real time detection code on a Samsung s8? Do you know what would be the best/easiest way to build an app and run it via smartphone? Thanks!
OpenCV provides Java bindings for Android. I would suggest looking at the OpenCV documentation for more details. I personally don’t have any experience working with OpenCV + Android.
For Windows users running into the Can’t open ModelNetSSD_deploy.prototxt.txt or ModelNetSSD_deploy.caffemodel, you have to use cmd or powershell as an Administrator. That fixed the problem for me, classic windows problems 😉
is it workable for oflline video ? if yes then what changes i should do ??
HI
May I know specifications of your laptop. I was doing the the same thing using haar cascade but it is lagging in my PC(8gb ram, i5 8th gen, 2gb AMD radeon 520 graphic card)
Thank you it works really well
Great news Soufiane 🙂
Thank you so much nice work…:)
Thanks Chetan, I’m glad you liked the blog post!
While executing the program i have some errors:
the following arguments are required: -p /- ,-portotext, -m/ — model
If you’re new to the terminal and command line arguments that’s okay, but make sure you read this tutorial first. From there you’ll be all set.
Copy everything between “$” and “[INFO]” (three lines in total) to run the script. I think you missed two lines.
As I saw in the comments you were going to cover object detection using Darknet too. Have you done anything on that so far? Thank you!
The YOLO post will be publishing next week, stay tuned 🙂
Adrien, it’s awesome, looking forward to it!
hey adrian i want to ask something, how to use only the class for car object detection? I just want to use this class only
You want to detect just the car class? If so, see this tutorial on how to filter object classes.
hi adrian what algorithm do you use for this object detection?
The object detector used in this blog post is a Single Shot Detector (SSD).
Hi Adrian, at first thanks a lot for your work and tutorials. I’m new to all of this and actually just playing a little bit around.
I would say that just ignoring specific results is only a “fake” solution. Wouldn’t it be more performant if the model is directly ignoring the classes (just looking for a subset of classes) instead of ignoring the results?
Is there a trained model available for specific classes?
Thanks!
Yes, absolutely. What you’re referring to is called “fine-tuning” but it requires that you:
1. Know how to modify the FC heads of the network
2. Replace them
3. Fine-tune them on a dataset of just what you want to detect
For some people that is overkill. For others it is required for reasonable accuracy. For Amar’s original question filtering the classes would be sufficient.
@Adrian Rosebrock sir I got this message when I ran the command in terminal.
error: argument -p/–prototxt is required. From where to include this parameter? please reply Thanks
If you are new to command line arguments you need to read this tutorial first. Invest in your knowledge of argparse and command line arguments and you will then be able to run the script.
Hi Adrian !
Very fine blog post . I was actually working on raspberry Pi than i came to know that it can only process 0.8 fps . what hardware should i choose to actually detect the high speed objects very smoothly . e.g a car moving at 70-100 mph
You’ll want a more powerful machine for sure. If you want to go the embedded route try NVIDIA’s Jetson series. But I’d try to prototype with a normal desktop GPU first.
Hi Adrain!
How to get voice output for the above code.
I don’t have any experience with text-to-speech Python library. I’m not sure what the best ones are but I know they do exist. I hope another reader can provide you with some suggestions.
Hi sir,
How to write caffemodel and prototext?
What kind of softwre can open the caffemodel?
You don’t “write” the actual .caffemodel and .prototxt files — the Caffe deep learning toolkit is used to train a deep neural network to detect and recognize object classes. It sounds like you may be new to computer vision and object detection so I would recommend reading this introductory guide to help you get started.
hey adrian sir,
Sir I want to detect human objects from IR camera is it possible if yes will you please let me know
I don’t have any tutorials on IR cameras and human detection but I will consider it for a future post. Thanks for the suggestion.
looking forward
Thank u so mouch.
How can i rezise the video from the output?
You can use either
cv2.resize
orimutils.resize
to resize a frame.Hi Sir,
I am new to Robotics field. I have to perform real time recognition & tracking of 3d textureless object. The objects are rectangular in shape and are of different colors. Therefore, I have to recognize the correct object based on colour.
https://www.youtube.com/watch?v=l5aPjTNYcpc
Actually, I was looking at this challenge no 2. In this challenge, I want to implement the code for the drone to correctly recognize the brick. Can you please suggest some approaches which can be used for this?
Adrian, I love reading your posts! Keep up the great work! I actually have referenced your code in an interview for a software development job!
One question on this topic, if I want to train my own models, do you have any recommendation on how I should go about that?
Thanks Joe!
As far as training your own custom object detectors, I discuss Faster R-CNN, Single Shot Detector (SSDs), and YOLO, both the theory and how to train them from scratch, inside my book, Deep Learning for Computer Vision with Python. Be sure to take a look, I have no doubt the book will help you train your own detectors.
Hi Adrian,
Thanks so much for the codes, this is really helpful in advancing newbies like me in advancing AI adoption 🙂
I will like to ask if I were to do tracking after the object detection in your code, will it help to decrease the computational load?
Thanks
Best,
Calista
Your intuition is correct but there is a balance you need to strike between detection and tracking. Refer to this tutorial for a practical example.
Hi Thanks for this wonderful explanation but i have one doubt you declared class above for some objects but this module didn’t detect cell phone ,pen i mean if want add lots objects name
inside class then how can i do that please tell me.
Are you SSH’ing into your system? If so, make sure you enable X11 forwarding:
$ ssh -X user@your_ip_address
Thank you for your blog,
I wanted to know whether same code can be used for detecting Helmet on a bikers in traffic scenario (with or without helmet)
I would recommend using a face detector and then training a custom helmet vs. no helmet classification model for the face and head region.
Hello, Adrian,
Thanks for the great article series.
I’m new to opencv-python. I follow your articles with interest and try to apply them.
Wabcam opens when I run the codes, but writes the object or the person into 8-10 boxes. Although I’m the only one on the screen, he sees me as many people. He marks and names a single chair many times. I couldn’t figure out the problem. Can you help me?
It sounds like the object detector is simply reporting incorrect results. It’s hard to say what the issues is without seeing your input images or video but my guess is that the OpenCV object detector was not trained on images similar to what your images are.
What you’ll find out in your studies is that computer vision algorithms are not magic. They do not work 100% of the time. In fact, many will work only in specific conditions.
Thanks for your time, my teacher,
In the form of a short video and I wanted to throw a picture as your mail.
Maybe my problem is better understood.
Also, can you open up a little bit more than you say ” …my guess is that the OpenCV object detector was not trained on images similar to what your images are. ”?
Can you tell me exactly what I need to do?
In the form of instructions respectively.
I am grateful to you.
Hey Muharrem — it would be a good to understand what your current experience level is with computer vision and deep learning. Could you tell me a bit more about your experience level?
My gut tells me you are likely new to CV and DL, which is totally okay, but I recommend you work through Deep Learning for Computer Vision with Python. Inside the book I teach you the fundamentals of deep learning and machine learning, eventually working all the way up to training your own custom object detectors on your own datasets. Be sure to take a look, I’m confident it will help you with your projects.
Hello, Adrian,
Thanks for your time, my teacher,
can I combine this code with https://pyimagesearch.com/2018/06/18/face-recognition-with-opencv-python-and-deep-learning/ ?
I need to delete all data except data of the person and add it new data(features of human) such as face recognition and color of clothes recognition
can I make it or not?
Yes, you can combine the scripts. First detect faces and then detect the full body. The face of the person should lay in the region of the detected body, that way you can associate a face with the body.
Hi I want to know how can i add more different types of objects, I have datasets of objects made but I dont know how to modify the above code on their basis.
Please help me out here….
I answer that exact question inside my gentle guide to deep learning object detection.
Hello Adrian…
Thanks for your time.
Please let us know what are the changes to be done in the code to detect only vehicle i.e car etc.., but should not any other objects.
I show you how to do exactly that in this blog post.
error: the following arguments are required: -p/–prototxt, -m/–model
You need to supply the command line arguments to the script.
Hello Adrian
Can I get more number of classes for the above code
See Lines 22-25.
Hi,
How to retrain mobilenet ssd caffe model ?
Could you please give me the stepls?
Hi Hemanth — I cover how to train and fine-tune SSDs, Faster R-CNNs, and RetinaNet inside my book, Deep Learning for Computer Vision with Python. I would suggest starting there.
Hi Adrian…
Can you please tell me to train custom objects like mobile phones which are not included in these classes.Thank you
You’ll need to either train or fine-tune an existing object detector on your mobile phone class. I cover the basics of object detection in this post. I then teach you how to train your own custom object detectors inside Deep Learning for Computer Vision with Python.
Hi, can i ask you how you made your own caffemodel? How can i make mine?
Thank you very much. Excelent code
Thanks Javier, I’m glad you enjoyed the tutorial 🙂
You can learn how to train your own custom object detector inside Deep Learning for Computer Vision with Python.
Thanks!!
Hi Adrian,
How do I measure accuracy and recall rates? I can not quantify the TP, FP, TN, and FN values of my pre-trained model with MobileNet SSD. Please, help me.
Hello Adrian,
First of all, AWESOME WORK MAN !!!
Every single blog of yours is just great !!!
I had a question regarding this tutorial, let’s say we want to save the image of the object that has been detected, how can that be done ? Can cv2.imwrite can be used ? if yes then how ?
Cheers Man !
Nevermind Adrian,
Did it using the following code:
image = frame[startX:endX,startY:endX]
cv2.imwrite(“detected.png”, image)
Posted the code if anyone else needs help.
Cheers !
Nice job Rajat!
How can I upgrade the OpenCv version because it is not working on 3.2.0?
You can follow my OpenCV install guides to help you get the latest version of OpenCV installed.
hii sir,
insted of showing labels in the box, is there any way to get that label as audio output?
Take a look at text-to-speech libraries. Google’s gTTS is a good one.
hello adrian,
I am new to computer vision. Instead of video, i want the pi camera to take a picture, process image and detect objects on image. What should i change in the codes?
If you are new to the world of computer vision and image processing I would suggest you first read through Practical Python and OpenCV so you can learn the basics first. I teach you how to perform face detection, determine the (x, y)-coordinates, and save the image. Start there first and from there you’ll be able to graduate to more advanced topics.
wow that is amazing. but how can i show the output to the browser so i can access it from different IP (not from console)?
I’ll be covering that exact question in my upcoming Computer Vision + Raspberry Pi book, stay tuned!
in MobileNet we have 90 classes, so can we use all the 90 classes? and how?
It depends on what the network was trained on. This network was trained on a subset of the COCO dataset. You might want to try this YOLO + OpenCV model.
Hi Adrian,
Can you tell me how many layers are present in the network
You can read this tutorial where I describe the object detection network and link to more details on it.
hi Adrian,
In this tutorial, I’m using two webcams and I got output in two frames perfectly.
you were use detection box ratio as 3:7 in line No:68 and in line no 59 used value 2 in confidence (confidence = detections[0, 0, i, 2]). so what is meant by that ratio and Value 2 ?. should I need to change all those values for confidence value obtained from frame function from the second camera. And what is mean by index value 2 in detections.shape[2].
thanks and regards
Hashir
Hi Adrian,
I got too bad results from SSD method and after a little search, I realize that if I change the following lines I got an incredible increase.
Before:
blob = cv2.dnn.blobFromImage(cv2.resize(frame, (300, 300)), 0.007843, (300, 300), 127.5)
After:
blob = cv2.dnn.blobFromImage(cv2.resize(frame, (300, 300)), 0.007843, (300, 300), (127.5, 127.5, 127.5))
I don’t know why but maybe somebody has the same problem.
Hi sir, really thanks for your useful post.
I have a question.
Can I trarin with my own dataset?
because I am making auto parking car and I wanna get inference when real-time camera get frame of my own environment.
Sorry for my lackness of English skills.
Have you taken a look at Deep Learning for Computer Vision with Python? That book will teach you how to train your own custom deep learning-based object detectors.
Could you please give me the following details-
In the above netwoek that I just implemented
1.what was the size of image used for training?
2.How many convolution layers were used and why?
3.How many filters were used to extract features?
I am so in need of these answers and by the way i love your work .
Hey Steve — your questions are answered through my previous post where I also link to the details on the object detector. See this tutorial.
hi Adrian Rosebrock
i need to track on only cars how can i do it?
can you guide me?
See this tutorial where I show you how to detect specific classes and ignore the rest.
How can we give an alert using json when cat and dogs are detected in frame???
What type of alert are you trying to create?
i would like to make a classifier on the trajectroy of a laser(continious and discontinious line ) in real time , could you help me please?
Sorry, I do not have any tutorials for that project.
Hi, adrian… I am working on openpose and it’s output is so slow… I mean itz not working properly on my machine… 1 frame takes approx 6 sec….. Please give me some solutions to boost it up… I am. Using caffe, and mfi/coco.!
I don’t have any tutorials on OpenPose yet but I do hope to cover it in the future!
hey dear..
very useful post… can u please help me to detect occluded objects (occlusion: overlapped object detection) from a video. Is there a method to detect occluded objects?
What types of objects? And how occluded are they? Are you working with “standard” dataset or your own custom dataset?
Hi Adrian..can i know how to modify the code to notify me if there are more than 2 persons?
Loop over the number of detected objects, check if they are a person class, and increment a counter. Once the loop is over check the count and see if it’s greater than two.
Hey Adrian, what types of object can it detect? Is there any library of pre-trained images?
The “CLASSES” list on Line 22 shows you what objects the pre-trained detector can detect.
Sir how can we train some objects.
I cover how to train your own custom deep learning object detectors inside Deep Learning for Computer Vision with Python. I would suggest starting there.
Is it possible just to only detect or show only 1 class?.
For example the object being detected is only the “bird” disregard the other classes
Yes. See this tutorial.
Hi Adrian,
This is some great work. I am a student working on body detection and I came across this code. I was wondering if you could help me to narrow down the above code on just ‘person’ detection. Would it be possible ?
Thanks and best regards,
Farzad Avari
See this post.
How to add new object to this object detection? Can you please provide the modification for that
Hey Abdul — make sure you read this guide.
Which Dataset is used here? Imangenet? PascalVOC?
Hi Adrian i actually wanted to do inference only on person detection and disable rest of the classes and draw the bounding box only on person. Can you please direct me to do this.
Thanks in Advance.
This tutorial addresses your exact question.
Hi Adrian, Do we have other ways to evaluate computational consumption of a model other than FPS? Once the model is trained and ready for deployment, how much RAM is necessary for obtaining the required performance or other parameters that we can use for evaluating a particular model.
hey,
Really helpful stuff you have here, thanks a lot.
BTW is there any way to train the ssd model as to modify it?
I wanna detect not just people but what they are doing, like sitting standing,crouching etc.
Any help regarding the same will be much appreciated
Absolutely. See this tutorial as well as Deep Learning for Computer Vision with Python.
What hardware was used for real time object detection ?
I used my laptop with a 2.8GHz quad-core processor.
Hi Adrian,
Excellent tutotial!! I found what I needed.
Now I just need to improve the speed (right now, 3-4fps), but I saw you proposed a few directions for that. For sure I will try.
Tx!
Hi Adrian,
I was able to detect only human and not the other objects by referring to other article by you. IN order to count number of person at a given time in a frame if I add a counter, it just keep on increment it even if there is one human in the frame. Is there any other way to count number of people in a given frame in real time using this code ?
Everything worked fine it is detecting persons but for every other objects like glass it is detecting as bottle or chair ….so how can I train it to detect other objects correctly.
Hi Adrian, In this object detection i have filtered to detect only person detection and i wanted get the count of person in the video.
Hi Adrian,
Thank you so much for these tutorials.
Pyimagesearch has been of immense value to me!
Do you have any suggestions as to how I could save a specific frame from the video stream as an image? Say a desired event occurs in that frame and I want to save it as an image for further action?
Thank you
This tutorial on saving key events sounds like what you’re looking for.
Hello Adrian, I just wanted to tell people that in order to put input video files like an .mp4 file instead of the camera feed. They need to change the VideoStream from
–> vs = VideoStream(src=0).start() to –> vs = VideoStream(src= ‘football.mp4’).start() for example
after that comment out –> time.sleep(2.0) and it should work at least it worked for me.
I don’t know why it gives an error if you don’t comment out that last line.
If you’re working with video files I recommend you use the
FileVideoStream
class instead.Hello Adrian.
I am working on something similar. I wanted to know how I can add more classes. Thank you
You need to fine-tune the network on the new classes. I cover how to do that inside Deep Learning for Computer Vision with Python.
Hi Adrian, thanks for putting together some great posts on this subject. And for explaining (way back in 2017) that the 1000-class ImageNet model only tells you what’s in an image but not where it is, my results from the examples I got on your and other sites now make sense.
I’m fairly new to the DNN part of OpenCV but I’ve gotten some basic real-time facial detection and object recognition models running using C++ and my laptop webcam (I’m not a Python guy however the codes are very similar as you know).
But I’m confused about the input image size a network is expecting. My video is 1280×720, do I really need to shrink the image to 300×300 (warping the aspect ratio at the same time) in order to find objects anywhere in the image? If I don’t shrink it, then the network would only search in the center 300×300? I also have 1920×1080 video so it would seem that resizing that to 300×300 is throwing away majority of resolution and therefore objects would need to be fairly large to be detected, are there any networks trained on larger images?
From what I read it seems that BlobFromImage() automatically will resize the input to whatever size() is given as the parameter, and then crop parameter will choose how to deal with aspect ratio. Do you find that you get best results if you pre-resize your input anyway?
What size was your raw images and video you used in these blogs?
Thanks!
HI Adrian ,
oh yea great tutorial as always .
Its been a while i am following you , i say BIG FAN base has been created for you in india , every friend of mine follows your tutorials , the way you put things are great , very easy to understand .
i have a request , i would request you to make a tutorial on how we can train and update our models to identify custom vehicles like ambulance and all , awaiting for your tutorial on the same .
Thanks
Hello Adrian,this tutorial was very helpful,i just want to know if it is possible to detect objects in a video like fan ,lights ,air-conditioners,tv etc .and the distance of them from the persons inside a room or hall.would be very glad if you show it through a tutorial.
THANKS IN ADVANCE.
Training your own custom object detectors is covered inside Deep Learning for Computer Vision with Python — I would suggest you start there.
Hi Adrian greate tutorial, this is something I’ve been looking for. I have a question hope you can answer or give me a tip how to solve.
Once I run this on my MacBook, I have quite a good frame rate and quality.
When I moved Your solution to my Raspberry Pi4 2GB ram ( Py3 + CV4) I’m able only to have 1,25 FPS. Im almost quite confident it is not a problem of camera setup ( ve been testing imutils.video/ VideoStream and PiVideoStream). also your tutorial for testing FPS on pi shows up to 500 FPS
Any ideas most welcomed
I’m not sure where you are using 500 FPS on the Pi. Can you link me to that?
Hey, i have executed the face recognition using OpenCV and python.now,the thing is i want to store the timestamp when the face is recognized. I am not able to do that, so Plz help
You can use the “time” or “datetime” Python module.
Hi Adrian…thanks for the source code
If I want to print the class and to count the number of objects belonging to each class what changes I have to make inside the script.
Can you suggest with some code examples
I would suggest using a Python dictionary:
1. Loop over all detected objects
2. Grab the class label of the current object
3. Loop up the object count in the dictionary
4. Increment the counter
5. Store the new count in the dictionary for the current label
Hi.
Thanks for the post. However, after downloading and running the code I’m getting an “Illegal Instruction” caused by th2 line “frame = imutils.resize(frame, width=400)”
– Any ideas? I’m running this on Linux and have OpenCV working as I’ve gone through some of your other examples without problems
Thanks
Are you using a Raspberry Pi Zero? What specific distribution of Linux?
Hi Adrian Rosebrock, Thank you very for your tutorials. Although my background is Civil Engineering I learned from your tutorials. I have a small request.
Can you please extend tutorial and include distance calculation as well. Like How far is an object from camera (Like sofa or a person).
Thanks Again, Hope to hearing from you soon.
I’ve already written a tutorial on distance between objects.
Hi
Is it possible to skip particular frames in a video using open cv python ?
for eg : i have to skip first 3 sec and run until 10th sec , then again have to skip frame from 11-13th , then run the rest f the video ? please help me out to solve this . Thanks in advance
I don’t have any tutorials on that topic but I’ll consider it for the future.
As far as I understand Python doesn t expose the GPU in OpenCV so you d have to switch to C++.
Even in C++ you won’t have access to your NVIDIA GPU via the “dnn” module — that is something the OpenCV developers are working on.
wow Great work. Can you please give me some documentation for this so that i can use this for my project submission?
The documentation is the blog post itself. If you use it in your project make sure you cite it.
For doing these deeplearing, I have some few questions.
1.
Do i have to put the 3 files(py, caffemodel, prototxt.txt) at the same file( for example , Downloads file)?
2.
And is MobileNetSSD_develop caffemodel is the pre-trained Convolution Neural network?
3.
At last, i want to train some fower. How can i train these data and change these data?
1. You can organize the files on disk however you like, just make sure you supply the command line arguments to the model and prototxt file.
2. Yes, it’s a pre-trained model.
3. If you want to train your own custom deep learning object detectors you should read Deep learning for Computer Vision with Python.
Can i used it on windows?
Provided you have OpenCV configured and installed correctly, yes, this code will work on Windows.
Hello, I’m a high school student and I started to learn ML/DL for my school club team project. AI would like to say thank you. I have searched many websites for learning and training, but I couldn’t found any site with is better than this site!
I have a question about this post. Now, I am using laptop(windows) and I want to use camera of my laptop at this project. Also, I downloaded tensorflow for learn ML, there are codes with Caffe in your source. :'(
Do you have source codes with tensorflow(or Keras)? If you have then could you send it me? If you don’t have, could you tell me what can I do for use Caffe?
Congrats on studying CV and DL in high school, that’s fantastic.
As for your question, this tutorial uses a pre-trained Caffe object detector. If you want to use a Keras model see this tutorial for applying Keras models to real-time video streams.
Good day Adrian! Can i use teachable machine(from google) tensorflow models with opencv? and how? Thank you very much
Hii Adrian
I have been following your blog for really long time and got to learn a lot. Currently, m working on a project where I need to train my own dataset model but facing some problem while labeling the image to create the class. I have approx. 5k images and labeling every single image consumes a lot of time, do you have any solution regarding my problem?
Thanks 🙂
Hey Monika, thanks for being a long-time reader of the PyImageSearch blog. If you need help training your own custom object detectors I would suggest you read Deep Learning for Computer Vision with Python where I cover training object detectors in detail.
can we do this pedestrian motion detection using RCNN and can you tell on how to do it?
Hi,
When I don’t know about python. I follow you tutorial. I have learnt so many things.
Thanks for your tutorial.
If I want to detect only once object like human what I need to do?
Regards
PR
You should read this tutorial which covers how to filter out detections.
hi Adrian,
thanks for the tutorial, I wanted to ask that how can i run or access my motor through scanning or image processing by pi camera with GPIO in raspberry pi by have my own data set of around 10-15 images actually i’m making autonomous car which is having pi camera , ultrasound sensor, motors, LCD, and speaker so can you please guide me how can i access my motor by scanning only when my camera can see the provided images os set to it
I would suggest you read Raspberry Pi for Computer Vision — that book covers how to apply computer vision algorithms with the GPIO and the Raspberry Pi.
Hii Adrian,
Im currently working on a project where i need to detect number of passengers in a car.
I’m kinda stuck here, not sure if i should go for face detection or human detection to identify if a passenger is sitting in the car.As for human detection, i cannot go for the already existing models which detects person as a whole and in seated position, the entire body is not visible.
What are your suggestions?
I would suggest using face detection as you likely won’t be able to see the entire view of the body in the car.
Thank you so much! After struggling with the output and the errors, it finally worked! For the people currently struggling as I did, I’ll tell what worked for me.
I typed cmd in my windows pc search, right-clicked on it and chose run as admin(may not be necessary but still..)
Then run the following code to change the directory to the directory where your real-time object detection file is stored (Here, I changed the directory one by one for easy understanding)
Step 1) cd..
Step 2) cd..
Step 3) cd Users
Step 4) cd hp
Step 5) cd PycharmProjects
Step 6) cd real-time-object-detection
Step 7) python real_time_object_detection.py –prototxt MobileNetSSD_deploy.prototxt.txt –model MobileNetSSD_deploy.caffemodel
That’s it. Hopefully, It should work for you as well.
The output would be
[INFO] loading model…
[INFO] starting video stream…
[INFO] elapsed time: 6.10
[INFO] approx. FPS: 11.97
I want to detect a bike from real-time video what should do to do this
You can filter the object detection results like I do in this tutorial.
HI…. this is gopi in this real_time_object_detection it not detecting
mobile phone’s how to add it …..
and
how to creat our own MobileNetSSD_deploy.caffemodel file
If you are interested in training your own custom object detector I would suggest you read Deep Learning for Computer Vision with Python where I cover training custom object detectors in detail.
May I know how can it use realsense camera? And I would like to know the distance from the object detected.
Sorry, I don’t have any tutorials on Intel’s RealSense at the moment.
I am running the code on a MacBook Pro and am seeing some strange behavior. When I run the code the height of the frame changes rapidly so I see my face with a rectangle around it for about half a second before the frame collapses and displays all black. It is almost like it does a detection then resizes down to a frame of width 400 and height of 2 or something and then repeats. Does anyone have any ideas? I have tried the code with the internal and external camera and get the same result.
That’s super strange that it’s happening with both your built-in webcam and USB webcam. Unfortunately I haven’t encountered that issue before so I don’t have any suggestions on why it may be happening.
how to Add a new class label to the list (new object)
You would need to apply fine-tuning to the network. I cover fine-tuning object detectors on new classes inside my book, Deep Learning for Computer Vision with Python.
Hi Adrian,
Thanks for the great tutorial.
I’m currently trying to run this code as a “motion detection injector” for a RTSP stream. As far as I know, there is a bit in the RTSP protocol that is used for motion detection by some NVR’s and clients. Do you have any idea on how to manipulate this protocol?
Thanks,
Lars
Working with OpenCV and RTSP can be a bear. I recommend trying to use ImageZMQ if possible.
How to test Object detection on a video input?
what changes do i make in code to make it possible
See my reply here.