Wow, last week’s blog post on building a basic motion detection system was awesome. It was a lot of fun to write and the feedback I got from readers like yourself made it well worth the effort to put together.
For those of you who are just tuning it, last week’s post on building a motion detection system using computer vision was motivated by my friend James sneaking into my refrigerator and stealing one of my last coveted beers. And while I couldn’t prove it was him, I wanted to see if it was possible to use computer vision and a Raspberry Pi to catch him in the act if he tried to steal one of my beers again.
And as you’ll see by the end of this post, the home surveillance and motion detection system we are about to build is not only cool and simple, but it’s also quite powerful for this particular goal.
Today we are going to extend our basic motion detection approach and:
- Make our motion detection system a little more robust so that it can run continuously throughout the day and not be (as) susceptible to lighting condition changes.
- Update our code so that our home surveillance system can run on the Raspberry Pi.
- Integrate with the Dropbox API so that our Python script can automatically upload security photos to our personal Dropbox account.
We’ll be looking at a lot of code into this post, so be prepared. But we’re going to learn a lot. And more importantly, by the end of this post you’ll have a working Raspberry Pi home surveillance system of your own.
You can find the full demo video directly below, along with a bunch of other examples towards the bottom of this post.
Update: 24 August 2017 — All code in this blog post has been updated to work with the Dropbox V2 API so you no longer have to copy and paste the verification key used in the video. Please see the remainder of this blog post for more details.
Before we start, you’ll need:
Let’s go ahead and get the prerequisites out of the way. I am going to assume that you already have a Raspberry Pi and camera board.
You should also already have OpenCV installed on your Raspberry Pi and be able to access your Raspberry Pi video stream using OpenCV. I’ll also assume that you have already read and familiarized yourself with last week’s post on a building a basic motion detection system.
Finally, if you want to upload your home security photos to your personal Dropbox, you’ll need to register with the Dropbox Core API to obtain your public and private API keys — but having Dropbox API access it not a requirement for this tutorial, just a little something extra that’s nice to have.
Other than that, we just need to pip-install a few extra packages.
If you don’t already have my latest imutils package installed, you’ll want to grab that from GitHub or install/update it via pip install --upgrade imutils
And if you’re interested in having your home surveillance system upload security photos to your Dropbox, you’ll also need the dropbox package: pip install --upgrade dropbox
Note: The Dropbox API v1 is deprecated. This post and associated code download now works with Dropbox API v2.
Now that everything is installed and setup correctly, we can move on to actually building our home surveillance and motion detection system using Python and OpenCV.
So here’s our setup:
As I mentioned last week, my goal of this home surveillance system is to catch anyone who tries to sneak into my refrigerator and nab one of my beers.
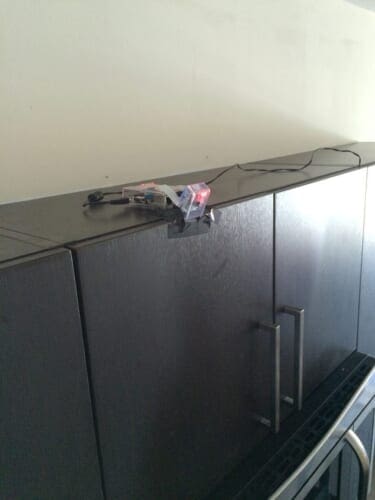
To accomplish this I have setup a Raspberry Pi + camera on top of my kitchen cabinets:
Which then looks down towards the refrigerator and front door of my apartment:
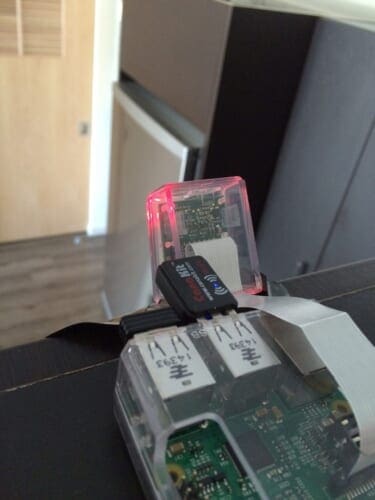
If anyone tries to open the refrigerator door and grab one of my beers, the motion detection code will kick in, upload a snapshot of the frame to my Dropbox, and allow me to catch them red handed.
DIY: Home surveillance and motion detection with the Raspberry Pi, Python, and OpenCV
Alright, so let’s go ahead and start working on our Raspberry Pi home surveillance system. We’ll start by taking a look at the directory structure of our project:
|--- pi_surveillance.py
|--- conf.json
|--- pyimagesearch
|    |--- __init__.py
|    |--- tempimage.py
Our main home surveillance code and logic will be stored in pi_surveillance.py . And instead of using command line arguments or hardcoding values inside the pi_surveillance.py file, we’ll instead use a JSON configuration file named conf.json .
For projects like these, I really find it useful to break away from command line arguments and simply rely on a JSON configuration file. There comes a time when you just have too many command line arguments and it’s just as easy and more tidy to utilize a JSON file.
Finally, we’ll define a pyimagesearch package for organization purposes, which will house a single class, TempImage , which we’ll use to temporarily write images to disk before they are shipped off to Dropbox.
So with the directory structure of our project in mind, open up a new file, name it pi_surveillance.py , and start by importing the following packages:
# import the necessary packages
from pyimagesearch.tempimage import TempImage
from picamera.array import PiRGBArray
from picamera import PiCamera
import argparse
import warnings
import datetime
import dropbox
import imutils
import json
import time
import cv2

# construct the argument parser and parse the arguments
ap = argparse.ArgumentParser()
ap.add_argument("-c", "--conf", required=True,
	help="path to the JSON configuration file")
args = vars(ap.parse_args())

# filter warnings, load the configuration and initialize the Dropbox
# client
warnings.filterwarnings("ignore")
conf = json.load(open(args["conf"]))
client = None
Wow, that’s quite a lot of imports — much more than we normally use on the PyImageSearch blog. The first import statement simply imports our TempImage class from the PyImageSearch package. Lines 3-4 import classes from picamera that will allow us to access the raw video stream of the Raspberry Pi camera (which you can read more about here). And then Line 8 grabs the Dropbox API. The remaining import statements round off the other packages we’ll need. Again, if you have not already installed imutils , you’ll need to do that before continuing with this tutorial.
Lines 15-18 handle parsing our command line arguments. All we need is a single switch, --conf , which is the path to where our JSON configuration file lives on disk.
Line 22 filters warning notifications from Python, specifically ones generated from urllib3 and the dropbox packages. And lastly, we’ll load our JSON configuration dictionary from disk on Line 23 and initialize our Dropbox client on Line 24.
Our JSON configuration file
Before we get too further, let’s take a look at our conf.json file:
{
	"show_video": true,
	"use_dropbox": true,
	"dropbox_access_token": "YOUR_DROPBOX_KEY",
	"dropbox_base_path": "YOUR_DROPBOX_PATH",
	"min_upload_seconds": 3.0,
	"min_motion_frames": 8,
	"camera_warmup_time": 2.5,
	"delta_thresh": 5,
	"resolution": [640, 480],
	"fps": 16,
	"min_area": 5000
}
This JSON configuration file stores a bunch of important variables. Let’s look at each of them:
show_video: A boolean indicating whether or not the video stream from the Raspberry Pi should be displayed to our screen.use_dropbox: Boolean indicating whether or not the Dropbox API integration should be used.dropbox_access_token: Your public Dropbox API key.dropbox_base_path: The name of your Dropbox App directory that will store uploaded images.min_upload_seconds: The number of seconds to wait in between uploads. For example, if an image was uploaded to Dropbox 5m 33s after starting our script, a second image would not be uploaded until 5m 36s. This parameter simply controls the frequency of image uploads.min_motion_frames: The minimum number of consecutive frames containing motion before an image can be uploaded to Dropbox.camera_warmup_time: The number of seconds to allow the Raspberry Pi camera module to “warmup” and calibrate.delta_thresh: The minimum absolute value difference between our current frame and averaged frame for a given pixel to be “triggered” as motion. Smaller values will lead to more motion being detected, larger values to less motion detected.resolution: The width and height of the video frame from our Raspberry Pi camera.fps: The desired Frames Per Second from our Raspberry Pi camera.min_area: The minimum area size of an image (in pixels) for a region to be considered motion or not. Smaller values will lead to more areas marked as motion, whereas higher values ofmin_areawill only mark larger regions as motion.
Now that we have defined all of the variables in our conf.json configuration file, we can get back to coding.
Integrating with Dropbox
If we want to integrate with the Dropbox API, we first need to setup our client:
# check to see if the Dropbox should be used
if conf["use_dropbox"]:
	# connect to dropbox and start the session authorization process
	client = dropbox.Dropbox(conf["dropbox_access_token"])
	print("[SUCCESS] dropbox account linked")
On Line 27 we make a check to our JSON configuration to see if Dropbox should be used or not. If it should, Line 29 authorizes our app with the API key.
At this point it is important that you have edited the configuration file with your API key and Path. To find your API key, you can create an app on the app creation page. Once you have an app created, the API key may be generated under the OAuth section of the app’s page on the App Console (simply click the “Generate” button and copy/paste the key into the configuration file).
Home surveillance and motion detection with the Raspberry Pi
Alright, now we can finally start performing some computer vision and image processing.
# initialize the camera and grab a reference to the raw camera capture
camera = PiCamera()
camera.resolution = tuple(conf["resolution"])
camera.framerate = conf["fps"]
rawCapture = PiRGBArray(camera, size=tuple(conf["resolution"]))

# allow the camera to warmup, then initialize the average frame, last
# uploaded timestamp, and frame motion counter
print("[INFO] warming up...")
time.sleep(conf["camera_warmup_time"])
avg = None
lastUploaded = datetime.datetime.now()
motionCounter = 0
We setup our raw capture to the Raspberry Pi camera on Lines 33-36 (for more information on accessing the Raspberry Pi camera, you should read this blog post).
We’ll also allow the Raspberry Pi camera module to warm up for a few seconds, ensuring that the sensors are given enough time to calibrate. Finally, we’ll initialize the average background frame, along with some bookkeeping variables on Lines 42-44.
Let’s start looping over frames directly from our Raspberry Pi video stream:
# capture frames from the camera
for f in camera.capture_continuous(rawCapture, format="bgr", use_video_port=True):
	# grab the raw NumPy array representing the image and initialize
	# the timestamp and occupied/unoccupied text
	frame = f.array
	timestamp = datetime.datetime.now()
	text = "Unoccupied"

	# resize the frame, convert it to grayscale, and blur it
	frame = imutils.resize(frame, width=500)
	gray = cv2.cvtColor(frame, cv2.COLOR_BGR2GRAY)
	gray = cv2.GaussianBlur(gray, (21, 21), 0)

	# if the average frame is None, initialize it
	if avg is None:
		print("[INFO] starting background model...")
		avg = gray.copy().astype("float")
		rawCapture.truncate(0)
		continue

	# accumulate the weighted average between the current frame and
	# previous frames, then compute the difference between the current
	# frame and running average
	cv2.accumulateWeighted(gray, avg, 0.5)
	frameDelta = cv2.absdiff(gray, cv2.convertScaleAbs(avg))
The code here should look pretty familiar to last week’s post on building a basic motion detection system.
We pre-process our frame a bit by resizing it to have a width of 500 pixels, followed by converting it to grayscale, and applying a Gaussian blur to remove high frequency noise and allowing us to focus on the “structural” objects of the image.
On Line 60 we make a check to see if the avg frame has been initialized or not. If not, we initialize it as the current frame.
Lines 69 and 70 are really important and where we start to deviate from last week’s implementation.
In our previous motion detection script we made the assumption that the first frame of our video stream would be a good representation of the background we wanted to model. For that particular example, this assumption worked well enough.
But this assumption is also easily broken. As the time of day changes (and lighting conditions change), and as new objects are introduced into our field of view, our system will falsely detection motion where there is none!
To combat this, we instead take the weighted mean of previous frames along with the current frame. This means that our script can dynamically adjust to the background, even as the time of day changes along with the lighting conditions. This is still quite basic and not a “perfect” method to model the background versus foreground, but it’s much better than the previous method.
Based on the weighted average of frames, we then subtract the weighted average from the current frame, leaving us with what we call a frame delta:
delta = |background_model – current_frame|
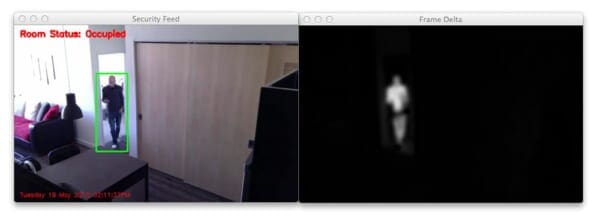
We can then threshold this delta to find regions of our image that contain substantial difference from the background model — these regions thus correspond to “motion” in our video stream:
	# threshold the delta image, dilate the thresholded image to fill
	# in holes, then find contours on thresholded image
	thresh = cv2.threshold(frameDelta, conf["delta_thresh"], 255,
		cv2.THRESH_BINARY)[1]
	thresh = cv2.dilate(thresh, None, iterations=2)
	cnts = cv2.findContours(thresh.copy(), cv2.RETR_EXTERNAL,
		cv2.CHAIN_APPROX_SIMPLE)
	cnts = imutils.grab_contours(cnts)

	# loop over the contours
	for c in cnts:
		# if the contour is too small, ignore it
		if cv2.contourArea(c) < conf["min_area"]:
			continue

		# compute the bounding box for the contour, draw it on the frame,
		# and update the text
		(x, y, w, h) = cv2.boundingRect(c)
		cv2.rectangle(frame, (x, y), (x + w, y + h), (0, 255, 0), 2)
		text = "Occupied"

	# draw the text and timestamp on the frame
	ts = timestamp.strftime("%A %d %B %Y %I:%M:%S%p")
	cv2.putText(frame, "Room Status: {}".format(text), (10, 20),
		cv2.FONT_HERSHEY_SIMPLEX, 0.5, (0, 0, 255), 2)
	cv2.putText(frame, ts, (10, frame.shape[0] - 10), cv2.FONT_HERSHEY_SIMPLEX,
		0.35, (0, 0, 255), 1)
To find regions in the image that pass the thresholding test, we simply apply contour detection. We then loop over each of these contours individually (Line 82) and see if the pass the min_area test (Lines 84 and 85). If the regions are sufficiently larger enough, then we can indicate that we have indeed found motion in our current frame.
Lines 89-91 then compute the bounding box of the contour, draw the box around the motion, and update our text variable.
Finally, Lines 94-98 take our current timestamp and status text and draw them both on our frame.
Now, let’s create the code to handle uploading to Dropbox:
	# check to see if the room is occupied
	if text == "Occupied":
		# check to see if enough time has passed between uploads
		if (timestamp - lastUploaded).seconds >= conf["min_upload_seconds"]:
			# increment the motion counter
			motionCounter += 1

			# check to see if the number of frames with consistent motion is
			# high enough
			if motionCounter >= conf["min_motion_frames"]:
				# check to see if dropbox sohuld be used
				if conf["use_dropbox"]:
					# write the image to temporary file
					t = TempImage()
					cv2.imwrite(t.path, frame)

					# upload the image to Dropbox and cleanup the tempory image
					print("[UPLOAD] {}".format(ts))
					path = "/{base_path}/{timestamp}.jpg".format(
					    base_path=conf["dropbox_base_path"], timestamp=ts)
					client.files_upload(open(t.path, "rb").read(), path)
					t.cleanup()

				# update the last uploaded timestamp and reset the motion
				# counter
				lastUploaded = timestamp
				motionCounter = 0

	# otherwise, the room is not occupied
	else:
		motionCounter = 0
We make a check on Line 101 to see if we have indeed found motion in our frame. If so, we make another check on Line 103 to ensure that enough time has passed between now and the previous upload to Dropbox — if enough time has indeed passed, we’ll increment our motion counter.
If our motion counter reaches a sufficient number of consecutive frames (Line 109), we’ll then write our image to disk using the TempImage class, upload it via the Dropbox API, and then reset our motion counter and last uploaded timestamp.
If motion is not found in the room (Lines 129 and 130), we simply reset our motion counter to 0.
Finally, let’s wrap up this script by handling if we want to display the security stream to our screen or not:
	# check to see if the frames should be displayed to screen
	if conf["show_video"]:
		# display the security feed
		cv2.imshow("Security Feed", frame)
		key = cv2.waitKey(1) & 0xFF

		# if the `q` key is pressed, break from the lop
		if key == ord("q"):
			break

	# clear the stream in preparation for the next frame
	rawCapture.truncate(0)
Again, this code is quite self-explanatory. We make a check to see if we are supposed to display the video stream to our screen (based on our JSON configuration), and if we are, we display the frame and check for a key-press used to terminate the script.
As a matter of completeness, let’s also define the TempImage class in our pyimagesearch/tempimage.py file:
# import the necessary packages
import uuid
import os

class TempImage:
	def __init__(self, basePath="./", ext=".jpg"):
		# construct the file path
		self.path = "{base_path}/{rand}{ext}".format(base_path=basePath,
			rand=str(uuid.uuid4()), ext=ext)

	def cleanup(self):
		# remove the file
		os.remove(self.path)
This class simply constructs a random filename on Lines 8 and 9, followed by providing a cleanup method to remove the file from disk once we are finished with it.
Raspberry Pi Home Surveillance
We’ve made it this far. Let’s see our Raspberry Pi + Python + OpenCV + Dropbox home surveillance system in action. Simply navigate to the source code directory for this post and execute the following command:
$ python pi_surveillance.py --conf conf.json
Depending on the contents of your conf.json file, your output will (likely) look quite different than mine. As a quick refresher from earlier in this post, I have my Raspberry Pi + camera mounted to the top of my kitchen cabinets, looking down at my kitchen and refrigerator — just monitoring and waiting for anyone who tries to steal any of my beers.
Here’s an example of video being streamed from my Raspberry Pi to my MacBook via X11 forwarding, which will happen when you set show_video: true :
And in this video, I have disabled the video stream, while enabling the Dropbox API integration via use_dropbox: true , we can see the results of motion being detected in images and the results sent to my personal Dropbox account:
Here are some example frames that the home surveillance system captured after running all day:
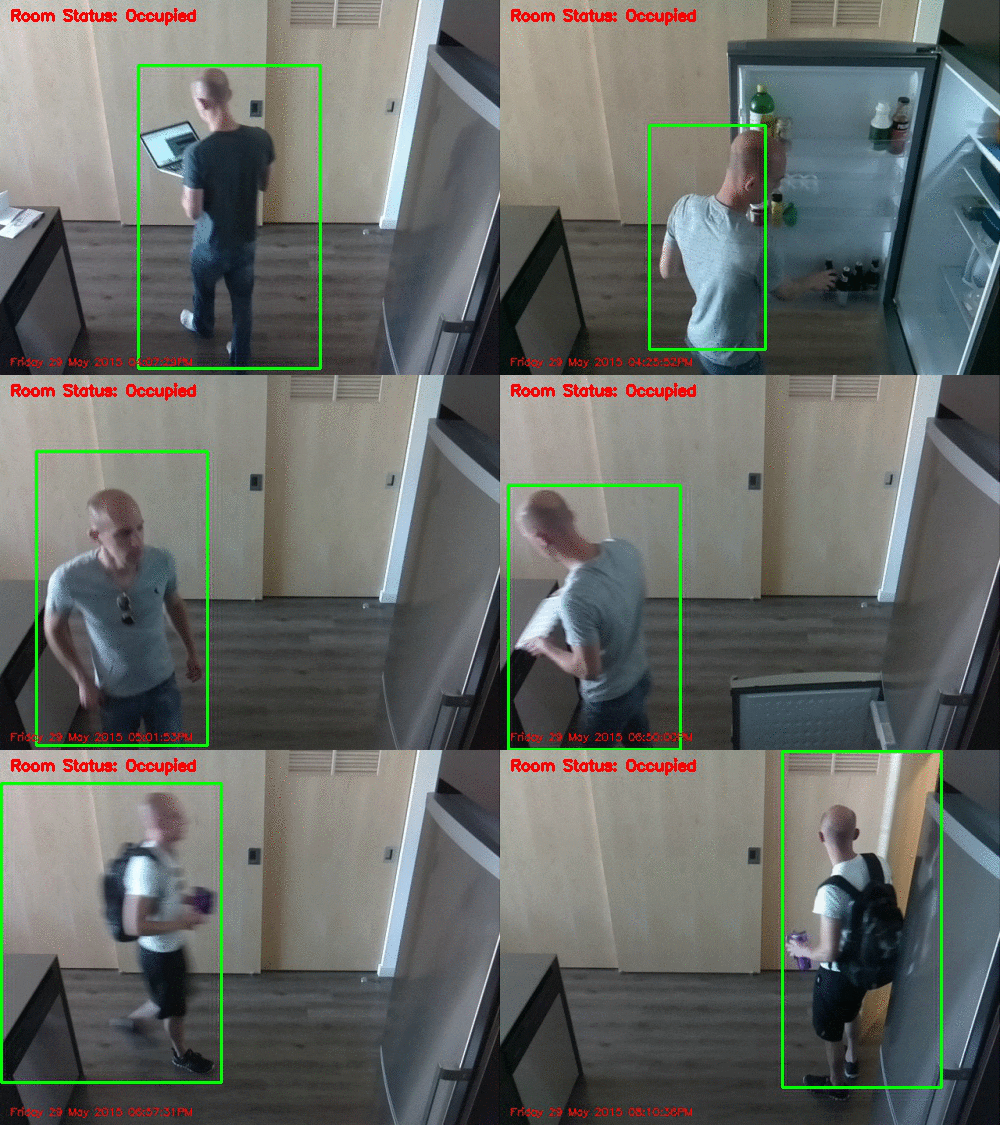
And in this one you can clearly see me reaching for a beer in the refrigerator:
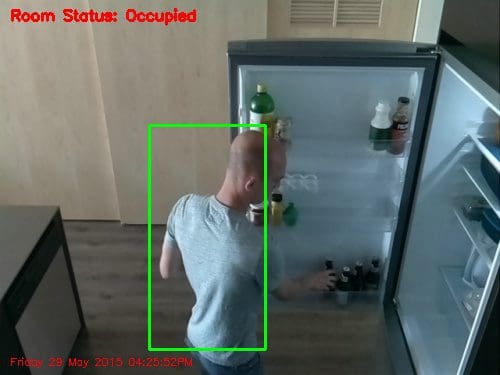
If you’re wondering how you can make this script start each time your Pi powers up without intervention, see my post on Running a Python + OpenCV script on reboot.
Given my rant from last week, this home surveillance system should easily be able to capture James if he tries steal my beers again — and this time I’ll have conclusive proof from the frames uploaded to my personal Dropbox account.
What's next? We recommend PyImageSearch University.
86+ total classes • 115+ hours hours of on-demand code walkthrough videos • Last updated: July 2025
★★★★★ 4.84 (128 Ratings) • 16,000+ Students Enrolled
I strongly believe that if you had the right teacher you could master computer vision and deep learning.
Do you think learning computer vision and deep learning has to be time-consuming, overwhelming, and complicated? Or has to involve complex mathematics and equations? Or requires a degree in computer science?
That’s not the case.
All you need to master computer vision and deep learning is for someone to explain things to you in simple, intuitive terms. And that’s exactly what I do. My mission is to change education and how complex Artificial Intelligence topics are taught.
If you're serious about learning computer vision, your next stop should be PyImageSearch University, the most comprehensive computer vision, deep learning, and OpenCV course online today. Here you’ll learn how to successfully and confidently apply computer vision to your work, research, and projects. Join me in computer vision mastery.
Inside PyImageSearch University you'll find:
- ✓ 86+ courses on essential computer vision, deep learning, and OpenCV topics
- ✓ 86 Certificates of Completion
- ✓ 115+ hours hours of on-demand video
- ✓ Brand new courses released regularly, ensuring you can keep up with state-of-the-art techniques
- ✓ Pre-configured Jupyter Notebooks in Google Colab
- ✓ Run all code examples in your web browser — works on Windows, macOS, and Linux (no dev environment configuration required!)
- ✓ Access to centralized code repos for all 540+ tutorials on PyImageSearch
- ✓ Easy one-click downloads for code, datasets, pre-trained models, etc.
- ✓ Access on mobile, laptop, desktop, etc.
Summary
In this blog post we explored how to use Python + OpenCV + Dropbox + a Raspberry Pi and camera module to create our own personal home surveillance system.
We built upon our previous example on basic motion detection from last week and extended it to (1) be slightly more robust to changes in the background environment, (2) work with our Raspberry Pi, and (3) integrate with the Dropbox API so we can have our home surveillance footage uploaded directly to our account for instant viewing.
This has been a great 2-part series on motion detection, I really hope you enjoyed it. But we’re honestly only scratching the surface on motion detection/background subtraction — this will most certainly not be the last time we cover it on the PyImageSearch blog. So if you want to keep up to date regarding new posts on PyImageSearch, I would definitely recommend signing up for the PyImageSearch Newsletter at the bottom of this page.
And finally, if you enjoyed this tutorial, please consider sharing it with others!

Download the Source Code and FREE 17-page Resource Guide
Enter your email address below to get a .zip of the code and a FREE 17-page Resource Guide on Computer Vision, OpenCV, and Deep Learning. Inside you'll find my hand-picked tutorials, books, courses, and libraries to help you master CV and DL!

