In this tutorial, you will learn how to install OpenCV 4 on the Raspberry Pi 4 and Raspbian Buster.
You will learn how to install OpenCV 4 on Raspbian Buster via both:
- A simple pip-install method (which can be completed in a matter of minutes)
- Compiling from source (which will take longer but will give you access to the full, optimized install of OpenCV)
To learn more about installing OpenCV 4 on the Raspberry Pi 4 and Raspbian Buster, just keep reading.
2019-11-21 Update: An update has been issued to this blog post due to compatibility issues with OpenCV using the pip install method. Be sure to find the updates via ctrl + f
as you search for “2019-11-21 Update”.
Install OpenCV 4 on Raspberry Pi 4 and Raspbian Buster
In this tutorial, we will install and test OpenCV 4 on Raspbian Buster in five simple, easy-to-follow steps.
If you’ve ever compiled OpenCV from scratch before, you know that the process is especially time-consuming and even painstakingly frustrating if you miss a key step or if you are new to Linux and Bash.
In Q4 2018, a new, faster method for installing OpenCV on the Raspberry Pi (i.e., a pip install) was made possible thanks to the hard work of the following people:
- Olli-Pekka Heinisuo — maintainer of the opencv-contrib-python package on PyPi
- Ben Nuttall — from the Raspberry Pi community-run piwheels.org, a Python package repository providing ARM wheels (i.e., pre-compiled binaries packages) for the Raspberry Pi
- Dave Jones — creator of the
picamera
Python module
Installing OpenCV via pip is easier than ever. In fact, you can be up and running (Step #1 – Step #4a) in less than 10 minutes.
But what’s the catch?
Using pip to install OpenCV is great, but for some projects (including many educational projects on PyImageSearch.com and in my books/courses) you might want the complete install of OpenCV (which the pip install won’t give you).
Don’t worry, I’ve got you covered in Step #4b below — you’ll learn to use CMake and Make to compile OpenCV 4 on BusterOS from scratch.
Let’s dive in!
Before we begin: Grab your Raspberry Pi 4 and flash BusterOS to your microSD
Let’s review the hardware requirements for this tutorial:
- Raspberry Pi: This tutorial assumes you are using a Raspberry Pi 4B 1GB, 2GB or 4GB hardware.
- Operating system: These instructions only apply to Raspbian Buster.
- 32GB microSD: I recommend the high-quality SanDisk 32GB 98Mb/s cards. Here’s an example on Amazon (however you can purchase them on your favorite online distributor).
- microSD adapter: You’ll need to purchase a microSD to USB adapter so you can flash the memory card from your laptop.
If you don’t already have a Raspberry Pi 4, I highly recommend CanaKits (which are available on Amazon) and directly through Canakit’s website. Most of their kits come with a Raspberry Pi, power adapter, microSD, microSD adapter, heatsinks, and more!
Once you have the hardware ready, you’ll need to flash a fresh copy of the Raspbian Buster operating system to the microSD card.
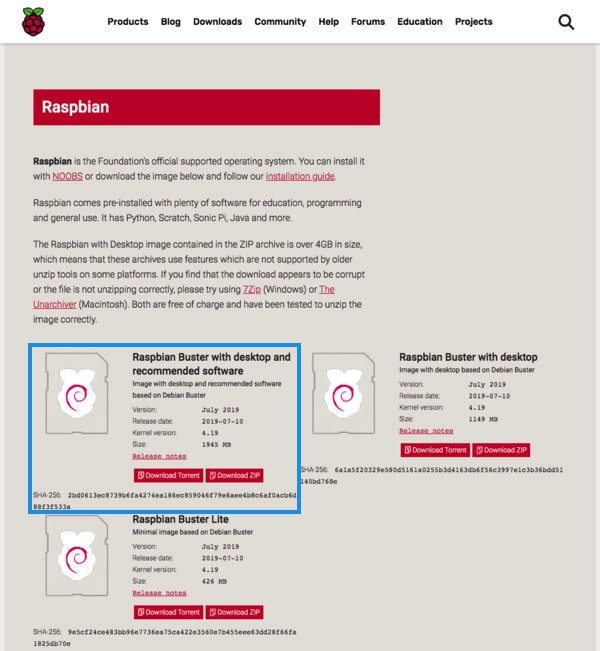
- Head on over to the official BusterOS download page (Figure 2), and start your download. I recommend the “Raspbian Buster with Desktop and recommended software”.
- Download Balena Etcher — software for flashing memory cards. It works on every major OS.
- Use Etcher to flash BusterOS to your memory card (Figure 3).
After downloading the Raspbian Buster .img file you can flash it to your micro-SD card using Etcher:
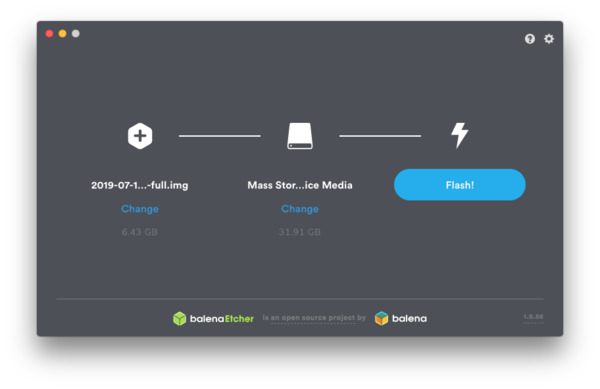
After a few minutes the flashing process should be complete — slot the micro-SD card into your Raspberry Pi 4 and then boot.
From there you can move on to the rest of the OpenCV install steps in this guide.
Step #1: Expand filesystem and reclaim space
For the remainder of this tutorial I’ll be making the following assumptions:
- You are working with a brand new, fresh install of Raspbian Buster (see the previous section to learn how to flash Buster to your microSD).
- You are comfortable with the command line and Unix environments.
- You have an SSH or VNC connection established with your Pi. Alternatively, you could use a keyboard + mouse + screen.
Go ahead and insert your microSD into your Raspberry Pi and boot it up with a screen attached.
Once booted, configure your WiFi/ethernet settings to connect to the internet (you’ll need an internet connection to download and install required packages for OpenCV).
From there you can use SSH as I have done, or go ahead and open a terminal.
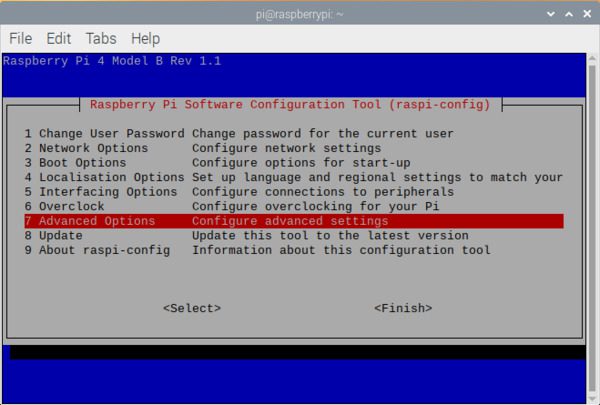
The first step is to run, raspi-config
and expand your filesystem:
$ sudo raspi-config
And then select the “7 Advanced Options” menu item:
Followed by selecting “A1 Expand filesystem”:
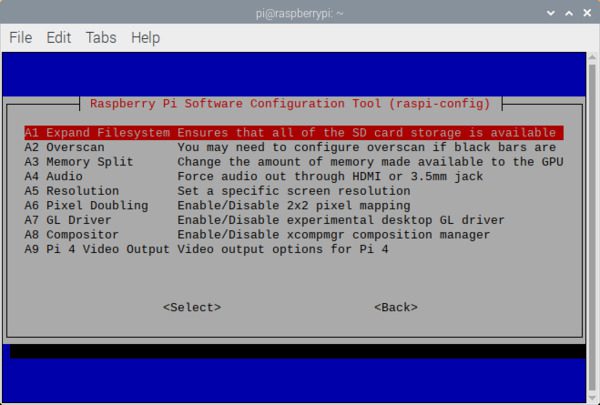
Once prompted, you should select the first option, “A1 Expand File System”, hit enter
on your keyboard, arrow down to the “<Finish>” button, and then reboot your Pi — you may be prompted to reboot, but if you aren’t you can execute:
$ sudo reboot
After rebooting, your file system should have been expanded to include all available space on your micro-SD card. You can verify that the disk has been expanded by executing df -h
and examining the output:
$ df -h Filesystem Size Used Avail Use% Mounted on /dev/root 29G 5.3G 23G 20% / devtmpfs 1.8G 0 1.8G 0% /dev tmpfs 1.9G 0 1.9G 0% /dev/shm tmpfs 1.9G 8.6M 1.9G 1% /run tmpfs 5.0M 4.0K 5.0M 1% /run/lock tmpfs 1.9G 0 1.9G 0% /sys/fs/cgroup /dev/mmcblk0p1 253M 40M 213M 16% /boot tmpfs 386M 0 386M 0% /run/user/1000
As you can see, my Raspbian filesystem has been expanded to include all 32GB of the micro-SD card.
However, even with my filesystem expanded, I have already used 15% of my 32GB card.
While it’s not required, I would suggest deleting both Wolfram Engine and LibreOffice to reclaim ~1GB of space on your Raspberry Pi:
$ sudo apt-get purge wolfram-engine $ sudo apt-get purge libreoffice* $ sudo apt-get clean $ sudo apt-get autoremove
Step #2: Install dependencies
The following commands will update and upgrade any existing packages, followed by installing dependencies, I/O libraries, and optimization packages for OpenCV:
The first step is to update and upgrade any existing packages:
$ sudo apt-get update && sudo apt-get upgrade
We then need to install some developer tools, including CMake, which helps us configure the OpenCV build process:
$ sudo apt-get install build-essential cmake pkg-config
Next, we need to install some image I/O packages that allow us to load various image file formats from disk. Examples of such file formats include JPEG, PNG, TIFF, etc.:
$ sudo apt-get install libjpeg-dev libtiff5-dev libjasper-dev libpng-dev
Just as we need image I/O packages, we also need video I/O packages. These libraries allow us to read various video file formats from disk as well as work directly with video streams:
$ sudo apt-get install libavcodec-dev libavformat-dev libswscale-dev libv4l-dev $ sudo apt-get install libxvidcore-dev libx264-dev
The OpenCV library comes with a sub-module named highgui
which is used to display images to our screen and build basic GUIs. In order to compile the highgui
module, we need to install the GTK development library and prerequisites:
$ sudo apt-get install libfontconfig1-dev libcairo2-dev $ sudo apt-get install libgdk-pixbuf2.0-dev libpango1.0-dev $ sudo apt-get install libgtk2.0-dev libgtk-3-dev
Many operations inside of OpenCV (namely matrix operations) can be optimized further by installing a few extra dependencies:
$ sudo apt-get install libatlas-base-dev gfortran
These optimization libraries are especially important for resource-constrained devices such as the Raspberry Pi.
The following pre-requisites are for Step #4a and they certainly won’t hurt for Step #4b either. They are for HDF5 datasets and Qt GUIs:
$ sudo apt-get install libhdf5-dev libhdf5-serial-dev libhdf5-103 $ sudo apt-get install libqtgui4 libqtwebkit4 libqt4-test python3-pyqt5
Lastly, let’s install Python 3 header files so we can compile OpenCV with Python bindings:
$ sudo apt-get install python3-dev
If you’re working with a fresh install of the OS, it is possible that these versions of Python are already at the newest version (you’ll see a terminal message stating this).
Step #3: Create your Python virtual environment and install NumPy
We’ll be using Python virtual environments, a best practice when working with Python.
A Python virtual environment is an isolated development/testing/production environment on your system — it is fully sequestered from other environments. Best of all, you can manage the Python packages inside your your virtual environment inside with pip (Python’s package manager).
Of course, there are alternatives for managing virtual environments and packages (namely Anaconda/conda). I’ve used/tried them all, but have settled on pip, virtualenv, and virtualenvwrapper as the preferred tools that I install on all of my systems. If you use the same tools as me, you’ll receive the best support from me.
You can install pip using the following commands:
$ wget https://bootstrap.pypa.io/get-pip.py $ sudo python get-pip.py $ sudo python3 get-pip.py $ sudo rm -rf ~/.cache/pip
Let’s install virtualenv
and virtualenvwrapper
now:
$ sudo pip install virtualenv virtualenvwrapper
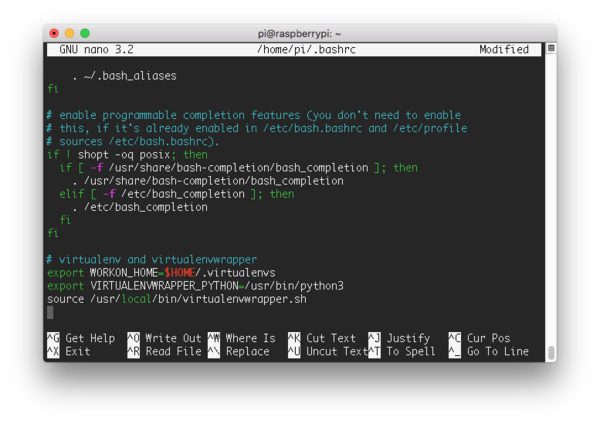
Once both virtualenv
and virtualenvwrapper
have been installed, open up your ~/.bashrc
file:
$ nano ~/.bashrc
…and append the following lines to the bottom of the file:
# virtualenv and virtualenvwrapper export WORKON_HOME=$HOME/.virtualenvs export VIRTUALENVWRAPPER_PYTHON=/usr/bin/python3 source /usr/local/bin/virtualenvwrapper.sh
Save and exit via ctrl + x
, y
, enter
.
From there, reload your ~/.bashrc
file to apply the changes to your current bash session:
$ source ~/.bashrc
Next, create your Python 3 virtual environment:
$ mkvirtualenv cv -p python3
Here we are creating a Python virtual environment named cv
using Python 3. Going forward, I recommend Python 3 with OpenCV 4+.
Note: Python 2.7 will reach end of its life on January 1st, 2020 so I do not recommend using Python 2.7.
You can name the virtual environment whatever you want, but I use cv
as the standard naming convention here on PyImageSearch.
If you have a Raspberry Pi Camera Module attached to your RPi, you should install the PiCamera API now as well:
$ pip install "picamera[array]"
Step #4(a or b): Decide if you want the 1-minute quick install or the 2-hour complete install
From here you need to make a decision about the rest of your install. There are two options.
- Step #4a: pip install OpenCV 4: If you decide to pip install OpenCV, you will be done in a matter of seconds. It is by far the fastest, easiest method to install OpenCV. It is the method I recommend for 90% of people — especially beginners. After this step, you will skip to Step #5 to test your install.
- Step #4b: Compile OpenCV 4 from source: This method gives you the full install of OpenCV 4. It will take 2-4 hours depending on the processor in your Raspberry Pi.
As stated, I highly encourage you to use the pip instructions. They are faster and will work for 90% of your projects. Additionally, the patented algorithms can only be used for educational purposes (there are plenty of great alternatives to the patented algorithms too).
Step #4a: pip install OpenCV 4
In a matter of seconds, you can pip install OpenCV into the cv
virtual environment:
$ pip install opencv-contrib-python==4.1.0.25
2019-11-21 Update: Readers have reported that some versions of OpenCV 4 as installed via pip do not work properly on the Raspberry Pi. You may encounter an `“undefined symbol: __atomic_fetch_add8″` for libatomic
error when you import cv2
from Python if you do not use the specific version of OpenCV mentioned in the code block above.
If you watch the terminal output you’ll see that OpenCV 3.4 rather than OpenCV 4 was installed?
What gives?
At the time of this writing, PiWheels has not been updated with pre-complied OpenCV 4 binaries for Raspbian Buster. PiWheels normally lags slightly behind the latest version of OpenCV, likely to ensure compatibility across the major Raspbian releases. Once OpenCV 4 has been released for PiWheels I will update this section.
That’s really all there is to it. You may skip to Step #5 now to test your install.
Step #4b: Compile OpenCV 4 from source
This option installs the full install of OpenCV including patented (“Non-free”) algorithms.
Note: Do not follow Step #4b if you followed Step #4a.
Let’s go ahead and download the OpenCV source code for both the opencv and opencv_contrib repositories, followed by unarchiving them:
$ cd ~ $ wget -O opencv.zip https://github.com/opencv/opencv/archive/4.1.1.zip $ wget -O opencv_contrib.zip https://github.com/opencv/opencv_contrib/archive/4.1.1.zip $ unzip opencv.zip $ unzip opencv_contrib.zip $ mv opencv-4.1.1 opencv $ mv opencv_contrib-4.1.1 opencv_contrib
For this blog post, we’ll be using OpenCV 4.1.1; however, as newer versions of OpenCV are released you can update the corresponding version numbers.
Increasing your SWAP space
Before you start the compile you must increase your SWAP space. Increasing the SWAP will enable you to compile OpenCV with all four cores of the Raspberry Pi (and without the compile hanging due to memory exhausting).
Go ahead and open up your /etc/dphys-swapfile
file:
$ sudo nano /etc/dphys-swapfile
…and then edit the CONF_SWAPSIZE
variable:
# set size to absolute value, leaving empty (default) then uses computed value # you most likely don't want this, unless you have an special disk situation # CONF_SWAPSIZE=100 CONF_SWAPSIZE=2048
Notice that I’m increasing the swap from 100MB to 2048MB. This is critical to compiling OpenCV with multiple cores on Raspbian Buster.
2019-11-21 Update: Our testing has shown that a 2048MB swap is most effective to prevent lock-ups while OpenCV compiles.
Save and exit via ctrl + x
, y
, enter
.
If you do not increase SWAP it’s very likely that your Pi will hang during the compile.
From there, restart the swap service:
$ sudo /etc/init.d/dphys-swapfile stop $ sudo /etc/init.d/dphys-swapfile start
Note: Increasing swap size is a great way to burn out your Raspberry Pi microSD card. Flash-based storage has a limited number of writes you can perform until the card is essentially unable to hold the 1’s and 0’s anymore. We’ll only be enabling large swap for a short period of time, so it’s not a big deal. Regardless, be sure to backup your .img
file after installing OpenCV + Python just in case your card dies unexpectedly early. You can read more about large swap sizes corrupting memory cards on this page.
Compile and install OpenCV 4 on Raspbian Buster
We’re now ready to compile and install the full, optimized OpenCV library on the Raspberry Pi 4.
Ensure you are in the cv
virtual environment using the workon
command:
$ workon cv
Then, go ahead and install NumPy (an OpenCV dependency) into the Python virtual environment:
$ pip install numpy
And from there configure your build:
$ cd ~/opencv $ mkdir build $ cd build $ cmake -D CMAKE_BUILD_TYPE=RELEASE \ -D CMAKE_INSTALL_PREFIX=/usr/local \ -D OPENCV_EXTRA_MODULES_PATH=~/opencv_contrib/modules \ -D ENABLE_NEON=ON \ -D ENABLE_VFPV3=ON \ -D BUILD_TESTS=OFF \ -D INSTALL_PYTHON_EXAMPLES=OFF \ -D OPENCV_ENABLE_NONFREE=ON \ -D CMAKE_SHARED_LINKER_FLAGS=-latomic \ -D BUILD_EXAMPLES=OFF ..
There are four CMake flags I’d like to bring to your attention:
- (1) NEON and (2) VFPv3 optimization flags have been enabled. These lines ensure that you compile the fastest and most optimized OpenCV for the ARM processor on the Raspberry Pi (Lines 7 and 8).
- Note: The Raspberry Pi Zero W hardware is not compatible with NEON or VFPv3. Be sure to remove Lines 7 and 8 if you are compiling for a Raspberry Pi Zero W.
- (3) Patented “NonFree” algorithms give you the full install of OpenCV (Line 11).
- And by drilling into OpenCV’s source, it was determined that we need the (4)
-latomic
shared linker flag (Line 12).
I’d like to take a second now to bring awareness to a common pitfall for beginners:
- In the terminal block above, you change directories into
~/opencv/
. - You then create a
build/
directory therein and change directories into it. - If you try to execute CMake without being in the
~/opencv/build
directory, CMake will fail. Try runningpwd
to see which working directory you are in before runningcmake
.
The cmake
command will take about 3-5 minutes to run as it prepares and configures OpenCV for the compile.
When CMake finishes, be sure to inspect the output of CMake under the Python 3 section:
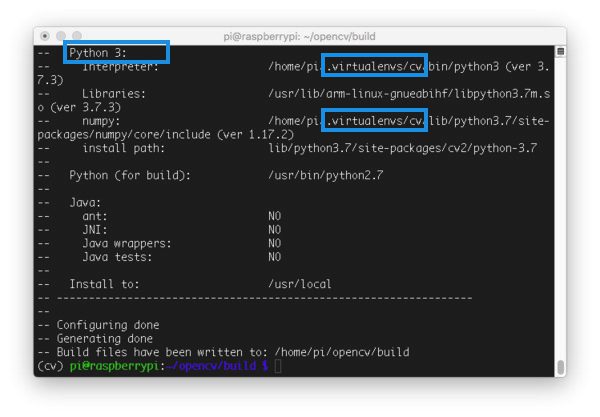
Notice how the Interpreter
, Libraries
, numpy
, and packages
path variables have been properly set. Each of these refers to our cv
virtual environment.
Now go ahead and scroll up to ensure that the “Non-Free algorithms” are set to be installed:
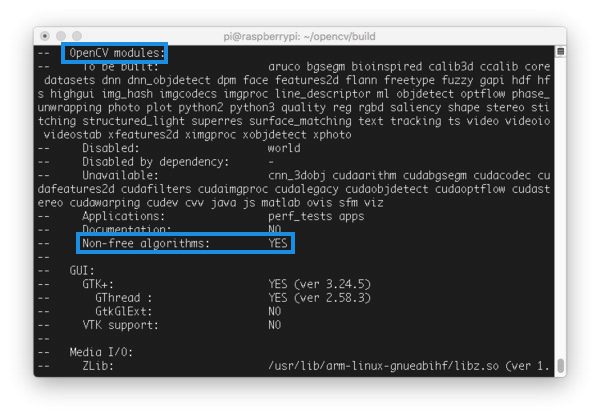
As you can see, “Non-free algorithms” for OpenCV 4 will be compiled + installed.
Now that we’ve prepared for our OpenCV 4 compilation, it is time to launch the compile process using all four cores:
$ make -j4
Running make
could take anywhere from 1-4 hours depending on your Raspberry Pi hardware (this tutorial is compatible with the Raspberry Pi 3B, 3B+, and 4). The Raspberry Pi 4 is the fastest at the time of this writing.
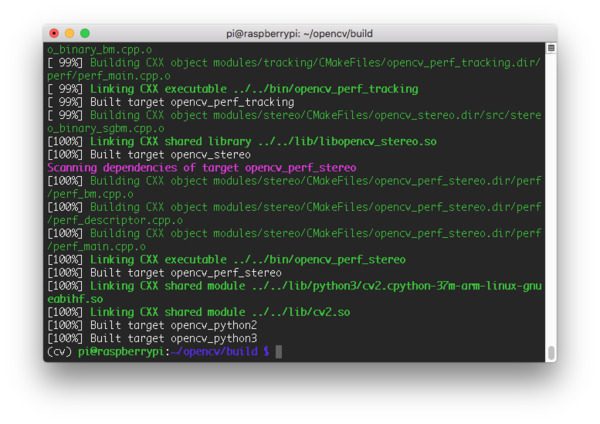
Assuming OpenCV compiled without error (as in my screenshot above), you can install your optimized version of OpenCV on your Raspberry Pi:
$ sudo make install $ sudo ldconfig
Reset your SWAP
Don’t forget to go back to your /etc/dphys-swapfile
file and:
- Reset
CONF_SWAPSIZE
to 100MB. - Restart the swap service.
Sym-link your OpenCV 4 on the Raspberry Pi
Symbolic links are a way of pointing from one directory to a file or folder elsewhere on your system. For this sub-step, we will sym-link the cv2.so
bindings into your cv
virtual environment.
Let’s proceed to create our sym-link. Be sure to use “tab-completion” for all paths below (rather than copying these commands blindly):
$ cd /usr/local/lib/python3.7/site-packages/cv2/python-3.7 $ sudo mv cv2.cpython-37m-arm-linux-gnueabihf.so cv2.so $ cd ~/.virtualenvs/cv/lib/python3.7/site-packages/ $ ln -s /usr/local/lib/python3.7/site-packages/cv2/python-3.7/cv2.so cv2.so
Keep in mind that the exact paths may change and you should use “tab-completion”.
Step 5: Testing your OpenCV 4 Raspberry Pi BusterOS install
As a quick sanity check, access the cv
virtual environment, fire up a Python shell, and try to import the OpenCV library:
$ cd ~ $ workon cv $ python >>> import cv2 >>> cv2.__version__ '4.1.1' >>>
Congratulations! You’ve just installed an OpenCV 4 on your Raspberry Pi.
If you are looking for some fun projects to work on with OpenCV 4, be sure to checkout my Raspberry Pi archives.
Frequently Asked Questions (FAQ)
Q: What do I do when I encounter an "undefined symbol: __atomic_fetch_add8"
error related to libatomic.so
?
A: The pip install has been giving readers troubles since OpenCV 4.1.1 (around the November 2019 timeframe). Be sure to install version 4.1.0.25
:
$ pip install opencv-contrib-python==4.1.0.25
What’s next?
Ready to put your Raspberry Pi and OpenCV install to work?
My brand new book, Raspberry Pi for Computer Vision, has over 40 Computer Vision and Deep Learning projects for embedded computer vision and Internet of Things (IoT) applications. You can build upon the projects in the book to solve problems around your home, business, and even for your clients. Each of these projects place an emphasis on:
- Learning by doing
- Rolling up your sleeves
- Getting your hands dirty in code and implementation
- Building actual, real-world projects using the Raspberry Pi
A handful of the highlighted projects include:
- Daytime and nighttime wildlife monitoring
- Traffic counting and vehicle speed detection
- Deep Learning classification, object detection, and instance segmentation on resource-constrained devices
- Hand gesture recognition
- Basic robot navigation
- Security applications
- Classroom attendance
- …and many more!
The book also covers deep learning using the Google Coral and Intel Movidius NCS coprocessors along with NVIDIA Jetson Nano board.
If you’re interested in studying Computer Vision and Deep Learning on embedded devices, you won’t find a better book than this one!
Summary
In today’s tutorial, you learned how to install OpenCV 4 on your Raspberry Pi 4 running the Raspbian Buster operating system via two methods:
- A simple pip install (fast and easy)
- Compiling from source (takes longer, but gives you the full OpenCV install/optimizations)
The pip method to install OpenCV 4 is by far the easiest way to install OpenCV (and the method I recommend for 90% of projects). It is especially great for beginners too.
If you need the full install of OpenCV, you must compile from source. Compiling from source ensures that you have the full install including the “contrib” module with patented (“NonFree”) algorithms.
While compiling from source is both (1) more complicated, and (2) more time-consuming, it is currently the only way to access all features of OpenCV.
I hope you enjoyed today’s tutorial!
And if you’re ready to put your RPi and OpenCV install to work, be sure to check out my book, Raspberry Pi for Computer Vision — inside the book you’ll learn how to build practical, real-world Computer Vision and Deep Learning applications on the Raspberry Pi, Google Coral, Movidius NCS, and NVIDIA Jetson Nano.
Be be notified when future tutorials are published on the PyImageSearch blog (and download my free 17-page CV and DL Resource Guide PDF), just enter your email address in the form below!
Join the PyImageSearch Newsletter and Grab My FREE 17-page Resource Guide PDF
Enter your email address below to join the PyImageSearch Newsletter and download my FREE 17-page Resource Guide PDF on Computer Vision, OpenCV, and Deep Learning.
I found direct compiling problematic with NCS2:
https://github.com/opencv/opencv/issues/15446
Thank you! Just started playing with opencv this weekend on an old model b, you have been an invaluable resource.
One question though: how much faster would you say the new model 4 is compared to the b or b+?
Trying to decide if it’s worth the upgrade or if I should switch to a laptop.
I was following your dlib tutorials last night and when modified for a live camera feed I was getting 3-7fps.
I can’t wait to get your book. Thanks again, this is really cool stuff.
You mean how fast is the Pi 4 compared to the Pi 3? It depends on which RAM model you get (1GB, 2GB, or 4GB) model, but many of our tests have seen 1.5-3x speedup on the RPi 4 for most book chapters. Some chapters are even 5x or more faster on the RPi 4.
i wanted this tutorial before a month ago.at that time i used your last year’s tutorial for installing opencv in raspberry pi 4.i see some major changes in this tutorial.how do you come to know these changes.is there any technical or logical reason to figure this out?
We figure it out through a combination of:
1. Experience
2. Trial and error
Over the years I’ve sort of developed a “sixth sense” as to how to debug any errors and resolve them. I then collect my tips, suggestions, and best practices and then publish them here on the blog.
Thanks for this sir!! Can’t wait to see the chapters!
Thanks Daniel 🙂
Thanks for the tutorial. I just attempted to follow using the pip method. Have tried two separate times and get an error on Step 5. Get the error msg below:
…
ModuleNotFoundError: No module named ‘cv2’
Any ideas?
Thanks,
Ken Walker
The most likely reason for that is not being inside the Python virtual environment when trying to
import cv2
. Make sure you access the Python virtual environment first:by following this commands, when I run cv2.__version__, it shows ‘3.4.3’. Why is it so? Thankyou.
See my note regarding installing via pip and why it will install 3.4.3 instead of OpenCV 4 until the PiWheels are updated.
My make command freezes at 100% ,I have used ‘make – clean’ command to do it again with make command but still facing same issues.
Hi Adrian,
i have the same problem, i am running in the virtual environment. my error is the following:
“ImportError: /home/pi/.virtualenvs/cv/lib/python3.7/site-packages/cv2/cv2.cpython-37m-arm-linux-gnueabihf.so: undefined symbol: __atomic_fetch_add_8”
See the solution from James.
Adrian,
Thanks for producing this guide, top-notch as always. However, one small item, I went with the quick install, and in your animation and on my Pi4, I have OpenCV 3.4.3 installed, and not 4.1.1. This is probably the result of the piwheels download using “opencv_contrib_python-3.4.3.18” . Is there a way to force the 4.1.1 version to be used instead?
Thanks!
Jon
Hey Jon, thanks for the comment.
I meant to include a note in the blog post regarding OpenCV 4 and the pip install (but I forgot about it, thanks for the reminder) — PiWheels does not currently have a pre-compiled OpenCV 4 distribution. They will but it hasn’t been released yet. I included it in the post so that it will work once it becomes available but forgot to include that note. I’ll be sure to do that now 🙂
Thanks Adrian – Just a quick follow-up to the install of OpenCV 4.1.1 on the Raspberry Pi 4b. 100% success on getting it installed. Took maybe 1.5 hours in all, thanks again for the help.
Congrats on getting OpenCV installed on your RPi!
Hi isn’t pip install opencv-contrib-python
still installing version 3.4 and not 4.1
Hey Martin — see my reply to Jon Lucenius.
After following your pip install method I end up with version 3.4.3 of cv2 – not version 4 ?
See my reply to Jon Lucenius.
Adrian
Most likely a dump questions (apologies for that), but not sure why you are linking the C++ atomic library (CMAKE_SHARED_LINKER_FLAGS=-latomic \), what in the opencv source encouraged you do that?
Thanks
Steve
Hi Steven. We found that
-latomic
is required for OpenCV 3.4.7. It doesn’t appear to hurt OpenCV 4.1.1 either, so we left it in there. That said, there is a related OpenCV issue which says “merged” at the bottom, so it may no longer be required. We’ll look into it.David
Thank you, particularly for that link to the Issue very helpful. I have compiled OpenCV 4.1.1 without that switch on both ARM32 and ARM64 boards all running buster and not seeing any errors. So I think you are right it might not be required. Thank you again for your help.
Hello Steven
I have been following the post about issues with the raspi pi and Buster (mine is pi4). The post , as advised by David earlier, has some changes that have been added to the current master (and possibly 3.7) 15278/15353 and a small correction 15540 near the bottom of that post (merged in 3.7 but not yet in 4 master. With these the atomic flag references are now under the bonnet for my pi4 at least.
Martin
If I don’t want to use virtual environment, which step should I skip (I am newbie in opencv). Thanks in advance.
If you want to skip the virtual environment I would recommend you just install OpenCV via pip and sudo:
$ pip install opencv-contrib-python
That will install OpenCV into your global site-packages directory.
Secondly, if you are new to OpenCV, you should read Practical Python and OpenCV to learn the fundamentals quickly.
Adrian – Could you provide some insight regarding the performance improvement achieved between non-compiled vs compiled OpenCV?
Thanks
Sure, that is covered inside Raspberry Pi for Computer Vision.
Thanks
OK, I get it that the virtual environment thing is a best practice for development.
What about deployment, where you would have to use shell scripts, etc., make sure you are in
the right spot with the right environment. That’s after you ensured that you have the exact same
VE set up on all targets. Is there an easier way? For an embedded application where you will
only ever run one this one application, perhaps on multiple units, doesn’t that get a bit sticky?
Deployment is really up to you. I would suggest creating a .img file for your environment and then deploying that to every device, that way you have a consistent environment across all devices.
Dear Sir,
I want to play a pi camera using raspberry pi 4 models, but the pi camera is not operating at that time. I have used commands like to display a video as vlc rtsp://192.168.0.100…at this time vlc is open but not live to respond.
Also, another option to create a .sh file and add a raspivid commands with its width & height, but sill not responding.
Also use : raspivid -o vid.h264..failed!!
RTSP streams with OpenCV can be a bit of a bear to deal with. I recommend using ImageZMQ instead.
Hi Adrian,
as I finished pip install on my own, I saw you post. Great post again!
I purchased your course few months ago and one of the reason why I did it was the images you offered in the course!
Would you consider building an image with BusterOS and OpenCV 4 precompiled for people like me, who would like to save time and nerve to compile on our own? We would be more than happy if we can purchase a prebuilt image from you!
Thanks!
Hi CK — both Practical Python and OpenCV and Raspberry Pi for Computer Vision include a Raspbian .img file that has Buster OS and OpenCV pre-compiled/pre-installed. It sounds like that’s exactly what you need 🙂
Thanks for the quick reply!
So you mean if I go to the purchase page again and download the zipped raspian image file I’ll get the latest image for my Pi 4? Or I’ve to buy the course again?
Do you already own a copy of Practical Python and OpenCV or Raspberry Pi for Computer Vision? If so, just download the latest .img file and it will (1) work with your RPi 4 and (2) include OpenCV 4.
If you don’t own a copy of either book, purchase a copy — you will have have access to the latest Raspbian .img file.
I purchased the Quickstart Bundle…So I am not sure if it counts as “own” a copy…
I downloaded the “Raspbian.zip” again yesterday and it seems like the image is not updated.
Hey CK — if you purchased a copy of the Quickstart Bundle then you certainly own a copy. Can you send me an email (or my contact form) so we can chat more about it?
Do you have a raspbian buster image that supports pi zero w? I assume with the NEON and VFPv3 flags set to true it will cause errors?
Attempted to compile with flags set to false using Pi 3B+ but failed at ~100% and it now refuses to boot.
I do! It can be found inside Practical Python and OpenCV as well as Raspberry Pi for Computer Vision.
Thank you it works installing openCV 4 on rasp pi 4. my question. if using rasp pi camera via CSI port does the main processor(bcm2711) alone will handle the computation? is this the same with smartphone camera system? same question with screen of rasp pi via DSI port. thank you so much from indonesia
If you’re using the CSI port the graphics chip on the card handles grabbing/processing the frames. That’s one of the benefits of using the CSI camera vs. a USB camera (in which the CPU would be used).
hey Adrian Rosebrock, hope you will be fine, we are trying to classifying cat_vs_dog on raspberry pi connected NCS2, using our own trained keras model . please make a tutorial on how to run our own trained model on NCS2.
I have tutorials for that exact question inside Raspberry Pi for Computer Vision.
Thank you for updating all of this information to Buster, and more importantly for me, for giving the hints about installing on a Raspberry Pi Zero. The changes to installing NEON and VFPv3 made for a successful compile of OpenCV 4. The make step took about 16 hours, but it got there!
Congrats on getting OpenCV installed on your Pi, Niles!
i tried running a face recognition program in startup after installing opencv using the above mentioned steps.i get ‘ImportError: no module named imutils.video’.(P.S. i have already installed imutils package using pip install)
It sounds like “imutils” was not installed properly. Try again:
$ pip install --upgrade imutils
Also make sure that you do not have a file named “imutils” in your working project directory.
Hi Adrian!
I tried installing OpenCv 4 on Raspian Buster before this post came out. I successfully installed OpenCv compiling from Source but here’s the catch.
The Python 3 IDLE isn’t pre-installed for Buster therefore I have to spearately install that. So whenever I install the IDLE
Run this command →
source ~/.profile
workon cv
idle
I am not able to ge the opencv in the idle however it works in the terminal shell
source ~/.profile
workon cv
python
cv2.__version__
»version 4.0.2
Does this method solve the IDLE problem? Also do you recommend using Anaconda on Pi?
Python’s IDLE does not respect Python virtual environments. You should either:
1. Use the Python shell
2. Execute your scripts via the command line or use
3. Use Jupyter Notebooks if you want an IDLE-like environment
I finished everything as stated. It works like a charm. But when it came to the last step, i got 3.4.3 instead of 4.1.1 when checking cv2 version. That’s normal right?
Or am I missing something out.
(Completely beginner, sorry)
Which method did you use? Compile from source? Or did you install via pip? If you installed via pip see my note regarding OpenCV 3.4 vs. OpenCV 4.
Hi Isaac
If you do the simpler install, then you will get the 3.4.3 version as right now it seems that is the currently supported wheel build as Adrian had stated. However if you build from source, you should get the latest 4.1.1 version.
Another great blog, just installed it on a PI zero for a simple burglar alarm, based on one of your earlier blogs of course!
Tried to be clever and put all of the install commands in a bash script which meant I missed some errors downloading some files, mainly to do with the gui, but got there in the end.
Congrats on getting OpenCV installed on your Pi Zero, Steve!
Many thanks Adrian.
The pip install on a Raspberry Pi 3 Model B gave me `ERROR: Could not find a version that satisfies the requirement opencv-contrib-python (from versions: none)`.
However, compiling from source worked fine and only took a couple of hours.
Congrats on getting OpenCV installed on your RPi!
Hi Adrian,
Thanks so much for putting this together. I got through all the steps, but I kept getting stuck at the CMAKE command. It kept having trouble finding the python3 libraries. I’m not totally sure why. I found the solution was to just delete everything in the build folder and then run the following command:
sudo apt-get install libatlas-base-dev
Hopefully this save someone else’s time.
Thanks for sharing, Nick!
Will the same method work for aarch64 arm devices?
Thanks! been trying for a while and finally got OpenCV to compile after going through your tutorial.
Congrats on getting OpenCV installed on your RPi, Ali!
Hello Adrian,
using your step-by-step guide OpenCV 4 was compiled and installed on a RPi3B. It was not difficult, but very time-consuming. OpenCV needs to be installed on 3 other RPi3B’s as well. Is there an overview of files and configuration settings which can be copied from one RPi3B to another in order to install OpenCV 4? That might be much faster than compiling it on each RPi individually. Moreover, such an overview can (will) be used to create an ansible-script (playbook) to automate installation (and update) of the set of RPi’s.
Hey Wim — have you taken a look at Practical Python and OpenCV and Raspberry Pi for Computer Vision? Those books include a pre-configured Raspbian .img file that you can use and shortcut the install process.
Hello Adrian — thanks for your quick reply. I take it that your answer implies “no” to my question. In this case maintenance of the RPi’s is based on ansible, allowing for updates with preservation of configuration and data files of other installed packages. Updating OpenCV by starting with a new image implies saving and restoring those configuration and data files.
Hello Adrian thanks for the tutorial. The installation of make is stuck at build target opencv_perf_stereo for almost 10 hours now on my second attempt. the day before it got stuck at the build target opencv_perf_stereo also for 6 hours before I lose my patience (haha) and decided to flash the OS again. Is this normal, should i just wait?
I’m using Raspberry Pi 3B+ with Raspbian Buster.
Try compiling with a single core (versus all four). It will take longer but should avoid any race conditions with the compile. Additionally you should try increasing your swap size.
Hi,
Thanks for such a complete and comprehensive tutorial! I am trying to instal openCV in my raspberry pi 3 b+, and then I am in the cmake part, when I do the check that you make in Figure 9, for the non-free programs I have ano (instead of a Yes). I did copy-paste all the lines and all the rest looks as in your tutorial, what could be the cause?
Thank you in advance
Hey Manuel — it’s hard to say what the exact issue is without seeing the full “cmake” log. If you’re having trouble installing OpenCV on your RPi I would recommend picking up a copy of Practical Python and OpenCV or Raspberry Pi for Computer Vision. Both of those books include a Raspbian .img file with OpenCV pre-installed. All you need to do is download the .img file, flash it to your RPi, and boot.
Hi,
I have a raspberry pi3 and have been following your tutorial to install OpenCV4 with Raspbian Buster. when I compile, all seems to work well until I get to this line
“[100%] Built target opencv_perf_stereo”
It then just hangs. We at this point for 5hrs now.
Suggestions?
Try compiling with just a single core rather than all four cores. Additionally you may want to increase your swap size.
Since I didn’t see anyone here verify that the use of make -j1 worked for them I just wanted to post that it does. I ran through the steps above on my RPi4+ without any issue, however the install using make -j4 on the RPi Zero W had the above issue where it would hang for more than 24 hours. I tried cleaning, reinstalling trying various things and the same result occurred every time. Yesterday I did a clean and then called “make -j1” and let it go. This morning after 19 hours it finally finished and I was able to complete the rest of the steps without issue. So it did take long…I was thinking after the fact that me having the RPi Zero connected to a rechargeable battery pack may not have helped the situation from a power standpoint and might have slowed things down some too. However, 19 hours was my current time it took on a RPi Zero W.
Thanks for sharing this information, Daniel! I appreciate it as I’m sure other PyImageSearch readers do as well.
This is a huge awesome tutorial!! To be perfect, I may just ask if is it possible to get hid of the ” $ ” symbol at the scripts hahahaha.
Thank you, very, very much for it!! Worked just perfectly.
The “$” is meant to indicate the shell/command line prompt. It’s a useful indicator to ensure readers know it’s a command versus code.
Worked first try! Thanks for the detailed post and explanations!
Thanks Chris and congrats on getting OpenCV installed on your RPi!
hy i want to ask can i install this command mkvirtualenv cv -p python2 and this command mkvirtualenv cv -p python3 together? or it must choose one option?
i’m using on raspberry pi 4?
If you want to use two different Python virtual environments then you’ll need to install OpenCV twice, one for each Python version.
Thanks for the tutorial! But something on my PI4 is wrong… when importing cv2 I get the error: Import:error: libQtGui.so.4: cannot open shared object file: No such file or directory
Not sure what is going on here, I have made sure that I am in the virtual environment and that OpenCV is installed within that environment. It’s failing within cv2/__init__.py. Any suggestions?
Oops, nevermind! I fixed the issue by updating my dependencies. Thank you again for the tutorial.
Congrats on resolving the issue, Liam!
I had the same error. Follows a tutorial who doesn’t know how to update dependencies.
https://blog.piwheels.org/how-to-work-out-the-missing-dependencies-for-a-python-package/
I used the 4a method and when I did the sanity check it came up with errors related to the atomic library. When I use LD_PRELOAD= python instead of just python I dont get any errors and cv2 reports as 4.1.1. I tried adding the file path to sys.path, edited /etc/ld.so.conf and even copied the file to every folder in the sys.path with no luck. Any idea what I’m doing wrong?
I’m still trying to get it compiled using different flags in Cmake and following your tutorial luckily I came across this website. Is OpenCV dependent on any Chromium libraries? I removed that package and Wolfram engine. Maybe I should have waited till after? Thanks for all your work.
PyImageSearch reader James provides the solution.
At firs, thank you for this useful guide. I have a question about opencl and gpu support for opencv, is there any chance to run opencv with opencl target on raspberry pi 4b ?
Unfortunately, no. The OpenCL libraries currently available support the Pi 3 but not the Pi 4.
Nevermind I got it to compile finally. It ran to about 96% and it would crash so I switch to 1 core and finsihed up the rest in about another hour. Thanks again….
Congrats on getting OpenCV installed on your Pi, Lee!
Aloha,
I’m following the tutorial with RP4, 1gb memory, on Buster.
I was seeing the following error after following step 4(a), the full compile, when verifying the cv2 install from Python console (step 5):
ImportError: /home/pi/.virtualenvs/cv/lib/python3.7/site-packages/cv2/cv2.cpython-37m-arm-linux-gnueabihf.so: undefined symbol: __atomic_fetch_add_8
I was able to resolve the issue with the following steps:
1 – $ sudo find / -type f -name ‘*atom*.so*’
/usr/lib/arm-linux-gnueabihf/libatomic.so.1.2.0
2 – LD_PRELOAD=/usr/lib/arm-linux-gnueabihf/libatomic.so.1.2.0 python3
3 – Python 3.7.3 (default, Apr 3 2019, 05:39:12)
[GCC 8.2.0] on linux
Type “help”, “copyright”, “credits” or “license” for more information.
>>> import cv2
>>> print(cv2.__version__)
4.1.1
Hope this helps anyone with the same issue…
J
Installing the previous version of `opencv-contrib-python` worked for me:
https://github.com/piwheels/packages/issues/59#issuecomment-554767058
Yep, this got it. Thanks for that, James. Just to finish the thought for anyone who wants a more permanent fix, you can include the LD_PRELOAD command in the .bashrc file in your home directory so that the opencv library will import normally. Goes like:
1 — cd ~
2 — nano .bashrc
3 — #Add this line at the end of your .bashrc file, then cmd/ctrl-o to write
export LD_PRELOAD=/usr/lib/arm-linux-gnueabihf/libatomic.so.1.2.0
Thanks, James. I did the pip install, and your workaround works for the “undefined symbol: __atomic_fetch_add_8” error, but what if don’t want to run Python scripts from command line? Is there a more permanent fix so I can run my scripts in a Python IDE?
Suggestions from anyone much appreciated.
is the code compatible with python 2.7?
When possible I try to provide Python 2.7 support, but you should really be using Python 3.
Hello,
So this works but i need to run the LD_PRELOAD (step 2) everytime.
-workon cv
-LD_PRELOAD
and then it opens python and import cv2 works and the version works.
Is there a way i dont have to write the LD_PRELOAD line everytime?
Thankyou,
Mike
Take a look at the other comments on the post. You can automatically have the command run by updating your “~/.bashrc” file.
Hey Adrian
Love your tutorial by the way. It’s all fine in the command line, but how would I execute the “source” and “workon” command in the Thonny IDE?
Thanks for all your help! 🙂
I don’t use Thonny so I can’t provide you with exact instructions but I did a quick Google search for “thonny python virtual environment”. The links seem relevant to you but I would suggest doing your own research.
So I followed James’ solution and it works, but now I basically have to use “LD_PRELOAD=/usr/lib/arm-linux-gnueabihf/libatomic.so.1.2.0 python3” everytime I want to open python to work on this? If I try the regular way as per your guide, I get that same error
Take a look at the comments — you can update your “~/.bashrc” to automatically handle the LD_REPLOAD command.
I have been trying to get this installed from your guide now for 3 days, this is my first experience with a raspberry pi and it has been beyond difficult and frustrating. I have followed this guide to the T and I cannot get anything working. I’m currently stuck trying to verify the install “import cv2” brings up an error about undefined symbol __atomic_fetch_add_8 Can not find any solutions. I cannot believe how difficult it is to simply install a program on a linux operating system. What do I do to get this to work?
Are you compiling from scratch? Or using the “pip install” method?
I am having the same issue and I am using the “pip install” method
hello, I used both – and the result is the same as Moo. I strictly followed your tips in tutorial. What can we do to make it work?
same issue….Thanks to James I tried your solution but is there no proper solution to this apart from reloading every time?
Got OpenCV 4.1.1 installed on my 3B within a few hours thanks to your guide. Was able to use ‘pip install opencv-contrib-python’ to get precompiled binaries of OpenCV installed from piwheels instead of building from scratch, which is great.
I did run into the ‘undefined symbol’ issue when importing cv2 from python. Like James suggested, setting the LD_PRELOAD took care of the issue for me (even though the ‘$ sudo find / -type f -name ‘*atom*.so*’’ command ran into a permission issue, the file was there, so I was able to run the following):
LD_PRELOAD=/usr/lib/arm-linux-gnueabihf/libatomic.so.1.2.0 python3
Type “help”, “copyright”, “credits” or “license” for more information.
>>> import opencv2
>>>
Hi,
Why are you installing pip3 and pip for python2 ? also, why not taking advantage of apt-get and install pip from there?
Typically apt-get packages are out of date. It’s better to install the latest version.
Hi, Sir. I follow your tutorial twice, The first time I can get on python 3 and can import cv2 in python 3 but when I install dlib I got an error and I delete all files that related to opencv. Today I try again and follow your tutorial and I only can get import cv2 in python 2 cannot in python3. Then actually I can import scipy but now cannot in python2. Any solution for this or I need to flash my sd again to redo it ?? Please help me and i am a freebie in this
I followed instructions above on a Pi3, used NOOBs (as Im a newbie.) Full compile failed at 100%. I restarted and failed again at 100% – one step farther… Then I used “make” (single core) and it completed successfully… THANK YOU Adrian for supporting this community.. Im now reading your CV blogs… and 14 day instruction!!
Congrats on getting OpenCV installed on your RPi, Bob!
i have this situation as well. i have used both compiling from scratch and pip install but the error still remains. And if i use James’s solution, this error appears
“find: paths must precede expression: `/usr/lib/arm-linux-gnueabihf/libatomic.so.1.2.0′
find: possible unquoted pattern after predicate `-name’?”
I’m using Pi4 4gb with Debian.
Be sure to search the blog post for the 2019-11-21 Update if you are encountering an
"undefined symbol: __atomic_fetch_add_8"
error while pip installing OpenCV. A workaround has been added to the blog post. A big thanks goes out to those that notified us of the error.Thanks for this post.
Just a little note.
When you run
>>> cv2.__version__
‘4.1.1’
I expect 4.1.0 since that is the version that your instructions suggest
I also had the “undefined symbol: __atomic_fetch_add_8” error while pip installing OpenCV.
I had installed 4.1.1 in November 2019
To get it working after this, I had to do the following. The PIP line alone did not work:
source ~/.bashrc
mkvirtualenv cv -p python3
If you have a Raspberry Pi Camera Module attached to your RPi, you should install the PiCamera API now as well:
pip install “picamera[array]”
pip install opencv-contrib-python==4.1.0.25
Thanks for sharing, Ira!
Hello Adrian,
Thanks for sharing the installation guideline.
Do you have any tutorial to setup Pycharm based editor with Jupyter notebook (including Python, tensorflow, keras etc.) on Linux machine on top of NVIDIA GPU?
Could you please provide me a pointer if possible?
Thanking you,
Saurabh
Sorry, I don’t have any tutorials for that.
Thank you!
Hi Adrian.
Many thanks for this article, it was very helpful. I have one small issue, i install Visual Studio Code and when i run any code that uses IMPORT CV2, i get the usual ‘No module named ‘cv2’.
Do you know how i get Visual Studio Code to run in the cv virtual environment OR to run the correct Python Interpreter.
Regards
Joe
I’m not a Visual Core Studio user so I don’t know the exact steps but you should look for an “Project Interpreter” setting and then point it to the Python virtual environment.
I did try to point the python interpreter to the VE but it did not see the python.exe interpreter (neither could i). I had the same issue trying to run spyder in the VE also. If i find a solution, i will update this post.
Hi Adrian, i found the solution.
Within VS CODE select File > Preferences > Settings to open your Settings, then select the Workspace Settings tab
Then enter the following within the curly brackets: “python.pythonPath”: “/home/pi/.virtualenvs/cv/bin/python3.7”
Now it sees the VE python interpreter.
🙂
Thanks for sharing, Joe!
I am trying to run some .py code examples with “import cv2” in them. It tells me the library is not installed. but when I test it in the virtual environment in the Terminal I am getting version 4.1.0 as it should be. Not sure what I am missing while trying to run .py scripts with the open cv library.
Are you running your Python scripts from inside the Python virtual environment? Double-check that you are.
Hi, I have the following problem. I have often tried to install Open CV on the Raspberry Pi 4. So far everything went well with the installation. After the installation, however, folders on the desktop can no longer be opened. They open very briefly and then disappear again.
What could the problem be? Does anyone have the same problem?
That is strange behavior but wouldn’t be related to installing OpenCV on your system. Try rebooting your Pi or installing a fresh version of Raspbian.
I’m following the instruction but in Virtual step, I got this message :”No matching distribution found for virtualenwrapper”? virtualenv is installed successfully. Can you show me how to fix this problem!!
Tks in advanced!
Mine is stuck at 100% compiling and it isn’t frozen. What should I do?
Let it sit and see if it finishes. Otherwise, increase your swap and compile with a single core.
Dear Respected Sir
Thank You Very Much
I Just managed to install Opencv 4.1.0 because of your efforts to put
steps
i am really very Happy in the Morning Because of You.
God Bless U
As You r helping Many students like me
I am 100% Joining your MASTER COURSE
Cheers
Congrats on getting OpenCV 4 installed!
And I hope to see you in the course soon 🙂
Once again, this just is great tutorial & instruction in detail like no other person’s post in elsewhere but Adrian’s!
I sincerly congratulate you of lifetime venture with your beautiful & lovely fiancé & wife!
When you have time to explore or able to;
You also posted Tensorflow implementation on Unbunta in your other blog & instruction and I’ll appreciate if you can provide instruction toward Pi4 specifically and if possible, Facenet Inception Resnet V1 into it as well.
I’ve been working on Haarcascade of face detection which I think it only have less than 30% accuracy due to tilted face position & background lighting.
My output & HW setup is here;
and I thought Tensorflow implementation & Facenet Inception Resnet V1combination have more promising feature per this blog & per link as follows;
https://www.youtube.com/watch?v=KjSD9fVHdi8&t=4s
Thank you,
Martin
Great job Martin and thank you for sharing!
Just to clarify, is your specific issue trying to get TensorFlow/Keras installed on your RPi?
Hi,
I found the solution you have to add
-D BUILD_opencv_python3=yes \
When you run the Cmake command
Thanks again for this tutorial
I solved the first problem by using sudo pip3 for the opencv install.
The reason I wanted to use the RPI zero is that it will attach to a battery run arduino robot to supply the eyes for the robot. The PI python program would send commands to the servos on the arduino.
Maybe opencv is overkill for this and I will just have to find and learn another package.
I am getting the same ‘atomic_fetch_…….’error . I used ‘LD…..’ and it worked. But while using this for another project I am still getting the same error.Pls can someone help me?
Update to my previous post re the problem with running mkvirtualenv cv and getting
ERROR: Environment ‘/home/pi/.virtualenvs/cv’ does not contain an activate script.
The solution posted by Simon TheChain at:
https://stackoverflow.com/questions/60252119/error-environment-users-myuser-virtualenvs-iron-does-not-contain-activation-s/60292344#60292344
worked for me. I uninstalled and reinstalled virtualenv and virtualenvwrapper and also modified ~/.bashrc as he suggested.
No more ERROR and the rest of your instructions were fine, with the compiling taking about 50 mins.
Thanks for sharing, Nigel!
This work for me too. Thanks
Thank you very much! You he driven me on the right way. The solution by Jeff Bass worked fine for me. On my Raspi4 now I have OpenCV 4.1.0.
Thanks Adrian and Community 🙂
Solution already posted by Nigel
The solution posted by Simon TheChain at:
https://stackoverflow.com/questions/60252119/error-environment-users-myuser-virtualenvs-iron-does-not-contain-activation-s/60292344#60292344
worked for me. I uninstalled and reinstalled virtualenv and virtualenvwrapper and also modified ~/.bashrc as he suggested.
No more ERROR and the rest of your instructions were fine, with the compiling taking about 50 mins.
I follow your instruction and install opencv on my RPI 4 successfully. It can run with python 2.7 without virtual machine so I can import opencv in IDLE 2.7 but with python3, it cannot run without virtual machine so cannot import in IDLE 3. Do you have any solution with IDLE 3?
You can’t use IDLE with Python virtual environments. Either use the command line or use a more powerful IDLE-like environment such as Jupyter Notebooks.