Today’s blog post is part two in a three-part series on building a complete end-to-end image classification + deep learning application:
- Part 1: How to (quickly) build a deep learning image dataset
- Part 2: Keras and Convolutional Neural Networks (today’s post)
- Part 3: Running a Keras model on iOS (to be published next week)
By the end of today’s blog post, you will understand how to implement, train, and evaluate a Convolutional Neural Network on your own custom dataset.
And in next week’s post, I’ll be demonstrating how you can take your trained Keras model and deploy it to a smartphone app with just a few lines of code!
To keep the series lighthearted and fun, I am fulfilling a childhood dream of mine and building a Pokedex. A Pokedex is a device that exists in the world of Pokemon, a popular TV show, video game, and trading card series (I was/still am a huge Pokemon fan).
If you are unfamiliar with Pokemon, you should think of a Pokedex as a smartphone app that can recognize Pokemon, the animal-like creatures that exist in the world of Pokemon.
You can swap in your own datasets of course, I’m just having fun and enjoying a bit of childhood nostalgia.
To learn how to train a Convolutional Neural Network with Keras and deep learning on your own custom dataset, just keep reading.
Looking for the source code to this post?
Jump Right To The Downloads SectionKeras and Convolutional Neural Networks
2020-05-13 Update: This blog post is now TensorFlow 2+ compatible!
In last week’s blog post we learned how we can quickly build a deep learning image dataset — we used the procedure and code covered in the post to gather, download, and organize our images on disk.
Now that we have our images downloaded and organized, the next step is to train a Convolutional Neural Network (CNN) on top of the data.
I’ll be showing you how to train your CNN in today’s post using Keras and deep learning. The final part of this series, releasing next week, will demonstrate how you can take your trained Keras model and deploy it to a smartphone (in particular, iPhone) with only a few lines of code.
The end goal of this series is to help you build a fully functional deep learning app — use this series as an inspiration and starting point to help you build your own deep learning applications.
Let’s go ahead and get started training a CNN with Keras and deep learning.
Configuring your development environment
To configure your system for this tutorial, I first recommend following either of these tutorials:
Either tutorial will help you configure you system with all the necessary software for this blog post in a convenient Python virtual environment.
Please note that PyImageSearch does not recommend or support Windows for CV/DL projects.
Our deep learning dataset
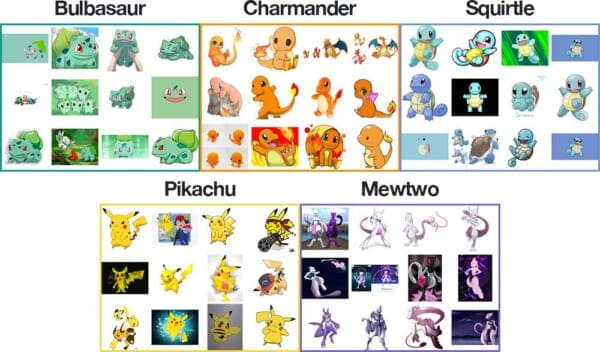
Our deep learning dataset consists of 1,191 images of Pokemon, (animal-like creatures that exist in the world of Pokemon, the popular TV show, video game, and trading card series).
Our goal is to train a Convolutional Neural Network using Keras and deep learning to recognize and classify each of these Pokemon.
The Pokemon we will be recognizing include:
- Bulbasaur (234 images)
- Charmander (238 images)
- Squirtle (223 images)
- Pikachu (234 images)
- Mewtwo (239 images)
A montage of the training images for each class can be seen in Figure 1 above.
As you can see, our training images include a mix of:
- Still frames from the TV show and movies
- Trading cards
- Action figures
- Toys and plushes
- Drawings and artistic renderings from fans
This diverse mix of training images will allow our CNN to recognize our five Pokemon classes across a range of images — and as we’ll see, we’ll be able to obtain 82%+ classification accuracy!
The Convolutional Neural Network and Keras project structure
Today’s project has several moving parts — to help us wrap our head around the project, let’s start by reviewing our directory structure for the project:
├── dataset │ ├── bulbasaur [234 entries] │ ├── charmander [238 entries] │ ├── mewtwo [239 entries] │ ├── pikachu [234 entries] │ └── squirtle [223 entries] ├── examples [6 entries] ├── pyimagesearch │ ├── __init__.py │ └── smallervggnet.py ├── plot.png ├── lb.pickle ├── pokedex.model ├── classify.py └── train.py
There are 3 directories:
dataset
: Contains the five classes, each class is its own respective subdirectory to make parsing class labels easy.examples
: Contains images we’ll be using to test our CNN.- The
pyimagesearch
module: Contains ourSmallerVGGNet
model class (which we’ll be implementing later in this post).
And 5 files in the root:
plot.png
: Our training/testing accuracy and loss plot which is generated after the training script is ran.lb.pickle
: OurLabelBinarizer
serialized object file — this contains a class index to class name lookup mechamisn.pokedex.model
: This is our serialized Keras Convolutional Neural Network model file (i.e., the “weights file”).train.py
: We will use this script to train our Keras CNN, plot the accuracy/loss, and then serialize the CNN and label binarizer to disk.classify.py
: Our testing script.
Our Keras and CNN architecture
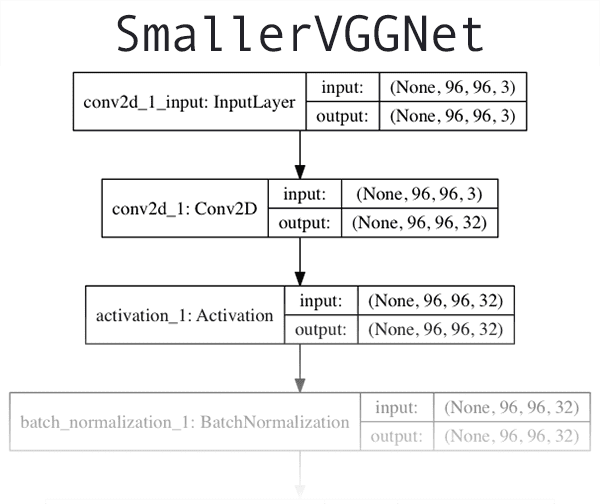
The CNN architecture we will be utilizing today is a smaller, more compact variant of the VGGNet network, introduced by Simonyan and Zisserman in their 2014 paper, Very Deep Convolutional Networks for Large Scale Image Recognition.
VGGNet-like architectures are characterized by:
- Using only 3×3 convolutional layers stacked on top of each other in increasing depth
- Reducing volume size by max pooling
- Fully-connected layers at the end of the network prior to a softmax classifier
I assume you already have Keras installed and configured on your system. If not, here are a few links to deep learning development environment configuration tutorials I have put together:
- Configuring Ubuntu for deep learning with Python
- Setting up Ubuntu 16.04 + CUDA + GPU for deep learning with Python
- Configuring macOS for deep learning with Python
If you want to skip configuring your deep learning environment, I would recommend using one of the following pre-configured instances in the cloud:
- Amazon AMI for deep learning with Python
- Microsoft’s data science virtual machine (DSVM) for deep learning
Let’s go ahead and implement SmallerVGGNet
, our smaller version of VGGNet. Create a new file named smallervggnet.py
inside the pyimagesearch
module and insert the following code:
# import the necessary packages from tensorflow.keras.models import Sequential from tensorflow.keras.layers import BatchNormalization from tensorflow.keras.layers import Conv2D from tensorflow.keras.layers import MaxPooling2D from tensorflow.keras.layers import Activation from tensorflow.keras.layers import Flatten from tensorflow.keras.layers import Dropout from tensorflow.keras.layers import Dense from tensorflow.keras import backend as K
First we import our modules — notice that they all come from Keras. Each of these are covered extensively throughout the course of reading Deep Learning for Computer Vision with Python.
Note: You’ll also want to create an __init__.py
file inside pyimagesearch
so Python knows the directory is a module. If you’re unfamiliar with __init__.py
files or how they are used to create modules, no worries, just use the “Downloads” section at the end of this blog post to download my directory structure, source code, and dataset + example images.
From there, we define our SmallerVGGNet
class:
class SmallerVGGNet: @staticmethod def build(width, height, depth, classes): # initialize the model along with the input shape to be # "channels last" and the channels dimension itself model = Sequential() inputShape = (height, width, depth) chanDim = -1 # if we are using "channels first", update the input shape # and channels dimension if K.image_data_format() == "channels_first": inputShape = (depth, height, width) chanDim = 1
Our build method requires four parameters:
width
: The image width dimension.height
: The image height dimension.depth
: The depth of the image — also known as the number of channels.classes
: The number of classes in our dataset (which will affect the last layer of our model). We’re utilizing 5 Pokemon classes in this post, but don’t forget that you could work with the 807 Pokemon species if you downloaded enough example images for each species!
Note: We’ll be working with input images that are 96 x 96
with a depth of 3
(as we’ll see later in this post). Keep this in mind as we explain the spatial dimensions of the input volume as it passes through the network.
Since we’re using the TensorFlow backend, we arrange the input shape with “channels last” data ordering, but if you want to use “channels first” (Theano, etc.) then it is handled automagically on Lines 23-25.
Now, let’s start adding layers to our model:
# CONV => RELU => POOL model.add(Conv2D(32, (3, 3), padding="same", input_shape=inputShape)) model.add(Activation("relu")) model.add(BatchNormalization(axis=chanDim)) model.add(MaxPooling2D(pool_size=(3, 3))) model.add(Dropout(0.25))
Above is our first CONV => RELU => POOL
block.
The convolution layer has 32
filters with a 3 x 3
kernel. We’re using RELU
the activation function followed by batch normalization.
Our POOL
layer uses a 3 x 3
POOL
size to reduce spatial dimensions quickly from 96 x 96
to 32 x 32
(we’ll be using 96 x 96 x 3
input images to train our network as we’ll see in the next section).
As you can see from the code block, we’ll also be utilizing dropout in our network architecture. Dropout works by randomly disconnecting nodes from the current layer to the next layer. This process of random disconnects during training batches helps naturally introduce redundancy into the model — no one single node in the layer is responsible for predicting a certain class, object, edge, or corner.
From there we’ll add (CONV => RELU) * 2
layers before applying another POOL
layer:
# (CONV => RELU) * 2 => POOL model.add(Conv2D(64, (3, 3), padding="same")) model.add(Activation("relu")) model.add(BatchNormalization(axis=chanDim)) model.add(Conv2D(64, (3, 3), padding="same")) model.add(Activation("relu")) model.add(BatchNormalization(axis=chanDim)) model.add(MaxPooling2D(pool_size=(2, 2))) model.add(Dropout(0.25))
Stacking multiple CONV
and RELU
layers together (prior to reducing the spatial dimensions of the volume) allows us to learn a richer set of features.
Notice how:
- We’re increasing our filter size from
32
to64
. The deeper we go in the network, the smaller the spatial dimensions of our volume, and the more filters we learn. - We decreased how max pooling size from
3 x 3
to2 x 2
to ensure we do not reduce our spatial dimensions too quickly.
Dropout is again performed at this stage.
Let’s add another set of (CONV => RELU) * 2 => POOL
:
# (CONV => RELU) * 2 => POOL model.add(Conv2D(128, (3, 3), padding="same")) model.add(Activation("relu")) model.add(BatchNormalization(axis=chanDim)) model.add(Conv2D(128, (3, 3), padding="same")) model.add(Activation("relu")) model.add(BatchNormalization(axis=chanDim)) model.add(MaxPooling2D(pool_size=(2, 2))) model.add(Dropout(0.25))
Notice that we’ve increased our filter size to 128
here. Dropout of 25% of the nodes is performed to reduce overfitting again.
And finally, we have a set of FC => RELU
layers and a softmax classifier:
# first (and only) set of FC => RELU layers model.add(Flatten()) model.add(Dense(1024)) model.add(Activation("relu")) model.add(BatchNormalization()) model.add(Dropout(0.5)) # softmax classifier model.add(Dense(classes)) model.add(Activation("softmax")) # return the constructed network architecture return model
The fully connected layer is specified by Dense(1024)
with a rectified linear unit activation and batch normalization.
Dropout is performed a final time — this time notice that we’re dropping out 50% of the nodes during training. Typically you’ll use a dropout of 40-50% in our fully-connected layers and a dropout with much lower rate, normally 10-25% in previous layers (if any dropout is applied at all).
We round out the model with a softmax classifier that will return the predicted probabilities for each class label.
A visualization of the network architecture of first few layers of SmallerVGGNet
can be seen in Figure 2 at the top of this section. To see the full resolution of our Keras CNN implementation of SmallerVGGNet
, refer to the following link.
Implementing our CNN + Keras training script
Now that SmallerVGGNet
is implemented, we can train our Convolutional Neural Network using Keras.
Open up a new file, name it train.py
, and insert the following code where we’ll import our required packages and libraries:
# set the matplotlib backend so figures can be saved in the background import matplotlib matplotlib.use("Agg") # import the necessary packages from tensorflow.keras.preprocessing.image import ImageDataGenerator from tensorflow.keras.optimizers import Adam from tensorflow.keras.preprocessing.image import img_to_array from sklearn.preprocessing import LabelBinarizer from sklearn.model_selection import train_test_split from pyimagesearch.smallervggnet import SmallerVGGNet import matplotlib.pyplot as plt from imutils import paths import numpy as np import argparse import random import pickle import cv2 import os
We are going to use the "Agg"
matplotlib backend so that figures can be saved in the background (Line 3).
The ImageDataGenerator
class will be used for data augmentation, a technique used to take existing images in our dataset and apply random transformations (rotations, shearing, etc.) to generate additional training data. Data augmentation helps prevent overfitting.
Line 7 imports the Adam
optimizer, the optimizer method used to train our network.
The LabelBinarizer
(Line 9) is an important class to note — this class will enable us to:
- Input a set of class labels (i.e., strings representing the human-readable class labels in our dataset).
- Transform our class labels into one-hot encoded vectors.
- Allow us to take an integer class label prediction from our Keras CNN and transform it back into a human-readable label.
I often get asked hereon the PyImageSearch blog how we can transform a class label string to an integer and vice versa. Now you know the solution is to use the LabelBinarizer
class.
The train_test_split
function (Line 10) will be used to create our training and testing splits. Also take note of our SmallerVGGNet
import on Line 11 — this is the Keras CNN we just implemented in the previous section.
Readers of this blog are familiar with my very own imutils package. If you don’t have it installed/updated, you can install it via:
$ pip install --upgrade imutils
If you are using a Python virtual environment (as we typically do here on the PyImageSearch blog), make sure you use the workon
command to access your particular virtual environment before installing/upgrading imutils
.
From there, let’s parse our command line arguments:
# construct the argument parse and parse the arguments ap = argparse.ArgumentParser() ap.add_argument("-d", "--dataset", required=True, help="path to input dataset (i.e., directory of images)") ap.add_argument("-m", "--model", required=True, help="path to output model") ap.add_argument("-l", "--labelbin", required=True, help="path to output label binarizer") ap.add_argument("-p", "--plot", type=str, default="plot.png", help="path to output accuracy/loss plot") args = vars(ap.parse_args())
For our training script, we need to supply three required command line arguments:
--dataset
: The path to the input dataset. Our dataset is organized in adataset
directory with subdirectories representing each class. Inside each subdirectory is ~250 Pokemon images. See the project directory structure at the top of this post for more details.--model
: The path to the output model — this training script will train the model and output it to disk.--labelbin
: The path to the output label binarizer — as you’ll see shortly, we’ll extract the class labels from the dataset directory names and build the label binarizer.
We also have one optional argument, --plot
. If you don’t specify a path/filename, then a plot.png
file will be placed in the current working directory.
You do not need to modify Lines 22-31 to supply new file paths. The command line arguments are handled at runtime. If this doesn’t make sense to you, be sure to review my command line arguments blog post.
Now that we’ve taken care of our command line arguments, let’s initialize some important variables:
# initialize the number of epochs to train for, initial learning rate, # batch size, and image dimensions EPOCHS = 100 INIT_LR = 1e-3 BS = 32 IMAGE_DIMS = (96, 96, 3) # initialize the data and labels data = [] labels = [] # grab the image paths and randomly shuffle them print("[INFO] loading images...") imagePaths = sorted(list(paths.list_images(args["dataset"]))) random.seed(42) random.shuffle(imagePaths)
Lines 35-38 initialize important variables used when training our Keras CNN:
EPOCHS:
The total number of epochs we will be training our network for (i.e., how many times our network “sees” each training example and learns patterns from it).INIT_LR:
The initial learning rate — a value of 1e-3 is the default value for the Adam optimizer, the optimizer we will be using to train the network.BS:
We will be passing batches of images into our network for training. There are multiple batches per epoch. TheBS
value controls the batch size.IMAGE_DIMS:
Here we supply the spatial dimensions of our input images. We’ll require our input images to be96 x 96
pixels with3
channels (i.e., RGB). I’ll also note that we specifically designed SmallerVGGNet with96 x 96
images in mind.
We also initialize two lists — data
and labels
which will hold the preprocessed images and labels, respectively.
Lines 46-48 grab all of the image paths and randomly shuffle them.
And from there, we’ll loop over each of those imagePaths
:
# loop over the input images for imagePath in imagePaths: # load the image, pre-process it, and store it in the data list image = cv2.imread(imagePath) image = cv2.resize(image, (IMAGE_DIMS[1], IMAGE_DIMS[0])) image = img_to_array(image) data.append(image) # extract the class label from the image path and update the # labels list label = imagePath.split(os.path.sep)[-2] labels.append(label)
We loop over the imagePaths
on Line 51 and then proceed to load the image (Line 53) and resize it to accommodate our model (Line 54).
Now it’s time to update our data
and labels
lists.
We call the Keras img_to_array
function to convert the image to a Keras-compatible array (Line 55) followed by appending the image to our list called data
(Line 56).
For our labels
list, we extract the label
from the file path on Line 60 and append it (the label) on Line 61.
So, why does this class label parsing process work?
Consider that fact that we purposely created our dataset directory structure to have the following format:
dataset/{CLASS_LABEL}/{FILENAME}.jpg
Using the path separator on Line 60 we can split the path into an array and then grab the second-to-last entry in the list — the class label.
If this process seems confusing to you, I would encourage you to open up a Python shell and explore an example imagePath
by splitting the path on your operating system’s respective path separator.
Let’s keep moving. A few things are happening in this next code block — additional preprocessing, binarizing labels, and partitioning the data:
# scale the raw pixel intensities to the range [0, 1] data = np.array(data, dtype="float") / 255.0 labels = np.array(labels) print("[INFO] data matrix: {:.2f}MB".format( data.nbytes / (1024 * 1000.0))) # binarize the labels lb = LabelBinarizer() labels = lb.fit_transform(labels) # partition the data into training and testing splits using 80% of # the data for training and the remaining 20% for testing (trainX, testX, trainY, testY) = train_test_split(data, labels, test_size=0.2, random_state=42)
Here we first convert the data
array to a NumPy array and then scale the pixel intensities to the range [0, 1]
(Line 64). We also convert the labels
from a list to a NumPy array on Line 65. An info message is printed which shows the size (in MB) of the data
matrix.
Then, we binarize the labels utilizing scikit-learn’s LabelBinarizer
(Lines 70 and 71).
With deep learning, or any machine learning for that matter, a common practice is to make a training and testing split. This is handled on Lines 75 and 76 where we create an 80/20 random split of the data.
Next, let’s create our image data augmentation object:
# construct the image generator for data augmentation aug = ImageDataGenerator(rotation_range=25, width_shift_range=0.1, height_shift_range=0.1, shear_range=0.2, zoom_range=0.2, horizontal_flip=True, fill_mode="nearest")
Since we’re working with a limited amount of data points (< 250 images per class), we can make use of data augmentation during the training process to give our model more images (based on existing images) to train with.
Data Augmentation is a tool that should be in every deep learning practitioner’s toolbox. I cover data augmentation in the Practitioner Bundle of Deep Learning for Computer Vision with Python.
We initialize aug, our ImageDataGenerator
, on Lines 79-81.
From there, let’s compile the model and kick off the training:
# initialize the model print("[INFO] compiling model...") model = SmallerVGGNet.build(width=IMAGE_DIMS[1], height=IMAGE_DIMS[0], depth=IMAGE_DIMS[2], classes=len(lb.classes_)) opt = Adam(lr=INIT_LR, decay=INIT_LR / EPOCHS) model.compile(loss="categorical_crossentropy", optimizer=opt, metrics=["accuracy"]) # train the network print("[INFO] training network...") H = model.fit( x=aug.flow(trainX, trainY, batch_size=BS), validation_data=(testX, testY), steps_per_epoch=len(trainX) // BS, epochs=EPOCHS, verbose=1)
On Lines 85 and 86, we initialize our Keras CNN model with 96 x 96 x 3
input spatial dimensions. I’ll state this again as I receive this question often — SmallerVGGNet was designed to accept 96 x 96 x 3
input images. If you want to use different spatial dimensions you may need to either:
- Reduce the depth of the network for smaller images
- Increase the depth of the network for larger images
Do not go blindly editing the code. Consider the implications larger or smaller images will have first!
We’re going to use the Adam
optimizer with learning rate decay (Line 87) and then compile
our model
with categorical cross-entropy since we have > 2 classes (Lines 88 and 89).
Note: For only two classes you should use binary cross-entropy as the loss.
From there, we make a call to the Keras fit
method to train the network (Lines 93-97). Be patient — this can take some time depending on whether you are training using a CPU or a GPU.
2020-05-13 Update: Formerly, TensorFlow/Keras required use of a method called fit_generator
in order to accomplish data augmentation. Now the fit
method can handle data augmentation as well making for more-consistent code. Be sure to check out my articles about fit and fit generator as well as data augmentation.
Once our Keras CNN has finished training, we’ll want to save both the (1) model and (2) label binarizer as we’ll need to load them from disk when we test the network on images outside of our training/testing set:
# save the model to disk print("[INFO] serializing network...") model.save(args["model"], save_format="h5") # save the label binarizer to disk print("[INFO] serializing label binarizer...") f = open(args["labelbin"], "wb") f.write(pickle.dumps(lb)) f.close()
We serialize the model (Line 101) and the label binarizer (Lines 105-107) so we can easily use them later in our classify.py
script.
The label binarizer file contains the class index to human-readable class label dictionary. This object ensures we don’t have to hardcode our class labels in scripts that wish to use our Keras CNN.
Finally, we can plot our training and loss accuracy:
# plot the training loss and accuracy plt.style.use("ggplot") plt.figure() N = EPOCHS plt.plot(np.arange(0, N), H.history["loss"], label="train_loss") plt.plot(np.arange(0, N), H.history["val_loss"], label="val_loss") plt.plot(np.arange(0, N), H.history["accuracy"], label="train_acc") plt.plot(np.arange(0, N), H.history["val_accuracy"], label="val_acc") plt.title("Training Loss and Accuracy") plt.xlabel("Epoch #") plt.ylabel("Loss/Accuracy") plt.legend(loc="upper left") plt.savefig(args["plot"])
2020-05-13 Update: In order for this plotting snippet to be TensorFlow 2+ compatible the H.history
dictionary keys are updated to fully spell out “accuracy” sans “acc” (i.e., H.history["val_accuracy"]
and H.history["accuracy"]
). It is semi-confusing that “val” is not spelled out as “validation”; we have to learn to love and live with the API and always remember that it is a work in progress that many developers around the world contribute to.
I elected to save my plot to disk (Line 121) rather than displaying it for two reasons: (1) I’m on a headless server in the cloud and (2) I wanted to make sure I don’t forget to save the plot.
Training our CNN with Keras
Now we’re ready to train our Pokedex CNN.
Be sure to visit the “Downloads” section of this blog post to download code + data.
Then execute the following command to train the mode; while making sure to provide the command line arguments properly:
$ python train.py --dataset dataset --model pokedex.model --labelbin lb.pickle Using TensorFlow backend. [INFO] loading images... [INFO] data matrix: 252.07MB [INFO] compiling model... [INFO] training network... Train for 29 steps, validate on 234 samples Epoch 1/100 29/29 [==============================] - 7s 237ms/step - loss: 1.4218 - accuracy: 0.6271 - val_loss: 1.9534 - val_accuracy: 0.2436 Epoch 2/100 29/29 [==============================] - 6s 208ms/step - loss: 0.7470 - accuracy: 0.7703 - val_loss: 2.7184 - val_accuracy: 0.3632 Epoch 3/100 29/29 [==============================] - 6s 207ms/step - loss: 0.5928 - accuracy: 0.8080 - val_loss: 2.8207 - val_accuracy: 0.2436 ... 29/29 [==============================] - 6s 208ms/step - loss: 0.2108 - accuracy: 0.9423 - val_loss: 1.7813 - val_accuracy: 0.8248 Epoch 98/100 29/29 [==============================] - 6s 208ms/step - loss: 0.1170 - accuracy: 0.9645 - val_loss: 2.2405 - val_accuracy: 0.7265 Epoch 99/100 29/29 [==============================] - 6s 208ms/step - loss: 0.0961 - accuracy: 0.9689 - val_loss: 1.2761 - val_accuracy: 0.8333 Epoch 100/100 29/29 [==============================] - 6s 207ms/step - loss: 0.0449 - accuracy: 0.9834 - val_loss: 1.1710 - val_accuracy: 0.8291 [INFO] serializing network... [INFO] serializing label binarizer...
Looking at the output of our training script we see that our Keras CNN obtained:
- 98.34% classification accuracy on the training set
- And 82.91% accuracy on the testing set
The training loss/accuracy plot follows:
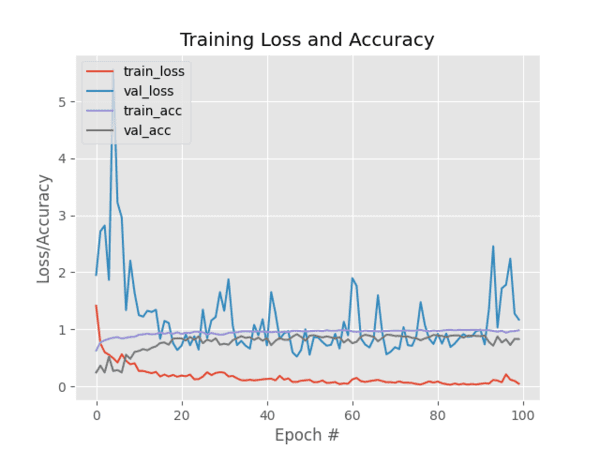
As you can see in Figure 3, I trained the model for 100 epochs and achieved low loss with limited overfitting. With additional training data we could obtain higher accuracy as well.
Creating our CNN and Keras testing script
Now that our CNN is trained, we need to implement a script to classify images that are not part of our training or validation/testing set. Open up a new file, name it classify.py
, and insert the following code:
# import the necessary packages from tensorflow.keras.preprocessing.image import img_to_array from tensorflow.keras.models import load_model import numpy as np import argparse import imutils import pickle import cv2 import os
First we import the necessary packages (Lines 2-9).
From there, let’s parse command line arguments:
# construct the argument parser and parse the arguments ap = argparse.ArgumentParser() ap.add_argument("-m", "--model", required=True, help="path to trained model model") ap.add_argument("-l", "--labelbin", required=True, help="path to label binarizer") ap.add_argument("-i", "--image", required=True, help="path to input image") args = vars(ap.parse_args())
We’ve have three required command line arguments we need to parse:
--model
: The path to the model that we just trained.--labelbin
: The path to the label binarizer file.--image
: Our input image file path.
Each of these arguments is established and parsed on Lines 12-19. Remember, you don’t need to modify these lines — I’ll show you how to run the program in the next section using the command line arguments provided at runtime.
Next, we’ll load and preprocess the image:
# load the image image = cv2.imread(args["image"]) output = image.copy() # pre-process the image for classification image = cv2.resize(image, (96, 96)) image = image.astype("float") / 255.0 image = img_to_array(image) image = np.expand_dims(image, axis=0)
Here we load the input image
(Line 22) and make a copy called output
for display purposes (Line 23).
Then we preprocess the image
in the exact same manner that we did for training (Lines 26-29).
From there, let’s load the model + label binarizer and then classify the image:
# load the trained convolutional neural network and the label # binarizer print("[INFO] loading network...") model = load_model(args["model"]) lb = pickle.loads(open(args["labelbin"], "rb").read()) # classify the input image print("[INFO] classifying image...") proba = model.predict(image)[0] idx = np.argmax(proba) label = lb.classes_[idx]
In order to classify the image, we need the model
and label binarizer in memory. We load both on Lines 34 and 35.
Subsequently, we classify the image
and create the label
(Lines 39-41).
The remaining code block is for display purposes:
# we'll mark our prediction as "correct" of the input image filename # contains the predicted label text (obviously this makes the # assumption that you have named your testing image files this way) filename = args["image"][args["image"].rfind(os.path.sep) + 1:] correct = "correct" if filename.rfind(label) != -1 else "incorrect" # build the label and draw the label on the image label = "{}: {:.2f}% ({})".format(label, proba[idx] * 100, correct) output = imutils.resize(output, width=400) cv2.putText(output, label, (10, 25), cv2.FONT_HERSHEY_SIMPLEX, 0.7, (0, 255, 0), 2) # show the output image print("[INFO] {}".format(label)) cv2.imshow("Output", output) cv2.waitKey(0)
On Lines 46 and 47, we’re extracting the name of the Pokemon from the filename
and comparing it to the label
. The correct
variable will be either "correct"
or "incorrect"
based on this. Obviously these two lines make the assumption that your input image has a filename that contains the true label.
From there we take the following steps:
- Append the probability percentage and
"correct"
/"incorrect"
text to the classlabel
(Line 50). - Resize the
output
image so it fits our screen (Line 51). - Draw the
label
text on theoutput
image (Lines 52 and 53). - Display the
output
image and wait for a keypress to exit (Lines 57 and 58).
Classifying images with our CNN and Keras
We’re now ready to run the classify.py
script!
Ensure that you’ve grabbed the code + images from the “Downloads” section at the bottom of this post.
Once you’ve downloaded and unzipped the archive change into the root directory of this project and follow along starting with an image of Charmander. Notice that we’ve provided three command line arguments in order to run the script:
$ python classify.py --model pokedex.model --labelbin lb.pickle \ --image examples/charmander_counter.png Using TensorFlow backend. [INFO] loading network... [INFO] classifying image... [INFO] charmander: 85.42% (correct)
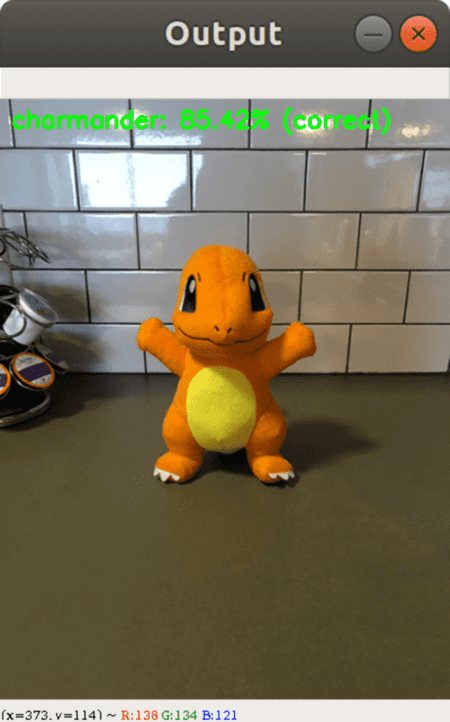
And now let’s query our model with the loyal and fierce Bulbasaur stuffed Pokemon:
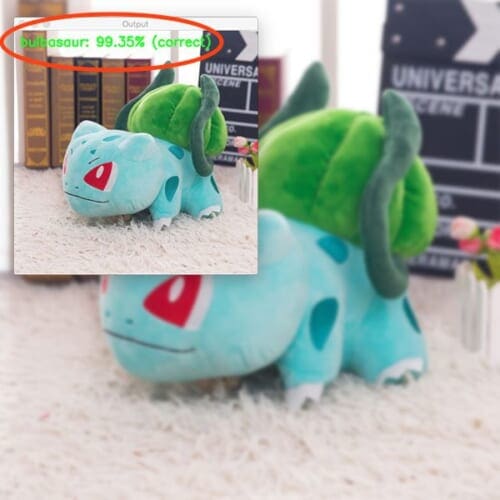
$ python classify.py --model pokedex.model --labelbin lb.pickle \ --image examples/bulbasaur_plush.png Using TensorFlow backend. [INFO] loading network... [INFO] classifying image... [INFO] bulbasaur: 99.61% (correct)
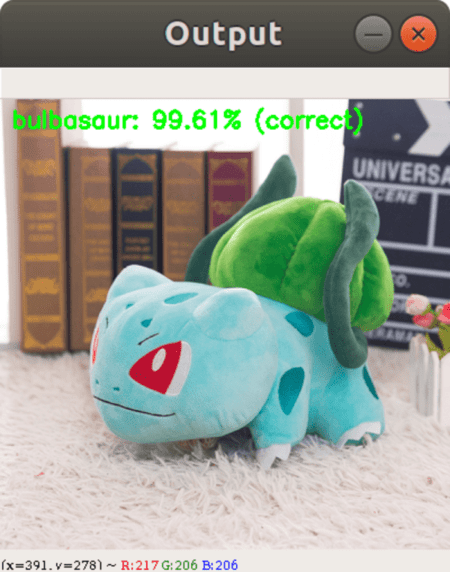
Let’s try a toy action figure of Mewtwo (a genetically engineered Pokemon):
$ python classify.py --model pokedex.model --labelbin lb.pickle \ --image examples/mewtwo_toy.png Using TensorFlow backend. [INFO] loading network... [INFO] classifying image... [INFO] mewtwo: 81.52% (correct)
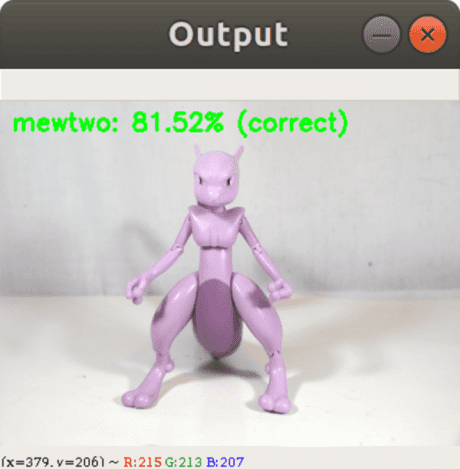
What would an example Pokedex be if it couldn’t recognize the infamous Pikachu:
$ python classify.py --model pokedex.model --labelbin lb.pickle \ --image examples/pikachu_toy.png Using TensorFlow backend. [INFO] loading network... [INFO] classifying image... [INFO] pikachu: 100.00% (correct)
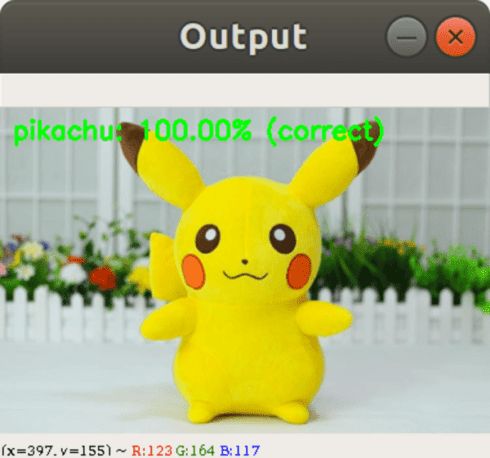
Let’s try the cute Squirtle Pokemon:
$ python classify.py --model pokedex.model --labelbin lb.pickle \ --image examples/squirtle_plush.png Using TensorFlow backend. [INFO] loading network... [INFO] classifying image... [INFO] squirtle: 99.96% (correct)
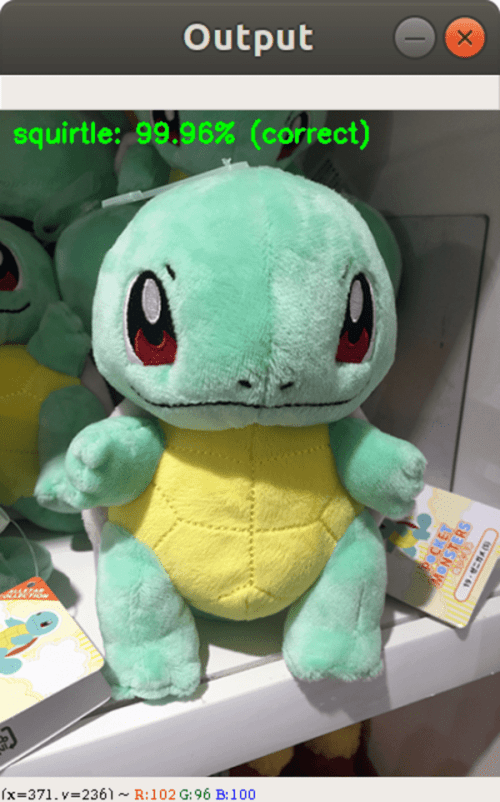
And last but not least, let’s classify my fire-tailed Charmander again. This time he is being shy and is partially occluded by my monitor.
$ python classify.py --model pokedex.model --labelbin lb.pickle \ --image examples/charmander_hidden.png Using TensorFlow backend. [INFO] loading network... [INFO] classifying image... [INFO] charmander: 98.78% (correct)
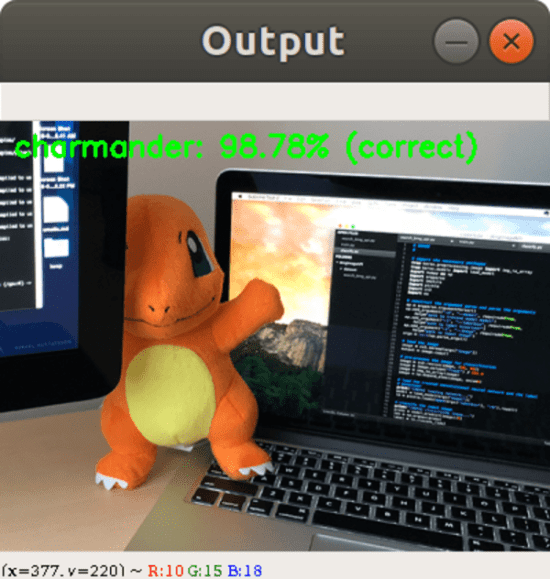
Each of these Pokemons were no match for my new Pokedex.
Currently, there are around 807 different species of Pokemon. Our classifier was trained on only five different Pokemon (for the sake of simplicity).
If you’re looking to train a classifier to recognize more Pokemon for a bigger Pokedex, you’ll need additional training images for each class. Ideally, your goal should be to have 500-1,000 images per class you wish to recognize.
To acquire training images, I suggest that you look no further than Microsoft Bing’s Image Search API. This API is hands down easier to use than the previous hack of Google Image Search that I shared (but that would work too).
Limitations of this model
One of the primary limitations of this model is the small amount of training data. I tested on various images and at times the classifications were incorrect. When this happened, I examined the input image + network more closely and found that the color(s) most dominant in the image influence the classification dramatically.
For example, lots of red and oranges in an image will likely return “Charmander” as the label. Similarly, lots of yellows in an image will normally result in a “Pikachu” label.
This is partially due to our input data. Pokemon are obviously fictitious so there no actual “real-world” images of them (other than the action figures and toy plushes).
Most of our images came from either fan illustrations or stills from the movie/TV show. And furthermore, we only had a limited amount of data for each class (~225-250 images).
Ideally, we should have at least 500-1,000 images per class when training a Convolutional Neural Network. Keep this in mind when working with your own data.
Can we use this Keras deep learning model as a REST API?
If you would like to run this model (or any other deep learning model) as a REST API, I wrote three blog posts to help you get started:
- Building a simple Keras + deep learning REST API (Keras.io guest post)
- A scalable Keras + deep learning REST API
- Deep learning in production with Keras, Redis, Flask, and Apache
What's next? We recommend PyImageSearch University.
84 total classes • 114+ hours of on-demand code walkthrough videos • Last updated: February 2024
★★★★★ 4.84 (128 Ratings) • 16,000+ Students Enrolled
I strongly believe that if you had the right teacher you could master computer vision and deep learning.
Do you think learning computer vision and deep learning has to be time-consuming, overwhelming, and complicated? Or has to involve complex mathematics and equations? Or requires a degree in computer science?
That’s not the case.
All you need to master computer vision and deep learning is for someone to explain things to you in simple, intuitive terms. And that’s exactly what I do. My mission is to change education and how complex Artificial Intelligence topics are taught.
If you're serious about learning computer vision, your next stop should be PyImageSearch University, the most comprehensive computer vision, deep learning, and OpenCV course online today. Here you’ll learn how to successfully and confidently apply computer vision to your work, research, and projects. Join me in computer vision mastery.
Inside PyImageSearch University you'll find:
- ✓ 86 courses on essential computer vision, deep learning, and OpenCV topics
- ✓ 86 Certificates of Completion
- ✓ 115+ hours of on-demand video
- ✓ Brand new courses released regularly, ensuring you can keep up with state-of-the-art techniques
- ✓ Pre-configured Jupyter Notebooks in Google Colab
- ✓ Run all code examples in your web browser — works on Windows, macOS, and Linux (no dev environment configuration required!)
- ✓ Access to centralized code repos for all 540+ tutorials on PyImageSearch
- ✓ Easy one-click downloads for code, datasets, pre-trained models, etc.
- ✓ Access on mobile, laptop, desktop, etc.
Summary
In today’s blog post you learned how to train a Convolutional Neural Network (CNN) using the Keras deep learning library.
Our dataset was gathered using the procedure discussed in last week’s blog post.
In particular, our dataset consists of 1,191 images of five separate Pokemon (animal-like creatures that exist in the world of Pokemon, the popular TV show, video game, and trading card series).
Using our Convolutional Neural Network and Keras, we were able to obtain 82% accuracy, which is quite respectable given (1) the limited size of our dataset and (2) the number of parameters in our network.
In next week’s blog post I’ll be demonstrating how we can:
- Take our trained Keras + Convolutional Neural Network model…
- …and deploy it to a smartphone with only a few lines of code!
It’s going to be a great post, don’t miss it!
To download the source code to this post (and be notified when next week’s can’t miss post goes live), just enter your email address in the form below!
Download the Source Code and FREE 17-page Resource Guide
Enter your email address below to get a .zip of the code and a FREE 17-page Resource Guide on Computer Vision, OpenCV, and Deep Learning. Inside you'll find my hand-picked tutorials, books, courses, and libraries to help you master CV and DL!
Anirban
Brilliant Post as usual.Thanks for sharing your knowledge.
Adrian Rosebrock
Thanks Anirban!
Baterdene
thanks.
Mohamed Emad
Hello Adrian You are as distinct as usual
I have touched something very important that stops too many people
He wonders how to train a nervous network of my own
And how to use cnn resnet models
Thank you very much for your efforts in pushing people seriously forward
I had a question about something to stop me and excuse me for this
I was asking how I was implementing a gradual training for my model
For example, I had a picture base for about 100 objects
Each object has 10,000 pictures
A model was built for this data
When I collect more pictures I want to add them to my model
Here I have to add pictures to the photo collection and then training again on all old and new photos?
As everyone knows, this needs too much time.
I learned about the incremental training but I do not know how to use it in practice
Using any method (caffe or keras or etc)
I hope you will give me a place to help me with the solution
Thank you Adrian
Adrian Rosebrock
Hi Mohamed — you could technically train from scratch but this would likely be a waste of resources each and every time you add new images. I would suggest a hybrid approach where you:
1. Apply fine-tuning to the network, perhaps on a weekly or monthly basis
2. Only re-train from scratch once every 3-6 months
The timeframes should be changed based on how often new images are added of course so you would need to change them to whatever is appropriate for your project. I also cover how to fine-tune a network inside Deep Learning for Computer Vision with Python.
Mohamed Emad
Thank you very much Adrian for your response
I really benefited a lot from you
Always forward
Thank you
Akbar Hidayatuloh
if i want to split my dataset into train, test and validation, what is the good method to do that? not only splitting dataset into train and test only.
Thank you very much
Adrian Rosebrock
You would use scikit-learn’s
train_test_split
function twice. The first time you split the data into two splits: training and testing.You then split a second time on the training data, creating another two splits: training and validation.
This process will leave you with three splits: training, testing, and validation.
AKBAR HIDAYATULOH
Thank you, that is really helpful.
now i want to try top-5 accuracy, do you know how to do that?
Adrian Rosebrock
I discuss rank-5 accuracy, including how to compute it, inside Deep Learning for Computer Vision with Python.
The gist is that you need to:
1. Loop over each of your test data points
2. Predict the class labels for it
3. Sort labels by their probability in descending order
4. Check to see if ground-truth label exists in the top 5 predicted labels
Refer to Deep Learning for Computer Vision with Python for more details, including implementation.
adam_my
nice post Adrian!!!, while running , I have got this error , “error: the following arguments are required: -d/–dataset, -m/–model, -l/–labelbin “, Plz help me in this..
Adrian Rosebrock
You need to supply the command line arguments to the Python script. Make sure you read this tutorial to help get you started.
Gilad
Update:
I tried to do the same on 5 actresses. I got 44% accuracy on the validation and above 80% on the main group.
I have ~280 pictures for each actress.
How to increase the accuracy?
1. increase the number of pictures
2. try to find the face and work on it as ROI
Do you have other ideas? maybe play with the training parameters (alpha)?
Adrian Rosebrock
When performing face recognition you need to:
1. Detect the face and extract the face ROI
2. Classify the face
Training a network to recognize faces on an entire image is not going to work well at all.
Sagar Patil
This dataset looks smaller than MNIST! I thing you should rather teach us how to work with real world data, where there a lot of classes, and the data is much more imbalanced.
Adrian Rosebrock
I discuss how to gather your own training data in a previous post. The post you are commenting on is meant to be an introduction to Keras and CNNs. If you want an advanced treatment of the material with real-world data I would kindly refer you to my book, Deep Learning for Computer Vision with Python, where I have over 900+ pages worth of content on training deep neural networks on real-world data.
Jesper
As always a really great post!
I was wondering if it’s possible to classify several objects in a picture (an image with several pokemons in it?) kinda like in one of your other great posts https://pyimagesearch.com/2017/10/16/raspberry-pi-deep-learning-object-detection-with-opencv/, using the models I train using Keras?
Thank you so much for an awesome post
Adrian Rosebrock
Hey Jesper — I’ll be writing a blog post on how and when you can use a CNN trained for image classification for object detection. The answer is too long to include in a comment as there is a lot to explain including when/where it’s possible. The post will be publishing on/around May 14th so keep an eye out for it.
Jesper
You are the superman of so many things – thanks also for the distinction between image classification and object detection. These blogs are so good!
Thanks again
Adrian Rosebrock
Thank you Jesper, I really appreciate that 🙂
Sean
Hi Adrian, thank you for the great explanation in detail. During my computer vision course we were given 2 projects and I have used a lot of algorithms from your website. In the last project it is not required to use Deep-learning but I went for it anyways as a bonus, and i’m using your pokedex code.
Thanks!
Adrian Rosebrock
Nice! Best of luck with the project Sean. I hope it goes well.
michael alex
Good job as usual Adrian. I learned so much from this blog series!
Adrian Rosebrock
Thank you, Michael! Believe it or not, the series only gets better from here 🙂
Idhant
Hi, I loved this post and found it really useful as a beginner learning about CNN’s.
Although I was getting a “memory error” at this step:
data = np.array(data, dtype=”float”) / 255.0
Actually, I added around 5k images to “data” and have around 13 classes… but clearly it is not working in this case… could you suggest anything to tackle this issue…
Adrian Rosebrock
Your system does not have enough memory to store all images in RAM. You can either:
1. Update the code to use a data generator and augmentor that loads images from disk in small batches
2. Build a serialized dataset, such as HDF5 format, and loop over the images in batches
If you’re working with an image dataset too large to fit into main memory I would suggest reading through Deep Learning for Computer Vision with Python where I discuss my best practices and techniques to efficiently train your networks (code is included, of course).
Alex
hi adrian. how can I use this network to select the object in the image, such as the face.
Adrian Rosebrock
Hi Alex — what do you mean by “select”? Can you clarify? Perhaps you are referring to object detection or face detection?
Alex
how do I use my trained model for object detection
Alex
Object detection
Adrian Rosebrock
You cannot use this exact model for object detection. Deep learning object detectors fall into various frameworks such as Faster R-CNN, Single Shot Detectors (SSDs), YOLO, and others. I cover them in detail inside Deep Learning for Computer Vision with Python where I also demonstrate how to train your own custom deep learning object detectors. Be sure to take a look.
I’ll also have a blog post coming out in early May that will help discuss the differences between object detection and image classification. This has become a common question on the PyImageSearch blog.
Finally, if you are specifically interested in face detection, refer to this blog post.
Bostjan
Hi Adrian,
did you try to use CNN for iris recognition?
Thanks for great post.
Adrian Rosebrock
Hi Bostjan — the iris of the eye? I have not used CNNs for iris recognition.
Abdullah
Hi Adrian
I got this error before starting training
Using TensorFlow backend.
[INFO] loading images…
libpng warning: Incorrect bKGD chunk length
[INFO] data matrix: 252.07MB
[INFO] compiling model.
can you clarify this for me?
moreover, for the val_loss, after about 10 epochs it hit high loss number and get back to normal
thanks
Adrian Rosebrock
This is not an error, it’s just a warning that the libpng library when it tried to load a specific image from disk. It can be safely ignored.
abdullah
Thanks A lot Adrian for sharing the informative knowledge <<
abdullah
by the way, can i use this model for one classification only?
Adrian Rosebrock
I’m not sure what you mean by “one classification only” — could you clarify?
abdullah
for example, i want to detect only cats , so inside dataset folder i will have only cats folder
Adrian Rosebrock
To train a model you need at least two classes. If you want to detect only cats you should create a separate “background” or “ignore” class that consists of random (typically “natural scene”) images that do not contain cats. You can then train your model to predict “cat” or “background”.
Gilad
Hi Adrian,
I would like to know how to set class weights for imbalanced classes in Keras.
I remember I read it in DL4CV but I can’t find it.
Can you point me to the chapter?
Thx,
G
Adrian Rosebrock
Hi Gilad — the chapter you are referring to is the “Smile Detection” chapter of the Starter Bundle.
Tyler
Very neat article, though I think there is still something to be said about Pokemon (and children’s media in general) being pre-engineered to be easily identifiable.
Musing about a real-life equivalent, many esteemed researchers argue over which animals belong is which categories.
I would be interesting to see a neural net which classifies animals among say, the order of ungulates.
Really cool and great work! About to start on some hobby work involving Keras and OpenCV installed in Blender environment.
Wish me luck!
Mustafa
Hi Adrian,
Thanks for your great post. I want to detect more than one object and draw rectangle around them. How can i modify code?
Adrian Rosebrock
Classification models cannot be directly used for object detection. You would need a deep learning object detection framework such as Faster R-CNN, SSD, or YOLO. I cover them inside Deep Learning for Computer Vision with Python.
Akshay Mathur
Amazing post. Really helpful for my project. Eagerly awaiting your next post.
Adrian Rosebrock
Hi Akshay — you can find the Keras + iOS + CoreML post here
SHASHANK
Hey can you also make a tutorial for object detection using keras..
Adrian Rosebrock
I cover deep learning object detection inside Deep Learning for Computer Vision with Python.
srinivas
Sir,
I have your 3 books. Could you please tell me where is the chapter that covers deep learning object detection.
Adrian Rosebrock
The “ImageNet Bundle” and “Bonus Bundle” both cover deep learning object detection.
Navendu Sinha
Adrian a great post, something I have been looking forward to. How would you save the Keras Model in a h5 format.?
Adrian Rosebrock
If you call the
save
method of amodel
it will write it to disk in a serialized HDF5 format.AKBAR HIDAYATULOH
# scale the raw pixel intensities to the range [0, 1]
data = np.array(data, dtype=”float”) / 255.0
labels = np.array(labels)
when i’m doing scaling my own data set on size 224 x 224 i got memory error, but the error not occurred if i used size 128 x 128.
How to solve that error? i need to use the data set with size 224 x 224
thank you very much,
Adrian Rosebrock
Your system is running out of RAM. Your entire dataset cannot fit into RAM. You can either (1) install more RAM on your system or (2) use a combination of lazy loading data generators from disk or use a serialized dataset, such an HDF5 file. I demonstrate how to do both inside Deep Learning for Computer Vision with Python.
Bog Flap
Ran this on your deep-learning-for-computer-vision AMI on AWS using a c4.2xlarge (the c4.xlarge instance type gave ALLOC errors, out of memory?) instance type and got the following
[INFO] serializing label binarizer…
Exception ignored in: <bound method BaseSession.__del__ of >
Traceback (most recent call last):
File “/home/ubuntu/.virtualenvs/dl4cv/lib/python3.5/site-packages/tensorflow/python/client/session.py”, line 701, in __del__
TypeError: ‘NoneType’ object is not callable
Adrian Rosebrock
This is a problem with the TensorFlow engine shutting down properly. It will only happen sporadically and since it only happens during termination of the script it can be safely ignored.
Shubham Kumar
Hi Adrian,
Thanks a lot for such a wonderful post. I am doing my project somewhat similar to this. But in my dataset, I have only two Labels.
One is background and in another different person with the background. I want to detect the presence of these people i.e i want to classify images into presence or absence (based on the presence of a person). But images in my dataset are of size 1092 X 1048 pixels. I have resized them to 512 X 512 using cv2.resize() function.
My question is can I use this same model for the training. If not, how can I decide the model suitable for this case? I believe I have to use a deeper network because the size of images used is much large.
Thanks.
Adrian Rosebrock
Instead of training your model from scratch is there a reason you wouldn’t use existing deep learning networks that are trained to perform person detection? Secondly, if you apply face detection using Haar cascades or HOG + Linear SVM you may be able to skip using deep learning entirely.
Depending on your input images, in particular how large, in pixels, the person is in the image, you may need to play around with larger input image dimensions — it’s hard to say which one will work best without seeing your data.
scott
Great post! I went through this exercise with 250 images of water bottles, 250 of tennis balls, and 60 of dog poop. Yes dog poop. There’s a story in there for later. Anyway, it classifies anything that looks like any of the three classes as dog poop and one image of a tree as a tennis ball with 50% confidence. Most of the images are fairly well cropped. The failures on water bottles and tennis balls really surprise me. Is it likely that I just don’t have enough samples of the dog poop class?
Adrian Rosebrock
You may not have enough examples of the dog poop class but you may also want to compute the class weights to handle the imbalance.
Bog Flap
Ran this code on AWS running a c4.2xlarge instance. No problems. Messed up first time using the wrong AMI image, Version 1.2 is required. I am running this again now using bee images obtained using the bing image search as outlined by you Adrian, about 11000+ images with 35 classes. I suspect I may need to run this on a GPU instance, only time will tell.
Adrian Rosebrock
Congrats on getting up and running with your dataset and network! For 11,000 images I would likely suggest a GPU instance, but that really depends on which model architecture you are using.
Bog Flap
You are quite right. Do not have the time or budget to use CPU only. Even using just a single GPU gives a ten times reduction in the time to produce the model, that is using a p2.xlarge.
So now I am going to look at the Microsoft offering and see how it fairs.
Bog Flap
That is bee’s as in honey bees
Dirk
Adrian,
thanks for your great work. These posts are extremely helpful.
That said, I do have a question and wonder if you can help. I’m running a paperspace P5000 instance w/ 16GB GPU memory and 30 GB general memory. When I was running your example w/ TensorFlow GPU support I got a memory warning/error.
…
W tensorflow/core/framework/op_kernel.cc:1273] OP_REQUIRES failed at constant_op.cc:207 : Resource exhausted: OOM when allocating tensor with shape[32,128,8,8] and type float on /job:localhost/replica:0/task:0/device:GPU:0
…
Is there any way to set this up, so it does not run into any issues? One would think that 16GB are enough for this example?
Thanks in advance for your answer.
Dirk
Adrian Rosebrock
Hey Dirk, I’m sorry to hear about the issues with the training process. 16GB of memory is way more than sufficient for this project. My guess is that you may be running some other job on your GPU at the same time and TensorFlow cannot allocate enough memory? Otherwise it may be a Paperspace issue. Perhaps try to launch a new instance and see if it’s the same result? Unfortunately I’m not sure what the exact error is, other than it’s likely an issue with the specific instance.
Matt
Hi Adrian,
Really excited to get something working from this amazing series. I’m hitting an error running my train.py – I get to the line:
[INFO] compiling model…
and get a traceback error: AttributeError ‘NonType’ object has no attribute ‘compile’
I followed along and created all the scripts while going through you’re posts. I don’t currently have a .model file in my project structure, but figured it would be generated at this point of execution. What am I missing?
Thanks!
Adrian Rosebrock
It looks like your “model” object was never defined. You do not recommend copying and pasting along with the tutorial. It’s too easy to miss code snippets or point them in the right place. Make sure you use the “Downloads” section of this tutorial to download my code. From there you can compare it to your own and determine what snippet you missed.
Bog Flap
Is it possible to convert the saved model to a format that can be used by the Movidius Neural Compute Stick (NCS). From the NCS documentation it seems that it will accept Caffe or TensorFlow format models.
I know “read the docs” but I am wondering of anybody knows off the top of their heads or have even attempted to use the NCS in this context?
I am looking to use this in conjunction with a Raspberry Pi. Not the same kudos as the Apple but a-lot cheaper overall.
Bog Flap
Dummkopf. I just spotted your article “Getting started with the Intel Movidius Neural Compute Stick”
Adrian Rosebrock
Keras models are not directly supported by the Intel NCS SDK and their team but from what I understand it is on their roadmap. There is an open source tool that claims to port Keras models to TensorFlow graphs to NCS graphs but I have not tried it and cannot speak to it (other than it exists).
Peshmerge
Hi Adrian,
Thanks for this great tutorial!
I have a question.
After training model with all pokemons. Can I remove a specific pokemon (for example Charmander) such that it can’t be recognized anymore?
How can I do that?
Adrian Rosebrock
Thanks, I’m glad you enjoyed it! 🙂
You would need to apply transfer learning, in particular fine-tuning to remove or add classes from a trained network. I cover transfer learning and fine-tuning inside Deep Learning for Computer Vision with Python.
Peshmerge Morad
Thanks Adrian! You Rock 🙂
Shashank Rao
Hey, can you also make a tutorial to develop a object detection model using keras: SSD.
Adrian Rosebrock
Hey Shashank — Deep Learning for Computer Vision with Python already covers object detection, SSDs, and Faster R-CNNs. Give it a look!
silverstone
Hey Adrian,
First of all thank you for this great tutorial. It helped me a lot! Now I’m trying to deploy Keras model on Heroku with Flask but I couldn’t handle it. Can you make a tutorial about it?
MImranKhan
i am on window and run this command
python classify.py –model pokedex.model –labelbin lb.pickle \
–image examples/charmander_counter.png
but getting this error anybudy can help me
usage: classify.py [-h] -m MODEL -l LABELBIN -i IMAGE
classify.py : error: the following arguments are required: -i/–image
Adrian Rosebrock
It looks like you’re using the command line arguments correctly but it is not finding the image argument. Perhaps in Windows you need to enter all the arguments on one line without the backslash.
jay
Hi Adrian,
I’m a bit confused as to what “% (incorrect) or % (correct)” is telling us.
Say for example we were to try to classify an image of a dog after we train our model, and it outputs “mewtwo: 90% (incorrect)”, what is this telling us? Does this mean that it is 90% sure that it is not a mewtwo?? If that’s the case, how did it come up with the “mewtwo” part being that the input image is titled “dog_test”
I hope the question makes sense
thanks for all your hard work in making these tutorials they are incredibly helpful
thanks
Adrian Rosebrock
The “correct” and “incorrect” text is determined via the filename. It’s only used for visual validation and to show us that our network correctly predicted an object. It will check the filename for the class label and then compare that to the prediction. If it matches then the prediction is “correct”. If it does not match, the prediction is “incorrect”.
AKBAR HIDAYATULOH
how to decode the predictions? so on the output shows all classes that we have, not only one class?
thank you
Adrian Rosebrock
Hey Akbar — are you referring to showing the probabilities + human readable class labels for each possible label?
AKBAR HIDAYATULOH
yes, so i can implement that with flask to create rest api
Adrian Rosebrock
An easy way to do this would be to use the LabelEncoder object’s “.transform” method.
Lisa
Thanks Adrian for the wonderful post. I have question. If I want to run the model for image size 28x28x4 (28 pixels, 4 bands R,G,B,NIR) where should I modify in the script?
Thanks again
Adrian Rosebrock
Yes, you will need to modify the network to accept an extra channel provided you would like to pass it through the network.
Lisa
Hi Adrian, Thanks for your reply. Can you briefly tell me how do I do it? Can you point me to some resources so I can learn how to do it
Adrian Rosebrock
Unfortunately I do not have any tutorials on the topic and none come to mind off the top of my head. If I come across any I’ll come back and update this comment.
Lisa
I get an error AttributeError: ‘LabelBinarizer’ object has no attribute ‘classes_’
Can you help me ?
Adrian Rosebrock
Hey Lisa — what version of scikit-learn are you using?
Lisa
I am using scikit-learn version 0.19.1
Adrian Rosebrock
I created this project using scikit-learn 0.19.0 so I doubt that’s the issue. Perhaps try re-installing scikit-learn and see if that resolves the issue.
adam_my
Hello Adrian,thanx a lot for your contribution.I have tried this and got a error like this
“ValueError: y has 0 samples: array([], dtype=float64)” .Plz help me in this..
Adrian Rosebrock
What line of code is throwing that error?
Shubham Pandey
Hey Adrian, I have one question. Suppose i have large collection of images say 5000 in each category and i do not want to use data augmentation just to reduce the burden on my CPU. i.e. i want to skip these lines:
aug = ImageDataGenerator(rotation_range=25, width_shift_range=0.1,
height_shift_range=0.1, shear_range=0.2, zoom_range=0.2,
horizontal_flip=True, fill_mode=”nearest”)
How i can do that and how i need to modify model.fit_generator()
H = model.fit_generator(
aug.flow(trainX, trainY, batch_size=BS),
validation_data=(testX, testY),
steps_per_epoch=len(trainX) // BS,
epochs=EPOCHS, verbose=1)
Please help.
Adrian Rosebrock
Is there a particular reason you want to skip data augmentation? Typically you would use it in nearly all situations. If you do not want to use the data augmentation object you can just call model.fit.
Shubham Pandey
I have already created multiple images from sample images using contrast, brightness adjustment and adding random noise. After combining these different sets i have final collection of data-sets in which every class has around 5000 images. All these pre-processing is done using openCV and python. Also i am working on CPU, so i wanted to reduce the complexity.
I do not want to perform data augmentation like horizontal flip, crop and others because it may eliminate the required region of interest.
Adrian Rosebrock
Got it, that makes sense. If you have already created your image dataset manually and created the data augmentation manually then you would just call the “.fit” method of the model. That said, I would still recommend creating a custom Python class to perform your required data augmentation on the fly.
ImranKhan
Hi, There is another way to write this im not using cmd argument
filename = args[“image”][args[“image”].rfind(os.path.sep) + 1:]
correct = “correct” if filename.rfind(label) != -1 else “incorrect”
Adrian Rosebrock
You would simply remove those lines. They would not be needed if (1) you are not using command line arguments and (2) your input image paths would not contain the label for the image (which the code would use to validate that the prediction is indeed correct).
Arun
Hello Adrian,
Great post as always. I am trying to use the code for binary classification (say cat vs dog).
Gathered around ~200 samples each using Bing API.
1. changed loss function to binary_crossentropy
2. changed the final Dense layer to have one class. (Is this right ?)
I am stuck at ~55% accuracy even after 100 epochs. Both training and test accuracy are low.
What am I missing here ? What needs to be changed ? Really appreciate your help.
Thanks.
Adrian Rosebrock
No, the final dense layer needs to have as many nodes as there are class labels. If you have two classes you need two nodes in that final dense layer.
Shubham Kumar
I did not get the concept behind it. why you have given same input_shape, each time you are using model.add function.
model.add(Conv2D(64, (3, 3), padding=”same”,input_shape=inputShape))
After every convolutional layer, the input shape should change. Am I wrong? Please clear my doubts.
Thanks.
Adrian Rosebrock
Are you asking why I explicitly use the padding=”same” parameter? If so, I only want to reduce the volume size via the pooling operations not via convolution.
Shubham kumar
No, i was asking about parameter “input_shape=inputShape”. Because after every convolutional layer, the input shape should change but here initial input shape of image is provided to every layer.
I am really confused with the parameter input_shape.
Adrian Rosebrock
The CONV layer is the first layer of the network. We define the input shape based on the parameters passed to the “build” method. For this example, assuming TensorFlow ordering, the input shape will be (96, 96, 3) since our input images are 96×96 with a depth of 3. Based on our CONV and POOL layers the volume size will change as it flows through the network.
For more information, examples, and code on learning the fundamentals of CNNs + Keras I would recommend taking a look at Deep Learning for Computer Vision with Python where I discuss the topic in detail.
Arun
Please correct me if I am wrong.
I think what Shubham is asking is, why are we giving inputShape each time we add Conv2D to our model. Is it not enough to give to the first layer alone ?
Rest of the layers, it should be automatically calculated from the previous layer’s dimensions right ?
In this case, even if we pass inputShape to Conv2D in other than first layer keras will ignore it I guess. Even if we remove inputShape parameter in the later layers it should run fine. (it ran fine for me)
Adrian Rosebrock
Thanks Arun! I understand the question now.
Yes, the input shape does not have to be explicitly passed into the Conv2D layer after the first one. It does for the first, but not for all others. I accidentally left it in when I was copying and pasting the blocks of layers. I’ll get the post updated to avoid any confusion. Thanks Arun and Shubham!
Dave Xanatos
Thanks again for this. I just got back to this today and am running into an issue: It gets all the way to [INFO] training network… and then errors out with (ultimately) this at the end of the traceback:
while using as loss ‘categorical_crossentropy’ expects targets to be binary matrices (1s and 0s) of shape (samples, classes). If your targets are integer classes, you can convert them to teh expected format via:
from keras.utils import categorical y_binary = to_categorical(y_int)
Any ideas what I must have screwed up to be able to get that far, but no further?
Thanks for any help,
Dave
Prince Bhatia
Hi dave,
i guess this error is all because of data. I tried using my own data set and received the same error.
Kin
Thanks for such an awesome post. Pokedex.model is an unknown area. Did you code anything there which is not provided. What exactly it is?
Adrian Rosebrock
Hi Kin — could you clarify what you mean by “an unknown area”? I’m not sure what you are referring to.
Kin
Sorry Adrian, I didn’t frame my question correctly. I wanted to understand how to made pokedex.model. Is it pre-built for you prepared it. I am new to Deep learning and Computer Vision. Pardon me if it’s a stupid questions.
Adrian Rosebrock
The “pokedex.model” file is created after you run the “train.py” file in this post. The “train.py” file trains a Keras CNN. This model is then serialized to disk as “pokedex.model”. If you’re new to deep learning I would suggest working through Deep Learning for Computer Vision with Python to help you get up to speed.
Kin
Hi Adrian, thanks for the response. I will definitely start referring that.
Danny
Hi Adrian, really thanks for the post, I tried it, and it works great, I added pidgeotto and works great to, but I dowloaded a dataset of food from here
the dataset is the same as the pokemon one, but there are a lot of classes, at the first time, I got the error in this line
image = image.astype(“float”) / 255.0″
Memory error”,
then I tried only with 20 classes and is running, but every Epoch have 500 steps, and every time I see the next message :
W tensorflow/core/framework/allocator.cc:101] Allocation of 33554432 exceeds 10% of system memory.
But is working till now, is too much time, I dont know, maybe my computer is not good enough for running with that dataset, or I have to change the dataset, or make it for parts, I need help, thanks for your time.
Adrian Rosebrock
This tutorial assumes that you can fit the entire image dataset into memory. The dataset is too large for you to fit into memory. Take a look at Keras’ “flow from directory” methods as a first start. You should also take a look at Deep Learning for Computer Vision with Python where I demonstrate how to work with datasets that are too large to fit into memory.
Diego
Hi Adrian!, great job! i have a question… i was testing the neural network for facial recognition and the result i think was good with the training set, but with my testing set it shows “incorrect” and displays the correct name of the face label. and that result confused me. can you explain me why that happens? i’m new on this and i want to learn and understand more about it. pls help me to understand why it recognizes the face but shows incorrect.
Adrian Rosebrock
I should really remove the “correct/incorrect” code from the post as it seems to be doing more harm than good and just confusing readers. Keep in mind that our CNN has no idea if it’s classification is correct or not. We validate if the CNN is correct (or incorrect) in its prediction by letting it investigate the input file path. If the input file path matches the correctly predicted label, we mark it as correct. This requires that our input file paths contain the class label of the image. This is done only for visualization purposes.
Again, if it’s confusing you, ignore that part of the code. I’ll be ripping it out of the post next week as again it’s just causing too much confusion.
Lee
Hi Adrian, I face this problem when I try to compile the code as you mention:
“TypeError: softmax() got an unexpected keyword argument ‘axis'”
any idea how to solve this?
thanks for your help
Adrian Rosebrock
Hey Lee — what version of Keras are you using? I haven’t encountered that particular error before.
usup
Hi Adrian
can the above code run on a laptop? for example laptop i use i5 and 8gb ram?
thanks in advance, very cool tutorials
Adrian Rosebrock
Yes, the code in this tutorial can run on a laptop (you do not need a GPU). If you want to use a different dataset keep in mind that this method will store the entire image dataset in memory. For a large dataset you’ll run out of RAM so you would need to either (1) update the code to apply Keras’ flow through directory or (2) follow my method inside Deep Learning for Computer Vision with Python where I demonstrate how to serialize an image dataset to disk and then efficiently load batches from the dataset into memory for efficient training.
Prince Bhatia
Hi Adrian,
How can i test on batch not on individual images? i want to test it on batch.
Adrian Rosebrock
The
model.predict
method will naturally accept batches of images, and in fact, our code is already working for batch processing, we are just using a “batch of one” for this example. To build a batch with more than one image you would loop over all images apply the pre-processing steps on Lines 26-29, building a NumPy array of images as you go. From there you can pass the entire batch through the network. If you’re interested in learning more about batch image classification be sure to refer to Deep Learning for Computer Vision with Python.Prince Bhatia
Hi adrian,
i was thinking what if in test images there are also images which doesn’t contain Pokemon toys then what output it should produce.?
Adrian Rosebrock
I would suggest training a separate class called “background” or “ignore”. Take a look at this blog post for more information.
Josep
Hi, if we have 1000 pokemon images for each class, how we know wich epochs and batch size would be correct in order to have a good accuracy?
Adrian Rosebrock
The number of epochs and batches are called “hyperparameters”. We normally run many experiments to manually tune such hyperparameters. The batch size wouldn’t typically change (it’s normally the largest value that could fit in your GPU). The epochs may change but you would manually run experiments to determine this.
Aman
Hello
I am trying to implement my own dataset on this CNN model . Is it possible for the CNN to take multiple images at the same time and then classify. For example If i give 20 images of just charmandar during the testing phase and the network would use all those 20 images and make a decision based on those images that what type of pokemen it is?
Thank you
Adrian Rosebrock
Yep! What you are referring to is called “batching”. CNNs naturally batch process images. You would build a NumPy of your (preprocessed) images and then pass them to the .predict method of the model. The model will classify all 20 of your images and return the probabilities of each label. If you had 20 images and 100 classes you were predicting your returned array would be 20×100.
Aman
what if I give it 20 different images of the same pokemon and I want only one prediction?.
For my application I have a time series classification problem i.e I have the data which has multiple time steps(samples) and each time step has multiple images but the same class and I want the model to take one time step consisting of multiple images and predict based on that complete time step
Also I do not know If I can specify each sample during the training phase or not to improve the accuracy of the model
Adrian Rosebrock
There are a few ways to approach this but the most simple method would be to make predictions on all 20 images and then average the probabilities for each class together.
tomdertech
Hi Adrian,
In the “limitations” section you mention that “When this happened, I examined the input image + network more closely and found that the color(s) most dominant in the image influence the classification dramatically.”
How do you delve into the model to find out what “features” such as color has the most “weight”. I wouldn’t have thought that the model is human readable?
Regards,
Tom
Adrian Rosebrock
You can visualize the activations for each layer. This article on the official Keras blog will help you get started.
Daniel
Hello. I am trying to do a model with a different dataset (only with two classes), and I stuck in this error, and I don’t know how to fix it. Could you bring me a hand with it?
This is an image of the error that I mentioned:
https://drive.google.com/open?id=1eZd-eeCSajYiOAZqKLenT3eI7u7Vzhqq
Thanks.
Adrian Rosebrock
The scikit-learn implementation of LabelBinarizer will not work for only two classes. Instead, you should use the “np_utils.to_categorical” function included in Keras. Also make sure you swap out categorical cross-entropy for binary cross-entropy. Be sure to refer to this post to help you get started.
Sridhar
Hi Adran,
Your posts and your books are highly inspirational and every time I read it enlightens more on these technologies. I tried this example as is and works absolutely fine and results are amazing. I have a question for you. I am already having both your books ppcv and DLCV (P bundle)
I just want to keep 32 pixel X 32 pixel images of training data which a shape of an object. Now I tried the same code. It fails. It gives me the following error
ValueError: Error when checking target: expected activation_7 to have shape (None, 2) but got array with shape (106, 1)
So can you please help me where I have to change the code in the above exercise.
Adrian Rosebrock
Based on the error I think you have an issue parsing your class labels. Double-check your label parsing and ensure they are vectorized properly.
Martin
Hi Adrian
I am experiencing the same error.
How do I check that they are vectorized properly?
Adrian Rosebrock
After the “for” loop started on Line 51 ends just write your labels to your terminal:
print(labels)
Make sure the output is what you expect. In this case your input paths are likely incorrect in which case the labels list won’t be populated properly.
Ben Bartling
Hi Adrian,
When I run the code, these warnings pop up:
libpng warning: iCCP: known incorrect sRGB profile.
Is that anything I should be worried about? Should I modify my training data??
I just found your blog and running the code examples are really easy & well written compared to others… Will your new deep learning book go on sale again? I should have jumped on that!
Thanks…
Adrian Rosebrock
That is a warning from the libraries used to load PNG images from disk via OpenCV. It is just a warning, it can be safely ignored and will not have an impact on training your Keras model. As for a sale on my deep learning book, no, I do not have any plans to run another sale.
Ben
Hi Adrian,
Can you help me out on one more tip? When I run the classify.py file after training, I get an error:
classify.py: error: the following arguments are required: -i/–image
I’m also on a linux OS and everything is working up here… Thanks so much for your time to respond…
Adrian Rosebrock
If you’re new to Python command line arguments you’ll want to read this blog post.
Rui
Hi Adrian!
I want to perform image classification on a dataset made of 1000 classes of very similar objects (medical pills). I am going to fine-tune a pre-trained model like mobilenets or Inception and then my idea is to deploy the model in a mobile app (Android).
I am wondering about the hardware limitations of the smartphone because the majority of tutorials and examples of mobile applications regarding image classification or object detection focus on a limited amount of classes. I am not sure if this methodology of the 3-post series is adequate for my specific problem, what do you think?
Besides, I am worried about the similarity between the classes, which I believe would be an obstacle to obtaining a good performance!
Do you think it is possible to achieve a good performance?
Thank you so much for this series of posts, I really appreciate your work! Keep going!
Adrian Rosebrock
1. You’ll likely want to use a different architecture than the one I discussed here but keep in mind that state-of-the-art networks such as MobileNet can run on mobile devices. I wouldn’t be too worried about that yet.
2. Instead, what you should be worried about is the similarity of pills. Try to solve that problem first. I have a lot of experience with prescription pill identification and I can tell you it’s an incredibly challenging problem.
3. Spend a lot of time gathering data of your example pills you want to recognize. You’ll need the data.
Rui
Thanks for the reply, Adrian.
I followed your series of posts which ended with the “Deep learning in production with Keras, Redis, Flask, and Apache” and Ifound it pretty awesome. It would be a solution if the mobile app used the API to perform the classification, what do you think?
What would you recommend to deal with the similarity of the pills and what does this problem so challenging, in your opinion?
In my dataset, I have only 10 or so pictures per class. Would you do data augmentation beforehand?
Thank you so much for you answers! It’s really important for me to get feedback from an expert.
Adrian Rosebrock
You could have the API perform classification but keep in mind that will require the mobile device to upload the image to the API which of course requires an internet connection. That may or may not be possible in some situations. You will need to do your research there.
If you have only 10 images per class I would spend your time building a larger dataset. You should be in the 100-1,000 images/class range before trying to train a CNN on pill images.
Prince Bhatia
Hi Adrian,
I am performing image classification on a data set made of 6 different classes of 2000 images in each class of watermark detection.
I tried your model but achieved the accuracy not more than 69%. I just found out that there are quite similar images but with different watermarks in each class, will they be causing the problem to achieve high accuracy on running my model on CPU version.?
Is there any other model would you recommend?
How can i achieve high rate of accuracy when and what are the parameters do we need to keep in mind while preparing dataset?
Adrian Rosebrock
Exactly which methods you should use and which techniques you should try is highly dependent on your project. Without knowing what those six classes are or what your end goal is it’s extremely challenging to provide guidance. My best general advice in this instance would be to read through Deep Learning for Computer Vision with Python where I discuss my tips, tricks, and best practices when training CNNs on datasets.
Xavier
Hi,
This is great as usual.
I am wondering how do you chose the model to classify with in testing. The last (100th) epoch may not be the best. So, do you choose the one with the best validation accuracy ? Or the smallest validation loss ?
Regards,
Xavier
Adrian Rosebrock
It really depends on the application. Keras includes methods and callbacks to handle serializing the “best” model based on whichever metric you choose.
Rye
Hey Adrian!
First of all thank you for such a great post! I am trying to classify the aerial satellite images which consists of one roof in every image and I am trying to classify them into their roof types. I have 3 classes with around 9000 images per class. Do you recommend neural network from scratch since I don’t see any pre-trained model with such data similarity so I am a little dubious about transfer learning. Also, do you recommend data augmentation?
Also, I tried using your pokedex network for the same dataset but it validation accuracy seems to fluctuate a lot. Do you have any inputs that might help me?
Thanks again!
Adrian Rosebrock
Hey Rye, there are a lot of things that can be addressed in this project but I would suggest backing up a bit:
1. Are you trying to perform classification, detection, or segmentation?
2. Unless you have a very specific reason not to you should always apply data augmentation.
3. Keep in mind that the Pokedex network accepts 64×64 input images. Without knowing what your images look like it’s hard for me to recommend a spatial input size but if you’re using aerial/satellite images you’ll likely need larger image dimensions.
Rye
I am trying to perform classification of roofs. I have been able to extract aerial images with each image containing exactly one roof and I want to determine the type of the roof through the image. Each image of approximately of 256*256 size and I changed my network a bit accordingly and it gives me an accuracy of approximately 90%. My current network has 4 blocks of CNN with each block containing two layers.
The first layer has 2 ConvNet of size (64,110), batch normalized, 2d pooling and dropout of 0.15. (relu)
The second layer has 2 ConvNet of size(84,84),batch normalized, 2d pooling and dropout of 0.20. (relu)
The third layer has 2 ConvNet of size(64,64),batch normalized, 2d pooling and dropout of 0.20. (relu)
The fourth layer has 2 ConvNet of size(128,128), batch normalized, 2d poolind and dropout of 0.20 (relu)
The final layer is a dense layer, of 1024 and then number of classes, softmax activation and dropout of 0..50.
I chaged my input dimensions to 112*112 and for 120 epochs, batch size of 48 and data augmentation it performs okayish and I get and accuracy of around 90%. I tried using inception v3 pre-trained model, froze some of the layers and used my above mentioned last layer as the last layer but I don’t get a result better than 80% from that model.
Any input from your end to make the model perform better would be appreciated!
Thank you,
Rye
Adrian Rosebrock
Thanks for the added details although I’m a bit confused by what you mean of 2 CONV layers of size 64×110. Are those your output volume dimensions? Or number of filters?
As far as fine-tuning goes you may want to continue to tune your hyperparameters. You may want to apply feature extraction via the pre-trained net and train a simple linear model on top of them.
In general I would recommend that you work through Deep Learning for Computer Vision with Python so you can gain a better understanding of how to train deep neural networks, including my best practices, tips, and techniques.
Victor Liendo
Hi Adrian,
After running the training script, all the ouptuts are generated OK (model, plot, lb), but i get the following message:
Exception ignored in: <bound method BaseSession.__del__ of >
Traceback (most recent call last):
File “/usr/local/lib/python3.5/dist-packages/tensorflow/python/client/session.py”, line 701, in __del__
TypeError: ‘NoneType’ object is not callable
Any idea of whats happening
Adrian Rosebrock
This is just a bug in TensorFlow where the session manager is having an issue shutting down. It does not impact the results of training the model. You can safely ignore it.
Suresh Kumar
I am in training neural network, But it seems quite long process, So I reduce the Epooch to 3 ..
To see first the result, How its working ?
After Training,
python classify.py –model pokedex.model –labelbin lb.pickle \ –image examples/charmander_counter.png
The above line will work to see results ?
Adrian Rosebrock
Yes, training the model can take a bit of time, especially if you are using a CPU. If you would like to see the first result you would need to execute the classify.py script as you suggested.
vamshi
hey adrian,
thanks for the post..
can i get an option on command prompt to change the no of epochs,no of cnn layers,batch size,filter size etc using argparse without always editing the code..
if so,how can i.?
Adrian Rosebrock
Hey Vamshi, are you asking how to edit the command line arguments to include the number of epochs and batch size?
vamshi
yes sir..
or can i add a separate config file which can change the variables like epochs,batch size as given in below link..how to do that
https://github.com/thtrieu/darkflow/blob/master/cfg/yolo.cfg
Adrian Rosebrock
It’s totally possible but you would need to edit the code significantly. I would suggest creating a configuration file and then loading the configuration file via a command line argument. Then pass the configurations into your optimizer, model, etc. It will require you to refactor the code to handle additional parameters to the constructor. Again, it’s possible, but I would only advise you to continue if you feel comfortable enough with your programming skills.
farshad
Thanks Adrian. very well and good job. I have a question. Is there any way to draw bounding box around each predicted object? Is this tutorial an object detection or a classification problem? thanks a lot.
Adrian Rosebrock
What you are referring to is “object detection”. I would suggest you read this blog post which will help you get up to speed.
Kemas Farosi
Hi adrian,
It’s a great tutorial !!!!. I followed all of your instructions in here, but i have a question for you. Why your deep learning model when i applied a new pokemon such as Raticate, resulted similarly with charmander ? because logically, it should have low probability in all of trained pokemon animals
Adrian Rosebrock
Hey Kemas — this model was not trained on Raticate so the model has no idea what Raticate actually looks like. You might want to take a look at this post where we introduced another class to to train on, a “background”, indicating that the input image/frame should be ignored.
Arun
Hi Adrian
Am a newbie to ML and your blogs have been really helping me! Thanks a lot.
Q. You used Lenet architecture earlier to solve a similar problem (Santa/not-Santa) and here you have used VGGNet. But in both cases, you trained the model only on your data, and aren’t depending on pre-trained data (like keras blog suggests to use vgg16 directly for cat/dog classification). Do you believe that would potentially increase the accuracy even further?
Generic Q – how do you judge which approach works best, without trying out different options. I understand that depends on the problem, and the classes one is going after; but is there is an implicit qualitative ordering?
Adrian Rosebrock
1. I’m actually not using VGG16. I’m training a smaller version called “SmallerVGGNet” from scratch. The network is inspired by the VGG-family of networks but is not pre-trained on anything. You could certainly use “transfer learning” (which is what you are referring to) to potentially increase accuracy.
2. I’m not sure what you mean by “implicit qualitative ordering”. Perhaps you can elaborate?
Arun
Thanks for clarifying. All I meant was how do you know which approach to try for any given image classification problem – Lenet, VGGNet, ResNet etc.. or for that matter something not involving Deep Learning.. Or do you try all approaches, and then figure out which gives the best results..
Adrian Rosebrock
Got it, I understand now. I would suggest taking a look at Deep Learning for Computer Vision with Python where I provide all of my best practices, tips, and suggestions when approaching an image classification problem with deep learning.
Sridhar
Hi Adrian,
I have trained the above pokedex model on three different lables (images) say Apple, Mango and pineapple. I ran for 50 epochs. Now when I try to classify Mango and pineapple its correctly classifying with a decent accuracy. But if I give any other image like mobile phone that also classifying as either Mango or pineapple, How do I get out of this problem
Please suggest .. Thanks
Sridhar
Adrian Rosebrock
You need to include a “background” or “ignore” class and train the model on random images that it may encounter in a real-world scenario that are not part of your fruit classes.
Justin
Hi Adrian,
Can you elaborate more on how to include a “background” class. I’ve noticed that the pretrained model you provided displays “background” when I use it in an iOS app. When I train the model myself using your training script and dataset, the model performs well at identifying Pokemon, but unfortunately it also mistakenly identifies just about everything else as an arbitrary Pokemon with a high degree of confidence. The object doesn’t even need to contain colors that are similar to Pokemon.
Adrian Rosebrock
The “background” class is is images of non-Pokemon (i.e., images you want to ignore and are unrelated to the Pokemon classes). You could create the “background” images yourself by sampling an existing dataset, grabbing images from your computer, Phone, Facebook, etc.
akusyn
hi Adrian
Thanks for this tutorial, it is very helpful for a newbie.
You saved the model weights and labels separately but I have seen others which saves the model as signature, graphs and variables. I tried saving this model using SavedModelBuilder (model.pb, variables.data and variables.index) but is unable to load it again for subsequent classification.
Any suggestion/comments on using a different model save and reload is appreciated.
Thanks
Akusyn
Adrian Rosebrock
The “SavedModelBuilder” function is actually a TensorFlow function. We’re using Keras in this blog post. You need to save the model using “model.save” I don’t believe “SavedModelBuilder” is compatible directly with Keras models (but I’ve never tried eitehr).
igor
Adrian,
Great post.
Any thoughts on which libraries to use for prediction?
We can predict with keras, opencv dnn, dllib? Which one should we choose? What it the best practice?
Thanks,
Igor
Adrian Rosebrock
If you used Keras to train your model, I would suggest you use Keras for prediction. If you used dlib for training, use dlib for prediction.
Jon
Hi Adrian,
Great tutorial! I’ve been struggling forever on finding out how to format the training and testing data and labels.
I’m currently doing object detection and classification and currently have a satellite dataset consisting of image chips (224×224) and each chip has multiple objects and classes. So what would the y_train and y_test look like? From all of the examples I’ve seen it looks like the ground truth data consists of a single class label per sample (i.e. a classification problem). My ground truth data consists of multiple bounding boxes and class labels per sample (e.g. image chip).
Do you have any suggestions on how I should format/structure my data based on the ground truth? Thank you for your time!
Adrian Rosebrock
Keep in mind that object detection and image classification are different. I would suggest reading through Deep Learning for Computer Vision with Python where I discuss my best practices for both object detection and image classification, including how to format and annotate your data. I think it will really help with your project!
Fjr
Always got “incorrect” result when predict the image, but the prediction is correct. i’m confused about “correct” and “incorrect” conditions here, could you explain to me the problem what i’ve got? Thanks in advance
Adrian Rosebrock
You should refer to my reply to Jay for a detailed discussion on “correct” vs. “incorrect”.
Miguel
Hi, Adrian. very big thanks for all your helpful knowledge. I am working in the project of simple “autonomous driving” based image depth using CNN. I am a little bit good in CNN, learned from your blog, but still confused how to compute image depth map using CNN. would you please guide me or give me a guidance how to perform CNN in that case.
Thank you very much in advance for your kindness.
here are sample paper found from internet used CNN for image depth:
https://arxiv.org/pdf/1803.10039.pdf
https://arxiv.org/pdf/1805.01328.pdf
https://github.com/mrharicot/monodepth
Adrian Rosebrock
Hey Miguel, it’s awesome that you are studying computer vision and deep learning. I don’t have any guides on estimating depth via single images with CNNs. I might be able to cover that in the future, but I don’t know if or when that may be.
Diptendu
Fantastic post… Did try and got exact result that i wanted. Thank you so much Adrian !! ..
Adrian Rosebrock
Congrats on your successful result, Diptendu! Nice job.
Aniket
Hi Adrian,
I have been following you from long now.. I ran the above code with my own dataset. So I have a question. I had 9 classes and each class has 1020 images. I can see that the data is divided into 80% training data and 20% validation data. Now when I am training on my dataset the training is happening on only “229 Images”. So I tried to figure out why but I think I will need you help in this.
so please let me know what am I doing wrong here.
Thanks,
Aniket
Adrian Rosebrock
Hi Aniket,
This line:
imagePaths = sorted(list(paths.list_images(args["dataset"])))
…will grab all images in your dataset. It assumes that your image classes in your dataset are organized into directories similar to the how the dataset is organized according to Pokemon species. To verify that all of your 9*1020 images will be used for training, just print the length of the list:
len(imagePaths)
I hope that makes sense.
Khaw Oat
I can train another picture?
Adrian Rosebrock
You can use this code to train your own CNN on your own custom image datasets.
Mohammed
How can i get vector of features for every image in dataset?
Adrian Rosebrock
Are you referring to transfer learning, and specifically feature extraction, using a CNN?
Marwa Said
Thank you so much for this simple beginner post
I didn’t use Keras before now I can 🙂
Adrian Rosebrock
Awesome, congratulations Marwa!
rick
Thanks for sharing your knowledge Adrian!. I’d like to do the same thing but to recognize the number of fingers I am showing. I have 5 folders with count 1 ,2 ,3 , til 5 fingers. I would like to get some help because I am getting a dimension error when using your code. Can you please guide me what things I can change so it will run. Thanks!
Adrian Rosebrock
I actually cover that exact problem (and include code to solve it) inside the PyImageSearch Gurus course. Be sure to take a look!
Sean
This has really helped me understand ML. I have actually modified this and am using my data and I can get great accuracy (greater than 90%) with my examples!
What I am trying to do now is to pass it a directory of images instead of single image for classify.py. These image wont have the predicted names (i.e. you would change your charmander_counter to just be pokeman_counter) and I want to have the model.predict tell me if that image is a Charmander, squirtlle, etc. and then save that image out with the % and predicted label (e.g. img1_charmander_95per.jpg)
Thoughts?
Adrian Rosebrock
Congrats on training your model and having it working, Sean! Nice job.
To solve your problem you would need to:
1. Loop over all images in your directory of input images
2. Load each of the input images and preprocess them
3. Append them to an array (which is your “batch”)
4. Pass the batch through the network using the exact same code in the guide
From there you’ll be able to loop over the results and obtain your probabilities.
For more information on how to get started with CNNs, build batches, and make predictions, I would recommend working through Deep Learning for Computer Vision with Python where I include lots of practical examples and code to help you accomplish your project.
BISWARANJAN BISWAL
Thank you for such a great tutorial
But I’am facing some problems like “Your CPU supports instructions that this TensorFlow binary was not compiled to use: AVX2”
Please suggest a solution.
Adrian Rosebrock
It’s not an error message, it’s just a suggestion from TensorFlow that you could further optimize your pipeline. It does not affect your code. Ignore it and keep going 😉
Arkhaya
I have a problem, even after changing loss function to binary for 2 labels as well. But we keep getting a problem saying activation_7 was expecting (2,) but got (1,).
I’m using 640 x 480 images that are 500 images per label. Total 1000 images. Not sure how to solve the problem.
Adrian Rosebrock
I think you may be parsing your class labels incorrectly from the file paths. Double-check that your class labels were parsed correctly.
Valentin Bouis
Hi and thank you for this wonderfull tutorial ! I am facing the same issue as @Arkhaya with the error :
ValueError: Error when checking target: expected activation_7 to have shape (2,) but got array with shape (1,)
when training the network. My labels are correctly extracted from the files paths, even if I dont really understand how the binarizer work. Do you have suggestions ? Thanks again
Adrian Rosebrock
How many labels are in your dataset? Keep in mind that you need at least two unique image categories to train the network. According to your error you may only have one class label.
Satthi
Hi Valentin!
I have same issue even images are dog and cat. Can you kindly tell me how you solved this.
Ishay Kaplan
Hi Adrian,
thanks a lot for your posts, they are really great!
2 questions:
I have a dataset with pictures in a large number of different sizes, what are the considerations when coming to select the size which all the pics have to be resized to it?
If the selected size won’t be 96*96, what are the rules which according to them I have to change the smallervggnet?
Adrian Rosebrock
Your input image dimensions are typically dictated by which CNN architecture you are using. Typically input image dimensions include 32×32, 64×64, 96×96, 227×227, and 256×256. If you want to increase your input image dimensions for SmallerVGGNet you would likely need to add more layers to the network, but keep in mind that the more weights you add, typically the more data you’ll need to obtain a reasonable result. I would suggest you read through Deep Learning for Computer Vision with Python for more information.
oat
Can I use it on Raspberry Pi?
Adrian Rosebrock
Yes, but I would recommend that you only run the trained network on the Pi. I would not recommend actually training the network itself on the Pi.
Carnat
Hi Adrian,
when I run train.py, on my anaconda prompt just showing “Using TensorFlow backend.” and the program is stop.
What should I do? thanks.
Adrian Rosebrock
Are you sure it has fully stopped and hung? Check your system monitor and ensure the process is still busy.
Carnat
Thanks adrian, it has been solved. I already run the py script and I got my model.
And I have another question, Can we use GPU on windows OS for modelling the image instead of using CPU?
Adrian Rosebrock
Yes, but I do not support Windows officially here on the PyImageSearch blog. You’ll want to install TensorFlow with GPU support. From there TensorFlow, and therefore Keras, will automatically access your GPU.
Artur Barseghyan
Excellent article! Thank you.
I have a question. You resize images to 96×96 px for both training and classification. I have used 32×32 px and it does not affect classification accuracy negatively, but rather speeds up training process, as well as brings minor classification speed ups in loading time (4 ms vs 3 ms) and trained model size (9 mb vs 90 mb). I have about 300 images per category (1500 in total).
Don’t get me wrong, please. I certainly have no doubts that you definitely have reasons for using 96×96, but rather want to know “why”.
Again, thanks a lot for your time and efforts!
Adrian Rosebrock
Thanks Artur, I’m glad you liked the tutorial!
As for why you would choose varying image sizes for a CNN, it is entirely dependent on your dataset. For example, if objects in images are super small in a 96×96 image they would be virtually invisible if resized to 32×32. But if your object is the most dominant region of the image then you may be able to get away with a 32×32 image. Again, it’s highly dependent on your exact use case, your dataset, and how much quality data you have.
Ali Nawaz
Hello sir, your books and tutorials are just great.
When I read your book and implementing the code it works fine but now I got this error “Nonetype object has no attribute compile”.
Adrian Rosebrock
It sounds like you introduced an error when copying and pasting the code. Make sure you use the “Downloads” section of the code to download the source code, ensuring it matches mine.
Matt
Hi Adrain:
I am very excited to see this blog, and tried to which runs well. But I’ve met one problem, I tried other pic which is not in these class, but it will become one of these class and the correct rate is very high. How can I solve it?
Adrian Rosebrock
You need to add a separate class to the architecture and name it “unknown”, “don’t care”, or something similar. Then, fill this class with random images your classifier may see but shouldn’t care about. From there, train your network.
Andie
Hi, Adrian.
Thank you! I love this tutorial and the model covered here is easy to apply.
I would like to add some classes and train the pretrained model but I don’t know how.
Could you show me how to update the model and lb?
Adrian Rosebrock
Hey Andie, you can simply replace my “dataset” directory with your own dataset where each class label has its own subdirectory. If you follow my exact directory structure you’ll be able to train the model on your own dataset. If you’re looking to apply fine-tuning (i.e., training a pre-trained model) you should see my example inside Deep Learning for Computer Vision with Python.
Rui
Hi Adrian!
I am trying to perform image classification using CNNs and my code is based on yours. However, my validation accuracy is much lower than the training accuracy.
After 50 epochs, I get 60% accuracy for training but only 20% for validation.
My dataset is limited and i am trying to classify 1000 different classes of medical pills. I have only 10 images per class. I performed real-time augmentation which allowed me to enlarge my dataset. How can i get better results? Besides, my training loss is dropping well, reaching 1.5 while my validation loss stops at 5/6. How would you face this issue?
Thank you!
Adrian Rosebrock
As someone who’s built software to recognize nearly 10,000+ unique prescription pills, I can tell you that the problem is extremely challenging. With only 10 images per class it’s very, very unlikely that you’ll be able to recognize 1,000 different prescription pills unless you are doing some sort of triplet loss/training procedure. I would suggest investing your time in obtaining more training data. I would also suggest working through Deep Learning for Computer Vision with Python where I share my suggestions, tips, and best practices when training your own CNNs on challenging datasets.
Vishal Borana
Hello, Adrian. This was a great post as usual. You are the best. In the post, you mentioned that you would deploy the program to a smartphone app. I couldn’t find that post. Could you please share the link?
Adrian Rosebrock
Yes, see this tutorial.
张惠化
hi,Adrian ! i get problem when used the train.py,that is it saied allocation of exceed 10% of system memory.what should i do? Thank you so much for you to answer this question for me .
Adrian Rosebrock
It sounds like your machine is running out of RAM. How big is your image dataset? How many images are you working with? And how much RAM does your machine have? If you are working with datasets too large to fit into memory make sure you refer to Deep Learning for Computer Vision with Python where I discuss how to train CNNs on large datasets.
Tomas
Hi Adrian, great post! When I use your data set training works fine. I’d like to try to prepare model to distinguish 2 classes. I put my images into two separated directories inside dataset directory. My images are RGB images.
However I have some issues with my data, I do not know why the dimension of trainY and testY are: (1106, 1) and (277, 1), instead of (1106, 2) and (277, 2) because of two classes. Do you have any idea what might be wrong?
Adrian Rosebrock
The
LabelBinarizer
class will return just integers for 2 classes rather than one-hot encoding. Use Keras’np_utils.to_categorical
instead.Huangz
Hi Adrian, You mentioned that the SmallerVGGNet was designed for 96×96 image pixel right?
suppose I want to modify the image dimenstion into 300 px, would you mind giving me tips in which part of the SmallerVGGNet.py I should change?
Cause I tried to train a bunch of food images using your code, and it keeps resulting a low accuracy, So I think, perhaps I can’t train the food images with 96px.
Adrian Rosebrock
It’s unfortunately not that simple. SmallerVGGNet was designed with a balance between (1) image dimensions and (2) dataset complexity. You’ll want to consider if your dataset requires a network with a larger depth to accommodate the increase in input pixel dimensions. I would suggest referring to Deep Learning for Computer Vision with Python where I include my tips, suggestions, and best practices when creating and training your own custom deep neural network architectures. Be sure to give it a look, I’m confident the book will help you.
Pepe
Can I get the dataset in the above system you implemented??
Adrian Rosebrock
Yes, just use the “Downloads” section of the tutorial to download the source code + dataset.
Isaac
Hey Adrian!
How did you run Ubuntu for this tutorial?
I’m running Ubuntu 16.04 on Windows 10 and if I’m thinking correctly, Ubuntu can’t access the directory I’ve set up on Windows with all the pictures. Is this correct and if so, could you recommend a work-around?
Also, do all the images in the dataset need to be the same resolution or can they vary? If they need to be the same resolution, how would you ensure that using Bing Image Search API?
Thanks!
Adrian Rosebrock
I haven’t tried the Windows/Ubuntu integration (I haven’t used Windows in 11+ years now) but my suggestion would be to transfer your directory of code/images to Ubuntu via SFTP, FTP, Dropbox, or whatever is most convenient for you. From there you can execute the code from the Ubuntu terminal.
As for your second question they don’t have to be the same resolution.
Vishnu
I tried Modifying the code to take the video stream as input but I am getting 0.05 fps why is this classification so slow?
Adrian Rosebrock
That is very, very slow. It sounds like there is a logic error somewhere in your code. Try using this tutorial as a template for classifying individual frames of a video stream with a Keras CNN.
Mustapha Nakbi
Hi Mr Adrian thank you for all your effort to explain and facilitate deep learning
i ask it’s possible to recognize person from the dog and cat program like a first experience for a beginner and to classify just two person, thank you in advance.
Rushad
Hi! Your articles are super fun and useful, so thanks!
I was trying training my own data set, but this time only with two categories, and i got the follow error :
alueError: Error when checking target: expected activation_7 to have shape (2,) but got array with shape (1,)
Adrian Rosebrock
99.9% percent of the time (at least with my code) the error is due to your directory structure being incorrect. You can verify by reviewing the parsed class labels — you’re likely parsing out the incorrect label from the file path. Double-check and triple-check your label parsing.
Dave
Hi,
I faced the same error.
I didn’t do anything on your code or folder structure but deleted 3 folders (./data/mewtwo, ./data/pikachu and ./data/squirtle).
I wonder whether this code works for 2 classes.
Please help.
Thank you.
Adrian Rosebrock
For only two classes scikit-learn’s LabelBinarizer will only produce integer encodings, not one-hot vector encodings.
To resolve the issue use the LabelEncoder function and then Keras’
np_utils.to_categorical
function.Tomasz
Hi Adrian,
Training a deep neural network on a huge dataset is really time consuming. Is there any way to resume training starting on a particular epoch and iteration using Keras?
Adrian Rosebrock
Absolutely. You can use Keras checkpointing to save a model to disk every N epochs. From there you can re-load the model via the
load_model
function and resume training. I cover exactly how to do that inside my book, Deep Learning for Computer Vision with Python.Tomasz
Hi Adrian,
Thanks, you described it perfectly in your book in chapter 18.
I highly recommend “Deep Learning for Computer Vision with Python.” to everyone.
Adrian Rosebrock
Thanks so much, Tomasz!
Antoine
Hi ! Thank you for this great tutorial !
I’ve managed to run your code on my computer but it seems that the model won’t converge.
I can’t reach the 97% of accuracy. I’m merely about 90%.
Do you kow where this come from ?
Thanks
Son Vo
Hi Adrian,
I have read your tutorials about object classification using SmallVGGNet. However, this architecture only supports low image resolution (96,96). I can’t use this architecture in my case in which I want to classify individual animals using only 3 or 4 high resolution images/individual for training. The resolution of images captured by Pi Cam V2 is 1944 × 2592 that I’m going to reduce to around 450×600 to ensure it still retains important information of patterns on the animal skin. I just wanted to know any suggestion from you on which architecture I can use for my case? Do you have any tutorial to support high resolution images? Thank you Adrian.
Adrian Rosebrock
You need more images. 3-4 images per individual animal is not enough. Additionally, you should look at triplet loss and siamese networks — they may work better in this case.
Flavio
Hi Adrian,
I’m a beginner on DL and I started with the basic fashion-MNIST to practice, I read in another blog about a similar CNN model that instead of using RELU activation they use LeakyRELU, saying that it is better since some neurons tend to “die” with RELU, also I tested their implementation of the fashion-MNIST against yours to compare, and the time using their code was less than half then yours, although your accuracy was better, why such a difference?
https://www.datacamp.com/community/tutorials/convolutional-neural-networks-python
Adrian Rosebrock
There are a variety of various activation functions including standard ReLU, Leaky ReLU, ELU, and other extensions. They are hyperparameters of your network that can be adjusted. I typically suggest using ReLU when building your initial model. Once you are able to train it and obtain reasonable accuracy swap in a Leaky ReLU or ELU and you might be able to get some additional accuracy out of it. I cover these activation functions and best practices on how to use them inside Deep Learning for Computer Vision with Python.
akk
i just want to know how to create a custom model in cnn with datasets which include photographed images.pls let me know
Adrian Rosebrock
You can use this tutorial to train your own CNN with a custom dataset. Have you given it a try?
If you are looking for a more detailed guide on how to train your own custom CNNs be sure to read through Deep learning for Computer Vision with Python.
Mohammad
Hi Adrian,
thanks your best tutorial, I have some question,
Q1- If we have the tensorflow model, how i can convert that model to keras for using in the ios?
Q2 – If we have one more model, is it possible to run on ios together? that’ mean, i want capture a image and feed into the model-1 and pass the result of the model-1 into the model-2?
If it’s possible, publish a new post about deploy the model on android.
Thanks,
Adrian Rosebrock
I have a tutorial on Keras and iOS that you should read first. If your model is already in TensorFlow format then you can likely just use TFLite on the mobile device.
Hassan
expected activation_7 to have shape (2,) but got array with shape (1,)
when I change the folders in side the dataset to two folders (labels) it give this error
Adrian Rosebrock
You need to call
np_utils.to_categorical
on the labels after you transform them. Unfortunately the LabelBinarizer function will return integers if there are only 2 classes — I have no idea why they decided to implement it that way.Amit
Hi Adrian
What additional code would you add to generate plots of ROC curve and PR curve. I would like to generate them in my model and present some arguments. pls help
Adrian Rosebrock
Take a look at the scikit-learn documentation which will show you how to create and plot a ROC curve.
Hemanth
hey me agian I resolved that error but Im getting a warning libpng warning
Adrian Rosebrock
You can safely ignore the warning, it will not affect the loading and training of the model.
PG
i have created a CNN model with 3 classes ( vehicles,birds,people ).
now i have to do single prediction .
how should i do that ? or which blog should i prefer ?
Adrian Rosebrock
If you are new to deep learning, training your own models, and making predictions, you should definitely read through Deep Learning for Computer Vision with Python where I teach you the fundamentals of deep learning and how to use Keras. Definitely give it a read as it will not only solve your problem but make you a better deep learning practitioner as well.
Farhan
Hello Adrian,
Brilliant tutorial. I’m a beginner at keras programing so your tutorials help a lot. I have used the source code for my image classification. I have 5 classes with a total of 1390 images. Also the images are in black and white so i modified the code for image dimensions to 96,96,1. I hope this is right. However when I run the train.py, I get the error “ValueError: Found input variables with inconsistent numbers of samples: [1016, 1390]”. I spoke with a colleague of mine and mine and he said the dimensions are not equal. However the dimensions are the same for all images i.e. 512×512. Could you please help. Thanks
Adrian Rosebrock
You’re missing a few steps. Are you trying to train on images that are 96x96x1 or 512x512x1? You need to set those as your
IMAGE_DIMS
. Secondly, you need to convert your images to grayscale viacv2.cvtColor
first.If you’re new to deep learning and Keras I would definitely recommend you read through Deep Learning for Computer Vision with Python first. The book will teach how you to train your own custom CNNs on your own datasets (including adjusting input image dimensions and grayscale conversion).
AMM
Hi Adrian
Thank you very much for your always helpful post. I applied your code on my face database for face recognition purpose, it’s good but I’m new in keras and CNN and I would to ask you about the database split how can I do it. I need to evaluate my model on unseen data, is the unseen data that you test or classify your model on them are part of the original database and you split them for testing the model? and if it yes, what is the portion that I should to split it from each individual from the face dataset to become unseen data using for testing or evaluating the accuracy of my model to recognize that face? Can you please help me, I will be thankful for you.
AMM
Also I would like to ask you when I retrieve the model and label that are saved to recognize the unseen data, the process is very very slow. I was split about 20% from my database as unseen data to evaluate the model, when I trained the model it go very fast, but when I want to evaluate the model on unseen data It is stopped on GPU say (Out Of Memory) and when I test it on CPU, It stills many days, Is what I did correct or I failed in specific point? Why the training go fast and evaluation is very slow? how many portion that should I split it from database as unseen data to be evaluated? I hope your help Thanks a lot.
Regard
Adrian Rosebrock
Typically you wouldn’t use a “standard” CNN such as this one for face recognition. You would use a siamese network with triplet loss, such as this one.
To address your other question related to data splitting and running out of memory, make sure you read through Deep Learning for Computer Vision with Python which includes my tips, suggestions, and best practices for data splitting and working with large datasets.
Mitesh Patel
Hey Adrian !
I am training a model for two classes. I have changed “loss” to “binary_crossentropy” from “categorical_crossentropy”.
I am getting this error:
ValueError: Error when checking target: expected activation_7 to have shape (2,) but got array with shape (1,)
Can you please help me with this?
Mitesh Patel
It got solved. I followed your reply for Hassan’s question.
Adrian Rosebrock
Congrats on resolving the issue!
Adrian Rosebrock
Your question has been addressed in the comments a few times. See my reply to Daniel and Tomas.
Shymaa Abo Arkoub
how to determine the layers and number of filters in CNN and max pooling
Adrian Rosebrock
I would suggest reading through Deep Learning for Computer Vision with Python where I show you my tips, suggestions, and best practices to determine the # of layers, filters, etc.
Ishan agarwal
Thanks sir for such a great article. Can you please tell me how can I get output of all the layers for an input image.
Adrian Rosebrock
I cover how to access the outputs of individual layers inside Deep Learning for Computer Vision — definitely consider starting there.
Jackson
this is great, but could you tell me how to use it (trained model and label) on webcam/live detection?
Thanks
Adrian Rosebrock
You mean something like this?
MEHRAN ALI
hi i just try this tutorial but didn’t get accurate result what shoulde i do now
Adrian Rosebrock
Were you applying the tutorial to your own dataset? Without knowing more details on your dataset it’s hard to say what’s going on. My recommendation would be for you to read through Deep Learning for Computer Vision with Python where I not only show you how to train your own CNNs, but also provide my tips, suggestions, and best practices.
Eduardo
Hi Adrian, thank you very much as always!
Can I ask how do you determine if the model is overfitted or underfitted from the loss difference between Train, Validation and Test?
Thank you very much!
Adrian Rosebrock
I cover that exact question, including how to spot underfitting and overfitting, inside Deep Learning for Computer Vision with Python. I suggest you start there.
ren_higuchi
Thank you for the great article.
I also tried this, but there is a bug that the acc cost is always 100%.
For the solution of this,please tell me the version of the library you used.
If possible, I also want to know the versions of python, keras, tensorflow, coremltools.
ren_higuchi
sorry,this is mistake.
Adrian Rosebrock
Congrats on resolving the issue!
Mohamed
Hi Adrian,
thanks for this precious tutorial
I might have a stupid question but, why doesn’t this work well for classifying human faces ?
Adrian Rosebrock
Take a look at my face recognition tutorials where I cover that question in more detail.
Jeremias
Hi, Addrian. What i would alter for i do SmallerVGGNet with 16 x 32 images. I have dataset of eyes, nose and mouth (three region of face).
Thank you very much!! for the great article.
Adrian Rosebrock
You could either:
1. Resize all 16×32 images to be 96×96
2. Or you could use a smaller CNN, such as MiniVGGNet (covered here), and then modify it to accept 16×32 images.
Misha
For people that have:
ValueError: Error when checking target: expected activation_7 to have shape (2,) but got array with shape (1,)
Reason:
The labels input array should have as many columns as amount of classes: there should be 1 if the column corresponds to the class number and 0 otherwise. There is a function keras.utils.to_categorical() that converts a class vector (integers) to the abovementioned binary class matrix. Got it from here: https://keras.io/utils/
Solution that helped me:
# add imports for keras.utils
from keras.utils import np_utils
# binarize the labels and convert to categorical
lb = LabelBinarizer()
labels = lb.fit_transform(labels)
labels = np_utils.to_categorical(labels)
Adrian Rosebrock
Correct, that is my biggest gripe with scikit-learn’s LabelBinarizer class. I don’t know why it won’t return a vector for a 2-class classification problem and instead returns only a single integer. For 2 classes you also need the “to_categorical” function, as you noted.
Kyle
Thanks for such a great tutorial,
I wanna know why did you choose the VGGNet, and why this particular version (smallerVggNet)? what are your reasons behind that decision?
Adrian Rosebrock
I cover my tips, suggestions, and best practices when choosing a CNN architecture and associated hyperparameters inside Deep Learning for Computer Vision with Python — I suggest you start there if you are interested in learning more about training your own custom CNNs.
vyshnavi
Hi Adrian,
in this tutorial,we are detecting one object in one image.Is it possible to detect more objects in one image using keras and CNNs ?
and how to detect objects in live video?
Adrian Rosebrock
You’re actually performing image classification here, not object detection. See this tutorial to help you learn the differences.
vyshnavi
Hi Adrian,
Can you please help how to do image classification for live video?
Adrian Rosebrock
This tutorial covers video classification with Keras.
Mario
Hi Adrian! First of all, your blog rocks
I have been training this network to classify super heros from cómic pages. It tends to work fine but i found 2 problems for this aplcation.
1- it missclassify heros that look similar like spiderman and ironman.
2- i dont know if this network could be used to detect multiple classes on the same image (e.g. Detect which heros appear on a given comic page) and to provide a region of interesar where each detection happens.
For the first problem i have trained a series of models that are binary (e.g. Spiderman/ not spiderman. This second category includes fotos of all other heros). This solved the problem but i find it kind of unefficient.
If you find it interesting i would Love to read what you have to suggest!
Best regards
Irwin
Hello Adrian,
Great tutorial! I have one question. I am currently working on training a model that will aid me in classifying “fullness” of a parking lot floor (Either 0-100% full with a total of 10 classes). The parking spaces are fixed and only appear on the left side of each image in my dataset. Vehicles will always park in only that area. Would it be a bad idea to use Data Augmentation in this situation?
Adrian Rosebrock
Detecting vehicles (or absence of them) sounds more like an object detection or instance segmentation problem. Is there a reason you are trying to use standard classification here?
Andreas
Hi Adrian,
thank you so much for sharing these tutorials, they have been incredible helpful so far.
In my case I have 4 different classes of objects, each class has around 150 – 200 images available. I can successfully train the network and receive very accurate results when presenting one of the 4 known objects to the network.
The issue however, if I use images which are not in one of these 4 classes (actually not even remotely similar), the model will always predict the same class and always with 100% confidence.
Could you point me into the right direction how I can avoid false positives with such high confidence?
Best regards
Adrian Rosebrock
Create a 5th class called “ignore” and fill it with images unrelated to the four other classes. Train your network on those 5 classes.
Wouter
Hi Adrian,
thanks for sharing these fantastic tutorials. I’m looking into them for a project of mine to determine the size of a cauliflower in the field and I was wandering if classification is the right approach or should I look to something like facial recognition? What do you think?
ARIJIT PAL
Is pyimagesearch module available in your pre configured AWS MI instance with smallervggnet?
Adrian Rosebrock
The “pyimagesearch” module is just meant to keep code tidy and organized (and to show readers proper Python module structure). It’s not meant to be pip-installable. If you download the source code to one of my blog posts, books, or courses you can upload it to the AMI and run it there.
Sachin Dhiman
Really Helpful ,
The way you explain the implementation of CNN,I Bet no one can.
I have Already implemented some interesting use cases using this in Automobile Insurance and Retail sector
Thanks a lot Adrian.
Adrian Rosebrock
Thanks Sachin 🙂
Sasan
Can I tutorial deploy it to a smartphone?
Adrian Rosebrock
See this tutorial on Keras and iOS.
Jenny.L
Hi, really thanks for the tutorial. How can I deploy a keras model like this to my own website? (I have already owned a hosting and has already accomplished domain name resolution) Thanks a lot for your help!
Adrian Rosebrock
You mean like a REST API? If so, take a look at this tutorial.
Assem
Dear Adrian,
thanks for fantastic blog.
I need to use my classes for example to classify different objects (Tire , Ladder , chain,..)
I tried to do that with the same code but I get only your labels. I need to change this labels with my own classes and labels .My project is to classify underwater objects , so I need to build my own datasets and labels.
Thanks again for your support.
Best Regards,
Assem
Adrian Rosebrock
If you need help building your own datasets and training your own custom CNNs I would recommend you read Deep Learning for Computer Vision with Python. That book covers dataset structure and custom training in detail.
Monika
Hiiii Adrian
I always found your tutorial helpful but I have some doubts regarding creating my own dataset, is it necessary to make the dimension of each image constant with the same value, can’t we just use the original image downloaded from net while labeling the image?
Adrian Rosebrock
I would recommend you resize each image such that the dimensions are the same. You can of course download the original image, just make sure they are resized before passing them through the CNN.
Asad
Can i train my own dataset using this algorithm ? and please explain VGGNET
Adrian Rosebrock
Yes you can. If you want to learn how to train your own model, including the inner-workings of VGG, I recommend you read Deep Learning for Computer Vision with Python.
Arsh Deep Singh Chadha
Suppose I trained this network using Keras, can I implement this network using a video stream?
Adrian Rosebrock
Yes, absolutely — see this video classification tutorial.