Inside this tutorial you will learn how to configure your Ubuntu 18.04 machine for deep learning with TensorFlow and Keras.
Configuring a deep learning rig is half the battle when getting started with computer vision and deep learning. I take pride in providing high-quality tutorials that can help you get your environment prepared to get to the fun stuff.
This guide will help you set up your Ubuntu system with the deep learning tools necessary for (1) your own projects and (2) my book, Deep Learning for Computer Vision with Python.
All that is required is Ubuntu 18.04, some time/patience, and optionally an NVIDIA GPU.
If you’re an Apple user, you can follow my macOS Mojave deep learning installation instructions!
To learn how to configure Ubuntu for deep learning with TensorFlow, Keras, and mxnet, just keep reading.
Ubuntu 18.04: Install TensorFlow and Keras for Deep Learning
On January 7th, 2019, I released version 2.1 of my deep learning book to existing customers (free upgrade as always) and new customers.
Accompanying the code updates for compatibility are brand new pre-configured environments which remove the hassle of configuring your own system. In other words, I put the sweat and time into creating near-perfect, usable environments that you can fire up in less than 5 minutes.
This includes an updated (1) VirtualBox virtual machine, and (2) Amazon machine instance (AMI):
- The deep learning VM is self-contained and runs in isolation on your computer in any OS that will run VirtualBox.
- My deep learning AMI is actually freely available to everyone on the internet to use (charges apply for AWS fees of course). It is a great option if you don’t have a GPU at home/work/school and you need to use one or many GPUs for training a deep learning model. This is the same exact system I use when deep learning in the cloud with GPUs.
While some people can get by with either the VM or the AMI, you’ve landed here because you need to configure your own deep learning environment on your Ubuntu machine.
The process of configuring your own system isn’t for the faint of heart, especially for first-timers. If you follow the steps carefully and take extra care with the optional GPU setup, I’m sure you’ll be successful.
And if you get stuck, just send me a message and I’m happy to help. DL4CV customers can use the companion website portal for faster responses.
Let’s begin!
Step #1: Install Ubuntu dependencies
Before we start, fire up a terminal or SSH session. SSH users may elect to use a program called screen (if you are familiar with it) to ensure your session is not lost if your internet connection drops.
When you’re ready, go ahead and update your system:
$ sudo apt-get update
$ sudo apt-get upgrade
Let’s install development tools, image and video I/O libraries, GUI packages, optimization libraries, and other packages:
$ sudo apt-get install build-essential cmake unzip pkg-config
$ sudo apt-get install libxmu-dev libxi-dev libglu1-mesa libglu1-mesa-dev
$ sudo apt-get install libjpeg-dev libpng-dev libtiff-dev
$ sudo apt-get install libavcodec-dev libavformat-dev libswscale-dev libv4l-dev
$ sudo apt-get install libxvidcore-dev libx264-dev
$ sudo apt-get install libgtk-3-dev
$ sudo apt-get install libopenblas-dev libatlas-base-dev liblapack-dev gfortran
$ sudo apt-get install libhdf5-serial-dev
$ sudo apt-get install python3-dev python3-tk python-imaging-tk
CPU users: Skip to “Step #5”.
GPU users: CUDA 9 requires gcc v6 but Ubuntu 18.04 ships with gcc v7 so we need to install gcc and g++ v6:
$ sudo apt-get install gcc-6 g++-6
Step #2: Install latest NVIDIA drivers (GPU only)

This step is for GPU users only.
Note: This section differs quite a bit from my Ubuntu 16.04 deep learning installation guide so make sure you follow it carefully.
Let’s go ahead and add the NVIDIA PPA repository to Ubuntu’s Aptitude package manager:
$ sudo add-apt-repository ppa:graphics-drivers/ppa
$ sudo apt-get update
Now we can very conveniently install our NVIDIA drivers:
$ sudo apt install nvidia-driver-396
Go ahead and reboot so that the drivers will be activated as your machine starts:
$ sudo reboot now
Once your machine is booted and you’re back at a terminal or have re-established your SSH session, you’ll want to verify that NVIDIA drivers have been successfully installed:
$ nvidia-smi
+-----------------------------------------------------------------------------+
| NVIDIA-SMI 396.54                 Driver Version: 396.54                    |
|-------------------------------+----------------------+----------------------+
| GPU  Name        Persistence-M| Bus-Id        Disp.A | Volatile Uncorr. ECC |
| Fan  Temp  Perf  Pwr:Usage/Cap|         Memory-Usage | GPU-Util  Compute M. |
|===============================+======================+======================|
|   0  Tesla K80           Off  | 00000000:00:1E.0 Off |                    0 |
| N/A   58C    P0    61W / 149W |      0MiB / 11441MiB |     99%      Default |
+-------------------------------+----------------------+----------------------+

+-----------------------------------------------------------------------------+
| Processes:                                                       GPU Memory |
|  GPU       PID   Type   Process name                             Usage      |
|=============================================================================|
|  No running processes found                                                 |
+-----------------------------------------------------------------------------+
In the first table, top row, we have the NVIDIA GPU driver version.
The next two rows display the type of GPU you have (in my case a Tesla K80) as well as how much GPU memory is being used — this idle K80 is using 0Mb of approximately 12GB.
The nvidi-smi command will also show you running processes using the GPU(s) in the next table. If you were to issue this command while Keras or mxnet is training, you’d see that Python is using the GPU.
Everything looks good here, so we can go ahead and move to “Step #3”.
Step #3: Install CUDA Toolkit and cuDNN (GPU only)
This step is for GPU users.
Head to the NVIDIA developer website for CUDA 9.0 downloads. You can access the downloads via this direct link:
https://developer.nvidia.com/cuda-90-download-archive
Note: CUDA v9.0 is required for TensorFlow v1.12 (unless you want to build TensorFlow from source which I do not recommend).
Ubuntu 18.04 is not yet officially supported by NVIDIA, but Ubuntu 17.04 drivers will still work.
Make the following selections from the CUDA Toolkit download page:
- “Linux”
- “x86_64”
- “Ubuntu”
- “17.04” (will also work for 18.04)
- “runfile (local)”
…just like this:

You may just want to copy the link to your clipboard and use the wget command to download the runfile:
$ wget https://developer.nvidia.com/compute/cuda/9.0/Prod/local_installers/cuda_9.0.176_384.81_linux-run
Be sure to copy the full URL:
https://developer.nvidia.com/compute/cuda/9.0/Prod/local_installers/cuda_9.0.176_384.81_linux-run
From there install let’s go ahead and install the CUDA Toolkit. This requires that we first give the script executable permissions via the chmod command and then that we use the super user’s credentials (you may be prompted for the root password):
$ chmod +x cuda_9.0.176_384.81_linux-run
$ sudo ./cuda_9.0.176_384.81_linux-run --override
Note: The –override switch is required, otherwise the CUDA installer will complain about gcc-7 still being installed.
During installation, you will have to:
- Use “space” to scroll down and accept terms and conditions
- Select y for “Install on an unsupported configuration”
- Select n for “Install NVIDIA Accelerated Graphics Driver for Linux-x86_64 384.81?”
- Keep all other default values (some are
yand some aren). For paths, just press “enter”.
Now we need to update our ~/.bashrc file to include the CUDA Toolkit:
$ nano ~/.bashrc
The nano text editor is as simple as it gets, but feel free to use your preferred editor such as vim or emacs. Scroll to the bottom and add following lines:
# NVIDIA CUDA Toolkit
export PATH=/usr/local/cuda-9.0/bin:$PATH
export LD_LIBRARY_PATH=/usr/local/cuda-9.0/lib64
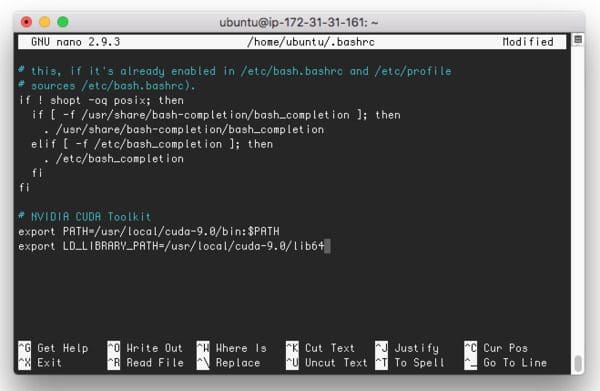
~/.bashrc profile for the CUDA Toolkit. CUDA allows you to use your GPU for deep learning and other computation.To save and exit with nano, simply press “ctrl + o”, then “enter”, and finally “ctrl + x”.
Once you’ve saved and closed your bash profile, go ahead and reload the file:
$ source ~/.bashrc
From there you can confirm that the CUDA Toolkit has been successfully installed:
$ nvcc -V
nvcc: NVIDIA (R) Cuda compiler driver
Copyright (c) 2005-2017 NVIDIA Corporation
Built on Fri_Sep__1_21:08:03_CDT_2017
Cuda compilation tools, release 9.0, V9.0.176
Step #4: Install cuDNN (CUDA Deep Learning Neural Network library) (GPU only)
For this step, you will need to create an account on the NVIDIA website + download cuDNN.
Here’s the link:
https://developer.nvidia.com/cudnn
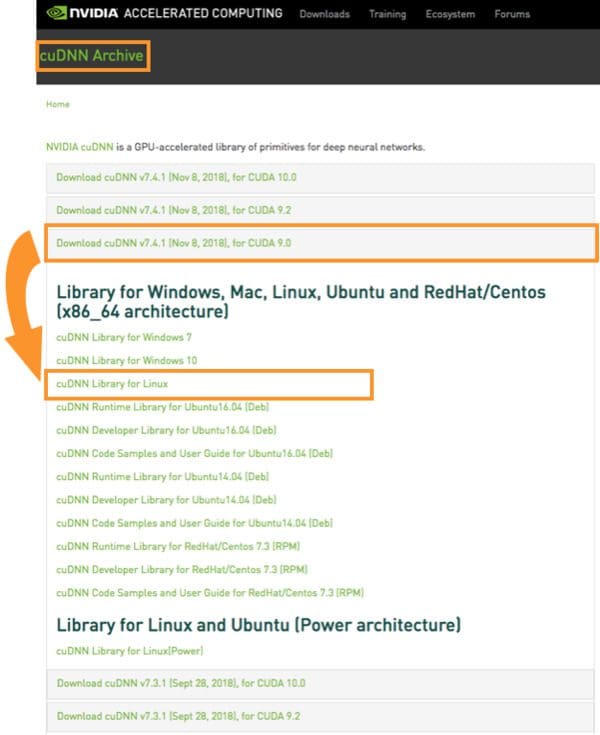
When you’re logged in and on that page, go ahead and make the following selections:
- “Download cuDNN”
- Login and check “I agree to the terms of service fo the cuDNN Software License Agreement”
- “Archived cuDNN Releases”
- “cuDNN v7.4.1 (Nov 8, 2018) for CUDA 9.0”
- “cuDNN Library for Linux”
Your selections should make your browser page look similar to this:
Once the files reside on your personal computer, you might need to place them to your GPU system. You may SCP the files to your GPU machine using this command (if you’re using an EC2 keypair):
$ scp -i EC2KeyPair.pem ~/Downloads/cudnn-9.0-linux-x64-v7.4.1.5.tgz \
	username@your_ip_address:~
On the GPU system (via SSH or on the desktop), the following commands will install cuDNN in the proper locations on your Ubuntu 18.04 system:
$ cd ~
$ tar -zxf cudnn-9.0-linux-x64-v7.4.1.5.tgz
$ cd cuda
$ sudo cp -P lib64/* /usr/local/cuda/lib64/
$ sudo cp -P include/* /usr/local/cuda/include/
$ cd ~
Above, we have:
- Extracted the cuDNN 9.0 v7.4.1.5 file in our home directory.
- Navigated into the
cuda/directory. - Copied the
lib64/directory and all of its contents to the path shown. - Copied the
include/folder as well to the path shown.
Take care with these commands as they can be a pain point later if cuDNN isn’t where it needs to be.
Step #5: Create your Python virtual environment
This section is for both CPU and GPU users.
I’m an advocate for Python virtual environments as they are a best practice in the Python development world.
Virtual environments allow for the development of different projects on your system while managing Python package dependencies.
For example, I might have an environment on my GPU DevBox system called dl4cv_21 corresponding to version 2.1 of my deep learning book.
But then when I go to release version 3.0 at a later date, I’ll be testing my code with different versions of TensorFlow, Keras, scikit-learn, etc. Thus, I just put the updated dependencies in their own environment called dl4cv_30 . I think you get the idea that this makes development a lot easier.
Another example would be two independent endeavors such as (1) a blog post series — we’re working on predicting home prices right now, and (2) some other project like PyImageSearch Gurus.
I have a house_prices virtual environment for the 3-part house prices series and a gurus_cv4 virtual environment for my recent OpenCV 4 update to the entire Gurus course.
In other words, you can rack up as many virtual environments as you need without spinning resource hungry VMs to test code.
It’s a no-brainer for Python development.
I use and promote the following tools to get the job done:
- virtualenv
- virtualenvwrapper
Note: I’m not opposed to alternatives (Anaconda, venv, etc.), but you’ll be on your own to fix any problems with these alternatives. Additionally, it may cause some headaches if you mix environment systems, so just be aware of what you’re doing when you follow tutorials you find online.
Without further ado, let’s setup virtual environments on your system — if you’ve done this before, just pick up where we actually create the new environment.
First, let’s install pip, a Python package management tool:
$ wget https://bootstrap.pypa.io/get-pip.py
$ sudo python3 get-pip.py
Now that pip is installed, let’s go ahead and install the two virtual environment tools that I recommend — virtualenv and virtualenvwrapper:
$ sudo pip install virtualenv virtualenvwrapper
$ sudo rm -rf ~/get-pip.py ~/.cache/pip
We’ll need to update our bash profile with some virtualenvwrapper settings to make the tools work together.
Go ahead and open your ~/.bashrc file using your preferred text editor again and add the following lines at the very bottom:
# virtualenv and virtualenvwrapper
export WORKON_HOME=$HOME/.virtualenvs
export VIRTUALENVWRAPPER_PYTHON=/usr/bin/python3
source /usr/local/bin/virtualenvwrapper.sh
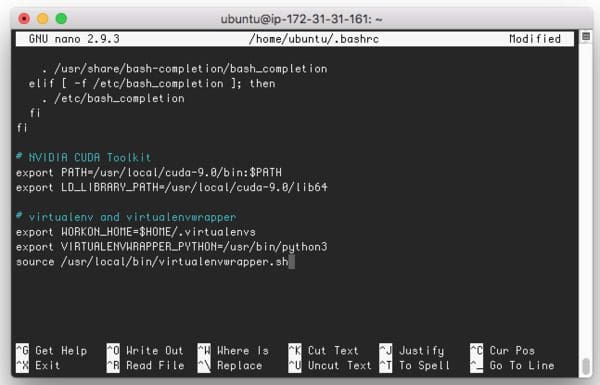
~/.bashrc to use virtualenv and virtualenvwrapper (two of my preferred tools).And let’s go ahead and reload our ~/.bashrc file:
$ source ~/.bashrc
The virtualenvwrapper tool now has support for the following terminal commands:
mkvirtualenv: Creates a virtual environment.rmvirtualenv: Removes a virtual environment.workon: Activates a specified virtual environment. If an environment isn’t specified all environments will be listed.deactivate: Takes you to your system environment. You can activate any of your virtual environments again at any time.
Creating the dl4cv environment
Using the first command from the list above, let’s go ahead and create the dl4cv virtual environment with Python 3:
$ mkvirtualenv dl4cv -p python3
When your virtual environment is active, your terminal bash prompt will look like this:
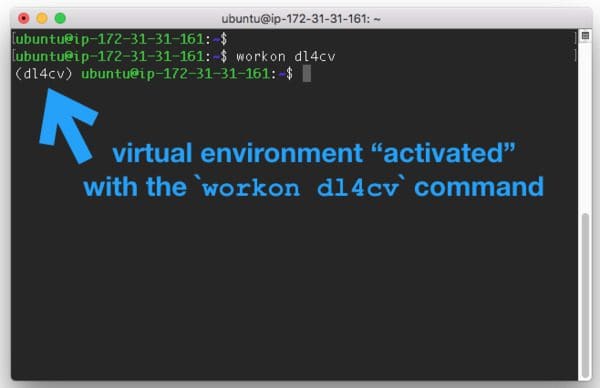
dl4cv environment is activated. The beginning of the bash prompt serves as my validation that I’m ready to install software for deep learning with Python.If your environment is not active, simply use the workon command:
$ workon dl4cv
From there your bash prompt will change accordingly.
Step #6: Install Python libraries
Now that our Python virtual environment is created and is currently active, let’s install NumPy and OpenCV using pip:
$ pip install numpy
$ pip install opencv-contrib-python
Alternatively, you can install OpenCV from source to get the full install with patented algorithms. But for my deep learning books, those additional algorithms are irrelevant to deep learning.
Let’s install libraries required for additional computer vision, image processing, and machine learning as well:
$ pip install scipy matplotlib pillow
$ pip install imutils h5py requests progressbar2
$ pip install scikit-learn scikit-image
Install TensorFlow for Deep Learning for Computer Vision with Python
You have two options to install TensorFlow:
Option #1: Install TensorFlow with GPU support:
$ pip install tensorflow-gpu==1.12.0
Note: Feedback from our readers has led us to realize that newer versions of CUDA don’t support the latest TensorFlow. We recommend installing version 1.12.0 as shown.
Option #2: Install TensorFlow without GPU support:
$ pip install tensorflow
Arguably, a third option is to compile TensorFlow from source, but it is unnecessary for DL4CV.
Go ahead and verify that TensorFlow is installed in your dl4cv virtual environment:
$ python
>>> import tensorflow
>>>
Install Keras for DL4CV
We’ll employ pip again to install Keras into the dl4cv environment:
$ pip install keras
You can verify that Keras is installed via starting a Python shell:
$ python
>>> import keras
Using TensorFlow backend.
>>>
Now let’s go ahead and exit the Python shell and then deactivate the environment before we move on to “Step #7”:
>>> exit()
$ deactivate
Note: An issue was raised about DL4CV ImageNet Bundle Chapter 10 “Case Study: Emotion recognition”. The solution is that the following commit-ID from the Keras master branch needs to be installed for compatibility: 9d33a024e3893ec2a4a15601261f44725c6715d1 . To implement the fix, you can (1) clone the Keras repo using the commit-ID, and (2) use setup.py to install Keras. Eventually PyPi will be updated and the pip installation method described above will work. The bug/fix does not impact all chapters. Reference: Ticket #798 in the DL4CV issue tracker.
Step #7: Install mxnet (DL4CV ImageNet Bundle only)
We use mxnet in the ImageNet Bundle of Deep Learning for Computer Vision with Python due to both (1) its speed/efficiency and (2) its great ability to handle multiple GPUs.
When working with the ImageNet dataset as well as other large datasets, training with multiple GPUs is critical.
It is not to say that you can’t accomplish the same with Keras with the TensorFlow GPU backend, but mxnet does it more efficiently. The syntax is similar, but there are some aspects of mxnet that are less user-friendly than Keras. In my opinion, the tradeoff is worth it, and it is always good to be proficient with more than one deep learning framework.
Let’s get the ball rolling and install mxnet.
Installing mxnet requires OpenCV + mxnet compilation
In order to effectively use mxnet’s data augmentation functions and the im2rec utility we need to compile mxnet from source rather than a simple pip install of mxnet.
Since mxnet is a compiled C++ library (with Python bindings), it implies that we must compile OpenCV from source as well.
Let’s go ahead and download OpenCV (we’ll be using version 3.4.4):
$ cd ~
$ wget -O opencv.zip https://github.com/opencv/opencv/archive/3.4.4.zip
$ wget -O opencv_contrib.zip https://github.com/opencv/opencv_contrib/archive/3.4.4.zip
And then unzip the archives:
$ unzip opencv.zip
$ unzip opencv_contrib.zip
I like to rename the directories, that way our paths will be the same even if you are using a version of OpenCV other than 3.4.4:
$ mv opencv-3.4.4 opencv
$ mv opencv_contrib-3.4.4 opencv_contrib
And from there, let’s create a new virtual environment (assuming you followed the virtualenv and virtualenvwrapper instructions from Step #2).
The mxnet virtual environment will contain packages completely independent and sequestered from our dl4cv environment:
$ mkvirtualenv mxnet -p python3
Now that your mxnet environment has been created, notice your bash prompt:
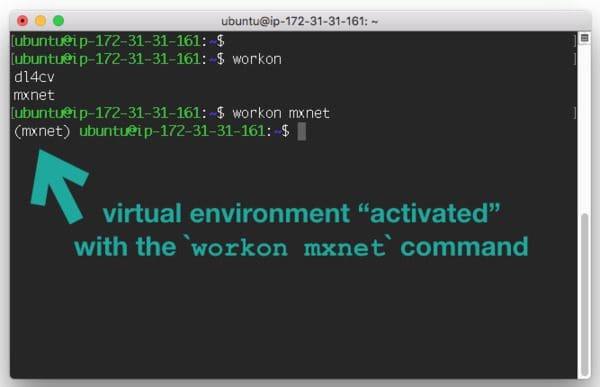
workon mxnet command activates our mxnet virtual environment for deep learning.We can go on to install packages we will need for DL4CV into the environment:
$ pip install numpy scipy matplotlib pillow
$ pip install imutils h5py requests progressbar2
$ pip install scikit-learn scikit-image
Let’s configure OpenCV with cmake:
$ cd ~/opencv
$ mkdir build
$ cd build
$ cmake -D CMAKE_BUILD_TYPE=RELEASE \
	-D CMAKE_INSTALL_PREFIX=/usr/local \
	-D INSTALL_PYTHON_EXAMPLES=ON \
	-D INSTALL_C_EXAMPLES=OFF \
	-D OPENCV_EXTRA_MODULES_PATH=~/opencv_contrib/modules \
	-D PYTHON_EXECUTABLE=~/.virtualenvs/mxnet/bin/python \
	-D OPENCV_ENABLE_NONFREE=ON \
	-D BUILD_EXAMPLES=ON ..
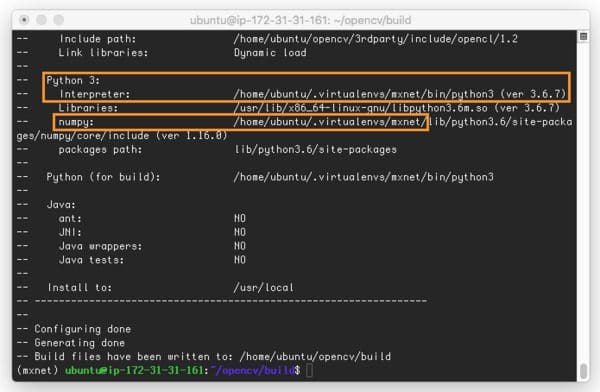
Provided that your output matches mine, let’s go ahead and kick off the compile process:
$ make -j4
Compiling OpenCV can take quite a bit of time, but since you likely have a GPU, your system specs are probably already very capable of compiling OpenCV in less than 30 minutes. Nevertheless, this is the point where you’d want to go for a walk or grab a fresh cup of coffee.
When OpenCV has been 100% compiled, there are still a few remaining sub-steps to perform, beginning with our actual install commands:
$ sudo make install
$ sudo ldconfig
You can confirm that OpenCV has been successfully installed via:
$ pkg-config --modversion opencv
3.4.4
And now for the critical sub-step.
What we need to do is create a link from where OpenCV was installed into the virtual environment itself. This is known as a symbolic link.
Let’s go ahead and take care of that now:
$ cd /usr/local/python/cv2/python-3.6
$ ls
cv2.cpython-36m-x86_64-linux-gnu.so
And now let’s rename the .so file to something that makes a little bit more sense + create a sym-link to our mxnet site-packages:
$ sudo mv cv2.cpython-36m-x86_64-linux-gnu.so cv2.opencv3.4.4.so
$ cd ~/.virtualenvs/mxnet/lib/python3.6/site-packages
$ ln -s /usr/local/python/cv2/python-3.6/cv2.opencv3.4.4.so cv2.so
Note: If you have multiple OpenCV versions ever installed in your system, you can use this same naming convention and symbolic linking method.
To test that OpenCV is installed + symbolically linked properly, fire up a Python shell inside the mxnet environment:
$ cd ~
$ workon mxnet
$ python
>>> import cv2
>>> cv2.__version__
'3.4.4'
We’re now ready to install mxnet into the environment.
Cloning and installing mxnet
We have gcc and g++ v7 installed for CUDA; however, there is a problem — mxnet requires gcc v6 and g++ v6 to compile from source.
The solution is to remove the gcc and g++ sym-links:
$ cd /usr/bin
$ sudo rm gcc g++
And then create new ones, this time pointing to gcc-6 and g++-6 :
$ sudo ln -s gcc-6 gcc
$ sudo ln -s g++-6 g++
Let’s download and install mxnet now that we have the correct compiler tools linked up.
Go ahead and clone the mxnet repository as well as check out version 1.3:
$ cd ~
$ git clone --recursive --no-checkout https://github.com/apache/incubator-mxnet.git mxnet
$ cd mxnet
$ git checkout v1.3.x
$ git submodule update --init
With version 1.3 of mxnet ready to go, we’re going to compile mxnet with BLAS, OpenCV, CUDA, and cuDNN support:
$ workon mxnet
$ make -j4 USE_OPENCV=1 USE_BLAS=openblas USE_CUDA=1 USE_CUDA_PATH=/usr/local/cuda USE_CUDNN=1
The compilation process will likely finish in less than 40 minutes.
And then we’ll create a sym-link for mxnet into the virtual environment’s site-packages:
$ cd ~/.virtualenvs/mxnet/lib/python3.6/site-packages/
$ ln -s ~/mxnet/python/mxnet mxnet
Update 2019-06-04: The sym-link is updated to support the io module of mxnet.
Let’s go ahead and test our mxnet install:
$ workon mxnet
$ cd ~
$ python
>>> import mxnet
>>>
Note: Do not delete the ~/mxnet directory in your home folder. Not only do our Python bindings live there, but we also need the files in ~/mxnet/bin when creating serialized image datasets (i.e., the im2rec command).
Now that mxnet is done compiling we can reset our gcc and g++ symlinks to use v7:
$ cd /usr/bin
$ sudo rm gcc g++
$ sudo ln -s gcc-7 gcc
$ sudo ln -s g++-7 g++
We can also go ahead and delete the OpenCV source code from our home folder:
$ cd ~
$ rm -rf opencv/
$ rm -rf opencv_contrib/
From here you can deactivate this environment, workon a different one, or create another environment. In the supplementary materials page of the DL4CV companion website, I have instructions on how to setup environments for the TensorFlow Object Detection API, Mask R-CNN, and RetinaNet code.
mxnet + OpenCV 4.1 workaround
Update 2019-08-08: OpenCV 4.1 has been causing a number of readers issues with mxnet. In this section, I’m presenting a workaround by PyImageSearch reader, Gianluca. Thank you, Gianluca!
The problem is that the latest OpenCV (4.1.0) does not create the opencv4.pc file that is needed by pkg-config command (used in mxnet build) to identify the installed libs and folders.
The fix is to add one more CMake flag in addition to a symlink later on.
Let’s review the CMake flag:
$ cmake -D CMAKE_BUILD_TYPE=RELEASE \
	-D CMAKE_INSTALL_PREFIX=/usr/local \
	-D INSTALL_PYTHON_EXAMPLES=ON \
	-D INSTALL_C_EXAMPLES=OFF \
	-D OPENCV_GENERATE_PKGCONFIG=YES \
	-D OPENCV_EXTRA_MODULES_PATH=~/opencv_contrib/modules \
	-D PYTHON_EXECUTABLE=~/.virtualenvs/mxnet/bin/python \
	-D OPENCV_ENABLE_NONFREE=ON \
	-D BUILD_EXAMPLES=ON ..
Note that Line 5 is highlighted.
Follow the instructions above from that point, however, there is one additional step.
Once installed (via the make command), we need to symlink the file opencv4.pc from /usr/local/lib to the default /usr/share/pkgconfig folder:
$ cd /usr/share/pkgconfig
$ ln -s /usr/local/lib/opencv4.pc opencv4.pc
Be sure to provide your comments in the form below if you have troubles with OpenCV 4.1 and mxnet.
A job well-done
At this point, a “congratulations” in order — you’ve successfully configured your Ubuntu 18.04 box for deep learning!
Great work!
Did you have any troubles configuring your deep learning system?
If you struggled along the way, I encourage you to re-read the instructions again and try to debug. If you’re really stuck, you can reach out in the DL4CV companion website issue tracker (there’s a registration link in the front of your book) or by contacting me.
I also want to take the opportunity to remind you about the pre-configured instances that come along with your book:
- The DL4CV VirtualBox VM is pre-configured and ready to go. It will help you through nearly all experiments in the Starter and Practitioner bundles. For the ImageNet bundle a GPU is a necessity and this VM does not support GPUs.
- My DL4CV Amazon Machine Image for the AWS cloud is freely open to the internet — no purchase required (other than AWS charges, of course). Getting started with a GPU in the cloud only takes about 4-6 minutes. For less than the price of a cup of coffee, you can use a GPU instance for an hour or two which is just enough time to complete some (definitely not all) of the more advanced lessons in DL4CV. The following environments are pre-configured:
dl4cv,mxnet,tfod_api,mask_rcnn, andretinanet.
Azure users should consider the Azure DSVM. You can read my review of the Microsoft Azure DSVM here. All code from one of the first releases of DL4CV in 2017 was tested using Microsoft’s DSVM. It is an option and a very good one at that, but at this time it is not ready to support the Bonus Bundle of DL4CV without additional configuration. If Azure is your preferred cloud provider, I encourage you to stay there and take advantage of what the DSVM has to offer.
What's next? We recommend PyImageSearch University.
86+ total classes • 115+ hours hours of on-demand code walkthrough videos • Last updated: February 2026
★★★★★ 4.84 (128 Ratings) • 16,000+ Students Enrolled
I strongly believe that if you had the right teacher you could master computer vision and deep learning.
Do you think learning computer vision and deep learning has to be time-consuming, overwhelming, and complicated? Or has to involve complex mathematics and equations? Or requires a degree in computer science?
That’s not the case.
All you need to master computer vision and deep learning is for someone to explain things to you in simple, intuitive terms. And that’s exactly what I do. My mission is to change education and how complex Artificial Intelligence topics are taught.
If you're serious about learning computer vision, your next stop should be PyImageSearch University, the most comprehensive computer vision, deep learning, and OpenCV course online today. Here you’ll learn how to successfully and confidently apply computer vision to your work, research, and projects. Join me in computer vision mastery.
Inside PyImageSearch University you'll find:
- ✓ 86+ courses on essential computer vision, deep learning, and OpenCV topics
- ✓ 86 Certificates of Completion
- ✓ 115+ hours hours of on-demand video
- ✓ Brand new courses released regularly, ensuring you can keep up with state-of-the-art techniques
- ✓ Pre-configured Jupyter Notebooks in Google Colab
- ✓ Run all code examples in your web browser — works on Windows, macOS, and Linux (no dev environment configuration required!)
- ✓ Access to centralized code repos for all 540+ tutorials on PyImageSearch
- ✓ Easy one-click downloads for code, datasets, pre-trained models, etc.
- ✓ Access on mobile, laptop, desktop, etc.
Summary
Today we learned how to set up an Ubuntu 18.04 + CUDA + GPU machine (as well as a CPU-only machine) for deep learning with TensorFlow and Keras.
Keep in mind that you don’t need a GPU to learn how deep learning works! GPUs are great for deeper neural networks and training with tons of data, but if you just need to learn the fundamentals and get some practice on your laptop, your CPU is just fine.
We accomplished our goal of setting up the following tools into two separate virtual environments:
- Keras + TensorFlow
- mxnet
Each of these deep learning frameworks requires additional Python packages to be successful such as:
- scikit-learn, SciPy, matplotlib
- OpenCV, pillow, scikit-image
- imutils (my personal package of convenience functions and tools)
- …and more!
These libraries are now available in each of the virtual environments that we set up today. You’re now ready to train state-of-the-art models using TensorFlow, Keras, and mxnet. Your system is ready to hack with the code in my deep learning book as well as your own projects.
Setting up all of this software is definitely daunting, especially for novice users. If you encountered any issues along the way, I highly encourage you to check that you didn’t skip any steps. If you are still stuck, please get in touch.
I hope this tutorial helps you on your deep learning journey!
To be notified when future blog posts are published here on PyImageSearch (and grab my 17-page Deep Learning and Computer Vision Resource Guide PDF), just enter your email address in the form below!

Join the PyImageSearch Newsletter and Grab My FREE 17-page Resource Guide PDF
Enter your email address below to join the PyImageSearch Newsletter and download my FREE 17-page Resource Guide PDF on Computer Vision, OpenCV, and Deep Learning.
