In this tutorial you will learn how to install OpenCV 4 on your Ubuntu system.
OpenCV 4 has been officially released as of 20 November 2018!
So, why bother installing OpenCV 4?
You may want to consider installing OpenCV 4 for further optimizations, C++11 support, more compact modules, and many improvements to the Deep Neural Network (DNN) module.
Don’t feel the need to upgrade immediately — but do keep these instructions in mind if and when you’re ready to make the switch to OpenCV 4.
How to install OpenCV 4 on Ubuntu
In this blog post, I’ll walk you through the six steps to install OpenCV 4 on your Ubuntu system.
I’ll also cover some Frequently Asked Questions (FAQs) that will help you troubleshoot in the event you run into an error message. I strongly urge you to read the FAQ prior to submitting a comment on this post.
Before we begin, you probably have two burning questions:
1. Which version of Ubuntu OS should I use with OpenCV 4?
Today I’ll be installing OpenCV 4 on Ubuntu 18.04. I’ve also tested these instructions with Ubuntu 16.04 as well.
If you intend on using this machine for deep learning I might suggest you use Ubuntu 16.04 as the GPU drivers are more mature. If you intend on using this machine just for OpenCV and other computer vision tasks, Ubuntu 18.04 is perfectly fine.
2. Should I use Python 2.7 or Python 3 with OpenCV 4?
Python 3 has become the standard and I highly recommend you install Python 3 with OpenCV 4.
That being said, if you’re making the conscious choice to use Python 2.7, you can of course follow these instructions, just be sure you take care to install Python 2.7 development headers and libraries as well as specifying Python 2.7 when creating your virtual environment. Everything else will be the same. Refer to the FAQs down below if you need pointers for Python 2.7.
Let’s begin.
Step #1: Install OpenCV 4 dependencies on Ubuntu
I’ll be using Ubuntu 18.04 to install OpenCV 4 with Python 3 bindings on my machine.
To get the OpenCV 4 install party started, fire up your Ubuntu machine and open a terminal. Alternatively, you may SSH into the box for the install portion.
From there, let’s update our system:
$ sudo apt-get update $ sudo apt-get upgrade
And then install developer tools:
$ sudo apt-get install build-essential cmake unzip pkg-config
Next, let’s install a handful of image and video I/O libraries.
$ sudo apt-get install libjpeg-dev libpng-dev libtiff-dev $ sudo apt-get install libavcodec-dev libavformat-dev libswscale-dev libv4l-dev $ sudo apt-get install libxvidcore-dev libx264-dev
These libraries enable us to load image from disk as well as read video files.
From there, let’s install GTK for our GUI backend:
$ sudo apt-get install libgtk-3-dev
Followed by installing two packages which contain mathematical optimizations for OpenCV:
$ sudo apt-get install libatlas-base-dev gfortran
And finally, let’s install the Python 3 development headers:
$ sudo apt-get install python3-dev
Once you have all of these prerequisites installed you can move on to the next step.
Step #2: Download OpenCV 4
Our next step is to download OpenCV.
Let’s navigate to our home folder and download both opencv and opencv_contrib. The contrib repo contains extra modules and functions which we frequently use here on the PyImageSearch blog. You should be installing the OpenCV library with the additional contrib modules as well.
When you’re ready, just follow along to download both the opencv
and opencv_contrib
code:
$ cd ~ $ wget -O opencv.zip https://github.com/opencv/opencv/archive/4.0.0.zip $ wget -O opencv_contrib.zip https://github.com/opencv/opencv_contrib/archive/4.0.0.zip
Update 2018-11-26: OpenCV 4.0.0 is released and I have updated the respective wget
URLs.
From there, let’s unzip the archives:
$ unzip opencv.zip $ unzip opencv_contrib.zip
I also like to rename the directories:
$ mv opencv-4.0.0 opencv $ mv opencv_contrib-4.0.0 opencv_contrib
If you skip renaming the directories, don’t forget to update the CMake paths.
Now that opencv
and opencv_contrib
are downloaded and ready to go, let’s set up our environment.
Step #3: Configure your Python 3 virtual environment for OpenCV 4
Let’s install pip, a Python Package Manager.
To install pip, simply enter the following in your terminal:
$ wget https://bootstrap.pypa.io/get-pip.py $ sudo python3 get-pip.py
Make use of virtual environments for Python development
Python virtual environments allow you to work on your Python projects in isolation. They are a best practice for Python development.
For example, maybe you have a Python + OpenCV project that requires an older version of scikit-learn (v0.14), but you want to keep using the latest version of scikit-learn (0.19) for all of your newer projects.
Using virtual environments, you could handle these two software version dependencies separately, something that is not possible using just the system install of Python.
If you would like more information about Python virtual environments take a look at this article on RealPython or read the first half of the this blog post on PyImageSearch.
Note: My preferred way to work with Python virtual environment is via the virtualenv
and virtualenvwrapper
packages; however if you are more familiar with conda or PyEnv, feel free to use them and skip this part.
Let’s go ahead and install virtualenv
and virtualenvwrapper
— these packages allow us to create and manage Python virtual environments:
$ sudo pip install virtualenv virtualenvwrapper $ sudo rm -rf ~/get-pip.py ~/.cache/pip
To finish the install of these tools, we need to update our ~/.bashrc
file.
Using a terminal text editor such as vi
/vim
or nano
, add the following lines to your ~/.bashrc
:
# virtualenv and virtualenvwrapper export WORKON_HOME=$HOME/.virtualenvs export VIRTUALENVWRAPPER_PYTHON=/usr/bin/python3 source /usr/local/bin/virtualenvwrapper.sh
Alternatively, you can append the lines directly via bash commands:
$ echo -e "\n# virtualenv and virtualenvwrapper" >> ~/.bashrc $ echo "export WORKON_HOME=$HOME/.virtualenvs" >> ~/.bashrc $ echo "export VIRTUALENVWRAPPER_PYTHON=/usr/bin/python3" >> ~/.bashrc $ echo "source /usr/local/bin/virtualenvwrapper.sh" >> ~/.bashrc
Next, source the ~/.bashrc
file:
$ source ~/.bashrc
Create a virtual environment to hold OpenCV 4 and additional packages
Now we’re at the point where we can create your OpenCV 4 + Python 3 virtual environment:
$ mkvirtualenv cv -p python3
This command simply creates a Python 3 virtual environment named cv
.
You can (and should) name your environment(s) whatever you’d like — I like to keep them short and sweet while also providing enough information so I’ll remember what they are for. For example, I like to name my environments like this:
py3cv4
py3cv3
py2cv2
- etc.
Here my py3cv4
virtual environment can be used for Python 3 + OpenCV 4. My py3cv3
virtual environment is used for Python 3 and OpenCV 3. And my py2cv2
environment can be used to test legacy Python 2.7 + OpenCV 2.4 code. These virtual environment names are easy to remember and allow me to switch between OpenCV + Python versions (nearly) seamlessly.
Let’s verify that we’re in the cv
environment by using the workon
command:
$ workon cv
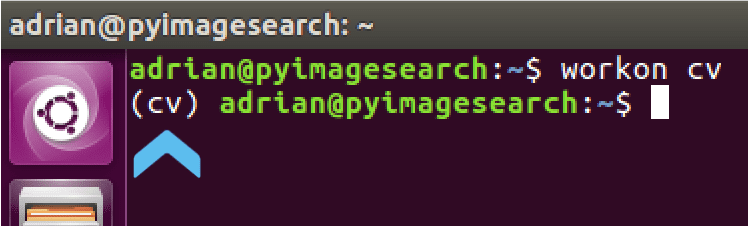
workon
command to activate our cv
virtual environment on Ubuntu prior to installing NumPy and OpenCV 4.Install NumPy
The first package and only Python prerequisite we’ll install is NumPy:
$ pip install numpy
We can now prepare OpenCV 4 for compilation on our Ubuntu machine.
Step #4: CMake and compile OpenCV 4 for Ubuntu
For this step, we’re going to setup our compile with CMake followed by running make
to actually compile OpenCV. This is the most time-consuming step of today’s blog post.
Navigate back to your OpenCV repo and create + enter a build
directory:
$ cd ~/opencv $ mkdir build $ cd build
Run CMake for OpenCV 4
Now let’s run CMake to configure the OpenCV 4 build:
$ cmake -D CMAKE_BUILD_TYPE=RELEASE \ -D CMAKE_INSTALL_PREFIX=/usr/local \ -D INSTALL_PYTHON_EXAMPLES=ON \ -D INSTALL_C_EXAMPLES=OFF \ -D OPENCV_ENABLE_NONFREE=ON \ -D OPENCV_EXTRA_MODULES_PATH=~/opencv_contrib/modules \ -D PYTHON_EXECUTABLE=~/.virtualenvs/cv/bin/python \ -D BUILD_EXAMPLES=ON ..
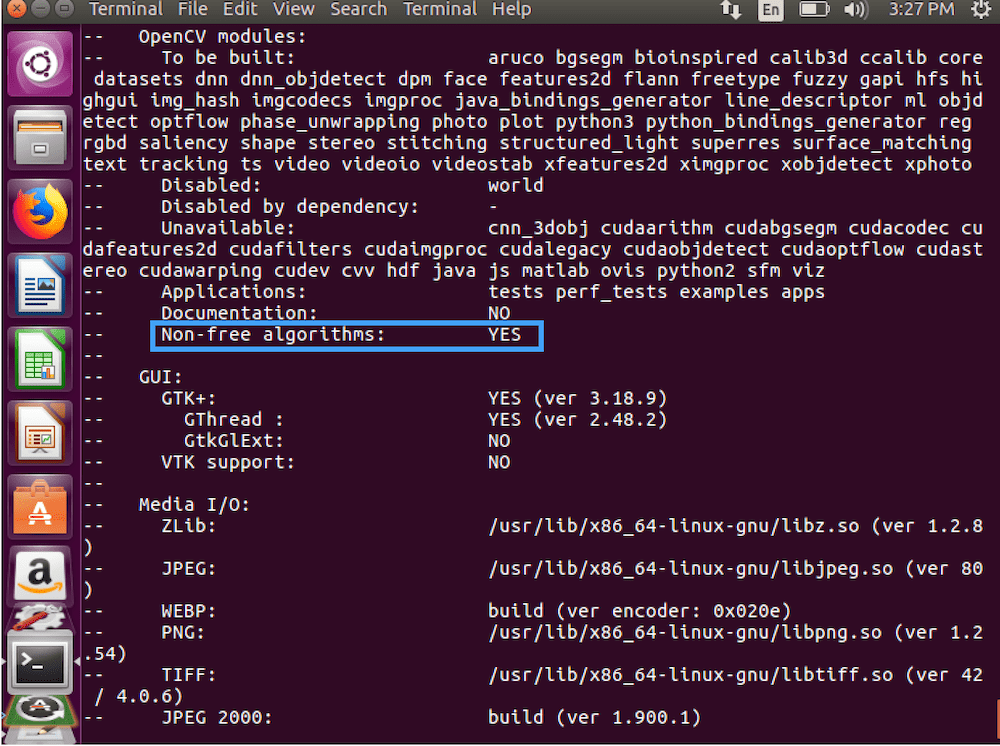
Update 2018-11-26: Notice the -D OPENCV_ENABLE_NONFREE=ON
flag. Setting this flag with OpenCV 4 ensures that you’ll have access to SIFT/SURF and other patented algorithms.
Be sure to update the above command to use the correct OPENCV_EXTRA_MODULES_PATH
and PYTHON_EXECUTABLE
in your virtual environment that you’re working in. If you’re using the same directory structure Python virtual environment names these paths should not need to be updated.
Once CMake finishes, it’s important that you inspect the output. Your output should look similar to mine below:
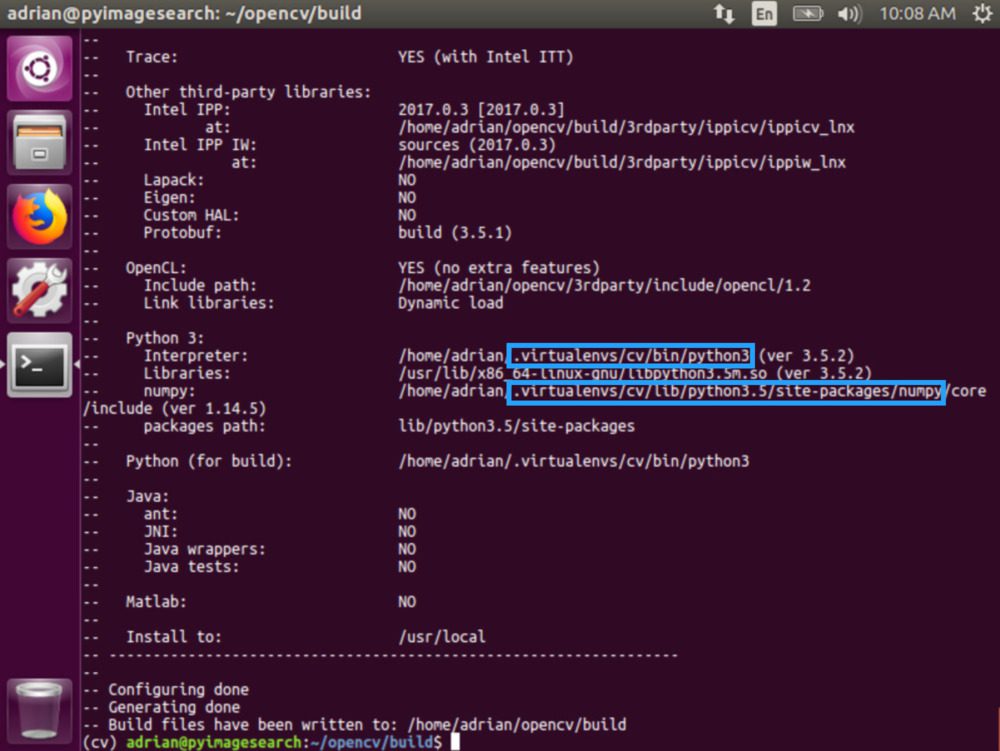
Take a second now to ensure that the Interpreter
points to the correct Python 3 binary. Also check that numpy
points to our NumPy package which is installed inside the virtual environment.
Compile OpenCV 4
Now we’re ready to compile OpenCV 4:
$ make -j4
Note: In the make
command above, the -j4
argument specifies that I have 4 cores for compilation. Most systems will have 2, 4, or 8 cores. You should update the command to use the number of cores on your processor for a faster compile. If you encounter compilation failures, you could try compiling with 1 core to eliminate race conditions by skipping the optional argument altogether.
Here you can see OpenCV 4 has compiled without any errors:
make
output reaches 100% we can move on.And from there, let’s install OpenCV 4 with two additional commands:
$ sudo make install $ sudo ldconfig
Step #5: Link OpenCV 4 into your Python 3 virtual environment
Before we make a symbolic link to link OpenCV 4 into our Python virtual environment, let’s determine our Python version:
$ workon cv $ python --version Python 3.5
Using the Python version, we can easily navigate to the correct site-packages
directory next (although I do recommend tab-completion in the terminal).
Update 2018-12-20: The following paths have been updated. Previous versions of OpenCV installed the bindings in a different location (/usr/local/lib/python3.5/site-packages
), so be sure to take a look at the paths below carefully.
At this point, your Python 3 bindings for OpenCV should reside in the following folder:
$ ls /usr/local/python/cv2/python-3.5 cv2.cpython-35m-x86_64-linux-gnu.so
Let’s rename them to simply cv2.so
:
$ cd /usr/local/python/cv2/python-3.5 $ sudo mv cv2.cpython-35m-x86_64-linux-gnu.so cv2.so
Pro-tip: If you are installing OpenCV 3 and OpenCV 4 alongside each other, instead of renaming the file to cv2.so
, you might consider naming it cv2.opencv4.0.0.so
and then in the next sub-step sym-link appropriately from that file to cv2.so
as well.
Our last sub-step is to sym-link our OpenCV cv2.so
bindings into our cv
virtual environment:
$ cd ~/.virtualenvs/cv/lib/python3.5/site-packages/ $ ln -s /usr/local/python/cv2/python-3.5/cv2.so cv2.so
Step #6: Test your OpenCV 4 install on Ubuntu
Let’s do a quick sanity test to see if OpenCV is ready to go.
Open a terminal and perform the following:
$ workon cv $ python >>> import cv2 >>> cv2.__version__ '4.0.0' >>> quit()
The first command activates our virtual environment. Then we run the Python interpreter associated with the environment.
Note: It is not necessary to specify python3
as Python 3 is the only Python executable in the environment.
If you see that you have version 4.0.0 installed, then a “Congratulations!” is in order. Have a swig of your favorite beer or bourbon and let’s get to something more fun than installing libraries and packages.
Let’s perform object tracking in video with OpenCV 4
I know you’re itching to test out your installation with a practical example. Tracking motion in video is a fun, small project to get you working with OpenCV 4 on your Ubuntu machine.
To get started, scroll to the “Downloads” section of this blog post to download the source code and example video.
From there, install the imutils
library in your fresh virtual environment:
$ workon cv $ pip install imutils
And then navigate to where you stored the zip file and unzip it. For example, you might save it in ~/Downloads
and then perform the following steps:
$ cd ~/Downloads $ unzip ball-tracking.zip $ cd ball-tracking
Now we’re ready to start our OpenCV + Python script.
You can execute the script using the following command:
$ python ball_tracking.py --video ball_tracking_example.mp4
Ready to try with your own ball and your webcam? Here’s the command:
$ python ball_tracking.py
At this point, you should see yourself. Bring the ball into the frame and move it around to see the red tracking trail!
To find out how this object tracking example works, be sure to refer to this blog post.
Troubleshooting and FAQ
Did you encounter an error installing OpenCV 4 on Ubuntu?
Don’t jump ship yet. The first time you install OpenCV, it can be very frustrating and the last thing I want for you to do is to end the learning process here.
I’ve put together a short list of frequently asked questions (FAQs) and I suggest that you familiarize yourself with them.
Q. Can I use Python 2.7?
A. Python 3 is what I suggest for development these days, but I do understand the need for Python 2.7 to work with legacy code.
Starting with Ubuntu 18.04, Python 2.7 isn’t even included. If you’re on Ubuntu 18.04 (or greater) you can still install it manually at the end of Step #1:
$ sudo apt-get install python2.7 python2.7-dev
From there, when you create your virtual environment in Step #3, first install pip for Python 2.7:
$ sudo python2.7 get-pip.py
And then (also in Step #3) when you create your virtual environment, simply use the relevant Python version flag:
$ mkvirtualenv cv -p python2.7
From there everything should be the same.
Q. Why can’t I just pip to install OpenCV 4?
A. There are a number of pip-installable versions of OpenCV available depending on your operating system and architecture. The problem you may run into is that they may be compiled without various optimizations, and image/video I/O support. Use them — but use them at your own risk. This tutorial is meant to give you the full install of OpenCV 4 on Ubuntu while giving you complete control over the compile.
Q. Why can’t I just apt-get install OpenCV?
A. I’d avoid this “solution” at all costs even though it might work. You’ll end up with an older, outdated version of OpenCV on your system. Secondly, apt-get doesn’t play nice with virtual environments and you won’t have control over your compile and build.
Q. When I execute mkvirtualenv
or workon
, I encounter a “command not found error”. What should I do?
A. There a number of reasons why you would be seeing this error message, all of come from to Step #3:
- First, ensure you have installed
virtualenv
andvirtualenvwrapper
properly using thepip
package manager. Verify by runningpip freeze
, and ensure that you see bothvirtualenv
andvirtualenvwrapper
in the list of installed packages. - Your
~/.bashrc
file may have mistakes. View the contents of your~/.bashrc
file to see the properexport
andsource
commands are present (check Step #3 for the commands that should be appended to~/.bashrc
). - You might have forgotten to
source
your~/.bashrc
. Make sure you runsource ~/.bashrc
after editing it to ensure you have access to themkvirtualenv
andworkon
commands.
Q. When I open a new terminal, logout, or reboot my Ubuntu system, I cannot execute the mkvirtualenv
or workon
commands.
A. Refer to #2 from the previous question.
Q. I’m trying to use a patented algorithm such as SURF and I see an exception about the NONFREE option. How can I use patented algorithms?
A. Be sure to refer to Step #4 (CMake command) and Figure 4 where this blog post has been updated to accomodate this change the OpenCV developers made.
Q. When I try to import OpenCV, I encounter this message: Import Error: No module named cv2
.
A. There are several reasons this could be happening and unfortunately, it is hard to diagnose. I recommend the following suggestions to help diagnose and resolve the error:
- Ensure your
cv
virtual environment is active by using theworkon cv
command. If this command gives you an error, then verify thatvirtualenv
andvirtualenvwrapper
are properly installed. - Try investigating the contents of the
site-packages
directory in yourcv
virtual environment. You can find thesite-packages
directory in~/.virtualenvs/cv/lib/python3.5/site-packages/
depending on your Python version. Make sure (1) there is acv2
directory in thesite-packages
directory and (2) it’s properly sym-linked to a valid directory. - Be sure to check the
site-packages
(and evendist-packages
) directory for the system install of Python located in/usr/local/python/
, respectively. Ideally, you should have acv2
directory there. - As a last resort, check in your
build/lib
directory of your OpenCV build. There should be acv2
directory there (if bothcmake
andmake
executed without error). If thecv2.so
file is not present, manually copy it into both the systemsite-packages
directory as well as thesite-packages
directory for thecv
virtual environment.
What's next? We recommend PyImageSearch University.
86+ total classes • 115+ hours hours of on-demand code walkthrough videos • Last updated: March 2025
★★★★★ 4.84 (128 Ratings) • 16,000+ Students Enrolled
I strongly believe that if you had the right teacher you could master computer vision and deep learning.
Do you think learning computer vision and deep learning has to be time-consuming, overwhelming, and complicated? Or has to involve complex mathematics and equations? Or requires a degree in computer science?
That’s not the case.
All you need to master computer vision and deep learning is for someone to explain things to you in simple, intuitive terms. And that’s exactly what I do. My mission is to change education and how complex Artificial Intelligence topics are taught.
If you're serious about learning computer vision, your next stop should be PyImageSearch University, the most comprehensive computer vision, deep learning, and OpenCV course online today. Here you’ll learn how to successfully and confidently apply computer vision to your work, research, and projects. Join me in computer vision mastery.
Inside PyImageSearch University you'll find:
- ✓ 86+ courses on essential computer vision, deep learning, and OpenCV topics
- ✓ 86 Certificates of Completion
- ✓ 115+ hours hours of on-demand video
- ✓ Brand new courses released regularly, ensuring you can keep up with state-of-the-art techniques
- ✓ Pre-configured Jupyter Notebooks in Google Colab
- ✓ Run all code examples in your web browser — works on Windows, macOS, and Linux (no dev environment configuration required!)
- ✓ Access to centralized code repos for all 540+ tutorials on PyImageSearch
- ✓ Easy one-click downloads for code, datasets, pre-trained models, etc.
- ✓ Access on mobile, laptop, desktop, etc.
Summary
Today we learned how to install OpenCV 4 from source on Ubuntu.
Compiling from source allows you to have full control over the install process, including adding any additional optimizations that you may wish to use.
We then tested the installation with a simple ball tracking demo.
Do you run macOS? I’ll be back on Friday with a macOS + OpenCV 4 installation guide so stay tuned!
If you enjoyed today’s installation tutorial and ball tracking demo, be sure to fill out the form below so that you receive updates when new blog posts go live!
Download the Source Code and FREE 17-page Resource Guide
Enter your email address below to get a .zip of the code and a FREE 17-page Resource Guide on Computer Vision, OpenCV, and Deep Learning. Inside you'll find my hand-picked tutorials, books, courses, and libraries to help you master CV and DL!
Adrian,
Nice post! I found a small typo (I think), “Don’t feed the need to upgrade immediately”, should be, “Don’t ‘feel’ the need to upgrade immediately”. Also, have you found any specific improvements to the DNN aspects of Opencv in this version? For instance, has the support for Tensorflow models improved at all?
Thanks Harrison! Typo fixed. To address your question:
The DNN module was introduced in OpenCV 3.3. The 3.4 release included a number of optimizations, making it faster, easier to use, and additional functionality. The OpenCV 4 release is even faster and more functionality, including the makings of actual “backends” to OpenCV for faster processing. I can’t comment directly on the TensorFlow models with OpenCV though as I haven’t tried them.
Getting VIDIOC_QBUF: Invalid argument error when i run python ball_tracking.py. Help?
Can you add some debugging print statements or use Python’s “pdb” to nail down exactly what line is throwing that error? Additionally, what version of Ubuntu and Python are you using?
Thank you so much adrian,Did these instructions could be apply to the raspberry pi 3?
Since Raspbian is Debian-based you can use the vast majority of the instructions for the Raspberry Pi. I’ll be posting a tutorial dedicated exclusively to the Raspberry Pi next week though! 🙂
Wowww its awesome,
Does this version of the opencv have a speed up of video processing in real-time than previous versions ??
I’m reasearching real-time facial recognition in a raspberry pi.
I haven’t had a chance to fully benchmark speedups between the versions. I’m going to hold off on that until the official OpenCV 4 release. If you’re interested in face recognition on the Pi, you should read this post.
Looking forward to the compile instructions on the Pi where any and all performance improvements would be most welcome!
I had good results with openCV 3.4.2:
pip install opencv-contrib-python
on Windows 7 (after a lot of hassles getting the “right” version of some DLLs). On Windows 10 it “just worked”. The dnn and highgui seem to be working perfectly for me so far. I’m not a Windows guy, but thought I’d pass this along as some Windows only friends asked about running the AI code I’d made with the help of your great tutorials. So far seems to be running fine.
It’d be great if versions for the Pi could be made available through PyPi.org as it takes many hours to compile on the Pi3.
Hey Wally — there actually is a Pi version available. I’ll be discussing how to use it and access it in either next week or the week after’s post. I’ll also be discussing some of the prons/cons of using the pip-based install, along what other gotchas to look out for.
Hi Adrian and all,
I am using python 3.6.5 and am having trouble with the following line.
ln -s /usr/local/lib/python3.6/site-packages/cv2.cpython-35m-x86_64-linux-gnu.so cv2.so
The import is failing with the following error.
ImportError: dynamic module does not define module export function (PyInit_cv4)
>
Is there an issue with python 3.6.5 or with my simlink?
Hi Adrian and all,
I found the problem. My simlink line should be
ln -s /usr/local/lib/python3.6/site-packages/cv2.cpython-36m-x86_64-linux-gnu.so cv2.so
Nice job resolving the issue, Pranav!
This was the best guide on how to build OpenCV. Lots of folks post scripts on Github without context or explanation on why certain cmake params are needed, or a full explanation of prerequisites. This worked exactly as described on my Ubuntu 18.04 build–thanks!
Thank you for the kind words Steve, I really appreciate that! And congrats on getting OpenCV 4 installed.
Nice post Adrian, what are major changes you noticed with this version.
I’ve noticed that the library can run faster and in particular the DNN module is becoming more easy to use and supports more models. C++11 is now required as well.
Hey Adrian, thanks for the amazing work you do for us.
I’m trying to install OpenCV on my WSL ubuntu 18.04, but facing many issues. Here are the issues in detail:
https://github.com/Microsoft/WSL/issues/3480
Any help from your side will be appreciated! Thank u in advance.
Sorry Ebrahim, I don’t have any experience with WSL so I’m not sure what the problem may be. Could you use VirtualBox or VMware to virtualize Ubuntu instead? That would likely solve the problem.
Great tutorial – followed it step by step and it just worked – thanks a lot! And I’m getting really fond of using virtualenv’s. Looking forward to some examples that make the difference between cv3 and 4.
Congrats on getting OpenCV 4 installed, Ivo! Nice job! 😀
I build it all correctly as shown and it looked like it worked yet when I try to import cv it does not find it. I did it on a virtual machine
Hey Mark — be sure to refer to the Troubleshooting and FAQ section of this post where I describe reasons why the import may fail.
Hi Adrian!
I want to use install opencv 4 in my anaconda environment. What are the specific steps do I need to take care of while installing?
Sorry, I do not have any tutorials related to Anaconda and OpenCV 4 nor do I have Anaconda installed on my system so I can’t provide any suggestions there. I might publish one in the future but I currently don’t have any plans to. In the meantime I would kindly encourage you to follow my tutorial exactly if you would like OpenCV 4 installed on your system.
I have the cv2.so in my virtual enviroment symbolically linked to this file cv2.cpython-35m-x86_64-linux-gnu.so in the build folder “cv2.so -> /usr/local/lib/python3.6/site-packages/cv2.cpython-35m-x86_64-linux-gnu.so” and I have cv2.so in my /usr/local/lib/python3.6/site-packages/ but python still says no to import cv2.
I found a typo in the FAQ on problem solving in the last question section 4 last hint ” If the cv2.so file is present, manually copy it into both the system site-packages directory as well as the site-packages directory for the cv virtual environment.”
Thanks for reporting the typo. Additionally, are you in the “cv” Python virtual environment before trying to import the cv2 bindings? That would be the most likely reason.
I’m having this problem, please elaborate on what you did exactly! Thank you
Hey, I have a windows machine and I know you don’t recommend using windows so can you tell me what should I do? I don’t really want to use virtualbox.
Thanks
If you don’t want to use a VM you could either:
1. Dual boot Ubuntu on your machine
2. Use a cloud-based instance and then SSH into it from your Windows machine
Hey, I have Ubuntu 14.04 machine and there is a error “fatal error:opencv2/xfeatures2d/cuda.hpp: there is no file” when i use make -j4 command. How can i solve this problem?
Thanks
For whatever reason it appears CMake found (or thinks it found) CUDA drivers on your system. Add the following configuration to your “cmake” command:
-D WITH_CUDA=OFF
Do the opencl backend of opencv4 support nvidia/amd gpu?
No, there will be separate functionality added for CUDA-specific functions.
This whole use of virtual environment seems to be a hassle ever since Open CV3. There are already a thousand of steps to install this and if a step goes wrong we have to start over.
Can we just skip the virtual environment part.
Python virtual environments are a best practice, Bruce. No one is forcing you to use them and you can absolutely skip them if you want. Secondly, the OpenCV version doesn’t have anything to do with Python virtual environments. They are totally independent and not related.
Hey,
i did follow your tutorial but for some reason, i can not find the final .so file in my system to link the cv2.so to that (I mean this file: cv2.cpython-35m-x86_64-linux-gnu.so).
The make command and everything finishes without error and i see many .so files built but not the one i mentioned above.
Thanks for your help.
Regards
Hey Ali — can you check your “build” directory as well? My guess is that your “Python 3” section from the “cmake” command did not match mine and ultimately the Python bindings were not built.
I also have no cv2.so and no Python 3 section from cmake. Python (for build) is there, with OpenCL immediately preceding it.
fyi I am running a new install of Ubuntu 18.04 which has Python 3.6.5. /usr/local/lib/python3.6 contains dist-packages but no site-packages directory.
If the “Python 3” section is not filled out like mine is then your OpenCV bindings will not be built. Go back and double-check that you are in the “cv” Python virtual environment (or whatever you named it) before continuing. You should also delete your “build” directory, re-create it, and re-run “cmake” to ensure there are no cached files from your previous configuration.
Thanks Adrian. But still no Python 3 section after running cmake in a new build directory.
“workon cv” appears to work. Running python starts 3.6.5 instead of 2.7 without virtualenv, and my prompt begins with “(cv) “.
Just to clarify, this tutorial doesn’t use Python 2.7 either. Would you be able to check with a Python virtual environment? Happy to try to help further but unfortunately these issues are super tricky to diagnose without having physical access to your machine.
Yes, I installed virtualenv as instructed and it appears to be correctly working with python3 from the behavior I mentioned above.
I understand. I’m not familiar with cmake but will try to determine why it doesn’t build for python.
Thanks.
Thanks Rick, best of luck with it! 🙂
My problem was with virtualenv. I don’t know why but cmake built for python fine by skipping “workon cv” and after pointing the “-D PYTHON_EXECUTABLE=” line to /usr/bin/python3.
I can use virtualenv now after creating the link with ln -s, except my cv2 file went to dist-packages instead of site-packages.
Thanks again Adrian. Fun stuff. 🙂
Awesome, I’m glad you were able to resolve the issue, Rick! Great job 😀
Hello Adrian,
I faced with the similar issue as Rick, but as I find for myself – the reason was miniconda installed. At the step “cmake -D CMAKE_BUILD_TYPE=RELEASE \…” I didn’t get Python information and got miniconda python executable as executable for build.
Maybe there is some better solution, but I could solve it only by deletion of miniconda.
Maybe it helps for somebody.
Thank you for sharing the solution, Slava.
Hi Rick,
I am facing the same problem as yours. I see your post below. Can you elaborate on your steps?
make -j4. i am having issue with this command. i can’t compile. please help.
What is the exact issue you are having? Without knowing the exact error I cannot provide any suggestions.
I’m able to get the test video to work but I am unable to try it with my own webcam. (Ubuntu 18.04 on VmWare, Windows Host) I’m able to view the webcam with Cheese but can’t capture any frames with openCV. I’ve searched around but haven’t found any fixes yet. Thoughts?
A VM by definition cannot access your webcam. Some combinations of VM software and hosts allow you to choose a setting to allow the VM to access your webcam but you’ll want to refer to your VMWware documentation to confirm this.
If I download this what about my existing CV3? Do I delete a folder or series of folders? Or do I simply delete the build folder and run Make again? Or create a new environment say, cv4 and when completely satisfied delete the cv environment?
I highly recommend you create a new Python virtual environment along with a brand new “build” directory for the compile.
Hi Adrian,
you are doing a really great job. It is awesome to see how your work is influencing others.
I’m an absolute rookie on linux and opencv.
I’ve got some small projects already working on raspberry, but due to the limited performance I was wondering if I could install opencv on my computer.
So I used Windows 10 and the linux subsystem. Installed there the Ubuntu 18.04 from microsoft store.
Updated / upgraded and everything works fine until the start of cmake.
End of your #3 you suggest to check the “workon cv” if it is working.
Later it is not clear for me, if I have to do the next steps inside of (CV) or in the regular linux environment.
So I did the numpy successfully sand tried cmake inside of (CV) afterwards,but got the very content less message “command not found”. Staring cmake with help switch, it works.
> workon cv
(CV) > installing numpy > making directory > starting cmake = “command not found”
Maybe you have an idea what I’m doing wrong.
But it could be waste of time, due to my rookie status.
If my English sounds strange sorry, it is not my first language 😉
Hi Heiko — your English is very understandable 🙂 As for your error, I have not tried using the Linux subsystem on Windows so I’m not sure if these instructions will work. Theoretically they should but I’m not 100% sure. That said, if the “cmake” command is not found I think you may have forgotten this step where we install “cmake”:
$ sudo apt-get install build-essential cmake unzip pkg-config
Hi Adrian, I received an error similar to this of the pastebin https://pastebin.com/RHHqW6ZM, in make -j4, and i don’t have idea how to solve, can you help me?
It looks like building the examples is causing the problem. Try turning off the
BUILD_EXAMPLES
switch:-D BUILD_EXAMPLES=OFF
Hi Adrian, I’m using CLion (for c++) on Ubuntu 16.04 but I’m getting errors during build with OpenCv 4. Tried with C++11 and C++14. I couldn’t imread. Is there any way to install opencv 3.4 because wget -O opencv.zip https://github.com/Itseez/opencv/archive/3.1.0.zip doesn’t work anymore? How can I do this
You can actually just grab .zip files (i.e., the “Sources”) for whatever version of OpenCV you want from the official OpenCV Releases page.
Hi Adrian ! Your tutorial is great!
I have just started to google some information about computer vision and luckily found your web page, and then after make this tracking_ball example I start to feel more motivated to study deeper about computer vision.
Thanks a lot.
PS. just sharing a small issue of my configuration (ubuntu 16.04 and python 3.5.2)
Step #4, cmake failed with “fatal error: linux/videodev.h: No such file or directory”
Fixed using: “sudo ln – s /usr/include/linux/videodev2.h /usr/include/linux/videodev.h”
Hi Adrian! Thanks for such a great post.
My question is I have already OpenCV 3.4.0 installed on my system with python 3.5.2. It works fine. However, I want to upgrade my OpenCV to 4.0.0. Just following these steps are enough for upgrading my OpenCV or do I need to remove OpenCV 3 first and then should follow these steps?
Thanks
No need to uninstall OpenCV 3. Just follow along with these steps but make sure you use a separate Python virtual environment for OpenCV 4. Otherwise everything else is the same.
Hi Adrian,
I have been running Open CV 3.3.0 in the dl4cv environment created following the 16.04 + CUDA + GPU tutorial.
I followed the instructions in this tutorial successfully however when I go back to the dl4cv environment is tells me that I am using 4.0.0-alpha
Interestingly when I run pkg-config –modversion opencv I get 3.3.0
I do not appear to have any issues using either environment, dl4cv or cv4 – I am just curious whether I should have done something different in the installation instructions and whether in fact my dl4cv environment is actually running 4.0.0-alpha?
Thanks,
Matt
It’s hard to tell what happened without having access to your machine and your command history. My guess is that you cloned down the latest version of OpenCV and installed it into the “dl4cv” virtual environment but had previously installed OpenCV 3.3.0. Unfortunately that’s my best guess. Either way I wouldn’t worry about it — it sounds like your machine is properly configured.
I did like you concerning the installation of opencv 4 but for me doesn’t work again,it put at the end :no module import
please help me
thank you
I found thank you for your this tutoriel
Congrats on resolving the issue, raph!
Adrian:
After some struggling I was able to get going on OpenCV using your tutorial.
Mistakes I made:
1) Took me a while to realize I was using Python 3.6, not 3.5.
2) Ignoring your warning I was able to bungle the sym link (related to mistake 1) ).
3) I had to compile using only 1 core (using an AMD Phenom). Otherwise it bombed on some error, I forget which.
Congratulations on an excellent tutorial.
Once I get a little acclimatized you will surely be hearing from me again (that’s a warning, ha!).
Thank you very much!
JP.
P.S.: I am an old programmer, but am fairly new to C, Python, Linux, and obviously OpenCV.
JP.
Congrats on getting OpenCV installed on your Ubuntu machine, JP! And thank you for sharing what tripped you up — I’m sure that information will help other readers as well.
Hi !
I recently install OpenCV 4.0 on my ubuntu 16.04 machine. It work perfectly but…
When I use surf = cv2.xfeatures2d.SURF_create() or SIFT
I get :
…
surf = cv2.xfeatures2d.SURF_create()
AttributeError: module ‘cv2’ has no attribute ‘xfeatures2d’
do you have any idea ?
Your path to the OpenCV contrib modules directory is incorrect. Double-check your director paths in “cmake” and try again.
Hello Adrian
Thanks for a well-written installation guide. I am trying to install OpenCV4 with python in anaconda environment. However, I checked the opencv/build/lib folder, and didn’t find cv2.so file. How do I resolve this?
Thanks and Regards
Akhilesh Mahajan
It sounds like it may be specific to Anaconda. You’ll either need to
1. Configure Anaconda to point to your Python libraries (which is something I only recommend advanced users do)
2. Not use Anaconda and instead use a different Python distribution
3. Wait until OpenCV 4 is officially released
I hope that helps point you in the right direction!
or try this )))
cmake -D CMAKE_BUILD_TYPE=RELEASE \
-D CMAKE_INSTALL_PREFIX=/home/user/anaconda3 \
-D INSTALL_PYTHON_EXAMPLES=ON \
-D INSTALL_C_EXAMPLES=OFF \
-D BUILD_opencv_python2=OFF \
-D OPENCV_EXTRA_MODULES_PATH=../../opencv_contrib/modules \
-D PYTHON_DEFAULT_EXECUTABLE=/home/user/anaconda3/bin/python3 \
-D PYTHON_EXECUTABLE=/home/user/anaconda3/bin/python3 \
-D PYTHON3_EXECUTABLE=/home/user/anaconda3/bin/python3 \
-D PYTHON_INCLUDE_DIR=/home/user/anaconda3/include/python3.6m \
-D PYTHON_PACKAGES_PATH=/home/user/anaconda3/lib/python3.6/site-packages \
-D PYTHON_EXECUTABLE=/home/user/anaconda3/bin/python3 \
-D PYTHON_LIBRARY=/home/user/anaconda3/lib/libpython3.6m.so \
-D ZLIB_LIBRARY_RELEASE=/home/user/anaconda3/lib/libz.so \
-D PNG_LIBRARY_RELEASE=/home/user/anaconda3/lib/libpng.so \
-D JPEG_LIBRARY=/home/user/anaconda3/lib/libjpeg.so \
-D TIFF_LIBRARY_RELEASE=/home/user/anaconda3/lib/libtiff.so \
-D BUILD_EXAMPLES=ON ..
make -j4 VERBOSE=1
Hi! Arian
I’m not able to do ~/.bashrc .
can you tell me properly?
or any link
Please.
What specifically are you having trouble with regarding the .bashrc file?
Hi Adrian and all,
I have problem with virtual environment, I did install virtualenv and virtualenvwrapper with pip, but when i try to do mkvirtualenv py3cv4, I get an error”No module named ‘virtualenvwrapper‘ I can’t find the source of this problem, is it OK if I just use conda instead of virtualenv?
It sounds like virtualenv and/or virtualenvwrapper were not installed properly. Make sure you have properly updated your
.bashrc
file and ransource
to reload it as I have done in the install guide.Hi Adrian,
Spotted some typo on the very beginning of your article. Here you go:
1. Which version of Ubuntu OS should I use with OpenCV 4?
Today I’ll be installing OpenCV 4 on Ubuntu 18.o4.
It should be 18.04 instead of 18.o4 🙂
Thanks!
Thanks Vincent! Typo fixed 🙂
Hello!
Can you please upload the makefile which make -j4 is supposed to compile because I don’t have it. I am trying to install not the opencv 4 alpha but the opencv 4 which came a few days later. Unfortunately, my make -j8, nor -j1 finds anything to compile.
You need to generate the Makefile for your own machine. My Makefile would not match yours. The issue you’re having is that “cmake” is exiting with an error and the Makefile is not generated. Double-check your output from “cmake” and correct any errors.
Just a couple comments:
– OpenCV 4.0 has been released.. No need to use the pre-release version, just grab the release version.
On my Linux Mint (effectively Ubuntu 18.04 for all practical purposes)
It uses Python 3.6 not 3.5; so the path is wrong in a couple places (might make note of this at the top of your post to see which version 3.5 or 3.6)
In addition The cv2.cpython-36m-x86_64.so file was NOT moved into the /usr/local/python3.6/site-packages (in fact their is no such thing as site-packages, only dist-packages is used apparent in 18.04). So instead it got installed into /usr/local/python/cv2/python-3.6 which of course meant it didn’t work from python (same issue as I believe the other guys having issues with Ubuntu 18.04).
So I manually copied it to /usr/local/python3.6/dist-packages and then python3 (from global) worked. Then I used the following:
$ cd ~/.virtualenvs/cv/lib/python3.6/site-packages/
$ ln -s /usr/local/lib/python3.6/dist-packages/cv2.cpython-36m-x86_64-linux-gnu.so cv2.so
To link it and it now works fine in the virtual environment…
Thanks, Nathanael. Now that OpenCV 4 has been officially released I’ll be updating this guide as well 🙂
Hey Adrian, I noticed there is a typo in the article because it says
“OpenCV 4 has NOT been officially released as of 20 November 2018!” instead of “now”. It confused me because I thought it maybe meant it wasn’t released yet since Im checking out this article and openCV for the first time 😛
Thanks for catching that, Michael! Typo fixed.
Hi Adrian
“Its alive!” cv4 & py3.6 are working together happily, in my py36cv4 environment.
But the only question I have is, the output from the cmake did not indicated the Python3 Interpreter: and numpy: as referencing the virtual environment.
For Step #4: CMake and compile OpenCV 4 for Ubuntu, were you still logged into the cv virtual environment or had you deactivate prior to this step?
Thanks for another great tut.
Regards Jack
You should be in the Python virtual environment for all steps up to “cmake”. After the “cmake” step you don’t technically have to be in the “cv” virtual environment but I recommend it, especially if you are new to using the command line and Python virtual environments.
Hi Adrian
I have scripted your installation method.
So just to clear things in my mind and get my script correct, the installation of cv4 I have done would be ‘system wide’ and works because I had previously installed numpy on system version of python3 and linked the cv4 to my virtual environment.
Your method above, the cv4 installation would be unique to the Python virtual environment, allowing different versions of cv on other Python virtual environment.
Is this a correct assumption?
If this is the case wouldn’t be better to point cmake arg CMAKE_INSTALL_PREFIX=~/.virtualenv/py36cv4
Thanks for your time, more than half of my python and CV knowledge has come from your posts.
Regards
Jack
Hi Jack — you are correct that the OpenCV bindings end up in the system
site-packages
. This is actually by design, mainly because you’ll end up having multiple Python virtual environments that you can sym-link.However, since I tend to have 5+ versions of OpenCV on my system at any even time, here is what I do:
1. Have an “opencv” directory in my home folder.
2. Compile each unique version of OpenCV in the “opencv” directory and when I’m done each compile, delete everything except the “build” directory
3. Sym-link the bindings into my Python virtual environment
Thanks Adrian
I will do just as you said if I add additional CVs to my system.
I have a fresh install of 18.04 for the purpose of using CV4 which I’m using for development.
I will now put CV4 on a RPi 3 and ZeroW for testing.
BTW, just a side note, 18.04 on SSD on 8 year old PC, goes from grub to ready to use in 12 seconds!!, well it sort of impresses me any way.
Again thanks, keep up the great work,
Regards
Jack
Regarding my last with:
print(“Your OpenCV version: {}”.format(cv2.__version__))
print(“Are you using OpenCV 2.X? {}”.format(imutils.is_cv2()))
print(“Are you using OpenCV 3.X? {}”.format(imutils.is_cv3()))
Apparently – the line 71 in the code:
” cnts = cnts[0] if imutils.is_cv2() else cnts[1]”
has a reverse sense and should be:
” cnts = cnts[1] if imutils.is_cv2() else cnts[0]”
Take care
Tony
OpenCV 4-beta and OpenCV official release now returns a 2-tuple with
cv2.findContours
. I’ll be updating all blog posts/tutorials that usecv2.findContours
to ensure they are compatible with both OpenCV 3 and OpenCV 4.Thank you so much !
You are welcome, Rohan!
What should be changed in the above installation script if I want to skip virtual environment? Let’s say I want to install OPenCV 4 without using virtualenv.
Simply don’t install virtualenv and virtualenvwrapper, then skip all steps related to “mkvirtualenv” and “workon”. Keep in mind I can only provide help or suggestions if you follow my instructions exactly.
Hello Adrian,
After all steps above, I tried to launch the ball-tracking code, but the zip file of the tracker could not be found.
Thank you so much!
Just to clarify, where you able to download the source code from the associated post? Did you download the .zip to your Ubuntu system?
Hi Adrian,
Can you give the steps for installing opencv 4 without using virtual environments.
Thank you,
Akshay
Using Python virtual environments are a best practice. I highly suggest you use them.
Hi, I’m getting ready to install openCV 4 on my ubuntu 18.04 system. I already have cuda 10 installed and configured.
From all the comments, am I to understand that OpenCV will automatically detect that cuda is available and compile accordingly? or do I need to specify “-D WITH_CUDA=ON”
I definitely need OpenCV with Cuda and I will not use any virtual environments.
Thanks
To be safe you should supply
-D WITH_CUDA=ON
Hi there I continue to have issues with the NONFREE compile option.
Despite having the flag ON , when I run the realtime stitcher demo I get an error
You not only need to have the NONFREE option set but you also need to ensure your path to the opencv_contrib directory is correct. I would double and triple-check that.
Hi, so. um, i messed up Step#4 i Cmake in the root then upto ‘make -j4’ and also the interpreter isn’t linked to the virtaulenv and Non-free Algorithm is set to NO. Please help i know it’s dumb not to read the instruction properly im sorry for that. please help me what to do.
and also i canceled the ‘make -j4’ command
Delete your “build” directory, re-create it, and re-run “cmake”, this time making sure:
1. You’re in the Python virtual enviroment
2. Your path to the opencv_contrib directory is correct
From there you can run “make”
Hi, Can you share the steps to install OpenCV 4 on windows as I want to capture the screen and perform image processing. I have a good nvidia graphics card so I prefer to use cuda also.
I’m able to get things done on linux environment but I want to use windows environment as I want to run on some real applications screen data.
Thanks
Hey there, I don’t officially support Windows here on the PyImageSearch blog. If you are interested in studying computer vision, OpenCV, or deep learning I highly recommend you use a Unix-based system such as Linux, macOS, or Raspbian. I’m happy to provide support for those operating systems but again, I do not support Windows here on PyImageSearch.
Thank you Adrian. This is awesome. Could you tell me what kind of hardware are you using? Do you need strong graphic card to make it run smoothly. I have tried to run one of the version of Windows OpenCV. And it’s really bad.
I used my MacBook Pro for that tutorial. The algorithm is super simplistic and can even run on resource constrained hardware so I’m not sure why your Windows system would be performing so poorly. In general I do not recommend using Windows for computer vision — I recommend a Unix-based machine line Ubuntu or macOS.
That worked great, the best tutorial out there.
As I am new to Linux(Ubuntu), I am curious how do you go on to learn, how to install programs and debugging, learning about virtual environments, etc on your own. Is there a resource where I can start learning this on a fast track.
Thank you for the awesome tutorial once again
Hi, I have two questions, can I work on C++ with this installation? and how I uninstall it?
OpenCV’s C++ libraries are included in this install (there is nothing to uninstall).
Hey Adrian, once again one of the best tutorial on the internet. I have a question about running opencv for C++ program. I have installed opencv 4.0.0 and run perfectly in python. But I couldn’t run it on C or C++ program. When I input this command `pkg-config –modversion opencv` it shows the older opencv (3.4.0 in my case). Do you know how to solve this problem? Thanks
Here is the source: https://github.com/opencv/opencv/issues/13154
for OpenCV 4.x, pkg-config support has been dropped.
add
-DOPENCV_GENERATE_PKGCONFIG=ON
-DOPENCV_PC_FILE_NAME=opencv4.pc
to cmake, this will generate the package config file. Its switched off by default for opencv 4.x
Adrian – if you can update this in the main post, that will be awesome:)
Hello Adrian! Kind of a stupid question, but still. Can I use OpenCV-4.00 for building C++ applications after completing these installation steps?
Hi Adrian! Thank you for your post. Following your step 4, I can see that the python interpreter and numpy are not correct.
How can I change this? Thank you!
Make sure you are in the Python virtual environment before running the “workon” command. That is typically the cause of that issue.
Hi Adrain!
I have this stupid problem where I can import cv2 in my home directory but not anywhere else. I suspect it is a symlink problem. As I am new to Linux environment, I am unable to solve this issue.
Any help will be appreciated.
THanks!
Ubuntu 18.04
Opencv 4.0.0 with Python3.6
I followed this post to the last comment.
That definitely sounds like a sym-link issue. Make sure you are in the “site-packages” directory of your Python virtual environment. Go back to Step #5 and redo those steps.
Just hope this could help someone: It took me hours to use python3 instead of python2 when configuring cmake by adding “-D PYTHON2_EXECUTABLE= \ “
“make -j$(nproc)” will use all of the available CPU threads on your system.
Hi Adrian , When I run This Command Line :
echo -e “\n# virtualenv and virtualenvwrapper” >> ~/.bashrc
I get This :
bash: home/zobiri/.bashrc: No Such File Or Directory
Any Suggestion ?? , Thank’s
For some reason your your “.bashrc” file doesn’t already exist. Create it first:
$ touch ~/.bashrc
we need to install the package gstreamer-video-1.0,then rebuid the opencv again;
finally i fixed the problem;
Congrats on resolving the issue!
Thank you so much for this tutorial! Was fantastic. Only issue I ran into was right at the end — was using Python 3.6, so needed to change symbolically linked file names accordingly. Convinced me to buy your book!
Congrats on getting OpenCV 4, installed Glen!
And thank you for picking up a copy as well, I really appreciate your support 🙂
Hi Adrian, thanks so much for all your amazing tutorials, PyImageSearch is really incredible! I’m having trouble getting OpenCV to work properly on GPU instances on AWS (any of them). I’m able to build it from source fine, but when I run cv2.VideoCaputre(‘path/to/video’) and try to .read() it in Python3, it always returns (False, None). I have ensured that the video file exists and is at the specified path. The same AMI and bash install script results in that video being read find on non-GPU instances on AWS. I also have the same problem with your pre-built community AMI- it works on non-GPU instances, but can’t read the video on GPU instances. Makes me think there’s something going on with the GPU blocking something. Any help would be amazing! Thank you!!
To be clear, I am not building OpenCV with CUDA or anything special expect for FFMPEG.
You believe the issue is related to the video file? If so, the problem would be whatever machine you are using not having the proper video file libraries/decoders instead. What type of video file are you trying to read?
Dear Adrian,
i have a issue need your help.
In step 4, after cmake, i cant find the resule about Interpreter points to the correct Python 3 binary, i cant see the python3 and numpy too.
please help me.
thanks
johnny
Make sure you are in your Python virtual environment before executing “cmake” (it sounds like you may not be).
I’m at Step 4 of your guide, however when I run CMake to configure OpenCV 4, there is no ‘Python 3’ that contains ‘Interpreter and ‘Libraries’ etc. All I can see are the ‘OpenCL’ and ‘Python (for build)’ blocks. I’m in my virtual environment and running python 3.6. Please help me fix this.
Try deleting your “build” directory, re-creating it, and then re-running “cmake”.
Had the same issue, resolved it by adding the flag:
-D BUILD_opencv_python3=yes
Same here, this flag solved my issue 😀
Great tutorial. Have openCV 4.1 up and running.
CMake needs to point to ../opencv
The path to cv2 is changed to /usr/local/lib/python3.6/site-packages/cv2/python-3.6
By far the best instructions to install OpenCV4. Thanks Adrian
I just installed OpenCV 4.1.0 with cuda following these instructions. Had some unrelated issues but was able to fix them.
For those using cuda 10 or higher, you may run into errors. You’ll probably have to add this to the cmake parameter
-DBUILD_opencv_cudacodec=Off \
nvcuvid.h is not deprecated with CUDA 10 and above.
Hope it helps save some folks time
Best,
Ray
Thanks Ray!
Quick question Adrian:
I installed opencv 4.10 with cuda without a virtual environment successfully.
However, now I want to create some virtual env for testing.
I followed the above steps to create the environment. Now do I have to rebuild/reinstall opencv in the virtualenv, or can I just call it in my code without reinstalling it?
I can install if needed, but don’t want to go through this process again for no reason.
Thanks
Please cancel my last request. I re-read the instructions a few times and understood
Congrats on resolving the issue, Ray!
Just wanted to leave a note that if you’re using Ubuntu you should use this method to install OpenCV rather than “pip install opencv-contrib-python”.
My team has spent a not insignificant amount of time wondering why OpenCV was unable to certain video stream using cv2.VideoCapture.
It appears as though the pip compiled version is missing some essential libraries required to process the stream, so it needs to be compiled as Dr. Rosebrock details above.
Cheers,
Ollie
Thanks for sharing, Ollie!
Hello, once i have the cv2.so file can i copy/link it in a different linux-operated computer and expect it to work (given that python version is the same)?
Would i still need to install libjpeg-dev, libavcodec-dev, etc or those are only needed at compile-time?
(sorry if the answer is obvious, i’m not really a programmer)
I installed opencv 4 using the instructions given. However,4.0.0 has some bug relating to drawKeypoints. Hence, I want to install 4.1.0. Could you tell me how to uninstall 4.0.0? I deleted source files but cv2.so file is not getting removed.
Thanks
Delete the “cv2.so” bindings from your “site-packages” directory. Then compile and install OpenCV 4.1 using these same instructions.
I also tried deleting the build file doing cmake again but the interpreter and libraries are not showing. I also made sure I am running in the cv virtual environment.
I want to use Anaconda for the virtual environment instead of virtualenv. What sould I do in the corresponding step?
After a clean install of 18.04 Kubuntu I tried installing opencv with contrib libraries though pip. This didn’t work for me, any use of the opencv gui would crash. So I came here and used your tutorial to compile 4.1.1 and contribs. No issues with compiling and everything works great so far. Thanks for all your informative and well written material!
Thanks Joseph! And congrats on getting OpenCV installed! 🙂
Hi Adrian,
Thanks for the clear explanation… It was very easy to follow the instructions.
But I have problem. I did everything whatever you have described and everything worked well but I got an error when trying with my own ball and my webcam.
VIDEOIO ERROR: V4L: can’t open camera by index 0
I tried -1, 1, 2 as index but the same error.. Is there anyone who has had similar problem?
(My system is Virtual Ubuntu 18.04 on Windows 10)
Thanks for your answer and help in advance
You cannot access hardware, such as a USB webcam, from a VM. By definition a VM abstracts the hardware. VirtualBox has a setting to enable USB setting for USB webcams but it may or may not work depending on your hardware. I would search Google for “virtualbox webcam windows 10“. I hope that helps!
I’m stumped a bit, and not because of anything lacking on your tutorial. I followed all the steps and I don’t see any errors yet there is no /usr/local/python/ directory with the cv2.so that needs to be symlinked. I’m also stuck using Ubuntu 19.x because I’m running on some maker hardware that requires a modified distro for it to see the eMMC drive (Udoo Bolt V8 if you have any interest in that). Anyhow, I read through the comments and looked to see if your previous support responses could help me, but I could not. Maybe I missed something so forgive me if I missed it. I’m also new to installing on linux like this so I am sure I am missing something basic. I will continue to try, and research this on my own, but if you have any insight I would appreciate it.
*** Update ***
I thought I sent the message but did not, so I will ask it but I will answer it as well for others to gain from.
Okay, basically for what ever reason, Ubuntu 19.x and possibly only the 19.x tweaked for the Udoo Bolt v8, installs to a different path than the one stated above or even the alternate stated above.
Here is the path I found the SO in. Once I adapted your tutorial steps for this location I was able to get it working:
/usr/local/lib/python3.7/site-packages/cv2/python-3.7/
s$ python
Python 3.7.3 (default, Aug 20 2019, 17:04:43)
[GCC 8.3.0] on linux
Type “help”, “copyright”, “credits” or “license” for more information.
>>> import cv2
>>> cv2.__version__
‘4.1.1’
>>> quit
Use quit() or Ctrl-D (i.e. EOF) to exit
>>>
THANK YOU SO MUCH!
Thanks for the detailed comment, Nik! And congrats on resolving the issue.
Hi,
I have been trying to implement step 5, but failimg to do so. I am using linux 19.10, and python 3.7.6
In addition to that, I am using pyenv and not virtualenv. But they are basically same thing for virtual envs.
I can look up site packages in this directory- /.pyenv/versions/cv/lib/python3.7/site-packages
and the cv2 is located in this directory-> /usr/local/lib/python3.7/dist-packages/cv2/
I am kinda confused what to do about the sym-link. Any help would be appreciated.
Also, do you think installing opencv through pip using the command pip3 install opencv-python is a good idea? I mean this worked for me, but I don’t know which way is better.
Thanks
I haven’t used pyenv so I can’t speak directly to exact instructions there.
An easier install method for you will likely be my pip install opencv tutorial.
Hi Adrian,
Followed this tutorial and installed everything on Ubuntu 18.04 running on a VMware machine.Of course using “workon cv” and your ball-tracking example works fine together with the supplied mp4 file.
Unfortunately it doesn’t work with the webcam from my laptop (that is connected and visible as /dev/video0. The light from the camera lights up, but no live video. Can you point me in the right direction?
Thanks,
Loek
A VM, by definition, abstracts your host software from the VM itself. Typically you have to explicitly allow the VM to access your camera, and other times it’s simply not possible. I recommend Googling your laptop brand + webcam + virtualbox and then looking at the results.
Fantastic installation guide, thanks so much.
All looks good, no errors on install, and the ball tracking example works with your mp4. However it doesn’t pick up the ball when I try to use it with my webcam. The video feed is great, but it just doesn’t “see” the ball.
Sorry if it’s a stupid question, but does it need to be a green ball ?
FWIW, I’m running Unbunt 18.04 on a Jetson Nano.
Cheers,
David
Is it the same colored ball? You likely need to tune your upper/lower color threshold parameters to match your ball color and lighting conditions.
A. Adrian, thanks for the superb tutorial. I had no problems with the installation. Thanks.
B. I have the same problem about different colored balls. The demo video worked great, but I cannot get a ball recognized when running
$ python ball_tracking.py
I tried a red ball, a yellow ball, and a white ball.
In the spirit of asking stupid questions, how do I tune the upper/lower color threshold parameters?
I see the greenLower and greenUpper parameters listed in ball_tracking.py. I found an old tennis ball and it works great. I can’t seem to find upper and lower limits for red, yellow, or white balls.
Any suggestions? (I assume these are rgb values.)
Hey Adrian.
Thank you for this guide, worked perfectly for me.
I had wonders about the SIFT/SURF algorithms. When are these algorithms needed?
Do I need these algorithms for text recognition for exemple?
Cheers,
GIlles
You typically use those algorithms for keypoint detection, image registration, 3D reconstruction, image search engines, and a large variety of other traditional computer vision tasks.
Thank you very much for your excellent tutorial.
Best regards,
Paul
You are welcome, Paul!
Hi Adrian! I installed OpenCV 3.4.4 following the step-by-step guide for Ubuntu on your website, and then noticed after a few days that the latest version is 4.0.0. Can I “upgrade” my OpenCV, or the 3.4.4 version is just fine enough for a beginner?
How did you install OpenCV? From source or via pip?
If you installed from source you will need to re-compile. If you installed via pip you can delete the old OpenCV via “pip uninstall” and then install the latest OpenCV via pip.