Last updated on July 7, 2021.
A couple weeks ago we learned how to classify images using deep learning and OpenCV 3.3’s deep neural network (dnn
) module.
While this original blog post demonstrated how we can categorize an image into one of ImageNet’s 1,000 separate class labels it could not tell us where an object resides in image.
In order to obtain the bounding box (x, y)-coordinates for an object in a image we need to instead apply object detection.
Object detection can not only tell us what is in an image but also where the object is as well.
Object detection algorithms need diverse and high-quality data to perform optimally. A rich dataset library helps train more accurate and adaptable models, ready for real-world detection tasks.
Roboflow has free tools for each stage of the computer vision pipeline that will streamline your workflows and supercharge your productivity.
Sign up or Log in to your Roboflow account to access state of the art dataset libaries and revolutionize your computer vision pipeline.
You can start by choosing your own datasets or using our PyimageSearch’s assorted library of useful datasets.
Bring data in any of 40+ formats to Roboflow, train using any state-of-the-art model architectures, deploy across multiple platforms (API, NVIDIA, browser, iOS, etc), and connect to applications or 3rd party tools.
With a few images, you can train a working computer vision model in an afternoon. For example, bring data into Roboflow from anywhere via API, label images with the cloud-hosted image annotation tool, kickoff a hosted model training with one-click, and deploy the model via a hosted API endpoint. This process can be executed in a code-centric way, in the cloud-based UI, or any mix of the two.
Over 250,000 developers and machine learning engineers from companies such as Cardinal Health, Walmart, USG, Rivian, Intel, and Medtronic build computer vision pipelines with Roboflow. Get started today, no credit card required.
In the remainder of today’s blog post we’ll discuss how to apply object detection using deep learning and OpenCV.
- Update July 2021: Added a section on alternative deep learning-based object detectors, including articles on how to train R-CNNs from scratch, and more details on bounding box regression.
Object detection with deep learning and OpenCV
In the first part of today’s post on object detection using deep learning we’ll discuss Single Shot Detectors and MobileNets.
When combined together these methods can be used for super fast, real-time object detection on resource constrained devices (including the Raspberry Pi, smartphones, etc.)
From there we’ll discover how to use OpenCV’s dnn
module to load a pre-trained object detection network.
This will enable us to pass input images through the network and obtain the output bounding box (x, y)-coordinates of each object in the image.
Finally we’ll look at the results of applying the MobileNet Single Shot Detector to example input images.
In a future blog post we’ll extend our script to work with real-time video streams as well.
Single Shot Detectors for object detection
When it comes to deep learning-based object detection there are three primary object detection methods that you’ll likely encounter:
- Faster R-CNNs (Ren et al., 2015)
- You Only Look Once (YOLO) (Redmon et al., 2015)
- Single Shot Detectors (SSDs) (Liu et al., 2015)
Faster R-CNNs are likely the most “heard of” method for object detection using deep learning; however, the technique can be difficult to understand (especially for beginners in deep learning), hard to implement, and challenging to train.
Furthermore, even with the “faster” implementation R-CNNs (where the “R” stands for “Region Proposal”) the algorithm can be quite slow, on the order of 7 FPS.
If we are looking for pure speed then we tend to use YOLO as this algorithm is much faster, capable of processing 40-90 FPS on a Titan X GPU. The super fast variant of YOLO can even get up to 155 FPS.
The problem with YOLO is that it leaves much accuracy to be desired.
SSDs, originally developed by Google, are a balance between the two. The algorithm is more straightforward (and I would argue better explained in the original seminal paper) than Faster R-CNNs.
We can also enjoy a much faster FPS throughput than Ren et al. at 22-46 FPS depending on which variant of the network we use. SSDs also tend to be more accurate than YOLO. To learn more about SSDs, please refer to Liu et al.
MobileNets: Efficient (deep) neural networks
When building object detection networks we normally use an existing network architecture, such as VGG or ResNet, and then use it inside the object detection pipeline. The problem is that these network architectures can be very large in the order of 200-500MB.
Network architectures such as these are unsuitable for resource constrained devices due to their sheer size and resulting number of computations.
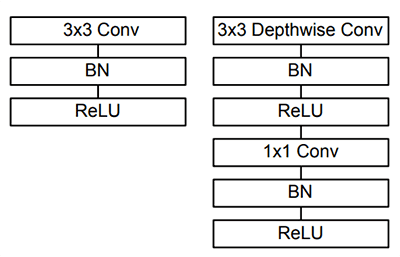
Instead, we can use MobileNets (Howard et al., 2017), another paper by Google researchers. We call these networks “MobileNets” because they are designed for resource constrained devices such as your smartphone. MobileNets differ from traditional CNNs through the usage of depthwise separable convolution (Figure 2 above).
The general idea behind depthwise separable convolution is to split convolution into two stages:
- A 3×3 depthwise convolution.
- Followed by a 1×1 pointwise convolution.
This allows us to actually reduce the number of parameters in our network.
The problem is that we sacrifice accuracy — MobileNets are normally not as accurate as their larger big brothers…
…but they are much more resource efficient.
For more details on MobileNets please see Howard et al.
Combining MobileNets and Single Shot Detectors for fast, efficient deep-learning based object detection
If we combine both the MobileNet architecture and the Single Shot Detector (SSD) framework, we arrive at a fast, efficient deep learning-based method to object detection.
The model we’ll be using in this blog post is a Caffe version of the original TensorFlow implementation by Howard et al. and was trained by chuanqi305 (see GitHub).
The MobileNet SSD was first trained on the COCO dataset (Common Objects in Context) and was then fine-tuned on PASCAL VOC reaching 72.7% mAP (mean average precision).
We can therefore detect 20 objects in images (+1 for the background class), including airplanes, bicycles, birds, boats, bottles, buses, cars, cats, chairs, cows, dining tables, dogs, horses, motorbikes, people, potted plants, sheep, sofas, trains, and tv monitors.
Deep learning-based object detection with OpenCV
In this section we will use the MobileNet SSD + deep neural network (dnn
) module in OpenCV to build our object detector.
I would suggest using the “Downloads” code at the bottom of this blog post to download the source code + trained network + example images so you can test them on your machine.
Let’s go ahead and get started building our deep learning object detector using OpenCV.
Open up a new file, name it deep_learning_object_detection.py
, and insert the following code:
# import the necessary packages import numpy as np import argparse import cv2 # construct the argument parse and parse the arguments ap = argparse.ArgumentParser() ap.add_argument("-i", "--image", required=True, help="path to input image") ap.add_argument("-p", "--prototxt", required=True, help="path to Caffe 'deploy' prototxt file") ap.add_argument("-m", "--model", required=True, help="path to Caffe pre-trained model") ap.add_argument("-c", "--confidence", type=float, default=0.2, help="minimum probability to filter weak detections") args = vars(ap.parse_args())
On Lines 2-4 we import packages required for this script — the dnn
module is included in cv2
, again, making hte assumption that you’re using OpenCV 3.3.
Then, we parse our command line arguments (Lines 7-16):
--image
: The path to the input image.--prototxt
: The path to the Caffe prototxt file.--model
: The path to the pre-trained model.--confidence
: The minimum probability threshold to filter weak detections. The default is 20%.
Again, example files for the first three arguments are included in the “Downloads” section of this blog post. I urge you to start there while also supplying some query images of your own.
Next, let’s initialize class labels and bounding box colors:
# initialize the list of class labels MobileNet SSD was trained to # detect, then generate a set of bounding box colors for each class CLASSES = ["background", "aeroplane", "bicycle", "bird", "boat", "bottle", "bus", "car", "cat", "chair", "cow", "diningtable", "dog", "horse", "motorbike", "person", "pottedplant", "sheep", "sofa", "train", "tvmonitor"] COLORS = np.random.uniform(0, 255, size=(len(CLASSES), 3))
Lines 20-23 build a list called CLASSES
containing our labels. This is followed by a list, COLORS
which contains corresponding random colors for bounding boxes (Line 24).
Now we need to load our model:
# load our serialized model from disk print("[INFO] loading model...") net = cv2.dnn.readNetFromCaffe(args["prototxt"], args["model"])
The above lines are self-explanatory, we simply print a message and load our model
(Lines 27 and 28).
Next, we will load our query image and prepare our blob
, which we will feed-forward through the network:
# load the input image and construct an input blob for the image # by resizing to a fixed 300x300 pixels and then normalizing it # (note: normalization is done via the authors of the MobileNet SSD # implementation) image = cv2.imread(args["image"]) (h, w) = image.shape[:2] blob = cv2.dnn.blobFromImage(cv2.resize(image, (300, 300)), 0.007843, (300, 300), 127.5)
Taking note of the comment in this block, we load our image
(Line 34), extract the height and width (Line 35), and calculate a 300 by 300 pixel blob
from our image (Line 36).
Now we’re ready to do the heavy lifting — we’ll pass this blob through the neural network:
# pass the blob through the network and obtain the detections and # predictions print("[INFO] computing object detections...") net.setInput(blob) detections = net.forward()
On Lines 41 and 42 we set the input to the network and compute the forward pass for the input, storing the result as detections
. Computing the forward pass and associated detections could take awhile depending on your model and input size, but for this example it will be relatively quick on most CPUs.
Let’s loop through our detections
and determine what and where the objects are in the image:
# loop over the detections for i in np.arange(0, detections.shape[2]): # extract the confidence (i.e., probability) associated with the # prediction confidence = detections[0, 0, i, 2] # filter out weak detections by ensuring the `confidence` is # greater than the minimum confidence if confidence > args["confidence"]: # extract the index of the class label from the `detections`, # then compute the (x, y)-coordinates of the bounding box for # the object idx = int(detections[0, 0, i, 1]) box = detections[0, 0, i, 3:7] * np.array([w, h, w, h]) (startX, startY, endX, endY) = box.astype("int") # display the prediction label = "{}: {:.2f}%".format(CLASSES[idx], confidence * 100) print("[INFO] {}".format(label)) cv2.rectangle(image, (startX, startY), (endX, endY), COLORS[idx], 2) y = startY - 15 if startY - 15 > 15 else startY + 15 cv2.putText(image, label, (startX, y), cv2.FONT_HERSHEY_SIMPLEX, 0.5, COLORS[idx], 2)
We start by looping over our detections, keeping in mind that multiple objects can be detected in a single image. We also apply a check to the confidence (i.e., probability) associated with each detection. If the confidence is high enough (i.e. above the threshold), then we’ll display the prediction in the terminal as well as draw the prediction on the image with text and a colored bounding box. Let’s break it down line-by-line:
Looping through our detections
, first we extract the confidence
value (Line 48).
If the confidence
is above our minimum threshold (Line 52), we extract the class label index (Line 56) and compute the bounding box around the detected object (Line 57).
Then, we extract the (x, y)-coordinates of the box (Line 58) which we will will use shortly for drawing a rectangle and displaying text.
Next, we build a text label
containing the CLASS
name and the confidence
(Line 61).
Using the label, we print it to the terminal (Line 62), followed by drawing a colored rectangle around the object using our previously extracted (x, y)-coordinates (Lines 63 and 64).
In general, we want the label to be displayed above the rectangle, but if there isn’t room, we’ll display it just below the top of the rectangle (Line 65).
Finally, we overlay the colored text onto the image
using the y-value that we just calculated (Lines 66 and 67).
The only remaining step is to display the result:
# show the output image cv2.imshow("Output", image) cv2.waitKey(0)
We display the resulting output image to the screen until a key is pressed (Lines 70 and 71).
OpenCV and deep learning object detection results
To download the code + pre-trained network + example images, be sure to use the “Downloads” section at the bottom of this blog post.
From there, unzip the archive and execute the following command:
$ python deep_learning_object_detection.py \ --prototxt MobileNetSSD_deploy.prototxt.txt \ --model MobileNetSSD_deploy.caffemodel --image images/example_01.jpg [INFO] loading model... [INFO] computing object detections... [INFO] loading model... [INFO] computing object detections... [INFO] car: 99.78% [INFO] car: 99.25%
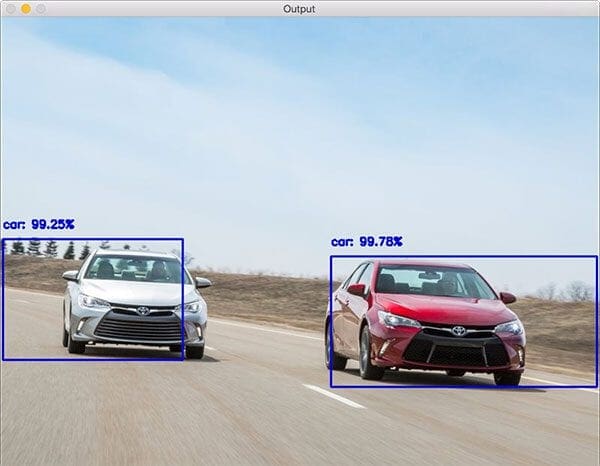
Our first result shows cars recognized and detected with near-100% confidence.
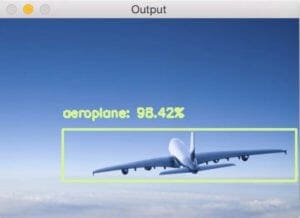
In this example we detect an airplane using deep learning-based object detection:
$ python deep_learning_object_detection.py \ --prototxt MobileNetSSD_deploy.prototxt.txt \ --model MobileNetSSD_deploy.caffemodel --image images/example_02.jpg [INFO] loading model... [INFO] computing object detections... [INFO] loading model... [INFO] computing object detections... [INFO] aeroplane: 98.42%
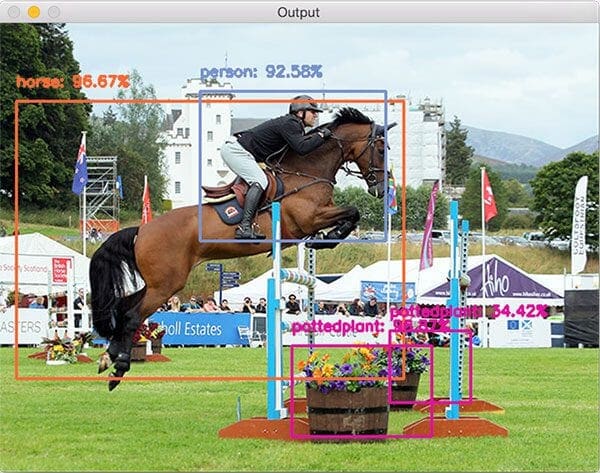
The ability for deep learning to detect and localize obscured objects is demonstrated in the following image, where we see a horse (and it’s rider) jumping a fence flanked by two potted plants:
$ python deep_learning_object_detection.py \ --prototxt MobileNetSSD_deploy.prototxt.txt \ --model MobileNetSSD_deploy.caffemodel --image images/example_03.jpg [INFO] loading model... [INFO] computing object detections... [INFO] horse: 96.67% [INFO] person: 92.58% [INFO] pottedplant: 96.87% [INFO] pottedplant: 34.42%
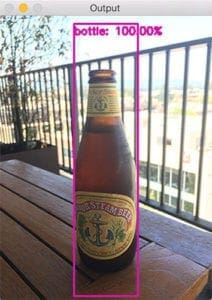
In this example we can see a beer bottle is detected with an impressive 100% confidence:
$ python deep_learning_object_detection.py --prototxt MobileNetSSD_deploy.prototxt.txt \ --model MobileNetSSD_deploy.caffemodel --image images/example_04.jpg [INFO] loading model... [INFO] computing object detections... [INFO] bottle: 100.00%
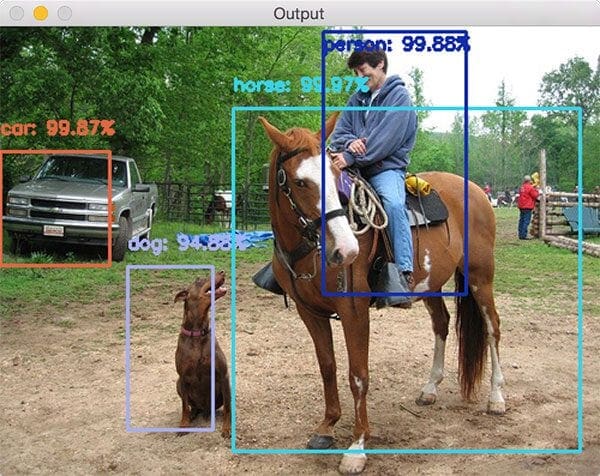
Followed by another horse image which also contains a dog, car, and person:
$ python deep_learning_object_detection.py \ --prototxt MobileNetSSD_deploy.prototxt.txt \ --model MobileNetSSD_deploy.caffemodel --image images/example_05.jpg [INFO] loading model... [INFO] computing object detections... [INFO] car: 99.87% [INFO] dog: 94.88% [INFO] horse: 99.97% [INFO] person: 99.88%
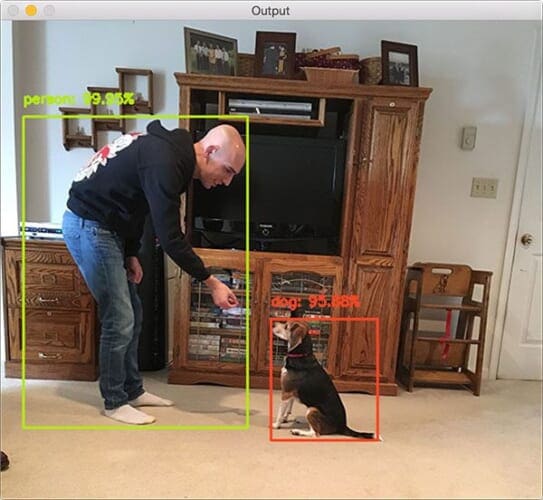
Finally, a picture of me and Jemma, the family beagle:
$ python deep_learning_object_detection.py \ --prototxt MobileNetSSD_deploy.prototxt.txt \ --model MobileNetSSD_deploy.caffemodel --image images/example_06.jpg [INFO] loading model... [INFO] computing object detections... [INFO] dog: 95.88% [INFO] person: 99.95%
Unfortunately the TV monitor isn’t recognized in this image which is likely due to (1) me blocking it and (2) poor contrast around the TV. That being said, we have demonstrated excellent object detection results using OpenCV’s dnn
module.
Alternative deep learning object detectors
In this post, we used OpenCV and the Single Shot Detector (SSD) model for deep learning-based object detection.
However, there are deep learning object detectors that we can apply, including:
- YOLO object detection with OpenCV
- YOLO and Tiny-YOLO object detection on the Raspberry Pi and Movidius NCS
- Faster R-CNN and OpenCV
- Mask R-CNN and OpenCV (technically an “instance segmentation” model)
- RetinaNet object detector
Additionally, if you are interested in learning how to train your own custom deep learning object detectors, including obtaining a deeper understanding of the R-CNN family of object detectors, be sure to read this four-part series:
- Turning any CNN image classifier into an object detector with Keras, TensorFlow, and OpenCV
- OpenCV Selective Search for Object Detection
- Region proposal object detection with OpenCV, Keras, and TensorFlow
- R-CNN object detection with Keras, TensorFlow, and Deep Learning
From there, I recommend studying the concept of bounding box regression in more detail:
- Object detection: Bounding box regression with Keras, TensorFlow, and Deep Learning
- Multi-class object detection and bounding box regression with Keras, TensorFlow, and Deep Learning
What's next? We recommend PyImageSearch University.
86+ total classes • 115+ hours hours of on-demand code walkthrough videos • Last updated: May 2025
★★★★★ 4.84 (128 Ratings) • 16,000+ Students Enrolled
I strongly believe that if you had the right teacher you could master computer vision and deep learning.
Do you think learning computer vision and deep learning has to be time-consuming, overwhelming, and complicated? Or has to involve complex mathematics and equations? Or requires a degree in computer science?
That’s not the case.
All you need to master computer vision and deep learning is for someone to explain things to you in simple, intuitive terms. And that’s exactly what I do. My mission is to change education and how complex Artificial Intelligence topics are taught.
If you're serious about learning computer vision, your next stop should be PyImageSearch University, the most comprehensive computer vision, deep learning, and OpenCV course online today. Here you’ll learn how to successfully and confidently apply computer vision to your work, research, and projects. Join me in computer vision mastery.
Inside PyImageSearch University you'll find:
- ✓ 86+ courses on essential computer vision, deep learning, and OpenCV topics
- ✓ 86 Certificates of Completion
- ✓ 115+ hours hours of on-demand video
- ✓ Brand new courses released regularly, ensuring you can keep up with state-of-the-art techniques
- ✓ Pre-configured Jupyter Notebooks in Google Colab
- ✓ Run all code examples in your web browser — works on Windows, macOS, and Linux (no dev environment configuration required!)
- ✓ Access to centralized code repos for all 540+ tutorials on PyImageSearch
- ✓ Easy one-click downloads for code, datasets, pre-trained models, etc.
- ✓ Access on mobile, laptop, desktop, etc.
Summary
In today’s blog post we learned how to perform object detection using deep learning and OpenCV.
Specifically, we used both MobileNets + Single Shot Detectors along with OpenCV 3.3’s brand new (totally overhauled) dnn
module to detect objects in images.
As a computer vision and deep learning community we owe a lot to the contributions of Aleksandr Rybnikov, the main contributor to the dnn
module for making deep learning so accessible from within the OpenCV library. You can find Aleksandr’s original OpenCV example script here — I have modified it for the purposes of this blog post.
In a future blog post I’ll be demonstrating how we can modify today’s tutorial to work with real-time video streams, thus enabling us to perform deep learning-based object detection to videos. We’ll be sure to leverage efficient frame I/O to increase the FPS throughout our pipeline as well.
To be notified when future blog posts (such as the real-time object detection tutorial) are published here on PyImageSearch, simply enter your email address in the form below.
Download the Source Code and FREE 17-page Resource Guide
Enter your email address below to get a .zip of the code and a FREE 17-page Resource Guide on Computer Vision, OpenCV, and Deep Learning. Inside you'll find my hand-picked tutorials, books, courses, and libraries to help you master CV and DL!
how do we train the dnn using opencv or do we have to use tensorflow and the likes?
plus where can we get some sample caffemodels?
tensorflow has some models in its own ckpt format.
I would start by giving the first post in the series a read. You do not train the models with OpenCV’s dnn module. They are instead trained using tools like Caffe, TensorFlow, or PyTorch. This particular example demonstrates how to load a pre-trained Caffe network.
The dnn module has been totally re-done in OpenCV 3.3. Many Caffe models will work with it out-of-the-box. I would suggest taking a look at the Caffe Model Zoo for more pre-trained networks.
Hi Adrian,
I need detect object on the traffic. Do you have a new topic about Caffe models? How to create or retrain model to custom caffe model for my way?
The model included in this post is trained on a car/bus class which is a presume what you mean by traffic? I also discuss how to train your own custom models inside the PyImageSearch Gurus course and Deep Learning for Computer Vision with Python.
when I learn the book “deep learning for computer vision” ,I missed this problem.I has installed the scipy.How can I resolve it?
from scipy import sparse
ModuleNotFoundError: No module named ‘scipy’
According to your error you have not installed SciPy. Make sure you confirm via “pip freeze”. You can install SciPy via:
$ pip install scipy
Hi Adrian,
how long does it take to forward walk through the provided network?
Is it faster than tensorflow based networks of same architecture?
Is there a tutorial inside of your books that covers fast recognition and detection using CNN at best in realtime with networks like YOLO.
1. As I’ll be discussing in next week’s tutorial you’ll be able to get 6-8 frames per second using this method.
2. Once the model is trained you won’t see massive speed increases as it’s (1) just the forward pass and (2) OpenCV is loading the serialized weights from disk.
3. Yes, I will be covering object detection inside Deep Learning for Computer Vision with Python. You’ll want to go with the ImageNet Bundle where I discuss SSD and Faster R-CNNs.
Hi Adrian , You always inspired me with your Tremendous Innovation and become my Role Model too….
Now Coming back to the Topic , I’m Getting this error :
Traceback (most recent call last):
File “deep_learning_object_detection.py”, line 32, in
net = cv2.dnn.readNetFromCaffe(args[“prototxt”], args[“model”])
AttributeError: ‘module’ object has no attribute ‘dnn’
Eventhough after installing Lasagne , it is giving me the error :
ImportError: Could not import Theano.
Please make sure you install a recent enough version of Theano. See
section ‘Install from PyPI’ in the installation docs for more details:
http://lasagne.readthedocs.org/en/latest/user/installation.html#install-from-pypi
Hi Vasanth — you need to install OpenCV 3.3 for this tutorial to work. Lasange and Theano are not needed and you can safely skip them.
Is there any way to make this work with OpenCV 3.2 – I am trying to make this work with ROS (Robot operating system) but this only incorporated OpenCV 3.2. AM I SOL don’t go there territory or is there a way?
Hey David — I wish I had better news for you. The
dnn
module was completely and entirely overhauled in OpenCV 3.3. Without OpenCV 3.3 you will not have the newdnn
module and therefore you cannot apply object detection with deep learning and OpenCV.Again, I hate to be the bearer of bad news.
I upgraded to 3.3.0:
pip install –upgrade opencv-python
or python -m pip install –upgrade opencv-python
Be careful when doing this — you’ll be missing out on additional libraries and you may not have GUI support.
Hi Adrian,
I tried installing opencv 3.3 but I am still getting the same issue below:
PS python
deep_learning_object_detection.py –image images/example_01.jpg –
-prototxt MobileNetSSD_deploy.prototxt.txt –model MobileNetSSD_de
ploy.caffemodel
[INFO] loading model…
Traceback (most recent call last):
File “deep_learning_object_detection.py”, line 32, in
net = cv2.dnn.readNetFromCaffe(args[“prototxt”], args[“model”])
AttributeError: ‘module’ object has no attribute ‘dnn’
Any suggestions?
Hi Usama — I would suggest opening a Python shell and checking the
cv2.__version__
. It still sounds like OpenCV 3.3 is not installed properly.hi am facing the same problem. i install opencv 3.3 but still this error is coming can u pls help.
hii i installed opencv 3.4.3 ,still i am facing same problem no module dnn found, even i checked the version of my cv , can you help me out?
What instructions did you use to install OpenCV? Was it one of my OpenCV install guides?
i encountered the same problem. Has the problem been solved?
I still believe this is a version issue/mismatch. Double-check that you have OpenCV 3.3 or greater installed.
hi Adrian , can you tell me how to update openCv properly
You’ll want to compile and reinstall. You can refer to my OpenCV install tutorials to get you started.
Hi Adrian,
I have installed opencv of 4.1.2 version. I am facing the same issue. Can you please help me here?
Hi Adrian,
I have installed opencv of 4.2.2 version. I am facing the same issue. Can you please help me here?
Great post, It makes me even more excited for your deep learning book
Thanks Andrew — I’ll be sharing how to train your own custom object detector inside Deep Learning for Computer Vision with Python as well.
Hi Adrian,
this might be very interesting when do you think train custom object tutorial will be shared ?
Thanks alot for what you doing for us!
As I mentioned in the previous comment, I’ll be covering how to train custom object detectors inside the ImageNet Bundle of Deep Learning for Computer Vision with Python.
i’m interested to buy this bundle,
when it will be released ?
if i pre-ordered now , when i should recieve all materials ?
Thanks
You would want to buy the ImageNet Bundle as that is where I’ll be covering object detection methods in detail. The chapters inside the ImageNet Bundle will be released in October 2017.
Can you please provide the dataset link and the train.py file
i want to manually train it and check it…
So please provide the dataset name or downloading link and the program to train the model…
Hi Aditya — as I mentioned in the tutorial this object detector is pre-trained via the Caffe framework. I’ll be discussing hwo to create your own custom object detectors inside Deep Learning for Computer Vision with Python.
Nice tutorial. Can i please have the video implementation of the object detection method. The challenge i am facing is of the model using up all my resources for inference and i am sure this method goes a long way in ensuring efficient resource usage during inference.
I will be sharing the video implementation of the deep learning object detection algorithm on Monday, September 18th. Be sure to keep an eye on your inbox as I’ll be announcing the tutorial via email.
Thanks a lot man
Hi Adrian,
Can you please share the code for the video implementation of the deep learning object detection algorithm.
See this blog post.
God send you to save my life. I struggled for months about the performance issue with yolov2. It’s just too heavy for cpu and mobile devices.
Adrian, I am glad there is someone like you in this CV/ML community!
Keep up the high quality contents!
Thanks Hilman!
I’m still trying to understand how an image classifier cold be incorporated into a larger network for find bounding boxes. I thought about searching a tree of cropped images buy that would be interactive and slow.
I looks like this article took the black-box approach. How to detect objects? Make a call to an object detector. That’s easy but how does the object detector work?
How can an object classifier like vgg16 be used for deception without iteration
Traditional object detection is accomplished using a sliding window an image pyramid, like in Histogram of Oriented Gradients. Deep learning-based object detectors do end-to-end object detection. The actual inner workings of how SSD/Faster R-CNN work are outside the context of this post, but the gist is that you can divide an image into a grid, classify each grid, and then adjust the anchors of the grid to better fit the object. This is a huge simplification but it should help point you in the right direction.
Hi Adrian, how can I edit your code to only detect person? The others shapes aren’t necessary for me. And thank you so much for your tutorial, it helps a lot
The “person” class is the 14th index in
CLASSES
and therefore the returneddetections
as well. You can remove thefor
loop that loops over the detections and then just check the probability associated with the person class:Thank you so much. You have no idea of how much your tutorials help
It didn’t work. the detections return only the shapes that were detected. if I had only 2 shapes in my image, the for loop will repeat twice, then integration would be 0 and 1 and not the whole CLASSES. So, your answer is wrong. I’ve tried it. But I can’t find a way of detecting only human shape.
Try this:
You’ll want to double-check that the
idx
is indeed 14.That’s is exactly what I tried, but it’s 15 for “person”. You said in other comment that you’d be sharing the video implementation on Monday. I already did that following the instructions here and others about video. But, it takes around 17 s between frames (between processing a frame and another). Do you know what I could do to decrease this time?
Hi Barbara — unfortunately without knowing more about your setup I’m not sure what the issue is. I would kindly ask you to please wait until the video tutorial is released on Monday, September 18th. There are additional optimizations that you may not be considering such as reducing frame size, using threading to speedup the frames per second rate, etc.
I modified this algorithm to find only people, there are many false positives.
Is it possible to integrate it with a face search? I just want to know if there is a person in the picture, not a position in the picture, recognition or something else.
Are you trying to detect the presence of a face in an image? Simple Haar cascades or HOG + Linear SVM detectors could easily accomplish this. Take a look at this blog post as well as Practical Python and OpenCV for help with face detection.
If you’re trying to actually recognize the face in an image you should use face recognition algorithms such as Eigenfaces, Fisherfaces, LBPs for face recognition, or even deep learning-based techniques. The PyImageSearch Gurus course covers face recognition techniques.
I hope that helps!
after running that code i found that error:argument -i/–image is required
How can I fix it?
I am using windows 10, and python 2.7
Hi Siam — you are not providing the
--image
command line argument. Please (1) see my examples of executing the script in this tutorial and (2) read up on command line arguments.hey, i am facing the same problem…have you fixed the problem..? can you please help me as i am not getting how to solve it
Thank you, Adrian. Very useful theme with interest explanation.
I’m happy you found it helpful, Alexander! It’s my pleasure to share.
hello adrian I am from Colombia you would recommend using linux for a higher performance or no problem if you use windows Thanks
I would definitely recommend using Linux for deep learning environments. macOS is a good fallback or if you’re just playing around and learning fundamentals. I would not recommend Windows.
Hi Adrian,
Is it possible to use a pre-trained TensorFlow model with OpenCV 3.3 as a custom object detector? Or does it only work with Caffe?
Thanks,
You can use a pre-trained TensorFlow model. Please see my reply to “Sydney”.
Thanks a lot
your simple illustration for complex new issues is highly appreciated,
Thanks Walid, I’m happy that you enjoyed the tutorial! 🙂
Hie man. How can i use a tensorflow .pb model file instead of he caffee model?
Please see this blog post where I list out the TensorFlow functions for OpenCV.
Hi, Adrian. Have you tried the original TensorFlow Model to compare with the Caffe version? Do you plan to do such tests and show on your blog how to use a pre-trained model with differentt Network architectures? Thanks a lot for your great posts. It encourages me even more to buy your books, and I hope I will!
I personally haven’t benchmarked the original TensorFlow model compared to the Caffe one; however, the author of the TensorFlow did benchmark them. They share their benchmarks here and note the differences in implementation.
I’ve already covered how to use GoogLeNet and now MobileNet in this post. I’ll cover more networks in the future. Otherwise, for a detailed review of other state-of-the-art architectures (and how to implement them) I would definitely refer you to Deep Learning for Computer Vision with Python.
Thanks a lot, Adrian. And I have just watched your new real-time object detection video on YouTube. Oh, man, stop blowing my mind! Hahaha. I can’t wait to see the blog post. And thank you for always answering our questions. You must be a super organized person to do that on such a busy schedule. Cheers.
Thanks Flávio, it’s my pleasure to help 🙂
Traceback (most recent call last):
File “deep_learning_object_detection.py”, line 32, in
net = cv2.dnn.readNetFromCaffe(args[“prototxt”], args[“model”])
AttributeError: ‘module’ object has no attribute ‘dnn’
I missed a step somewhere.
Hi Alan — it looks like you do not have OpenCV 3.3 installed. Please ensure OpenCV 3.3 has been installed on your system.
You need OpenCV 3.3 or greater which it seems that you do not have.
Hi Adrian,
I tried to combine this code with your previous code which uses googlenet, but found out that the forward procedure doesn’t support localization.
If I don’t care about the computation timing and would like to have much more classes with localization, what should I do?
Thx,
G
Unfortunately in that case you would need to train your own custom object detector to on the actual ImageNet dataset so you can localize the 1,000 specific categories rather than the 20 that this network was trained on.
Is there a list out there of the different “classes” that can be detected? I have searched extensively and can’t find anything. My guess is that there are A LOT of them.
Hi Scott — please see this blog post, specifically Lines 20-23. The
CLASSES
list provides the list of classes that can be detected using this pre-trained network.Hi adrian,
Ran your code and honestly it’s amazing. Superb! The models are soo well trained, and code so clean and well to read.
Can I measure distance b/w the detected objects? using your previous blog:
https://pyimagesearch.com/2016/04/04/measuring-distance-between-objects-in-an-image-with-opencv/#comment-435018
Yes, just be sure to perform the calibration step via the triangle similarity (as discussed in the “Measuring distance between objects in an image” post you linked to).
Have you had a chance to look at the Neural network on a stick from Modivus? (developer dot movidius dot com/ ) Do you believe if it holds promise for this sort of application, where small and faster computation is more the need than the crunching power of say the Nvidiai Tesla machines?
It really depends on how well Intel documents the Movidius stick (Intel isn’t known for their documentation). The Movidius is really only meant for deploying networks, not training.
Hi, Adrian. Maybe it’s something worth to give it a try. The stick is not that expensive and appears to increase the frame rate substanttialy on a Pi 2 or 3. I’m waiting for your post about real-time object detection on a Pi, but I’m afraid that it doesn’t work so well. I have seen these two videos (https://www.youtube.com/watch?time_continue=4&v=f39NFuZAj6s ; https://www.youtube.com/watch?v=41E5hni786Y) and i’m wondering how would it be using such pre-trained Caffe models running on Movidius NCS with a Raspberry Pi and OpenCV. It would be awesome! Have you ever thought about exploring it?
I’ve mentioned the Movidius in a handful of comments in other blog posts. The success of the Movidius is going to depend a lot on Intel’s documentation which is not something they are known for. I’ll likely play around with it in the future, but it’s primarily used for deploying pre-trained networks rather than training them. Again, it’s something that I need to give more thought to.
How to install OpenCV-3.3
please help me
Follow my OpenCV 3 install tutorials and ensure you download OpenCV 3.3.
how to install OpenCV3.3
You can follow my OpenCV 3 install tutorials and replace the OpenCV 3.X version with OpenCV 3.3.
Your tutorials are really excellent! You get the impression that everything is so simple.
On the basis of your code, which works perfectly, I would now like to identify (car / van / small trucks / large trucks).
As you suggested, I looked into the Caffe Model Zoo. I tried to use GoogLeNet_cars by retrieving directly .model (http://mmlab.ie.cuhk.edu.hk/datasets/comp_cars/googlenet_finetune_web_car_iter_10000.caffemodel)
And the corresponding prototxt (https://gist.github.com/bogger/b90eb88e31cd745525ae#file-deploy-prototxt)
But simply changing the model does seem to be the right way to go. What should I do? … Yes I completely discover the subject.
Thanks in advance.
You can use pre-trained models to detect objects in images; however, these pre-trained models must be object detectors. The GoogLeNet model is not an object detector. It’s an image classifier. The version of GoogLeNet you supplied cannot be used for object detection (just image classification).
I hope that helps!
Interestingly, running your code on my machine gives different object detection results than yours. For instance, on example 3, I can only detect the horse and one potted plant. On example 5 I get the same detection plus the dog is also detected as a cat (with a higher probability) and the model is able to capture the person in the back, left side near the fence.
Is this variation expected? I would have expected that the dnn model would behave the same on an the same image for all repetitions of the experiment.
thanks for the great post!
There will be a very tiny bit of variation depending on your version of OpenCV, optimization libraries, system dependencies, etc.; however, I would not expect results to vary as much as you are seeing. What OS and versions of libraries are you running?
Hi Adrian, I got the same result as Geraro and feel confused. there is a probability for cat with higher probability but without the box for it
… terminal output removed to formatting …
Hi Peter, thanks for the comment. I’m honestly not sure what the problem is here. I have not run into this issue personally and I’m not sure what the problem/solution is. I will continue to look into it.
Python 3.5.2, opencv 3.3.0, Ubuntu 16.04
There will also be variations based on the confidence level you specify. For example in the image above one plant is 89% confidence and the other is much lower at only 34%.
Hi Adrian,
Thanks for writing wonderful tutorials. What is the best place to learn about all functions inside OpenCV module and Tensorflow deep learning modules? For understanding your code, I feel i should brushup these things first, I can better understand your code.
Can you elaborate on what you mean by “all functions”? If you wanted to learn about “all functions” you would read through the documentation for OpenCV and TensorFlow.
However, I don’t think this is a very good way to learn. Instead, you should go through Practical Python and OpenCV and Deep Learning for Computer Vision with Python which teaches you how to use these functions to solve actual problems.
Reading the documentation can be helpful to clarify the parameters to a function, but it’s not a very good way to practically learn the techniques.
How do I run the final command on windows?
Adrian,
I’m getting the following error when trying to run your code:
[INFO] loading model….
…
Can’t open “MobileNetSSD_deploy.prototxt.txt” in function ReadProtoFromTextFile
Any idea what this could be? OpenCV 3.3, Python 3.6 (same error on 2.7). Similar error is produced when I change the model or prototxt.
Cheers!
Please see my reply to “zhang xue” and confirm whether you’ve used the “Downloads” sections of this post to download the pre-trained model files.
Hi Adrian,
I have come across some problems when understanding your code:
In this line,
detections.shape[2]
what does this line means when the blob is forward pass through the network in the line “net.forward”?
In this line,
confidence = detections[0, 0, i, 2]
what are these 4 parameters(0,0,i,2) means and how it extracts the confidence of the object detected?
In this line,
idx = int(detections[0, 0, i, 1])
what is this 1 signifies in detections[ ]?
In this line,
box = detections[0, 0, i, 3:7] * np.array([w, h, w, h])
what do you want to do by multiplying numpy array with detections? Why you take 4th argument of detections[ ] as 3:7, what does this mean? Why you pass [w, h, w, h] to numpy array and why you pass width and height two times to numpy array?
Please help, thanks in advance.
The
detections
object is a mulit-dimensional NumPy array. The call todetections.shape
gives us the number of actual detections. We can then extract theconfidence
for the i-th detection viadetections[0, 0, i, 2]
. The slice 3:7 gives us the bounding box coordinates of the object that was detected. We need to multiply these coordinates by the image width and height as they were relatively scaled by the SSD.Take a look at the
detections
NumPy array and play around with it. If you’re new to NumPy, take the time to educate yourself on how array slices work and how vector multiplies work. This will help you learn more.Hi Adrian, I try to do a simple net.forward() (for MobileNet) and detections always have shape: (1, 1001, 1, 1).
The values inside the array are different.
Any hints why is that?
I am using OpenCV 4.1.0 and Python3.6.7, MobileNet.prototext and MobileNet.caffemodel downloaded from here: https://github.com/chuanqi305/MobileNet-SSD
Thanks.
Nevermind, figured this out: it was the wrong model file.
Congrats on resolving the issue!
Hi Adrian,
Just to make sure I’m understanding what is going on here. SSD is an object detector that sits on top of an image classifier (in this case MobileNet). So, technically, one can switch to a more accurate (but slower) image classifier such as Inception. And this would improve the detection results of SSD. Is this correct? I guess I can look at your other posts about using Google LeNet and change a few lines in this example to switch MobileNet with Google LeNet in OpenCV?
Also, have you come across any implementations or blog posts that discuss playing around with various image classifiers + SSD in Keras to perform object detection?
Thanks once again for your blog posts. They have saved me hours and hours of time and the hair on my head.
Cheers!
This is a bit incorrect. In the SSD architecture, the bounding boxes and confidences for multiple categories are predicted directly within a single network. We can modify an existing network architecture to fit the SSD framework and then train it to recognize objects, but they are not hot swappable.
For example, the base of the network could be VGG or ResNet through the final pooling layers. We then convert the FC layers to CNV layers. Additional layers are then used to perform the object detection. The loss function then minimizes over correct classifications and detections. A complete review of the SSD framework is outside the scope of this post, but I will be covering it in detail inside Deep Learning for Computer Vision with Python.
There are one or two implementations I’ve seen of SSDs in Keras and mxnet, but from what I understand they are a bit buggy.
Will the ImageNet Bundle of “Deep Learning for Computer Vision with Python” cover code (at least to some extent) to play around with object detectors and image classifiers, like I asked in my first post? There’s plenty of stuff on the net to train image classifiers but not much if one wants to couple object detection with everything. Cheers. (Oh, and when will the review of SSD and everything related be available for reading and exploring in your book?)
Yes, you are absolutely correct. the ImageNet Bundle of Deep Learning for Computer Vision with Python will demonstrate how to train your own custom object detectors using deep learning. From there I’ll also demonstrate how to create a custom image processing pipeline that will enable you to take an input image and obtain the output predictions + detections using your classifier.
Secondly, I will be reviewing SSD inside the ImageNet Bundle. I won’t be demonstrating how to implement it, but I will be discussing how it works and demonstrating how to use it.
Hi, I was wondering if I would be able to only detect fruits and vegetables and differentiate the different types?
Using the pre-trained network, no. You can only detect objects that the network was already trained to recognize.
If you want to recognize custom objects (such as fruits and vegetables) you’ll need to either (1) train a new network from scratch or (2) apply transfer learning, such as fine-tuning.
Would you be able to send any helpful tools or links that would help me start the train the network from scratch?.
I would suggest reading up on Caffe. You should use read how the MobileNet detector was trained on the author’s GitHub. I’ll also be discussing how to train your own custom deep learning object detectors inside the ImageNet Bundle of Deep Learning for Computer Vision with Python.
Traceback (most recent call last):
File “deep_learning_with_opencv.py”, line 34, in
net = cv2.dnn.readNetFromCaffe(args[“prototxt”], args[“model”])
cv2.error: /home/ubuntu/opencv-3.3.0/modules/dnn/src/caffe/caffe_io.cpp:1113: error: (-2) FAILED: fs.is_open(). Can’t open “MobileNetSSD_deploy.prototxt.txt” in function ReadProtoFromTextFile
how to solve it?thanks
Just to clarify, have you used the “Downloads” section of this blog post to download the source code + pre-trained Caffe model and prototxt files?
i have the same problem here. code, model and prototxt is from your site!
ubuntu 16.04
Hi Jason — thanks for the comment. I’ve seen a handful of readers run into this problem. Unfortunately I have not been able to replicate it. It would be a big help to me and the rest of the PyImageSearch community could help to replicate this error.
Hi Adrian, thanks for all of your efforts in making such useful tutorials. I am also facing the same error though I have downloaded the code from the website.
“Can’t open “MobileNetSSD_deploy.prototxt” in function cv::dnn::ReadProtoFromTextFile”
I guess I have found the solution, at least it worked for me. Some times downloaded files are blocked by the computer, so you have to open the properties of Model file and Prototxt file, and check the UNBLOCK at bottom right. Hopefully it would work. Thanks again.
Hi Fahad — thanks for sharing. Just to clarify, what operating system are you using?
Hi Adrian, I am using Windows 10 and Spyder IDE for Python 3.6.
Thanks Fahad!
Hi Adrian. Thanks a lot for your tutorials.
But i’m still having this error. Have you found any ways to solve it ?
Hi Hung Tran — what operating system are you using? I would suggest double-checking the paths to your prototxt and model files.
Hi, Thank you for this nice tutorial.I have another question.
Traceback (most recent call last):
File “deep_learning_object_detection.py”, line 43, in
net = cv2.dnn.readNetFromCaffe(args[“prototxt”], args[“model”])
cv2.error: /Users/travis/build/skvark/opencv-python/opencv/modules/dnn/src/caffe/caffe_io.cpp:1122: error: (-2) FAILED: fs.is_open(). Can’t open “MobileNetSSD_deploy.caffemode” in function ReadProtoFromBinaryFile
How to solve this?Thank you!
Please double-check the path to the input model path controlled by the
--model
switch. The path you supplied does not exist. That is why OpenCV is throwing an error.Hi Adrian,
I thought it might help to add my thought to this thread, because I had the same error, but my problem might have been very different.
I’m also on Windows 10, using Idle in Python 3.8.
After checking the processes using print statements, I realized that I was getting stuck in the While loop and repeatedly getting dimensions, then passing to blob.
There reason being that everything after ‘detections = net.forward()’ was outside out the While loop.
Hopefully this helps if someone encounters it again.
Hi! thank u for this nice tutorial. I have the same error and I download the code from this site. Fahad solution does not work for me… I’m using python 3.5 , opencv 3.3 on windows 8..
Any suggestions?
I Found the solution for this problem and it worked for me…
the problem was in addressing the args … i entered the whole path in CMD and it worked…
i did s.th like this :
python d:\object-detection-deep-learning\deep_learning_object_detection.py -i d:\object-detection-deep-learning\images\example_01.jpg -p d:\object-detection-deep-learning\MobileNetSSD_deploy.prototxt.txt -m d:\object-detection-deep-learning\MobileNetSSD_deploy.caffemodel -c 0.2
hope it works for you!
Just add .txt after the protxt filename while giving the parameters if you are using Windows.
ie: –protxt C:\Users\rai_a\PycharmProjects\sdd\MobileNetSSD_deploy.prototxt.txt
what algorithm you used detect object in image or can you please links for research paper , other code for object detection from image in which i can train my own images as it will be covered in your book you told but for now i need a reference as a part of my project….
so i would be glad if you can share github link for thr object detection code with train.py file.
Thanks your tutorials are too good….
I cover various object detection methods inside the PyImageSearch Gurus course, including links to various academic papers. I suggest you start there.
Hello Adrian,
I want to play with this code on my pc which is windows 7 64-bit. On my machine, I still don’t yet have opencv installed and even I don’t know about which configuration(working environment) should I have in order to run this code. I even don’t know how to install opencv on my pc so that this code will run, please help…..
Hi Aniket — if you are interested in studying computer vision and deep learning I would recommend that you use either Linux or macOS. Windows is not recommended for deep learning or computer vision. I demonstrate how to configure Ubuntu for deep learning and macOS for deep learning.
Otherwise, I offer a pre-configured Ubuntu VirtualBox virtual machine as part of my book, Deep Learning for Computer Vision with Python.
This VM will run on Windows, macOS, and Linux and is by far the fastest way to get up and running with deep learning and OpenCV.
I hope that helps!
Hi Adrian, caffe 2 models are used for OpenCv or only Caffe.
Hi Adrian,
first of all, thanks for this great tutorial!
I have a short question: I am trying to rebuilt your tutorial with the openCV C++ API. When I see the call for the function for the blog generation from the input image:
cv2.dnn.blobFromImage(cv2.resize(image, (300, 300)), 0.007843, (300, 300), 127.5)
it is hard for me to match it up with the corresponding C++ API function
Could you give me a small hint how to match it? Escpecially the scalar value “0.007843” and “127.5” did not realy match for me.
Thanks for you help and again great work!
Johannes
I’ll actually be doing a tutorial that details every parameter of the
cv2.dnn.blobFromImage
in the next few weeks. In the meantime, 127.5 is the mean subtraction value and 0.007843 is your normalization factor.Hi Adrian, thanks for your fast reply.
Ok, is this a special function you are using? I am currently using openCV 3.3 from august this year. Actually, I do not understand yet how the normalization factor fits to the current API. There is the mean value which gets subtracted from each color channel and parameters for the target size of the image. And finally a boolean flag to swap the red and green channels.
Could you give me a hint please?
You are correct. The mean value is computed across the training set and then subtracted from each channel of the image. You can also optionally supply a 3-tuple if you have different RGB values (which in most cases you do). Once you perform the mean subtraction you multiply by the scaling value.
Ok, thanks for the hint. Sorry for bothering you again but would be this call correct?
cv::Mat inputBlob = cv::blobFromImage(img, 0.007843, cv::Size(300, 300), cv::Scalar(127.5));
Again, thank you for your great tutorials!
Johannes
I have only used the Python bindings of the “dnn” module, not the C++ ones. It looks like your call is correct, but again, you should compile your code and try it.
Hi John,
I am trying to convert the python code in C++ , I think you already did it . is it possible for you to share it or give some direction on it.
I am trying to detect just 1 object . I am able to run the c++ example provided by OPenCV but want to add the rectangle around the object . I am not so good in python so unable to understand much out of it.
Hello,
I was trying to replicate your results of example 3. In my case only the horse and potted plants were getting detected and not the person. Either I had to remove the mean (127.5) from blobFromImage or resize to 400×400 to get person detected. Do you know why so ?
Hi Nihit — that is indeed strange; however, I’m not sure why that would be. Did you use the “Downloads” section of the post to use the same code, pre-trained network, and example images that I used?
Yes I downloaded the code,examples and model from the ‘Downloads’ section
Thank you for sharing the additional details, Nihit! Unfortunately I’m not sure what the exact issue is here. I wish I could help more, but without physical access to your machine to diagnose any library issues, I’m not sure what the problem may be.
Did you solve this? Same issue here. Tried opencv versions 3.3.0.9, 3.3.0.10, 3.3.1.11, 3.4.0.12, 3.4.0.14, 3.4.1.15, 3.4.2.16, 3.4.2.17. All have this issue.
Hi! Thanks for the clear tutorial, really makes difference in trying to figure this stuff out!
This is what I don’t get about how the dnn works (I’m a newbie with the object detection so :D):
how does the model go through the blob to get the location? I mean, if the object recognition model is (presumably) trained with the object nicely framed in the middle of the image, how does the detection model find a small or partially covered object like the baseball glove? Does it somehow divide the image in seqments?
The model is not trained with images that have the objects nicely framed in the center of the image. Instead, images are provided with plaintext bounding boxes that indicate where in the image the object is. The SSD then learns patterns in the input images that correspond to the class labels while simultaneously adjusting the predicted bounding boxes.
If you’re new to computer vision and object detection be sure to read this post on the fundamentals on more traditional object detectors.
Hi, thanks for this post but I have a problem.
error: AttributeError: module ‘cv2.cv2’ has no attribute ‘dnn’
So this is either (1) a typo or (2) you haven’t installed OpenCV 3.3.
The correct call is
cv2.dnn.
, notcv2.cv2.dnn
.Secondly, please ensure you have installed OpenCV 3.3 on your system.
Hi, thanks for this post but I have a problem.
after running that code i found that error:argument -i/–image is required
How can I fix it?
Please see my reply to “siam” above.
Hi, Adrian,
say that I have a GPU card fitted in my machine, would opencv dnn module utilizes it to speed up the detection and how would it do it? Thanks ~~
As far as I understand, Python cannot access the GPU-bindings for OpenCV. I would suggest taking a look at the C++ API of OpenCV.
Cool, thank you for your suggestion. As my projects are all developed with C++ openCV APIs, this will be easier for me if the opencv C++ APIs could access the GPU-bindings.
Also I am looking forward to your next post regarding object detection on a video stream~~
thanks
Paul
Hi Paul — the object detection in video stream post you are referring to was actually published on September 18th. You can find it here.
Traceback (most recent call last):
File “real_time_object_detection.py”, line 33, in
net = cv2.dnn.readNetFromCaffe(args[“prototxt”], args[“model”])
AttributeError: ‘module’ object has no attribute ‘dnn’
this is the issue i am getting while running the real_time_object_detection.py file
is there anything wrong with my opencv installation??
I installed it from the link provided by you, i din run into any issue , while installation, however while running the real_time_object_detection.py file i get the above error.
Please help, anyone if came across such issue
Please read the comments before posting. I’ve already addressed this issue multiple times. Take a look at my reply to “Vasanth”. Please ensure you have properly installed OpenCV 3.3.
Hey Adrian,
Thank you so much for making such great tutorials.Just wanted to know the way to train the model for a huge database (for more objects other than listed in the classes).
Thank you!
Hi Satyam — I’m covering how to train your own custom deep learning object detectors inside Deep Learning for Computer Vision with Python. I suggest you start there and take a look.
Hi Adrian,
usage: deep_learning_object_detection.py [-h] -i IMAGE -p PROTOTXT -m MODEL
[-c CONFIDENCE]
deep_learning_object_detection.py: error: argument -i/–image is required
Hi Ahmad — you must use the proper command line arguments. Give this page a read.
Adrian,
I just downloaded the source and the images were supposed to be in the .ZIP but I don’t see them. Not sure if I fumbled, but downloaded a second time and still not in the .ZIP. Not sure what I am doing wrong.
dcd
Adrian,
Apologies, I was in the wrong lesson! Sorry.
I’m glad you found the code and images! Let me know if you run into any issues.
Hi Adrian,
Thanks for the great tutorial.
I have used it for object detection, and it works like charm on my laptop!!.
I tried to replicate the same thing on Jetson Tx1, on which Opencv4Tegra was preinstalled, but, while installing Opencv 3.3 make -j4, there arises space issues.
It seems i do not have enough space on Tx1.
Can you suggest what are the possible options that might get me out of this problem,
Thanks in Advance.
I would suggest using an external SD card, or better yet, external drive.
Be sure to download the OpenCV repos to your SD card/external drive and do the compile there. This will ensure you have the additional space during the compile. After the compile has finished run
sudo make install
which will copy the compiled files to their appropriate locations.Hi,
I really enjoyed your tutorial because it gave me a good start with this interesting topic. So one question regarding object detection. Is there an approach that will tell me, if a general object is in my image or not? Let’s say we have a background that stays the same and there is an object in the image. I do not know what is the object, but that an object is there. At the moment I tend to solve this problem with “classic” computer vision, is there a deep learning approach? Maybe check if no object is matched? (with certain probability)
Are you trying to recognizing the object and label it? Or just say “yes, there is an object here” or “no, there is no object”. If it’s the latter deep learning is overkill. Simple motion detection/background subtraction is more than enough.
Can you give a clear understanding of what prototext is supposed to be? Thanks.
The .prototxt files are similar to configuration files for Caffe. They are in plaintext format and specify either (1) how to train a model or (2) the architecture of the model.
Sir How to detect only one type of object like, only persons
Hi Adrian. Thanks very much for this awesome tutorial. I have one concern here though. You only take one image for detection. But this is not efficient. If I have multiple images or a video file I could read bunch of images/frames and try to detect them all at once. That will be much faster. This is a huge problem that I’m facing right now with RCNN. I can test one image but I could not find any solution how to do batch testing. It would be really great if you could also do a post about it.
Love your work btw 🙂 Thanks very much.
Hi Tahlil — if you’re looking to batch images together, please refer to this post to obtain optimal performance.
Amazing post !..really inspired me to work on my computer vision project . I am a new baby and was really worried about it. Thank you !..I would try this and move for my project !..we were going to fine tune vgg16 with google ref dataset…which machine learning library do you suggest for use ?
Are you trying to perform object detection or image classification? Keep in mind that VGG16 cannot be directly used for object detection. You would need to fit into a deep learning + object detection framework, such as SSD.
Nice example. I looked at the script of Aleksandr Rybnikov you mentioned in the post and tried to adapt your example to use it with the tensorflow prelearned model.
I adapted it to the 90 classes, used the ssd_mobilenet_v1_coco.pbtxt from opencv_extra and downloaded ssd_mobilenet_v1_coco_11_06_2017.tar.gz to get the frozen_inference_graph.pb.
At first I used the graph.pbtxt included in the tar file but that doesn’t work with OpenCV3.1.1 and your script. So I tried the ssd_mobilenet_v1_coco.pbtxt from opencv_extra. This sort of works (doesn’t give errors) but the object recognition results are not good.
Is there a way to generate an OpenCV3.1.1 compatible *.pbtxt? to work with your script or doesn’t it work this way?
I’m not sure it works that way, but I would ask the OpenCV developers for further clarification.
I built OpenCV 3.3 on a Raspberry Pi3 following your Raspbian Stretch instructions and downloaded this sample code. Everything seems to work except my results don’t quite match the results shown in this blog.
Particularly example_05.jpg where I get:
[INFO] car: 99.49%
[INFO] cat: 61.79%
[INFO] dog: 50.56%
[INFO] horse: 99.80%
[INFO] person: 86.79%
[INFO] person: 26.94%
Instead of what you show:
[INFO] car: 99.87%
[INFO] dog: 94.88%
[INFO] horse: 99.97%
[INFO] person: 99.88%
Seems I should get the same results with the same code and test images, but it appears I don’t. The “boxes” drawn on my images seem better located than those in your example, except for the cat, which is not really there and probably is drawn over by the box for the dog.
I setup virtual environments for python3 and python2.7 and my results are the same with the python3 and python2.7 environment, but different from yours.
Hey Wally — sorry for any confusion here, but I updated the code in the blog post to provide better localization. That is the reason why your results do not 100% match up with mine.
Hi Adrian!
I was trying this with an input image containing a bat and a ball. Since these classes aren’t part of the trained classes, I was expecting that the classifier doesn’t classify my image into any classes. However it was classifying the bat and the ball into ‘Aeroplane’ and ‘Bottle’.
Is there any way through which the classifier doesn’t classify an image containing untrained objects and instead outputs a message saying that the classifier was not able to detect any classes.
There are “background” classes (i.e., “not interesting objects” or “not an object all”) that are used when training some object detectors; however, these only work in some contexts. I would suggest upping the minimum probability used to filter out weak predictions.
Hi! I was not able to detect the ‘background’ class, even when testing it against ‘white background’ image! Could you provide me with some idea for an image where the background class can be detected.
Secondly I wanted to ask if the training file is available for this? I wanted to train some classes on my own.
Thirdly is there any portal where datasets for multiple images can be easily availible that can be used to test this?
I am hoping to receive your guidance at the earliest. Thank you so much 🙂
1. I haven’t played with the background class for this model.
2. Please see my reply to “Justice” on September 27, 2017.
3. Are you referring to the “background” class?
Any chance I can label these detected objects, so I can distinguish between two same type of objects. For example, if I have two dogs and distinguish them as dog1 and dog2
Can you go into a bit more detail? Are you monitoring a video stream and you want to be able to track multiple objects (in this case, dogs)?
Dear Adrian!
Thank you for a kind example. I am new to neural networks and I am wondering, how much speedup can one achieve, if the object classification is trained only for e.g. aeroplane in comparison to this case, where the detector is trained for 20 classes? Is that 2 times, 3 times, certainly not 20 times? What is your rough estimate?
What about the size of the training file – this should be reduced 20-times?
Thank you for your effort and for educating us!
The number of classes a network has to recognize does not change the size of weights in the network (within reason). What changes the size of the network and associated weight file is the depth and number of parameters. You can use the same architecture and use 20 classes or 2 classes and the output model would be almost identical and size. Again, it’s the depth and type of architecture. I discuss this more in my book, Deep Learning for Computer Vision with Python.
usage: work.py [-h] -p PROTOTXT -m MODEL [-c CONFIDENCE]
work.py: error: the following arguments are required: -p/–prototxt, -m/–model
>>>
what should i do? please guide me.
i am using python 3.5.2 and opencv 3.3
It sounds like you are trying to parse your command line arguments inside a shell. Instead, execute the code directly via the command line as i do in the post:
Notice how I am executing the command from my command line, not with the Python shell itself.
Secondly, make sure you read up on command line arguments before continuing.
Hello,
Thank you for providing us these useful and important things.
I have a question about dataset which we are using while training. I want to create a dataset which consists of luggage: handbag, backpack, suitcase etc.
Does it matter to have different types of an object in the dataset, because I want to combine all these types in luggage class? Will it effect my accuracy?
I would run a test using different classes and all of them combined. Handbags, backpacks, and suitcases can vary quite dramatically but without seeing your particular dataset my gut tells me that you should be using separate classes.
Hi Adrian,
Thanks again for the great post.
I am using the above code, to get distance value from rectified stereo left and right images. I detect same object in both left and right images using the cv2.dnn.blobFromImage. Then from difference in the horizontal pixel location,i am finding distance.
But the blob returns different vertical pixel values for same object, as the images are rectified, we should get same value right, do you know why this happens ?
Also the estimated distance is erroneous, is is due to resize or scaling that we apply during cv2.dnn.blobFromImage function ?
Thanks in advance !
Dear Adrian!
Thank you for a kind example. I am finding a way of using a video as a input. how can i do this? please, help me:)
Please take a look at this blog post where I discuss performing object detection in real-time using deep learning. Instead of supplying the index of the webcam to
cv2.VideoCapture
you can pass in a file path. If you’re new to using OpenCV for video processing I would suggest reading through my introductory book, Practical Python and OpenCV. I hope that helps!I don’t know if this question will be answered or if anyone will know how to answer. But I am getting video feed from a TurtleBot Kinect Camera. How would I go about showing the feed with the rectangles if I am using the TurtleBot’s Kinect camera???
Hi ,
How can catch your code?
I’m not sure what you mean by “catch”. Can you please clarify?
Hi Adrian,
Is there any way to see the results of different layers?
Thanks
Hey Massa — what in particular are you trying to visualize? The layer activations?
Yes. In fact, I need to investigate how an image is processed while it passes through the layers.
Thank you again
Take a look at the official Keras blog. They have a nice example you can follow.
Please send me your future blog posts
Hi Adrian,
How we can load video instead of images in this program for object detection.
thanks.
You can pass a video file path into
cv2.VideoCapture
. I would also suggest taking a look at this tutorial. I hope that helps!thanks for real for your unlimited support of the community
I need to use SSD person detection In a transport vehicle in their sitting position.
do I need to train the person detection or the pretrained data in Caffe is enough?
Is there any method of counting the bounding boxes after person detection?
does caffe limited of youtube tutorials?
When building a production-level system you should always train or fine-tune on images that represent what the CNN will be used to detect in real-world scenarios. I would suggest fine-tuning on your own dataset if at all possible.
When I run this program and I have the following condition, what do you want me to reinstall OpenCV?
AttributeError: ‘module’ object has no attribute ‘dnn’
Here’s my screenshot: https://imgur.com/2NJhsZO
Hi Jasper, be sure to check your OpenCV version:
The “dnn” module is only in OpenCV 3.3 and above. My guess is that you have an earlier version of OpenCV installed and that you will need to reinstall OpenCV.
i downloaded some images from google and its not working ,its coming like this
(h, w) = image.shape[:2]
AttributeError: ‘NoneType’ object has no attribute ‘shape’
but if i try for images given along with source code it works anybody help
It sounds like your path to your input image is correct and
cv2.imread
is returning None. You can read more about this error this blog post.Hello. what are the numbers in blob = cv2.dnn.blobFromImage(cv2.resize(image, (300, 300)), 0.007843,
(300, 300), 127.5)?
how did you get the 0.0078 and the 127.5?
These are the mean subtraction and scaling values. Refer to this blog post for more details.
is there any way to measure the height of the bounding boxes drawn using, say, the x and y position that the program returns?
The height in terms of pixels? Or the height in terms of a real-world metric such as inches, millimeters, etc.?
When I run this code then it gives error:
usage: deep_learning_object_detection.py [-h] -i IMAGE -p PROTOTXT -m MODEL
[-c CONFIDENCE]
deep_learning_object_detection.py: error: the following arguments are required: -i/–image, -p/–prototxt, -m/–model
Please read my reply to “Ahmad” on October 28, 2017. You can search this page for “command line arguments” as well.
Hi Adrian,
Thanks for your help in learning Mobilenet and SSD using dnn module. This blog is first of its kind and very unique. However i wanted to know if we can extend the number of classes more than 20, say 100? If so can you please guide as to how can do that?
You would need to:
1. Gather example images of the additional objects you want to recognize (including any images the network was originally trained on if you wanted to continue to utilize those classes).
2. And then either re-train the network from scratch or fine-tune it
Deep Learning for Computer Vision with Python covers both of these methods.
Hi Adrian,
Thank You! This was a beautiful guide. I have one question though, what are the 4 values in detections[] ? in line 42. You use it in the loop like this detections[0, 0, i, 2] what is 0,0,i,2?
Please see my reply to “Aniket” on September 26 2017.
Hey Adrian,
I am trying to get the code from object detection and deep learning to work:
I’ve downloaded it and when i open a jupyter notebook in the directory of the files and run the code:
$ python deep_learning_object_detection.py \
–prototxt MobileNetSSD_deploy.prototxt.txt \
–model MobileNetSSD_deploy.caffemodel –image images/example_06.jpg
I get an invalid syntax error. I’ve even tried loading the numpy, cv2 and still nothing. How to i get the code to run?
Thank you
Are you trying to run the Python script from within the Jupyter Notebook? If so, that is your error. Execute the script from your command line.
What an excellent blog. My pics are size 640×480, and I see much more accurate results (detecting objects as opposed to not detecting anything at all sometimes) when I modify the source code to not resize to 300×300, (lines 36-37), but to put 640×480 there. Is this to be expected, and why yes why no? Ofcourse I should invest the time to learn exactly what it is I’m doing, but my time for these things unfortunately is limited ;(
So keep in mind if your images at not resized to 300×300 pixels than OpenCV will just take the center crop of your 640×480 image and then process it. Perhaps the center of your image contains higher resolution objects that you are trying to detect and using the center crop helps enable this?
Yes I’m trying to detect quite small objects, relative to the image size. Why will it center crop? It cannot work with arbitrary image dimensions? What are the restrictions?
And if it needs to be resized to 1:1 ratio (like 300×300), why is the changed aspect ratio then not an issue? (If resizing 640×480 to 300×300, for example, the aspect ratio ofcourse changes)
Hey! I have had some problems regarding the line:
blob = cv2.dnn.blobFromImage(cv2.resize(image, (300, 300)), 0.007843,
(300, 300), 127.5)
That’s, I think, because “ciop” argument is not false by default, but true, so I ha problems with the detection until I added this crop=False argument.
Hi Adrian,
Great post as always!
I am currently preparing a dataset to train SSD on it in order to localize my own objects.
What is the best way to prepare data for the training and validation part:
– is it to make annotations (class_id + bounding box) for each object in the images I have
– or crop my images to isolate my objects alone in smaller images, and then put them in a folder which represents its class?
Would one of these techniques make a difference during training?
I am asking this question because I noticed that for classifiers the second method is used while for detectors the first one is used.
But I couldn’t found anywhere if annotations were a rule for detectors or just a convention.
As for the test images, I perfectly understand the use of annotations.
Thanks in advance for any support you could provide me
You should always make annotations of the class ID + bounding boxes of each object in an image and save the annotations to a separate file (I recommend a simple CSV or JSON file). You can always use this information to later crop out bounding boxes and save the ROIs individually if you wish. The reverse is not true.
Since SSDs and Faster R-CNNs have a concept of hard-negatives (where they take a non-annotated ROI region and see if the network incorrectly classifies it) you’ll want to supply the entire image to the network, not just a small crop of the ROI.
Adrian,
I just wanted to say that I am deeply impressed by your diligence and sincerity in your blog posts.
I have immense respect for you.
I am an applied-maths guy and was looking to catch on recent developments in cv and your posts arrived just at the right time.
Seriously, Thank You.
In case I can be of any help to you ever, please do let me know.
Thank you Vaibhav, I really appreciate that. Comments like these really put a smile on my face and make my day 🙂
can do this object detection with video please
You bet. Please see this tutorial.
Hi Adrian,
Awesome blog for image detection using openCV. Thank you for this one.
If I want to train my own set of images (not the COCO dataset) on MobileNetSSD, how can I do that ?
My goal is to detect an object in an image, crop that object and then run a color detection on that cropped image. It would be really helpful if you could provide some help for the same 🙂
Thank you once again.
Hi Falgun — I cover how to train your own deep learning object detectors (including SSDs and Faster R-CNNs), inside Deep Learning for Computer Vision with Python.
Hi,
Could you please show an implementation using other pre-trained models such as VGG_16?
Hi Alok — I cover implementing VGG, AlexNet, ResNet, GoogLeNet (and Inception variants), SqueezNet, and other architectures from scratch with Python code and plenty of documentation (as I do here on the PyImageSearch blog) inside my book, Deep Learning for Computer Vision with Python.
What algorithm has been used for only object detection in an image and what is its computational complexity?
Thank you for the post. I am just wondering why you used a Caffe model instead of a TensorFlow model, could you please elaborate on this? Thanks!
OpenCV’s “dnn” module works a bit better with Caffe models right now. I’m sure in future releases of OpenCV the TensorFlow model loading will become more robust, but for the time being OpenCV supports loading Caffe models a bit better.
What is the algorithm used here for object detection and classification and what is the time and space complexity for the same?
The blog post discusses the algorithm used for detection: MobileNet + Single Shot Detector (SSD).
how to detect objects other than those mentioned in the class labels?
You would need to apply either (1) transfer learning via feature extraction or fine-tuning or (2) train your own custom network from scratch. I discuss how to perform all of these techniques inside Deep Learning for Computer Vision with Python.
Thanks:)
Hello Adrian,
The class labels (21 labels) used for initialization at the beginning of the code in this post are those used during the training. That’s the reason why you choose only 21 labels in the post. Am i right ?
There are more than 21 objects in the COCO dataset. Why do we only choose 21 of them as labels ? I mean we can set, say, 100 labels during the training, of course that would require more training time.
The 21 labels in this post are the 21 class labels the network was initially trained on. The creator of this model trained on a subset of the full dataset.
Hi Adrian
i can not install caffe on python in windows, please help me
Hey Ali — sorry, I haven’t used a Windows system in a good many years. I’m not sure about the best way to install Caffe on Windows.
Thanks for the inspiration Adrian! I’ve created a docker container for my Synology Surveillance Station server to do a more advanced detection using your code as a basis and now I get much more relevant notifications. https://hub.docker.com/r/nidayand/synology-surveillance-opencv/
Thanks a bunch!
Awesome, thanks for sharing!
Hello Adrian, may u give me solution?
i want add new object in your project, for the step , what i doing in first time ?
thnks adrian
Hey Rarat — your choices are either to:
1. Train a new SSD from scratch
2. Fine-tune an existing SSD
The first step would be to gather your training data.
Deep Learning for Computer Vision with Python will teach you each and every step required to train your own custom deep learning-based object detectors.
Great intro. I didn’t read the code part because I was looking for reasoning regarding training new classes (classes outside of PASCAL VOC, or whichever dataset the pretrained weights were trained on). I look forward to reading more of your articles.
Thanks Matt, I’m glad you enjoyed the post. If you’re interested in training your own object detectors on your own custom classes and datasets be sure to take a look at Deep Learning for Computer Vision with Python where I discuss it in detail (including code as well).
Hi Adrian thanks for the intro! I ran into this problem
net = cv2.dnn.readNetFromCaffe(args[“prototxt”], args[“model”])
cv2.error: D:\Build\OpenCV\opencv-3.4.0\modules\dnn\src\caffe\caffe_io.cpp:1119: error: (-2) FAILED: fs.is_open(). Can’t open “MobileNetSSD_deplot.prototxt” in function cv::dnn::ReadProtoFromTextFile
Opencv is working fine in my other applications. Thank you!
The path to your input prototxt file is incorrect. Make sure you use the “Downloads” section of this post to download the source code and then double-check your paths to the input .prototxt and .caffemodel files.
i got an error, please help!
usage: object.py [-h] -i IMAGE -p PROTOTXT -m MODEL [-c CONFIDENCE]
object.py: error: the following arguments are required: -i/–image, -p/–prototxt, -m/–model
Hey there, I’ve addressed this question a few times in the comments section. See my reply to “Noor khokhar” on December 4, 2017 to help you get started.
Hi Adrian, I have been following your posts, great stuff. I am saving money to buy one of your bundles. By the way, have you look into Keras RetinaNet implementation?, I would like to hear your thoughts.
I have looked at RetinaNet and I have successfully used it. I will be doing a blog post on it in the next couple of weeks.
Hi,Adrian
Great article.Have you ever talked about RetinaNet in one of your blogs?
Yep! It was covered in Deep Learning for Computer Vision with Python.
hiii adrian
can you pls send me more images for the above code
Hi
Really a very interesting Post. How can I train this software for detecting only one category like road signs from a given image .
Hi Aqsa — one of the chapters inside Deep Learning for Computer Vision with Python discusses how to train your own custom object detector on road signs. I would suggest starting there.
error: the following arguments are required: -i/–image, -p/–prototxt, -m/–model
An exception has occurred, use %tb to see the full traceback.
im getting the error
You need to supply the command line arguments to the script, exactly as I do in the post. If you’re new to command line arguments, that’s okay, but you should read up on them first.
for i in np.arange(0, detections.shape[2]):
whats the meaning of this?
It loops over the total number of detections from the network. I would suggest adding some “print” statements in the code to help you debug and visualize this as well.
detections = net.forward()
whats the use of this line
It performs a “forward pass” of the network. Simply put: it computes the detections and associated probabilities.
Hi Adrian,
I want the SSD mobilenet to classify trains, truck and other vehicle types too. Please tell me how do I add more classes/categories to the pretrained model ?
Thanks
M
You cannot directly add more classes to the pre-trained model. You would need to either train the model from scratch or apply transfer learning via fine-tuning. I discuss how to train your own custom deep learning object detectors, including how to recognize different types of vehicles, inside Deep Learning for Computer Vision with Python.
Hi Adrian,
Your blogs have helped me understand the code easily and I thank you for that.
What if I want to reduce the number of classes for detection?
I have tried doing that and have been facing errors with idx out of range.
Here are the changes I’ve made:
CLASSES = [“bicycle”,”bus”, “car”, “motorbike”, “person”]
And executing this I get the following error:
Traceback (most recent call last):
File “real_time_object_detection.py”, line 67, in
label = “{}: {:.2f}%”.format(CLASSES[idx],confidence * 100)
IndexError: list index out of range
You don’t want to modify the
CLASSES
list. Instead, when looping over the detected objects, use anif
statement to filter out classes you are not interested in.Hi Adrian.
Great post as always.
I have one question
What is the difference between training a convolutional neural network for classification and one for object detection?
I know that when you train a CNN for classification you need a big dataset of images where those images contain the objects that we want the network learns to recognize, but for object detection how do you train the CNN (For example with SSD, I know it would be different if we train a YOLO network)
The paper for SSD says “ground truth information needs to be assigned to specific outputs in
the fixed set of detector outputs” (What it means with ground truth information needs to be assigned?)
“Once
this assignment is determined, the loss function and back propagation are applied endto-end.” (This is the normal training for a CNN)
“Training also involves choosing the set of default boxes and scales for detection
as well as the hard negative mining and data augmentation strategies.”
(How do we apply this?)
For me, an object detection is one which can detect an object, no matter what that object is, but it seems that a CNN for object detection can only recognize objects for what it was trained. (For example, if we train an SSD to detect objects of dogs we train the model with a dataset of dogs)
If that is the case, I don´t see why to have 2 CNN to detect objects (1 for classification and another one for object detection)
For what I understood in your post is that once you are ready, you have 2 models 1 for object classification y another for object classification.
How do you combine both models to work together?
Simply put:
1. A classification network will give you a class label of what the image contains.
2. An object detection network will give you multiple class labels AND bounding boxes that indicate where in the image each object is.
Keep in mind that it’s impossible for a machine learning model to recognize classes or objects it was not trained it. It has to be trained on the classes to recognize them.
If you’re interested in learning more about classification, object detection, and deep learning, I would suggest taking a look at Deep Learning for Computer Vision with Python where I discuss the techniques in detail (and with source code to help solidify the concepts).
Thanks Adrian.
So, what you are saying is that for object detection there is only one neural network that will bring the class label and the bounding boxes? I just need one big dataset and with it I can train my neural network for object detection?
or an object detection network is form with 2 differente networks, one for class label and other for bounding boxes?
You’re understanding is very close but I want to clarify one point:
You normally start with what we call a “base network”. This network is typically, but not always, pre-trained on an existing dataset for classification. We then modify the network architecture, remove some layers, add new special ones, and transform it into an object detection network. We then train the entire modified network end to end to perform detection.
hello,
i have downloaded openCV 3.3
and also the code that was mailed to me.
the problem is i dont know how to run it.
i am new to this and i have no clue on how to go about the execution of this code and if i require any other software.
so it would be really helpful if someone gave me steps to execute it.
please….
If you are new to running code and command line arguments, no worries, but you should read up on the command line first. I would also recommend reading up on command line arguments.
First of all, love your work. And especially love this tutorial for making ML easily understandable and used with opencv.
Just wanted to let you know about the MobileNet-SSD object detection model trained in TensorFlow found by following the information in opencv > dnn > samples > “mobilenet_ssd_accuracy.py” has alot higher accuracy (or more detections if accuracy isnt the right word here).
It detected the tv in the background of your last picture and detected relatively small people in a picture that the caffe model provided here didnt. With roughly the same time for prediction
https://github.com/opencv/opencv/blob/master/samples/dnn/mobilenet_ssd_accuracy.py
Thank you for sharing this, Tai!
Your blogs have helped me understand the code easily and I thank you for that.If I want to detect fruits on tree specifically fruits like apple,mango,strawberry,watermelon,orange,pineapple then what should I use.
Actually I have detected on tree fruits on the basis of color. But that is not much accurate .Is their any way to detect and identiy on tree fruit.
It is certainly possible to detect various fruits in an image/video; however, you will need to train your own custom object detector. I would suggest taking a look at Deep Learning for Computer Vision with Python where I provide detailed instructions (including code) on how to train your own object detectors. After going through the book I am confident that you will be able to train your fruit detector 🙂
Hey can you explain me the different parameters used in the layers in prototxt file and how the image is processed from one layer to other like what is the input and output of the hidden layers?
how do we decide the number of layers?
Also how does the entrire process goes?
please help me out.
thnak you.
Hey Bhavitha — explaining the entire process of how an image/volume is transformed layer-by-layer by a network is far too detailed to cover in a blog post comment, especially when you consider the different types of layers (convolution, activation, batch normalization, pooling, etc.).
The gist is that a network is inputted to a network. A total of K convolutions are applied resulting in a MxNxK volume. We then pass through a non-linear activation (ReLU) and optionally a batch normalization (sometimes the order of activation and BN are swapped). Max pooling could be used to reduce volume size or convolutions can be used as well if their strides are large enough.
This process repeats, reducing the size of the volume and increasing the depth as it passes through the network.
Eventually we use a fully-connected layer(s) to obtain the final predictions.
If you’re interested in learning more about CNNs, including:
– How they work
– The parameters used for each layer
– How to piece together the building blocks to build your own CNN architectures
Then I suggest you work through Deep Learning for Computer Vision with Python where I discuss all if this in detail.
I hope that helps!
Thanks for the suggestion Adrew.
Is there any big difference between the CNN and MobileNets+SSd?
what do you mean by depthwise separable convolution in detail?
A CNN is used for image classification. A CNN is also used as a base network in the SSD framework. When saying “MobileNet + SSD” we’re saying that MobileNet is the base network and SSD is the object detection framework.
usage: deep_learning_object_detection.py [-h] -i IMAGE -p PROTOTXT -m MODEL
[-c CONFIDENCE]
deep_learning_object_detection.py: error: the following arguments are required: -i/–image, -p/–prototxt, -m/–model
this error occured
You need to supply the command line arguments to the script. See this post.
thanks sir for this post
Hi Adrian,
Thank you for your posts. I have learned alot from yours.
So is it right if I say we can use MobileNet base-network with YOLO framework?
Yes, your understanding is correct.
Hi Adrain,
Thanks a lot for this wonderful tutorial, I was trying to detect human hands from the caffe model obtained from “http://vision.soic.indiana.edu/projects/lending-a-hand/”, in case you gets time please tell me how to fix it. I tried it both your tutorial as well as opencv dnn samples (C++)
Hey Abhisek — I don’t have any experience with this model so I’m not sure what the error is. It does look cool though so if I have some spare time I might take a look (no promises though).
Hi Adrian,
how to detect other objects for example resistance, inductance?
Thank you
I’m not sure what you mean by “example resistance”. Could you clarify?
Hello,
In your program (deep learning object detection.py) you have detected 20 object, but for me I choose to detected other electronic object as resistance, diode, Microcontroller …. I would like to help you to show how add these object.
Thank you
Got it, thank you for the clarification — I understsand the question now.
You have two options:
1. Fine-tune an existing object detection model
2. Train your own object detector from scratch
You cannot simply modify the code to detect your microcontroller components — you need to train the network.
I cover how to train your own custom deep learning-based object detectors inside Deep Learning for Computer Vision with Python. I would suggest starting there.
I hope that helps point you in the right direction!
Hello Adrian,
how can I add ‘ball’ to the classes? so that I can also detect ball in the provided image.
Thanks,
Prasanna
You would need to:
1. Gather example images of balls (see this post)
2. Train or fine-tune an object detector on your new dataset
You cannot simply add “ball” to the classes. It requires training or fine-tuning the network.
Hi Adrian,
I am running object detection on Rpi 3 with a raspicam(Raspberry pi camera connect via CSI cable) I am getting following error . I tried debugging None type error but no luck can you please help into this?
Following is error:
ploy.caffemodel
[INFO] loading model…
[INFO] starting video stream…
Traceback (most recent call last):
…
(h, w) = image.shape[:2]
AttributeError: ‘NoneType’ object has no attribute ‘shape’
PS: camera is working fine. I tried normal capture and streaming to a local web server but its working properly.
To start, take a look at my reply to “Ajeya B Jois December 29, 2017”. My reply discusses “NoneType” errors and how to resolve them. Additionally, the post you commented on does not include real-time object detection — perhaps you meant this post?
I got the detection using readNetFromDarknet() using python, but I am not able to figure out how to iterate over the detection and draw bounding box on image. Pl suggest
I am using tiny-yolo-voc.cfg and tiny-yolo-voc.weights
Hi Nilesh — I have not tried using the readFromDarnket function yet. Once I do I will write a post on it.
I want to add a new class but it does not work. the example of the class I want to add is the ladder. what’s wrong with this. does the class of stairs not exist? from the reading even shows that the picture is a chair.
Are you using the pre-trained network in this blog post? Keep in mind that the network was never trained on a “ladder” or “chair” class. You would need to either train the network from scratch or apply fine-tuning. This appears to be a common misconception with this post so I’ll make sure to write a follow up tutorial in early May.
yes. i used the pre-trained network in this blog post. but not work for ladder or chair. what do I do if I want to add new data? so I do not add data to previously trained data?
Hi Usup — stay tuned for my blog post that will go live on 5/14/2018.
Hello,
Thanks for the tutorial.
What’s basically “.caffemodel”
and how can I create my own ?
How do I read a .caffemodel file ?
Hi Kaustubh, training a Caffe model is outside the scope of this blog post. I do cover Caffe in PyImageSearch Gurus if you’re interested in learning to train Caffe models.
Thanks for interesting material!
But how we can to train model to recognize some new object?
May be your have short tutorial for this?
Be sue to take a look at my book Deep Learning for Computer Vision with Python where I demonstrate how to train your own custom object detectors.
Hi, Is it possible to fine tune this caffemodel for own application?
Yes, this model can be fine-tuned. Do you have any experience fine-tuning models before?
Hi Adrian !!
do you have any idea how to run SSD detector fast; like how to increase FPS? I implement SSD( single shot multi box detector) person detector and add a dlib tracker with it. but it is very very slow to the extent that it can not be used for real time applications. but Hog detectors work well with dlib tracker and it is fast (sufficient for real time apps).
Thank you in advance
Have you tried pushing the SSD inference to the GPU? That would be the fastest way to increase speed.
I do not understand what does it mean please?
Run your object detector on your GPU vs. your CPU. It will run significantly faster.
Hi Adrain,
Could you please let me know how we can achieve this
Thanks for the inspiration Adrian. Well, I have almost followed all your blog post and successfully applied some of it. Particularly for this blog, I have investigated several related papers started from R-CNN and all the way to YOLO.
But I have been stacking with very first stage of all of those methods, how to prepare own custom dataset include annotation so I can use my own custom dataset . It seems all those methods are using public dataset which already annotated.
Thank you.
It sounds like you are asking about annotation tools and how to annotate your own images? Take a look at LabelMe and dlib’s “imglab” tool. I also discuss how to label your own images for object detection inside the PyImageSearch Gurus course and Deep Learning for Computer Vision with Python.
hello adrian
how can i change the classe
i want detect shapes of object , like circle or squarre but real things , can u please tell me how change in class
This blog post will help you learn the fundamentals of deep learning object detection, including adding or removing classes.
Sir,
Is this method follows Non-Max-Suppression? When I’m running this algorithm it is showing a person with different boxes and upper half and lower half but not the person as whole object?
This method does indeed apply NMS internally. In your particular image it sounds like the network is localizing the person as two objects. This could be due to an odd angle of the person in the image, the input resolution, or image quality.
Thank you!! 🙂
Hello
Thanks for the post it is really usefull
how to get other objects to detect by using this program..
and how to train the objects to help program to detect in the video frame..
could you please tell me how to do it
thanks in advance
I would suggest starting by reading this blog post on the fundamentals of deep learning and object detection.
From there, read this blog post on real-time object detection with deep learning.
Hello. I would like to know how can I get a background from some image, and, example, to compare him with another image background?
I’m not sure what you mean by “compare background” in this context. Could you please elaborate?
For example, you have 2 pictures of one area, but a couple of people or a car are present in the first picture. And on the other picture there is, for example, a bicycle or a cat. The background remains the same (large buildings, trees), but only some moving objects have changed. And I want to compare background of this images to understand same or different this pictures
I think an image difference algorithm would work well here.
Hey,
First of all, I love your blog. They are simple and easy to follow.
Second of all, I have a question. From the description above, I understand that
–prototxt : The path to the Caffe prototxt file.
–model : The path to the pre-trained model.
I have installed Caffe successfully. I have OpenCV version 3.4.1 and I am using python 3.5
So my question is:
Does MobileNetSSD_deploy.prototxt.txt gets install when one installs Caffe? I could not find it in the “Caffe” (the installed) folder.
Also, how do I train the model?
For example, I want to train an image with a different set of objects (not the one mentioned above) and would like to have lesser neural network layers (since I do not have a complicated image to train). How do I do that?
I am new to deep learning and trying to understand the program.
Thank you very much!
Best Regards
1. You actually don’t need Caffe for this example, just OpenCV 3.3+. OpenCV will load the Caffe files.
2. No, you need to actually download the prototxt and model using the “Downloads” section of the blog post.
3. If you wanted to train/fine-tune the model you would need to use the Caffe framework itself. If you’re interested in doing this I would recommend take a look at the PyImageSearch Gurus course as well as Deep Learning for Computer Vision with Python.
Hi,
Thanks for the reply 🙂
A quick question:
How did you build the prototxt file and trained the model?
Regards
You’ll want to take a look at the Caffe library. As I mentioned in my previous comment, I discuss how to train networks using Caffe inside the PyImageSearch Gurus course. That said, you might want to take a look at Keras along with the TensorFlow Object Detection API to train your own custom object detectors as well.
Hi,
is the a class to only detect a soccer ball ?
Thanks
The COCO dataset contains a “sports ball” class. Take a look and see if that would help with your project.
I’ve had such good results with your realtime Movidius examples and MobileNetSSD as a starting point for adding AI “person detection” to video security systems, that I decided to use this as a starting point for a stand-alone Raspberry Pi3 & PiCamera module AI enhanced video security system.
Basically I just replaced image = cv2.imread(args[“image”]) with image = vs.read() in the loop after starting the camera with vs = VideoStream(usePiCamera=True, resolution=DISPLAY_DIMS, framerate=8).start()
It works wonderfully and for monitoring intrusions and the one frame every ~2 second is very useful in many situations.
Minor problem is the latency to detection. I can walk through the FOV, sit down at my monitor and then watch the frames where I walk through be processed. I’ve reduced the framerate from the default to 8 and it made no noticeable difference. Is there an option to use VideoStream from your imutils without the threading? Or should I just switch to using picamera module directly? I’m using your latest imutils v-0.4.6.
But the big problem is after it runs for a while it seems the net.forward() stops detecting the new image and returns the detection from the previous detection, sometimes just for the next frame a two, others continuously until I move in front of the camera again or move it to apparently force another detection. I’ve tried setting detections=0 before the net.forward() call and it makes no difference. Something weird seems to be going on in the dnn opencv module. I have two nice example images to illustrate the problem if you tell me where to upload them. (I could put then on OneDrive and post a link, if that is allowed here)
Basically you can see a person walking briskly enter the right side of the frame and get a good detection and then the next image ~2 seconds later about to exit the left side of the frame but the detection box is drawn from the previous detection on the right side!
My Pi3 has a heat-sink attached and the CPU/GPU temps report ~70/71 C
If you don’t want to use threading you should just use the picamera module directly. As for your second question, I answered that in your comment in your other comment. In the future please keep all comments related to the project on the same post. It gets too confusing to jump back and forth — and furthermore, other readers cannot learn from your comments either.
deep_learning_object_detection.py: error: the following arguments are required: -i/–image images/example_01.jpg, -p/–prototxt MobileNetSSD_deploy.prototxt, -m/–model MobileNetSSD_deploy.caffemodel
how to solve this error??
It sounds like you may not have any prior experience with command line arguments. That’s okay, but you should read this post first.
Hi Adrian, i need your help please !
How can I edit your code to only detect cars?
Thank you so much for your tutorial !
See this post.
hi adrian ,
i got result with larger sized ouput imgae so that i could’t saw the ouput image fully. so how can i reduce the ouput image size to fit my screen
You should resize the image before calling cv2.imshow. You could use cv2.resize or my imutils.resize function.
Hello, Adrian! Great lesson, thank you!
I have a question. In your post you mentioned that it example based on combination of the MobileNet architecture and the Single Shot Detector (SSD) framework. As I understood you right, it example only suit to COCO dataset and was pretrained on it.
What if I want to use it network for my purposes? I need to gather my own database and train it network on it? If yes, what requirements to images will be, where to find it? And how to train it? Use Caffe, right?
Just want to clarify it details and get any possible links.
Thank you for answer.
You are correct that you would need to gather your own dataset but you don’t have to use Caffe (other deep learning frameworks can be used as well). I actually cover how to train your own custom object detectors inside Deep Learning for Computer Vision with Python. You should also read this guide on the fundamentals of deep learning object detection.
I executed the code but it is not recognizing person from image example_03.jpg.
if i have a picture with multiple persons and dogs in it, how do i come to know what is the percentage of women and the percentage of dogs in the picture ?? the percentage obtained from this technique is the accuracy rate which is not what i’m looking for .
plz help!
Hey Shweta — this is a simple math problem.
Total objects = the # of objects detected in an image with probability greater than the minimum confidence
Percentage of women = # of women detected / total objects
Percent of dogs = # of dogs detected / total objects
I hope that helps!
Hmm… I get this error all the time:
deep_learning_object_detection.py: error: the following arguments are required: -i/–image, -p/–prototxt, -m/–model
Even after putting the path in help= “”
Please help and let me know where am I going wrong.
I am running it in IDLE as python file, first downloaded then added the path and then F5 to run in shell.
Also I tried using the same way you used to command prompt but it didn’t seem to work. Am I supposed to make any changes in program? My current directory is the same where models and images are stored. and btw I am using windows cmd
Don’t run the command in IDLE, use your command prompt. If you’re new to Python command line arguments, that’s okay, but read up on them first.
hey..
you uploaded cat detection on https://pyimagesearch.com/2016/06/20/detecting-cats-in-images-with-opencv/ …that is perfectly working..
but when i tried to detect the cat image taken from internet it does not detect ..
what should i do?
The post you are referring to uses Haar cascades which can be very hard to tune the parameters to on an image-by-image basis. You should consider using a deep learning detector (like the one covered in this post).
Hey Adrian, thanks for this wonderful article and for so many comments; I went through each of them and spawned multiple tabs. I have three questions as below.
1) Are you aware of any trained dataset which consist of primitive geometrical shapes viz. squares, circles, rectangles, semi-circles, quadrilaterals, polygons, etc. where the shapes are just wire-frames and not the solid types filled with some colors?
2) If such a dataset exists then can deep learning like in this article be applied to recognize multiple shapes of different sizes stacked together in a drawing as in https://imgur.com/a/5yw1b2m ? If yes, can there sizes be extracted too using some technique? For some reason I don’t want to use openCV image processing functions but want to apply deep learning in this problem.
3) If such a dataset DOES NOT exist then is the following strategy feasible/practical?
a) Collect all the primitive and non-primitive shapes of different sizes occurring in many such drawings and put them into a dataset and annotate them manually.
b) Train a model through some popular technique on this dataset to learn the features.
c) Use this model with deep learning combined with openCV and detect shapes.
I deeply appreciate you taking out time to read through this and for providing any advices, pointers, or existing work. Many thanks.
Of the top of my head, sorry, I do not know of such a dataset. But you could easily create one yourself using OpenCV’s built-in drawing functions. Loop over random selections of shapes, sizes, colors, etc. and then create your dataset that way. From there you can train your own model.
Thanks a lot Adrian, it saved my time in exploring such a dataset. Actually, there exist many 2D shapes dataset but they are very big and contain many different things so probably ill-suited for my problem. So what I understand from your advice is that I generate all the shapes with different parameters and create a dataset of all shapes occurring in my drawings. After that I can train a model for this dataset and do object recognition using deep learning ? Is deep learning the only solution if I want to have an AI based solution? Thanks a lot.
Your understanding is correct. Deep learning is certainly not the only solution but you will need to leverage machine learning to some extent. I think you would be a great fit for the PyImageSearch Gurus course where I discuss image classification in detail. I have no doubt you would be able to solve your project after working through the course.
hi,
thanks a lot for this amazing tutorial. its really very helpful. i am able to execute this code on windows and getting good results. but when the same code i am executing on Raspberry Pi, i get this following error:
(h, w) = image.shape[:2]
AttributeError: ‘NoneType’ object has no attribute ‘shape’
the location for this error it shows as in …/imutils/sitepackage/convenience.py line no 69
please let me know what should i exactly change in the code. i have referred the blog written for this(https://pyimagesearch.com/2016/12/26/opencv-resolving-nonetype-errors/)
but still i am getting the same error.
I am looking forward for your help/inputs.
Thanks a lot..!!! 🙂
Double-check the path to your input image. The error is likely due to the “cv2.imread” function returning “None” due to a non-existent file path.
Thanks a lot for your tutorial, it worked perfectly for me.
I have a couple of questions though.
1) I tried the tensorflow framework itself to implement the same task – object detection, I used their example https://github.com/tensorflow/models/tree/master/research/object_detection
It worked well but much, much slower and, what was more important to me, it consumed a tremendous amount of memory (around 1G for just one image processing). How would you explain that OpenCV does its work much better (faster, less greedy)?
2) Do I understand properly that I can feed cv2.dnn any other supported model from other frameworks like tensorflow?
Thanks a lot!
Which model did you use from the TensorFlow Object Detection API? Keep in mind that the architecture you used will have a very different memory footprint. Secondly, the cv2.dnn module does support a number of different frameworks but you’ll need to check the documentation depending on which specific one you want to use.
Hi Adrian,
I need detect object on the Online Shopping Page. The images could be Baby’s items, Apparel, Electronics, Home Decor etc. Do you suggest a suitable Caffe models?
Hey Rupak — I do not have such a model. You would likely need to train your own model from scratch. The following blog post covers the fundamentals of deep learning object detection. You should also refer to Deep Learning for Computer Vision with Python to learn more about training your own models from scratch.
Hi Adrian,
I am new to deep learning am i’m trying some program for face detection using opencv. Is there any pre-trained module from which we can find out the parts of body?
Hi thanks for this interresting topic, i wonder if it is possible to have the x, and y of the frame surlighting the object to know its position in the photo
thanks again
how to modify this to detect only humans
I answer your exact question in this post.
Modified your code to capture video from the webcam on my laptop, and run detection on each frame. Works really cool!!
Your tutorials really are awesome!!
Thanks Siladittya! 🙂 And congrats on running the object detection script on your laptop.
Hey can someone help me with this.
Is there any step by step tutorial for running this code.
I’m totally new to this.
Please help me out.
If you’re new to Python and programming in general, that’s okay, but this is a more advanced guide and it does assume you know the fundamentals. I would suggest investing some time into learning the basics of Python before trying to run these more advanced examples.
Hi Adrian ,
I’m Getting this error :
Traceback (most recent call last):
File “deep_learning_object_detection.py”, line 32, in
net = cv2.dnn.readNetFromCaffe(args[“prototxt”], args[“model”])
AttributeError: ‘module’ object has no attribute ‘dnn’
Iam using opencv-3.4.2
I’ve gone through all comments here.
Its showing AttributeError: ‘module’ object has no attribute ‘dnn’
I am using opencv 3.4.2 in raspberry pi 3.
>>> import cv2
>>> cv2.__version__
‘2.4.9.1’
This is what I am getting when I check for the version. Does this mean that the opencv version in 2.4.9.1? Is that different from opencv version or both are the same? Because the folder shows “opencv3.4.2”
However there is a dnn folder at the location, home/pi/opencv-3.4.2/samples/dnn
It sounds like you’re actually not using OpenCV 3.4.2, you’re using OpenCV 2.4.9.1. It sounds like a Python path issue. Make sure you have followed one of my install tutorials to ensure your system is configured properly.
Hello Adrian, I used your tutorials for installation.
However the problem got fixed when I used workon cv before executing this code.
Thank You.
Although I am getting this error
[INFO] loading model…
[INFO] computing object detections…
[INFO] car: 99.95%
[INFO] car: 95.62%
Traceback (most recent call last):
File “deep_learning_object_detection.py”, line 74, in
cv2.imshow(‘Output’, image)
cv2.error: OpenCV(3.4.2) /home/pi/opencv-3.4.2/modules/highgui/src/window.cpp:632: error: (-2:Unspecified error) The function is not implemented. Rebuild the library with Windows, GTK+ 2.x or Carbon support. If you are on Ubuntu or Debian, install libgtk2.0-dev and pkg-config, then re-run cmake or configure script in function ‘cvShowImage’
Your install of OpenCV does not have the “highgui” module. I assume you pip installed OpenCV? If so, you didn’t have the proper GUI library pre-installed. Make sure you refer to eone of my OpenCV install tutorials to help you configure your machine properly.
Hi Adrian,
Could we use this in x-ray images?
You would need to train your own custom model for x-ray images. Furthermore, semantic segmentation may be a better option as well.
Hi Adrian,
Where can I get more information on training my own custom model for x-ray images? Is it possible if I buy your book?
I don’t have any specific tutorials on x-ray images and semantic segmentation. I am considering doing more semantic segmentation posts and perhaps even additional chapters in the future though! Be sure to signup for the PyImageSearch Newsletter to be notified when any new chapters or posts are published 🙂
Hi, I want to detect some particular objects only which are not in this trained model from webcam, how can I do that ? please
It’s 100% possible but you will need to understand how deep learning-based object detection works first. Be sure to read the tutorial, it will help you get started training a model to detect different classes.
Hi Adrian, thank you for the tutorials. I am a beginner and your tutorials are of great help. I do have some questions.
1) I tried dnn-mobilenet ssd, using the 20 classes trained by chuanqi (same as yours). It works. But there are any pre-trained models that I can use? I am actually trying to detect boxes but sadly the 20 classes did not include boxes.
2) Inception V3’s model do have cartons. But are they strictly for image classification? Can we use the model for object detection? If can, how can we do that?
1. What kinds of boxes? 2D representations that are squares? Or actual packing boxes?
2. You would want to apply transfer learning via fine-tuning with the Inception V3 model as your “base” or “backbone” network. I discuss how to apply transfer learning for object detection inside Deep Learning for Computer Vision with Python.
Use anaconda to manage python libraries, including opencv.
I had no issue
Hello Adrian, how come I implement this on android? can you help me to do so.
OpenCV provides Java/Android bindings but you will need to refer to the documentation for them. I do not have experience with the Java/Android OpenCV bindings.
deep_learning_object_detection.py: error: the following arguments are required: -i/–image, -p/–prototxt, -m/–mode
how can i fix it
plz help??
If you’re new to command line arguments that’s okay, but make sure you read up on them first. From there you will be able to resolve your error 🙂
hello sir how can i make my own caffe data….
I would suggest starting by reading my gentle guide to object detection. From there you’ll have a good understanding of how these algorithms work, including resources to start training your own models.
Thanks Adrian!
Thank you very much for a great post!
I downloaded the code and it works really well. However, I obtain slightly different detection results than the ones you showed. For instance, one potted plant and the person are missing in my detections in the file example_03.jpg (a horse jumping over a hurdle). I also get different bounding boxes in the first image of two cars on the highway.
My question is: was the model retrained in the meantime? What I find surprising is that it seems significantly less accurate than the YOLO network you presented recently.
Many thanks in advance for your answer!
The model was not retrained at all. It may be a difference in our OpenCV versions.
Hey Adrain great post
I have a question though what does the percentage(%) denote after detecting an object?
The probability/confidence of the prediction.
I thought COCO had 90 classes. I see this model has only 20, what happened to the other classes? Thanks Adrian.
There are various subsets of the COCO dataset, both existing and ones that can be manually created. This one was only trained on 20, at least according to the person who trained the model.
Hey Adrian, great tutorials, even for beginers!
How can I change the program to detect only people (or any single class)?
And is it possible to crop the area, where detected object is? Im going to create traffic lights detector and find out the signal (red light or green), so i need to crop the area, where traffic light was found.
Thank you in advance for your answer!
Yes, you can certainly do that. I would recommend reading this introduction to object detection first. If you’re interested in training your own deep learning models be sure to refer to my book, Deep Learning for Computer Vision with Python.
Like usual, great job Adrian! This is just amazing! On my HP machine, when I use YOLO it takes approximately somewhere between 1 to 10 minutes to detect objects in the dog.jpg image, while running this code takes anywhere between 0.5 to 1 second for the same exact image!!! Its really amazing!
Thanks so much Ahmed, I’m happy you found the tutorial helpful!
Adrian,
Kindly, I would love to figure out a way to have this program to process detection on multiple images inside Images folder automatically, and keeps running so that whenever I throw an image inside the Images folder it will process it. Then saves all outputs in a seperate output foldr!
How can achieve that? Do you have any tutorials or some resources that guide me to accomplish this goal?
Thanks
There are a few ways to accomplish that, but it’s honestly not really a computer vision question, it’s more of a Python programming question. There are plenty of tools you can use to monitor a directory for new files. Python’s watchdog seems like a good option but I Haven’t personally used it.
Awesome! The watchdog script you recommended was helpful!
Great, I’m glad that helped 🙂
Hey Adrian
Great post
I have to only detect humans in a video what all changes do I have to make to the classes in order to detect on humans?
I cover exactly that question in this post.
Hello,
Should we change arguments like –image? sry I’m a beginner. Idk what to do to make it run.
No worries if you are new to command line arguments, just refer to this tutorial first.
Hi!
I know that if we use Keras ResNet50 in kaggle kernel, we shoud load it directly from internet. Is there such a possibility to do with OpenCV models?
Sorry, I’m not sure what you are asking. Are you asking if Keras models are compatible with OpenCV?
If we use the OpenCV model (for example MobileNet SSD), we should download it from GitHub to our computer, and then load it into our program from the directory where we have downloaded it. I meant that maybe we could skip downloading it to our computer and load it into our program directly from GitHub. This seems like a stupid question now, I’m sorry.
How can i add more labels in the pre trained model ?
I answer that exact question in my gentle guide to deep learning object detection.
I want to scan for images of houses that have something like “Ring” door bell or a placard in front of houses, purely for tracking purposes. Model datasets defined in this article was pre-defined. How I can expand my dataset or totally ignore the dataset and have something of my own (especially for purposes I stated earlier)
Great question. I elaborate on that and provide answers/suggestions in this gentle guide to deep learning-based object detection.
Great tutorial. I really appreciate the work you do Adrian. Its has help me a lot in learning NN in python.
I created a ROS package based around your tutorial set that uses python and mxnet
https://github.com/RoverRobotics/rr_mxnet
Keep up the good work 🙂
Hi,
Thanks for this great tutorial.
Kindly try to help me out also …
I want to detect hexagon shape from image(s) and image(s) consists of many objects !!!
Can you please guide me !!!
Thanks in advance !!!
There are a few options. If you can easily segment the background from the foreground then simple shape detection would work. Otherwise, you may want to try training a HOG + Linear SVM detector. If all else fails you can train a Faster R-CNN, SSD, or RetinaNet detector to detect the hexagons. Those detectors are covered inside Deep Learning for Computer Vision with Python.
I hope that helps point you in the right direction!
Thanks a lot.
if I have a Caffe prototxt file that uses GPU for inference, it does not work
Am i missing something?
I’ve mentioned this in the comments section a few times (so please make sure you’re reading them) but OpenCV’s “dnn” module does not yet support many GPUs, even if you compile OpenCV with GPU support. If you need GPU support for inference right this second you should be using the “pycaffe” bindings of Caffe.
I am reading your blogs since last few days and my interest in ML / DL has increased.
And i have become fond of your blogs !
Just one question about this article.
Is CAFFE model a must ? Can we eliminate CAFFE model and opt for TensorFlow only?
Yes, you could use a different model. The model we are using here today was just trained with Caffe, that’s all. If you’re interested in learning how to train your own custom deep learning object detectors be sure to refer to Deep Learning for Computer Vision with Python.
Hi Adrian,
Your tutorials are amazing and very helpful for even a beginner like me. I’ve got 2 questions
#1
I am running this program on windows (i5 processor) using a 24 MP USB webcam and the speed of obtaining subsequent frames and object detection is significantly slow.Is it because of the processor and camera?Is there any way to increase the speed ?
#2
How to reduce misclassification?
Thanks in advance.
This method runs on the CPU not the GPU, so yes, it will be slower. For faster, more accurate object detection you’ll want to refer to Deep Learning for Computer Vision with Python where I discuss object detection on the GPU in more detail.
Hi Adrian, I used your object detection and set a counter so whenever it goes to a person, it’ll say person detected: 1 however, it keeps adding so it goes 1, 2, 3, 4, 5 even though there’s one person. Is there anyway I can only count one person based off the frame?
Have you tried using my OpenCV people counter tutorial?
hey adrian i have 2 problems
1)when i use the another picture which were not given by you then only specific part of the image is goes under the detection remaining part is not displayed on the frame output why????
2) can you detect objects by using webcam? how?
See this tutorial on object detection using video and webcams.
thank you so much
If i wanted to detect say only person from the above given code what would i need to modify in the code
See this post which answers your exact question.
Hello Rosebrock,
I wanna detect a car logo and define (Car brand name) as label.
Landmark detection algorithm. Can you help me with that?
I cover how to train your own custom logo detectors inside Deep Learning for Computer Vision with Python. I would suggest starting there.
Hello, I want to know if this model is trained by yourself according to the steps of MobileNet-SSD, or you directly use the contents of the GitHub link, without any modifications.This answer is very important for me to understand the article and the article in the next video stream. If the model used here is your own training model, can you elaborate on your training steps?I am very eager to look forward to your reply.
I did not train this model. It was trained and provided by the user in the GitHub link I included in the tutorial.
Thank you very much for your reply, this is very helpful to me, thank you again for your attention to me.
You are welcome!
hi Adrian,
actually i need the code which counts the cars passed from camera ..
like a person counting system in mall so can you guide me please.
You can build exactly that using this post and then swapping out the person class for the vehicle-related classes the SSD was trained on.
what is background in the class?
How to train this model for custom dataset like i want this model to detect the objects in the sea.Can you please help me with this??
Have you taken a look at Deep Learning for Computer Vision with Python? Inside the book I provide code + instruction to train your own custom deep learning object detectors. Do take a look!
Hello sir
I want to know how to code for detecting litter on beach in python and can i connect python code with arduino ??
You would need to train a model to actually detect the litter. You can learn how to train your own custom object detectors inside my book, Deep Learning for Computer Vision with Python. And yes, Python does work with Arduino.
Hello Adrian,thank you very much for the effort that you do and especially for sharing with us this interesting things 🙂
I want to ask you if i want to detect others object what i must change in this code ? ( i’m new in this domain)
In my case i want to detect boxes (in stock inventory) and i tested many codes but it doesn’t work for me do you have any suggestion please ? Thank you very much
You mean objects that the network was not already trained on? You would need to either train your own custom object detector or fine-tune an existing one. I cover both techniques inside my book, Deep Learning for Computer Vision with Python.
Hey Adrian
Thank you for explaining things easily. One question, how many hidden layers used for the network?
Hey Adrian,
I would like to display the time taken for the model to detect the objects for image input. What are the necessary changes I need to make to the code?
Pseudocode would look something like this:
I hope that helps!
Why is there a maximum of 20 objects detected in a single image
Hello Adrian,
When you passed the blob in neural network, is the neural network mobilenet or Mobilenet SSD itself?
The model in this tutorial? It’s a Single Shot Detector (SSD) with a MobileNet backbone.
So,i read your blog on blob image function and i’m trying to relate it here. So,the image was actually passed in a CNN first .Then, created a blob out of it….and then the blob is passed through the Mobilenet SSD neural network right?
1. First we load an image from disk
2. We then create a blob from the image
3. The blog is passed through MobileNet + SSD
4. We obtain our bounding boxes
okk undersood…thank you very much.
Sorry, another question. Is MobileNet used as a feature extractor or classifier?
MobileNet can be used as either a feature extractor or image classifier.
Hi Adrian,
I wanted to ask how can we evaluate other parameters for our models used, such as required processing power, runtime analysis, etc.? These are necessary for translating these models to production. Also, Could you suggest other metrics or factors which might be necessary for the production side of these models on a large scale? It would be great if you could share some resources for the same as well.
Thanks for the suggestion. I don’t have any tutorials on that but I may consider it in the future, especially for the upcoming embedded computer vision book.
Hi Adrian,
Your tutorials are nice but I didn’t understand how to write .prototxt and .caffemodel files. I have searched a lot on internet but i couldn’t find any thing related to.
You don’t write then, they are generated by deep learning frameworks and libraries. If you’d like to learn how to train your own custom deep learning object detectors you should refer to Deep Learning for Computer Vision with Python.
Sir, can i train custom objects like a tanker,chair,bags etc ,using this code ? please guide me on this.
I cover how to train your own custom object detectors inside Deep learning for Computer Vision with Python.
Hello Mr Andrian Thank you for sharing this article. I would like to ask about something about object detection.
I have case that want to classify the person holds snack or not. If the person holds snack will give the label “person bring snack” and if not give the label “person not bring snack”. And the question is. how do i train data? i will train data separately. for instance in this case there are two objects : person and snack and i give the label which is person and which is snack.
Or
I create the the training data label “person holds image” with no separately?
Thank you in advance
Make sure you refer to Deep Learning for Computer Vision with Python where I show you how to train your own object detectors (and answer your exact question).
Hello friend, you think it is possible to recognize defective bottles of the type with holes or deformed, obviously that these defects are notoriously visible. either with yolo or ssd?
That would be better handled with instance segmentation and Mask R-CNN.
Is it possible to detect an object which is not present in the pre trained model classes?
For example, I am trying to detect a few fuses in a circuit. If it is possible, could you give a brief insight on it?
Yes, that’s called fine-tuning. You can refer to this tutorial to understand the basics and then read Deep Learning for Computer Vision with Python to learn how to fine-tune your own custom object detectors.
This guide is very helpful thanks a lot! How can I improve the object detection in night/dark conditions? Should I need to train a new model ?
Yes, but make sure you have example images that are night/dark/low contrast — your model cannot recognize objects in environments it was not trained on so make sure your training data is representative of your test data.
Hello Adrian,
Thanks for writing and sharing interesting blogs.
I am looking for “How to train SSD based object detection on the custom dataset?”. Could you please provide a pointer?
Thanking you!
I would suggest you read Deep Learning for Computer Vision with Python — that book will teach you how to train a SSD object detector on your own custom dataset.
Thank you!
After the object is detected, the class and percentage are labeled in the frame. The percentage shown in the frame is IoU?
No, the percentage is the probability/confidence of the class label of the object.
Hi Adrian,
Thanks for the wonderful post. I learned a lot from it.
However, can i double check with you whether I have understood the “frameworks” correctly?
For my understanding, the MobileNet, VGG, GoogleLeNet etc. are all some “base framework” and caffe, YOLO, SSDs etc. are so call “object detection framework”. And we are connecting these two frameworks together to get the whole network to achieve the object detection task.
If I understood the above concept correctly, then why don’t we just make one big framework to do the object detection task instead of combining two together?
Thanks
Your understanding is fundamentally correct. We train “backbone networks” or “base networks” on large image datasets first. They are then used inside object detection networks.
Hello Adrian, can we actually find the actual object coordinates like the middle point of the object?
You mean the center (x, y)-coordinates? If so, yes. Take the width and height of the bounding box, divide them by two, then add in the respective starting (x, y)-coordinates of the bounding box. That will give you the center coordinates.
Hi,
where can i find information on which classes the model is trained on?
Lines 20-23 of the code.
Hi,
Thanks for the helpful tutorials. Currently i am working on detecting person sitting in a room using Raspberry Pi 3, i have used IGNORE to ignore the remaining classes other than Person. Even after ignoring “idx = int(detections[0, 0, i, 1])” is returning index value of chair, table etc, is there a way to get only person idx.
Also when person is looking towards camera or standing are detected but if a person is not facing towards camera or sitting on the chair are not detected. Need your support to complete this assignment.
When you loop over the class labels you should check to see if the index exists in your IGNORE set. If so, discard the detection and continue processing the remaining detections.
Hi Adrian,
Good job done. I am very new to this platform and a beginner. I am working on a project to detect surface imperfections of metal objects e.g. barrels/pipes etc. I am wondering if i can use this method presented by you for object detection to detect defects like pitting/ cracks etc? pls comment if its possible and how. your help is greatly needed. regards!
You could, but I would recommend Mask R-CNN instead. That model will give you a pixel-wise mask of the cracks and defects. Training your own custom Mask R-CNN model is covered in Deep Learning for Computer Vision with Python.
Dear Sir,
Thank you for such a informative blog, indeed you triggered my eagerness towards deep learning, computer vision, opencv etc
thank you for that sir.
Sir, I have a doubt, Will the technique mentioned in this blog detect the human toy models in showroom as “human”??
Thank you in advance!!!!
If the human toy looks sufficiently lifelike, then yes, it likely would label the toy as “human”.
thank you sir!! for your reply.
Sir, Kindly suggest me any resource from which I could learn about “mobilenet ssd” from scratch.
As I am new to this field, kindly help me sir!!!
My book, Deep Learning for Computer Vision with Python, covers Single Shot Detectors (SSDs). I suggest you start there.
Thanks Dr Adrian for all your tutorials. But i have a question why the sound in the video disappear after applying the code ???
Thanks you !!!
OpenCV does not support writing audio to a video file. For that I would recommend using moviepy.
Adrian I just wanted to say thank you for taking the time to educate and guide.
Thank you, I appreciate it!
How to replace Tensorflow model in place of caffe model and make it run on it with SSD ?
Hi Adrian, I have read your well written tutorials with interest. However, I was very surprised to see your surname – that we share. As there are not that many of us – I am curious.
You can delete this comment after reading if you wish as it is irrelevant to the context- but i appreciate an email. Cheers
Uwe
Thanks Uwe, I appreciate the comment 🙂