Today is the second post in our three part series on milking every last bit of performance out of your webcam or Raspberry Pi camera.
Last week we discussed how to:
- Increase the FPS rate of our video processing pipeline.
- Reduce the affects of I/O latency on standard USB and built-in webcams using threading.
This week we’ll continue to utilize threads to improve the FPS/latency of the Raspberry Pi using both the picamera
module and a USB webcam.
As we’ll find out, threading can dramatically decrease our I/O latency, thus substantially increasing the FPS processing rate of our pipeline.
Looking for the source code to this post?
Jump Right To The Downloads SectionNote: A big thanks to PyImageSearch reader, Sean McLeod, who commented on last week’s post and mentioned that I needed to make the FPS rate and the I/O latency topic more clear.
Increasing Raspberry Pi FPS with Python and OpenCV
In last week’s blog post we learned that by using a dedicated thread (separate from the main thread) to read frames from our camera sensor, we can dramatically increase the FPS processing rate of our pipeline. This speedup is obtained by (1) reducing I/O latency and (2) ensuring the main thread is never blocked, allowing us to grab the most recent frame read by the camera at any moment in time. Using this multi-threaded approach, our video processing pipeline is never blocked, thus allowing us to increase the overall FPS processing rate of the pipeline.
In fact, I would argue that it’s even more important to use threading on the Raspberry Pi 2 since resources (i.e., processor and RAM) are substantially more constrained than on modern laptops/desktops.
Again, our goal here is to create a separate thread that is dedicated to polling frames from the Raspberry Pi camera module. By doing this, we can increase the FPS rate of our video processing pipeline by 246%!
In fact, this functionality is already implemented inside the imutils package. To install imutils
on your system, just use pip
:
$ pip install imutils
If you already have imutils
installed, you can upgrade to the latest version using this command:
$ pip install --upgrade imutils
We’ll be reviewing the source code to the video
sub-package of imutils
to obtain a better understanding of what’s going on under the hood.
To handle reading threaded frames from the Raspberry Pi camera module, let’s define a Python class named PiVideoStream
:
# import the necessary packages from picamera.array import PiRGBArray from picamera import PiCamera from threading import Thread import cv2 class PiVideoStream: def __init__(self, resolution=(320, 240), framerate=32): # initialize the camera and stream self.camera = PiCamera() self.camera.resolution = resolution self.camera.framerate = framerate self.rawCapture = PiRGBArray(self.camera, size=resolution) self.stream = self.camera.capture_continuous(self.rawCapture, format="bgr", use_video_port=True) # initialize the frame and the variable used to indicate # if the thread should be stopped self.frame = None self.stopped = False
Lines 2-5 handle importing our necessary packages. We’ll import both PiCamera
and PiRGBArray
to access the Raspberry Pi camera module. If you do not have the picamera Python module already installed (or have never worked with it before), I would suggest reading this post on accessing the Raspberry Pi camera for a gentle introduction to the topic.
On Line 8 we define the constructor to the PiVideoStream
class. We’ll can optionally supply two parameters here, (1) the resolution
of the frames being read from the camera stream and (2) the desired frame rate of the camera module. We’ll default these values to (320, 240)
and 32
, respectively.
Finally, Line 19 initializes the latest frame
read from the video stream and an boolean variable used to indicate if the frame reading process should be stopped.
Next up, let’s look at how we can read frames from the Raspberry Pi camera module in a threaded manner:
def start(self): # start the thread to read frames from the video stream Thread(target=self.update, args=()).start() return self def update(self): # keep looping infinitely until the thread is stopped for f in self.stream: # grab the frame from the stream and clear the stream in # preparation for the next frame self.frame = f.array self.rawCapture.truncate(0) # if the thread indicator variable is set, stop the thread # and resource camera resources if self.stopped: self.stream.close() self.rawCapture.close() self.camera.close() return
Lines 22-25 define the start
method which is simply used to spawn a thread that calls the update
method.
The update
method (Lines 27-41) continuously polls the Raspberry Pi camera module, grabs the most recent frame from the video stream, and stores it in the frame
variable. Again, it’s important to note that this thread is separate from our main Python script.
Finally, if we need to stop the thread, Lines 38-40 handle releasing any camera resources.
Note: If you are unfamiliar with using the Raspberry Pi camera and the picamera
module, I highly suggest that you read this tutorial before continuing.
Finally, let’s define two more methods used in the PiVideoStream
class:
def read(self): # return the frame most recently read return self.frame def stop(self): # indicate that the thread should be stopped self.stopped = True
The read
method simply returns the most recently read frame from the camera sensor to the calling function. The stop
method sets the stopped
boolean to indicate that the camera resources should be cleaned up and the camera polling thread stopped.
Now that the PiVideoStream
class is defined, let’s create the picamera_fps_demo.py
driver script:
# import the necessary packages from __future__ import print_function from imutils.video.pivideostream import PiVideoStream from imutils.video import FPS from picamera.array import PiRGBArray from picamera import PiCamera import argparse import imutils import time import cv2 # construct the argument parse and parse the arguments ap = argparse.ArgumentParser() ap.add_argument("-n", "--num-frames", type=int, default=100, help="# of frames to loop over for FPS test") ap.add_argument("-d", "--display", type=int, default=-1, help="Whether or not frames should be displayed") args = vars(ap.parse_args()) # initialize the camera and stream camera = PiCamera() camera.resolution = (320, 240) camera.framerate = 32 rawCapture = PiRGBArray(camera, size=(320, 240)) stream = camera.capture_continuous(rawCapture, format="bgr", use_video_port=True)
Lines 2-10 handle importing our necessary packages. We’ll import the FPS
class from last week so we can approximate the FPS rate of our video processing pipeline.
From there, Lines 13-18 handle parsing our command line arguments. We only need two optional switches here, --num-frames
, which is the number of frames we’ll use to approximate the FPS of our pipeline, followed by --display
, which is used to indicate if the frame read from our Raspberry Pi camera should be displayed to our screen or not.
Finally, Lines 21-26 handle initializing the Raspberry Pi camera stream — see this post for more information.
Now we are ready to obtain results for a non-threaded approach:
# allow the camera to warmup and start the FPS counter print("[INFO] sampling frames from `picamera` module...") time.sleep(2.0) fps = FPS().start() # loop over some frames for (i, f) in enumerate(stream): # grab the frame from the stream and resize it to have a maximum # width of 400 pixels frame = f.array frame = imutils.resize(frame, width=400) # check to see if the frame should be displayed to our screen if args["display"] > 0: cv2.imshow("Frame", frame) key = cv2.waitKey(1) & 0xFF # clear the stream in preparation for the next frame and update # the FPS counter rawCapture.truncate(0) fps.update() # check to see if the desired number of frames have been reached if i == args["num_frames"]: break # stop the timer and display FPS information fps.stop() print("[INFO] elasped time: {:.2f}".format(fps.elapsed())) print("[INFO] approx. FPS: {:.2f}".format(fps.fps())) # do a bit of cleanup cv2.destroyAllWindows() stream.close() rawCapture.close() camera.close()
Line 31 starts the FPS counter, allowing us to approximate the number of frames our pipeline can process in a single second.
We then start looping over frames read from the Raspberry Pi camera module on Line 34.
Lines 41-43 make a check to see if the frame
should be displayed to our screen or not while Line 48 updates the FPS counter.
Finally, Lines 61-63 handle releasing any camera sources.
The code for accessing the Raspberry Pi camera in a threaded manner follows below:
# created a *threaded *video stream, allow the camera sensor to warmup, # and start the FPS counter print("[INFO] sampling THREADED frames from `picamera` module...") vs = PiVideoStream().start() time.sleep(2.0) fps = FPS().start() # loop over some frames...this time using the threaded stream while fps._numFrames < args["num_frames"]: # grab the frame from the threaded video stream and resize it # to have a maximum width of 400 pixels frame = vs.read() frame = imutils.resize(frame, width=400) # check to see if the frame should be displayed to our screen if args["display"] > 0: cv2.imshow("Frame", frame) key = cv2.waitKey(1) & 0xFF # update the FPS counter fps.update() # stop the timer and display FPS information fps.stop() print("[INFO] elasped time: {:.2f}".format(fps.elapsed())) print("[INFO] approx. FPS: {:.2f}".format(fps.fps())) # do a bit of cleanup cv2.destroyAllWindows() vs.stop()
This code is very similar to the code block above, only this time we initialize and start the threaded PiVideoStream
class on Line 68.
We then loop over the same number of frames as with the non-threaded approach, update the FPS counter, and finally print our results to the terminal on Lines 89 and 90.
Raspberry Pi FPS Threading Results
In this section we will review the results of using threading to increase the FPS processing rate of our pipeline by reducing the affects of I/O latency.
The results for this post were gathered on a Raspberry Pi 2:
- Using the
picamera
module. - And a Logitech C920 camera (which is plug-and-play capable with the Raspberry Pi).
I also gathered results using the Raspberry Pi Zero. Since the Pi Zero does not have a CSI port (and thus cannot use the Raspberry Pi camera module), timings were only gathered for the Logitech USB camera.
I used the following command to gather results for the picamera
module on the Raspberry Pi 2:
$ python picamera_fps_demo.py
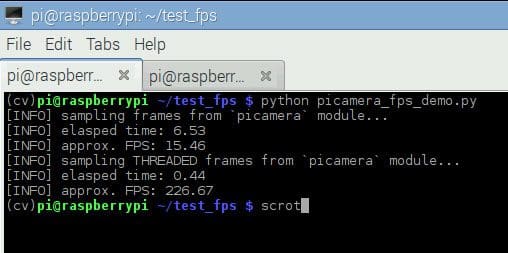
As we can see from the screenshot above, using no threading obtained 15.46 FPS.
However, by using threading, our FPS rose to 226.67, an increase of over 1,366%!
But before we get too excited, keep in mind this is not a true representation of the FPS of the Raspberry Pi camera module — we are certainly not reading a total of 226 frames from the camera module per second. Instead, this speedup simply demonstrates that our for
loop pipeline is able to process 226 frames per second.
This increase in FPS processing rate comes from decreased I/O latency. By placing the I/O in a separate thread, our main thread runs extremely fast — faster than the I/O thread is capable of polling frames from the camera, in fact. This implies that we are actually processing the same frame multiple times.
Again, what we are actually measuring is the number of frames our video processing pipeline can process in a single second, regardless if the frames are “new” frames returned from the camera sensor or not.
Using the current threaded scheme, we can process approximately 226.67 FPS using our trivial pipeline. This FPS number will go down as our video processing pipeline becomes more complex.
To demonstrate this, let’s insert a cv2.imshow
call and display each of the frames read from the camera sensor to our screen. The cv2.imshow
function is another form of I/O, only now we are both reading a frame from the stream and then writing the frame to our display:
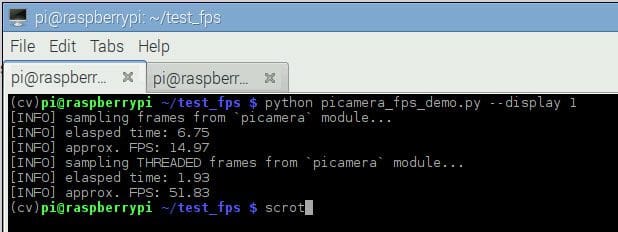
$ python picamera_fps_demo.py --display 1
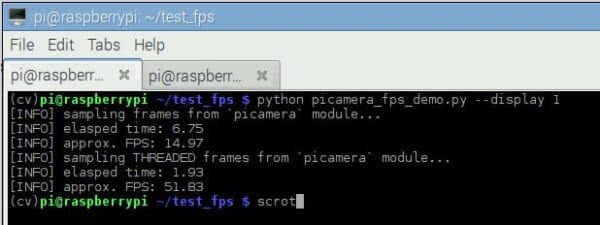
Using no threading, we reached only 14.97 FPS.
But by placing the frame I/O into a separate thread, we reached 51.83 FPS, an improvement of 246%!
It’s also worth noting that the Raspberry Pi camera module itself can reportedly get up to 90 FPS.
To summarize the results, by placing the blocking I/O call in our main thread, we only obtained a very low 14.97 FPS. But by moving the I/O to an entirely separate thread our FPS processing rate has increased (by decreasing the affects of I/O latency), bringing up the FPS rate to an estimated 51.83.
Simply put: When you are developing Python scripts on the Raspberry Pi 2 using the picamera
module, move your frame reading to a separate thread to speedup your video processing pipeline.
As a matter of completeness, I’ve also ran the same experiments from last week using the fps_demo.py
script (see last week’s post for a review of the code) to gather FPS results from a USB camera on the Raspberry Pi 2:
$ python fps_demo.py --display 1
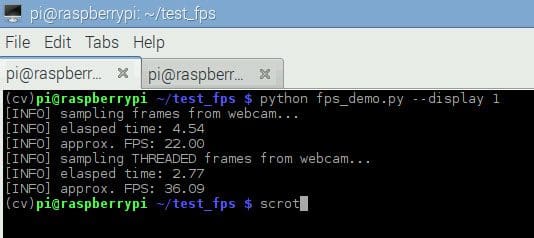
With no threading, our pipeline obtained 22 FPS. But by introducing threading, we reached 36.09 FPS — an improvement of 64%!
Finally, I also ran the fps_demo.py
script on the Raspberry Pi Zero as well:
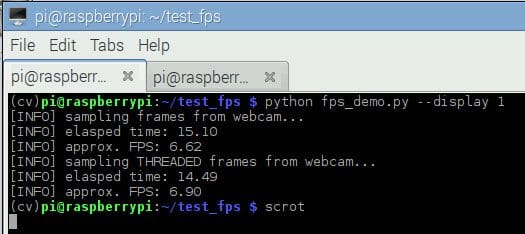
With no threading, we hit 6.62 FPS. And with threading, we only marginally improved to 6.90 FPS, an increase of only 4%.
The reason for the small performance gain is simply because the Raspberry Pi Zero processor has only one core and one thread, thus the same thread of execution must be shared for all processes running on the system at even given time.
Given the quad-core processor of the Raspberry Pi 2, it’s suffice to say the Pi 2 should be used for video processing.
What's next? We recommend PyImageSearch University.
86 total classes • 115+ hours of on-demand code walkthrough videos • Last updated: October 2024
★★★★★ 4.84 (128 Ratings) • 16,000+ Students Enrolled
I strongly believe that if you had the right teacher you could master computer vision and deep learning.
Do you think learning computer vision and deep learning has to be time-consuming, overwhelming, and complicated? Or has to involve complex mathematics and equations? Or requires a degree in computer science?
That’s not the case.
All you need to master computer vision and deep learning is for someone to explain things to you in simple, intuitive terms. And that’s exactly what I do. My mission is to change education and how complex Artificial Intelligence topics are taught.
If you're serious about learning computer vision, your next stop should be PyImageSearch University, the most comprehensive computer vision, deep learning, and OpenCV course online today. Here you’ll learn how to successfully and confidently apply computer vision to your work, research, and projects. Join me in computer vision mastery.
Inside PyImageSearch University you'll find:
- ✓ 86 courses on essential computer vision, deep learning, and OpenCV topics
- ✓ 86 Certificates of Completion
- ✓ 115+ hours of on-demand video
- ✓ Brand new courses released regularly, ensuring you can keep up with state-of-the-art techniques
- ✓ Pre-configured Jupyter Notebooks in Google Colab
- ✓ Run all code examples in your web browser — works on Windows, macOS, and Linux (no dev environment configuration required!)
- ✓ Access to centralized code repos for all 540+ tutorials on PyImageSearch
- ✓ Easy one-click downloads for code, datasets, pre-trained models, etc.
- ✓ Access on mobile, laptop, desktop, etc.
Summary
In this post we learned how threading can be used to increase our FPS processing rate and reduce the affects of I/O latency on the Raspberry Pi.
Using threading allowed us to increase our video processing rate by a nice 246%; however, its important to note that as the processing pipeline becomes more complex, the FPS processing rate will go down as well.
In next week’s post, we’ll create a Python class that incorporates last week’s WebcamVideoStream
and today’s PiVideoStream
into a single class, allowing new video processing blog posts on PyImageSearch to run on either a USB camera or a Raspberry Pi camera module without changing a single line of code!
Sign up for the PyImageSearch newsletter using the form below to be notified when the post goes live.
Download the Source Code and FREE 17-page Resource Guide
Enter your email address below to get a .zip of the code and a FREE 17-page Resource Guide on Computer Vision, OpenCV, and Deep Learning. Inside you'll find my hand-picked tutorials, books, courses, and libraries to help you master CV and DL!
Tony Waite
Great post!
The code ran ‘straight out of the box’ for me, albeit I had to run it from the ‘standard’ prompt rather than the ‘cv2’ wrapper.
Your tutorials are fantastically helpful!
Do you have any plans to incorporate a QR reader?
Adrian Rosebrock
Thanks Tony! At the present time I don’t have any plans to do any tutorials for a QR reader, although that’s something I would like to explore in the future. In the meantime, you should take a look at the zbar library.
Rudolph
Hi Adrian,
I absolutely love your blogs. I like your more recent posts that shows how To more efficiently use Python. Or use Python in a better way to complement the use of CV. Also dome of the the things you do i. Your example code it very applicable to not only image processing. But other problem domains as well.
Keep up the good work.
Adrian Rosebrock
Thanks Rudolph! 🙂
Tonyv
Thanks Adrian, again, for all your very informative blogs. It is a great improvement over older blogs that the comments now match actual line numbers; thanks!
So, now I have a problem which I’m unable to fathom:
I’m running my pi2 headless, but with a HDMI display attached, over a ssh -X link. I can see the camera from this blog image on my monitor, which is in itself a miracle!
However, presumably because of the ssh latency , I’m only getting:
#####
tony@pibot0:~/work/picamera$ python picamera_fps_demo.py –display 1
[INFO] sampling frames from `picamera` module…
[INFO] elasped time: 6.97
[INFO] approx. FPS: 14.48
[INFO] sampling THREADED frames from `picamera` module…
[INFO] elasped time: 4.22
[INFO] approx. FPS: 23.72
#####
A significant improvement, on which I’d like to do some further investigation, but for now I’d like the camera image displayed on the HDMI screen as well as the monitor. I can’t seem to figure out how to make that happen.
Can you help, please?
PS, the typo “elasped time” comes straight from your code 🙂
Adrian Rosebrock
You are correct, the X11 forwarding is what is causing the slow down.
As for your question, I’m not sure I understand. You want to display an image on your HDMI screen (that is physically connected to your Pi) along with the same image to the system you are using to SSH into the Pi?
Unfortunately, I don’t think that’s an easy thing to do. You’ll likely need to create a producer/consumer setup where your first Python script reads frames from the camera device (i.e., the producers) and then other Python scripts (i.e., consumers) are able to take the frame and display it.
tonyv
Thanks for your prompt reply, Adrian.
Perhaps I’m envisaging too many steps at a time. I guess initially I’m really wanting to display the image on the attached HDMI display, instead of the X11 display.
I then want to do some processing, such as shape recognition, as per your other tutorials, and display the results on the remote monitor.
I had envisaged perhaps running a third thread, which extracts the current (or last) frame from the real-time HDMI display, and sends that over the X11 link, while allowing the data acquisition and processing to continue at full speed.
Does that make sense?
Adrian Rosebrock
That does indeed make sense. In either case, I think the best way to accomplish this is with a messaging passing library such as RabbitMQ or pyzmq.
Christoph Viehoff
Got the code and that wasn’t it. Also found all the files from imutils in directory
/home/pi/.virtualenvs/cv3/lib/python3.2/site-packages/imutils/video/
fps.py
is thereplus the
__init__.py
file:Not sure where else to look
Adrian Rosebrock
Hey Christoph — make sure you have downloaded and installed the latest version of
imutils
:$ pip install --upgrade imutils --no-cache-dir
This will ensure that the latest version is installed and that a cached version is not used.
You can also find the imutils code on GitHub.
Christoph Viehoff
Did this but it is already installed
Adrian Rosebrock
Can you list the contents of the
site-packages
directory of yourcv3
virtual environment?$ ls -l ~/.virtualenvs/cv/lib/python2.7/site-packages
And see which version of
imutils
is installed? It should be v0.3.3.Nick
Adrian, I’m curious. I’m running this threading exercise with some boilerplate image processing (for motion) from earlier on in your posts and am only seeing rather marginal improvements on the RPi2. From PiCamera module without threading, I see ~10FPS and with threading I’m getting ~14FPS. Is this likely due to imshow?
What I’m really curious about is piping this to a website of sorts so it can actually be apart of a responsive security system.
Thanks, and I’ve probably spent about 10hrs on your website over the past week learning all this! Super intuitive the way you write it up, and I can’t thank you enough for commenting all your code, as a self-taught developer, the comments and tutorials you provide are invaluable.
Adrian Rosebrock
Is your boilerplate pipeline doing anything other than calling
cv2.imshow
? It’s important to keep in mind that the more processing you do inside the loop, the longer each loop will take, and thus your overall FPS processing rate will drop.If you are doing more than just using
cv2.imshow
, I would remove it and then re-run your script. You should see another improvement.And thanks for the kind words regarding the blog, I’m happy you have found it so useful! 🙂
foxmjay
I struggled for long time to get opencv compiled on the RPI to use it with RaspiCam c++ library and got around 24FPS which is quiet good . and now you are showing we can get over 50FPS ! with simple threading and with my favorite programming language :d , this is amazing . Thanks a lot for sharing it with us .
Ben
Nice post. I like how you do different experiments with the Raspberry Pi and the camera. It reminds me of the time when I was playing with Opencv and the model B a few years ago. One thing I don’t understand is that how were you only getting around 15 FPS without doing multithreading? The only processing you were doing was resizing on 320*240 frames. In part one you were using a 1080P webcam and you could get around 30 FPS with the opencv library. Is picamera library extremely slow or am I missing something important? Because when I was doing heavy processing (resizing ,filtering,greyscale,flip,face detection,…) on similar sized frames with the model B I could achieve around 10FPS. I just ordered a Raspberry Pi2 so I was expecting better performance.
Adrian Rosebrock
The picamera library is implemented in Python, so yes, it can be a bit slower than
cv2.VideoCapture
which is implemented in C++ — and then Python binaries supplied. But also keep in mind that the Pi 2 only has a 900mhz processor. Yes, it’s quadcore and multi-threaded, but until you write code to actually take advantage of multiple threads, you won’t be able to utilize the benefits of the processor. When you run tests like this, you quickly realize how much performance is lost to I/O latency.Damien JARRY
Does this means that we can get better performance with cv2.VideoCapture and a threaded wrapper around it, like PiVideoStream around PiCamera ?
Adrian Rosebrock
Yes, and in fact, that’s already done for you.
Hunt
This blog is wonderful and exactly what I need for my current project. However I noted when running your fps_demo.py as is with the same Logitech c920, I received significantly fewer frames than you show in your screenshot. I’m running a Raspberry Pi 2 and the script is reporting around 9 fps for single threaded and fps 13 for multi-threaded.
I followed your tutorial for setting up OpenCV with Python 2.7, but aside from that don’t have much else on the Pi so far.
Could there be something I’m doing wrong/havent setup that could account for this discrepancy?
Adrian Rosebrock
Hey Hunt, I’m honestly not sure why your numbers do not match mine exactly. Do you know if you have any additional drivers installed, such as V4L2? Also, are you executing your script locally on the Pi or remotely via SSH?
Hunt
I’ve executed it both remotely and locally, with the same results. I do have V4L2 installed and made sure my OpenCV was built with support on. However, running “v4l2-ctl –info” for the camera device info prints:
“Driver Info (not using libv4l2): Driver name: uvcvideo …”
I was under the impression that the uvcvideo driver was dependent on v4l2 (http://unix.stackexchange.com/questions/116904/understanding-webcam-s-linux-device-drivers), but it seems I’ve got a lot of searching to do to see what’s really going on.
Connor
Hi Hunt,
What did you find in regards to the v4l2 problem? I am also having some troubles getting v4l2 to work how I need it to. I would love to hear your feedback
Steve
I tried the raspicam vs VideoCapture method… but notice the frame rate seems slightly better (if not the same) using cv2.VideoCapture on RPi2.
I think I had to ‘sudo modprobe bcm2835-v4l2’ to get that working…
Trish Mapow
Hi, great tutorial! Do you know how I would be able to have one thread that continually displays current frames, and another one that detects faces; so when the detect face script is finished it changes the live frame?
Adrian Rosebrock
That’s absolutely possible, but I don’t have any code for that. I would suggest starting by reading through Practical Python and OpenCV where I discuss how to detect faces in images and video streams. You’ll want to use a separate thread for this code. Then, your main thread can monitor the previous thread and see if any new bounding boxes are returned.
Kai Bergmann
Hi Adrian, thank you for all your great tutorials.
I’ve been playing around with this one for some time and there is something I don’t quite understand.
The read() function simply gives us the last captured frame. There is nothing that prevents it from delivering the same image more than once.
As I can tell you only use this read() funciton in the loop of your fps-test method. It doesn’t measure how many frames from the streams are captured – in an extreme case the same frame could be delivered in every call of read().
In contrast the fps test for the non-threaded approach really captures a frame in every loop execution. The numbers can’t be compared in a meaningful way.
Can you enlighten me? Maybe my understanding of “fps” just differs from yours.
Adrian Rosebrock
Hey Kai, I would suggest giving this post a read, which better explains the context of FPS. We aren’t measuring the true FPS of the physical camera sensor; instead, we are measuring the Frames Per Second processing rate of our video processing pipeline. The numbers can be compared in a meaningful way by measuring the actual throughput of our processing pipeline.
The examples presented in this blog post are quite simple, but in reality, most video processing pipelines are more computationally expensive, so the background thread (i.e., removing a blocking I/O operation) can help speedup the pipeline — that is what the blog post is trying to demonstrate.
José
Hi Adrian, thanks for this awesome post.
I’m learning python, and now I get the camera pi.
I have one question.
In all of my python’s codes I need add:
camera. vflip=True
because my pi camera is inverted.
I try to add these line only in your PiVideoStream in :
(….)
self.camera = PiCamera()
self.camera.resolution = resolution
self.camera.framerate = framerate
self. camera. vflip=True
(….)
When I execute the fps test with display, the image don’t change when the thread start . I don’t know that it’s wrong.
( I’m not english speaker)
Adrian Rosebrock
I personally haven’t tried the
vflip
flag before, so I’m honestly not sure about it. You might want to open up an “Issue” on the official official GitHub for picamera.Also, instead of using
picamera
to perform the image flip, you could use OpenCV instead:frame = cv2.flip(frame, 0)
Erik
Hi,
I modified the pivideostream.py to include the horizontal and vertical flip attributes and they work fine for me. My picamera hangs upside down.
It allows me to select whether i need to flip or not when calling PiVideoStream.
in picamera_fps_demo.py modify
vs = PiVideoStream(vf=True,hf=True).start()
in pivideostream.py add the last two lines
Adrian Rosebrock
Thanks for sharing Erik! And for those who are interested, you can obtain the same affect of flipping the frame via OpenCV and the
cv2.flip
function.Yash
Hi Adrian,
Thanks for the amazing tutorial. I tried implementing as per the tutorial and it works great!
Of late, I was reading about the Global Interpreter Lock that python has and from what I have understood, python threads don’t actually execute in parallel. So, I was wondering how is this code actually managing to get the speed boost? Generally people use multi-processing with overhead message passing but your tutorial deals with multi-threading only.
Is it because the bottleneck over here is the I/O latency and not the CPU processing time, hence though threads are not actually running in parallel, we never have to deal with the latency arising because of I/O?
Adrian Rosebrock
You’re exactly right — the bottleneck here is the I/O latency, not the CPU, so by moving the I/O to a separate thread, our main thread is free to run unblocked, not having to wait for the I/O.
Emil
Will there be a further improvement in the FPS If the multiprocessing module is used in order to run the camera capturing thread on a separate core?
Adrian Rosebrock
In general, no. Threads are used for I/O bound tasks while processes are used for heavy computations.
Sainandan Ramakrishnan
Hey there Adrian!
Absolutely helpful all of your tutorials.
I tried multi-threading on Windows on my Laptop and the improvement is DRASTIC.
But as soon as I try the very same thing on my Raspberry Pi B+(remotely accessed on my laptop via X11 port forwarding), not only do I get significantly slower results, BUT the threaded FPS happens to be even SLOWER than the VideoCapture one!! 🙁
I understand that your multi-threading results were demonstrated on a Pi 2, but can’t it be done on a B+ as well?
Adrian Rosebrock
There are two reasons for this. The first is that the B+ has only a single core while the Pi 2 has four cores, making threading a much more efficient operation. Secondly, X11 forwarding adds yet another level of I/O overhead and will dramatically hurt your performance. Instead of executing your script via X11 either (1) turn off the
cv2.imshow
call by commenting it out or (2) execute your script keyboard + monitor. This will improve the results on the B+.Anders Bering
Hi
I’ve been trying to get a python script up and running with some streaming from my NOiR cam.
And I’ve been succesfull in executing your above script. however what i want was to capture a stream do something with it transcode it to H264 using the pi’s HW acceleration and the send it to a server. But just getting the above code to run with an acceptable FPS is beyond me.
I am of cause trying to capture a stream in 1920×1080. Is this to much to ask for in the python script.
I have this working using the gstream method. and i could use the python script to setup the gstreamer instead, it would just be nice to have it all in the same spot.
Adrian Rosebrock
Realistically, yes, I think capturing 1920×1080 is a bit too much for the simple
picamera
module. If you’re looking to get a reasonable FPS, your frames should be a maximum of 640 x 480 (at least that’s the rule of thumb I use from my experience). As the size of your frames increase, the number of frames per second the pipeline can process will drop dramatically. The larger the image is, the more data there is to process — thus the script starts to run slower.Anders Bering
Ok thank you.
However it is possible for me just to start the picamera streaming and it runs just fine with fin FPS.
but the problem is when i capture the image and pass it to openCv then the drop to about 2 fps with threading and 1.5 fps without.
I am looking for a way to make motion detection, and the start a high res stream to a server.
so maybe capture a low res stream in python and when it detect call gstreamer and send it to my server (i have gstreamer working as it is now. whit capture and H264 encoding)
Adrian Rosebrock
So just to clarify, what resolution are you capturing your frames at? The larger your frames are, the less FPS you’ll be able to process. As an aside, I currently have open GitHub issue with picamera to see if it’s possible to capture multiple stream resolutions at the same time. It can be done using multiple resolutions + files, but I’m not sure if it’s possible to capture the raw stream.
Anders Bering
My plan is to do motion detection and a steam of 320×200 (low res). if it then detects anything the raspi should start sending a stream of 1920x1080p to my server.
It is possible to use gstreamer to split a stream into two with different resolution. this could be used to transmit both a 1920×1080 stream to my server while doing motion detection on a low res stream of 320×200
Adrian Rosebrock
Thanks for the tip on gstreamer, I’ll be sure to give this a try inside of utilizing
picamera
.Max
I am trying to do a similiar project, so iwouød like to ask if you had success with solving the low fps/resolution problem?
Rock
Raspicam is limited with 1080p30fps.
In that case, thread won’t help to break that limitation. Am I right?
Adrian Rosebrock
Correct, you cannot break the limitations of the sensors themselves.
Rock
Thanks for your confirmation. It’s really helpful.
Anders Bering
I’m only achieving bout 2 FPS
Jacob
Hello Adrian
I did some investigation of your code using threaded and stumbled upon a problem I’m not sure you are aware of. The frame rate is actually not improving, it is just the same frame being received multiple times. I implemented a method to check if the frame had actually changed between calls and then got a better estimation of the correct frame rate, which is around 6 fps at 640×480.
Adrian Rosebrock
Thanks for the comment Jacob. As I do a better job explaining in this post, the goal of this series is to increase the FPS processing rate of the pipeline. Or more simply, how many frames our
while
loop can process in a second. The distinction is subtle, but important. That said, I would definitely like to update thePiVideoStream
class to only return a frame when a new one has been polled from the camera.Jindrich
Adrian, than you for all the effort you’re putting in these tutorials. You helped me a lot in my adventures with OpenCV and Raspberry Pi.
For my application I need to process as many frames as possible (who doesn’t?) while avoiding duplicate frames. I stumbled upon the video_threaded.py in OpenCV samples. I adapted the script for Raspberry Pi and I was able to get 16 fps at 320×240 on Raspberry Pi 3.
https://github.com/Itseez/opencv/blob/master/samples/python/video_threaded.py
Do you think this is a good approach to increase fps?
Adrian Rosebrock
If your goal is to read as many (new) frames as possible and then process them, then this is a standard producer/consumer relationship. Your “producer” is the frame reader (single thread) which only grabs new frames and sends them to the consumer. The consumers should be a set of processes that look for new frames in the queue and process them. There are many, many ways to accomplish this in Python, but as long as you use a producer/consumer relationship, you’ll be okay.
khosro
hello Adrian
how can i change raspberry pi camera setting in PiVideoStream class ?
note that i have opencv3.0.0 without virtual env and install imutils whit
sudo pip install imutils
(iwant to change shutter speed of camera)
regards
Adrian Rosebrock
You’ll need to modify the
imutils
directly. I would suggest downloading the code directly and then modifying thePiVideoStream class to your liking.
Brian
When you define a Python class named PiVideoStream, where and how is it saved? Is it saved as a separate file in the same folder as picamera_fps_demo.py? Does it have an extension? I noticed this file wasn’t included in the downloads so I wasn’t sure.
I’m asking because I’ve run into the following error:
“No module named video.pivideostream”
Thanks!
Adrian Rosebrock
The reason the
pivideostream.py
file wasn’t included in the download of the code is because it’s already online and part of the imutils Python package. Make sure you installimutils
(or upgrade to the latest version) before running the code in this blog post.Simeon
Hi Adrian. I’m getting a similar error but imutils is installed and upgraded:
‘No module named imutils.video.pivideostream’
I’m in the python virtual env while executing the code (I’ve ensured that imutils is installed in the env)
Any idea what I’m not doing or doing wrong?
Thanks.
Adrian Rosebrock
To start, I would verify that you have correctly upgraded and installed imutils into the Python virtual environment:
Alex
Thanks for the tutorial! I followed on a pi zero with the official pi camera and thought someone might be interested in how well performs.
With display:
Not threaded – 9.16 sec = 11.03 fps
Threaded – 6.19 sec = 16.16 fps
Without display:
Not threaded – 5.16 sec = 19.59 fps
Threaded – 3.04 = 32.86 fps
Adrian Rosebrock
Thanks for sharing Alex! Although in general, I don’t really recommend the Pi Zero for video processing since it has only one core (while the Pi 2 and Pi 3 have four cores).
Chris Willing
Could I suggest a small change to the the fps function in FPS modules? If ‘self._end = datetime.datetime.now()’ is added immediately before ‘return self._numFrames / self.elapsed()’, then the fps function may be used anywhere in a pipeline (provided _start has been set). For instance, I added a call to fps at the end of the timestamp overlay in the video window so I can see the frame rate ‘live’.
Yadullah Abidi
Hi Adrian!
I was wondering how do I implement this code in my python script for image processing?
Adrian Rosebrock
This code is already implemented in the imutils library. Just install imutils and you’ll be able to use it!
Hytham
i used the code but it doesnt show the stream cv2.imshow(“Frame”, frame)
please help me
Adrian Rosebrock
It sounds like your Raspberry Pi is having trouble accessing your video stream. Double check that you can access your Raspberry Pi camera module. I would suggest starting with this post.
Jon Lee
Awesome tutorial! Do you know how to get this same boost in fps with CSI cameras?
I should’ve specified that I am using a rpi 3 and if that would change anything.
Adrian Rosebrock
So you’re using the standard Raspberry Pi camera module? That shouldn’t change anything at all. You’ll still get an increase with threading.
Adam Smith
This is an amazingly helpful post. Thank you Adrian!
I removed the line “frame = imutils.resize(frame, width=400)” from my threaded process, making the window go to the default 320×240 buffer size instead. I was able to achieve over 350fps from my threaded process on my Raspberry Pi 3 after doing that!
I currently get around 100fps while using multiple threads, even after applying transformations like gaussian blur, grayscale, thresholding and blob detection to each frame. A 10x increase fom the 10fps I was getting before. Thanks again!
Adrian Rosebrock
No problem Adam, happy I could help! Just keep in mind that the 350 FPS is the number of frames per second that you can theoretically process using your loop. This code measures the actual throughput processing rate of the video pipeline. As you add more steps to your pipeline, this will start to decrease.
Charles
Hi Adrain, when you use the pi camera, you set the frame rate to 32 in this line: def __init__(self, resolution=(320, 240), framerate=32) , what does 32 mean here? Is it the ‘true’ frame rate of the pi camera? If my frame rate is 128 after applying the multiple threading, does it mean that each image sent from pi camera will be processed 3 times in the loop?
Adrian Rosebrock
Yes, that is the intended, “true” rate of the camera. The 128 implies that you can feed a total of 128 frames per second through your video processing pipeline. Whether or not your camera is physically capable of reading 128 frames per second is dependent on the actual hardware of the camera.
Islam
Thanks for the tutorial! I followed on Raspberry Pi2 using pi camera and USB Camera
Picamera
With display:
Not threaded – 9.52 sec = 10.61 fps
Threaded – 2.69 sec = 37.12 fps
Without display:
Not threaded – 4.35 sec = 23.23 fps
Threaded – 0.91 = 110.08 fps
USB Webcam
With display:
Not threaded – 8.42 sec = 11.96 fps
Threaded – 5.91 sec = 16.93 fps
Without display:
Not threaded – 6.85 sec = 14.61 fps
Threaded – 3.65 = 27.37 fps
I found very perfect performance for Pi Camera vs Web Cam A4TECH model:PX-835MU
Lahiru Jayakody
Your comparison really important
Peni
Dear Adrian,
I need to edit the resolution, currently the class PiVideoStream is using 320 x 240 pixels, I need to change this.
Adrian Rosebrock
Just change Line 68 to include the
resolution
parameter:vs = PiVideoStream(resolution=(640, 480).start()
Matt
Hi Adrian,
Thanks for the great tutorial! Similar question to the above on changing the frame resolution:
If I want to change the camera.awb_gains or camera.contrast of the threaded stream, do I just add it in the PiVideoStream() call? For example vs = PiVideoStream(contrast=40).start()
Thanks,
Matt
Matt
Sorry, one quick additional question. Is it possible to change the resolution to a different aspect ratio than 320×240? I seem to be having trouble with 16:9 video where the frame gets all scrambled.
Thanks again!
Matt
Adrian Rosebrock
The PiVideoStream class abstracts away the internal picamera object. I would suggest modifying the class to (1) adjust the resolution from within the constructor or (2) accept a pre-configured
PiCamera
object. I hope that helps!Matt
Yep, I think that makes sense! My python is….not good 🙂 but I’ll see what I can manage. Thanks!
amrosik
What if the processing pipeline is so complex, that the image processing itself is slower than the framerate the picamera is potentially delivering? Am I right in saying that this threading method only makes sense, if the processing pipeline is not too complex? For example, if the processing pipeline is a hough transform, which costs tremendous amount of cpu time.
If I get you right, then in this case we should put the processing and the image aquisition into one single thread, and execute them in serial. Because otherwise, in the threaded approach, the cpu would spend time streaming frames, which are not going to be processed anyways, since the processing loop hasnt finnished yet.
amrosik
In my current houghcircles application your threaded approach gives much better results (thanks by the way). Maybe houghcircles is not costly enough?
I wonder if you can get even better results by not only threadening the stream, but actually making a seperate process out of it, by using multiprocessing library?
Adrian Rosebrock
It is actually extremely likely that at some point your image processing pipeline will not run in real-time, or you run into a roadblock where you need to optimize the living heck out of the application.
Does that mean that threading is actually a waste of time?
Actually, quite the opposite.
Keep in mind that reading the frames from our video stream is a blocking I/O operation. This would actually slow down our video processing pipeline even further since we would need to wait for the next frame to be read. By using threading, we can always grab the most recently read frame from the stream without having to wait for it.
farbod
Hello Adrian, how can I show up python code properly in a comment, like you do in your blog posts?
I disoverd a really bad thing:
My image processing loop is able to process 10 frames (each 720×720 ) per second, so each loops takes about 0.1s. Setting up the PiVideoStream instance with a framerate of 40, and a resolution of 720×720 should be more than enough. Theoretically a framerate of 10 fps would give the same outcome.
What I discoverd is, that apparently the REAL framerate of the camera is lower than 10! So I am grabbing and processing the same frame multiple times. Changing the framerate parameter of PiVideoStream doesn’t make a namable difference.
And another discovery:
by introducing the option camera.sensor_mode into the PiVideoStream class one is able to set the camera mode to 7, for example, (see here: http://picamera.readthedocs.io/en/release-1.12/fov.html), which ensures a minimum fps of 40 at a resolution of 640×480.
After specifying the sensor mode to 7, my image processing has apparently been getting slower!
Before that, it took 0.1s to process one 720×720 frame. Now with the sensor_mode specified it takes 3 times longer to go through one loop. What the F*? This all makes no sense to me. I really need your help.
The PiVideoStream class established the camera.capture_continuous method.
Is it possible to use instead the camera.capture_sequence method? According to the picamera docs the latter is faster. But I dont know how to make a threaded stream out of it.
Adrian Rosebrock
Without having physical access to your camera, it’s really hard to diagnose what the exact issue might be. It may be unlikely, but it’s certainly possible that you might have a faulty Raspberry Pi camera module. I would suggest using the
raspivid
tool to capture videos directly to file and monitor the FPS there as well. Secondly, I would suggest posting on the picamera GitHub Issues to see if there are any known problems as well.amrosik
I noticed that the real framerate is much lower than specified, even slower than the processing(which is 10 processing loops per second). how is that possible?
Since I dont know, how to insert code blocks into this comment, I posted the full question + code on raspberry.stackexchange, see here: http://raspberrypi.stackexchange.com/questions/54886/picams-real-framerate-is-too-slow-camera-modes-are-strange
Adrian Rosebrock
Can you elaborate on what you mean by the “real framerate”? Are you talking about the limitations of the physical camera sensor?
Roger Costandi
Hi Adrian,
I thought I could share the results of running the test program on a Raspberry Pi 3 (Raspbian GNU/Linux 8 (jessie)) :
Adrian Rosebrock
Thanks for sharing the results Roger, it’s much appreciated!
Kirill
Adrian, thank you for this post. It inspired me to move my cv project to raspberry + picamera and result are very promising. However, placing data analysing code inside main thread drops FPS back down. As discussed before, multiprocessing could be a key to this problem. I could not find information regarding multiprocessing in your other posts. For raspberry it turns out to be very important issue to keep maximum FPS. Some basic example of using multiprocessing in your code would be very useful. Hope I am not asking too much.
Adrian Rosebrock
Thank you for the suggestion Kirill. I will certainly consider doing more advanced and optimized posts directly for the Raspberry Pi in the future.
Dylan B
Adrian, I am a newbie to python and raspberry pi, please help! I am running a simple open cv2 program(with picam) to draw a rectangle around a face. It is a little choppy and I want to use your imutils package to solve the issue.
However I don’t understand how to use the downloaded imutils package files. Can you post a clear step by step process of threading the pi. The blog just seems to explain each part of the program but I want to know how to use threading in a program.
What file of the imutils package do I use? How do a interface the imutils package with my code?
Thanks!
Adrian Rosebrock
Hey Dylan — you would normally let
pip
install theimutils
package for you:$ pip install imutils
If you are new to the world of computer vision, OpenCV, and Python I would really encourage you to read through my book, Practical Python and OpenCV. This book will help you get started with computer vision easily. I also include a downloadable Raspbian .img file that has OpenCV + Python and all other necessary Python packages pre-installed. Be sure to take a look!
Dylan B
Last question, so once I do: $ pip install imutils , Do I just include its directory/package import name (import imutils) on the top of my program? Is it that easy to make it thread? I thought I would need to restructure my current program to make it work as a thread.
Does the recommended book and or Raspbian.img file have threading in it?
Thanks for getting back to me so quickly, I will definitely look into the book for Christmas!
Happy Holidays!
Adrian Rosebrock
Yes, once you run
pip install imutils
you would import it at the top of your Python file just like any other Python package.I don’t know what the code of your old project looks like, but I would suggest using the template I provided here as a starting point for the threading.
And yes, the Raspbian .img file that comes with my book already has
imutils
installed with the threading component.Dylan B
Adrian, when I do: pip install imutils, it wont install, it says “errorno 13 Permission denied”
I think this is why the example code above does not work. Why is is not allowing me access?
Adrian Rosebrock
It sounds like you’re trying to install
imutils
into your system install of Python and not a local install or Python virtual environment. In that case you need sudo permission:$ sudo pip install imutils
afsane
Thank dear????
Ghanendra
Hi Adrian, how to display the FPS on current frame ?
Adrian Rosebrock
I would suggest using the
cv2.putText
function. A good example ofcv2.putText
can be found in this post.Adam
Hey Adrian,
Great tutorial as usual! I very much enjoyed learning that polling from a camera stream is a heavy IO operation that can benefit from multi-threading.
I have a question and I apologize if it’s a duplicate. I Couldn’t find it in the comments thread.
When I do not use the display (-d 1 option) I get a serious improvement (over 1000% as you get). When I do use the display I get very low FPS (somewhere around the 1 or 2 FPS). See below:
Multithreaded- no display:
[INFO] elasped time: 0.09
[INFO] approx. FPS: 1172.77
Multithreaded- display:
[INFO] elasped time: 42.68
[INFO] approx. FPS: 2.34
From other comments I read that the X11 is a serious bottleneck and it makes sense. However, I also noticed that when you use the display you get around 51 FPS. Are there any specific X11 configurations you are using?
p.s
I am using RPi 2
Adrian Rosebrock
Hey Adam — when you use X11 you need to transmit the frame over the network. This is a serious I/O overhead. When I gathered the results for this tutorial I was using a physical display connected to my Pi via a HDMI cable. No specific X11 configurations were used.
Matt
Hi Adrian,
Thanks again for this tutorial! Is it possible to simultaneously record an h264 video file while this stream is providing frames? Do I need to adjust the PiVideoStream class to give it the record attribute?
Thanks,
Matt
Adrian Rosebrock
I don’t think a simultaneous recording + video stream access is directly possible with picamera (although I’ve heard mentions of it in the GitHub Issues), but what you could do is write the frames to file via OpenCV and cv2.VideoWriter.
Oguzhan
Hi Adrian firstly great thanks for your helpful tutorial we are following your amazing blog with excitedly. i have this results with display mode :
[INFO] elasped time: 4.49
[INFO] approx. FPS: 20.22
[INFO] elasped time: 0.79
[INFO] approx. FPS: 126.90
When i run the script i have display just a few second. i want to display screen infinitely how should i modify to code to display infinitely ?
Regards
Adrian Rosebrock
Hey Oguzhan — can you elaborate more on what you mean by “display infinitely”?
Oguzhan
thanks for amazing tutorial! .How can i move the frame for my video processing script ?
Regards
Adrian Rosebrock
What do you mean by “move the frame”?
Gaurav
Hi Adrian,
Thanks for the great blog. I implemented this code in one of my projects on Pi, but the code exits gracefully without any error or crash dump. My processing block includes face detection using haar cascades on a background subtracted frame. I’m not able to understand the root cause of the exit. Can you please share your thoughts?
https://github.com/gmish27/PeoplCpounter
When I execute ‘python main.py’ the code exits as soon as a detection occurs.
Adrian Rosebrock
Hi Gaurav — are you able to process any of the frames in the script? Or does the script exit as soon as you start the Python script?
Anastasios Selalmazidis
Great article Adrian,
there is a typo somewhere, you mention 14.46 FPS for the RPi Zero but on the image we can see that it is 15.46 FPS
Adrian Rosebrock
Thank you for pointing this out Anastasios! I have updated the blog post.
maymuna
hi adrian, i have been following your tutorials for my FYP . i run your code of video streaming on my pi it worked well but when i extend my code for face detection the frame rate becomes very slow because of processing. please guide me with it as i have done upto facial recognition but its too slow.
Adrian Rosebrock
To start, make sure you resize your frame before applying face detection (the less data there is to process, the faster your algorithm will run). Also keep in mind that face detection is a slow process. Every step you add to your frame processing pipeline the slower it will become. For what its’ worth, I cover how to perform face detection + face recognition on the Raspberry Pi inside the PyImageSearch Gurus course.
Rob
What would be the best way to go if I want to process data from 2 cameras (capture 2 cameras using Raspberry Pi multi camera adapter http://www.arducam.com/multi-camera-adapter-module-raspberry-pi/)?
Adrian Rosebrock
Hey Rob — I don’t know about the multi-camera adapter, but you can use this blog post to help you access multiple video streams on your Raspberry Pi.
hishaam
hello adrain,
Thank you for the wonderful tutorial
i had run picamera_fps_demo.py in that their is function cv2.imshow(‘frame’,frame) though having this function i cant see the image(window is not opened)
Adrian Rosebrock
How are you accessing your Raspberry Pi? Via an HDMI monitor? VNC? SSH?
albert
Hi Adrian, i’m using this for an outdoor project but have noticed that my video is very dark. Is there anyway to increase the brightness and detail of dark area’s while still maintaining a fast streaming rate?
Thanks!
Adrian Rosebrock
You can actually adjust the brightness setting of your Raspberry Pi camera. Simply follow the documentation.
albert
Ok cool thanks!
Albert
Hi Adrian, to ask another question. I want to do basic color recognition on a video stream from the pi(with v2.1 camera) but even with multithreading it’s only doing 15ish frames per second(without any processing). I only really need about a 100px horizontal line of the image for my project, to try and speed up the image stream is it possible to just take those pixels(1280×100 from the centre of the screen)?
I thought about inputing that as the image resolution but assumed it would just shrink down the vertical dimensions when what i want is just a small section of the vertical pixels in the middle of the screen without having to crop the image after it’s been read as this would likely not improve the speed. Is this possible or is there anything else you can think of to improve the speed?
Thanks Albert
Adrian Rosebrock
Reading frames at 1280px is likely why your processing pipeline is so slow. Can you reduce the size of your resolution? That will dramatically increase your throughput. And yes, you can process just a specific area of a frame. Just apply basic NumPy array slicing/cropping to extract the region.
albert
Hi Adrian, i could but i would loose the distance, basically i want to be able to recognise an object like a qr code at distance, so reducing the resolution directly affects the range of the device. Is there any way to digitally zoom with the camera(so i can get a high resolution from a certain part of an image(get the range but with less pixels == faster)?
Thanks Albert
Adrian Rosebrock
If you want to “zoom” in on a specific ROI using a lower resolution image you would have to resize the ROI via interpolation. This could lead to the ROI looking interpolated. Because of this, it’s best that you work with the higher resolution image (even though it will be slower).
albert
ok thanks!
Pavel
Amazing post, Adrian!
Can you explain the next problems for picamera for resolution 1296×972 and setting camera FPS=30:
1.1) If camera.startpreview() used I get a good video with high FPS. \
1.2) If I use cv2.imshow() realization (for example your VideoStream class) without any processing FPS dramatically decrease to 10 without multithreading and 14 with multithreading.
Why it is happening? Is cv2.imshow() decrease represenatition FPS?
2) If I use 1296×972 (default resolution) and OpenCV and while capture starting cv2 return message that resolution was rounded to 1296×976 (default resolution). What the reason of that?
Adrian Rosebrock
The
.startpreview
function shows a previous of the video stream. As a compiled binary it runs quite fast. I also believe it’s piping the output of the camera straight to the screen which helps reduce the latency (instead of allowing any processing to take place). As far as OpenCV returning a different resolution, I’m not sure why that is happening.Mary
hello,
Can I use this code with an external camera? I don’t have picamera and I would like to increase the speed of detecting the faces in raspberry pi 3 using an external camera. Is that possible?
Adrian Rosebrock
Yes. Please see this post. This gist is that you swap out the
PiVideoStream
class for theVideoStream
Stanley
Hi Adrian!!!, excellent post!.
Thanks for all your posts, all of them are very very helpful .
I have a Trouble trying to run the PiVideoStream() with the Raspberry Pi Camera Module V2 – 8 Megapixel,1080p resolution = (height = 3264, width = 2448)) in the RPi3, I was able to get the frames from the producer vs.read() but they are just black screen images, this behavior appear from 2 Megapixles resolution = (2048, width = 1536) and up , below this everything is normal. All this is some limitation from the VRAM, RAM or the Threading module???
Adrian Rosebrock
This sounds like a limitation of the Raspberry Pi camera module itself. Which version of the camera are you using?
Stanley
Practically is this https://www.pi-supply.com/product/raspberry-pi-camera-board-v2-1-8mp-1080p/
With the classic cv2.VideoCapture() from opencv running in a separate thread as you teach us before there is not this problem, but with this approach from opencv there is not a automatic gamma correction for darkness and brightness from opencv to the picam, that is why I was trying the way to make work the picamera module for this automatic gammas corrections.
Adrian Rosebrock
I have a post on Gamma Correction that might suite your needs.
justyine
Hi Adrian, thanks for the post!
I’m wondering when you set the resolution to 320×240 and later resize the frame to 400 width, does it somehow affects the resolution? After resizing, the resolution is no longer 320×240?
Adrian Rosebrock
I’m only resizing to better visualize the image on my screen. The resizing does not affect the capture resolution.
Jimmy
Hi Adrian, thanks for the post, it helps a lot.
I was messing around the program and got into a problem I couldn’t solve. When I increased the frame rate of the camera by writing
vs = PiVideoStream(resolution=(320, 240), framerate=60).start()
some corrupted frames started to show up in the stream every now and then, about 1 or 2 frames per second.
Their brightness seems to be wrong, which affects my thresh process.
Streaming video using raspvid doesn’t show the same issue, even when I set the fps to 90.
Do you have any idea why this could happen?
Adrian Rosebrock
That is quite odd. I’m honestly not sure what the problem is there. I would suggest posting on the picamera GitHub as that is the underlying library used to access the Raspberry Pi camera module.
Sagar Jaiswal
I keep getting an error, where it says not enough resources. I’m pretty sure its because of the camera being initialised twice, once in the thread script and once in the normal script? I’ve copied your script exactly still don’t know why its causing an error! Please help!
Adrian Rosebrock
Hey Sagar — what is the exact error that you are getting? Also, make sure you use the “Downloads” section of this blog post to download my code + example instead of copying and pasting it. You may have accidentally introduced an error during the copy and paste.
Hojo
Very helpful guide. It made me realize my current set of code is not optimized. I’m trying to achieve 60fps at 720p the picamera is supposed to be able to perform. Using the picamera module (picamera.start_recording) would allow me to achieve about 20-24 fps.
Is it faster to go with opencv like in your example?
Adrian Rosebrock
Unfortunately OpenCV + picamera is not going to be able to perform the raw 60 FPS that the Raspberry Pi camera module itself is able to perform. There is too much overhead with the additional Python libraries.
welly
hi Adrian,
i copied this code but the error occurred like this:
$ python picamera_fps_demo.py
…
ImportError: No module named imutils.video.pivideostream
what is the solution?
please help!
Adrian Rosebrock
You need to install the “imutils” package:
$ pip install imutils
Justyine
Hi Adrian,
A bit of confusion here. From what I understood, Python multithreading is not allowed to run on multiple cores due to GIL. But from htop command in Raspberry Pi 3, I saw the CPU usage is 110%. Does that mean the main thread and the camera thread are run on 2 different cores?
I read that some I/O tasks would release the GIL allowing them to run in parallel?
Thank you!
Adrian Rosebrock
We specifically create a thread here would should theoretically be associated with the same process and same core. It’s not a forked process or brand new process. I’m not sure why your CPU usage would be that high.
Anderson Madureira
Hello Adrian,
When you say “The read method simply returns the most recently read frame from the camera sensor to the calling function”, means that, if the process pipeline consumes more time than the FPS from the camera, some frames will be skiped?
Thanks
Adrian Rosebrock
Your understanding is correct. The function will always return the most recent frame.
Simon
Hello Adrian!
I see that in therading mode we read the frame:
frame = vs.read()
But i can not understand where and when vs.update() is made?
How can i check if the loop works on the next frameor still the same?
Thanks!
Adrian Rosebrock
The “start” method kicks off the “update” method which will then start an infinite loop. This loop is responsible for reading new frames from the Raspberry Pi camera module. The “read” method will return the most recent frame.
sai
Hi Adrian,
I need to increase fps around 900 using raspberry pi camera is this possible ?.i see your picamera improving fps code if any changes or any line add to that code can be reach 900 fps(>500fps)
Adrian Rosebrock
Over 500 FPS on a Pi? No, not possible.
Steve Gale
Hi Adrian,
It has been a while since I have looked at your blog posts, I am trying this one out on a B2 raspberry PI running stretch. I do not use a virtual environment on the PI.
I have simplified my program to
import imutils
when I run the script the error I get is “No module named imutils” I simplified to this becasue none of the import imutils.video etc work.
sudo pip3 install imutils ( or pip) gives me a message saying it is up to date.
I can see the files in the /usr/local/lib/python3.5/dist-packages folder
If I open up the basic python IDE then I can import imutils and list all the functions etc.
When imutils was installed it used piwheels.
Also, I have read some posts regarding __init__.py not being needed on oython 3.3 and above.
So I am confused as to what is going on. I think it has got to be a python problem of some sort, have you come across this?
cheers
Steve
Steve Gale
As soon as I post a question, 10 minutes later I realise what is going on!
Think I need to type out my problem then wait a day before I ppst!
I had not changed geany to run python3, thought the default was python3 on stretch, do not know where I thought that mind you!
Thatvexplains what was going on, the IDE was running python3, hence imutils was imported, script was running python 2, hence it was not.
Sorry to bother ypu, now on with me face detection on a B2.
PS, I wont be bothering you with any problems there because I am using your previous blog which works!
Adrian Rosebrock
No bother at all Steve and congrats on resolving the issue 🙂
Bharath
Hey Adrian,
Okay, I would like to share my inference from the implementation.
What I observed was, when I fed a pre-recorded video to the pipepline, a video with aprox~700 frames was processed at around aprox ~2 seconds. So, the pipeline achieved a fps of 350 frames.
And when I Implemented the code on a webcam/picam it gave me a value of 100-150 fps, but not really on the display i.e cv2.imshow().
So, the pipeline is capable of achieving the calculated fps theoretically, but limited to the physical capabilities of the nature of the sensor itself i.e A 30 fps camera would give a 30 fps frames feed by implementing this pipeline . But fails to achieve by using just cv2.VideoCapture() since the blocking function(reading and decoding) happening simultaneously which along with the o/p display cv2.imshow() reduces the fps processed.
Please correct me if I’m wrong.
Thanks.
Adrian Rosebrock
Keep in mind that we are not increasing the FPS of the camera itself. There are physical limitations of what the camera can achieve. Instead, what we are doing is increasing the frames per second throughput rate of the pipeline. In that sense, yes, your understanding is correct.
Phil
Hi Adrian, great posts, thanks for sharing. I’m looking to get full resolution from the sensor (3280×2464) I’m not too concerned about having a high frame rate, although the the specs it seems like the sensor should produce 15fps at this resolution. I’ve managed to achieve 1640×1232 with more than acceptable results using your code, but at the 3289×2464 I only get a black frame. I’ve increase the GPU memeory to 254MB but this makes no difference, and there’s no obvious information given on what the issue could be. My goal is to produce a digital zoom camera (smooth and progressive) with the final output resolution at 800×480, and 4:1 zoom ratio, so at the high zoom I’ll be croping the image and at low zoom I’ll be binning the image (on the Pi rather than the camera).
Any ideas would be gratefully recieved.
Many thanks
Adrian Rosebrock
The blank frame makes me think it’s an issue with the “picamera” library itself. I’m not sure off the top of my head what the problem or corresponding solution would be but I would suggest posting the issue on the official picamera GitHub Issues page so the developers can take a look. I’m sorry I couldn’t help more but I hope that at least points you in the right direction.
Mohsen
Hi Adrian, thanks for sharing.
I have a problem. I dont understand why real FPS (without multi threading) is not 90. It is just 15-22. In documents it should be 90 at 640×480 or more if over clocked.
Is there any way to get real 90 or more FPS in python with raspberry 3 and pi camera v2.1?
prabas
Is this work for raspberry pi 3 B+ module
Thank you
Adrian Rosebrock
Yes, it will work on a Raspberry Pi 3B+.
Vaishakh Nambiar
Hi Adrian,
Thanks for the great posts, i use pi-zero to detect faces, but it seems very slow and not accurate or fast, will increasing the fps solve this issue ? please help me.
Adrian Rosebrock
The Pi Zero is very slow in general. I don’t recommend using it for computer vision tasks. Try to use a 3B+ if at all possible.
Denis
Hello Adrian.
Thanks for your guide.
Imutilts library really helps getting more fps but I want it to be an exact stable amount of frames per second.
How can I set exact amount of fps? (something like PiCamera.framerate = 100)
Adrian Rosebrock
I don’t have a method to internally set the frame rate. You would need to create your own PiVideoStream class and then set any appropriate parameters inside the constructor.
Steve
Hello Adrian,
To start with, thanks for the work in your tutorials. They have been extremely helpful in getting to grips with Python, OpenCV on RPi. I have used the threading techniques to increase FPS while capturing and processing a camera image and displaying this as a stream through a Flask app.
Sorry if this next bit is out of context to this blog thread but I couldn’t see anything similar throughout your other tutorials. I’m trying to add an audio element to the video stream and as you are aware OpenCV doesn’t seem to have any audio function. The idea is that a .wav file on the RPi can be played at a specific point in the video stream after a condition is set =True either in the main program or through the RPi GPIO. My initial thought was to somehow mix the audio into the video stream but couldn’t seem to find a method to do do that. I then thought about using socketIO to hold a connection open to the client(browser) just for the audio, and play the file that way but again couldn’t find any worked examples along those lines.
Programming is fairy new to me and I wondered if you had any thoughts on the best way forward or point me in a direction to a resource with examples.
Steve.
Dave
Very interesting post.
I have a rather basic question now that I am seriously thinking of reinitiating training in computer vision(that I have left for some time)
It is regarding the concept of fps (frames per second). I know the theoretical definition and can understand what it means as a spec of a camera.
However, in terms of “Image recognition” what does it mean?
For example, if someone says
“I want this system to recognize obstacle A at 30fps and obstacle B at 15fps”
or
“figure 1 shows the results of recognition at 120fps and at 60fps”.
Is it implying that the recognition algorithm takes 33ms to recognize obstacle A?
If that is the case why would someone set the parameter at 30fps, isn’t faster better?
Or how can someone set his algorithm at precisely 120fps?
In this post, you >measure< the fps, not set it. How can you set it- if possible at all?