In this tutorial, you will learn about adaptive thresholding and how to apply adaptive thresholding using OpenCV and the cv2.adaptiveThreshold function.
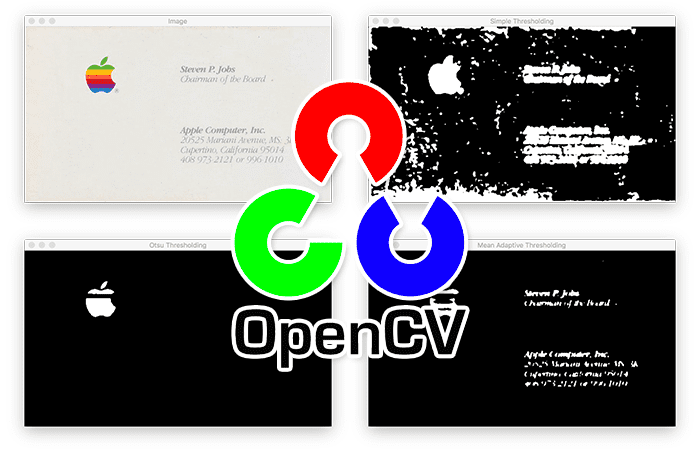
Last week, we learned how to apply both basic thresholding and Otsu thresholding using the cv2.threshold function.
A diverse set of images, particularly those with varying lighting conditions, is crucial for understanding adaptive thresholding. This method helps in segmenting images in different light conditions, and a good dataset enables us to see its efficacy.
Roboflow has free tools for each stage of the computer vision pipeline that will streamline your workflows and supercharge your productivity.
Sign up or Log in to your Roboflow account to access state of the art dataset libaries and revolutionize your computer vision pipeline.
You can start by choosing your own datasets or using our PyimageSearch’s assorted library of useful datasets.
Bring data in any of 40+ formats to Roboflow, train using any state-of-the-art model architectures, deploy across multiple platforms (API, NVIDIA, browser, iOS, etc), and connect to applications or 3rd party tools.
When applying basic thresholding we had to manually supply a threshold value, T, to segment our foreground and our background.
Otsu’s thresholding method can automatically determine the optimal value of T, assuming a bimodal distribution of pixel intensities in our input image.
However, both of these methods are global thresholding techniques, implying that the same value of T is used to test all pixels in the input image, thereby segmenting them into foreground and background.
The problem here is that having just one value of T may not suffice. Due to variations in lighting conditions, shadowing, etc., it may be that one value of T will work for a certain part of the input image but will utterly fail on a different segment.
Instead of immediately throwing our hands and claiming that traditional computer vision and image processing will not work for this problem (and thereby immediately jumping to training a deep neural segmentation network like Mask R-CNN or U-Net), we can instead leverage adaptive thresholding.
As the name suggests, adaptive thresholding considers a small set of neighboring pixels at a time, computes T for that specific local region, and then performs the segmentation.
Depending on your project, leveraging adaptive thresholding can enable you to:
- Obtain better segmentation than using global thresholding methods, such as basic thresholding and Otsu thresholding
- Avoid the time consuming and computationally expensive process of training a dedicated Mask R-CNN or U-Net segmentation network
To learn how to perform adaptive thresholding with OpenCV and the cv2.adaptiveThreshold function, just keep reading.
Adaptive Thresholding with OpenCV ( cv2.adaptiveThreshold )
In the first part of this tutorial, we’ll discuss what adaptive thresholding is, including how adaptive thresholding is different from the “normal” global thresholding methods we’ve discussed so far.
From there we’ll configure our development environment and review our project directory structure.
I’ll then show you how to implement adaptive thresholding using OpenCV and the cv2.adaptiveThreshold function.
We’ll wrap up this tutorial with a discussion of our adaptive thresholding results.
What is adaptive thresholding? And how is adaptive threshold different from “normal” thresholding?
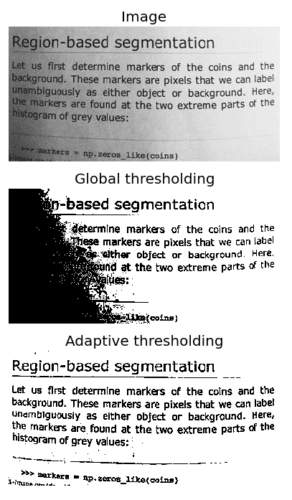
As we discussed earlier in this tutorial, one of the downsides of using simple thresholding methods is that we need to manually supply our threshold value, T. Furthermore, finding a good value of T may require many manual experiments and parameter tunings, which is simply not practical in most situations.
To aid us in automatically determining the value of T, we leveraged Otsu’s method. And while Otsu’s method can save us a lot of time playing the “guess and checking” game, we are left with only a single value of T to threshold the entire image.
For simple images with controlled lighting conditions, this usually isn’t a problem. But for situations when the lighting is non-uniform across the image, having only a single value of T can seriously hurt our thresholding performance.
Simply put, having just one value of T may not suffice.
To overcome this problem, we can use adaptive thresholding, which considers small neighbors of pixels and then finds an optimal threshold value T for each neighbor. This method allows us to handle cases where there may be dramatic ranges of pixel intensities and the optimal value of T may change for different parts of the image.
In adaptive thresholding, sometimes called local thresholding, our goal is to statistically examine the pixel intensity values in the neighborhood of a given pixel, p.
The general assumption that underlies all adaptive and local thresholding methods is that smaller regions of an image are more likely to have approximately uniform illumination. This implies that local regions of an image will have similar lighting, as opposed to the image as a whole, which may have dramatically different lighting for each region.
However, choosing the size of the pixel neighborhood for local thresholding is absolutely crucial.
The neighborhood must be large enough to cover sufficient background and foreground pixels, otherwise the value of T will be more or less irrelevant.
But if we make our neighborhood value too large, then we completely violate the assumption that local regions of an image will have approximately uniform illumination. Again, if we supply a very large neighborhood, then our results will look very similar to global thresholding using the simple thresholding or Otsu’s methods.
In practice, tuning the neighborhood size is (usually) not that hard of a problem. You’ll often find that there is a broad range of neighborhood sizes that provide you with adequate results — it’s not like finding an optimal value of T that could make or break your thresholding output.
Mathematics underlying adaptive thresholding
As I mentioned above, our goal in adaptive thresholding is to statistically examine local regions of our image and determine an optimal value of T for each region — which begs the question: Which statistic do we use to compute the threshold value T for each region?
It is common practice to use either the arithmetic mean or the Gaussian mean of the pixel intensities in each region (other methods do exist, but the arithmetic mean and the Gaussian mean are by far the most popular).
In the arithmetic mean, each pixel in the neighborhood contributes equally to computing T. And in the Gaussian mean, pixel values farther away from the (x, y)-coordinate center of the region contribute less to the overall calculation of T.
The general formula to compute T is thus:
T = mean(IL ) – C
where the mean is either the arithmetic or Gaussian mean, IL is the local sub-region of the image, I, and C is some constant which we can use to fine tune the threshold value T.
If all this sounds confusing, don’t worry, we’ll get hands-on experience using adaptive thresholding later in this tutorial.
Configuring your development environment
To follow this guide, you need to have the OpenCV library installed on your system.
Luckily, OpenCV is pip-installable:
$ pip install opencv-contrib-python
If you need help configuring your development environment for OpenCV, I highly recommend that you read my pip install OpenCV guide — it will have you up and running in a matter of minutes.
Having problems configuring your development environment?

All that said, are you:
- Short on time?
- Learning on your employer’s administratively locked system?
- Wanting to skip the hassle of fighting with the command line, package managers, and virtual environments?
- Ready to run the code right now on your Windows, macOS, or Linux system?
Then join PyImageSearch University today!
Gain access to Jupyter Notebooks for this tutorial and other PyImageSearch guides that are pre-configured to run on Google Colab’s ecosystem right in your web browser! No installation required.
And best of all, these Jupyter Notebooks will run on Windows, macOS, and Linux!
Project structure
Let’s get started by reviewing our project directory structure.
Be sure to access the “Downloads” section of this tutorial to retrieve the source code and example image:
$ tree . --dirsfirst
.
├── adaptive_thresholding.py
└── steve_jobs.png

0 directories, 2 files
We have a single Python script to review today, adaptive_thresholding.py.
We’ll apply this script to our example image, steve_jobs.png, which will show compare and contrast the results of:
- Basic global thresholding
- Otsu global thresholding
- Adaptive thresholding
Let’s get started!
Implementing adaptive thresholding with OpenCV
We are now ready to implement adaptive threshold with OpenCV!
Open the adaptive_thresholding.py file in your project directory and let’s get to work:
# import the necessary packages
import argparse
import cv2

# construct the argument parser and parse the arguments
ap = argparse.ArgumentParser()
ap.add_argument("-i", "--image", type=str, required=True,
	help="path to input image")
args = vars(ap.parse_args())
Lines 2 and 3 import our required Python packages — argparse for command line arguments and cv2 for our OpenCV bindings.
From there we parse our command line arguments. We only need a single argument here, --image, which is the path to the input image that we want to threshold.
Let’s now load our image from disk and preprocess it:
# load the image and display it
image = cv2.imread(args["image"])
cv2.imshow("Image", image)

# convert the image to grayscale and blur it slightly
gray = cv2.cvtColor(image, cv2.COLOR_BGR2GRAY)
blurred = cv2.GaussianBlur(gray, (7, 7), 0)
We start by loading our image from disk and displaying the original image on our screen.
From there we preprocess the image by converting it to grayscale and blurring it with a 7×7 kernel. Applying Gaussian blurring helps remove some of the high frequency edges in the image that we are not concerned with and allow us to obtain a more “clean” segmentation.
Let’s now apply basic thresholding with a hardcoded threshold value T=230:
# apply simple thresholding with a hardcoded threshold value
(T, threshInv) = cv2.threshold(blurred, 230, 255,
	cv2.THRESH_BINARY_INV)
cv2.imshow("Simple Thresholding", threshInv)
cv2.waitKey(0)
Here, we apply basic thresholding and display the result on our screen (you can read last week’s tutorial on OpenCV Thresholding ( cv2.threshold ) if you want more details on how simple thresholding works).
Next, let’s apply Otsu’s thresholding method which automatically computes the optimal value of our threshold parameter, T, assuming a bimodal distribution of pixel intensities:
# apply Otsu's automatic thresholding
(T, threshInv) = cv2.threshold(blurred, 0, 255,
	cv2.THRESH_BINARY_INV | cv2.THRESH_OTSU)
cv2.imshow("Otsu Thresholding", threshInv)
cv2.waitKey(0)
Now, let’s apply adaptive thresholding using the mean threshold method:
# instead of manually specifying the threshold value, we can use
# adaptive thresholding to examine neighborhoods of pixels and
# adaptively threshold each neighborhood
thresh = cv2.adaptiveThreshold(blurred, 255,
	cv2.ADAPTIVE_THRESH_MEAN_C, cv2.THRESH_BINARY_INV, 21, 10)
cv2.imshow("Mean Adaptive Thresholding", thresh)
cv2.waitKey(0)
Lines 34 and 35 apply adaptive thresholding using OpenCV’s cv2.adaptiveThreshold function.
We start by passing in the blurred input image.
The second parameter is the output threshold value, just as in simple thresholding and Otsu’s method.
The third argument is the adaptive thresholding method. Here we supply a value of cv2.ADAPTIVE_THRESH_MEAN_C to indicate that we are using the arithmetic mean of the local pixel neighborhood to compute our threshold value of T.
We could also supply a value of cv2.ADAPTIVE_THRESH_GAUSSIAN_C (which we’ll do next) to indicate we want to use the Gaussian average — which method you choose is entirely dependent on your application and situation, so you’ll want to play around with both methods.
The fourth value to cv2.adaptiveThreshold is the threshold method, again just like the simple thresholding and Otsu thresholding methods. Here we pass in a value of cv2.THRESH_BINARY_INV to indicate that any pixel value that passes the threshold test will have an output value of 0. Otherwise, it will have a value of 255.
The fifth parameter is our pixel neighborhood size. Here you can see that we’ll be computing the mean grayscale pixel intensity value of each 21×21 sub-region in the image to compute our threshold value T.
The final argument to cv2.adaptiveThreshold is the constant C which I mentioned above — this value simply lets us fine tune our threshold value.
There may be situations where the mean value alone is not discriminating enough between the background and foreground — thus by adding or subtracting some value C, we can improve the results of our threshold. Again, the value you use for C is entirely dependent on your application and situation, but this value tends to be fairly easy to tune.
Here, we set C=10.
Finally, the output of mean adaptive thresholding is displayed to our screen.
Let’s now take a look at the Gaussian version of adaptive thresholding:
# perform adaptive thresholding again, this time using a Gaussian
# weighting versus a simple mean to compute our local threshold
# value
thresh = cv2.adaptiveThreshold(blurred, 255,
	cv2.ADAPTIVE_THRESH_GAUSSIAN_C, cv2.THRESH_BINARY_INV, 21, 4)
cv2.imshow("Gaussian Adaptive Thresholding", thresh)
cv2.waitKey(0)
This time we are computing the weighted Gaussian mean over the 21×21 area, which gives larger weight to pixels closer to the center of the window. We then set C=4, a value that we tuned empirically for this example.
Finally, the output of the Gaussian adaptive thresholding is displayed to our screen.
Adaptive thresholding results
Let’s put adaptive thresholding to work!
Be sure to access the “Downloads” section of this tutorial to retrieve the source code and example image.
From there, you can execute the adaptive_thresholding.py script:
$ python adaptive_thresholding.py --image steve_jobs.png
Here, you can see our input image, steve_jobs.png, which is Steve Job’s business card from Apple Computers:

Our goal is to segment the foreground (Apple logo and text) from the background (the rest of the business card).
Using simple thresholding with a preset value of T is able to somewhat perform this segmentation:
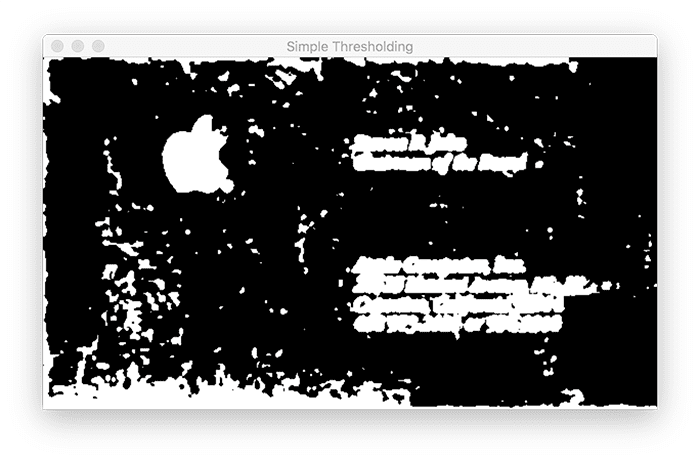
Yes, the Apple logo and text are part of the foreground, but we also have a lot of noise (which is undesirable).
Let’s see what Otsu thresholding can do:
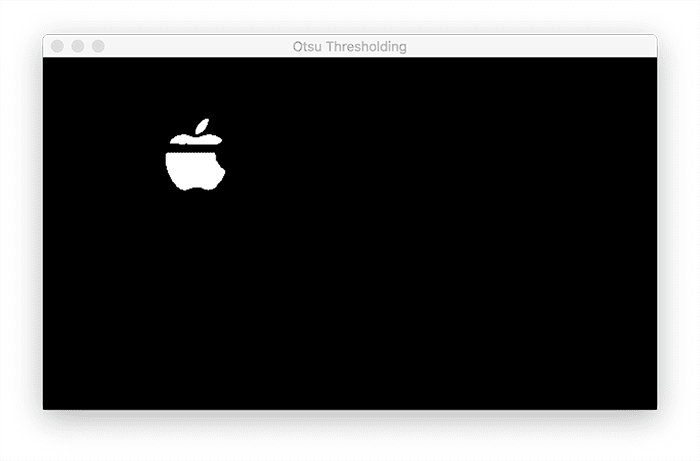
Unfortunately, Otsu’s method fails here. All of the text is lost in the segmentation, as well as part of the Apple logo.
Luckily, we have adaptive thresholding to the rescue:
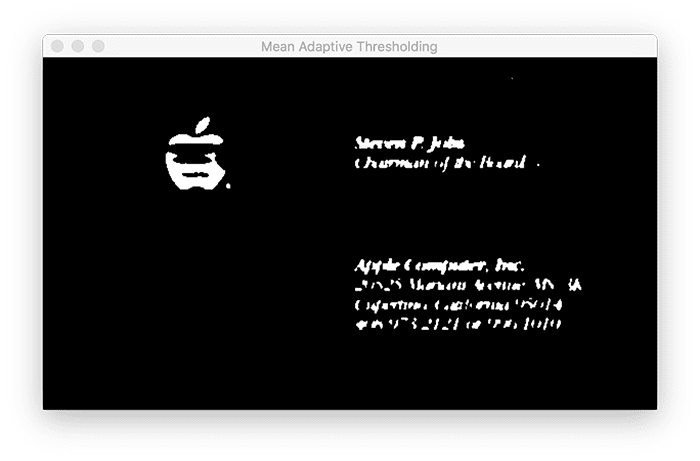
Figure 6 shows the output of mean adaptive thresholding.
By applying adaptive thresholding we can threshold local regions of the input image (rather than using a global value of our threshold parameter, T). Doing so dramatically improves our foreground and segmentation results.
Let’s now look at the output of Gaussian adaptive thresholding:

This method provides arguably the best results. The text is segmented as well as most of the Apple logo. We can then apply morphological operations to clean up the final segmentation.
What's next? We recommend PyImageSearch University.
86+ total classes • 115+ hours hours of on-demand code walkthrough videos • Last updated: July 2025
★★★★★ 4.84 (128 Ratings) • 16,000+ Students Enrolled
I strongly believe that if you had the right teacher you could master computer vision and deep learning.
Do you think learning computer vision and deep learning has to be time-consuming, overwhelming, and complicated? Or has to involve complex mathematics and equations? Or requires a degree in computer science?
That’s not the case.
All you need to master computer vision and deep learning is for someone to explain things to you in simple, intuitive terms. And that’s exactly what I do. My mission is to change education and how complex Artificial Intelligence topics are taught.
If you're serious about learning computer vision, your next stop should be PyImageSearch University, the most comprehensive computer vision, deep learning, and OpenCV course online today. Here you’ll learn how to successfully and confidently apply computer vision to your work, research, and projects. Join me in computer vision mastery.
Inside PyImageSearch University you'll find:
- ✓ 86+ courses on essential computer vision, deep learning, and OpenCV topics
- ✓ 86 Certificates of Completion
- ✓ 115+ hours hours of on-demand video
- ✓ Brand new courses released regularly, ensuring you can keep up with state-of-the-art techniques
- ✓ Pre-configured Jupyter Notebooks in Google Colab
- ✓ Run all code examples in your web browser — works on Windows, macOS, and Linux (no dev environment configuration required!)
- ✓ Access to centralized code repos for all 540+ tutorials on PyImageSearch
- ✓ Easy one-click downloads for code, datasets, pre-trained models, etc.
- ✓ Access on mobile, laptop, desktop, etc.
Summary
In this tutorial, we learned about adaptive thresholding and OpenCV’s cv2.adaptiveThresholding function.
Unlike basic thresholding and Otsu thresholding, which are global thresholding methods, adaptive thresholding instead thresholds local neighborhoods of pixels.
Essentially, adaptive thresholding makes the assumption that local regions of an image will have more uniform illumination and lighting than the image as a whole. Thus, to obtain better thresholding results we should investigate sub-regions of an image and threshold them individually to obtain our final output image.
Adaptive thresholding tends to produce good results, but is more computationally expensive than Otsu’s method or simple thresholding — but in cases where you haven non-uniform illumination conditions, adaptive thresholding is a very useful tool to have.
To download the source code to this post (and be notified when future tutorials are published here on PyImageSearch), simply enter your email address in the form below!

Download the Source Code and FREE 17-page Resource Guide
Enter your email address below to get a .zip of the code and a FREE 17-page Resource Guide on Computer Vision, OpenCV, and Deep Learning. Inside you'll find my hand-picked tutorials, books, courses, and libraries to help you master CV and DL!


Comment section
Hey, Adrian Rosebrock here, author and creator of PyImageSearch. While I love hearing from readers, a couple years ago I made the tough decision to no longer offer 1:1 help over blog post comments.
At the time I was receiving 200+ emails per day and another 100+ blog post comments. I simply did not have the time to moderate and respond to them all, and the sheer volume of requests was taking a toll on me.
Instead, my goal is to do the most good for the computer vision, deep learning, and OpenCV community at large by focusing my time on authoring high-quality blog posts, tutorials, and books/courses.
If you need help learning computer vision and deep learning, I suggest you refer to my full catalog of books and courses — they have helped tens of thousands of developers, students, and researchers just like yourself learn Computer Vision, Deep Learning, and OpenCV.
Click here to browse my full catalog.