In this tutorial, you will learn about color spaces in OpenCV, the cv2.cvtColor function, and the importance of lighting conditions/environments when building a computer vision and image processing pipeline.
A dataset with images in various color spaces is useful to understand and visualize the impact of changing color spaces using cv2.cvtColor. It helps us learn how different color spaces can affect image processing tasks.
Roboflow has free tools for each stage of the computer vision pipeline that will streamline your workflows and supercharge your productivity.
Sign up or Log in to your Roboflow account to access state of the art dataset libaries and revolutionize your computer vision pipeline.
You can start by choosing your own datasets or using our PyimageSearch’s assorted library of useful datasets.
Bring data in any of 40+ formats to Roboflow, train using any state-of-the-art model architectures, deploy across multiple platforms (API, NVIDIA, browser, iOS, etc), and connect to applications or 3rd party tools.

To illustrate the importance of lighting conditions, I’d like to start today’s tutorial with a personal story from my time developing an iPhone app called ID My Pill.
ID My Pill was an iPhone application and web API that allowed you to identify prescription pills in the snap of your smartphone. You simply snapped a photo of your prescription pills and ID My Pill would instantly identify and verify that they are the correct medication using computer vision and machine learning techniques.
Whether or not a pill was identified correctly had nothing to do with the programming language I used to develop it. It had nothing to do with the computer vision libraries that I built ID My Pill around. And a successful pill identification has absolutely nothing to do with my pill identification algorithms that I developed working in the background.
In fact, whether or not a pill can be successfully identified is determined long before a single line of code is even executed.
I’m talking, of course, about lighting conditions.
A pill captured in very poor lighting conditions where there is an abundant amount of shadowing, washout, or lack of contrast simply cannot be identified. With over 27,000+ prescription pills on the market in the United States (with well over half being round and/or white), there are an incredible number of pills that are nearly identical to each other. And given this high number of visually similar pills, non-ideal lighting conditions can completely ruin the results of the pill identification algorithm.
Believe it or not, the success of (nearly) all computer vision systems and applications is determined before the developer writes a single line of code.
In the rest of this article, we’ll be discussing the importance of lighting conditions and the dramatic role it plays in the successful development of a computer vision system.
We’ll also be discussing color spaces and how we can leverage them to build more robust computer vision applications.
To learn about color spaces in OpenCV and the cv2.cvtColor function, just keep reading.
OpenCV Color Spaces ( cv2.cvtColor )
In the first part of this tutorial, we’ll discuss the importance of lighting conditions in any computer vision and image processing pipeline.
We’ll then review the three goals you should seek to obtain when working with lighting conditions:
- High contrast
- Generalizable
- Stable
From there we’ll configure our development environment and review our project directory structure.
We’ll then implement Python code to work with four color spaces/models in OpenCV:
- RGB
- HSV
- L*a*b*
- Grayscale
We’ll wrap up this tutorial with a discussion of our results.
The importance of lighting conditions in image processing and computer vision
The field of computer vision is rapidly expanding and evolving. Every day we are seeing new advances in the field that we once thought were impossible.
We’re seeing deep learning classify images, detect objects, and segment images with astonishingly high accuracy.
Tiny little computers, like the Raspberry Pi, Google Coral, and Jetson Nano can be used to build intricate surveillance systems.
And industry is seeing more commercial computer vision applications pushed to market every single day.
And while the field is growing, changing, and evolving, I can guarantee you one absolute constant that will never change: every single computer vision algorithm, application, and system ever developed and that will be developed will depend on the quality of images input to the system.
We’ll certainly be able to make our systems more robust in relation to poor lighting conditions, but we’ll never be able to overcome an image that was captured under inferior conditions.
So let me say this again, because I really want to make sure it sticks: lighting can mean the difference between success and failure of your computer vision algorithm.
One of the most common pitfalls I see computer vision developers make is overlooking lighting and the effect it will have on algorithm performance.
The quality of light in a given environment is absolutely crucial in obtaining your goals — in fact, I would go as far to say that it is likely the most important factor.
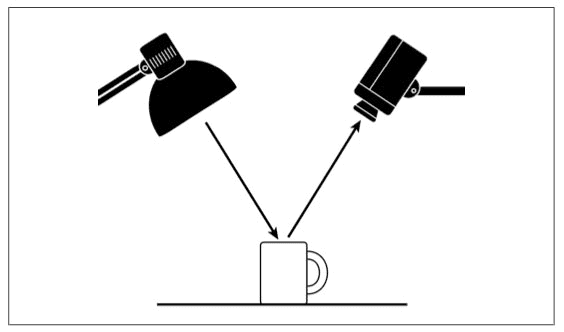
The camera is not actually “filming” the object itself. Instead, it is capturing the light reflected from our object. This also implies that different objects in images will require different lighting conditions to obtain “good” results (where “good” is defined in terms of whatever the end goal of your algorithm is).
To illustrate the importance of lighting conditions, this morning I captured a selfie of myself in the bathroom mirror:

But whoops — I left the flash on my camera on! The mirror is reflective surface, thus the light is just going to bounce right off the surface and into my camera sensor. The photograph is quite poor and it would be near impossible to write code to detect my face in this image due to how much the flash is interfering with the lower part of my face.
Instead, when I turn my flash off and use the soft light from above which is not aimed at a reflective surface, I get my intended results:

Here, my face is clearly visible and it would be almost trivial to detect.
Again, you simply cannot compensate for poor lighting conditions. When developing an application to detect faces in images, which type of image would you prefer? The one in Figure 2 when my face is practically not visible at all due to the flash? Or the image in Figure 3 where my face is clearly visible and identifiable?
Obviously, Figure 3 is the preferred choice — and also a great example of why you need to consider your lighting conditions when developing a computer vision application.
In general, your lighting conditions should have three primary goals. Let’s review them below.
Goal #1: High contrast
You should seek to maximize the contrast between the Regions of Interest in your image (i.e., the “objects” you want to detect, extract, describe, classify, manipulate, etc., should have sufficiently high contrast from the rest of the image so they are easily detectable).
For example, when building our simple document scanner we ensured that the piece of paper we wanted to detect was light on a dark background, thereby ensuring there is sufficient contrast and the paper can be easily detected:
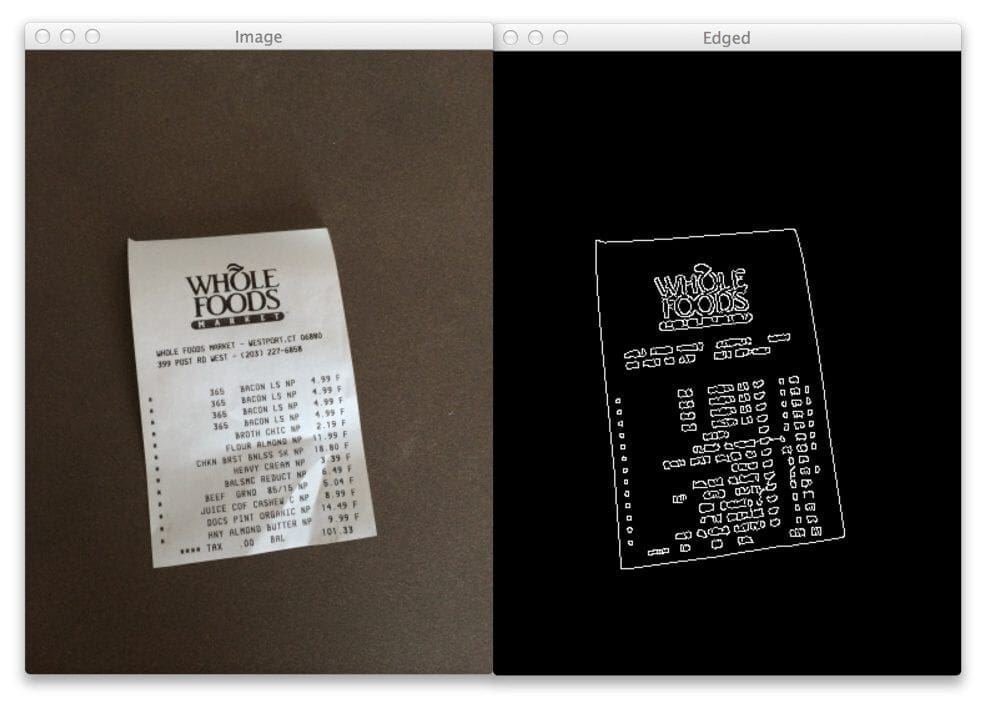
Whenever possible, try to ensure there is high contrast between the background and foreground of your environment — it will make writing code to accurately understand the background versus foreground much easier.
Goal #2: Generalizable
Your lighting conditions should be consistent enough that they work well from one object to the next.
If our goal is to identify various United States coins in an image, our lighting conditions should be generalizable enough to facilitate coin identification, whether we are examining a penny, nickel, dime, or quarter.
Goal #3: Stable
Having stable, consistent, and repeatable lighting conditions is the holy grail of computer vision application development. However, it’s often hard (if not impossible) to guarantee — this is especially true if we are developing computer vision algorithms that are intended to work in outdoor lighting conditions. As the time of day changes, clouds roll in over the sun, and rain starts to pour, our lighting conditions will obviously change.
Even in my case with ID My Pill, having a truly stable and repeatable lighting condition cannot be done. Users from all around the world will capture pictures of medications under tremendously different lighting conditions (outside, inside, fluorescent light, quartz halogen, you name it) — and I simply have no control over it.
But let’s say that ID My Pill was not developed for the consumer to validate their prescription pills. Instead, let’s suppose that ID My Pill was used on the factory conveyor belt to ensure that each pill on the belt is of the same medication and there is no “cross-contamination” or “leakage” of different types of medication in the same production environment.
In the pill factory scenario, I’m much more likely to obtain stable lighting conditions. This is because I can:
- Place the camera to capture photos of the pill wherever I want
- Have full control over the lighting environment — I can increase the lights, decrease them, or set up a pill “photo booth” that is entirely self-contained and apart from any other lighting source that could contaminate the identification
As you can see, truly stable lighting conditions are often hard (if not impossible) to guarantee. But it’s extremely important that you at least consider the stability of your lighting conditions before you even write a single line of code.
So here’s my key takeaway:
Strive as much as possible to obtain your ideal lighting conditions before you even write a single line of code. It’s substantially more beneficial (and easier) to control (or at least acknowledge) your lighting conditions than it is to write code to compensate for inferior lighting.
Color spaces versus color models
The second topic we are going to discuss in this tutorial is color spaces and color models.
Simply put, a color space is just a specific organization of colors that allow us to consistently represent and reproduce colors.
For example, imagine browsing your local home improvement warehouse for your desired shade of paint for your living room. These color swatches at your home improvement store are likely organized in some coherent manner based on the color and tone of the swatch. Obviously this is quite the simplistic example and color spaces can be more rigorous and structured mathematically.
A color model, on the other hand, is an abstract method of numerically representing colors in the color space. As we know, RGB pixels are represented as a 3-integer tuple of a Red, Green, and Blue value.
As a whole, a color space defines both the color model and the abstract mapping function used to define actual colors. Selecting a color space also informally implies that we are selecting the color model.
The difference between the two is subtle, but important to cover as a matter of completeness.
In the rest of this tutorial we’ll be discussing the four main color spaces you’ll come across when developing computer vision applications:
- RGB
- HSV,
- L*a*b*
- Grayscale (which is not technically a color space, but you’ll be using it in nearly all computer vision applications you develop).
Configuring your development environment
To follow this guide, you need to have the OpenCV library installed on your system.
Luckily, OpenCV is pip-installable:
$ pip install opencv-contrib-python
If you need help configuring your development environment for OpenCV, I highly recommend that you read my pip install OpenCV guide — it will have you up and running in a matter of minutes.
Having problems configuring your development environment?

All that said, are you:
- Short on time?
- Learning on your employer’s administratively locked system?
- Wanting to skip the hassle of fighting with the command line, package managers, and virtual environments?
- Ready to run the code right now on your Windows, macOS, or Linux systems?
Then join PyImageSearch University today!
Gain access to Jupyter Notebooks for this tutorial and other PyImageSearch guides that are pre-configured to run on Google Colab’s ecosystem right in your web browser! No installation required.
And best of all, these Jupyter Notebooks will run on Windows, macOS, and Linux!
Project structure
Before we implement color spaces and utilize the cv2.cvtColor function with OpenCV, let’s first inspect our project directory structure.
Start by accessing the “Downloads” section of this tutorial to retrieve the source code and example image:
$ tree . --dirsfirst
.
├── adrian.png
└── color_spaces.py

0 directories, 2 files
We have a single Python script to review, color_spaces.py. This script will load adrian.png from disk and demonstrate how to work with the RGB, HSV, and L*a*b* color spaces.
You’ll also learn how to convert images to grayscale as well.
RGB color space
The first color space we are going to discuss is RGB, which stands for the Red, Green, and Blue components of an image. In all likelihood you are already very familiar with the RGB color space as most color applications and computer vision/image processing libraries use RGB by default.
To define a color in the RGB color model, all we need to do is define the amount of Red, Green, and Blue contained in a single pixel. Each Red, Green, and Blue channel can have values defined in the range [0, 255] (for a total of 256 “shades”), where 0 indicates no representation and 255 demonstrates full representation.
The RGB color space is an example of an additive color space: the more of each color is added, the brighter the pixel becomes and the closer it comes to white:
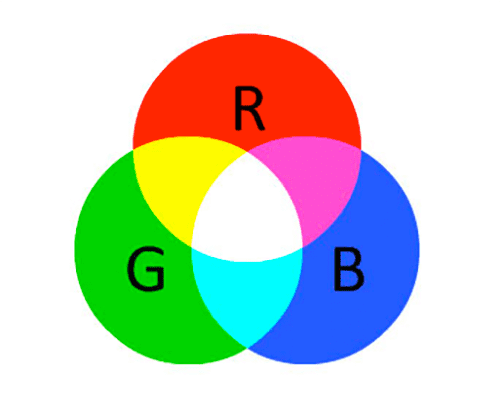
As you can see, adding red and green leads to yellow. Adding red and blue yields pink. And adding all three red, green, and blue together we create white.
The RGB color space is commonly visualized as a cube:
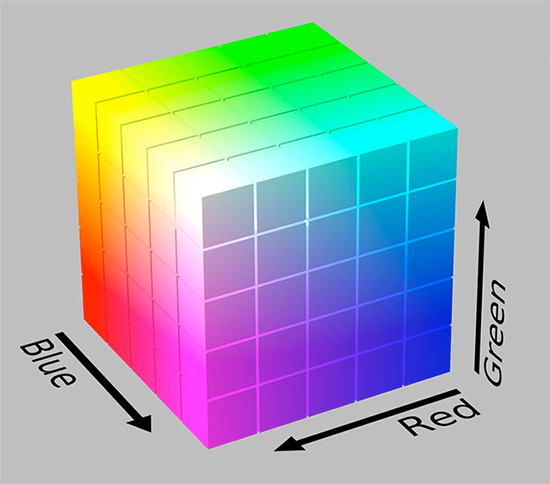
Since an RGB color is defined as a 3-valued tuple, with each value in the range [0, 255], we can thus think of the cube containing 256×256×256 = 16,777,216 possible colors, depending on how much Red, Green, and Blue we place into each bucket.
However, this is not exactly the most friendly color space for developing computer vision based applications. In fact, it’s primary use is to display colors on a monitor.
Consider for instance if we want to determine how “much” red, green, and blue we need to create a single color.
Would you imagine that it takes R=252, G=198, B=188 to create my caucasian shade of skin, as in Figure 8:

Or what about this much R=22, G=159, B=230 to get the shade of blue for the PyImageSearch logo:

Pretty unintuitive, right?
But despite how unintuitive the RGB color space may be, nearly all images you’ll work with will be represented (at least initially) in the RGB color space.
That all said, let’s take a look at some code to display each channel of a RGB image.
Open up the color_spaces.py file in your project directory structure and let’s get to work:
# import the necessary packages
import argparse
import cv2

# construct the argument parser and parse the arguments
ap = argparse.ArgumentParser()
ap.add_argument("-i", "--image", type=str, default="adrian.png",
	help="path to input image")
args = vars(ap.parse_args())
Lines 2 and 3 import our required Python packages while Lines 6-9 parse our command line arguments.
We only need a single argument here, --image, which we default to adrian.png (which lives in our project directory, if you downloaded the code and example images to this tutorial).
Let’s now load our image:
# load the original image and show it
image = cv2.imread(args["image"])
cv2.imshow("RGB", image)

# loop over each of the individual channels and display them
for (name, chan) in zip(("B", "G", "R"), cv2.split(image)):
	cv2.imshow(name, chan)

# wait for a keypress, then close all open windows
cv2.waitKey(0)
cv2.destroyAllWindows()
Lines 12 and 13 load our input image to disk and display it to our screen.
We then loop over each of the image channels in Blue, Green, Red order since OpenCV represents images as NumPy arrays in reverse order on Line 16.
For each of these channels we display them to our screen on Line 17.
When you execute this script you will see the following output:
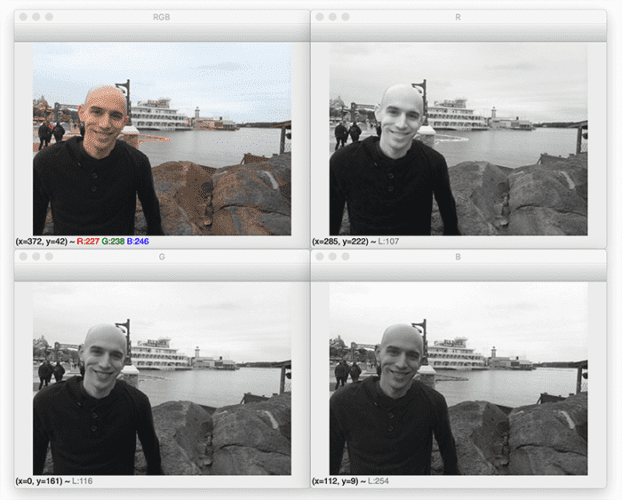
On the top-left, we have our original RGB image, which consists of each of the Red, Green, and Blue channels added together (top-right, bottom-right, and bottom-left, respectively).
So while the RGB is the most used color space, it’s the not most intuitive color space. Let’s take a look at the HSV color space, which is a little more intuitive and easier to understand when defining color ranges.
HSV color space
The HSV color space transforms the RGB color space, remodeling it as a cylinder rather than a cube:
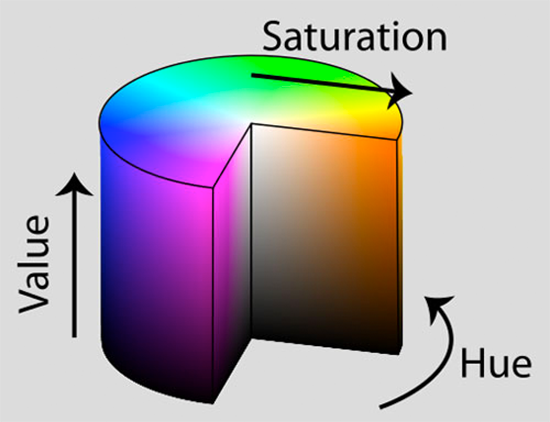
As we saw in the RGB section, the “white” or “lightness” of a color is an additive combination of each Red, Green, and Blue component. But now in the HSV color space, the lightness is given its own separate dimension.
Let’s define what each of the HSV components are:
- Hue: Which “pure” color we are examining. For example, all shadows and tones of the color “red” will have the same Hue.
- Saturation: How “white” the color is. A fully saturated color would be “pure,” as in “pure red.” And a color with zero saturation would be pure white.
- Value: The Value allows us to control the lightness of our color. A Value of zero would indicate pure black, whereas increasing the value would produce lighter colors.
It’s important to note that different computer vision libraries will use different ranges to represent each of the Hue, Saturation, and Value components.
In the case of OpenCV, images are represented as 8-bit unsigned integer arrays. Thus, the Hue value is defined as the range [0, 179] (for a total of 180 possible values, since [0, 359] is not possible for an 8-bit unsigned array) — the Hue is actually a degree () on the HSV color cylinder. And both saturation and value are defined on the range [0, 255].
Let’s look at some example code to convert an image from the RGB (or rather, BGR) color space to HSV:
# convert the image to the HSV color space and show it
hsv = cv2.cvtColor(image, cv2.COLOR_BGR2HSV)
cv2.imshow("HSV", hsv)

# loop over each of the individual channels and display them
for (name, chan) in zip(("H", "S", "V"), cv2.split(hsv)):
	cv2.imshow(name, chan)

# wait for a keypress, then close all open windows
cv2.waitKey(0)
cv2.destroyAllWindows()
To convert our image to the HSV color space, we make a call to the cv2.cvtColor function.
This function accepts two arguments: the actual image that we want the convert, followed by the output color space.
Since OpenCV represents our image in BGR order rather than RGB, we specify the cv2.COLOR_BGR2HSV flag to indicate that we want to convert from BGR to HSV.
From there we’ll go ahead and loop over each of the individual Hue, Saturation, and Value channels and display them to our screen:
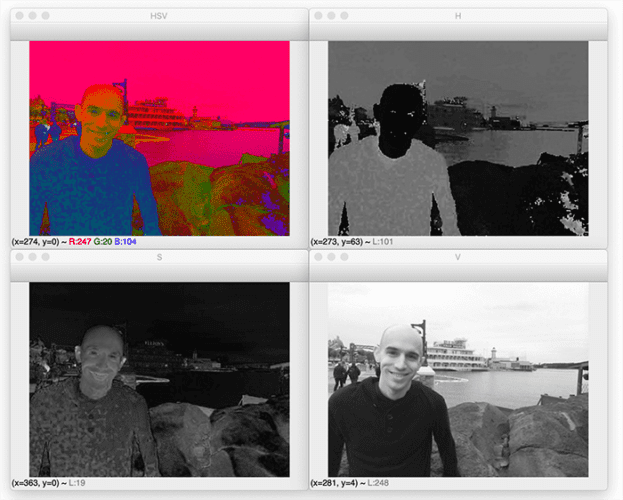
Notice how the Value component on the bottom-left is essentially a grayscale image — this is because the value controls the actual lightness of our color, while both Hue and Saturation define the actual color and shade.
The HSV color space is used heavily in computer vision applications — especially if we are interested in tracking the color of some object in an image. It’s far, far easier to define a valid color range using HSV than it is RGB.
L*a*b* color space
The last color space we are going to discuss is L*a*b*.
While the RGB color space is easy to understand (especially when you’re first getting started in computer vision), it’s non-intuitive when defining exact shades of a color or specifying a particular range of colors.
On the other hand, the HSV color space is more intuitive but does not do the best job in representing how humans see and interpret colors in images.
For example, let’s compute the Euclidean distance between the colors red and green; red and purple; and red and navy in the RGB color space:
>>> import math
>>> red_green = math.sqrt(((255 - 0) ** 2) + ((0 - 255) ** 2) + ((0 - 0) ** 2))
>>> red_purple = math.sqrt(((255 - 128) ** 2) + ((0 - 0) ** 2) + ((0 - 128) ** 2))
>>> red_navy = math.sqrt(((255 - 0) ** 2) + ((0 - 0) ** 2) + ((0 - 128) ** 2))
>>> red_green, red_purple, red_navy
(360.62445840513925, 180.31361568112376, 285.3226244096321)
So that begs the question: what do these distance values actually represent?
Is the color red somehow more perceptually similar to purple rather than green?
The answer is a simple “No” — even though we have defined our color spaces on objects like a cube and a cylinder, these distances are actually quite arbitrary and there is actual no way to “measure” the perceptual difference in color between various colors in the RGB and HSV color spaces.
That is where the L*a*b* color space comes in — its goal is to mimic the methodology in which humans see and interpret color.
This means that the Euclidean distance between two arbitrary colors in the L*a*b* color space has actual perceptual meaning.
The addition of perceptual meaning makes the L*a*b* color space is less intuitive and understanding as RGB and HSV, but it is heavily used in computer vision.
Essentially, the L*a*b* color space is a 3-axis system:
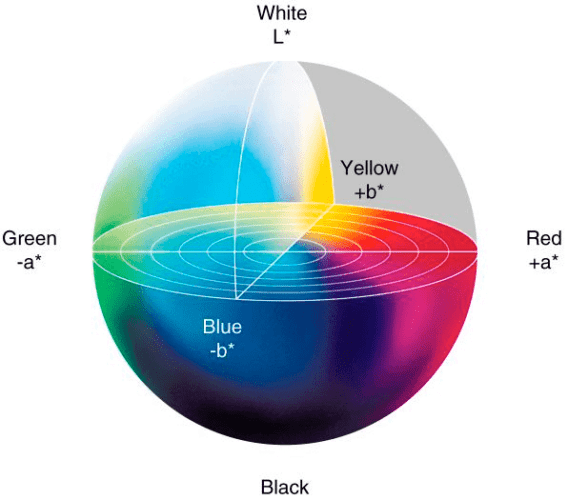
Where we define each channel below:
- L-channel: The “lightness” of the pixel. This value goes up and down the vertical axis, white to black, with neutral grays at the center of the axis.
- a-channel: Originates from the center of the L-channel and defines pure green on one end of the spectrum and pure red on the other.
- b-channel: Also originates from the center of the L-channel, but is perpendicular to the a-channel. The b-channel defines pure blue at one of the spectrum and pure yellow at the other.
Again, while the L*a*b* color space is less intuitive and not as easy to understand as the HSV and RGB color spaces, it is heavily used in computer vision. This is due to the distance between colors having an actual perceptual meaning, allowing us to overcome various lighting condition problems. It also serves as a powerful color image descriptor.
Now, let’s look at how we can convert our images to the L*a*b* color space:
# convert the image to the L*a*b* color space and show it
lab = cv2.cvtColor(image, cv2.COLOR_BGR2LAB)
cv2.imshow("L*a*b*", lab)

# loop over each of the individual channels and display them
for (name, chan) in zip(("L*", "a*", "b*"), cv2.split(lab)):
	cv2.imshow(name, chan)

# wait for a keypress, then close all open windows
cv2.waitKey(0)
cv2.destroyAllWindows()
The conversion to the L*a*b* color space is once again handled by the cv2.cvtColor function, but this time we provide the cv2.COLOR_BGR2LAB flag to indicate that we want to convert from the BGR to L*a*b* color space.
From there, we loop over each of the L*, a*, and b* channels, respectively, and display them to our screen:
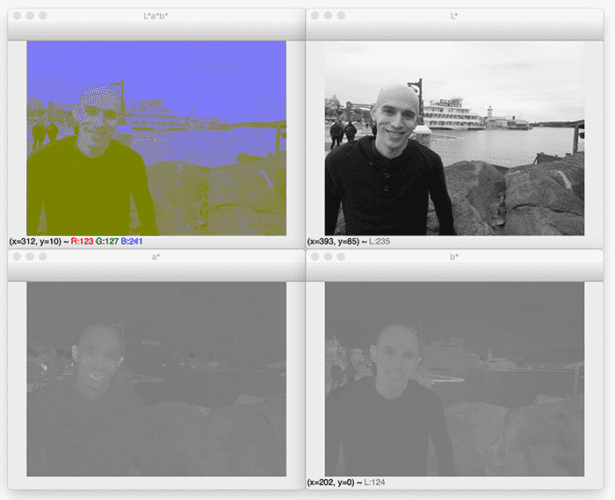
Similar to our HSV example, we have the L*-channel which is dedicated to displaying how light a given pixel is. The a* and b* then determine the shade and color of the pixel.
Grayscale
The last color space we are going to discuss isn’t actually a color space — it’s simply the grayscale representation of a RGB image.
A grayscale representation of an image throws away the color information of an image and can also be done using the cv2.cvtColor function:
# show the original and grayscale versions of the image
gray = cv2.cvtColor(image, cv2.COLOR_BGR2GRAY)
cv2.imshow("Original", image)
cv2.imshow("Grayscale", gray)
cv2.waitKey(0)
Where our output is a grayscale image:

The grayscale representation of an image is often referred to as “black and white,” but this is not technically correct. Grayscale images are single channel images with pixel values in the range [0, 255] (i.e., 256 unique values).
True black and white images are called binary images and thus only have two possible values: 0 or 255 (i.e., only 2 unique values).
Be careful when referring to grayscale images as black and white to avoid this ambiguity.
However, converting an RGB image to grayscale is not as straightforward as you may think. Biologically, our eyes are more sensitive and thus perceive more green and red than blue.
Thus when converting to grayscale, each RGB channel is not weighted uniformly, like this:
Instead, we weight each channel differently to account for how much color we perceive of each:
Again, due to the cones and receptors in our eyes, we are able to perceive nearly 2x the amount of green than red. And similarly, we notice over twice the amount of red than blue. Thus, we make sure to account for this when converting from RGB to grayscale.
The grayscale representation of an image is often used when we have no use for color (such as in detecting faces or building object classifiers where the color of the object does not matter). Discarding color thus allows us to save memory and be more computationally efficient.
OpenCV color space results
Ready to visualize the output of RGB, HSV, and L*a*b* color spaces?
Be sure to access the “Downloads” section of this tutorial to retrieve the source code and example image.
You can then execute our demo script using the following command:
$ python color_spaces.py
The output of this script should match the images and figures I have provided above.
What's next? We recommend PyImageSearch University.
86+ total classes • 115+ hours hours of on-demand code walkthrough videos • Last updated: July 2025
★★★★★ 4.84 (128 Ratings) • 16,000+ Students Enrolled
I strongly believe that if you had the right teacher you could master computer vision and deep learning.
Do you think learning computer vision and deep learning has to be time-consuming, overwhelming, and complicated? Or has to involve complex mathematics and equations? Or requires a degree in computer science?
That’s not the case.
All you need to master computer vision and deep learning is for someone to explain things to you in simple, intuitive terms. And that’s exactly what I do. My mission is to change education and how complex Artificial Intelligence topics are taught.
If you're serious about learning computer vision, your next stop should be PyImageSearch University, the most comprehensive computer vision, deep learning, and OpenCV course online today. Here you’ll learn how to successfully and confidently apply computer vision to your work, research, and projects. Join me in computer vision mastery.
Inside PyImageSearch University you'll find:
- ✓ 86+ courses on essential computer vision, deep learning, and OpenCV topics
- ✓ 86 Certificates of Completion
- ✓ 115+ hours hours of on-demand video
- ✓ Brand new courses released regularly, ensuring you can keep up with state-of-the-art techniques
- ✓ Pre-configured Jupyter Notebooks in Google Colab
- ✓ Run all code examples in your web browser — works on Windows, macOS, and Linux (no dev environment configuration required!)
- ✓ Access to centralized code repos for all 540+ tutorials on PyImageSearch
- ✓ Easy one-click downloads for code, datasets, pre-trained models, etc.
- ✓ Access on mobile, laptop, desktop, etc.
Summary
In this tutorial, we learned about lighting conditions and the critical role they play in computer vision applications. The key takeaway is to always consider your lighting conditions before you write a single line of code!
And in situations where you can actually control your lighting conditions, you are even better off. In general, you’ll find that it’s easier to control your lighting conditions than to write code that compensates for images captured under poor quality.
Second, we reviewed three very common color spaces in computer vision: RGB, HSV, and L*a*b*.
The RGB color space is the most common color space in computer vision. It’s an additive color space, where colors are defined based on combining values of red, green, and blue.
While quite simple, the RGB color space is unfortunately unintuitive for defining colors as it’s hard to pinpoint exactly how much red, green, and blue compose a certain color — imagine looking a specific region of a photo and trying to identify how much red, green, and blue there is using only your naked eye!
Luckily, we have the HSV color space to compensate for this problem. The HSV color space is also intuitive, as it allows us to define colors along a cylinder rather than a RGB cube. The HSV color space also gives lightness/whiteness its own separate dimension, making it easier to define shades of color.
However, both the RGB and HSV color spaces fail to mimic the way humans perceive color — there is no way to mathematically define how perceptually different two arbitrary colors are using the RGB and HSV models.
And that’s exactly why the L*a*b* color space was developed. While more complicated, the L*a*b* provides with perceptual uniformity, meaning that the distance between two arbitrary colors has actual meaning.
All that said, you’ll find that you will use the RGB color space for most computer vision applications. While it has many shortcomings, you cannot beat its simplicity — it’s simply adequate enough for most systems.
There will also be times when you use the HSV color space — particularly if you are interested in tracking an object in an image based on its color. It’s very easy to define color ranges using HSV.
For basic image processing and computer vision you likely won’t be using the L*a*b* color space that often. But when you’re concerned with color management, color transfer, or color consistency across multiple devices, the L*a*b* color space will be your best friend. It also makes for an excellent color image descriptor.
Finally, we discussed converting an image from RGB to grayscale. While the grayscale representation of an image is not technically a color space, it’s worth mentioning in the same vein as RGB, HSV, and L*a*b*. We often use grayscale representations of an image when color is not important — this allows us to conserve memory and be more computationally efficient.
To download the source code to this post (and be notified when future tutorials are published here on PyImageSearch), simply enter your email address in the form below!

Download the Source Code and FREE 17-page Resource Guide
Enter your email address below to get a .zip of the code and a FREE 17-page Resource Guide on Computer Vision, OpenCV, and Deep Learning. Inside you'll find my hand-picked tutorials, books, courses, and libraries to help you master CV and DL!


Comment section
Hey, Adrian Rosebrock here, author and creator of PyImageSearch. While I love hearing from readers, a couple years ago I made the tough decision to no longer offer 1:1 help over blog post comments.
At the time I was receiving 200+ emails per day and another 100+ blog post comments. I simply did not have the time to moderate and respond to them all, and the sheer volume of requests was taking a toll on me.
Instead, my goal is to do the most good for the computer vision, deep learning, and OpenCV community at large by focusing my time on authoring high-quality blog posts, tutorials, and books/courses.
If you need help learning computer vision and deep learning, I suggest you refer to my full catalog of books and courses — they have helped tens of thousands of developers, students, and researchers just like yourself learn Computer Vision, Deep Learning, and OpenCV.
Click here to browse my full catalog.