One of my favorite parts of running the PyImageSearch blog is a being able to link together previous blog posts and create a solution to a particular problem — in this case, real-time panorama and image stitching with Python and OpenCV.
Over the past month and a half, we’ve learned how to increase the FPS processing rate of builtin/USB webcams and the Raspberry Pi camera module. We also learned how to unify access to both USB webcams and the Raspberry Pi camera into a single class, making all video processing and examples on the PyImageSearch blog capable of running on both USB and Pi camera setups without having to modify a single line of code.
And just to weeks ago, we discussed how keypoint detection, local invariant descriptors, keypoint matching, and homography matrix estimation can be used to construct panoramas and stitch images together.
Today we are going to link together the past 1.5 months worth of posts and use them to perform real-time panorama and image stitching using Python and OpenCV. Our solution will be able to run on both laptop/desktops systems, along with the Raspberry Pi.
Furthermore, we’ll also apply our basic motion detection implementation from last week’s post to perform motion detection on the panorama image.
This solution is especially useful in situations where you want to survey a wide area for motion, but don’t want “blind spots” in your camera view.
Keep reading to learn more…
Real-time panorama and image stitching with OpenCV
As I mentioned in the introduction to this post, we’ll be linking together concepts we have learned in the previous 1.5 months of PyImageSearch posts and:
- Use our improved FPS processing rate Python classes to access our builtin/USB webcams and/or the Raspberry Pi camera module.
- Access multiple camera streams at once.
- Apply image stitching and panorama construction to the frames from these video streams.
- Perform motion detection in the panorama image.
Again, the benefit of performing motion detection in the panorama image versus two separate frames is that we won’t have any “blind spots” in our field of view.
Hardware setup
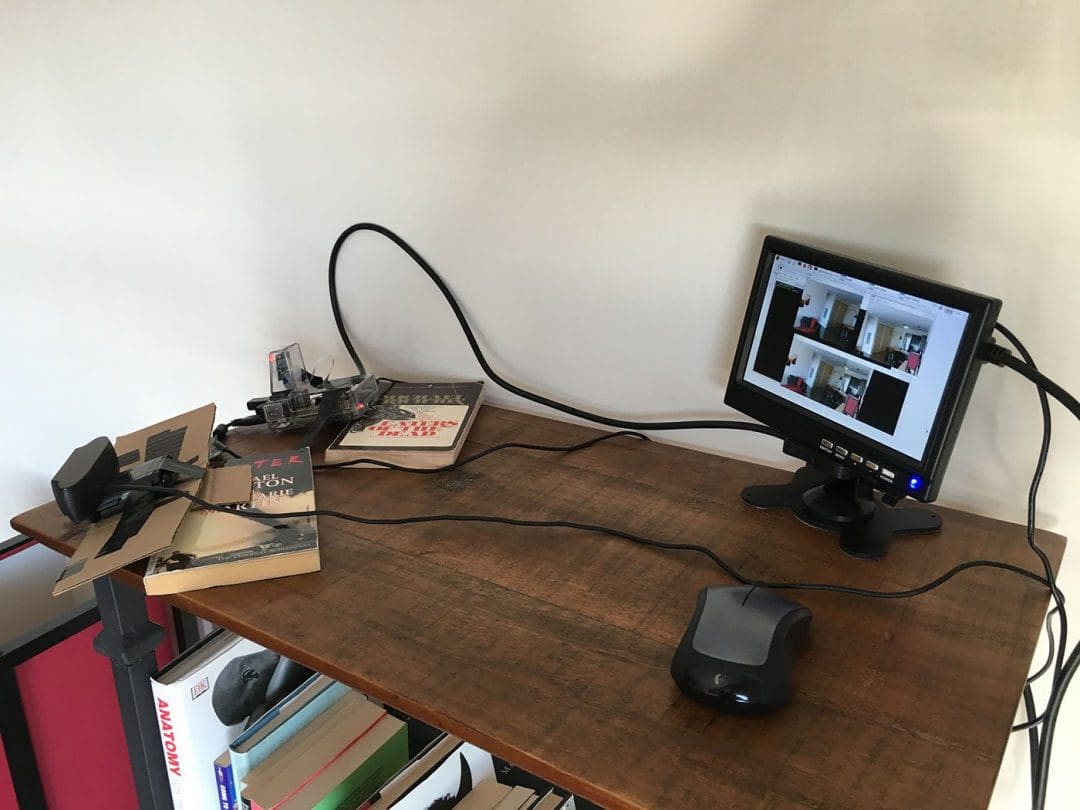
For this project, I’ll be using my Raspberry Pi 2, although you could certainly use your laptop or desktop system instead. I simply went with the Pi 2 for it’s small form factor and ease of maneuvering in space constrained places.
I’ll also be using my Logitech C920 webcam (that is plug-and-play compatible with the Raspberry Pi) along with the Raspberry Pi camera module. Again, if you decide to use your laptop/desktop system, you can simply hook-up multiple webcams to your machine — the same concepts discussed in this post still apply.
Below you can see my setup:
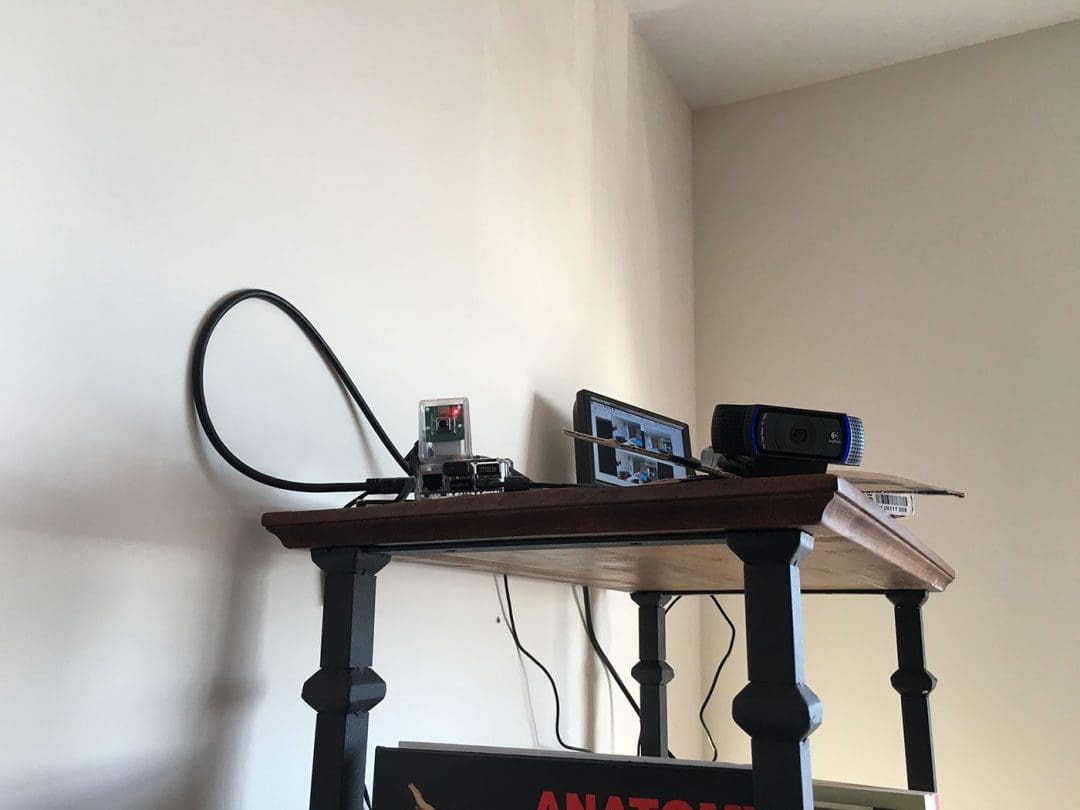
Here is another angle looking up at the setup:
The setup is pointing towards my front door, kitchen, and hallway, giving me a full view of what’s going on inside my apartment:
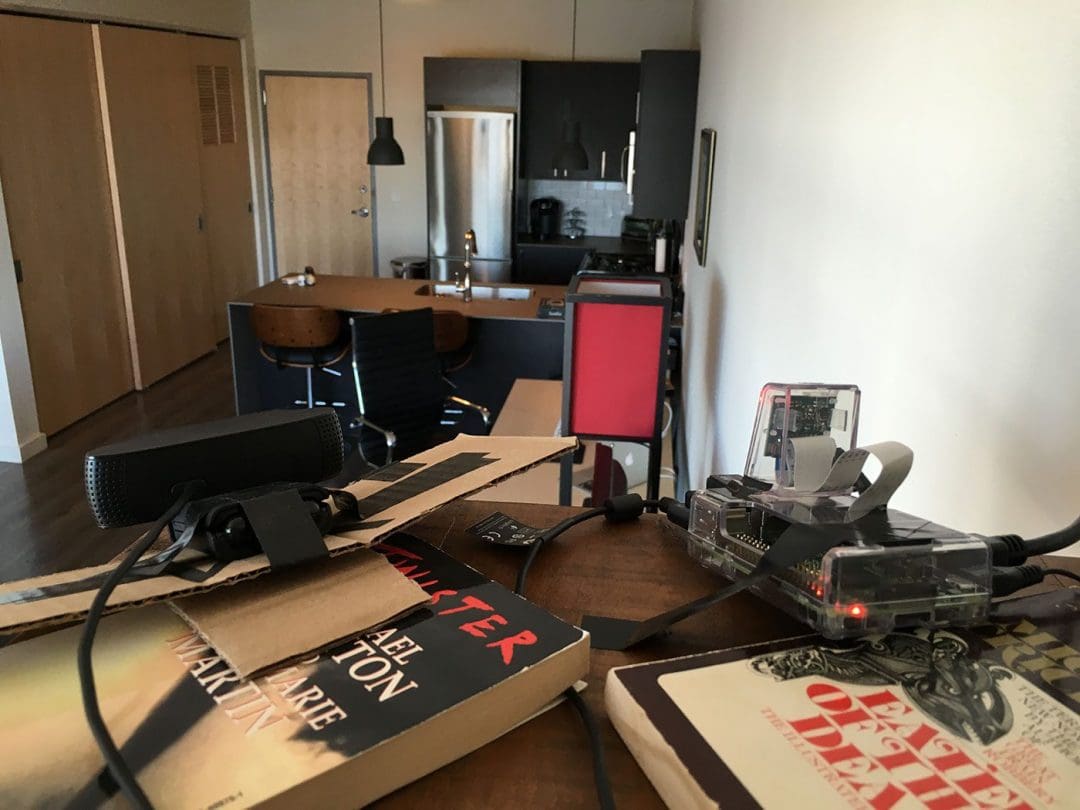
The goal is to take frames captured from both my video streams, stitch them together, and then perform motion detection in the panorama image.
Constructing a panorama, rather than using multiple cameras and performing motion detection independently in each stream ensures that I don’t have any “blind spots” in my field of view.
Project structure
Before we get started, let’s look at our project structure:
|--- pyimagesearch | |---- __init__.py | |--- basicmotiondetector.py | |--- panorama.py |--- realtime_stitching.py
As you can see, we have defined a pyimagesearch
module for organizational purposes. We then have the basicmotiondetector.py
implementation from last week’s post on accessing multiple cameras with Python and OpenCV. This class hasn’t changed at all, so we won’t be reviewing the implementation in this post. For a thorough review of the basic motion detector, be sure to read last week’s post.
We then have our panorama.py
file which defines the Stitcher
class used to stitch images together. We initially used this class in the OpenCV panorama stitching tutorial.
However, as we’ll see later in this post, I have made a slight modifications to the constructor and stitch
methods to facilitate real-time panorama construction — we’ll learn more about these slight modifications later in this post.
Finally, the realtime_stitching.py
file is our main Python driver script that will access the multiple video streams (in an efficient, threaded manner of course), stitch the frames together, and then perform motion detection on the panorama image.
Updating the image stitcher
In order to (1) create a real-time image stitcher and (2) perform motion detection on the panorama image, we’ll assume that both cameras are fixed and non-moving, like in Figure 1 above.
Why is the fixed and non-moving assumption so important?
Well, remember back to our lesson on panorama and image stitching.
Performing keypoint detection, local invariant description, keypoint matching, and homography estimation is a computationally expensive task. If we were to use our previous implementation, we would have to perform stitching on each set of frames, making it near impossible to run in real-time (especially for resource constrained hardware such as the Raspberry Pi).
However, if we assume that the cameras are fixed, we only have to perform the homography matrix estimation once!
After the initial homography estimation, we can use the same matrix to transform and warp the images to construct the final panorama — doing this enables us to skip the computationally expensive steps of keypoint detection, local invariant feature extraction, and keypoint matching in each set of frames.
Below I have provided the relevant updates to the Sticher
class to facilitate a cached homography matrix:
# import the necessary packages import numpy as np import imutils import cv2 class Stitcher: def __init__(self): # determine if we are using OpenCV v3.X and initialize the # cached homography matrix self.isv3 = imutils.is_cv3() self.cachedH = None
The only addition here is on Line 11 were I define cachedH
, the cached homography matrix.
We also need to update the stitch
method to cache the homography matrix after it is computed:
def stitch(self, images, ratio=0.75, reprojThresh=4.0): # unpack the images (imageB, imageA) = images # if the cached homography matrix is None, then we need to # apply keypoint matching to construct it if self.cachedH is None: # detect keypoints and extract (kpsA, featuresA) = self.detectAndDescribe(imageA) (kpsB, featuresB) = self.detectAndDescribe(imageB) # match features between the two images M = self.matchKeypoints(kpsA, kpsB, featuresA, featuresB, ratio, reprojThresh) # if the match is None, then there aren't enough matched # keypoints to create a panorama if M is None: return None # cache the homography matrix self.cachedH = M[1] # apply a perspective transform to stitch the images together # using the cached homography matrix result = cv2.warpPerspective(imageA, self.cachedH, (imageA.shape[1] + imageB.shape[1], imageA.shape[0])) result[0:imageB.shape[0], 0:imageB.shape[1]] = imageB # return the stitched image return result
On Line 19 we make a check to see if the homography matrix has been computed before. If not, we detect keypoints and extract local invariant descriptors from the two images, followed by applying keypoint matching. We then cache the homography matrix on Line 34.
Subsequent calls to stitch
will use this cached matrix, allowing us to sidestep detecting keypoints, extracting features, and performing keypoint matching on every set of frames.
For the rest of the source code to panorama.py
, please see the image stitching tutorial or use the form at the bottom of this post to download the source code.
Performing real-time panorama stitching
Now that our Stitcher
class has been updated, let’s move on to to the realtime_stitching.py
driver script:
# import the necessary packages from __future__ import print_function from pyimagesearch.basicmotiondetector import BasicMotionDetector from pyimagesearch.panorama import Stitcher from imutils.video import VideoStream import numpy as np import datetime import imutils import time import cv2 # initialize the video streams and allow them to warmup print("[INFO] starting cameras...") leftStream = VideoStream(src=0).start() rightStream = VideoStream(usePiCamera=True).start() time.sleep(2.0)
We start off by importing our required Python packages. The BasicMotionDetector
and Stitcher
classes are imported from the pyimagesearch
module. We’ll also need the VideoStream
class from the imutils package.
If you don’t already have imutils
installed on your system, you can install it using:
$ pip install imutils
If you do already have it installed, make sure you have upgraded to the latest version (which has added Python 3 support to the video
sub-module):
$ pip install --upgrade imutils
Lines 14 and 15 then initialize our two VideoStream
classes. Here I assume that leftStream
is a USB camera and rightStream
is a Raspberry Pi camera (indicated by usePiCamera=True
).
If you wanted to use two USB cameras, you would simply have to update the stream initializations to:
leftStream = VideoStream(src=0).start() rightStream = VideoStream(src=1).start()
The src
parameter controls the index of the camera on your system.
Again, it’s imperative that you initialize leftStream
and rightStream
correctly. When standing behind the cameras, the leftStream
should be the camera to your lefthand side and the rightStream
should be the camera to your righthand side.
Failure to set these stream variables correctly will result in a “panorama” that contains only one of the two frames.
From here, let’s initialize the image stitcher and motion detector:
# initialize the image stitcher, motion detector, and total # number of frames read stitcher = Stitcher() motion = BasicMotionDetector(minArea=500) total = 0
Now we come to the main loop of our driver script where we loop over frames infinitely until instructed to exit the program:
# loop over frames from the video streams while True: # grab the frames from their respective video streams left = leftStream.read() right = rightStream.read() # resize the frames left = imutils.resize(left, width=400) right = imutils.resize(right, width=400) # stitch the frames together to form the panorama # IMPORTANT: you might have to change this line of code # depending on how your cameras are oriented; frames # should be supplied in left-to-right order result = stitcher.stitch([left, right]) # no homograpy could be computed if result is None: print("[INFO] homography could not be computed") break # convert the panorama to grayscale, blur it slightly, update # the motion detector gray = cv2.cvtColor(result, cv2.COLOR_BGR2GRAY) gray = cv2.GaussianBlur(gray, (21, 21), 0) locs = motion.update(gray)
Lines 27 and 28 read the left
and right
frames from their respective video streams. We then resize the frames to have a width of 400 pixels, followed by stitching them together to form the panorama. Remember, frames supplied to the stitch
method need to be supplied in left-to-right order!
In the case that the images cannot be stitched (i.e., a homography matrix could not be computed), we break from the loop (Lines 41-43).
Provided that the panorama could be constructed, we then process it by converting it to grayscale and blurring it slightly (Lines 47 and 48). The processed panorama is then passed into the motion detector (Line 49).
However, before we can detect any motion, we first need to allow the motion detector to “run” for a bit to obtain an accurate running average of the background model:
# only process the panorama for motion if a nice average has # been built up if total > 32 and len(locs) > 0: # initialize the minimum and maximum (x, y)-coordinates, # respectively (minX, minY) = (np.inf, np.inf) (maxX, maxY) = (-np.inf, -np.inf) # loop over the locations of motion and accumulate the # minimum and maximum locations of the bounding boxes for l in locs: (x, y, w, h) = cv2.boundingRect(l) (minX, maxX) = (min(minX, x), max(maxX, x + w)) (minY, maxY) = (min(minY, y), max(maxY, y + h)) # draw the bounding box cv2.rectangle(result, (minX, minY), (maxX, maxY), (0, 0, 255), 3)
We use the first 32 frames of the initial video streams as an estimation of the background — during these 32 frames no motion should be taking place.
Otherwise, provided that we have processed the 32 initial frames for the background model initialization, we can check the len
of locs
to see if it is greater than zero. If it is, then we can assume “motion” is taking place in the panorama image.
We then initialize the minimum and maximum (x, y)-coordinates associated with the locations containing motion. Given this list (i.e., locs
), we loop over the contour regions individually, compute the bounding box, and determine the smallest region encompassing all contours. This bounding box is then drawn on the panorama image.
As mentioned in last week’s post, the motion detector we use assumes there is only one object/person moving at a time. For multiple objects, a more advanced algorithm is required (which we will cover in a future PyImageSearch post).
Finally, the last step is to draw the timestamp on panorama and show the output images:
# increment the total number of frames read and draw the # timestamp on the image total += 1 timestamp = datetime.datetime.now() ts = timestamp.strftime("%A %d %B %Y %I:%M:%S%p") cv2.putText(result, ts, (10, result.shape[0] - 10), cv2.FONT_HERSHEY_SIMPLEX, 0.35, (0, 0, 255), 1) # show the output images cv2.imshow("Result", result) cv2.imshow("Left Frame", left) cv2.imshow("Right Frame", right) key = cv2.waitKey(1) & 0xFF # if the `q` key was pressed, break from the loop if key == ord("q"): break # do a bit of cleanup print("[INFO] cleaning up...") cv2.destroyAllWindows() leftStream.stop() rightStream.stop()
Lines 82-86 make a check to see if the q
key is pressed. If it is, we break from the video stream loop and do a bit of cleanup.
Running our panorama builder + motion detector
To execute our script, just issue the following command:
$ python realtime_stitching.py
Below you can find an example GIF of my results:
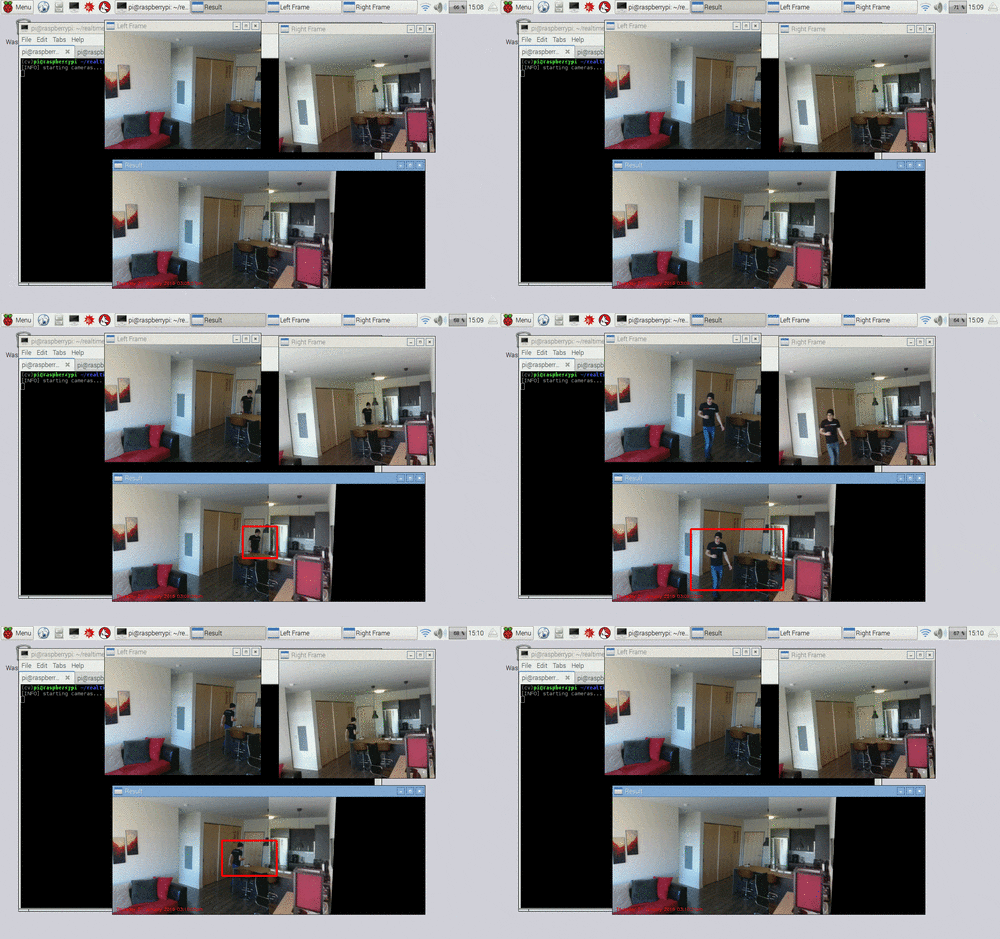
On the top-left we have the left video stream. And on the top-right we have the right video stream. On the bottom, we can see that both frames have been stitched together into a single panorama. Motion detection is then performed on the panorama image and a bounding box drawn around the motion region.
The full video demo can be seen below:
What's next? We recommend PyImageSearch University.
86+ total classes • 115+ hours hours of on-demand code walkthrough videos • Last updated: April 2025
★★★★★ 4.84 (128 Ratings) • 16,000+ Students Enrolled
I strongly believe that if you had the right teacher you could master computer vision and deep learning.
Do you think learning computer vision and deep learning has to be time-consuming, overwhelming, and complicated? Or has to involve complex mathematics and equations? Or requires a degree in computer science?
That’s not the case.
All you need to master computer vision and deep learning is for someone to explain things to you in simple, intuitive terms. And that’s exactly what I do. My mission is to change education and how complex Artificial Intelligence topics are taught.
If you're serious about learning computer vision, your next stop should be PyImageSearch University, the most comprehensive computer vision, deep learning, and OpenCV course online today. Here you’ll learn how to successfully and confidently apply computer vision to your work, research, and projects. Join me in computer vision mastery.
Inside PyImageSearch University you'll find:
- ✓ 86+ courses on essential computer vision, deep learning, and OpenCV topics
- ✓ 86 Certificates of Completion
- ✓ 115+ hours hours of on-demand video
- ✓ Brand new courses released regularly, ensuring you can keep up with state-of-the-art techniques
- ✓ Pre-configured Jupyter Notebooks in Google Colab
- ✓ Run all code examples in your web browser — works on Windows, macOS, and Linux (no dev environment configuration required!)
- ✓ Access to centralized code repos for all 540+ tutorials on PyImageSearch
- ✓ Easy one-click downloads for code, datasets, pre-trained models, etc.
- ✓ Access on mobile, laptop, desktop, etc.
Summary
In this blog post, we combined our knowledge over the past 1.5 months of tutorials and:
- Increased FPS processing rate using threadng.
- Accessed multiple video streams at once.
- Performed image stitching and panorama construction from these video streams.
- And applied motion detection on the panorama image.
Overall, we were able to easily accomplish all of this on the Raspberry Pi. We can expect even faster performance on a modern laptop or desktop system.
See you next week!
If you enjoyed this post, please be sure to signup for the PyImageSearch Newsletter using the form below!
Download the Source Code and FREE 17-page Resource Guide
Enter your email address below to get a .zip of the code and a FREE 17-page Resource Guide on Computer Vision, OpenCV, and Deep Learning. Inside you'll find my hand-picked tutorials, books, courses, and libraries to help you master CV and DL!
Good Work !
When looking at the video, i feel like your Pi works faster than mine… At what clock frequency you are running your Pi?
I am using the stock clock frequency, no overclocking is being performed.
You rock man … Supb tuto.
Thanks so much!
I just came across this doing some research on a little project I’d like to do.
I’m self taught using Internet resources and am still learning python and just delving into opencv.
I read your very well written post and was curious about something. In my case, I don’t want to use motion detection, I simply want to stitch 2 back to back rpi camera streams together to create a 360 stream. Would this be possible of the back of this tutorial with a bit of modification?
I read the assumption that both cameras are fixed and non moving, in my case, the cameras are fixed back to back and will not move but I intend for the cameras to be mobile to stream video with.
Would this be possible?
Doing a great job for beginners like me,
Keep going……..
Thanks Hemant!
Hi Adrian,
Been following your blog for a while, great work man, great work! and it tends to get more impressive from post to post 😀 wonder how long you can keep up that pace 🙂 and i Luke your case studies.
Cheers
Max
Thanks for the kind words Max! 🙂
Nice to see your new project! Terrific!
A nice addition would be to give the stitcher the same interface as a videostream.
The stitching could be run in its own thread (like the cams do), but more importantly the motion detector (for example) could just take a videostream instead and do its thing.
So you would end up with:
motion = BasicMotionDetector(aVideoStream, minArea=500)
and in the loop:
motion.update()
That way you have a ‘larger videostream’ and the code doesn’t have to care where the images come from.
After the initial homography estimation, all that needs to be done to stitch images together is used
cv2.warpPerspective
which runs quite fast. Realistically, I don’t think threading would improve performance that much in this case.Threading was just a side-note.
I really liked the idea though to be able to use the stitcher just like a “normal” pi/web cam VideoStream (basically have something like a (java) interface) and use that interchangably in other code.
Hi Adrian
I want to stitch two videos i have. How would I go about doing that using the same code.
Just some pointers in the right direction would be appreciated.
If you have two videos, then you’ll need to read frames from both of them using the
cv2.VideoCapture
function. Once you have both the frames, you can apply the stitching code. If you’re interesting, I cover how to usecv2.VideoCapture
in a variety of applications inside Practical Python and OpenCV.Hi, Adrian
I have pi camera and a web camera, i tried to stitch videos from two camera, i get no homograpy could be computed. i am placing two camera’s exactly on the same line, the thing is my web camera focus is slightly zoomed than the pi camera, will that be an issue?
If you’re getting an error that the homography cannot be computed, then there are not enough raw keypoint matches. Make sure you are detecting a sufficient number of reliable keypoints. You might have to play with different keypoint detectors as well. Otherwise, it’s hard to say if the zooming issue would be a problem without seeing your actual images. As I said, this issue can likely be resolved by ensuring enough reliable keypoints are being detected in both images.
Hi,Adrian
I copy your code to my raspberry pi ,but it didn’t work ! (I also use picamera and USB webcam). When I execute the “realtime_stitching.py” ,it just show that [INFO] starting cameras… and nothing happen.
I don’t know how to fix this problem….can you help me?
See my reply to “Sarath” above. It seems likely that the homography matrix isn’t being computed. Otherwise, if you are getting no video streams displayed to your screen, then you’ll need to double-check that your machine can properly access the cameras.
Hi, Great post.
I was wondering, you are assuming fixed camera positions, what would happen if you were to apply the homography estimation continuously (lets say the cameras were moving).
I know that this is a computationally expensive task but lets assume we are not using a Raspberry Pi.
Would it be possible to use the same code (modified version) to stitch multiple moving cameras?
(I am also looking at this code which takes another approach https://www.youtube.com/watch?v=mMcrOpVx9aY)
Just t clarify, by “moving cameras” , I still mean that cameras do not move relative to each other. But lets say they were mounted on sides of a car.
Providing your system is fast enough, there shouldn’t be an issue applying homography estimation continuously. The only problem you might encounter is if there is too much “jitter” and “noise” in your video stream, causing the homography estimation to change. If the homography estimation changes, so does your resulting panorama.
What kind of pc would be needed to stitch 6 camera streams (Blackmagic) into one 360 video in realtime?
Would it work with OpenCV?
If your homography matrices are pre-computed (meaning they don’t need to be re-computed and re-validated) between each set of frames, you can actually perform image stitching on low end hardware (like a Raspberry Pi). If you need to constantly re-compute the matrices though, you will likely need a standard laptop/desktop system. I’ve never personally worked with stitching frames into a full 360 panorama though, so that question would likely need more investigation and even a bit of experimentation.
Hi Sven,
Did you manage to do this? Any code you could share? I’m looking into doing the same for 4 camera’s.
Thanks.
Hello, Adrian.
I have two usb webcams and trying to get panoramic video, but one of my frames(right frame always) got damaged after stitching. I’l try to change cams, but it steal the same problem. Maybe you know how to fix it?
Hm, nothing comes to mind off the top of my head. Without seeing your setup it’s pretty much impossible to tell what the exact issue is. My guess is that the quality of keypoints being matched is very low leading to a poor homography matrix.
What version of python and openCV did you use?
I used both Python 2.7 and Python 3 along with OpenCV 2.4 and OpenCV 3. The code should be compatible with all versions.
Hello,Sevastsyan.
have figured out a solution to this problem ,if so please share your knowledge.
I’m trying to figure out how to apply this to more than two cameras (five, actually, in a 360 degree panorama). I did see that the case of a >2 camera panorama was mentioned here somewhere as a case that might be covered in the future.
Has it been covered yet? If so I don’t see it.
Thanks!
I haven’t had a chance to cover image stitching for > 2 images yet. It’s in my queue but I’m honestly not sure when I’ll be able to write about it.
Hi Adrian! Nice guide!
I would need to stitch two cameras on top of each other, like top and bottom instead of left and right.
What would I need to edit in the code to make this to happen?
Thanks, I’m glad you enjoyed the guide. As for stitching images on top of each other, you need to change Lines 38-40 The first change is
cv2.warpPerspective
so that your output image is tall than it is wide (as the current code does). Then, you can update Line 40 to stack the images vertically rather than horizontally by adjusting the NumPy array slice. I hope that helps!Hi Adrian, Awesome guide..
1. I would need to save the stitched video stream on to a file. I used the cv2.Videowriter function shown in this guide of yours- https://pyimagesearch.com/2016/02/22/writing-to-video-with-opencv/ . But the output file is rather empty. Is there any specific modification for this?
2. I would also like to know if it is possible to stitch the image for more than two usb cameras?
Thanks
Writing video to file with OpenCV is unfortunately a pain in in the ass. The issue could be a lot of things related to logic in your code, how your system is configured, the list goes on. I would suggest taking a step back and just trying to write frames from your video stream to file without any processing. This will at least tell you if the problem is with your system or your code.
As for stitching together more than two frames, I will try to cover that in a future blog post.
Adrian, am looking at trying to stitch more than 2 videos together to make a wide panorama file (multiple HDMI woven into one wide window) from which I can select a viewing window (single HDMI window). Really like your subject following. One idea would be to keep the display window (single HDMI) centered around the moving subject but keep all the background which doesn’t change much as context. Do you think this is a difficult extension to what you’ve done?
Second question has to do with computing. If I know that the background and cameras are not going to move, then the only data i need to deal with is that related to the subject (that which is different from the standard background). Could/should this be done by using one RP to extract the subject from the background (large fixed file?) and then another to manage the tracking and other functions?
Really impressive what you’ve done!
Hey Bruce — this sounds like a simple object tracking problem. Once you have the object detected you can track it as it moves around (and extract its ROI and background for context). If your cameras are fixed and not moving, this process becomes even easier. Please see this post for more details on a simple motion detector and tracker.
Adrian, thanks for the tip. I’m working through it all now. is it possible to test some of this using a windows computer rather than the Pi? I only ask this because the Pi, which I have a 3 and camera, is a bit more physically difficult to deal with than, say, getting it all to work using a web cam and monitor that is already connected?
I’ll be buying your book, too!
Thanks, again.
Absolutely! As long as you use my
VideoStream
class you should be able to easily develop on Windows and deploy to the Raspberry Pi with minimal code changes.Adrian, thanks, again! You’ve hooked me. I’m just starting in computer vision, so, I’m heading to “Start Here.” You are an excellent teacher and communicator. I’ll be spending a good bit of time here!
Fantastic, glad to hear it! I hope the “Start Here” guide helps you on your journey!
Loving this blog. It’s really helping me learn computer vision quickly.
Question, though…
How would one determine the amount of overlap between the two images? I need to determine the center of the overlapped space.
I’m glad you’re finding the blog helpful Jeff, that’s great!
As for determining the level of overlap, there are multiple ways to do this. I would suggest looking at the (x, y)-coordinates of your matched keypoints in both images. Matched keypoints indicate overlap. Based on these coordinates you can derive the ratio of overlap between the two images.
Hi, very nice tutorial.
I want to take this one step further.
I want to use 3 goPros, a HDMI capture card to stitch real-time video.
How should I start to modify your code? and what is important to think about?
Using more than 2 cameras becomes much more challenging, the reasons of which are many for a blog post comment. I’ve been wanting to do a blog post on the topic, but haven’t gotten around to it. I will try to do one soon!
Great work Adrian, what is the maximum number of video streams that can be combined?
I was thinking of a set up using the NVIDIA Jetson and 6 cameras http://www.nvidia.com/object/jetson-tx1-dev-kit.html and https://www.e-consystems.com/blog/camera/?p=1709
I haven’t tried with more than 4 cameras before. But in theory, 6 shouldn’t be an issue, although the stitching algorithm will need to be updated to handle this.
Hi Adrain,
I tried to use your code on Raspberry Pi 3 using 2 cameras but I get “Segmentation failed” error on the command window.
Can you please suggest me how to fix this error.
Can you run a traceback error to determine which line of code caused the error? Also, which version of OpenCV are you using?
Would there be any way to get this feed to stream to something like a VR device? Like would it be compatible with ffmpeg or something similar?
Also, would it be possible to stitch something coming from a uv4l mjpeg stream?
Yes, absolutely. Provided you can read the frame(s) from a video stream the exact same process applies. You would just need to code the logic to grab the frame from your respective frames.
Hi, i tried to run this code on ip cameras, but it’s not working- I changed VideoStream function to cv2.VideoCapture,
is there some information about VideoStream ?
my goal is to run both streams using threading
I’d like to learn more of this as well, as I’m working with this stuff right now. I cannot find any documentation on VideoStream() for OpenCV
stitcher.stitch() exits the script without any messages
Any ideas?
Can you elaborate more on what you mean by “exits the script without any messages”? Normal issues would be not being able to access both video streams, thus the stitching not being able to take place. Otherwise, depending on OpenCV version, you might see a seg-fault based on which keypoint detector + descriptor you are using.
I am using Python v. 2.7 and cv2 v. 2.4.9.1
So, you’ve deleted my comments and questions?
Hey Matthew:
Due to spam reasons, all comments have to be manually approved by me on the PyImageSearch blog. After a comment is entered, it goes into the database, and awaits moderation. — your comments were not deleted, just waiting for approval.
I normally go through comments every 72 hours or so (I can’t spend all my time waiting for new comments to enter the queue).
I will approve + reply to your comments when I can, but please be patient and please don’t expect the worst and that I would delete your comments. Thank you.
Hi,
As I understand the homography matrix is M[1], am I right?
How can I use her for another transform that I’m trying to do.
I want to multiple a pixel (x1,y1,1) in one image and to get the result on the second image (x2,y2,1) I tried to do it, but it doesn’t work – maybe can you help me with it?
Thanks in advance.
Daniella
Hi,
I keep getting this error when trying to launch the script.
Traceback (most recent call last):
File “realtime_stitching.py”, line 3, in
from pyimagesearch.basicmotiondetector import BasicMotionDetector
ImportError: No module named pyimagesearch.basicmotiondetector
I have brought your book and have you image installed on my Rasberry Pi.
Can you please help me
Hi Jay — make sure you use the “Downloads” section of this blog post to download the source code. This will provide you with code that has the exact same directory structure as mine. It’s likely that your directory structure is incorrect. Download my source code and compare it to mine and I’m positive that you’ll be able to spot the differences.
Hi,
I am working on a project, I want to make a panoramic map off of a live footage of a camera, the camera traverses in a room (via car/drone) in a specific high, and it will only see the floor.
Do you have a suggestion on how and where should I learn to do this? I am working with OpenCV by the way.
OH and great job.
Hi Samer — so if I understand your question correctly, your camera only has a view of the floor? And you want to create a map of the room this way?
Hi Adrian,
I love your blog! I started reading as a hobby and now i want to test everything! Really great work – thank you so much!
I have a question about the panoramic stitching. With minor changes to your code i tried to read from 2 video files as an input and created a stitched result which is shown on its own frame, same as your example.
I can see the resulted stitched video and it is correct but i cannot save it to file. It creates a file but with only 6KB size.
Maybe a codec problem?
(Tried many codecs, even set value to -1 in order to choose. Also tried different syntax for codec – MJPG, ‘M’,’J’,’P’,’G’ etc.)
Any tip to put me to the right path?
Windows 8.1 , Python 3.6, OpenCV 3
Once again great job! Thank you in advance
Hi Giannis — unfortunately writing to video with OpenCV is a bit of a pain. I wrote a blog post on it, I hope it can help you!
I read it before attempting the recording but i thought to ask here also 🙂
I will try again though and report back with any findings If i manage to record it successfully.
Thank you again for your kind help!
Is it possible to use those functions in OpenCV Stitcher class (eg. blender and exposureCompensator) to improve the panorama, like eliminate the seam at the middle?
Thank you so much!
Hi Adrian,
I will be attempting to connect four cameras like that:
https://www.aliexpress.com/store/product/1080p-full-hd-mjpeg-30fps-60fps-120fps-OV2710-cmos-usb-camera-for-android-linux-raspberry-pi/913995_32397903999.html?spm=2114.10010108.1000023.1.34tJER
Do you think it would be straightforward, or are there any possible challenges with ordering cameras from aliexpress? Maybe you have a good suggestion what hardware would be the best?
Thanks!
I have never used the camera you linked to. I’ve normally use the Logitech C920 with my Raspberry Pi. Regardless of the camera model you choose, keep in mind that the Pi likely will not draw enough current to power all four cameras. You’ll also likely need a USB hub that can be plugged into a wall for extra power.
I am intrigued by the possibilities of this. I have a motorhome and have looked for a good 360 birdseye view camera system to no avail. It seems it could work with 4 ip fisheye cameras through rtsp. Only a small portion of the corner of each image would have to be maped. Any ideas on what I would have to do to get it done. This would be a great continuation of this post for multiple cameras. Thank you.
matches = self.flann.knnMatch(
^
SyntaxError: invalid syntax
I get above error when i use your above code of image stitching
Hi Manju — please make sure you use the “Downloads” section of this guide to download the source code and example videos. This will ensure there are no syntax errors that may happen when copying and pasting code.
Hi Adrian, first of all, thanks a lot for your work on helping others. I would like to know if is possible to do this in the background and have the Pi to provide a video stream url that you can grab in a browser, I’m trying to get 4 cameras (360) stitched together in a single feed and then using WebGL build a 360 interface to navigate that feed. Any help is appreciated and again thanks!
You can certainly perform this process in the background but I don’t have any tutorials on streaming the output straight to a web browser. I will consider this for a future tutorial. Thank you for the suggestion.
Mr. Rosebrock,
I emailed you about a year ago to see whether you would be interested in discussing a business opportunity using the video stitching software you described above. I’m still working on the business and would love to re-visit with you the possibility of talking about the project.
In a nutshell, it would involve real-time stitching of feeds from 2 video cameras at a sporting event (your part), then indexing and distributing the resulting video via cloud servers. There is definitely an altruistic component to the project, but also a financial component as well. There appears to be money to be made on this type of project.
I assembled a small team and we have made great progress with the indexing and distribution end of this project. I also have access to sports teams and have obtained permissions to film. Your demonstrated expertise could be very helpful.
I would love to hear back from you to gauge your interest.
Hey Joseph, thanks for considering me for the project but to be honest, I have too much on my plate right. Between planning PyImageConf 2018 and planning a wedding on top of that my time is just spread too thin. I would suggest posting the project on PyImageJobs and hiring a computer vision developer from there.
hey Adrian, love your work. I’m trying to do video stitching with live feed through IP cameras. I’m able to get the feed only by using rtsp command but the stitch is not proper. there is some kind of jerking effect observed.
tried the same using your but then i got an attribute error stating “tuple object has no attribute called shape”.
how can i perform video stitching of 2 IP cameras using the code you provided. i mean to say what changes are to be done to access cameras using IP address and then perform video stitch.
That jerking effect you are referring to is due to mismatches in the keypoint matching process. You might want to try a different keypoint detector to see if accuracy improves.
Hi Adrian,
Been following your work recently regarding stitching. I am working on similar project, I would want to know how to access IP cameras and perform video stitching.
Please help me.
Thanks in advance.
I don’t have any tutorials on accessing IP cameras yet, but I hope to cover it in the future! Sorry I couldn’t be of more direct help right now.
Hi Adrian,
thanks for your tutorials, they’re always a great inspiration.
I’m currently working on stitching a real time panorama from five cameras that will never move relative to one another. I’ve been following the approach outlined here: https://kushalvyas.github.io/stitching.html
The main idea is to stitch from center to left and then from center to right.
While I have been able to increase speed of aforementioned code by a factor of ~ 300, it still takes me around a quarter of a second to stitch the panorama. Too long to call it real time.
Are you planing to cover real time stitching of > 2 images any time soon? Or do you know of any other quality resources on this topic?
Thanks, Christoph.
I wrote a followup tutorial on image stitching. I would suggest starting there (and be sure to see my comments on real-time stitching).
Hello everyone i need help
I need to develop a video surveillance system that records the video stream in case of motion detection
I would suggest starting with this tutorial. It will show you how to write key event clips to video file. You can then swap out the color thresholding for motion detection (like we’ve done here).
Hi Adriane
With the same your implementation, is it possible to stitch three sources of cameras ?
Because I have a project that almost the same idea of this post implementation but it requires stitching three images instead of two.
Take a look at my latest multi-image stitching tutorial. Inside the post you’ll learn how to stitch multiple images; however, you’ll run into a few caveats with real-time stitching.
Thanks
One more question, is it possible to control the stitch direction? (on this post, the stitched result comes on the right, is it possible to apply the same implementation but the stitched result will be on the left instead of right?)
I don’t have any tutorials for IP camera streaming but I will try to cover it in a future blog post.
You would pass in the IP streaming URL to the
src
of theVideoStream
.can you share me the code to perform real time image stitching using three cameras?
Refer to this tutorial.
I’ve done some work based on this code. I like the way you get the homography matrix and reuse it to get a big speed increase. I have a need to stitch three videos. In case this is useful to someone else, this is what I did:
1. I have three videos I call left, center, and right. The code in this blog post is set up for one on the left and one on the right. My cameras are very wide angle and the center should be the “anchor”
2. I need to stitch the center first, so I stitch center and right. Starting here makes the center the “anchor” and distorts the right to fit.
3. Rotate the resulted sitched image 180 degrees and also the left image 180 degrees
4. Stitch the two rotated images. The rotation is so that the previously stitched image is on the left, making it the anchor.
5. Rotate the resulting image 180 degrees, leaving it in the original orientation.
I use Adrian’s stitch class to store the homography matrices – I don’t touch that, other than keeping two copies: one for the center, right and one for the stiched center right and the left.
Admittedly, this is a big hack, but it works well. If I were to take another stab at this, I would look more at the stitching code to see how I could define the right or left side as the “anchor” This would eliminate all the image rotation.
This approach, however hacky, leaves a lot of flexibility to stitch images in orientations other than the stock left right horizontal orientation.
Thanks for sharing, Erik!
Hello Adrian and Erik,
I did all the steps what you have been suggested, but in the final output, I am not getting the three stitched videos. the left video is missing and only the center and right stitched video are there in the middle. please suggest me for correction, your help will be appreciated.
Is now with new opencv update, possible to take transformations and sittch frames in real-time?
Hi Adrian. How can I stitch the images together without having a cropped result so that no information is lost? I would like to do something similar to “Image Stitching with OpenCV and Python” using the “Simple” method, but with two frames in real-time.
This method doesn’t crop out the center and keeps the “black” regions of the image after the transform so I’m not sure I understand your question?
Hello Adrian,
I am trying to stitch two real-time videos, But the output frame is continuously changing its frame size and create flicker in the display window. Please hint me some solution.
It sounds like there’s not enough keypoints being matched to reliably construct the homography matrix. Try using a different set of keypoint detectors and local invariant descriptors.
Hi Adrian,
I am trying to do the stitching using two webcams(one logitech 310hd and pc inbuilt cam) . While running the code the right side of the panorama always seems to be either distorted or fully black or a small portion displayed. What might be the reason?
It sounds like the keypoint matching resulted in a poor homography matrix. Try a different keypoint detector and/or local invariant descriptor.
Aravind, did you ever come up with a solution?
I am having the exact same problem and wonder if you can post your solution if you found one.
Thank you very much!
-Steve
Hi Adrian,
thanks for your tutorials.
I am trying to build a GUI(in Pyqt5) for this panorama stitching Video, but it always came to an error calls ‘unhandled AttributeError: builtin_function_or_method object has no attribute”shape”.’ it seems like it happened in the file named ‘convenience.py’ and it’s located at the function “def resize”. maybe you know the reason why?
ps: the original codes worked perfectly, but this problem came when I try to combine the codes with my GUI codes.
or maybe can you please give me some advices?
Thank you very much.
Best regards.
Sorry, it’s pretty hard to know without seeing your source code. Perhaps follow these suggestions.
I think you haven’t attached camera’s check with that and try
thanks for your tutorial.
i was just wondering will it work the same with 10 cameras at at once?
would you recommend using a GoPro or an IP camera for image processing using OpenCV as I’m currently working on a project and have faced multiple issues with choosing the appropriate type of camera to use instead of a webcam
I have video files from 3 different cameras, each covering some part of football pitch.
I want to stitch videos together to form a panoramic view.
later I need to extract position of players using motion sensor.
Can you please guide me, which parts do I need to consider altering.