Can you believe it’s been over four years since the original Raspberry Pi model B was released? Back then the Pi Model B shipped with only 256MB of RAM and a 700MHz single core processor.
Just over one year ago the Raspberry Pi 2 was unleashed on the world. And man, for something called a “Pi”, this beast made an impact on the computer world like an asteroid. This board sported 1GB of RAM and a 900MHz quad-core processor — quite the upgrade from the original single core, 700MHz system!
In my opinion, the Raspberry Pi 2 is what made computer vision possible on the Pi platform (at least from a Python + OpenCV perspective). The original model B simply didn’t have the processing capacity (or the RAM) to be powerful enough to process images video streams for anything more than trivial operations — the Pi 2 changed all that.
In fact, the Raspberry Pi 2 had such a meaningful impact on the computer vision space, that I even took the time to make a all code examples in Practical Python and OpenCV compatible with the Pi.
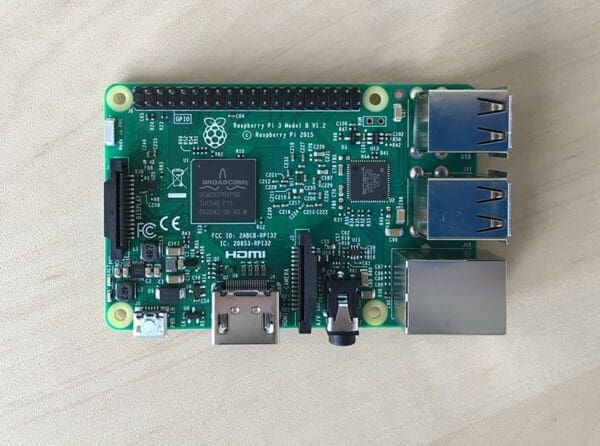
And now we have the Raspberry Pi 3:
- 1.2Ghz 64-bit quad-core processor.
- 1GB RAM.
- Integrated 802.11n wireless and bluetooth.
Personally, I was hoping for a bit more RAM (perhaps in the range of 1.5-2GB). But upgrading to a 64-bit processor with 33% increased performance is well worth it.
Just as I have done in previous blog posts, I’ll be demonstrating how to install OpenCV 3 with Python bindings on Raspbian Jessie.
If you are looking for previous installation instructions for different platforms, please consult this list:
- How to install OpenCV 3.0 on Raspbian Jessie.
- Installing OpenCV on your Raspberry Pi Zero running Raspbian Jessie.
- Installing OpenCV 3.0 for both Python 2.7 and Python 3+ on Raspbian Wheezy.
- Install OpenCV 2.4 for Python 2.7 on Raspbian Wheezy.
Otherwise, let’s proceed with getting OpenCV 3 installed on your brand new Raspberry Pi 3!
Assumptions
In this tutorial, I am going to assume that you already own a Raspberry Pi 3 with Raspbian Jessie installed.
You should also have either:
- Physical access to your Raspberry Pi 3 so that you can open up a terminal and execute commands.
- Remote access via SSH.
I’ll be doing the majority of this tutorial via SSH, but as long as you have access to a terminal, you can easily follow along.
Installing OpenCV 3 on a Raspberry Pi 3 running Raspbian Jessie
If you’ve ever installed OpenCV on a Raspberry Pi (or any other platform before), you know that the process can be quite time consuming with many dependencies and pre-requisites that have to be installed. The goal of this tutorial is to thus guide you step-by-step through the compile and installation process.
In order to make the installation process go more smoothly, I’ve included timings for each step so you know when to take a break, grab a cup of coffee, and checkup on email while the Pi compiles OpenCV. That said, the Pi 3 is substantially faster than the Pi 2, so the time it takes to compile OpenCV has decreased dramatically.
Anyway, let’s go ahead and get started installing OpenCV 3 on your brand new Raspberry Pi 3 running Raspbian Jessie.
Step #1: Expand filesystem
Are you using a brand new install of Raspbian Jessie?
If so, the first thing you should do is expand your filesystem to include all available space on your micro-SD card:
$ sudo raspi-config
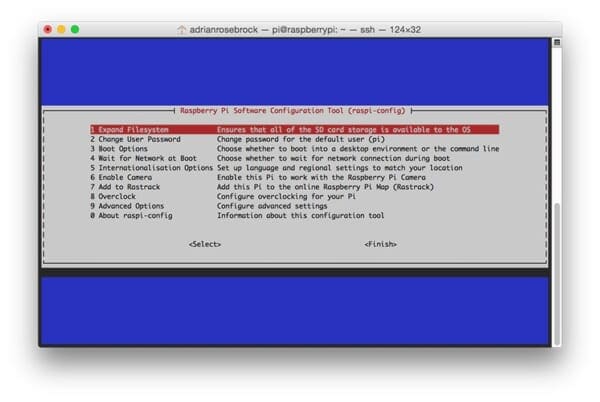
Once prompted, you should select the first option, “1. Expand File System”, hit Enter on your keyboard, arrow down to the “<Finish>” button, and then reboot your Pi:
$ sudo reboot
After rebooting, your file system should have been expanded to include all available space on your micro-SD card. You can verify that the disk has been expanded by executing df -h
and examining the output:
$ df -h Filesystem Size Used Avail Use% Mounted on /dev/root 7.2G 3.3G 3.6G 48% / devtmpfs 459M 0 459M 0% /dev tmpfs 463M 0 463M 0% /dev/shm tmpfs 463M 6.4M 457M 2% /run tmpfs 5.0M 4.0K 5.0M 1% /run/lock tmpfs 463M 0 463M 0% /sys/fs/cgroup /dev/mmcblk0p1 60M 20M 41M 34% /boot tmpfs 93M 0 93M 0% /run/user/1000
As you can see, my Raspbian filesystem has been expanded to include all 8GB of the micro-SD card.
However, even with my filesystem expanded, I have already used 48% of my 8GB card!
OpenCV, along with all its dependencies, will need a few gigabytes during the compile, so you should delete the Wolfram engine to free up some space on your Pi:
$ sudo apt-get purge wolfram-engine
After removing the Wolfram Engine, you can reclaim almost 700mb!
Step #2: Install dependencies
This isn’t the first time I’ve discussed how to install OpenCV on the Raspberry Pi, so I’ll keep these instructions on the briefer side, allowing you to work through the installation process: I’ve also included the amount of time it takes to execute each command so you can plan your OpenCV + Raspberry Pi 3 install accordingly (OpenCV itself takes 1h 12m to compile).
The first step is to update and upgrade any existing packages:
$ sudo apt-get update $ sudo apt-get upgrade
Timing: 1m 26s
We then need to install some developer tools, including CMake, which helps us configure the OpenCV build process:
$ sudo apt-get install build-essential cmake pkg-config
Timing: 40s
Next, we need to install some image I/O packages that allow us to load various image file formats from disk. Examples of such file formats include JPEG, PNG, TIFF, etc.:
$ sudo apt-get install libjpeg-dev libtiff5-dev libjasper-dev libpng12-dev
Timing: 32s
Just as we need image I/O packages, we also need video I/O packages. These libraries allow us to read various video file formats from disk as well as work directly with video streams:
$ sudo apt-get install libavcodec-dev libavformat-dev libswscale-dev libv4l-dev $ sudo apt-get install libxvidcore-dev libx264-dev
Timing: 34s
The OpenCV library comes with a sub-module named highgui
which is used to display images to our screen and build basic GUIs. In order to compile the highgui
module, we need to install the GTK development library:
$ sudo apt-get install libgtk2.0-dev
Timing: 3m 6s
Many operations inside of OpenCV (namely matrix operations) can be optimized further by installing a few extra dependencies:
$ sudo apt-get install libatlas-base-dev gfortran
Timing: 46s
These optimization libraries are especially important for resource constrained devices such as the Raspberry Pi.
Lastly, let’s install both the Python 2.7 and Python 3 header files so we can compile OpenCV with Python bindings:
$ sudo apt-get install python2.7-dev python3-dev
Timing: 45s
If you skip this step, you may notice an error related to the Python.h
header file not being found when running make
to compile OpenCV.
Step #3: Download the OpenCV source code
Now that we have our dependencies installed, let’s grab the 3.1.0
archive of OpenCV from the official OpenCV repository. (Note: As future versions of openCV are released, you can replace 3.1.0
with the latest version number):
$ cd ~ $ wget -O opencv.zip https://github.com/Itseez/opencv/archive/3.1.0.zip $ unzip opencv.zip
Timing: 1m 26s
We’ll want the full install of OpenCV 3 (to have access to features such as SIFT and SURF, for instance), so we also need to grab the opencv_contrib repository as well:
$ wget -O opencv_contrib.zip https://github.com/Itseez/opencv_contrib/archive/3.1.0.zip $ unzip opencv_contrib.zip
Timing: 43s
You might need to expand the command above using the “<=>” button during your copy and paste. The .zip
in the 3.1.0.zip
may appear to be cutoff in some browsers. The full URL of the OpenCV 3.1.0 archive is:
https://github.com/Itseez/opencv_contrib/archive/3.1.0.zip
Note: Make sure your opencv
and opencv_contrib
versions are the same (in this case, 3.1.0
). If the versions numbers do not match up, then you’ll likely run into either compile-time or runtime.
Step #4: Python 2.7 or Python 3?
Before we can start compiling OpenCV on our Raspberry Pi 3, we first need to install pip
, a Python package manager:
$ wget https://bootstrap.pypa.io/get-pip.py $ sudo python get-pip.py
Timing: 20s
If you’re a longtime PyImageSearch reader, then you’ll know that I’m a huge fan of both virtualenv and virtualenvwrapper. Installing these packages is not a requirement and you can absolutely get OpenCV installed without them, but that said, I highly recommend you install them as other PyImageSearch tutorials in the future will also leverage Python virtual environments. I’ll also be assuming that you have both virtualenv
and virtualenvwrapper
installed throughout the remainder of this guide.
So, given that, what’s the point of using virtualenv
and virtualenvwrapper
?
First, it’s important to understand that a virtual environment is a special tool used to keep the dependencies required by different projects in separate places by creating isolated, independent Python environments for each of them.
In short, it solves the “Project X depends on version 1.x, but Project Y needs 4.x” dilemma. It also keeps your global site-packages
neat, tidy, and free from clutter.
If you would like a full explanation on why Python virtual environments are good practice, absolutely give this excellent blog post on RealPython a read.
It’s standard practice in the Python community to be using virtual environments of some sort, so I highly recommend that you do the same:
$ sudo pip install virtualenv virtualenvwrapper $ sudo rm -rf ~/.cache/pip
Timing: 9s
Now that both virtualenv
and virtualenvwrapper
have been installed, we need to update our ~/.profile
file to include the following lines at the bottom of the file:
# virtualenv and virtualenvwrapper export WORKON_HOME=$HOME/.virtualenvs source /usr/local/bin/virtualenvwrapper.sh
In previous tutorials, I’ve recommended using your favorite terminal-based text editor such as vim
, emacs
, or nano
to update the ~/.profile
file. If you’re comfortable with these editors, go ahead and update the file to reflect the changes mentioned above.
Otherwise, you should simply use cat
and output redirection to handle updating ~/.profile
:
$ echo -e "\n# virtualenv and virtualenvwrapper" >> ~/.profile $ echo "export WORKON_HOME=$HOME/.virtualenvs" >> ~/.profile $ echo "source /usr/local/bin/virtualenvwrapper.sh" >> ~/.profile
Now that we have our ~/.profile
updated, we need to reload it to make sure the changes take affect. You can force a reload of your ~/.profile
file by:
- Logging out and then logging back in.
- Closing a terminal instance and opening up a new one
- Or my personal favorite, just use the
source
command:
$ source ~/.profile
Note: I recommend running the source ~/.profile
file each time you open up a new terminal to ensure your system variables have been setup correctly.
Creating your Python virtual environment
Next, let’s create the Python virtual environment that we’ll use for computer vision development:
$ mkvirtualenv cv -p python2
This command will create a new Python virtual environment named cv
using Python 2.7.
If you instead want to use Python 3, you’ll want to use this command instead:
$ mkvirtualenv cv -p python3
Again, I can’t stress this point enough: the cv
Python virtual environment is entirely independent and sequestered from the default Python version included in the download of Raspbian Jessie. Any Python packages in the global site-packages
directory will not be available to the cv
virtual environment. Similarly, any Python packages installed in site-packages
of cv
will not be available to the global install of Python. Keep this in mind when you’re working in your Python virtual environment and it will help avoid a lot of confusion and headaches.
How to check if you’re in the “cv” virtual environment
If you ever reboot your Raspberry Pi; log out and log back in; or open up a new terminal, you’ll need to use the workon
command to re-access the cv
virtual environment. In previous blog posts, I’ve seen readers use the mkvirtualenv
command — this is entirely unneeded! The mkvirtualenv
command is meant to be executed only once: to actually create the virtual environment.
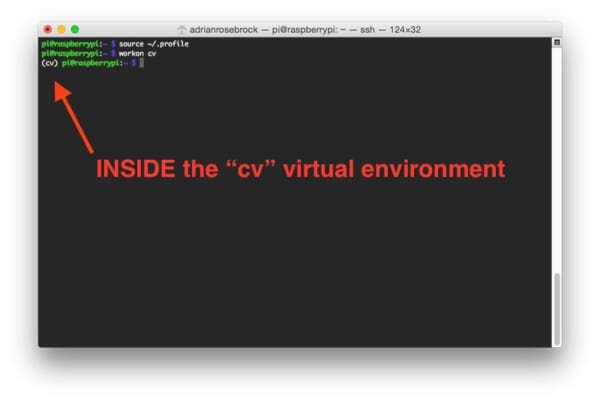
After that, you can use workon
and you’ll be dropped down into your virtual environment:
$ source ~/.profile $ workon cv
To validate and ensure you are in the cv
virtual environment, examine your command line — if you see the text (cv)
preceding your prompt, then you are in the cv
virtual environment:
Otherwise, if you do not see the (cv)
text, then you are not in the cv
virtual environment:
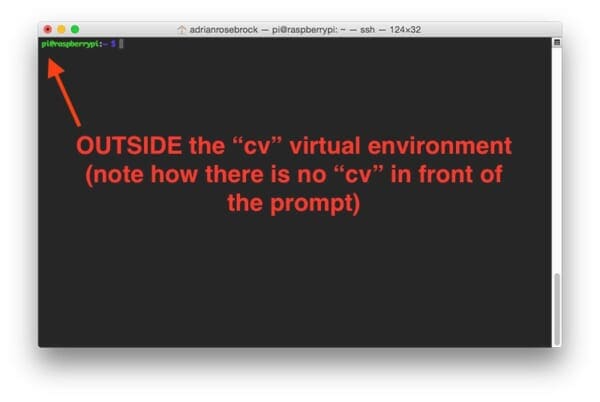
To fix this, simply execute the source
and workon
commands mentioned above.
Installing NumPy on your Raspberry Pi
Assuming you’ve made it this far, you should now be in the cv
virtual environment (which you should stay in for the rest of this tutorial). Our only Python dependency is NumPy, a Python package used for numerical processing:
$ pip install numpy
Timing: 9m 39s
Be sure to grab a cup of coffee or go for a nice walk, the NumPy installation can take a bit of time.
Note: Another question I’ve often seen is “Help, my NumPy installation has hung and it’s not installing!” Actually, it is installing, it just takes time to pull down the sources and compile. Be patient. The Raspberry Pi isn’t as fast as your laptop/desktop.
Step #5: Compile and Install OpenCV
We are now ready to compile and install OpenCV! Double-check that you are in the cv
virtual environment by examining your prompt (you should see the (cv)
text preceding it), and if not, simply execute workon
:
$ workon cv
Once you have ensured you are in the cv
virtual environment, we can setup our build using CMake:
$ cd ~/opencv-3.1.0/ $ mkdir build $ cd build $ cmake -D CMAKE_BUILD_TYPE=RELEASE \ -D CMAKE_INSTALL_PREFIX=/usr/local \ -D INSTALL_PYTHON_EXAMPLES=ON \ -D OPENCV_EXTRA_MODULES_PATH=~/opencv_contrib-3.1.0/modules \ -D BUILD_EXAMPLES=ON ..
Timing: 1m 57s
Now, before we move on to the actual compilation step, make sure you examine the output of CMake!
Start by scrolling down the section titled Python 2
and Python 3
.
If you are compiling OpenCV 3 for Python 2.7, then make sure your Python 2
section includes valid paths to the Interpreter
, Libraries
, numpy
and packages path
, similar to my screenshot below:
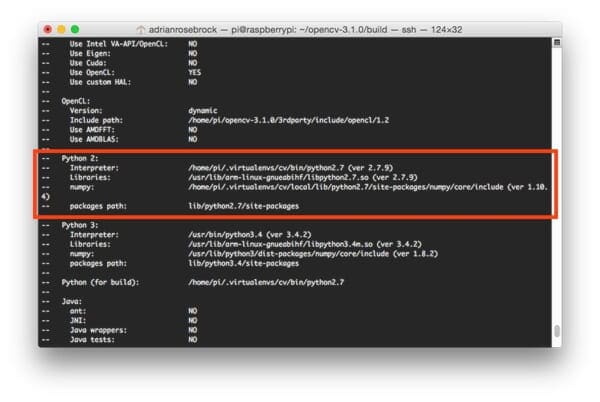
Notice how the Interpreter
points to our python2.7
binary located in the cv
virtual environment. The numpy
variable also points to the NumPy installation in the cv
environment.
Similarly, if you’re compiling OpenCV for Python 3, make sure the Python 3
section looks like the figure below:
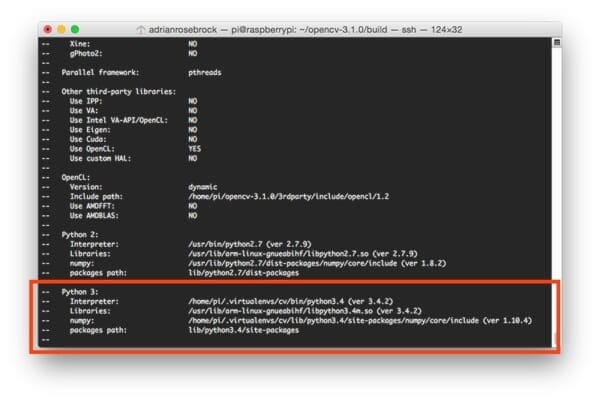
Again, the Interpreter
points to our python3.4
binary located in the cv
virtual environment while numpy
points to our NumPy install.
In either case, if you do not see the cv
virtual environment in these variables paths, it’s almost certainly because you are NOT in the cv
virtual environment prior to running CMake!
If this is the case, access the cv
virtual environment using workon cv
and re-run the cmake
command outlined above.
Finally, we are now ready to compile OpenCV:
$ make -j4
Timing: 1h 12m
Note: Compiling OpenCV in 72 minutes on the Raspberry Pi 3 is a 24% improvement over the previous 95 minutes for the Raspberry Pi 2. That extra 300MHz makes a big difference!
The -j4
command controls the number of cores to leverage when compiling OpenCV 3. The Raspberry Pi 3 has four cores, thus we supply a value of 4
to allow OpenCV to compile faster.
However, due to race conditions, there are times when make
errors out when using multiple cores. If this happens to you, I suggest starting the compilation over again and using only one core:
$ make clean $ make
Once OpenCV 3 has finished compiling, your output should look similar to mine below:
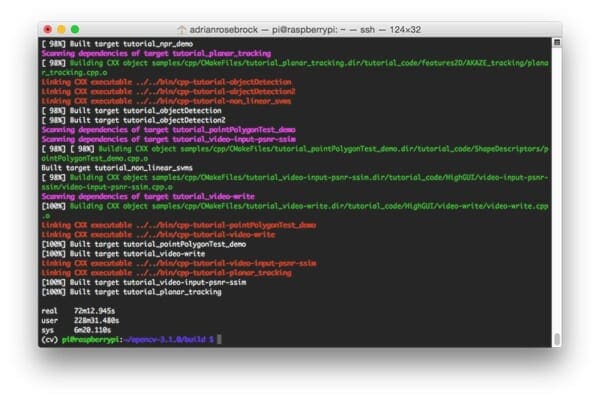
From there, all you need to do is install OpenCV 3 on your Raspberry Pi 3:
$ sudo make install $ sudo ldconfig
Timing: 52s
Step #6: Finish installing OpenCV on your Pi
We’re almost done — just a few more steps to go and you’ll be ready to use your Raspberry Pi 3 with OpenCV 3.
For Python 2.7:
Provided your Step #5 finished without error, OpenCV should now be installed in /usr/local/lib/python2.7/site-pacakges
. You can verify this using the ls
command:
$ ls -l /usr/local/lib/python2.7/site-packages/ total 1852 -rw-r--r-- 1 root staff 1895772 Mar 20 20:00 cv2.so
Note: In some cases, OpenCV can be installed in /usr/local/lib/python2.7/dist-packages
(note the dist-packages
rather than site-packages
. If you do not find the cv2.so
bindings in site-packages
, we be sure to check dist-packages
.
Our final step is to sym-link the OpenCV bindings into our cv
virtual environment for Python 2.7:
$ cd ~/.virtualenvs/cv/lib/python2.7/site-packages/ $ ln -s /usr/local/lib/python2.7/site-packages/cv2.so cv2.so
For Python 3:
After running make install
, your OpenCV + Python bindings should be installed in /usr/local/lib/python3.4/site-packages
. Again, you can verify this with the ls
command:
$ ls -l /usr/local/lib/python3.4/site-packages/ total 1852 -rw-r--r-- 1 root staff 1895932 Mar 20 21:51 cv2.cpython-34m.so
I honestly don’t know why, perhaps it’s a bug in the CMake script, but when compiling OpenCV 3 bindings for Python 3+, the output .so
file is named cv2.cpython-34m.so
(or some variant of) rather than simply cv2.so
(like in the Python 2.7 bindings).
Again, I’m not sure exactly why this happens, but it’s an easy fix. All we need to do is rename the file:
$ cd /usr/local/lib/python3.4/site-packages/ $ sudo mv cv2.cpython-34m.so cv2.so
After renaming to cv2.so
, we can sym-link our OpenCV bindings into the cv
virtual environment for Python 3.4:
$ cd ~/.virtualenvs/cv/lib/python3.4/site-packages/ $ ln -s /usr/local/lib/python3.4/site-packages/cv2.so cv2.so
Step #7: Testing your OpenCV 3 install
Congratulations, you now have OpenCV 3 installed on your Raspberry Pi 3 running Raspbian Jessie!
But before we pop the champagne and get drunk on our victory, let’s first verify that your OpenCV installation is working properly.
Open up a new terminal, execute the source
and workon
commands, and then finally attempt to import the Python + OpenCV bindings:
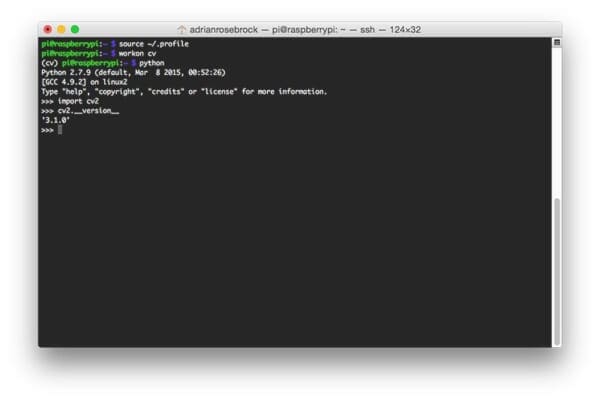
$ source ~/.profile $ workon cv $ python >>> import cv2 >>> cv2.__version__ '3.1.0' >>>
As you can see from the screenshot of my own terminal, OpenCV 3 has been successfully installed on my Raspberry Pi 3 + Python 2.7 environment:
Once OpenCV has been installed, you can remove both the opencv-3.1.0
and opencv_contrib-3.1.0
directories to free up a bunch of space on your disk:
$ rm -rf opencv-3.1.0 opencv_contrib-3.1.0
However, be cautious with this command! Make sure OpenCV has been properly installed on your system before blowing away these directories. A mistake here could cost you hours in compile time.
Troubleshooting and FAQ
Q. When I try to execute mkvirtualenv
and workon
, I get a “command not found error”.
A. There are three reasons why this could be happening, all of them related to Step #4:
- Make certain that you have installed
virtualenv
andvirtualenvwrapper
viapip
. You can check this by runningpip freeze
and then examining the output, ensuring you see occurrences of bothvirtualenv
andvirtualenvwrapper
. - You might not have updated your
~/.profile
correctly. Use a text editor such asnano
to view your~/.profile
file and ensure that the properexport
andsource
commands are present (again, check Step #4 for the contents that should be appended to~/.profile
. - You did not
source
your~/.profile
after editing it, rebooting, opening a new terminal, etc. Any time you open a new terminal and want to use a virtual environment, make sure you executesource ~/.profile
to load the contents — this will give you access to themkvirtualenv
andworkon
commands.
Q. After I open a new terminal, logout, or reboot my Pi, I cannot execute mkvirtualenv
or workon
.
A. See reason #3 from the previous question.
Q. When I (1) open up a Python shell that imports OpenCV or (2) execute a Python script that calls OpenCV, I get an error: ImportError: No module named cv2
.
A. Unfortunately, this error is extremely hard to diagnose, mainly because there are multiple issues that could be causing the problem. To start, make sure you are in the cv
virtual environment by using workon cv
. If the workon
command fails, then see the first question in this FAQ. If you’re still getting an error, investigate the contents of the site-packages
directory for your cv
virtual environment. You can find the site-packages
directory in ~/.virtualenvs/cv/lib/python2.7/site-packages/
or ~/.virtualenvs/cv/lib/python3.4/site-packages/
(depending on which Python version you used for the install). Make sure that your sym-link to the cv2.so
file is valid and points to an existing file.
What's next? We recommend PyImageSearch University.
86+ total classes • 115+ hours hours of on-demand code walkthrough videos • Last updated: February 2025
★★★★★ 4.84 (128 Ratings) • 16,000+ Students Enrolled
I strongly believe that if you had the right teacher you could master computer vision and deep learning.
Do you think learning computer vision and deep learning has to be time-consuming, overwhelming, and complicated? Or has to involve complex mathematics and equations? Or requires a degree in computer science?
That’s not the case.
All you need to master computer vision and deep learning is for someone to explain things to you in simple, intuitive terms. And that’s exactly what I do. My mission is to change education and how complex Artificial Intelligence topics are taught.
If you're serious about learning computer vision, your next stop should be PyImageSearch University, the most comprehensive computer vision, deep learning, and OpenCV course online today. Here you’ll learn how to successfully and confidently apply computer vision to your work, research, and projects. Join me in computer vision mastery.
Inside PyImageSearch University you'll find:
- ✓ 86+ courses on essential computer vision, deep learning, and OpenCV topics
- ✓ 86 Certificates of Completion
- ✓ 115+ hours hours of on-demand video
- ✓ Brand new courses released regularly, ensuring you can keep up with state-of-the-art techniques
- ✓ Pre-configured Jupyter Notebooks in Google Colab
- ✓ Run all code examples in your web browser — works on Windows, macOS, and Linux (no dev environment configuration required!)
- ✓ Access to centralized code repos for all 540+ tutorials on PyImageSearch
- ✓ Easy one-click downloads for code, datasets, pre-trained models, etc.
- ✓ Access on mobile, laptop, desktop, etc.
Summary
In this blog post, we learned how to install OpenCV 3 with either Python 2.7 or Python 3 bindings on your Raspberry Pi 3 running Raspbian Jessie.
If you are running a different version of Raspbian (such as Raspbian Wheezy) or want to install a different version of OpenCV (such as OpenCV 2.4), please consult the following tutorials:
- How to install OpenCV 3.0 on Raspbian Jessie.
- Installing OpenCV on your Raspberry Pi Zero running Raspbian Jessie.
- Installing OpenCV 3.0 for both Python 2.7 and Python 3+ on Raspbian Wheezy.
- Install OpenCV 2.4 for Python 2.7 on Raspbian Wheezy.
But before you go…
I tend to utilize the Raspberry Pi quite a bit on this blog, so if you’re interested in learning more about the Raspberry Pi + computer vision, enter your email address in the form below to be notified when these posts go live!
Join the PyImageSearch Newsletter and Grab My FREE 17-page Resource Guide PDF
Enter your email address below to join the PyImageSearch Newsletter and download my FREE 17-page Resource Guide PDF on Computer Vision, OpenCV, and Deep Learning.
Is there any advantage to compiling OpenBLAS as well (I did that on my Pi3 without really knowing what it was, because it was mentioned as missing during config)
Since all Raspberry Pi models within the same family have the same architecture, no, I can’t really see a reason for compiling OpenBLAS for source unless there is some specific feature inside OpenBLAS that you wanted to optimize. Within every library there are various knobs you can tweak and levers to pull — so unless you know exactly what you wanted to optimize, I’m not sure I would go down that rabbit hole.
I have a 8gb card and when i reached to sudo make install process it shows “No space left on device”.. so is 8 gb card is enough???
8GB should be more than sufficient. Make sure you have ran
raspi-config
and expanded the disk to use the entire card.I am having a problem on step : 5 i.e: make
i stuck on 91% it doesn’t go to 100%………. ?
When you say “stuck” how long is stuck there? 5 minutes? 60 minutes? If you are compiling with multiple cores then it’s possible that a race condition was hit. Instead, try using only a single core:
The compile will take longer but you will ideally not be caught in a situation where the compile gets stuck.
Same issue here. My 8G card only had about 7 usable though. Switched to a 16G card.
BR,
Steve
I am using 16GB scan disk memory card, but still same issue got stuck in 85% and nothing going further, seems like Raspberry Pi got hang, even screen also freezes, and once disconnect from VNC cant again again able to connect just showing connecting….
(although i am using raspberry pi 3 B+ model)
The size of the SD card doesn’t matter. You’re running out of memory and the Pi is hanging. Be sure to follow this guide on increasing your swap size and compiling OpenCV on the Pi.
Did you try to use autoenv instead of manually load the environment every time?
https://github.com/kennethreitz/autoenv
I’ve never heard of autoenv before, thanks for bringing it to my attention!
Hi Adran, always a pleasure to read your blog/tutorials.
Could you post some comparisons between RPI2 and PRI3 timings when solving different problems. I am wondering what is the real acceleration factor between the two RPIs.
Personally, I am using them for motion detection.
Sure, I can look into doing some benchmark posts. But keep in mind that the major difference between the Pi 2 and Pi 3 (at least in terms of speed) is that the Pi 3 is 300Mhz faster than the Pi 2. If you’re working with motion detection, then absolutely go with the Pi 3 — that extra 300Mhz is important.
Thanks for your tutorial
python2 or python3 , which one is faster ?
is there a significant difference between them in speed when run a opencv example?
I don’t have any formal benchmarks to verify this, but there really aren’t any true speed differences between Python 2.7 and Python 3. Both versions are pretty optimized (at least as far as scripting languages are concerned). I would use whichever Python version you are more comfortable with.
Adrian, not to be picky but to reinforce your point, Raspberry Pi model B shipped originally with just 256MB of RAM. One of them is working nicely with OpenELEC in my bedroom…
Thank you for all your interesting posts!
Thanks for pointing this out Pablo! I have updated the blog post to reflect the change.
Hey thank for your tutorials! Much easier than most others. Pulling bits of tutorials and examples together from around the web I’ve been able to create this: https://www.youtube.com/watch?v=hvzohGuw8XI
Once it’s working I’ll send publish all the python/c++/html code.
Very cool, thanks for sharing! 🙂
Adrian, thanks ! I got my Pi3 up and running with OpenCV 3.1 with no problems.
Fantastic, glad to hear it Blaine!
while running opencv on raspberry pi3,i am having this error ,what to do now
“Unable to stop the stream: Inappropriate ioctl for device”
i was trying to use a video file as input
Hey just a noob and I’m wondering will this add all the opencv headers and libraries to the “path” (sorry for using windows terms for use when compiling native cpp code?
It’s been a long time since I’ve had to compile C++ code for OpenCV, but I’ve always manually specified the include directories, like in this StackOverflow question.
Hi Adrian,
I have a few question
1.if 64 bit OS released for Pi 3 so what is 64 bit advantages?
i read somewhere that you can use int_64 but your program need more RAM to run
but i cant find anything that show clearly how much improve OpenCV programs speed?
2.in previous tutorial you say : “In order to build OpenCV 3.1.0 , you need to set -D INSTALL_C_EXAMPLES=OFF (rather than ON ) in the cmake command. ”
but in this tutorial you not mention it.when i run make command i get error in 93% so i add this to cmake and run again .finished without error but im not sure the reason is for that.
another thing i want to say ,the Pi3 has the same RAM and GPU but the clock frequency of them increased so i think the 33% increasing in CPU clock is not the only improvement
and i test a several code with both Pi3 and Pi2
the FPS increase about 45 to 50% for me
for example,a python script with only imshow (+ your perfect imutils library) from 40 in Pi2 reached to 80 FPS ! (use raspberry camera)
thanks Adrian
I don’t have any formal benchmarks related to speed and 64-bit versus 32-bit. By definition, 64-bit value will require more memory than a 32-bit. However, the benefit is more precision.
I also left out
-D INSTALL_C_EXAMPLES=OFF
in this tutorial because this bug seems to be resolved in the latest release of OpenCV.This seems to be broken again 🙁
sudo apt-get install libv4l-dev
cd /usr/include/linux/
sudo ln -s ../libv4l1-videodev.h videodev.h
for building on 3.2.0
Hi Adrian
Your post is invaluable – thank you. I could not have installed OpenCV on my Raspberry Pi 3 without your post.
I did encounter one problem as I followed it through. I got a certificate error for the command
wget https://bootstrap.pypa.io/get-pip.py
which I worked around easily using
wget –no-check-certificate https://bootstrap.pypa.io/get-pip.py
kind regards
George
Awesome, thanks for sharing George!
while compiling OpenCV i am getting makefile:160: recipe for target ‘all’ failed error
Be sure to check the output of the “make” command. You will likely need to scroll through it to determine exactly what caused the error.
HI Adrian! i badly need help. Sorry for the bother but in my case, in “cmake -D CMAKE_BUILD_TYPE=RELEASE \” and so on, after entering the code, it sayd”bash: Cmake: command not found” and i dont know why 🙁 PLease
It sounds like you missed Step 2, in particular where we install cmake:
$ sudo apt-get install build-essential cmake pkg-config
Hey adrian! We have the same problem as @KUNAL M and I checked the output of the make command, we have the same output of python3 but our version is different I have python 3.5.3 and numpy version of 1.15.4. Do you think that is the one causing the error? How do I fix it?
If you are having trouble compiling OpenCV from source you may prefer to do a pip install of OpenCV instead.
same.
can you hepl me, pls?
Hi Adrian.
Your posts and the Book are excellent resources.
Will you be having posts on Deep Learning soon?
Thank You
Abkul Orto
Yes, I’ll absolutely be doing more posts on deep learning soon. I also cover deep learning inside the PyImageSearch Gurus course.
What a difference in timings between the PI models. I dusted off my B+ a few days ago and after adding a snazzy new 32GB SSD and Jessie I decided to compile OpenCV. 14 hours later I was done. I’m not sure where these quoted times came from as it takes several hours to compile on my MacBook Air running a Vagrant CentOS-7 box. I don’t see how it’s possible that PI can compile the full OpenCV install in just over an hour. Enlighten me, Sensei. 🙂
The B+ has only one core. Meanwhile, the Pi 2 and Pi 3 have four cores. This means that you can distribute the compile time over the 4 cores and dramatically reduce your compile time!
Hi,
Thanks for the tutorial. I would like to instal opencv 3 on rip 3 without virtual environment as I might use Python 2.7 only or no Python at all (C++) What is the sequence of installation then to skip virtual environment and it’s complexity?
To clarify: You can use this same procedure to install OpenCV on your Raspberry Pi and simply never use the Python bindings. By installing OpenCV, you’ll still have full access to the C++ OpenCV API. The easiest method to skip Python support is to use CMake and add the flag:
-D BUILD_opencv_python=OFF
Adrian,
Is it possible to implement a colour tracking project (ball on the plate) using RPi3 with a resolution of 640×480 and a frame rate better than 30fps? I have Logitech C920 webcam. Thanks for your time and sharing the knowledge.
At 640×480 you’ll struggle to get a frame processing rate > 30 FPS, between the I/O latency and the general power of the Pi. In order to milk every last bit of speed out of the Pi, you might want to implement the color tracking in C/C++, that should give you a bit of a speed boost.
Thanks Adrian,
Following your response, I’m trying to investigate how to use multicore and multithreading on RPi with opencv to increase the performance. Some sources say that it has to be recompiled with WITH_TBB or WITH_OPENMP flag enabled. My guess is the your installation procedure doesn’t do that, correct?
When I started with running guvcview on my RPi3, it gives me a discouraging 2fps with 480 x 320 resolution, yet to see what I can get with opencv.
If anyone did a similar project already and can give some pointers, it would be highly appreciated.
Correct, this tutorial does not take into account TBB or OpenMP. 2 FPS sounds extremely, extremely low. How are you executing your Python script? Natively on the Pi via a keyboard and HDMI monitor? Or SSH? VNC?
can I add the openmp features if I have already installed opencv following this thread. and how?
If you’ve already compiled + installed OpenCV then any additional features you may want will require a re-compile and re-install.
Adrian,
First a thanks…awesome install instructions. Awesome books! Awesome videos! I’m completely new to python and opencv and you have made it dead simple. I’m up and running in virtualbox on my Macbook Air and my Pi3 as well.
Only problem is I’m having trouble with matplotlib on the Pi3. I used pip to install it and it appears to run…i.e. the histogram programs from Chapter 7 run but the windows with the plots of the histograms don’t show up. Since there doesn’t seem to be any error I haven’t been able to track down what I’m missing….
Any thoughts?
Regards,
Jeff
Luckily this is an easy fix! Just use this tutorial.
Hi, Ive been planning to use openmp, tbb, and ipp for my opencv3 but I am having problems, when I try to compile IPP by including WITH_IPP=ON every time i compile, it won’t still recognize ipp. tbb was succesfully built with opencv but everytime I run my program the cores being utilize still the same. can you give me some ideas on how to work with these 3rd party software and how to use/add them in opencv3. been search all over the internet and I can’t find a good guide/answers.
IPP is Intel’s asynchronous C/C++ library. The Raspberry Pi is an ARM (non-Intel) processor so IPP isn’t relevant here.
Hi Adrian,
Thanks for the detailed install instruction, based on these I also purchased your book which i’m working through. Could I suggest you also add pip install “picamera[array]” to the installation instructions.
Hi Tony — thanks for picking up a copy of Practical Python and OpenCV. I normally wouldn’t include installation of the picamera library in a general OpenCV install tutorial, mainly because some readers may not be using the Raspberry Pi camera module — they may be using the USB webcam instead. But that’s a good suggestion, thanks for the comment.
is it only my lack of understanding or is the virtualenv approach a total waste of time if I’m preparing a device for production? In other words, I developed an opencv app that runs on RaspberryPi and I found a client for it. The app runs on system startup (crontab pointing to a launcher script)… Did I just make a bloody mess on a brand new RPi3’s SD disk by creating a virtualenv there and installing opencv in it? Apparently now I cant access opencv from outside that virtualenv so I need to compile it again, this time outside
In my opinion, it’s never a waste of time to use Python virtual environments, especially for production environments. I detail my reasoning in the first few sections this blog post. As running a Python + OpenCV script on boot, keep an eye on the PyImageSearch blog. The next post (which should publish in ~30 minutes) details exactly how to do this.
I’ve followed your setup and am having problems. Whenever I import cv2 and run
cam = cv2.VideoCapture(0)
print cam.isOpened()
I am always getting false. Whatever I do I cannot seem to be able to access the camera features through openCV.
Any pointers?
Are you using the Raspberry Pi camera module? Or a USB webcam? If you’re using the Pi camera module, A target=”blank” href=”https://pyimagesearch.com/2015/03/30/accessing-the-raspberry-pi-camera-with-opencv-and-python/”>follow this tutorial on how to access it. You might also be interested in this blog post where I demonstrate how to access the picamera module and
cv2.VideoCapture
using the same function.Will this install also work with Raspbian Jessie Lite?
I personally haven’t tried this on tutorial on Raspbian Lite. I would be very curious to see if it works. If you gave it a try, can you let me know the result?
hi all so i’m trying with the “2017-06-21-raspbian-jessie-lite.img” on my RPi3.
everything is fine untile the cmake on the virtual (cv).
— Python 2:
— Interpreter: /usr/bin/python2.7 (ver 2.7.9)
—
— Python 3:
— Interpreter: /usr/bin/python3.4 (ver 3.4.2)
don’t no why i can’t have the same thing as you show! 🙁
but before this everything was ok. So i think it can be done on the lite version… just need to fix this passage 🙂
everything ok! 8) my bad!
what did you di to solve this problem? I am stuck on this one…
When I run this command:
pip install numpy
I get this response:
Requirement already satisfied (use –upgrade to upgrade): numpy in /user/lib/python2.7/dist-packages
I’m starting from a fresh install of Jessie. So, is numpy already installed at this point, or is there something else going on?
Thanks!
Have you already used the
mkvirtualenv
/workon
commands to enter thecv
Python virtual environment? If so, then yes, you can proceed okay. Otherwise, make sure you create thecv
virtual environment first and then install NumPy.If I open up the idle then I can not import cv2 or when I don’t do workon cv even then I can not import cv2.
I want to write my program directly in IDLE and run from there what do I do ?
Are you referring to the GUI version of IDLE? Or the command line version of IDLE? Unfortunately, the GUI version of IDLE does not respect the
workon
command. You’ll instead need to use the command line IDLE or something like IPython Notebooks.I think I’m having the same problem. I can import cv2 from python3 command line, but not if I try to import it when I open idle3.
Is there no way to have it import into the Idle GUI? How do you write a program that you can save if you have to do everything from the command line?
Hey Matt — you actually just write the code in a
.py
file and then execute it via:$ python my_script.py
Keep in mind that the command line IS NOT IDLE. IDLE is a separate program. The command line just calls other programs.
Thanks so much! Massive help for a beginner.
No problem Jake, I’m happy I could help!
I have installed everything following the procedures in your tutorial and everything appears to have worked well, thank you, except for one thing. When I try to use cv2.SURF I get an error that there is no such module.
Looking through the contents and readme’s in the installed and unzipped folder there does not appear to be a SURF module in the list of modules. Am I missing something?
I am currently using opencv 2.9.1 in my robot and use SURF to recognise images which guide it. I would like to upgrade to a later version to see if its “hit rate” can be improved.
I have made the installation on a Pi2 with the very latest (as of yesterday) upgraded copy of Jessie but I can’t see that this would be an issue.
This blog post on OpenCV versions and SIFT/SURF will help you quite a bit 🙂
Thanks Adrian. I should have looked a bit harder before posting, the blog certainly answers my question.
sir i installed opencv3 correctly and nothing wrong up to the last command but when i run your sample code drawing.py from your pyimagesearch book the error says “No module named cv2” .. what do you think is the error?
Make sure you access your Python virtual environment before executing the Python script:
everytime that i will run python drawing.py i will run first workon cv?
You don’t have to execute
workon
every time — just anytime you open up a terminal window and want to execute Python code. I would suggest this blog post to better understand Python virtual environments.sir i followed this steps correctly without errors but when i am inside the cv environment i cant import other modules like Serial and rpio.gpio .. how can i use other modules with opencv?
but when i am inside the cv environment i cant import other modules like Serial and rpio.gpio .. how can i use other modules with opencv?
Please see this blog post on utilizing OpenCV + RPi.GPIO together.
thank you again for you sensational installation guide. the whole world should have this quality in terms of documentation and explanation!
did you also measure the speed of recognising stuff with the pi 3 vs p 2 using opencv3? it would be very interesting to know from an expert how much speed gains one gets and possibly in what analysis scenarios.
I don’t have any recognition timings — I’ll keep that in mind for future blog posts. Thanks for the suggestion.
is there a way that i dont have to execute source and work on command to to execute python code .. for example just direct type python drawing.py to the terminal
You only have to execute the
source
andworkon
commands once when you open up a new terminal. They don’t need to be executed every time.Please allow me to echo what others have said — THANK YOU for this fine tutorial!
How I was dreading the process of installing CV; yet that worry was ill placed. Your tutorial worked perfectly and the entire process was (dare I say it?) easy!
The clarity of these instructions certainly lends confidence to the quality of your book. I’ll have to give it a look.
Thanks so much for the kind words Jack, I’m happy I could help out 🙂
I installed this on my pi 3 twice. NumPy was already in Jessie. No errors found. looked ok for python 2.7 but ALWAYS after source and workon cv python import cv2 it says no module found.
i verified cv2.so was in /home/pi/.virtualenvs/cv/lib/python2.7/site-packages
second time, I did none of the steps with 3.4 still won’t import cv2
Please help
It’s hard to tell what the exact error is without seeing your output from CMake, but from what I can tell, CMake was not automatically detecting the correct Python interpreter, site-packages directory, etc. I’m not sure why that would be. But again, without direct access to the machine, I can’t give a definitive answer.
when installing on the latest Jessie image, the process breaks because Numpy and Python are already installed and don’t get added to the virtual environment correctly. Leaving out the virtual environment seems to fix this and avoids the complexity of source ~/.profile and workon cv…
Took me three tries but now I am well on the way to success! thank you!
Hey Charles — for what it’s worth, you can install NumPy into the virtual environment:
Since the
cv
virtual environment is independent from the system Python install, you won’t get an error this way.Hello Adrian, I am having the same problem as Charles. Unfortunate, all this is new to me and I could not really understand how Charles solved the problem nor your response. I followed all the steps and checked the output on each step. I checked /home/pi/.virtualenvs/cv/lib/python2.7/site-packages to make sure that I have the cv2.so file there. I also tried doing the symbolic link again and got a message that the link already exists. I am really stuck. Any further pointer you can provide is much appreciated.
If the sym-link already exists, you can simply delete it and re-create it. However, I would check your
build/lib
directory and ensure that yourcv2.so
bindings have been compiled and stored there. If not, there was likely an error in your compilation OR a problem with the CMake configuration and the Python bindings were never compiled. To start, be sure to refer to the “Troubleshooting” section of this blog post.Hi Adrian,
As requested, i made a try on Jessie Lite.
It runs like a charm by following your tutorial (very well and sufficiently documented) step by step. (on Pi2 & py27)
No information returned about compiling time. approximately ~2h (~3h from the beginning)
The purpose of Jessie lite is to build a headless version of Pi.
So the result is that direct video stream thru X11 forwarding or VNC is not efficient, as exactly i expected 🙂
Now I will give a look on your home monitoring and motion detection tuto
(include or add secure remote access to a real realtime stream thru http and messaging alert)
Many Thanks
Fantastic, thanks for sharing Sebastien! 🙂
Hi Adrian,
OpenCV has been successfully installed on my Raspberry Pi 3!
Thank you so much!!!
Nice, congratulations Alexey!
is there any function i can use other than “cv2.boxPoints()” ? because i can’t use it in cv2 🙁
Are you using the older version of OpenCV prior to OpenCV 2.4? If so, the original old function is called:
cv.BoxPoints
. Although I would highly recommend that you install OpenCV 2.4.X or OpenCV 3 for the newer features.When I type “import cv2” in my virtual environment I get the following error:
Traceback (most recent call last):
File “”, line 1,
ImportError: numpy.core.multiarray failed to import
If you are getting that error, then you did not install NumPy into your
cv
virtual environment. You can resolve the issue by installing NumPy into your virtual environment:Hi,
I got the same error and I did install numpy on the virtual environment.
But if I write sudo python and then import cv2 it worked
Thanks for the post!
Could you please advice how me to run python in cv environment for apache web server?
I mean how to implement workon template for these script before running?
For an Apache server, you would likely be using something like mod_wsgi. From there, it’s just a matter of setting up your Django or Flask or whatever web framework you are using to access the virtual environment. Here is an example of using mod_wsgi, Django, and virtual environments.
Hi,
Thank you for the tutorial. I would like to install Opencv 3 on Raspberry Pi 3. But I want to use C++ instead of Python. What is the steps of installation I should follow or which steps above might be different? Thank you!
The tutorial doesn’t change at all for C++. You can skip the virtual environment steps if you would like, but otherwise, the steps are identical.
thanks adrian!!.
can i make command source ~./profile and workon cv automatic on startup ?
Sure. Anytime you open a new terminal, the contents of your
~/.bashrc
should execute. If your~/.bashrc
file does not exist, create it, and then add the contents of~/.profile
to it.Hello,
Thank you for your tuto. It works to install opencv 3.1 with python 3.4. I have only a trouble with the python command :
cam = cv2.VideoCapture(0)
print cam.isOpened()
Always return False.
Do you know more about VideoCapture() drivers ?
If you’re using the Raspberry Pi camera module, then you’ll want to activate the V4L drivers. Otherwise, I would recommend using the picamera module to access your camera on the Raspberry Pi.
I can’t import other rpi library modules while I’m inside cv environment. why is it so??
This is because you are using virtual environments. Virtual environments are sequestered and independent from your default Python install. We use them to avoid versioning issues and to keep your projects tidy. You can read more about virtual environments in the first half of this blog post.
I cloned the latest OpenCV and OpenCV_Contrib gits and performed a make -j4. It’s been going for over 12 hours at 100% CPU Load. Is this normal? Instructables says that for a Pi model b (the original) it should take 10hrs.
Could the kernel I am using be nit-so-good? Or maybe I ran out of RAM and it is now performing the switching operations? (I have 256mb allocated to the GPU in my current setup)
Thanks for the tutorial! Otherwise very easy to follow.
Funny thing about your RC post and Cat detection posts the other day: I would like to do exactly that, have a cheap rc toy to interact with my cats!
Shoot, sorry, I should add that this is an RPI 3 Model b. Thanks in advance!
It should definitely not take 12 hours to compile OpenCV on the Raspberry Pi 3. In fact, it should take less than 2 hours. I think there might be an issue with the multi-processing compile and somewhere a race-condition has been caused, making the compile infinitely spin.
Instead, I would suggest stopping the compile, deleting your “build” directory, re-creating it, and re-running CMake. From there, just compile with a single thread using:
$ make
This will take longer to compile, but it should ideally avoid any type of threading issues you may have encountered.
Why delete the build folder? If most of the resources have been built without issue, why rebuild them? All you really need do is rerun the make to start back at where it is incomplete.
If you run make with the “-d” option, you should see most of the output fly past, because it sees that it doesn’t need to rebuild certain modules.
Readers who run into these sort of issues may have left the build in an inconsistent state, especially if threading is involved. It would be impossible for me to debug it therefore I recommend starting from scratch so we’re all on the same page.
Hello Mr.Adrian,
After executing make -j4 my raspberry pi 3 restarted and didn’t do anything after. Can you please explain how to fix this?
Thank you,
Manu Mahalingam
That sounds quite strange. It should not have restarted during the reboot. Perhaps it overheated? I would suggest deleting your
build
directory, re-creating it, and then re-running make and CMake to see if the problem happens again.Hello again Mr.Adrian,
I am not very experienced with raspberry pi yet so could you tell me how to delete the build directory?
Thanks,
Manu Mahalingam
You can just use the
rm -r
command, for example:rm -r build
I would suggest also running
man rm
to learn more about the command.Hi Mr.Adrian,
When rm -r build
it says the file is not found yet when I look into the folder in open.cv I find the build file. So could you please explain how to fix this? Sorry for so many questions I hope I am not bothering you.
Thanks,
Manu Mahalingam
Hey Manu — before continuing, I would suggest reading up on the basics of utilizing the command line and the Linux filesystem. This will better help you understand how to resolve these types of errors. This tutorial should help you get started.
Hello Mr Adrian,
I have followed the entire tutorial and everything works great, but im having trouble with how to autorun my opencv code on start up since my code will only work inside the cv virtual env. Can u please tell me which command should be used to do the above .Thanks in advance.
To run a Python script on startup/reboot, please refer to this post.
Hi Adrian,
I’ve spent a couple of days trying to complete this tutorial, even went as far as creating a clean Raspbian install when I couldn’t get it working.
I am continually hitting an error just before I run the ¨make -j4¨.
http://pastebin.com/xus0QxWM
I have tried deleting the build directory and re-running cmake multiple times.
Any suggests as to what I might be doing wrong would be appreciated.
Thanks
Take a look at your CMake output — the error is clearly stated on Line 60:
Basically, you need to double-check your path to the opencv_contrib directory. You may have forgotten to download it or placed it in a different directory.
Perfect!! Thank you so much, had a look and the contrib folder was empty so something must have gone wrong there.
I found your post on finding the distance of a known object to the camera extremely useful. I was wondering If you have any similar posts or resources for finding the x,y,z distance from the camera? I understand this involves camera calibration?
I’m trying to find a way to do this accurately with real world distances rather than just in the image frame perspective.
If you want a true representation of the (x, y, z)-coordinate space you’ll need to perform camera calibration first. I don’t have a blog post on that, but I’ll try to do one in the future.
Thanks. I will definitely be keeping my eye out for one.
Hello Mr. Adrian,
I was following your tutorial when I made an error during step 4 updating the raspberry pi profile. Instead of putting the ~/.profile prefix, I left it out and ran the commands without it. When I realized my mistake, I tried to run the commands again with ~/.profile but it gave me an “access denied” error.
What did the commands do without the ~/.profile prefix and how do I stop getting the “access denied” error?
Thanks.
Hey Kevin — I’m not sure why you would be getting a access denied permissions error on your
~/.profile
file, but try editing the file as sudo instead:$ sudo nano ~/.profile
Mr. Adrian,
Firstly I want to apologize for the late response. I have been busy with other projects lately and haven’t had time to reply.
Anyway, I took your suggestion and the nano editor gave me access to the profile folder. However, I know almost nothing about Linux C programming, and am a little lost at what to do. Do I just add the lines after the last if statement, or within the last if statement? And can you explain what the commands do?
Thanks again.
After you access the
~/.profile
file, scroll to the bottom of the file, add a new line, and then copy and paste the virtualenv statements from this tutorial. From there, save and exit the editor.Hi!
I’m sure you know the answer to this:
When i do not enter “workon cv” and do not see the (cv) i cannot import cv2 into python3 but can in python 2.
As soon as I get the cv virtual environment I again have cv2 in python3. Why is this?
Hey Stephen — I would suggest reading up on Python virtual environments to better understand how they work and why we use them. Specifically, you’ll want to pay attention to the first half of the blog post I linked to.
Hello Mr.Adrian,
My raspberry pi 3 crashed again but this time did not restart, even after I deleted the build directory, recreated it and ran cmake and make. Could you please help?
Thanks for all the tips so far,
Manu Mahalingam
I’m not sure why your Raspberry Pi 3 would crash. Perhaps it overheated during the compile? Next time try using only a single core when compiling. The compile will take longer, but ideally the Pi won’t get as hot.
Hello Mr.Adrian,
By using one core I was able to get it running and it is working. Thanks for the great tip, by the way your tutorials rock! I am planning to use this image recognition software for a robotic project and i found this very useful. However I would like to know why in rare conditons does a raspberry pi overheat because of 4 cores did it work for you when you did ran the make command? Just wondering…
Thanks,
Manu Mahalingama
Hey Manu — race conditions can handle in any multi-threaded environment. As for exactly why this happened with OpenCV, I’m not sure. I would have to look at the error logs. Also, the Raspberry Pi can overheat. It happens. Especially if you are already in a warm environment.
can we use open cv on raspberry pi .take video form rasberry pi process it and send the data of the processed video over bluetooth to mobile.i want to create a entire standalone system of pi.without using a laptop
I have a tutorial here on accessing the Raspberry Pi camera. As for sending the photo of bluetooth, I personally haven’t done that and don’t have any experience in that area. I would suggest starting with simply accessing the Raspberry Pi video stream though. From there, you can focus on frame serialization.
Hey Adrian, thanks for such a great tutorial.
Am new to Raspberry pi world and So I was wandering if I use Noobs to install jessie on my RPI 3, am I still able to remove wolfram engine from the memory and continue with your tutorial or I have to completely follow your tutorial from expanding file system and rebooting and all??
I’m not positive, but I think newer versions of NOOBS automatically expands the filesystem? In either case, I would run
raspi-config
to ensure that the filesystem is expanded. It will only take a few seconds to do it and this will ensure that your filesystem is expanded.Hi I am using noobs. When I run sudo raspi-config and try to expand partition get message that:” your partition layout is not currently supported by this tool. You are probably using noobs, in which case your root file system is already expanded anyway. ”
However when I run sudo df -h it tells me Size of root is 6gb. As a result I’m running out of room following your tutorial for opencv installation. Any idea where the other 2gb has gone?
That is quite strange, I’m not sure why that would happen. Can you instead try using strictly Raspbian without NOOBS? If the issue persist I would post on the official Raspberry Pi forums regarding the error.
Hi there,
I’ve been trying to install OpenCV on my Pi 3 according to these instructions and ran out of space on the Pi’s 8GB SD card. I’m guessing this isn’t normal. I’m using standard NOOBS and there’s some pre-installed stuff I’ve now purged (libreoffice*, penguinpuzzle, etc) to make more room. From df -h I now see the card has 3.2G available – is that enough? Or should I mount something externally to store the build files in? (Or get a bigger SD card, sigh…)
Success! Looks like removing those extra unecessary packages did the trick. I imagine in future it would be easiest to start out with a ‘light’ copy rather than full NOOBS which is what I was using.
For reference, I ended up purging:
libreoffice*
smartsim
penguinpuzzle
dillo
minecraft-pi
python-minecraft-pi
sonic-pi
wolfram-engine
Hope this helps someone else.
I agree, I’m actually pretty frustrated with how “bloated” Raspbian has become. There is Raspbian Lite, which as the name suggests is a much smaller version of Raspbian, but it’s also “headless” so if you needed a GUI, you would need to install it.
Removing opencv directory did not work. my image file still has 14GB worth of stuff. Any ways you could help? Thanks in advance!
$ rm -rf opencv-3.1.0 opencv_contrib-3.1.0
See the comment by “Gray” on packages that can be removed to reduce your .img size.
Thanks for the great guide!
I ran into a problem while installing NumPy which took some time to figure out, so I’ll share here in case anyone else runs into the same issue.
The installation for numpy was failing with an error code 1
What I finally realized was that my /tmp directory was running out of space since I had previously turned it into a tmpfs RAM filesystem with a 80mb limit.
To fix I just updated my “/etc/fstab” file to remove the line I added that defined /tmp as a RAM filesystem and rebooted my Pi. The numpy install went smoothly after that.
Thanks for sharing Mark!
Hey Aulia — it’s hard to to tell what the exact issue is without seeing all of your previous commands, but I would double-check which Python version your virtual environment is using. It seems that you may be using Python 3 by accident.
How to use both of them in a virtual environment cz i see that your screenshot, python 2 and 3 detected sucessfully..
If you want to use OpenCV in both virtual environments, then you would need to create two separate compiles of OpenCV — one for Python 2.7 and another for Python 3.
Hi Adrian, thanks for the tutorial, but i have a problem.
After the cmake command is exectuted, in its output under Python2 and Python3 there is only the path of the interpreter present and nothing else, which is leading to improper installation.
PLEASE HELP : )
Thank you
Please see the previous comments to this post as this issue has been discussed multiple times.
Hi Adian! tks for your tutorial. i have folowed your tut step by step. i use terminal to test version of opencv in my raspberry pi, it show “3.0.0”, yeah, it work.
but when i use a file *.py to compiler, it show ” import error cv2″. can you help me? look forward to hearing from you. tks so much 😀
Please refer to the “Troubleshooting” section of this post for common errors related to import the OpenCV library.
Hi Adrian, I do make sure it’s in cv environment in step 5 but the cmake result still are still not in the cv environment. I have tried multiple times and same result happens every time. Where do you think I could be doing wrong? Thanks for your help.
It’s hard to say where the exact issue might be without having access to your system. I would suggest referring to the “Troubleshooting” section of this post.
hey adrian thanks for tutorial ….
how to add matplotlib to vertual environment of cv?
i already install matplot in pi but when i start using cv mode it never import matplotlib so please hepl me on that
Hey Vivek — take a look at this post for information installing matplotlib.
Hi,
I followed your tutorial and at the last step it says no module named cv2. at this point i was in (cv) environment as you mentioned. but when I’m not in (cv) environment and if i run “import cv2” it works. What does that mean? I think inside virtual environment python cant see openCV. am I right? Please help.
If you can import OpenCV outside the virtual environment, then OpenCV is installed correctly — you just need to symlink the
hi adrian
How to install OPENCV but outside the virtual environment? I have sensors installed outside , I need to work outside the virtual environment with sensors
You can certainly use OpenCV outside the virtual environment — just skip all steps related to virtualenv, virtualenvwrapper, and workon and you can install OpenCV without Python virtual environments.
However, based on your comment, I get the impression that you can simply install your required sensor packages into the Python virtual environment. See this blog post for more information.
the opencv without virtual environment was installed , but when testing the example of the cameras , opencv error indicates that libgtk missing , I followed all the steps minus the virtual environment, although not well how to do the last part in step 6
It sounds like you might have installed OpenCV without GTK installed. You’ll need to install libgtk and then re-compile and re-install OpenCV.
Thank you very much Adrian, this is a really well done tutorial! Worked perfectly first time and I have got openCV installed on my RPi 3. Can’t wait to start your tutorials and then I should be ready to start with my project. You have done a fantastic job. Nice one.
Congrats on getting OpenCV installed on your Pi, Pierre — nice job!
Hi Adrian, thanks a lot for your clear instructions, I have successfully installed OpenCV. My question is on the samples/examples. I saw printout they got compiled and installed along the steps, but I couldn’t find their binaries get installed in the file system. You suggested to rm -rf the two folders at the last step. That includes the sample source code. Do we need them no more? Perhaps there is another way to run those samples? Thanks.
Hey Ken, congrats on getting OpenCV installed. I honestly can’t remember where the samples are stored after you run
make install
. That would be a good question for the OpenCV forums. Before deleting theopencv
andopencv_contrib
directories, I would check in there and see if the samples were compiled. But after you are done with them, you can delete those directories.Hi Adrian!
Nice walkthrough, thanks! 🙂
BTW, any idea if we can build OpenCV to use the Raspberry Pi GPU (QPU)?
Excellent tutorial!
Got up and running, and completed a proof of concept really quickly! Thanks for the generosity.
Congrats on getting OpenCV installed and configured on your Pi, Luis!
hi Adrian in this tutorial can we install scipy and matplotlib ?
if yes when i can do that?
Of course! You just need to install them into your Python virtual environment:
If you run into any issues with matplotlib, refer to this post.
There is something strange:
At the end of the tutorial you say one can delete the opencv-3.1.0 and opencv_contrib directories with rm -rf [folders]. Where is then OpenCV installed? We built Opencv into the build-folder. But after having deleted the folders, there is no build-folder left. How can it be, that Opencv still works? Where is opencv located?
If I would want to make little customizations to the opencv source, I have no idea where to find the files, and how to remake them.
kind regards from germany,
amrosik
After you run:
$ sudo make install
The compiled libraries and binaries are copied into their respective places. The original
build
directories are no longer needed after runningmake install
. You can see exactly where the OpenCV has been copied to by examining your CMake output. Normally you can find the files in/usr/local/lib
.i have installed everything successfully but every time i try running a program (after reboot) that includes the opencv library i have to enter these two commands:
‘workon cv’
‘source ~/.profile’
Is there any way by which i don’t need to do that every time i run a script after reboot
Please reply as soon as possible
Yes, both of those scripts need to be executed each time you reboot your system or open a new shell. It’s part of configuring your development environment properly. If you do not want to run
workon
after reboot, just update your.profile
file to include theworkon
command as well.So i’ll have to run source ~/.profile every time?
I have another doubt: How do i run it on GUI
What do you mean by “GUI”? I presume you mean IDE?
Not every time — just each time that you open up a new shell.
Can you please tell me how to execute the ‘workon cv’ command in python shell
You actually execute the
workon cv command BEFORE you open a Python shell. For example:
Hi when I enter this command “wget -O opencv.zip https://github.com/Itseez/opencv/archive/3.1.0.zip”
I get the error failed:Connection timed out. Retrying..I’ve done this multiple times but no success.
It sounds like you might have a problem with your internet connection or there was a hiccup in the GitHub connection. I’ve manually tried to download the file just now and it worked fine. My suggestion would be to ensure your internet connection is working properly and try again.
I am not able to get this either… seems like it was moved. Can you tell us where to locate it now?
The GitHub link is still working. Make sure you are copying and pasting the URL correctly.
Thanks for the thorough, clear, and well-paced tutorial!
I followed everything to a T but failed at Step 6. My Python 3.4 directory only has dist-packages, no site-packages. As such, it doesn’t seem like any of the Python bindings have been installed after running ‘make’… Any idea? Fresh RPi3, fresh SD card, started from the top, worked my way down…
Thanks!!
Check in the
build/lib
directory for any sort ofcv2.so
file. If you’re using Python 3, the filename may by slightly different. Also, after runningsudo make install
, be sure to check yourdist-packages
directory. Finally, manually investigate your CMake output to see if CMake has displayed where the bindings would be installed.That did it! Much thanks, seems to work 🙂
It had put it in the build/lib/python3 directory. I simply moved it over to the site-packages folder and followed the rest of the steps.
Great job resolving the issue Tom, congrats!
Your tutorial are the best in this world.
I have a simple question on my mind. You said:
“Any Python packages in the global site-packages directory will not be available to the cv virtual environment. Similarly, any Python packages installed in site-packages of cv will not be available to the global install of Python.”
I didn’t install opnenCV on my Global environment but on the environment named “cv” i installed python 3 and open cv. But when I open a fresh terminal and type (without the workon command):
$ python
python 2.7.9 (default, Mar 8 2015, 00:52:26)
which makes sense, cause my global python is 2.7.9 where as the one in the virtual environment is 3.4.2
>>> import cv2
>>> cv2.version
‘3.1.0’
NO ERRO!! Why is that? Shouldn’t it pop an error message saying “cv2 not understood” as we are working on global environment?
no error occurs. Why is that?
When you installed OpenCV, it was installed in
/usr/local/lib/python2.7/site-packages
— this directory is the global directory for your Python install. It does indeed work outside the virtual environment. We then use the sym-link command to move thecv2.so
bindings into the “cv” virtual environment.That said, I’m not sure how you have OpenCV bindings for both Python 2.7 and Python 3 installed on the same system without explicitly doing so. Compiling OpenCV against a different version of Python than it’s imported into would cause an error, so I’m not particularly sure how your system is setup.
https://pyimagesearch.com/wp-content/uploads/2015/10/raspbian_jessie_py3_example.jpg
When I try the above code at terminal, it is working .But When I open Python3IDLE and type #import cv2# then a error occurs saying #ImportError: No module named ‘cv2’# .
How to solve this???????????
Python virtual environments will work with the shell version of IDLE but not the GUI version of IDLE. Instead, try using Jupyter notebooks.
After I enter the Cmake command, there were no paths for libraries, numpy, packages path for Python 2, however there is for Python 3. Does this mean, I won’t be able to use OpenCV in Python 2?
If you want to use OpenCV with both Python 2.7 and Python 3 then you’ll need to compile OpenCV twice, one for each respective version. The bindings are not cross-compatible between Python versions.
Hi Adrian,
I completed the tutorial, and its awesome, I got it working on Python 3. However, I can only run cv2 on ssh terminal. Once I enter the pi via vnc server, it doesn’t work anymore, I can’t enter the virtual environment through ther terminal either.
I’m still new to raspi, and also how linux works. So how do you run the virtual environment in the Raspi GUI via VNC server?
Thank you in advance Adrian
If you are accessing your Pi via the GUI (VNC doesn’t have anything to do with it) make sure you are
source
‘ing your.profile
file before importing the cv2 bindings:Thanks so much! Your instructions worked like a charm. Although most of the steps took a lot longer than the amount of time you stated.
Thanks for sharing Michael, I’m happy the tutorial worked for you.
Anyone had issue with building opencv because of the FFMpeg dependencies problem?
I’m getting a compilation error about avformat_get_mov_video_tags.
Any help is much appreciated.
This happens to me before I correct typing the opencv contrib path.
Greetings.
How did you fix it?
I followed the instructions exactly but it has issue with the codecs
Awesome guide! The only one that worked for me.
Do you have any new insights on how to include TBB to the mix since Jan asked in May?
I honestly haven’t tried since then. I’ll try to discuss it in a future post but I’m not sure when that might be.
Thank you so much , it was very useful 🙂
hi~
i’m done until Step#3 and installed pip.
but i don’t get how to edit ‘.profile’ .
would you tell me where it is and how to edit?
You can use a simple text editor such as nano:
$ nano ~/.profile
About halfway through the tutorial, you mention modifying the ~/.profile
I can’t figure out where the .profile file is. If I type ~/.profile, I get nothing. If I try nano ~/.profile, it creates a new file. How do I get to this file to edit it?
See below
————————————————————————————————————–
Now that both virtualenv and virtualenvwrapper have been installed, we need to update our ~/.profile file to include the following lines at the bottom of the file:
# virtualenv and virtualenvwrapper
export WORKON_HOME=$HOME/.virtualenvs
source /usr/local/bin/virtualenvwrapper.sh
If the
~/.profile
does not already exist, create it.Thanks a lot for sharing,
Very useful !
No problem, I’m happy I could help Steven!
Adrian congratulations for your posts and your book!
I have installed opencv with python2.7 correctly and everything is fine. Then, I tried to make the same steps for python3 from the point: mkvirtualenv cv -p python3 onwards in the same or in a different terminal window. The installation cannot be done. When I am trying to import cv2, it says it cannot find numpy. Why numpy is not in the site-packages although I have followed exactly the same steps as for python2.7?
Thank you anyway for your valuable presence!
Hey John — it sounds like you are not inside the
cv
virtual environment. Every time you open up a new terminal (after runningmkvirtualenv
to create the actual virtual environment) you should be using theworkon
command to access it:$ workon cv
hi Adrian,
Appreciated with your post, it really helped plenty of people who wants to install opencv on their Raspberry Pi, however there is one question would like to ask:
Although my Pi 3 has SUCCESSFULLY installed the opencv 3.1.0 and also showed the correct version in Python 3 as Step #7 illustrated; however, when i verify with the ls command, by type in:
ls -l /usr/local/lib/python3.4/site-packages/
It returns the following:
-rw-r--r-- 1 root staff 1480296 Oct 27 06:08 cv2.cpython-34m.so
Knowing some files are missing as for the fact, but will opencv operate properly with missing files? Please advice, thank you very much.
I actually address this question inside the blog post. Take a look at the “For Python 3:” sub-section. All you need to do is rename the file to simply
cv2.so
this must have been a race condition. I did a make without the j4 and it worked.
Hello Adrian,
I read a comment above indicating that the steps would remain the same for a c++ installing however I’m unsure how or where to obtain the c++ header files from in order to compile with c++ bindings?
Hope you can get back to me!
Thanks for always replying to my emails by the way, your dedication is inspirational!
I don’t cover C++ on this blog, but for what it’s worth, your answer can be found here. Basically, you need to use either pkg-config or CMake.
Hi Adrian,
I’m reasonably new to python (and raspberry pi) and am feeling in the dark a little bit with the virtual environments stuff.
I need to use opencv 3 on my raspberry pi 3, preferably with python 3, and I also need to install wiringpi:
https://github.com/WiringPi/WiringPi-Python#manual-build
If I try to follow your instructions without the virtual environments bit then I don’t know how to get cmake to set the ‘python (for build)’ version to python3.
Conversely, if I try to follow the instructions on the wiringpi page whilst in my newly created python3 virtual environment, and then run
python -c ‘import wiringpi; print(“Hello”);’
I get an error that it cannot find the ‘_wiringpi’ module.
What is my quickest way out?
UPDATE:
I set the build going for what I assumed would be only python2.7 last night, only do my delight discovered that it created the cv2.so files for both python versions!!
So my problem was really a non-problem (though others may benefit from knowing this too!!).
Thank you very much for the excellent tutorial!
Hi Jack — I would double-check that the
cv2.so
files were created for both versions by importing OpenCV into both Python versions. I have only seen circumstances where the bindings are build for Python 2.7 OR Python 3 — never both.I also don’t have any experience with WiringPi, but provided you can copy the install files to the virtual environment you’ll be all set 🙂
Hi, is it possible to install Opencv in a Raspberry 2 with Ubuntu mate?
I have not tried using this tutorial with Ubuntu Mate but it should work just fine.
Hi Adrian, I have different problems every time I try to compile. such problems are os / hardware related problem (this happened when I run with core4). then I changed to make -j1 as I believed to compile with 1core, it took me couple of hours until it terminated and give message as below:
/usr/include/c++/4.9/limits:1777:1: fatal error: can’t write PCH file: No space left on device
Im using 16GB memory sd card.
Any advise? Thank you.
16GB is more an sufficient to compile and install OpenCV. If you are running out of space my guess is that you forgot to run
raspi-config => Expand Filesystem
to ensure the entire disk is being utilized.I just found out that Raspberry built some partitions in SD card that only left 2GB for me. I reformat my SD card (delete the unnecessary partitions) and finally have 8GB volume left. Thank you for your tutorial. Now everything work as I hope it to be.
Hi!
Thanks for your great tutorial! Everything is working fine except when I’m in the virtual env (python2.7) I get import error of other modules installed with apt-get outside it.
The module pigpio is imported without any problems outside cv env.
How can I solve this?
Thanks again, keep up the good work!
You need to install
pigpio
into the “cv” virtual environment. I haven’t usedpigpio
before, but this blog post should help get you started.When I got to step 5 and type in:
$ cmake …
it says:
bash: cmake: command not found
Any suggestions?
Hey Mike — make sure you follow the instructions in this tutorial exactly. You forgot to execute this command in Step #2:
$ sudo apt-get install build-essential cmake pkg-config
Is there any ready to burn RasPi image with integrated OpenCV libraries?
Great question, thanks for asking.
Yes, there is a pre-configured Raspbian .img with OpenCV pre-installed as part of the Quickstart Bundle and Hardcopy Bundle of my book, Practical Python and OpenCV.
Hello
I have gotten all the way through the the tutorial and can import cv2 in the LX terminal when in the virtual environment running python 3, but when I open up python 3 and try to import cv2 it gives me an undefined error. What do I need to do to fix this?
So you can import OpenCV into your Python 3 virtual environment, correct? And you now want to import OpenCV outside your virtual environment? And I understanding your question correctly?
Hi Adrian,
Thanks for the post its amazing I like to ask one question that is it possible to install opencv and c++ only. Can i skip entire python installation process. I just need opencv and C++ compiler in raspberry pi 3 model B with raspbaian jesse. please suggest what can be the steps.
Thanks and Take care 🙂
You can skip the Python steps if you want and you’ll still have the C++ version of OpenCV installed. That said, if you skip steps I can’t provide any help or suggestions if you run into errors.
Great and detailed instructions! Just FYI, I tried the compile starting with 2.6 GB free space, but that didn’t work. Turns out after compiling, the opencv-3.1.0/ folder ends up taking 3.0 GB of space.
I would suggest having an 8GB card for the install process.
Hi sir,I created a local webserver that streams the video from my Logitech camera, and the webpage also has the buttons through which I control my robot.Can i make open cv work on the video that my camera is streaming to my local server?
You would need to use
cv2.VidepCapture
to read the video stream URL from your camera. However, this would be separate from the video that you see in your web browser. Without a significant amount of hacking I don’t see how you could modify the direct URL of the stream loaded into your browser.hey hi, i have a scool project with raspberry, but i am a beginner in phyton, ok i say what is the project, fist i need to take a picture of a plate of car, and need to read this picture and then activate a 2 step motors of this motors i have the code of programation, i have problems whit take a capture of the plate can u helpme please?
By “plate” do you mean “license plate”? If so, I cover Automatic License Plate Recognition inside the PyImageSearch Gurus course.
Hi Adrian,
Thanks for your tutorial and demonstration I appreciated! I did everything as you did. But there is a problem about video streaming. Everything worked well when I was trying to take a photo. But I got only black screen when I was streaming to video. I will be very happy if you can help me. Thank you very much ..
Hey Omer — I discuss the black screen issue in this post where I also provide the solution.
Hi Adrian,
I followed your guide to install opencv on a RPi 3, but with Jessie Lite and with no virtual environment. Cmake failed in that opencv only pointed to python2.7, when I want to be using python3.
Therefore, I started again and only installed the python3-dev, and also used sudo pip3 for numpy. However, the packages path points to lib/python3.4/dist-packages, rather than site packages ….. is this a problem?
I can import cv2 and numpy into python3 and they seem to be working fine, but will future packages be installed into site-packages and will having two locations for packages cause an issue?
I don’t really understand it, but it is discussed here https://leemendelowitz.github.io/blog/how-does-python-find-packages.html
Hey Anthony — the solution in your case was to use “python3-dev”. You need the Python development headers installed so you can compile the OpenCV bindings.
You will still be able to use OpenCV with your Python 3 install. Python will check
dist-packages
andsite-packages
.hi sorry but i have problems when tray to put this make -j4 because the instalation is in 91% or 92% and the raspberry freeze do you know why do this?
It sounds like this could be a race case condition. I would stop the compile, run
make clean
and then compile with justmake
.I wish to use I2C with my opencv project, but I can’t seem to get the “smbus” module working in the cv environment.
“import smbus” results in: “ImportError: No module named smbus”
I tried both “sudo apt-get install python-smbus” and “sudo pip install smbus” with cv activated, but it returns that it’s already up to date. Yet “pip freeze” does not show smbus unless I’m outside cv.
You need to install smbus into the Python virtual environment.
From there your script should work.
Sorry, I meant to add that I was already working on the cv environment when trying to install it!
I’m not familiar with the smbus library. Does it require root permissions to run? I would also utilize
pip freeze
to ensure it is installed inside the “cv” virtual environment.Hi Adrian
I followed the exact steps that you’ve written nad the I execute the cmake in step 5 my numpy and interpreter paths are not in the cv environment :
Interpreter : /usr/bin/python2.7
I am sure that I’m in cv env and I have installed all the packages and libraries from the second chapter of your book.
what can I do to fix this?
Thanks Hamed
Hey Hamed — it’s hard to tell without having access to your machine, but I would suggest taking a look at the “Troubleshooting” section of this tutorial. You should also delete your “build” directory, re-create it, and re-run CMake.
Hi again
I tried opencv 3.1.0 three times with a new raspbian every time but it didnt work so I tried your other tutorial for opencv 3.0.0 and it worked perfectly.
when I was trying the fifth step (cmake command) it needed the sudo command to work but on opencv 3.0.0 it worked without the sudo and I think that was the only difference.Thanks for the tutorials you are the best
Congrats on getting OpenCV installed on your Pi, Hamed — nice job!
Great tutorial, thank you!
I’m happy I could help Brunno! Have an awesome day. 🙂
I used NOOBS, and there isn’t sufficient space on there for that.
The total build uses 3.24GB.
Here is what I did:
1) grabbed an old thumb drive – 4GB and plugged it in
2) typed “df” and identified it from that as /dev/sdb1
3) umount /dev/sdb1
4) mkfs.ext3 /dev/sdb1 (this annihilates everything but hey, thats what a 4GB drive deserves!
5) mkdir /home/cv (make a directory called /home/cv, for our new user “cv” -see later)
6) put an entry into /etc/fstab:
/dev/sdb1 /home/cv ext3 defaults,noatime 0 1
7) sudo mount /dev/sda1 /home/cv (or sudo mount -a )
8) sudo adduser cv (to add the user cv, which will compile the opencv)
9) sudo chown cv:cv /home/cv
And from there on, follow step 2 from above!
I must say, I am coming back to linux after nearly a decade of absence, and this was one of the easiest and most nicely documented compiles I have seen. Well done!
Thanks for sharing Leon. As long as you have an 8GB or greater SD card you should have enough room to compile and install OpenCV without additional storage.
Hey Adrian, can you help me out,
how to install dlib library??
how to use all 4 cores of processor in Pi 3 for heavy motion tracking.?
I will write an updated tutorial on how to install dlib, but you should be using the official dlib documentation in the meantime.
For the Python bindings, you can also use:
$ pip install dlib
Hi Adrain thanks for the great tutorials, I’ve found many of them to be quite helpful.
I am having some trouble on step 5 of this tutorial where we configure the cmake options and confirm that the output shows the build is using the correct python interpreters. Currently I have a python 3.5 virtualenv setup, have installed numpy and can confirm that “python” and “import numpy” pull the 3.5 interpreter and numpy successfully. However when I run cmake with your options it chooses the python 3 interpreter in /usr/bin/python3.4
I tried adding these more explicit options into cmake:
-D PYTHON3_PACKAGES_PATH=/.virtualenvs/py35-cv/lib/python3.5/site-packages \
-D PYTHON3_INCLUDE_DIR=/.virtualenvs/py35-cv/include/python3.5m \
But they didn’t seem to have an effect.
Any advice?
Note: I am working inside my py35-cv virtual environment when running the cmake commands.
Whenever you make a change to your CMake command, make sure you delete the
build
directory, re-create it, and then re-run CMake. This will ensure that any previous CMake configurations have been removed. If you have explicitly pointed CMake to your Python 3.5 install then it should work.Hi, Mike
I have the same problem: cmake doesn’t see python 3.6.1 virtual environment and choosing /usr/bin/python3.4
I’ve fixed it adding the following line to cmake:
-D PYTHON3_EXECUTABLE=/home/pi/.virtualenvs/env3/bin/python3.6 \
But first it is better to delete “build” directory and re-create it.
OpenCV 3.2.0 has been released
Hi,
Is it possible to run an opencv python program in raspberry pi without using a display module? Because I don’t want any visual outputs,so using a display will be a waste of cost.
Absolutely. You can SSH into your Pi with X11 forwarding and you’ll be able to see the results of your program on your screen. You could also use VNC as well.
Hi Adrian,
Am I supposed to write the following:
$ sudo make install
$ sudo ldconfig
in the build folder??
Yes, you run
sudo make install
after successfully compiling OpenCV viamake
. Thesudo ldconfig
command can technically be ran from anywhere.thanks
I’m at the step “Finally, we are now ready to compile OpenCV:” and get error message “make: *** No targets specified and no makefile found. Stop.” I have the (cv) pi@raspberrypi: so am in the cv environment. Any ideas? Thanks, Justin
I looked at the results from cmake .. and see “Configuring incomplete, errors occurred!” I have to look through the error log.
i have the exact same error as yours last night, then I made a new system and follow the instructions again.
This time i got rid of the “Configuring incomplete”. I thought this would be caused by the version, i used the 3.1 instead of 3.2 this time.
When running the “make -j4”, make sure that you are currently in the /build direction.
I had exactly the same issue – realised it was because I wasn’t following the instructions exactly. Rather than installing in my home directory (~/) I was in a subdirectory (~/opencvinstall/) this was causing problems with the opencv-contrib section. I changed the build command:
-D OPENCV_EXTRA_MODULES_PATH=~/opencv_contrib-3.1.0/modules
to reflect this:
-D OPENCV_EXTRA_MODULES_PATH=~/opencvinstall/opencv_contrib-3.1.0/modules
and the configuration worked, currently building!
Whilst I’m here – thanks for this awesome guide 🙂
Thanks for sharing Rob — and congrats on getting OpenCV installed on your Raspberry Pi.
Very high quality tutorial. I’m sure I will be accessing your paid content soon. Thanks!
Thanks Forrest! Have a great day.
thanks a lot for this in-depth tutorial….was very helpful for a noob like me. keep up the good work!
Congrats on getting OpenCV installed, Veeresh — nice work!
I got the solution…..
the error was related to make -j4
initially i tried make -j4 command for compilation
after using just make command opencv compiled successfully
Congrats on getting OpenCV installed Ashish!
Hi, many thanks for your really helpful tutorial let me finally get the opencv work on my Pi.
But i do have a question here. This tutorial teaches how to install the Opencv in the virtual environment. Therefore does it means, for every time i have to go into the VE to import the cv2? I found which could be very tedious, so how can i install it in the real system instead of the virtual one?
Many thanks
If you would like to use OpenCV outside the virtual environment just ensure you have copied the
cv2.so
file into thesite-packages
directory of your system install. Take care to ensure that your system install of Python is the same as the one you compiled OpenCV against, otherwise you will get an error.Where can I locate the cv2.so file?
If you have already compiled OpenCV it should be in
build/lib
. If you have already installed OpenCV it will be in thesite-packages
directory of the Python location you provided ruing the CMake step.I tried following steps with download of up-to-date OpenCv3.2.0 and got stuck at step 5. I then deleted these and started from step 1 again, this time using download links provided to OpenCv3.1.0 and works perfectly. Thanks Adrian!
Congrats on getting OpenCV installed, Gal — nice job!
Thanks for the in-depth tutorial Adrian.
I too have had an issue with version 3.2.0 not working. Could you please update this so it will work with 3.2.0 so we can utilise the new features and bug fixes
Thanks!
UPDATE
I just figured out what my problem was. I hope this is the same problem others were having also as it is a simple fix. I did not see the 3.1.0 in the cmake part, here -D OPENCV_EXTRA_MODULES_PATH=~/opencv_contrib-3.1.0/modules \
This compile will certainly work with OpenCV 3.2. As you suggested, just make sure you update all 3.1 paths to 3.2.
Thankyou so much for this amazing tutorial. worked perfectly 😀
Awesome, I’m glad to hear it Bipin 🙂 Have a great day.
Adrian, This is a great tutorial and a must-have resource for starting with OpenCV and Python on Raspberry Pi ! I have subscribed to both your 10 day and 21 day crash courses. I have been having trouble trying to get my setup working on Raspberry Pi. I had two unused webcams (Phillips SPC900NC and Logitech Quickcam 400). I am trying to get OpenCV working on Raspberry Pi with an intention to use these two for stereo vision. Do you think its something worth attempting? I know people typically use same cameras – but theoretically I should be able to get this working? Your advice?
If at all possible I would highly recommend that you use the same cameras. Theoretically, it’s possible — but practically it’s more of a headache.
Hi Adrian, great tutorial! It works also on my RPi2B with full Jessy-OS on 16GByte with opencv3.2.0. I got also Jupyter on my virtual Environment. It works fine. Next i try to use the picamera. The cv2.videoCapture with camera is not easy2use but You also habe a solution 🙂
Congrats on getting OpenCV installed Johannes! And excellent usage of Jupyter Notebooks 🙂
Thanks so much for this wonderful step-by-step post! 🙂 Very useful and easy to follow!
Thanks Silvia!
Awesome post!!
Sadly though, I am having some trouble integrating it with my current project.
I am able to install OpenCV3 fully and import/test it (step 7) successfully. However, when I exit out of python back to the normal command line and attempt to run my program I get “ImportErrorr: no module named cv2”. I ran through all of the trouble shooting steps and can’t determine the problem. My “~/.profile” is correct, it looks like the smy-link is correct, and I am able to run “workon cv”. I’m not sure where to go from here and any help would be appreciated.
Hey Bud — are you sure you’re inside your Python virtual environment when trying to execute your script?
Great instructions and everything works. Unfortunately my unfamiliarity with virtual environments is causing me a lot of issues. Looking up explanations of virtualenv elsewhere, they use different terminology/steps to install it (for instance they don’t use .profile etc). Therefore, I’m unable to understand what I did in this tutorial and I am having trouble adding packages to my virtual environment or creating new virtual environments.
If I wanted to delete this virtual environment and install opencv the regular way, how do I go about uninstalling the cv virtual environment/ what folders do I delete?
Hey Jesse, you can delete a virtual environment with:
$ rmvirtualenv your_env_name
If you are struggling to get OpenCV + Python installed on your system, be sure to take a look at the Quickstart Bundle and Hardcopy Bundle of Practical Python and OpenCV which come with a Raspbian .img file with OpenCV pre-configured and pre-installed. Simply flash the .img file to your SD card and boot!
i have a error on installation the ” importerror: no module named cv2” pls how to diagnose the error pls help me
Please take a look at the “Troubleshooting and FAQ” section of this tutorial where I discuss common errors related to importing the “cv2” bindings.
Hi Adrian – great install guide! I’m having trouble setting up the OpenCv build. It seems to be telling me that cmake is not available ..? I may have screwed this up myself, by first setting up the python virtualenv for Py2.7, then for Py3. Should I wipe the card and start over?
(cv) pi@raspberrypi:~/opencv-3.1.0/build $ cmake -D CMAKE_BUILD_TYPE=RELEASE \
…
bash: cmake: command not found
I’m new to Linux and sure could use some advice.
Thanks!
I thin you forgot this command from Step #2:
$ sudo apt-get install build-essential cmake pkg-config
well, that’s just embarrassing … thanks, Adrian.
No problem, I’m happy I could help 🙂
Hey Matt, how did you manage to enter the backslash in the raspberry pi GUI “\”?
I have tried to search on the internet in order how to configure the keyboard layout, but sofar nothing useful found.
Thanks in advance!
Amazing Post!!
Had no snags whatsoever and got a good idea of what I’m doing thanks to the embedded links.
You’re a real lifesaver. Keep it up and all the best!
Nice job getting OpenCV installed Abhik, congrats!
$ sudo pip install virtualenv virtualenvwrapper this step not working it says could not find a version that satisfies the requirment virtualenwrapper( from versions:)
sir how can i solve it
hi Adrian, can i follow this steps for raspberry pi 2 model B? Thanks.
Yes, these steps will work for the Pi Model B provided that you are running Raspbian Jessie.
Thanks for the tutorial, Adrian! Got it all done and backed up, too.
One question:
Could the install have affected my RPi3 wifi? I had trouble staying connected during some of the longer gets yesterday, and read that I could use ‘sudo wconfig lan0 power off’ to fix it, and it did- the rest of the installs went off without a hitch. But today, after a fresh boot, the same command (its also in rc.local) has no apparent affect. The wifi fails every time I use the internet. Each time I restart the wifi it goes down within a minute, which is much more frequently than when I was doing the installs. And I think it takes my router down with it, too.
Any ideas?
Hey Matt — that is a very strange error, I haven’t encountered that before. The OpenCV install should not affect your WiFi at all.
Hi Adrian,
Thanks for the great tutorial. I currently have opencv working on my pi 3, but when I try to run a python file that imports cv2 as sudo it cant find it.
To be more specific when I run:
python cvTest.py
everything works and cv is properly imported and such, but when I run:
sudo python cvTest.py
I get the error: ImportError: No module named cv2
Do you have any idea why this is happening or how to solve it? I have to run my final program as sudo to use the pigpio that the project also uses.
Thanks for the help!
Hey Breanne — since you are trying to execute the script as the root user, you need to specify the full path to your Python binary to ensure the environment variables are set:
$ sudo /home/pi/.virtualenvs/cv/bin/python your_script.py/code>
Hi Adrian,
So this worked for me but I have other packages that were installed that aren’t working now because they aren’t installed into the virtual environment. How do I install a package into the virtual environment? Specifically I’m trying to install the pigpio library into the virtual environment so that I can run that at the same time as running opencv.
I tried reinstalling pigpio when I was in the virtual environment but the python file is still unable to import pigpio.
If you have any recommendations on how to solve this that would be greatly appreciated!
Thanks!
-Breanne
You simply need to access the virtual environment via the
workon
command followed by usingpip
to install your packages into the virtual environment. I actually demonstrate how to install and access RPi.GPI + OpenCV from the same virtual environment in this post.Hi again; it doesn’t have the import cv2 problem when in python IDLE 2.7.9 or IDLE 3.4.2 when running in the GUI or in a terminal while in the GUI… seems like it was just a Putty problem! Woohoo!
Congrats on resolving the issue Ray!
Hi Adrian, what will happen if I install this on both python 2 and python 3 at the same time? Thanks
If you want to have Python bindings for both Python 2 and Python 3, then you’ll need to create two separate Python virtual environments for each Python version and then compile OpenCV twice (again, for each version).
Hi Adrian,
I’m new to linux,raspberry pi as well as open cv, but interested to learn,
I just need help at the last steps as everything went well as you said but I’m having this error;
Import Error: No such module as cv2
I know this is given in the FAQ’s but I reall don’t know what a “sym-link” is and how to make sure if it’s valid and points to cv2.so file
So if you can just explain little bit or share some links,anything would be helpful
Really great post by the way,and thank you for your time
Hey Max — if you’re new to Lunux and sym-links, I would suggest giving this StackOverflow thread a read. I hope that helps!
I tried it Adrian, still it’s not working,whenever I use the virtual environment the python line ” import cv2″ gives the same error ,
Import Error: No such module as cv2
But it works fine , i.e it imports the cv2 library when i don’t run the virtual environment and run python directly from the terminal and it also shows the version number,what’s the meaning of all this ?
Thanks again in advance
I forgot to mention if I change the directory after running the virtual environment , to:
/usr/local/lib/python3.4/site-packages
and then run python 3 and then import cv2 ,it works fine, why is this ?
Is there anything I can do so that I won’t have to change my directory every time I want to import cv2?
The
/usr/local/lib/python3.4/site-packages
directory is likely where your OpenCV bindings were compiled and installed to. I think the issue here is that you don’t have the sym-link pointing to yourcv2.so
file from your virtual environment.thank you so much for this it really helped me out I appreciate it cheers.
I’m glad to hear it Meshack, congrats on getting OpenCV installed!
Hey Adrian. Thanks for your brilliant tutorial.
I am doing an image processing project.
I am a beginner to raspberry pi and have written a python script which uses OpenCV libraries. I’ve tested the code and works well on a computer.
I want it to run on Raspberry pi 3 model B.
I want to run the script on pi’s reboot. I am using a USB camera and probably an LCD display along with tesseract ocr.
And honestly speaking, as a beginner I don’t want to get into the virtual environment stuff.
Can i follow your tutorial without using virtual environment skipping the virtual environment steps? Do i have to make any changes in other steps?
And after installing OpenCV without doing the virtual environment stuff, will I be able to execute the code in IDLE on the pi?
Sorry for being such a noob. :p
Many thanks!!
If you want to run a script on reboot, I would start with this tutorial.
You can certainly skip the virtual environment steps if you want — it’s not a necessity, although I do highly recommend it. Also keep in mind that if you run into an error message and you did not use virtual environments as outlined in this tutorial, I won’t be able to provide any suggestions.
For what it’s worth, I offer a pre-configured Raspbian .img file that has OpenCV pre-installed as part of the Quickstart Bundle and Hardcopy Bundle of Practical Python and OpenCV.
Thanks Adrian! It worked with almost 90% of your tutorial without using virtual environment.
Would definitely try doing it with virtual env on some other projects.
Thank you loads, brother! 🙂
Congrats on getting OpenCV installed Akash, nice job.
Hi Adrian,
thank you so much for providing this tutorial.
Just wanna share my experience:
I got stuck at 87% when I use make -j4 (Raspberry Pi 3 model B with 80mbps SD card tho). So I repeated the installation, this time I only used 1 core and it succeeded.
Thanks for sharing Maria!
Hello Adrian,
I followed your tutorial which was very helpful thank you so much for that 🙂 but I got stuck at 87% when I used make -j4 (Raspberry Pi 3 model B ). So I repeated the installation but this time I used 1 core same as Maria have done but I got stuck at 14% and everything froze (desktop).
Try booting up your Pi in a headless state (no monitor) and then SSH into the Pi for the compile stage. It sounds like your Pi might be using too much memory. If your Pi continues to freeze try re-installing Raspbian. I would also suggest that you take a look at Practical Python and OpenCV which includes a Raspbian .img file pre-configured with OpenCV + Python installed. This will save you time getting up and running.
Hello Adrian ,
I’m trying to download the opencv_contrib zip file and the connection fails and keeps timing out, I was able to download the opencv file no problem.
This is the same for the bootsrap pip.py, any advice?
Many thanks,
Sinjon
Double-check your internet connection and ensure you have a strong, reliable enough connection for the download.
It still didn’t work even through a wired connection, i ended up downloading it from the website itself.
Another quick question, I’ve gone through the whole guide, on the last step when trying to import python opencv bindings….
I’ve entered import cv2 and I get the following it says ‘no module named ‘cv2’. I’ve also tried cv2.so and get the same message.
Thanks in advance
Please refer to the “Troubleshooting” section of this blog post for reasons as to why the OpenCV bindings may fail to import.
Hi, i have installed successfully Opencv in my raspberry pi, nevertheless i can’t use it on Python2 IDLE, beside i would like to connect to a Ip camera and i don’t find ffmpeg library, could you help me? thanks!
You cannot use the GUI version of IDLE with Python virtual environments. You will need to use the command line or Jupyter Notebooks.
Hands down the best tutorial for installing opencv on your RPi 3!
Great work man! Loved it
Thank you Manish, I’m happy the tutorial worked for you 🙂 Have a great weekend.
Thank you very much for your work !
Our students here in Valenciennes (France) are going to enjoy practical vision with raspberry thanks to your help !
JC Canonne , Mathematics Teacher, Institute of Technology of Valenciennes, Electrical Engineering and Computer Science Department.
Thank you for the comment, I appreciate it. I’m happy your students have found the guide helpful 🙂
Hi Adrian,
I’m new to python and this has been a really useful tutorial! I’m on the last step trying to bind opencv to python and I get an error message saying there is no cv2 file.
I’m able to bind outside the virtual environment? have I missed something?
Thanks in advance!
Please take a look at the “Troubleshooting and FAQ” section of this post where I discuss common reasons the
cv2.so
file may not be found.Thanks,
I’ve found the problem. the default version of python is 2.7 and the cv.so file is located in 3.4.
My aims are to build a program that could track a barbells trajectory, calculate velocity and then output this information. Which version would be best suited? and if 3.4, should i delete 2.7 or make 3.4 the default?
Many thanks
Your Python version doesn’t matter. As long as you have OpenCV installed, that’s what is important. Simply proceed with your current Python + OpenCV install. There are differences between Python 2.7 and Python 3, but none that would impact your application.
Brilliant thanks!
Sorry to be a pain, I reimaged my raspberry pi, followed the guide through step by step. I’m the compiling OpenCV for Python 3 stage. My interpreter for 3.4 has the correct path but numpy & libraries aren’t there at all?
how can I get these paths added in?
Thanks a million
It’s honestly hard to say without having access to your machine and seeing exactly which commands you executed. While I’m happy to help point you in the right direction, I would really encourage you to grab a copy of either the Quickstart Bundle or Hardcopy Bundle of Practical Python and OpenCV which includes a Raspbian .img file with OpenCV pre-configured + pre-installed. This will be the fastest, most reliable way for you to get OpenCV up and running on your Pi.
Hi Adrian,
I following your instructions and install openCV on my RPi3. I am on step #4 and used nano to modify the ~/.profile and add the required things at the bottom. I saved it, exited, closed the terminal and reopened it and checked that the saved items were still there and they are.
When I enter “source ~/.profile” as directed I receive “mkdir: cannot create directory ‘/.virtualenvs’: Permission denied” any clue what the issue might be?
Are you trying to install as a root user or the pi user? In either case, it looks like your directory permissions are incorrect.
Hello, i am new to this… I got up to the point where i am supposed to install numpy in the cv virtual environment. but i get an error that says too many levels of symbolic links. I have no idea what that means, or what to do about it, any help would be appreciated.
I have not encountered that error message before, that is quite strange. Sorry I couldn’t be of more help here!
I just encountered this; I bet you did the same thing I did. I installed the virtual environment incorrectly. When I messed up, I had typed in “mkvirtualenv cv -p python” without putting in python2 or python3.
You need to type “rmvirtualenv cv” and then re-create a new virtual environment
Good luck!
i am unable to create a virtual environment for python3
can you please give a tutorial on python3 with opencv
All of my OpenCV 3 + Python 3 (and Python 2.7) install tutorials can be found here.
If you are struggling to get OpenCV installed on your Raspberry Pi, I would suggest you use my pre-configured Raspbian .img file, part of the Quickstart Bundle and Hardcopy Bundle of Practical Python and OpenCV.
Hi Adrian,
Thanks a lot for this wonderful tutorial. I’ve followed your instructions and managed to get everything working fine except for one problem… Within a few seconds to a minute after running the script the “security feed” window freezes. However, if any motion is detected the pictures will still be captured and uploaded correctly despite the window not responding to the key (has to be closed from terminal). I’m using OpenCV 3.0.
Any ideas as to why the window is frozen?
How are you accessing your Raspberry Pi? Via HDMI + keyboard or over VNC/SSH? It seems that you might be accessing your frames over a network connection (likely X11) and the connection is dropped.
One of my programs needs a different version of opencv.I have already installed 2.4.13 version.
Can I install opencv 3+ on pi aswell.( Or If I want to change the version do I have to do the entire process again?)
Yes, you can install multiple OpenCV versions on the same machine. My favorite method of doing this is to:
1. Create a “build” directory for the new OpenCV install.
2. Run CMake to configure the build for OpenCV 3.
3. Compile OpenCV.
4. Delete everything but the “build” directory.
5. Copy the resulting
cv2.so
file into thesite-packages
directory for your Python install.I would highly recommend that you use Python virtual environments for this.
Hi Adrian
Thanks for the tutorial. When i try make -j4 the terminals states “make: *** No targets specified and no makefile found. Stop”. Do you know what the problem is?
Please read the other comments before posting or doing a ctrl + f search on the page for your error message. See my reply to “Justin” above.
Thanks for the detailed tutorial. Is there a way to just download OpenCV, or compile it elsewhere? I get a “Segment Fault” when using 4 processors, and with just one it crashes my Pi3.
Hey Russell — I actually provide a downloadable Raspbian .img file with OpenCV pre-configured and pre-installed. All you need to do is flash the .img file to your Pi. The .img file can be found inside the Quickstart Bundle and Hardcopy Bundle of Practical Python and OpenCV.
Thanks for the neat step-by-step tutorial, I am able to build opencv+python2.7 on pi3 at first attempts itself. Now I can’t resist myself to run first sample.
Congrats on getting OpenCV installed Ganga! 🙂
Thank you for your tutorial it has been helping us a lot. We are having a problem where every time we put in:
# ls -l /usr/local/lib/python3.4/site-packages/
we get out
ls: cannot access /usr/local/lib/python3.4/site-packages/:No such file or directory
we have tried it in both in a (cv) environment and not
We are not sure what to do from here any help would be appreciated. Thank you
Try running
python --version
to determine which Python version you are using. You might not be using Python 3.4.i faced the same issue so i checked and got to know im using 2.7.9 but how do i switch to 3.4?
If you are using virtual environments you would need to explicitly supply the “python3” switch as detailed in this blog post:
$ mkvirtualenv cv -p python3
Hi there, I am having an issue when I go to compile. I am in the cv environment and when I put in “make-j4” it tells me “no targets speficied and no makefile found”. I followed the instructions to a t up to this point. Any ideas?
Check your output from CMake. The CMake command exited with an error. You need to resolve this error before continuing.
Hi adrian,
im just confuse in step no 5,
i got the look like appears in figure 4, for python 2.7,
but how i can get look like figure 5, for python 3.4 ?
currently im just ignore for figure 5 look like,
when i continues with another step, im stuck in step 6 for python 3.
in i also cannot get look like u in step 7.
Hey Adrian,
I am not able to install open cv correctly.
I have followed all your steps correctly, but when I check the output of cmake the paths are not there.Only for interpreter the path is there, but not for others.
I am a noob, so please help me ASAP.
Arpit Gupta
Make sure you are in the “cv” virtual environment when executing CMake. If you are still having problems, I would highly suggest you download my pre-configured Raspbian .img file with OpenCV pre-installed. This .img file is part of the Quickstart Bundle and Hardcopy Bundle of Practical Python and OpenCV.
Mr Adrian does the Python (for build ) matter? I have followed the steps to install OpenCv on Python 3.4 but for some reason it keep displaying Python2.7 why is that?
The “Python (for build)” is buggy. As long as your Python 3.4 is configured correctly, CMake will use Python 3.4 for the build.
Hi Adrian,
a very good tutorial. Thanks.
A note – albeit I was on cv there would be no way to get cmake using/generating the right path for Python3.
I was on PUTTY while working… after a while , then I switched to VNC and did the very same and bingo… it worked properly.
Weird…
May be some interference between putty and the virtual env? – strange.
just to mention.
Best
Robert
Hi Adrian
I followed the tutorial for the installation of opencv 3.0 and 3.1 in Raspbian, but I’m having a problem because in the idle of python 2 it’s being returned that there is no module called import cv2, but I’m getting it through python in workon cv. I’m developing a facial detection program, but when I ask to import the picamera with python accessed through the workon cv it is returned that there is no such module. I tried installing the picamera module plus the terminal warns that it is already installed. I have been experiencing this problem since the last update of Raspbian, since previously I was able to install opencv without any problem following the tutorial and developed a facial detection program, I wish you could help me with this problem on opencv
The GUI IDLE does not respect Python virtual environments. I would suggest using the command line or Jupyter Notebooks rather than IDLE.
If I wanted to use OpenCV 2.4 with python 2.7 instead of OpenCV3.1 would I only need to change:
Step 2: use python2.7-dev instead of python3-dev (or would I just keep that line the same
sudo apt-get install python2.7-dev python3-dev)
and change
Step 3: use 2.4.8 instead of 3.1.0 (unless there is a different version of 2.4 that I should use)
And if so is there anything else I should do differently to install OpenCV 2.4 with Python 2.7 on my Pi?
Also, if I already am using this set up with python 3 and OpenCV 3 can I install 2.4 with python 2.7 on the same card without any problems?
Thanks,
Mike
If you want to compile OpenCV 2.4 support, you’ll want to use Python 2.7. There are no Python 3 bindings available for OpenCV 3.
Hi Adrian,
Great tutorial! After 2 attemps it finally compiled. (with 3 cores)
I have one question.
I had version 2.4 before i did this tutorial and when I run python it seems It is still importing version 2.4 instead of 3.2.
I didn’t use virtualenv because I just need version 3,2.
I have cv2.so in python2.7/dist-packages but I am not able to know if it is from version 2 or 3.
I must have both versions now, how can i just use version 3?.
Thanks!
Alex.
When you an
sudo make install
you must have overwrote thecv2.so
file. When running multiple versions of OpenCV on the same system, run CMake + make twice (one for each version), then delete everything but the “build” directories. You can the sym-link in yourcv2.so
file into your separatesite-packages
directories.Thanks for your reply.
I realized I had version 3.2 available when running Python3, but not on 2.7.
I will try what you said.
Thanks!
Alex.
Adrian, I have used your guides on several occasions, both for work projects and for my senior capstone – and I would like to thank you for all your work. If I can add just one thing: when using a virtual environment,I ran into trouble trying to use the smbus for i2c, because I never called toggleglobalsitepackages in the venv. Calling that might save another poor soul hours of searching.
Hey Alexander — I actually detail how to use these types of “global” site-package directories within virtual environments in this blog post.
Hi Adrian. I am getting errors when using the HoughCircles opencv function. Online people say that I need to import cv2.cv in order to fix the problem. When I try to install this by using “pip install opencv-python” I get an error “Could not find a version that satisfies the requirement”. In short I am trying to import cv2.cv and have not been able to find a way to do so in the virtual environment. Thanks!
I would suggest you use one of my tutorials for installing OpenCV. The
cv2.cv
module was removed by default in OpenCV 3. You can re-enable it via CMake if needed.Thank you for the detailed tutorial. Wanted to share something I learned.
I started with a brand new RP3b and fresh install. Meticulously followed your directions. The final test seemed to indicate everything worked fine.
But I got an “ImportError: No module named cv2” when I was trying to test someone else’s demo program. The line in the program corresponding to the error is this: “import cv2.cv as cv”.
Another blog said the cv2.cv is depreciated and to use just cv2. I deleted the .cv and the program got further. However, now I get a different error.
Any ideas what would be generating this error? “(HueComp:6807): Gtk-WARNING **: cannot open display: ”
I am on a Mac. I had removed Real vnc server and installed tightvnc so my mac would connect with it’s internal vnc client which I read is incompatible with realvnc. After I got that cannot open display message I removed tightvnc and reinstalled realvnc. Still get the same error. Any ideas?
I’m not sure about the VNC support, but the GTK warning can be alleviated by using X11 forwarding via SSH:
$ ssh -X pi@your_ip_address
After you logon to your Pi, make sure you access the “cv” virtual environment before you try to import your OpenCV bindings.
Hi Adrian, thanks for your tutorial mate 🙂
I’ve run across quite a few problems but OpenCV is finally up and running 😀
Congrats on getting OpenCV installed on your Raspberry Pi Silvia, nice job!
also this does not make any sens
why do we have to create a virtual environement if the numpy install is done outside of it ???
– virtual environement make everything complicated instead of simpler
– I always compiled CV with c++ why would python be involved in here ?
The NumPy install isn’t supposed to be done outside of the virtual environment. Virtual environments actually make your life easier once you take the time to understand them.
As for compiling OpenCV with C++, I’m not sure what you mean. The OpenCV library works for many programming languages such as C++, Python, etc.
ok I cleaned a lot of stuff and I missed the contrib repo, stupid of me but now it does not find numpy.distutil
https://pastebin.com/j72WhptQ
any idea what I been missing ?
sudo find / -name numpy
/usr/local/lib/python2.7/dist-packages/numpy
/usr/local/lib/python2.7/dist-packages/numpy/core/include/numpy
You need to install NumPy into your “cv” virtual environment:
redone everything on a fresh rpi install without the virtual evironement crap and it works just fine, no need for symbolic links nor useles python 3 crap
hi, i got stuck after cmake! cmake output doesnt show numpy or libraries.
Python 3:
— Interpreter: /home/pi/.virtualenvs/cv/bin/python3.4 (ver 3.4.2)
thats all ! please help
Make sure you have installed NumPy into your virtual environment to start. If you are having continued trouble installing OpenCV on your Raspberry Pi, I would suggest taking a look at the pre-configured Raspbian .img file I offer as part of the Quickstart Bundle or Hardcopy Bundle of Practical Python and OpenCV.
great stuff Adrian! I had to re-run make three times but omitting -j4 worked just like you hinted. A rpi 3b and 16Gb sdcard here.
Great job on getting OpenCV installed on your Raspberry Pi 3, Bert! 🙂
Adrian,
I followed all the steps mentioned in the tutorial. I am having difficulty opening the camera to read the video.
I am trying to do it in c++. Any thoughts why it might be happening?
The program compiles without any issue but fails to open the camera.
I tested the camera using raspistill and it works perfectly fine.
Without access to your machine, I’m not sure what the exact issue would be. This blog also only focuses on Python, not C++. Best of luck with the project!
after the make-j4 command installation starts but the when its at 12% to 13 % the raspi reboots .. plzz help
It sounds like your Pi might be overheating. Try running just
make
to compile with a single core.Hi Adrian, i attempt for install opencv with another steps and didn’t work, then i moved to this page and i’m trying to follow your instructions but when i run the cmake command (inside the virtual enviroment) could not obtain the cv in the path for interpreter, libraries, numpy nor packages path. The cv appears in the prompt. What can i do for obtain the cv in these paths.
Thanks,
Gerardo
I would start by deleting the “build” directory, re-creating, and re-running CMake. I would also run
pip freeze
from within the “cv” virtual environment to ensure NumPy is properly installed.Great Directons.
Everything worked fine .
Thanks
Congrats on getting OpenCV installed Ted!
I have installed opencv on a raspberry pi 3 and have written a Python program using opencv. Everything works properly when running the program from the terminal: python /home/pi/EdgeDetect1.py. I have tried crontab, and systemd reboot options, but nothing happens. I did see a GTV: error on a log entry.
What is the best procedure for running Python and opencv on reboot?
You can learn how to run a Python + OpenCV script on reboot in this blog post.
thanks a lot, this worked !! really appreciated
Thanks Emmanuel! Congrats on getting OpenCV installed.
Hi Adrian
When I start the “make -j4″
the output is ” no targets specified and no makefile found
Any idea what it happened?
Thanks
Please read the other comments before posting. See the comment by “Justin” above. The short answer is that there was an error executing CMake. Find out what the error by viewing the output of CMake. Resolve the error. And once CMake runs without error it will generate your Makefile for you.
Thanks Adrian. I have fixed this problem.
Congrats on resolving the issue!
Hi,
Can you help me with using a USB Webcam with OpenCV 3.2.0 and a RaspberryPi 3 for face recognition and object recognition?
Also, will the above installation process be the same when using a USB Webcam?
Hope to hear from you soon!
Thanks. 🙂
I cover how to use the Raspberry Pi 3 and USB webcam for face recognition inside the PyImageSearch Gurus course. I would suggest starting there. As for the install process, nothing has to change when using a USB webcam and OpenCV. The same steps used in this tutorial will work.
I tried compiling with four cores, and I failed.
Then I tried compiling with two cores, and I failed again.
And finally, when I compiled using just one core, I was successful.
It took me around 3 and a half hours to compile using one core (make), but I was finally able to compile OpenCV 3.2.0 successfully.
Thank you so much Adrian for this wonderful tutorial.
Can you please share some tutorials or links with regard to using a USB webcam with OpenCV on Raspberry pi.
Congrats on getting OpenCV installed! It sounds like there was some strange race condition causing your compile to fail with multiple cores.
As for using a USB webcam + the Raspberry Pi together, take a look at this blog post. I also cover the subject in detail inside Practical Python and OpenCV.
Man thanks alot. Very nice guide for installing open cv.
Thank you Hassan!
I have a problem I did all steps above but still I cant find cv2.so in /usr/local/lib/python2.7/site-packages nor dist-packages
also in config after make in python 2.7 section I can just see interpretuer link nut canot find link to libraries or numpy link
plz help asap as I must finish it today thanks
If the Interpreter or NumPy sections are not identified via CMake then OpenCV will not compile the Python bindings. I would suggest ensuring you are in the “cv” virtual environment and then re-running CMake.
Secondly, I do offer a pre-configured Raspbian .img file that has OpenCV pre-installed as part of the Quickstart Bundle and Hardcopy Bundle of Practical Python and OpenCV. Simply download the .img file, flash it to your SD card, and boot.
Opencv successfully installed. Thank you Adrian. I setup python 3, opencv 3.1.0. I had problem installing because i was using another repository for opencv_contrib-3.1.0.zip. Using exact steps of this tutorial works.
Thanks.
Great job getting OpenCV installed Gerardo!
Thanks for writing this guide Adrian
Will try it soon and share the result here
Hi Adrian. Thanks for an amazing tutorial!
I got openCV installed with no knowledge on Raspberry pi at all.
I have a project to do in which I have to detect different pets (cats and dogs) with computer vision.
I dont have any knowledge on computer vision but I have to learn to finish this project asap.
Can you please point me in the right direction?
Kind regards from South Africa
Hi Abrie, thanks for the comment. I’ll actually be discussing how to correctly label cats vs. dogs in my book, Deep Learning for Computer Vision with Python.
Thanks for the Reply Adrian. Will there be tutorials and step by step help in this book?
Yes, there will be abundant step-by-step instructions with lots of code.
Dear Adrian!
I made a real time shape detector, from your tutorial, with picamera. The problam is that I wanted to controll a led via gpio when a certain shape in front of the camera. So if I run the shapedetector I got an error that there no RPI module. When I run the program with sudo, it says that there no such module CV2.
Maybe there is a way that I could intall CV2 in root?
(I followed your steps to install OpenCV.)
I would suggest you follow this blog post where I discuss how to use OpenCV and RPi.GPIO together.
Thank you! That helped a lot.
Fantastic, I’m glad to hear it Vincze 🙂
My build repeatedly got stuck around 91% – when it is trying to build cv2.o. The reason, I think is that this is the point where 4 ccs use up all the memory and the pi starts to swap. Swapping using the SD card is very slow and wears out the SD card. There are articles on the web on using an external hard drive for swap. I don’t have one handy so I’m continuing building using only 1 core with
make -j1.
I also disabled swap with
sudo swapoff –all
If that doesn’t work I’ll have to dig around for hard drive with some space to use as the swap.
That fixed it. The remaining 10% built very quickly.
just jessie software work in noobs …we are stuck in 6 step.do we need any additional software for open cv in raspberry pi 3??can anyone reply its urgent
NOOBs is just software to install the actual OS (Raspbian). I tend to skip NOOBs and just install Raspbian directly. If you are getting stuck and it’s urgent, take a look at the Quickstart Bundle and Hardcopy Bundle of Practical Python and OpenCV which includes a Raspbian .img file with OpenCV pre-configured and pre-installed. Simply flash the .img to your SD card, boot, and you’re ready to go.
I have gotten stuck twice at 87%. It has now been 2 hours 45 minutes. I am going to stop the installation and try single core.
I am assuming that the time is in minutes not seconds . . .
Which time are you referring to?
i am not getting an option for empty space in $ sudo raspi-config step.
please help me how to expand it!
I’m not sure I understand what you mean by “getting an empty option”. Can you elaborate?
sorry,that problem is resolved.now can i install opencv for both python 2.7.9 and python 3.4.9
i have installed for python 2.7.9.now i want to use it for python 3.4.9,so should i remove it for 2.7.9 or not
You do not have to remove the Python 2.7 install, but you do need to re-compile OpenCV with Python 3 bindings.
Well done, Adrian! Thank you so much.
Thanks Tom!
Hi Adrian,
I am trying to display images/video from opencv to a web page, but can’t find much information about the method or coding. Do you have a tutorial about this topic?
My goal is to have a button on a web page that can trigger a python-opencv script to process images (or video stream) from a webcam or raspberry pi camera and then display the results on the web page.
Best,
I would suggest you use an OpenCV + Python script to detect send videos from your Pi to a web server, one that is running Django, Flask, whatever web framework you are comfortable with. Then on the front-end, have some JavaScript that polls for new images that are uploaded and then displays them.
I do not have an tutorials in directly streaming a Raspberry Pi video stream to a web page.
Amazing Adrian! I can sure you is almost the first time a tutorial works for me from the beginning to the end. Im starting in CV and Raspberry world and I think you will see me around for a while. Thank you very much!
Congrats on getting OpenCV installed Rosa, nice job 🙂
Thank you, Adrian, for the excellent tutorial!
I have one more note to add. I had to reboot my Raspberry Pi after installation to make command “import cv2” work for Python 2.7.13. Before reboot it show me the error:
ImportError: ./cv2.so: undefined symbol: PyUnicode_AsUnicode
It’s a Windows-like behavior: reboot could be mandatory 🙂
Hi, Adrian.
Do you use which IDE in Raspberry pi?
I normally don’t use an IDE on the Raspberry Pi. I normally SSH or SFTP in from my laptop and use either Sublime Text or PyCharm with a remote interpreter. If I am actually coding on the Pi, I use Sublime Text.
Thanks Adrian!
Hi Adrian, I have installed open CV like in your tutorial using a virtual environment. How can I activate this environment when running the program from PyCharm?
found the solution here: https://nathanpjones.com/2016/02/remote-debug-gpio-on-raspberry-pi/
Thank you for sharing the solution Phillip!
This post will show you how to use OpenCV + PyCharm together.
Hello adrian
My classes are very useful to me thank you very much. I want to install OpenCV to pi 3.
In step 6, a total of 0 results are output for python 2.7. I can not find the reason, please help me, Adrian.
thank you..
Hi Adrian, I am experiencing the same problem like Habib. I ran “make clean” and then “make” on my Rpi 3 but running “make” took a couple of hours. I am on step 6 and I ran “ls -l /usr/local/lib/python2.7/site-packages/” but the total is 0. What can I do? Help please. Thank you.
Double-check your “Python 2” and “Python 3” section of Cmake and ensure it matches my screenshots. If any of the four Interpreter, site-packages, Libraries, or NumPy paths are empty then the cv2.so bindings will not be built.
Here is what is says in my terminal but the total shows 0 in step 6. I am running make clean and then make. I am not sure why it is not working. Compiled make and it is installed 100%. Is there a way that I can clear everything and start from scratch? I do not mind starting over and just download python 2 version. I appreciate the help Adrian.
— Python 2:
— Interpreter: /usr/bin/python2.7 (ver 2.7.13)
— Libraries: /usr/lib/arm-linux-gnueabihf/libpython2.7.so (ver 2.7.13)
— numpy: /usr/lib/python2.7/dist-packages/numpy/core/include (ver 1.12.1)
— packages path: lib/python2.7/dist-packages
—
— Python 3:
— Interpreter: /home/pi/.virtualenvs/cv/bin/python3 (ver 3.5.3)
— Libraries: /usr/lib/arm-linux-gnueabihf/libpython3.5m.so (ver 3.5.3)
— numpy: /home/pi/.virtualenvs/cv/local/lib/python3.5/site-packages/numpy/core/include (ver 1.14.1)
— packages path: lib/python3.5/site-packages
—
— Python (for build): /usr/bin/python2.7
Check your Python version of the Python virtual environment:
What is the version? It Python 3?
Hi adrian
Can I import cv2 in python3 (IDE)?
Which IDE are you trying to import OpenCV into? Normally you would set the Project Interpreter, like in PyCharm.
Hey Adrian! I’ve followed this blogpost in the past for installing OpenCV on the Raspberry Pi for a while now, and I have a problem that has been bugging me the few times I’ve had to reinstall everything.
Sometimes, for seemingly no reason whatsoever, after installing virtualenvwrapper and preparing the ~/.profile file, the command “source ~/.profile” throws up an error that is essentially “No module named virtualenvwrapper”
I’ve tried uninstalling and reinstalling both virtualenv and virtualenvwrapper, but no luck. Do you have a fix? I’ve been dealing with this problem for the last hour and I’m getting no closer to solving it than when I started.
Hi Trey — so the problem is intermittent? That is extremely strange, I have never encountered that issue before. It’s hard to say how to resolve the issue, other than you might want to start with a fresh Raspbian install and try again. Sorry I couldn’t be more help here!
Hi Adrian,
I’m having an issue with Step 5 while compiling OpenCV, specifically with the make -j4 command. When I try to run this line, the terminal gives me this error: make: *** No targets specified and no makefile found. Stop.
Do you have any suggestions on what the problem might be and how to address it? Many thanks.
If you are getting this “make” error it is because your “cmake” command exited with an error. Go back to the CMake step and examine the output to find the error you need to correct.
Thanks, it works!!!!.
But i have 2 questions.
1)I have OPENCV for Python2. Can i change something and make it okey for python3?
2)I have Thonny ide. But i can’t use opencv with ide. How Can i do that?.
Please respond me Adrian. Thanks.
1. If you want to use OpenCV with Python 3, then you’ll need to re-compile and re-install OpenCV with Python 3 support.
2. I haven’t used the Thonny IDE before and am unfamiliar with it. Most IDEs let you set a “Project Interpreter” like in PyCharm. I would suggest looking for such a setting.
Thanks Adrian for the marvellous post.
I am planning to use 1 webcam and 1 pi-camera (placed back-to-back) to record videos and do real-time image processing, for nearly 8 hours at a stretch. Do you think, its possible to commercialise this product, without excessive heat generation and performance issues. ? Can I take it for installation inside the driver cabin of a heavy vehicle ?
Hi Neil — I actually cover using multiple cameras with the Raspberry Pi in this blog post. However, my tests were for only 1-2 hours at a time in an “open air” environment. If you were to box up the product, I would be concerned heavily with heat. Unfortunately, I do not know the answer to the heat question issue and instead suggest you ask the experts over at the Raspberry Pi forums.
Can you confirm if you used Python 3.4 or Python 3.5 for the compile? Secondly,check your
build/lib
directory for the bindings. If the file is not there, then there was likely a misconfiguration in your CMake file and the Python bindings were not built.Typo report: control-F for pacakges
in desperate need of help. im trying to install it using this method (bar virtual environment) and i’ve installed opencv 3.1.0 multiple times, but it keeps telling me in python that i’ve got 2.4.9.1 installed.
im trying to uninstall ALL opencv traces from my pi but nothing seems to be working.
is there anyway to just wipe opencv from this system? afaik; i’ve installed it originally using pip and then building it like this, however the pip method of deletion doesnt seem to work.
Hey Seth — without physical access to your machine it’s hard to say where your OpenCV 2.4 libraries may be installed. I would suggest wiping out any opencv* files in
/usr/local
. This should remove both OpenCV 2.4 and OpenCV 3.1. From there you can install OpenCV 3 from scratch.Secondly, check your
site-packages
for your Python version and delete anycv2.so
files.Hi,
Does any of you know how to configure Thonny to use the cv environment we created following this guide?
I have never used the Thonny IDE before, but if it’s anything like PyCharm you simply have to switch your Python interpreter.
Hi,
I did the full tutorial, and it worked once.
After the whole installation, it worked the test code.
But when I reopen the terminal, it didn’t work. I’m using python 2.7.
The hint said “No module named cv2”
Could you show how to fix it??
Thanks!!
It sounds like you are forgetting to use the
workon
command to access your Python virtual environment after opening a new terminal.I did that too.
After reopen the terminal, workon cv first.
If reboot, then source ~/.profile first.
But still can’t work.
I tried to reinstall, and it worked.
Thank you for the great tutorial and the patience to answer questions.
Congrats on getting OpenCV installed on your Raspberry Pi, David! Nice job.
Run program in python 2.7 i have error like this. Why sir?
help me 🙁
Traceback (most recent call last):
…
(h, w) = image.shape[:2]
AttributeError: ‘NoneType’ object has no attribute ‘shape’
Hi Panji — the vast majority of NoneType errors occur to either (1) invalid paths to input images/videos or (2) your video file stream not being setup properly. I have documented these types of issues and how to resolve them in this blog post.
Hi,
While installing opencv 3.1.0 on raspbian jessie.. Am getting errors. I have followed all steps except for virtual environment for python. I skipped that step.. Can you please help me to figure out with this issue. Thanks in advance
Hi Aasha — without knowing what your errors are, it’s impossible to point you in the right direction.
Thank you so much for this great tutorial. I recently enabled the OpenGL driver that is available since feb17. Do you confirm that I have to recompile the code again to use it ? Shall I expect a boost in performance ?
If you previously installed OpenCV without your OpenGL driver then yes, you will need to recompile OpenCV.
Adrian,
Thanks for your tutorial. I just wanted to post some helpful information for everyone. If your Pi seems to be running slow, then check to see if the red LED on your Pi is blinking. If it is, you have power supply problems.
The red LED should be solid all the time. More information including performance testing can be found here: https://www.raspberrypi.org/forums/viewtopic.php?p=952371
Thanks for sharing Michael!
Thanks for the indepth tutorial! I got version 3.3.0 working on an original gen1 rpi model B+. The make took 23hours!!!!!!! and at 82% I ran out of memory but managed to purge some stuff to scavange the last bit of compile. At the end, it was in python34 but under dist-packages. I tried importing cv2 without renaming it and it worked fine so I didn’t bother. You could update the guide to mention that this step may not be neccesary. Thanks again, couldn’t do this without you 🙂
Congrats on getting OpenCV installed on your Raspberry Pi, Joe! Nice job.
Hi Adrian
Thanks for your well-explained Tutorial
Is OpenCV 3.x faster than OpenCV 2.x on raspberry pi? I’m using 2.4.13 but wanted to know whether should I migrate to 3.x or not?
In practice there is no speed difference between OpenCV 2.4 and OpenCV 3 — it all depends on the algorithms you are working with. I would suggest continuing with whichever version of OpenCV you are more comfortable with.
following exactly all steps, i successfully installed the opencv 3.1.0 with python2 on the first raspi 3, and then i tried to install on another raspi 3, then i got the problem at the step of compiling. i tried both “make -j4” (whic is using 4 cores) and “make” (which is using one core), but both failed, and the fatal error is about “stdlib.h no such file or directory”. Can someone advise me? thank you
First: Very nice job Adrian. Thank you.
After searching a bit I added the last line to Adrian’s cmake like so:
Adrian: It worked but not sure if there is any side effect as a result of disabling PRECOMPILED_HEADERS ?
Thank you.
I don’t know the answer off the top of my head, but from my understanding it might slow down the actual compile of OpenCV but shouldn’t have any performance implications (someone should correct me if I’m wrong).
Eric. Did you get an answer? I’m having the same issue. I saw a post on stackoverflow.com but it was related to GCC 6.3. The post stated to change
#include_next
to
#include
in the usr/include/c++/6/cstdlib file. However, it wouldn’t allow me to modify the file. I presume I’d have to change the file’s permissions but just haven’t done that yet. Trying to see if there’s something else I can do before messing with files I don’t understand.
Let me know if you figured it out.
-drew
Hi, Drew
Did you fix the problem?? I got the same issue. .
Can someone show how to fix this problem? @Adrain
-David
Add -D ENABLE_PRECOMPILED_HEADERS=OFF to the cmake invocation in the beginning of step #5 to fix this
thanx sumanth. your reply really helps me. XD
Sumanth, It is not working for me
Did you find the solution?
I’m having this same issue. Is there a recommended resolve? Many thanks in advance!
Why do I always need to execute source ~/.profile to load the commands? Why isn’t giving the path once enough?
On my laptop, I have installed opencv3 in a similiar fashion using one of your excellent tutorials, but there was no need to execute the source ~/.profile everytime i wanted to access my virtual environment.
Why must i do this on the pi?
Depending on how you access your Raspberry Pi the
~/.profile
file is not loaded automatically, hence you need to do it manually.Actually everytime I boot the pi, I’m able to access my virtualenv directly by using the workon command and I do not need to reload my .profile file!
Hi,
I’ve followed this tutorial successfully in the past a couple of times on the same raspberry pi on the same 8 gb card; however, this time, it fails to finish compiling (around 75% through) due to lack of space. I’ve gone through and deleted a number of other large things on the system including chromium-browser; however, it doesn’t seem to be enough. (I’m using the desktop version, without NOOBS, while trying to compile cv version 3.3.0). Is the problem that the 3.3.0 version is much larger? I don’t have a larger card though, so are there any workarounds using the same version of cv?
I would recommend using a 16GB card if possible. You should also try deleting Wolframe Engine and LibreOffice from your system as well, this will reclaim abou 1GB of space.
Hi adrian
I installed opencv 3 on R pi as you instructed. But it does not open window when cv2.imshow(‘image’,img) is executed. There is no error, line just gets executed without opening a window. Please give solution
Thanks a lot.
You might be forgetting to include
cv2.waitKey
after your call tocv2.imshow
.Hi Adrian,
I encountered an error while installing image I/O package so i skipped the step and went on with the installation. Is it possible to do this step at the very end?
Thanks a bunch
Which package? And what was the error?
Thanks for the detailed instructions Adrian, It is really useful. I think it will be even faster if we could cross-compile on PC and copy the opencv libraries to rasp pi board.
Thanks again!!
Hi Adrian.
How do I run a script inside a virtual environment from the start of the raspberry pi 3?
Your first access your “cv” Python virtual environment and execute the script:
Hi Adrian.
I followed everything and it’s actually working, but when I try to use cv2.dnn.readNetFromCaffe(…) it says that ‘module’ object has no attribute ‘dnn’.
What can I do?
You need to install OpenCV 3.3. Please make sure you downloaded the OpenCV 3.3 source code.
I was having trouble and after 10 hrs of trying to compile and it crashing at 84% I did a remake and tried again… and crashed again… after doing a nice top in a separate window I noticed that it was not freeing the cache… after doubling the cache to 200 and rebooting I had no crashes and the times that were listed were above are accurate… so if your compile is slow and it crashes try upping the cache.
Thanks for sharing, Ersatz!
unable to install the packages on my raspberry pi 3 it gives the failed to download the package message.
please help
Hi Ashish — I’m not sure what packages you are referring to. I would suggest ensuring your internet connection is strong and retrying.
I needed to add `BUILD_NEW_PYTHON_SUPPORT=ON` so the CMake command to create cv2.so
Hi Adrian, I have followed every step in this tutorial and installation was a breeze. However, i have not been able to run a single cv script since i finished installation (1 year ago now) without getting the ‘cv2 module not found’.
After a while i also noticed that the workon cv command is no longer recognized and the source ~/.profile command just freezes.
I’m desperate. Any advice? a fresh install didn’t fix this either.