Building a document scanner with OpenCV can be accomplished in just three simple steps:
- Step 1: Detect edges.
- Step 2: Use the edges in the image to find the contour (outline) representing the piece of paper being scanned.
- Step 3: Apply a perspective transform to obtain the top-down view of the document.
Really. That’s it.
Only three steps and you’re on your way to submitting your own document scanning app to the App Store.
Sound interesting?
Read on. And unlock the secrets to build a mobile scanner app of your own.
Looking for the source code to this post?
Jump Right To The Downloads SectionOpenCV and Python versions:
This example will run on Python 2.7/3+ and OpenCV 2.4/3+
How To Build a Kick-Ass Mobile Document Scanner in Just 5 Minutes
Last week I gave you a special treat — my very own transform.py
module that I use in all my computer vision and image processing projects. You can read more about this module here.
Whenever you need to perform a 4 point perspective transform, you should be using this module.
And you guessed it, we’ll be using it to build our very own document scanner.
So let’s get down to business.
Open up your favorite Python IDE, (I like Sublime Text 2), create a new file, name it scan.py
, and let’s get started.
# import the necessary packages from pyimagesearch.transform import four_point_transform from skimage.filters import threshold_local import numpy as np import argparse import cv2 import imutils # construct the argument parser and parse the arguments ap = argparse.ArgumentParser() ap.add_argument("-i", "--image", required = True, help = "Path to the image to be scanned") args = vars(ap.parse_args())
Lines 2-7 handle importing the necessary Python packages that we’ll need.
We’ll start by importing our four_point_transform
function which I discussed last week.
We’ll also be using the imutils
module, which contains convenience functions for resizing, rotating, and cropping images. You can read more about imutils
in my this post. To install imutils
, simply:
$ pip install --upgrade imutils
Next up, let’s import the threshold_local
function from scikit-image. This function will help us obtain the “black and white” feel to our scanned image.
Note (15 January 2018): The threshold_adaptive
function has been deprecated. This post has been updated to make use of threshold_local
.
Lastly, we’ll use NumPy for numerical processing, argparse
for parsing command line arguments, and cv2
for our OpenCV bindings.
Lines 10-13 handle parsing our command line arguments. We’ll need only a single switch image, --image
, which is the path to the image that contains the document we want to scan.
Now that we have the path to our image, we can move on to Step 1: Edge Detection.
Step 1: Edge Detection
The first step to building our document scanner app using OpenCV is to perform edge detection. Let’s take a look:
# load the image and compute the ratio of the old height # to the new height, clone it, and resize it image = cv2.imread(args["image"]) ratio = image.shape[0] / 500.0 orig = image.copy() image = imutils.resize(image, height = 500) # convert the image to grayscale, blur it, and find edges # in the image gray = cv2.cvtColor(image, cv2.COLOR_BGR2GRAY) gray = cv2.GaussianBlur(gray, (5, 5), 0) edged = cv2.Canny(gray, 75, 200) # show the original image and the edge detected image print("STEP 1: Edge Detection") cv2.imshow("Image", image) cv2.imshow("Edged", edged) cv2.waitKey(0) cv2.destroyAllWindows()
First, we load our image off disk on Line 17.
In order to speedup image processing, as well as make our edge detection step more accurate, we resize our scanned image to have a height of 500 pixels on Lines 17-20.
We also take special care to keep track of the ratio
of the original height of the image to the new height (Line 18) — this will allow us to perform the scan on the original image rather than the resized image.
From there, we convert the image from RGB to grayscale on Line 24, perform Gaussian blurring to remove high frequency noise (aiding in contour detection in Step 2), and perform Canny edge detection on Line 26.
The output of Step 1 is then shown on Lines 30 and 31.
Take a look below at the example document:
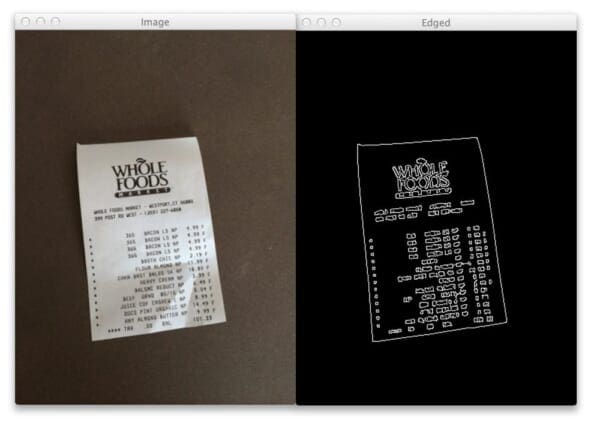
On the left you can see my receipt from Whole Foods. Notice how the picture is captured at an angle. It is definitely not a 90-degree, top-down view of the page. Furthermore, there is also my desk in the image. Certainly this is not a “scan” of any means. We have our work cut out for us.
However, on the right you can see the image after performing edge detection. We can clearly see the outline of the receipt.
Not a bad start.
Let’s move on to Step 2.
Step 2: Finding Contours
Contour detection doesn’t have to be hard.
In fact, when building a document scanner, you actually have a serious advantage…
Take a second to consider what we’re actually building.
A document scanner simply scans in a piece of paper.
A piece of paper is assumed to be a rectangle.
And a rectangle has four edges.
Therefore, we can create a simple heuristic to help us build our document scanner.
The heuristic goes something like this: we’ll assume that the largest contour in the image with exactly four points is our piece of paper to be scanned.
This is also a reasonably safe assumption — the scanner app simply assumes that the document you want to scan is the main focus of our image. And it’s also safe to assume (or at least should be) that the piece of paper has four edges.
And that’s exactly what the code below does:
# find the contours in the edged image, keeping only the # largest ones, and initialize the screen contour cnts = cv2.findContours(edged.copy(), cv2.RETR_LIST, cv2.CHAIN_APPROX_SIMPLE) cnts = imutils.grab_contours(cnts) cnts = sorted(cnts, key = cv2.contourArea, reverse = True)[:5] # loop over the contours for c in cnts: # approximate the contour peri = cv2.arcLength(c, True) approx = cv2.approxPolyDP(c, 0.02 * peri, True) # if our approximated contour has four points, then we # can assume that we have found our screen if len(approx) == 4: screenCnt = approx break # show the contour (outline) of the piece of paper print("STEP 2: Find contours of paper") cv2.drawContours(image, [screenCnt], -1, (0, 255, 0), 2) cv2.imshow("Outline", image) cv2.waitKey(0) cv2.destroyAllWindows()
We start off by finding the contours in our edged image on Line 37. We also handle the fact that OpenCV 2.4, OpenCV 3, and OpenCV 4 return contours differently on Line 38.
A neat performance hack that I like to do is actually sort the contours by area and keep only the largest ones (Line 39). This allows us to only examine the largest of the contours, discarding the rest.
We then start looping over the contours on Line 42 and approximate the number of points on Line 44 and 45.
If the approximated contour has four points (Line 49), we assume that we have found the document in the image.
And again, this is a fairly safe assumption. The scanner app will assume that (1) the document to be scanned is the main focus of the image and (2) the document is rectangular, and thus will have four distinct edges.
From there, Lines 55 and 56 display the contours of the document we went to scan.
And now let’s take a look at our example image:
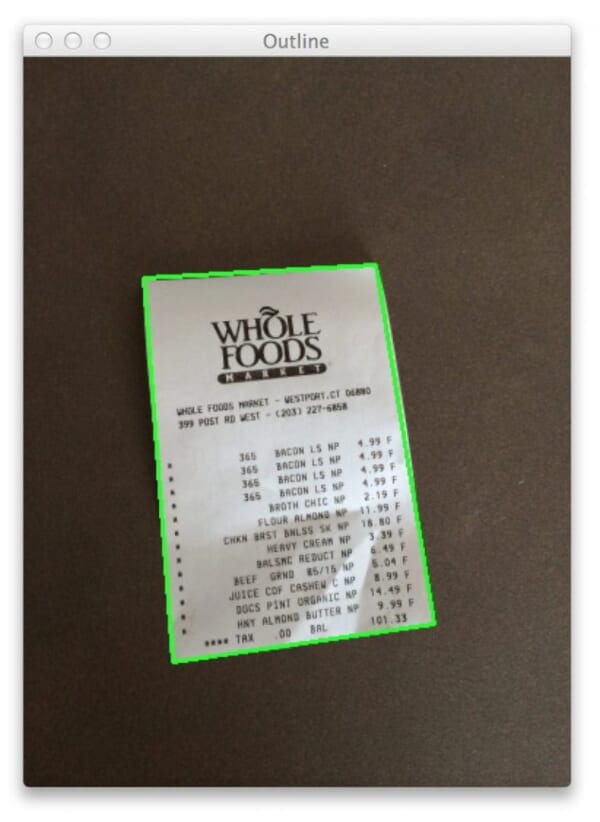
As you can see, we have successfully utilized the edge detected image to find the contour (outline) of the document, illustrated by the green rectangle surrounding my receipt.
Lastly, let’s move on to Step 3, which will be a snap using my four_point_transform function.
Step 3: Apply a Perspective Transform & Threshold
The last step in building a mobile document scanner is to take the four points representing the outline of the document and apply a perspective transform to obtain a top-down, “birds eye view” of the image.
Let’s take a look:
# apply the four point transform to obtain a top-down # view of the original image warped = four_point_transform(orig, screenCnt.reshape(4, 2) * ratio) # convert the warped image to grayscale, then threshold it # to give it that 'black and white' paper effect warped = cv2.cvtColor(warped, cv2.COLOR_BGR2GRAY) T = threshold_local(warped, 11, offset = 10, method = "gaussian") warped = (warped > T).astype("uint8") * 255 # show the original and scanned images print("STEP 3: Apply perspective transform") cv2.imshow("Original", imutils.resize(orig, height = 650)) cv2.imshow("Scanned", imutils.resize(warped, height = 650)) cv2.waitKey(0)
Line 62 performs the warping transformation. In fact, all the heavy lifting is handled by the four_point_transform
function. Again, you can read more about this function in last week’s post.
We’ll pass two arguments into four_point_transform
: the first is our original image we loaded off disk (not the resized one), and the second argument is the contour representing the document, multiplied by the resized ratio.
So, you may be wondering, why are we multiplying by the resized ratio?
We multiply by the resized ratio because we performed edge detection and found contours on the resized image of height=500 pixels.
However, we want to perform the scan on the original image, not the resized image, thus we multiply the contour points by the resized ratio.
To obtain the black and white feel to the image, we then take the warped image, convert it to grayscale and apply adaptive thresholding on Lines 66-68.
Finally, we display our output on Lines 72-74.
Python + OpenCV document scanning results
And speaking of output, take a look at our example document by running the script:
$ python scan.py --image images/receipt.jpg
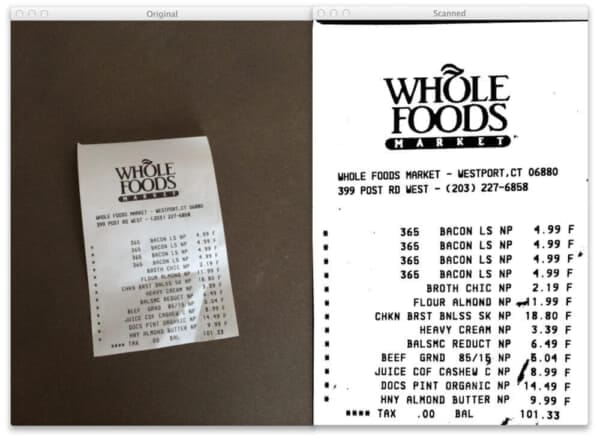
On the left we have the original image we loaded off disk. And on the right, we have the scanned image!
Notice how the perspective of the scanned image has changed — we have a top-down, 90-degree view of the image.
And thanks to our adaptive thresholding, we also have a nice, clean black and white feel to the document as well.
We have successfully built our document scanner!
All in less than 5 minutes and under 75 lines of code (most of which are comments anyway).
More Examples
The receipt example was all well and good.
But will this approach work for normal pieces of paper?
You bet!
I printed out page 22 of Practical Python and OpenCV, a book I wrote to give you a guaranteed quick-start guide to learning computer vision:
$ python scan.py --image images/page.jpg
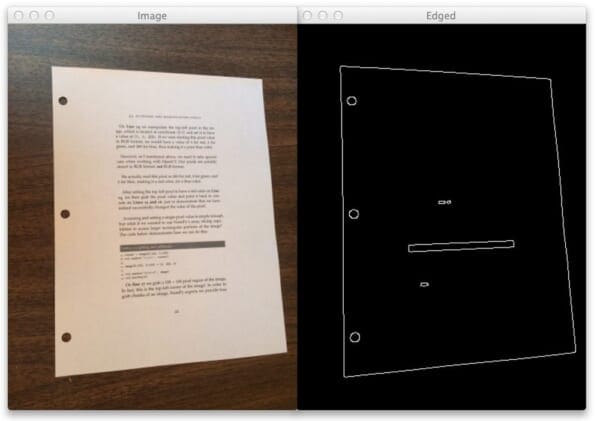
You can see the original image on the left and the edge detected image on the right.
Now, let’s find the contour of the page:
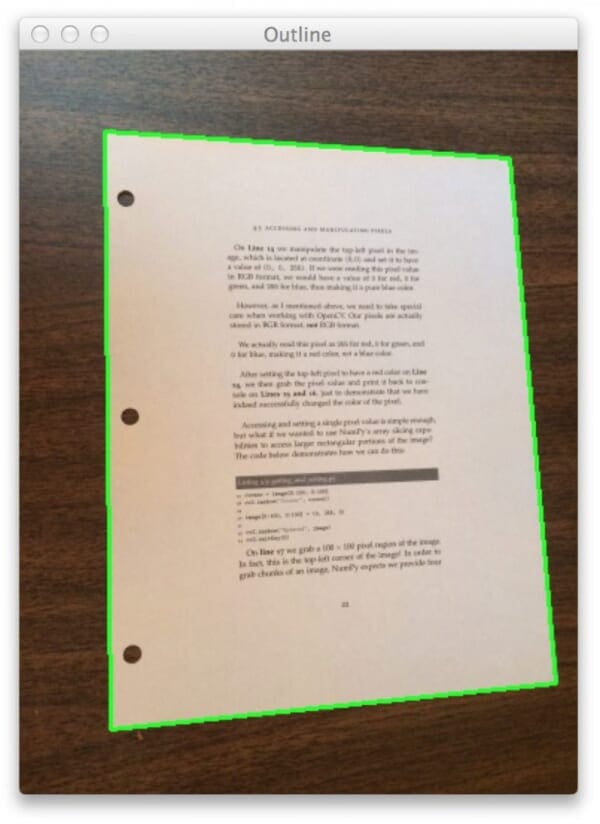
No problem there!
Finally, we’ll apply the perspective transform and threshold the image:
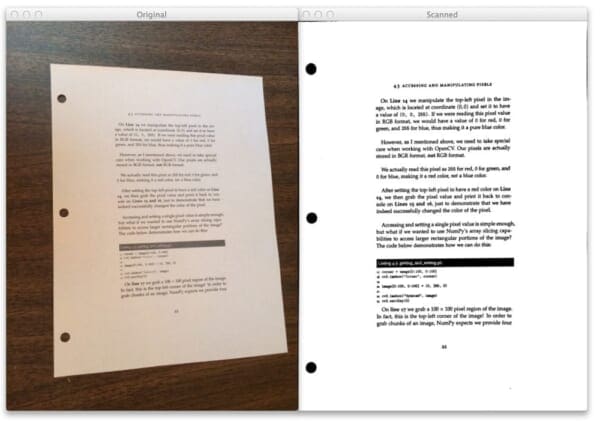
Another successful scan!
Where to Next?
Now that you have the code to build a mobile document scanner, maybe you want to build an app and submit to the App Store yourself!
In fact, I think you should.
It would be a great learning experience…
Another great “next step” would be to apply OCR to the documents in the image. Not only could you scan the document and generate a PDF, but you would be able to edit the text as well!
What's next? We recommend PyImageSearch University.
86 total classes • 115+ hours of on-demand code walkthrough videos • Last updated: October 2024
★★★★★ 4.84 (128 Ratings) • 16,000+ Students Enrolled
I strongly believe that if you had the right teacher you could master computer vision and deep learning.
Do you think learning computer vision and deep learning has to be time-consuming, overwhelming, and complicated? Or has to involve complex mathematics and equations? Or requires a degree in computer science?
That’s not the case.
All you need to master computer vision and deep learning is for someone to explain things to you in simple, intuitive terms. And that’s exactly what I do. My mission is to change education and how complex Artificial Intelligence topics are taught.
If you're serious about learning computer vision, your next stop should be PyImageSearch University, the most comprehensive computer vision, deep learning, and OpenCV course online today. Here you’ll learn how to successfully and confidently apply computer vision to your work, research, and projects. Join me in computer vision mastery.
Inside PyImageSearch University you'll find:
- ✓ 86 courses on essential computer vision, deep learning, and OpenCV topics
- ✓ 86 Certificates of Completion
- ✓ 115+ hours of on-demand video
- ✓ Brand new courses released regularly, ensuring you can keep up with state-of-the-art techniques
- ✓ Pre-configured Jupyter Notebooks in Google Colab
- ✓ Run all code examples in your web browser — works on Windows, macOS, and Linux (no dev environment configuration required!)
- ✓ Access to centralized code repos for all 540+ tutorials on PyImageSearch
- ✓ Easy one-click downloads for code, datasets, pre-trained models, etc.
- ✓ Access on mobile, laptop, desktop, etc.
Summary
In this blog post I showed you how to build a mobile document scanner using OpenCV in 5 minutes and under 75 lines of Python code.
Document scanning can be broken down into three distinct and simple steps.
The first step is to apply edge detection.
The second step is to find the contours in the image that represent the document we want to scan.
And the final step is to apply a perspective transform to obtain a top-down, 90-degree view of the image, just as if we scanned the document.
Optionally, you can also apply thresholding to obtain a nice, clean black and white feel to the piece of paper.
So there you have it.
A mobile document scanner in 5 minutes.
Excuse me while I call James and collect my money…
Did You Like this Post?
Hey, did you enjoy this post on building a mobile document scanner?
If so, I think you’ll like my book, Practical Python and OpenCV.
Inside you’ll learn how to detect faces in images, recognize handwriting, and utilize keypoint detection and the SIFT descriptors to build a system to recognize the book covers!
Sound interesting?
Just click here and pickup a copy.
And in a single weekend you’ll unlock the secrets the computer vision pros use…and become a pro yourself!
Download the Source Code and FREE 17-page Resource Guide
Enter your email address below to get a .zip of the code and a FREE 17-page Resource Guide on Computer Vision, OpenCV, and Deep Learning. Inside you'll find my hand-picked tutorials, books, courses, and libraries to help you master CV and DL!
Aaron Altscher
Very informative and detailed explanation. Everything this blogger publishes is gold!
Adrian Rosebrock
🙂 Thanks, Aaron!
Marx
Hello Adrian. Thanks for your awesome posts! I’m completely blind, and your content has greatly helped me develop a proof of concept prototype in Python for an AI-guided vision system for blind people like me.
Right now, I’m trying to add a function that will instruct a blind user if his or her camera is properly capturing all four points of an object with the largest contours (hence assuming nearest); and
I think I can build on the block of code below to print out statements if the object with largest contours does not have all four points, but:
I’m thinking of ways to do this that will allow me to instruct the blind user whether to move the focus of his or her camera to the left, right, up, or down …
– I just need approximations. I think this can be done by getting location coordinates of the missing point/s (out of the 4 supposed points) of the object with the largest contours, and using those values to calculate and print out comprehensible instructions for the end user?
Do you have any suggestions on how this can be done? Thanks in advance! 🙂
# if our approximated contour has four points, then we
# can assume that we have found our screen
if len(approx) == 4:
>>> screenCnt = approx
>>> break
Marx
P.S. This is for providing blind users with guided instructions on how to properly point their camera at a piece of document with text, in order to run the OCR functions of my software…
Adrian Rosebrock
Hi Marx — this sounds like a wonderful project, thank you for sharing. I think you are on the right track here. Find the largest contour region in the image. If the approximated contour region does not have 4 vertices, tell the end user.
As for determining how the user should move their camera, the angles between the vertices should be (approximately) 90 degrees. Compute the angles between the contours and if the angle is not 90 degrees, you’ll know which corner is missing and then be able to give the user instructions on how to move the paper/camera.
Marx
Hi Adrian. Thanks for your help! 🙂
However, I’ve been searching and reading up on how to measure the angles of contour vertices for several hours now, but I just can’t find something that I can comprehend and use. 🙁
I also read up on how to sort contours from left to right and top to bottom, thinking that I’d be able to identify the missing edge and just tell the user to move his or her camera towards that missing edge for now (until I find something that allows me to give the user an approximation on how much to move the camera towards that direction) …
…
Also, I’m thinking if it would be better to implement this for a live camera feed, than for a captured image?
That’s mainly because before capturing the image for OCR processing, the user will need to know the right time to capture the image, in real time preferrably …
I’d greatly appreciate your suggestions regarding this matter. Thanks again! 🙂
Adrian Rosebrock
If your goal is to provide real-time feedback to the user, then yes, a live camera feed would be more appropriate. However, this makes the task a bit more challenging due to motion blur. I would instead suggest solving the problem for a single image before you start moving on to real-time video processing.
Skaag Argonius
You can eliminate motion blur using a really good camera sensor, and manual control of white balance. This is critical since a lot of sensors come with a controller which by default will try to increase the brightness of the image by capturing multiple frames in succession and adding them together. This process is what creates motion blur so you need to simply disable automatic white balance in the controller, and you’ll get clean frames every time. However this also means that in some situations it will be too dark for the sensor to see anything. One way to solve this is to put a large amount of powerful infrared LED lights around or behind the sensor, and remove the infrared filter from the sensor so it becomes sensitive to infrared light. The sensor will not see colors, but for reading text from a page you don’t need colors. This way your sensor will see images even in total “darkness” without blinding the non-blind with a potentially strong white light. Reach out to me if you’re interested and I will send you information about such a sensor that we use in my company.
Adrian Rosebrock
Thanks for sharing Skaag!
pratap
Hai Adrian can you help me to extract text from scanned images these images are very low quality.
i am using pytessaract module to find out text from scanned image but i am not able to find out. please help me to find out the text from scanned image
Adrian Rosebrock
Hey Pratap — I’ll be covering how to cleanup images before passing them into Tesseract in my next blog post. Be sure to stay tuned!
Bhargav
Hi Adrian,
I am wondering what is the title of your followup post after this that you mentioned above. Please let me know if you have it on top of your head.
Thanks!
Surya
How long does it usually take to finish the process on a minimum config machine?
Adrian Rosebrock
Less than a second.
Cuong Nguyen Hung
Hello Adrian Rosebrock,
I am Vietnamese,I am very interested in your blog.
But I see almost your post is work on MÂC OS ?
So I am using Windows OS,so your code can’t work on my computer.
And I am beginner (don’t have programmer knowledge).
But I want to learn Face recognize,text recognize and object detect/count only.
Do you think I can ?
Adrian Rosebrock
I recommend using macOS or Linux to run the examples on this blog. Please note that I do not officially support Windows on this blog.
Roberto
Hello Coung, I made this examples work on windows, you should be able too.
I work now on mac OS but if you put some effort you should be able to make it work in work in windows.
Since you are not a programer I would suggest you to start there, with some python tutorials on windows.
uchiha tashi
yes, you can!
I m even working on windows only and his program also works on the window OS too. you just need to change a little bit of his code and that’s it.
even I had worked on face recognition and many more using windows only.
if you need a personal guide I will help you when i m free! 🙂
Bob
how hard would it be to pan parts of the document so it all fits into one panoramic view?
Adrian Rosebrock
Awesome question, thanks for asking! Substantially harder, but certainly not impossible. Basically, your first step would be to perform “image stitching” to generate the larger panoramic picture. From there, you could essentially use the same techniques used in this post. Would you be interested in a blog post on image stitching?
Lúcio Corrêa
Would it be better to do stiching after perspective transform and threshold or before?
Adrian Rosebrock
It depends on what your end goal is, but I would do stitching first, then perform the perspective transform.
Jose Luis
Hello Adrian,
An example of image stitching would be great!!
Thanks for your awesome posts
Can
How can you export to Appstore your applications write with Python?
To my knowledge you cant. You must use c++.
Adrian Rosebrock
Hi Can, you are correct. You must first convert it to iOS, but the algorithm is the same. All you have to do is port the code.
Alex
Or run the python code on a server and upload the image from your phone.
Adrian Rosebrock
Exactly. And for applications that don’t require real-time processing, I highly recommend doing this. You can update your algorithms on the fly and don’t have to worry about users updating their software.
Usama
Hi Adrian,
I want to learn how do I run a server so that my application gets process in my computer?
Adrian Rosebrock
Hi Usama, I don’t have any posts on creating a web API/server for computer vision code yet, but it’s in the queue. I should have a blog post out on it within the next few weeks.
raphael
Hi, how can you run a python code on a server? Where can I find a step by step on how to do this? thanks!
Adrian Rosebrock
You can see this tutorial on converting an image processing pipeline to an API accessible via a server.
bidder
use kivy ( is a python framework to build mobile apps ) 🙂
Can
Also why you need scikit-image Open CV already have adaptive threshold?
Adrian Rosebrock
The scikit-image adaptive threshold function is more powerful than the OpenCV one. It includes more than just Gaussian and mean, it includes support for custom filtering along with median (Although I only use Gaussian for this example). I also found it substantially easier to use than the OpenCV variant. In general, I just (personally) like the scikit-image version more.
curtis
If somebody wants to use the opencv threshold I think this is an equivalent substitute:
warped = cv2.adaptiveThreshold(warped, 255, cv2.ADAPTIVE_THRESH_GAUSSIAN_C, cv2.THRESH_BINARY, 251, 11)
Atanas Minev
Cool (post-OCR) improvement would be to recognize receipts and communicate information with budgeting app 😉
Adrian Rosebrock
Agreed! That would be a really fantastic improvement. And I think (most) budgeting apps provide an API to interface with the app.
Alex
Hello guys,
Great Job, good instructions, perfect !!!
Do you know, if and how this could be work on Android devices ?
Adrian Rosebrock
Absolutely, you would just have to look into using the Java OpenCV bindings.
Andrea
This example may be a good starting point: https://github.com/jhansireddy/AndroidScannerDemo
Toni
Very informative. Great!! Thanks.
Matthew Nichols
What applications are you using to code? I don’t recognise the icons.
Cheers,
Great post btw
Adrian Rosebrock
I use Sublime Text 2 most of the time.
qubodup
I’m sorry, what constitutes the “mobile” part of a mobile doc scanner?
To me: it runs on a smartphone that runs Android, iOS, WP8 or Whatever the name of the BB OS is.
Adrian Rosebrock
You are correct, the “mobile” part of a mobile document scanner is an app that runs on a smartphone device that utilizes the smartphones camera to capture documents and “scan” them.
Sasa
I would like to see some OCR on it or on just some simple text or numbers.
Adrian Rosebrock
Hi Sasa, good point. OCR would be a really great extension. If you’re interested in recognizing text, especially handwritten digits, definitely take a look at my Practical Python and OpenCV book. Inside I cover recognizing handwritten digits. Definitely not the same as OCR, but if you’re interested in recognizing text, it’s a pretty cool place to start.
Gaduc
Yeah!
I played with that some time ago in order to scan books.
But I faced to a harder problem: pages of a book are not flat but warped.
I was able to isolate the curve the page made from the flatbed (*).
And then?
There is two transformation to achieve:
– first to convert from a warped surface to a flat one ;
– secondly to convert from a perspective surface to a rectangular one (easy as you did it).
How can we do the first conversion? Bilnear formula?
Another problem I used to face to is to progressively cancel the shade that appears as the distance between the page surface and the camera increases.
(*) There are different methods to achieve that:
– take a shot at 45° ;
– use the shade as an approximate distance from the lens.
I you have idea how to compute that …
db
Manuel
I would like to know about this too.
Milo Hyson
This is a great approach when dealing with small things like a typical receipt. But unless you’re going to take multiple pictures and stitch them together, the resolution will suffer as the item to be scanned gets larger and you have to pull the camera back to get it all into frame. This is where purpose-built document scanners really shine. They can capture a metre-long receipt at full resolution.
mohammad
hi
What IDE do I use Python and Open CV? Please download link
Adrian Rosebrock
Hi Mohammad. I use Sublime Text 2 and PyCharm. Definitely check them out!
mohammad
Thank
You’re very cool
Richard
Hi great post!! I really like your web and your tutorials are the best! Just a doubt… is it better to use a bilateral filter instead of a gaussian one to smooth the image? If a recall right, the bilateral filter preserves better features like edges…
Great post, keep doing this great job! Thanks.
Adrian Rosebrock
Great observation! A bilateral filter could definitely be used in this situation. However, I choose to use Gaussian smoothing, simply because there were less parameters to tune and get correct. Either way, I think the result would be the same.
Richard
Thanks!
Jasper
Hi thanks for the post, really helpful! I noticed the contour detection approach isn’t working to well when part of the document to capture is offscreen. Any idea’s on how to solve this? TIA
Adrian Rosebrock
In general, you’ll need the entire document to be in your image, otherwise you won’t be able to perform a reliable perspective transform.
Joe Landau
This exercise requires scikit-image, which someone who just installed OpenCV and Python on a new Raspberry Pi 2 would not have. Installing scikit-image in turn seems to require scipy, which I am trying to install (slowly using pip install -U scipy) at this very minute. Perhaps a setup step would help.
Adrian Rosebrock
Good point Joe. How are you liking your Pi 2?
Joe Landau
So far the Pi 2 is doing well. The installation of scipy took between 1 and 2 hours (I didn’t time it) and then scikit-image took only minutes. Using the browser thru VNC displaying 1920 x 1080 is a bit slow, I’ll have to work with a smaller screen. I won’t know if the Pi 2 is adequate for my application until I get there–if the application works but is slow I will have to go to a faster system, maybe a Tegra.
Adrian Rosebrock
If you’re doing most of your work via terminal, I would suggest using SSH forwarding instead of VNC:
$ ssh -X pi@your_ip_address
. You’ll be able to execute your Python scripts via command line and the OpenCV windows will still show up.Joe Landau
I withdraw the information about installing scikit-image. I didn’t realize that the first try had failed. In fact, it took over an hour.
Alexander
Hi Adrian,
Thank you so much for the great article and for the rest of your series!
I stumbled with the task of how to correct the document scan of a sheet of paper that has been folded 2 or 4 times?
Could you please take a look at my question here: http://stackoverflow.com/questions/31008791/opencv-transform-shape-with-arbitrary-contour-into-rectangle.
Will appreciate if you could give some direction on how to achieve this.
Adrian Rosebrock
If the paper has been creased or folded, then you’ll want to modify Line 48:
if len(approx) == 4:
and find a range of values that work well for the contour approximation. From there, you’ll want to find the top-left, top-right, bottom-right, and bottom-left corners of the approximation region, and then finally apply the perspective transform.Alexander
Adrian, thank you for the answer!
But I need to clarify: I’m able to find the corners of a folded\creased paper and perform the proper perspective transform using those four points. In other words, your whole perfect algorithm works fine. What I’m doing is trying to take a step further 🙂
The step I’m asking about is how to “straighten” (recover rectangular shape of) the paper with OpenCV? I.e. stretch it so that its edges become touching surrounding rectangle.
J
I’m really not understanding where you put the path to the file that will be scanned. Can you give an example of proper usage of the code on lines 10-13?
Adrian Rosebrock
If you have an image named
page.png
in animages
directory, then your example command would look like this:$ python scan.py --image images/page.jpg
Definitely download the code to the post and give it a try!
fariss
hi,
your source code was very helpful,
what’s the functions to do some image processing for the scanned image (contrast, btightness, contrast…) ?, i removed the part that gives the image the ‘black and white’ paper effect…
Adrian Rosebrock
I would suggest taking a look at the official OpenCV docs to get you started.
Bhuvesh
Great work!!
Sir, can i use this on Raspberry Pi B+ or 2 ?
If Yes, than How!
Please guide me I’m working on some related project.
Adrian Rosebrock
You could certainly use either, but I would suggest going with the Pi 2. From there, you can follow my OpenCV install guide for the Raspberry Pi. Once you have OpenCV installed on your system, you should be able to download and execute the code in this post.
Mohd Ali
I keep getting this error at line 37.
(cnts, _) = cv2.findContours(edged.copy(), cv2.RETR_LIST, cv2.CHAIN_APPROX_SIMPLE)
ValueError: too many values to unpack
I’ve triend this script on 3-4 images but getting same error. I tried to debug, but didn’t succeed.
Adrian Rosebrock
I’ve mentioned the solution to this problem many times on the PyImageSearch blog before. The reason you are getting this error is because you are using OpenCV 3 — this post was written for OpenCV 2.4, well before OpenCV 3 was released. Please see this post for a discussion on how the
cv2.findContours
return signature changed in OpenCV 3.ashish
try this….
(cnts) = cv2.findContours(edged.copy(), cv2.RETR_LIST, cv2.CHAIN_APPROX_SIMPLE)
Adrian Rosebrock
This is incorrect. For OpenCV 3, it should be:
(_, cnts, _) = cv2.findContours(edged.copy(), cv2.RETR_LIST, cv2.CHAIN_APPROX_SIMPLE)
Jorvan Rodrigues Brito
Many thanks Adrian, this information solved my problem !!
Adrian Rosebrock
Awesome, I’m glad to hear it Jorvan 🙂
parviz
dude! you are so cool 😀 thanks buddy
Adrian Rosebrock
No problem Parviz 🙂
Hacklavya
I was very happy to see this tutorial, but then I found that you didn’t tell howto install OpenCV 2.4.X with Python 2.7
So please tell me link to do that.
or more generally there is no date-wise posts in here, so that I see what is all on your website.
and how can I search a particular post on your website?
Adrian Rosebrock
There is a search bar at the bottom-right corner of the sidebar on every page on the blog. As far explaining how to install OpenCV 2.4 and Python 2.7, I cover that in this post and in my book.
Hacklavya
I tried many help from internet to install scikit image,
but this line:
please tell us how to fix it.
Adrian Rosebrock
Please see the official scikit-image install instructions. All you need to do is let pip install it for you:
$ pip install -U scikit-image
Dirk Josefiak
thanks a lot for all your work and this tipp also
syaifulnizam bin amran
$ pip install -U scikit-image
while installing, it stuck at
Running setup.py bdist_wheel for scikit-image …
Adrian Rosebrock
It’s likely not stuck. It takes a long time to compile and install scikit-image. If you take a look at your processor usage you’ll see that the processor is very busy compiling and installing scikit-image. What system are you trying to install scikit-image on?
nidhi
this should be installed inside the (CV) or outside???
Adrian Rosebrock
If you are using Python virtual environments you should be installing inside the “cv” virtual environment.
Lady
Thank you very much for the help you had the same problem, really thank you for sharing your knowledge with us
Cyrus Smith
Hello, Adrian!
I have downloaded your code and tried to launch it on my computer and I failed.
I use PyCharm 4.5, OpenCV300 and Python 2.7.
I think it’s not versions thing.
There is a line on main code (scan.py) :
from skimage.filter import threshold_adaptive
But there is no skimage folder in your project…
What should I do?
Thanks.
Adrian Rosebrock
The error can be resolved by installing scikit-imagee:
$ pip install -U scikit-image
However, keep in mind that this tutorial is for OpenCV 2.4.X, not OpenCV 3.0, so you’ll need to adjust Line 37 to be:
(_, cnts, _) = cv2.findContours(edged.copy(), cv2.RETR_LIST, cv2.CHAIN_APPROX_SIMPLE)
Mike Mehr
Hi Adrian,
I also found that I had to add parens to the print statement arguments on lines 32, 56, and 73 when running with Python 3.5 (they are optional in v2.7).
There is also a warning that the skimage.filter submodule has had a name change to skimage.filters, so I added the ‘s’ on line 7 and now it runs without any errors or warnings. The warning says the old name is deprecated and will be removed in version 0.13. This occurs for both virtual environments/versions of Python.
It seems like these changes might impact some of your other code on the site as well.
Best regards,
Mike
Adrian Rosebrock
Thanks for the update Mike. I’m still trying to figure out a decent solution to handle the OpenCV 2.4 vs. OpenCV 3 issue. As a blog post that will come out this Monday will show, many users are still use OpenCV 2.4. (although that number growing and will continue to grow). But since this is a teaching blog, it’s not exactly easy to switch the code from one version to another if tow equally sized groups of people are using different versions.
Teddy
do you have code for building in OCR into the Scanner?
Adrian Rosebrock
Not yet, but that’s something I would like to cover in a future blog post.
Gary King
Adrian,
I am a novice Pyphon developer, but was wondering if the scanning and OCR reading could have all been achieved via Javascript/HTML5?. I find it very hard trawling the javascript libraries to find something that will mostly do this. I don’t mind glue things together, but would prefer it if most of the hard work were done via some commercial library if possible, and obviously don’t mind paying for such a product. Do you know of any libraries that might fit this requirement?.
Adrian Rosebrock
I don’t use JavaScript often, but I’ve heard of Ocard.js being used for OCR with JavaScript. I haven’t personally tried it out, but it might be worth looking into.
Mouiche
Dear Adrian and other members
Your job is highly interesting, I have a related project for 3 weeks.
– first, I have to take one scanned page that can be inclined in all directions and do the transformation to have what you did in your code in pdf.
– Secondly, snap two pages of a book, transform the edge’s curves into straight lines and finally have these pages in a rectangle in pdf.
Now, I am trying to use your code as a model but i don’t have openCV in my computer. which module or function can i use? I have “skimage” . Are there other links or documents that can help to solve this problem.
Thank you.
Adrian Rosebrock
Having scikit-image is a good start, but I would really recommend getting OpenCV installed as well. I have tutorials detailing how to get OpenCV installed on your system here. I’m not sure if I understand the second part of your question, but if you’re trying to “scan” two pages of a book side-by-side, you can try finding the center spine of the book using edge detection. Once you have it, you can apply perspective transforms like the ones used in this post.
Mouiche
Thank you, I am trying now to install openCV as well.
In my second task I am trying to scan two pages of a book not side-by-side. So I will be asked to manage the horizontal lines that will look like curves and the middle-line between these pages that will not be well seen after scanning, but i need to manage it in this job
Mouiche
Please,
can someone help me on how to proceed for the case of two scanned pages of a book. Two pages are scanned together and i need to do the transformation to have the plat (or flat) rectangular form of these pages.
Adrian Rosebrock
As I suggested over email, the try to detect the “spine” of the book using the Canny edge detector. If you can determine where the boundaries of the book and the top/bottom intersect, you can essentially split the book in two, determine your four points for the transformation, and apply the perspective warp.
Steve Dyson
Does anyone have something similar built for JS? We are working on a document scanner and would love some help on where to get started.
OCR is not needed – we only need the cropping, alignment, and conversion to b&w.
Thank you!
Steve
Adrian Rosebrock
Computer vision is slowly starting to expand to the browser (since computers are becoming faster), but currently there is no full port of OpenCV to JavaScript, making it hard to build applications like these.
If you want to do something similar to this in JavaScript, I would suggest wrapping the document scanner code into an API, like this tutorial does. From there you can make requests to the API from JavaScript and display your results.
Sainandan
Hey Adrian,
This mini project is really handy in terms of usage and fundamental exposure to IP.
But how do you integrate this python code into a mobile android application ?
Adrian Rosebrock
I would suggest wrapping your Python code using a web framework such as Django or Flask and then calling it like an API. You can find an example of doing this here.
singh
Hi, scan.py hangs after Step 1. I left it running for more than hour but still didn’t finish. I am on Mac OS X El-captain. Using the Opencv 2.49 and Python 2.7. I have all the modules installed. I tried your transform_example.py and that works fine. Am I missing anything here? Do I need to hit a command or something?
Commenting out the following helped. Thanks. (sorry new to Python and OpenCV but loving it so far).
#cv2.waitKey(0)
#cv2.destroyAllWindows()
Adrian Rosebrock
Interesting, I’m not sure why it would take so long to process the image during Step 1. The
cv2.waitKey
call wouldn't matter, provided that you clicked the window and pressed a button to advance the process. The
cv2.waitKey
method pauses all execution until a key is pressed.singh
How do i save the final image in a new file?
Adrian Rosebrock
You can use the
cv2.imwrite
method:cv2.imwrite("output.png", warped)
And if you’re just getting started learning Python + OpenCV, you should definitely take a look at Practical Python and OpenCV. This book can get you up to speed with Python + OpenCV very quickly.
Mukundan
Thanks for this informative article
deepak
hi Adrian,
really nice tutorial there.I am currently trying to follow it to build an app of my own. I wanted to ask if its possible to generate a crude 3d wireframe model from a photo with probably the users help in correcting the edges. basically take 2-3 photos from a phone and then process it to create a simple 3d wireframe model.
Adrian Rosebrock
It’s certainly possible, but you’ll realistically need more than 2-3 photos. I would suggest reading up on 3D Reconstruction.
Dino
Hi Adrian,
In line 37:
(cnts, _) = cv2.findContours(edged.copy(), cv2.RETR_LIST, cv2.CHAIN_APPROX_SIMPLE)
Does it better to use cv2.RETR_EXTERNAL as second parameter in findContours ?
Adrian Rosebrock
For this project, yes, I would suggest using
cv2.RETR_EXTERNAL
. I should have mentioned that in the original post 🙂 Thanks for noting this!Linus
Hi, and thanks for a great tutorial.
To the point: I’m having trouble with the part where you sort the contours according to area, around line 38 in the sample code. The problem is that the contours that correspond to big blobs (such as the receipt border) does not at all end near the top of the list. Instead the largest contour is a contour around the WHOLE FOOD title.
I have checked that the contours are indeed sorted in descending order by the value returned by contourArea(), and sifted through all contours to verify that the contour enclosing the receipt indeed is present in the list. However, the area corresponding to that contour is uncannily small (about 12 pixels).
The issue, I believe, is that findContours() here finds the contours of the canny-edges rather than the enclosed objects. However, why this happens to me and none of you is beyond my comprehension. Maybe I have an unknown ascendency to Murphy.
Anyway, does anyone here have any I idea what might be going on?
Also, I’m using opencv 3.1.0 and python 3.4
Adrian Rosebrock
Just to clarify, are you using the same Whole Foods receipt as I am in the blog post? It sounds like there might be an issue segmenting the actual receipt from the image. The likely issue is that that the border of the receipt outline is not “complete”. Can you take a second look at the edge map of the receipt and ensure that it is all one continuous rectangle?
EDIT: Try changing
cv2.RETR_LIST
tocv2.RETR_EXTERNAL
incv2.findContours
and see if that resolves the issue.Linus
Yes I use the same image as in the post. Well almost. I used gimp to cut out the part containing the receipt.
Anyhow, the problem was a discontinuity in the edge map, just as you suspected. And a solution was to decrease the size of the Gaussian filter ((3,3) worked for me). Maybe the reason that I get this problem, but not anybody else, is that I use an original image of significantly lower resolution. I suspect your mobile camera does better than 496×669?
Thanks for quick response!
Adrian Rosebrock
Indeed, the cropping in Gimp must have caused some sort of issue. My camera is an iPhone, so the resolutions is very high. I actually reduced the resolution of teh original image for this example. In fact, I wouldn’t suggest processing images larger than 640 x 480 pixels if at all possible. It’s normally to resize images prior to processing them. The less data there is to process, the faster the algorithm will run. And most computer vision functions expect smaller image sizes for more accurate results (edge detection and finding contours, for example).
Ghassan
if we put image scanned from scanner it will show this error
AttributeError: ‘NoneType’ object has no attribute ‘shape’
how to pass it ?
Adrian Rosebrock
Anytime you see an error related to an image being
NoneType
, it’s 99% of the time due to an image not being loaded from disk properly or read from a stream. Make sure the path you supply tocv2.imread
is valid. I demonstrate how to execute the Python script via command line (and pass in the image path argument) in this post.sagar
Hi Adrian,
I run your code on Anaconda, Windows. It runs perfectly.
I want to build an mobile android app on android studio, There are many functionalities including document scanning. As user have to get picture of any object, app may be responsible to get result out of it, But this code need some bindings with android code.
How to do this. How to integrate both these together ?
Adrian Rosebrock
I personally don’t use Windows or Visual Studio, nor to I do any coding for the Android environment. That said, you have two options:
1. Convert the code from Python to Java + OpenCV (there are OpenCV bindings available for the Java programming language).
2. Wrap the document scanner code as computer vision API, then upload the image from the Android app to the API, process it, and then return the results.
Reza
If the second approach (using HTML5/javascript) can be implemented, then the export to mobile phones as a native application (for instance apk for android) would be very easy using CORDOVA.
Adrian Rosebrock
Which is the exact same approach I took when building both Chic Engine and ID My Pill 🙂
I also demonstrate how to wrap a computer vision app as an API and access it via PhoneGap/Cordova inside the PyImageSearch Gurus course
Damien Mac Namara
Could this be easily modified for video?
Adrian Rosebrock
Absolutely. You just need to wrap the code in a look that access a video stream. This blog post should be a good starting point.
Damien Mac Namara
Thanks Adrian for your quick response. I cant recommend you enough.
Adrian Rosebrock
No problem, happy to help 🙂 And thanks for the kind words!
sunchy11
Hi, Adrain,
I try a lot of different coupons except your sample “whold food “one.
I got the difficulties in finding the four points of the edge.
It looks like the “approx” is not 4 points for some of them.
so the error is ‘screenCnt’ si not defined.
Thank you !
Adrian Rosebrock
If the approximated contour does not have 4 points, then you’ll want to play with the percentage percentage parameter of
cv2.approxPolyDP
Typical values are in the range of 1-5% of the perimeter. You can try working adjusting this value to help with the contour approximation.Daniel Bornman
I’m having issues with getting a clean contour that represents a full piece of paper. My paper contour is represented by two separate tuples in the cnts array. One tuple is for the left and bottom edge, and a distance away is the tuple for the top and right edge. Adjusting parameters within the cnts array is too late to find a all encompassing document contour.
I tried changing the parameter in findContours() as suggested above from cv2.RETR_LIST to cv2.RETR_EXTERNAL but that did not fix the problem.
I took a photo with my iphone of a 8×11 piece of paper with regular type against a plain dark background. I intentionally took it at a slight angle to test the transform function. It appears that the assumption of 4 clean points is failing.
Adrian Rosebrock
If you’re not getting one contour that represents the entire piece of paper, then the issue is likely with the edge map generated by the Canny edge detector. Check the edged image and see if there are any discontinuities along the outline. If so, you’ll want to tune the parameters to
cv2.Canny
to avoid these problems or use a series of dilations to close the gaps in the outline.Jim
I got every thing installed, all very smooth, but experiencing the same problem
STEP 2: Find contours of paper
Traceback (most recent call last):
File “scan.py”, line 63, in
cv2.drawContours(image, [screenCnt], -1, (0, 255, 0), 2)
NameError: name ‘screenCnt’ is not defined
i tried the auto_canny and still have same error.
Certain problem is with me, but not sure where. Thanks
Adrian Rosebrock
If the
screenCnt
isNone
it’s because there are no contours in your image that contain 4 vertices. Take a look at your edge map and explore the contours. You might need to tune the value of the contour approximation.Samvatsar Shastrimath
Thanks for the awesome and detailed explanation. I am facing the same issue that sunchy11 was facing. I am not able to find the rectangle/ four points. So, it throws the error: name ‘screenCnt’ is not defined. I tried changing the value of perimeter from 1-5%. Still no luck. Can u please let me know what may be the issue.
Adrian Rosebrock
Are you using the same example images in this tutorial? Or your own image?
K van de Maan
thank you
TD
Hi Adrian,
Great article. I am encountering the issue below when following your instruction. Please advise.
Note that I am using openCV (3.1), python (3.5.1), numpy (1.11.0) & scikit-image (0.12.3)
….site-packages/skimage/filters/thresholding.py”, line 72, in threshold_adaptive
““block_size“ {0} is even.”.format(block_size))
ValueError: The kwarg “block_size“ must be odd! Given “block_size“ 250 is even.
Few steps I revised in order to make it worked.
+ parenthesis for the print command: print (“STEP 1: Edge Detection”)
+ skimage.filters —> skimage.filters
+ comment out the following:
# cv2.waitKey(0)
# cv2.destroyAllWindows()
Adrian Rosebrock
Thanks for sharing TD. It looks like the function signature to
threshold_adaptive
changed in the latest release ofscikit-image
. I’ll need to take a closer look at this. I’ll post an update to the blog post when I have resolved the error.UPDATE: In previous versions of scikit-image (<= 0.11.X) an even
block_size
was allowed. However, in newer versions of scikit-image (>= 0.12.X), an oddblock_size
is required. I have updated the code in the blog post (along with the code download) to use the correctblock_size
so everything should once again work out of the box.Mickey Friedman
Adrian, this is wonderful!
Unfortunately my code doesn’t run past Step 1…it just stops before “(cnts, _) = cv2.findContours(edged.copy(), cv2.RETR_LIST, cv2.CHAIN_APPROX_SIMPLE)
cnts = sorted(cnts, key = cv2.contourArea, reverse = True)[:5]”
Do you know how I can fix this?
Adrian Rosebrock
Hey Mickey — please read the previous comments, specifically my reply to “Ashish”. It details a solution to what is (likely) causing your problem with
cv2.findContours
.Chuck
Hey man,
you’re amazing!!!!
I’m a German student, and I’m working right now with opencv and Python.
I installed the opencv and python with another post of you.
Now, I wanted to scan a receipt, and searched in Internet. And what did I found? A post you wrote. 🙂
thanks a lot!
Adrian Rosebrock
Awesome! I’m glad I could be of help Chuck! 😀
RANVIR
It is working good with only for the given example but not working in any other image. so please make it dynamic so it can recognize edge of any image ie, in any color any light.
Adrian Rosebrock
It’s hard to ensure guaranteed edges in any color or lighting conditions, but you might want to try the automatic edge detector.
Sid
Hey Adrian,
My current set up is OpenCV 3.1.0 + RPi Model B + Python2.7.9
I’ve followed your tutorial on installing OpenCV 3 on the Pi. Did that include installing the scikit-learn module ?
I tried running the code the code and got an error : “No module named skimage.filters” on line 7.
What are the changes needed for the code to work on OpenCV 3? Thanks.
Adrian Rosebrock
You’ll need to install scikit-image on your system:
Sid
Hey Adrian,
I tried the “import Scipy” works out of the cv environment
When I’m in the cv environment it gives the “No module named Scipy” error!!
Is there a way to shift the Scipy folder to the correct path?
Adrian Rosebrock
You need to install SciPy into your virtual environment:
gigi
Hey Adrian
Thx for your Kick-Ass-Sample-Code.
One question though:
Line 67: warped = warped.astype(“uint8”) * 255
I don’t really get what’s going on here (and why).
Adrian Rosebrock
After coming out of the
threshold_adaptive
function, we need to ensure that the image is an 8-bit unsigned integer data type, which is what OpenCV expects.Nirvar
I understand that astype casts the complete array to uint8 and uint8 is for a 8 bit unsigned integer. But why are we multiplying it with 255?
Adrian Rosebrock
Because
(warped > T)
returns an array of booleans which when translated into integers is either “0” or “1”.friedman
Hi Adrian!
I was wondering if there was a way to adjust the document scanner’s sensitivity to edge detection? I want to detect faint edges on white surfaces. Is there anything i can do about contouring or thresholding?
Adrian Rosebrock
You can control the edge detection process via the two parameters to the
cv2.Canny
function. You can read more about these parameters here. But in general, you’re going to have a real hard time detecting faint edges against a white surface. Edge detection requires that there be contrast between the background and foreground.uma
hi….
can i get certificate after completion of this course?
Adrian Rosebrock
I only offer a Certificate of Completion inside the PyImageSearch Gurus course. A Certificate of Completion is not provided for the free OpenCV/Image Search Engine courses.
abggcv
This code did not work on the image of a graph I have:
https://www.dropbox.com/s/buexnnip3z4x4sl/2011-01-17.jpg?dl=0
I ran your code and it did not give me the edges as expected. This code is not generic to be used to scan any kind of document. It would be nice if a generic code or approach can be suggested because that is what the professional scanning apps does.
User should not have to play with parameters like size, gaussian blur
Adrian Rosebrock
While there are such things as “generic edge detectors”, they normally require a bit of machine learning to use. In fact, much of computer vision and machine learning is tuning parameters and learning how to tune them properly. Anyway, you might want to give the auto_canny function a try for parameter free edge detection.
Ramon Gajardo
Please any idea because the line code the scan documents
warped = threshold_adaptive(warped, 255, offset=11)
take too many time like 30 sec.,
Thank you
Adrian Rosebrock
If it’s taking a lot time to process your image, then your image is likely too large. Resize your image and make it smaller. The smaller your image is, the less data there is to process, and thus the faster your program will run.
Jon
Small question, in this line:
cv2.drawContours(image, [screenCnt], -1, (0, 255, 0), 2)
What does the brackets does specifically around screenCnt? Also, is there an other tutorial where the functions, algorithms and arguments are explained or we need to look at the OpenCV documentation?
Adrian Rosebrock
The brackets simply wrap the contours array as a list, that’s all. I would suggest either refer to the OpenCV documentation or go through Practical Python and OpenCV for a detailed explantation of
cv2.findContours.
Em
Hi Adrian,
Beautiful work.
Is there a way to use houghtransform (or some other command) to close open contours? Can you use houghtransform over canny? What would that look like?
sometimes 3 out of four edges of a document come out clearly in pictures, but the fourth is only half detected. Its so close to working perfectly, but i don’t know what to do!
-em
Adrian Rosebrock
If you have open contours, I would suggest using morphological operations to close the gap. A dilation or a closing operation should work well in that case.
John
Hi Adrian,
I love your blog!
I am having trouble with the image resolution. I want the output of the image resolution to be similar to the image i am inputing.
Also, some images that i input i get “NameError: name ‘screenCnt’ is not defined”. Does that mean the program does not detect 4 edges.
Thank you,
John
Adrian Rosebrock
Yep, that’s correct! I would insert a
print
statement into your code in thefor
loop where you loop over the contours to confirm this.However, a better way to solve this problem would be to keep track of the ratio of the width of original to the resized image. Perform your edge detection and contour approximation on the resized image. Then, multiply your bounding box region by the ratio — this will give you the coordinates in terms of the original image.
Kalpesh kp
Hello Adrian Rosebrock,
Your blog is superb and like to do something like your demo. I want to develop app in ios which detects objects from video and want to count total number of objects found in Video.
So i plan to divide video in multiple images and then selecting any image and try to identify objects from image. But i am not getting any help with OpenCv much, but while i am looking at your demo. It can help me.
So can you please tell me how can i use your python code in my objective C code.
Thanks in Advance.
Adrian Rosebrock
Your project sounds neat! However, I only provide Python code on this blog post — not Objective-C.
Cristian
Hi, Adrian!
Can this tutorial still be implemented in an app for android current versions? If yes, how can I get in touch with somebody that does it?
Thanks
Adrian Rosebrock
Yes, you can use this algorithm inside of an Android app, but you would need to port it to Java + OpenCV first. As for as an Android developer, I would suggest using Upwork or Freelancer to find a developer suitable to your needs and budget.
Matthew Montebello
Had to change Line 37 to:
_, cnts, _= cv2.findContours(edged.copy(), cv2.RETR_EXTERNAL, cv2.CHAIN_APPROX_SIMPLE)
with Python3.5.2 and Opencv3
Adrian Rosebrock
Indeed, this blog post was written well before OpenCV 3 was released. You can read more about the changes to
cv2.findContours
between OpenCV 2.4 and OpenCV in this post.John
How would apply OCR to the processed image?
Adrian Rosebrock
There are many ways to apply OCR to the thresholded image, but to start, you could try Tesseract, the open source solution. I also really like the Google Vision API for OCR as well.
Tahir
Good explanation,can you tell me where i can use this feature mean to say where to use this docment scanner
Adrian Rosebrock
Hey Tahir — can you elaborate more on what you mean by “where to use this document scanner”? I’m not sure I understand what you mean.
Nicky Fandino
Hi, Adrian. It’s been a while since you created this blog. I got a question for you. I want to build this kind of paper scanner myself. Do you think it’s possible to make the scanner detect some sort of QR codes at each corners of the paper ? And then use the qr codes as the corner of the digitized paper instead of using edge detection like yours. I could use some help. Thanks before, btw
Adrian Rosebrock
Absolutely — as long as you can detect the four corners and recognize them properly, that’s all that matters. I don’t have any QR code detection blog posts, but you might want to take a look at the ZBar library. Once you detect the markers, order them as I do in this blog post, and then apply the transformation. I would suggest starting with an easier marker than QR codes just to understand the general process.
Nicky Fandino
Thanks for replying. I’m quite new to image processing, so maybe I need to ask a few questions. I know how to detect a certain shape or a square, but I never try to detect 4 squares. What’s the easiest way to do this ? Can you send me a link to your blog that explain this or some other blog maybe ? Also, how can I order them and then apply the transformation ? Is that what line 41 is ?
Adrian Rosebrock
If you’re trying to understand how to order coordinates, start here.
From there, read this post on applying a perspective transform.
As for detecting squares, the simplest method is to use contour approximation and examine the number of vertices as this blog post does. I also have an entire blog post dedicated to finding shapes in image.
I hope that helps!
Nicky Fandino
Thanks, this really helps !
Oleg Kersh
Hi Adrian,
Thank you for the very cool article. I am actually trying to port your code to android (using opencv 3.1 and the android bindings) but I have got stuck at tje step of applying the Canny filter.
Although I am using the very same parameters as you are (and also downscale images to 500 rows) the edge detector does not seem to detect horizontal edges of the paper even though there is good contrast and the background is not busy.
It is strange, because vertical and angled edges are picked up nicely.
I have went even as far as lowering the tresholds to 10 and 20 and while it produces tons of false edges (as expected) it does not produce more than a handful of dots from the horizontal or near-horizontal edges.
I suppose i am missing something trivial. I have even tried the opencv android sample app and its canny does pick up edges nicely.
Your help would be really appreciated.
Adrian Rosebrock
That is quite strange, although I must admit that I do not have any experience working with the Java + OpenCV bindings outside of testing them out by writing a program to load and display an image to my screen. This does seem like a Java specific issue so I would suggest posting on the OpenCV forums.
Hariyama
Hi, I am a beginner on Python.
I have a question on Line 38:
cnts = sorted(cnts, key = cv2.contourArea, reverse = True)[:5].
How does the description “[:5]” work?
I understand “sorted” function, but I cannot understand it.
Sorry for bothering you.
Adrian Rosebrock
The
[:5]
is just an array slice. It simply takes the first 5 elements in the list and discards the rest. You can learn more about array slicing here.fabio
Hi
Thanks a lot for the very informative post. Could you elaborate a bit on why you resize the image before the edge detection and why exactly to a height of 500 pixels? Because I tried your technique on a couple of images with and without resizing to 500 pixels. It worked perfectly for the resized images but for the original ones (they were bigger) the edge and contour detection failed horribly. I would probably just need to tune the parameters a bit differently?
Thanks!
Adrian Rosebrock
In computer vision and image processing we rarely process images larger than 600 pixels along the maximum dimension. While high resolution images are appealing to the human eye they are simply too much detail for image processing algorithms. You can actually think of resizing an image as a form of “noise removal”. We discard much of the detail so we can focus our attention on a smaller version of the image that still contains the same contents — but with less “noise”, leading to much better results.
Harry
Getting error : No module named pyimagesearch.transform.
Please help/
Adrian Rosebrock
You need to download the source code to this blog post using the “Downloads” section of this tutorial. You are likely forgetting to create the
pyimagesearch
directory and put a__init__.py
file inside of it.jagdish
hey there
which all libraries are you using ?
which version
thanks man
Adrian Rosebrock
This blog post assumes you are using OpenCV 2.4 and Python 2.7. The code can be easily adapted to work with OpenCV 3 and Python 3 as well.
sushma
Hi, Can i get same concept ( Mobile Document Scanner) on Android…
Adrian Rosebrock
I only cover Python + OpenCV on this blog. You would need to convert it to Java + OpenCV for Android.
Michael
Hi,
Thanks for the awesome and comprehensive tutorial!
I actually want to apply this to some photo of receipts, but unfortunately not all the corner is inside the image (there is even a photo where not even one of the corner is on the image).
Is there a way to use the four_point_transform in this case? If yes, how to do it and if not is there any good way to deskew the image?
Thanks!
Adrian Rosebrock
If you lack the corners you can apply the perspective transform to the entire image, although I really don’t recommend this. Otherwise, you can try to deskew the image. I’ve been meaning to do a tutorial on this, but the gist is that you threshold the image to reveal the text, then computing a rotated bounding box around a text region. The rotated bounding box will give you the angle that you can correct for. Again, I’ll try to do a tutorial on this in the future.
Neil
Hi Adrian
I’m struggling to understand how exactly the number of vertices are approximated in lines 43 and 44. Would you mind explaining this?
Many thanks
Adrian Rosebrock
First, we compute the perimeter of the contour. We then take the perimeter and multiply it by a small percentage. The exact value of the percentage may take some fiddling based on your dataset, but typically values between 0.01-0.05 are common. This percentage controls the actual approximation according to the Ramer-Douglas-Peucker algorithm. The larger epsilon is, the less points included in the actual approximation.
Umair
Hi,
I am working on a similar project and your tutorials are of great help.
My goal was to detect the total price mentioned in a receipt. How can we achieve that goal so that i can easily detect the price? Any input will be much appreciated.
Adrian Rosebrock
It sounds like you are trying to apply Optical Character Recognition (OCR) which is the process of recognizing text in images. This is a very extensive (and challenging field). To start, I would suggest trying to localize where in the image the total price would be (likely towards the bottom of the receipt). From there you can apply an OCR engine like Tesseract or the Google Vision API.
Arturo
Thanks Adrian!! The practical uses for Computer Vision techniques are amazing. I like them. Do you have a post or any suggestion on how to load the python code on android mobile cell phones? regards!
Adrian Rosebrock
Unfortunately, I don’t know of a way to use OpenCV + Python on a mobile devices. I would instead suggest creating a API endpoint that can process images and have the mobile app call the API.
Eric
Hi, it’s a great tutorial. May I ask instead of using skiimage adaptive thresholding, is it possible to use the adaptive thresholding in cv2, such as
cv2.adaptiveThreshold(img,255,cv2.ADAPTIVE_THRESH_GAUSSIAN_C,cv2.THRESH_BINARY,11,2)
as there is a problem importing skiimage python package to AWS Lambda. If it is possible, it would be great if the parameter in cv2 function could be provided to best suit this mobile scanner application . As I am new to opencv and skiimage. Any suggestions would be appreciated. Thanks in advance.
Adrian Rosebrock
You can certainly use OpenCV’s adaptive thresholding algorithm, that’s no problem at all.
Jonathan
Hi there, thanks for the great piece of work. I am having trouble to reliably find the countour. Would there be a way to have cv to default to image boundaries or may be bounding rectangle if the countours could not be approximated? Thanks again so much and happy new year
Adrian Rosebrock
If you are having trouble finding the contour of the document then I would suggest playing with the edge detection parameters. If the script cannot find this contour then there isn’t really a way to “default” any coordinates unless you were working in a fixed, controlled document where you know exactly where the user was placing the document to be scanned.
Alexander Chebykin
You could just check if value in screenCnt is None, and in case it is, default to the whole image. Also I found that blurring the edged image before approximation makes approximation better.
Alexander Chebykin
Hi. Thanks for the article – it was really helpful.
I went further by adding OCR, and optimizing the code for that matter.
My code and thoughts on the subject can be found here: https://awesomelemon.github.io/2017/01/15/Document-recognition-with-Python-OpenCV-and-Tesseract.html
I hope it will be useful for people who want to make the next step.
Adrian Rosebrock
Thanks for sharing Alexander!
Murthy
Hi Adrian,
Thanks for this. This was a good beginning to learn OpenCV.
I struggled to install opencv on Mac but then was successful in doing so on a linux box.
I used Python 2.7 and opencv 3.1.0
Line 37 :
(cnts, _) = cv2.findContours(edged.copy(), cv2.RETR_LIST, cv2.CHAIN_APPROX_SIMPLE)
in this example gave me error (ValueError: too many values to unpack)
I changed left hand side of line 37 to:
(_, cnts, _) = cv2.findContours(edged.copy(), cv2.RETR_LIST, cv2.CHAIN_APPROX_SIMPLE)
and it worked!
Sergi
Hi Adrian, I followed your tutorial on installing openCV on RPi3, so there it is working into a virtual environment.
Now I find that I can use scipy, skimage and I also tried with sklearn, only outside the virtual environment, inside the v.environment those packages are not found. I have done many times to “pip uninstall” those packages and install them again from the virtual environment, but nothing changes.
Maybe you have some tips since I am completely lost.
Adrian Rosebrock
Hey Sergi — it sounds like you have installed SciPy, scikit-image, etc. into the global
site-packages
directory for your system. You mentioned installing them into your virtual environment, but I don’t think the commands worked:qkzk
Hello ! Thank you for the wonderfull work.
I followed your raspberry pi installation guide and managed to install CV 3 on my rpi3 (raspbian jessie with pixel). I went here and downloaded your code.
I’m not able to install scikit-image package in the virtual environment.
I did :
workon cv
pip install -U scikit-image (with sudo too)
first try : failed, a lot of garbage from python but only “memory error”.
second try : No eggs found in /tmp/easy_install-V0e5rR/Cython-0.25.2/egg-dist-tmp-dt9B8k (setup script problem?)
But it keeps failing. I managed to install scikit-image out of the vitual environment with apt-get but, obviously, it doesn’t work in cv…
pip is working in the cv : workon cv, pip install scipy
python
>>> import scipy
doesn’t return an error. It just took 3 hours 🙂
—
I’ve read crazy solutions like apt-get download the packages and install them manually but I’d like to find a cleaner workaround.
Any idea ?
Adrian Rosebrock
If you are getting a memory issue, try using the
--no-cache-dir
when installing viapip
:$ pip install scikit-image --no-cache-dir
This should alleviate the issue.
Vineet
Hello Adrian, can you tell me how to get the transform module? Also, how to set up the module so that I can use it for other programs as well?
Adrian Rosebrock
Use the “Downloads” section of this blog post to download the example code (including the “pyimagesearch” and “transform” mini-modules for the example).
Guy
Hi!
I don’t know if you’re still active
but anyway
just wanted to thank you
me and my friend are doing a project
and you’re code really saves us
without you we were lost
so – making long story short –
THANK YOU VERY VERY MUCH
YOU’RE OUR SAVIOR!!!
Adrian Rosebrock
Thank you Guy, I’m happy the tutorial helped you out!
Karl Dreyer
Hello, are there any guides or examples how to use OpenCV in a Xamarin Android environment? I’m working on an Android app and need to find a good alternative from Scanbot and other expensive solutions.
Adrian Rosebrock
Hey Karl — I don’t have any experience with OpenCV + Android environments so I’m unfortunately not the right person to ask regarding this question.
Suraj
Hello Adrian, i just came across this post its very helpful please do you have anything on OCR?
or is it possible to modified this code for this purpose?
Adrian Rosebrock
I don’t have any posts on OCR right, but I will be covering OCR in the future.
Vikram
Can you suggest some tutorial or any source to make an android or IOS app for mobile scanner and integrate with the mobile camera and convert the clicked image into PDF or jpeg
Michiel
Hi Adrian,
Many thanks for uploading your tutorials! I have a problem with installing the pyimagesearch module though. I am using the jupyter notebook, usually with installing packages I use the following code:
!pip install [PACKAGE NAME]
However, this time this gives te following error: Could not find a version that satisfies the requirement pyimagesearch (from versions: )
No matching distribution found for pyimagesearch
Do you have any idea what might cause the problem?
Adrian Rosebrock
There is no “pyimagesearch” module on PyPI. You need to use the “Downloads” section of this tutorial to download the code + example images, then place the
pyimagesearch
directory in the same path as your Jupyter Notebook.Ian
Just wondering … where is the best place to find Android/iOS developer?
vasanth
error: argument -i/–image is required while i run the program
Adrian Rosebrock
You need to read up on command line arguments.
vasanth
i’m using windows
nisnab udas
can u please tell me how to do it, with possible changes/solutions?
vasanth
sir how to save the scanned image sir
Adrian Rosebrock
I would suggest you use
cv2.imwrite
to write the image to disk. If you’re just getting started learning the basics of OpenCV and Python, I would absolutely suggest you work through practical Python and OpenCV. This book will help you learn the fundamentals of OpenCV and image processing.Onkar Pandit
Hey, great tutorial.Very informative and easy to understand.
However I am unable to figure out how to use it in android studio to build the app.
Please Help
Adrian Rosebrock
Hi Onkar — this blog uses primarily OpenCV and Python. It does not cover Java. I would suggest you read up on Java + OpenCV bindings and convert the code. Alternatively you can build a REST application where the Java app sends the image to be processed on a Python server and the results returned.
Francois
The imutils module is not included in the code download for Basic Image Manipulations, so I can’t progress part the first part of this tutorial.
Adrian Rosebrock
Each blog post is independent from the others. You should either use the “Downloads” section of the blog post to download the code or install imutils via pip:
$ pip install imutils
shravankumar
Hey chief,
I have successfully tried the code on my machine with the provided images, but when I tried with images downloaded from web, unable to find contours around the sheet. What could be done to optimize the code for any image.
Any help would greatly appreciated
Thank you
Adrian Rosebrock
If there is not enough contrast between the edges of the paper and the background then the paper may not be detected. Furthermore, if paper is noisy/folded/etc. the contour approximation won’t be able to locate the paper region (since it might have more than four vertices). In that case, you would want to train a custom object detector. I’ve also seen work done on using machine learning specifically to find edge-regions (even low contrast ones) in documents. I can’t seem to find the paper though. If I do, I’ll be sure to link you to it.
Adrian Rosebrock
This code will find the largest rectangular region that has 4 corners. It accomplishes this by sorting the contours by area. If you’re detecting a rectangular region inside the document, then you’ll want to double-check your contour approximation. It’s likely that the contour approximation parameters need to be tweaked since there are likely more than 4 corners being detected on the outer document.
Juan
Hello Adrian,
I just signed in for your ten days course, great first class. I am running the code in Python 3.5.2, scikit_image 0.13 and CV 3.2.0 in Ubuntu 16.04
When I run the code, scikit complains with the following warning:
/home/juan/.virtualenvs/cv/local/lib/python3.5/site-packages/skimage/filters/thresholding.py:222: skimage_deprecation: Function “threshold_adaptive“ is deprecated and will be removed in version 0.15. Use “threshold_local“ instead.
def threshold_adaptive(image, block_size, method=’gaussian’, offset=0,
/home/juan/.virtualenvs/cv/local/lib/python3.5/site-packages/skimage/filters/thresholding.py:224: UserWarning: The return value of `threshold_local` is a threshold image, while `threshold_adaptive` returned the *thresholded* image.
warn(‘The return value of `threshold_local` is a threshold image, while
(error cuts there, but the idea is clear)
So I tried to replace threshold_adaptative for threshold_local, but I get a blurry image instead of the black & white. Can’ t figure out why?
Also, if I remove line 66 (just to see what happens) the image I get is “white & black” (inverted, vs. black & white). Also don’t get exactly why? Is due casting when you do the astype?
Finally, all my images are rotated 90 degrees in the screen, also not sure why the differences.
Thanks a lot!!
Adrian Rosebrock
Hi Juan — it’s important to understand that this is just a warning, not an error message. It’s simply alerting you that the
threshold_adaptive
function will be renamed tothreshold_local
in a future release of scikit-image. The functions should be the same (only with a different name), so I’m not sure why they would give different results. I will look into these and see if any parameters have changed.John Goodman
Hi Adrian and all,
Just wanted to chime in on this.
I’m having the same issue as Juan and it seems that threshold_local doesn’t quite work the same as threshold_adaptive? The work around for threshold_local can be found here:
http://scikit-image.org/docs/dev/auto_examples/xx_applications/plot_thresholding.html
Here’s how I implemented the doc scanner based on the above scikit doc:
Adrian Rosebrock
Thank you for sharing, John! It looks like scikit-image has deprecated the function. I’ll get this blog post updated.
Rajeev Narayanan
Hi Adrian,
I used the code from John Goodman’s post above. It doesnt work as before. Your code was working perfectly earlier. Now it doesnt work the same way. Could you update the example so it works like before using threshold_local.
Thanks.
regards,
Rajeev
Adrian Rosebrock
Hi Rajeev — certainly, I will get the post updated by the end of January.
Adrian Rosebrock
I just wanted to follow up here and say that the code + associated downloads have been updated to handle Python 2.7/3, OpenCV 2.4/3, and scikit-image.
nisnab udas
usage: scan.py [-h] -i IMAGE
scan.py: error: argument -i/–image is required
i encounter this error.
what happens in line 12?? where
should i give image path ? how is it given??please provide example
Adrian Rosebrock
Please read up on command line arguments.
Pablo
Hello Adrian,
I am replicating a similar algorithim in OpenCV4Android. But Im running into a problem that the output I get from the Canny edge detector is not even close to the one you get in terms of edge detection quality. It rarely gets the 4 side edges of the documents.
I have resized the image to an even smaller one and tweeked the parameters from both the gaussian filter and the edge detection. I am even using THRESH_OTSU as a parameter for the Canny edge detection. But no success.
How would you approach this?
Thank you very much
Adrian Rosebrock
Hi Pablo — I don’t have any experience using the OpenCV + Java bindings, so it’s hard to provide any substantial guidance here. I would likely speak with the Java bindings developers and explain to them how you are getting different results based on the programming language.
felix jaramillo
Sorry but How i make install the package pyimagesearch? pls :/
Adrian Rosebrock
You simply use the “Downloads” section of this blog post to download the source code and example images. This download includes the “pyimagesearch” module covered in this post.
Saumya
What if my Rectangle Paper has many tiny Rectangles on it?
How will it find the longest Rectangle from it?
Adrian Rosebrock
Lines 37-50 will find the largest rectangular object in the image.
krishna
hey Adrian,
In the cases where receipt’s or paper’s image is not exactly rectangular
or if it’s outer edge is not exactly contour
How should I process the Image?
Adrian Rosebrock
If the outer edge of the document is not rectangular I would suggest being more aggressive with your contour approximation. You will need to reduce the number of points to four in order to apply the perspective transform.
shrey malhotra
When ever i try to run the code i get;
Traceback (most recent call last):
File “scan.py”, line 40, in
(cnts, _) = cv2.findContours(edged.copy(), cv2.RETR_LIST, cv2.CHAIN_APPROX_SIMPLE)
ValueError: too many values to unpack (expected 2)
What should i do?
Adrian Rosebrock
Please read the other comments before posting. Your question has been addressed multiple times in previous comments. See my reply to “Mohd Ali” for more details.
Nick
I was trying to draw the contour on the original image (not scaled down), but I must be doing something wrong. How would one go about doing this? A couple attempts of mine…
cv2.drawContours(orig, [np.multiply(screenCnt,ratio)], -1, (0, 255, 0), 2)
cv2.drawContours(orig, [screenCnt * ratio], -1, (0, 255, 0), 2)
Both of these produce an error saying (-215) npoints > 0 in function drawContours
Zubaer
Awesome post. How would you proceed on transforming the perspective of whole image?
Let’s say –
1) we detected the reciept with a set of four co-ordinates.
2) next step I assume to provide with four co-ordinates corresponding to this receipt in the perspective corrected output image
3) next step is to acquire the relationship (homography matrix) between these two sets of four co-ordinates
4) next to calculate the resultant image size
5) next to warp the image.
Is this how I should do it? Let me know if I am missing anything.
Adrian Rosebrock
Your question actually reminds me of this StackOverflow question on computing a homography matrix to transform an entire image. I would start there.
Carlos
Hi Adrian! Today I was porting your example to C++ and you can find it in this link
https://github.com/devtodev/TicketScanner/tree/master/src
Could you shine a light on me and tell me why the result image of my program doesn’t seen well as the output of your program?
Thank you!
Adrian Rosebrock
Hi Carlos — thanks for sharing the C++ implementation, I’m sure many other PyImageSearch readers will benefit from this.
As for your result, I think you adaptive thresholding may be incorrect (disclaimer: I didn’t look at the code, just the output).
Carlos
You are welcome! Your website is a great source of inspiration and learning I am happy to contribute at least a little bit.
Sophia G
I just have a question as to how could you actually grab the text and input it into a variable in swift and have it print out? In other words how could you recognize the words on a picture that is taken, and directly input it into code ?
Adrian Rosebrock
I don’t cover Swift programming here on PyImageSearch, but the process you are referring to is called Optical Character Recognition.
Dars
Hello do you have a bubble sheet scanner and to get the data in the sheet like a,b,c,d,e. Sorry for the english…. And how to implement in android
MichaelCu
Hi Adrian,
I stumbled on your blog post years later. It’s been very educational and informative for me.
Since I didn’t see anyone posting a Flask version of this, I wanted to share a quick and dirty way to use your function with Flask.
Basically make a post request with a file in the body and get back the scanned image as a response.
I hope others find it helpful.
https://github.com/zenners/flask-document-scanner
Cheers
Adrian Rosebrock
Awesome, thanks so much for sharing MichaelCu!
Erik
Hi Adrian,
Great and informative post. I do have a question though from my experiments with the code. It seems very fragile if there is some occlusion of an edge (say we capture just the document, and only one side has some background). It also seems fragile if the canny edge detector gets most of the outline of the document but finds a break in one of the edges (say I’m holding the paper in my hand).
In these cases, it seems the
if len(approx) == 4:
screenCnt = approx
break
doesn’t work.
Do you have any advice for handling these cases?
Adrian Rosebrock
You are correct, you need a good segmentation in order to perform the contour approximation test. You might want to consider training your own custom object detector that specifically detects rectangle/document-like objects.
Shashank
Hey,
You told about an Android app. Is it possible to create an android app using python. Any suggestions regarding it.
Thank you,
Adrian Rosebrock
No, not easily. The problem is getting OpenCV + Python to interface together on the mobile app. I would suggest re-creating the app using the Java + OpenCV bindings for Android.
Ronak Shah
Hi Adrian,
I’ve had couple of doubts about parameters used in he openCV codes. How do you choose the optimal parameters for Canny function and how it affects the efficiency of edge detection?
How do you Define the Kernel size for gaussian filter?
How do you choose the optimal epsilon for approxPolyDP function?
Your help will be much appreciated!
Thanks
Adrian Rosebrock
The short version is that you need to experimentally tune the values to both the Canny edge detector in approxPolyDP. The values I use here tend to work will if there is sufficient contrast between the background and foreground.
muni
can you please tell me how to get accuracy rate from the given image in this process??
Thanks
Ankita
Hello sir,
I am ankita pursuing my undergraduate degree in computer science , i have been following all your projects and feel they are great, i would be glad if you could help me in doing a mini project on fingerprint matching using python and opencv.
Thank you,
Alex
Hi Adrian,
This was the first of the free lessons given to me from your course.
I unfortunately was not able to jump right in, as I do not see any mentioning of how to install the pyimagesearch package in my windows python 2.7 (with openCV). There is no mentioning on your website from what I can find. Can you direct me to how I would install it through console? Thanks!
Alex
Adrian Rosebrock
Hi Alex — please use the “Downloads” section of this tutorial to grab the source code + example images. This will enable you grab the “pyimagesearch” module.
Julian
Hi Adrian,
Thanks for the awesome article – very informative and well explained. I managed to build a in-browser working version in opencv.js in just a little bit more than 5 minutes 😉
Cheers,
Julian.
Adrian Rosebrock
Congratulations Julian, nice job!
Mo
Hi Julian do you mind sharing how you were able to achieve the in browser version.
Wasabi Lee
Hello,
I’m currently working on a project for a contest and your blog really helped me quicken the process. So far everything went flawless but atm I’m encountering a problem regarding skimage. I’m trying to make a image be readable for tesseract but so far I somehow struggle on getting the same results as you did by using the adaptive threshold function. I even tried adding multiple filters before that but noting seemed to work.
Would really appreciate the help!
Adrian Rosebrock
Hey Wasabi, thanks for the comment. I’m not sure what the exact issue is in this case. Which version of scikit-image are you using?
Albe
Hello
Thanks for this article. I’m new with python and I’m having trouble with cv2.waitKey(0). I have all the modules installed but it freeze.
I would really appreciate the help!
Albe
Adrian Rosebrock
Hey Able — make sure you click the active window opened by OpenCV and then press a key on your keyboard. This will advance the script.
Tript
Hi,
when I am running this code my image after thresholding isn’t as clear as yours. Could you please clear this to me, why is this happening?
Adrian Rosebrock
Are you using the same example images as the ones in this post? Or are you using different images?
Gabriel Gonzalez
Hello Adrian,
I want to thank you for posting this tutorial.
I will be using your code to scan pictures of music sheets in order to make a Nao robot play simple melodies on piano. This will be done by generating a MIDI file from the scanned sheet.
Can you tell me how to properly credit you? I was thinking of
“Credits to Adrian Rosebrock on pyimagesearch.com”
Is that OK?
Thanks,
Gabriel
Adrian Rosebrock
Hi Gabriel — that is a perfectly fine credit, thank you. If you publish your code on GitHub or your own personal site I would appreciate a link back to PyImageSearch from the readme file/webpage.
hamid
Hi Adrian
There are some cases that the intended contour isn’t a closed one. Is there any way to handle such cases using openCV’s functions or I should write my own algorithm?
Adrian Rosebrock
Try using morphological operations such as a dilation or closing operation to close the gap between the contours.
hami
Another problem is that paper contour is connected to other contours in the background. this is the link for canny result: ‘https://ibb.co/js2PFc’ if you want to see. I know the background is not suitable for the purpose but document scanner apps (like CamScanner) are able to detect the paper even in such cases. I think your assumption is not completely safe at least for a publishing app.
To solve this problem I used a houghline transform to detect lines, but then I don’t know how to extract that final four points. Do you have any idea?
Adrian Rosebrock
This solution is certainly not recommended to be used in a production level app. It’s meant to be a tutorial to help you get started and learn the fundamentals of how these apps work. Production-level apps would use a bit of machine learning, at least an object detector and maybe even semantic segmentation to help detect the document.
Oliver
Hi Adrian, Everytime I run scan.py I am given this message
usage: scan.py [-h] -i IMAGE
scan.py: error: the following arguments are required: -i/–image
can you please help?
Adrian Rosebrock
Please take a look at the comments before posting as I have addressed this issue a few times. See my reply to “vasanth” on May 7, 2017 to get started.
Dinesh Kumar
Hi Adrian, I have one doubt in step 2..This code is only use for rectangular shape objects?
can i use the same logic for t shirt shape images?
Adrian Rosebrock
Correct, this method is meant to be used for rectangular shaped objects. You could technically use something similar for t-shirt detection but that would require you to obtain a very nice, clean segmentation of the t-shirt. You should instead consider training your own custom object detector or perform some sort of pixel-wise segmentation using deep learning, such as Mask R-CNN or UNet.
mohit
i’m getting this when i run this code:
usage: scan.py [-h] -i IMAGE
scan.py: error: argument -i/–image is required
Please help
Adrian Rosebrock
You can solve this error by reading up on command line arguments.
Leks
Good Tutorial. I try to implement it in android. My goal is to Scan a national Id Card. I’m able to draw on the contour but sometimes it draws in information inside my card too. Do you have any suggestion how to avoid it?
Adrian Rosebrock
I would suggest tuning your contour approximation values. It sounds like the code is finding areas inside your card that has four vertices but the card itself does not have four vertices (at least according to the approximated contour).
Leks
Hi Adrian,
Thanks for your feedback. Finally, I did it by looping trough all the countour detected ( boundy rectangle and get the largest rect (Width and height).
Have you written some articles describing how to capture(auto capture) image from camera when Threshold are found (distance between camera and object) lighting condition?
Any suggestions will be appreciated.
Regards….
Adrian Rosebrock
I would start with this blog post. You can modify it to capture images/frames when the distance reaches some threshold.
lucifer
Hi Adrian,
i’m getting this when i run this code:
STEP 1: Edge Detection
Traceback (most recent call last):
…
cv2.drawContours(image, [screenCnt], -1, (0, 255, 0), 2)
NameError: name ‘screenCnt’ is not defined
STEP 2: Find contour of paper
Process finished with exit code 1
can you give me a help,thank you.
Adrian Rosebrock
I get the impression that you may have copied and pasted the code rather than using the “Downloads” section of this post to download the code. Make sure you use the “Downloads” section to download the code — this will help reduce any copy and paste errors as I believe what happened here.
Mo
Hi Adrian,
This is an awesome resource, Wondering if you have any suggestions on how to get your code to work for a web app
Adrian Rosebrock
I’m not sure how to answer this question as the term “web app” is pretty loose. What exactly is the goal of your web app?
jatin
hi Adrian ,fantastic way to explain things and show how it is done.
How to install pyimagesearch module for four_point_transform as it shows no module named pyimagesearch .
Or We need to write full code under the function four_point_transform in order to use it
Adrian Rosebrock
Hey Jatin, make sure you use the “Downloads” section of this blog post to download the source code. It will include the functions/modules that you need.
Bill Harvey
Adrian;
I posted a comment on an error however I thought I had resolved it by amending the imports as follows:
Instead of importing as in your example:
from skimage.filters import threshold_local
I did the following:
from skimage import filters
I thought this would get around the “ImportError: cannot import name threshold_local”
I also amended the script as per John Goodman’s post (isn’t he an actor 🙂 )
I thought this worked as I could then get all the way past step 2 however as soon as it reads the threshold_local it fails with ‘NameError name threshold_local is not defined”
Any ideas?
Adrian Rosebrock
Hey Bill, can you check which scikit-image version you are using? I think you may be using an older version. Please check and let me know.
Adrian Rosebrock
Hey Bill, please see my reply to your other comment. I believe you are using an older version of scikit-image. Please double-check your scikit-image version and let me know which one you are using.
Jesudas
thanks for the article, with explanations and code. Loved creating my first program with openCV and python.
Was amazing to see the results, using the scanner on different kinds of receipts and documents, with different margins, backgrounds.
thanks !
Adrian Rosebrock
Thank you for the kind words, Jesudas. I’m happy you enjoyed the tutorial 🙂
Chintan Gandhi
Hi Adrian. Thanks for your crisp, clear and well-explained blog posts.
As in the “Where to next?” section, I tried incorporating the OCR using pytesseract with reference to your article: https://pyimagesearch.com/2017/07/10/using-tesseract-ocr-python/.
However, I couldn’t get the pytesseract library’s “image_to_string” function to work on the output of this article’s code: the scanned image. Could you please suggest as to what might be wrong with my approach?
Adrian Rosebrock
Could you be more specific in what you mean by getting the function to work? Is the function returning an error? Is the OCR output not what you expect?
Chintan Gandhi
There is no OCR output. The “image_to_string” function does not convert the image into text, so no output is seen.
Adrian Rosebrock
In that case the Tesseract library likely cannot OCR any of the text and hence returns an empty string. You linked to my previous post on using Tesseract + Python together so to confirm the issue, you should run the code on the example images in the post. If it doesn’t work then there is a problem with your Tesseract install. If it does work then you know Tesseract simply cannot OCR your input image.
Kent
Adrian, Thank you for this really good tutorial. It needed some exploration with collecting the transform function from the previous blog entry and tweaking the code/reviewing the comments to ascertain just what each line is doing, but taking apart examples is how you learn best.
Could you please update line 29 of “Edge Detection” from a Python 2 print statement (without parenthesis) to match the other python 3 print statements?
Adrian Rosebrock
Done! I must have missed that when I updated the post. I have confirmed the source code download is correct though. Thanks Kent!
Michael Adjeisah
Hi Andrian,
Can you help me on how to Accessing the Kinect Camera with OpenCV and Python?
Thanks.
Adrian Rosebrock
Sorry, it’s been a long, long time since I’ve used OpenCV, Python, and the Kinect camera. Any suggestions I would have here would be out dated. I may consider doing a tutorial on it in the future but I’m not sure if/when that may be.
Syifa Hersista
Hi Adrian!
Thank you for your post! It’s very helpful!
I am currently trying your code now, and trained with some objects.
I just wonder, what if the background is lighter than the object, for example on white table.
Somehow it cannot calculate the right “screenCnt”.
I realized when use Canny Edge, it cannot detect the edge of object.
Then, I tried to use another preprocessing beside Gaussian Blur or Grayscale (like dilate, and threshold), only detects one side of the edge (depend on the light). Can you suggest me how to detect the good edge on the lighter background?
Thank you!
sivaani nagarajan
how can i create an app using this code?
Adrian Rosebrock
There are two options:
1. Use the Python code sitting behind a REST API. Your mobile app would upload the original image and the API can return the scanned image.
2. You can convert the Python code to the native language of your mobile device.
Ashish
Awesome blog, helped me a lot in getting started with Opencv.
Thank you,
Adrian Rosebrock
Adrian Rosebrock
Thanks Ashish, it is my pleasure to help!
rick5
Awesome Adrian Rosebrock, you are so generous.
There is some bugs, if it can not detect 4 count of corner, the value parameter ‘screenCnt’ can’t be define and set value.
This would cause crash.
zhanglu
Hi Adrian!
Thank you for your post! It’s very helpful!
When the background and target gray value are similar, how can we find out the edge as much as possible by adjusting canny‘s parameters?
Adrian Rosebrock
This method assumes there is sufficient contrast between your background and edge of the document itself. You might want to try histogram equalization, edge detection, and non-maxima suppression. A Hough lines transform may also help.
Nilesh
hey 🙂
can you help me to understand argparse
I am not getting that part correctly.
Adrian Rosebrock
No problem. Read this tutorial on argparse and you’ll be up to speed in no time 🙂
Lady
hello I have a problem when I run the program it say: No module named ‘scipy’
What I can do?
Adrian Rosebrock
Make sure you install SciPy on your system via pip:
$ pip install scipy
Const
Hey Adrian, thanks for great example!
I’ve been following this as day 3/17 and opted to download example code/library/image but to actually type everything from scratch following your guidelines and code examples (for learning sake, but I digress).
Issues I’ve found so far are really minor but wanted to bring you attention to them:
1) Original provided image of recipe used as-is from downloaded section is rotated (might be issue with macOS / Debian, but it registers as landscape at my end). I had to rotate it 90 degrees to be upright. Since initially I’ve hardcoded rotation angle, it then broke the page example which is properly portrait (incorrectly finding biggest contour) I eventually had to add:
…
# as second required argument (could be handled as defaulted to 0 if omitted ofc)
ap.add_argument(“-r”, “–rotate”, required = True, help = “Rotation angle of the image to be scanned”)
…
# right after initial imread of image
image = imutils.rotate(image, angle = int(args[“rotate”]))
in order to process both original unmodified images (receipt and page) properly (-r 0 for page, -r 90 for receipt).
2) Contrast of gray-scale receipt image was fairly average, so It had to have its threshold value increased from 11 to 81 to achieve results that are a bit weaker but closer to your resulting dark-contrasted images:
…
T = threshold_local(warped, 81, offset = 10, method = “gaussian”)
…
Overall it was excellent read and thanks for great tutorials!
Adrian Rosebrock
Thank you for sharing, Const! Could you also share your Python, OpenCV, OS version just in case others run into a similar problem?
Honey
Please can somebody explain me this line
warped = (warped > T).astype(“uint8”) * 255
and how to write it in node.js as i am building this in node.js.
shafique
Hi Adrian,
It is a very good blog to understand the basics how to detect four corners then as per corner how to scan our document but it is only able to detect corners when corners are fully available in image but if I have full screen doc image or docs which are little bit smaller or some one holding docs then it is not able to detect corners and because of that it is not able to scan those images could you please help me how I can achieve scanning for these type of images.
Ripon das
Please give a minute.
I am newbie in image processing. I want to process image with a raspberry pi. I have just setup raspberry pi. Tell me please which software package is require to install for opencv+python. For getting started with raspberry pi image processing.
Thank you in advance.
Adrian Rosebrock
I provide a number of OpenCV install tutorials here. Give them a look, they will help you install OpenCV on your Pi.
James
You almost made it sound like it’s possible for someone without a computer or tech background to actually nail this sort of stuff! Awesome.
Adrian Rosebrock
Thanks James! 🙂
RAMJAN RAEEN
HI! Adrian
First of all, I want to say thanks for awesome tutorials.
Here I’m getting an error to not install pyimagesearch package.
Please share me the version of pyimagesearch to install.
Adrian Rosebrock
You can download the “pyimagesearch” package by using the “Downloads” section of this tutorial (it is not distributed on PyPI).
AraS
Hi Adrian, first thanks for your tutorials. They are super didactic
I ask you a question, could you help me do the same as in this tutorial but using the Hough Transform instead of the four point detection.
Is for a job at the University, i’m just over time and I can’t get me out.
Thank you again for your help!
Adrian Rosebrock
Hey there — I don’t have any tutorials on using the Hough Transform method but if this project is for a University I really think you should research it, study it, and put in the hard work yourself. If you are going to be teaching others you need to educate yourself.
Gilles T
Hi Adrian,
Thank you for your wonderfull job and script!!
I spend lot of time on ggle to find something like that…..
I have one question for my own project, do you think it’s possible to determine contours with some corner image, qrcode, anaything else ??
I mean a function like that : https://blog.my-oxford.com/fr/scan/
Many thanks!
Gilles
Adrian Rosebrock
I actually discuss how to perform QR code recognition with OpenCV in this tutorial.
Gilles T
Thanks Andrian,
Ur answer comes for another question, how to decode EAN128 on capture 🙂
But my first question is about the edge, in this tutorial you have decide to take a capture of the document by detect his corner.
But can you think it’s possible to define “custom corner” detection, like a litle place in this document itself.
Thanks an thanks a lot !
Gilles
Adrian Rosebrock
I would suggest taking a look at keypoint detectors, specifically Harris and GFTT which are designed for corner detection. Along with keypoint matching they can be used to detect specific regions of an object.
Onkar
how can we save the scanned image (step 3) in the directory from which we get an actual image
Adrian Rosebrock
You can use the
cv2.imwrite
function to save any image you wish to disk.Vijay Chhuttani
First of all, thank you for this amazing website. I am starting to learn OpenCV and this site has guided me a lot where to start. I have started learning Python as I am a node guy with some java background.
My question here is, what additional step do you think will be required when doing an ID Scan. We are a background check company and perform OCR on government IDs and validate the data for KYC purpose. But now we are trying to improve our performance and scale. By improving the document orientation and cropping and resizing the ID from the whole image, we can provide clean inputs to our OCR engine.
Other than Edge detection and Transform what other steps do you think will help us to solve this problem. One issue I see is user holding the ID card in hand while taking the photo, causing edge detection issues.
Adrian Rosebrock
Thanks Vijay, I’m so happy to hear you are enjoying the PyImageSearch blog 🙂
You may be able to get around many of the scanning issues by using a more powerful OCR engine. Have you tried this tutorial?
Hancer
This is really Great and very bried
Adrian Rosebrock
Thanks Hancer!
Aamir sohail
Sir i want to scan pictures from live cam
Adrian Rosebrock
You’ll want to combine the code from this post with this one on accessing your webcam.
Ahmed Ahmed
It doesn’t work with me i got the Error :
scan.py : error : argument -i/–image is required
Should my code to look like that ?
ap.add_argument(“-i”, “–image”, required = True,
help = “C:\\Users\\Ahmed\\Desktop\\image.jpg”)
Adrian Rosebrock
No, that is incorrect. The code doesn’t have to be updated at all. Make sure you read this tutorial on argument parsing before you continue.
Binh
Hi Adrian,
There is a error when running args:
error: the following arguments are required: -i/–image
An exception has occurred, use %tb to see the full traceback.
Please help to advise how to fix it.
Thanks,
Adrian Rosebrock
You need to supply the command line arguments to the script.
Samvatsar Shastrimath
Wow.. Superb explaination. Really helpful. Thank you so much!!
Adrian Rosebrock
You are welcome, I’m glad you found it helpful!
michael
very great information about documents.
sometimes where there are lighting issues the contour method not always works.
and my advice use watershad segmentation to find the shape of document and then perform contours.
for performing this one part is middle of image other is edges of image. then segmentation will give two parts one the document other the background.
https://docs.opencv.org/3.3.1/d3/db4/tutorial_py_watershed.html
Mike
Thank you very much for this. I’m adapting it to find multiple documents in a single (scanned) image. I’m finding that each document is actually producing two nearly identical contours, the second slightly smaller than the first.
Any idea what might be causing this? I can just throw out every second contour, but that seems inefficient.
Thanks,
Mike
Adrian Rosebrock
I would suggest taking a look at your edge map to see if there is some sort of “double contour” going on. Alternatively, you can check to see if the contour is enclosed within another, and if so, discard it.
Shahudullah
Hello Adrian,
I have one query. Is it necessary to import imutils? Can I use opencv functions instead of imutils for the same operation?
Adrian Rosebrock
For resizing? Yes, you certainly can. The difference is that the “imutils” function automatically preserves the aspect ratio for you while “cv2.resize” will not.
anirudh
how to save that scanned image in system
Adrian Rosebrock
You can use the “cv2.imwrite” function to write an image to disk.
Raja
How to Split image based on dark center line in the book?
Raj
Hello Adrian, thanks for your post. It helps to detect the edges of the page perfectly.
Your code works for the single page, but i need to slice the image by detecting the edges and shadow of the center part of the book. Can you help me to overcome this issue.
neha jain
Is there a way to identify whether an image is scanned or original ?
Adrian Rosebrock
Sorry, I’m not sure what you mean? Could you clarify?
Shreyas
Awesome resource Adrian,THANKS a lot..
I had a question…how would i import ur transform module in google colab
MarcoS
Excellent article. I also suggest dewarping the pages.
https://mzucker.github.io/2016/08/15/page-dewarping.html
Adrian Rosebrock
Nice, thanks for sharing!
Joe
I have a question? How did you choose the right argument value e.g. when you apply local thresholding
Adrian Rosebrock
Typically you manually tune it by trial and error.
Owen
Hey thanks a lot for this guide Adrian! Is there any licensing on this code/could I build on top of it for my own ideas?
Adrian Rosebrock
Yes, but read this first.
Valerio
Hello Adrian,
I was wondering why you use the skimage adaptive thresholding method threshold_local as opposed to the opencv one adaptiveThresholding. did you find it in any way better at doing the job?
By the way, awesome site and great OpenCV tutorials. I’m an undergraduate studying Robotics and your tutorials have helped a ton in strengthening my skills.
Adrian Rosebrock
No reason other than I like the scikit-image adaptive thresholding method. I find it easier to use and more Pythonic.
Shlok
Hello Adrian! Thanks a lot for the above algorithm, its amazing to work with such a brilliant code. While i was fiddling around with it on my system, i found out that the algorithm doesnt work very well when white paper is used on white backgrounds, i have tried using every possible method i could think of, either adjusting thresh or blur values, resizing the image, but cant work out any of those. Would be grateful if you could guide me through with this….
Thanks a lot!
William
Wow. This is might be the oldest comment left of them all, but as a professional in the industry of scanning documents… This script is great! Props Adrian! I’m curious about what the cost might be to use an OCR engine like Tesseract.
Adrian Rosebrock
Thanks William. Although I’m not sure what you mean by “cost”. Tesseract is a free and open source library.
Mr.Li
I would like to ask you a question. If the text picture has no border and has local distortion and skew and part of the shadow to deal with, I know the text skew can be handled, but the local distortion in the picture has no idea.Do you have any good ideas?thank you
Charles Brabec
Adrian, Thanks for the wonderful tutorial. I made a few modifications to my copy and I’d like to offer them as additional next-steps suggestions.
– add params to the program to pass in the expected size of the scanned document
– modify the four_point_transform() function to ensure the output image has the same aspect ratio as the scanned document
– the local_threshold() function uses a block_size of 11, which seems to be too low for higher resolution pictures. Use the size of the warped image to calculate the dpi and use that to adjust the block_size
– add an output parameter to save the final result as a new image suitable for printing
Now I can use my phone camera and this program as a quite usable photocopier. Great fun!
Adrian Rosebrock
Great job, Charles!
Bilal
Hey Adrian, I hope you fine I successfully implemented your code and it’s working fine but the problem is it’s good on your example image when i use my own image it’s good is not good and specially not detecting the Contours Accurately so what’s the alternative of the “ration” that you used between 17-20 lines.
Thanks in Advance.
Best Regards: Bilal
Tong Duc Khai
Hi Andrian,
Thanks for post. I followed the guide and downloaded your source code and tried executing but I’ve encountered a problem. It stucked on STEP 1. I’ve been waiting for so long but nothing happened. I use python 3.7 and OpenCV 4.2 on Kubuntu 19.10. Please help me. Thank you so much !
Adrian Rosebrock
Click on the window opened by OpenCV and press any key on your keyboard. The “cv2.waitKey” function call pauses execution of the script until you press a key on the keyboard.
Mayur Satav
Hi Adrian,
Thank you for your wonderful tutorials! very appreciate your work in computer vision.whenever i visit your website I always learn something useful that I can apply in a number of projects. Right now i am working on my engineering project that is “Data extraction from pdf invoices using computer vision” After searching lots of research papers and resources, but failed to extract text into different parts like Vendor name, Invoice number, item name and item quantity.Could you please tell me how i achieve it?
Thank You!
Adrian Rosebrock
Hi Mayur — what referring to is a type of Optical Character Recognition (OCR) problem. I have plans to cover more advanced forms of OCR soon, so stay tuned to the PyImageSearch blog!