Over the past few months I’ve gotten quite the number of requests landing in my inbox to build a bubble sheet/Scantron-like test reader using computer vision and image processing techniques.
A dataset of filled-in bubble sheets is essential for this project. It allows for training a model to accurately recognize and grade the responses, making it useful for automating multiple-choice test evaluation.
Roboflow has free tools for each stage of the computer vision pipeline that will streamline your workflows and supercharge your productivity.
Sign up or Log in to your Roboflow account to access state of the art dataset libaries and revolutionize your computer vision pipeline.
You can start by choosing your own datasets or using our PyimageSearch’s assorted library of useful datasets.
Bring data in any of 40+ formats to Roboflow, train using any state-of-the-art model architectures, deploy across multiple platforms (API, NVIDIA, browser, iOS, etc), and connect to applications or 3rd party tools.
And while I’ve been having a lot of fun doing this series on machine learning and deep learning, I’d be lying if I said this little mini-project wasn’t a short, welcome break. One of my favorite parts of running the PyImageSearch blog is demonstrating how to build actual solutions to problems using computer vision.
In fact, what makes this project so special is that we are going to combine the techniques from many previous blog posts, including building a document scanner, contour sorting, and perspective transforms. Using the knowledge gained from these previous posts, we’ll be able to make quick work of this bubble sheet scanner and test grader.
You see, last Friday afternoon I quickly Photoshopped an example bubble test paper, printed out a few copies, and then set to work on coding up the actual implementation.
Overall, I am quite pleased with this implementation and I think you’ll absolutely be able to use this bubble sheet grader/OMR system as a starting point for your own projects.
To learn more about utilizing computer vision, image processing, and OpenCV to automatically grade bubble test sheets, keep reading.
Looking for the source code to this post?
Jump Right To The Downloads SectionBubble sheet scanner and test grader using OMR, Python, and OpenCV
In the remainder of this blog post, I’ll discuss what exactly Optical Mark Recognition (OMR) is. I’ll then demonstrate how to implement a bubble sheet test scanner and grader using strictly computer vision and image processing techniques, along with the OpenCV library.
Once we have our OMR system implemented, I’ll provide sample results of our test grader on a few example exams, including ones that were filled out with nefarious intent.
Finally, I’ll discuss some of the shortcomings of this current bubble sheet scanner system and how we can improve it in future iterations.
What is Optical Mark Recognition (OMR)?
Optical Mark Recognition, or OMR for short, is the process of automatically analyzing human-marked documents and interpreting their results.
Arguably, the most famous, easily recognizable form of OMR are bubble sheet multiple choice tests, not unlike the ones you took in elementary school, middle school, or even high school.
If you’re unfamiliar with “bubble sheet tests” or the trademark/corporate name of “Scantron tests”, they are simply multiple-choice tests that you take as a student. Each question on the exam is a multiple choice — and you use a #2 pencil to mark the “bubble” that corresponds to the correct answer.
The most notable bubble sheet test you experienced (at least in the United States) were taking the SATs during high school, prior to filling out college admission applications.
I believe that the SATs use the software provided by Scantron to perform OMR and grade student exams, but I could easily be wrong there. I only make note of this because Scantron is used in over 98% of all US school districts.
In short, what I’m trying to say is that there is a massive market for Optical Mark Recognition and the ability to grade and interpret human-marked forms and exams.
Implementing a bubble sheet scanner and grader using OMR, Python, and OpenCV
Now that we understand the basics of OMR, let’s build a computer vision system using Python and OpenCV that can read and grade bubble sheet tests.
Of course, I’ll be providing lots of visual example images along the way so you can understand exactly what techniques I’m applying and why I’m using them.
Below I have included an example filled in bubble sheet exam that I have put together for this project:
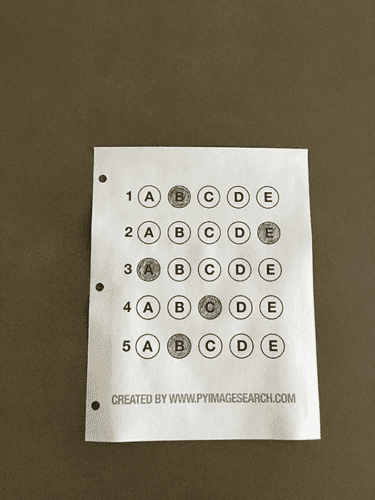
We’ll be using this as our example image as we work through the steps of building our test grader. Later in this lesson, you’ll also find additional sample exams.
I have also included a blank exam template as a .PSD (Photoshop) file so you can modify it as you see fit. You can use the “Downloads” section at the bottom of this post to download the code, example images, and template file.
The 7 steps to build a bubble sheet scanner and grader
The goal of this blog post is to build a bubble sheet scanner and test grader using Python and OpenCV.
To accomplish this, our implementation will need to satisfy the following 7 steps:
- Step #1: Detect the exam in an image.
- Step #2: Apply a perspective transform to extract the top-down, birds-eye-view of the exam.
- Step #3: Extract the set of bubbles (i.e., the possible answer choices) from the perspective transformed exam.
- Step #4: Sort the questions/bubbles into rows.
- Step #5: Determine the marked (i.e., “bubbled in”) answer for each row.
- Step #6: Lookup the correct answer in our answer key to determine if the user was correct in their choice.
- Step #7: Repeat for all questions in the exam.
The next section of this tutorial will cover the actual implementation of our algorithm.
The bubble sheet scanner implementation with Python and OpenCV
To get started, open up a new file, name it test_grader.py
, and let’s get to work:
# import the necessary packages from imutils.perspective import four_point_transform from imutils import contours import numpy as np import argparse import imutils import cv2 # construct the argument parse and parse the arguments ap = argparse.ArgumentParser() ap.add_argument("-i", "--image", required=True, help="path to the input image") args = vars(ap.parse_args()) # define the answer key which maps the question number # to the correct answer ANSWER_KEY = {0: 1, 1: 4, 2: 0, 3: 3, 4: 1}
On Lines 2-7 we import our required Python packages.
You should already have OpenCV and Numpy installed on your system, but you might not have the most recent version of imutils, my set of convenience functions to make performing basic image processing operations easier. To install imutils
(or upgrade to the latest version), just execute the following command:
$ pip install --upgrade imutils
Lines 10-12 parse our command line arguments. We only need a single switch here, --image
, which is the path to the input bubble sheet test image that we are going to grade for correctness.
Line 17 then defines our ANSWER_KEY
.
As the name of the variable suggests, the ANSWER_KEY
provides integer mappings of the question numbers to the index of the correct bubble.
In this case, a key of 0 indicates the first question, while a value of 1 signifies “B” as the correct answer (since “B” is the index 1 in the string “ABCDE”). As a second example, consider a key of 1 that maps to a value of 4 — this would indicate that the answer to the second question is “E”.
As a matter of convenience, I have written the entire answer key in plain english here:
- Question #1: B
- Question #2: E
- Question #3: A
- Question #4: D
- Question #5: B
Next, let’s preprocess our input image:
# load the image, convert it to grayscale, blur it # slightly, then find edges image = cv2.imread(args["image"]) gray = cv2.cvtColor(image, cv2.COLOR_BGR2GRAY) blurred = cv2.GaussianBlur(gray, (5, 5), 0) edged = cv2.Canny(blurred, 75, 200)
On Line 21 we load our image from disk, followed by converting it to grayscale (Line 22), and blurring it to reduce high frequency noise (Line 23).
We then apply the Canny edge detector on Line 24 to find the edges/outlines of the exam.
Below I have included a screenshot of our exam after applying edge detection:
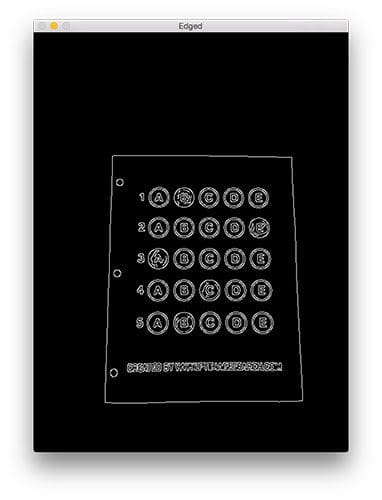
Notice how the edges of the document are clearly defined, with all four vertices of the exam being present in the image.
Obtaining this silhouette of the document is extremely important in our next step as we will use it as a marker to apply a perspective transform to the exam, obtaining a top-down, birds-eye-view of the document:
# find contours in the edge map, then initialize # the contour that corresponds to the document cnts = cv2.findContours(edged.copy(), cv2.RETR_EXTERNAL, cv2.CHAIN_APPROX_SIMPLE) cnts = imutils.grab_contours(cnts) docCnt = None # ensure that at least one contour was found if len(cnts) > 0: # sort the contours according to their size in # descending order cnts = sorted(cnts, key=cv2.contourArea, reverse=True) # loop over the sorted contours for c in cnts: # approximate the contour peri = cv2.arcLength(c, True) approx = cv2.approxPolyDP(c, 0.02 * peri, True) # if our approximated contour has four points, # then we can assume we have found the paper if len(approx) == 4: docCnt = approx break
Now that we have the outline of our exam, we apply the cv2.findContours
function to find the lines that correspond to the exam itself.
We do this by sorting our contours by their area (from largest to smallest) on Line 37 (after making sure at least one contour was found on Line 34, of course). This implies that larger contours will be placed at the front of the list, while smaller contours will appear farther back in the list.
We make the assumption that our exam will be the main focal point of the image, and thus be larger than other objects in the image. This assumption allows us to “filter” our contours, simply by investigating their area and knowing that the contour that corresponds to the exam should be near the front of the list.
However, contour area and size is not enough — we should also check the number of vertices on the contour.
To do, this, we loop over each of our (sorted) contours on Line 40. For each of them, we approximate the contour, which in essence means we simplify the number of points in the contour, making it a “more basic” geometric shape. You can read more about contour approximation in this post on building a mobile document scanner.
On Line 47 we make a check to see if our approximated contour has four points, and if it does, we assume that we have found the exam.
Below I have included an example image that demonstrates the docCnt
variable being drawn on the original image:
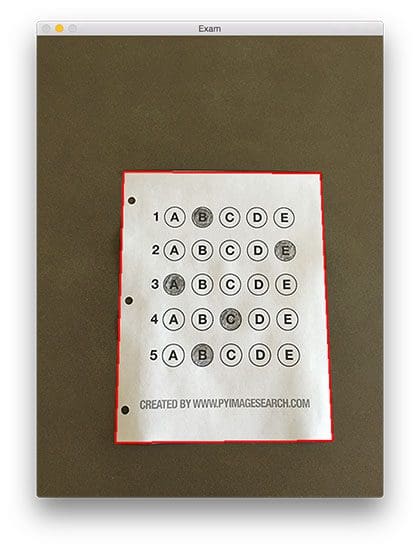
Sure enough, this area corresponds to the outline of the exam.
Now that we have used contours to find the outline of the exam, we can apply a perspective transform to obtain a top-down, birds-eye-view of the document:
# apply a four point perspective transform to both the # original image and grayscale image to obtain a top-down # birds eye view of the paper paper = four_point_transform(image, docCnt.reshape(4, 2)) warped = four_point_transform(gray, docCnt.reshape(4, 2))
In this case, we’ll be using my implementation of the four_point_transform
function which:
- Orders the (x, y)-coordinates of our contours in a specific, reproducible manner.
- Applies a perspective transform to the region.
You can learn more about the perspective transform in this post as well as this updated one on coordinate ordering, but for the time being, simply understand that this function handles taking the “skewed” exam and transforms it, returning a top-down view of the document:
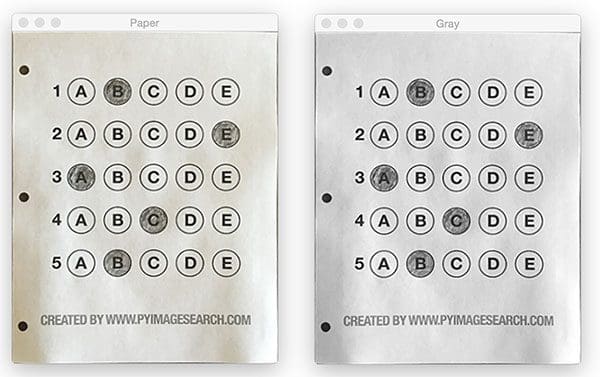
Alright, so now we’re getting somewhere.
We found our exam in the original image.
We applied a perspective transform to obtain a 90 degree viewing angle of the document.
But how do we go about actually grading the document?
This step starts with binarization, or the process of thresholding/segmenting the foreground from the background of the image:
# apply Otsu's thresholding method to binarize the warped # piece of paper thresh = cv2.threshold(warped, 0, 255, cv2.THRESH_BINARY_INV | cv2.THRESH_OTSU)[1]
After applying Otsu’s thresholding method, our exam is now a binary image:
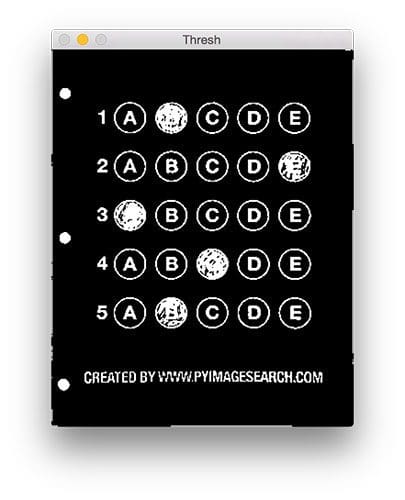
Notice how the background of the image is black, while the foreground is white.
This binarization will allow us to once again apply contour extraction techniques to find each of the bubbles in the exam:
# find contours in the thresholded image, then initialize # the list of contours that correspond to questions cnts = cv2.findContours(thresh.copy(), cv2.RETR_EXTERNAL, cv2.CHAIN_APPROX_SIMPLE) cnts = imutils.grab_contours(cnts) questionCnts = [] # loop over the contours for c in cnts: # compute the bounding box of the contour, then use the # bounding box to derive the aspect ratio (x, y, w, h) = cv2.boundingRect(c) ar = w / float(h) # in order to label the contour as a question, region # should be sufficiently wide, sufficiently tall, and # have an aspect ratio approximately equal to 1 if w >= 20 and h >= 20 and ar >= 0.9 and ar <= 1.1: questionCnts.append(c)
Lines 64-67 handle finding contours on our thresh
binary image, followed by initializing questionCnts
, a list of contours that correspond to the questions/bubbles on the exam.
To determine which regions of the image are bubbles, we first loop over each of the individual contours (Line 70).
For each of these contours, we compute the bounding box (Line 73), which also allows us to compute the aspect ratio, or more simply, the ratio of the width to the height (Line 74).
In order for a contour area to be considered a bubble, the region should:
- Be sufficiently wide and tall (in this case, at least 20 pixels in both dimensions).
- Have an aspect ratio that is approximately equal to 1.
As long as these checks hold, we can update our questionCnts
list and mark the region as a bubble.
Below I have included a screenshot that has drawn the output of questionCnts
on our image:
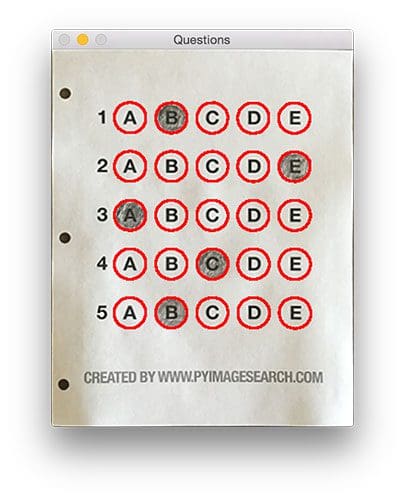
Notice how only the question regions of the exam are highlighted and nothing else.
We can now move on to the “grading” portion of our OMR system:
# sort the question contours top-to-bottom, then initialize # the total number of correct answers questionCnts = contours.sort_contours(questionCnts, method="top-to-bottom")[0] correct = 0 # each question has 5 possible answers, to loop over the # question in batches of 5 for (q, i) in enumerate(np.arange(0, len(questionCnts), 5)): # sort the contours for the current question from # left to right, then initialize the index of the # bubbled answer cnts = contours.sort_contours(questionCnts[i:i + 5])[0] bubbled = None
First, we must sort our questionCnts
from top-to-bottom. This will ensure that rows of questions that are closer to the top of the exam will appear first in the sorted list.
We also initialize a bookkeeper variable to keep track of the number of correct
answers.
On Line 90 we start looping over our questions. Since each question has 5 possible answers, we’ll apply NumPy array slicing and contour sorting to to sort the current set of contours from left to right.
The reason this methodology works is because we have already sorted our contours from top-to-bottom. We know that the 5 bubbles for each question will appear sequentially in our list — but we do not know whether these bubbles will be sorted from left-to-right. The sort contour call on Line 94 takes care of this issue and ensures each row of contours are sorted into rows, from left-to-right.
To visualize this concept, I have included a screenshot below that depicts each row of questions as a separate color:
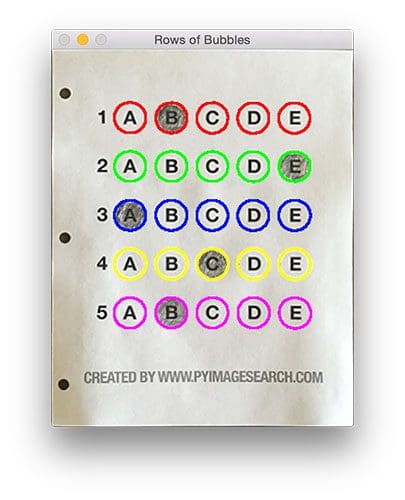
Given a row of bubbles, the next step is to determine which bubble is filled in.
We can accomplish this by using our thresh
image and counting the number of non-zero pixels (i.e., foreground pixels) in each bubble region:
# loop over the sorted contours for (j, c) in enumerate(cnts): # construct a mask that reveals only the current # "bubble" for the question mask = np.zeros(thresh.shape, dtype="uint8") cv2.drawContours(mask, [c], -1, 255, -1) # apply the mask to the thresholded image, then # count the number of non-zero pixels in the # bubble area mask = cv2.bitwise_and(thresh, thresh, mask=mask) total = cv2.countNonZero(mask) # if the current total has a larger number of total # non-zero pixels, then we are examining the currently # bubbled-in answer if bubbled is None or total > bubbled[0]: bubbled = (total, j)
Line 98 handles looping over each of the sorted bubbles in the row.
We then construct a mask for the current bubble on Line 101 and then count the number of non-zero pixels in the masked region (Lines 107 and 108). The more non-zero pixels we count, then the more foreground pixels there are, and therefore the bubble with the maximum non-zero count is the index of the bubble that the the test taker has bubbled in (Line 113 and 114).
Below I have included an example of creating and applying a mask to each bubble associated with a question:
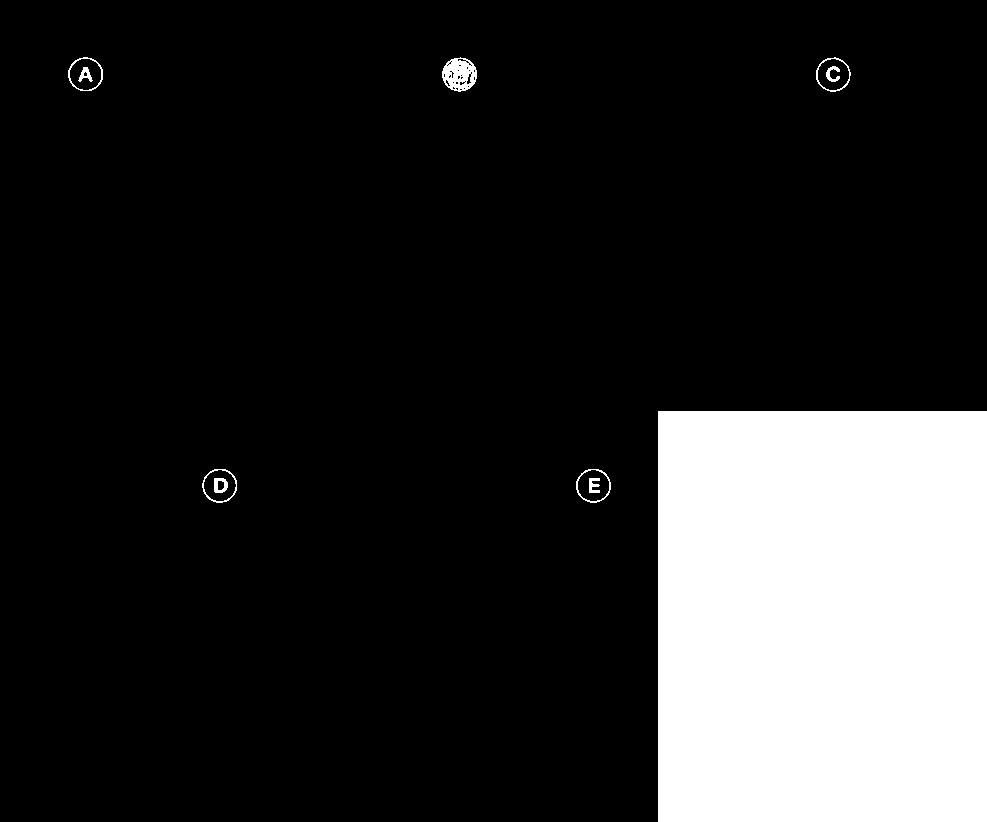
Clearly, the bubble associated with “B” has the most thresholded pixels, and is therefore the bubble that the user has marked on their exam.
This next code block handles looking up the correct answer in the ANSWER_KEY
, updating any relevant bookkeeper variables, and finally drawing the marked bubble on our image:
# initialize the contour color and the index of the # *correct* answer color = (0, 0, 255) k = ANSWER_KEY[q] # check to see if the bubbled answer is correct if k == bubbled[1]: color = (0, 255, 0) correct += 1 # draw the outline of the correct answer on the test cv2.drawContours(paper, [cnts[k]], -1, color, 3)
Based on whether the test taker was correct or incorrect yields which color is drawn on the exam. If the test taker is correct, we’ll highlight their answer in green. However, if the test taker made a mistake and marked an incorrect answer, we’ll let them know by highlighting the correct answer in red:
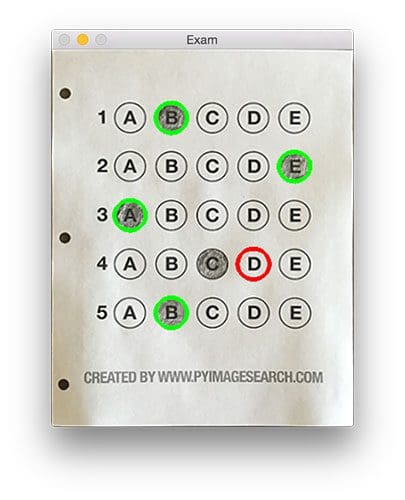
Finally, our last code block handles scoring the exam and displaying the results to our screen:
# grab the test taker score = (correct / 5.0) * 100 print("[INFO] score: {:.2f}%".format(score)) cv2.putText(paper, "{:.2f}%".format(score), (10, 30), cv2.FONT_HERSHEY_SIMPLEX, 0.9, (0, 0, 255), 2) cv2.imshow("Original", image) cv2.imshow("Exam", paper) cv2.waitKey(0)
Below you can see the output of our fully graded example image:
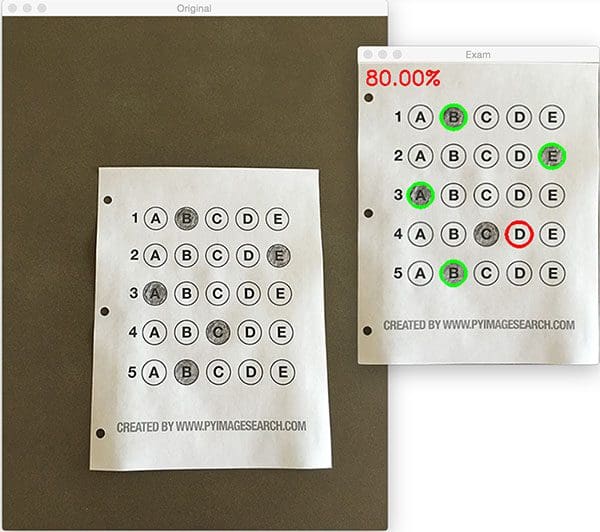
In this case, the reader obtained an 80% on the exam. The only question they missed was #4 where they incorrectly marked “C” as the correct answer (“D” was the correct choice).
Why not use circle detection?
After going through this tutorial, you might be wondering:
“Hey Adrian, an answer bubble is a circle. So why did you extract contours instead of applying Hough circles to find the circles in the image?”
Great question.
To start, tuning the parameters to Hough circles on an image-to-image basis can be a real pain. But that’s only a minor reason.
The real reason is:
User error.
How many times, whether purposely or not, have you filled in outside the lines on your bubble sheet? I’m not expert, but I’d have to guess that at least 1 in every 20 marks a test taker fills in is “slightly” outside the lines.
And guess what?
Hough circles don’t handle deformations in their outlines very well — your circle detection would totally fail in that case.
Because of this, I instead recommend using contours and contour properties to help you filter the bubbles and answers. The cv2.findContours
function doesn’t care if the bubble is “round”, “perfectly round”, or “oh my god, what the hell is that?”.
Instead, the cv2.findContours
function will return a set of blobs to you, which will be the foreground regions in your image. You can then take these regions process and filter them to find your questions (as we did in this tutorial), and go about your way.
Our bubble sheet test scanner and grader results
To see our bubble sheet test grader in action, be sure to download the source code and example images to this post using the “Downloads” section at the bottom of the tutorial.
We’ve already seen test_01.png
as our example earlier in this post, so let’s try test_02.png
:
$ python test_grader.py --image images/test_02.png
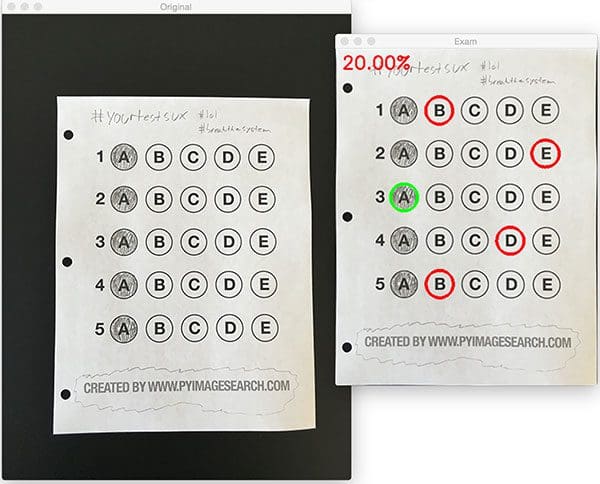
Here we can see that a particularly nefarious user took our exam. They were not happy with the test, writing “#yourtestsux” across the front of it along with an anarchy inspiring “#breakthesystem”. They also marked “A” for all answers.
Perhaps it comes as no surprise that the user scored a pitiful 20% on the exam, based entirely on luck:
Let’s try another image:
$ python test_grader.py --image images/test_03.png
This time the reader did a little better, scoring a 60%:
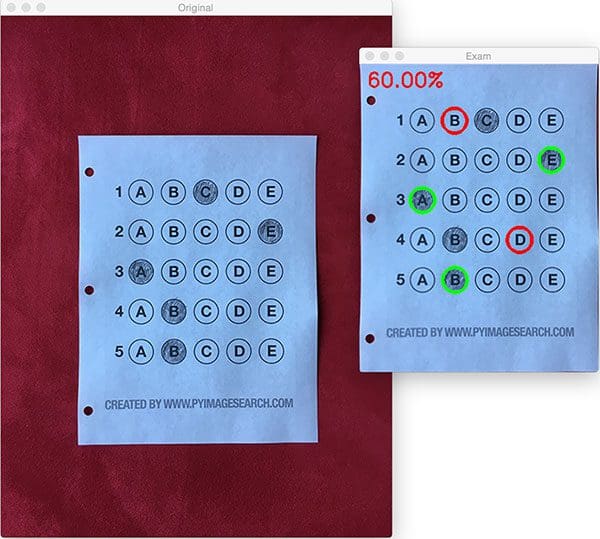
In this particular example, the reader simply marked all answers along a diagonal:
$ python test_grader.py --image images/test_04.png
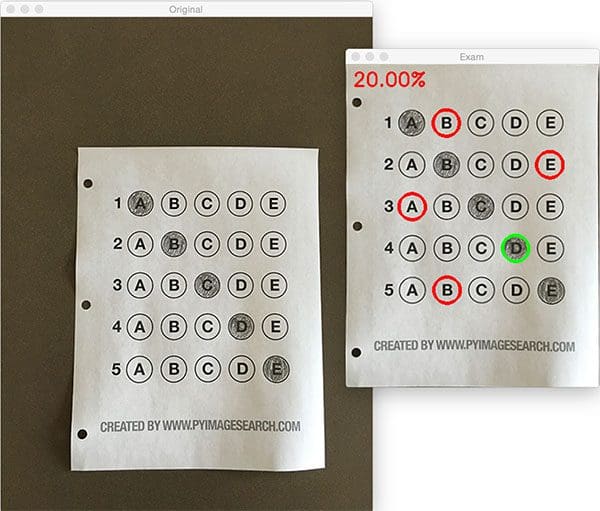
Unfortunately for the test taker, this strategy didn’t pay off very well.
Let’s look at one final example:
$ python test_grader.py --image images/test_05.png
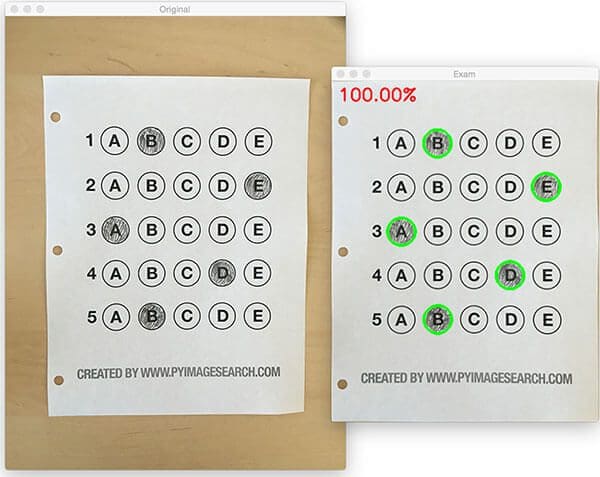
This student clearly studied ahead of time, earning a perfect 100% on the exam.
Extending the OMR and test scanner
Admittedly, this past summer/early autumn has been one of the busiest periods of my life, so I needed to timebox the development of the OMR and test scanner software into a single, shortened afternoon last Friday.
While I was able to get the barebones of a working bubble sheet test scanner implemented, there are certainly a few areas that need improvement. The most obvious area for improvement is the logic to handle non-filled in bubbles.
In the current implementation, we (naively) assume that a reader has filled in one and only one bubble per question row.
However, since we determine if a particular bubble is “filled in” simply by counting the number of thresholded pixels in a row and then sorting in descending order, this can lead to two problems:
- What happens if a user does not bubble in an answer for a particular question?
- What if the user is nefarious and marks multiple bubbles as “correct” in the same row?
Luckily, detecting and handling of these issues isn’t terribly challenging, we just need to insert a bit of logic.
For issue #1, if a reader chooses not to bubble in an answer for a particular row, then we can place a minimum threshold on Line 108 where we compute cv2.countNonZero
:
If this value is sufficiently large, then we can mark the bubble as “filled in”. Conversely, if total
is too small, then we can skip that particular bubble. If at the end of the row there are no bubbles with sufficiently large threshold counts, we can mark the question as “skipped” by the test taker.
A similar set of steps can be applied to issue #2, where a user marks multiple bubbles as correct for a single question:
Again, all we need to do is apply our thresholding and count step, this time keeping track if there are multiple bubbles that have a total
that exceeds some pre-defined value. If so, we can invalidate the question and mark the question as incorrect.
What's next? We recommend PyImageSearch University.
84 total classes • 114+ hours of on-demand code walkthrough videos • Last updated: February 2024
★★★★★ 4.84 (128 Ratings) • 16,000+ Students Enrolled
I strongly believe that if you had the right teacher you could master computer vision and deep learning.
Do you think learning computer vision and deep learning has to be time-consuming, overwhelming, and complicated? Or has to involve complex mathematics and equations? Or requires a degree in computer science?
That’s not the case.
All you need to master computer vision and deep learning is for someone to explain things to you in simple, intuitive terms. And that’s exactly what I do. My mission is to change education and how complex Artificial Intelligence topics are taught.
If you're serious about learning computer vision, your next stop should be PyImageSearch University, the most comprehensive computer vision, deep learning, and OpenCV course online today. Here you’ll learn how to successfully and confidently apply computer vision to your work, research, and projects. Join me in computer vision mastery.
Inside PyImageSearch University you'll find:
- ✓ 86 courses on essential computer vision, deep learning, and OpenCV topics
- ✓ 86 Certificates of Completion
- ✓ 115+ hours of on-demand video
- ✓ Brand new courses released regularly, ensuring you can keep up with state-of-the-art techniques
- ✓ Pre-configured Jupyter Notebooks in Google Colab
- ✓ Run all code examples in your web browser — works on Windows, macOS, and Linux (no dev environment configuration required!)
- ✓ Access to centralized code repos for all 540+ tutorials on PyImageSearch
- ✓ Easy one-click downloads for code, datasets, pre-trained models, etc.
- ✓ Access on mobile, laptop, desktop, etc.
Summary
In this blog post, I demonstrated how to build a bubble sheet scanner and test grader using computer vision and image processing techniques.
Specifically, we implemented Optical Mark Recognition (OMR) methods that facilitated our ability of capturing human-marked documents and automatically analyzing the results.
Finally, I provided a Python and OpenCV implementation that you can use for building your own bubble sheet test grading systems.
If you have any questions, please feel free to leave a comment in the comments section!
But before you, be sure to enter your email address in the form below to be notified when future tutorials are published on the PyImageSearch blog!
Download the Source Code and FREE 17-page Resource Guide
Enter your email address below to get a .zip of the code and a FREE 17-page Resource Guide on Computer Vision, OpenCV, and Deep Learning. Inside you'll find my hand-picked tutorials, books, courses, and libraries to help you master CV and DL!
evandrix
what if the candidate marked one bubble, realised it’s wrong, crossed it out, and marked another? will this system still work?
Adrian Rosebrock
When taking a “bubble sheet” exam like this you wouldn’t “cross out” your previous answer — you would erase it. The assumption is that you always use pencils for these types of exams.
Jurriaan Schreuder
Made this a long time ago for android, when I used to give a cocktail party on every Friday the 13th. We always had a quiz, which took more than an hour to grade, so I made an app for it!
Has long since been taken offline because I was banned from the Google Play Store.
Was pure Java, no libraries. Could do max 40 questions, on 2 a4 papers (detected if first or second sheet)
http://multiplechoicescanner.com/
Adrian Rosebrock
Very nice, thanks for sharing Jurriaan!
Chacrit
Can I get you source code ?
Johnny
You do you have to go to java code help me with. Thanhk
zikrie
can i get the source code pls sirrrrrr
hgeorge
Great article!
One question though. ideally (assuming the input image was already a birds-eye view), won’t the loop in lines 26-49 be sufficient to detect the circle contours too?
Adrian Rosebrock
If the image is already a birds-eye-view, then yes, you can use the same contours that were extracted previously — but again, you would have to make the assumption that you already have a birds-eye-view of the image.
Madhup
Hi Adrian,
I am trying to run this code and am getting an error on running this code:
from imutils.perspective import four_point_transform
ImportError: No module named scipy.spatial
I have installed imutils successfully and am not sure why I am getting this error. It would be great if you could help me here
Thanks,
Madhup
Adrian Rosebrock
Make sure you install NumPy and SciPy:
King
Wonderful Tut!
I was wondering how to handle such OMR sheets.
http://i.stack.imgur.com/r9GEx.jpg
any idea or algorithm please?
Thanks!!
Adrian Rosebrock
I would suggest using more contour filtering. You can use contours to find each of the “boxes” in the sheet. Sort the contours from left-to-right and top-to-bottom. Then extract each of the boxes and process the bubbles in each box.
King
Thanks!
What can I do to detect the four anchor points and transform the paper incase it rotates?
Adrian Rosebrock
As long as you can detect the border of the paper, it doesn’t matter how the paper is oriented. The
four_point_transform
function will take care of the point ordering and transformation for you.King
I understand, but what If the paper is cropped being rotated without border of the paper?
What technique shall I use to detect the four anchor points please?
Adrian Rosebrock
If you do not have the four corners of the paper (such as the corners being cropped out) then you cannot apply this perspective transform.
Johannes Brodwall
@King
It looks like the marks on the right side of the paper are aligned with the target areas. You could threshold the image, findContours and filter contours in the leftmost 10% of the image to find the rows and sort them by y-position.
Then you could look for contours in the rest of the area. The index of the closest alignment mark for y-direction gives row, the x position as percentage of the page width gives column.
Once you have the column and row of each mark, you just need “normal code” to interpret which question and answer this represents.
Watch out for smudges, though! 😉
silver
you see this project:
project.auto-multiple-choice.net
it’s free and opensource.
you can design any form in the world.
example
https://2.bp.blogspot.com/-tSleoOLzh3o/WChq5qIQj1I/AAAAAAAAA-g/ZL7JlLNxRTUkPBlM_fnCK_giXb2JULgtgCLcB/s1600/last.png
Edwin
Nice to see your implementation of this. I started a similar project earlier this year but I ended up putting it on parking for now.
My main concern was the amount of work it goes into making one work right without errors and the demand didn’t seem to be there.
Seems like scantron has a monopoly on this.
What are your thoughts on that?
Adrian Rosebrock
There are a lot of companies in this space actually. I would suggest reading this thread on reddit to learn more about the companies involved and what they are doing for OMR.
Linus
This is indeed a very cool post! Well explained 🙂
Adrian Rosebrock
Thank you Linus, I’m glad you enjoyed it 🙂
simon
please, send me your code!
Adrian Rosebrock
You can download the code + example images to this post by using the “Downloads” form above.
bhanu prakash
Hi thank you very much..
But
cnts = cv2.findContours(thresh.copy(), cv2.RETR_EXTERNAL,cv2.CHAIN_APPROX_SIMPLE)
giving me only one counter as a result only one question is being identified.
Could you pls help
Adrian Rosebrock
I’m not sure what you mean by “giving me only one contour as a result”. Can you please elaborate?
Ruhi
Hi adrian,
In my case, Image contain 4 reference rectangle which is base for image deskewing. Assume, Image contain some other information like text, circle and rectangle. Now, I want to write a script to straighten the image based on four rectangle.my resultant image should be straighten. So i can extract some information after deskewing it.How can be possible it? When i used for my perspective transformation, it only detects highest rectangle contour.
my image is like https://i.stack.imgur.com/46rsL.png
output image must be like https://i.stack.imgur.com/rqgsY.png
Adrian Rosebrock
So your question is on deskewing? I don’t have any tutorials on how to deskew an image, but I’ll certainly add it to my queue.
Ruhi
I am waiting for that tutorial. i am not getting proper reference for deskewing of image in my scenario. In image there is barcode as well as that 4 small rectangle. i am not able to deskew it because of barcode in side that. As i am building commercial s/w, i can not provide real images here only. In side image, i have to extract person’s unique id and age, DOB which are in terms of optical mark. Once i scan form which is based on OMR i need to extract those information. Is there any approach which can help me to achieve this goals?
I am very thankful to your guidance.
Adrian Rosebrock
As I mentioned, I’ve added it to my queue. I’ll try to bump it up, but please keep in mind that I am very busy and cannot accommodate every single tutorial request in a timely manner. Thank you for your patience.
silver
Dear Adrian
thank you
i upgraded the code:
– the code now capturing the image from laptop camera.
– added dropdown to selected answer key.
– added the date in the name of the result (result+date+.png).
can i send the cod to you, and is this code opensource, free.
best regards
Adrian Rosebrock
Hi Silver — feel free to send me the code or you can release it on your own GitHub page. If you don’t mind, I would appreciate a link back to the PyImageSearch site, but that’s not necessary if you don’t want to.
Iqra Naqvi
AoA…My final Year project is Mobile OMR system for recognition of filled bubbles…but using Matlab will you please provide me Matlab code… 🙁
silver
Hi adrian
i made gui for this projects and add the program in sourceforge.net
https://sourceforge.net/projects/ohodo/
best regards
Sanna Khan
Hi adrian,
I am facing below issues while making bounding rectangle on bubbles:
1. In image, bubbles are somewhere near to rectangle where student can write manually their roll number because after thresolding bubbles get touched to rectangle. so, it can’t find circle.
2. If bubble filled out of the boundary, again it can’t be detectable.
3. False detection of circle because of similar height and width.
Best Regards,
Sanna
Adrian Rosebrock
If you’re running into issues where the bubbles are touching other important parts of the image, applying an “opening” morphological operation to disconnect them.
Sanna Khan
What about second and third issue? Is there any rough idea which can help me to sort out it?
Adrian Rosebrock
It’s hard to say without seeing examples of what you’re working with. I’m not sure what you mean by if the bubble is filled in outside the circle it being impossible to detect — the code in this post actually helps prevent that by alleviating the need for Hough circles which can be hard to tune the parameters to. Again, I get the impression that you’re using Hough circles instead of following the techniques in this post.
Usman
Dear sir I have install imutils but I am still facing “ImportError: No module named ‘imutils'” kingly guide me.
Adrian Rosebrock
You can install imutils using pip:
$ pip install imutils
If you are using a Python virtual environment, access it first and then install imutils via pip:
Hoang Ngoc
How to convert py to android
Nyx
Can this also work with many items in the exam like 50 or 100?
Adrian Rosebrock
Yes. As long as you can detect and extract the rows of bubbles this approach can work.
Dana
Adrian, do you have the android version of this application?
Adrian Rosebrock
You will need to port the Python code to Java if you would like to use it as an Android application.
Nic
Hello Adrian,
Do you have a code for this in java? I am planning a project similar to this one, I am having problems especially since this program was created in python and using many plugin modules which is not available in java.
I hope you can consider my request since this is related for my school work. Thank you
Adrian Rosebrock
Hey Nic — I only provide Python and OpenCV code on this blog. If you are doing this for a school project I would really suggest you struggle and fight your way through the Python to Java conversion. You will learn a lot more that way.
Nic
Hi again adrian, thanks for the reply on my previous comments.
Can you provide a code that can allow this code to run directly on a python compiler rather than running the program on cmd. I would like to focus on python for developing a project same on this one, I’ve ask many experts and python was the first thing they recommended since it can create many projects and provides many support on many platforms unlike java.
Adrian Rosebrock
Hey Nic — while I’m happy to help point readers like yourself in the write direction, I cannot write code for you. I would suggest you taking the time to learn and study the language. If you need help learning OpenCV and computer vision, take a look at Practical Python and OpenCV.
Nic
Can this process of computation be possible in a mobile devices alone using openCV and python? If yes, In what way can it be done?
Adrian Rosebrock
Most mobile devices won’t run native Python + OpenCV code. If you’re building for iOS, you would want to use Swift/Objective-C + OpenCV. For Android, Java + OpenCV.
pawan
hi Adrain
could u please tell the code about how did u draw the output of questionCnts on image
Adrian Rosebrock
I’m not sure what you mean Pawan. Can you please elaborate?
Ckj
I’m capturing image through USB web camera and executing this program but that image not giving any answers and it’s shows multiple errors
Adrian Rosebrock
Without knowing what your errors are, it’s impossible to point you in the right direction.
jf pwork
In fact, try the same.
1 – Take a picture with mobile phone => test_mobile.jpeg
2 – python test_grader.py –image images/test_mobile.jpeg
It seems that it comes from
edged = cv2.Canny(blurred, 100, 200)
3 – add instruction to check it: cv2.imshow(“edged”, edged)
4 – In our program :
# then we can assume we have found the paper
=> no ‘paper’ found …
– – try different values for 2nd & 3rd arguments of cv2.Canny
– – ( http://docs.opencv.org/trunk/da/d22/tutorial_py_canny.html )
—-> same result, edged dont have paper contour well defined as your image.
Must we have to convert jpeg to png ?
when i show your edged image with test_01.png, we have a high quality of contour.
Could you please explain how you get a so well defined contour ?
Best regards
Adrian Rosebrock
The best way to ensure you have a well defined contour is to ensure there is contrast between your paper and your background. For example, if you place a white piece of paper on a white countertop, there is going to be very little contrast and it will be hard for the edge detection algorithm to find the outlines of the paper. Place the paper on a background with higher contrast and the edges will easily be found.
Jason
Hi Adrian,
I’m getting a really weird error and was hoping if you could provide some guidance.
First of all, I’m using my own omr that is a bit different from yours.
I did up to finding thresh and got a really nice clear picture.
thresh = cv2.threshold(warp, 0, 255, cv2.THRESH_BINARY_INV | cv2.THRESH_OTSU)[1]
However, when I try to find the bubbles, it fails to find them. The only contour it gives is the outermost boundary.
On the other hand, if I do some additional steps on “warp” before finding thresh, I get almost all the bubbles. Here are the additional steps I performed on “warp”.
(cnts, _) = cv2.findContours(warp.copy(),cv2.RETR_TREE,cv2.CHAIN_APPROX_SIMPLE)
cv2.drawContours(warp, cnts, -1, (255,0,0), 3)
I was wondering if you have any insights on this matter.
Why is it not finding contours for the bubbles if I don’t do some steps on “warp”? The picture of “thresh” seems to have very clear boundaries of bubble.
If this is confusing, I’d love to share with you my code and some images I generated to give you a more clear picture of what’s going on.
Adrian Rosebrock
The best way to diagnose this issue would be to see what your
thresh
image looks like. Also, is there any reason why you are usingcv2.RETR_TREE
? Usually for this application you would usecv2.RETR_EXTERNAL
, but again, that is really dependent on what yourthresh
image looks like.Jason
Thanks for the reply!
Here is the link to my “thresh” image
http://imgur.com/a/xWhJA
And for using RETR_EXTERNAL instead of RETR_TREE when processing warp, thank you for the suggestion. I was able to detect few more bubbles using RETR_EXTERNAL.
I used RETR_TREE previously for cropping my omr image. (when I used RETR_EXTERNAL, I wasn’t able to crop the image properly for some reason) Here is the link to my original image for your information.
http://imgur.com/a/GVZ7c
Thank you so much in advance.
Adrian Rosebrock
I think I see the issue. The thresholded image contains white pixels along the borders. That is what is causing the contour detection to return strange results. Remove the white pixels along the boundaries and your script should work okay.
redget
just use adaptive threshold
Gautam
Hi Jason and Adrian, could you share how you managed to overcome this problem? I have a similar thresh image, and am unable to remove the white borders. Any help would be greatly valued.
debit
if i have only four circles , then what should i modify to the given codes?help me with figures,
Adrian Rosebrock
You’ll want to change Line 90 so that the code only looks for 4 circles along the row instead of 5.
Mehul Bhardwaj
Hey Adrian,
Thanks for a really good post. This has helped me a lot. I have doubt but.
I can’t seem to figure out the use of this line
cnts = cnts[0] if imutils.is_cv2() else cnts[1]
I was able to detect the contour of my paper only after removing this line.
What is imutils.is_cv2()?
Adrian Rosebrock
The
cv2.findContours
return signature changed between OpenCV 2.4 and OpenCV 3. You can read more about this change (and the associated function call) here.Sandeep
How to divide circles if options are not equally divide? cnts = contours.sort_contours(questionCnts[i:i + 5])[0]. In my case, somewhere, it is like 4 option or 3 option. How to resolve uneven division issue?
rad
hello.. in need of your help.
the system gives me a traceback error while installing imutils. why is this happening and how can i get over it.?
Adrian Rosebrock
What is the error you are getting when installing imutils? Without knowing the error, neither myself nor any other PyImageSearch reader can help.
Rafael
usage: test_grader.py [-h] -i IMAGE
test_grader.py: error: argument -i/–image is required
Can you help me with this error?
Adrian Rosebrock
Please read up on command line arguments before continuing.
Abhi
please tell me how sorting is working??
Adrian Rosebrock
Are you referring to contour sorting? If so, I cover contour sorting in detail in this blog post.
Anchit
Adrian, it is a great post for learners like me.
I had this problem in detecting circle contours, for non filled circles it is detecting inside as well as outside edge of the circle. any method by which i can make it to detect only outside edges ??
Adrian Rosebrock
I would suggest working with your pre-processing methods (edge detection and thresholding) to create a nicer edge map. Secondly, make sure you are passing the
cv2.RETR_EXTERNAL
intocv2.findContours
.Anchit
Thanks!! it worked.
Abhi
Hey Adrian,
Is there any specific blog or tutorial about porting python code to java?
I am developing Application in android and struggling with few points.
Please help me
Adrian Rosebrock
Sorry, I am pretty far removed from the Java + OpenCV world so no recommendations come to mind.
Tom
Hi Adrian,
I had to add “break” in line 125 and de-indent line 127 to get proper score and still draw the circles after the break. Otherwise (1) score was increased with every iteration after finding a filled bubble (resulting in final 280%) and (2) contours were drawn also repetitively. Maybe I made a mistake somewhere else in the code but the above fixed it.
I’m glad you added a section about dealing with unexpected input (e.g. no bubbles filled or more than 1 filled), I wish more of your tutorials had such critical analysis.
Cheers,
Tom
Adrian Rosebrock
Hi Tom — always make sure you use the “Downloads” section of a post when running the code. Don’t try to copy and paste it as that will likely introduce indentation errors/bugs.
Pjay
Hi Adrian,
I’m trying to identify crosses in the check-boxes using similar approach, the problem I’m having is the mask becomes hollow box instead of the type we obtain here which is just the outline of the bubble (The reason for this is the bubble have alphabet inside and checkbox is completely blank). Thereafter, when I try to calculate total pixels (using bit-wise and logic between mask and thresh checkbox), the totals are somehow incorrect. As a result, the box that gets highlighted at the end is the one that is not crossed? Any suggestion how to modify the mask on plain boxes and check boxes without any background serialization?
Thanks,
Pjay
Adrian Rosebrock
Hi Pjay — do you have any example images of the crosses and check-boxes you are using? That might help me point you in the right direction.
Chester
Hi. do you guys have links to tutorials or blogs that I can follow to develop the same bubble sheet scanner for android? I have this project and I really don’t know where to start. I would appreciate any suggestions.
Thank you.
Otis Olifant
Good day,
My name is Otis Olifant from an agency in South Africa called SPACE Grow Media. The company is hosting an event in Munich next year. There will be an exam during the event which will require a third party to assist us in marking the exam papers.
I would like to ask if you will be able to assist me in marking the exam papers written at the event. If you are able to assist, may I please request that you reply to this mail with a formal high level price quotation for marking the papers.
Please get back to me as soon as you can.
Kind regards
Adrian Rosebrock
Hi Otis — while I’m happy to help point you in the right direction, I cannot write code for you. I hope you understand. I would suggest you post your project on PyImageJobs, a computer vision and OpenCV jobs board I created to help connect employers with computer vision developers. Please take a look and consider posting your project — I know you would get a number of applicants.
Daniel Moya
Hi,
I want to know how can orientation be considered in the algorithm. In your examples the photos are well taken, but what if an user takes a photo upside down? would the algorithm still work but with wrong results? In some example sheets I have seen that 4 squares in the corners are used, but I don’t understand how could that determine the right orientation. Thank you in advance.
Best regards
Adrian Rosebrock
Hi Daniel — this particular example does not consider orientation. You can modify it to consider orientation by detecting markets on each of the four corners. One marker should be different than the rest. If you can detect that marker you can rotate it such that the orientation is the same for all input images.
Arshey
Hello Adrian,
The code giving me error ”
gray = cv2.cvtColor(image, cv2.COLOR_BGR2GRAY)
error: C:\projects\opencv-python\opencv\modules\imgproc\src\color.cpp:10638: error: (-215) scn == 3 || scn == 4 in function cv::cvtColor ”
How to solve this?
Adrian Rosebrock
Double-check the path to your input image. It sounds like
cv2.imshow
is reading the path to an invalid image and returning “None”.Luisa Villaluna
Hi, I have a question ! I took my exam yesterday and I’m quite concerned with my answers because I got to shade ¼ of each the circles only. I just tried to put mark inside the circles while I was answering. After I finished my exam the proctor didn’t anymore allow me to shade so some of the circles were left ¼ shaded only. Will the scantron be able to read them? ?
If you don’t mind, could you send me your reply in my gmail account? (email removed)
Adrian Rosebrock
The Scantron software is normally pretty good at recognizing partially filled in bubbles, but you should really take the time to fill in bubbles fully when you take an exam.
Kapil
Hello Adrian,
Thanks a lot for such a nice article, I coded the same and found your blog very helpful.
I have a major doubt, why some of major bubble sheet providers have `a vertical strip of black markers`. I searched it a lot, I just came to know that it will improve accuracy.
but how the `vertical strip of black markers` is helpful to detect circles/elipses in the image.
example of such a sheet is here
http://management.ind.in/img/o/OMR-Answer-Sheet-of-WBJEE.jpg
Searching a lot, but could not find the reason of black strip of vertical markers on the right of the sheet.
Udayraj
I was looking for an answer to the same doubt for long. Strangely, found it in a OMR software guide! Quoting the snip:
“In the old pattern, machine read sheets, were additional black marks placed at equal increments running throughout the length of the sheet on either side or on both sides. This strip of black marks is called a timeline which helps the OMR machine to identify the next row of bubbles”
Ref link: https://www.addmengroup.com/Downloads/Addmen-OMR-Sheet-Design-Guide.pdf
Fernando Vazquez
Hello Adrian I wanted to ask you how can you expand this to include more questions per page? Since in the expample it only showed 5 questions, I want to expand it to say 15 to 20 per page
Adrian Rosebrock
Yes, it would still work.
Sanjay Ghosh
Is it possible to get output in .xls or .csv file?
Can we scan multiple pages bubble sheets?
Can we scan multiple students multi pages bubble sheets?
Adrian Rosebrock
Sure, you can absolutely save the output to a CSV file. A CSV file is just a comma separated file. If you’re new to CSV files I would encourage you to do your research on them. They are very easy to work with.
pradeep chauhan
Traceback (most recent call last):
File “test_grader.py”, line 55, in
paper = four_point_transform(image, docCnt.reshape(4, 2))
AttributeError: ‘NoneType’ object has no attribute ‘reshape’
Adrian Rosebrock
It sounds like your document contour region was not properly found. This method assumes that the document has 4 vertices. Double-check the output of the contour approximation.
pradeep chauhan
The picture is perfect i do not why it is not working. The image i have given as input have 4 corners visible.
Adrian Rosebrock
Okay, but what does OpenCV report? Does OpenCV report four corners after the contour approximation?
Thai Nguyen
Hi,
I would like to ask if you have a test image when the examinee circles 2 answers for 1 question.
Thank you.
Adrian Rosebrock
I don’t have a test image for this but you can update the code to sort the bubbles based on how filled in they are and keep the two bubbles with the largest filled in values.
Nhut Thai
Hi,
When my input is the original image of yours, which is without any bubble has been filled, it doesn’t work. How come I solve this problem? Please show me. Thank you.
Adrian Rosebrock
Can you be more descriptive of what you mean by “it doesn’t work”? I’m happy to help but keep in mind that I cannot help if you do not provide more details on what specifically isn’t working.
Bernard
What if student leave some question blank? Any way I can be notified once empty answer is detected?
Adrian Rosebrock
I address this in the blog post. See the “Extending the OMR and test scanner” section.
Tevfik Yoruk
Hello Adrian, I not see your adress. Please shared me your adress. And I ask for your support in a matter.
Adrian Rosebrock
You can use the PyImageSearch contact form to get in contact with me.
Jordan
Hi Adrian. Thanks so much for this tutorial – I’ve found it immensely helpful in learning OpenCV. A few questions:
1) If I were to add additional questions to include a total of 20 questions and only have 4 answer options, where would I edit the code?
2) Is it possible to include fill-in-the-blank questions on the same test paper and use a OCR-like solution for those? If so, how where would I edit the code to disregard these fill-in-the-blank questions? Any recommended OCR solutions that would work well with this?
Again, thanks so much. Love the site & newsletter!
Adrian Rosebrock
1. On Line 90 you would change the “5” to a “4”. Same goes for Line 94. This should be the main lines to edit.
2. You may want to try Tesseract for OCR and then look at the Google Vision API.
Jordan
Thank you sir! Very much appreciated.
Malik Razzaq
hi, can anyone can tell me this code is patent? can we use commercially or not with further development?
i have some questions to about Indian software’s like OMR Home and admin OMR, they are selling their solutions but Scantron OMR scanners even scanning Techniques are patent by their respective owners. how they work to skip this part or they are just selling their software without any permission or they work with fair use? please help me in this regards
thanks
Adrian Rosebrock
Are you asking about my code on this blog post? It’s MIT license. You can use it on your own projects but I would appreciate an attribution or a link back.
Malik Razzaq
I was asking for the general, not for your code, if I code of any famous OMR software algorithm myself, by of its working function, the same function in my code that is an infringement of patent?
Daniel
The predictions are the exact replica of the data with which it learned from.
It doesn’t seem to matter what is “shown” to it.
The answers are always the same.
Adrian Rosebrock
I’m not sure what you mean by “data with which it learned from”. The algorithm in this post does not use any machine learning. Could you elaborate?
XtianDR
Good morning. I proposed this project to our design project/thesis project. But our instructor asked why I do this system if there is a machine in store. Can I try this on Windows 10 OS? I want to make this project in our thesis that can answer 60 question and save the score via MySQL.
Adrian Rosebrock
Provided you have OpenCV + Python installed on your system this code will run on Windows.
manas parida
hi, sir I have partially filled a wrong bubble then completely filled a correct bubble in my state staff selection commission exam.will it be counted as correct response??.plz sir tell me.
Adrian Rosebrock
Hey Manas, I would recommend that you try the code and see. I’ve discussed extensions to handle partially filled in bubbles or no bubbles filled in either.
Hannah
After I execute the file, I get this error:
usage: [-h] -i IMAGE
: error: the following arguments are required: -i/–image
How can I fix it please?
Adrian Rosebrock
You need to provide the “–image” command line argument to the script. If you’re new to command line arguments you need to read this post first.
abdurrahmankutlu
This tutorial is awesome in every angle, Thanks man, very informative,
Adrian Rosebrock
Thank you for the kind words 🙂
Lokesh Dangi
Code for the last two problems (no bubble marked and multiple bubbles marked)
https://github.com/lokeshdangi/Computer-Vision/blob/master/module-4/Optical%20Mark%20Recognition.ipynb
Adrian Rosebrock
Thanks for sharing, Lokesh! 🙂
Saurabh
I am getting error at following line:
ap.add_argument(“-i”, “–image”, required=True,
help=”path to the input image”)
I am replacing –image with image name for ex. “1.png” and “path to the input image” with my path where image is stored for ex. “C:\\Users\\SAURABH\\Desktop”.
Adrian Rosebrock
You are not supplying the command line arguments correctly. Read my tutorial on command line arguments and you’ll be all set 😉
zikrie
hello sir .. how to matching image on omr sheets paper ,,, but this project u was set the answer key in source code right .. pls give me the solution ,,, thanks
Robert Farmer
Could you possibly help me utilize this code for a more traditional “scantron” style document? I’ve noticed a few issues with them already: If I blur the document almost nothing is left when examining it. I plan on making it to the end of the tutorial without changing too much but I may require assistance and I would be delighted if you would be able to help.
Adrian Rosebrock
Hey Robert — this blog post is really meant to be just an example of what you can accomplish with computer vision. It’s not meant to work with Scantron-style cards right out-of-the-box. I’m happy to provide this tutorial for free and if you have any specific questions related to the problems you’re having updating the code I’d be happy to provide suggestions.
Constantin Baumgartner
Hi Adrian,
I added the logic for skipped questions and multiple answers and finally got it to work. During the process I noticed that the code is EXTREMELY sensitive to input conditions (input being the picture of the test) such as:
– If the paper isn’t perfectly flat, or close to it, the thresholding/masking produces weird shadows and results in additional contours that mess with the for-loop sequence
– If I photograph the test with the flash on, the reflective properties of the graphite result in higher pixel values which in turn break the thresholding step and results in some of the filled in circles being interpreted as empty, especially the circles located directly under the lens of the camera because much of the light bounces directly back
– If I photograph the test without flash, unless I have a light source that isn’t directly above (which was problematic because at the time I was working in an area that only had ceiling lighting), the resulting image has shadows from my hand/camera which again mess with the thresholding/masking
I finally got it to work by taking a very good photo of the test. I was wondering if you encountered similar problems while writing the tutorial, and if there are any additional steps, aside from fine tuning the thresholding/masking, to deal with this kind of noise that generalize well to different images, i.e. with flash, without, wrinkled paper, etc.?
For a commercial application I imagine the tests would be scanned and then these artifacts wouldn’t really be an issue, but I’m just curious what you think.
Adrian Rosebrock
If you are trying to build a commercial grade application you would certainly need to apply more advanced algorithms. This tutorial is meant to be a proof of concept and show you what’s possible with a little bit of computer vision, OpenCV, and a few hours of hacking around. It’s meant to be educational, not necessarily a professional application.
Lyko
Hi Adrian! just want to ask, will it work if i use squares instead of circles?
Adrian Rosebrock
That is absolutely doable, just follow this guide, specifically the steps on contour approximation and detecting squares.
coder
Any idea how to use multiple columns and read it correctly?
sanjog
I have rectangular boxes inside of circles .
How can i detect them?
Adrian Rosebrock
Is that a type of bubblesheet/OMR system? Or is that just a general computer vision question?
Jack
if background is white, it not working?
Fábio
Adrian,
Is it possible to port this tutorial to use tensorflow?
I need a mobile version of this.
Adrian Rosebrock
You don’t need TensorFlow for this project, just OpenCV.
Gautam
Hi Adrian, can you explain how we can use Hough Circle Transform in OpenCV to detect circles instead of the method you have used?
Adrian Rosebrock
You can follow this post on Hough circles and then replace the contour method with the Hough circles method.
DD
Hi
I was wondering about your thoughts on this paper I found whilst looking for a OMR type solution: http://academicscience.co.in/admin/resources/project/paper/f201804301525069153.pdf
It’s from 2018 in what seems like an academic journal of some sort. The pictures looks quite similar. Did you work on this together? As otherwise it’s very dubiously used.
Adrian Rosebrock
Ooof. That’s just pure plagiarism. Shame on the paper authors and journal publishers 🙁 Thank you for reporting it.
ali moradi
hi Adrian
how are you ??
how can i use oval instead of circle in omr sheet and detecting
Adrian Rosebrock
Take a look at the scikit-image library — it includes a method for detecting ovals/ellipses.
Joe Ciaramitaro
I’m really enjoying these tutorials! Thanks for all your hard work.
I actually find it helpful that this one has some issues to deal with, as it provides an excellent opportunity to make changes to the code and learn more.
Additionally, I find it helpful to read through all the comments posted on each tutorial and see the various questions people have asked. This helps me to consider things I may have not yet considered about the specific tutorial and also provides me with some laughs when I read the ridiculous things some people request (hey, you’ve done all this work in providing me with a great free tutorial, can you now also port this code to Java and make it production ready for my commercial endeavour? Thanks in advance!)
Adrian Rosebrock
Thanks Joe, I really appreciate your comment. It definitely brought a smile to my face and made me feel appreciated. Thanks again!
Bilal
Hi ardian,
I want to create hybrid android and ios app which can scan bubble sheet by taking pictures but I’m not familiar with hybrid app development. I have searched out but not get the exact answer that which platform should I learn which support all of the functions that you use in this scanning process.
can you suggest me a platform ? react-native, ionic, flutter , apache-cordova or any other.
Adrian Rosebrock
Apache Cordova is the simplest method but requires you implement your OpenCV code as a REST API (i.e., the iOS app uploads the image to the server, OpenCV processes it, and returns the result). The downside is of course that it requires a network connection. Otherwise, you should look into React Native.
Anthony Conde Muñoz
Hi Adrian, following your tutorial of multiple-choice bubble sheet scanner and test evaluator using OMR, Python and OpenCV, I want to do a job almost similar to yours;
develop a function programmed and trained with the best machine learning algorithm that allows to identify if an answer is marked or not, the answers are images of 64×64 pixels in black and white color (it must be threshold-grayscale) (1 bit),
The objective is to indicate if a certain bubble is filled in correctly or not, to do this you must use the classification studied and train a model that generalizes the results in the best way
Adrian Rosebrock
That sounds like a problem that can be addressed in the PyImageSearch Gurus course. That course will teach you computer vision methods that can be used to complete your project.
sayler
If i draw a circle on the paper ,then the grading results will be wrong, is that right?
Nuwan Withanage
Hi Adrian,
Very good explanation. Is it possible to get count of marked bubble for each question such as 1q marked count – 1, 2q marked count – 1 etc… because some question may have more than one answer.
Regards,
Michael Cain
Because of the current Covid pandemic, there’s a lot of discussion of vote-by-mail in places that have never considered it (I live in a state that’s already vote-by-mail). All the vbm systems I’m aware of use paper ballots with fill-in-the-oval marking (*not* circles) that are run through optical scanners for counting. Those ballots present their own set of challenges. In addition to using ovals, where those ovals physically appear on the ballot can be very irregular.
Michelle
Hi, why is line 37 missing a [:5] that is used in line 39 from this tutorial (https://pyimagesearch.com/2014/09/01/build-kick-ass-mobile-document-scanner-just-5-minutes/?unapproved=780164&moderation-hash=991ffcf2628cbb178e6d10593ed034fe&submitted_comment=1#comment-780164)?(Yes, I’m following the crash course.) They both sort out the largest contour. What is this [:5]?
Line 37:
cnts = sorted(cnts, key=cv2.contourArea, reverse=True)
Line 39 from document scanner tutorial:
cnts = sorted(cnts, key = cv2.contourArea, reverse = True)[:5]
Thanks in advance!
Adrian Rosebrock
The [:5] is a Python array slice. He we are sorting the contours by their area (largest to smallest) and then grabbing the five largest ones.