Table of Contents
- Introduction to Gradio for Building Interactive Applications
- What Is Gradio?
- High-Impact Projects Powered by Gradio
- The Next Generation of Gradio: What’s New in Version 5
- Performance Improvements 🏎️ 💨
- Enhanced Security Measures 🔒
- AI-Powered App Creation 🧠
- Low-Latency Streaming
- Configuring Your Development Environment
- Gradio’s Core Classes
- Exploring Gradio Textbox, Buttons, Sliders, and Other Key Components
- AttributeError: Module ‘Gradio’ Has No Attribute ‘Inputs’ — How to Fix It
- Cause of the Error
- Solution: Update Your Syntax
- Compatibility with Older Code Repositories
- Note on Python Compatibility
- Understanding the Gradio API (Python Client)
- Why Use the Gradio API?
- Example: Creating a Gradio App and Connecting via the Gradio API
- Why This Gradio API Example Matters
- Client and Server Roles in Gradio API Usage
- Summary
Introduction to Gradio for Building Interactive Applications
In this tutorial, you’ll dive into Gradio and learn how it empowers Python developers to create interactive applications ideal for showcasing machine learning (ML) models. We’ll cover what makes Gradio popular, explore high-impact projects built with it, and review the latest enhancements in Gradio 5. You’ll also get hands-on with Gradio’s core classes, essential components like TextBox, Buttons, and Sliders, and learn how to handle common errors like the “AttributeError: module ‘gradio’ has no attribute ‘inputs’.” Finally, we’ll show you how to connect with external models using the Gradio API, unlocking dynamic data interactions for your applications.

This lesson is the 1st of a 2-part series on Gradio for building interactive applications:
- Introduction to Gradio for Building Interactive Applications (this tutorial)
- Lesson 2
To learn how to get started with Gradio, explore its latest features, and work with its core components and API, just keep reading.
In the world of machine learning and AI (artificial intelligence), building a powerful model is only half the battle; the other half lies in demonstrating its impact. For machine learning engineers and data scientists, creating intuitive user interfaces (UIs) to showcase their models can be a game-changer. A well-designed interface allows end-users — who might not be technically inclined — to interact with models, provide input, and observe results in real-time. This not only enhances the model’s accessibility but also enables feedback collection, collaboration, and practical application in real-world scenarios.
This is where Gradio comes into play. Gradio is an open-source Python library that empowers developers to build interactive web interfaces for their machine learning models, APIs, or any Python functions with ease. With Gradio, engineers can go beyond code and present their work engagingly and tangibly, allowing users to test, validate, and gain insights from models firsthand. In essence, Gradio serves as a bridge between complex machine learning models and the non-technical users who can benefit from them.
What Is Gradio?
Gradio is an open-source Python library that simplifies the creation of user-friendly web interfaces for machine learning models, APIs, or any Python function. Initially developed as a way to help machine learning practitioners showcase their models, Gradio has evolved into a powerful tool for creating interactive applications across various domains. It’s especially popular among developers, educators, and data scientists who need to demonstrate complex models to a non-technical audience.
Gradio was founded by Abid et al. (2019) with the goal of making machine learning models accessible to everyone. The tool quickly gained popularity due to its simplicity and the ability to create fully functional web interfaces with minimal code. In 2021, Gradio was acquired by Hugging Face, a leader in the machine learning space known for its extensive Transformers library and model hub. This acquisition further boosted Gradio’s development, adding more resources, community support, and deep integrations with Hugging Face’s powerful model ecosystem.
Today, Gradio is a favorite among Python developers and machine learning practitioners. It was even the #1 trending GitHub repository at the time of writing, reflecting its strong adoption and the enthusiasm within the developer community. It has become a staple tool in machine learning, with over 6.7 million downloads per month, making it one of the most widely used libraries for building ML interfaces. Gradio’s easy setup, component versatility, and rich integration with other Python tools and frameworks have made it a top choice for prototyping, deploying, and sharing machine learning applications quickly.
High-Impact Projects Powered by Gradio
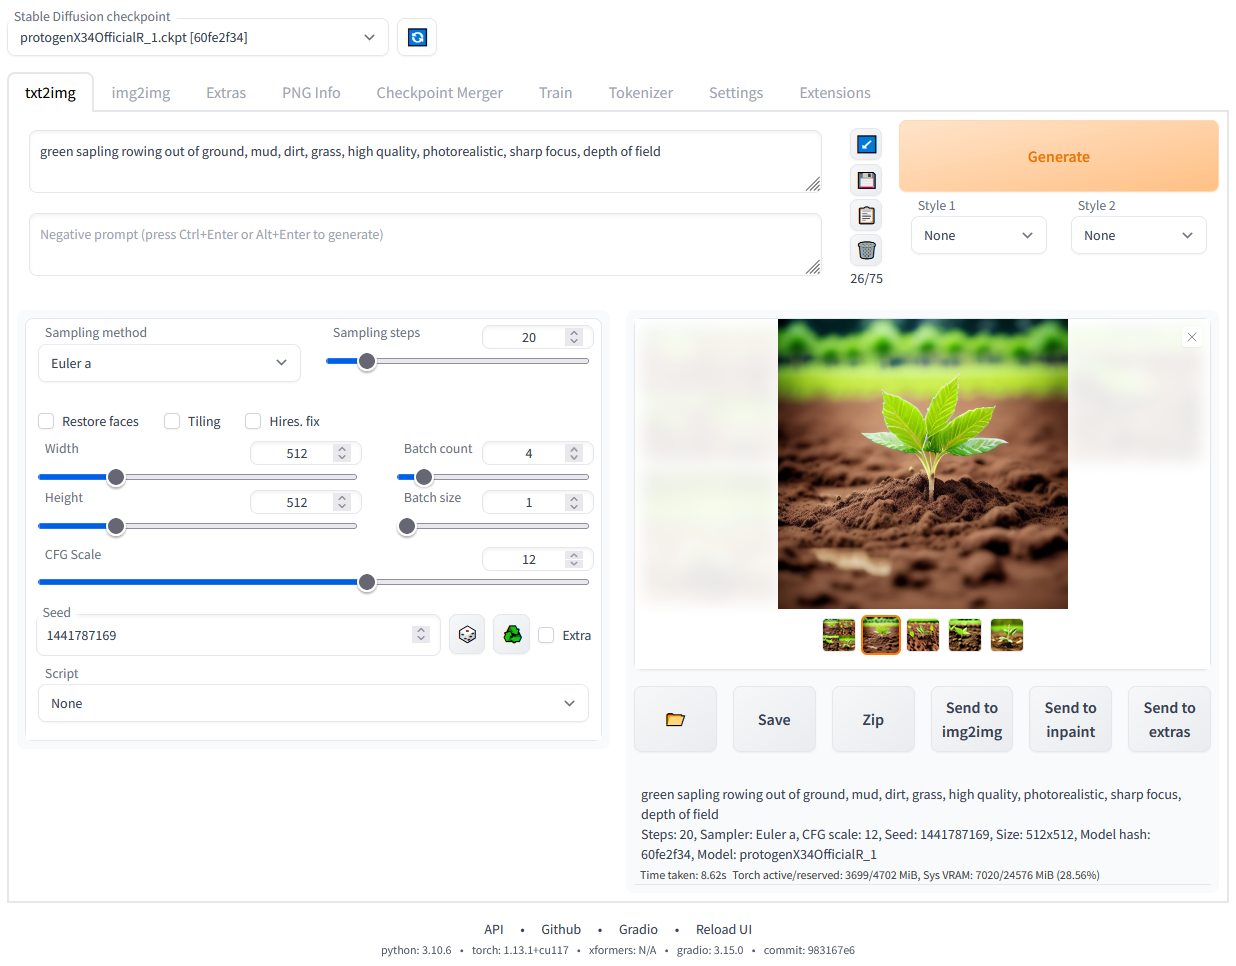
AUTOMATIC1111’s Stable Diffusion Web UI
AUTOMATIC1111 is a widely used web interface for Stable Diffusion, built entirely with Gradio. This tool allows users to generate images from text prompts and make adjustments in real-time, highlighting Gradio’s ability to handle advanced image generation workflows in an accessible format, bypassing the need for extensive programming knowledge or hardware setup.
You can learn more about it here.
oobabooga’s Text Generation Web UI
The Text Generation Web UI by oobabooga leverages Gradio to create a powerful interactive interface for large language models (LLMs). This project allows users to load pre-trained models across various formats and frameworks, including Transformers, Llama.cpp, AutoGPTQ, and more. The flexibility of model loading means users can experiment with a wide range of LLMs, making it ideal for those interested in text generation, creative writing, chatbots, and conversational AI.
One of the standout features of this Gradio-powered UI is the Training Tab, which enables users to fine-tune models directly within the interface. Techniques like Low-Rank Adaptation (LoRA) make it possible to customize models (e.g., fine-tuning a Llama model for specific tasks) without needing extensive computational resources.
For a deeper dive into its features and a step-by-step guide to training LLMs like Llama with LoRA, you can refer to our blog post, Exploring Oobabooga Text Generation Web UI.
The Next Generation of Gradio: What’s New in Version 5
Gradio 5 introduces several enhancements aimed at improving performance, security, and user experience for developers building machine learning applications. Key updates include the following.
Performance Improvements 🏎️ 💨
Gradio 5 incorporates server-side rendering (SSR), enabling applications to load almost instantaneously in the browser, eliminating previous loading delays.
Enhanced Security Measures 🔒
A comprehensive security audit was conducted by Trail of Bits, leading to the identification and resolution of potential vulnerabilities. These fixes have been validated and integrated into Gradio 5, ensuring safer deployment of applications.
AI-Powered App Creation 🧠
The new AI Playground allows developers to generate or modify Gradio applications using natural language prompts, facilitating rapid prototyping and experimentation.

You can preview the app right in your browser immediately: https://www.gradio.app/playground
Modernized Component Design 🎨
Core components (e.g., Buttons, Tabs, and Sliders) have been refreshed with a modern design, enhancing the visual appeal and usability of applications.
Built-in Themes
Gradio 5 introduces a set of built-in themes, enabling developers to create fresh-looking applications without extensive customization easily (Hugging Face).
Low-Latency Streaming
Support for low-latency streaming has been added, allowing for real-time applications (e.g., webcam-based object detection, video streaming, and conversational chatbots).
Configuring Your Development Environment
To follow this guide, you’ll need to install the gradio library. For the latest version (Gradio 5), ensure your Python version is 3.10 or higher.
Luckily, gradio is pip-installable:
$ pip install --upgrade gradio
Optional Installations: If you plan to use the Gradio Client for remote API calls or experiment with text generation models, you may also want to install the following libraries:
$ pip install gradio-client  # Needed for connecting to remote Gradio apps via API
$ pip install transformers # Optional, used for text generation models
$ pip install torch # Optional, provides support for models in transformers
Note: These optional libraries are primarily needed for the Gradio API section. If you only need the Gradio interface, installing gradio alone will suffice.
Need Help Configuring Your Development Environment?

All that said, are you:
- Short on time?
- Learning on your employer’s administratively locked system?
- Wanting to skip the hassle of fighting with the command line, package managers, and virtual environments?
- Ready to run the code immediately on your Windows, macOS, or Linux system?
Then join PyImageSearch University today!
Gain access to Jupyter Notebooks for this tutorial and other PyImageSearch guides pre-configured to run on Google Colab’s ecosystem right in your web browser! No installation required.
And best of all, these Jupyter Notebooks will run on Windows, macOS, and Linux!
Gradio’s Core Classes
Gradio offers several foundational classes for building interfaces, each suited to different levels of complexity. The primary classes are Interface and Blocks, which allow developers to tailor Gradio to their needs, from simple demos to highly customizable applications.
Interface
The Interface class is ideal for quick, high-level demos where you want to connect a function to input and output components with minimal setup. It’s designed for simplicity, making it perfect for single-function applications.
Example with Interface
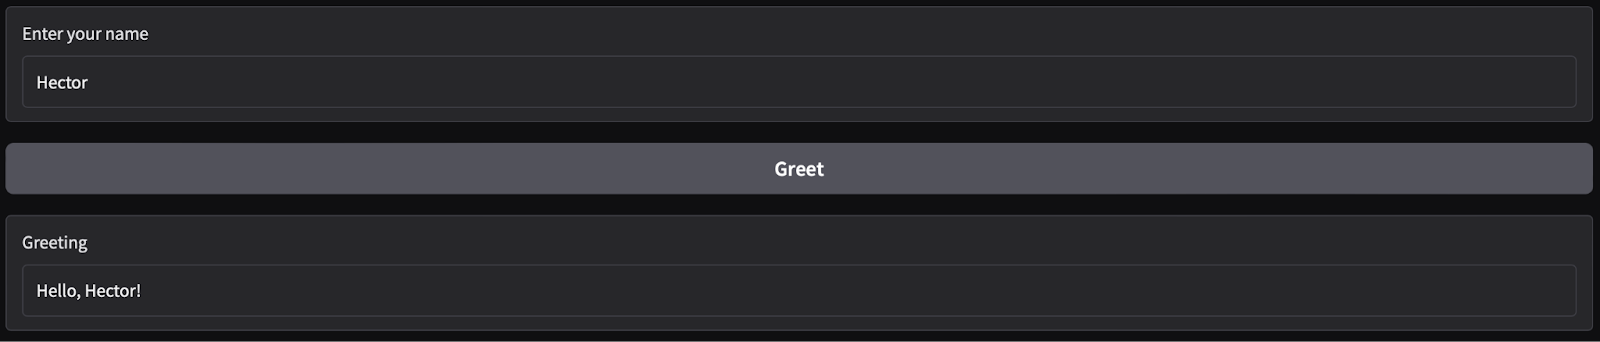
Let’s build a basic greeting app that simply takes a user’s name and returns a greeting.
import gradio as gr

def greet(name):
    return f"Hello, {name}!"

# Using Interface for a simple layout
demo = gr.Interface(fn=greet, inputs="text", outputs="text")
demo.launch()

With Interface, you specify the input and output types directly. The layout is handled automatically, so there’s minimal setup, but also limited control over customization.
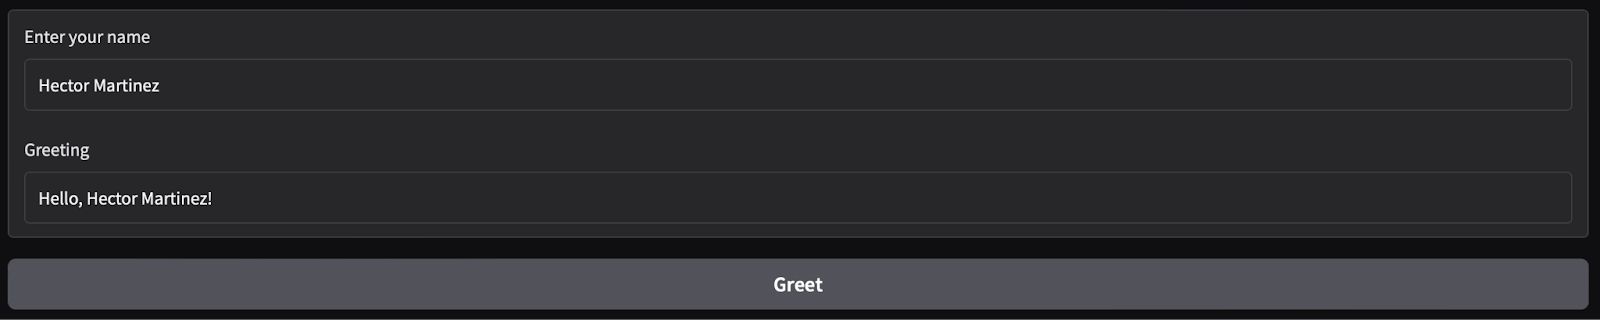
Blocks
The Blocks class, on the other hand, provides a lower-level API for greater flexibility and control. With Blocks, you can arrange multiple components, group them in custom layouts, and define interactions between them, making it the go-to choice for more complex applications.
Example with Blocks
Let’s revisit the greeting app but add a button that only triggers the greeting when clicked, demonstrating how Blocks allows for customized layouts and functionality.
import gradio as gr

def greet(name):
    return f"Hello, {name}!"

# Using Blocks for a custom layout
with gr.Blocks() as demo:
    name_input = gr.Textbox(label="Enter your name")  # Input component
    greet_button = gr.Button("Greet")  # Button component
    greeting_output = gr.Textbox(label="Greeting")  # Output component
    # Button triggers the greet function, with input and output connections
    greet_button.click(greet, inputs=name_input, outputs=greeting_output)

demo.launch()
In Blocks:
- You have full control over the layout, positioning the
name_input,greet_button, andgreeting_outputelements as desired. - The
greet_buttontriggers the greeting function only when clicked, offering an interactive flow. - Blocks enable flexibility in designing complex workflows, which is not achievable with Interface alone.
When to Use Each
- Use Interface: For quick, straightforward demos without the need for custom layouts.
- Use Blocks: When building multi-component or more interactive applications where layout customization and component control are needed.
Gradio Chat Interface (Optional)
Gradio also offers ChatInterface, a specialized class tailored for conversational applications. It simplifies the creation of chatbots and conversational agents by automatically managing chat history and responses, making it ideal for large language model (LLM) interactions.
Example with ChatInterface
import gradio as gr

def respond(message, history):
    response = f"Echo: {message}"
    history.append((message, response))
    return history

demo = gr.ChatInterface(fn=respond)
demo.launch()
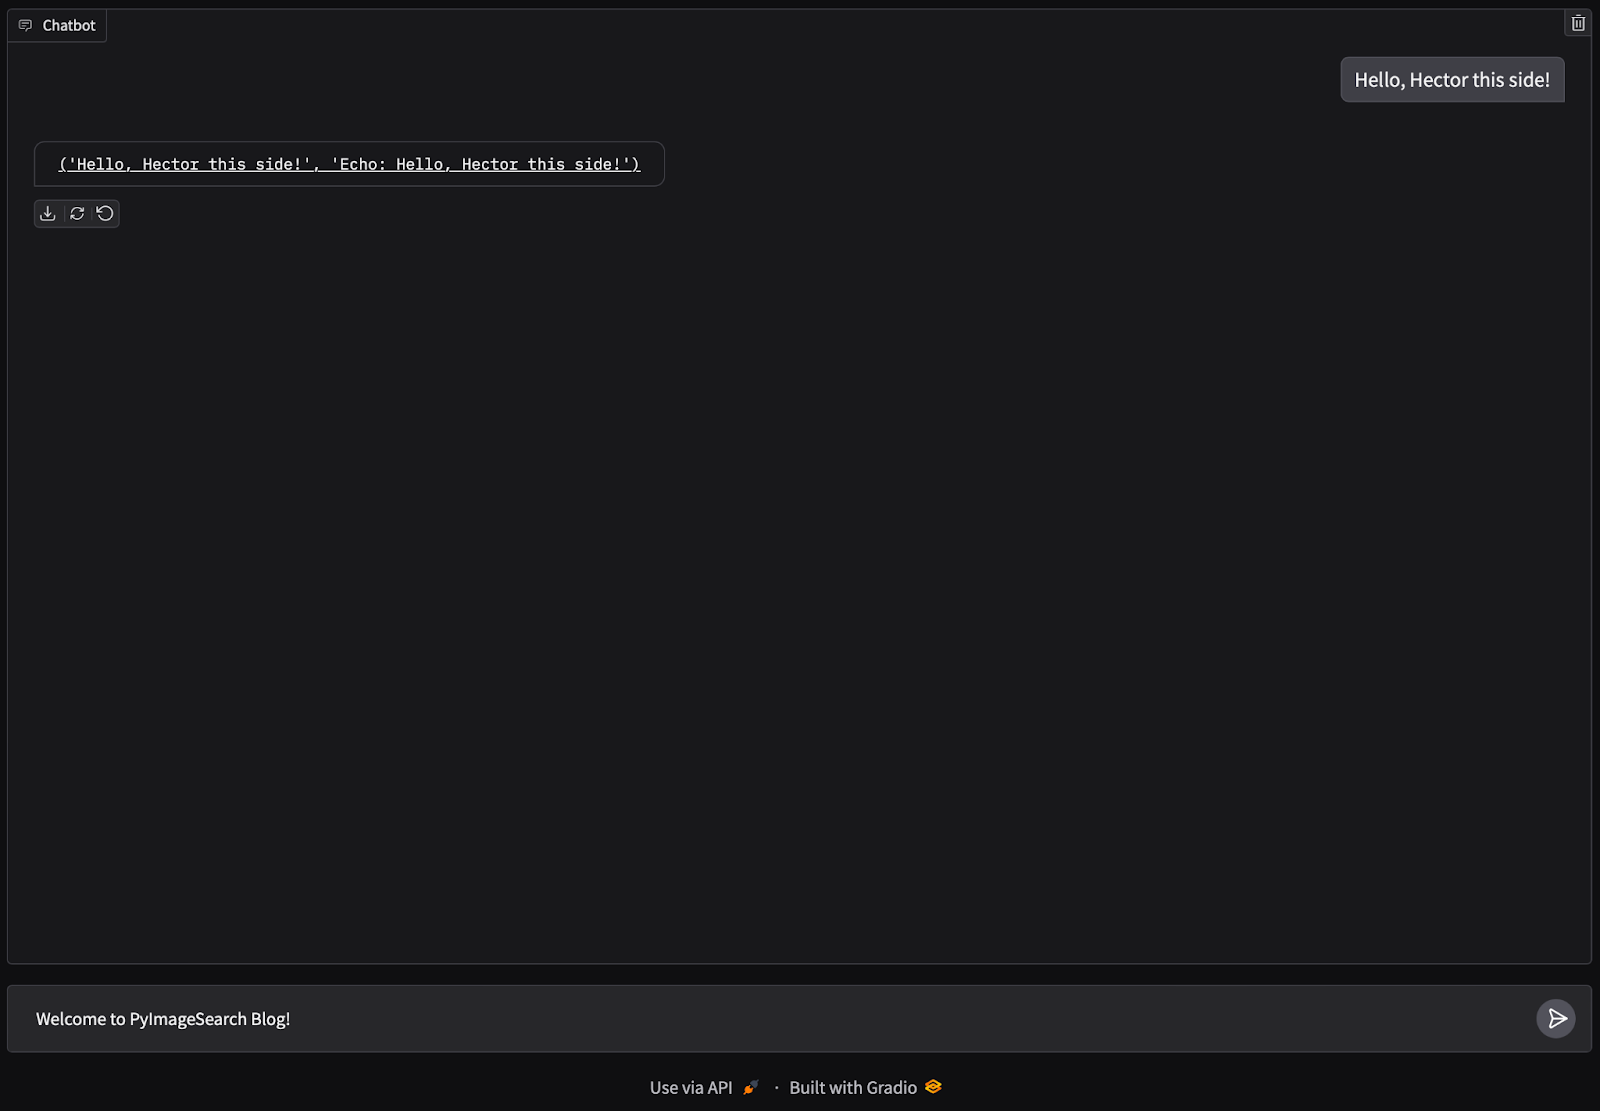
In conversational AI applications, ChatInterface saves development time by handling chat history and responses intuitively.
Exploring Gradio Textbox, Buttons, Sliders, and Other Key Components
Gradio offers a suite of interactive components that facilitate the creation of user-friendly interfaces for machine learning models and data applications. These components enable developers to design intuitive and responsive user experiences. Below, we explore some of the key elements:
Gradio Textbox
The Textbox component allows users to input text data, making it essential for tasks (e.g., receiving user queries or textual data). It supports various configurations, including single-line and multi-line inputs, and can be customized with placeholders, labels, and default values.
Example
import gradio as gr

def greet(name):
    return f"Hello, {name}!"

with gr.Blocks() as demo:
    name_input = gr.Textbox(label="Enter your name")
    greeting_output = gr.Textbox(label="Greeting")
    greet_button = gr.Button("Greet")
    greet_button.click(greet, inputs=name_input, outputs=greeting_output)

demo.launch()
Button
The Button component triggers specific actions or functions when clicked. It’s commonly used to initiate processes like data submission, machine learning model inference, or other interactive tasks.
Example
import gradio as gr

def process_data():
    return "Data processed successfully!"

with gr.Blocks() as demo:
    process_button = gr.Button("Process Data")
    result_output = gr.Textbox(label="Result")
    process_button.click(process_data, outputs=result_output)

demo.launch()

Slider
The Slider component enables users to select a numerical value within a specified range by dragging a handle along a track. It’s particularly useful for adjusting parameters like thresholds, learning rates, or any variable that benefits from fine-tuning.
Example
import gradio as gr

def adjust_value(value):
    return f"Selected value: {value}"

with gr.Blocks() as demo:
    value_slider = gr.Slider(minimum=0, maximum=100, step=1, label="Adjust Value")
    value_output = gr.Textbox(label="Output")
    value_slider.change(adjust_value, inputs=value_slider, outputs=value_output)

demo.launch()

Dropdown
The Dropdown component presents a list of options from which users can select. It’s ideal for scenarios where a predefined set of choices is available (e.g., selecting a model type or choosing a dataset).
Example
import gradio as gr

def select_option(option):
    return f"You selected: {option}"

with gr.Blocks() as demo:
    options = ["Option A", "Option B", "Option C"]
    option_dropdown = gr.Dropdown(choices=options, label="Select an Option")
    selection_output = gr.Textbox(label="Selection")
    option_dropdown.change(select_option, inputs=option_dropdown, outputs=selection_output)

demo.launch()

Checkbox
The Checkbox component allows users to make binary choices (e.g., enabling or disabling a feature). It’s useful for toggling options or settings within an application.
Example
import gradio as gr

def toggle_feature(is_enabled):
    return "Feature enabled" if is_enabled else "Feature disabled"

with gr.Blocks() as demo:
    feature_checkbox = gr.Checkbox(label="Enable Feature")
    status_output = gr.Textbox(label="Status")
    feature_checkbox.change(toggle_feature, inputs=feature_checkbox, outputs=status_output)

demo.launch()

By combining these components, developers can create rich, interactive interfaces that enhance user engagement and streamline the interaction with machine learning models and data-driven applications.
AttributeError: Module ‘Gradio’ Has No Attribute ‘Inputs’ — How to Fix It
The “AttributeError: Module 'Gradio' Has No Attribute 'Inputs'” error is common when using outdated syntax. In previous Gradio versions, components like Textbox, Slider, and Dropdown were accessed with gr.inputs (e.g., gr.inputs.Textbox). In newer Gradio versions, however, this syntax has been deprecated, and components are now called directly (e.g., gr.Textbox).

Cause of the Error
This error appears when the older gr.inputs structure is used with a recent Gradio version. Gradio updated its API to simplify syntax, eliminating prefixes like gr.inputs.
Solution: Update Your Syntax
To resolve this, update the syntax by removing gr.inputs:
# Old syntax (deprecated)
import gradio as gr
input_text = gr.inputs.Textbox(label="Enter your text")
# New syntax (correct in Gradio 3.x and above)
import gradio as gr
input_text = gr.Textbox(label="Enter your text")
Compatibility with Older Code Repositories
If you’re using code from an older repository where the Gradio version isn’t specified in the requirements.txt file, Gradio will automatically install the latest version that’s compatible with your Python environment. This can lead to errors if the code relies on the gr.inputs syntax but doesn’t specify an older Gradio version.
To ensure compatibility with older syntax, you may need to specify a Gradio version compatible with the gr.inputs syntax (e.g., Gradio 3.5):
# In requirements.txt
gradio==3.5
Note on Python Compatibility
Please keep in mind that Gradio 3.5 is not compatible with Python 3.10 and above. If you’re working with Python 3.10+, you’ll need to use a newer Gradio version and update the code syntax accordingly.
Understanding the Gradio API (Python Client)
The Gradio API (a.k.a. the Gradio Python Client) enables developers to interact with Gradio applications programmatically. Rather than manually using the Gradio web interface, the API allows for remote communication with Gradio apps, making it an ideal tool for automation, integration with other applications, and backend connections.
Why Use the Gradio API?
- Remote Interactions: With the Gradio API, you can connect to and control Gradio applications from anywhere. This is particularly useful when deploying machine learning models as remote services that other applications or scripts can access.
- Automation and Testing: The API allows you to programmatically send inputs to the Gradio app, retrieve outputs, and automate testing workflows.
- Data Integration: For scenarios where Gradio apps are part of a larger pipeline, the API lets you connect the app with other systems (e.g., data preprocessing or external databases).
In essence, the Gradio API makes Gradio applications far more versatile and extensible, allowing for seamless integration with a variety of use cases.
Example: Creating a Gradio App and Connecting via the Gradio API
Now, let’s walk through a complete example where:
- We create a Gradio app that generates text based on input prompts.
- We connect to it remotely using the Gradio API.
Step 1: Setting Up the Gradio App (Server-Side)
This Gradio app will take a text prompt as input and generate text completions using a Hugging Face Transformer model.
import gradio as gr
from transformers import pipeline

# Load a text generation model from Hugging Face
generator = pipeline("text-generation", model="gpt2")

# Define the function for the Gradio app
def generate_text(prompt):
    result = generator(prompt, max_length=50, num_return_sequences=1)
    return result[0]["generated_text"]

# Create the Gradio interface with an explicit api_name
app = gr.Interface(
    fn=generate_text,
    inputs="text",
    outputs="text"
)

# Launch the app with a public link
app.launch(share=True)
In this setup, we’re using the Hugging Face gpt2 model as the text-generation pipeline, which powers the generate_text function. This function is then exposed through a Gradio interface, allowing users to enter prompts and receive generated responses. By setting share=True, Gradio provides a public URL for easy access to the app, which we’ll use to connect through the Gradio API.

Step 2: Connecting to the Gradio App Using the Gradio API (Client-Side)
With the Gradio app deployed, you can use the Gradio API to interact with it programmatically from a different script or environment.
Client-Side Code
from gradio_client import Client

# Use the exact URL generated by Gradio
client = Client("https://9b11815743f11d3437.gradio.live")  # Replace with your specific .gradio.live URL

# Send a prompt to the Gradio app and retrieve the generated text
prompt = "Once upon a time in a land far away"
response = client.predict(prompt, fn_index=0)
print("Generated Text:", response)
The client connects to the Gradio app using the exact URL generated by Gradio, enabling remote interaction with the deployed app. To send data, the predict method takes a prompt and sends it to the app’s generate_text function. By specifying fn_index=0, we’re able to target the first function defined in the Gradio app (in this case, generate_text) and retrieve the generated text as the output.
Note: Replace https://<your-gradio-app-url>.gradio.live with the specific URL generated when the Gradio app was launched.
Output
>>> prompt = "Once upon a time in a land far away"
>>> response = client.predict(prompt, fn_index=0)  # Use fn_index=0 as a fallback
Setting `pad_token_id` to `eos_token_id`:None for open-end generation.
>>> print("Generated Text:", response)
Generated Text: Once upon a time in a land far away, a strange creature descended from the heavens. In a thousand years, the world itself would seem doomed, until the last people of that land, some four hundred thousand Years of Age, arose, to establish
Alternative for Stability: For a more robust API setup, consider deploying your Gradio app to Hugging Face Spaces. Spaces provides a stable, permanent URL, and the api_name functionality is expected to work consistently. You can run gradio deploy from your project directory to set this up. This deployment can prevent the issues encountered when using .gradio.live URLs, making it ideal for long-term applications or integrations.
Why This Gradio API Example Matters
This setup demonstrates the practical use of the Gradio API for creating and connecting to machine learning applications. By combining server-side app deployment with client-side automation, you can:
- Build scalable applications that generate real-time predictions.
- Integrate Gradio apps as microservices within larger systems.
- Automate testing and run batch processes, further extending the use of Gradio beyond a simple GUI interface.
For additional capabilities, you can refer to the official Gradio Python Client documentation here.
Client and Server Roles in Gradio API Usage
When using Gradio as an API, we can think of it as a client-server model. Here, the Gradio app acts as the server, handling incoming requests and executing the functions you’ve defined (e.g., generate_text). The Gradio Client, meanwhile, serves as the client that makes remote API calls to the app’s server-side functions.
Though Gradio is primarily known as an interface library for interactive web apps, this setup demonstrates its versatility. It can function as both a user-facing application and a backend service that supports programmatic interaction, making it useful for remote API calls and automated workflows.
What's next? We recommend PyImageSearch University.

120+ total classes • 115+ hours hours of on-demand code walkthrough videos • Last updated: July 2026
★★★★★ 4.84 (128 Ratings) • 16,000+ Students Enrolled
I strongly believe that if you had the right teacher you could master computer vision and deep learning.
Do you think learning computer vision and deep learning has to be time-consuming, overwhelming, and complicated? Or has to involve complex mathematics and equations? Or requires a degree in computer science?
That’s not the case.
All you need to master computer vision and deep learning is for someone to explain things to you in simple, intuitive terms. And that’s exactly what I do. My mission is to change education and how complex Artificial Intelligence topics are taught.
If you're serious about learning computer vision, your next stop should be PyImageSearch University, the most comprehensive computer vision, deep learning, and OpenCV course online today. Here you’ll learn how to successfully and confidently apply computer vision to your work, research, and projects. Join me in computer vision mastery.
Inside PyImageSearch University you'll find:
- ✓ 120+ courses on essential computer vision, deep learning, and OpenCV topics
- ✓ 94+ Certificates of Completion
- ✓ 115+ hours hours of on-demand video
- ✓ Brand new courses released regularly, ensuring you can keep up with state-of-the-art techniques
- ✓ Pre-configured Jupyter Notebooks in Google Colab
- ✓ Run all code examples in your web browser — works on Windows, macOS, and Linux (no dev environment configuration required!)
- ✓ Access to centralized code repos for all 540+ tutorials on PyImageSearch
- ✓ Easy one-click downloads for code, datasets, pre-trained models, etc.
- ✓ Access on mobile, laptop, desktop, etc.
Summary
This guide introduced Gradio, a powerful Python library for building interactive applications to showcase machine learning models. It began with an overview of What Is Gradio, explaining its role in democratizing machine learning through accessible, user-friendly interfaces and highlighting high-impact projects that relied on it. Then, it covered What’s New in Version 5, outlining key improvements (e.g., enhanced performance, better security measures, AI-powered app creation, and low-latency streaming).
Following that, it explored the Gradio Core Classes (e.g., Interface, Blocks, and the optional ChatInterface), which are essential for structuring applications in Gradio. Key components like Textbox, Buttons, and Sliders were discussed to help users understand how to build intuitive interfaces.
A section on AttributeError: Module ‘Gradio’ Has No Attribute ‘Inputs’ addressed common errors, offering solutions and compatibility notes for older code repositories and Python versions. Finally, Understanding the Gradio API (Python Client) provided an example of connecting to a Gradio app via the API, illustrating how to send data and retrieve responses programmatically, with an explanation of why this approach is valuable for remote interactions.
Citation Information
Martinez, H. “Introduction to Gradio for Building Interactive Applications,” PyImageSearch, P. Chugh, S. Huot, A. Sharma, and P. Thakur, eds., 2025, https://pyimg.co/8dxkj
@incollection{Martinez_2025_intro-to-gradio-for-building-interactive-apps,
  author = {Hector Martinez},
  title = {{Introduction to Gradio for Building Interactive Applications}},
  booktitle = {PyImageSearch},
  editor = {Puneet Chugh and Susan Huot and Aditya Sharma and Piyush Thakur},
  year = {2025},
  url = {https://pyimg.co/8dxkj},
}
To download the source code to this post (and be notified when future tutorials are published here on PyImageSearch), simply enter your email address in the form below!

Download the Source Code and FREE 17-page Resource Guide
Enter your email address below to get a .zip of the code and a FREE 17-page Resource Guide on Computer Vision, OpenCV, and Deep Learning. Inside you'll find my hand-picked tutorials, books, courses, and libraries to help you master CV and DL!

Comment section
Hey, Adrian Rosebrock here, author and creator of PyImageSearch. While I love hearing from readers, a couple years ago I made the tough decision to no longer offer 1:1 help over blog post comments.
At the time I was receiving 200+ emails per day and another 100+ blog post comments. I simply did not have the time to moderate and respond to them all, and the sheer volume of requests was taking a toll on me.
Instead, my goal is to do the most good for the computer vision, deep learning, and OpenCV community at large by focusing my time on authoring high-quality blog posts, tutorials, and books/courses.
If you need help learning computer vision and deep learning, I suggest you refer to my full catalog of books and courses — they have helped tens of thousands of developers, students, and researchers just like yourself learn Computer Vision, Deep Learning, and OpenCV.
Click here to browse my full catalog.