Table of Contents
Training the YOLOv8 Object Detector for OAK-D
In this tutorial, you will learn to train a YOLOv8 object detector to recognize hand gestures in the PyTorch framework using the Ultralytics repository by utilizing the Hand Gesture Recognition Computer Vision Project dataset hosted on Roboflow. The goal would be to train a YOLOv8 variant that can learn to recognize 1 of 5 hand gestures (e.g., one, two, three, four, and five) with good mean average precision (mAP). Furthermore, since this tutorial acts as a strong base for an upcoming tutorial, the trained YOLOv8 variant should be able to run inference in near real-time on the OpenCV AI Kit (OAK) that comes powered with the Intel MyriadX neural hardware accelerator.
This lesson is the 1st in our 3-part series on OAK 102:
- Training the YOLOv8 Object Detector for OAK-D (this tutorial)
- Hand Gesture Recognition with YOLOv8 on OAK-D in Near Real-Time
- OAK 102 (lesson 3)
To learn how to train a YOLOv8 object detector on a hand gesture dataset for OAK-D, just keep reading.
Training the YOLOv8 Object Detector for OAK-D
Introduction
Object detection is one of the most exciting problems in the computer vision domain. The progress in this domain has been significant; every year, the research community achieves a new state-of-the-art benchmark. And, of course, all of this wouldn’t have been possible without the power of Deep Neural Networks (DNNs) and the massive computation by NVIDIA GPUs.
It all started when Redmon et al. (2016) published the YOLO research community gem, “You Only Look Once: Unified, Real-Time Object Detection,” at the CVPR (Computer Vision and Pattern Recognition) Conference. YOLO, or YOLOv1, was the first single-stage object detection model. It quickly gained popularity due to its high speed and accuracy.
The authors continued from there. Redmon and Farhadi (2017) published YOLOv2 at the CVPR Conference and improved the original model by incorporating batch normalization, anchor boxes, and dimension clusters.
And then came the YOLO model wave. In 2023, we arrived at Ultralytics YOLOv8. Yes, you read it right! From the day YOLOv1 was out, a new version of YOLO was published every year with improvements in both speed and accuracy.
Today, YOLO is the go-to object detection model in the computer vision community since it is the most practical object detector focusing on speed and accuracy.
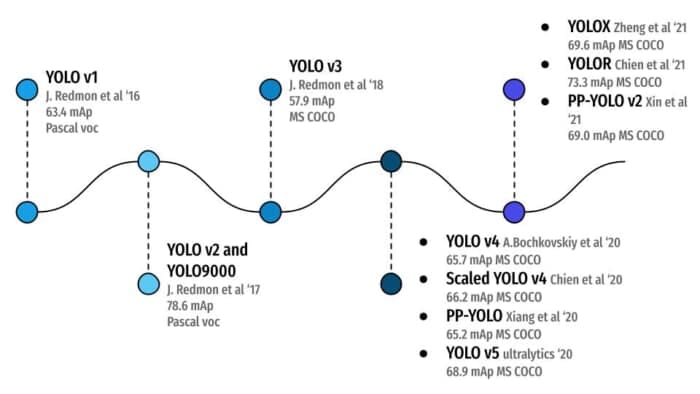
Figure 1 shows the progression in YOLO models from YOLOv1 to PP-YOLOv2. One interesting aspect in the figure is the YOLOv5 model by Ultralytics, published in the year 2020, and this year, they released yet another state-of-the-art object detection model, YOLOv8. And today’s tutorial is all about experimenting with YOLOv8 but for OAK-D.
If you would like to learn about the entire history of the YOLO family, we highly recommend you check out our series on YOLO!
A Primer on YOLOv8
YOLOv8 is the latest version of the YOLO object detection, classification, and segmentation model developed by Ultralytics. While writing this tutorial, YOLOv8 is a state-of-the-art, cutting-edge model. Like previous versions built and improved upon the predecessor YOLO models, YOLOv8 also builds upon previous YOLO versions’ success. The new features and improvements in YOLOv8 boost performance and accuracy, making it the most practical object detection model.
One key feature of YOLOv8 is its extensibility. It is designed as a framework that supports all previous versions of YOLO, making it easy to switch between versions and benchmark their performance. This makes YOLOv8 an ideal choice for users who want to take advantage of the latest YOLO technology while still being able to use their existing YOLO models.
Table 1 shows the performance (mAP) and speed (frames per second (FPS)) benchmarks of five YOLOv8 variants on the MS COCO (Microsoft Common Objects in Context) validation dataset at 640×640 image resolution on Ampere 100 GPU. All five models were trained on the MS COCO training dataset. The model benchmarks are shown in ascending order starting with YOLOv8n (i.e., the nano variant having the smallest model footprint to the largest model, YOLOv8x). We would be training the Nano and Small variant of YOLOv8 as it would fit well into the OAK’s computer power.
The innovation is not just limited to YOLOv8’s extensibility. Some more prominent innovations that directly relate to its performance and accuracy include
- a new backbone network
- a new anchor-free detection head
- a new loss function
YOLOv8 is also highly efficient and can run on various hardware platforms, from CPUs to GPUs to Embedded Devices like OAK. And as you already know, our goal is to run YOLOv8 on an embedded hardware platform (i.e., an OAK edge device).
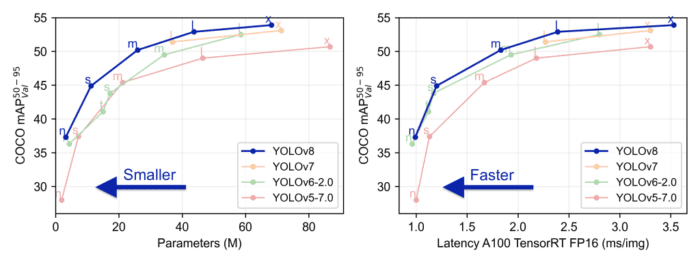
Figure 2 compares YOLOv8 with previous YOLO versions: YOLOv7, YOLOv6, and Ultralytics YOLOv5. The comparison is made in two fashions: mAP vs. model parameters and mAP vs. Latency measured on A100 GPU. The figure shows that almost all the YOLOv8 variants achieve the highest mAP on the COCO validation dataset. Also, YOLOv8 has fewer model parameters and less Latency benchmarked on the NVIDIA Ampere 100 architecture.
Overall, YOLOv8 is hands down a powerful and flexible framework for object detection offered in PyTorch.
This tutorial is the first in our OAK-102 series, and we hope you have followed the series of tutorials in our OAK-101 series. If not, we highly recommend you check out the OAK-101 series, which will build a strong foundation for the OpenCV AI Kit. You will learn the OAK hardware and the software stack from the ground level, and not just that. For example, you would learn to train and deploy an image classification TensorFlow model on an OAK edge device.
This tutorial will cover more advanced Computer Vision applications and how to deploy these advanced applications onto the OAK edge device.
Now, let’s start with today’s tutorial and learn to train the hand gesture recognition model for OAK!
Configuring Your Development Environment
To follow this guide, you need to clone the Ultralytics repository and pip install all the necessary packages via the setup and requirements files.
Luckily, to run the YOLOv8 training, you can do a pip install on the ultralytics cloned folder, meaning all the libraries are pip-installable!
One good news is that YOLOv8 has a command line interface, so you do not need to run Python training and testing scripts. With just the yolo command, you get most functionalities like modes, tasks, etc. Do not worry; today’s tutorial will cover the important command line arguments!
$ git clone https://github.com/ultralytics/ultralytics
$ pip install ultralytics
Need Help Configuring Your Development Environment?

All that said, are you:
- Short on time?
- Learning on your employer’s administratively locked system?
- Wanting to skip the hassle of fighting with the command line, package managers, and virtual environments?
- Ready to run the code immediately on your Windows, macOS, or Linux system?
Then join PyImageSearch University today!
Gain access to Jupyter Notebooks for this tutorial and other PyImageSearch guides pre-configured to run on Google Colab’s ecosystem right in your web browser! No installation required.
And best of all, these Jupyter Notebooks will run on Windows, macOS, and Linux!
About the Dataset
For today’s experiment, we will train the YOLOv8 model on the Hand Gesture Recognition Computer Vision Project dataset hosted on Roboflow.
These datasets are public, but we download them from Roboflow, which provides a great platform to train your models with various datasets in the Computer Vision domain. Even more interesting is that you can download the datasets in multiple formats like COCO JSON, YOLO Darknet TXT, and YOLOv8 PyTorch. This process saves time for writing helper functions to convert the ground-truth annotations to the format required by these object detection models.
YOLOv8 Label Format
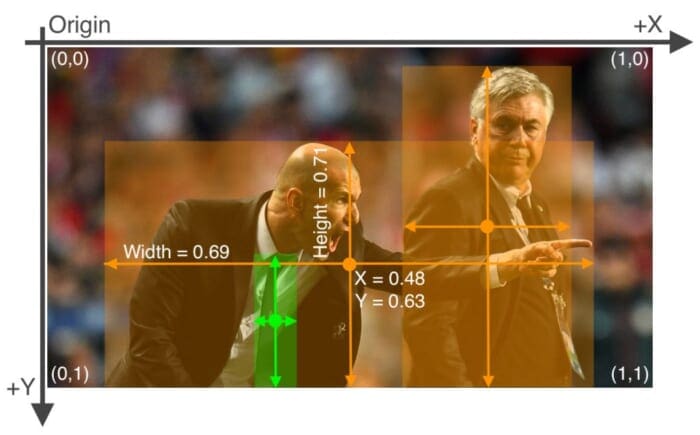
Since we will train the YOLOv8 PyTorch model, we will download the dataset in YOLOv8 format. The ground-truth annotation format of YOLOv8 is the same as other YOLO formats (see Figure 4), so you could write a script on your own that does this for you. There is one text file with a single line for each bounding box for each image. For example, if four objects exist in one image, the text file would have four rows containing the class label and bounding box coordinates. The format of each row is
class_id center_x center_y width height
where fields are space-delimited, and the coordinates are normalized from 0 to 1. To convert to normalized xywh from pixel values:
- divide
xand the box width by the image’s width - divide
yand the box height by the image’s height
Hand Gesture Recognition Dataset
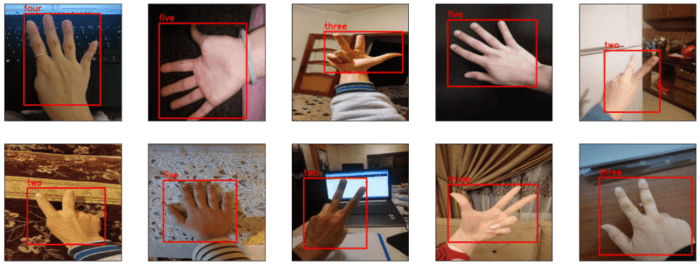
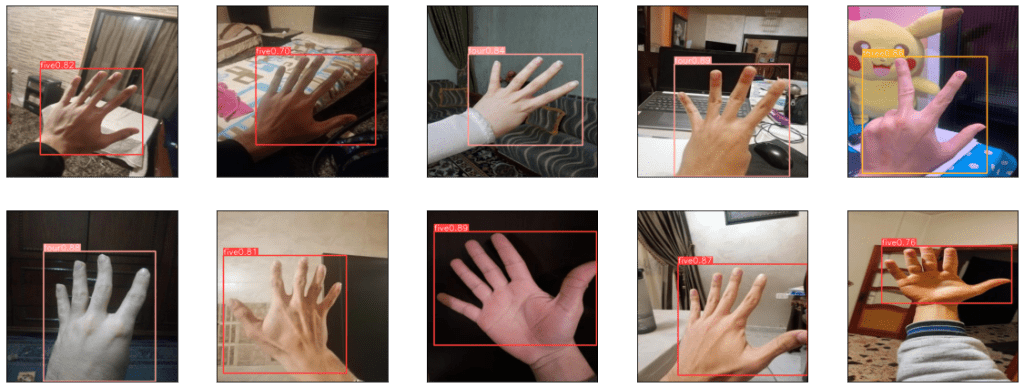
This dataset contains 839 images of 5 hand gesture classes for object detection: one, two, three, four, and five. With the help of five fingers, one- to five-digit combinations are formed, and the object detection model is trained on these hand gestures with respective labels, as shown in Figure 5. The dataset is split into training, validation, and testing sets. The dataset comprises 587 training, 167 validation, and 85 testing images. Each image has a 416×416 resolution with only one object (or instance).
Figure 5 shows sample images from the dataset with ground-truth bounding boxes annotated in red, belonging to classes four, five, two, and three.
Since only one object (gesture or class) is present in each image, there are 587 regions of interest (objects) in 587 training images, meaning there is precisely one object per image. Based on the heuristic shown in Figure 6, class five contributes to more than 45% of the objects. In contrast, the remaining classes: one, two, three, and four, are under-represented relative to gesture class five.

five (source: image by the author).The Python code for data visualization (Figure 5) and class distribution graph (Figure 6) computation is provided inside the Google Colab Notebook of this tutorial!
YOLOv8 Training
This section is the heart of today’s tutorial, where we will cover most of the tasks, including
- Selecting the model
- Downloading the dataset
- Creating the data configuration
- Understanding the YOLOv8 command line interface
- Training the YOLOv8 nano model
- Visualizing the YOLOv8 nano model artifacts
- Qualitative and quantitative evaluation of testing data
- Training the YOLOv8 small model
- Evaluating the YOLOv8 small variant on testing data
Selecting the Model
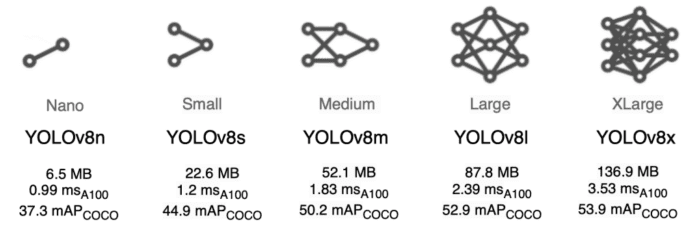
Figure 7 shows 5 YOLOv8 variants starting with the most miniature YOLOv8 nano model built for running on mobile and embedded devices to the YOLOv8 XLarge on the other end of the spectrum. For today’s experiment, we will work with mainly two variants: Nano and Small. We chose these two variants because our final goal is to run the YOLOv8 model on an OAK-D device that can recognize hand gestures. The figure shows that the Nano and Small model variants have smaller memory footprints than higher-end variants.
OAK-D, an embedded device, has computation constraints, which doesn’t mean that other higher-end variants like Medium and Large won’t work on OAK-D, but the performance (FPS) would be lesser. Hence, we choose Nano and Small as they balance accuracy and performance well.
One more observation from Figure 7 is that the mAP improvements from Medium to XLarge are minute. However, the algorithm processing time increases significantly, which would pose a problem for deploying these models on OAK devices.
Downloading the Hand Gesture Recognition Dataset
# Download the vehicles-open image dataset
!mkdir hand_gesture_dataset
%cd hand_gesture_dataset
!curl -L -s "https://universe.roboflow.com/ds/zafYqbWHn8?key=n1igBaphSm" > hand_gesture.zip
!unzip -q hand_gesture.zip
!rm hand_gesture.zip
On Lines 2 and 3, we create the hand_gesture_dataset directory and cd into the directory where we download the dataset. Then, on Line 4, we use the curl command and pass the dataset URL we obtained from the Hand Gesture Recognition Computer Vision Project. Finally, we unzip the dataset and remove the zip file on Lines 5 and 6.
Let’s look at the contents of the hand_gesture_dataset folder:
$tree /content/hand_gesture_dataset -L 2
/content/hand_gesture_dataset
├── data.yaml
├── README.dataset.txt
├── README.roboflow.txt
├── test
│   ├── images
│   └── labels
├── train
│   ├── images
│   └── labels
└── valid
    ├── images
    └── labels

9 directories, 3 files
The parent directory has 3 files, out of which only data.yaml is essential, and 3 subdirectories:
data.yaml: Has the data-related configurations, such as- the train and valid data directory path
- the total number of classes in the dataset
- the name of each class
train: Training images along with training labelsvalid: Validation images with annotationstest: Test images and labels
Configuration Setup
Next, we will edit the data.yaml file to have the path and absolute path for the train and valid images.
# Create configuration
config = {
   "path": "/content/hand_gesture_dataset",
   "train": "train",
   "val": "valid",
   "test": "test",
   "nc": 5,
   "names": ['five', 'four', 'one', 'three', 'two']
}


with open("hand_gesture_dataset/data.yaml", "w") as file:
   yaml.dump(config, file, default_flow_style=False)
From Lines 3-7, we define the data path, train, validation, test, number of classes, and class names in a config dictionary.
Finally, on Lines 12 and 13, we:
- open the existing
data.yamlfile that was downloaded along with the dataset - overwrite it with the contents in
config - store it on the disk
Understanding the YOLOv8 Command Line Interface
The good news is that YOLOv8 also comes with a command line interface (CLI) and Python scripts, making training, testing, and exporting the models much more straightforward. In addition, the YOLOv8 CLI allows for simple single-line commands without needing a Python environment. For example, as shown in the shell blocks below, all tasks related to the YOLO model can be run from the terminal using the yolo command.
!yolo TASK MODE ARGS
Please note in the above command line that TASK, MODE, and ARGS are just placeholders you will need to replace with actual values, which we discuss next.
TASK is an optional parameter; if not passed, YOLOv8 will determine the task from the model type, which means it’s intelligently designed. The TASK can be detect, segment, or classify.
MODE is a required parameter that can be either train, val, predict, export, track, or benchmark. This parameter helps tell YOLOv8 whether you want to use it for
- training the model on a custom dataset
- validating a trained model
- making predictions with the trained weights on images/videos
- converting or exporting the trained model to a format that can be deployed
- training a YOLOv8 detection or segmentation model for use in conjunction with tracking algorithms like BoT-SORT or ByteTrack to perform object tracking on video streams
- benchmarking the YOLOv8 exports such as TensorRT for speed and accuracy (for example, see Table 1)
Finally, ARGS is an optional parameter with various custom configuration settings used during training, validation/testing, prediction, exporting, and all the YOLOv8 hyperparameters. Examples of ARGS can be image size, batch size, learning rate, etc. To learn more about all the available configurations, check out the default.yaml file in the Ultralytics repository.
In short, the YOLOv8 CLI is a powerful tool that allows you to operate YOLOv8 at the tip of your fingers by providing features such as
- model training
- model validation and testing
- exporting a trained model to various formats
- 10-15 types of data augmentations
- training logs
- model checkpoints
- mAP and loss plots
- file management
Let’s look at a few examples of how YOLOv8 CLI can be leveraged to train, predict, and export the trained model.
- Fine-tune a pretrained YOLOv8 nano detection model for
20epochs with an initiallearning_rateof0.01.
!yolo train data=coco128.yaml model=yolov8n.pt epochs=20 lr0=0.01
- Predict a YouTube video using a pretrained YOLOv8 nano segmentation model at image size
320×320.
!yolo predict model=yolov8n-seg.pt source='https://youtu.be/Zgi9g1ksQHc' imgsz=320
- Export a YOLOv8n classification model to ONNX (Open Neural Network Exchange) format at image size
224×224.
!yolo export model=yolov8n-cls.pt format=onnx imgsz=224,224
Voila! Isn’t that surprising? How easy it was to perform training, prediction, and even model conversion in just one single command.
Training the YOLOv8n Model
Alright! We are almost ready to train the YOLOv8 nano and small object detection model. However, before we run the training, let’s understand a few parameters that we will use while training:
We define a few standard model parameters:
imgsz: Image size or network input while training. The images will be resized to this value before being fed to the network. The preprocessing pipeline will resize them to416pixels.data: Path to the data.yamlfile, which has training, validation, and testing data paths and class label information.batch: Number of images fed as a single batch into the network for a forward pass. You can modify it according to the GPU memory available. We have set it to32.epochs: Number of times we want to train the model on the entire hand gesture training dataset. We will train the model for 20 epochs.model: Path to the base model we want to use for training. We use thenanomodelyolov8nfrom the YOLOv8 family.project: This will create a project directory inside the working directory (gesture_train_logs).name: Each time you run this model, it will create a subdirectoryyolov8nunder the project directory, which would have a lot of information on the model (e.g., weights, sample input images, a few validation predictions outputs, metrics plot, etc.).
!yolo train model=yolov8n.pt data=hand_gesture_dataset/data.yaml epochs=20 imgsz=416 \
batch=32 project=gesture_train_logs name=yolov8n device=0
The training will start if there are no errors, as shown below. The logs indicate that the YOLOv8 model would train with Torch version 1.13.1 on a Tesla T4 GPU, showing initialized hyperparameters.
The yolov8n.pt weights are downloaded, which means the YOLOv8n model is initialized with the parameters trained with the MS COCO dataset. Finally, we can see that two epochs have been completed with a mAP@0.5=0.238.
Downloading https://github.com/ultralytics/assets/releases/download/v0.0.0/yolov8n.pt to yolov8n.pt...
100% 6.23M/6.23M [00:00<00:00, 80.7MB/s]
Ultralytics YOLOv8.0.55 🚀 Python-3.9.16 torch-1.13.1+cu116 CUDA:0 (Tesla T4, 15102MiB)
yolo/engine/trainer: task=detect, mode=train, model=yolov8n.pt, data=hand_gesture_dataset/data.yaml, epochs=20, patience=50, batch=32, imgsz=416, save=True, save_period=-1, cache=False, device=0, workers=8, project=gesture_train_logs, name=yolov8n, exist_ok=False, pretrained=False, optimizer=SGD, verbose=True, seed=0, deterministic=True, single_cls=False, image_weights=False, rect=False, cos_lr=False, close_mosaic=10, resume=False, overlap_mask=True, mask_ratio=4, dropout=0.0, val=True, split=val, save_json=False, save_hybrid=False, conf=None, iou=0.7, max_det=300, half=False, dnn=False, plots=True, source=None, show=False, save_txt=False, save_conf=False, save_crop=False, hide_labels=False, hide_conf=False, vid_stride=1, line_thickness=3, visualize=False, augment=False, agnostic_nms=False, classes=None, retina_masks=False, boxes=True, format=torchscript, keras=False, optimize=False, int8=False, dynamic=False, simplify=False, opset=None, workspace=4, nms=False, lr0=0.01, lrf=0.01, momentum=0.937, weight_decay=0.0005, warmup_epochs=3.0, warmup_momentum=0.8, warmup_bias_lr=0.1, box=7.5, cls=0.5, dfl=1.5, fl_gamma=0.0, label_smoothing=0.0, nbs=64, hsv_h=0.015, hsv_s=0.7, hsv_v=0.4, degrees=0.0, translate=0.1, scale=0.5, shear=0.0, perspective=0.0, flipud=0.0, fliplr=0.5, mosaic=1.0, mixup=0.0, copy_paste=0.0, cfg=None, v5loader=False, tracker=botsort.yaml, save_dir=gesture_train_logs/yolov8n
Downloading https://ultralytics.com/assets/Arial.ttf to /root/.config/Ultralytics/Arial.ttf...
100% 755k/755k [00:00<00:00, 17.2MB/s]
Overriding model.yaml nc=80 with nc=5

                   from  n    params  module                                       arguments
  0                  -1  1       464  ultralytics.nn.modules.Conv                  [3, 16, 3, 2]
  1                  -1  1      4672  ultralytics.nn.modules.Conv                  [16, 32, 3, 2]
  2                  -1  1      7360  ultralytics.nn.modules.C2f                   [32, 32, 1, True]
. . . . .
. . . . .
 21                  -1  1    493056  ultralytics.nn.modules.C2f                   [384, 256, 1]
 22        [15, 18, 21]  1    752287  ultralytics.nn.modules.Detect                [5, [64, 128, 256]]
Model summary: 225 layers, 3011823 parameters, 3011807 gradients, 8.2 GFLOPs

Transferred 319/355 items from pretrained weights
TensorBoard: Start with 'tensorboard --logdir gesture_train_logs/yolov8n', view at http://localhost:6006/
AMP: running Automatic Mixed Precision (AMP) checks with YOLOv8n...
AMP: checks passed ✅
optimizer: SGD(lr=0.01) with parameter groups 57 weight(decay=0.0), 64 weight(decay=0.0005), 63 bias
train: Scanning /content/hand_gesture_dataset/train/labels... 587 images, 0 backgrounds, 0 corrupt: 100% 587/587 [00:00<00:00, 2371.06it/s]
train: New cache created: /content/hand_gesture_dataset/train/labels.cache
albumentations: Blur(p=0.01, blur_limit=(3, 7)), MedianBlur(p=0.01, blur_limit=(3, 7)), ToGray(p=0.01), CLAHE(p=0.01, clip_limit=(1, 4.0), tile_grid_size=(8, 8))
val: Scanning /content/hand_gesture_dataset/valid/labels... 167 images, 0 backgrounds, 0 corrupt: 100% 167/167 [00:00<00:00, 2200.35it/s]
val: New cache created: /content/hand_gesture_dataset/valid/labels.cache
Plotting labels to gesture_train_logs/yolov8n/labels.jpg...
Image sizes 416 train, 416 val
Using 2 dataloader workers
Logging results to gesture_train_logs/yolov8n
Starting training for 20 epochs...

      Epoch    GPU_mem   box_loss   cls_loss   dfl_loss  Instances       Size
       1/20      2.05G      1.315      3.383      1.556         23        416: 100% 19/19 [00:12<00:00,  1.57it/s]
                 Class     Images  Instances      Box(P          R      mAP50  mAP50-95): 100% 3/3 [00:02<00:00,  1.07it/s]
                   all        167        167    0.00357      0.974      0.119      0.064

      Epoch    GPU_mem   box_loss   cls_loss   dfl_loss  Instances       Size
       2/20      2.41G      1.132       2.83      1.326         24        416: 100% 19/19 [00:10<00:00,  1.83it/s]
                 Class     Images  Instances      Box(P          R      mAP50  mAP50-95): 100% 3/3 [00:01<00:00,  2.07it/s]
                   all        167        167     0.0209      0.989      0.238      0.164
Voila! With this, you have learned to train a YOLOv8 nano object detector on a hand gesture recognition dataset you downloaded from Roboflow. Isn’t that amazing?
As discussed in the Understanding the YOLOv8 CLI section, YOLOv8 logs the model artifacts inside the runs directory, which we will look at in the next section.
Once the training is complete, you will see the output similar to the one shown below:
Epoch GPU_mem box_loss cls_loss dfl_loss Instances Size
19/20 2.41G 0.7323 1.017 1.07 11 416: 100% 19/19 [00:05<00:00, 3.46it/s]
Class Images Instances Box(P R mAP50 mAP50-95): 100% 3/3 [00:01<00:00, 1.57it/s]
all 167 167 0.786 0.824 0.878 0.681
Epoch GPU_mem box_loss cls_loss dfl_loss Instances Size
20/20 2.41G 0.7141 0.9552 1.061 11 416: 100% 19/19 [00:05<00:00, 3.32it/s]
Class Images Instances Box(P R mAP50 mAP50-95): 100% 3/3 [00:03<00:00, 1.15s/it]
all 167 167 0.805 0.772 0.86 0.67
20 epochs completed in 0.061 hours.
Optimizer stripped from gesture_train_logs/yolov8n/weights/last.pt, 6.2MB
Optimizer stripped from gesture_train_logs/yolov8n/weights/best.pt, 6.2MB
Validating gesture_train_logs/yolov8n/weights/best.pt...
Ultralytics YOLOv8.0.55 🚀 Python-3.9.16 torch-1.13.1+cu116 CUDA:0 (Tesla T4, 15102MiB)
Model summary (fused): 168 layers, 3006623 parameters, 0 gradients, 8.1 GFLOPs
Class Images Instances Box(P R mAP50 mAP50-95): 100% 3/3 [00:03<00:00, 1.13s/it]
all 167 167 0.786 0.824 0.877 0.681
five 167 77 0.801 0.857 0.92 0.696
four 167 21 0.814 0.832 0.937 0.726
one 167 19 0.76 0.789 0.813 0.646
three 167 27 0.829 0.815 0.845 0.7
two 167 23 0.726 0.826 0.873 0.637
Speed: 0.1ms preprocess, 2.1ms inference, 0.0ms loss, 2.0ms postprocess per image
Results saved to gesture_train_logs/yolov8n
The above results show that the YOLOv8n model achieved an mAP of 0.877@0.5 IoU and 0.681@0.5:0.95 IoU in all classes on the validation set. It also indicates class-wise mAP, and the model achieved the best score for gesture class four (i.e., 0.937 mAP@0.5 IoU). Moreover, since the training dataset is not huge, the model took hardly 3.66 minutes to complete the training for 20 epochs on a Tesla T4 GPU.
Visualizing Model Artifacts
Now that we have trained our model, let’s look at the results generated inside the gesture_train_logs directory.
All training results are logged by default to yolov8/runs/train with a new incrementing directory created for each run as runs/train/exp, runs/train/exp1, etc. However, while training the model, we passed the PROJECT and the RUN_NAME, so in this case, it does not create the default directory to log the training results. Hence, in this experiment, runs is yolov8n.
Next, let’s look at the files created in the experiment.
$ tree gesture_train_logs/yolov8n
gesture_train_logs/yolov8n
├── args.yaml
├── confusion_matrix.png
├── events.out.tfevents.1679594913.1b3064e8db41.10831.0
├── F1_curve.png
├── labels_correlogram.jpg
├── labels.jpg
├── P_curve.png
├── PR_curve.png
├── R_curve.png
├── results.csv
├── results.png
├── train_batch0.jpg
├── train_batch190.jpg
├── train_batch191.jpg
├── train_batch192.jpg
├── train_batch1.jpg
├── train_batch2.jpg
├── val_batch0_labels.jpg
├── val_batch0_pred.jpg
├── val_batch1_labels.jpg
├── val_batch1_pred.jpg
├── val_batch2_labels.jpg
├── val_batch2_pred.jpg
└── weights
    ├── best.pt
    └── last.pt

1 directory, 25 files
On Line 1, we use the tree command followed by the PROJECT and RUN_NAME, displaying various evaluation metrics and weights files for the trained object detector. As we can observe, it has a precision curve, recall curve, precision-recall curve, confusion matrix, prediction on validation images, and finally, the best and last epoch weights file in PyTorch format.
Now, look at a few images from the runs directory.
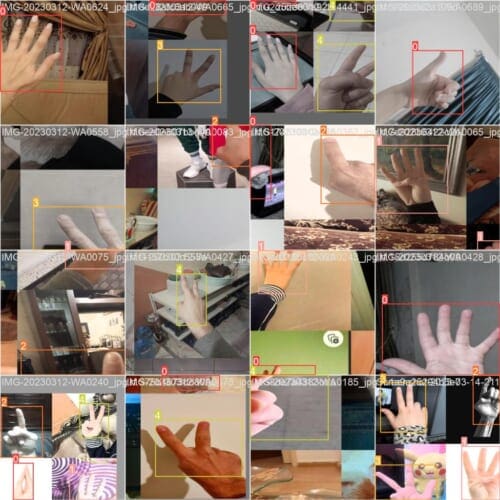
Figure 8 shows the training images batch with Mosaic data augmentation. There are 16 images clubbed together; if we pick one image from the 4th row × 1st column, we can see that the image combines four different images. We explain the concept of Mosaic data augmentation in the YOLOv4 post, so do check that out if you haven’t already.
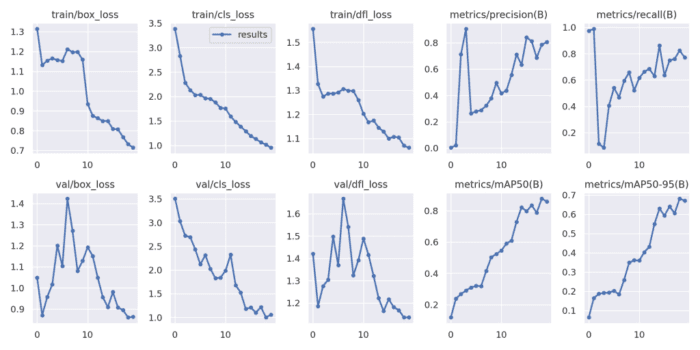
Next, we look at the results.png, which comprises training and validation loss for bounding box, objectness, and classification. It also has the metrics: precision, recall, mAP@0.5, and mAP@0.5:0.95 for training (Figure 9).
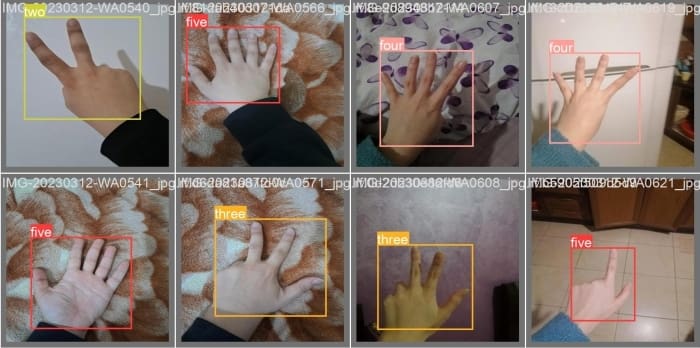
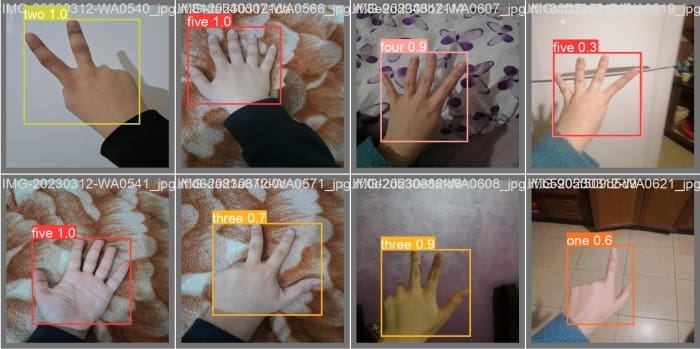
Figure 10 shows the ground-truth images and the YOLOv8n model prediction on the Hand Gesture Recognition validation dataset. From the two images below, it is clear that the model did a great job detecting the objects. The model has no False Negative predictions; however, the model did have a few False Positive detections. For example, in the 1st row × 4th column, the model detected a class four hand gesture as class five, and a rather difficult one in the 2nd row × 4th column, a class five gesture was detected as class one. But overall, it did great on these images.
Figure 10: Ground-truth images (top) and YOLOv8n model prediction (bottom) on a sample validation dataset fine-tuned with all layers (source: image by the author).
Evaluating YOLOv8n on the Test Dataset
Now that the training is complete, we have also looked at the few artifacts generated during the training, like loss and mAP plots and YOLOv8n model prediction on the validation dataset. Next, let’s put our model to evaluation on the test dataset. To achieve this, we would write a HandGesturePredictor class.
from ultralytics import YOLO

class HandGesturePredictor:
   def __init__(self, model_path, test_folder_path):
       self.model = YOLO(model_path)
       self.test_folder = glob.glob(test_folder_path)

   def classify_random_images(self, num_images=10):
       # Generate num_images random numbers between
       # 0 and length of test folder
       random_list = random.sample(range(0, len(self.test_folder)), num_images)
       plt.figure(figsize=(20, 20))

       for i, idx in enumerate(random_list):
           plt.subplot(5,5,i+1)
           plt.xticks([])
           plt.yticks([])
           plt.grid(True)
           img = cv2.imread(self.test_folder[idx])
           results = self.model.predict(source=img)
           res_plotted = results[0].plot()
           # cv2_imshow(res_plotted)
           # convert the image frame BGR to RGB and display it
           image = cv2.cvtColor(res_plotted, cv2.COLOR_BGR2RGB)
           plt.imshow(image)
       plt.show()
On Line 1, we import the YOLO module from the ultralytics Python package. This would help us to load the trained YOLOv8n model weights directly as a parameter.
Then, on Line 3, we define the HandGesturePredictor class. On Lines 4-6, the class constructor is defined that takes two parameters: model_path and test_folder_path. We then use the model_path to initialize the YOLO model instance and store all the .jpg image paths using the glob module in the test_folder attribute.
On Lines 8-26, we define the classify_random_images method that takes num_images as an optional parameter (default value is 10). This parameter tells the number of images we would infer with trained hand gesture recognition YOLOv8 model and plot the results.
Further in classify_random_images:
- We generate a list of random numbers between
0and the length of the test folder. This would ensure every run generates predictions for different sets of images. - Next, we create a figure of
20×20inches using thematplotlibPython package. - Then, we start a
forloop over each of the 10 test images, create a subplot in the current20×20figure with a grid of five rows and five columns, selecting the(i+1)thsubplot. - Inside the
forloop, we read the image using OpenCV, perform object detection on theimgusing the YOLOv8n hand gesture recognition model, and store the results in theresultsvariable. - Continuing the loop, we call the
ultralyticsmethod.plot(), which creates a new image with overlaid object detection results. We convert the result intoRGBcolor space and display all subplots with predictions usingplt.show().
classifier = HandGesturePredictor("gesture_train_logs/yolov8n/weights/best.pt", "hand_gesture_dataset/test/images/*.jpg")
classifier.classify_random_images(num_images=10)
Now that we have the HandGesturePredictor class defined, we create a classifier instance of the class by passing in the best weights of the YOLOv8n hand gesture model and the test images path. The class instance then invokes the classify_random_images method with num_images set to 10.
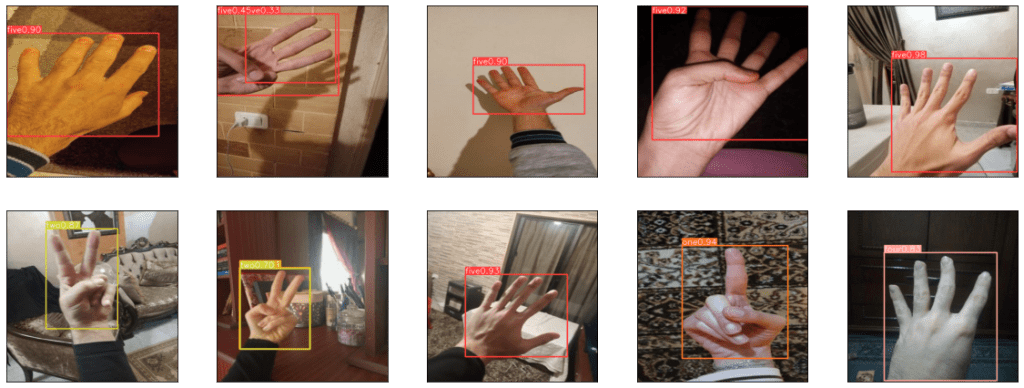
Figure 11 shows the object detection predictions on the 10 test images we obtain by running the above code. The results show that the YOLOv8n hand gesture recognition model did a brilliant job, given that it’s the most lightweight model in the YOLOv8 family.
Figure 11: Ground-truth images (top) and YOLOv8n model prediction (bottom) fine-tuned with all layers (source: image by the author).
The best part is that the model did not miss any detections, and it did have a few False Positive detections, like detecting a class three hand gesture twice as a class five gesture and a class four gesture again as a class five. Well, if we look at the 1st row × 2nd image, we can clearly see that the confidence for both detections is less than 0.5, so we can ignore the detections with confidence scores less than 0.5.
Now that we have observed the qualitative results of the YOLOv8n hand gesture model, we run the quantitative evaluation of the model on the 85 test set images using the YOLO CLI in val mode.
# Validate YOLOv8n on hand gesture test data
!yolo val model=gesture_train_logs/yolov8n/weights/best.pt \
project=gesture_train_logs/yolov8n data=hand_gesture_dataset/data.yaml split=test
Figure 12 shows that the YOLOv8n hand gesture recognition model achieved an mAP of 0.824@0.5 IoU and 0.656@0.5:0.95 IoU in all classes on the test set. It also indicates class-wise mAP, and the model achieved the best score for gesture class two (i.e., 0.927 mAP@0.5 IoU).

Training the YOLOv8s Model
Alright! So now that we have trained the YOLOv8 nano model on the Hand Gesture Recognition dataset, let’s take one step further into the YOLOv8 family and train the YOLOv8 small variant on the same dataset, and find out which one trumps the other!
!yolo train model=yolov8s.pt data=hand_gesture_dataset/data.yaml epochs=20 imgsz=416 \
batch=32 project=gesture_train_logs name=yolov8s device=0
To train the YOLOv8 small variant, we need to change the model parameter to yolov8s.pt, the pretrained weights of the YOLOv8 small variant. Next, we also need to change the name (run name) parameter to yolov8s, which would create a directory inside the gesture_train_logs project directory.
20 epochs completed in 0.062 hours.
Optimizer stripped from gesture_train_logs/yolov8s/weights/last.pt, 22.5MB
Optimizer stripped from gesture_train_logs/yolov8s/weights/best.pt, 22.5MB

Validating gesture_train_logs/yolov8s/weights/best.pt...
Ultralytics YOLOv8.0.55 🚀 Python-3.9.16 torch-1.13.1+cu116 CUDA:0 (Tesla T4, 15102MiB)
Model summary (fused): 168 layers, 11127519 parameters, 0 gradients, 28.4 GFLOPs
                 Class     Images  Instances      Box(P          R      mAP50  mAP50-95): 100% 3/3 [00:03<00:00,  1.23s/it]
                   all        167        167      0.803      0.803      0.871      0.688
                  five        167         77      0.793      0.766      0.885      0.683
                  four        167         21      0.732       0.81      0.832      0.624
                   one        167         19      0.786      0.842      0.884      0.733
                 three        167         27       0.84      0.778      0.849      0.717
                   two        167         23      0.862      0.818      0.904      0.683
Speed: 0.6ms preprocess, 2.5ms inference, 0.0ms loss, 2.3ms postprocess per image
Results saved to gesture_train_logs/yolov8s
The above results show that the YOLOv8n model achieved an mAP of 0.871@0.5 IoU and 0.688@0.5:0.95 IoU in all classes on the validation set. It also indicates class-wise mAP, and the model achieved the best score for gesture class two (i.e., 0.904 mAP@0.5 IoU).
Since the training dataset is not huge, the model took hardly 3.72 minutes to complete the training for 20 epochs on a Tesla T4 GPU.
A few surprising findings after training YOLOv8s on the Hand Gesture dataset are:
- The
mAP@0.5IoU is slightly less than the YOLOv8n model, and themAP@0.5:0.95IoU is marginally better than YOLOv8n. - The time taken to train both variants is also quite similar; there’s hardly a difference of a few seconds.
It would be interesting to see how the YOLOv8s model performs qualitatively and quantitatively on the test dataset. So let’s find out in the next section!
Evaluating YOLOv8s on the Test Dataset
Similar to the YOLOv8n evaluation, we put the YOLOv8s hand gesture variant to qualitative and quantitative assessments on the test dataset.
For the qualitative analysis, we create a classifier instance of the HandGesturePredictor class by passing in the best weights of the YOLOv8s hand gesture model and test images path. The class instance then invokes the classify_random_images method with num_images set to 10.
classifier = HandGesturePredictor("gesture_train_logs/yolov8s/weights/best.pt", "hand_gesture_dataset/test/images/*.jpg")
classifier.classify_random_images(num_images=10)
Figure 13 shows the object detection predictions on the 10 test images we obtain by running the above code. From the results, we can see that the YOLOv8s hand gesture recognition model does a better job than the YOLOv8n model. In fact, there are no False Positive predictions made by the model. Of course, the images are sampled randomly, and the best comparison can be made only if the same set of images is used with the YOLOv8s hand gesture model as with YOLOv8n.
Figure 13: Ground-truth images (top) and YOLOv8s model prediction (bottom) fine-tuned with all layers (source: image by the author).
However, we would better understand the quantitative (mAP scores) analysis improvements.
Next, we run the quantitative evaluation of the YOLOv8s hand gesture model on the 85 test set images using the YOLO CLI in val mode.
# Validate YOLOv8n on hand gesture test data
!yolo val model=gesture_train_logs/yolov8s/weights/best.pt \
project=gesture_train_logs/yolov8n data=hand_gesture_dataset/data.yaml split=test
Figure 14 shows that the YOLOv8n hand gesture recognition model achieved an mAP of 0.887@0.5 IoU and 0.706@0.5:0.95 IoU in all classes on the test set. It also indicates class-wise mAP, and the model achieved the best score for gesture class five (i.e., 0.93 mAP@0.5 IoU).

Comparing the results with the YOLOv8n hand gesture model, we can observe a significant improvement in the mAP scores across all five classes.
What's next? We recommend PyImageSearch University.
86+ total classes • 115+ hours hours of on-demand code walkthrough videos • Last updated: February 2026
★★★★★ 4.84 (128 Ratings) • 16,000+ Students Enrolled
I strongly believe that if you had the right teacher you could master computer vision and deep learning.
Do you think learning computer vision and deep learning has to be time-consuming, overwhelming, and complicated? Or has to involve complex mathematics and equations? Or requires a degree in computer science?
That’s not the case.
All you need to master computer vision and deep learning is for someone to explain things to you in simple, intuitive terms. And that’s exactly what I do. My mission is to change education and how complex Artificial Intelligence topics are taught.
If you're serious about learning computer vision, your next stop should be PyImageSearch University, the most comprehensive computer vision, deep learning, and OpenCV course online today. Here you’ll learn how to successfully and confidently apply computer vision to your work, research, and projects. Join me in computer vision mastery.
Inside PyImageSearch University you'll find:
- ✓ 86+ courses on essential computer vision, deep learning, and OpenCV topics
- ✓ 86 Certificates of Completion
- ✓ 115+ hours hours of on-demand video
- ✓ Brand new courses released regularly, ensuring you can keep up with state-of-the-art techniques
- ✓ Pre-configured Jupyter Notebooks in Google Colab
- ✓ Run all code examples in your web browser — works on Windows, macOS, and Linux (no dev environment configuration required!)
- ✓ Access to centralized code repos for all 540+ tutorials on PyImageSearch
- ✓ Easy one-click downloads for code, datasets, pre-trained models, etc.
- ✓ Access on mobile, laptop, desktop, etc.
Summary
We have now reached the end of this tutorial, and we hope you have gained valuable insights into training the YOLOv8 object detector for OAK-D. In this tutorial, we provided a comprehensive guide on training the YOLOv8 object detector for the OAK-D device.
We started by giving an introduction to YOLOv8 and discussed its quantitative benchmarks with previous YOLO versions. The tutorial then discussed the dataset used for training, specifically focusing on the hand gesture recognition dataset and YOLOv8 label format.
The training process is explained in detail, including
- selecting the appropriate model
- downloading the dataset
- setting up the configuration
- using the YOLOv8 Command Line Interface (CLI)
We then covered the training and evaluation of two different YOLOv8 models (i.e., YOLOv8n and YOLOv8s) with visualization of model artifacts and evaluation on the test dataset.
This tutorial serves as a foundation for an upcoming tutorial, where we will deploy the gesture recognition model on the OAK device and perform inference using the DepthAI API on images and camera streams. Stay tuned for the next tutorial in this series to dive deeper into the deployment and practical applications of the trained model.
Citation Information
Sharma, A. “Training the YOLOv8 Object Detector for OAK-D,” PyImageSearch, P. Chugh, A. R. Gosthipaty, S. Huot, K. Kidriavsteva, R. Raha, and A. Thanki, eds., 2023, https://pyimg.co/9qcei
@incollection{Sharma_2023_YOLOv8-OAK-D,
  author = {Aditya Sharma},
  title = {Training the {YOLOv8} Object Detector for {OAK-D}},
  booktitle = {PyImageSearch},
  editor = {Puneet Chugh and Aritra Roy Gosthipaty and Susan Huot and Kseniia Kidriavsteva and Ritwik Raha and Abhishek Thanki},
  year = {2023},
  url = {https://pyimg.co/9qcei},
}
Unleash the potential of computer vision with Roboflow - Free!
- Step into the realm of the future by signing up or logging into your Roboflow account. Unlock a wealth of innovative dataset libraries and revolutionize your computer vision operations.
- Jumpstart your journey by choosing from our broad array of datasets, or benefit from PyimageSearch’s comprehensive library, crafted to cater to a wide range of requirements.
- Transfer your data to Roboflow in any of the 40+ compatible formats. Leverage cutting-edge model architectures for training, and deploy seamlessly across diverse platforms, including API, NVIDIA, browser, iOS, and beyond. Integrate our platform effortlessly with your applications or your favorite third-party tools.
- Equip yourself with the ability to train a potent computer vision model in a mere afternoon. With a few images, you can import data from any source via API, annotate images using our superior cloud-hosted tool, kickstart model training with a single click, and deploy the model via a hosted API endpoint. Tailor your process by opting for a code-centric approach, leveraging our intuitive, cloud-based UI, or combining both to fit your unique needs.
- Embark on your journey today with absolutely no credit card required. Step into the future with Roboflow.
To download the source code to this post (and be notified when future tutorials are published here on PyImageSearch), simply enter your email address in the form below!

Download the Source Code and FREE 17-page Resource Guide
Enter your email address below to get a .zip of the code and a FREE 17-page Resource Guide on Computer Vision, OpenCV, and Deep Learning. Inside you'll find my hand-picked tutorials, books, courses, and libraries to help you master CV and DL!



Comment section
Hey, Adrian Rosebrock here, author and creator of PyImageSearch. While I love hearing from readers, a couple years ago I made the tough decision to no longer offer 1:1 help over blog post comments.
At the time I was receiving 200+ emails per day and another 100+ blog post comments. I simply did not have the time to moderate and respond to them all, and the sheer volume of requests was taking a toll on me.
Instead, my goal is to do the most good for the computer vision, deep learning, and OpenCV community at large by focusing my time on authoring high-quality blog posts, tutorials, and books/courses.
If you need help learning computer vision and deep learning, I suggest you refer to my full catalog of books and courses — they have helped tens of thousands of developers, students, and researchers just like yourself learn Computer Vision, Deep Learning, and OpenCV.
Click here to browse my full catalog.