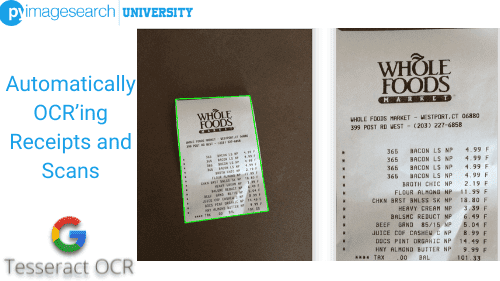
In this tutorial, you will learn how to use Tesseract and OpenCV to build an automatic receipt scanner. We’ll use OpenCV to build the actual image processing component of the system, including:
- Detecting the receipt in the image
- Finding the four corners of the receipt
- And finally, applying a perspective transform to obtain a top-down, bird’s-eye view of the receipt

To learn how to automatically OCR receipts and scans, just keep reading.
Automatically OCR’ing Receipts and Scans
From there, we will use Tesseract to OCR the receipt itself and parse out each item, line-by-line, including both the item description and price.
If you’re a business owner (like me) and need to report your expenses to your accountant, or if your job requires that you meticulously track your expenses for reimbursement, then you know how frustrating, tedious, and annoying it is to track your receipts. It’s hard to believe that purchases are still tracked via a tiny, fragile piece of paper in this day and age!
Perhaps in the future, it will become less tedious to track and report our expenses. But until then, receipt scanners can save us a bunch of time and avoid the frustration of manually cataloging purchases.
This tutorial’s receipt scanner project serves as a starting point for building a full-fledged receipt scanner application. Using this tutorial as a starting point — and then extend it by adding a GUI, integrating it with a mobile app, etc.
Let’s get started!
Learning Objectives
In this tutorial, you will learn:
- How to use OpenCV to detect, extract, and transform a receipt in an input image
- How to use Tesseract to OCR the receipt, line-by-line
- See a real-world application of how choosing the correct Tesseract Page Segmentation Mode (PSM) can lead to better results
OCR’ing Receipts with OpenCV and Tesseract
In the first part of this tutorial, we will review our directory structure for our receipt scanner project.
We’ll then review our receipt scanner implementation line-by-line. Most importantly, I’ll show you which Tesseract PSM to use when building a receipt scanner, such that you can easily detect and extract each item and price from the receipt.
Finally, we’ll wrap up this tutorial with a discussion of our results.
Configuring your development environment
To follow this guide, you need to have the OpenCV library installed on your system.
Luckily, OpenCV is pip-installable:
$ pip install opencv-contrib-python
If you need help configuring your development environment for OpenCV, I highly recommend that you read my pip install OpenCV guide — it will have you up and running in a matter of minutes.
Having Problems Configuring Your Development Environment?

All that said, are you:
- Short on time?
- Learning on your employer’s administratively locked system?
- Wanting to skip the hassle of fighting with the command line, package managers, and virtual environments?
- Ready to run the code right now on your Windows, macOS, or Linux system?
Then join PyImageSearch University today!
Gain access to Jupyter Notebooks for this tutorial and other PyImageSearch guides that are pre-configured to run on Google Colab’s ecosystem right in your web browser! No installation required.
And best of all, these Jupyter Notebooks will run on Windows, macOS, and Linux!
Project Structure
We first need to review our project directory structure.
Start by accessing the “Downloads” section of this tutorial to retrieve the source code and example images.
From there, take a look at the directory structure:
|-- scan_receipt.py
|-- whole_foods.png
We have only one script to review today, scan_receipt.py, which will contain our receipt scanner implementation.
The whole_foods.png image is a photo I took of my receipt when I went to Whole Foods, a grocery store chain in the United States. We’ll use our scan_receipt.py script to detect the receipt in the input image and then extract each item and price from the receipt.
Implementing Our Receipt Scanner
Before we dive into implementing our receipt scanner, let’s first review the basic algorithm we’ll implement. Then, when presented with an input image containing a receipt, we will:
- Apply edge detection to reveal the outline of the receipt against the background (this assumes that we’ll have sufficient contrast between the background and foreground; otherwise, we won’t be able to detect the receipt)
- Detect contours in the edge map
- Loop over all contours and find the largest contour with four vertices (since a receipt is rectangular and will have four corners)
- Apply a perspective transform, yielding a top-down, bird’s-eye view of the receipt (required to improve OCR accuracy)
- Apply the Tesseract OCR engine with
--psm 4to the top-down transform of the receipt, allowing us to OCR the receipt line-by-line - Use regular expressions to parse out the item name and price
- Finally, display the results on our terminal
That sounds like many steps, but as you’ll see, we can accomplish all of them in less than 120 lines of code (including comments).
With that said, let’s dive into the implementation. Open the scan_receipt.py file in your project directory structure, and let’s get to work:
# import the necessary packages
from imutils.perspective import four_point_transform
import pytesseract
import argparse
import imutils
import cv2
import re
We start by importing our required Python packages on Lines 2-7. These imports most notably include:
four_point_transform: Applies a perspective transform to obtain a top-down, bird’s-eye view of an input ROI. We used this function in a previous tutorial when obtaining a top-down view of a sudoku board (such that we can automatically solve the puzzles) — we’ll be doing the same here today, only with a receipt instead of a sudoku puzzle.pytesseract: Provides an interface to the Tesseract OCR engine.cv2: Our OpenCV bindingsre: Python’s regular expression package will allow us to easily parse out the item names and associated prices of each line of the receipt.
Next up, we have our command line arguments:
# construct the argument parser and parse the arguments
ap = argparse.ArgumentParser()
ap.add_argument("-i", "--image", required=True,
	help="path to input receipt image")
ap.add_argument("-d", "--debug", type=int, default=-1,
	help="whether or not we are visualizing each step of the pipeline")
args = vars(ap.parse_args())
Our script requires one command line argument, followed by an optional one:
--image: The path to our input image contains the receipt we want to OCR (in this case,whole_foods.png). You can supply your receipt image here as well.--debug: An integer value used to indicate whether or not we want to display debugging images through our pipeline, including the output of edge detection, receipt detection, etc.
In particular, if you cannot find a receipt in an input image, it’s likely due to either the edge detection process failing to detect the edges of the receipt: meaning that you need to fine-tune your Canny edge detection parameters or use a different method (e.g., thresholding, the Hough line transform, etc.). Another possibility is that the contour approximation step fails to find the four corners of the receipt.
If and when those situations happen, supplying a positive value for the --debug command line argument will show you the output of the steps, allowing you to debug the problem, tweak the parameters/algorithms, and then continue.
Next, let’s load our --input image from disk and examine its spatial dimensions:
# load the input image from disk, resize it, and compute the ratio
# of the *new* width to the *old* width
orig = cv2.imread(args["image"])
image = orig.copy()
image = imutils.resize(image, width=500)
ratio = orig.shape[1] / float(image.shape[1])
Here, we load our original (orig) image from disk and then make a clone. We need to clone the input image such that we have the original image where we apply the perspective transform. But, we can apply our actual image processing operations (i.e., edge detection, contour detection, etc.) to the image.
We resize our image to have a width of 500 pixels (thereby acting as a form of noise reduction) and then compute the ratio of the new width to the old width. Finally, this ratio value will be used to apply a perspective transform to the orig image.
Let’s start applying our image processing pipeline to the image now:
# convert the image to grayscale, blur it slightly, and then apply
# edge detection
gray = cv2.cvtColor(image, cv2.COLOR_BGR2GRAY)
blurred = cv2.GaussianBlur(gray, (5, 5,), 0)
edged = cv2.Canny(blurred, 75, 200)

# check to see if we should show the output of our edge detection
# procedure
if args["debug"] > 0:
	cv2.imshow("Input", image)
	cv2.imshow("Edged", edged)
	cv2.waitKey(0)
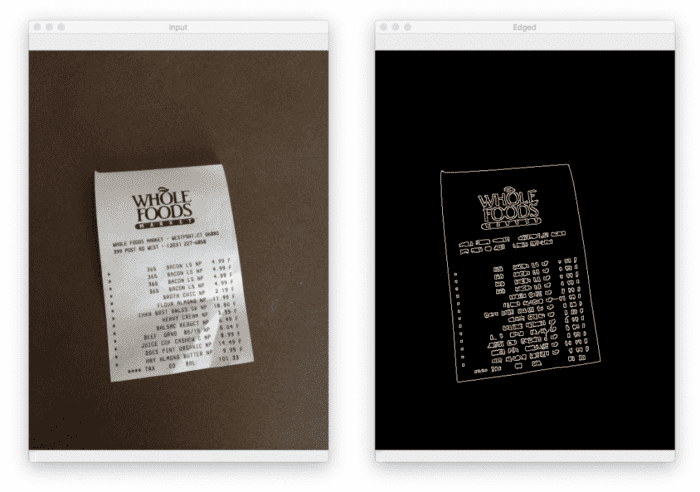
Here, we perform edge detection by converting the image to grayscale, blurring it using a 5x5 Gaussian kernel (to reduce noise), and then applying edge detection using the Canny edge detector.
If we have our --debug command line argument set, we will display the input image and the output edge map on our screen.
Figure 2 shows our input image (left), followed by our output edge map (right). Notice how our edge map clearly shows the outline of the receipt in the input image.
Given our edge map, let’s detect contours in the edged image and process them:
# find contours in the edge map and sort them by size in descending
# order
cnts = cv2.findContours(edged.copy(), cv2.RETR_EXTERNAL,
	cv2.CHAIN_APPROX_SIMPLE)
cnts = imutils.grab_contours(cnts)
cnts = sorted(cnts, key=cv2.contourArea, reverse=True)
Take note of Line 42, where we sort our contours according to their area (size) from largest to smallest. This sorting step is important as we’re assuming that the largest contour in the input image with four corners is our receipt.

The sorting step takes care of our first requirement. But how do we know if we’ve found a contour that has four vertices?
The following code block answers that question:
# initialize a contour that corresponds to the receipt outline
receiptCnt = None

# loop over the contours
for c in cnts:
	# approximate the contour
	peri = cv2.arcLength(c, True)
	approx = cv2.approxPolyDP(c, 0.02 * peri, True)

	# if our approximated contour has four points, then we can
	# assume we have found the outline of the receipt
	if len(approx) == 4:
		receiptCnt = approx
		break

# if the receipt contour is empty then our script could not find the
# outline and we should be notified
if receiptCnt is None:
	raise Exception(("Could not find receipt outline. "
		"Try debugging your edge detection and contour steps."))
Line 45 initializes a variable to store the contour that corresponds to our receipt. We then start looping over all detected contours on Line 48.
Lines 50 and 51 approximate the contour by reducing the number of points, thereby simplifying the shape.
Lines 55-57 check to see if we’ve found a contour with four points. If so, we can safely assume that we’ve found our receipt as this is the largest contour with four vertices. Once we’ve found the contour, we store it in receiptCnt and break from the loop.
Lines 61-63 provide a graceful way for our script exit if our receipt was not found. Typically, this happens when there is a problem during the edge detection phase of our script. Due to insufficient lighting conditions or simply not having enough contrast between the receipt and the background, the edge map may be “broken” by having gaps or holes in it.
The contour detection process does not “see” the receipt as a four-corner object when that happens. Instead, it sees a strange polygon object, and thus the receipt is not detected.
If and when that happens, be sure to use the --debug command line argument to inspect your edge map’s output visually.
With our receipt contour found, let’s apply our perspective transform to the image:
# check to see if we should draw the contour of the receipt on the
# image and then display it to our screen
if args["debug"] > 0:
	output = image.copy()
	cv2.drawContours(output, [receiptCnt], -1, (0, 255, 0), 2)
	cv2.imshow("Receipt Outline", output)
	cv2.waitKey(0)

# apply a four-point perspective transform to the *original* image to
# obtain a top-down bird's-eye view of the receipt
receipt = four_point_transform(orig, receiptCnt.reshape(4, 2) * ratio)

# show transformed image
cv2.imshow("Receipt Transform", imutils.resize(receipt, width=500))
cv2.waitKey(0)
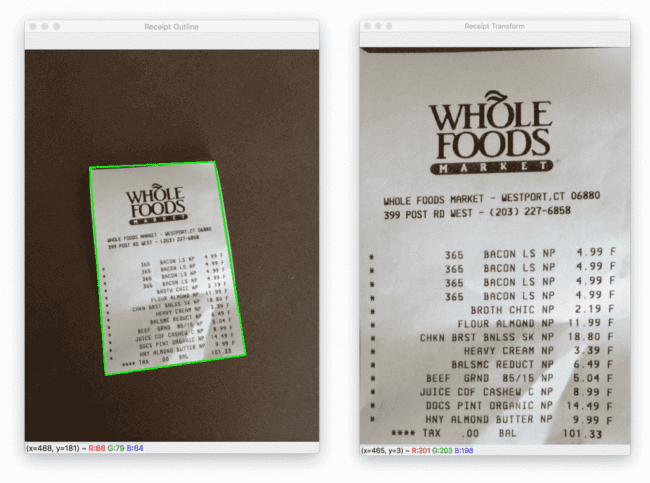
Lines 67-71 outline the receipt on our output image if we are in debug mode. We then display that output image on our screen to validate that the receipt was detected correctly (Figure 3, left).
A top-down, bird’s-eye view of the receipt is accomplished on Line 75. Note that we are applying the transform to the higher resolution orig image — why is that?
First and foremost, the image variable already had edge detection and contour processing applied. Using a perspective transform the image and then OCR’ing it wouldn’t lead to correct results; all we would get is noise.
Instead, we seek the high-resolution version of the receipt. Hence we apply the perspective transform to the orig image. To do so, we need to multiply our receiptCnt (x, y)-coordinates by our ratio, thereby scaling the coordinates back to the orig spatial dimensions.
To validate that we’ve computed the top-down, bird’s-eye view of the original image, we display the high-resolution receipt on our screen on Lines 78 and 79 (Figure 3, right).

Given our top-down view of the receipt, we can now OCR it:
# apply OCR to the receipt image by assuming column data, ensuring
# the text is *concatenated across the row* (additionally, for your
# own images you may need to apply additional processing to cleanup
# the image, including resizing, thresholding, etc.)
options = "--psm 4"
text = pytesseract.image_to_string(
	cv2.cvtColor(receipt, cv2.COLOR_BGR2RGB),
	config=options)

# show the raw output of the OCR process
print("[INFO] raw output:")
print("==================")
print(text)
print("\n")
Lines 85-88 use Tesseract to OCR receipt, passing in the --psm 4 mode. Using --psm 4 allows us to OCR the receipt line-by-line. Each line will include the item name and the item price.
Lines 91-94 then show the raw text after applying OCR.
However, the problem is that Tesseract has no idea what an item is on the receipt versus just the grocery store’s name, address, telephone number, and all the other information you typically find on a receipt.
That raises the question — how do we parse out the information we do not need, leaving us with just the item names and prices?
The answer is to leverage regular expressions:
# define a regular expression that will match line items that include
# a price component
pricePattern = r'([0-9]+\.[0-9]+)'

# show the output of filtering out *only* the line items in the
# receipt
print("[INFO] price line items:")
print("========================")

# loop over each of the line items in the OCR'd receipt
for row in text.split("\n"):
	# check to see if the price regular expression matches the current
	# row
	if re.search(pricePattern, row) is not None:
		print(row)
If you’ve never used regular expressions before, they are a special tool that allows us to define a pattern of text. The regular expression library (in Python, the library is re) then matches all text to this pattern.
Line 98 defines our pricePattern. This pattern will match any number of occurrences of the digits 0-9, followed by the . character (meaning the decimal separator in a price value), followed again by any number of the digits 0-9.
For example, this pricePattern would match the text $9.75 but would not match the text 7600 because the text 7600 does not contain a decimal point separator.
If you are new to regular expressions or simply need a refresher on them, I suggest reading the following series by RealPython.
Line 106 splits our raw OCR’d text and allows us to loop over each line individually.
For each line, we check to see if the row matches our pricePattern (Line 109). If so, we know we’ve found a row that contains an item and price, so we print the row to our terminal (Line 110).
Congrats on building your first receipt scanner OCR application!
Receipt Scanner and OCR Results
Now that we’ve implemented our scan_receipt.py script, let’s put it to work. Open a terminal and execute the following command:
$ python scan_receipt.py --image whole_foods.png
[INFO] raw output:
==================
WHOLE
FOODS

WHOLE FOODS MARKET - WESTPORT, CT 06880
399 POST RD WEST - (203) 227-6858

365 BACON LS NP 4.99

365 BACON LS NP 4.99

365 BACON LS NP 4.99

365 BACON LS NP 4.99
BROTH CHIC NP 4.18

FLOUR ALMOND NP 11.99

CHKN BRST BNLSS SK NP 18.80
HEAVY CREAM NP 3 7

BALSMC REDUCT NP 6.49

BEEF GRND 85/15 NP 5.04
JUICE COF CASHEW C NP 8.99
DOCS PINT ORGANIC NP 14.49
HNY ALMOND BUTTER NP 9.99
eee TAX .00 BAL 101.33
The raw output of the Tesseract OCR engine can be seen in our terminal. By specifying --psm 4, Tesseract has been able to OCR the receipt line-by-line, capturing both items:
- name/description
- price
However, there is a bunch of other “noise” in the output, including the grocery store’s name, address, phone number, etc. How do we parse out this information, leaving us with only the items and their prices?
The answer is to use regular expressions which filter on lines that have numerical values similar to prices — the output of these regular expressions can be seen below:
[INFO] price line items:
========================
365 BACON LS NP 4.99
365 BACON LS NP 4.99
365 BACON LS NP 4.99
365 BACON LS NP 4.99
BROTH CHIC NP 4.18
FLOUR ALMOND NP 11.99
CHKN BRST BNLSS SK NP 18.80
BALSMC REDUCT NP 6.49
BEEF GRND 85/15 NP 5.04
JUICE COF CASHEW C NP 8.99
DOCS PINT ORGANIC NP 14.49
HNY ALMOND BUTTER NP 9.99
eee TAX .00 BAL 101.33
By using regular expressions, we’ve extracted only the items and prices, including the final balance due.
Our receipt scanner application is an important implementation to see as it shows how OCR can be combined with a bit of text processing to extract the data of interest. There’s an entire computer science field dedicated to text processing called natural language processing (NLP).
Just like computer vision is the advanced study of writing software that can understand what’s in an image, NLP seeks to do the same, only for text. Depending on what you’re trying to build with computer vision and OCR, you may want to spend a few weeks to a few months just familiarizing yourself with NLP — that knowledge will better help you understand how to process the text returned from an OCR engine.
What's next? We recommend PyImageSearch University.
86+ total classes • 115+ hours hours of on-demand code walkthrough videos • Last updated: July 2025
★★★★★ 4.84 (128 Ratings) • 16,000+ Students Enrolled
I strongly believe that if you had the right teacher you could master computer vision and deep learning.
Do you think learning computer vision and deep learning has to be time-consuming, overwhelming, and complicated? Or has to involve complex mathematics and equations? Or requires a degree in computer science?
That’s not the case.
All you need to master computer vision and deep learning is for someone to explain things to you in simple, intuitive terms. And that’s exactly what I do. My mission is to change education and how complex Artificial Intelligence topics are taught.
If you're serious about learning computer vision, your next stop should be PyImageSearch University, the most comprehensive computer vision, deep learning, and OpenCV course online today. Here you’ll learn how to successfully and confidently apply computer vision to your work, research, and projects. Join me in computer vision mastery.
Inside PyImageSearch University you'll find:
- ✓ 86+ courses on essential computer vision, deep learning, and OpenCV topics
- ✓ 86 Certificates of Completion
- ✓ 115+ hours hours of on-demand video
- ✓ Brand new courses released regularly, ensuring you can keep up with state-of-the-art techniques
- ✓ Pre-configured Jupyter Notebooks in Google Colab
- ✓ Run all code examples in your web browser — works on Windows, macOS, and Linux (no dev environment configuration required!)
- ✓ Access to centralized code repos for all 540+ tutorials on PyImageSearch
- ✓ Easy one-click downloads for code, datasets, pre-trained models, etc.
- ✓ Access on mobile, laptop, desktop, etc.
Summary
In this tutorial, you learned how to implement a basic receipt scanner using OpenCV and Tesseract. Our receipt scanner implementation required basic image processing operations to detect the receipt, including:
- Edge detection
- Contour detection
- Contour filtering using arc length and approximation
From there, we used Tesseract, and most importantly, --psm 4, to OCR the receipt. By using --psm 4, we extracted each item from the receipt, line-by-line, including the item name and the cost of that particular item.
The most significant limitation of our receipt scanner is that it requires:
- Sufficient contrast between the receipt and the background
- All four corners of the receipt to be visible in the image
If any of these cases do not hold, our script will not find the receipt.
Citation Information
Rosebrock, A. “Automatically OCR’ing Receipts and Scans,” PyImageSearch, 2021, https://pyimagesearch.com/2021/10/27/automatically-ocring-receipts-and-scans/
@article{Rosebrock_2021_Automatically,
 author = {Adrian Rosebrock},
 title = {Automatically {OCR}’ing Receipts and Scans},
 journal = {PyImageSearch},
 year = {2021},
 note = {https://pyimagesearch.com/2021/10/27/automatically-ocring-receipts-and-scans/},
}
To download the source code to this post (and be notified when future tutorials are published here on PyImageSearch), simply enter your email address in the form below!

Download the Source Code and FREE 17-page Resource Guide
Enter your email address below to get a .zip of the code and a FREE 17-page Resource Guide on Computer Vision, OpenCV, and Deep Learning. Inside you'll find my hand-picked tutorials, books, courses, and libraries to help you master CV and DL!


Comment section
Hey, Adrian Rosebrock here, author and creator of PyImageSearch. While I love hearing from readers, a couple years ago I made the tough decision to no longer offer 1:1 help over blog post comments.
At the time I was receiving 200+ emails per day and another 100+ blog post comments. I simply did not have the time to moderate and respond to them all, and the sheer volume of requests was taking a toll on me.
Instead, my goal is to do the most good for the computer vision, deep learning, and OpenCV community at large by focusing my time on authoring high-quality blog posts, tutorials, and books/courses.
If you need help learning computer vision and deep learning, I suggest you refer to my full catalog of books and courses — they have helped tens of thousands of developers, students, and researchers just like yourself learn Computer Vision, Deep Learning, and OpenCV.
Click here to browse my full catalog.