Table of Contents
- Text Detection and OCR with Google Cloud Vision API
- Google Cloud Vision API for OCR
- Obtaining Your Google Cloud Vision API Keys
- Configuring Your Development Environment for the Google Cloud Vision API
- Having Problems Configuring Your Development Environment?
- Project Structure
- Implementing the Google Cloud Vision API Script
- Google Cloud Vision API OCR Results
- Summary
Text Detection and OCR with Google Cloud Vision API
In this lesson, you will:
- Learn how to obtain your Google Cloud Vision API keys/JSON configuration file from the Google cloud admin panel
- Configure your development environment for use with the Google Cloud Vision API
- Implement a Python script used to make requests to the Google Cloud Vision API
This lesson is the last part of a 3-part series on Text Detection and OCR:
- Text Detection and OCR with Amazon Rekognition API
- Text Detection and OCR with Microsoft Cognitive Services
- Text Detection and OCR with Google Cloud Vision API (this tutorial)
To learn about text detection and OCR with Google Cloud Vision API, just keep reading.
Text Detection and OCR with Google Cloud Vision API
In today’s lesson, we will look at the Google Cloud Vision API. In terms of code, the Google Cloud Vision API is easy to use. Still, it requires that we use their admin panel to generate a client JavaScript Object Notation (JSON) file that contains all the necessary information to access the Vision API.
We have mixed feelings about the JSON file. On the one hand, it’s nice not to have to hardcode our private and public keys. But on the other hand, it’s cumbersome to have to use the admin panel to generate the JSON file itself.
Realistically, it’s a situation of “six of one, half a dozen of the other.” It doesn’t make that much of a difference (just something to be aware of).
And as we’ll find out, the Google Cloud Vision API, just like the others, tends to be quite accurate and does a good job OCR’ing complex images.
Let’s dive in!
Google Cloud Vision API for OCR
In the first part of this lesson, you’ll learn about the Google Cloud Vision API and how to obtain your API keys and generate your JSON configuration file for authentication with the API.
From there, we’ll be sure to have your development environment correctly configured with the required Python packages to interface with the Google Cloud Vision API.
We’ll then implement a Python script that takes an input image, packages it within an API request, and sends it to the Google Cloud Vision API for OCR.
We’ll wrap up this lesson with a discussion of our results.
Obtaining Your Google Cloud Vision API Keys
Prerequisite
A Google Cloud account with billing enabled is all you’ll need to use the Google Cloud Vision API. You can find the Google Cloud guide on how to modify your billing settings here.
Steps to Enable Google Cloud Vision API and Download Credentials
You can find our guide to getting your keys in our book, OCR with OpenCV, Tesseract, and Python.
Configuring Your Development Environment for the Google Cloud Vision API
To follow this guide, you need to have the OpenCV library and the google-cloud-vision Python package installed on your system.
Luckily, both are pip-installable:
$ pip install opencv-contrib-python
$ pip install --upgrade google-cloud-vision
If you are using a Python virtual environment or an Anaconda package manager, be sure to use the appropriate command to access your Python environment before running the above pip-install command. Otherwise, the google-cloud-vision package will be installed in your system Python rather than your Python environment.
If you need help configuring your development environment for OpenCV, we highly recommend that you read our pip install OpenCV guide — it will have you up and running in a matter of minutes.
Having Problems Configuring Your Development Environment?

All that said, are you:
- Short on time?
- Learning on your employer’s administratively locked system?
- Wanting to skip the hassle of fighting with the command line, package managers, and virtual environments?
- Ready to run the code right now on your Windows, macOS, or Linux system?
Then join PyImageSearch University today!
Gain access to Jupyter Notebooks for this tutorial and other PyImageSearch guides that are pre-configured to run on Google Colab’s ecosystem right in your web browser! No installation required.
And best of all, these Jupyter Notebooks will run on Windows, macOS, and Linux!
Project Structure
Start by accessing the “Downloads” section of this tutorial to retrieve the source code and example images.
Let’s inspect the project directory structure for our Google Cloud Vision API OCR project:
|-- images
|   |-- aircraft.png
|   |-- challenging.png
|   |-- street_signs.png
|-- client_id.json
|-- google_ocr.py
We will apply our google_ocr.py script to several examples in the images directory.
The client_id.json file provides all necessary credentials and authentication information. The google_ocr.py script will load this file and supply it to the Google Cloud Vision API to perform OCR.
Implementing the Google Cloud Vision API Script
With our project directory structure reviewed, we can move on to implementing google_ocr.py, the Python script responsible for:
- Loading the contents of our
client_id.jsonfile - Connecting to the Google Cloud Vision API
- Loading and submitting our input image to the API
- Retrieving the text detection and OCR results
- Drawing and displaying the OCR’d text to our screen
Let’s dive in:
# import the necessary packages
from google.oauth2 import service_account
from google.cloud import vision
import argparse
import cv2
import io
Lines 2-6 import our required Python packages. Note that we need the service_account to connect to the Google Cloud Vision API while the vision package contains the text_detection function responsible for OCR.
Next, we have draw_ocr_results, a convenience function used to annotate our output image:
def draw_ocr_results(image, text, rect, color=(0, 255, 0)):
	# unpacking the bounding box rectangle and draw a bounding box
	# surrounding the text along with the OCR'd text itself
	(startX, startY, endX, endY) = rect
	cv2.rectangle(image, (startX, startY), (endX, endY), color, 2)
	cv2.putText(image, text, (startX, startY - 10),
		cv2.FONT_HERSHEY_SIMPLEX, 0.8, color, 2)

	# return the output image
	return image
The draw_ocr_results function accepts four parameters:
image: The input image we are drawing ontext: The OCR’d textrect: The bounding box coordinates of the text ROIcolor: The color of the drawn bounding box and text
Line 11 unpacks the (x, y)-coordinates of our text ROI. We use these coordinates to draw a bounding box surrounding the text along with the OCR’d text itself (Lines 12-14).
We then return the image to the calling function.
Let’s examine our command line arguments:
# construct the argument parser and parse the arguments
ap = argparse.ArgumentParser()
ap.add_argument("-i", "--image", required=True,
	help="path to input image that we'll submit to Google Vision API")
ap.add_argument("-c", "--client", required=True,
	help="path to input client ID JSON configuration file")
args = vars(ap.parse_args())
We have two command line arguments here:
--image: The path to the input image that we’ll be submitting to the Google Cloud Vision API for OCR.--client: The client ID JSON file containing our authentication information (be sure to follow the Obtaining Your Google Cloud Vision API Keys section to generate this JSON file).
It’s time to connect to the Google Cloud Vision API:
# create the client interface to access the Google Cloud Vision API
credentials = service_account.Credentials.from_service_account_file(
	filename=args["client"],
	scopes=["https://www.googleapis.com/auth/cloud-platform"])
client = vision.ImageAnnotatorClient(credentials=credentials)

# load the input image as a raw binary file (this file will be
# submitted to the Google Cloud Vision API)
with io.open(args["image"], "rb") as f:
	byteImage = f.read()
Lines 28-30 connect to the Google Cloud Vision API, supplying the --client path to the JSON authentication file on disk. Line 31 then creates our client for all image processing/computer vision operations.
We then load our input --image from disk as a byte array (byteImage) to submit it to Google Cloud Vision API.
Let’s submit our byteImage to the API now:
# create an image object from the binary file and then make a request
# to the Google Cloud Vision API to OCR the input image
print("[INFO] making request to Google Cloud Vision API...")
image = vision.Image(content=byteImage)
response = client.text_detection(image=image)

# check to see if there was an error when making a request to the API
if response.error.message:
	raise Exception(
		"{}\nFor more info on errors, check:\n"
		"https://cloud.google.com/apis/design/errors".format(
			response.error.message))
Line 41 creates an Image data object, which is then submitted to the text_detection function of the Google Cloud Vision API (Line 42).
Lines 45-49 check to see if there was an error OCR’ing our input image and if so, we raise the error and exit from the script.
Otherwise, we can process the results of the OCR step:
# read the image again, this time in OpenCV format and make a copy of
# the input image for final output
image = cv2.imread(args["image"])
final = image.copy()

# loop over the Google Cloud Vision API OCR results
for text in response.text_annotations[1::]:
	# grab the OCR'd text and extract the bounding box coordinates of
	# the text region
	ocr = text.description
	startX = text.bounding_poly.vertices[0].x
	startY = text.bounding_poly.vertices[0].y
	endX = text.bounding_poly.vertices[1].x
	endY = text.bounding_poly.vertices[2].y

	# construct a bounding box rectangle from the box coordinates
	rect = (startX, startY, endX, endY)
Line 53 loads our input image from disk in OpenCV/NumPy array format (so that we can draw on it).
Line 57 loops over all OCR’d text from the Google Cloud Vision API response. Line 60 extracts the ocr text itself, while Lines 61-64 extract the text region’s bounding box coordinates. Line 67 then constructs a rectangle (rect) from these coordinates.
The final step is to draw the OCR results on the output and final images:
	# draw the output OCR line-by-line
	output = image.copy()
	output = draw_ocr_results(output, ocr, rect)
	final = draw_ocr_results(final, ocr, rect)

	# show the output OCR'd line
	print(ocr)
	cv2.imshow("Output", output)
	cv2.waitKey(0)

# show the final output image
cv2.imshow("Final Output", final)
cv2.waitKey(0)
Each piece of OCR’d text is displayed on our screen on Lines 75-77. The final image, with all OCR’d text, is displayed on Lines 80 and 81.
Google Cloud Vision API OCR Results
Let’s now put the Google Cloud Vision API to work! Open a terminal and execute the following command:
$ python google_ocr.py --image images/aircraft.png --client client_id.json
[INFO] making request to Google Cloud Vision API...
WARNING!
LOW
FLYING
AND
DEPARTING
AIRCRAFT
BLAST
CAN
CAUSE
PHYSICAL
INJURY
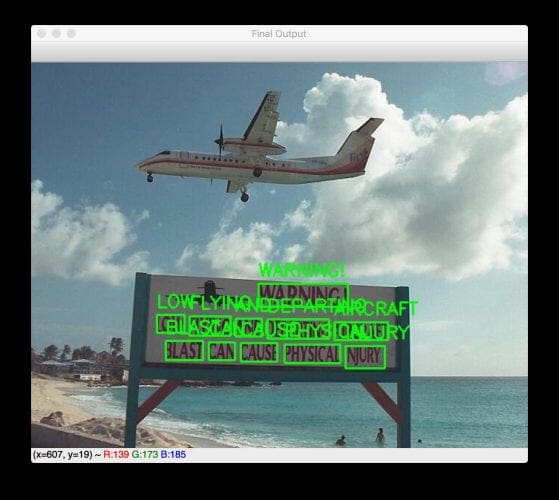
Figure 2 shows the results of applying the Google Cloud Vision API to our aircraft image, the same image we have been benchmarking OCR performance across all three cloud services. Like Amazon Rekognition API and Microsoft Cognitive Services, the Google Cloud Vision API can correctly OCR the image.
Let’s try a more challenging image, which you can see in Figure 3:
$ python google_ocr.py --image images/challenging.png --client client_id.json
[INFO] making request to Google Cloud Vision API...
LITTER
First
Eastern
National
Bus
Fimes
EMERGENCY
STOP
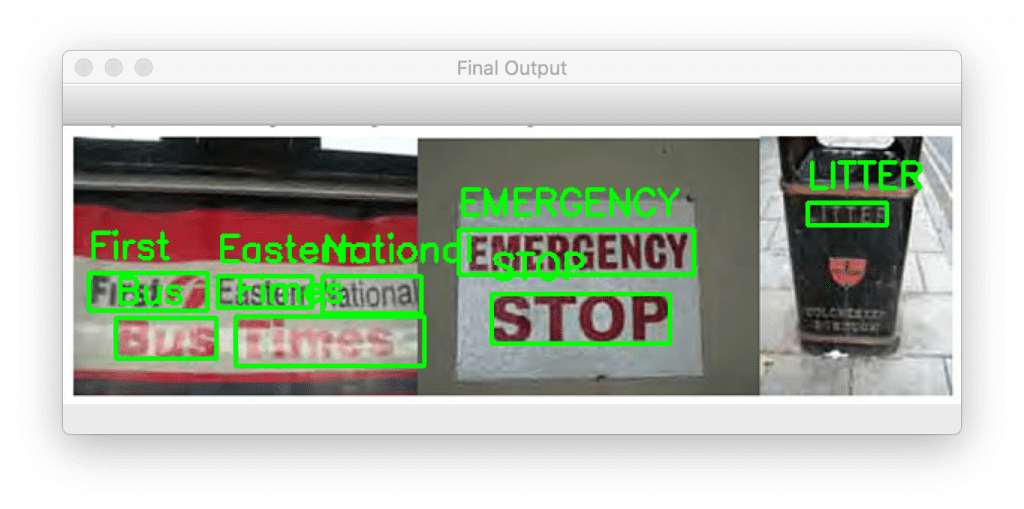
Just like the Microsoft Cognitive Services API, the Google Cloud Vision API performs well on our challenging, low-quality image with pixelation and low readability (even by human standards, let alone a machine). The results are in Figure 3.
Interestingly, the Google Cloud Vision API does make a mistake, thinking that the “T” in “Times” is an “F.”
Let’s look at one final image, this one of a street sign:
$ python google_ocr.py --image images/street_signs.png --client client_id.json
[INFO] making request to Google Cloud Vision API...
Old
Town
Rd
STOP
ALL
WAY
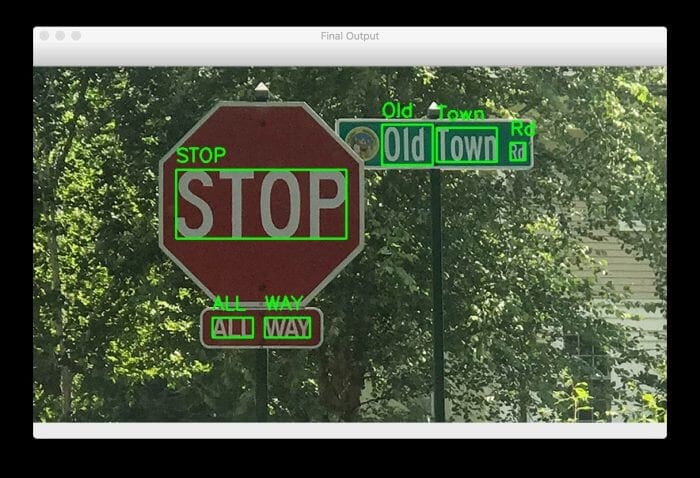
Figure 4 displays the output of applying the Google Cloud Vision API to our street sign image. Microsoft Cognitive Services API OCRs the image line-by-line, resulting in the text “Old Town Rd” and “All Way” to be OCR’d as a single line. Alternatively, Google Cloud Vision API OCRs the text word-by-word (the default setting in the Google Cloud Vision API).
What's next? We recommend PyImageSearch University.
86+ total classes • 115+ hours hours of on-demand code walkthrough videos • Last updated: July 2025
★★★★★ 4.84 (128 Ratings) • 16,000+ Students Enrolled
I strongly believe that if you had the right teacher you could master computer vision and deep learning.
Do you think learning computer vision and deep learning has to be time-consuming, overwhelming, and complicated? Or has to involve complex mathematics and equations? Or requires a degree in computer science?
That’s not the case.
All you need to master computer vision and deep learning is for someone to explain things to you in simple, intuitive terms. And that’s exactly what I do. My mission is to change education and how complex Artificial Intelligence topics are taught.
If you're serious about learning computer vision, your next stop should be PyImageSearch University, the most comprehensive computer vision, deep learning, and OpenCV course online today. Here you’ll learn how to successfully and confidently apply computer vision to your work, research, and projects. Join me in computer vision mastery.
Inside PyImageSearch University you'll find:
- ✓ 86+ courses on essential computer vision, deep learning, and OpenCV topics
- ✓ 86 Certificates of Completion
- ✓ 115+ hours hours of on-demand video
- ✓ Brand new courses released regularly, ensuring you can keep up with state-of-the-art techniques
- ✓ Pre-configured Jupyter Notebooks in Google Colab
- ✓ Run all code examples in your web browser — works on Windows, macOS, and Linux (no dev environment configuration required!)
- ✓ Access to centralized code repos for all 540+ tutorials on PyImageSearch
- ✓ Easy one-click downloads for code, datasets, pre-trained models, etc.
- ✓ Access on mobile, laptop, desktop, etc.
Summary
In this lesson, you learned how to utilize the cloud-based Google Cloud Vision API for OCR. Like the other cloud-based OCR APIs we’ve covered in this book, the Google Cloud Vision API can obtain high OCR accuracy with little effort. The downside, of course, is that you need an internet connection to leverage the API.
When choosing a cloud-based API, I wouldn’t focus on the amount of Python code required to interface with the API. Instead, consider the overall ecosystem of the cloud platform you are using.
Suppose you’re building an application that requires you to interface with Amazon Simple Storage Service (Amazon S3) for data storage. In that case, it makes a lot more sense to use Amazon Rekognition API. This enables you to keep everything under the Amazon umbrella.
On the other hand, if you are using the Google Cloud Platform (GCP) instances to train deep learning models in the cloud, it makes more sense to use the Google Cloud Vision API.
These are all design and architectural decisions when building your application. Suppose you’re just “testing the waters” of each of these APIs. You are not bound to these considerations. However, if you’re developing a production-level application, then it’s well worth your time to consider the trade-offs of each cloud service. You should consider more than just OCR accuracy; consider the compute, storage, etc., services that each cloud platform offers.
Citation Information
Rosebrock, A. “Text Detection and OCR with Google Cloud Vision API,” PyImageSearch, D. Chakraborty, P. Chugh. A. R. Gosthipaty, S. Huot, K. Kidriavsteva, R. Raha, and A. Thanki, eds., 2022, https://pyimg.co/evzxr
***@incollection{Rosebrock_2022_OCR_GCV,
  author = {Adrian Rosebrock},
  title = {Text Detection and {OCR} with {G}oogle Cloud Vision {API}},
  booktitle = {PyImageSearch},
  editor = {Devjyoti Chakraborty and Puneet Chugh and Aritra Roy Gosthipaty and Susan Huot and Kseniia Kidriavsteva and Ritwik Raha and Abhishek Thanki},  year = {2022},
  note = {https://pyimg.co/evzxr},
}
Unleash the potential of computer vision with Roboflow - Free!
- Step into the realm of the future by signing up or logging into your Roboflow account. Unlock a wealth of innovative dataset libraries and revolutionize your computer vision operations.
- Jumpstart your journey by choosing from our broad array of datasets, or benefit from PyimageSearch’s comprehensive library, crafted to cater to a wide range of requirements.
- Transfer your data to Roboflow in any of the 40+ compatible formats. Leverage cutting-edge model architectures for training, and deploy seamlessly across diverse platforms, including API, NVIDIA, browser, iOS, and beyond. Integrate our platform effortlessly with your applications or your favorite third-party tools.
- Equip yourself with the ability to train a potent computer vision model in a mere afternoon. With a few images, you can import data from any source via API, annotate images using our superior cloud-hosted tool, kickstart model training with a single click, and deploy the model via a hosted API endpoint. Tailor your process by opting for a code-centric approach, leveraging our intuitive, cloud-based UI, or combining both to fit your unique needs.
- Embark on your journey today with absolutely no credit card required. Step into the future with Roboflow.
To download the source code to this post (and be notified when future tutorials are published here on PyImageSearch), simply enter your email address in the form below!

Download the Source Code and FREE 17-page Resource Guide
Enter your email address below to get a .zip of the code and a FREE 17-page Resource Guide on Computer Vision, OpenCV, and Deep Learning. Inside you'll find my hand-picked tutorials, books, courses, and libraries to help you master CV and DL!


Comment section
Hey, Adrian Rosebrock here, author and creator of PyImageSearch. While I love hearing from readers, a couple years ago I made the tough decision to no longer offer 1:1 help over blog post comments.
At the time I was receiving 200+ emails per day and another 100+ blog post comments. I simply did not have the time to moderate and respond to them all, and the sheer volume of requests was taking a toll on me.
Instead, my goal is to do the most good for the computer vision, deep learning, and OpenCV community at large by focusing my time on authoring high-quality blog posts, tutorials, and books/courses.
If you need help learning computer vision and deep learning, I suggest you refer to my full catalog of books and courses — they have helped tens of thousands of developers, students, and researchers just like yourself learn Computer Vision, Deep Learning, and OpenCV.
Click here to browse my full catalog.