In this tutorial, you will learn how to perform video classification using Keras, Python, and Deep Learning.
Specifically, you will learn:
- The difference between video classification and standard image classification
- How to train a Convolutional Neural Network using Keras for image classification
- How to take that CNN and then use it for video classification
- How to use rolling prediction averaging to reduce “flickering” in results
This tutorial will serve as an introduction to the concept of working with deep learning in a temporal nature, paving the way for when we discuss Long Short-term Memory networks (LSTMs) and eventually human activity recognition.
To learn how to perform video classification with Keras and Deep learning, just keep reading!
Video Classification with Keras and Deep Learning
2020-06-12 Update: This blog post is now TensorFlow 2+ compatible!
Videos can be understood as a series of individual images; and therefore, many deep learning practitioners would be quick to treat video classification as performing image classification a total of N times, where N is the total number of frames in a video.
There’s a problem with that approach though.
Video classification is more than just simple image classification — with video we can typically make the assumption that subsequent frames in a video are correlated with respect to their semantic contents.
If we are able to take advantage of the temporal nature of videos, we can improve our actual video classification results.
Neural network architectures such as Long short-term memory (LSTMs) and Recurrent Neural Networks (RNNs) are suited for time series data — two topics that we’ll be covering in later tutorials — but in some cases, they may be overkill. They are also resource-hungry and time-consuming when it comes to training over thousands of video files as you can imagine.
Instead, for some applications, all you may need is rolling averaging over predictions.
In the remainder of this tutorial, you’ll learn how to train a CNN for image classification (specifically sports classification) and then turn it into a more accurate video classifier by employing rolling averaging.
How is video classification different than image classification?
When performing image classification, we:
- Input an image to our CNN
- Obtain the predictions from the CNN
- Choose the label with the largest corresponding probability
Since a video is just a series of frames, a naive video classification method would be to:
- Loop over all frames in the video file
- For each frame, pass the frame through the CNN
- Classify each frame individually and independently of each other
- Choose the label with the largest corresponding probability
- Label the frame and write the output frame to disk
There’s a problem with this approach though — if you’ve ever tried to apply simple image classification to video classification you likely encountered a sort of “prediction flickering” as seen in the video at the top of this section. Notice how in this visualization we see our CNN shifting between two predictions: “football” and the correct label, “weight_lifting”.
The video is clearly of weightlifting and we would like our entire video to be labeled as such — but how we can prevent the CNN “flickering” between these two labels?
A simple, yet elegant solution, is to utilize a rolling prediction average.
Our algorithm now becomes:
- Loop over all frames in the video file
- For each frame, pass the frame through the CNN
- Obtain the predictions from the CNN
- Maintain a list of the last K predictions
- Compute the average of the last K predictions and choose the label with the largest corresponding probability
- Label the frame and write the output frame to disk
The results of this algorithm can be seen in the video at the very top of this post — notice how the prediction flickering is gone and the entire video clip is correctly labeled!
In the remainder of this tutorial, you will learn how to implement this algorithm for video classification with Keras.
The Sports Classification Dataset
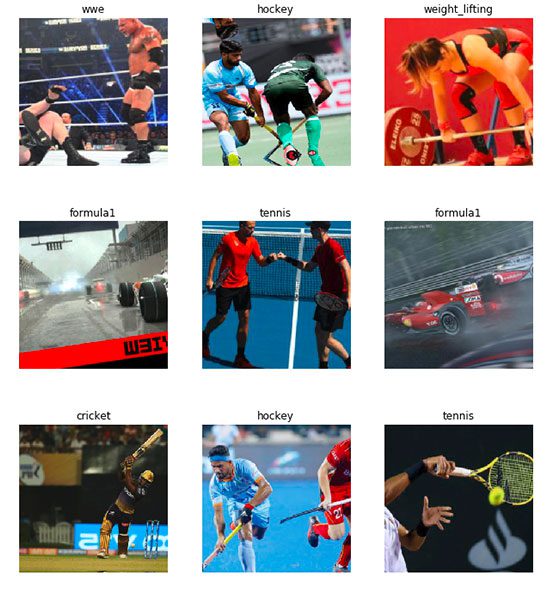
The dataset we’ll be using here today is for sport/activity classification. The dataset was curated by Anubhav Maity by downloading photos from Google Images (you could also use Bing) for the following categories:
- Swimming
- Badminton
- Wrestling
- Olympic Shooting
- Cricket
- Football
- Tennis
- Hockey
- Ice Hockey
- Kabaddi
- WWE
- Gymnasium
- Weight lifting
- Volleyball
- Table tennis
- Baseball
- Formula 1
- Moto GP
- Chess
- Boxing
- Fencing
- Basketball
To save time, computational resources, and to demonstrate the actual video classification algorithm (the actual point of this tutorial), we’ll be training on a subset of the sports type dataset:
- Football (i.e., soccer): 799 images
- Tennis: 718 images
- Weightlifting: 577 images
Let’s go ahead and download our dataset!
Downloading the Sports Classification Dataset
Go ahead and download the source code for today’s blog post from the “Downloads” link.
Extract the .zip and navigate into the project folder from your terminal:
$ unzip keras-video-classification.zip
$ cd keras-video-classification
I’ve decided to include a subset of the dataset with today’s “Downloads” in the Sports-Type-Classifier/data/ directory because Anubhav Maity’s original dataset is no longer available on GitHub (a near-identical sports dataset is available here).
The data we’ll be using today is in the following path:
$ cd keras-video-classification
$ ls Sports-Type-Classifier/data | grep -Ev "urls|models|csv|pkl"
football
tennis
weight_lifting
Configuring your development environment
To configure your system for this tutorial, I recommend following either of these tutorials:
Either tutorial will help you configure you system with all the necessary software for this blog post in a convenient Python virtual environment.
Please note that PyImageSearch does not recommend or support Windows for CV/DL projects.
Project Structure
Now that we have our project folder and Anubhav Maity‘s repo sitting inside, let’s review our project structure:
$ tree --dirsfirst --filelimit 50
.
├── Sports-Type-Classifier
│   ├── data
│   │   ├── football [799 entries]
│   │   ├── tennis [718 entries]
│   │   └── weight_lifting [577 entries]
├── example_clips
│   ├── lifting.mp4
│   ├── soccer.mp4
│   └── tennis.mp4
├── model
│   ├── activity.model
│   └── lb.pickle
├── output
├── plot.png
├── predict_video.py
└── train.py

8 directories, 8 files
Our training image data is in the Sports-Type-Classifier/data/ directory, organized by class.
I’ve extracted three example_clips/ for us from YouTube to test our model upon. Credits for the three clips are at the bottom of the “Keras video classification results” section.
Our classifier files are in the model/ directory. Included are activity.model (the trained Keras model) and lb.pickle (our label binarizer).
An empty output/ folder is the location where we’ll store video classification results.
We’ll be covering two Python scripts in today’s tutorial:
train.py: A Keras training script that grabs the dataset class images that we care about, loads the ResNet50 CNN, and applies transfer learning/fine-tuning of ImageNet weights to train our model. The training script generates/outputs three files:model/activity.model: A fine-tuned classifier based on ResNet50 for recognizing sports.model/lb.pickle: A serialized label binarizer containing our unique class labels.plot.png: The accuracy/loss training history plot.
predict_video.py: Loads an input video from theexample_clips/and proceeds to classify the video ideally using today’s rolling average method.
Implementing our Keras training script
Let’s go ahead and implement our training script used to train a Keras CNN to recognize each of the sports activities.
Open up the train.py file and insert the following code:
# set the matplotlib backend so figures can be saved in the background
import matplotlib
matplotlib.use("Agg")

# import the necessary packages
from tensorflow.keras.preprocessing.image import ImageDataGenerator
from tensorflow.keras.layers import AveragePooling2D
from tensorflow.keras.applications import ResNet50
from tensorflow.keras.layers import Dropout
from tensorflow.keras.layers import Flatten
from tensorflow.keras.layers import Dense
from tensorflow.keras.layers import Input
from tensorflow.keras.models import Model
from tensorflow.keras.optimizers import SGD
from sklearn.preprocessing import LabelBinarizer
from sklearn.model_selection import train_test_split
from sklearn.metrics import classification_report
from imutils import paths
import matplotlib.pyplot as plt
import numpy as np
import argparse
import pickle
import cv2
import os
On Lines 2-24, we import necessary packages for training our classifier:
matplotlib: For plotting. Line 3 sets the backend so we can output our training plot to a .png image file.tensorflow.keras: For deep learning. Namely, we’ll use theResNet50CNN. We’ll also work with theImageDataGeneratorwhich you can read about in last week’s tutorial.sklearn: From scikit-learn we’ll use their implementation of aLabelBinarizerfor one-hot encoding our class labels. Thetrain_test_splitfunction will segment our dataset into training and testing splits. We’ll also print aclassification_reportin a traditional format.paths: Contains convenience functions for listing all image files in a given path. From there we’ll be able to load our images into memory.numpy: Python’s de facto numerical processing library.argparse: For parsing command line arguments.pickle: For serializing our label binarizer to disk.cv2: OpenCV.os: The operating system module will be used to ensure we grab the correct file/path separator which is OS-dependent.
Let’s go ahead and parse our command line arguments now:
# construct the argument parser and parse the arguments
ap = argparse.ArgumentParser()
ap.add_argument("-d", "--dataset", required=True,
	help="path to input dataset")
ap.add_argument("-m", "--model", required=True,
	help="path to output serialized model")
ap.add_argument("-l", "--label-bin", required=True,
	help="path to output label binarizer")
ap.add_argument("-e", "--epochs", type=int, default=25,
	help="# of epochs to train our network for")
ap.add_argument("-p", "--plot", type=str, default="plot.png",
	help="path to output loss/accuracy plot")
args = vars(ap.parse_args())
Our script accepts five command line arguments, the first three of which are required:
--dataset: The path to the input dataset.--model: Our path to our output Keras model file.--label-bin: The path to our output label binarizer pickle file.--epochs: How many epochs to train our network for — by default, we’ll train for25epochs, but as I’ll show later in the tutorial,50epochs can lead to better results.--plot: The path to our output plot image file — by default it will be namedplot.pngand be placed in the same directory as this training script.
With our command line arguments parsed and in-hand, let’s proceed to initialize our LABELS and load our data :
# initialize the set of labels from the spots activity dataset we are
# going to train our network on
LABELS = set(["weight_lifting", "tennis", "football"])

# grab the list of images in our dataset directory, then initialize
# the list of data (i.e., images) and class images
print("[INFO] loading images...")
imagePaths = list(paths.list_images(args["dataset"]))
data = []
labels = []

# loop over the image paths
for imagePath in imagePaths:
	# extract the class label from the filename
	label = imagePath.split(os.path.sep)[-2]

	# if the label of the current image is not part of of the labels
	# are interested in, then ignore the image
	if label not in LABELS:
		continue

	# load the image, convert it to RGB channel ordering, and resize
	# it to be a fixed 224x224 pixels, ignoring aspect ratio
	image = cv2.imread(imagePath)
	image = cv2.cvtColor(image, cv2.COLOR_BGR2RGB)
	image = cv2.resize(image, (224, 224))

	# update the data and labels lists, respectively
	data.append(image)
	labels.append(label)
Line 42 contains the set of class LABELS for which our dataset will consist of. All labels not present in this set will be excluded from being part of our dataset. To save on training time, our dataset will only consist of weight lifting, tennis, and football/soccer. Feel free to work with other classes by making changes to the LABELS set.
All dataset imagePaths are gathered via Line 47 and the value contained in args["dataset"] (which comes from our command line arguments).
Lines 48 and 49 initialize our data and labels lists.
From there, we’ll begin looping over all imagePaths on Line 52.
In the loop, first we extract the class label from the imagePath (Line 54). Lines 58 and 59 then ignore any label not in the LABELS set.
Lines 63-65 load and preprocess an image . Preprocessing includes swapping color channels for OpenCV to Keras compatibility and resizing to 224×224px. Read more about resizing images for CNNs here. To learn more about the importance of preprocessing be sure to refer to Deep Learning for Computer Vision with Python.
The image and label are then added to the data and labels lists, respectively on Lines 68 and 69.
Continuing on, we will one-hot encode our labels and partition our data :
# convert the data and labels to NumPy arrays
data = np.array(data)
labels = np.array(labels)

# perform one-hot encoding on the labels
lb = LabelBinarizer()
labels = lb.fit_transform(labels)

# partition the data into training and testing splits using 75% of
# the data for training and the remaining 25% for testing
(trainX, testX, trainY, testY) = train_test_split(data, labels,
	test_size=0.25, stratify=labels, random_state=42)
Lines 72 and 73 convert our data and labels lists into NumPy arrays.
One-hot encoding of labels takes place on Lines 76 and 77. One-hot encoding is a way of marking an active class label via binary array elements. For example “football” may be array([1, 0, 0]) whereas “weightlifting” may be array([0, 0, 1]) . Notice how only one class is “hot” at any given time.
Lines 81 and 82 then segment our data into training and testing splits using 75% of the data for training and the remaining 25% for testing.
Let’s initialize our data augmentation object:
# initialize the training data augmentation object
trainAug = ImageDataGenerator(
	rotation_range=30,
	zoom_range=0.15,
	width_shift_range=0.2,
	height_shift_range=0.2,
	shear_range=0.15,
	horizontal_flip=True,
	fill_mode="nearest")

# initialize the validation/testing data augmentation object (which
# we'll be adding mean subtraction to)
valAug = ImageDataGenerator()

# define the ImageNet mean subtraction (in RGB order) and set the
# the mean subtraction value for each of the data augmentation
# objects
mean = np.array([123.68, 116.779, 103.939], dtype="float32")
trainAug.mean = mean
valAug.mean = mean
Lines 85-96 initialize two data augmentation objects — one for training and one for validation. Data augmentation is nearly always recommended in deep learning for computer vision to increase model generalization.
The trainAug object performs random rotations, zooms, shifts, shears, and flips on our data. You can read more about the ImageDataGenerator and fit here. As we reinforced last week, keep in mind that with Keras, images will be generated on-the-fly (it is not an additive operation).
No augmentation will be conducted for validation data (valAug ), but we will perform mean subtraction.
The mean pixel value is set on Line 101. From there, Lines 102 and 103 set the mean attribute for trainAug and valAug so that mean subtraction will be conducted as images are generated during training/evaluation.
Now we’re going to perform what I like to call “network surgery” as part of fine-tuning:
# load the ResNet-50 network, ensuring the head FC layer sets are left
# off
baseModel = ResNet50(weights="imagenet", include_top=False,
	input_tensor=Input(shape=(224, 224, 3)))

# construct the head of the model that will be placed on top of the
# the base model
headModel = baseModel.output
headModel = AveragePooling2D(pool_size=(7, 7))(headModel)
headModel = Flatten(name="flatten")(headModel)
headModel = Dense(512, activation="relu")(headModel)
headModel = Dropout(0.5)(headModel)
headModel = Dense(len(lb.classes_), activation="softmax")(headModel)

# place the head FC model on top of the base model (this will become
# the actual model we will train)
model = Model(inputs=baseModel.input, outputs=headModel)

# loop over all layers in the base model and freeze them so they will
# *not* be updated during the training process
for layer in baseModel.layers:
	layer.trainable = False
Lines 107 and 108 load ResNet50 pre-trained with ImageNet weights while chopping the head of the network off.
From there, Lines 112-121 assemble a new headModel and suture it onto the baseModel .
We’ll now freeze the baseModel so that it will not be trained via backpropagation (Lines 125 and 126).
Let’s go ahead and compile + train our model :
# compile our model (this needs to be done after our setting our
# layers to being non-trainable)
print("[INFO] compiling model...")
opt = SGD(lr=1e-4, momentum=0.9, decay=1e-4 / args["epochs"])
model.compile(loss="categorical_crossentropy", optimizer=opt,
	metrics=["accuracy"])

# train the head of the network for a few epochs (all other layers
# are frozen) -- this will allow the new FC layers to start to become
# initialized with actual "learned" values versus pure random
print("[INFO] training head...")
H = model.fit(
	x=trainAug.flow(trainX, trainY, batch_size=32),
	steps_per_epoch=len(trainX) // 32,
	validation_data=valAug.flow(testX, testY),
	validation_steps=len(testX) // 32,
	epochs=args["epochs"])
2020-06-12 Update: Formerly, TensorFlow/Keras required use of a method called .fit_generator in order to accomplish data augmentation. Now, the .fit method can handle data augmentation as well, making for more-consistent code. This also applies to the migration from .predict_generator to .predict. Be sure to check out my articles about fit and fit_generator as well as data augmentation.
Lines 131-133 compile our model with the Stochastic Gradient Descent (SGD ) optimizer with an initial learning rate of 1e-4 and learning rate decay. We use "categorical_crossentropy" loss for training with multiple classes. If you are working with only two classes, be sure to use "binary_crossentropy" loss.
A call to the fit_generator function on our model (Lines 139-144) trains our network with data augmentation and mean subtraction.
Keep in mind that our baseModel is frozen and we’re only training the head. This is known as “fine-tuning”. For a quick overview of fine-tuning, be sure to read my previous article. And for a more in-depth dive into fine-tuning, pick up a copy of the Practitioner Bundle of Deep Learning for Computer Vision with Python.
We’ll begin to wrap up by evaluating our network and plotting the training history:
# evaluate the network
print("[INFO] evaluating network...")
predictions = model.predict(x=testX.astype("float32"), batch_size=32)
print(classification_report(testY.argmax(axis=1),
	predictions.argmax(axis=1), target_names=lb.classes_))

# plot the training loss and accuracy
N = args["epochs"]
plt.style.use("ggplot")
plt.figure()
plt.plot(np.arange(0, N), H.history["loss"], label="train_loss")
plt.plot(np.arange(0, N), H.history["val_loss"], label="val_loss")
plt.plot(np.arange(0, N), H.history["accuracy"], label="train_acc")
plt.plot(np.arange(0, N), H.history["val_accuracy"], label="val_acc")
plt.title("Training Loss and Accuracy on Dataset")
plt.xlabel("Epoch #")
plt.ylabel("Loss/Accuracy")
plt.legend(loc="lower left")
plt.savefig(args["plot"])
2020-06-12 Update: In order for this plotting snippet to be TensorFlow 2+ compatible the H.history dictionary keys are updated to fully spell out “accuracy” sans “acc” (i.e., H.history["val_accuracy"] and H.history["accuracy"]). It is semi-confusing that “val” is not spelled out as “validation”; we have to learn to love and live with the API and always remember that it is a work in progress that many developers around the world contribute to.
After we evaluate our network on the testing set and print a classification_report (Lines 148-150), we go ahead and plot our accuracy/loss curves with matplotlib (Lines 153-163). The plot is saved to disk via Line 164.
To wrap up will serialize our model and label binarizer (lb ) to disk:
# serialize the model to disk
print("[INFO] serializing network...")
model.save(args["model"], save_format="h5")

# serialize the label binarizer to disk
f = open(args["label_bin"], "wb")
f.write(pickle.dumps(lb))
f.close()
2020-06-12 Update: Note that for TensorFlow 2.0+ we recommend explicitly setting the save_format="h5" (HDF5 format).
Line 168 saves our fine-tuned Keras model .
Finally, Lines 171-173 serialize and store our label binarizer in Python’s pickle format.
Training results
Before we can (1) classify frames in a video with our CNN and then (2) utilize our CNN for video classification, we first need to train the model.
Make sure you have used the “Downloads” section of this tutorial to download the source code to this image (as well as downloaded the sports type dataset).
From there, open up a terminal and execute the following command:
$ python train.py --dataset Sports-Type-Classifier/data --model model/activity.model \
	--label-bin output/lb.pickle --epochs 50
[INFO] loading images...
[INFO] compiling model...
[INFO] training head...
Epoch 1/50
48/48 [==============================] - 10s 209ms/step - loss: 1.4184 - accuracy: 0.4421 - val_loss: 0.7866 - val_accuracy: 0.6719
Epoch 2/50
48/48 [==============================] - 10s 198ms/step - loss: 0.9002 - accuracy: 0.6086 - val_loss: 0.5476 - val_accuracy: 0.7832
Epoch 3/50
48/48 [==============================] - 9s 198ms/step - loss: 0.7188 - accuracy: 0.7020 - val_loss: 0.4690 - val_accuracy: 0.8105
Epoch 4/50
48/48 [==============================] - 10s 203ms/step - loss: 0.6421 - accuracy: 0.7375 - val_loss: 0.3986 - val_accuracy: 0.8516
Epoch 5/50
48/48 [==============================] - 10s 200ms/step - loss: 0.5496 - accuracy: 0.7770 - val_loss: 0.3599 - val_accuracy: 0.8652
...
Epoch 46/50
48/48 [==============================] - 9s 192ms/step - loss: 0.2066 - accuracy: 0.9217 - val_loss: 0.1618 - val_accuracy: 0.9336
Epoch 47/50
48/48 [==============================] - 9s 193ms/step - loss: 0.2064 - accuracy: 0.9204 - val_loss: 0.1622 - val_accuracy: 0.9355
Epoch 48/50
48/48 [==============================] - 9s 192ms/step - loss: 0.2092 - accuracy: 0.9217 - val_loss: 0.1604 - val_accuracy: 0.9375
Epoch 49/50
48/48 [==============================] - 9s 195ms/step - loss: 0.1935 - accuracy: 0.9290 - val_loss: 0.1620 - val_accuracy: 0.9375
Epoch 50/50
48/48 [==============================] - 9s 192ms/step - loss: 0.2109 - accuracy: 0.9164 - val_loss: 0.1561 - val_accuracy: 0.9395
[INFO] evaluating network...
                precision    recall  f1-score   support

      football       0.93      0.96      0.95       196
        tennis       0.92      0.92      0.92       179
weight_lifting       0.97      0.92      0.95       143

      accuracy                           0.94       518
     macro avg       0.94      0.94      0.94       518
  weighted avg       0.94      0.94      0.94       518

[INFO] serializing network...
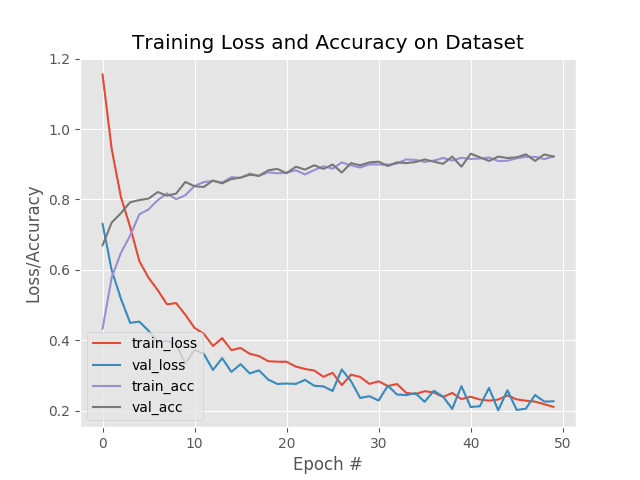
As you can see, we’re obtaining ~94% accuracy after fine-tuning ResNet50 on the sports dataset.
Checking our model directory we can see that the fine-tuned model along with the label binarizer have been serialized to disk:
$ ls model/
activity.model		lb.pickle
We’ll then take these files and use them to implement rolling prediction averaging in the next section.
Video classification with Keras and rolling prediction averaging
We are now ready to implement video classification with Keras via rolling prediction accuracy!
To create this script we’ll take advantage of the temporal nature of videos, specifically the assumption that subsequent frames in a video will have similar semantic contents.
By performing rolling prediction accuracy we’ll be able to “smoothen out” the predictions and avoid “prediction flickering”.
Let’s get started — open up the predict_video.py file and insert the following code:
# import the necessary packages
from tensorflow.keras.models import load_model
from collections import deque
import numpy as np
import argparse
import pickle
import cv2

# construct the argument parser and parse the arguments
ap = argparse.ArgumentParser()
ap.add_argument("-m", "--model", required=True,
	help="path to trained serialized model")
ap.add_argument("-l", "--label-bin", required=True,
	help="path to  label binarizer")
ap.add_argument("-i", "--input", required=True,
	help="path to our input video")
ap.add_argument("-o", "--output", required=True,
	help="path to our output video")
ap.add_argument("-s", "--size", type=int, default=128,
	help="size of queue for averaging")
args = vars(ap.parse_args())
Lines 2-7 load necessary packages and modules. In particular, we’ll be using deque from Python’s collections module to assist with our rolling average algorithm.
Then, Lines 10-21 parse five command line arguments, four of which are required:
--model: The path to the input model generated from our previous training step.--label-bin: The path to the serialized pickle-format label binarizer generated by the previous script.--input: A path to an input video for video classification.--output: The path to our output video which will be saved to disk.--size: The max size of the queue for rolling averaging (128by default). For some of our example results later on, we’ll set the size to1so that no averaging is performed.
Armed with our imports and command line args , we’re now ready to perform initializations:
# load the trained model and label binarizer from disk
print("[INFO] loading model and label binarizer...")
model = load_model(args["model"])
lb = pickle.loads(open(args["label_bin"], "rb").read())

# initialize the image mean for mean subtraction along with the
# predictions queue
mean = np.array([123.68, 116.779, 103.939][::1], dtype="float32")
Q = deque(maxlen=args["size"])
Lines 25 and 26 load our model and label binarizer.
Line 30 then sets our mean subtraction value.
We’ll use a deque to implement our rolling prediction averaging. Our deque, Q , is initialized with a maxlen equal to the args["size"] value (Line 31).
Let’s initialize our cv2.VideoCapture object and begin looping over video frames:
# initialize the video stream, pointer to output video file, and
# frame dimensions
vs = cv2.VideoCapture(args["input"])
writer = None
(W, H) = (None, None)

# loop over frames from the video file stream
while True:
	# read the next frame from the file
	(grabbed, frame) = vs.read()

	# if the frame was not grabbed, then we have reached the end
	# of the stream
	if not grabbed:
		break

	# if the frame dimensions are empty, grab them
	if W is None or H is None:
		(H, W) = frame.shape[:2]
Line 35 grabs a pointer to our input video file stream. We use the VideoCapture class from OpenCV to read frames from our video stream.
Our video writer and dimensions are then initialized to None via Lines 36 and 37.
Line 40 begins our video classification while loop.
First, we grab a frame (Lines 42-47). If the frame was not grabbed , then we’ve reached the end of the video, at which point we’ll break from the loop.
Lines 50-51 then set our frame dimensions if required.
Let’s preprocess our frame :
	# clone the output frame, then convert it from BGR to RGB
	# ordering, resize the frame to a fixed 224x224, and then
	# perform mean subtraction
	output = frame.copy()
	frame = cv2.cvtColor(frame, cv2.COLOR_BGR2RGB)
	frame = cv2.resize(frame, (224, 224)).astype("float32")
	frame -= mean
A copy of our frame is made for output purposes (Line 56).
We then preprocess the frame using the same steps as our training script, including:
- Swapping color channels (Line 57).
- Resizing to 224×224px (Line 58).
- Mean subtraction (Line 59).
Frame classification inference and rolling prediction averaging come next:
	# make predictions on the frame and then update the predictions
	# queue
	preds = model.predict(np.expand_dims(frame, axis=0))[0]
	Q.append(preds)

	# perform prediction averaging over the current history of
	# previous predictions
	results = np.array(Q).mean(axis=0)
	i = np.argmax(results)
	label = lb.classes_[i]
Line 63 makes predictions on the current frame. The prediction results are added to the Q via Line 64.
From there, Lines 68-70 perform prediction averaging over the Q history resulting in a class label for the rolling average. Broken down, these lines find the label with the largest corresponding probability across the average predictions.
Now that we have our resulting label , let’s annotate our output frame and write it to disk:
	# draw the activity on the output frame
	text = "activity: {}".format(label)
	cv2.putText(output, text, (35, 50), cv2.FONT_HERSHEY_SIMPLEX,
		1.25, (0, 255, 0), 5)

	# check if the video writer is None
	if writer is None:
		# initialize our video writer
		fourcc = cv2.VideoWriter_fourcc(*"MJPG")
		writer = cv2.VideoWriter(args["output"], fourcc, 30,
			(W, H), True)

	# write the output frame to disk
	writer.write(output)

	# show the output image
	cv2.imshow("Output", output)
	key = cv2.waitKey(1) & 0xFF

	# if the `q` key was pressed, break from the loop
	if key == ord("q"):
		break

# release the file pointers
print("[INFO] cleaning up...")
writer.release()
vs.release()
Lines 73-75 draw the prediction on the output frame.
Lines 78-82 initialize the video writer if necessary. The output frame is written to the file (Line 85). Read more about writing to video files with OpenCV here.
The output is also displayed on the screen until the q key is pressed (or until the end of the video file is reached as aforementioned) via Lines 88-93.
Finally, we’ll perform cleanup (Lines 97 and 98).
Keras video classification results
Now that we’ve implemented our video classifier with Keras, let’s put it to work.
Make sure you’ve used the “Downloads” section of this tutorial to download the source code.
From there, let’s apply video classification to a “tennis” clip — but let’s set the --size of the queue to 1, trivially turning video classification into standard image classification:
$ python predict_video.py --model model/activity.model \
	--label-bin model/lb.pickle \
	--input example_clips/tennis.mp4 \
	--output output/tennis_1frame.avi \
	--size 1
Using TensorFlow backend.
[INFO] loading model and label binarizer...
[INFO] cleaning up...
As you can see, there is quite a bit of label flickering — our CNN thinks certain frames are “tennis” (correct) while others are “football” (incorrect).
Let’s now use the default queue --size of 128, thus utilizing our prediction averaging algorithm to smoothen the results:
$ python predict_video.py --model model/activity.model \
	--label-bin model/lb.pickle \
	--input example_clips/tennis.mp4 \
	--output output/tennis_128frames_smoothened.avi \
	--size 128
Using TensorFlow backend.
[INFO] loading model and label binarizer...
[INFO] cleaning up...
Notice how we’ve correctly labeled this video as “tennis”!
Let’s try a different example, this one of “weightlifting”. Again, we’ll start off by using a queue --size of 1:
$ python predict_video.py --model model/activity.model \
	--label-bin model/lb.pickle \
	--input example_clips/lifting.mp4 \
	--output output/lifting_1frame.avi \
	--size 1
Using TensorFlow backend.
[INFO] loading model and label binarizer...
[INFO] cleaning up...
We once again encounter prediction flickering.
However, if we use a frame --size of 128, our prediction averaging will obtain the desired result:
$ python predict_video.py --model model/activity.model \
	--label-bin model/lb.pickle \
	--input example_clips/lifting.mp4 \
	--output output/lifting_128frames_smoothened.avi \
	--size 128
Using TensorFlow backend.
[INFO] loading model and label binarizer...
[INFO] cleaning up...
Let’s try one final example:
$ python predict_video.py --model model/activity.model \
	--label-bin model/lb.pickle \
	--input example_clips/soccer.mp4 \
	--output output/soccer_128frames_smoothened.avi \
	--size 128
Using TensorFlow backend.
[INFO] loading model and label binarizer...
[INFO] cleaning up...
Here you can see the input video is correctly classified as “football” (i.e., soccer).
Notice that there is no frame flickering — our rolling prediction averaging smoothes out the predictions.
While simple, this algorithm can enable you to perform video classification with Keras!
In future tutorials, we’ll cover more advanced methods of activity and video classification, including LSTMs and RNNs.
Video Credits:
- Ultimate Olympic Weightlifting Motivation – Alex Yao
- The Best Game Of Tennis Ever? | Australian Open 2012 – Australian Open TV
- Germany v Sweden – 2018 FIFA World Cup Russia™ – Match 27 – FIFATV
What's next? We recommend PyImageSearch University.
86+ total classes • 115+ hours hours of on-demand code walkthrough videos • Last updated: July 2025
★★★★★ 4.84 (128 Ratings) • 16,000+ Students Enrolled
I strongly believe that if you had the right teacher you could master computer vision and deep learning.
Do you think learning computer vision and deep learning has to be time-consuming, overwhelming, and complicated? Or has to involve complex mathematics and equations? Or requires a degree in computer science?
That’s not the case.
All you need to master computer vision and deep learning is for someone to explain things to you in simple, intuitive terms. And that’s exactly what I do. My mission is to change education and how complex Artificial Intelligence topics are taught.
If you're serious about learning computer vision, your next stop should be PyImageSearch University, the most comprehensive computer vision, deep learning, and OpenCV course online today. Here you’ll learn how to successfully and confidently apply computer vision to your work, research, and projects. Join me in computer vision mastery.
Inside PyImageSearch University you'll find:
- ✓ 86+ courses on essential computer vision, deep learning, and OpenCV topics
- ✓ 86 Certificates of Completion
- ✓ 115+ hours hours of on-demand video
- ✓ Brand new courses released regularly, ensuring you can keep up with state-of-the-art techniques
- ✓ Pre-configured Jupyter Notebooks in Google Colab
- ✓ Run all code examples in your web browser — works on Windows, macOS, and Linux (no dev environment configuration required!)
- ✓ Access to centralized code repos for all 540+ tutorials on PyImageSearch
- ✓ Easy one-click downloads for code, datasets, pre-trained models, etc.
- ✓ Access on mobile, laptop, desktop, etc.
Summary
In this tutorial, you learned how to perform video classification with Keras and deep learning.
A naïve algorithm to video classification would be to treat each individual frame of a video as independent from the others. This type of implementation will cause “label flickering” where the CNN returns different labels for subsequent frames, even though the frames should be the same labels!
More advanced neural networks, including LSTMs and the more general RNNs, can help combat this problem and lead to much higher accuracy. However, LSTMs and RNNs can be dramatic overkill dependent on what you are doing — in some situations, simple rolling prediction averaging will give you the results you need.
Using rolling prediction averaging, you maintain a list of the last K predictions from the CNN. We then take these last K predictions, average them, select the label with the largest probability, and choose this label to classify the current frame. The assumption here is that subsequent frames in a video will have similar semantic contents.
If that assumption holds then we can take advantage of the temporal nature of videos, assuming that the previous frames are similar to the current frame.
The averaging, therefore, enables us to smooth out the predictions and make for a better video classifier.
In a future tutorial, we’ll discuss the more advanced LSTMs and RNNs as well. But in the meantime, take a look at this guide to deep learning action recognition.
To download the source code to this post, and to be notified when future tutorials are published here on PyImageSearch, just enter your email address in the form below!

Download the Source Code and FREE 17-page Resource Guide
Enter your email address below to get a .zip of the code and a FREE 17-page Resource Guide on Computer Vision, OpenCV, and Deep Learning. Inside you'll find my hand-picked tutorials, books, courses, and libraries to help you master CV and DL!

