Today’s blog post is a continuation of our recent series on Optical Character Recognition (OCR) and computer vision.
In a previous blog post, we learned how to install the Tesseract binary and use it for OCR. We then learned how to cleanup images using basic image processing techniques to improve the output of Tesseract OCR.
However, as I’ve mentioned multiple times in these previous posts, Tesseract should not be considered a general, off-the-shelf solution for Optical Character Recognition capable of obtaining high accuracy.
In some cases, it will work great — and in others, it will fail miserably.
A great example of such a use case is credit card recognition, where given an input image,
we wish to:
- Detect the location of the credit card in the image.
- Localize the four groupings of four digits, pertaining to the sixteen digits on the credit card.
- Apply OCR to recognize the sixteen digits on the credit card.
- Recognize the type of credit card (i.e., Visa, MasterCard, American Express, etc.).
In these cases, the Tesseract library is unable to correctly identify the digits (this is likely due to Tesseract not being trained on credit card example fonts). Therefore, we need to devise our own custom solution to OCR credit cards.
In today’s blog post I’ll be demonstrating how we can use template matching as a form of OCR to help us create a solution to automatically recognize credit cards and extract the associated credit card digits from images.
To learn more about using template matching for OCR with OpenCV and Python, just keep reading.
Credit Card OCR with OpenCV and Python
Today’s blog post is broken into three parts.
In the first section, we’ll discuss the OCR-A font, a font created specifically to aid Optical Character Recognition algorithms.
We’ll then devise a computer vision and image processing algorithm that can:
- Localize the four groupings of four digits on a credit card.
- Extract each of these four groupings followed by segmenting each of the sixteen numbers individually.
- Recognize each of the sixteen credit card digits by using template matching and the OCR-A font.
Finally, we’ll look at some examples of applying our credit card OCR algorithm to actual images.
The OCR-A font

The OCR-A font was designed in the late 1960s such that both (1) OCR algorithms at that time and (2) humans could easily recognize the characters The font is backed by standards organizations including ANSI and ISO among others.
Despite the fact that modern OCR systems don’t need specialized fonts such as OCR-A, it is still widely used on ID cards, statements, and credit cards.
In fact, there are quite a few fonts designed specifically for OCR including OCR-B and MICR E-13B.

While you might not write a paper check too often these days, the next time you do, you’ll see the MICR E-13B font used at the bottom containing your routing and account numbers. MICR stands for Magnetic Ink Character Recognition code. Magnetic sensors, cameras, and scanners all read your checks regularly.

Each of the above fonts have one thing in common — they are designed for easy OCR.
For this tutorial, we will make a template matching system for the OCR-A font, commonly found on the front of credit/debit cards.
OCR via template matching with OpenCV
In this section we’ll implement our template matching algorithm with Python + OpenCV to automatically recognize credit card digits.
In order to accomplish this, we’ll need to apply a number of image processing operations, including thresholding, computing gradient magnitude representations, morphological operations, and contour extraction. These techniques have been used in other blog posts to detect barcodes in images and recognize machine-readable zones in passport images.
Since there will be many image processing operations applied to help us detect and extract the credit card digits, I’ve included numerous intermediate screenshots of the input image as it passes through our image processing pipeline.
These additional screenshots will give you extra insight as to how we are able to chain together basic image processing techniques to build a solution to a computer vision project.
Let’s go ahead and get started.
Open up a new file, name it ocr_template_match.py , and we’ll get to work:
# import the necessary packages
from imutils import contours
import numpy as np
import argparse
import imutils
import cv2
Lines 1-6 handle importing packages for this script. You will need to install OpenCV and imutils if you don’t already have them installed on your machine. Template matching has been around awhile in OpenCV, so your version (v2.4, v3.*, etc.) will likely work.
To install/upgrade imutils , simply use pip :
$ pip install --upgrade imutils
Note: If you are using Python virtual environments (as all of my OpenCV install tutorials do), make sure you use the workon command to access your virtual environment first and then install/upgrade imutils .
Now that we’ve installed and imported packages, we can parse our command line arguments:
# construct the argument parser and parse the arguments
ap = argparse.ArgumentParser()
ap.add_argument("-i", "--image", required=True,
	help="path to input image")
ap.add_argument("-r", "--reference", required=True,
	help="path to reference OCR-A image")
args = vars(ap.parse_args())
On Lines 8-14 we establish an argument parser, add two arguments, and parse them, storing as the variable, args .
The two required command line arguments are:
--image: The path to the image to be OCR’d.--reference: The path to the reference OCR-A image. This image contains the digits 0-9 in the OCR-A font, thereby allowing us to perform template matching later in the pipeline.
Next let’s define credit card types:
# define a dictionary that maps the first digit of a credit card
# number to the credit card type
FIRST_NUMBER = {
	"3": "American Express",
	"4": "Visa",
	"5": "MasterCard",
	"6": "Discover Card"
}
Credit card types, such as American Express, Visa, etc., can be identified by examining the first digit in the 16 digit credit card number. On Lines 16-23 we define a dictionary, FIRST_NUMBER , which maps the first digit to the corresponding credit card type.
Let’s start our image processing pipeline by loading the reference OCR-A image:
# load the reference OCR-A image from disk, convert it to grayscale,
# and threshold it, such that the digits appear as *white* on a
# *black* background
# and invert it, such that the digits appear as *white* on a *black*
ref = cv2.imread(args["reference"])
ref = cv2.cvtColor(ref, cv2.COLOR_BGR2GRAY)
ref = cv2.threshold(ref, 10, 255, cv2.THRESH_BINARY_INV)[1]
First, we load the reference OCR-A image (Line 29) followed by converting it to grayscale (Line 30) and thresholding + inverting it (Line 31). In each of these operations we store or overwrite ref , our reference image.

Figure 4 shows the result of these steps.
Now let’s locate contours on our OCR-A font image:
# find contours in the OCR-A image (i.e,. the outlines of the digits)
# sort them from left to right, and initialize a dictionary to map
# digit name to the ROI
refCnts = cv2.findContours(ref.copy(), cv2.RETR_EXTERNAL,
	cv2.CHAIN_APPROX_SIMPLE)
refCnts = imutils.grab_contours(refCnts)
refCnts = contours.sort_contours(refCnts, method="left-to-right")[0]
digits = {}
On Lines 36 and 37 we find the contours present in the ref image. Then, due to how OpenCV 2.4, 3, and 4 versions store the returned contour information differently, we check the version and make an appropriate change to refCnts on Line 38.
Next, we sort the contours from left-to-right as well as initialize a dictionary, digits , which maps the digit name to the region of interest (Lines 39 and 40).
At this point, we should loop through the contours, extract, and associate ROIs with their corresponding digits:
# loop over the OCR-A reference contours
for (i, c) in enumerate(refCnts):
	# compute the bounding box for the digit, extract it, and resize
	# it to a fixed size
	(x, y, w, h) = cv2.boundingRect(c)
	roi = ref[y:y + h, x:x + w]
	roi = cv2.resize(roi, (57, 88))

	# update the digits dictionary, mapping the digit name to the ROI
	digits[i] = roi
On Line 43 we loop through the reference image contours. In the loop, i holds the digit name/number and c holds the contour.
We compute a bounding box around each contour, c , (Line 46) storing the (x, y)-coordinates and width/height of the rectangle.
On Line 47 we extract the roi from ref (the reference image) using the bounding rectangle parameters. This ROI contains the digit. We resize each ROI on Line 48 to a fixed size of 57×88 pixels. We need to ensure every digit is resized to a fixed size in order to apply template matching for digit recognition later in this tutorial.
We associate each digit 0-9 (the dictionary keys) to each roi image (the dictionary values) on Line 51.
At this point, we are done extracting the digits from our reference image and associating them with their corresponding digit name.
Our next goal is to isolate the 16-digit credit card number in the input --image . We need to find and isolate the numbers before we can initiate template matching to identify each of the digits. These image processing steps are quite interesting and insightful, especially if you have never developed an image processing pipeline before, so be sure to pay close attention.
Let’s continue by initializing a couple structuring kernels:
# initialize a rectangular (wider than it is tall) and square
# structuring kernel
rectKernel = cv2.getStructuringElement(cv2.MORPH_RECT, (9, 3))
sqKernel = cv2.getStructuringElement(cv2.MORPH_RECT, (5, 5))
You can think of a kernel as a small matrix which we slide across the image to do (convolution) operations such as blurring, sharpening, edge detection, or other image processing operations.
On Lines 55 and 56 we construct two such kernels — one rectangular and one square. We will use the rectangular one for a Top-hat morphological operator and the square one for a closing operation. We’ll see these in action shortly.
Now let’s prepare the image we are going to OCR:
# load the input image, resize it, and convert it to grayscale
image = cv2.imread(args["image"])
image = imutils.resize(image, width=300)
gray = cv2.cvtColor(image, cv2.COLOR_BGR2GRAY)
On Line 59 we load our command line argument image which holds the photo of the credit card. Then, we resize it to width=300 , maintaining the aspect ratio (Line 60), followed by converting it to grayscale (Line 61).
Let’s take a look at our input image:
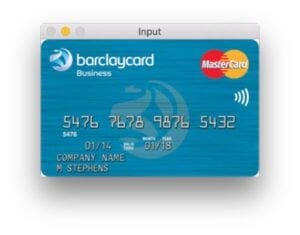
Followed by our resize and grayscale operations:

Now that our image is grayscaled and the size is consistent, let’s perform a morphological operation:
# apply a tophat (whitehat) morphological operator to find light
# regions against a dark background (i.e., the credit card numbers)
tophat = cv2.morphologyEx(gray, cv2.MORPH_TOPHAT, rectKernel)
Using our rectKernel and our gray image, we perform a Top-hat morphological operation, storing the result as tophat (Line 65).
The Top-hat operation reveals light regions against a dark background (i.e. the credit card numbers) as you can see in the resulting image below:

Given our tophat image, let’s compute the gradient along the x-direction:
# compute the Scharr gradient of the tophat image, then scale
# the rest back into the range [0, 255]
gradX = cv2.Sobel(tophat, ddepth=cv2.CV_32F, dx=1, dy=0,
	ksize=-1)
gradX = np.absolute(gradX)
(minVal, maxVal) = (np.min(gradX), np.max(gradX))
gradX = (255 * ((gradX - minVal) / (maxVal - minVal)))
gradX = gradX.astype("uint8")
The next step in our effort to isolate the digits is to compute a Scharr gradient of the tophat image in the x-direction. We complete this computation on Lines 69 and 70, storing the result as gradX .
After computing the absolute value of each element in the gradX array, we take some steps to scale the values into the range [0-255] (as the image is currently a floating point data type). To do this we compute the minVal and maxVal of gradX (Line 72) followed by our scaling equation shown on Line 73 (i.e., min/max normalization). The last step is to convert gradX to a uint8 which has a range of [0-255] (Line 74).
The result is shown in the image below:
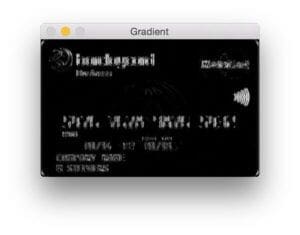
Let’s continue to improve our credit card digit finding algorithm:
# apply a closing operation using the rectangular kernel to help
# cloes gaps in between credit card number digits, then apply
# Otsu's thresholding method to binarize the image
gradX = cv2.morphologyEx(gradX, cv2.MORPH_CLOSE, rectKernel)
thresh = cv2.threshold(gradX, 0, 255,
	cv2.THRESH_BINARY | cv2.THRESH_OTSU)[1]

# apply a second closing operation to the binary image, again
# to help close gaps between credit card number regions
thresh = cv2.morphologyEx(thresh, cv2.MORPH_CLOSE, sqKernel)
To close the gaps, we do a closing operation on Line 79. Notice that we use our rectKernel again. Subsequently we perform an Otsu and binary threshold of the gradX image (Lines 80 and 81), followed by another closing operation (Line 85). The result of these steps is shown here:
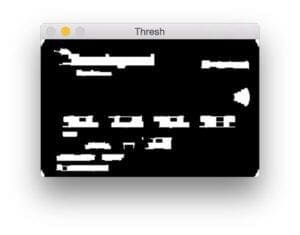
Next let’s find the contours and initialize the list of digit grouping locations.
# find contours in the thresholded image, then initialize the
# list of digit locations
cnts = cv2.findContours(thresh.copy(), cv2.RETR_EXTERNAL,
	cv2.CHAIN_APPROX_SIMPLE)
cnts = imutils.grab_contours(cnts)
locs = []
On Lines 89-91 we find the contours and store them in a list, cnts . Then, we initialize a list to hold the digit group locations on Line 92.
Now let’s loop through the contours while filtering based on the aspect ratio of each, allowing us to prune the digit group locations from other, irrelevant areas of the credit card:
# loop over the contours
for (i, c) in enumerate(cnts):
	# compute the bounding box of the contour, then use the
	# bounding box coordinates to derive the aspect ratio
	(x, y, w, h) = cv2.boundingRect(c)
	ar = w / float(h)

	# since credit cards used a fixed size fonts with 4 groups
	# of 4 digits, we can prune potential contours based on the
	# aspect ratio
	if ar > 2.5 and ar < 4.0:
		# contours can further be pruned on minimum/maximum width
		# and height
		if (w > 40 and w < 55) and (h > 10 and h < 20):
			# append the bounding box region of the digits group
			# to our locations list
			locs.append((x, y, w, h))
On Line 95 we loop through the contours the same way we did for the reference image. After computing the bounding rectangle for each contour, c (Line 98), we calculate the aspect ratio, ar , by dividing the width by the height (Line 99).
Using the aspect ratio, we analyze the shape of each contour. If ar is between 2.5 and 4.0 (wider than it is tall), as well as the w between 40 and 55 pixels and h between 10 and 20 pixels, we append the bounding rectangle parameters in a convenient tuple to locs (Lines 101-110).
Note: These the values for the aspect ratio and minimum width and height were found experimentally on my set of input credit card images. You may need to change these values for your own applications.
The following image shows the groupings that we have found — for demonstration purposes, I had OpenCV draw a bounding box around each group:
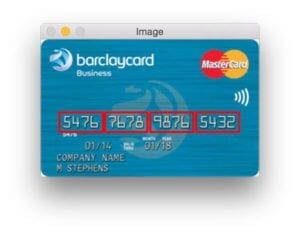
Next, we’ll sort the groupings from left to right and initialize a list for the credit card digits:
# sort the digit locations from left-to-right, then initialize the
# list of classified digits
locs = sorted(locs, key=lambda x:x[0])
output = []
On Line 114 we sort the locs according to the x-value so they will be ordered from left to right.
We initialize a list, output , which will hold the image’s credit card number on Line 115.
Now that we know where each group of four digits is, let’s loop through the four sorted groupings and determine the digits therein.
This loop is rather long and is broken down into three code blocks — here is the first block:
# loop over the 4 groupings of 4 digits
for (i, (gX, gY, gW, gH)) in enumerate(locs):
	# initialize the list of group digits
	groupOutput = []

	# extract the group ROI of 4 digits from the grayscale image,
	# then apply thresholding to segment the digits from the
	# background of the credit card
	group = gray[gY - 5:gY + gH + 5, gX - 5:gX + gW + 5]
	group = cv2.threshold(group, 0, 255,
		cv2.THRESH_BINARY | cv2.THRESH_OTSU)[1]

	# detect the contours of each individual digit in the group,
	# then sort the digit contours from left to right
	digitCnts = cv2.findContours(group.copy(), cv2.RETR_EXTERNAL,
		cv2.CHAIN_APPROX_SIMPLE)
	digitCnts = imutils.grab_contours(digitCnts)
	digitCnts = contours.sort_contours(digitCnts,
		method="left-to-right")[0]
In the first block for this loop, we extract and pad the group by 5 pixels on each side (Line 125), apply thresholding (Lines 126 and 127), and find and sort contours (Lines 129-135). For the details, be sure to refer to the code.
Shown below is a single group that has been extracted:

Let’s continue the loop with a nested loop to do the template matching and similarity score extraction:
	# loop over the digit contours
	for c in digitCnts:
		# compute the bounding box of the individual digit, extract
		# the digit, and resize it to have the same fixed size as
		# the reference OCR-A images
		(x, y, w, h) = cv2.boundingRect(c)
		roi = group[y:y + h, x:x + w]
		roi = cv2.resize(roi, (57, 88))

		# initialize a list of template matching scores
		scores = []

		# loop over the reference digit name and digit ROI
		for (digit, digitROI) in digits.items():
			# apply correlation-based template matching, take the
			# score, and update the scores list
			result = cv2.matchTemplate(roi, digitROI,
				cv2.TM_CCOEFF)
			(_, score, _, _) = cv2.minMaxLoc(result)
			scores.append(score)

		# the classification for the digit ROI will be the reference
		# digit name with the *largest* template matching score
		groupOutput.append(str(np.argmax(scores)))
Using cv2.boundingRect we obtain parameters necessary to extract a ROI containing each digit (Lines 142 and 143). In order for template matching to work with some degree of accuracy, we resize the roi to the same size as our reference OCR-A font digit images (57×88 pixels) on Line 144.
We initialize a scores list on Line 147. Think of this as our confidence score — the higher it is, the more likely it is the correct template.
Now, let’s loop (third nested loop) through each reference digit and perform template matching. This is where the heavy lifting is done for this script.
OpenCV, has a handy function called cv2.matchTemplate in which you supply two images: one being the template and the other being the input image. The goal of applying cv2.matchTemplate to these two images is to determine how similar they are.
In this case we supply the reference digitROI image and the roi from the credit card containing a candidate digit. Using these two images we call the template matching function and store the result (Lines 153 and 154).
Next, we extract the score from the result (Line 155) and append it to our scores list (Line 156). This completes the inner-most loop.
Using the scores (one for each digit 0-9), we take the maximum score — the maximum score should be our correctly identified digit. We find the digit with the max score on Line 160, grabbing the specific index via np.argmax . The integer name of this index represents the most-likely digit based on the comparisons to each template (again, keeping in mind that the indexes are already pre-sorted 0-9).
Finally, let’s draw a rectangle around each group and view the credit card number on the image in red text:
	# draw the digit classifications around the group
	cv2.rectangle(image, (gX - 5, gY - 5),
		(gX + gW + 5, gY + gH + 5), (0, 0, 255), 2)
	cv2.putText(image, "".join(groupOutput), (gX, gY - 15),
		cv2.FONT_HERSHEY_SIMPLEX, 0.65, (0, 0, 255), 2)

	# update the output digits list
	output.extend(groupOutput)
For the third and final block for this loop, we draw a 5-pixel padded rectangle around the group (Lines 163 and 164) followed by drawing the text on the screen (Lines 165 and 166).
The last step is to append the digits to the output list. The Pythonic way to do this is to use the extend function which appends each element of the iterable object (a list in this case) to the end of the list.
To see how well the script performs, let’s output the results to the terminal and display our image on the screen.
# display the output credit card information to the screen
print("Credit Card Type: {}".format(FIRST_NUMBER[output[0]]))
print("Credit Card #: {}".format("".join(output)))
cv2.imshow("Image", image)
cv2.waitKey(0)
Line 172 prints the credit card type to the console followed by printing the credit card number on the subsequent Line 173.
On the last lines, we display the image on the screen and wait for any key to be pressed before exiting the script Lines 174 and 175.
Take a second to congratulate yourself — you made it to the end. To recap (at a high level), this script:
- Stores credit card types in a dictionary.
- Takes a reference image and extracts the digits.
- Stores the digit templates in a dictionary.
- Localizes the four credit card number groups, each holding four digits (for a total of 16 digits).
- Extracts the digits to be “matched”.
- Performs template matching on each digit, comparing each individual ROI to each of the digit templates 0-9, whilst storing a score for each attempted match.
- Finds the highest score for each candidate digit, and builds a list called
outputwhich contains the credit card number. - Outputs the credit card number and credit card type to our terminal and displays the output image to our screen.
It’s now time to see the script in action and check on our results.
Credit card OCR results
Now that we have coded our credit card OCR system, let’s give it a shot.
We obviously cannot use real credit card numbers for this example, so I’ve gathered a few example images of credit cards using Google. These credit cards are obviously fake and for demonstration purposes only.
However, you can apply the same techniques in this blog post to recognize the digits on actual, real credit cards.
To see our credit card OCR system in action, open up a terminal and execute the following command:
$ python ocr_template_match.py --reference ocr_a_reference.png \
	--image images/credit_card_05.png
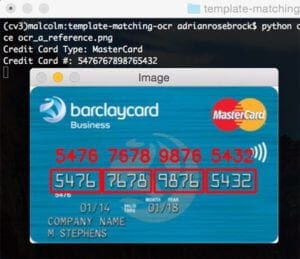
Credit Card Type: MasterCard
Credit Card #: 5476767898765432
Our first result image, 100% correct:

Notice how we were able to correctly label the credit card as MasterCard, simply by inspecting the first digit in the credit card number.
Let’s try a second image, this time a Visa:
$ python ocr_template_match.py --reference ocr_a_reference.png \
	--image images/credit_card_01.png
Credit Card Type: Visa
Credit Card #: 4000123456789010
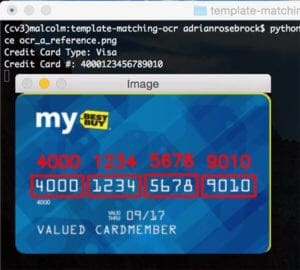
Once again, we were able to correctly OCR the credit card using template matching.
How about another image, this time from PSECU, a credit union in Pennsylvania:
$ python ocr_template_match.py --reference ocr_a_reference.png \
	--image images/credit_card_02.png
Credit Card Type: Visa
Credit Card #: 4020340002345678
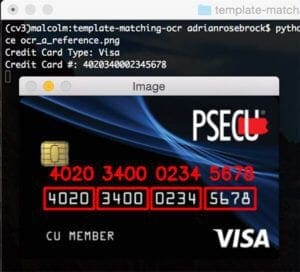
Our OCR template matching algorithm correctly identifies each of the 16 digits. Given that each of the 16 digits were correctly OCR’d, we can also label credit card as a Visa.
Here’s another MasterCard example image, this one from Bed, Bath, & Beyond:
$ python ocr_template_match.py --reference ocr_a_reference.png \
	--image images/credit_card_03.png
Credit Card Type: MasterCard
Credit Card #: 5412751234567890
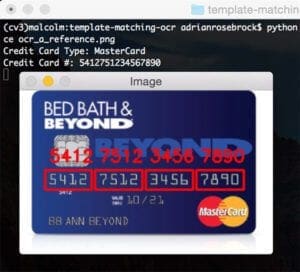
No problems for our template matching OCR algorithm here!
As our last example, let’s use another Visa:
$ python ocr_template_match.py --reference ocr_a_reference.png \
	--image images/credit_card_04.png
Credit Card Type: Visa
Credit Card #: 4000123456789010

In each of the examples in this blog post, our template matching OCR script using OpenCV and Python correctly identified each of the 16 digits 100% of the time.
Furthermore, template matching is also a very fast method when comparing digits.
Unfortunately, we were not able to apply our OCR images to real credit card images, so that certainly raises the question if this method would be reliable on actual, real-world images. Given changes in lighting condition, viewpoint angle, and other general noise, it’s likely that we might need to take a more machine learning oriented approach.
Regardless, at least for these example images, we were able to successfully apply template matching as a form of OCR.
What's next? We recommend PyImageSearch University.
86+ total classes • 115+ hours hours of on-demand code walkthrough videos • Last updated: July 2025
★★★★★ 4.84 (128 Ratings) • 16,000+ Students Enrolled
I strongly believe that if you had the right teacher you could master computer vision and deep learning.
Do you think learning computer vision and deep learning has to be time-consuming, overwhelming, and complicated? Or has to involve complex mathematics and equations? Or requires a degree in computer science?
That’s not the case.
All you need to master computer vision and deep learning is for someone to explain things to you in simple, intuitive terms. And that’s exactly what I do. My mission is to change education and how complex Artificial Intelligence topics are taught.
If you're serious about learning computer vision, your next stop should be PyImageSearch University, the most comprehensive computer vision, deep learning, and OpenCV course online today. Here you’ll learn how to successfully and confidently apply computer vision to your work, research, and projects. Join me in computer vision mastery.
Inside PyImageSearch University you'll find:
- ✓ 86+ courses on essential computer vision, deep learning, and OpenCV topics
- ✓ 86 Certificates of Completion
- ✓ 115+ hours hours of on-demand video
- ✓ Brand new courses released regularly, ensuring you can keep up with state-of-the-art techniques
- ✓ Pre-configured Jupyter Notebooks in Google Colab
- ✓ Run all code examples in your web browser — works on Windows, macOS, and Linux (no dev environment configuration required!)
- ✓ Access to centralized code repos for all 540+ tutorials on PyImageSearch
- ✓ Easy one-click downloads for code, datasets, pre-trained models, etc.
- ✓ Access on mobile, laptop, desktop, etc.
Summary
In this tutorial we learned how to perform Optical Character Recognition (OCR) using template matching via OpenCV and Python.
Specifically, we applied our template matching OCR approach to recognize the type of a credit card along with the 16 credit card digits.
To accomplish this, we broke our image processing pipeline into 4 steps:
- Detecting the four groups of four numbers on the credit card via various image processing techniques, including morphological operations, thresholding, and contour extraction.
- Extracting each of the individual digits from the four groupings, leading to 16 digits that need to be classified.
- Applying template matching to each digit by comparing it to the OCR-A font to obtain our digit classification.
- Examining the first digit of the credit card number to determine the issuing company.
After evaluating our credit card OCR system, we found it to be 100% accurate provided that the issuing credit card company used the OCR-A font for the digits.
To extend this application, you would want to gather real images of credit cards in the wild and potentially train a machine learning model (either via standard feature extraction or training or Convolutional Neural Network) to further improve the accuracy of this system.
I hope you enjoyed this blog post on OCR via template matching using OpenCV and Python.
To be notified when future tutorials are published here on PyImageSearch, be sure to enter your email address in the form below!

Download the Source Code and FREE 17-page Resource Guide
Enter your email address below to get a .zip of the code and a FREE 17-page Resource Guide on Computer Vision, OpenCV, and Deep Learning. Inside you'll find my hand-picked tutorials, books, courses, and libraries to help you master CV and DL!


Thanks for the great tutorial!
A question, what to do if the credit card doesn’t face camera? Someone holding the card, so the card is tilted?
I would suggest detecting the four corners of the credit card and applying a perspective transform, like I do in this document scanner post.
Hi Adrian, this post it’s very interesting, I like it!!
Best Regards.
Thanks Oscar!
This has nothing to do with OCR, but MasterCard is now issuing numbers that begin with 2. https://gravitypayments.com/highlights/mastercard-2series-bin/
Amazing article as always, thanks for the tutorial.
Thanks Ahmad, I’m glad you enjoyed it! 🙂
What about reading the card holder’s name?
There are a number of ways to accomplish recognizing the card holders name. First, you would need to isolate the card holder name characters. This can be accomplished in a similar manner used for localizing the digits. From there, threshold the characters and OCR them, perhaps using Tesseract + Python.
hello adrian rosebrock ! your tutoriall is very good. Adrian i want to detect the digits of license plate of my country. can you help me how to apply ocr on license plate.just like this.thanks in advance
Hi Hassan — I cover automatic license plate recognition inside the PyImageSearch Gurus course. I would suggest you start there.
Hi Adrian
Thank you very much for your blog I will ask a question I dont understand that how we can card type master card or visa You just give numbers but how code can detect master or visa and I try this image but I can not a good result :
https://i.resimyukle.xyz/JyxbM.png
I am confused a bit
Hi Gozde — if you want to detect the Visa or Mastercard logo itself, I would suggest using template matching. You could use keypoints, local invariant descriptors, and keypoint matching to recognize the logo as well — I provide an example of this technique to recognize the covers of books inside Practical Python and OpenCV. This would make a good starting point for your project.
One of the useful tutorial (fr those who can read between the lines), I follow you since almost a beginning 🙂
Thank you Yuri, I’m glad you enjoyed the tutorial 🙂
Hi Adrian
very good !!
thanks for the tutorial.
regards
Where should I look for OCR-B-Reference images, sir? My card is printed in OCR-B font.
Please use the “Downloads” section of the post. The Downloads section provides a .zip of the code, reference images, and example images.
Hi Adrian!
Thanks for this amazing tutorial. I want to do something similar with electric meter system. What things will I have to change from this tutorial to get that done ?
Template image
http://l7.alamy.com/zooms/4245c7ffaaad4bef937e60c81540031c/an-old-british-electricity-usage-meter-a837mx.jpg
Hi Aadesh — water meter detection is always a great project. The first step is to localize each of the digits. From there, you would want to quantify each digit. Then train a simple Linear SVM to recognize each of the characters. Jeff Bass, a PyImageSearch Gurus member built this exact project using the knowledge he learned from the course. I would definitely suggest you take a look at PyImageSearch Gurus — it would help you solve this exact problem.
this above code is working good for demo images..but i am getting error while recognizing blur image and image of SBI card(beacuse it have image in center)..may anyone help me to recognize any any cards..
I am getting very bad accuracy if I download an image and extract the 16 numbers. Will i have to preprocess the image?
Are you referring to the images in this blog post? Or images from your own collection?
images from my own collection.
As I mentioned in the blog post, this method will work best for images captured in controlled lighting conditions. Without seeing your example images it’s hard to say what the issue might be, but I would recommend looking into training your own custom object detector.
what do you suggest if we have 4×4 visas image that we want to extract evey card number ?
You would detect each Visa card individually (likely using contour approximation) like I do in this post. Then you OCR each of the cards.
sir is there is any way to fetch all information exactly from card
I’m not sure what you mean by “all information exactly”. Please clarify.
sir i m getting full information from the card image..Thats ok but i want to get only exact name and sex(female and male ) from the image but i don’t know how to get can u help me….
I would highly suggest you play around with the Google Vision API and benchmark your results against Tesseract. As far as OCR, the Google Vision API is (arguably) the best off-the-shelf solution.
Hi Adrian,
Your lessons are dope,you are a rock star man. I cannot thank you enough for how much you have helped me in learning and implementing projects.
My current project needs to read the name, DOB,Sex and everything from the passport.
could you take up a blog to explain , how it could be done or let me know how i can proceed with implementing this.
Thanks in advance.
Hi Edd — I will consider this for a future blog post, but I cannot guarantee when/if I will cover it. I would suggest looking into the Google Vision API if you need an off-the-shelf OCR system.
This is really interesting. For me it is good way to get into image processing.
Thanks!
Hi Adrian,
Thanks for this amazing project!
I have few doubts
1: What should i do to scan real card images?
2:My cards have OCR-B font and there is no OCR-B reference image available on internet or in your downloads section.
3:What should i do when the credit card has a background pics drawn on it? what method should i apply to detect it?
Hello Adrian, above’s code generates output of credit card as all 0s. please help.
Hey Mihir — that is indeed a bit strange. What version of OpenCV and Python are you using?
Hi Adrian, Can you please tell me what softwares i have to use to do this? Please give me a complete list. I am new to Computer vision.
This tutorial uses the Python programming language, OpenCV, NumPy, and imutils. I provide install an configuration tutorials here. If you are brand new to computer vision I would highly suggest you read through my book, Practical Python and OpenCV which will teach you the fundamentals and help you get up to speed.
how apply ocr on a driving license?
I would suggest taking a look at this post on OCR with passports to help you get started.
any little changes and script can not solve task. try your pictures https://pyimagesearch.com/wp-content/uploads/2017/06/ocr_groupings.jpg it is impossible
Hey Nikolay — you need to use the “Downloads” section of this blog post to download the raw example images. Then run the code on them.
Good article
Thanks Jeremiah!
I followed the tutorial instructions and run the code with the raspbian image I bought from the course
practical-python-opencv but when I test the script with a similar image downloaded from the internet
it doesn’t work.
the image is as follows
http://es.tinypic.com/r/25samph/9
if the image has the same format as the images used in the tutorial. Why doesn’t it work?
the error displayed in console is as follows
http://es.tinypic.com/r/2uek0ic/9
Is the code so sensitive to the few differences between different images?
Hey Claudio — thanks for picking up a copy of Practical Python and OpenCV! I hope you are enjoying it so far.
The code used in this post is meant to be an introduction to OCR-based techniques, enabling you to get an idea of how to approach various image processing problems. It’s not meant to be a production quality credit card OCR system.
The error itself is due to the key of the dictionary not being found (i.e., it cannot recognize the digit). You can insert logic to to handle when a digit is unknown or you can try a more advanced OCR engine, such as the Google Vision API.
Hi Adrian,
I am not able to run your code because of the following error
usage: ocr.py [-h] -i IMAGE -r REFERENCE
ocr.py: error: the following arguments are required: -i/–image, -r/–reference
Nevermind, rookie error :/
For anyone else having this error please refer to this blog post on command line arguments.
Awesome!!
hello Adrian brilliant work on credit OCR, but can you suggest some solutions to do OCR on Indian Pan card.
I am not familiar with an Indian Pan card. What is it?
hi Adrian I am getting all 0’s after using one of the images you provided. What cn be the issue. ( iam using python 2)
Did you use the “Downloads” section to the blog post to download the source code + example images? Or did you copy and paste the code? If you didn’t download the code make sure you do so just in case there was a copy and paste problem.
hello Adrian thank you for such a grate post what should i do if i want to detect the score board run and out section only (123-3 ) of any cricket match by using ocr and template matching
You would first want to detect the cricket scoreboard via object detection first. Once you have the scoreboard apply a perspective transform to obtain a “top down” view of the board. Finally, apply OCR.
from where to read morphological transformation in image
Hello, It would be great to have projects that works on real-world applications.
Thank you for the tutorial! However, as you mentioned, I still wonder how can you determine the exact number for selection in line 101-110.
”Using the aspect ratio, we analyze the shape of each contour. If ar is between 2.5 and 4.0 (wider than it is tall), as well as the w between 40 and 55 pixels and h between 10 and 20 pixels, we append the bounding rectangle parameters in a convenient tuple to locs (Lines 101-110).”
This is essentially trial and error. You play with the values and investigate them until you find a set of parameters that work.
hi Adrian
Can you tell me which is the image you are using for ocr reference
Sorry, I’m not sure what you mean. Could you elaborate?
This code works for all the scanned images what about real life images
Thank you for sharing this.
You are welcome, Justin!
Hey, thank you for this tutorial. Can you answer one question:
I have a sheet with the contours of 8 letters. I want to recognize them with Open CV so I get the knowledge about the letters which are on the sheet. While recognizing the letters It’s important for me, that I seperate each letter. With the knowledge about the letter I want to get the spline for a robot and the start and endpoints. So the robot can write the letter
Have you tried recognizing the letters using this code? What methods have you tried thus far?
thanks!!!
HI,
I actually find it hard to know when to use which type of threshold or when to use sobel on Images or directly find contours could u help?
Take a look at Practical Python and OpenCV as it will help you learn how to build your own image processing pipelines.
Thanks a lot, Adrian. I was able to complete the tutorial and the result was awesome! 🙂
You are welcome!
Awesome Exercise, Specially for me. As I didn’t download the code but was copying from the website. And I was not able to get the desired results, What was wrong? As i was copying from website the image of ocr_a here is different, I mean it’s white on black background which was causing the issue. If anyone else is doing that then either download the code or process the image and reverse the colors.
Good article, thanks.
Just a little typo :
“To problems for our template matching OCR algorithm here!”
If think you mean :
“No problems for our template matching OCR algorithm here!”
Thanks Greg. Typo has been fixed.
Hello Adrian,
Thank you for good series of tutorials.
Have few queries regarding the Credit Card OCR:
A) Regarding Top Hat Morphological operator –
1) For Credit Card with dark font but lighter background would Top Hat Morphological operator still work or BLACK_HAT or there is any inversion equivalent of THRESH_BINARY_INV ?
2) For credit cards with same background and foreground say dark font and dark background or edge detection using cv2.Canny(…) will have to be used ?
B) Whats the reason for applying MORPH_CLOSE operator – you have explained that its to isolate the digits but is there any best practice guide to be aware on its usage and avoidance ?
Regards,
Navin
Hi there Navin, I would suggest you refer to the PyImageSearch Gurus course where I discuss morphological operations in more detail. The lessons in the course will help clear up your confusions here.