Over the past two years running the PyImageSearch blog, I’ve authored two tutorials detailing the required steps to install OpenCV (with Python bindings) on Ubuntu. You can find the two tutorials here:
- Install OpenCV 3.0 and Python 2.7+ on Ubuntu 14.04
- Install OpenCV 3.0 and Python 3.4+ on Ubuntu 14.04
However, with support of Ubuntu 14.04 winding down and Ubuntu 16.04 set as the next LTS (with support until April 2021), I thought it would be appropriate to create a new, updated Ubuntu + OpenCV install tutorial.
Inside this tutorial, I will document, demonstrate, and provide detailed steps to install OpenCV 3 on Ubuntu 16.04 with either Python 2.7 or Python 3.5 bindings.
Furthermore, this document has been fully updated from my previous Ubuntu 14.04 tutorials to use the latest, updated packages from the apt-get
repository.
To learn how to install OpenCV on your Ubuntu 16.04 system, keep reading.
Note: Don’t care about Python bindings and simply want OpenCV installed on your system (likely for C++ coding)? No worries, this tutorial will still work for you. Follow along with the instructions and perform the steps — by the end of this article you’ll have OpenCV installed on your system. From there, just ignore the Python bindings and proceed as usual.
Ubuntu 16.04: How to install OpenCV
Before we get into this tutorial, I want to mention that Ubuntu 16.04 actually ships out-of-the-box with both Python 2.7 and Python 3.5 installed. The actual versions (as of 24 October 2016) are:
- Python 2.7.12 (used by default when you type
python
in your terminal). - Python 3.5.2 (can be accessed via the
python3
command).
Again, it’s worth repeating that Python 2.7 is still the default Python version used by Ubuntu. There are plans to migrate to Python 3 and use Python 3 by default; however, as far as I can tell, we are still a long way from that actually becoming a reality.
In either case, this tutorial will support both Python 2.7 and Python 3. I’ve highlighted the steps that require you to make a decision regarding which version of Python you would like to use. Make sure you are consistent with your decision, otherwise you will inevitably run into compile, linking, and import errors.
Regarding which Python version you should use…I’m not getting into that argument. I’ll simply say that you should use whichever version of Python you are comfortable with and use on a daily basis. Keep in mind that Python 3 is the future — but also keep in mind that porting Python 2.7 code to Python 3 isn’t terribly challenging either once you understand the differences between the Python versions. And as far as OpenCV goes, OpenCV 3 doesn’t care which version of Python you’re using: the bindings will work just the same.
All that said, let’s get started installing OpenCV with Python bindings on Ubuntu 16.04.
Step #1: Install OpenCV dependencies on Ubuntu 16.04
Most (in fact, all) steps in this tutorial will be accomplished by using your terminal. To start, open up your command line and update the apt-get
package manager to refresh and upgrade and pre-installed packages/libraries:
$ sudo apt-get update $ sudo apt-get upgrade
Next, let’s install some developer tools:
$ sudo apt-get install build-essential cmake pkg-config
The pkg-config
package is (very likely) already installed on your system, but be sure to include it in the above apt-get
command just in case. The cmake
program is used to automatically configure our OpenCV build.
OpenCV is an image processing and computer vision library. Therefore, OpenCV needs to be able to load various image file formats from disk such as JPEG, PNG, TIFF, etc. In order to load these images from disk, OpenCV actually calls other image I/O libraries that actually facilitate the loading and decoding process. We install the necessary ones below:
$ sudo apt-get install libjpeg8-dev libtiff5-dev libjasper-dev libpng12-dev
Okay, so now we have libraries to load images from disk — but what about video? Use the following commands to install packages used to process video streams and access frames from cameras:
$ sudo apt-get install libavcodec-dev libavformat-dev libswscale-dev libv4l-dev $ sudo apt-get install libxvidcore-dev libx264-dev
OpenCV ships out-of-the-box with a very limited set of GUI tools. These GUI tools allow us to display an image to our screen (cv2.imshow
), wait for/record keypresses (cv2.waitKey
), track mouse events (cv2.setMouseCallback
), and create simple GUI elements such as sliders and trackbars. Again, you shouldn’t expect to be building full-fledged GUI applications with OpenCV — these are just simple tools that allow you to debug your code and build very simple applications.
Internally, the name of the module that handles OpenCV GUI operations is highgui
. The highgui
module relies on the GTK library, which you should install using the following command:
$ sudo apt-get install libgtk-3-dev
Next, we install libraries that are used to optimize various functionalities inside OpenCV, such as matrix operations:
$ sudo apt-get install libatlas-base-dev gfortran
We’ll wrap up Step #1 by installing the Python development headers and libraries for both Python 2.7 and Python 3.5 (that way you have both):
$ sudo apt-get install python2.7-dev python3.5-dev
Note: If you do not install the Python development headers and static library, you’ll run into issues during Step #4 where we run cmake
to configure our build. If these headers are not installed, then the cmake
command will be unable to automatically determine the proper values of the Python interpreter and Python libraries. In short, the output of this section will look “empty” and you will not be able to build the Python bindings. When you get to Step #4, take the time to compare your output of the command to mine.
Step #2: Download the OpenCV source
At the time of this article’s publication, the most recent version of OpenCV is 3.1.0
, which we download a .zip
of and unarchive using the following commands:
$ cd ~ $ wget -O opencv.zip https://github.com/Itseez/opencv/archive/3.1.0.zip $ unzip opencv.zip
When new versions of OpenCV are released you can check the official OpenCV GitHub and downloaded the latest release by changing the version number of the .zip
.
However, we’re not done downloading source code yet — we also need the opencv_contrib repository as well:
$ wget -O opencv_contrib.zip https://github.com/Itseez/opencv_contrib/archive/3.1.0.zip $ unzip opencv_contrib.zip
Why are we bothering to download the contrib repo as well?
Well, we want the full install of OpenCV 3 to have access to features (no pun intended) such as SIFT and SURF. In OpenCV 2.4, SIFT and SURF were included in the default installation of OpenCV. However, with the release of OpenCV 3+, these packages have been moved to contrib, which houses either (1) modules that are currently in development or (2) modules that are marked as “non-free” (i.e., patented). You can learn more about the reasoning behind the SIFT/SURF restructuring in this blog post.
Note: You might need to expand the commands above using the “<=>” button during your copy and paste. The .zip
in the 3.1.0.zip
may be cutoff in smaller browser windows. For convenience, I have included the full URL of both the opencv
archive as well as the opencv_contrib
archive below:
- https://github.com/Itseez/opencv/archive/3.1.0.zip
- https://github.com/Itseez/opencv_contrib/archive/3.1.0.zip
I also want to mention that both your opencv
and opencv_contrib
versions should be the same (in this case, 3.1.0
). If the versions numbers do not matchup, you could very easily run into compile time errors (or worse, runtime errors that are near impossible to debug).
Step #3: Setup your Python environment — Python 2.7 or Python 3
We are now ready to start configuring our Python development environment for the build. The first step is to install pip
, a Python package manager:
$ cd ~ $ wget https://bootstrap.pypa.io/get-pip.py $ sudo python get-pip.py
I’ve mentioned this in every single OpenCV + Python install tutorial I’ve ever done, but I’ll say it again here today: I’m a huge fan of both virtualenv and virtualenvwrapper. These Python packages allow you to create separate, independent Python environments for each project that you are working on.
In short, using these packages allows you to solve the “Project X depends on version 1.x, but Project Y needs 4.x dilemma. A fantastic side effect of using Python virtual environments is that you can keep your system Python neat, tidy, and free from clutter.
While you can certainly install OpenCV with Python bindings without Python virtual environments, I highly recommend you use them as other PyImageSearch tutorials leverage Python virtual environments. I’ll also be assuming that you have both virtualenv
and virtualenvwrapper
installed throughout the remainder of this guide.
If you would like a full, detailed explanation on why Python virtual environments are a best practice, you should absolutely give this excellent blog post on RealPython a read. I also provide some commentary on why I personally prefer Python virtual environments in the first half of this tutorial.
Again, let me reiterate that it’s standard practice in the Python community to be leveraging virtual environments of some sort, so I suggest you do the same:
$ sudo pip install virtualenv virtualenvwrapper $ sudo rm -rf ~/get-pip.py ~/.cache/pip
Once we have virtualenv
and virtualenvwrapper
installed, we need to update our ~/.bashrc
file to include the following lines at the bottom of the file:
# virtualenv and virtualenvwrapper export WORKON_HOME=$HOME/.virtualenvs source /usr/local/bin/virtualenvwrapper.sh
The ~/.bashrc
file is simply a shell script that Bash runs whenever you launch a new terminal. You normally use this file to set various configurations. In this case, we are setting an environment variable called WORKON_HOME
to point to the directory where our Python virtual environments live. We then load any necessary configurations from virtualenvwrapper
.
To update your ~/.bashrc
file simply use a standard text editor. I would recommend using nano
, vim
, or emacs
. You can also use graphical editors as well, but if you’re just getting started, nano
is likely the easiest to operate.
A more simple solution is to use the cat
command and avoid editors entirely:
$ echo -e "\n# virtualenv and virtualenvwrapper" >> ~/.bashrc $ echo "export WORKON_HOME=$HOME/.virtualenvs" >> ~/.bashrc $ echo "source /usr/local/bin/virtualenvwrapper.sh" >> ~/.bashrc
After editing our ~/.bashrc
file, we need to reload the changes:
$ source ~/.bashrc
Note: Calling source
on .bashrc
only has to be done once for our current shell session. Anytime we open up a new terminal, the contents of .bashrc
will be automatically executed (including our updates).
Now that we have installed virtualenv
and virtualenvwrapper
, the next step is to actually create the Python virtual environment — we do this using the mkvirtualenv
command.
But before executing this command, you need to make a choice: Do you want to use Python 2.7 or Python 3?
The outcome of your choice will determine which command you run in the following section.
Creating your Python virtual environment
If you decide to use Python 2.7, use the following command to create a Python 2.7 virtual environment:
$ mkvirtualenv cv -p python2
Otherwise, use this command to create a Python 3 virtual environment:
$ mkvirtualenv cv -p python3
Regardless of which Python command you decide to use, the end result is that we have created a Python virtual environment named cv
(short for “computer vision”).
You can name this virtual environment whatever you like (and create as many Python virtual environments as you want), but for the time bing, I would suggest sticking with the cv
name as that is what I’ll be using throughout the rest of this tutorial.
Verifying that you are in the “cv” virtual environment
If you ever reboot your Ubuntu system; log out and log back in; or open up a new terminal, you’ll need to use the workon
command to re-access your cv
virtual environment. An example of the workon
command follows:
$ workon cv
To validate that you are in the cv
virtual environment, simply examine your command line — if you see the text (cv)
preceding your prompt, then you are in the cv
virtual environment:
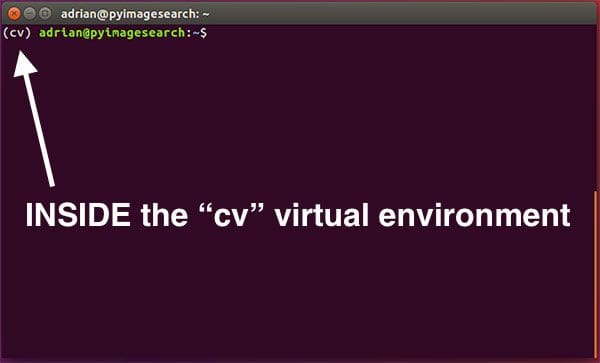
Otherwise, if you do not see the cv
text, then you are not in the cv
virtual environment:
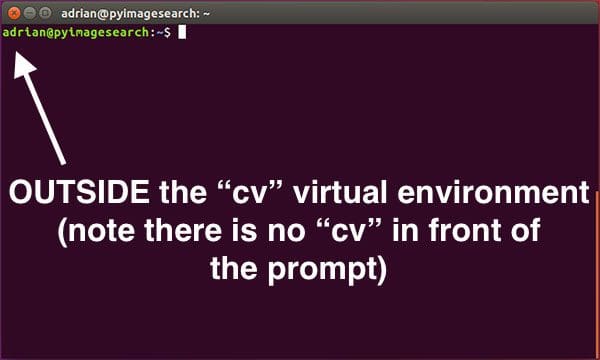
To access the cv
virtual environment simply use the workon
command mentioned above.
Install NumPy into your Python virtual environment
The final step before we compile OpenCV is to install NumPy, a Python package used for numerical processing. To install NumPy, ensure you are in the cv
virtual environment (otherwise NumPy will be installed into the system version of Python rather than the cv
environment). From there execute the following command:
$ pip install numpy
Step #4: Configuring and compiling OpenCV on Ubuntu 16.04
At this point, all of our necessary prerequisites have been installed — we are now ready to compile and OpenCV!
But before we do that, double-check that you are in the cv
virtual environment by examining your prompt (you should see the (cv)
text preceding it), and if not, use the workon
command:
$ workon cv
After ensuring you are in the cv
virtual environment, we can setup and configure our build using CMake:
$ cd ~/opencv-3.1.0/ $ mkdir build $ cd build $ cmake -D CMAKE_BUILD_TYPE=RELEASE \ -D CMAKE_INSTALL_PREFIX=/usr/local \ -D INSTALL_PYTHON_EXAMPLES=ON \ -D INSTALL_C_EXAMPLES=OFF \ -D OPENCV_EXTRA_MODULES_PATH=~/opencv_contrib-3.1.0/modules \ -D PYTHON_EXECUTABLE=~/.virtualenvs/cv/bin/python \ -D BUILD_EXAMPLES=ON ..
The above commands change directory to ~/opencv-3.1.0
, which if you have been following this tutorial is where you downloaded and unarchived the .zip
files.
Note: If you are getting an error related to stdlib.h: No such file or directory
during either the cmake
or make
phase of this tutorial you’ll also need to include the following option to CMake: -D ENABLE_PRECOMPILED_HEADERS=OFF
. In this case I would suggest deleting your build
directory, re-creating it, and then re-running CMake with the above option included. This will resolve the stdlib.h
error. Thank you to Carter Cherry and Marcin for pointing this out in the comments section!
Inside this directory we create a sub-directory named build
and change into it. The build
directory is where the actual compile is going to take place.
Finally, we execute cmake
to configure our build.
Before we move on to the actual compilation of OpenCV, make sure you examine the output of CMake!
To do this, scroll down the section titled Python 2
and Python 3
.
If you are compiling OpenCV on Ubuntu 16.04 with Python 2.7 support, make sure the Python 2
section includes valid paths to the Interpreter
, Libraries
, numpy
, and packages path
. Your output should be similar to mine below:
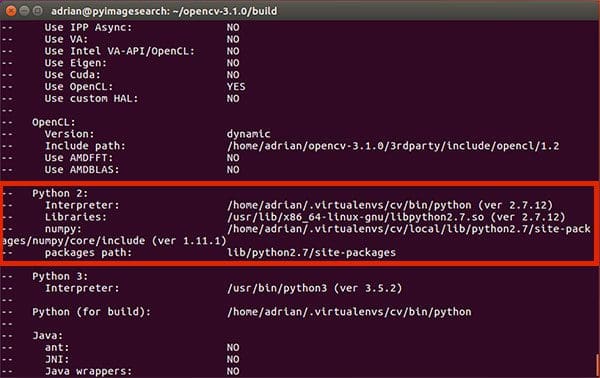
Examining this output, you can see that:
- The
Interpreter
points to the Python 2.7 binary in thecv
virtual environment. Libraries
points to the Python 2.7 library (which we installed during the final step of Step #1).- The
numpy
value points to our NumPy installation in thecv
virtual environment. - And finally, the
packages path
points tolib/python2.7/site-packages
. When combined with theCMAKE_INSTALL_PREFIX
, this means that after compiling OpenCV, we’ll find ourcv2.so
bindings in/usr/local/lib/python2.7/site-packages/
.
Similarly, if you’re compiling OpenCV 16.04 with Python 3 support, you’ll want to ensure your Python 3
section looks similar to mine below:
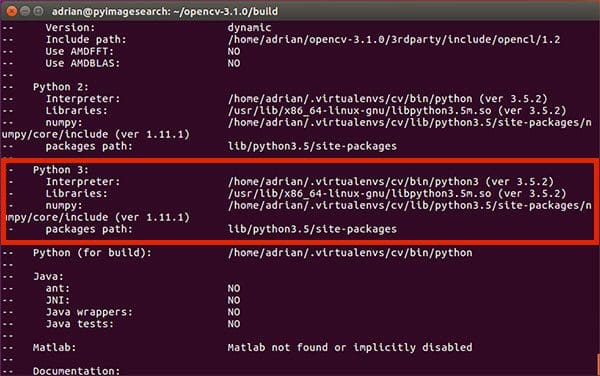
Again, notice how my Interpreter
, Libraries
, numpy
and packages path
have all been correctly set.
If you do not see the cv
virtual environments in these variable paths, it’s almost certainly because you are NOT in the cv
virtual environment prior to running CMake!
If that is indeed the case, simply access the cv
virtual environment by calling workon cv
and re-run the CMake command mentioned above.
Assuming your CMake command exited without any errors, you can now compile OpenCV:
$ make -j4
The -j
switch controls the number of processes to be used when compiling OpenCV — you’ll want to set this value to the number of processors/cores on your machine. In my case, I have a quad-core processor, so I set -j4
.
Using multiple processes allows OpenCV to compile faster; however, there are times where race conditions are hit and the compile bombs out. While you can’t really tell if this is the case without a lot of previous experience compiling OpenCV, if you do run into an error, my first suggestion would be to run make clean
to flush the build, followed by compiling using only a single core:
$ make clean $ make
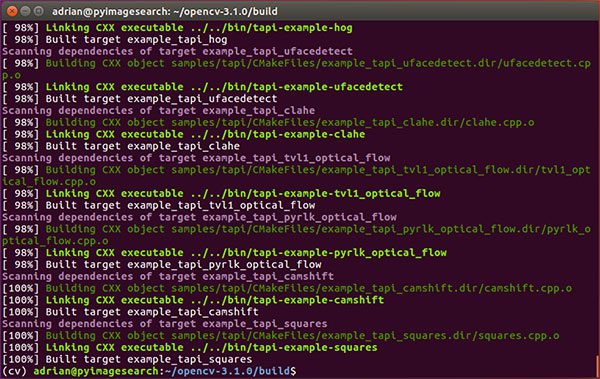
Below you can find a screenshot of a successful OpenCV + Python compile on Ubuntu 16.04:
The last step is to actually install OpenCV 3 on Ubuntu 16.04:
$ sudo make install $ sudo ldconfig
Step #5: Finish your OpenCV install
You’re coming down the home stretch, just a few more steps to go and your Ubuntu 16.04 system will be all setup with OpenCV 3.
For Python 2.7:
After running sudo make install
, your Python 2.7 bindings for OpenCV 3 should now be located in /usr/local/lib/python-2.7/site-packages/
. You can verify this using the ls
command:
$ ls -l /usr/local/lib/python2.7/site-packages/ total 1972 -rw-r--r-- 1 root staff 2016608 Sep 15 09:11 cv2.so
Note: In some cases, you may find that OpenCV was installed in /usr/local/lib/python2.7/dist-packages
rather than /usr/local/lib/python2.7/site-packages
(note dist-packages
versus site-packages
). If your cv2.so
bindings are not in the site-packages
directory, be sure to check dist-pakages
.
The final step is to sym-link our OpenCV cv2.so
bindings into our cv
virtual environment for Python 2.7:
$ cd ~/.virtualenvs/cv/lib/python2.7/site-packages/ $ ln -s /usr/local/lib/python2.7/site-packages/cv2.so cv2.so
For Python 3.5:
After running sudo make install
, your OpenCV + Python 3 bindings should be located in /usr/local/lib/python3.5/site-packages/
. Again, you can verify this using the ls
command:
$ ls -l /usr/local/lib/python3.5/site-packages/ total 1972 -rw-r--r-- 1 root staff 2016816 Sep 13 17:24 cv2.cpython-35m-x86_64-linux-gnu.so
I’ve been puzzled regarding this behavior ever since OpenCV 3 was released, but for some reason, when compiling OpenCV with Python 3 support, the output cv2.so
filename is different. The actual filename might vary for you, but it should look something similar to cv2.cpython-35m-x86_64-linux-gnu.so
.
Again, I have no idea exactly why this happens, but it’s a very easy fix. All we need to do is rename the file:
$ cd /usr/local/lib/python3.5/site-packages/ $ sudo mv cv2.cpython-35m-x86_64-linux-gnu.so cv2.so
After renaming cv2.cpython-35m-x86_64-linux-gnu.so
to simply cv2.so
, we can sym-link our OpenCV bindings into the cv
virtual environment for Python 3.5:
$ cd ~/.virtualenvs/cv/lib/python3.5/site-packages/ $ ln -s /usr/local/lib/python3.5/site-packages/cv2.so cv2.so
Step #6: Testing your OpenCV install
Congratulations, you now have OpenCV 3 installed on your Ubuntu 16.04 system!
To verify that your installation is working:
- Open up a new terminal.
- Execute the
workon
command to access thecv
Python virtual environment. - Attempt to import the Python + OpenCV bindings.
I have demonstrated how to perform these steps below:
$ cd ~ $ workon cv $ python Python 3.5.2 (default, Jul 5 2016, 12:43:10) [GCC 5.4.0 20160609] on linux Type "help", "copyright", "credits" or "license" for more information. >>> import cv2 >>> cv2.__version__ '3.1.0' >>>
As you can see, I can import my OpenCV bindings into my Python 3.5 shell.
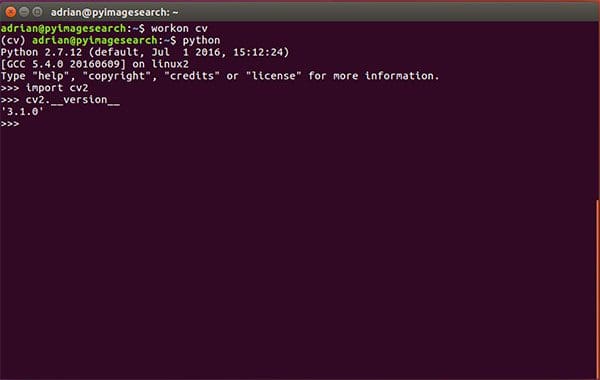
Below follows a screenshot of me utilizing the same steps outlined in this tutorial and importing OpenCV bindings into a Python 2.7 shell:
Thus, regardless of which Python version you decide to use, simply follow the steps detailed in this tutorial and you’ll be able to install OpenCV + Python on your Ubuntu 16.04 system.
Once OpenCV has been installed, you can delete both the opencv-3.1.0
and opencv_contrib-3.1.0
directories (along with their associated .zip
files):
$ cd ~ $ rm -rf opencv-3.1.0 opencv_contrib-3.1.0 opencv.zip opencv_contrib.zip
But again, be careful when running this command! You’ll want to make sure you have properly installed OpenCV on your system prior to blowing along these directories. Otherwise, you’ll need to restart the entire compile process!
Troubleshooting and FAQ
In this section, I address some of the common questions, problems, and issues that arise when installing OpenCV on Ubuntu 16.04.
Q. When I execute mkvirtualenv
or workon
, I get a “command not found error”.
A. There are three primary reasons why you would be getting this error message, all of which are related to Step #3:
- First, make sure you have installed
virtualenv
andvirtualenvwrapper
using thepip
package manager. You can verify this by runningpip freeze
, examining the output, and ensuring that you see bothvirtualenv
andvirtualenvwrapper
in the list of installed packages. - Your
~/.bashrc
file may not be updated correctly. To diagnose this, use a text editor such asnano
and view the contents of your~/.bashrc
file. At the bottom of the file, you should see the properexport
andsource
commands are present (again, check Step #3 for the commands that should be appended to~/.bashrc
). - After editing your
~/.bashrc
file, you may have forgotten tosource
it and reload its contents. Make sure you run source~/.bashrc
after editing it to ensure the contents are reloaded — this will give you access to themkvirtualenv
andworkon
commands.
Q. Whenever I open a new terminal, logout, or reboot my Ubuntu system, I cannot execute the mkvirtualenv
or workon
commands.
A. See reason #2 from the previous question.
Q. When I (1) open up a Python shell that imports OpenCV or (2) execute a Python script that calls OpenCV, I get an error: Import Error: No module named cv2
.
A. Unfortunately, the exact cause of this error message is extremely hard to diagnose as there are multiple reasons this could be happening. In general, I recommend the following suggestions to help diagnose and resolve the error:
- Make sure you are in the
cv
virtual environment by using theworkon cv
command. If this command gives you an error, then see the first question in this FAQ. - If after you’ve ensured your
~/.bashrc
file has been updated properly andsource
‘d, then try investigating the contents of thesite-packages
directory in yourcv
virtual environment. You can find thesite-packages
directory in~/.virtualenvs/cv/lib/python2.7/site-packages/
or~/.virtualenvs/cv/lib/python3.5/site-packages/
depending on your Python version. Make sure that (1) there is acv2.so
file in thissite-packages
directory and (2) that it’s properly sym-linked to a valid, existing file. - Be sure to check the
site-packages
(and evendist-packages
) directory for the system install of Python located in/usr/local/lib/python2.7/site-packages/
and/usr/local/lib/python3.5/site-packages/
, respectively. Ideally, you should have acv2.so
file there. - If all else fails, check in your
build/lib
directory of your OpenCV build. There should be acv2.so
file there (provided that bothcmake
andmake
executed without error). If thecv2.so
file is present, manually copy it into both the systemsite-packages
directory as well as thesite-packages
directory for thecv
virtual environment.
What's next? We recommend PyImageSearch University.
86 total classes • 115+ hours of on-demand code walkthrough videos • Last updated: October 2024
★★★★★ 4.84 (128 Ratings) • 16,000+ Students Enrolled
I strongly believe that if you had the right teacher you could master computer vision and deep learning.
Do you think learning computer vision and deep learning has to be time-consuming, overwhelming, and complicated? Or has to involve complex mathematics and equations? Or requires a degree in computer science?
That’s not the case.
All you need to master computer vision and deep learning is for someone to explain things to you in simple, intuitive terms. And that’s exactly what I do. My mission is to change education and how complex Artificial Intelligence topics are taught.
If you're serious about learning computer vision, your next stop should be PyImageSearch University, the most comprehensive computer vision, deep learning, and OpenCV course online today. Here you’ll learn how to successfully and confidently apply computer vision to your work, research, and projects. Join me in computer vision mastery.
Inside PyImageSearch University you'll find:
- ✓ 86 courses on essential computer vision, deep learning, and OpenCV topics
- ✓ 86 Certificates of Completion
- ✓ 115+ hours of on-demand video
- ✓ Brand new courses released regularly, ensuring you can keep up with state-of-the-art techniques
- ✓ Pre-configured Jupyter Notebooks in Google Colab
- ✓ Run all code examples in your web browser — works on Windows, macOS, and Linux (no dev environment configuration required!)
- ✓ Access to centralized code repos for all 540+ tutorials on PyImageSearch
- ✓ Easy one-click downloads for code, datasets, pre-trained models, etc.
- ✓ Access on mobile, laptop, desktop, etc.
Summary
In today’s blog post, I demonstrated how to install OpenCV 3 with either Python 2.7 or Python 3 bindings on your Ubuntu 16.04 system.
For more OpenCV install tutorials on other operating systems (such as OSX, Raspbian, etc.), please refer to this page where I provide additional links and resources.
But before you go…
If you’re interested in learning more about OpenCV, computer vision, and image processing, be sure to enter your email address in the form below to be notified when new blog posts are published!
Join the PyImageSearch Newsletter and Grab My FREE 17-page Resource Guide PDF
Enter your email address below to join the PyImageSearch Newsletter and download my FREE 17-page Resource Guide PDF on Computer Vision, OpenCV, and Deep Learning.
nico
Thanks Adrian! This is my to-go site for installing openCV.
I ran into a “404 not found” when trying to download opencv_contrib using the link indicated in the tutorial. How can I fix this?
I was missing the .zip at the end, my bad!
Adrian Rosebrock
Congrats on resolving the issue Nico!
sulthana
hi adrian.. wil this work for ubuntu 14.04? mine is 14.04. thank you
Adrian Rosebrock
For Ubuntu 14.04, I would recommend this tutorial.
Alberto Castillo
Adrian, thanks a lot. It was really helpful
Jaime Lopez
Hi Adrian,
Thank you very much for share this steps. I am using openCV 3.0 on windows 10 and python 2.7, but some times I have had some problems when I want to re-installing these.
So, it is really good to know you share this, as a source in case of need.
Keep doing that way Adrian, I enjoy following your steps.
Jaime
Luis
Hey Adrian!, i have installed opencv and python in like 3 or 4 times on a raspberry and odroid and it has worked really good, however i have read about TBB enabling which allow us to run some opencv tools using all the cores in the device. Have you considered to add such feature during the install process? Regards.
Specially with HAAR cascade training, which have reducing the training time in a very noticeable ratio.
Adrian Rosebrock
TBB (Threading Building Blocks) can certainly speedup OpenCV. I haven’t included it in this tutorial mainly because these tutorials are aimed at readers just getting started with OpenCV, not those who are trying to milk every last bit of performance out of OpenCV (and are therefore used to reading command line output and can diagnose compile errors). I’ll consider this for a more “advanced build” tutorial.
Gabriel
Hello Luis!
What is your OS? Ubuntu Mate?
I would like to install OpenCV on odroid to make some projects with USB webcam. Can you show me how to install the OS and OpenCV (the links or tutorials that you follow)?
Thanks a lot!!!
Anselal
Great tutorial Adrian. Maybe I have asked this before but what is the difference between compiling opencv and instaling it via `apt-get install python-opencv` ?
Adrian Rosebrock
The
python-opencv
repository is older, outdated, and doesn’t include theopencv_contrib
package. I cannot say this enough — I do not recommend installing OpenCV via apt-get. You’ll be missing features and be running an older, outdated version. Simply put: don’t do it.Steve
There’s actually a python-contrib-opencv available through pip that contains both main and contrib modules. https://pypi.org/project/opencv-contrib-python/
As of right now on Ubuntu 16.04, this gives me cv2.__version__ = 3.4.2, which was only released a few weeks ago as of this writing. So seems pretty up-to-date, and much easier to install than your instructions. Maybe for true beginners this is the way to go.
Cesar
Hi¡
I jump the following error: Configuring incomplete, errors occurred! has something to do that is doing this tutorials are in a virtual machine?
Adrian Rosebrock
I assume you are referring to the “cmake” command? If so, check the output of cmake — it will tell you what the configuration error is.
Bibigun
-D OPENCV_EXTRA_MODULES_PATH=~/opencv_contrib-3.1.0/modules \
Change it to
-D OPENCV_EXTRA_MODULES_PATH=~/opencv_contrib-3.4.0/modules \
Jose C
Thank you!! working properly with python 3.5.
Only I have changed this part:
$ sudo mv cv2.cpython-35m-x86_64-linux-gnu.so cv2.so
By this other:
$ sudo mv cv2.cpython-35m-i386-linux-gnu.so cv2.so
Thank you,
regards..
Francois Koutchouk
Everything worked up to:
pip install numpy
that fails with errors like
Failed to establish a new connection: [Errno -2] Name or service not known’,)’: /simple/numpy/
This occurs in both a Python2 or Python3 environment.
So I did
pip install scipy and then the pip install numpy worked. Strange, perhaps an improvement on your excellent documentation?
Adrian Rosebrock
This sounds like a problem with your internet connection. Double-check that you have a strong connection before continuing with the tutorial.
Francois Koutchouk
I think in Step #4 above for cmake it should read
-D PYTHON_EXECUTABLE=~/.virtualenvs/cv/bin/python3 \
note the 3. After that change all worked just fine.
Adrian Rosebrock
The “3” is not necessary. When you create the Python virtual environment the virtualenv/virtualenvwrapper commands will automatically sym-link the correct version of Python you chose using
mkvirtualenv
.jonathan marcelino
Thanks! I have been looking for this. 🙂
Adrian Rosebrock
No problem Jonathan, happy I could help 🙂
Linus
Hey Adrian,
you’re too late, I’ve managed this just some weeks ago. However, well explained! Do you think it’s worth uninstalling OpenCV and reinstalling it with virtualenvs? Do I have to install OpenCV for every project new?
Thanks in advance!
Adrian Rosebrock
I highly recommend using Python virtual environments but they are not a strict requirement. You do not have to install OpenCV for every new project. The only thing you would need to do is sym-link in the
cv2.so
bindings into thesite-packages
directory. It’s literally one command that you would have to execute. I would encourage you to use virtual environments but at the end of the day it’s your choice.jd
Hi Adrian,
How do you exactly do this sym-link? I have followed the tutorial and everything was installed succesfully, however, I am trying to use Qt creator to program an OpenCV app and getting the error: “/usr/bin/ld: cannot find -lGL”.
So, my question is, how do you link the opencv installation to each project?
By the way, thanks for the tutorial, it is easy to follow and very friendly..
Adrian Rosebrock
You can read up on sym-links here.
CanAmHack
Not sure if I missed a step but I couldn’t get Python 3.5 installed on Ubuntu 16.04. Python 3.4 installs fine but running:
sudo apt-get install python2.7-dev python3.5-dev
returns this error:
E: Unable to locate package python3.5-dev
E: Couldn’t find any package by regex ‘python3.5-dev’
CanAmHack
So apparently I got mixed up in my Virtual Box images and I wasn’t actually running Ubuntu 16.04. My bad. I reran on 16.04 and it worked like a charm. Thanks for a fantastic and nicely detailed step-by-step!
Adrian Rosebrock
Fantastic, I’m happy to hear it worked! 🙂
h3cr0jas
Hi Adrian, I finally have install opencv in a VM.
Thanks!! and great job!!
Thanks for sharing your knowledge and experience!!
Adrian Rosebrock
Congrats on getting OpenCV installed, I’m happy I could help! 🙂
Ehsan Eshaghi
Dear Adrian,
I was wondering how i can uninstall this version of opencv and delete its virtual environment completely. i am using octave to run a code which needs opencv. But octave cant find this virtual environment…
Regards
Ehsan
Adrian Rosebrock
You can delete a virtual environment using
rmvirtaulenv
. To delete OpenCV from your system simply delete anylibopencv*
files from/usr/local/lib
nidhi
Hi,
I installed opencv and opencv_contrib Ubuntu 15.04 using your method and it worked fine.
But after I restart my system, I couldn’t import cv2 again.
Do you know what can be the reason?
Adrian Rosebrock
It sounds like you are not accessing your virtual environment. Don’t forget to use the
workon
command each time you open up a new terminal:Marcin Budny
Hi Adrian,
Great article. I followed the instructions in Ubuntu 16.10 and had some issues during the compilation phase – some header files were not found. I turned out that including -DENABLE_PRECOMPILED_HEADERS=OFF in the cmake command helped.
Adrian Rosebrock
Thanks for sharing Marcin. I personally haven’t ran into this issue but I’ll absolutely make note of it.
Dominik L
Hey Adrian,
I think I have a similar problem like Marcin. When i run the make I get a fatal error: hdf5.h: no such file or directory.
Do you know what the problem could be?
Adrian Rosebrock
If you are getting an error related to HDF5 then you do not have HDF5 installed on your machine but for some reason the CMake command thinks you do. You can either install HDF5 using:
$ sudo apt-get install libhdf5-serial-dev
And then re-run CMake and recompile.
Another option is to instruct CMake to explicitly compile without HDF5. I can’t remember off the top of my head but I think the switch is
-D WITH_HDF5=OFF
. You could verify this by runningccmake ..
and looking for the HDF5 option.Adrian Montero
I got a solution here
https://github.com/opencv/opencv/issues/6050
Message from https://github.com/kleinash
*****************************************************************
#6016 @avtomatons solution worked for me, add:
find_package(HDF5)
include_directories(${HDF5_INCLUDE_DIRS})
into modules/python/common.cmake
(I just put it at the bottom)
******************************************************************
Yogesh Lather
Adrian Montero’s Comment did work!
I also got the same library error.
Thanks!
Dani
Yes Adrian Montero’s solution worked also for me with opencv 2.7.
Thanks all!
Riya
I can’t openCV on my laptop. it says “hdf5.h: no such file or directory.”. I tried the above solution i.e. $ sudo apt-get install libhdf5-serial-dev, without any luck. I also tried,
“find_package(HDF5)
include_directories(${HDF5_INCLUDE_DIRS})” (Although, I am not sure if I have correctly used the code)
still no luck.
Please help me
Adrian Rosebrock
Try deleting your “build” directory, re-creating it, and re-running cmake, this time adding the following flag:
-D WITH_HDF5=OFF
Additionally, you may want to consider deleting your “build” directory and re-running cmake now that you have the libhdf5-serial-dev library installed. Sometimes cmake does not pick up on these initial configuration differences if you do not re-run it.
Riya
So, I deleted the “build” directory using the command:
$ rm -rf build
Re-created it using the command:
$ mkdir build:
and re-run the cmake using the command:
cmake -D CMAKE_BUILD_TYPE=RELEASE
-D CMAKE_INSTALL_PREFIX=/usr/local
-D INSTALL_PYTHON_EXAMPLES=ON
-D INSTALL_C_EXAMPLES=OFF -DOPENCV_EXTRA_MODULES_PATH=~/opencv_contrib-3.1.0/modules -D PYTHON_EXECUTABLE=~/.virtualenvs/cv/bin/python
-D BUILD_EXAMPLES=ON ..
-D WITH_HDF5=OFF
The error says: “CMake Error: The source directory “/home/raov/opencv-3.1.0/build/WITH_HDF5=OFF” does not exist.”
So, I moved the following files in build directory:
hdf5-1.10.1
build-unix.sh
CTestScript.cmake
HDF5config.cmake
HDF5options.cmake
SZip.tar.gz
ZLib.tar.gz
and still showing the same error. Is there something I am doing wrong?
Adrian Rosebrock
You forgot the “..” at the end of the cmake command. You correctly added the “-D WITH_HDF5=OFF” but you need to move the “..” to the end, implying that cmake will run on the next level up directory (i.e., where the source code is).
Maciej
For me the answer here: https://stackoverflow.comhttps://stackoverflow.com/a/44912342 worked perfectly.
Adrian Rosebrock
Awesome, thanks for sharing Maciej 🙂
Jonas K
Hi Adrian,
Thanks for the Tutorial! is has worked well until I ran into the same error regarding the stdlib.h: No such file or directory.
I’m on Ubuntu 17.04 and tried to compile, but unfortunately the solution of Marcin Budny did not work.
I removed the whole build directory first and rebuild it, also tried both python (2 & 3) environments but did not change anything.
Do you have any suggestion what I could do?
Adrian Rosebrock
You might have missed this line:
$ sudo apt-get install build-essential cmake pkg-config
The
build-essential
package is important. Make sure you have it installed, delete your “build” directory, and then re-run CMake and make.Jonas K
Thanks for the answer, but the build-essential package was already installed (i double checked). 🙁
Do you have any other ideas?
I am trying to compile opencv-3.2.0 if this is of any importance.
Adrian Rosebrock
The standard development headers should be installed via
build-essential
. Take a look at this thread on the Ubuntu forums for more information and other possible suggestions.Riya
what is the command to remove the build directory and to rebuild it?
Adrian Rosebrock
You can remove your “build” directory via:
$ rm -rf build
And then re-run the “cmake” command we detailed in the blog post.
Carter Cherry
Marcin and Adrian,
cmake compile error In Ubuntu 16.10 installing opencv 3.1.0, python 3.5 :
/usr/include/c++/6/cstdlib:75:25: fatal error: stdlib.h: No such file or directory #include_next
Resolved as Marcin Budny stated by changing cmake command to:
cmake -D CMAKE_BUILD_TYPE=RELEASE \
> -D CMAKE_INSTALL_PREFIX=/usr/local \
> -D INSTALL_PYTHON_EXAMPLES=ON \
> -D INSTALL_C_EXAMPLES=OFF \
> -D OPENCV_EXTRA_MODULES_PATH=~/opencv_contrib-3.1.0/modules \
> -D PYTHON_EXECUTABLE=~/.virtualenvs/cv/bin/python \
> -D BUILD_EXAMPLES=ON \
> -DENABLE_PRECOMPILED_HEADERS=OFF ..
Thanks Marcin!! Great tutorial, Adrian!
Adrian Rosebrock
Thanks for sharing this CMake command Carter! I know a few other PyImageSearch readers were having this same issue as well.
soumen
Hello @Adrian Montero,
Can you please tell me how to add the commands into the common.cmake as I am also getting same error hdf5.sh not found
Anjan Das
Hey buddy! Where do we include this statement in the command, I mean the position?
Mattia
Yeah it was very useful also to me.
Juan Torres
Try this
cmake -DBUILD_TIFF=ON -DBUILD_opencv_java=OFF -DWITH_CUDA=OFF -DWITH_OPENGL=ON -DWITH_OPENCL=ON -DWITH_IPP=ON -DWITH_TBB=ON -DWITH_EIGEN=ON -DWITH_V4L=ON -DWITH_VTK=OFF -DBUILD_TESTS=O ..
it works for me
James
great guide, but i’ve got to step 3, where im getting the error ‘no module named virtualenvwrapper’. any idea??
Thanks
Adrian Rosebrock
Hey James, be sure to check the “Troubleshooting and FAQ” section of this post — you likely forgot to install virtualenv/virtualenvwrapper and/or forgot to update your
~/.bashrc
file.nidhi
Hi,
Thanks for this tutorial.
Can you please tell how to run this in anaconda spyder. Also i have installed matplotlib but in the virtualenvs its showing an error- ImportError: No module named matplotlib
Can you help.
Regards
Adrian Rosebrock
I have not used the Sypder IDE before but essentially all you should need to do is configure the IDE to point to the Python interpreter inside the “cv” virtual environment. Exactly which menu choices you need to select I’m not sure since I’m not a Sypder user, but it is certainly possible. As for matlotlib, make sure you install it in the “cv” virtual environment:
Bojan Matovski
Hey nidhi,
I am a spyder user myself.
Fixed this issue by adding the “~/.virtualenvs/cv/lib/python3.5/site-packages/” directory in the PYTHONPATH manager, which can be found in the menu section above the top Toolbar (in Tools>PYTHONPATH manager).
Cheers,
Bojan
Bojan Matovski
I just noticed that adding the cv2 path in the PYTHONPATH manager makes the cv2 available outside the cv virtual environment and I’m not sure that it something you wish to do, since Adrian (and a lot of other developers in the Python community) have stated multiple times that virtual environments are almost a “must use”.
Maybe Adrian will leave further thoughts on this “solution”.
Adrian Rosebrock
Provided that the version of Python you are importing
cv2
into is the same version OpenCV was compiled against, this will work. However, instead of updating thePYTHONPATH
(which can include extra libraries along your path) I would suggest just creating a sym-link to thecv2.so
file.Adrian Rosebrock
Thanks for sharing Bojan!
kara
what a very helpful tutorial is!
but i have problem, when I did Step 4, no error appeared. But, unlike your result, mine doesnt have Libraries , numpy , and packages path in the list. I install Python 2.7 btw.
then when i keep continue, I couldnt find any linked library when I did check ls -l /usr/local/lib/python2.7/site-packages/ (total 0) or dist-packages. but in dist-packages, it was total 364 items detected.
how could be the problem?
is it okay to ignore this thing?
ive solved my problem by deleting “build” folder and do the procedure from beginning. without deleting it, the problem keeps coming
thank you~
Adrian Rosebrock
Congrats on resolving the error Kara!
Mike
Hi,
I seem to have the same issue, in that my CMake output in step 4 shows Python 2 with an interpreter but nothing else. No libraries, numpy or paths.
As with Kara my Python 2.7 install seems to be in /dist-packages.
Can you advise when you delete the build folder? Do you just mean you deleted the build, start the process over and create a new build folder?
Thanks for the help
Mike
Adrian Rosebrock
If I need to make a change to my CMake command, I first delete the “build” directory, re-create the “build” directory, and then run my updated CMake command.
jordan
Hi Adrian,
I’m having same issue as above. Also Python 2.7 and seeing install in dist-packages.
I delete the ‘build’ folder and still problems persist when I try the cmake process again. Any other ideas you can suggest? I’m so close to the finish line!
Thanks,
Jordan
jordan
Hi Adrian,
Two follow-up points that may provide some insight. I don’t actually see cv2.so file in either packages folder, even though I follow instructions to the letter.
Also when I run workon cv I get an error message, that says “Error: deactivate must be sourced. Run ‘source deactivate’ instead of ‘deactivate’.
I believe this is due to my anaconda python install, which I read would require me to run source deactivate instead of deactivate.
Yet when I run workon cv, I indeed am in the environment and can open Python from here, so I believe that all steps are working up until my openCV cmake.
jordan
Sorry that this is coming out in 3 separate comments!
I noticed that I do have a cv2.so file – but it’s in my virtual environment. Is this OK? Did I do something wrong?
Can I just reverse my binding command? I ran cmake while in cv, so this outcome doesn’t seem surprising, but it’s confusing compared to instructions above, because my cv2.so is in .virtualenv instead of in /usr/local/lib
Thanks again!
Adrian Rosebrock
It’s perfectly okay for the
cv2.so
file to be in your virtual environment. This might also be because you used Anaconda as well.Trung Bui
Hi Adrian,
I have the same issue, and it cannot be solved by simply deleting build folder. I check that ~/.virtualenvs/cv/lib/python2.7/site-packages/ does include cv2.so, numpy, and pip.
I cannot figure out what actual problem is. Please share your opinion.
Thank you.
Adrian Rosebrock
What about
build/lib
? Can you check that directory and see if the Python bindings were successfully built? If they do not exist inbuild/lib
, then the Python section of CMake was not configured properly.Trung Bui
You are right. Is there any way to configure Python section of CMake properly? I have just installed cmake by the command “sudo apt-get install cmake”.
Adrian Rosebrock
The section “Step #4: Configuring and compiling OpenCV on Ubuntu 16.04” covers how to configure the CMake command. I have plans on creating a more updated blog post with video tutorials and foolproof CMake configurations which should also help with getting OpenCV installed.
In the meantime, I would suggest you take a look at the Quickstart Bundle and Hardcopy Bundle of my book, Practical Python and OpenCV. Both of these bundles include a pre-configured Ubuntu VirtualBox virtual machine that comes with OpenCV + Python pre-installed. It’s by far the fastest way to et up and running with OpenCV.
Rafael
Hi Adrian,
I normally use pyenv to for my python environments, but when I setup the build it didn’t set the interpreter and libraries path correctly so I followed your tutorial and used virtualenv/virtualenvwrapper.
But now it won’t find any interpreter at all. The vm is definitely activated and the “PYTHON_EXECUTABLE=” points to “/path/to/vm/bin/python”.
Any idea what could cause this problem?
Regards
PS: Really nice and detailed tutorial by the way!
Adrian Rosebrock
It’s hard to say what the actual problem is without having physical access to your machine. I doubt that pyenv would conflict since you are already explicitly inside the Python virtual environment, but at the same time I’ve always used both virtualenv and virtualenvwrapper. I would suggest double checking your virtual environment path.
Scott
Thanks for these, Adrian! They’ve taken so much of the headache out of switching from Windows to Linux. Setting up OpenCV in Visual Studio was such a nightmare, that I dreaded trying to do it on Linux. Your tutorials made it a snap in Ubuntu and Raspbian both.
One question / comment. If you’re going to use Python3, don’t you need to use pip3 instead of pip? I had a problem with numpy when importing cv2, but reinstalling numpy with pip3 seems to have fixed the problem.
Thanks, again.
Adrian Rosebrock
I’m happy the tutorials helped Scott! Once you make the switch over to Ubuntu/Raspbian it actually makes working with OpenCV and computer vision much easier.
As for pip vs. pip3, once you are inside the Python virtual environment it doesn’t matter — the virtual environment correctly sets the pip version based on your Python interpreter for the project.
Ostrogrox
Hi,
Thanks for this great tutorial where I’ve learned a lot!
Following the steps, I found that opencv doesn’t support cuda-8 so ‘make’ fails (giving “nppiGraphcut8_32f8u was not declared in this scope opencv python”). There is a bugfix on opencv repository but it’s not merged with master yet.
check out : https://github.com/opencv/opencv/issues/6677
Using that, I successfully compiled it with cuda 8 (takes about 20 minutes to compile).
Thanks again
Adrian Rosebrock
Thanks for sharing!
Dave Selinger
Hey there, just thought I’d share that if you run into this NPPIGraphCut8 issue, I made a fork of OpenCV just to support this specific configuration: https://github.com/daveselinger/opencv/tree/3.1.0-with-cuda8
Given that OpenCV doesn’t have point releases, I’m maintaining this simply to pull forward bug fixes like this one into the 3.10 branch. If you try to compile master, you get daily issues 🙂
Francois
Hi Adrian,
first, thank you for this great tutorial.
I got an error during cmake that says: ImportError: No module named ‘numpy’
although in the cmake report I got exactly the same output than yours in figure 3. I also double checked that numpy was installed in the virtualenv.
Any idea what could be the problem?
Thank you very much.
Adrian Rosebrock
Did you receive the error message during the CMake stage or the make stage? If you already have NumPy installed into the virtual environment AND your output matches mine then I would proceed with running “make”.
ValR
Great tutorial !
I followed it with a fresh install of Linux Mint 18 (xfce desktop). I just had to install g++, i had an error during the Cmake step.
Just want to become an openCV ninja !
Thanks !
Adrian Rosebrock
Great job!
ronen
Hi, Thanks for the helpful installation guide.
Adrian Rosebrock
No problem Ronen!
farlina
i went through every step but still unable to use opencv..please help me out.
its showing the error whenever i am trying to import.
Adrian Rosebrock
If you are having trouble importing the
cv2
module please refer to the “Troubleshooting” section of this blog post. This section will take care of 95% of the common problems you may run into.rahul pathak
guys please help
after typing “make clean” and “make” i am not getting the output as shown in the step 4.
were am I going wrong
Adrian Rosebrock
There could be many reasons why you are not seeing the correct CMake output. Please see the “Troubleshooting” section at the bottom of this post for common errors.
Marie
Hi! Could you help me? I can’t see “Libraries , numpy and packages path” 🙁 Only interpreter.
Adrian Rosebrock
It sounds like you are not in the “cv” virtual environment. Run
workon cv
before you run the CMake step and make sure you have installed NumPy into the “cv” environment.Sam
Hi Adrian, how would I go about using the virtual environment in an IDE such as IDLE?
Adrian Rosebrock
If you want to use an IDLE-like IDE, I would suggest install Jupyter Notebooks inside the “cv” virtual environment. Jupyter Notebooks are worlds better than IDLE.
Anastasios Tsiolakidis
I came to report build problems on Ubuntu 16.10, but glad to see someone already posted the solution -DENABLE_PRECOMPILED_HEADERS=OFF , you may want to make that one standard. You should include unzip in the installs, while new Ubuntus take the view that libpng-dev should be the name of the current library (v16), fingers crossed no incompatibilities will pop up. Finally, I take the view that such a big build should be even bigger, and would recommend that java is enabled before cmake, eg by pulling “maven”, unless someone is absolutely certain they will do all their work in Python.
Adrian Rosebrock
The reason I don’t include
-D ENABLE_PRECOMPILED+HEADERS=OFF
standard is because it slows down the compile time. It’s only specific to a number of machines though. The vast majority of Ubuntu 16.04 systems I’ve installed OpenCV on do not require this switch.This switch has also already been documented both inside the blog post and in the comments section.
navia
So detailed tutorial! Thanks! And I d like to know more about how to cleanly uninstall these software, for fear that I made some problems in between and want to start again from the very beginning. 😉
Adrian Rosebrock
You can use
apt-get remove
to remove each of the packages installed byapt-get
. As for OpenCV, delete the source code directories and any file that has “opencv” in the filename inside/usr/local/lib
.Rahul Kamma
Is it compulsory to delete the directories after install??
Adrian Rosebrock
You don’t have to, but it saves space. The benefit of keeping them around is that if you re-run “make” with different configurations the entire library doesn’t have to be re-compiled so it will save time.
Lucas S Ferreira
The URL for the contrib repo is not working for me
It seems that the correct one is: https://github.com/opencv/opencv_contrib/archive/3.1.0.zip
Adrian Rosebrock
Hey Lucas — make sure you’re expanding the entire code block when copying and pasting commands by clicking the “<=>” button. You’ll notice that your URL will match mine exactly.
aNuo
Hi Adrian,
Many thanks for your helpful tutorial! A short question, what is the difference between opencv and python-opencv? It seems easier to install python-opencv. Then why opencv is necessary? what is the extra features in opencv?
Adrian Rosebrock
I assume you are referring to the apt-get version of python-opencv? In short, don’t use it. It’s old. Outdated. And doesn’t have many of the features you’ll need when developing computer vision applications. For example, you won’t have any of the
opencv_contrib
functionality which any type of feature extraction algorithm will likely need.Juan
My two cents: I would recommend splitting these guides into Installation Guide for Py2..7, and one for 3.5. It’s overloaded and unnecessary to have both in a single place.
Navidzj
If you are installing in a path different from what Adrian said above, you might get not foung ffmpeg.h, videoio.h and videodev.h error when running CMake commands. Simply correct the path in this line:
-D OPENCV_EXTRA_MODULES_PATH=~/opencv_contrib-3.1.0/modules \
Adrian Rosebrock
Hey Navidzj — installing OpenCV into a different path shouldn’t cause any issues related to the video processing libraries. If you are getting an error related to this then you likely forgot these commands in Step #1:
jaan
Hello Adrian, I got the same errors and he’s right. He means that the actual path of the opencv_contrib-3.1.0 must be YOUR path to the directory. I had installed it in ~/workspace/opencv310. I corrected my path to:
-D OPENCV_EXTRA_MODULES_PATH=~/workspace/opencv310/opencv_contrib-3.1.0/modules \
and no more build error. nice tutorial btw
Adrian Rosebrock
Got it, that makes sense. Thank you for the clarification Jaan!
cat
You’re absolutely correct. Since I have my “opencv_contrib-3.1.0/modules” under ~/Desktop/OpenCV3/opencv_contrib-3.1.0/modules, I change this line to:
-D OPENCV_EXTRA_MODULES_PATH=~/Desktop/OpenCV3/opencv_contrib-3.1.0/modules \
And it worked!
Agnel Vishal
In my output of cmake, the libraries,numpy and package path of python3 were empty though interpreter was set. I had repeated the tutorial several times and confirmed that the python libraries were installed and I was in cv virtual environment. What worked for me was changing python to python 3.5 in cmake command
” -D PYTHON_EXECUTABLE=~/.virtualenvs/cv/bin/python3.5″
TAM
Hey,
am a beginner in this scoop and u really had explained lots of thing so really thanks for this blog, actually i have dozen of questions but let me start with one after i installed opencv with virtualenv i upgraded my python version , yet i can’t access neither virtualenv nor my new python version, another thing : i tried to delete all what i did but i couldn’t find how ?
hope u find my question
Adrian Rosebrock
If you cannot access virtualenv or virtualenvwrapper hen please check the “Troubleshooting” section of this post where I discuss common errors or problems.
Seba
Great Tutorial! It worked perfect, thank a lot!
Adrian Rosebrock
Awesome! Congrats on getting OpenCV installed Seba! 🙂
santhosh
Thanks a lot for the brilliant tutorial. Works like a charm for me !!
Adrian Rosebrock
Fantastic! Congrats on getting OpenCV installed on your system Santhosh!
Amr
Hi Adrian,
Thank you for a great Tut,
I have followed the previous installation steps, and now i would like to do the Reverse ( purge remove opencv )
regards,
Amr
Adrian Rosebrock
To delete OpenCV simply delete any
opencv*
files in/usr/local/lib
.Yakup
Sorry, I guess image isn’t opening again.
This pic is your step
https://pyimagesearch.com/wp-content/uploads/2016/09/ubuntu1604_python3.jpg
But, this check is my step, Libraries and Package PATH isn’t seeming.
Sorry for my bad English. 🙂
Yakup
Hi, I tried again and this time I succeeded. I know that I am in dept to you a thanking, even though we were “unlink” 🙂 I appreciate your effort and your interest in people. Thanks again.
Adrian Rosebrock
Congrats in getting OpenCV installed! 🙂
tham
Thanks for this post, recently setup caffe environments and other deep learning tools on ubuntu cost me lot of times.
I think the war between py2 and py3 are due to backward compatibility, in the real world old softwares are very hard to upgrade, this need times(equal to money).
Besides, most of the programmers and project manager(at least my experiences told me) do not like programming at all. Those people lost interest on learning new things, some of them told me they refuse to use the tools if that means they need to spend time to study. Consider the conditions of real world, It is not a wise decision to break codes when upgrading language version.
Edhoari Setiyoso
Hi Adrian, thank you for this great installation tutorial.
I have it installed on my Ubuntu 16.10 box and made some adjustment.
1. There is bug in Ubuntu which stopped the compilation. I solved it by following instruction -> http://askubuntu.com/questions/742180/cmake-error-when-i-try-install-opencv-3-1
2. I modified cmake flags with the following (please modify opencv-contrib with your own):
cmake -D CMAKE_BUILD_TYPE=RELEASE \
-D CMAKE_INSTALL_PREFIX=/usr/local \
-D INSTALL_PYTHON_EXAMPLES=ON \
-D INSTALL_C_EXAMPLES=OFF \
-D OPENCV_EXTRA_MODULES_PATH=~/opencv_contrib-3.1.0/modules \
-D PYTHON_EXECUTABLE=~/.virtualenvs/cv/bin/python \
-D BUILD_EXAMPLES=ON ..
Adrian Rosebrock
Thanks for sharing Edhoari!
kris
Hey, after cmake, I still don’t see the libraries and numpy. I only see
“Interpreter: /home/mnemono/.virtualenvs/cv/bin/python3 (ver 3.5.2)”
I’m still inside cv. I checked and double checked.
Adrian Rosebrock
If you are in the “cv” environment make sure NumPy was successfully installed via
pip freeze
. You should see NumPy in that list. If not, install it via:pip install numpy
As for the libraries section, your path might be slightly different. Try to find the path using the
ls
command and auto-tab complete. It’s a pain, but if you work with it, you’ll find the correct path.kazoo
+1 for this question. I’m having the same issue for python2.7. I checked pip freeze, and it showed the followings:
numpy==1.11.3
pkg-resources==0.0.0
I could only see Interpreter. Then, after I installed OpenCV with command `sudo make install`, all the .so files were placed under `usr/loca/lib`, not `usr/local/lib/python2.7/site-packages`. This may be because I missed packages path, but how can I fix this?
Adrian Rosebrock
This sounds like a CMake misconfiguration of some sort. It’s hard to say what the exact error is without having access to your machine. It’s normal for the OpenCV binaries to be placed in
/usr/local/lib
but thecv2.so
file should be in thesite-packages
directory. If it’s not (and the compile succeeded) you can simply manually copy thecv2.so
file into thesite-packages
directory.klibre87
I have exactly the same problem as above. I only can see Interpreter, I have been working on this for days, I have no idea how to solve it
redit
i have the same pb i could’t fix it
Neal
Same issue, no idea how to solve it. When looking at the CMAKE configuration it can’t even see the other python version so I don’t know how it ends up in the system python site-packages directory.
But I did what Adrian said to do and copied cv2.so to the virtualenv python site-packages directory but now I’m getting the import error: undefined symbol: PyCObject_Type
Adrian Rosebrock
Again, it’s a bit hard to diagnose this error without access to your machine but it sounds like you compiled OpenCV for one version of Python and then are trying to import it to a different Python version. Since the
cv2.so
bindings were not compiled for the same version of Python you are running into an error. Definitely go back to the “CMake” step and check the Python 2/Python 3 section — my guess is that the Python versions are not matching what they bindings are being imported into.Akanksha Dwivedi
Hi, Adrian. Thank you so much for this tutorial. I installed opencv on my ubuntu 16.04 machine using this tutorial with python 3.5. Could you also list out the steps to install matplotlib. I tried installing them following different links but they did not exactly work out.
Thank you!
Adrian Rosebrock
Where you getting an error when installing matplotlib? Or were the plots simply not showing up? If it’s the latter, you should refer to this blog post.
Eric Lovejoy
This is well written, and easy to search visually, and it reminded me to do sudo ldconfig, which took my woes of not being able to run my programs after updating to opencv version 3.2, and completely alleviated them.
Adrian Rosebrock
I’m happy to hear it! Congrats on getting OpenCV installed Eric 🙂
amankishan
Hi ,
Thank you for the tutorial , After following the whole process , I am able to setup with opencv in my ubuntu system , but it is running only on python 3.5 , since I am not able to find cv2.so in ~/usr/local/lib/python2.7/site-packages or ~/usr/local/lib/python2.7/dist-packages.
Please provide help .
Thank you
Adrian Rosebrock
If you would like to have the Python 2.7 bindings and Python 3.5 bindings then you’ll need to re-compile OpenCV with Python 2.7 support and copy the resulting
cv2.so
file into your Python 2.7site-packages
directory.Peter
I installed opencv 3.2.0 on Ubuntu 16.04
If the install path is /sw/opencv then setting
export PYTHONPATH=/sw/opencv/lib/python3.5/dist-packages/
fixes the “import cv2” problem without having to rename .so files
Mzbahrainwla
Hey,
Thanks for the tutorial. It is really very helpful.
I ran into a problem:
After running the cmake command, the instruction say to run make -j4. I can’t do that as I don’t see a makefile in my build folder.
Any clue as to where I might be going wrong?
Thanks!
Adrian Rosebrock
If there isn’t a resulting make file after running CMake, then CMake exited with an error. Go back to the CMake step and resolve any errors with CMake.
Frederik Kratzert
First of all: Thank you very much for this tutorial.
As a side note, if anyone under Ubuntu 16.04 with OpenCV (I now installed 3.2.0) under Python2 has problems with OpenCV connections and PyQt4 GUI’s, change
“sudo apt-get install libgtk-3-dev” to “sudo apt-get install libgtk2.0-dev”
The error that occured was some Glib-Object Warning. Everything i could find out was, that there are some troubles between libgtk2 and libgtk3 and libgtk2 is already installed. Changing to libgtk2.0-dev did the trick.
libgtk2.0-dev is also the version of pyimagesearch’s guide of opencv and ubuntu 14.04 😉
Adrian Rosebrock
Thanks for sharing Frederik!
Vegard
Hey, I followed your tutorial to the point, but when i start python in order to test the install (in the cv virtual environment), i get a ImportError (ImportError: dynamic module does not define module export function (PyInit_cv2)) when i try to import cv2. I’ve run the tutorial three times now, to no avail (guess that makes me crazy, expecting different results). Any idea what might be wrong? Any help will be much appreciated!
Thanks!
Adrian Rosebrock
Are you trying to compile OpenCV with Python 2.7 or Python 3 support? The likely issue here is that you compiled the wrong Python bindings for the Python version you are using.
nikitha
what can i do? if it shows ” canot read from progress file?
Adrian Rosebrock
Hi Nikitha — what command is giving you that error?
John
Hi may I know what is the difference between installing with this method and just simply typing sudo apt-get python-opencv ?
Thanks
Adrian Rosebrock
Using apt-get to install OpenCV is not recommended. It will install an older version of OpenCV without the opencv_contrib modules, meaning that you’ll be missing on important functionality (specifically keypoint detectors and local invariant descriptors like SIFT/SURF). While it’s certainly easier to just issue an apt-get command, I don’t recommend this. It will cause more problems in the long run.
Sidney
Hey I get it worked when in terminal, but I would like to use it with IDE like wingIDE, but how to set ‘workon cv’ thing inside because the shell in wingIDE is already in python.
Adrian Rosebrock
I haven’t used the Wing IDE before, but all you should have to do is set the “Project Interpreter” like in PyCharm.
Joyce
Adrian, you rock. Thank you for sharing and thank you for your time
Adrian Rosebrock
Thank you for the kind words Joyce, I’m happy the tutorial helped!
Siddharth
Thank you so very much for everything
Shubhankar
Man you are amazing!!!! Thanks for writing this.
Adrian Rosebrock
No problem Shubhankar, I’m happy it helped!
Murtaza Dalal
For me import cv2 works but cv2.xfeatures2d doesn’t so I dont think that opencv-contrib install worked. I’m confused because I’m pretty sure that I followed all the steps. Any ideas as to what the issue could be?
Adrian Rosebrock
If
xfeatures2d
isn’t found then thisopencv_contrib
was not compiled. Double-check the path to youropencv_contrib
in your CMake command and then ensure thatxfeatures2d
is listed in the “Packages to build” section of CMake output.Murtaza Dalal
Hi adrian, I checked my path it was fine, I didnt see xfeatures2d though. What do you think is going on?
Adrian Rosebrock
Without physical access to your machine I’m not sure what the exact issue is, but you should triple check your path to the contrib modules. I am 99% sure that is the problem.
Mikkel Green
Hey Adrian,
Thanks for the great tutorial! I had a problem with the output of my cmake not listing the libraries, numpy etc. I was most certainly on (cv) but I think the mistake I made was running pip install numpy as sudo unnecessarily. When I ran pip freeze as you recommended it revealed it was not installed properly in my virtualenv. I rm -rf ‘d my build dir and properly installed numpy and then specified my python_executable as python2.7 (as another poster suggested).
Adrian Rosebrock
I would simply go back to access your virtual environment and install NumPy there:
And then run the remaining steps from within the “cv” virtual environment.
Viktor
Hi Adrian,
I’m quite new to Linux and therefore have the following question:
How do I remove OpenCV properly to start again from scratch (the common answers on the internet didn’t help me yet)?
I need to switch from 3.1.0 to 3.0.0 because the FlannMatcher seem to be bugged in 3.1.0 ( see https://github.com/opencv/opencv/issues/5667 ) and the solution is to modify the cv2.cpp file or go back to 3.0.0. As I couldn’t find the .cpp-file I tried to remove opencv via different methods which lead to the fact that opencv is now not working at all 🙂 .
Thanks in advance and keep up the great work.
Adrian Rosebrock
Did you successfully compile and install OpenCV? If so, remove all
libopencv*
files from/usr/local/lib
. Otherwise, delete your “build” directory and recompile.Alex
I made it to the cmake step without any issues. I copied and pasted the cmake command into my terminal and ran it, and the output did not contain all of the things that you had in yours under python 3. All I had was the interpreter and nothing else. I double and triple checked to make sure i was in the cv environment so that was not my issue. I’m fairly certain I followed every step exactly, but I will run through one more time to make sure. Any idea why I’m only getting the interpreter with cmake here?
Thanks so much!
Adrian Rosebrock
It sounds like you might be using a different version of Python 3 than the one in this tutorial. What is the output of running
python --version
in your terminal?Fadwa
Yes i have the same problem ! Python –version is 2.7.12
Guillaume
Very nice tutorial ! Thank you !
Nikki
In step 4, after creating directory ,Interpreter in Python2 and Python 3 is ON and not showing path.Can anyone help me to resolve this problem.
Tony Holdroyd
Had problems the first go-round, so instead of wasting too much time, and since I was working with a more-or-less fresh install of Ubuntu 10.04, but thought I may have messed it up with other installs, I re-installed the O.S. and bingo, it all worked perfectly this time and I now have my virtual environments. Great stuff, thank you Adrian, I am now ready to march on my with my pyimagesearch gurus journey.
Olim
Hi Adrian,
Thank you for the tutorial!
I am encountering a problem in Step 4: “make clean” gives the following result:
make: *** No rule to make target ‘clean’. Stop.
My output of CMake is identical to yours.
What could be the problem?
Cheers, Olim
Adrian Rosebrock
To start, I would:
1. Make sure that CMake exited without error. This is the likely cause of the problem.
2. If CMake completed successfully, make sure you are in the “build” directory when executing the “make” program.
Giuseppe Scollo
Hi,
I’m just in the process of installing OpenCV 3.2.0 on Ubuntu 16.04 following your excellent tutorial. I’m finished with step #2. Before I embark on step #3, I wonder about a couple of questions:
(1) Is it OK to install in another directory rather than $HOME, say /opt/opencv/ ?
(2) Suppose I create _two_ distinct installation directories, say /opt/opencv2/ and /opt/opencv3/, and therein follow all the steps to install and compile OpenCV separately, one with Python 2.7 and the other with Python 3.5 (resp. binaries python and python3), could such a double installation work or would conflicts arise at some point in time?
Thank you very much, in advance, for your help.
Adrian Rosebrock
1. Yes, you can install OpenCV in any location that you would like.
2. This is (essentially) exactly what I do to install multiple versions of OpenCV + Python on the same machine. As long as you have separate virtual environments (or update your PYTHONPATH), this method works perfectly.
Presish
what do you do if Python 2 and Python 3 Interpreter is missing content? just says “NO” next to the Python 2 and Python 3 result of “cmake” command.
Adrian Rosebrock
Make sure you are in the “cv” virtual environment before you are executing CMake, otherwise CMake might have problems trying to automatically determine your Python paths.
Anuradha Sharma
Didn’t get any details after cmake in the interpreter column. It says NO. I am in cv environment. and tried doing it twice also
Adrian Rosebrock
Which Python version are you trying to compile OpenCV bindings for?
Anuradha Sharma
tried it with both python 2.7 and python3.5.2!
Adrian Rosebrock
I am sorry to hear about the issue Anuradha, that is super frustrating. However, without physical access to your machine I’m not sure what the exact error would be.
Arjun
Same issue encountered.
🙁
Asif
I am not being able to install the freenect(Kinnect) in “cv” virtual environment. I can use the library from outside the “cv” virtual environment but not from inside. Please help.
Adrian Rosebrock
I haven’t used freenect before so I don’t know where the output modules are, but I would suggest taking a look at the
site-packages
directory of your Python install. If they are there, copy them into thesite-packages
directory of your Python virtual environment.Salvador Blanco
First of all thank you very much for the tutorial.
The problem I have is that to use the Kinect camera with freenect I need root access, and when I run the scripts with sudo I get the following error: ” import cv2 ImportError: No module named cv2″
The solution would be: ” This problem was caused because when I installed OpenCV I created it in a virtual env. Making a link to the OpenCV file from outside the env to the OpenCV library folder fixed it.”
But I don’t know how to make a link to the OpenCV file, could you help me?
Thank you very much
Adrian Rosebrock
Hi Salvador — I haven’t used the Kinect and associated libraries in quite some time, but in this case, it sounds like you are trying to run a script as root using a Python virtual environment. The easiest way to resolve this issue is to supply the full path to your Python virtual environment binary:
sudo ~/.virtualenvs/cv/bin/python your_script.py
soumen
Hello Adrian, I want to use opencv3.0 Can you please let me know how to do
Hilman
Hey Adrian. Nice as always.
One question, what does
`$ sudo rm -rf ~/get-pip.py ~/.cache/pip`
line do? Why is it necessary?
Adrian Rosebrock
This line deletes the cache directory for pip. If you installed virtualenv or virtualenvwrapper via sudo this directory may now belong to the root user than than the standard user. The command simply deletes the cache directory so it can be used by a normal user again (not strictly necessary — only necessary if you get a permissions issue, but good to include).
Zubair
Hi adrian
Thanku for your every tutorials , i learned alot and still learning from your blogs thanks alot bro 🙂
Adrian Rosebrock
Thank you for the kind words Zubair, I’m happy the tutorials have helped you 🙂
Prasanth
How to set Interpreter , Libraries , numpy and packages paths. My cmake is successful but I see no such variables after python path.
Adrian Rosebrock
Make sure you are in the “cv” virtual environment prior to running the CMake command.
jsa
I was able to install opencv 3.2 in ubuntu 16.04.02 and xubuntu 16.04 wihtout virtualenvs. However, I had to do a fresh install, otherwise it wouldn’t build for python3. Thank you.
Ramu
Hi Adrian,
When i run cmake I cant find paths to interpreter, libraries and numpy.
Please help me
Adrian Rosebrock
Make sure you are in the “cv” virtual environment prior to running CMake.
Wei Ren
Thank you for the great tutorial. In case that you have installed the ROS opencv3 package in your Ubuntu machine and include the ROS setup.bash in your .bashrc, you may hit an import error when you try using the OpenCV Python3 binding. This is because the ROS setup.bash sets the environment variable “PYTHONPATH” to its Python2.7 package path, i.e., /opt/ros/kinetic/lib/python2.7/dist-packages. To fix this, you may remove the ROS Python 2.7 package path from PYTHONPATH by adding the following line in ~/.virtualenvs/cv/bin/activate.
“`
export PYTHONPATH=${PYTHONPATH/”/opt/ros/kinetic/lib/python2.7/dist-packages”/}
“`
Adrian Rosebrock
Thank you for sharing Wei Ren!
Robert Lee
Dear Wei,
I am also trying to get ROS work with this install. I was wondering if you could elaborate a little more on how to get it to work. I did gedit on the file you mentioned and added the last line but i still cant seem to import rospy.
Bonafide Caskett
Thanks Wei and Adrian, It worked perfectly when you have ROS Kinetic
Riya
Hello,
I don’t really understand.
How do I find ~/.virtualenvs/cv/bin/activate. ?
I am a bit confused. Please guide me
Regards
Raghav Bansal
Thanks a lot Wei Ren for this trick. It worked for me with ROS kinetic.
I also want to thank Adrian Rosebrock for providing this wonderful opencv tutorial.
Twinkle
Thank you tons.
completing working now.
sebastian
Thanks a lot! I apreciate the effort that you put in did this amazing step by step tutorial for openCV, have a nice day!
Adrian Rosebrock
Thank you Sebastian, congrats on getting OpenCV installed!
Neeraj
What is the difference between your guide to install opencv and “sudo pip3 install opencv-python”?
Thanks
Adrian Rosebrock
The opencv-python package on PyPI doesn’t include (1) the “opencv_contrib” module which has all the extra goodies with OpenCV and (2) it doesn’t have “highgui” module support so you won’t be able to use functions like
cv2.imshow
to display images to your screen. I would recommend installing OpenCV from source.Frank
Hi Adrian
I’ve installed openCV per your tutorial. Worked great.
However, I keep getting an error when I try to display an image on the computer screen per the example code in chapter three of your book practicalpython and open cv.
Looks like I need the highgui, etc modules. So I guess I have to install via source? Can I use pip3 install opencv-python if I’m using python 2.7.x?
Adrian Rosebrock
Hi Frank — the issue is because you installed via
pip install opencv-python
. This method does not include thehighgui
module required to display images to your screen. I would suggest compiling OpenCV from source as I describe in this tutorial so you can display windows to your screen.Jarades
After the installation — apparently everything has gone well –, I am not able to show images with imshow, I can use imread and work on the image properties but can not display it.
Jarades
I am sorry, it is ok and working. I just wasn’t using the waitkey()…
Adrian Rosebrock
Yes, the
cv2.waitKey
call is very important. Make sure you include it 🙂Manu BN
Here are some errors I faces & their fixes:
1. During cmake if it says cant find path to contrib_modules, then mention the complete path of the modules like -D OPENCV_EXTRA_MODULES_PATH=/home/dell/OpenCV_Installed/opencv_contrib-3.1.0/modules
2. During cmake if errors occur due to IPPICV unable to download, then physically download it from http://www.linuxfromscratch.org/blfs/view/svn/general/opencv.html and put it in the folder /home/dell/OpenCV_Installed/opencv-3.1.0/3rdparty/ippicv/downloads/linux-808b791a6eac9ed78d32a7666804320e and run cmake with -D WITH_IPP=ON
3. If you are still facing errors due to IPPICV during compilation time such as ” cannot find -iipicv” then simply copy it to usr/local/lib with the following command sudo cp 3rdparty/ippicv/unpack/ippicv_lnx/lib/intel64/libippicv.a /usr/local/lib/
Hope it helps others and thanks to Adrian for the awesome tutorial
Adrian Rosebrock
Hey Manu — I saw your original CMake command. Your issue for (1) was that you left an extra space before
-D OPENCV_EXTRA_MODULES_PATH
and the start of the path. This caused the problem. You can specify the full path or the shortcut path. Either will work.Thanks for sharing your findings!
johnson
Thank you very much for such detail! ippicv annoying me days!
Akhilesh
I am still having the same error as you got could u help me with it please
Akhilesh
this is the attached screenshot of the output
https://drive.google.com/file/d/0Bw-Ggfuv_TqibGpuanBqU1hBbVE/view?usp=sharing
Adrian Rosebrock
It’s interesting that there is a hash mismatch. Can you try either (1) re-downloading the source code or (2) installing via Homebrew?
Faris
Hi, Adrian, could you tell me how to install opencv without virtualenv? Thanks
Adrian Rosebrock
Skip all steps involving creating a Python virtual environment. Skip installing virtualenv/virtualenvwrapper. Don’t update your
.bashrc
file. Skip any steps involving “workon”.Andy
What a fantastically useful contribution to the world! Love this article.
Thank you,
Andy
Adrian Rosebrock
Thank you Andy!
Hack_Rider
really great post..describe brifely each and every step with detail..what we actully doing..
thats is great post..
install opncv without error..really thank you Adrian Resebrock..
great work
Adrian Rosebrock
Thank you, I appreciate the kind words 🙂
Karen
Hi Adrian,
I just installed the opencv3 & python2.7 on Ubuntu successfully according to your wonderful tutorial. The project I am going to do is about object tracking, and when I was calling cv2.Tracker_create(“KCF”), an error turned up: ‘module’ object has no attribute ‘Tracker_create’, also, when i try help(cv2.face), it also returns the same error.
Thanks in advance!
Karen
Adrian Rosebrock
It sounds like you might not have installed OpenCV with opencv_contrib support. Double-check your CMake output to ensure contrib support is enabled. Also, make sure you download OpenCV 3.2 which is the latest release.
Murthy
Hi Adrian,
I upgraded my Linux from 14.04 to 16.04 only to find that python2.7 failed to import cv2 also the upgrade rendered by /dev/sda to read only drive.
I used:
sudo hdparm -r0 /dev/sdb
to set that right and rebooted my machine. that did not make any difference to python. Still gave me the same errors when I imported cv2.
I re-installed openCV on 16.04 under different virtual environment and all seems to be working now.
Wondering if anyone has upgraded linux to 16.04 and are able to still work on their OpenCV installed prior to upgrade.
Adrian Rosebrock
In general I do not recommend doing major operating system upgrades on your development environment. Sym-links are bound to break, which is likely what happened in your particular situation.
iss
hi adrian
when I want to import cv2 I get this error
Traceback (most recent call last):
File “”, line 1, in
ImportError: No module named cv2
When I type the command ls in the directory site-packages I see that there is the file cv2.so
Adrian Rosebrock
Are you inside a Python virtual environment or outside of it? If you’re inside the “cv” virtual environment you need to sym-link the
cv2.so
file into thesite-packages
directory for your “cv” environment.iss
it s done thunck you adrian
do you have a tutorial for recognition emotions on image with opencv
Adrian Rosebrock
I will be covering emotion recognition inside Deep Learning for Computer Vision with Python.
iss
ok thunck you
good luck
Chaitanya Deshpande
Thanks bro! works like charm!
Adrian Rosebrock
Great to hear Chaitanya, congrats on getting OpenCV installed on your Ubuntu system.
Yunfei
Hi, Adri.
Thanks for the wonderful work you have done.
I run into a promblem after followed the step by step tutorial couple of times.
I run ‘workon cv “sucessfully and python, but I can’t import cv2
However only when I cd to this directory:
~/.virtualenvs/cv/lib/python2.7/site-packages
can I sucessfully import cv2?
I really don’t understand how the virtual environment works. and can’t find an answer. Really dont want to be stuck here.
Do you have any idea of this? Really appreciate it .
Adrian Rosebrock
Based on your error message it seems that you are not in the “cv” virtual environment. Make sure you run:
And then try to import your
cv2
bindings. From there, take a second to read up on how virtual environments work.Francesco
Hi Adrian,
thank you very much for your fantastic guide! 🙂
I am using OpenCV 3.1 and Python 3.5. I have configured properly the Enviorment and it is working fine by terminal.
Now the question is this: how can I configure the same Enviorment that I am using with the Atom.io IDE?
Thanks a lot.
Francesco
Adrian Rosebrock
I haven’t used the Atom IDE, but I imagine it has a “Project Interpreter” setting similar to PyCharm. Update the Python interpreter to be your Python virtual environment and you’ll be all set.
Francesco
Thanks. I will have a look…..
Dalibor
You don’t need to configure anything. Just install platformio-ide-terminal. You will see in the down left corner + sign. Just click it, and type “workon cv”. When you want to execute your code, on the folder panel right click to py file, and choose “Copy full path”, in you terminal window, below your code, type python(or python3) and press ctr+shift+v. And your code will run. Greetings from Serbia
kaan
install opncv 3.2.0 without error..(after 3 days of try, it was my fault )
really I feel better now
thank you Adrian
Adrian Rosebrock
Congrats on getting OpenCV installed Kaan, nice job!
Krishan
Hello Mr. Adrian , Firstly i want to congratulate and thank you for your excellent tutorials. I want to install use opencv with pycharm on my ubuntu 16.04. I use anaconda on my system for all python work. What steps should i follow to run opencv with pycharm on my system ? I tried this tutorial but make -4j command did not complete successfully.
Adrian Rosebrock
The first step is to install OpenCV on your system. Without knowing what your specific error is, I can’t point you in the right direction. Once you get OpenCV installed you can link to with PyCharm as I discuss here.
Michael du Plessis
Hello Adrian, I am having trouble finding
https://github.com/Itseez/opencv/archive/3.1.0.zip ?
Has the link changed ?
Adrian Rosebrock
Double-check your internet connection. The link is working just fine for me.
Sayeed
i failed to install…cmake fails..also if i continue i dint find anaconda/keras in the virtual environment…do i have to install them again? Pls gv a tutorial on how to install opencv using conda
Adrian Rosebrock
If you create a Python virtual environment, you need to install Keras (and any other libraries you want) inside the virtual environment. Keep in mind that a Python virtual environment is separate and independent from your system Python install. I would suggest reading up on Python virtual environments here.
Additionally, if you are struggling to get OpenCV installed, be sure to take a look at the Quickstart Bundle and Hardcopy Bundle of Practical Python and OpenCV which includes a pre-configured Ubuntu VirtualBox virtual machine which has OpenCV pre-installed.
Geethan
Great article.
Everything explained in best possible detail
Thanks and keep up the good work 🙂
Adrian Rosebrock
Thanks Geethan!
Arjun
Hi Adrian,
Everything worked till the very end except i didnt find my python 3.5 folder as stated in ‘usr/local/lib/python3.5/site-packages/’ . However, i did find my ‘opencv-3.1.0’ and ‘opencv_contrib -3.1.0’ folders. How do i overcome this problem ?
Thanks in advance. 🙂
Adrian Rosebrock
Hey Arjun — I’m confused by your comment. You were able to compile OpenCV correctly, but the
cv2.so
bindings were not where you expected them to be? Or you ran into an error when running CMake or make?Kunal
I have Anaconda already installed, so my path for python2.x is different and so that cmake command is not executing properly 🙁
Any suggestions?
Adrian Rosebrock
You would need to determine the Python library paths for your Anaconda install. I have never tried this with Anaconda so it might take a bit of trial and error.
dai
Hi thank you for your instructions.
I got problems as when I imported cv2 in python 2.7.
And I try to use cv2.MultiTracker, then it said that ”AttributeError: ‘module’ object has no attribute ‘MultiTracker’ ”
Could you help me with this, I want to run multitracker.py.
Thank you.
Duhai
Hi,
When working with a virtual environment based on python3, for some reason after running camke to configure the build does not detect python interpreters. I had to run camke configuration on a virtual environment based on python2.
I am running:
———————————–
Distributor ID: Ubuntu
Description: Ubuntu 16.04.2 LTS
Release: 16.04
Codename: xenial
Thanks
Adrian Rosebrock
That is quite strange that the CMake configuration didn’t automatically pickup the virtual environment for Python 3. I’m planning on writing an updated blog post that can automatically detect the proper CMake configurations. In the meantime, take a look at this blog post (even though it’s for macOS) as you’ll likely need to set Python 3 specific CMake parameters.
Esteban
Thank you, it works pretty good.
Adrian Rosebrock
Fantastic, I’m glad to hear it Esteban!
Yashas
Never mind, I figured it out. Thanks though.
Adrian Rosebrock
Congrats on resolving the issue Yashas!
KelvinS
Thanks for the excellent tutorial Adrian and congrats for the great work you’re doing on PyImageSearch.
Adrian Rosebrock
Thank you, I really appreciate the kind words.
KelvinS
A little tip: I had an issue with the ‘confidence’ value when trying to use the predict function from the face recognition modules (by using eigenfaces). The issue is explained here: http://answers.opencv.org/question/82294/cant-get-predict-confidence/. If someone will use the ‘confidence’ value in future I suggest to take a look at the link above before build the OpenCV, so you can change the face.hpp file to provide the ‘confidence’ value as explained by Berak as a workaround.
Adrian Rosebrock
This is great, thank you so much for sharing!
Aleksei
Adrian, thank you a lot! Great article. I installed everything without any problems. However, I would kindly ask you several questions, just in case if you will have time to answer them.
Let’s assume installation was made 100% the way described in the tutorial (for python 3):
1) We installed opencv in a given virtual environment, however ‘make install’ placed .so file into system-wide site-packages directory of python 3.5.
– Why?
– Why not in virtual environment directory?
– If so, why system-wide python 3.5 installation cannot import opencv even if .so file is present in its site-packages directory (/usr/local/lib/python3.5/site-packages).
I understand that build process was specifically tuned by the virtual environment modules which may not be available on a system level, but installation places all the files into system-wide directory and it rises this question (naturally, system-wide python should not be able to run opencv installed inside virtual environment because but I cannot figure out how this isolation is guaranteed).
2) All the story behind virtual environment is to have isolated dependencies.
– How can I install another different instance of opencv for a different virtual environment (for example, 3.0.0 or 3.1.0 without contributions or opencv built for different numpy version)?
– ‘make install’ will place another .so file into /usr/local/lib/python3.5/site-packages and here the conflict comes. Am I right?
3) When we install system-wide pip – is it installed per specific python version or for any python version particular system has (I guess the latter)? How does this process work?
4) If I update global version of pip or python. Does my virtual environment keep old versions?
5) What do you think about python’s own implementation – venv? Is is better/worse than virtualenv+virtualenvwrapper, in your opinion?
Appreciate your attention and help. Great site!
Adrian Rosebrock
1. You can install the
cv2.so
files into your Python virtual environment, that’s not an issue at all. It requires changing the site-packages flag during CMake, but that’s the only change that is required.2. The easiest way to do this is to create a separate Python virtual environment for each OpenCV install. Access the individual Python virtual environment. Run CMake + make. Then copy the resulting
cv2.so
files from yourbuild
directory into their appropriatesite-packages
directories for each Python virtual environment. This is exactly how I organize my installs.3 and 4. Pip is first installed systemwide. Once you create a new Python virtual environment a new version of pip is used. Therefore, you can upgrade or downgrade pip and other packages from within the virtual environment.
5. I personally think virtualenv+virtualenvwrapper is easier to use, but that’s my personal opinion.
Aleksei
Thank you a lot for replies, Adrian. Have a nice day!
Peter
Great tutorial, thanks!
Adrian Rosebrock
Thanks Peter!
Akash
thank you so much. i was running into weird errors all the time and your method worked perfectly for me. very grateful to you
Adrian Rosebrock
I’m glad to hear it Akash! Congrats on getting OpenCV installed on your Ubuntu machine.
progitto
Quest a hint for who has “Missing dependencies for SOCKS support” problem on
mkvirtualenv cv -p python2 command like me.
Results from this post on stackoverflow https://stackoverflow.com/questions/38794015/pythons-requests-missing-dependencies-for-socks-support-when-using-socks5-fro that is related to one proxy enviroment variable (for who use a proxy for internet connection).
Adrian Rosebrock
Thanks for sharing!
Jeremy Delahanty
Hey guys,
I’m having trouble installing and finding the libjasper-dev and libpng-dev modules. When I try to install them with sudo apt-get install, I’m told that the package can’t be located or that the version has been obsoleted (for jasper and png, respectively).
Any tips on how I can find and install these libraries so I can get started?
Thanks! Good luck!
Adrian Rosebrock
Try running
sudo apt-get update
to refresh your package repositories.Mouha
I think this is normal: this package is now obsolete on next Ubuntu version (libpng instead ?) however : you can install it from this link :
https://packages.ubuntu.com/xenial/amd64/libjasper1/download
Petjan
why not checkinstall?
Itay
Hey Adrian, I’ve followed you instructions and the environment works as expected – Thanks a lot.
There is one more issue though – when I enter the virtual environment I cannot import packages that are already installed such pylab even though that it possible to import them in other python regular shells and vice versa (cannot import cv2 to regular python shells).
What am I missing ?
Thanks,
Itay.
Adrian Rosebrock
Hi Italy — I would suggest reading up on virtual environments more. By definition, a virtual environment creates a separate, independent Python environment from your system install. To install any new packages into the “cv” virtual environment, simply access the environment via the
workon
and install your packages viapip
.mohammed
total 1972
give to me error
1972 cannot open
Adrian Rosebrock
What command is giving you that output?
mohammed
at step 5
commend total 1972
ENA
I followed the instructions. Installation went smoothly but at the end /usr/local/lib/python2.7/site-packages is empty.
Adrian Rosebrock
I would double-check your
build/lib
directory and ensure the resultingcv2.so
file is in there. If not, there was an error in your CMake configuration and the Python bindings were not built.Jin Kweon
Hi Adrian,
I cannot download virtualenvwrapper for some reasons….
Best
-Jin Kweon
Adrian Rosebrock
What is the error message that you are getting when you try to install virtualenv/virtualenvwrapper?
Saket Karve
I have installed python 2.7.13.
When I followed all the steps mentioned above skipping the virtual environment creation, I could do everything perfectly fine. But, python2 output from step 4 doesnot contain libraries, numpy and packages. Rather python3 contains it.
Moreover, the cv2.so file is also not present anywhere under python2.7 but is present in python3.5 directory
Not able to understand why is it happening!!
PREM CHIDAMBARAM
Adrian,
I did buy the book from you. I have successfully install open cv. Thank you. Now to get this to work with a python IDE….
Adrian Rosebrock
Thank you for picking up a copy of Practical Python and OpenCV! As far as a Python IDE goes, have you tried PyCharm?
PREM CHIDAMBARAM
Adrian,
Used pycharm . I am at Chapter 10 in a day !! Thank you . Let me finish the book with the Case Studies. I think I owe you a big recommendation some time this week!!
Adrian Rosebrock
Congrats on getting all the way to Chapter 10 in a single day, nice job!
Sridhar Thiagarajan
Thanks a bunch adrian!
Adrian Rosebrock
Glad I could help, Sridhar!
Abi Shalini
Hey Adrian,
Thank you for the installation guide! I can currently working on a project that requires installing scikit-learn
I just wanted to know if I should pip install SciPy and scikit-learn before executing cmake or can I still install them after following through all the instructions above.
Adrian Rosebrock
You can install scikit-learn before or after installing OpenCV, it doesn’t make a difference (just make sure you install scikit-learn into the “cv” virtual environment).
Erbic
One question: why do you have to rename the cv2.so file? Why doesn’t simply creating a hard link or soft link to the original long file name work?
Adrian Rosebrock
You could create a sym-link for the
cv2.so
file, that is also perfectly acceptable. I personally prefer for the files to be (correctly) namedcv2.so
.Yuliang
Thanks for your article!
I just confused about the virtual environment. I am only working on c++ project now, if I install the cv2 using this virtual env way, does my c++ project can find the cv2?
Now I have an error like this:
opencv2/opencv.hpp: No such file or directory
So I know I have to install OpenCV, but c++ doesn’t have virtual env, right?
thanks.
Adrian Rosebrock
This method will install your OpenCV C++ headers, but C++ does not require the virtual environment (that is for Python only).
Yuliang
Sorry but another question about the virtual env. If I want to install another app using virtual env, e.g., Tensorflow, in env “tensorflow”. Does the env “tensorflow” know there is an OpenCV installed in the machine?
Adrian Rosebrock
Are you referring to C++ or Python? Keep in mind that this is a Python-based blog so I kindly ask that all questions are related to Python to keep comment discussions on track. If you have a question regarding C++ and OpenCV, I would suggest asking on the official OpenCV forums.
Mayank
Hi Adrian!
I was trying the installation of opencv by your method, but my operating system is not having the required space in the root mount.So I’ll increase the size of my root, and want to try out a fresh installation, and want to remove the files and libraries download and installed.
My build process is not getting completed due to no space in the disk.
I want to remove all the libraries and files downloaded prior to that.
Kindly help how to remove them.
Adrian Rosebrock
All you need to do is delete your “build” directory. Then create a new “build” directory after you have increased the space of your system.
Julio V
This is an amazing article. Many thanks for all the hard work and attention to detail that went into making it happen.
Quick question, I performed the installation procedures on root, but is it possible to enable other user accounts to leverage the environment?
Adrian Rosebrock
Congrats on getting OpenCV installed, Julio! Nice job.
As for your question, if you installed OpenCV into
/usr/local
then yes, other users will have access to the OpenCV + Python bindings. However, you will need to create a Python virtual environment for each of the users.Theo
So, to enable opencv + python on a non-root user, should I follow this tutorial again in a new virtual environment for the new user?
Or is there a way to copy it from the root venv to a new venv?
Adrian Rosebrock
You can actually access the Python virtual environment for another user via root. Please see this blog post for an example.
rastaxe
Hi Adrian. I have a problem. I am installing opencv3.2 using virtaulenv (python3) on ubuntu.
No problem when I import cv2 outside virtualenv. When I am inside virtualenv I have:
ImportError: /opt/ros/kinetic/lib/python2.7/dist-packages/cv2.so: undefined symbol: PyCObject_Type
So it looks on another path. All the paths of interpreter, libraries, numpy, and packages path are like you described. I looked at the simlink and inside “.virtualenvs/cv/lib/python3.5/site-packages” folder the cv2.so file is correctly linked to:
cv2.so -> /usr/local/lib/python3.5/site-packages/cv2.so
So, do you know why the virtualenv looks wrong python packages (ROS installation?)
rastaxe
Just an update. If a comment out the ROS stuffs from the .bashrc file it works. But I do not know how to make it works together.
Adrian Rosebrock
It sounds like you compiled OpenCV with Python 2.7 support, but are trying to import it into a Python 3 shell. Keep in mind that you need to configure CMake such that it compiles OpenCV for the Python version you want to use. Python + OpenCV bindings are not compatible across different versions. You need to re-compile and re-install OpenCV for each version of Python you want to use.
artemii
ROS Kinetic + OpenCV conflict
For those, who faced with the same issue.
It’s actually kindly explained by Mr Wei. I’m copying it with a ROS and ImportError tags.
In case that you have installed the ROS opencv3 package in your Ubuntu machine and include the ROS setup.bash in your .bashrc, you may hit an import error when you try using the OpenCV Python3 binding. This is because the ROS setup.bash sets the environment variable “PYTHONPATH” to its Python2.7 package path, i.e., /opt/ros/kinetic/lib/python2.7/dist-packages. To fix this, you may remove the ROS Python 2.7 package path from PYTHONPATH by adding the following line in ~/.virtualenvs/cv/bin/activate.
export PYTHONPATH=${PYTHONPATH/”/opt/ros/kinetic/lib/python2.7/dist-packages”/}
just by putting it under the code the problem gets solved.
Adrian Rosebrock
Thank you for sharing!
Ahmed Hassan
I deleted all what I have installed in this tutorial, I followed the steps for python 3.5 before.
Then I tried to follow the python-2.7 version.
it worked after that. Dunno, but it may be because ROS used the 2.7 version.
Alexey
OpenCV contrib module now requires such flag at installation:
-D OPENCV_EXTRA_MODULES_PATH=/modules
Without it does not link to its contrib modules!
Adrian Rosebrock
Hi Alexey — perhaps I’m misunderstanding your comment, but the
-D OPENCV_EXTRA_MODULES_PATH
flag is included in the CMake command in this blog post.Erik
No, it is just OPENCV_EXTRA_MODULES in the blog post. Took some time to find that one should append _PATH as well.
Shivani
Hello SIr !
I followed each and every step of your tutorial.The problems I’m facing are :
1) cmake is running fine, but I can’t see the libraries , package path or any other sub-heading in the output. There was no error during cmake, only the output is not as expected.
2) site-package directory is empty and dist-package also has no files of opencv.
I’ve repeated the procedure multiple times,it’s still not working. Any help would be appreciated.
Thank you
Adrian Rosebrock
Hi Shivani — make sure you are in the “cv” virtual environment before executing CMake. You should consider delete your “build” directory, re-create it, and re-run CMake.
yahya_Nik
Dear Adrian;
I have installed the OpenCV 3.2.0 and everything works fine (importing cv2). My problem is that when I try to use “Tracker = cv2.tracker_create(“MIL”)”. But I receive error “AttributeError: ‘module’ object has no attribute ‘tracker_create'”…
I dont know what to do. I need to mention that I checked configuration and the extra Tracking Package was included.
Adrian Rosebrock
You have a typo in your code. The “T” should be capitalized:
tracker = cv2.Tracker_create("MIL")
Joe_Tro
I have the same issue. I made sure that I had the correct capitalization. I can also run the tracker example in opencv-3.2.0/build/bin just fine. Any ideas or things to check would be much appreciated.
Adrian Rosebrock
Can you confirm that you installed your Python + OpenCV bindings with the opencv_contrib module? That could be part of the issue.
Ron
Adrian, the amount of work you have put into this is amazing, so I don’t want to appear whiny. I moved over to this thread after I managed to kill my SD card trying to set this up with Pi. I do have xbuntu 16.04 and I don’t know if that is the real problem. I’ve run the CMake and get an error log I’m trying to interpret. The primary issue seems to be with video files. One issue is I didn’t have ffmpeg installed. And when I did install it, I had to truncate the directory name of version numbers. I still got errors I tried to work around by coping files from a sub-directory to the ffmpeg directory. Also have errors like:
fatal error: linux/videodev.h: No such file or directory
Guidance?
TIA
Ron
TIA
Ron
Adrian Rosebrock
Hi Ron — my guess is that you are missing this command from Step #1 where we install video support:
Run the above command, delete your “build” directory, re-create it, and re-compile.
Vivek
Hi Adrian,
I did install the video support, still I’m facing the same errors as mentioned by Ron.
Can you please help in this?
Note: I’m doing this on VM of Ubuntu 16.04 (Guest) on Windows 10 (host).
Thanks in advance,
Vivek
Vivek
I’m getting following error:
— Looking for linux/videodev.h
— Looking for linux/videodev.h – not found
— Looking for linux/videodev2.h
— Looking for linux/videodev2.h – found
— Looking for sys/videoio.h
— Looking for sys/videoio.h – not found
Not sure, what is missing?
Vivek
I found my mistake.
I used both opencv and contrib version 3.2.0, but cmake command had path of 3.1.0. So, when I fixed the version, it worked.
Sorry to bother you.
Thanks & regards,
Vivek
Adrian Rosebrock
Congrats on resolving the issue, Vivek! Nice job getting OpenCV installed and working.
Min
Hi Vivek, I have the same issue now, how did you check and change the path of cmake command?
Samrat Sinha
Nice blog Adrian.
But how am i supposed to use opencv outside the “cv” virtual environment ? Suppose i needed to do it ?
Adrian Rosebrock
If you installed OpenCV globally into
/usr/local
you should be able to use OpenCV with Python outside the virtual environment.Rich
Hi, I believe I may have missed something. when I navigate to the folder Python3.5 > Dist packages, it is empty. However Python 2.7 > Dist packages has contents. reason being is I am having the issue of cv2 not found. I’m sure I went through all the steps. Is there a way to restart the process without havibg to start from step one? Iv’e not uninstalled the zip downloads.
Regards
Rich
Adrian Rosebrock
The easiest way is to simply delete your “build” directory, re-create it, re-run CMake, and re-run make. There is no need to start from Step #1.
Nacho
Thank you very much for the tutorial, Adrian 🙂 I used pyenv-virtualenv so it needed a bit of tweaking but it works.
I was wondering however: we have created a virtual environment (cv) which has numpy and which is used by opencv. However, I will potentially have different computer vision projects in my machine, and each one of them should have an independent virtual environment. However, newly created environments don’t have access to cv2, as expected.
How do you deal with this? I hope we don’t need to recompile opencv for every new project! Thanks 🙂
Adrian Rosebrock
Simply sym-link the
cv2.so
file into each of your newly created Python virtual environments (no need to recompile). From there you’ll be all set.Nacho
Works like a charm after installing numpy in the new virtual environment. Thanks 🙂
Adrian Rosebrock
Fantastic, I’m had to hear it worked 🙂 Congrats on getting your system up and running with OpenCV.
Jeremy
Hi, Adrian. What a thorough tutorial! My autistic brain thanks you. I am having a small problem installing OpenCV in Python 2…in Step#4 I execute cmake, and my packages path points to Python3.5, while all other paths point to Python2.7, which I’d rather use.
I also get a couple of error messages, telling me that “no package found”, and “Configuring incomplete, errors occurred”.
What can I do about this?
Adrian Rosebrock
If you are getting issues related to “Configuring incomplete, errors occurred” scroll back through the CMake output. It will tell you specifically where the errors were. You can also check the CMake errors log.
walter
sorry for my English
You could do a python and opencv tutorial for debian ..
Does not work on debian ..
Or if they know of a link
Thank you and sorry for the inconvenience
Adrian Rosebrock
Hi Walter — Ubuntu is Debian-based. I’ve used this tutorial myself to install OpenCV on Debian machines. What is the issue you are running into?
John
This is the best tutorial I’ve found for installing OpenCV in Ubuntu. Thanks!
I installed PyCharm on the virtual environment and it all worked just fine.
Adrian Rosebrock
Thanks John, congrats on getting OpenCV installed!
Muaz Usmani
Hey Adrian, thanks for the great tutorial. I have followed this tutorial couple of times since I have found it. But recently I am trying to install it on a machine remotely where I don’t have `sudo` permission, which is why it is failing now. Also I am not that good with compiling using cmake etc. Can you please guide me what should I do in that case. Thanks.
Adrian Rosebrock
Hi Muaz — you will need sudo permissions to install the proper pre-reqs for OpenCV via
apt-get
. Otherwise, you would have to manually compile the pre-reqs by hand and install them into your local home directory. I do not recommend this as it’s a major pain.Kartik
Hi Adrian! First, I would like to thank you for this succinct tutorial to install OpenCV 3 on Ubuntu 16.04.
I am a novice Linux user. I followed the steps as you have mentioned in the tutorial and OpenCV 3.2.0 has installed successfully. However, as you had said to switch to cv environment by sending ‘workon cv’ and ‘python’, I was able to access Python Shell only. For accessing scripts, I installed IDLE using the sudo command. To my surprise, when I typed out a simple program, it gave me the following errors:-
“No module named cv2” and “No module named numpy”.
How do I fix this? Do I need to configure my IDLE? I want to use IDLE for writing the programs in a similar fashion which we use it in Windows. Let me know if there’s a solution to this.
Many Thanks!
Adrian Rosebrock
IDLE cannot access your “cv” virtual environment, hence why you cannot import “cv2” and “numpy”. If you want to use something similar (and better) than IDLE, I would suggest using Jupyter Notebooks.
Kartik
So even the Jupyter Notebooks need to be installed on ‘cv’ environment?
Adrian Rosebrock
Correct. Please keep in mind that a Python virtual environment is totally and completely independent of your system Python install. If you are new to Python virtual environments (and why they are useful and a best development practice), please refer to this post.
Kartik
Can we install Scikit for Machine Learning? Do we need to install Scikit in the cv environment or normally in the system environment?
Adrian Rosebrock
You would install scikit-learn into the “cv” virtual environment:
Arek
Hi I want to use python script in ruby on rails. How Can I run virtual env in rails controller? I have tried use system command but this isn’t work
Stacy
Thank you for the tutorial, Adrian! After some small difficulties I finally managed to do it:) And thanks for telling about virtualenv, it is a great thing and I didn’t use it before
Adrian Rosebrock
Congrats on getting OpenCV installed Stacy, nice job! 🙂
Zito
I’m having trouble importing cv2. When I use python in the virtualenv, I am able to import it and use it properly. If I am not in the virtualenv, I am unable to import it. I have already manually copied the cv2.so file from my build file into my system install of python but this does not seem to fix the problem. Any help would be appreciated
Adrian Rosebrock
Fire up your Python shell (outside of the virtual environment) and run:
Willie Maddox
If “workon cv” puts you in the virtual environment, what takes you out? Just plain old “deactivate”? or something special?
Adrian Rosebrock
You are correct —
deactivate
removes you from the virtual environment.Eric F.
Hi Adrian,
I have some trouble for compiling opencv on ubuntu 16.04. I have this message:
CMake error: The source directory “~/opencv-3.1.0/build/BUILD_EXAMPLES_ON” does not exist
Could you help me?
Thanks for all this work.
Eric F.
Forget my comment. I simply haven’t seen the two dots at the end of the comment CMAKE…
Azmin
Hi, I’ve tried to copy manually the cv2.so in site-packages system and cv2 environment like you said in FAQ but can’t as it is already there. but still have the error “no module named cv2” in Pycharm.
I’ve found a new version of opencv and opencv-contrib that says can intergrate with Pycharm IDE here https://pypi.python.org/pypi/opencv-python but I don’t know the correct steps to do like in this tutorial you written. Can you enlighten me to resolve this? I’ve been stuck for days now. Thank you.
Adrian Rosebrock
So you’re using PyCharm as your IDE? If so, you just need to configure your “Python Interpreter” for the project. Please see this post for more details.
edlectrico
Thank you man, I followed your guide step-by-step and it works! Even in a Virtual Machine! I tried to do the same with an Ubuntu 17.04 but it failed. Anyways, thank you.
Adrian Rosebrock
Congrats on getting OpenCV installed on Ubuntu 16.04! I haven’t tried this guide yet with Ubuntu 17.04. I would be curious to know what step the build errored out at.
Jeremy Collins
Thanks for this guide, it saved me a lot of time!
Adrian Rosebrock
I’m glad to hear it Jeremy! Congrats on getting OpenCV installed.
Fav
two things , did exactly everything under linux mint
but the virtual enviroment went to the python 2.7 folder , not the 3.5!
what should i do?
Adrian Rosebrock
Hi Fav — it sounds like you may have created your Python virtual environment via:
$ mkvirtualenv cv
Rather than:
$ mkvirtualenv cv -p python3
Definitely double-check which Python version you used to create the virtual environment.
Ho Hai Dang
Hello Adrian Rosebrock,
I followed all your direction. When I tried to use cmake command. cmake… -> make. It doesn’t work just can go to 67% -> fail
I realized I had to add this line to cmake -D WITH_FFMPEG=OFF\. Then it works. I don’t know when I disable ffmpeg what features I will lost when I use OpenCV?
Adrian Rosebrock
FFMPEG is typically used for various video file codecs. I rarely compile OpenCV with FFMPEG implicitly enabled so unless you are looking for specific video codecs you won’t lose much.
Carol
Hi Adrian,
Thanks for the tutorials! I’m currently encountering a problem with videocapture function of cv2. The ‘ret’ value is always false when using cv2.videocapture. Just wondering, if this is the issue related to ffmpeg compilation?
Adrian Rosebrock
It’s hard to say without having access to your physical machine, but yes, it seems there is a problem with your installation. I would suggest recompiling and reinstalling OpenCV. Make sure you didn’t miss the step where we installed the video I/O libraries:
Wentai
Hello Carol, I wonder whether you have solved your problem?
Simon
Adrian, I appreciate the time you’ve spent preparing this tutorial and responding the comments you’ve received. I’ve read your tutorial line by line, trying to understand each step. I am still pretty much clueless, but its not your fault: I am utterly new at Ubuntu and Python (OpenCV is pretty much Chinese to me at this point). I have a lot of questions, but I’ll only ask the one that’s been bothering me the most: If the idea is to have OpenCV working in a virtual environment, why isn’t everything done within it? I guess another way to phrase the question is: Why isn’t the creation of the virtual environment step # 1. If I’ve understood correctly, OpenCV has been installed in the Home directory, and the build has been made inside the OpenCV file. I know my confusion stems from a lack of understanding of how virtual environments work. I read the links you referenced regarding this matter, but they aren’t clear enough for a newbie (or plain simple idiot) like me. I would GREATLY appreciate it if you could shed some light on all this, and if you could be so kind, give me a reference to understand the mechanics of python paths and dependencies in the context of Ubuntu.
Thank you very much!
Adrian Rosebrock
Hi Simon — the virtual environment only affects your Python PATH (a system variable). Installing dependency libraries via apt-get (such as those for image I/O, video I/O, optimizations, etc.) do not affect Python. Again, Python virtual environments will only affect the Python path on your system.
Yasir
im trying to build it in OrangePi-plus2,
whatever i do cmake task won’t detect python library, numpy and package path
gal
hey Adrian, thanks for this tutorial!
as usual, awesome work pal.
i have worked by youre instructions,
and yet, i get “cv2 module has no attribute ‘SIFT_create()’ ”
same for other sift ans surf commands
why is that?
thanks!
gal.
Adrian Rosebrock
The SIFT class changed from OpenCV 2.4 to OpenCV as I discuss here.
You can access SIFT via:
cv2.xfeatures2d.SIFT_create()
Linus
Just because I’m currently upgrading to 3.3.0, I saw you still have the old GitHub links in the post. All the OpenCV related official repos have moved to the opencv account, now located at https://github/opencv/*
So you might update the links, even though GitHub just redirects the old one with 301 (moved permanently).
-Linus
Jan Debiec
Hi Adrian,
Thank you for the fantastic tutorial.
I have the similar issues with the configuration of cmake.
But I have found the fix:
Always delete the build folder if the call to cmake was not perfect (results as in your picture).
Then make fresh build folder, cd into it and call cmake with proper parameters.
Jan
P.S. You earned a lot of praise for the idea with virtual environment
Adrian Rosebrock
Thanks Jan! And yes, you’re absolutely right — to restart your compile from scratch the easiest method is to delete your
build
directory, re-create it, and then re-run “cmake”. Thanks for chiming in!Avery
I’m having the same issue as the one described here: http://answers.opencv.org/question/138047/opencv-32-includes-libmirprotobuf-and-protobuf-26-which-is-conflicting-with-protobuf-31/
Any ideas how to compile to avoid this problem?
I’m on Ubuntu 16.04
Ramy Hassan
I’ve the same issue, How did you resolve it.
Nader
Hi adrian
Thanks for your tutarial.
I tried to install opencv with your guid in ubunto 16.04.
I upgraded ubunto and now i have ubunto 17.04 on my machin.
When i run my code from command terminal it works fine.
But when i configure it by qt it crashe when i use namedwindow.
Is it becase of upgrading my ubunto to 17.04 or an other reason cause crash??
Thank you
Adrian Rosebrock
Hi Nader — I haven’t tried this tutorial with Ubuntu 17.04, but in general, upgrading your OS is likely to break the development environment. If you want to use Ubuntu 17.04 I would suggest starting with a fresh install of Ubuntu 17.04.
Nader
Thanks for your answer adrian.
I changed my machin os to ubuntu 14.04 and tested it
I use opencv 3.3 and qt 5.9.
But my problem does’nt resolved.
Actually when use namedwindow or imshow or waitkey, programm crashes.
I feel that opencv 3.3 does’nt works on qt or is not cofigurable with qt.
Does it correct??
Thanks a lot.
Adrian Rosebrock
I haven’t used OpenCV with Qt in quite some time, but you can compile OpenCV with Qt support. I typically used GTK-based GUIs so I’m unfortunately not sure what the exact error is.
Marcelo
Guys, I had a trouble with a looping in IPPICV download that didn’t stopped. This instructions made me compile:
To add to cmake command:
-D WITH_IPP=ON ..
https://software.intel.com/en-us/articles/intel-integrated-performance-primitives-intel-ipp-open-source-computer-vision-library-opencv-faq/
einstienien
I’m getting a `fatal error: linux/videodev.h: No such file or directory` error. I checked `/usr/include/linux` directory and can verify I only have a videodev2.h file.
I’m getting the same error for `videoio.h`. I’m currently trying to install in a 16.04.3 VM. I have successfully installed all the packages required. Maybe something changed in the packages since this write up.
Adrian Rosebrock
Can you confirm that that you have installed the video I/O packages:
If not, install them, delete your “build” directory, and then re-run CMake and make.
ampppppp
In step 4 : mkdir build it show mkdir: cannot create directory ‘build’: File exists
what would I do ???
Adrian Rosebrock
Delete it can re-create it:
Fav
there is something im not following , i already installed everything and seems to be working
now for instance lets say that i want to create a .py using sublime , what should i do? how do i relate the virtual enviroment with that file? i cant import cv2 for some reason in sublime
but i do see it in workon cv when i import it there
Adrian Rosebrock
I would suggest using Sublime Text to write your code and then executing the code from your command line within the “cv” virtual environment. Otherwise, you can set the Python virtual environment for your Sublime Text project. More details here.
Fav
interesting will try soon , thanks
Yamil
hi, i’m trying to install and make some projects with opencv, y was using your tutorial, but, when i was in the step 4, when i compiling opencv isn’t appear libraries, numpy and packages path. i suppose that i had a bad instalation, bu in the second time it was the same result, i want to know why this don’t appear i why i can fix that, because i try a lot of things and i had no good results. thanks for this tutorial, it was a good help
Adrian Rosebrock
Hi Yamil — can you please confirm whether you were in the “cv” virtual environment before executing CMake? It sounds like you may not have been.
Fav
so when i try to run from the enviroment a .py file i get this
Error in `python3′: free(): invalid pointer: 0x0000000001fae290 *
and many lines with the backtrace
im trying to install opencv 3.3.0 with linux mint 18.1 ( ubuntu 16.04 based )
Adrian Rosebrock
It sounds like you may have compiled OpenCV with Python bindings for a different Python version. I would check your output of CMake and ensure the Python version you are compiling OpenCV for matches the Python version you are trying to import OpenCV into.
Fav
seems like its is related to my version of linux , i tried the same with OPencv3.2 and 3.1 and works OK but get that error with 3.3.0
Ali
Hey Adrian, I keep running into the following error in the make
Makefile:160: recipe for target ‘all’ failed
make: *** [all] Error 2
Adrian Rosebrock
Without knowing where the compile errored out I cannot provide any insight as to why the compile failed.
Nish
Hey Ali, did you figure this out?
Adrian Rosebrock
You need to check your output of ‘make’ to find the error. The reason your OpenCV compile failed may be different.
Ilaria
I ran in the pretty same error presented by Ali, while applying ‘make -j4’. I tried to remove the build folder and recompile using simply make, as suggested, but the same error continued stopping me, showing problems about potobuf packages. I inspected the log deeply and searched online but without appreciable results.
Nevertheless, I fixed the issue in a quite lucky way: I needed to restart my pc and then I noticed that the errors given changed abruptly due to sudden “disappearing” of packages that cmake wanted to load. Hence, after a new reboot, I deleted all opencv sources and started again from zero with sudo update, upgrade, package checking and downloading opencv and contrib sources. The compilation succeeded perfectly until the end of this tutorial and my python apps are now happily running with cv2 😀
According to what I saw in my logs, I suppose that my errors were caused by a combination of unstable internet connection and unresolved dependencies with other installed packages: so, connection checking and overall cleaning fixed it. I hope it can help 🙂
I want to thank Adrian again for this good tutorial. I also followed many others of yours and I always find them really helpful and pleasant to read 😀
Adrian Rosebrock
Congrats on getting OpenCV installed, Ilaria! I’m super happy for you.
chet
>>> import cv2
in virtual env gives an error saying protobuf version with which the common.cc file was run (3.0.0) does not match the one installed (3.1.0) please do help!
Simon
Hi!
First of all thank you very much for this tutorial, it was very easy to follow and everthing seems to work.
I just noticed however, that I need some additional libs to the ones you recommended. How can I “integrate” additional libs?
In the case that I have to compile again, do I have to repeat everything from step 4 onwards?
Thank you very much!
Adrian Rosebrock
Hi Simon — yes, if you need additional libraries you should run CMake and compile again. You can put the paths to your libraries in a CMakeLists.txt file. There are many examples online which should get you on the right path. You will have to repeat steps 4 onwards.
umi
Thank you very much for the post..I tried it and everything went fine until the command to compile opencv
$ make -j4
which returned this
make: *** No targets specified and no makefile found. Stop.
Tried make clean as said in the post still the same result..Can someone HELP me!!
Adrian Rosebrock
Hi Umi — you must execute the make command from within the
build
directory. Did you, perhaps, miss a step in the instructions? Please try again and let me know.umi
Sorry it was my mistake..I didnt download the contrib file..
Adrian Rosebrock
Ah — that could do it! Congratulations on getting OpenCV installed!
Mubeen
Thanks Adrian for the tutorial.I did everything fine just before installing i.e., the $make- j4 command.
$make- j4 exited at 19% with errors like the below
/home/mm/opencv-3.3.1/modules/stitching/include/opencv2/stitching/detail/matchers.hpp:52:42: fatal error: opencv2/xfeatures2d/cuda.hpp: No such file or directory
compilation terminated.
So tried using $make after flushing the build as shown in the page.Again it exited with error at 76% as shown below
$/home/mm/opencv_contrib-3.3.1/modules/xfeatures2d/src/boostdesc.cpp:646:37: fatal error: boostdesc_bgm.i: No such file or directory
compilation terminated.
Is there a way out of this?
Adrian Rosebrock
Hi Mubeen — the first error appears to be a CUDA issue. Does your system have CUDA installed? The second error I’m not sure about. I actually offer a pre-configured and pre-installed Virtual Machine that comes with Practical Python and OpenCV + Case Studies Quickstart Bundle. I know that the solution isn’t ideal, but you could get started from there.
chunlin
i met the second error too. it seems that i had not install the numpy in the cv evnvironment and after i install it and run cmake and make again, the problems was solved
Rahul
Thank you Adrian, took a while but got setup!
One issue I ran into was with CUDA 9.0. There are some errors so I removed that and with 8.0 it works.
With 8 it shows this warning so I assume with 9 they have removed it so that is what is breaking the make.
Building NVCC (Device) object modules/core/CMakeFiles/cuda_compile.dir/src/cuda/cuda_compile_generated_gpu_mat.cu.o
nvcc warning : The ‘compute_20’, ‘sm_20’, and ‘sm_21’ architectures are deprecated, and may be removed in a future release (Use -Wno-deprecated-gpu-targets to suppress warning).
Adrian Rosebrock
Hi Rahul — since you’re using a GPU and CUDA, try these installation instructions: Setting up Ubuntu 16.04 + CUDA + GPU for deep learning with Python.
Cristiano Saltori
Hi! Here is Cristiano from Italy!
Congratulations for the tutorial, it’s very useful!
Just a suggestion to the people that have the error “ImportError: No module named ‘cv2′”,
don’t try to use bpython or ipython to do the import cv2, I’ve spent hours on trying to search the error when with the simple python has found the module immediately.
I used this tutorial to install Opencv 3.3.0 in python 3.5 on Ubuntu 16.04 LTS and it works well changing some names!
Thank you!
Adrian Rosebrock
Thanks for the tip, Christiano. Those Python environments done use virtual environments as far as I know, so you won’t be able to access the packages in your site-packages directory.
Adrian Rosebrock
Hi Ankit — that means that you haven’t installed OpenCV. I’d suggest you follow my instructions and use virtual environments. From there you could make two virtual environments — one for Python 2 and one for Python 3. You’d have to install + link OpenCV into each environment.
sarma
Hi Adrian,
Thanks for this great post!,
I have used it and got good results on laptop and ran your deep learning tutorial also.
Now I want to repeat the same thing on Jetson TX1, but due to space issues on TX1, I want to install the entire thing(opencv3.3 + python 3.5 virtual environment) on SD card. I want to know is this feasible or not, and the proper process i need to follow!
Thanks in advance.!!
Adrian Rosebrock
Yes, you can follow these exact same instructions, the only thing that will change is your file paths. Be sure to download the OpenCV repos to your SD card/external drive and do the compile there. This will ensure you have the additional space during the compile. After the compile has finished run
sudo make install
which will copy the compiled files to their appropriate locations.sarma
Hi Adrian,
I have followed steps as you have outlined, and created build folder in external sd.
I have created build folder in opencv3.3.0, and gave “-D CMAKE_INSTALL_PREFIX=/usr/local \ ” also.
The CMAKE and MAKE are running without errors, but i do not see any cv2.so file created in the python2.7 or python3.5 or build directories!
Can you please help me with this, it took almost 2 days (have tried 2 times of my time, but to no avail).
Adrian Rosebrock
Hi Sarma — make sure you double check your output of CMake. It sounds like either the “Python 2″ or Python 3” section (depending on which Python version you are compiling for) is not properly set (for example, not being in the “cv” Python virtual environment). Your CMake output should match mine for the Python 2/Python 3 section, so again, make sure you check that.
Sarma
Hi Adrian, I am sure that I am running code in CV environment. In CMake I give : -D PYTHON_EXECUTABLE=~/.virtualenvs/cv/bin/python3 \ , will this effect the bindings ?
It installed correctly in laptop, but with tx1 and external sd this problem is arising.
Can I take build file from successful laptop installation and copy the cv2.so file ?
Adrian Rosebrock
No, because OpenCV has not been cross-compiled. You can specify your Python executable if you need to, that’s not a problem. As for the error, I unfortunately don’t know what the problem is. I’m sorry I can’t help more in this stance, but I’ll certainly be doing dedicated TX1 and TX2 tutorials in the future.
Amila
Thanks Adrian.
This worked for me for opencv 3.3.0 + CUDA 8.0
Adrian Rosebrock
Congrats on getting OpenCV installed on your Ubuntu system, Amila! Great job.
rania
hi
i used this command
export PYTHONPATH=” /usr/local/lib/python3.5/site-packages/:PYTHONPATH”
and its worked
Snow
Hi Adrian,
I was trying to link cv.so with python 2 but it failed with a error but file exists. However I was able to link with python3 version. How to link Python 2.7 bindings for OpenCV 3?
Adrian Rosebrock
You need to recompile OpenCV for Python 3. You cannot use the same OpenCV bindings for different versions of Python.
wally
Thanks for a great tutorial!
Successfully built on Ubuntu-mate 16.04 and ran some PyImageSearch tutorial code samples, about 70X faster than on my Pi3 🙂
I now see the merit in python virtual environments. My system has the distribution opencp packages (2.4.9.1) installed and I’ve a fair number of programs installed that depend on them as I discovered when I started marking them for removal with Synaptic.
Compiling and installing for python3 in a virtual environment is a nice solution! On the Pi3 it just seemed like extra steps, but was a lifesaver here!
Adrian Rosebrock
Congrats on getting OpenCV installed, Wally! Nice job 🙂
Forrest Lundstrom
I had to run: “sudo add-apt-repository universe” and another “sudo apt-get update” to get the A\V libs to pull onto my Jetson TX2
Nickson Munge
Hello Adrian,
Really great tutorial. So far, almost so good.
I added the
> -D ENABLE_PRECOMPILED_HEADERS=OFF .. at the end of the cmake command
But I am still getting the
/usr/include/c++/7/cstdlib:75:15: fatal error: stdlib.h: No such file or directory
#include_next
error.
I am running opencv-3.1.0, python 2.7 and ubuntu 17.10
Any suggestions?
Nickson Munge
Turns out I had mis-pelt PRECOMPILED but I don’t know I wrote it well here.
Thank you for this awesome tutorial 😀
Adrian Rosebrock
Congrats on resolving the issue! 🙂
Pankaja
I did everything according to this. But when I try to import opencv libraries by “import cv2” I’m getting this error
Traceback (most recent call last):
File “”, line 1, in
ImportError: No module named ‘cv2’
Why is that ?
Adrian Rosebrock
There are a number of reasons that you may not be able to import the “cv2” library. Unfortunately it’s extremely hard to diagnose as the root cause could have happened in many steps along the way. Please see the “Troubleshooting and FAQ” of this blog post where I have compiled the most common reasons.
Skanda
Adrian, I don’t know if I can thank you enough for this tutorial. The amount of detail was unbelievable. Thank you so much.
Adrian Rosebrock
Thank you Skanda, I really appreciate that 🙂
Siladittya Manna
If I need to run any python script from the terminal.
Do I need to include “workon cv” in the python script?
Or I have to type in “workon cv” in the terminal first, for entering the virtualenv and then run the python script in the virtualenv?
Adrian Rosebrock
You type “workon cv” in your terminal before you execute the Python script.
Siladittya Manna
$ source ~/.bashrc
I am getting an error
bash: ~./bashrc: No such file or directory
Siladittya Manna
Sorry.
I am getting this error
The previous came because I typed ~./bashrc instead of ~/.bashrc
bash: /usr/local/bin/virtualenvwrapper.sh: No such file or directory
I found out that it has been installed in /usr/share/virtualenvwrapper/
Maybe because I mistakably installed using sudo apt-get instead of sudo pip
Will that cause any problem in future?
Siladittya Manna
How to install Opencv without using virtualenv?
I tried step by step but
using both with and without virtualenv
I am getting the error on the cmake step
Parse error in command line argument: -D
Should be: VAR:type=value
CMake Error: No cmake script provided.
CMake Error: Problem processing arguments. Aborting.
Adrian Rosebrock
Hey Siladittya — I think you are copying and pasting your CMake command incorrectly. Make sure you copy the entire command. If you are still having problems try copying and pasting the command line-by-line.
Sumanth
Hi Adrian.
In step #4, I only got the path for the interpreter displayed. But not for the Libraries, numpy and packages path. Is this a problem?
Thanks in advance.
Adrian Rosebrock
Yes, this will cause a problem during the build. If all four sections are not properly displayed the OpenCV bindings will not be properly built. Definitely make sure you are in the “cv” virtual environment prior to running CMake. I would also suggest deleting your “build” directory, re-creating it, and re-running CMake.
prasant
Hey Adrian thanks for the wonderful tutorial. but what if i forget to install the numpy before configuring and compiling opencv. can i install it afterwards???
t
Adrian Rosebrock
Make sure you install NumPy first. Then delete your “build” directory, re-create it, and then re-run Cmake + make.
Lorenzo
Hi Adrian,
Thanks for the tutorial. I was wondering if it made sense to install OpenCV without the virtual environment if you knew you were going to use the same version for all your future applications. Otherwise every time you start working on a new project and you want to create a new virtual environment you will have to install OpenCV again, right?
Thanks again!
Lorenzo
Adrian Rosebrock
You can, but I still wouldn’t recommend it unless you are distributing a pre-made .img file. Python virtual environments are a best practice and I suggest you use them whenever possible. You would not need to install OpenCV again if you are using the same Python + OpenCV version — just sym-link in the bindings.
Heath
Hello,
I have run into this error in the linked photo below. How should I proceed?
Error message given in terminal: https://www.dropbox.com/s/btrcfviicvt3mv2/Error%20from%202017-12-22%2022-04-30.png?dl=0
Thanks
Adrian Rosebrock
It looks like the issue here may be related to CUDA. Delete your “build” directory, re-create it, and re-run CMake, this time adding the following switch:
-D WITH_CMAKE=OFF
This should resolve the issue.
Kleyson Rios
After run cmake, not getting the correct libraries configuration for the Python3.
We need to include the option:
-D BUILD_opencv_python3=ON
And make sure that installed the numpy for Python3
pip3 install numpy
tim
thanks adrian, just copied and pasted quickly without paying attention: the only change i had to make was below. Which I just had to reread your steps more carefully.
/usr/local/lib/python2.7/site-packages$ sudo mv cv2.cpython-35m-x86_64-linux-gnu.so cv2.so
Siladittya Manna
I am trying to install OpenCV 3.3.0 on my Ubuntu 16.04 without using virtual environment.
I followed the rest of the steps. But after cmake step, the python interpreter is not showing the path ‘/usr/bin/python’
Jason
thank for your contribute.. Adrian..
I had dump on my Hyper-v environment with Ubuntu 16.04; however, it is perfectly work on my vmware with Ubuntu 16.04 environment.
I can go through all the step you explain and I can successfully complete all.
very exciting to move forward with you, Adrian.
All we need is before go through, we have a proper environment and update to follow, what Adrian guide on his article…. then.. that’s it.
Adrian Rosebrock
Congrats on getting OpenCV installed on your Ubuntu system, great job Jason!
george
Try to build opencv3.4 on TX2 with virtual env, but show that Libraries is NO, do you know why?
— Python 3:
— Interpreter: /usr/bin/python3 (ver 3.5.2)
— Libraries: NO
— numpy: NO (Python3 wrappers can not be generated)
— packages path: lib/python3.5/dist-packages
—
— Python (for build): /usr/bin/python2.7
Adrian Rosebrock
Hey George — if you’re following this tutorial exactly you’ll want to make sure you’re in the “cv” Python virtual environment before executing “cmake”.
melon
In step #4, if your cmake is successful with no error, but the output of cmake in figure 3 or 4 is empty, just remove the “build” directory and build a new one.
This works for me !
Seth
Hi Adrian,
I have been working on some of your newer projects in a virtual environment (VE) called dl4cv. I wanted to use my OpenCV 3.4.0 build both outside of the dl4cv VE and in other VEs. However, I can’t figure out how to do this. I installed OpenCV as per your instructions linked the long-name cv2 shared object to cv2.so in the dl4cv VE site-packages folder, and also created cv2.so outside of my VE using:
$ cd /usr/local/lib/python3.5/site-packages/
$ sudo ln -s cv2.cpython-35m-x86_64-linux-gnu.so cv2.so
However, when I run python outside of the VE, it can’t find cv2, but it can in the VE:
$ python3.5
>>>import cv2
Traceback (most recent call last):
File “”, line 1, in
ImportError: No module named ‘cv2’
>>> quit()
$ workon dl4cv
(dl4cv)$ python3.5
>>> import cv2
>>>
How can I use the OpenCV build in more than one environment?
Thanks,
Seth
Adrian Rosebrock
You need to create the sym-link to cv2.so inside the
site-packages
directory for each Python virtual environment you create. It looks like you have done this for dl4cv. However, outside the Python virtual environment there seems to be a problem. Go back and re-install viasudo make install
. Re-install the OpenCV bindings. Then go back to your/usr/local/lib/python3.5/site-packages/
and ensure the long .so file is there. If it’s not, it’s in thesite-packages
directory of your “dl4cv” environment. I get the impression that thecv2.cpython-35m-x86_64-linux-gnu.so
file may not exist (and thus your sym-link is an empty file).Seth
Hi Adrian,
Thanks for the reply. I rebuilt and had the same issues.
What I eventually tracked down is that $ python3.5 in my Ubuntu 16.04 installation did not have /usr/local/lib/python3.5/site-packages in PYTHONPATH (which I checked through sys.path).
I added ‘export PYTHONPATH=”${PYTHONPATH}:/usr/local/lib/python3.5/site-packages”‘ to my ~/.bashrc and it loads in my deactivated environment just fine.
Thanks,
Seth
KT
For some reason, the cv2.cpython-35m-x86_64-linux-gnu.so file isn’t located in site-packages directory for me. I had to go into 2 more directories (cv2 and python-3.5) to find it. Change the path in step 5 accordingly to rename the file to cv2.so. Hope this will help somebody.
Srikar
EVerything was same until I got the error while trying to import cv2. I’m in cv virtual environment, I executed all the commands then ran the install command. I also read through the FAQ’s and tried the steps again but I’m ending up with the same unable to import cv2 error.
Any remedy to this problem?
Adrian Rosebrock
Hey Srikar — unfortunately it’s extremely hard to diagnose why you may not be able to import the cv2 bindings into your Python shell without seeing exactly what commands you ran and what the output was. I would suggest restarting the install (ideally on a fresh Ubuntu install as well) and them saving the commands + output to a txt file. Make sure you inspect the output of each command to ensure there were no errors. From there it would be easier to diagnose what the exact issue was.
RR
Hey Adrian great tutorial it worked perfectly fine.
But there is an issue, I have dual boot OS with windows 10 as the primary OS and ubuntu as the secondary OS.
Till i install opencv on ubuntu everything is fine but after installing opencv and shutting down ubuntu, ubuntu just doesn’t boot up.
I have a windows bootloader when i select the ubuntu option the grub bootloader just doesn’t come up it comes back to the windows bootloader and i can’t get into ubuntu.
Can you Help?
Adrian Rosebrock
Wow, that is very strange! Installing OpenCV would not affect your boot loader. Unfortunately this seems like a totally unrelated problem. I’m sorry to hear about the boot issue, that is a huge bummer, but again, I’m not sure why that would happen. I hope you can resolve the issue quickly and you do not have to reformat/reinstall!
Shubham
Hey adrain. Thanks for the amazing tutorial.
I followed everything in the tutorial until step 2. After that I had a virtualenv already on my system and hence directly decided to install opencv there.
Although cmake is running, but its showing errors in the end.
Also make -j command shows this error
make: *** No targets specified and no makefile
I would really appreciate if you could help.
Btw loved your opencv book. Recently finished it 🙂
Adrian Rosebrock
Hey Shubham — please see my reply to “Umi” on October 27, 2017. It sounds like your cmake command exited with an error and thus the build files were not generated.
WillSapgreen
Hello Andrian,
Just want to let you know this article is the best instruction I can find on the internet!!!
I follow each step to install OpenCV 3.4.0 in Linux Mint 18.3 Sylvia.
( I clone the opencv and opencv_contrib repos from
https://github.com/opencv/opencv and
https://github.com/opencv/opencv_contrib
to my machine,
and move to 3.4.0 tag )
Great job and thank you!!!
Adrian Rosebrock
Thank you for the comment, I really appreciate it 🙂 Congrats on getting your Linux Mint machine configured with OpenCV!
Prathmesh
Hello Andrian,
Thank you for this article. It is very helpful. I was able to setup OpenCv 3.4.0 on Ubuntu easily.
Adrian Rosebrock
Congrats on getting OpenCV installed on your Ubuntu machine, Prathmesh! 🙂
keke
Hello Andrian,
Thanks for sharing this precious information. I have encountered an issue that I cannot import cv2 under my home directory. but I can import cv2 under the ~/.virtualenvs/cv/lib/python3.5/site-packages and /usr/local/lib/python3.5/site-packages/ directory, do you know what might cause this issue? Looking forward to your answer.
Adrian Rosebrock
It sounds like you may not be in the “cv” virtual environment before trying to import the “cv2” library. Make sure you use the “workon” command to access your “cv” environment prior to importing OpenCV:
keke
No, I am sure I am in the “cv” virtual environment because there is (cv) before my hostname. I have tried to retype workon cv but the same issue still happens.
Adrian Rosebrock
Hm, that is strange then. I would double-check your sym-links to the cv2.so file. Unfortunately without direct access to your machine I’m not sure where the exact error is in this case. Would you be able to start with a fresh Ubuntu install and see if the issue persists?
Nafisa Dahodwala
Hey Adrian!
Thanks for the wonderful tutorial.I wanted to know how to install the packages that will be required. Is it by working in the virtual environment(workon cv) or out of it. I actually tried installing tkinter for python 2.7 but I get an error saying ‘Unable to locate package tkinter’. Please tell me what to do.
Adrian Rosebrock
This tutorial should help you out.
Sanket Sharma
How can I install OpenCV in Spyder IDE? When I tried to install it by using the command “conda install opencv” and imported it successfully. The moment I invoked the function cv2.imshow() it throws an error. Do anyone have a fix for it?
Adrian Rosebrock
The Spyder IDE should have a setting that lets to set the “Project Interpreter” similar to how PyCharm does it. Set the project interpreter to the “cv” Python virtual environment and you’ll be all set.
Rndness
Just purchased your “Practical Python and Open CV” eBook. Great stuff!
As I am setting up my machine, I noticed that the OS, Python and OpenCV libs have changed slightly. I thought I document these little changes in installation so I can help others who are interested in setting up Ubuntu 17.10 with Python 3.6.3 and Open CV 3.4.
http://rndness.com/blog/2018/2/3/installing-opencv-on-ubuntu-1710
Adrian Rosebrock
Thanks so much for sharing!
Rndness
No problem.
OBTW, I updated my micro-tutorial because it seems one needs QT 5 to get imshow to work.
sahil
hiiiii adrian,
i am stuck into step #6……after the python and import cv2 what should i do..?…by the way after import cv2 and cv2 version 3.3.2 >>> what to do…….please tell me as fast as u can.
A Mechanical Engineer.
Adrian Rosebrock
If you made it to where OpenCV has been imported without an error you have OpenCV installed. You can continue with your project now.
Raja
Hiii Adrian
What difference will python 3.0 will make over python 2.7?
Is there any way to update to 3.0?
Adrian Rosebrock
There isn’t a speed/performance difference between the OpenCV binaries for Python 2.7 or Python 3, if that is what you are asking.
If you have already installed OpenCV for Python 2.7 you’ll need to compile again for OpenCV and Python 3.
Nidhi
Thank you so much for awesome tutorial. It’s really useful for beginners like me. I was stuck in step 4 but was my mistake . I have forgotten to unzip opencv_contrib.zip file. Now its working fine. Again thank you so much for this tutorial.
Adrian Rosebrock
Congrats on getting OpenCV installed, Nidhi! Great job 🙂
Nidhi
hi Adrian.. it may not be a suitable place for this question but can you please tell me how to debug python code with this virtual environment. I have tried some of your code and they are working really fine but I want to run step by step as can be done in MATLAB. Is there any way please suggest.. I tried with IDEL3 but it seems it will not work with virtual environment as it is showing error in import cv2 line
Adrian Rosebrock
IDLE does not respect Python virtual environments. You need to use the Python virtual environment. You can launch a Python shell via “python” and then code there. If you really like the IDLE environment I would suggest using Jupyter Notebooks.
Pablo
I wanna re-compile and re-install OpenCV because I wanna add the Multicore flag. What steps should I follow? Should I just compile and replace cv2.so after its done that’s it?
Adrian Rosebrock
Correct. You’ll need to recompile, re-install, and replace the resulting cv2.so file.
Sourav
I have successfully installed opencv and python and they are working fine for me. I usually use Sublime Text as editor and run my codes. To run the code I have written, if I select default Python then it runs with pre installed python in system, which is 2.7. I want to link this python and opencv to the sublime text using “Built New System” option. Can you please tell me how to do that?
Thanks
Adrian Rosebrock
Hey Sourav — I’m not sure how to do that but I’m sure someone else in the PyImageSearch community knows how to 🙂
Michael Cheng
Hi,
I had successfully install opencv on raspberry pi 3 with the virtual environment before
However, I find I may miss the opencv_contrib so I can’t use functions like cv2.TrackerKCF_create()
It shows me “module ‘cv2’ has no attribute ‘TrackerKCF_create()”
Is there any way to install opencv_contrib only to my raspberry pi 3 ?
Btw, I am using python 3.5.2 and opencv 3.3.1 on raspberry pi 3
I am looking forward to having your reply soon.
Jeff
Any changes for 16.4 LTS
lxw
Great Job~
Adrian Rosebrock
Thank you, I’m glad you enjoyed the tutorial! 🙂
Mons
hai sir adrian, can i ask a help , how to reinstall all the package of opencv and python in ubunto and delete the exixting installation. hence, my last process has a error. thanks for the help
Adrian Rosebrock
Which packages/files are you trying to delete? Are you trying to restart from step 1?
mons
hai sir adrian how can i free up some space in my ubunto? because during the time i catch to install the make i’ve encounter an error “fatal error: can’t write PCH file: No space left on device”
thank you
Adrian Rosebrock
You will need to delete any large personal files on your system or move them to a separate external hard drive. You may also want to delete unneeded software/packages that you are not using. The aptitude package manager can help with this.
Liu MinXiang
Hey Adrian,
I follow your tutorial.
I have some problem in cmake step.
I execute cmake in cv environment.
But my result have not Interpreter , Libraries , numpy and packages path.
And My path “/usr/local/lib/python3.5/dist-packages/” have not cv2*.so file.
Could you help me?
Adrian Rosebrock
Hey Liu — make sure you are in the “cv” Python virtual environment before executing “cmake”.
monsour
hai sir Adrian, Thank you for the very effective toturial . I’ve been successfully installed the OpenCv+Python in my ubunto
Adrian Rosebrock
Congrats on getting OpenCV installed on your Ubuntu machine, great job!
Guillermo
Hey there Adrian,
i’ve gone through your tutorial and it all seems to have worked out just fine because i am able to import the Python + OpenCV bindings. However, everytime i open a new terminal i get a message with the following error:
·/usr/bin/python: no module named virtualenvwrapper
virtualenvwrapper.sh: there was a problem running the initialization hooks.
if python could not import the modle virtualenvwrapper.hook_loader, check that virtualenwrapper has been installed for VIRTUALENVWRAPPER_PYTHON=/usr/bin/python and that PATH is set properly.”
i have checked that virtualenvwrapper is installed with the command “pip expected”
which returns that virtualenv==15.1.0 and that virtualenvwrapper==4.8.2
is there anything i can do to fix that up?
Thanks a million
Adrian Rosebrock
Try updating:
VIRTUALENVWRAPPER_PYTHON=/usr/bin/python
To be:
VIRTUALENVWRAPPER_PYTHON=/usr/bin/python3
In your .bash_profile file.
bhavika panara
hello, Sir
Still, I am not able to fix this error even after changing this on .profile file.
please Help me to solve it out.
Thanks
Adrian Rosebrock
Make sure you run
source ~/.bash_profile
to reload the changes. Also, it’s not.profile
— it’s.bash_profile
in your home directory. Make sure you updated the correct file.Akshitha Reddy
I’m getting that error too. Can you please tell me how you rectified it?
Carlos Alberto
Hello Adrian, I’m watching your tutorial about “Ubuntu 16.04: How to install OpenCV”. To be quick, the tutorial was done on October 24th, 2016 and the OpenCV version has already advanced from 3.1.0 to 3.4.1 to date. The question is: What is the difference between the versions? and, Is it better to install the latest version? or, which one do you recommend?
Thank you for your attention.
Adrian Rosebrock
You can use these same instructions to install OpenCV 3.1, 3.2, etc. The only change would be in downloading the source code for a particular version of OpenCV. That’s literally it. If you are interested in the differences between OpenCV versions you should consult their changelog.
But in general, you should install OpenCV 3.3 or OpenCV 3.4 as they include the latest “dnn” module for deploying deep neural networks.
Eduard Cojocea
Thanks a lot for the tutorial, it was very helpful on multiple occasions. I just wanna add that if you want to use this tutorial on Windows Subsystem for linux, you have to do this after you finish these steps:
http://answers.opencv.org/question/103825/py-opencv-import-error-in-bash-for-windows-10/
Adrian Rosebrock
Thank you for sharing, Eduard!
Loïc Viard
Hello Adrian, when I execute the make command, I get this error after 7%:
/usr/include/c++/7/cstdlib:75:15: fatal error: stdlib.h: Aucun fichier ou dossier de ce type
#include_next
^~~~~~~~~~
what should I do ?
Adrian Rosebrock
See my note in the post that starts with:
“If you are getting an error related to stdlib.h: No such file or directory…”
praveen kumar
My installation stucks at 100% Built target opencv-python3.
Ubuntu 16.04. kindly help me to install opencv on my machine.
seeking for your help
Adrian Rosebrock
Hey Praveen — can you elaborate more on what you mean by “stuck”? How long has it been stuck at 100%? A few minutes? A few hours?
You might want to try running “make clean” and then re-compiling with only a single core via “make”.
The compile will take longer but it might avoid any thread/process race conditions you are running into now.
Xuan
Hi everyone,
Now, I am doing a specialized project with the subject “Image processing of moving objects in traffic”. I want to install the opencv library into Qt Creator 5+ on Linux Mint. But I have not yet added the open Cv library to Qt, can anyone help me to install it?
Adrian Rosebrock
I don’t have any experience with Qt Creator 5 but perhaps another PyImageSearch reader will be able to help you out.
Uche Osahor
I found something new after installing, i could not launch it so i wwent to the /.virtualenvs/cv/lib/python2.7/site-packages/ directory and cv2.so was saved as cv2.s so i renamed it backe to cv.so and it worked for me..hoe this helps..
cool job Adrian
Uche Osahor
Forgive my English
Adrian Rosebrock
Thank you for sharing, Uche 🙂
Johnny Law
Hi, I successfully installed opencv 3.10 last year following this blog. Recently I need to use opencv for cpp in my system. How to add opencv cpp support in the current environment? thx a lot.
Adrian Rosebrock
OpenCV and C++ support is installed on your system once you run “sudo make install”. If you want to use OpenCV and C++ together do some research on “gcc” and how to link the libraries during the compile of your C++ program.
b.abbs
hello
if i want to install caffe.
did i have to go to cv or not ??
b.abbs
actually i did install cuda and caffe out of the vitual environment that i install caffe in it.
is this make problem for me at future??
Adrian Rosebrock
It will only be a problem if you want to access the Caffe + Python bindings from your Python virtual environment. However, you can add your Caffe Python bindings to your virtual environment provided your Caffe bindings were compiled for the same version of Python.
Create a new file named
caffe.pth
in your Python virtual environmentsite-packages
directory:$ nano ~/.virtualenvs/cv/lib/python3.5/site-packages/caffe.pth
And then add a line to the file that points to your Caffe + Python bindings:
/home/user/caffe/python
hossein
I have a problem with step 3
source ~/.bashrc
I’ve used fish shell not bash shell
How can I execute this on the fish shell ??
Adrian Rosebrock
I have not used fish shell. I’m not sure what the solution is. I hope another reader can help out here.
K.SOWMYA
HOW FOR UBUNTU 15.04
Adrian Rosebrock
Are you using Python virtual environments? If so, IDLE will not respect them. If you would like to use an IDLE-like environment use Jupyter Notebooks and install it into the Python virtual environment. If you are going to get into a lot of trouble if you start apt-get installing the Python packages. I do not recommend it.
Hari
Hi Adrian,
Thanks a lot for this post. You have saved me from a weeks block!
Adrian Rosebrock
Thank you for the kind words, Hari. I’m happy I could help.
Uditha
Hi Adrian,
I’m installing opencv and python on my raspberry pi3 model B according to this tutorial right now. No errors occurred till now. But make is compiling for many hours at [83%]. Is it possible?
Adrian Rosebrock
I would let it go for another hour but if it’s still causing you problems make sure you kill the compile, delete your “build” directory, re-run “cmake”, and then compile with just “make”. The compile will take longer but should avoid any threading/race condition issues that you’re running into now.
Baltazar Mayo
Hi Adrian, i’ve follow this blog and have been so useful to me, will you do a guide to install OpenCV on Ubuntu 18.04? i’ve tried but i had problems with the libpng library, i’ve installed the version on ubuntu repository and appearly works well but i get some issues when i put text in a frame with realtime videos.
Adrian Rosebrock
Yep! I’ll be doing an Ubuntu 18.04 guide. Expect the Ubuntu 18.04 + OpenCV install guide to be released in the next 1-2 months.
Michele
Thanks Adrian! Really helpful post.
I created a Docker container with OpenCV 3.4, Python3.5 and Jupyter Notebooks to experiment quickly in a cross-platform environment with computer vision. Friends doing research in environmental engineering use it on Windows as an alternative to MATLAB.
You can find it here: https://github.com/elehcimd/jupyter-opencv
Will update it to Ubuntu 18.04 once your next guide is out!
Rajesh
After executing CMAKE command, it is showing only the interpretor but not the libraries, packages and numpy paths. I followed all the prior steps. Am i missing something? Any help is appreciated.
Adrian Rosebrock
Definitely make sure you are in the “cv” Python virtual environment before you execute the “cmake” command. It may also help to delete the “build” directory, re-create it, and re-run “cmake”.
Jeremiah
Thanks for the well detailed tutorial. Managed to install it with opencv 3.1.0. However, it fails with version 3.4.1 on the make command at 81% . Its having errors with “vgg.cpp” file located at “opencv_contrib/modules” path. Though, still okay having version 3.1.0 . Hope it serves me well. By the way, I am huge fan of your blogs. Keep up the good work you do, it really helps me alot.
Adrian Rosebrock
Hi Jeremiah — I’m sorry about the issue installing OpenCV. Are you using Ubuntu 16.04 or a newer version? I’ll be releasing an Ubuntu 18.04 tutorial in a couple weeks so you may want to give that one a try as well.
Ketan Garg
Hey Adrian,
Can you please make a tutorial on installing openCV on ubuntu 18.04. Actually, I ran into an error while executing the following command:
sudo apt-get install libjpeg8-dev libtiff5-dev libjasper-dev libpng12-dev
It said that libpng12-dev & libjasper-dev is not located but replaced by libpng-0 and when i tried to run that same error occurred again.
If there is any other solution then, please comment.
Thanks
Adrian Rosebrock
Hey Ketan — I just installed OpenCV on Ubuntu 18.04 yesterday. I’ll have the blog post online within the next few weeks.
sanju
Hello Adrian,
I am getting error while i run make.
error is “fatal error: hdf5.h: No such file or directory”
Can you please help me to solve this.
Adrian Rosebrock
Try updating your “cmake” command to disable HDF5 by adding the following switch:
-D WITH_HDF5=OFF
sanju
It doesn’t worked but I am able to use opencv for my program to detect face. Thank u for this wonderful tutorial.
Daniel
Thanks..though had “no module named virtualenvwrapper” error, I used a sudo easy install. All in all, the process was wonderful.
Adrian Rosebrock
Congrats on getting OpenCV installed on your Ubuntu machine, Daniel! 🙂
Travis
Hi Adrian. I’m extremely new to both OpenCV and Ubuntu. Your tutorial has been a massive help, but I’m running into some issues around Step 3.
After I edit the ~/.bashrc file, I get the following error:
…
If Python could not import the module virtualenvwrapper.hook_loader,
check that virtualenvwrapper has been installed for
VIRTUALENVWRAPPER_PYTHON=/opt/anaconda2/bin/python and that PATH is
set properly.
I also see the same error whenever I close and reopen the terminal. If you have any ideas on what to do here, I’d appreciate it
Adrian Rosebrock
Try changing:
VIRTUALENVWRAPPER_PYTHON=/opt/anaconda2/bin/python
To:
VIRTUALENVWRAPPER_PYTHON=/opt/anaconda2/bin/python3
Notice how I added the “3” to specify Python 3 rather than Python 2.7.
Punya
This worked perfectly for me, except for one thing – I needed to switch to a newer version by “git checkout 3.1.0-with-cuda8”. The 3.0.0 version was giving compilation errors. That apart an excellent tutorial with super illustrations. Thanks!
Abdelrhman Medhat
Hey Adrian, thanks a lot for this post, i have one problem though, after i finished all seemed to work fine but i was planning to do image processing on a video so i used cv2.VideoCapture(“myvideo.avi”) and it doesn’t work some says it’s related to ffmpeg and compiling opencv with it enabled sot what to do here?
Adrian Rosebrock
I would suggest you install FFMPEG on your Ubuntu machine and then re-compile and then re-install OpenCV. That should resolve the issue.
Bojie
Hi, can you help me for two questions about installing opencv:
1. how to set the OpenCV libraries “Path” as “/usr/lib/”?
2. how to set the OpenCV header files. “Path” as “/usr/include/opencv”?
Adrian Rosebrock
One quick tip I’ll share with all readers — you can run the following command from your
build
:$ ccmake ..
Note the two “c” characters in the command. That command will allow you to scroll through all options generated by
cmake
and allow you to manually modify them.BOjie
Thanks, Adrian.
Can you please let me know the detailed code for the two questions?
Adrian Rosebrock
Sorry, I do not know the exact parameters off the top of my head. You’ll need to consult the OpenCV docs or use the
ccmake
command as I suggested.Sathish
Hello Adrian,
I followed all the steps but I am not able to locate cv2.so either inside site-packafe or dist-packages. What went wrong here ? PleasE help me on this
Adrian Rosebrock
Be sure to double-check the “Troubleshooting and FAQ” section as I discuss reasons why you “cv2.so” file may not exist.
Manisha
Hi Adrian,
i have installed opencv 3.1 eventhough i have 3.5 already. But it is showing
…
ImportError: No module named cv
plz help
Adrian Rosebrock
Refer to the “Troubleshooting and FAQ” section of this post as I detail the most common reasons why you may be unable to import the “cv2” bindings.
Nikhil
Thank you so much .. . . . it was really great help. . . .
Adrian Rosebrock
Thanks Nikhil, I’m happy the tutorial helped you!
TAKRIM
hi Ardian,
In the step 4 – nothing got linked under python 2 and 3. only interpreter is displayed and it maps to No .
Adrian Rosebrock
Make sure you are in your Python virtual environment before executing “cmake”.
Jin
Hi Adrian,
I’m wondering if it is able to install opencv3.0 for both python2 and python3 on ubuntu16.04?
I have both python2 and python3 installed on my machine and run my projects in corresponding python virtual environment, since the projects need to use opencv, I’m wondering how it is possible to run both python versions with the installed opencv?
I’ve tried to go through the above steps but the opencv only works either for python2 virtual-env or python3 virtual-env.
Thank you very much for your time and kind help in advance!
Adrian Rosebrock
You will need to create two Python virtual environments, one for Python 2 and another for Python 3. From there, compile and install OpenCV for each (you will need to compile OpenCV twice, once for each virtual environment).
Robin CHacko
Hello Adrian,
It was a well explained tutorial on Open CV installation. For my deep learning project, I want to set up tensor flow and open CV in the same virtual environment. Is it possible to install tensorflow on this particular virtual environment made for open cv installation
Adrian Rosebrock
Absolutely, just use the “workon” command to access your “cv” virtual environment and then install TensorFlow:
Prasanna
Hai Adrian , The installation is successful but i have a problem in importing opencv as cv2
my open cv is installed for python2.7 but i am using anaconda navigator which has python 3.6 installed so i cannot able to import open cv how to resolve the problem.
Adrian Rosebrock
I’m not an Anaconda user myself but if you installed OpenCV for Python 2.7 then you won’t be able to import OpenCV into your Anaconda environment. You’ll need to manually configure the build to use your Anaconda interpreter.
Said
Hi Adrian, got no questions bust just wanted to thank you for all the effort you’ve put into this tutorial.
Cheers.
Adrian Rosebrock
Thank you Said, I really appreciate that.
Rahul
Hi Adrian ,
Thanks for sharing this wonderful tutorial and I have successfully build openCV following this tutorial with an virtual environment using python 3.5.
Actually I also want to work on a project that uses python 3.6 . I made the virtual env using python 3.6.7 and is it possible to create a symbolic link of cv2.so I made with python 3.5 in new enviornment site-package ? Or should I build it using python 3.6 again ?
Adrian Rosebrock
You will need to compile again using Python 3.6. The bindings between Python versions are not interchangeable.
waqar ahmad
thank you for such a complete and easy to follow tutorial. i have install opencv3.4.5 with your tutorial. at first i got error with cmake command but after going through it and comments i figured about that i am giving my opencv contrib modules path wrong. second thing is that my cv2 library was placed in another cv2 directory under which was another python 3.5 directory and there the library file was. accordingly created the link and boom it worked giving me the version 3.4.5
Adrian Rosebrock
Congrats on getting OpenCV installed, Waqar!
Keerti
you didn’t show installing scipy package anywhere in this tutorial, is it by default installed???
Adrian Rosebrock
If you want to install SciPy you can install it via:
$ pip install scipy
Make sure you use the “workon” command to access your Python virtual environment first (assuming you are using one).
Parth
Hey Adrian
Wonderful bolg here , really helpful
I have a couple of doubts-
1) How to create a virtualenv (after the first one) without building opencv again (if at all thats possible)
2) Enable opencv for python 3 in a virtualenv created for python2
Thanks
Adrian Rosebrock
1. You can use the
mkvirtualenv your_env_name
and then sym-link in the OpenCV bindings.2. Specify the Python version via:
mkvirtualenv your_env_name -p python2
However, keep in mind you will need to re-compile OpenCV for Python 2.7 as the bindings cannot be used for both Python 2.7 and Python 3.Erich Bevensee
This different path worked for me to get sym-link our OpenCV bindings into the cv virtual environment.
ln -s /usr/local/python/cv2/python-2.7/cv2.so cv2.so
Madhu Oruganti
Hi adrian, I have Ubuntu 17.04, can I install whatever the page here in my machine for opencv python or could you please suggest any other webpage to install.
Thanks
Adrian Rosebrock
Sorry, I don’t have an Ubuntu 17.04 guide. I cover major LTS Ubuntu releases such as 16.04 and 18.04. The latest guide I have is for installing OpenCV on Ubuntu 18.04.
Juan
Hi Adrian, just FYI, these steps worked perfectly on a Debian 9.8. Just wanted to say how much I appreciate your blog, thank you so much! Good luck and keep rocking!
Adrian Rosebrock
Thanks so much for letting us know, Juan! Congrats on getting OpenCV installed.
Shrida
Hello
I tried above steps. But I am not able to find cv2.so file in site-packages or dist-packages
Adrian Rosebrock
Have you taken a look at the FAQ section of the post? I would also suggest you take a look in the “build/lib” directory to see if the bindings are there. Most likely your “Python” section of the “cmake” command doesn’t match mine. Go back and double-check.
Hamid
Hello Adrian,
Thanks so much for the Tuturial, I am quite a beginner but it is essential for me to run and see the output of this code. In virtual box I have successfully installed OpenCv on Ubunto 16.04 and python 3.5, but I can not run the code inside (cv), would you please help me?
Adrian Rosebrock
I’m not sure what you mean by not being able to run the code? What error are you getting?
Vinay
Hey Adrian, will this tutorial would work on Ubuntu 18.04??
Adrian Rosebrock
You should follow my dedicated Ubuntu 18.04 install guide.
Muzaffar Hussain
Hi Adrian,
You are a life saver. Thank You 🙂
Plus I was wondering if you can add how we can make opencv with gstreamer plug-in I am trying it for days & wasn’t able to do so yet.