Last updated on July 9, 2021.
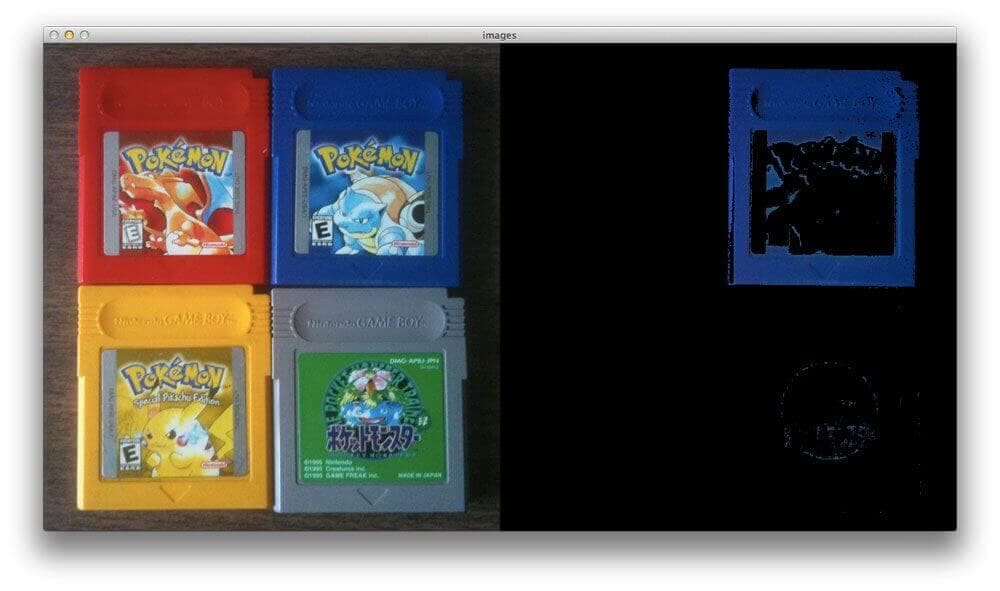
So, here I am. Riding the Amtrak 158 train, coming home after a long business trip.
It’s hot. The AC is barely working. A baby is screaming right next to me while the accompanying mother looks forlornly out the window, clearly questioning whether or not having a child was the right life decision.
And to top it all off, the Wi-Fi doesn’t work.
Luckily, I brought along my Game Boy and collection of Pokemon games.
As I slid my trusty Blue version into my Game Boy, I thought to myself, instead of battling Gary Oak for the thousandth time, maybe I can do a little computer vision.
Honestly, wouldn’t it be really cool to be able to segment each of the game cartridges using nothing but color?
Grab yourself a nice cool glass of water to combat the failed AC and a pair of ear plugs to block out the wailing child. Because in this post I’ll show you how to use OpenCV and Python to perform color detection.
- Update July 2021: Added new section on how to improve color detection accuracy using color matching cards and histogram matching.
OpenCV and Python versions:
This example will run on Python 2.7/Python 3.4+ and OpenCV 2.4.X/OpenCV 3.0+.
OpenCV and Python Color Detection
Let’s go ahead and get this started.
Open up your favorite editor and create a file named detect_color.py :
# import the necessary packages
import numpy as np
import argparse
import cv2

# construct the argument parse and parse the arguments
ap = argparse.ArgumentParser()
ap.add_argument("-i", "--image", help = "path to the image")
args = vars(ap.parse_args())

# load the image
image = cv2.imread(args["image"])
We’ll start by importing our necessary packages on Lines 2-4. We’ll use NumPy for numerical processing, argparse to parse our command line arguments, and cv2 for our OpenCV bindings.
Lines 7-9 then handle parsing our command line arguments. We’ll need just a single switch, --image , which is the path to where our image resides on disk.
Then, on Line 12, we load our image off disk.
Now, here comes the interesting part.
We want to be able to detect each of the Game Boy cartridges in the image. That means we’ll have to recognize red, blue, yellow, and gray colors in the image.
Let’s go ahead and define this list of colors:
# define the list of boundaries
boundaries = [
	([17, 15, 100], [50, 56, 200]),
	([86, 31, 4], [220, 88, 50]),
	([25, 146, 190], [62, 174, 250]),
	([103, 86, 65], [145, 133, 128])
]
All we are doing here is defining a list of boundaries in the RGB color space (or rather, BGR, since OpenCV represents images as NumPy arrays in reverse order), where each entry in the list is a tuple with two values: a list of lower limits and a list of upper limits.
For example, let’s take a look at the tuple ([17, 15, 100], [50, 56, 200]) .
Here, we are saying that all pixels in our image that have a R >= 100, B >= 15, and G >= 17 along with R <= 200, B <= 56, and G <= 50 will be considered red.
Now that we have our list of boundaries, we can use the cv2.inRange function to perform the actual color detection.
Let’s take a look:
# loop over the boundaries
for (lower, upper) in boundaries:
	# create NumPy arrays from the boundaries
	lower = np.array(lower, dtype = "uint8")
	upper = np.array(upper, dtype = "uint8")

	# find the colors within the specified boundaries and apply
	# the mask
	mask = cv2.inRange(image, lower, upper)
	output = cv2.bitwise_and(image, image, mask = mask)

	# show the images
	cv2.imshow("images", np.hstack([image, output]))
	cv2.waitKey(0)
We start looping over our upper and lower boundaries on Line 23, then convert the upper and lower limits to NumPy arrays on Line 25 and 26. These two lines seem like they can be omitted, but when you are working with OpenCV Python bindings, OpenCV expects these limits to be NumPy arrays. Furthermore, since these are pixel values that fall within the range [0, 256] we can use the unsigned 8-bit integer data type.
To perform the actual color detection using OpenCV, take a look at Line 29 where we use the cv2.inRange function.
The cv2.inRange function expects three arguments: the first is the image were we are going to perform color detection, the second is the lower limit of the color you want to detect, and the third argument is the upper limit of the color you want to detect.
After calling cv2.inRange, a binary mask is returned, where white pixels (255) represent pixels that fall into the upper and lower limit range and black pixels (0) do not.
Note: We are performing color detection in the RGB color space. But you can easily do this in the HSV or L*a*b* color space as well. You would simply need to adjust your upper and lower limits to the respective color space.
To create the output image, we apply our mask on Line 31. This line simply makes a call to cv2.bitwise_and, showing only pixels in the image that have a corresponding white (255) value in the mask.
Finally, our output images are displayed on Lines 34 and 35.
Not bad. Only 35 lines of code, and the vast majority is imports, argument parsing, and comments.
Let’s go ahead and run our script:
$ python detect_color.py --image pokemon_games.png
If your environment is configured correctly (meaning you have OpenCV with Python bindings installed), you should see this as your output image:
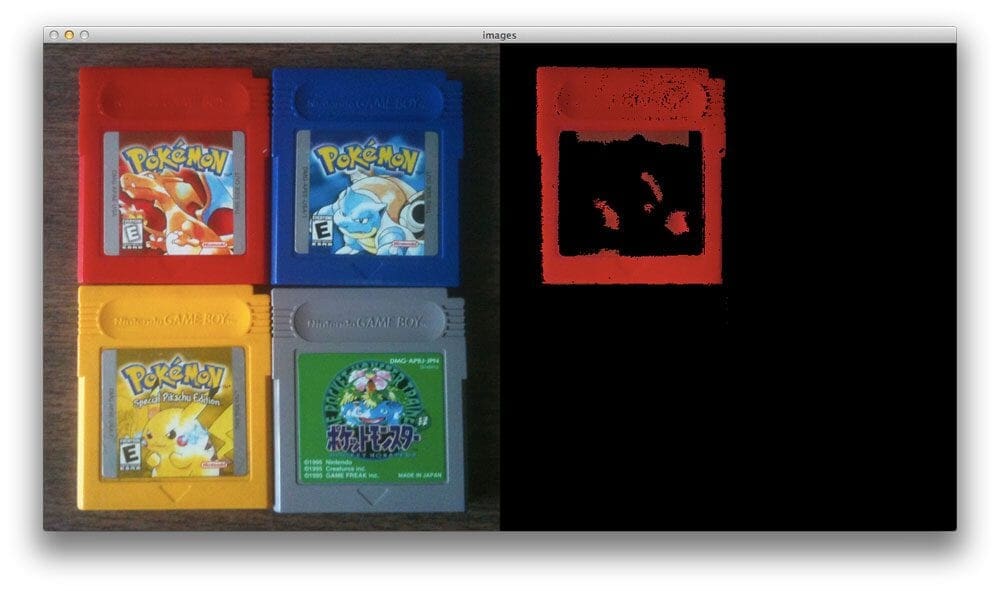
As you can see, the Red Pokemon cartridge is easily detected!
Now let’s try the blue one:

Nope, no problem there!
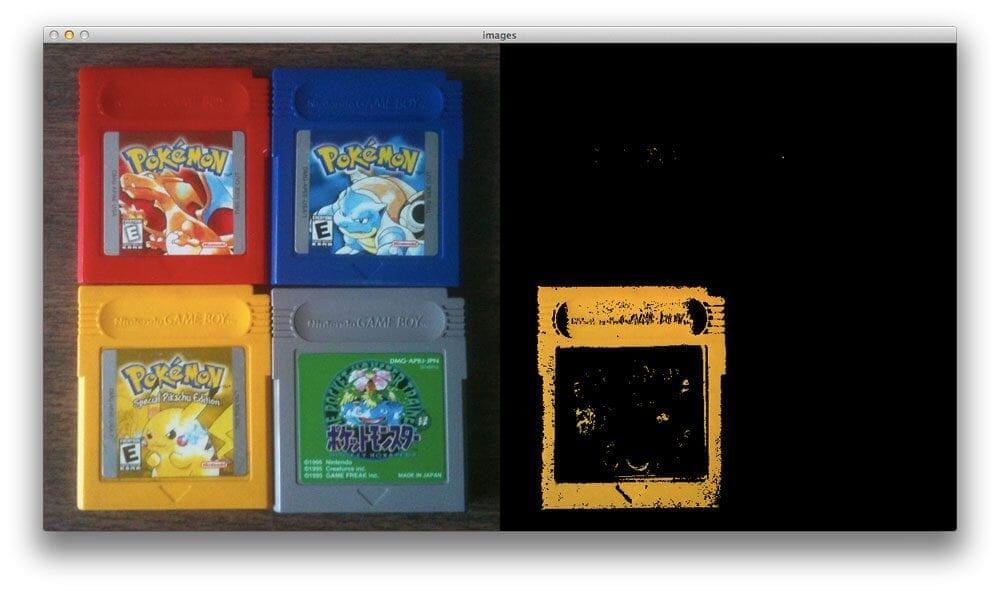
And a similar story for Yellow version:
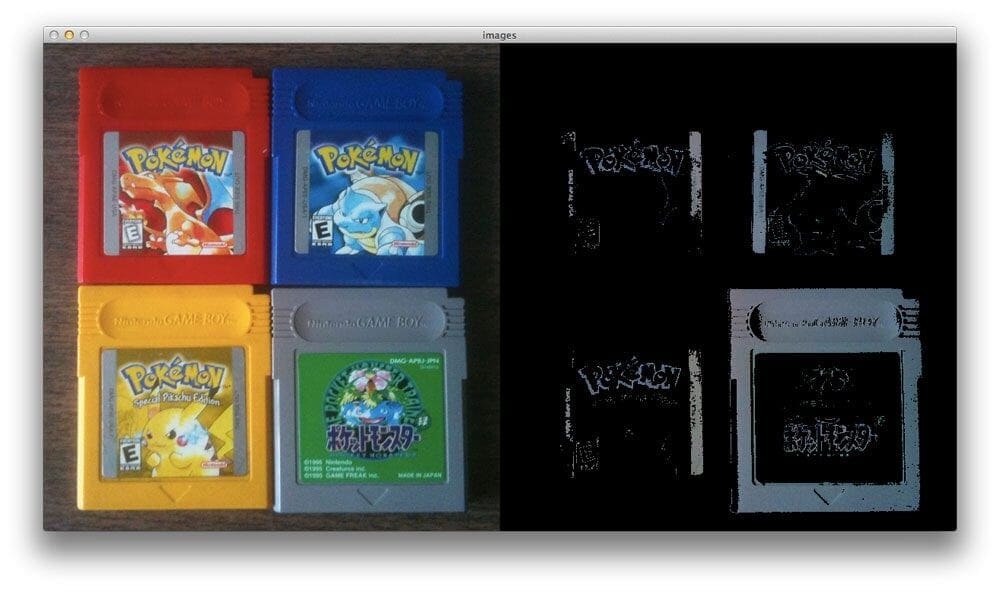
Lastly, the outline of the gray Game Boy cartridge is also found:
Improving color detection accuracy with color correction
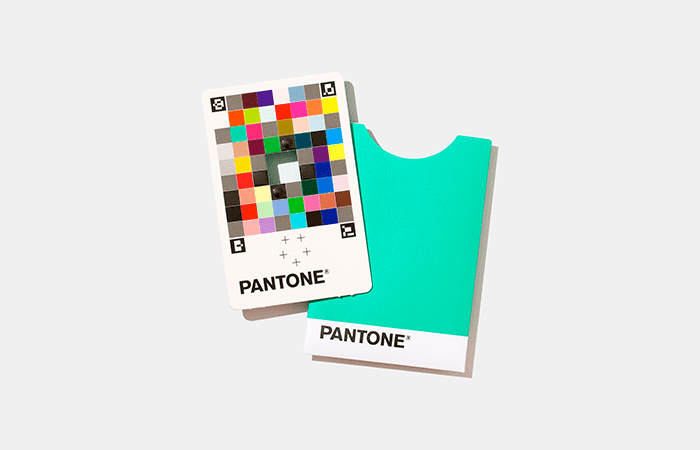
In this tutorial, you learned how to perform color correction by hard-coding lower and upper RGB color ranges.
Let’s suppose you are given a dataset of 1,000 images and are told to find all “red” objects with RGB values in the range (17, 15, 100) and (50, 56, 200), respectively.
If your entire dataset of images were captured in controlled lighting conditions with the same lighting for each image, then this won’t be a hard task — you can use the hard-coded RGB values mentioned above.
But … let’s say your dataset of images were not captured in controlled lighting conditions. Some were captured using fluorescent lighting, others were taken outside when it was bright and sunny, while others were captured when it was dark and dreary.
The point here is that lighting conditions have a huge impact on output pixel values.
Colors can look very different under varying illumination, and when that happens, your hard-coded lower and upper RGB ranges will fail.
One potential solution is to use a different color space which does a better job of mimicking how humans perceive color — the HSV and L*a*b* color spaces are good choices here.
An even better alternative would be to use a color correction card. You place a card (like that in Figure 5 above) in the scene containing the objects we’re capturing, and then you post-process all these images by:
- Detecting the color correction card
- Determining the color block region
- Performing histogram matching to transfer the color space from one image to another
In that manner you can help ensure a consistent color across all images, even though they may have been captured under different lighting conditions.
To learn more about this technique, I suggest reading the following two tutorials:
- Histogram matching with OpenCV, scikit-image, and Python
- Automatic color correction with OpenCV and Python
What's next? We recommend PyImageSearch University.
86+ total classes • 115+ hours hours of on-demand code walkthrough videos • Last updated: February 2026
★★★★★ 4.84 (128 Ratings) • 16,000+ Students Enrolled
I strongly believe that if you had the right teacher you could master computer vision and deep learning.
Do you think learning computer vision and deep learning has to be time-consuming, overwhelming, and complicated? Or has to involve complex mathematics and equations? Or requires a degree in computer science?
That’s not the case.
All you need to master computer vision and deep learning is for someone to explain things to you in simple, intuitive terms. And that’s exactly what I do. My mission is to change education and how complex Artificial Intelligence topics are taught.
If you're serious about learning computer vision, your next stop should be PyImageSearch University, the most comprehensive computer vision, deep learning, and OpenCV course online today. Here you’ll learn how to successfully and confidently apply computer vision to your work, research, and projects. Join me in computer vision mastery.
Inside PyImageSearch University you'll find:
- ✓ 86+ courses on essential computer vision, deep learning, and OpenCV topics
- ✓ 86 Certificates of Completion
- ✓ 115+ hours hours of on-demand video
- ✓ Brand new courses released regularly, ensuring you can keep up with state-of-the-art techniques
- ✓ Pre-configured Jupyter Notebooks in Google Colab
- ✓ Run all code examples in your web browser — works on Windows, macOS, and Linux (no dev environment configuration required!)
- ✓ Access to centralized code repos for all 540+ tutorials on PyImageSearch
- ✓ Easy one-click downloads for code, datasets, pre-trained models, etc.
- ✓ Access on mobile, laptop, desktop, etc.
Summary
In this blog post I showed you how to perform color detection using OpenCV and Python.
To detect colors in images, the first thing you need to do is define the upper and lower limits for your pixel values.
Once you have defined your upper and lower limits, you then make a call to the cv2.inRange method which returns a mask, specifying which pixels fall into your specified upper and lower range.
Finally, now that you have the mask, you can apply it to your image using the cv2.bitwise_and function.
My train is just a few stops away from home, so I better wrap this post up. I hope you found it useful!
And if you have any questions, as always, feel free to leave a comment or shoot me a message.

Download the Source Code and FREE 17-page Resource Guide
Enter your email address below to get a .zip of the code and a FREE 17-page Resource Guide on Computer Vision, OpenCV, and Deep Learning. Inside you'll find my hand-picked tutorials, books, courses, and libraries to help you master CV and DL!

