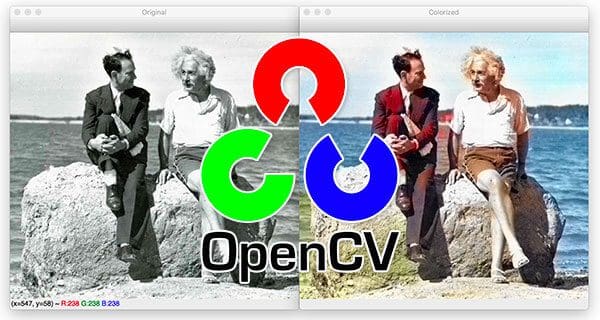
In this tutorial, you will learn how to colorize black and white images using OpenCV, Deep Learning, and Python.
Image colorization is the process of taking an input grayscale (black and white) image and then producing an output colorized image that represents the semantic colors and tones of the input (for example, an ocean on a clear sunny day must be plausibly “blue” — it can’t be colored “hot pink” by the model).
Previous methods for image colorization either:
- Relied on significant human interaction and annotation
- Produced desaturated colorization
The novel approach we are going to use here today instead relies on deep learning. We will utilize a Convolutional Neural Network capable of colorizing black and white images with results that can even “fool” humans!
To learn how to perform black and white image coloration with OpenCV, just keep reading!
Black and white image colorization with OpenCV and Deep Learning
In the first part of this tutorial, we’ll discuss how deep learning can be utilized to colorize black and white images.
From there we’ll utilize OpenCV to colorize black and white images for both:
- Images
- Video streams
We’ll then explore some examples and demos of our work.
How can we colorize black and white images with deep learning?

The technique we’ll be covering here today is from Zhang et al.’s 2016 ECCV paper, Colorful Image Colorization.
Previous approaches to black and white image colorization relied on manual human annotation and often produced desaturated results that were not “believable” as true colorizations.
Zhang et al. decided to attack the problem of image colorization by using Convolutional Neural Networks to “hallucinate” what an input grayscale image would look like when colorized.
To train the network Zhang et al. started with the ImageNet dataset and converted all images from the RGB color space to the Lab color space.
Similar to the RGB color space, the Lab color space has three channels. But unlike the RGB color space, Lab encodes color information differently:
- The L channel encodes lightness intensity only
- The a channel encodes green-red.
- And the b channel encodes blue-yellow
A full review of the Lab color space is outside the scope of this post (see this guide for more information on Lab), but the gist here is that Lab does a better job representing how humans see color.
Since the L channel encodes only the intensity, we can use the L channel as our grayscale input to the network.
From there the network must learn to predict the a and b channels. Given the input L channel and the predicted ab channels we can then form our final output image.
The entire (simplified) process can be summarized as:
- Convert all training images from the RGB color space to the Lab color space.
- Use the L channel as the input to the network and train the network to predict the ab channels.
- Combine the input L channel with the predicted ab channels.
- Convert the Lab image back to RGB.
To produce more plausible black and white image colorizations the authors also utilize a few additional techniques including mean annealing and a specialized loss function for color rebalancing (both of which are outside the scope of this post).
For more details on the image colorization algorithm and deep learning model, be sure to refer to the official publication of Zhang et al.
Project structure
Go ahead and download the source code, model, and example images using the “Downloads” section of this post.
Once you’ve extracted the zip, you should navigate into the project directory.
From there, let’s use the tree command to inspect the project structure:
$ tree --dirsfirst
.
├── images
│   ├── adrian_and_janie.png
│   ├── albert_einstein.jpg
│   ├── mark_twain.jpg
│   └── robin_williams.jpg
├── model
│   ├── colorization_deploy_v2.prototxt
│   ├── colorization_release_v2.caffemodel
│   └── pts_in_hull.npy
├── bw2color_image.py
└── bw2color_video.py

2 directories, 9 files
We have four sample black and white images in the images/ directory.
Our Caffe model and prototxt are inside the model/ directory along with the cluster points NumPy file.
We’ll be reviewing two scripts today:
bw2color_image.pybw2color_video.py
The image script can process any black and white (also known as grayscale) image you pass in.
Our video script will either use your webcam or accept an input video file and then perform colorization.
Colorizing black and white images with OpenCV
Let’s go ahead and implement black and white image colorization script with OpenCV.
Open up the bw2color_image.py file and insert the following code:
# import the necessary packages
import numpy as np
import argparse
import cv2

# construct the argument parser and parse the arguments
ap = argparse.ArgumentParser()
ap.add_argument("-i", "--image", type=str, required=True,
	help="path to input black and white image")
ap.add_argument("-p", "--prototxt", type=str, required=True,
	help="path to Caffe prototxt file")
ap.add_argument("-m", "--model", type=str, required=True,
	help="path to Caffe pre-trained model")
ap.add_argument("-c", "--points", type=str, required=True,
	help="path to cluster center points")
args = vars(ap.parse_args())
Our colorizer script only requires three imports: NumPy, OpenCV, and argparse .
Let’s go ahead and use argparse to parse command line arguments. This script requires that these four arguments be passed to the script directly from the terminal:
--image: The path to our input black/white image.--prototxt: Our path to the Caffe prototxt file.--model. Our path to the Caffe pre-trained model.--points: The path to a NumPy cluster center points file.
With the above four flags and corresponding arguments, the script will be able to run with different inputs without changing any code.
Let’s go ahead and load our model and cluster centers into memory:
# load our serialized black and white colorizer model and cluster
# center points from disk
print("[INFO] loading model...")
net = cv2.dnn.readNetFromCaffe(args["prototxt"], args["model"])
pts = np.load(args["points"])

# add the cluster centers as 1x1 convolutions to the model
class8 = net.getLayerId("class8_ab")
conv8 = net.getLayerId("conv8_313_rh")
pts = pts.transpose().reshape(2, 313, 1, 1)
net.getLayer(class8).blobs = [pts.astype("float32")]
net.getLayer(conv8).blobs = [np.full([1, 313], 2.606, dtype="float32")]
Line 21 loads our Caffe model directly from the command line argument values. OpenCV can read Caffe models via the cv2.dnn.readNetFromCaffe function.
Line 22 then loads the cluster center points directly from the command line argument path to the points file. This file is in NumPy format so we’re using np.load .
From there, Lines 25-29:
- Load centers for ab channel quantization used for rebalancing.
- Treat each of the points as 1×1 convolutions and add them to the model.
Now let’s load, scale, and convert our image:
# load the input image from disk, scale the pixel intensities to the
# range [0, 1], and then convert the image from the BGR to Lab color
# space
image = cv2.imread(args["image"])
scaled = image.astype("float32") / 255.0
lab = cv2.cvtColor(scaled, cv2.COLOR_BGR2LAB)
To load our input image from the file path, we use cv2.imread on Line 34.
Preprocessing steps include:
- Scaling pixel intensities to the range [0, 1] (Line 35).
- Converting from BGR to Lab color space (Line 36).
Let’s continue with our preprocessing:
# resize the Lab image to 224x224 (the dimensions the colorization
# network accepts), split channels, extract the 'L' channel, and then
# perform mean centering
resized = cv2.resize(lab, (224, 224))
L = cv2.split(resized)[0]
L -= 50
We’ll go ahead and resize the input image to 224×224 (Line 41), the required input dimensions for the network.
Then we grab the L channel only (i.e., the input) and perform mean subtraction (Lines 42 and 43).
Now we can pass the input L channel through the network to predict the ab channels:
# pass the L channel through the network which will *predict* the 'a'
# and 'b' channel values
'print("[INFO] colorizing image...")'
net.setInput(cv2.dnn.blobFromImage(L))
ab = net.forward()[0, :, :, :].transpose((1, 2, 0))

# resize the predicted 'ab' volume to the same dimensions as our
# input image
ab = cv2.resize(ab, (image.shape[1], image.shape[0]))
A forward pass of the L channel through the network takes place on Lines 48 and 49 (here is a refresher on OpenCV’s blobFromImage if you need it).
Notice that after we called net.forward , on the same line, we went ahead and extracted the predicted ab volume. I make it look easy here, but refer to the Zhang et al. documentation and demo on GitHub if you would like more details.
From there, we resize the predicted ab volume to be the same dimensions as our input image (Line 53).
Now comes the time for post-processing. Stay with me here as we essentially go in reverse for some of our previous steps:
# grab the 'L' channel from the *original* input image (not the
# resized one) and concatenate the original 'L' channel with the
# predicted 'ab' channels
L = cv2.split(lab)[0]
colorized = np.concatenate((L[:, :, np.newaxis], ab), axis=2)

# convert the output image from the Lab color space to RGB, then
# clip any values that fall outside the range [0, 1]
colorized = cv2.cvtColor(colorized, cv2.COLOR_LAB2BGR)
colorized = np.clip(colorized, 0, 1)

# the current colorized image is represented as a floating point
# data type in the range [0, 1] -- let's convert to an unsigned
# 8-bit integer representation in the range [0, 255]
colorized = (255 * colorized).astype("uint8")

# show the original and output colorized images
cv2.imshow("Original", image)
cv2.imshow("Colorized", colorized)
cv2.waitKey(0)
Post processing includes:
- Grabbing the
Lchannel from the original input image (Line 58) and concatenating the originalLchannel and predictedabchannels together formingcolorized(Line 59). - Converting the
colorizedimage from the Lab color space to RGB (Line 63). - Clipping any pixel intensities that fall outside the range [0, 1] (Line 64).
- Bringing the pixel intensities back into the range [0, 255] (Line 69). During the preprocessing steps (Line 35) we divided by
255and now we are multiplying by255. I’ve also found that this scaling and"uint8"conversion isn’t a requirement but that it helps the code work between OpenCV 3.4.x and 4.x versions.
Finally, both our original image and colorized images are displayed on the screen!
Image colorization results
Now that we’ve implemented our image colorization script, let’s give it a try.
Make sure you’ve used the “Downloads” section of this blog post to download the source code, colorization model, and example images.
From there, open up a terminal, navigate to where you downloaded the source code, and execute the following command:
$ python bw2color_image.py \
	--prototxt model/colorization_deploy_v2.prototxt \
	--model model/colorization_release_v2.caffemodel \
	--points model/pts_in_hull.npy \
	--image images/robin_williams.jpg
[INFO] loading model...
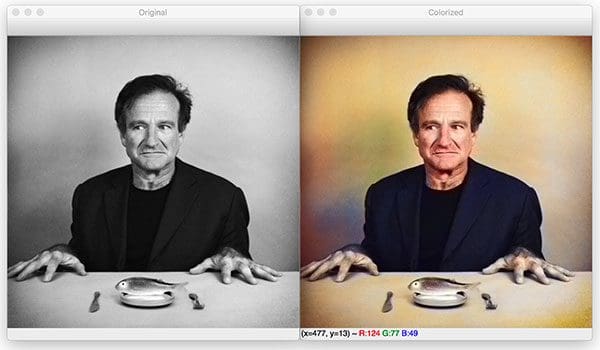
On the left, you can see the original input image of Robin Williams, a famous actor and comedian who passed away ~5 years ago.
On the right, you can see the output of the black and white colorization model.
Let’s try another image, this one of Albert Einstein:
$ python bw2color_image.py \
	--prototxt model/colorization_deploy_v2.prototxt \
	--model model/colorization_release_v2.caffemodel \
	--points model/pts_in_hull.npy \
	--image images/albert_einstein.jpg
[INFO] loading model...
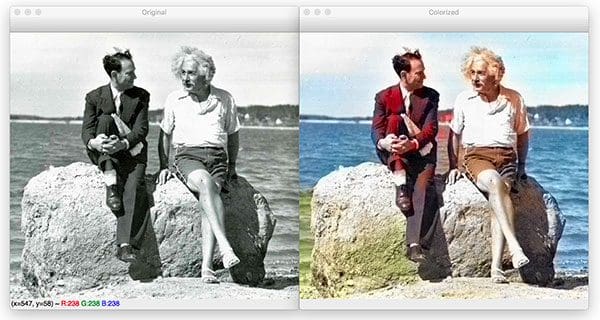
I’m particularly impressed by this image colorization.
Notice how the water is an appropriate shade of blue while Einstein’s shirt is white and his pants are khaki — all of these are plausible colorizations.
Here is another example image, this one of Mark Twain, one of my all-time favorite authors:
$ python bw2color_image.py \
	--prototxt model/colorization_deploy_v2.prototxt \
	--model model/colorization_release_v2.caffemodel \
	--points model/pts_in_hull.npy
	--image images/mark_twain.jpg
[INFO] loading model...
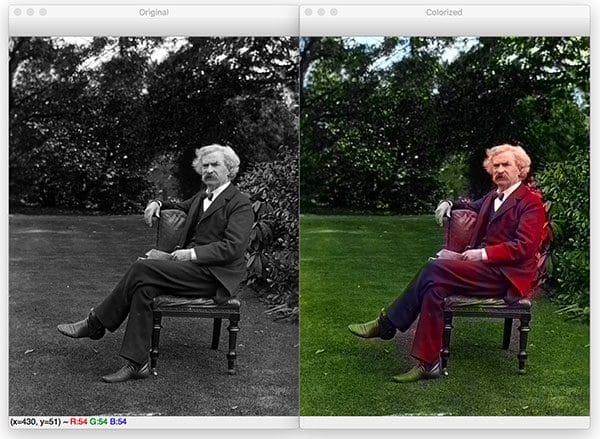
Here we can see that the grass and foliage are correctly colored a shade of green, although you can see these shades of green blending into Twain’s shoes and hands.
The final image demonstrates a not-so-great black and white image colorization with OpenCV:
$ python bw2color_image.py \
	--prototxt model/colorization_deploy_v2.prototxt \
	--model model/colorization_release_v2.caffemodel \
	--points model/pts_in_hull.npy
	--image images/adrian_and_janie.png
[INFO] loading model...
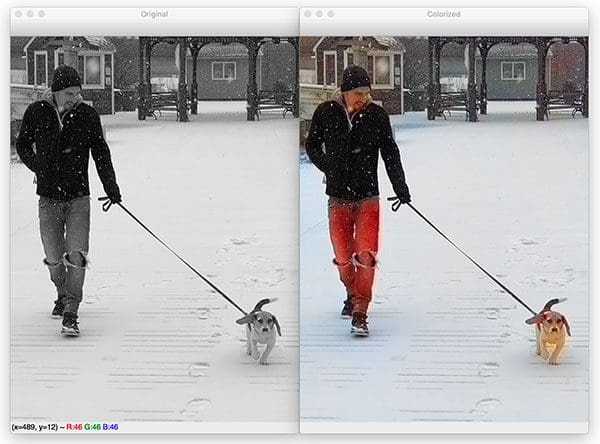
This photo is of myself and Janie, my beagle puppy, during a snowstorm a few weeks ago.
Here you can see that while the snow, Janie, my jacket, and even the gazebo in the background are correctly colored, my blue jeans are actually red.
Not all image colorizations will be perfect but the results here today do demonstrate the plausibility of the Zhang et al. approach.
Real-time black and white video colorization with OpenCV
We’ve already seen how we can apply black and white image colorization to images — but can we do the same with video streams?
You bet we can.
This script follows the same process as above except we’ll be processing frames of a video stream. I’ll be reviewing it in less detail and focusing on the frame grabbing + processing aspects.
Open up the bw2color_video.py and insert the following code:
# import the necessary packages
from imutils.video import VideoStream
import numpy as np
import argparse
import imutils
import time
import cv2

# construct the argument parser and parse the arguments
ap = argparse.ArgumentParser()
ap.add_argument("-i", "--input", type=str,
	help="path to optional input video (webcam will be used otherwise)")
ap.add_argument("-p", "--prototxt", type=str, required=True,
	help="path to Caffe prototxt file")
ap.add_argument("-m", "--model", type=str, required=True,
	help="path to Caffe pre-trained model")
ap.add_argument("-c", "--points", type=str, required=True,
	help="path to cluster center points")
ap.add_argument("-w", "--width", type=int, default=500,
	help="input width dimension of frame")
args = vars(ap.parse_args())
Our video script requires two additional imports:
VideoStreamallows us to grab frames from a webcam or video filetimewill be used to pause to allow a webcam to warm up
Let’s initialize our VideoStream now:
# initialize a boolean used to indicate if either a webcam or input
# video is being used
webcam = not args.get("input", False)

# if a video path was not supplied, grab a reference to the webcam
if webcam:
	print("[INFO] starting video stream...")
	vs = VideoStream(src=0).start()
	time.sleep(2.0)

# otherwise, grab a reference to the video file
else:
	print("[INFO] opening video file...")
	vs = cv2.VideoCapture(args["input"])
Depending on whether we’re working with a webcam or video file, we’ll create our vs (i.e., “video stream”) object here.
From there, we’ll load the colorizer deep learning model and cluster centers (the same way we did in our previous script):
# load our serialized black and white colorizer model and cluster
# center points from disk
print("[INFO] loading model...")
net = cv2.dnn.readNetFromCaffe(args["prototxt"], args["model"])
pts = np.load(args["points"])

# add the cluster centers as 1x1 convolutions to the model
class8 = net.getLayerId("class8_ab")
conv8 = net.getLayerId("conv8_313_rh")
pts = pts.transpose().reshape(2, 313, 1, 1)
net.getLayer(class8).blobs = [pts.astype("float32")]
net.getLayer(conv8).blobs = [np.full([1, 313], 2.606, dtype="float32")]
Now we’ll start an infinite while loop over incoming frames. We’ll process the frames directly in the loop:
# loop over frames from the video stream
while True:
	# grab the next frame and handle if we are reading from either
	# VideoCapture or VideoStream
	frame = vs.read()
	frame = frame if webcam else frame[1]

	# if we are viewing a video and we did not grab a frame then we
	# have reached the end of the video
	if not webcam and frame is None:
		break

	# resize the input frame, scale the pixel intensities to the
	# range [0, 1], and then convert the frame from the BGR to Lab
	# color space
	frame = imutils.resize(frame, width=args["width"])
	scaled = frame.astype("float32") / 255.0
	lab = cv2.cvtColor(scaled, cv2.COLOR_BGR2LAB)

	# resize the Lab frame to 224x224 (the dimensions the colorization
	# network accepts), split channels, extract the 'L' channel, and
	# then perform mean centering
	resized = cv2.resize(lab, (224, 224))
	L = cv2.split(resized)[0]
	L -= 50
Each frame from our vs is grabbed on Lines 55 and 56. A check is made for a None type frame — when this occurs, we’ve reached the end of a video file (if we’re processing a video file) and we can break from the loop (Lines 60 and 61).
Preprocessing (just as before) is conducted on Lines 66-75. This is where we resize, scale, and convert to Lab. Then we grab the L channel, and perform mean subtraction.
Let’s now apply deep learning colorization and post-process the result:
	# pass the L channel through the network which will *predict* the
	# 'a' and 'b' channel values
	net.setInput(cv2.dnn.blobFromImage(L))
	ab = net.forward()[0, :, :, :].transpose((1, 2, 0))

	# resize the predicted 'ab' volume to the same dimensions as our
	# input frame, then grab the 'L' channel from the *original* input
	# frame (not the resized one) and concatenate the original 'L'
	# channel with the predicted 'ab' channels
	ab = cv2.resize(ab, (frame.shape[1], frame.shape[0]))
	L = cv2.split(lab)[0]
	colorized = np.concatenate((L[:, :, np.newaxis], ab), axis=2)

	# convert the output frame from the Lab color space to RGB, clip
	# any values that fall outside the range [0, 1], and then convert
	# to an 8-bit unsigned integer ([0, 255] range)
	colorized = cv2.cvtColor(colorized, cv2.COLOR_LAB2BGR)
	colorized = np.clip(colorized, 0, 1)
	colorized = (255 * colorized).astype("uint8")
Our deep learning forward pass of L through the network results in the predicted ab channel.
Then we’ll post-process the result to from our colorized image (Lines 86-95). This is where we resize, grab our original L , and concatenate our predicted ab . From there, we convert from Lab to RGB, clip, and scale.
If you followed along closely above, you’ll remember that all we do next is display the results:
	# show the original and final colorized frames
	cv2.imshow("Original", frame)
	cv2.imshow("Grayscale", cv2.cvtColor(frame, cv2.COLOR_BGR2GRAY))
	cv2.imshow("Colorized", colorized)
	key = cv2.waitKey(1) & 0xFF

	# if the `q` key was pressed, break from the loop
	if key == ord("q"):
		break

# if we are using a webcam, stop the camera video stream
if webcam:
	vs.stop()

# otherwise, release the video file pointer
else:
	vs.release()

# close any open windows
cv2.destroyAllWindows()
Our original webcam frame is shown along with our grayscale image and colorized result.
If the "q" key is pressed, we’ll break from the loop and cleanup.
That’s all there is to it!
Video colorization results
Let’s go ahead and give our video black and white colorization script a try.
Make sure you use the “Downloads” section of this tutorial to download the source code and colorization model.
From there, open up a terminal and execute the following command to have the colorizer run on your webcam:
$ python bw2color_video.py \
	--prototxt model/colorization_deploy_v2.prototxt \
	--model model/colorization_release_v2.caffemodel \
	--points model/pts_in_hull.npy

If you want to run the colorizer on a video file you can use the following command:
$ python bw2color_video.py \
	--prototxt model/colorization_deploy_v2.prototxt \
	--model model/colorization_release_v2.caffemodel \
	--points model/pts_in_hull.npy
	--input video/jurassic_park_intro.mp4
Credits:
The model here is running in close to real-time on my 3Ghz Intel Xeon W.
With a GPU, real-time performance could certainly be obtained; however, keep in mind that GPU support for OpenCV’s “dnn” module is currently a bit limited and it, unfortunately, does not yet support NVIDIA GPUs.
What's next? We recommend PyImageSearch University.
86+ total classes • 115+ hours hours of on-demand code walkthrough videos • Last updated: December 2025
★★★★★ 4.84 (128 Ratings) • 16,000+ Students Enrolled
I strongly believe that if you had the right teacher you could master computer vision and deep learning.
Do you think learning computer vision and deep learning has to be time-consuming, overwhelming, and complicated? Or has to involve complex mathematics and equations? Or requires a degree in computer science?
That’s not the case.
All you need to master computer vision and deep learning is for someone to explain things to you in simple, intuitive terms. And that’s exactly what I do. My mission is to change education and how complex Artificial Intelligence topics are taught.
If you're serious about learning computer vision, your next stop should be PyImageSearch University, the most comprehensive computer vision, deep learning, and OpenCV course online today. Here you’ll learn how to successfully and confidently apply computer vision to your work, research, and projects. Join me in computer vision mastery.
Inside PyImageSearch University you'll find:
- ✓ 86+ courses on essential computer vision, deep learning, and OpenCV topics
- ✓ 86 Certificates of Completion
- ✓ 115+ hours hours of on-demand video
- ✓ Brand new courses released regularly, ensuring you can keep up with state-of-the-art techniques
- ✓ Pre-configured Jupyter Notebooks in Google Colab
- ✓ Run all code examples in your web browser — works on Windows, macOS, and Linux (no dev environment configuration required!)
- ✓ Access to centralized code repos for all 540+ tutorials on PyImageSearch
- ✓ Easy one-click downloads for code, datasets, pre-trained models, etc.
- ✓ Access on mobile, laptop, desktop, etc.
Summary
In today’s tutorial, you learned how to colorize black and white images using OpenCV and Deep Learning.
The image colorization model we used here today was first introduced by Zhang et al. in their 2016 publication, Colorful Image Colorization.
Using this model, we were able to colorize both:
- Black and white images
- Black and white videos
Our results, while not perfect, demonstrated the plausibility of automatically colorizing black and white images and videos.
According to Zhang et al., their approach was able to “fool” humans 32% of the time!
To download the source code to this post, and be notified when future tutorials are published here on PyImageSearch, just enter your email address in the form below!

Download the Source Code and FREE 17-page Resource Guide
Enter your email address below to get a .zip of the code and a FREE 17-page Resource Guide on Computer Vision, OpenCV, and Deep Learning. Inside you'll find my hand-picked tutorials, books, courses, and libraries to help you master CV and DL!
