Today I’m going to show you how to compile and install OpenCV 4 on your Raspberry Pi.
OpenCV 4 was officially released on November 20th, 2018.
This blog post was updated subsequently on November 28th to accommodate the changes to the install (previously these instructions linked to the alpha release source code).
It is also possible to pip install OpenCV as well! As of this update however, PyPi does not contain precompiled OpenCV 4 binaries which can be installed via pip.
Therefore, if you want OpenCV 4 then you’ll need to compile from source.
To learn how to install OpenCV 4 on your Raspberry Pi, just follow this tutorial!
Looking for the source code to this post?
Jump Right To The Downloads SectionInstall OpenCV 4 on your Raspberry Pi
In this blog post, we’re going to install OpenCV 4 on your Raspberry Pi. OpenCV 4 has a goal of reducing bloat, adding optimizations, and updating the deep learning module.
Note: There are many install guides on my blog. Before you begin, be sure to check out the available install tutorials on my OpenCV installation guides page.
First we’ll cover assumptions that go along with this tutorial.
From there, we’ll walk through 7 steps to compile and install OpenCV 4 on your Raspberry Pi. Compiling from source allows us to have full control over the compile and build. It also allows us to grab the latest code — something that pip and apt-get don’t offer.
Finally, we’ll test our OpenCV 4 install on our Raspberry Pi with a fun project.
Let’s get started.
Assumptions
In this tutorial, I am going to assume that you already own a Raspberry Pi 3 B or the newer Raspberry Pi 3 B+ with Raspbian Stretch installed.
If you don’t already have the Raspbian Stretch OS, you’ll need to upgrade your OS to take advantage of Raspbian Stretch’s new features.
To upgrade your Raspberry Pi 3 to Raspbian Stretch, you may download it here and follow these upgrade instructions (or these for the NOOBS route which is recommended for beginners). The former instructions take approximately 10 minutes to download via a torrent client and about 10 minutes to flash the SD card with Etcher or another tool. At that point you can power up and proceed to the next section.
Assuming that your OS is up to date, you’ll need one of the following for the remainder of this post:
- Physical access to your Raspberry Pi 3 so that you can open up a terminal and execute commands
- Remote access via SSH or VNC.
I’ll be doing the majority of this tutorial via SSH, but as long as you have access to a terminal, you can easily follow along.
Can’t SSH? If you see your Pi on your network, but can’t ssh to it, you may need to enable SSH. This can easily be done via the Raspberry Pi desktop preferences menu (you’ll need an HDMI cable and a keyboard/mouse) or running sudo service ssh start
from the command line of your Pi.
After you’ve changed the setting and rebooted, you can test SSH directly on the Pi with the localhost address. Open a terminal and type ssh pi@127.0.0.1
to see if it is working. To SSH from another computer you’ll need the Pi’s IP address — you could figure it out by looking at your router’s clients page or by running ifconfig
on the Pi itself.
Keyboard layout giving you problems? Change your keyboard layout by going to the Raspberry Pi desktop preferences menu. I use the standard US Keyboard layout, but you’ll want to select the one appropriate for you.
Step #1: Expand filesystem on your Raspberry Pi
To get the OpenCV 4 party started, fire up your Raspberry Pi and open an SSH connection (alternatively use the Raspbian desktop with a keyboard + mouse and launch a terminal).
Are you using a brand new install of Raspbian Stretch?
If so, the first thing you should do is expand your filesystem to include all available space on your micro-SD card:
$ sudo raspi-config
And then select the “Advanced Options” menu item:
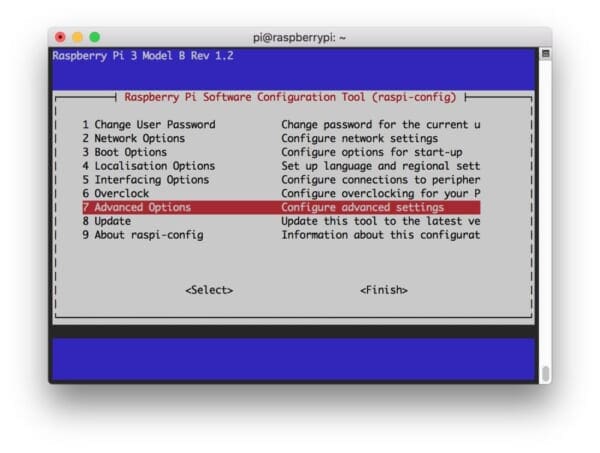
Followed by selecting “Expand filesystem”:
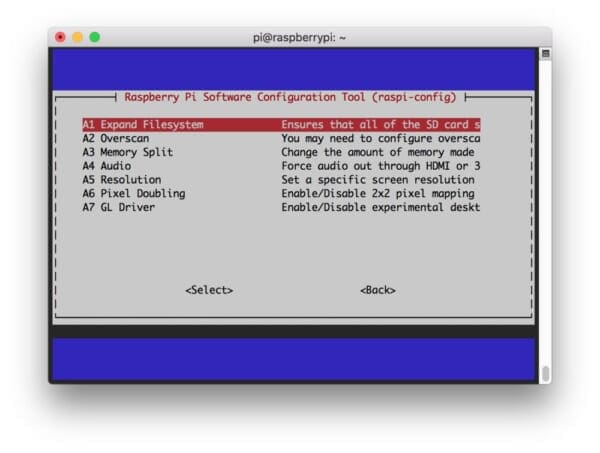
Once prompted, you should select the first option, “A1. Expand File System”, hit Enter on your keyboard, arrow down to the “<Finish>” button, and then reboot your Pi — you may be prompted to reboot, but if you aren’t you can execute:
$ sudo reboot
After rebooting, your file system should have been expanded to include all available space on your micro-SD card. You can verify that the disk has been expanded by executing df -h
and examining the output:
$ df -h Filesystem Size Used Avail Use% Mounted on /dev/root 30G 4.2G 24G 15% / devtmpfs 434M 0 434M 0% /dev tmpfs 438M 0 438M 0% /dev/shm tmpfs 438M 12M 427M 3% /run tmpfs 5.0M 4.0K 5.0M 1% /run/lock tmpfs 438M 0 438M 0% /sys/fs/cgroup /dev/mmcblk0p1 42M 21M 21M 51% /boot tmpfs 88M 0 88M 0% /run/user/1000
As you can see, my Raspbian filesystem has been expanded to include all 32GB of the micro-SD card.
However, even with my filesystem expanded, I have already used 15% of my 32GB card.
If you are using an 8GB card you may be using close to 50% of the available space, so one simple thing to do is to delete both LibreOffice and Wolfram engine to free up some space on your Pi:
$ sudo apt-get purge wolfram-engine $ sudo apt-get purge libreoffice* $ sudo apt-get clean $ sudo apt-get autoremove
After removing the Wolfram Engine and LibreOffice, you can reclaim almost 1GB!
Step #2: Install OpenCV 4 dependencies on your Raspberry Pi
From there, let’s update our system:
$ sudo apt-get update && sudo apt-get upgrade
And then let’s install developer tools including CMake:
$ sudo apt-get install build-essential cmake unzip pkg-config
Next, let’s install a selection of image and video libraries — these are critical to being able to work with image and video files:
$ sudo apt-get install libjpeg-dev libpng-dev libtiff-dev $ sudo apt-get install libavcodec-dev libavformat-dev libswscale-dev libv4l-dev $ sudo apt-get install libxvidcore-dev libx264-dev
From there, let’s install GTK, our GUI backend:
$ sudo apt-get install libgtk-3-dev
And now let’s install a package which may reduce pesky GTK warnings:
$ sudo apt-get install libcanberra-gtk*
The asterisk will grab the ARM specific GTK.
Followed by installing two packages which contain numerical optimizations for OpenCV:
$ sudo apt-get install libatlas-base-dev gfortran
And finally, let’s install the Python 3 development headers:
$ sudo apt-get install python3-dev
Once you have all of these prerequisites installed you can move on to the next step.
Step #3: Download OpenCV 4 for your Raspberry Pi
Our next step is to download OpenCV.
Let’s navigate to our home folder and download both opencv and opencv_contrib. The contrib repo contains extra modules and functions which we frequently use here on the PyImageSearch blog. You should be installing the OpenCV library with the additional contrib modules as well.
When you’re ready, just follow along to download both the opencv
and opencv_contrib
code:
$ cd ~ $ wget -O opencv.zip https://github.com/opencv/opencv/archive/4.0.0.zip $ wget -O opencv_contrib.zip https://github.com/opencv/opencv_contrib/archive/4.0.0.zip
From there, let’s unzip the archives:
$ unzip opencv.zip $ unzip opencv_contrib.zip
I also like to rename the directories:
$ mv opencv-4.0.0 opencv $ mv opencv_contrib-4.0.0 opencv_contrib
If you skip renaming the directories, don’t forget to update the CMake paths.
Now that opencv
and opencv_contrib
are downloaded and ready to go, let’s set up our environment.
Step #4: Configure your Python 3 virtual environment for OpenCV 4
Let’s grab and install pip, a Python Package Manager.
To install pip, simply enter the following in your terminal:
$ wget https://bootstrap.pypa.io/get-pip.py $ sudo python3 get-pip.py
Make use of virtual environments for Python development
If you aren’t familiar with virtual environments, please take a moment look at this article on RealPython or read the first half of the this blog post on PyImageSearch.
Virtual environments will allow you to run different versions of Python software in isolation on your system. Today we’ll be setting up just one environment, but you could easily have an environment for each project.
Let’s go ahead and install virtualenv
and virtualenvwrapper
now — they allow for Python virtual environments:
$ sudo pip install virtualenv virtualenvwrapper $ sudo rm -rf ~/get-pip.py ~/.cache/pip
To finish the install of these tools, we need to update our ~/.profile
file (similar to .bashrc
or .bash_profile
).
Using a terminal text editor such as vi
/vim
or nano
, add the following lines to your ~/.profile
:
# virtualenv and virtualenvwrapper export WORKON_HOME=$HOME/.virtualenvs export VIRTUALENVWRAPPER_PYTHON=/usr/bin/python3 source /usr/local/bin/virtualenvwrapper.sh
Alternatively, you can append the lines directly via bash commands:
$ echo -e "\n# virtualenv and virtualenvwrapper" >> ~/.profile $ echo "export WORKON_HOME=$HOME/.virtualenvs" >> ~/.profile $ echo "export VIRTUALENVWRAPPER_PYTHON=/usr/bin/python3" >> ~/.profile $ echo "source /usr/local/bin/virtualenvwrapper.sh" >> ~/.profile
Next, source the ~/.profile
file:
$ source ~/.profile
Create a virtual environment to hold OpenCV 4 and additional packages
Now you’re at the point where you can create your OpenCV 4 + Python 3 virtual environment on your Raspberry Pi:
$ mkvirtualenv cv -p python3
This line simply creates a Python 3 virtual environment named cv
.
You can (and should) name your environment(s) whatever you’d like — I like to keep them short and sweet while also providing enough information so I’ll remember what they are for. For example, I like to name my environments like this:
py3cv4
py3cv3
py2cv2
- etc.
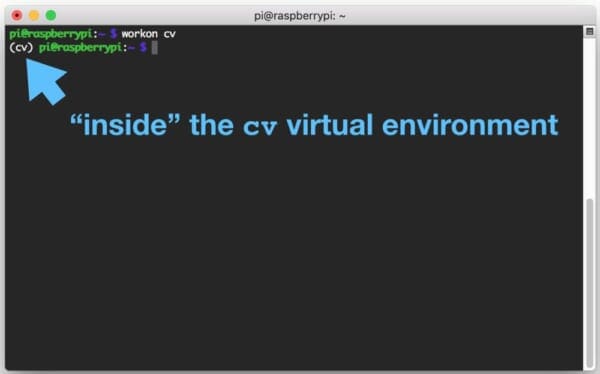
Let’s verify that we’re in the cv
environment by using the workon
command:
$ workon cv
Install NumPy
The first Python package and only OpenCV prerequisite we’ll install is NumPy:
$ pip install numpy
We can now prepare OpenCV 4 for compilation on our Raspberry Pi.
Step #5: CMake and compile OpenCV 4 for your Raspberry Pi
For this step, we’re going to setup our compile with CMake followed by running make
to actually compile OpenCV. This is the most time-consuming step of today’s blog post.
Navigate back to your OpenCV repo and create + enter a build
directory:
$ cd ~/opencv $ mkdir build $ cd build
Run CMake for OpenCV 4
Now let’s run CMake to configure the OpenCV 4 build:
$ cmake -D CMAKE_BUILD_TYPE=RELEASE \ -D CMAKE_INSTALL_PREFIX=/usr/local \ -D OPENCV_EXTRA_MODULES_PATH=~/opencv_contrib/modules \ -D ENABLE_NEON=ON \ -D ENABLE_VFPV3=ON \ -D BUILD_TESTS=OFF \ -D OPENCV_ENABLE_NONFREE=ON \ -D INSTALL_PYTHON_EXAMPLES=OFF \ -D BUILD_EXAMPLES=OFF ..
Update 2018-11-27: Notice the -D OPENCV_ENABLE_NONFREE=ON
flag. Setting this flag with OpenCV 4 ensures that you’ll have access to SIFT/SURF and other patented algorithms.
Be sure to update the above command to use the correct OPENCV_EXTRA_MODULES_PATH
path. If you’re following along with this tutorial exactly you should not need to update the path.
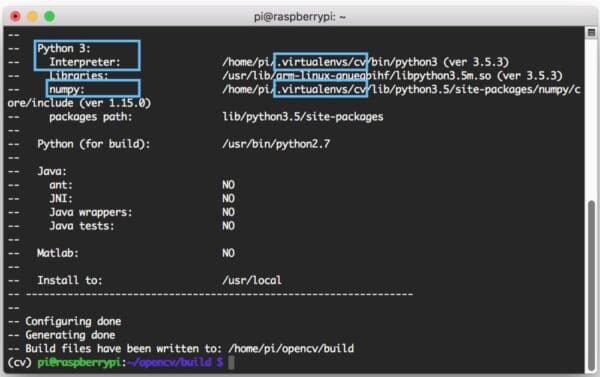
Once CMake is finished, it’s important that you inspect the output. Your output should look similar to mine below:
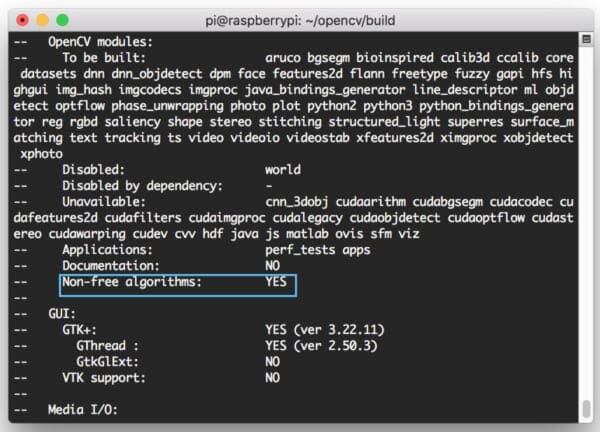
Take a second now to ensure that the Interpreter
points to the correct Python 3 binary. Also check that numpy
points to our NumPy package which is installed inside the virtual environment.
Increase the SWAP on the Raspberry Pi
Before you begin the compile I would suggest increasing your swap space. This will enable you to compile OpenCV with all four cores of the Raspberry Pi without the compile hanging due to memory exhausting.
Open up your /etc/dphys-swapfile
file:
$ sudo nano /etc/dphys-swapfile
…and then edit the CONF_SWAPSIZE
variable:
# set size to absolute value, leaving empty (default) then uses computed value # you most likely don't want this, unless you have an special disk situation # CONF_SWAPSIZE=100 CONF_SWAPSIZE=2048
Notice that I’m increasing the swap from 100MB to 2048MB.
If you do not perform this step it’s very likely that your Pi will hang.
From there, restart the swap service:
$ sudo /etc/init.d/dphys-swapfile stop $ sudo /etc/init.d/dphys-swapfile start
Note: Increasing swap size is a great way to burn out your Raspberry Pi microSD card. Flash-based storage have limited number of writes you can perform until the card is essentially unable to hold the 1’s and 0’s anymore. We’ll only be enabling large swap for a short period of time, so it’s not a big deal. Regardless, be sure to backup your .img
file after installing OpenCV + Python just in case your card dies unexpectedly early. You can read more about large swap sizes corrupting memory cards on this page.
Compile OpenCV 4
Now we’re ready to compile OpenCV 4:
$ make -j4
Note: In the make
command above, the -j4
argument specifies that I have 4 cores for compilation. If you have compile errors or your Raspberry Pi hangs/freezes you can try without the -j4
switch which can eliminate race conditions.
Here you can see OpenCV 4 has compiled without any errors:
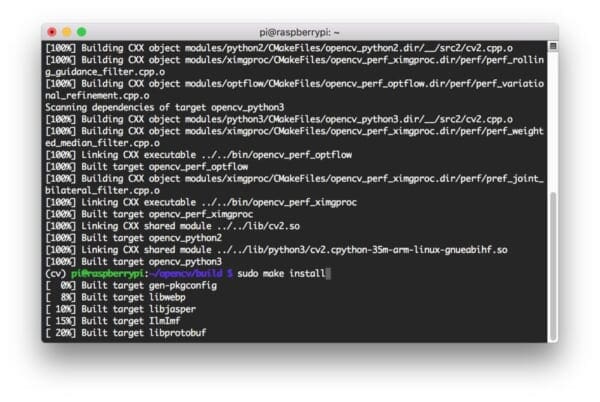
And from there, let’s install OpenCV 4 with two additional commands:
$ sudo make install $ sudo ldconfig
Don’t forget to go back to your /etc/dphys-swapfile
file and:
- Reset
CONF_SWAPSIZE
to 100MB. - Restart the swap service.
Step #6: Link OpenCV 4 into your Python 3 virtual environment
Let’s create a symbolic link from the OpenCV install in the system site-packages
directory to our virtual environment:
$ cd ~/.virtualenvs/cv/lib/python3.5/site-packages/ $ ln -s /usr/local/python/cv2/python-3.5/cv2.cpython-35m-arm-linux-gnueabihf.so cv2.so $ cd ~
I cannot stress this step enough — this step is critical. If you don’t create a symbolic link, you won’t be able to import OpenCV in your scripts. Also, ensure that the paths and filenames in the above commands are correct for your Raspberry Pi. I suggest tab-completion.
Step #7: Test your OpenCV 4 install on your Raspberry Pi
Let’s do a quick sanity test to see if OpenCV 4 is ready to go.
Open a terminal and perform the following:
$ workon cv $ python >>> import cv2 >>> cv2.__version__ '4.0.0' >>> exit()
The first command activates our virtual environment. Then we run the Python interpreter associated with the environment.
If you see that you have version 4.0.0 installed, then you’re now fully armed and dangerous + ready to perform computer vision and image processing.
A Raspberry Pi + OpenCV 4 project to get your feet wet
A while back, I was working hard on responding to PyImageSearch readers via comments, emails, and Twitter/Facebook/LinkedIn. I make a point of responding to as many incoming questions and comments as I can.
It was 4:30 in the afternoon and I was cranking away at the keyboard in a “flow” state.
But while I was typing away, something triggered in my brain that I was thirsty. Very thirsty.
So I took a quick break from the keyboard and went to the fridge to grab a tasty beer ?.
WTF?
All my beers were gone!
Who stole my beer?!
I grabbed some water instead and went back to the computer. I closed all correspondence windows and fired up a code editor/IDE (I like PyCharm).
I started tapping away at the keyboard again and sipping some water.
What was I building?
I was building a security cam with my Raspberry Pi which will catch people leaving/entering my apartment and opening/closing my fridge. I’ll catch that SOB stealing my beer next time!
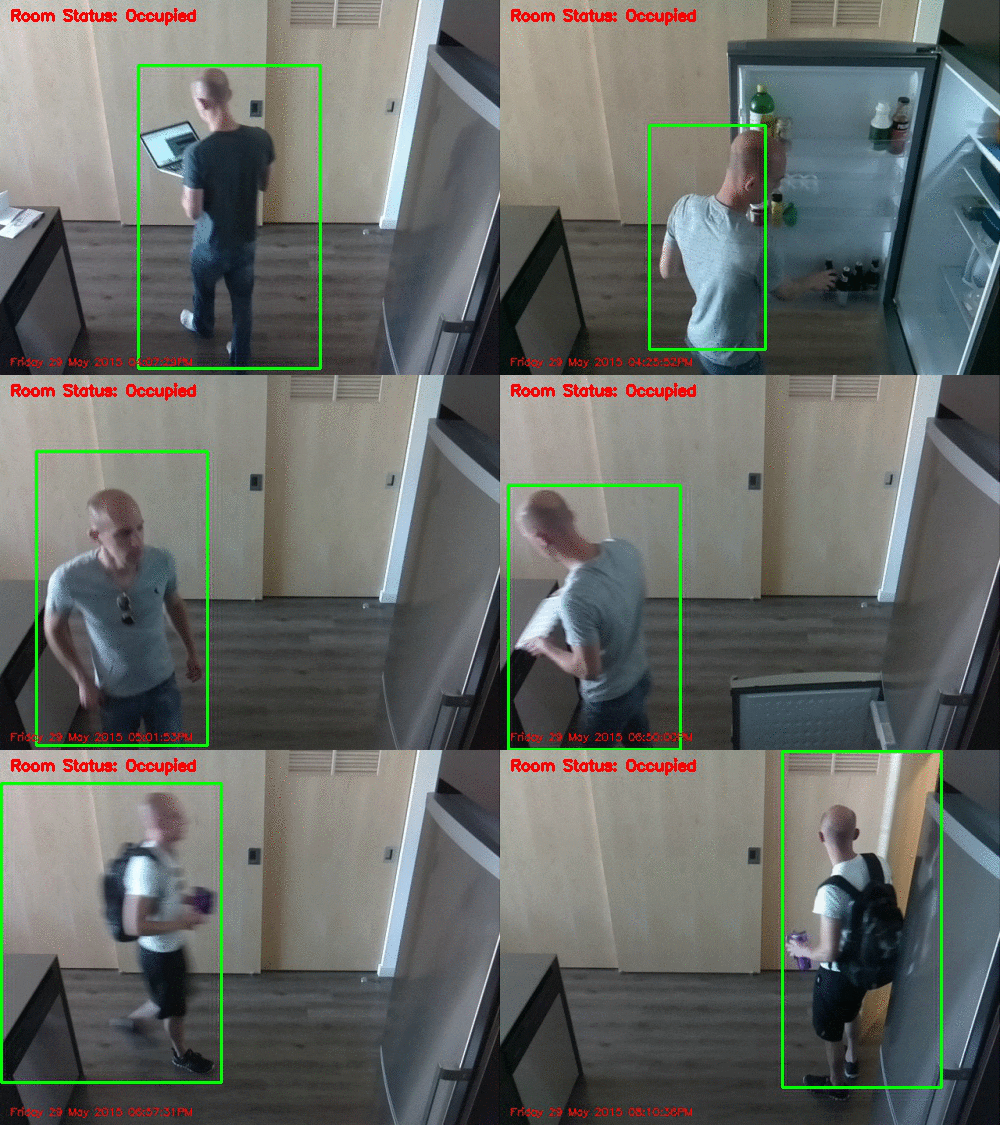
If you want to learn how to build a security camera with your Raspberry Pi and OpenCV 4, then I suggest you read the original blog post.
This project is relatively simple and will accomplish the following:
- Detects motion via background subtraction.
- Uploads images of intruders and other motion to Dropbox so you can review events later. All images are timestamped so you’ll know when someone was in view of your Raspberry Pi security camera.
Or if you’re savvy and want to grab the code right now, you can be up and running in a few moments after you paste your Dropbox API key in the config file.
To download this project, scroll to the “Downloads” section of this blog post and fill out the form.
You can download the zip to your ~/Downloads
folder and then fire up a terminal:
$ cd ~/Downloads $ scp pi-home-surveillance.zip pi@192.168.1.119:~ # replace IP with your Pi's IP $ ssh pi@192.168.1.119 # replace with your Pi's IP
Once your SSH connection is established let’s install a couple packages, namely the Dropbox API:
$ workon cv $ pip install dropbox $ pip install imutils $ pip install "picamera[array]"
From there, unzip the files and change working directory:
$ cd ~ $ unzip pi-home-surveillance.zip $ cd pi-home-surveillance
You’ll be presented with a directory structure that looks like this:
$ tree --dirsfirst . ├── pyimagesearch │ ├── __init__.py │ └── tempimage.py ├── conf.json └── pi_surveillance.py 1 directory, 6 files
Before you’ll be able to deploy the project, you need to edit the config file, conf.json
. Let’s quickly inspect it in our terminal using the nano
text editor (or vim
/emacs
if you prefer):
$ nano conf.json
You’ll be presented with a JSON dictionary that looks like this:
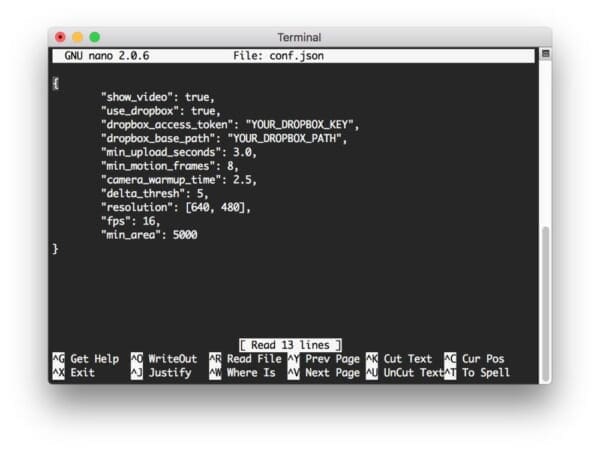
At this point it is important to edit the configuration file with your API key and Path. To find your API key, you can create an app on the app creation page. Once you have an app created, the API key may be generated under the OAuth section of the app’s page on the App Console (simply click the “Generate” button and copy/paste the key into the configuration file). The Path needs to be a valid path in your Dropbox file structure.
Note: Don’t share your API key with anyone unless you trust them!
For testing, you can leave "show_video": true
and connect an HDMI screen + keyboard/mouse to your Pi. Eventually you’ll want to set the value to false
and have your Pi run headless with few cables connected to it so you can hide it in the inconspicuously.
Once you get your project working, you can monitor the Dropbox folder in your web browser (you might need to refresh to check for images), or if you are syncing the folder to your laptop/desktop, you can monitor the folder there.
I highly recommend that you read the entire blog post as well.
Happy hacking with your Raspberry Pi and OpenCV 4!
Troubleshooting and Frequently Asked Questions (FAQ)
Did you encounter an error installing OpenCV 4 on your Raspberry Pi?
Don’t throw the little gadget across the room yet. The first time you install OpenCV on your Raspberry Pi, it can be very frustrating and the last thing I want for you to do is to end the learning process here.
If you really get stuck, don’t forget that the QuickStart Bundle of Practical Python and OpenCV + Case Studies comes with Raspberry Pi images which are pre-configured and ready to go. Images for RPi 3B/3B+ and RPi Zero W are included. These images can save you hours and days (yes it took me about 6 days to set up the RPi Zero W) of frustration.
If you have your heart set on figuring this out on your own, I’ve put together a short list of frequently asked questions (FAQs) and I suggest that you familiarize yourself with them.
Q. How do I flash an operating system on to my Raspberry Pi memory card?
A. I recommend that you:
- Grab a 16GB or 32GB memory card.
- Flash Raspbian Stretch with Etcher to the card. Etcher is supported by all 3 major OSes.
- Insert the card into your Raspberry Pi and begin with “Assumptions” and “Step 1” in this blog post.
Q. Can I use Python 2.7?
A. I don’t recommend using Python 2.7 as it’s rapidly approaching its end of life. Python 3 is the standard now. But if you insist…
Here’s how to get up and running with Python 2.7:
$ sudo apt-get install python2.7 python2.7-dev
Then, before you create your virtual environment in Step #4, first install pip for Python 2.7:
$ sudo python2.7 get-pip.py
Also in Step #4: when you create your virtual environment, simply use the relevant Python version flag:
$ mkvirtualenv cv -p python2.7
From there everything should be the same.
Q. Can I just pip to install OpenCV 4?
A. In the future, yes. Currently you’ll need to compile from source until piwheels has an OpenCV 4 binary available.
Q. Why can’t I just apt-get install OpenCV?
A. Avoid this “solution” at all costs even though it might work. First, this method likely won’t install OpenCV 4 for a while. Secondly, apt-get doesn’t play nice with virtual environments and you won’t have control over your compile and build.
Q. The mkvirtualenv
and workon
commands yield a “command not found error”. I’m not sure what to do next.
A. There a number of reasons why you would be seeing this error message, all of come from to Step #4:
- First, ensure you have installed
virtualenv
andvirtualenvwrapper
properly using thepip
package manager. Verify by runningpip freeze
, and ensure that you see bothvirtualenv
andvirtualenvwrapper
in the list of installed packages. - Your
~/.profile
file may have mistakes. View the contents of your~/.profile
file to see the properexport
andsource
commands are present (check Step #4 for the commands that should be appended to~/.profile
). - You might have forgotten to
source
your~/.profile
. Make sure you runsource ~/.profile
after editing it to ensure you have access to themkvirtualenv
andworkon
commands.
Q. When I open a new terminal, logout, or reboot my Raspberry Pi, I cannot execute the mkvirtualenv
or workon
commands.
A. If you’re on the Raspbian desktop, this will likely occur. The default profile that is loaded when you launch a terminal, for some reason, doesn’t source the ~/.profile
file. Please refer to #2 from the previous question. Over SSH, you probably won’t run into this.
Q. When I try to import OpenCV, I encounter this message: Import Error: No module named cv2
.
A. There are several reasons this could be happening and unfortunately, it is hard to diagnose. I recommend the following suggestions to help diagnose and resolve the error:
- Ensure your
cv
virtual environment is active by using theworkon cv
command. If this command gives you an error, then verify thatvirtualenv
andvirtualenvwrapper
are properly installed. - Try investigating the contents of the
site-packages
directory in yourcv
virtual environment. You can find thesite-packages
directory in~/.virtualenvs/cv/lib/python3.5/site-packages/
depending on your Python version. Make sure (1) there is acv2
sym-link directory in thesite-packages
directory and (2) it’s properly sym-linked. - Be sure to check the
site-packages
(and evendist-packages
) directory for the system install of Python located in/usr/local/python/
, respectively. Ideally, you should have acv2
directory there. - As a last resort, check in your
build/lib
directory of your OpenCV build. There should be acv2
directory there (if bothcmake
andmake
executed without error). If thecv2
directory is present, manually copy it into/usr/local/python
and then link the .so file to thesite-packages
directory for thecv
virtual environment.
Q: Why do I encounter a message about “Non-free modules” not being installed? How can I get the OpenCV non-free modules?
A: New in OpenCV 4, a special CMake flag must be set to obtain the non-free modules. Refer to Step #5 above and pay attention to the flag in the CMake command.
What's next? We recommend PyImageSearch University.
86 total classes • 115+ hours of on-demand code walkthrough videos • Last updated: October 2024
★★★★★ 4.84 (128 Ratings) • 16,000+ Students Enrolled
I strongly believe that if you had the right teacher you could master computer vision and deep learning.
Do you think learning computer vision and deep learning has to be time-consuming, overwhelming, and complicated? Or has to involve complex mathematics and equations? Or requires a degree in computer science?
That’s not the case.
All you need to master computer vision and deep learning is for someone to explain things to you in simple, intuitive terms. And that’s exactly what I do. My mission is to change education and how complex Artificial Intelligence topics are taught.
If you're serious about learning computer vision, your next stop should be PyImageSearch University, the most comprehensive computer vision, deep learning, and OpenCV course online today. Here you’ll learn how to successfully and confidently apply computer vision to your work, research, and projects. Join me in computer vision mastery.
Inside PyImageSearch University you'll find:
- ✓ 86 courses on essential computer vision, deep learning, and OpenCV topics
- ✓ 86 Certificates of Completion
- ✓ 115+ hours of on-demand video
- ✓ Brand new courses released regularly, ensuring you can keep up with state-of-the-art techniques
- ✓ Pre-configured Jupyter Notebooks in Google Colab
- ✓ Run all code examples in your web browser — works on Windows, macOS, and Linux (no dev environment configuration required!)
- ✓ Access to centralized code repos for all 540+ tutorials on PyImageSearch
- ✓ Easy one-click downloads for code, datasets, pre-trained models, etc.
- ✓ Access on mobile, laptop, desktop, etc.
Summary
Today we installed OpenCV 4 on our Raspberry Pi.
Compiling from source was paramount so that we could obtain OpenCV 4 since it isn’t possible yet to install OpenCV 4 via pip.
We then tested our install and deployed a Raspberry Pi as a security camera. This security camera will detect motion via background subtraction and upload pictures of intruders to Dropbox. You can read the full Raspberry Pi + home surveillance post here.
To stay up to date with PyImageSearch, be sure to drop your email in the form below!
Download the Source Code and FREE 17-page Resource Guide
Enter your email address below to get a .zip of the code and a FREE 17-page Resource Guide on Computer Vision, OpenCV, and Deep Learning. Inside you'll find my hand-picked tutorials, books, courses, and libraries to help you master CV and DL!
Sudeep
Hey Adrian, How come we dis not need to change the Swap size from the default 100 to the 1024 like we did in the other OpenCV installs on the Rpi
David Hoffman
Hi Sudeep, good catch. It is very important to change the SWAP to 1024 before starting the compile. I made this change for Adrian while he is on vacation.
Ted
Hi David.
I did everything like this post and got no errors. But in the end it does not know workon cv.should I enter workon cv in a new terminal or the same I did installation. I examined in both.
Please help me.
Thank u
Ted
Raspberrypi downloded python 3.7 so should I change #step6
marco
Hello Adrian, I followed step by step your beautiful post and everything went smoothly up to the Cmake -D where in the end I received an error, thinking it was not very important I continued the installation but when I typed Make -j4 not the He found … where did I go wrong?
(cv) pi@raspberrypi: ~/opencv-4.0.0-alpha/build $ make -j4
make: *** No specified target and no makefiles found. Stop."
David Hoffman
Hi Marco, this is because you did not rename your directories as specified in Step #3. It isn’t your fault — due to OpenCV 4 Alpha releasing on September 20th while Adrian was on vacation, and considering Adrian wrote this post about 3 weeks ago, this post needed a last minute update (from cloning the Git repo to downloading the zip archives). I updated the post to show the need for renaming the directories. Simply rename your
opencv-4.0.0-alpha
directory toopencv
andopencv_contrib-4.0.0-alpha
toopencv_contrib
. Then delete the build directory and re-run CMake and continue to follow the instructions. Sorry for the mixup and thanks for bringing it to our attention!Filippo Pesavento
Hi 🙂 I got the same error, though I renamed correctly all folders. Seems to be an error from the previous step, using cmake.
Cmake does not say “Configuring done” and “Generating done”, but it throws an error log file and I cannot figure out why. Any suggestion?
PS. I followed the tutorial step by step, even if I am very familiar with Linux and bash. I’m running the latest version of Raspbian Lite, if that can help.
pag
I have the same problem. Did anyone find a solution to this or can name the issue?
peru
Hi! as i faced this problem also, i found a solution that worked for me.
i changed the -D OPENCV_EXTRA_MODULES_PATH=../../opencv_contrib/modules \ with relative paths instead of the “~”. then the cmake process finishes with out any errors
hope this helps
Linus Goh
Hi Adrian, David,
I’m an active member of the Raspberry Pi community so I think I can say a word or two about that 🙂
1. Step #1 should NOT be necessary, as Raspbian will do this step *automatically* on the first boot and reboot afterwards, which is since a long time BTW. Even though it might not yield any errors doing it a second time, I see no improvement in it, whatsoever.
2. Even though recommended by the foundation itself, in the German Raspberry Pi forum we have commonly reports of strange issues caused by NOOBS installs of Raspbian which DO NOT OCCUR when doing a direct flashing of Raspbian onto the SD card, with the same Pi, PSU etc.
It’s not entirely clear what causes this, but IMO NOOBS is to be recommended with caution, especially to completely new users. They should be able to use Raspbian installed directly as it’s the next step after NOOBS for most people anyway.
Cheers!
Abhishek Thanki
Hi Linus,
Interesting on Raspbian automatically expanding the filesystem. I recently did an install and had to do it manually.
Also, I think the only reason why Adrian recommends NOOBS for beginners is since it’s recommended by the foundation itself. But thanks for your input on it!
Alexander Holsgrove
I think if you’re interested in learning about OpenCV and other articles by Adrian, then you’re probably more likely to be comfortable working on Raspbian rather than NOOBS!
Johan Smit
Hi,
I have done embedded work on Arm processors (STM32F1 and F4) in C without operating system, but no Raspberry Pi.
Please help me with information.
I would like to use the unit as a type of trail camera, with animal recognition and discarding some photos but saving others according to type of animal.
This means that the processor must mostly sleep, and be woken up by passive infrared detector.
The question is: Will the Raspbian operating system be able to handle this wakeup to take photos in a short time, eg., milliseconds?
I have seen Raspberry Pis boot up, and that is totally useless, minutes rather than milliseconds.
Any information will be greatly appreciated, thank you
Johan Smit
Denis Brion
w/r to RPi starting in minutes : consider a RPi as … a PC (libreoffice, wolfram are x86 ports to ARMs) and notice it boots about 10 100 times faster than Windows (part of Windows booting is hidden : there is a desktop for marketing “reasons”, but difficult to use).
There is a thing RPi is very bad: it is what PC have, named ACPI (ask wikipedia). RPi has no -or very lousy and buggy- sleep options. Do not worry : nanoPi (chinese “clones”, with better HW design, octo cores – are worse in this domain,… I am af asking a raid you asking a feature where RPis are at their worst.
Denis Brion
Three things worry me :
a) make -j’ is unnecessary; make (without j) will compile 4 times slower… and keep RPi somewhat cool (BTW, at least in hot countries… or in summer, an heatsink+ fan are useful/necessary when compiling for hours)
b) one can remove the tiny swap partition and add an external swap file on a USB disk.
Drawbacks :it is slightly slower; one needs to compile linux-utils (IIRC) for a classical manipulation)
Advantages : repeated writes on a flash device ruins it…. and swap is made to allow repeated writes. No need to remove libreoffice (suppose one needs it) or wolfram. One can get rid of the 100M nanoflash (eats a little disk swap).
AFAIK (from reading last year dphys git) , dphys is a warpper around sawpon and swapoff… (parts of linux-utils: I prefer using century old commands to 1) make a swap file (not partition); 2) desctivate the 100 M builtin partition; 3) actvate the new swap file)
c) alpha versions seem … very new. What is the advantage over a ocv3-x version (btw: pip installing a 3.x version worked very fast and comfortably, as you showed it last week)
Abhishek Thanki
Hi Denis,
a) I think using make -j`x` is a personal choice and I don’t really see any issues with it, most people would go for speed on any given day. (Also, having lived in a country where temperatures go upto 50C in summer, we use A/Cs, and it’s pretty cool inside. 🙂 )
b) Interesting and theoretically speaking it makes sense. Definitely something worth a try.
c) Advantages: optimizations, C++11 support, more compact modules, and many improvements to the Deep Neural Network (DNN) module.
Denis Brion
Hi Abishek:
heat issues are not a worry for computers between Syria and North India: as people know one can reach 50C, one has an air conditioner. OTOH, in West Europe, heath spells are rare enough, thus most people do not have air conditioners.
I have a nanoPi m3 (octocore) and just an airshield -no fan : is noisy- and tried with 8 cores (compiling xtensa-gcc : does not need swap extension: it lasted 15 minuts with heatsink before crushing: using 3 cores was OK).
nanoPi m3 are very much like RPi (less support; use debian stable instead of debian unstable ; software compiled on a nanoPi is likely to work -ocv does- once newer (but compatible) libraries are installed. same RAM -1G-: worse temperature scaling, IMO).
I managed to have ocv4 alpha installed (had to remove _xfeatures2d and stiching, to avoid issues) using your script the following way:
a) I made a huge (1G) file in ~/ext/catalogue/gros using dd.
597 sudo mount /dev/sdb2 ext # ~ext is mount point /directory
598 ls ext
599 ls ext/catalogue
609 dd if=/dev/zero of=ext/catalogue/gros bs=1k count=1024k
610 sync
611 ls -lh ext/catalogue/gros
b) as “gros” cannot be used as a swap file as it is, it must be preapaired. single issue is that some parts of util-linux (ask wikipedia for util-linux)are not packaged , as, among them, the one I neded, mkswap, was not packaged -according to Murphys laws- and I had to compile them from sources (got from https://mirrors.edge.kernel.org/pub/linux/utils/util-linux/v2.15/) the following way:
619 tar xvf cle/utilLinux.tar.gz
620 cd util-linux-2.26-rc1/
621 ./configure
622 make -j4 # is short to compile… wonot heat that much
623 ls # what did I do?
624 ./mkswap ~/ext/catalogue/gros # no need to install, it is just to prepare a swap file
Then, it is straight forwards (on a RPi, one should remove existing wap partition with suso swapoff -a )
625 sudo swapon ~/ext/catalogue/gros
626 history >~/swapstoria # to remember … for next time or pyimagesearch…
Then, compilation (with one core enabled) was comfortable (almost no library needed swap : makes a difference with ocv3 IIRC and seems a nice side of ocv4; only one was python bindings which needed about 400 M swap + exiting RAM -but desktop remains usable for reading docs)
Alexander Holsgrove
After running the build and then the make on a Raspberry Pi 3, I can’t link the .so file as it’s not there. I do have /usr/local/lib/python3.5/dist-packages/cv2.cpython-35m-arm-linux-gnueabihf.so and also /usr/local/lib/python3.5/dist-packages/cv2.cpython-35m-arm-linux-gnueabihf.so
What have I done wrong please?
Adrian Rosebrock
You have not done anything wrong. Use the filename that you have found.
Matteo
Hello to all,
I am a beginner and I have some problems with the translations, I tried to document before writing but probably it did not happen to anyone that after making make -j4 without errors and verified the correct directories of the python and Numpy interpreter launching the python command then gave “importError: no module named CV2”
I think it’s a path problem, but I do not know how to get it back, can you help me?
Adrian Rosebrock
Hey Matteo, I would recommend you read the “Troubleshooting and Frequently Asked Questions (FAQ)” section of this tutorial as I provide answers to the most common reasons why you may not be able to import the OPenCV bindings.
Alexander Holsgrove
The symlink was wrong for me. The file is “cv2.cpython-35m-arm-linux-gnueabihf.so” and not “cv2.cpython-35m-x86_64-linux-gnu.so”. The whole command therefor “ln -s /usr/local/lib/python3.5/site-packages/cv2.cpython-35m-arm-linux-gnueabihf.so cv2.so
“
Pranav Lal
Hi,
I completed the installation. I had to interrupt make -j4 once when it was stuck at 99%. I ran make again without any parameters. I have followed the rest of the guide including creating the symbolic link. However, when I import cv2 python 3.5 is unable to find the file. I have created a virtual environment named cv4 and have followed the rest of your instructions without problems. What data should I share to help us diagnose the problem?
Adrian Rosebrock
Take a look at the “Troubleshooting and Frequently Asked Questions (FAQ)” section of this tutorial as I discuss the most common reasons why the import will fail.
carlo santos
hi adrian how can i fix the error name module cv2, when i write the code $python, and type import cv2 the system will not determine the module name cv2 thanks alot
Adrian Rosebrock
There are many reasons why that could happen. I have documented the most common reasons in the “Troubleshooting and Frequently Asked Questions (FAQ)” section of this post.
Cameron
Hi,
I have tried following this tutorial to compile opencv 4 for the orangepi zero board, however when I run the cmake command it does not complete due to errors. Looking in the error log it says:
Regex: ‘command line option .* is valid for .* but not for C\+\+’
Any ideas why this may be happening?
marco
hello Adrian, I would like to understand one thing, why on the Raspberry even if you follow the post to the letter then OpenCv does not install as it should, even repeating the installation several times then you always find yourself with the same problem! You know I thought maybe if you put a video with all the steps of the installation maybe it could help beginners like me to understand where have wrong or at least see where there are differences in the installation.
However, I thank you because you are doing a great jo
Adrian Rosebrock
I’ve done a few Raspberry Pi + OpenCV install guide videos. I’m considering doing one for this post as well but I wanted to wait until OpenCV 4 is officially released.
Lee
hi , have anyone of you here faced this problem?
the build of opencv hang/not responding when come to 98% progress.
any suggestion/comment?
Adrian Rosebrock
Did you increase your swap size as recommended? If so, try:
1. Deleting your “build” directory
2. Re-creating your “build” directory
3. Re-run “cmake”
4. Start the compile but this time only compile with a single core via “make -j1”
It sounds like your Pi is running into a threading/race condition which is causing the problem.
Chris Pinkenburg
Hi Lee,
at the end of the compilation using -j4 you run two linking processes – each taking 80% of the available memory and the raspberry pi swaps itself to death achieving nothing (run “top” in a terminal window, hit M to sort by memory and you’ll see two large compilation processes which do not get any significant cpu).
What worked for me is to ctrl-c the ongoing build and then run make without -j4. There is enough memory for running one process. You do not need to run a make clean, make will pick up where you left it. This way you still get the benefit of running -j4 which is a lot faster
Andrew Baker
I was able to successfully install OpenCV 4.4.0-alpha. However I had some initial issues.
1. The first attempt failed, RPI locked up. I had the swap space at 1024MB and used the make -j4 command. While running the RPI was very hot (80 – 85C).
2. I deleted my build folder and tried again. This time I was met with the error:
cmake fails to determine the bitness of the target platform.
Solution:.
1. Within an old post I found a slightly different cmake command. This was the modified command I used:
cmake -D CMAKE_BUILD_TYPE=RELEASE \
-D CMAKE_INSTALL_PREFIX=/usr/local \
-D OPENCV_EXTRA_MODULES_PATH=~/opencv_contrib-4.0.0-alpha/modules \
-D ENABLE_NEON=ON \
-D ENABLE_VFPV3=ON \
-D BUILD_TESTS=OFF \
-D INSTALL_PYTHON_EXAMPLES=OFF
-D CMAKE_SIZEOF_VOID_P=4 \
-D BUILD_opencv_python3=TRUE \
-D PYTHON3_LIBRARY=/usr/lib/arm-linux-gnueabihf/libpython3.5m.so \
-D BUILD_EXAMPLES=OFF ..
2. I executed this with only cmake. I didn’t use -j4.
3. It took approximately 4 hours, but the build complied and installed successfully.
Adrian Rosebrock
Thanks for sharing Andrew! And congrats on getting OpenCV 4 installed on your Pi.
Gaurav Shirke
[ 95%] Building CXX object modules/python2/CMakeFiles/opencv_python2.dir/__/src2/cv2.cpp.o
stucked at 95%
tried with make -j4 which stuck at same line but with 98%
with makt -j1 at 95%
and with make at 95%
Gaurav Shirke
problem solved
Adrian Rosebrock
Congrats on resolving the issue, Gaurav!
devashish
same here . How did you do it?
Adrian Rosebrock
Did you increase your swap size like I recommended in the tutorial? Make sure you do so. Alternatively, you can pip install opencv.
Maciej Bartoszek
hello Gaurav,
got same problem here.
How did you solve it?
Adrian Rosebrock
Increase your swap size to 2048MB. Then compile with just “make” instead of “make -j4”
Sai
Hi Adrian,
I followed all your steps until make -j4. It was stuck at 99% for a long time. Restarted make and now currently keeps stopping at 98% how many ever times I try. I have already increased the swap size to 2048MB. Please let me know if there is any other step i am missing.
Adrian Rosebrock
Try using only a single core for the compile via just “make” (no “-j4”).
Gaurav Shirke
eveything is okay but then this error occured
ln: failed to create symbolic link ‘cv2.so’: File exists
Followed all steps open cv2.so file is not there in ”/usr/local/lib/python3.5/site-packages/”
another file is present their which is named as ”cv2.cpython-35m-arm-linux-gnueabihf.so”
Arul
Step # 6 references incorrect lib? I see only ARM version, not x86. I had to do this instead.
ln -s /usr/local/lib/python3.5/site-packages/cv2.cpython-35m-arm-linux-gnueabihf.so cv2.so
Adrian Rosebrock
Hey Arul, I’ve updated the tutorial with the path most readers are getting. I suggest other readers use tab completion to derive the correct file name.
murksiuke
hello, after the cmake the output shows the interpreter as python2.7, even though i followed the commands on the guide. not sure what to do
Adrian Rosebrock
Are you referring to the interpreter used for the compile? If so, ignore it — that’s a bug in the “cmake” output. As long as your “Python 3” section looks like mine you can proceed.
murksiuke
Thank you for the reply, i redid the whole thing (actually got a larger sd because of space problems) and everything went fine. Thanks for the guide!
Adrian Rosebrock
Fantastic, I’m glad it worked for you! 🙂
Ahmed Raza
having an error while cmake
Run CMake for OpenCV 4
configuration in complete, errors occured!
Adrian Rosebrock
Take a look at your output of “cmake”. It will tell you what the error is.
Francisco
Hi, thanks for the detailed tutorial.
I faced an issue when creating the link in step #6, the output .so file had a different name “cv2.cpython-35m-arm-linux-gnueabihf.so” instead of “cv2.cpython-35m-x86_64-linux-gnu.so”, so I had to rename it (this was already pointed out in your previous tutorial for installing OpenCV 3).
Adrian Rosebrock
Thanks Francisco. I’ve updated the post but I would encourage readers to use tab completion to correctly determine their output filename.
Adrian Rosebrock
Thanks for sharing, Victor. I’ve updated the blog post. I also recommend readers perform tab completion so correctly determine the filename.
Charlie
Hi Dr. Adrian. As a beginner, I wonder if it’s possible to have both versions of OpenCV (3.x and 4.x) installed on a Pi. Can I use a virtual environment (VE) for each version? If so, how can I do that? Is it covered in any blog post? Besides, how can I update an Environment with a more recently Python version when one becomes available? Can I do the same with a new OpenCV release in a VE? Thank you.
Adrian Rosebrock
Yes, you can have multiple OpenCV versions on your system. I like to:
1. Create a new Python virtual environment for each version of OpenCV
2. Compile OpenCV but only sym-link in the OpenCV bindings from the “build/lib” directory (I keep a “build” directory for each version of OpenCV I compile)
Steven
Adrian
Thank you for the post really appreciate it. I built OpenCV 4.0 on new Pi3 Model B+ booting off mSATA drive with you can do with the new Model B+. I was monitoring the build with -J4 switch with free -h and the process actually used up the swap file and stalled in latter stages of the build, (99% stage). Increased the swap size and was able to make it through that late build stage and complete. Its possible that some of the others reading the comments hit the same situation. Quick question why does your version show 4.0 and mine show 4.0 alpha on the check version?
import cv2
>>> cv2.__version__
‘4.0.0-alpha’
>>> exit()
Adrian Rosebrock
Hey Steven, thanks for the tip on increasing swap size further. Compiling only only a single core just should resolve the issue as well.
Regarding your question, it looks like you compiled OpenCV using the official alpha version of the library. When I compiled OpenCV it was with the pre-release which did not have the “alpha” tag, hence the discrepancy.
Denis Brion
AFAIK :
a) “only” last stage needs swaps, if one uses a single core (else, one has to add memory consumptions of each process + some RAM to have parallel processes to communicate)
b) last stage is a single process build (makes a huge *.so with a lot of libraries, ready to be called by python): it needs less than 1G swap (total less than 2G RAM+ virtual RAM : if RPi had 2 G RAM, … no swap would be needed.
Is it possible to … cross compile for RPi (I sometimes use nanoPi -debian stable- to make binaries for RPi -debian unstable-: *.so are compatible (the other way, it would not), though certain optimisations cannot be caught. Cross compiling goes further : one uses an x86 PC -some have tons of RAM, lets us say 4 G- to make *.so -and executables; they are sent to a RPi (arduino cross compiles for … avrs, say) : hertaville used it for <=512 M RPis http://www.hertaville.com/development-environment-raspberry-pi-cross-compiler.html
It might be difficult to install on the first time, but much faster (and one often needs a PC … to put on a SD disk the Rapsbian image : at least, once…). (processes using swap have unpredictable delays : depends on the nature and state of the swap partition/file ; a process can be seen as hanged and continue at a very slow pace…. leading people to kill it : cross compiling is likely, once setup -this is a difficult task- to avoid all of these troubles)
Adrian Rosebrock
Cross-compiling OpenCV for the Pi has been a royal pain in my ass. It’s not a nut I’ve been able to crack yet, unfortunately 🙁
m
Hello! Is there a reason for installing inside the “cv” environment? I have seen guides that skip that step, and in the end you can call “import cv2” without a “workon cv” command beforehand.
Adrian Rosebrock
Using Python virtual environments is a best practice in Python development. They are certainly optional but heavily recommended. If you’re new to Python virtual environments or how they work be sure to read this post.
kr
Hi, thanks for all the tutorials!
I understand the reasons for a virtual env when working in python, but how does it impact this build? Does building in this venv mean it might not work in another? What if I plan to write C++ application with OpenCV and won’t use Python, should I build outside the venv? I saw another blog say don’t use a venv if you want to “make opencv installation public, to be accessible across all virtual environments.”
My best guess is that the build process needs a specific python install, and doing it in a venv assures that. But beyond that, it should have no effect on the OpenCV built output. Does that sound right?
One more question: if I ran cmake in the venv, but then rebooted and forgot to `workon cv` before running make -j4, will that cause problems? Cause I just did that. Ops!
Thanks!
Karl
Adrian Rosebrock
If you want to use C++ that’s fine — this tutorial will give you the C++ headers installed. To answer your other question, provided you were in the “cv” virtual environment when running “cmake” it does not matter if you are in the “cv” environment when running “make”. The “cmake” command builds the configuration while “make” does the actual compile. As long as “cmake” has been run in the “cv” environment you’ll be fine.
Phil Desrosiers
I’m getting “zsh: no matches found: libcanberra-gtk*” when I try to apt-get libcanberra-gtk* .
As far as I know, my sources are up to date. Do I need to add another apt source somewhere?
Phil Desrosiers
I’m getting an error while attempting to make. Do I need an EVEN LARGER swap file?:
virtual memory exhausted: Cannot allocate memory
Adrian Rosebrock
Unfortunately it seems like you may need a larger swap file.
Ahmed Raza
Dear Adrian
kindly resolve my issue i am having an error “ImportError: No module named ‘picamera’ ”
while running a python file.
Adrian Rosebrock
You need to install the picamera Python library:
$ pip install "picamera[array]"
Rion Ahl
Adrian, I have a problem, with the import cv2 as described in FAQ, but as I am a beginner, I dont really understand what to do? Could you please help?
Adrian Rosebrock
Hey Rion, unfortunately without physical access to your Pi it is hard to determine where you would have made a mistake. It’s okay if you are a beginner, but you need to take the time to educate yourself on how the command line argument works, including file paths. Again, it’s impossible for me to guess what step may have tripped you up without more information so I suggest you take it slow and work through the FAQ.
wenkang
Hi Adrian,
Can the OpenCV 3 and 4 coexist in Raspberry pi ? Or do I have to remove one if want to install the other?
And if not, how to configure and specify the one that I want when running one python script ?
Thanks.
Adrian Rosebrock
Both can coexist on the same machine, just create a separate Python virtual environment for your OpenCV 4 install. Other than that, no other changes are required.
Jim
Hey Adrian, I made it most of the way through this tutorial…while compiling opencv, my Pi stops at [ 98% ] Built target opencv_perf_tracking. I expanded the swapfile size to 1024…there’s no error message, just no more progress. Should I close the terminal and start from the compiling step again? Should I make the swapfile bigger?
elroy
Did you ever find out who stole your beer?
jim421616
Hi, Adrian, I posted a comment yesterday about my Pi not responding during the compile. I left it running overnight and when I came back to it, it had run out of memory. I increased the swapfile size to 2048 Mb, ran the compile again, and it works now. Thanks for your outstanding tutorials!
Adrian Rosebrock
Awesome, congratulations on getting OpenCV installed on your Pi!
devashish
Hi adrian . i have been trying to install opencv from past 4 days. I have gone through all versions from 3.3.0 to the 4.0 . Currently in this tutorial the cmake compiled till 98% but has been like this since 1.5 hrs . This opencv thing has made be furious . Please suggest something x(.
Adrian Rosebrock
Have you tried (1) increasing your swap size and (2) compiling using just a single core? What about doing a pip install of opencv?
Emilio Meza
Hi Adrian! I followed the steps and everything worked well on the virtual environment but, what if i want to use opencv 4 on python 3(IDLE)? there’s an easy way to do it without starting again with a different process?
Adrian Rosebrock
If you are using the same Python version for a different environment you can simply copy your cv2.so bindings into the new site-packages directory for the environment. Otherwise you will need to recompile OpenCV for that specific Python version number. You may also be able to pip install opencv.
Aly Rofie
Hi Adrian, Thanks for your tutorial. But i got some problem when i’m on step 5, i can’t do “make” it says (cannot find makefile. stop), and also i can’t move into opencv directory, can you tell how to fix this?
thank you
Adrian Rosebrock
Your “cmake” directory likely excited with an error. Go back to the “cmake” step and investigate the output to find the error. Once “cmake” executes without error then you can run “make”.
David Monk
I installed opencv-4.0.0-beta last night; I noticed the beta version was available so I downloaded the source and compiled it instead of the alpha. Seems to have compiled successfully.
Adrian Rosebrock
Awesome, congrats on getting OpenCV 4 installed on your Pi, David!
Darcy
Hey Adrian,
Love the tutorials. You are really the main resource for opencv on raspberry pi. I’m hoping you can help me with a problem I have. I’ve gone through the tutorial 3 times now, and no matter what I do during step 5, I cannot get the interpreter, or numpy to point inside the virtual environment. What am I doing wrong?
Adrian Rosebrock
Hey Darcy, are you sure you are in the Python virtual environment when running “cmake”? Unfortunately without having physical access to your Pi I’m not sure what the issue may be. Don’t worry though, OpenCV 4 will soon be released and then you’ll be able to use pip in install opencv.
balaji
hi adrian,
Thanks for your post,,,i follow your steps but when make -j4 command running my code gets hanged at 98% ,,i tried 3 times even it doesn’t cross 98%,,,how to resolve this issues,,,,,
Adrian Rosebrock
It sounds like your Raspberry Pi is frozen. Delete the “build” directory, re-create it, re-run “cmake”, but this time run “make” without the “-j4” option. The compile will take longer but your Pi shouldn’t lock up.
Mark
This code does not run “as is” with the current Raspberian
https://www.raspberrypi.org/downloads/raspbian/
Version:November 2018
Release date:2018-11-13
Kernel version:4.14
and with OpenCV 4
The problem seemed to be two fold: It installed for Python2.7 and never could find Python 3 (per the instructions) and was missing:
sudo apt-get install libatlas-base-dev
sudo pip install setuptools
FYI
Adrian Rosebrock
It sounds like you created a Python 2.7 virtual environment instead of a Python 3 virtual environment. Can you check your Python virtual environment version?
Austin B
Thank you so much for this tutorial! I was able to get OpenCV 4.0.0 (official release now, no longer at pre-release) built against Python 3.6.7 on the 3 B+ in about half a day (using only “make -j2”, because I was afraid of overheating, and I was going to let it run overnight). Your instructions worked like a charm 🙂
Adrian Rosebrock
Congrats on getting OpenCV 4 installed on your Pi, Austin!
Chris Pinkenburg
Hi Adrian,
great tutorial, made installing opencv a cut and paste operation. opencv 4.0.0 is now out and I just installed it. One thing which has changed compared to the alpha version is the location of the python cv2 library. I found it in /usr/local/python/cv2/python-3.5/cv2.cpython-35m-arm-linux-gnueabihf.so, not as your tutorial suggests in /usr/local/lib/python3.5/site-packages/cv2.cpython-35m-arm-linux-gnueabihf.so
Adrian Rosebrock
Thanks Chris — this guide was written before OpenCV 4 was officially released. OpenCV 4 was officially released last week so I’m testing out all the install instructions and updating as necessary 🙂
xiheng
Great tutorial. I’m using Buster /usr/local/lib/python3.7/site-packages/cv2/python-3.7/cv2.cpython-37m-arm-linux-gnueabihf.so is the location.
Tom Foltz
When I get to this point, I’m confused on what to do. I’m a relative newbie
Using a terminal text editor such as vi / vim or nano , add the following lines to your ~/.profile :
When I enter the following: sudo nano ~/.profile
I seem to have a problem. Maybe I don’t need sudo. I think the ~/ takes me to home, so what is the file I’m editing, “.profile” is not valid.
Tom Foltz
I’m in this section:
Make use of virtual environments for Python development
Adrian Rosebrock
No, you do not need “sudo”. Use just “nano ~/.profile” so you are editing the .profile file of the “pi” user.
Ziad Alexander
Awesome tutorial. I am building a drone with an IR camera using openCV. But PLEASE for the love of all things holy. REMOVE the dollar signs ‘$’ from your shell lines. They are beyond annoying and serve no purpose. I still have no idea why people still do that.
Adrian Rosebrock
They do serve a purpose. The “$” indicates that you are at the command line executing a command versus opened up a text file for editing, etc.
Roy Georgius
hi, im stuck while in process make -j4 in the line 100% building CXX object module/python3/CMakeFiles/opencv_python3.dir/__/src2/cv2/cpp.o can you help me??
Adrian Rosebrock
It sounds like your Raspberry Pi has hung. Stop the compile, delete your “build” directory, re-create it, and re-run “cmake” and “make”, but this time increase your swap size to 2048MB.
Kurt Hoffmann
Hi,
i just had the same problem during the last two days.
Please check the effect of changing the “CONF SWAPSIZE=2048” in the dphys-swapfile using the “free -m” command before and after stopping and restarting the process.
Does anything change?
Forcing a swapfile of defined size (blocksize and blocks copied) might do the job:
dd if=/dev/zero of=/var/swap.img bs=1024k count=1000
mkswap /var/swap.img
swapon /var/swap.img
Adrian Rosebrock
Thanks for sharing, Kurt!
Chris Foley
I think my pi has stalled. I am at mostly 100% but the command prompt won’t come back. This is a B 3+ with swap file expanded to 2048 as specified. The compile was done with the -j4 switch. This is a BRAND NEW Pi and a brand new install. I got a bunch of warnings about clock skew and some about parameter passing being changed in GCC 7.1.
After a lot of retries, I found that I was having some intermittant network issues. So I went bakc to a physical connection. I had some trouble figuring out why I could not switch to my cv environment locally. After editing my .bashrc file, I was up and recompiling.
I would like to ask about the GCC 7.1 warnings. Will this be updated soon? GCC is now at 8.5?
Adrian Rosebrock
I can’t comment on the GCC warnings without seeing what they were but regarding the Pi looking up, try using only a single core when compiling:
$ make -j1
That should, ideally prevent the Pi from locking up.
Chris Foley
Clearly I am having issues. I keep missing steps. Forgetting to change to CV and so forth. I have removed the build directory several times now and finally have a new compilation running under CV directly and not limited by my sporadic network issues. I will let this run this morning and hope that I can come home to a new compile. I still worry about “failed” errors in the build cycle. Several items were marked this way. Do I need to post those are is it normal to see a few items marked this way? Seems fishy to me but I do not know any of details of this build.
Adrian Rosebrock
It’s totally normal to see the “failed” message in the “cmake” output. OpenCV has A LOT of different configurations. The “cmake” script is just checking for various configurations and reporting “failed” if it cannot find a given configuration — it’s nothing to worry about.
Naveen
Hi Adrian,
First of all a pretty comprehensive and well compiled tutorial.
OpenCv Intsalltion on my pi3 B+ has been a nightmare for me. First try it got hung up , Then i had to restore my pi from backup . The Second time i tried from some other method .This time it went thru’ successful but my cv2.so got listed under /home/pi and i could’t do the sym-link . I am now going to try it for the 3rd time from this link . Hopefully it works out fine . Any tips that could help me out .
Adrian Rosebrock
Here are my suggestions:
1. Increase your swap size from 1024MB to 2048MB
2. Compile with only a single core (
make -j1
)Both of those will help the Pi from locking up.
As for your sym-link issue that just sounds like you were in the incorrect directory when creating the sym-link. Try again but this time make sure you’re in the “site-packages” directory.
Leandro Boari
I followed the steps and on my Raspberry Pi 3B is stopped here:
[100%] Built target opencv_perf_stitching
Can someone help me?
Adrian Rosebrock
It sounds like you Pi has locked up. Try increasing your swap size to 2048MB and compiling with only a single core (i.e., “make -j1”). The compile will take longer but it should prevent the Pi from locking up.
taufikmas
same with me..i will try make -j1.
galile
Hi Adrian,
When I compile opencv, it’s being 100 percent and I got no error, but the command line doesn’t come to console,its not understood it compiled or not. I mean I can’t enter new command. How can I figure out?
Adrian Rosebrock
Can you still type via your keyboard or use your mouse? Is your Pi locked up?
Florin
Hi Adrian, I have a probelm with this error
ln: failed to create symbolic link ‘cv2/cv2’: Permission denied
Adrian Rosebrock
What directory are you when you try to create the sym-link?
paul
In “Run CMake for OpenCV 4” run those commands 1-at-a-time. THey do not work in one big copy/paste.
Shashank
How do I install matplotlib, scikit, imutils etc after doing this procedure? Can anyone please help. And after installing this there is only 300MB left , I have uninstalled libre office , Wolfram engine etc
Adrian Rosebrock
You can use pip to install them:
$ pip install imutils matplotlib scikit-learn
Calum
Hi Adrian,
I am trying to install openCV without a virtual environment and for python 2.7. This is due to some additional equipment that I’m using that requires installation outside of a virtual environment and is only compatible with python 2.7. I have previously installed openCV with python 2.7 following your tutorial, but this was done in a virtual environment.
Now that I am trying both python 2.7 and no virtual environment, I am struggling to successfully install openCV. I am able to complete the build and install steps successfully, but when I try to import cv2 i get the error ‘ImportError: No module named cv2’.
Is there anything different I must do to install openCV in this way? How do I go about successfully importing cv2?
Thanks
Adrian Rosebrock
If you can skip the Python virtual environment, that’s not a problem. The same goes for the “Troubleshooting and Frequently Asked Questions (FAQ)” section of the guide, just be sure to check the “site-packages” directory of your system install of Python 2.7. Please keep in mind that the PyImageSearch blog is now officially Python 3+ so my Python 2.7 support moving forward will be fairly limited.
Geoff
Thanks for the tutorial. I was able to install OpenCV4 on my RaspPi 3. I tried -j4 which got mo to 100%…then it seemed to hand. I started over with -j1, left it for 2 hrs, and it finished.
Now that that works, I am trying to import this into Python 3, but am having trouble. When I enter “import cv2 as cv2” into Python 3, I get this error:
“ImportError: No module named ‘cv2’
Am I missing something?
Adrian Rosebrock
Make sure you refer to the “Troubleshooting and Frequently Asked Questions (FAQ)” section where I discuss most of the reasons why that may happen.
Hayat
hi i think that i solve this issue by using python3 instead of just python before you import cv2
i got it to work that way. hope this help you out
LeninGF
Hello everyone …. Thanks to author for guiding in installation. It worked. However I am wondering if conda could be used, since I am kind of more comfortable with that.
I have a question. I followed the instructions but when I start up the Raspberry Pi I cant enable the virtual env cv from command line. I always have to run the command source ~/.profiles and then I can do workon cv….. Is there a way to fix this? Did I do something wrong?
Adrian Rosebrock
You could use the conda environment if you wanted but it gets tricky to correctly supply the conda Python paths if you’ve never done it before. I only recommend doing it if you have good experience debugging Python paths.
As far as your question goes, the
source ~/.profile
command only needs to be executed once per terminal session. That is normal.Montel Hudson
When I open a new terminal to check if If my cv is working and I enter workon I get.bash: workon: command not found, why is that happening I followed everything step by step
Adrian Rosebrock
It sounds like you have not installed virtualenv and virtualenvwrapper properly OR you have not updated your .profile correctly. Double-check those steps.
Jaydip Bari
Hey there ,
I have successfully installed opencv4. But now the problem is that I want to start my python script on raspberry pi on startup and it seems that I cannot enable virtual environment at startup. Please guide me how should I enable virtual environment and start my script. Please reply me with my email id.
Adrian Rosebrock
Make sure you refer to the “Troubleshooting and Frequently Asked Questions (FAQ)” section where I include detailed instructions on how to debug not being able to find your Python virtual environment. My guess is you’re forgetting to use the
source ~/.profile
command beforeworkon cv
djef
hello , i am using raspberry pi b+ and i had succefully install open cv like this blog but when i tried the sample below and in the scp pi-home-surveillance.zip pi@192168 1 1 athey aask me a password plzzzzzzzzzzzz any help
Adrian Rosebrock
The password to your Raspberry Pi is likely the default password, “raspberry”
Tjaart
Hi there
I am a complete noob… but have managed to install Opencv4 and Tensorflow in two different virtual machines. Thanks for a great tutorial on CV4 install.
How ever I cant import tensorflow when working in the Opencv 4 environment, so I am trying to follow your tutorial but installing it outside a virtual environment.
The cmake errors out and I am a noob so the error file makes no sense to me.
1 Could you please consider a short vid or tutorial to setup opencv 4 outside virtual environment.
I would love to enter your “The PyImageSearch Gurus course” but I will get lost in the first lesson.
2 Have you ever considered a classroom setup where the enrolled people can ask Q? as you go?
Adrian Rosebrock
Do you already have OpenCV 4 installed into your Python virtual environment? If so, you should be able to install TensorFlow via:
As far as the PyImageSearch Gurus course goes, I have designed the course to help you study computer vision even if you are totally new to computer vision. I also have provided pre-configured development environments you can use (no need to configure your system). You just download the virtual machine, install it with a few clicks, and you’re ready to go! I would suggest you give the course a try, I think it will really help you.
Hanno
This was the only tutorial that worked flawlessly to install and run CV 4. Thanks Adrian.
Adrian Rosebrock
Thanks Hanno! And congratulations on getting OpenCV 4 installed on your Pi!
Saami
Hey i came across a problem when i was making an ocr program using your method with tesseract and open cv it says no module named pytesseract i am using a raspberry pi 3
Adrian Rosebrock
You need to install the pytesseract lbirary:
$ pip install pytesseract
Pandora
Is it really okay to ignore the mismatch between the compiletime and runtime versions along with the runtime errors?
Adrian Rosebrock
What runtime errors are you referring to?
Ethan
Hi Adrian!
Thanks for the walk through. I have a question concerning doing this on a Raspberry Pi Zero W. I followed through all of your instructions and when it came time to try and import cv2 in the python environment, it threw an error. “FATAL ERROR: This OpenCV build doesn’t support current CPU/HW configuration”. Under that it says “Required baseline features: NEON – NOT AVAILABLE”. I did some research and found that the raspberry pi zero doesn’t support NEON? Can you confirm this? Also, what would be my steps to backtrack and fix this. Do I need to go back and run cmake with the neon flag turned off? What should I delete or do before I do this so I don’t have two sets of opencv libraries? Thanks for all of your help!
Steffen
Hey Adrian,
thank you very much for everything! Just a short question: Can the folders opencv and opencv_contrib be deleted after successful installation? Or they still necessary for opencv to work?
Adrian Rosebrock
Once OpenCV has been successfully installed you can delete the “opencv” and “opencv_contrib” directories.
Brad
It looked like I successfully completed each step, and on step 7 (test) it still says version 3.4.2
Is this somehow related to the virtual environment from the older OpenCV? Each time I enter workon cv I need to enter source ~/.profile, or I get a bash error.
Adrian Rosebrock
Did you create a new Python virtual environment for your OpenCV 4 install? If so, you definitely need to.
Brad
Hi, thanks for the quick response, I did the virtual environment as per step 4 above. I’ve been over the tutorial on virtual environments, but can I redo step 4 without re-installing OpenCV 4?
Adrian Rosebrock
Yes, you can do it over, just make sure your sym-link is correct. I get the impression that you may have installed a previous version of OpenCV on your Pi before you followed this tutorial though.
Brad
Thanks, that did it. I just repeated steps 4 and 7, and named the new virtual environment cv4.
Yes, I have opencv 3.4.1, 3.4.2, and now 4 installed.
Adrian Rosebrock
Awesome, I’m glad that worked!
Peter
I would just like to say that this is one of the most useful and comprehensive ‘How-to’ articles I have ever followed. Not only did each step work, but each step both taught me and explained things along the way.
A brilliant, well thought out practical article.
You should be proud of this.
Thank you for all your hard work.
Peter.
Adrian Rosebrock
Thank you Peter, I really appreciate your kind words. Your comment really made my day 🙂
Dalil Maadour
Hi, when I do the “make -j4” command, the raspberry freeze at 100% of the loading.. help me pleaase
Adrian Rosebrock
See the sentence in the post that starts with “If you have compile errors or your Raspberry Pi hangs/freezes you can try without the -j4 switch which can eliminate race conditions.”
Dalil Maadour
Hi Adrian, I’ve been installed and compiled opencv, but when I want to do “import cv2”, the IDE answers me an error. What is the problem ? 😮
Adrian Rosebrock
I don’t know which IDE you are using, but if it’s anything like PyCharm you likely need to set the Python project interpreter to point to the Python virtual environment. See this tutorial on instructions to do exactly that.
rohit
in opencv4 sift is not working
error is
File “Detector.py”, line 5, in
detector=cv2.SIFT()
AttributeError: module ‘cv2’ has no attribute ‘SIFT’
Adrian Rosebrock
That’s not how you access SIFT in OpenCV 3 and OpenCV 4. See this tutorial.
You should be using:
sift = cv2.xfeatures2d.SIFT_create()
Caleb
I’m having trouble with step #5. Everything seems to compile just fine in my virtual environment, but when I check the output, I can’t find anything indicating that the compiler is pointing to python 3 and numpy. Any suggestions?
Adrian Rosebrock
Make sure you use the “workon” command to access your Python virtual environment first. It sounds like you may have missed that step.
Shaun
Nice work as always.
I ran out of swap while building and the Pi 3b hung. I discovered a way to temporarily increase the swap file on the fly (no reboot) which allowed me to save the build. I’ll be using this in the future rather than changing the default swap space with /etc/dphys-swapfile in the future.
# ==================
# Add 3Gb of extra swap
# ==================
sudo dd if=/dev/zero of=/var/swap2 bs=3072M count=1024
sudo mkswap /var/swap2
sudo chmod 0644 /var/swap2
sudo swapon /var/swap2
# Check it’s been added
sudo swapon –show
# ==================
# Removing the swap file
# ==================
sudo swapoff /var/swap2
# Check it’s been removed – wait if it hasn’t
sudo swapon –show
# Remove the swap file
sudo rm -f /var/swap2
Shaun Price
Correction. The first line should have been:
sudo dd if=/dev/zero of=/var/swap2 bs=1024 count=3M
spinoza
Excuse me, there will be some way to optimize opencv and install without graphics, I am currently using it for object recognition with audio output and I do not require graphics. thanks greetings.
Adrian Rosebrock
Are you referring to a headless install of your Pi and OpenCV?
Stephen Gloor
Hi Adrian – I just wanted to install it without the virtual environment as this machine is just going to run scripts not really develop them.
I had to link up the cv2.so with this:
cd /usr/local/lib/python3.5/dist-packages/
ln -s /usr/local/python/cv2/python-3.5/cv2.cpython-35m-arm-linux-gnueabihf.so cv2.so
It then worked OK
Ben
Hi Adrian
Firstly, thanks for the tutorial updates; everything’s much clearer and more comprehensive now. I have two questions regarding virtual environments building on things that you have referenced:
1. Several of the blogs that you suggest reading re virtual environments imply that python’s inbuilt (v3.3+) virtual environment tool “venv” is better than “virtualenv.” Any chance your instructions could contain some notes on why you use the older “virtualenv” tool and what differs if using “venv” (alternate cmake screenshots would be ideal)
2. In a couple of your replies above, you briefly mention that you use symlinks to make opencv available in multiple virtual environments with the same python version without reinstalling a new copy of opencv on each one. Any chance you could give more detailed instructions on how to do this? I’d really like to know how to make environments share site packages of my choosing to save space and am struggling to find instructions online.
Thanks in advance!
Adrian Rosebrock
1. Whether you use virtualenv or venv is a matter of preference. Have you tried using either? What has your personal preference been?
2. If you’re having trouble understanding sym-links I would suggest reading the “man ln” documentation first. Here is another simple tutorial you can refer to. Try creating your own sym-links to files on your desktop, in your documents directory, etc. I get the impression that you may be new to Unix systems — that’s totally okay but make sure you walk before you run first. Grasp making basic sym-links first before you start trying to share files across multiple site-packages directories.
Olen
Hi Adrian,
My Pi hung up during the compilation at this point : [100%] Built target opencv_perf_superres
I have increased the SWAP to 2G, I have deleted and created again the build folder twice and started the process allover again but it always hangs at 99% or 100%
What else can I try?
If I compile with a single core it is certain that it will complete the compilation?
Thanks.
Adrian Rosebrock
Yes, try compiling with a single core — that should resolve the issue.
Virgil
Do i hv to delete the build folder, or i just continue with the make command ?
Adrian Rosebrock
I recommend always deleting your “build” directory if you compiled with more than one core and your Pi locked up. It’s hard to say what state the compile was left in. Re-create the “build” directory then re-run “cmake” and “make”
Krishan
Yes, try compiling with a single core But I stuck at 100%
Adrian Rosebrock
If you’re still running into issues you might want to utilize a pip install of OpenCV. I also offer a pre-configured Raspbian .img file with OpenCV pre-installed inside Practical Python and OpenCV. That .img file will get you up and running with OpenCV on the RPi in a matter of minutes.
KH
Hi Adrian, after successfully completing step 7 and the sanity check for the version number (it all worked till that point), I tried to follow your tutorial “Accessing RPi wth OpenCV” on the capture of single image test_image.py. I was getting the import cv2 error.
I am using a Win 10 laptop and doing SSH into a headless Pi 3 Model B loaded with Stretch Lite, Pixel Desktop and Thonny Python IDE .
This is what I did to partially solve the problem.
After the carrying out the following steps:
1) typing the follow commands at SSH command line:
cd /usr/local/lib/python3.5/dist-packages/
ln -s /usr/local/python/cv2/python-3.5/cv2.cpython-35m-arm-linux-gnueabihf.so cv2.so
and
2) amending the follower in the interpreter parameters in Thonny from the default option “The same interpreter which runs Thonny…” to “alternative python 3 interpreter or virtual environment”
and amending the default path from “/usr/bin/python3” to
“/usr/bin/python3.5”
….
and then I was able to run your tutorials on capturing a single image and also accessing the webcam videostream.
I mentioned the problem is solved partially only because I can only run the python programs in the Pixel GUI desktop environment , not the SSH command line.
I had already followed the instructions left by another forum reader to install Xming server on windows and also the ssh -X command and also enabled the X11forwarding in the X11 config file. But I still get error messages when trying to run the python files in SSH command line.
The error messages are “connect localhost port 6000: Connection refused
(Image:4413): Gtk-WARNING **: cannot open display: localhost:11.0 ”
How can I solve this ?
Secondly, the partial solution I used seems to suggestion the interpreter path in Thonny was not pointing to the ./virtualenv… path of the interpreter.
How can I solve this problem if I wish to follow your steps in working with a virtual environment ?
Apologies for the long mail, I am seeking help as this is meant for a school project.
Thank you.
Adrian Rosebrock
You mentioned you are using a headless Pi and that you installed X11 on your Windows system. Did you install X11 on your Pi though? You’ll need X11 installed on the Pi as well.
As far as Thonny goes I don’t use that IDE and I’m not familiar with it. If it’s like other Python IDEs you can set the Python project interpreter to point to your virtual environment. You may need to do your own research there.
KH
Hi Adrian, how do I go about installing X11 on the Pi?
Secondly, is there any Python IDE that you can recommend where it is easy to use and install on the Pi in the SSH command line environment? I had to resort to using Thonny based on what I could google. So far, my difficulty with Thonny is I can’t seem to amend the path of the interpreter. That seems to be what is driving the “missing cv2 ” error messages when running the python code.
I started out with the Stretch Lite and installed the Pixel desktop with very bare software hence there was no IDLE software in it and I am trying to avoid reinstalling the Stretch Desktop image if possible.
Adrian Rosebrock
1. I would suggest you do some research on how to install X11 on the Pi. There are a number of different packages that you may need to install and I cannot answer that directly for you. Take the time do some research on how to install X11 on the Pi.
2. I would suggest using Sublime Text 2 on the Pi. Sublime Text is a nice editor. You may also want to look into using PyCharm from your laptop/desktop and have the files automatically upload to the Pi.
Stephen
The big problem with setting up anything inside a Virtual Environment on Raspberry Pi is that it you would need to set up the IDE to work in a Virtual Environment. I’ve looked at each of the IDEs that come with the Pi and found Thonny to be the only one that allowed me to set up the Virtual Environment and run OpenCV per directions from here.
1. Start Thonny -> Options -> Interpreter
2. Change to: “Alternative Python 3 Interpreter or Virtual Environment
3. Set Link by using Locate Another Python Executable
4. Click on top of Window where the directory input should be and just start typing and the folder user input bar should appear.
5. Go to : /home/pi/.virtualenvs/
Select file:
/home/pi/.virtualenvs/cv/bin/python3.x
And now the Virtual Environment should be added to your Thonny IDE.
Sam
Hello Adrian,
Thanks a lot for the detailed procedure. I got the CV installed finally by making use of the make command without passing the j flag.
Adrian Rosebrock
Congrats on getting OpenCV installed on your Pi!
Virgil
Hey guys, i think i need some help, i try to install the opencv like 3 or 4 times, but always end up with an error or freeze, thou i already try the make and make -j4 command…
please help
Adrian Rosebrock
Have you increased your swap size as well?
Hamza
Hello everyone, i tried to install opencv4 2 times but again it blocks in 100%, i can still move the mouse or write something with the keyboard. I don’t know what to do, i increased my swap and, tried first time with make -j4 , and second time with only make, but still doesnt work.
i have an rpi 3 B+ and a sd card 16go .
Hamza
It worked ! , i had to wait longer,
now, when i open a new terminal and tape ; workon cv
it does not work till i tape the command before : source ~/.profile
can anyone explain that to me please ?
Adrian Rosebrock
What is the exact error you are getting? Without knowing the error I cannot diagnose or provide any suggestions.
Jordan
Will this tutorial simply not work on a Raspberry Pi 2 Model B, or will it just take a long time?
Adrian Rosebrock
It will take a long time but provided you have Raspbian installed, yes, it should work.
Ian
Hi
I have succesfully installed open cv 4 in my rasp pi 3 via putty.
But the problem is that i cannot acces the program when i connect my pi directly to my monitor.
I hope you can help me.
Thx
Adrian Rosebrock
It sounds like you may be forgetting to use the “workon” command to access your Python virtual environment before executing the script.
Hariharan
Hey Adrian,
The compilation always seems to be stuck at “Scanning dependencies of target opencv_python 2” and then produces an error even if I increase the swap and use “make -j1”.
Please help me resolve this issue.
Adrian Rosebrock
That’s definitely strange behavior. What is your exact error?
Hariharan Gopalakrishnan
Hi Adrian,
I was successfully able to install OpenCV4 but when I try to import cv2 …”I got import module: no such module name “cv2”.
1) “workon cv” works.
2) There is cv2 symlink directory in site-packages. I
3) There is cv2 directory in /usr/local/python .
4) I tried the last step indicated in the FAQ section for this question.
Still, cv2 can’t be imported please help me.
Adrian Rosebrock
Are you in your Python virtual environment via the “workon” command before trying to import the “cv2” bindings?
Hariharan Gopalakrishnan
Yes. I was
Adrian Rosebrock
Can you import OpenCV outside of your Python virtual environment? It sounds like at some point your Python versions got mixed up or your sym-link was placed in the incorrect location. Unfortunately, without access to your Pi it’s extremely hard to diagnose. I would suggest you try again with a fresh install of Raspbian.
John
hi adrian
i am trying to make the use_dropbox true
but when i get in the json file by using the terminal, i dont know how to change it
can u pls tell me how to enable the use_dropbox
thanks
Adrian Rosebrock
You can use your favorite text editor to edit the JSON file. That could be your terminal (vim, emacs, nano) or a text editor. Open up the JSON file and then change the setting.
Volker von Einem
Thank you very much for the great instructions!
I installed OpenCV 4.0.1 but didn’t do dist upgrade before – worked like a charm with only a few tweaks.
Adrian Rosebrock
Fantastic, congrats on getting OpenCV 4 installed on your Raspberry Pi!
anabelle
hi,
i cant install opencv and opencv contrib. please help.
anabelle
it says “wget” not recognised ….im using windows 10.
Adrian Rosebrock
This tutorial is for installing OpenCV 4 on a Raspberry Pi, not Windows 10. Make sure you are executing the commands on the Pi.
vamc
connect to internet then download from github later unzip it
anastasia
hi Adrian,
While compiling open cv, some of the dependencies reached 100% at last , but when i go up, some didnt reach 100%….is it normal?
Adrian Rosebrock
Was OpenCV able to successfully compile? Or did your Pi freeze up and get “stuck”?
anastasia
no its ok now..thanks 🙂
Ivan Surya H
hi, I just want to help with error for importing cv2module, actualy for me, the location of cv2.cpython-35m-arm-linux-gnueabihf.so is not at the Adrian’s tutorial where it said “ln -s /usr/local/python/cv2/python-3.5/cv2.cpython-35m-arm-linux-gnueabihf.so cv2.so”
so I deleted the old cv2.so and then found new location of cv2.cpython-35m-arm-linux-gnueabihf.so
then the command become like this:
ln -s /usr/local/lib/python3.5/site-packages/cv2/python-3.5/cv2.cpython-35m-arm-linux-gnueabihf.so cv2.so
Thanks Adrian for the tutorial.
and it worked like a charm for me.
Andy
Can confirm, worked for me as well. Thanks Ivan!
Boipelo Zuma
You saved my life! Can reaffirm, this works. Thanks Ivan!
Mark
Hi Adrian. Just worked my way through this tutorial, no problems. Worked a treat on my Pi 3 B+. Great work. Thanks
Adrian Rosebrock
Fantastic, congrats on getting OpenCV installed on your Pi!
wpimuhammadali
dear Adrian, i already install the Opencv as your instruction, and is working after installed, moreover at the moment i restart my raspberry pi, and write “import cv” is gives error no such command.
could you please tell me what is wrong ?
thank you in advance
Adrian Rosebrock
The name of the OpenCV bindings is actually “cv2”, not “cv”. It also sounds like you didn’t launch a Python shell before trying to import.
Miles Archer
Thanks for the great write up. Took more than 24 hours to compile on a raspi Zero. But it did finish. With hindsight, -j4 is probably not a good choice for a single core processor. 😉
Miles Archer
Whoops. Yeah, it compiled, but it doesn’t run. The processor is missing NEON support. Looking at other options…
Adrian Rosebrock
Compiling OpenCV on a Raspberry Pi Zero is a royal pain. I don’t recommend it. The Pi Zero is extremely underpowered and isn’t a good solution for computer vision. I would honestly try to use a Pi 3 if at all possible, the performance gains will be significant and it will be far easier to install.
Werner Boecker
Hi Adrian, thanks for this great tutorial. But I have one problem. I have done all steps but if I try to import cv2 I will get an error. If I check my installed modules using “pip freeze” it shows me only numpy. There is an cv2.so file in the site-packages directory of my virtualenv but no cv2 directory. The virtualenv works fine and I got the (cv) prompt after the workon cv command. What went wrong? Thanks for your help and your great work!
Adrian Rosebrock
Unless you installed OpenCV via “pip” you will not see OpenCV listed in the output of “pip freeze”. Double-check that your sym-link is a valid one, it’s likely that the sym-link is pointing to a file that doesn’t exist.
Justin Gruber
I am having a similar issue as the original post. I had few questions regarding the symbolic link as well. I understand where the file that is first stated in the line “/usr/local/python/cv2/python-3.5/cv2.cpython-35m-arm-linux-gnueabihf.so” is located but what is the file location of the “cv2.so” that the symbolic link is being created with? Is that the cv2.so file that is located in the virtual environment?
Adrian Rosebrock
The location of where the sym-link should reside is the “site-packages” directory of your Python virtual environment:
/home/pi/.virtualenvs/your_env_name/lib/python/site-packages
Ravindra Patil
Adrian sir, can i use the raspberry pi with this opencv4 and python3 virtual installation for practical projects and how can i access this isolated environment please give detailed information.
Adrian Rosebrock
Yes, you can use this method with multiple OpenCV versions installed. Just create a new Python virtual environment for each OpenCV version you want installed. Compile and then sym-link in your bindings to the “site-packages” directory of the Python virtual environment.
Ravindra Patil
i want to run my opencv python code in python 3 idle and dont want virtual enviornment so what changes should i does in the above procedure please answer sir
Adrian Rosebrock
Python IDLE does not respect Python virtual environments. I would suggest you use Jupyter Notebooks instead.
Javier
Hi Adrian,
I found a raspberry with OpenCV 4.0.0 alpha that i should have installed last year.
And now i want to build the face recognition that you made. Do you sugest me to continue with this “alpha version”?? or should i update it to the latest.
If i have to update it, should a update/upgrade command be enough? or i have to installed from the beginning.
Thanks a lot
Adrian Rosebrock
You won’t be able to update/upgrade, you need to download the source code of OpenCV 4 that you would like to utilize then compile it.
Amrin
Hi, I’ve been trying to compile opencv on rpi zero w…and it is stuck at 100% Building CXX object modules/python2/CMakeFiles/opencv_python2.dir/__/src2/cv2.cpp.o for about a day now ?
So I’ve tried remake it using make (single threading) but still stuck there…swap file is 2048mb…the pi is not freezing, it is still responsive
Adrian Rosebrock
Compiling and installing OpenCV on a Pi Zero W can be a huge pain — my only suggestion here would be to increase your swap size again.
Arbaz Pathan
Hi Adrian,
I completely followed the steps, but while compiling the opencv it got stuck after completing 100%. From where should I resume
Adrian Rosebrock
Try re-compiling but this time:
1. Increase your swap size to 2048MB
2. Compile with a single core
The compile will take longer but shouldn’t freeze.
gülce
Hi Adrian,
I had an error too in the j4 command. my raspberry freezed and i closed the command window. Then when I restarted raspberry It worked too slowly. Why is that? any suggestions?
gülce
Hi again,
After some errors I finally install open cv. Thanks to you!
Meanwhile, pi is slower than before opencv installation. Is there any thing to do for this?
Adrian Rosebrock
Congrats on getting OpenCV installed on your Pi, nice job!
sweetsouce
Is it possible to install opencv_contrib after installing opencv? I am running rasbian stretch on 8GB sd card and need to preserve memory as much as possible, so I was thinking of installing opencv first then delete contents of build and then building opencv_contrib. Can you help?
Adrian Rosebrock
No, you will need to re-compile and re-install OpenCV, unfortunately.
kumar
I want to install Open CV 4.0 without a virtual environment in raspberry-pi. may I know what setups to flow?.
Keyur Modi
Thanks you so much. I successfully installed OpenCV4.
Adrian Rosebrock
Congrats on getting OpenCV 4 installed on your Pi! Nice job.
Kartik Kharbanda
Hi Adrian I followed your steps exactly the way they are but when i run the make -j4 command the raspberry pi freezes and I know you said to just type in make if it does that but it also freezes when i type in make by itself. it gets to a 100% and freezes and I can’t get past that. Any way of fixing the issue?
Adrian Rosebrock
Try using “make -j1” instead to compile with just a single core.
jmr
Hi Adrian,
thanks so much for your installation instuctions. I did both the Mac and the Raspi installation and they worked right away, so I could run the 2 sample projects.
From other experiences I made, I can estimate and value the amount of time you saved me.
Looking forward to learning how to implement my own project.
Adrian Rosebrock
Congrats on getting OpenCV 4 installed on your Pi, nice job!
Karl
Hi Adrian, what a great tutorial.
Like others, I am hung on the make step at about 92% compete. The machine is totally unresponsive.
I’m going to try increasing the swap file size to 2048 like others have done. My question is: do I need to do anything special to clean up after the failed make before trying it again?
Many thanks for all that you do.
Adrian Rosebrock
You can try to restart the compile but this time use just “make -j1” to compile with only a single core.
Peter
If I will install OpenCV according to your tutorial will I be able to write code in C++ with openCV libraries and then compile it or I have to use python?
Adrian Rosebrock
You will be able to use both C++ and Python.
Andy
Hi Adrian, im following your tutorial, but when I run the CMake, the “OPENCV_ENABLE_NONFREE=ON” flag doesnt seem to work, as it does not enable the non free aspects (wich I really need for my current project).
Any advice?
Bob H
I installed per your instructions last night and everything seemed to work but when I ran the check in the tutorial I got the following error:
AttributeError: module ‘cv2’ has no attribute ‘_version_’
I thought it might be my linking but I double checked the paths so it should be correct. Any ideas on what to do next?
(Also have not done the symbolic link thing before. Can a link be removed if its wrong?)
Adrian Rosebrock
This is almost definitely a sym-link issue of some sort. Can you import the “cv2” library correctly from your “build/lib” directory?
Wassim racheh
Hello, i’m trying to install opencv4 on my raspberry pi 3 b+, i was following all the steps,
But the build stucks at 100%,
[100%] Built target opencv _perf_stitching
I incresed the swapfile to 2048 and i tryed make-j1, make and make -j4 but always the same prob it stucks at 100%
Ps: i stil can use my pi still responsive.
I need help please it’s for my final project and thanks.
Cai
just wait, it does not stuck, it just Needs a little bit time.
Andrwe C
I just had the same issue, the paths are a bit different than the examples shown above. Just verify your path and your symbolic link will work.
diana cuevas
I have the same problem as wassim, what do you mean by the paths are different?
Ronald Mourant
When I tried to install numpy with the statement
$ pip install numpy
I got a code 1 error.
Then I tried:
$ pip install ‘numpy==1.15’
and it worked!
Roberto Alini
Thanks Ronald for the suggestion. It worked also for me but the command is without thick ‘ otherwise it gives me error
$ pip install numpy==1.15
Aj
Hi Adrian ,
I am done with the entire steps as specified above with no errors but yet import error is thrown when i import cv2 , can someone help me out ?
Adrian Rosebrock
What steps from the “Troubleshooting and Frequently Asked Questions (FAQ)” section have you tried?
Ambarish
Is there anyway to install opencv 4 for jetson nano? I have tried it but I end with error and not compiling. So can I use the same method for even jetson nano?
Adrian Rosebrock
See the comments of this post.
Cai
Hi Adrian. Thanks a lot for that amazing guide! But I got a Problem with GUI/GTK installation. “Unable to fetch some archives, maybe run apt-get update or try with –fix-missing?” Even I tried update it still dosen’t work. Then I just went on with the other part, and the other went well. Now I can import opencv, and see the vision. But when I do other like preview something relevant with GUI/GTK, then I get BUG. Do you know how can I fix it? Thanks:)
Adrian Rosebrock
It sounds like it may be an issue with your apt-get definitions. Try doing:
$ sudo apt-get update
If that doesn’t work try flashing a fresh version of Raspbian.
DickM
Hi Adrian
I was so proud of myself – although 99% of the kudos should go to your great, clear tutorial – as I appeared to successful install OpenCV 4.1.0 on my Pi3B+. Not only that but I installed it as a Docker image! It didn’t even take too long: certainly not the 3 or 4 hours your earlier tutorials were suggesting.
HOWEVER when I popped the SD card out of the 3B+ and tried it in a ZeroW things looked fine until I tried to “import CV2” in python3 when I got “Illegal instruction (core dumped)”.
Do I need to compile separately for the 3B+ and for the ZeroW?
Adrian Rosebrock
The Zero W is a bear to work with. You need to compile OpenCV separately on the Zero W, unfortunately.
Cai
Hi Adrian, thanks for sharing. I got a question, I counld not download the GUI and GTK paket, even though I updated the apt-get. It still did not work, any ideas? Thanks a lot!
Adrian Rosebrock
Docker would introduce more overhead than just a Python virtual environment. Your Docker instance itself would also require more storage than just the Python virtual environment. I would not go that route unless you wanted to keep your system packages themselves separate from your host system.
Hiep Le
Thank you very much. Using your guide, I’ve have successfully installed OpenCV 4.1.0 on my Raspberry Pi 3+.
There a small fix, however. The path to cv2.cpython-35m-arm-linux-gnueabihf.so is not correct for me, so I have to change it to:
ln -s /usr/local/lib/python3.5/site-packages/cv2/python-3.5/cv2.cpython-35m-arm-linux-gnueabihf.so cv2.so
Perhaps you should mention it in your guide. It may help other people
Darren
If you are trying to build this on the ‘buster’ version which uses Python 3.7 then you lin command has changed quite a bit.
cd ~/.virtualenvs/cv/lib/python3.7/site-packages
ln -s /usr/local/lib/python3.7/site-packages/cv2/python-3.7/cv2.cpython-37m-arm-linux-gnueabihf.so cv2.so
Adrian Rosebrock
Thanks for sharing Darren!
Sahil
I have been trying to install it from the last week now. (well this field is new to me.)
everyone i recommend to follow this tutorial for RASPBIAN BUSTER in RPI4B model. and please do the above commands modifications for SYM-LINK suggested by DARREN.
Thanks a lot, Adrian and Darren
diogo
Hi, great job for this tutorial!!
For those who want to install opencv for c++ development, what would be the changes in this tutorial? Is it necessary to do the steps 4 and 6?
Thanks
Denis I.
Hi Adrian! Grat article.
I have a question. I was able to successfully install OpenCV 4.1 on my Paspberry Pi 3b+. However as per you advice I installed it in a virtual enviornment. However, I am trying to use a FaceRecognition module for MagicMirror (https://magicmirror.builders) that runs outside of that enviornment and therefore cv2 module cannot be found.
Is there a way for me to “take out” the cv2 module outside of the virtual enviornment?
BR,
Denis
Adrian Rosebrock
Yes, provided that your Python virtual environment version matches your system Python version, just move the “cv2.so” bindings into the “site-packages” directory of your system Python install.
Shawn
Hello! This is a really helpful guide! I’m stuck on the make -j4 line. it seems to get to 100% and then it is stuck on line
[100%] Built target opencv_python2
[100%] Building CXX object modules/python3/CMakeFiles/opencv_python3.dir/__/src2/cv2.cpp.o
does this normally take a long time?
Thank you!
Adrian Rosebrock
Yes, it can take a bit of time.
Letty B.
Hi Adrian! Great tutorial!
I have a question, I try to install opencv on an orange pi rk3399, with armbian aarch64. I was able to get to step 6, to link opencv into my python virtual environment without any errors, but when I try to test opencv I get this:
File “”, line 1, in
ImportError: No module named ‘cv2’
I already check your FAQ section and…
1. I have my virtual environment is active.
2. I have check the contents of the site-packages directory in the virtual environment and there is a cv2 sym-link directory in the site-packages directory and it’s properly sym-linked.
3. Also I check in /usr/local/python/ and Ihave a cv2 directory there.
4. But I thing this is the weird part when I try to use the last resort by going to build/lib directory of my opencv build, there isn’t a cv2 directory there, even though all the steps run without any errors.
Do you have any ideas of what could be happening?
Letty B.
Thanks in advance
Adrian Rosebrock
Thanks Letty; however, I have not tested these instructions with the Orange Pi. My suggestion is to check your “build/lib” directory (it may be in “build/lib/python3” as well).
B.Karthikeyan
Hi Adrian,
Initially I tried with make -j4. At 100% of build completion, the Pi locked up. So terminated the build process. Tried again with make -j1 and everything went well.
Now OpenCv is installed in my Pi.
Adrian Rosebrock
Congrats on getting OpenCV installed on your RPi!
srujan
Hi Adrian,
I followed the same instructions on Raspberry Pi 4B on a freshly installed Raspbian Buster headless (July 10th release). Everything worked perfectly. the make -j4 took me 44 minutes. I am wondering if there are any new updated video/image libraries specific to Rpi 4 which might increase the overall performance of Pi.
Best,
Srujan
doni
hi. i also tried Rpi4 with this step but stuck with import cv2 in step 7, trying to copy cv2.so from folder python2.7 to python3.7 but acces denied also with mv, chmod command also acces denied. its look like you already try the Rpi4 with for image processing task how its performance like the FPS. thank you
Stephen
Is there a version of these instructions for installing without virtualenvironment or at least a more detailed instruction set on how to run a .py file in any of the native IDEs on the Pi with a virtual environment since “workon cv” doesn’t activate inside an IDE.
Adrian Rosebrock
It will work inside an IDE, you just need to change your Project Interpreter first. Make sure you refer to this tutorial.
Venkat
Hi , Thanks for the Info , i followed your instructions and commands step by step and successfully installed the Opencv and confirmed by checking the cv2 version and shows 4.0.
but when I opened the new terminal and tried for $ workon cv it say’s
‘ Bash: workon :command not found’ . any suggestion on this ?
Thanks
Adrian Rosebrock
It sounds like you may not have ran the “source ~/.profile” command.
Col h
Thanks for this tutorial, just a note that this worked just fine on a raspberry pi 4 (2G) and with no heatsink it compiled in around an hour, I thought it had hung at the 99% mark but it just needs to be left alone for 10-15 minutes or something.
AndK
Adrian, thanks for the great tutorial.
I been trying it a couple of times. One time it went right through (I saved an image 🙂 )but all the other times it keeps stalling at a very specific point of your described process. Hope you or someone can be helpful!
I avoid step #4 since the rpi 3b is a single purpose machine with 32gb sd-card with noobs (I also remove wolfram and libre).
I only perform last step of step #4: install numpy but the response is it is already satisfied.
I follow step #5, step-by-step, and the last instruction I make is: make -j4
It starts fine, and progress up to 100% happens ok fast, but then every time it stalls at:
[100%] Built target opencv_perf_stitching
The rpi does not freeze, I can run top in a new terminal and see something is happening, but even after several hours no progress on step #5. I can do other functions on the rpi, but it happens slowly. CPU is allocated to step#5, but no progress?
Hope someone has any constructive ideas?
Thanks.
I have left it running over night but no progress. It reaches this stall point rather fast.
Mark
Great article Adrian.
I installed it with
sudo apt-get install libopencv-dev python3-opencv
Seems to work on raspi 3
Adrian Rosebrock
I really don’t recommend doing that. Using “apt-get” to manage Python packages often installs older, outdated versions. It also installs them into the system “site-packages” which can become really messy and is not a good practice for Python development.
Either way, congrats on getting OpenCV installed!
Uwe Kleis
Hello Adrian
First of all Sorry because my english is not very good and I use Google Translator
I installed opencv after your description and everything worked
after a reboot I can not use the command Workon cv anymore the message “bash workon command not found” appears
Can you help me here?
greeting
Uwe
Adrian Rosebrock
Make sure you run “source ~/.profile” first.
electron1979
Thanks!
I seem to have installed oCV 4.1.1 😉
Adrian Rosebrock
Congrats on getting OpenCV installed!
Antony Smith
Hi guys,
I’ve just installed a fresh version of the latest raspbian – BUSTER and having major issues installing OpenCV 4.1.1 AND OpenCV 4.0.0??
I’ve successfully installed 4.0.0. on Jessie without any issues before, but it seems to fail consistently on BUSTER??
I’ve tried all combinations of SWAPFILE (1024, 2048) with make -j(1, 2, 4) and never make it past 48%.
Considering rolling back to Jessie, unless you guys have suggestions?
Adrian Rosebrock
I’ll have a dedicated tutorial for Raspbian Buster and OpenCV 4, stay tuned!
Chris Carroll
Would LOVE to see that. Been struggling to get 4.1.1 compiled on Buster (pi 4) for several days and still haven’t figured it out. Your expertise would be much appreciated.
Adrian Rosebrock
It’s coming later this month (September 2019)! Just putting the instructions through a few final tests.
Marie
Any news on when you will publish it? I have been trying for days, getting it to work on Raspbian Buster, but I’m always getting an error, when I’m importing cv2. (ModuleNotFoundError: No module named ‘cv2’)
Thanks in Advance and all the content!
Adrian Rosebrock
Definitely sometime in September. Stay tuned!
Starsmer
I’m glad I’m not alone on this one. managed to make it to 51% after a few attempts at 2048 and -j4, but still no prize there either. anyway, looking forward to the new tuit!
jonathan
hi Adrien,
first, im in love with your blog.
second: I couldn’t compile with but only with . does it mean the compilation will be slower? or the application at run time?
thank you. (for this and for everything that’s on pyimagesearch
BBC_Basic
Will this tutorial work on Raspberry Pi 4 with 4GB ram?
BBC_Basic
Sorry just seen that this will work
Frieda Rhema
Hello Adrian,
Thanks for this awesome tutorial.
I have an issue at the level of the command make -j4, When i use this command, my pi crashed. After reinstalling it, i used just make but it seems not to work because my pi always freezes when i get to a hundred percent. I have been on it for three days now. Your help would highly be appreciated.
I am using a raspberry pi3 model B+ with a 32GB memory card.
Thanks
Adrian Rosebrock
Try using only a single core via “make -j1”. The compile will take longer but it should work.
RajPan
Thank you Adrian. Great step-by-step guide. Anxiously waiting for your tutorial for Raspbian Buster and OpenCV 4,
Adrian Rosebrock
It will be live later this month 🙂
Sunil V
I was able to install OpenCV4.1.0 on Pi4-4G with Raspbian Buster. Wondering if I can copy binaries the next time from the SD card without having to do cmake again. Is that possible ? If yes, what binaries do I need to copy over?
Daniel Krotov
So I tried the pre-compiled image on my newest RPi4B Raspbian Buster and it didn’t work (Now seeing the comment about you working on something)…regardless, I decided to take a stab at following your steps here and I just had to thank you for putting this all together. It went perfectly….time consuming of course, but absolutely perfect! I can’t wait to start playin around with this hardware….for now it is time to get some shut eye.
Adrian Rosebrock
Congrats on getting OpenCV installed on your Pi, Daniel!
And just to clarify, the Raspberry Pi .img file that was released yesterday fully supports the RPi 4, Raspbian Buster, and OpenCV 4.
Nazarii
for raspbian buster (no stretch) link OpenCV 4 into your Python 3 (last step):
cd /usr/local/lib/python3.7/dist-packages/cv2
sudo ln -s /usr/local/python/cv2/python-3.7/cv2.cpython-37m-arm-linux-gnueabihf.so cv2.so
(without virtualenv)
jyotish
workon cv is also some time not work after restart
Adrian Rosebrock
Make sure you
source ~/.profile
first.Eli
Hi, dont see my previous question yet, but found an answer to the “select timeout resource unavailable” issue when trying to do video capture with USB webcam.
I instead did video capture (in the script) and passed it a url instead of a device number.
First, compile/install mjpg-streamer, get that working.
then your url would be something like this:
http://localhost:/?action=stream
Adrian Rosebrock
Thanks for sharing, Eli!
Deepak
Hi Adrian, I want to install Opencv 3.3 in Raspberry 4. But I’m getting error in make. But Opencv 4.1.0 will install smoothly without error. Is there any possibility for installing Opencv 3.3 in Raspberry 4?
Larry Springsteen
At step 4 I hit a dead end. It says – To finish the install of these tools, we need to update our ~/.profile !!!
What where and HOW?
Larry
Adrian Rosebrock
Hey Larry — updating your ~/.profile file is discussed in the tutorial. Did you run into an error when trying to update it?
Andrew
Hello Adrian,
On the step where I compile the cv, i keep getting error at 85%. The error i keep encounter is Makefile:163: all. any ideas? Ive updated the swap to 2048 and used make & make -j1 instead of the original make -j4. Still no improvements.
Could you help me out?
George
Hi, I’ve problem to install: my system compile with cmake only with 2.7 version. Could you tell me how I can delete 2.7 or tell to cmake to use 3.7 ? Thank you.
sweeney
Hey Adrian,
I just found this on a website and it seemed to work.
https://github.com/piwheels/packages/issues/59
Thanks for your tutorial. Very helpful.
cedric euchie
is possible to install opencv4 in Raspberry 3b+?
Adrian Rosebrock
Yes, simply follow this tutorial.
cedric euchie
hallo Adrian inside raspbian and opencv preinstall this finds also already dlib,and imutils?if such is the case I can already start with facial recognition?
Adrian Rosebrock
Are you referring to my pre-configured Raspbian .img file?
If so, yes, it comes with OpenCV, dlib, imutils, etc. pre-installed, enabling you to jump right into your project.
Yehonatan Peleg
Great help, thx a lot. have a good week
Adrian Rosebrock
Thanks, I’m glad you enjoyed the tutorial!
Uknown
Successfully installed OpenCV 4.2.0 on Raspberry pi 4 (4 GB Ram) and python 3.7.3. Many thanks Adrian!
Adrian Rosebrock
Congrats on getting OpenCV installed on your RPi! 🙂
Max
Thank you for the excellent tutorial. Let me ask a noob question:
I managed to compile Open CV 4.1 on my Raspberry 3B+. In did so in a VM called cv. However, when I run the test from step #7 I receive version 3.3.3.0. I had this Open CV version installed on the Raspberry before. In the system, not from a VM. I found a hint in your comments to just create a new VM and repeat the linking step. It did not help.
Do I have to uninstall the Open CV 3 in order to access version 4.1? If so, how?
And: Please don’t tell me that I need to recompile version 4.1. It took a very long time …
When you answer, please don’t take any knowledge for granted. 😉
Thank you very much,
Max
Juan Carlos
Yesterday I instaled OpenCV 4 on Raspberry Pi 4 B with Raspian Buster and Python 3.7, thanks to this blog post. in the very last step of the compilation I thought the machine was freezed, but the installation was successful and I have it now up and running. Thank you very much!
(just now I’ve found your more recent post to install it for Raspberry 4 and Raspbian Buster, but its done yet)
Adrian Rosebrock
Congrats on getting OpenCV installed on your Raspberry Pi!
Andy Lim
HI, I have issue that after i ran make (same to make -j4), nothing happen and running.
I have tried to restart dphys-swapfile and also rebuild the build file.
How can i solve this issue?
Ainul Hayat
Hello Prof Adrian, im really thankful to you for providing the internet with awesome tutorial. However it seems that im unable to create a virtual environment. This is the error that i get when i try to create a virtual environment named CV
using the command mkvirtualenv cv -p python3:
ERROR: Environment ‘/home/pi/.virtualenvs/cv’ does not contain an activate script.
really appreciate it if you could help out to guide me on the right direction on how i can solve this issue. Thanks in advanced 🙂
joseph
hello Ainul were you able to sort this error out as i am having the same issue?
thanya boonsiri
Try to check “virtualenvwrapper” version first, If you follow the step above, the version of virtualenvwrapper will be “virtualenvwrapper-5.0.0”.
But, The current virtuallenvwrapper is 4.8.4 (check on this site “https://pypi.org/project/virtualenvwrapper/#history”
Fix by this step
1. uninstall virtualenv and virtualenvwrapper by this command :
sudo pip3 uninstall virtualenv virtualenvwrapper
2. Reinstall it by specified the version by this command :
sudo pip3 install virtualenv virtualenvwrapper==’4.8.4′
3. Append all of these in .profile as below
VIRTUALENVWRAPPER_PYTHON=/usr/bin/python3
VIRTUALENVWRAPPER_VIRTUALENV=/usr/local/bin/virtualenv
export PATH=/usr/local/bin:$PATH
export WORKON_HOME=~/.virtualenvs
source /usr/local/bin/virtualenvwrapper.sh
4. Reload .profile by this command :
source .profile
5. Try to create virtual environment again :
mkvirtualenv cv -p python3
*Note : I use python 3.7.3
Hope this help … ^u^
Funnn
thx a lot!!!!!
Michael Navarre
Confirmed this works using a 3 Model B with Buster OS – thank you so much!! Have been working on this for days.
Swapnil Goyal
Was this problem solved? If yes please give me appropriate steps for the same. I tried different things but didn’t work at all.
Maxime Coret
In fact there is a just small trick, go to:
cd ~/.virtualenvs/cv
and run:
source bin/activate
For some reason it is looking for the activation file into cv directory whereas it is in cv/bin….
Justin
Spent many hours on this. Step #6 make sure to update your symbolic link to latest file name. It will create cv2.so link, but points to nothing. Should be added as #5 of troubleshooting Import Error: No module named cv2
I am using python-3.7 folder and cv2.cpython-37m
To resolve problem here is latest symbolic link
ln -s /usr/local/python/cv2/python-3.7/cv2.cpython-37m-arm-linux-gnueabihf.so cv2.so
Pablo
Hi!
In this post we are using Virtual Env for isolation.
Is there any possibility of using Docker in the same regard?
Using a Python Docker image for the Pi Architecture to use pywheels for pre-compiled pip packages and avoid using VirtualEnv?
How good/bad practice would this be?
Thanks!
Adrian Rosebrock
No, Docker is not a good option on the RPi. The RPi has limited computational resources as is — throwing Docker in the mix would only slow it down further.