A few months ago, I was teaching an online seminar on the basics of computer vision.
And do you know what the most common question I got asked was?
How do I use OpenCV to load an image and display it on my screen?
It’s a pretty basic concept, but I think many instructors (myself included) quickly jump over this question and immediately dive into more advanced techniques such as blurring, edge detection, and thresholding.
Displaying an image to your screen is a simple way to debug a computer vision program, so let’s take a couple minutes and answer the this question.
How-To: OpenCV Load an Image
The objective of this post is to show you how to read an image off of disk using OpenCV, display it on your screen, and then wait for a key press to close the window and terminate the script.
While simply displaying an image on your screen isn’t practical by itself, it’s an important technique that you will use a lot when you’re developing (and more importantly, debugging) your own computer vision applications.
You see, displaying an image on your screen is much like a print statement when you’re debugging a tricky program.
When it comes to debugging, nothing beats a few well placed print statements to figure out where the problem is coming from.
The same is true in computer vision.
A few well placed calls to cv2.imshow will quickly help you resolve the problem.
So let’s go ahead and jump into some code:
import argparse
import cv2

ap = argparse.ArgumentParser()
ap.add_argument("-i", "--image", required = True, help = "Path to the image")
args = vars(ap.parse_args())

image = cv2.imread(args["image"])

cv2.imshow("image", image)
cv2.waitKey(0)
Lines 1-2 handle importing the packages that we’ll need — argparse to parse command line arguments and cv2 for our OpenCV bindings.
Then, on Lines 4-6 we parse our command line arguments. We only need a single switch, --image, which is the path to where our image resides on disk.
Loading the image using OpenCV is taken care on Line 8 by making a call to the cv2.imread function. This function takes a single parameter — the path to where the image resides on disk, which is supplied as a command line argument.
Finally, we can display our image to our screen on Lines 10-11.
Displaying the image to our screen is handled by the cv2.imshow function. The first argument to cv2.imshow is a string containing the name of our window. This text will appear in the titlebar of the window. The second argument is the image that we loaded off of disk on Line 8.
After we have made a call to the cv2.imshow function, we then need to wait for a key press using the cv2.waitKey function on Line 11.
It’s very important that we make a call to this function, otherwise our window will close automatically!
See, the cv2.waitKey function pauses execution of our Python script and waits for a key press. If we removed Line 11, then the window containing our image would close automatically. By making a call to cv2.waitKey, we are able to pause the execution of our script, thus displaying our image on our screen, until we press any key on our keyboard.
The only argument cv2.waitKey takes is an integer, which is a delay in milliseconds. If this value is positive, then after the specified number of milliseconds elapses the window will close automatically. If the number of milliseconds is zero, then the function will wait infinitely until a key is pressed.
The return value of cv2.waitKey is either the code of the pressed key, or -1, indicating that no key was pressed prior to the supplied amount of milliseconds elapsing.
We can execute our script by issuing the following command:
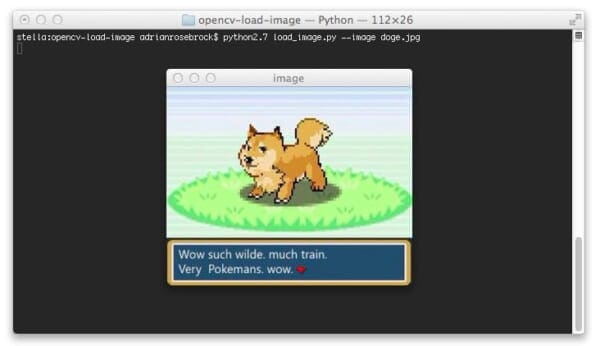
$ python load_image.py --image doge.jpg
You should then see an image on your screen:

Clearly a wild Doge has appeared! And I’m all out of Pokeballs…
Pressing any key on your keyboard will un-pause the script and close the window.
What's next? We recommend PyImageSearch University.
86+ total classes • 115+ hours hours of on-demand code walkthrough videos • Last updated: December 2025
★★★★★ 4.84 (128 Ratings) • 16,000+ Students Enrolled
I strongly believe that if you had the right teacher you could master computer vision and deep learning.
Do you think learning computer vision and deep learning has to be time-consuming, overwhelming, and complicated? Or has to involve complex mathematics and equations? Or requires a degree in computer science?
That’s not the case.
All you need to master computer vision and deep learning is for someone to explain things to you in simple, intuitive terms. And that’s exactly what I do. My mission is to change education and how complex Artificial Intelligence topics are taught.
If you're serious about learning computer vision, your next stop should be PyImageSearch University, the most comprehensive computer vision, deep learning, and OpenCV course online today. Here you’ll learn how to successfully and confidently apply computer vision to your work, research, and projects. Join me in computer vision mastery.
Inside PyImageSearch University you'll find:
- ✓ 86+ courses on essential computer vision, deep learning, and OpenCV topics
- ✓ 86 Certificates of Completion
- ✓ 115+ hours hours of on-demand video
- ✓ Brand new courses released regularly, ensuring you can keep up with state-of-the-art techniques
- ✓ Pre-configured Jupyter Notebooks in Google Colab
- ✓ Run all code examples in your web browser — works on Windows, macOS, and Linux (no dev environment configuration required!)
- ✓ Access to centralized code repos for all 540+ tutorials on PyImageSearch
- ✓ Easy one-click downloads for code, datasets, pre-trained models, etc.
- ✓ Access on mobile, laptop, desktop, etc.
Summary
In this blog post I answered one of the most common questions I get asked: “How do I use OpenCV to load an image and display it on my screen?”
In order to load an image off of disk and display it using OpenCV, you first need to call the cv2.imread function, passing in the path to your image as the sole argument.
Then, a call to cv2.imshow will display your image on your screen.
But be sure to then use cv2.waitKey to wait for a key press, otherwise the window created by cv2.imshow will close automatically.
Learn the Basics of Computer Vision in a Single Weekend
If you’re interested in learning the basics of computer vision, but don’t know where to start, you should definitely check out my new eBook, Practical Python and OpenCV.
In this book I cover the basics of computer vision and image processing…and I can teach you in a single weekend!
I know, it sounds too good to be true.
But I promise you, this book is your guaranteed quick-start guide to learning the fundamentals of computer vision. After reading this book you will be well on your way to becoming an OpenCV guru!
So if you’re looking to learn the basics of OpenCV, definitely check out my book. You won’t be disappointed.

Download the Source Code and FREE 17-page Resource Guide
Enter your email address below to get a .zip of the code and a FREE 17-page Resource Guide on Computer Vision, OpenCV, and Deep Learning. Inside you'll find my hand-picked tutorials, books, courses, and libraries to help you master CV and DL!


