Two weeks ago OpenCV 3.3 was officially released, bringing with it a highly improved deep learning (dnn
) module. This module now supports a number of deep learning frameworks, including Caffe, TensorFlow, and Torch/PyTorch.
Furthermore, this API for using pre-trained deep learning models is compatible with both the C++ API and the Python bindings, making it dead simple to:
- Load a model from disk.
- Pre-process an input image.
- Pass the image through the network and obtain the output classifications.
While we cannot train deep learning models using OpenCV (nor should we), this does allow us to take our models trained using dedicated deep learning libraries/tools and then efficiently use them directly inside our OpenCV scripts.
In the remainder of this blog post I’ll demonstrate the fundamentals of how to take a pre-trained deep learning network on the ImageNet dataset and apply it to input images.
To learn more about deep learning with OpenCV, just keep reading.
Looking for the source code to this post?
Jump Right To The Downloads SectionDeep Learning with OpenCV
In the first part of this post, we’ll discuss the OpenCV 3.3 release and the overhauled dnn
module.
We’ll then write a Python script that will use OpenCV and GoogleLeNet (pre-trained on ImageNet) to classify images.
Finally, we’ll explore the results of our classifications.
Deep Learning inside OpenCV 3.3
The dnn module of OpenCV has been part of the opencv_contrib
repository since version v3.1. Now in OpenCV 3.3 it is included in the main repository.
Why should you care?
Deep Learning is a fast growing domain of Machine Learning and if you’re working in the field of computer vision/image processing already (or getting up to speed), it’s a crucial area to explore.
With OpenCV 3.3, we can utilize pre-trained networks with popular deep learning frameworks. The fact that they are pre-trained implies that we don’t need to spend many hours training the network — rather we can complete a forward pass and utilize the output to make a decision within our application.
OpenCV does not (and does not intend to be) to be a tool for training networks — there are already great frameworks available for that purpose. Since a network (such as a CNN) can be used as a classifier, it makes logical sense that OpenCV has a Deep Learning module that we can leverage easily within the OpenCV ecosystem.
Popular network architectures compatible with OpenCV 3.3 include:
- GoogleLeNet (used in this blog post)
- AlexNet
- SqueezeNet
- VGGNet (and associated flavors)
- ResNet
The release notes for this module are available on the OpenCV repository page.
Aleksandr Rybnikov, the main contributor for this module, has ambitious plans for this module so be sure to stay on the lookout and read his release notes (in Russian, so make sure you have Google Translation enabled in your browser if Russian is not your native language).
It’s my opinion that the dnn
module will have a big impact on the OpenCV community, so let’s get the word out.
Configure your machine with OpenCV 3.3
Installing OpenCV 3.3 is on par with installing other versions. The same install tutorials can be utilized — just make sure you download and use the correct release.
Simply follow these instructions for MacOS or Ubuntu while making sure to use the opencv and opencv_contrib releases for OpenCV 3.3. If you opt for the MacOS + homebrew install instructions, be sure to use the --HEAD
switch (among the others mentioned) to get the bleeding edge version of OpenCV.
If you’re using virtual environments (highly recommended), you can easily install OpenCV 3.3 alongside a previous version. Just create a brand new virtual environment (and name it appropriately) as you follow the tutorial corresponding to your system.
OpenCV deep learning functions and frameworks
OpenCV 3.3 supports the Caffe, TensorFlow, and Torch/PyTorch frameworks.
Keras is currently not supported (since Keras is actually a wrapper around backends such as TensorFlow and Theano), although I imagine it’s only a matter of time until Keras is directly supported given the popularity of the deep learning library.
Using OpenCV 3.3 we can load images from disk using the following functions inside dnn
:
cv2.dnn.blobFromImage
cv2.dnn.blobFromImages
We can directly import models from various frameworks via the “create” methods:
cv2.dnn.createCaffeImporter
cv2.dnn.createTensorFlowImporter
cv2.dnn.createTorchImporter
Although I think it’s easier to simply use the “read” methods and load a serialized model from disk directly:
cv2.dnn.readNetFromCaffe
cv2.dnn.readNetFromTensorFlow
cv2.dnn.readNetFromTorch
cv2.dnn.readhTorchBlob
Once we have loaded a model from disk, the `.forward` method is used to forward-propagate our image and obtain the actual classification.
To learn how all these OpenCV deep learning pieces fit together, let’s move on to the next section.
Classifying images using deep learning and OpenCV
In this section, we’ll be creating a Python script that can be used to classify input images using OpenCV and GoogLeNet (pre-trained on ImageNet) using the Caffe framework.
The GoogLeNet architecture (now known as “Inception” after the novel micro-architecture) was introduced by Szegedy et al. in their 2014 paper, Going deeper with convolutions.
Other architectures are also supported with OpenCV 3.3 including AlexNet, ResNet, and SqueezeNet — we’ll be examining these architectures for deep learning with OpenCV in a future blog post.
In the meantime, let’s learn how we can load a pre-trained Caffe model and use it to classify an image using OpenCV.
To begin, open up a new file, name it deep_learning_with_opencv.py
, and insert the following code:
# import the necessary packages import numpy as np import argparse import time import cv2
On Lines 2-5 we import our necessary packages.
Then we parse command line arguments:
# construct the argument parse and parse the arguments ap = argparse.ArgumentParser() ap.add_argument("-i", "--image", required=True, help="path to input image") ap.add_argument("-p", "--prototxt", required=True, help="path to Caffe 'deploy' prototxt file") ap.add_argument("-m", "--model", required=True, help="path to Caffe pre-trained model") ap.add_argument("-l", "--labels", required=True, help="path to ImageNet labels (i.e., syn-sets)") args = vars(ap.parse_args())
On Line 8 we create an argument parser followed by establishing four required command line arguments (Lines 9-16):
--image
: The path to the input image.--prototxt
: The path to the Caffe “deploy” prototxt file.--model
: The pre-trained Caffe model (i.e,. the network weights themselves).--labels
: The path to ImageNet labels (i.e., “syn-sets”).
Now that we’ve established our arguments, we parse them and store them in a variable, args
, for easy access later.
Let’s load the input image and class labels:
# load the input image from disk image = cv2.imread(args["image"]) # load the class labels from disk rows = open(args["labels"]).read().strip().split("\n") classes = [r[r.find(" ") + 1:].split(",")[0] for r in rows]
On Line 20, we load the image
from disk via cv2.imread
.
Let’s take a closer look at the class label data which we load on Lines 23 and 24:
n01440764 tench, Tinca tinca n01443537 goldfish, Carassius auratus n01484850 great white shark, white shark, man-eater, man-eating shark, Carcharodon carcharias n01491361 tiger shark, Galeocerdo cuvieri n01494475 hammerhead, hammerhead shark n01496331 electric ray, crampfish, numbfish, torpedo n01498041 stingray ...
As you can see, we have a unique identifier followed by a space, some class labels, and a new-line. Parsing this file line-by-line is straightforward and efficient using Python.
First, we load the class label rows
from disk into a list. To do this we strip whitespace from the beginning and end of each line while using the new-line (‘\n
‘) as the row delimiter (Line 23). The result is a list of IDs and labels:
['n01440764 tench, Tinca tinca', 'n01443537 goldfish, Carassius auratus', 'n01484850 great white shark, white shark, man-eater, man-eating shark, Carcharodon carcharias', 'n01491361 tiger shark, Galeocerdo cuvieri', 'n01494475 hammerhead, hammerhead shark', 'n01496331 electric ray, crampfish, numbfish, torpedo', 'n01498041 stingray', ...]
Second, we use list comprehension to extract the relevant class labels from rows
by looking for the space (‘ ‘) after the ID, followed by delimiting class labels with a comma (‘,
‘). The result is simply a list of class labels:
['tench', 'goldfish', 'great white shark', 'tiger shark', 'hammerhead', 'electric ray', 'stingray', ...]
Now that we’ve taken care of the labels, let’s dig into the dnn
module of OpenCV 3.3:
# our CNN requires fixed spatial dimensions for our input image(s) # so we need to ensure it is resized to 224x224 pixels while # performing mean subtraction (104, 117, 123) to normalize the input; # after executing this command our "blob" now has the shape: # (1, 3, 224, 224) blob = cv2.dnn.blobFromImage(image, 1, (224, 224), (104, 117, 123))
Taking note of the comment in the block above, we use cv2.dnn.blobFromImage
to perform mean subtraction to normalize the input image which results in a known blob shape (Line 31).
We then load our model from disk:
# load our serialized model from disk print("[INFO] loading model...") net = cv2.dnn.readNetFromCaffe(args["prototxt"], args["model"])
Since we’ve opted to use Caffe, we utilize cv2.dnn.readNetFromCaffe
to load our Caffe model definition prototxt
and pre-trained model
from disk (Line 35).
If you are familiar with Caffe, you’ll recognize the prototxt
file as a plain text configuration which follows a JSON-like structure — I recommend that you open bvlc_googlenet.prototxt
from the “Downloads” section in a text editor to inspect it.
Note: If you are unfamiliar with configuring Caffe CNNs, then this is a great time to consider the PyImageSearch Gurus course — inside the course you’ll get an in depth look at using deep nets for computer vision and image classification.
Now let’s complete a forward pass through the network with blob
as the input:
# set the blob as input to the network and perform a forward-pass to # obtain our output classification net.setInput(blob) start = time.time() preds = net.forward() end = time.time() print("[INFO] classification took {:.5} seconds".format(end - start))
It is important to note at this step that we aren’t training a CNN — rather, we are making use of a pre-trained network. Therefore we are just passing the blob through the network (i.e., forward propagation) to obtain the result (no back-propagation).
First, we specify blob
as our input (Line 39). Second, we make a start
timestamp (Line 40), followed by passing our input image through the network and storing the predictions. Finally, we set an end
timestamp (Line 42) so we can calculate the difference and print the elapsed time (Line 43).
Let’s finish up by determining the top five predictions for our input image:
# sort the indexes of the probabilities in descending order (higher # probabilitiy first) and grab the top-5 predictions idxs = np.argsort(preds[0])[::-1][:5]
Using NumPy, we can easily sort and extract the top five predictions on Line 47.
Next, we will display the top five class predictions:
# loop over the top-5 predictions and display them for (i, idx) in enumerate(idxs): # draw the top prediction on the input image if i == 0: text = "Label: {}, {:.2f}%".format(classes[idx], preds[0][idx] * 100) cv2.putText(image, text, (5, 25), cv2.FONT_HERSHEY_SIMPLEX, 0.7, (0, 0, 255), 2) # display the predicted label + associated probability to the # console print("[INFO] {}. label: {}, probability: {:.5}".format(i + 1, classes[idx], preds[0][idx])) # display the output image cv2.imshow("Image", image) cv2.waitKey(0)
The idea for this loop is to (1) draw the top prediction label on the image itself and (2) print the associated class label probabilities to the terminal.
Lastly, we display the image to the screen (Line 64) and wait for the user to press a key before exiting (Line 65).
Deep learning and OpenCV classification results
Now that we have implemented our Python script to utilize deep learning with OpenCV, let’s go ahead and apply it to a few example images.
Make sure you use the “Downloads” section of this blog post to download the source code + pre-trained GoogLeNet architecture + example images.
From there, open up a terminal and execute the following command:
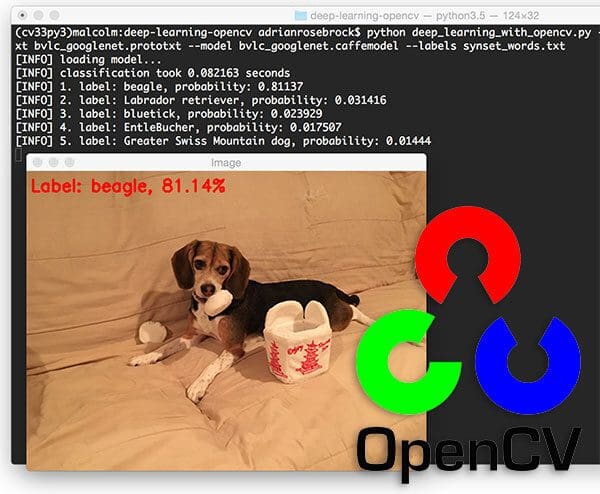
$ python deep_learning_with_opencv.py --image images/jemma.png --prototxt bvlc_googlenet.prototxt \ --model bvlc_googlenet.caffemodel --labels synset_words.txt [INFO] loading model... [INFO] classification took 0.075035 seconds [INFO] 1. label: beagle, probability: 0.81137 [INFO] 2. label: Labrador retriever, probability: 0.031416 [INFO] 3. label: bluetick, probability: 0.023929 [INFO] 4. label: EntleBucher, probability: 0.017507 [INFO] 5. label: Greater Swiss Mountain dog, probability: 0.01444
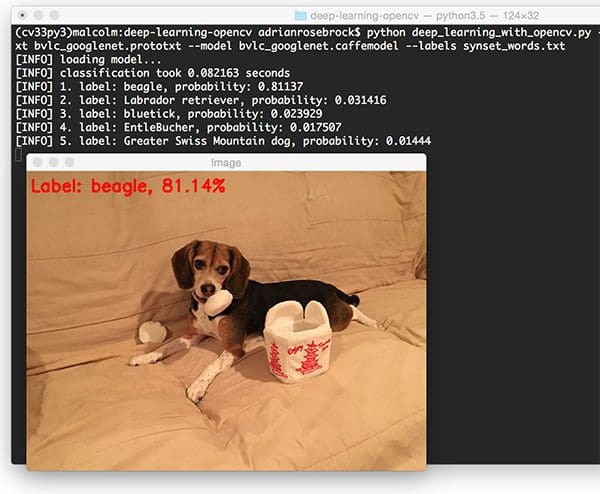
In the above example, we have Jemma, the family beagle. Using OpenCV and GoogLeNet we have correctly classified this image as “beagle”.
Furthermore, inspecting the top-5 results we can see that the other top predictions are also relevant, all of them of which are dogs that have similar physical appearances as beagles.
Taking a look at the timing we also see that the forward pass took < 1 second, even though we are using our CPU.
Keep in mind that the forward pass is substantially faster than the backward pass as we do not need to compute the gradient and backpropagate through the network.
Let’s classify another image using OpenCV and deep learning:
$ python deep_learning_with_opencv.py --image images/traffic_light.png --prototxt bvlc_googlenet.prototxt \ --model bvlc_googlenet.caffemodel --labels synset_words.txt [INFO] loading model... [INFO] classification took 0.080521 seconds [INFO] 1. label: traffic light, probability: 1.0 [INFO] 2. label: pole, probability: 4.9961e-07 [INFO] 3. label: spotlight, probability: 3.4974e-08 [INFO] 4. label: street sign, probability: 3.3623e-08 [INFO] 5. label: loudspeaker, probability: 2.0235e-08
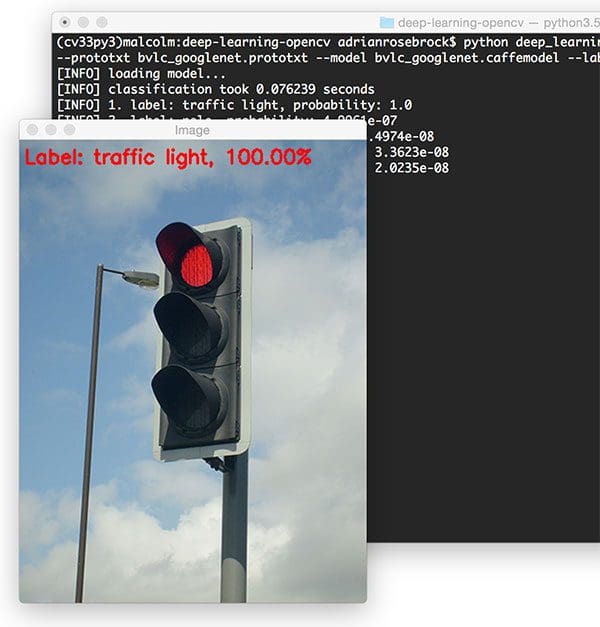
OpenCV and GoogLeNet correctly label this image as “traffic light” with 100% certainty.
In this example we have a “bald eagle”:
$ python deep_learning_with_opencv.py --image images/eagle.png --prototxt bvlc_googlenet.prototxt \ --model bvlc_googlenet.caffemodel --labels synset_words.txt [INFO] loading model... [INFO] classification took 0.087207 seconds [INFO] 1. label: bald eagle, probability: 0.96768 [INFO] 2. label: kite, probability: 0.031964 [INFO] 3. label: vulture, probability: 0.00023595 [INFO] 4. label: albatross, probability: 6.3653e-05 [INFO] 5. label: black grouse, probability: 1.6147e-05
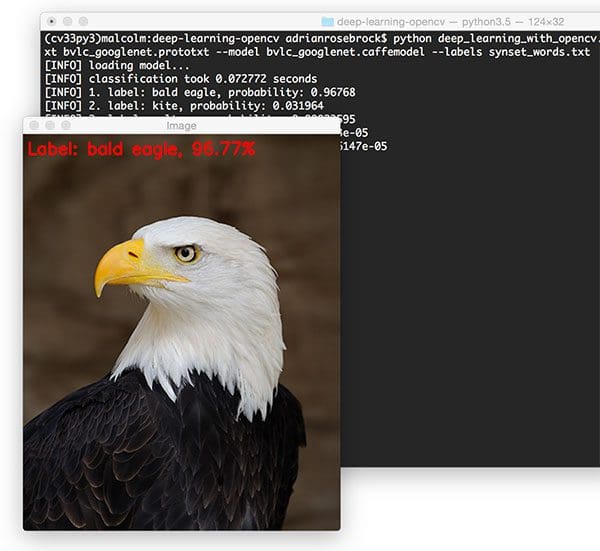
We are once again able to correctly classify the input image.
Our final example is a “vending machine”:
$ python deep_learning_with_opencv.py --image images/vending_machine.png --prototxt bvlc_googlenet.prototxt \ --model bvlc_googlenet.caffemodel --labels synset_words.txt [INFO] loading model... [INFO] classification took 0.099602 seconds [INFO] 1. label: vending machine, probability: 0.99269 [INFO] 2. label: cash machine, probability: 0.0023691 [INFO] 3. label: pay-phone, probability: 0.00097005 [INFO] 4. label: ashcan, probability: 0.00092097 [INFO] 5. label: mailbox, probability: 0.00061188
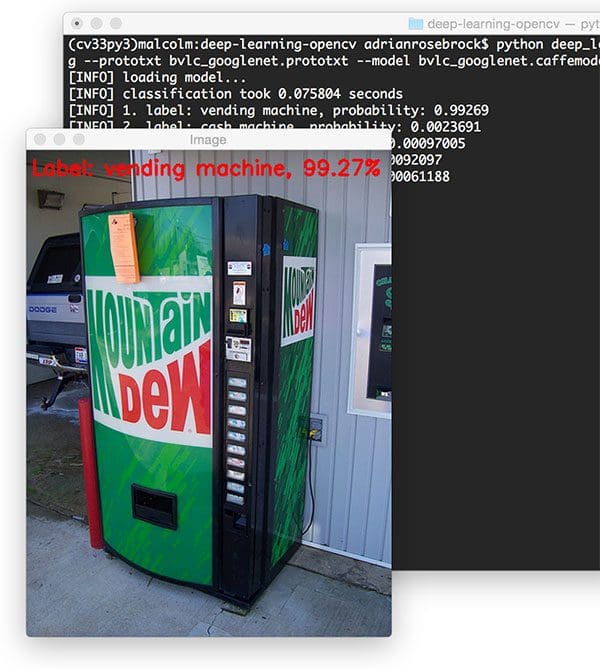
OpenCV + deep learning once again correctly classifes the image.
What's next? We recommend PyImageSearch University.
86 total classes • 115+ hours of on-demand code walkthrough videos • Last updated: October 2024
★★★★★ 4.84 (128 Ratings) • 16,000+ Students Enrolled
I strongly believe that if you had the right teacher you could master computer vision and deep learning.
Do you think learning computer vision and deep learning has to be time-consuming, overwhelming, and complicated? Or has to involve complex mathematics and equations? Or requires a degree in computer science?
That’s not the case.
All you need to master computer vision and deep learning is for someone to explain things to you in simple, intuitive terms. And that’s exactly what I do. My mission is to change education and how complex Artificial Intelligence topics are taught.
If you're serious about learning computer vision, your next stop should be PyImageSearch University, the most comprehensive computer vision, deep learning, and OpenCV course online today. Here you’ll learn how to successfully and confidently apply computer vision to your work, research, and projects. Join me in computer vision mastery.
Inside PyImageSearch University you'll find:
- ✓ 86 courses on essential computer vision, deep learning, and OpenCV topics
- ✓ 86 Certificates of Completion
- ✓ 115+ hours of on-demand video
- ✓ Brand new courses released regularly, ensuring you can keep up with state-of-the-art techniques
- ✓ Pre-configured Jupyter Notebooks in Google Colab
- ✓ Run all code examples in your web browser — works on Windows, macOS, and Linux (no dev environment configuration required!)
- ✓ Access to centralized code repos for all 540+ tutorials on PyImageSearch
- ✓ Easy one-click downloads for code, datasets, pre-trained models, etc.
- ✓ Access on mobile, laptop, desktop, etc.
Summary
In today’s blog post we learned how to use OpenCV for deep learning.
With the release of OpenCV 3.3 the deep neural network (dnn
) library has been substantially overhauled, allowing us to load pre-trained networks via the Caffe, TensorFlow, and Torch/PyTorch frameworks and then use them to classify input images.
I imagine Keras support will also be coming soon, given how popular the framework is. This will likely take be a non-trivial implementation as Keras itself can support multiple numeric computation backends.
Over the next few weeks we’ll:
- Take a deeper dive into the
dnn
module and how it can be used inside our Python + OpenCV scripts. - Learn how to modify Caffe
.prototxt
files to be compatible with OpenCV. - Discover how we can apply deep learning using OpenCV to the Raspberry Pi.
This is a can’t-miss series of blog posts, so be before you go, make sure you enter your email address in the form below to be notified when these posts go live!
Download the Source Code and FREE 17-page Resource Guide
Enter your email address below to get a .zip of the code and a FREE 17-page Resource Guide on Computer Vision, OpenCV, and Deep Learning. Inside you'll find my hand-picked tutorials, books, courses, and libraries to help you master CV and DL!
Hermann-Marcus Behrens
Very cool work! Thanks for your blogposts.
Bayo
hello, does the code work on raspberry pi?
Adrian Rosebrock
This method will work on the Raspberry Pi, but you’ll need a network small enough to run on the Pi. I’ll covering this in detial in a future blog post.
Mas
Strongly yes
Ansh
This is great, cant wait to try it! It was about time that OpenCV introduced Deep Learning. I was wondering of the following though –
It would be great to see if we can use DNN for tracking objects, like the “tracking a ball” example you had blogged. Most of the Neural Nets examples I have seen involved classification or labeling the objects. Are neural network efficient in tracking objects as well? Or does dlib’s object correlation better at it. Which CV method is good (efficient) for what….? it would be great if you can blog about the CV landscape as there are so many methods efficient for different things
I am motivated for robotics application of CV. Also I am assuming that your consequent blogs will have methods to train a model as well?
Thanks.
Adrian Rosebrock
It really depends on exactly what types of objects you are trying to track and under which conditions. Deep learning can be used to track objects, but typically we use correlation filters for this (like in dlib). I’ll consider doing a survey of object tracking methods in the future, thanks for the suggestion!
Aleksandr Rybnikov
Object tracking is already in OpenCV dnn. Lightweight yet accurate SSD with MobileNet backbone is in the samples directory https://github.com/opencv/opencv/blob/master/samples/dnn/mobilenet_ssd_python.py
Adrian Rosebrock
Thanks for sharing (and for your contributions!) Aleksandr. What you’re referring to is actually object detection, the process of determining the (x, y)-coordinates of a given object in an image. Object tracking normally takes place after a location has been identified (which is what I assume Ansh is referring to). “Object detection” and “object tracking” are two different operations.
Thanks again for the comment I’ll make sure object detection with OpenCV + deep learning is covered in a future blog post as well.
Steven Barnes
It might be useful to mention where to get the python opencv library for python3 for each platform as it is not obvious. You also mention following the install instructions but do not have a link to them, and again they are not that easy to find on the OpenCV site.
Adrian Rosebrock
Hi Steven — I actually link to this page which includes OpenCV + Python install instructions for a variety of different platforms and operating systems.
Diogo Aleixo
Hi Adrian
Is there a way to train another category on imageNet? The one that i want is not available.
Adrian Rosebrock
Hi Diogo — you would need to either (1) train your CNN from scratch or (2) apply transfer learning. I discuss both in detail Deep Learning for Computer Vision with Python.
Maham Khan
Wow! This is the best thing ever. Deep learning will be so easy with OpenCV. And also thank you Adrian for making the tutorial so quickly, and keep us updated with the latest release. You are doing great contribution for Computer Vision community!
Much appreciated tutorials. Just by going through your post, one can get the whole idea of the process.
Adrian Rosebrock
Thanks Maham! I’m glad you enjoyed the post. There will be plenty more on deep learning + OpenCV 🙂
Supra
It doesn’t work with raspberry pi 3 on latest version Raspbian Stretch.
I’m using OpenCV 3.3.0. And the problem is “No module named cv2”
Adrian Rosebrock
You need to install OpenCV first. It doesn’t matter if you’re using Raspbian Wheezy, Jessie, or Stretch — OpenCV must first be installed.
Aleksandr Rybnikov
BTW, there is an error in the article. Correct name of the developer of the dnn is Aleksandr Rybnikov, actually it’s me
Adrian Rosebrock
Thank you for bringing this to my attention. I have updated the blog post 🙂 Thank you again for your wonderful contributions to the OpenCV library. I look forward to help spread the word more regarding your work!
Saumya Rajen Shah
Where can we find the imageNet labels?
Adrian Rosebrock
Please use the “Downloads” section of this blog post. There you will find a .txt file containing the ImageNet labels.
Vincent Thon
I Adrian, love your work! Your blog is my main go to place when it comes to computer vision. I have some models trained with tflearn. Do you think I’d be able to utilize those with the cv2.dnn.createTensorFlowImporter?
Adrian Rosebrock
Hi Vincent — I haven’t tried importing a model trained via TFLearn. I would suggest giving it a try.
Mansoor Nasir
Adrian, this is amazing work, i really appreciate all the efforts you make this step by step tutorial. My only question is, how will we use this with a model trained by TensorFlow?
Thank you for all your help.
Adrian Rosebrock
You would replace
cv2.dnn.readNetFromCaffe
withcv2.dnn.readNetFromTensorFlow
.knaffe
Thank you for your blogs. I have read all of them.
How could I load my model trained by myself with tensorflow and use it ?
By the way, Do you know some effective deep or traditional methods for motion detection running on raspberry PI3 with real-time performance?
Thank you for your great job again and look forward to your new blogs!!
Adrian Rosebrock
1. Please see my reply to “Mansoor” above regarding TensorFlow.
2. Take a look at this blog post for simple motion detection on the Raspberry Pi.
oguzhan
So cool, THX!! We are waiting raspberry pi tutorial 🙂
Megha Shanbhag
Hi, I have installed and built openCV 3.3 in my laptop. I have not built Opencv_contrib. When I run the example given in the deep-learning-opencv.zip, i get error stating
” File “deep_learning_with_opencv.py”, line 34, in
blob = cv2.dnn.blobFromImage(image, 1, (224, 224), (104, 117, 123))
AttributeError: ‘module’ object has no attribute ‘blobFromImage'”
Can you please tell me what could be the issue?
Adrian Rosebrock
Can you confirm that you are running OpenCV 3.3?
The output should be 3.3.0.
Boikobo
I have a similar issue. It is showing that its opencv 3.3.0 but saying
blob = cv2.dnn.blobFromImage(image, 1, (224, 224), (104, 117, 123))
AttributeError: ‘module’ object has no attribute ‘blobFromImage’”
Adrian Rosebrock
Hi Boikobo — that is indeed very strange. For whatever reason it appears your version of OpenCV was not compiled with “dnn”. I would go back to installing OpenCV and ensure that “dnn” is listed in the “modules to be built” output of CMake.
Smartos
great post!
Tham
Do you know how to save the model of PyTorch?
I train and save a simple cnn model by PyTorch, but it cannot loaded by the dnn module(I am using 3.3).
Complete question can view at StackOverflow(https://stackoverflow.com/questions/45929573/how-should-i-save-the-model-of-pytorch-if-i-want-it-loadable-by-opencv-dnn-modul)
Adrian Rosebrock
I have not used PyTorch so unfortunately I do not know the answer to this question. I hope another PyImageSearch reader can help!
Devin
i am using pytorch and i have the same problem…
dam van tai
use convert model pytorch -> caffe,after load opencv!!
Imaduddin A Majid
Really great article. Thank you for sharing this with us. I also expected this will work with Keras soon.
Adrian Rosebrock
I actually already have number of blog posts on Keras. I also cover Keras in-depth inside my book, Deep Learning for Computer Vision with Python.
Lg
Thanks for this post. Really cool stuff.
I’ve tried with other models like squeezenet, alexnet, bvlc_reference_caffenet with success, the accuracy is good as well.
Some errors, like with a white cat jumping in a meadow recognized as an artic fox.
Are there caffe models trained to recognize people ?
Adrian Rosebrock
Yes, I will actually be covering one for object detection that can detect people in next week’s blog post. Stay tuned 🙂
Lg
Hi Adrian,
Looking for models on the Internet, I found several articles about “OXFORD VGG Face dataset”.
References :
• https://github.com/mzaradzki/neuralnets/blob/master/vgg_faces_keras/
• http://www.vlfeat.org/matconvnet/pretrained/#face-recognition
Then I installed keras_vggface.
I finally found the caffe model and prototxt. This works very well with your code: “deep-learning-with-opencv”.
[INFO] classification took 0.66553 seconds
[INFO] 1. label: Adelaide_Kane, probability: 0.99818
[INFO] 2. label: Lucy_Hale, probability: 0.00031506
[INFO] 3. label: Jamie_Gray_Hyder, probability: 0.0001969
[INFO] 4. label: Odeya_Rush, probability: 0.00010968
[INFO] 5. label: Sasha_Barrese, probability: 8.4347e-05
Now, the question is how to train this model with our own pictures or add more people to the dataset.
I am looking forward to reading your article.
Adrian Rosebrock
If you want to add in more people you would need to either (1) train your model from scratch or (2) apply fine-tuning. I cover both in detail inside Deep Learning for Computer Vision with Python.
Komal
Hey Adrian,
in Opencv 3.2 I’m getting an error while using blobfFromImage function of dnn. That it’s not there. What are the differences in Opencv 3.2 and OpenCV 3.3 ?
Adrian Rosebrock
Hi Komal — the “dnn” sub-module was totally re-engineered in OpenCV 3.3. You need to upgrade to OpenCV 3.3.
Sean McLeod
Hi Adrian
Where are the values used for the mean subtraction (104, 117, 123) documented?
Cheers
Adrian Rosebrock
They are the mean values of the ImageNet training set. These values don’t change since the ImageNet dataset is pre-split. Nearly all deep learning publications/implementations that are trained on ImageNet report these values as the mean. I’ve also trained networks on ImageNet by hand and can confirm the values.
Andrew Craton
Thanks for all the great work here! Your script works perfectly on the model. However, I’ve trained my own MobileNetSSD caffe model, but am struggling with using the trained model with the script. There appears to be a difference between the trained model and a “deploy” optimized version of the model, where a script called “merge_bn.py” is necessary to merge the batchnorm, scale layer weights to the conv layer, to improve the performance. (https://github.com/chuanqi305/MobileNet-SSD/blob/master/merge_bn.py) I continue to get errors like : Message type “caffe.LayerParameter” has no field named “permute_param”. and Check failed: ReadProtoFromTextFile(param_file, param) Failed to parse NetParameter file: MobileNetSSD_deploy.prototxt. Is it possible that my OpenCV build does not contain the correct modules?
Adrian Rosebrock
OpenCV’s “dnn” module is brand new, so it’s entirely possible that not all features in Caffe/TensorFlow/Torch etc. have 1-to-1 equivalents in OpenCV. I would suggest posting the error on the official OpenCV forums and seeing what the developers say. Again, I’m not sure what the exact issue is here. Thanks for sharing though, myself and other PyImageSearch readers appreciate it!
Steve Cox
I have run into this situation as well. 10/13/17. I am using Tensorflow 1.* and Python 3.5 on Windows 10 x64. I don’t want to deal with Docker containers and virtual environment, to much to keep track of. I just want to retrain models and play them back through OpenCV. Using TF on deployed models is over kill. I am using the flowers example. I got TF to retrain the inception (model?) using the flower images. I then take the output graph and try and load it with OpenCV 3.3 (cv2.dnn.readNetFromTensorflow) and get different Unknown Layer errors. I have looked at several different Python scripts you have to run to strip out Layers OpenCV can’t deal with “yet” that exist in the retrained TF model. If someone knows where an ALL IN ONE python script exists, that takes a previously re-trained TF models and converts them so they can be loaded into OpenCV 3.3 dnn that would be great. I am using Python 2.7 and OpenCV 3.3 to do the model prediction. This works fine with Adrian’s caffe example, but not with a retrained TF model. I realize I have a lot to learn on all the nutz and bolts with TF and deployment. Sorry if there is another link somewhere on this site that covers this material. This is by far the best site i have seen on this subject.
Adrian Rosebrock
As far as I understand it, the TensorFlow loading capabilities of OpenCV 3.3 are no where near as good as the Caffe ones. I’m sure this will mature in future releases of OPenCV 3.3, but for the time being, I might try to (1) use Caffe to train your network or (2) try to convert your TF weights to Caffe format. You might also consider posting on the official OpenCV forums.
Igor
Good afternoon Adrian, thanks for the interesting article! Tell me how to determine the coordinates of the detected object, i.e. to outline the detected object.
Adrian Rosebrock
Hi Igor — I suggest you look at Lines 38-67 on this blog post, Object detection with deep learning and OpenCV
Igor
Adrian thank you for a great course. For the convenience of working from your post, it would be convenient to display the contents of your course if the contents of the course are, then tell me where it is. I can’t find it.
Adrian Rosebrock
Hi Igor — you can grab the table of contents and free sample chapters of Deep Learning for Computer Vision with Python by visiting the link and entering your email on the bottom right. For the Gurus Course, simply go to the PyImageSearch Gurus landing page and click the green button at the top to get the syllabus + 10 free sample lessons.
RomRoc
Really excellent site! Thanks Adrian for your help to go into deep learning and computer vision programming.
For what I understood, a crucial part is to train deep learning to obtain models. It is challenging mostly because we need a huge dataset to obtain good models.
Is there any public archive in Internet to download the most common objects models?
Thanks
Adrian Rosebrock
Arguably the best dataset for common objects is ImageNet. I detail how to obtain ImageNet and train your own CNNs on it inside Deep Learning for Computer Vision with Python.
Nasir
Hi ,
I want to get the box around the detection. i have also read your other post but it only supports upto 20 objects detection. Objects i want to get identified are not supported by that model but with this model they does. Kindly can you let me know how can I get coordinates of detected object to track them with this model.
Thanks in advance
Adrian Rosebrock
You can’t directly convert a model used for image classification and then use it for object detection. You would need to either (1) train your own object detection network from scratch on objects you are interested in recognizing or (2) fine-tune an existing network that is used for object detection.
Dixon Dick
Adrian,
Thanks for all you do, your work is easy to use, foundational and informative.
Just completed an install for OpenCV 3.3, Python 2.7.12, Ubuntu 16.04.3 using your previous install instructions here:
https://pyimagesearch.com/2016/10/24/ubuntu-16-04-how-to-install-opencv/
Perhaps you have updated these? Didn’t find anything for 3.3 except the back ref to this so I went through it from scratch.
There were a couple of challenges and I captured my notes. Let me know how to post to you. Might be a bit long for this comment tool.
Warmest regards,
dcd
Adrian Rosebrock
Hi Dixon — the instructions should work for OpenCV 3.3 but you’d download and reference OpenCV 3.3 instead. Thanks for your comment.
Nasir
I want coordinates with the detection. But unfortunately I am not able to get the coordinates because I want to get them detect in real time. I have also gone through your other posts but models you are using in them have not the objects which I want to get them detected. I want to achieve it via Dnn module but I am not able to get the direction. Ill be really grateful if you can help in this perspective.
Adrian Rosebrock
Hi Nasir — see this post on Real-time object detection with deep learning and OpenCV.
Nasir
Hi Adrian. I have already gone through this post but the problem is the model that is being given in that example is just capable of detecting 20 objects where as model given in this example is capable of detecting objects much more. So my concern here is that, that i want to get detect punching bag in real time and find it in image with bounding box but unfortunately I am not able to do so with this model. I am seeking help in this prospective.
Thanks in advance
Adrian Rosebrock
Hi Nasir — I understand your question, please see my reply above. You cannot use the model used in this blog post for object detection — it can only be used for image classification. You would need to either (1) train an object detection model from scratch to detect any objects you are interested in or (2) perform fine-tuning or an existing object detection model. For what it’s worth, I’m covering object detection models (and how to train them) inside Deep Learning for Computer Vision with Python.
Mario
I Adrian, love your work, very very useful!
I’ve a problem, this algorithm doesn’t find a person in this photo https://mosaic01.ztat.net/vgs/media/pdp-zoom/K4/85/1H/04/JA/11/K4851H04J-A11@10.jpg
How can I add it (and other images) to the training?
Adrian Rosebrock
Have you tried using a dedicated pedestrian detector?
You cannot directly add additional training images. You would need to instead train from scratch or perform transfer learning such as fine-tuning. I cover both inside Deep Learning for Computer Vision with Python.
Wenkang
Hello Dr. Rosebrock,
I read the fine-tuning chapter of your book, and it is based on keras, whose backend is either tensorflow or therno.
But most the pre-trained models used in Raspberry Pi is from caffe.
The problem now is, I cannot deploy the fine-tuned model (in keras) on Raspberry.
Personally,
Q1: I have to use caffe, not keras, to fine-tune a pre-trained model if I want to deploy that on raspberry after fine-tunning. Am I correct ?
Q2: And if want to use keras for fine-tuning, and then deploy the model on Raspberry(if I use cv2.dnn.readNetFromCaffe). What should I do ?
Thanks
Adrian Rosebrock
1. Unfortunately OpenCV does not have any bindings to accept a Keras input model and use it via their “dnn” module.
2. OpenCV does support TensorFlow models but with limited functionality.
3. If you would like to use a deep learning model via OpenCV’s “dnn” module you should use Caffe to train and export your model.
4. That said…if your model is already trained via Keras you don’t need to use OpenCV’s “module”. You can run it on the Pi directly. See this blog post for a complete guide.
Wenkang
Clear!
Thank you so much.
lee
good
ahmed mansour
hello
thank you ver much
you are very helpfull man
how i acan make my module
to identify person faces and
can identify mobile and chairs and laptop
Adrian Rosebrock
You would need to use a dedicated library for face recognition. I cover face recognition inside the PyImageSearch Gurus course. You can also look into strictly deep learning-based face recognition algorithms such as OpenFace and face embeddings.
Dann
Hi Adrian
I am still new here and hope that you will be able to help me in this. Thankyou
So I have already downloaded the whole folder from the email. Also, I am using the Raspberry Pi
For the Deep learning and OpenCV classification results part , am I suppose to right click the deep-learning-opencv and click on “open in terminal”?
After opening the terminal, am i also just suppose to copy and paste this only?
“$ python deep_learning_with_opencv.py”
therefore the whole sentence will be pi@raspberrypi:~/Desktop/deep-learning-opencv $ python deep_learning_with_opencv.py.
However this was wrong because there was error poping out. Where did i go wrong and What should i copy and paste in order for it to work?
Adrian Rosebrock
I would suggest using the “cd” command to change directory to where you downloaded the code. The “$” indicates the shell. You do not need to copy and paste it. You can see examples of how to execute the script in the blog post.
Ajeya B Jois
cv2.dnn.blobFromImage(image,scalefactor=1,size=(224,224),mean=(104,117,123)) this line is giving me error eventhough am using open cv 3.3
please help anyone
Adrian Rosebrock
What is the error you are getting?
Muthukumar
usage: deep_learning_with_opencv.py [-h] -i IMAGE -p PROTOTXT -m MODEL -l
LABELS
deep_learning_with_opencv.py: error: argument -i/–image is required
Adrian Rosebrock
You need to supply the command line arguments as I do in this script. Please read on up command line arguments before continuing.
Muthukumar
hi adrian
while i am running the code it shows erorr.
the problem is when i am trying to give the” –image images/jemma.png”,
it shows ‘images ‘ is an invalid syntax.
i can’t give input arguments form command window.
how to solve this
hfad
how can I read a .caffemodel file? Can I look at the code used in it?
Also, can I look at the 1000+ images in the datasets used? How and where?
Thank you so much
Adrian Rosebrock
The Caffe model are the weights obtained after training a neural network. The networks covered in this post were trained on the ImageNet dataset. I discuss how to train our own neural networks inside Deep Learning for Computer Vision with Python.
yates
That’s cool.Where Can I get the demo?
Adrian Rosebrock
Please use the “Downloads” section of this blog post to download the source code + example images.
jackliu
Very good!!!!!
Adrian Rosebrock
Thanks Jackliu 🙂
Arvind
Hey
How do you go about training the model for deep learning? I’m not sure if I’m missing anything.
If someone can help me out it will be great.
Thanks in advance
Adrian Rosebrock
Hey Arvind — I discuss how to train your own custom deep learning models quite a bit in this blog post. Take a look at this page for a list of all deep learning tutorials here on PyImageSearch. You should also take a look at my book, Deep Learning for Computer Vision with Python, which discusses how to train your own deep learning models in detail.
Arsam Ali
Hey Adrian!
I just downloaded the source code and all other files then I opened the deep_learning_with_opencv.py file with my IDLE and ran it but it gives me this error.
usage: deep_learning_with_opencv.py [-h] -i IMAGE -p PROTOTXT -m MODEL -l
LABELS
deep_learning_with_opencv.py: error: the following arguments are required: -i/–image, -p/–prototxt, -m/–model, -l/–labels
Kindly guide me how to use this code. I opened the python terminal and wrote the command you have mentioned above as well but i was getting an error on that.
Adrian Rosebrock
Hey Arsam — you need to execute the script from your terminal and supply the command line arguments. If you are new to command line arguments, that’s okay, but you need to read up on them first before you try to execute the script.
Pudding
thank you
lewlovehow
it is just what I want
Yuan
I’m learning opencv and I love it
Adrian Rosebrock
That’s wonderful to hear Yuan! 🙂
Michael
Hi Adrian!
Many thanks – this works great with the pre-trained model which you provide.
I tried out some other models as well (e.g., inception or bvlc_googlenet), but they do not seem to provide shapes as an output to actually draw the rectangle (detections.shape is undefined). Do you know of ther – more completely trained – models which also provide the shapes in order to draw the rectangles?
Many thanks and all the best,
Michael
Adrian Rosebrock
Hey Michael — I think you’re confusing “image classification” with “object detection”. Image classification will assign a single label to an image while object detection will return the bounding boxes of each object in the image. See this post for more details.
hamze60
Hi,
I understand that this is called image classification. However as a test, I tried to run this program on another image, containing two obvious objects, like a clear dog and cat. While the returned top prediction matches one of objects with high probability, the other object is not detected at all (no high probability is assigned to that). but when I delete the main object, the other one is detected strongly.
is there any explanation about how this network works?
Adrian Rosebrock
What do you mean by you “delete” the main object? You use a photo editing application and remove the object?
Pha
I’m found some error.they show me that “terminate called after throwing an instance of std::bad_alloc”
How can I fix this ??
Thank.
— I run on my rasp pi 3-stretch and open-cv 3.5
Eric
Hi Adrian,
Thanks for your great work.
I am now running Inception V3 based on Tensorflow upon Raspberry pi3, openCV is not used.
This paper seems like another method.
A very basic question: Do I have install Tensorflow on Raspberry if I want to try a trained model imported from Tensorflow based on openCV?
Thanks.
Adrian Rosebrock
The OpenCV library provides methods to load TensorFlow models, but they are a bit buggy so you might struggle with them (just fair warning). That said, no, you do not have to install TensorFlow to load your model provided that you are using OpenCV’s built-in functions.
Wenkang
Hello Adrian,
Thanks for your excellent work. I followed your step-by-step tutorial and successfully realized deep learning on opencv.
I once also tried to install tensorflow on Raspberry Pi3, and ran the Inception model. And that really requires a longer time to identify a picture.
Based on opencv, the inference time much samller. That’s really practical.
Does it mean compared with opencv based deep learning, running deep learning model upon a framework, e.g. Tensorflow, on resource limited hardware, has no practical meaning ? Is there any other options if we don’t use opencv ?
Adrian Rosebrock
I’m not sure why your TensorFlow model may have executed so slowly. It might be due to the actual code you were using or the model itself. OpenCV certainly facilitates real-time image processing but based on pure inference time there shouldn’t be a huge difference between the two.
Eric
Thanks.
openCV has a new release of its deep learning library, opencv_contrib. I have realized the implementation of some models from caffe and TF on Respberry, without installing the deep learning framework.
Thanks.
Eric
Hello Dr. Adrian,
Thanks, it works based on opencv.
Do you have any tutorial that opencv reads model from tensorflow ? Or do you have any tutorial about how to export pre-trained model from tensorflow ?
Adrian Rosebrock
I do not have any tutorials on using TensorFlow models with OpenCV. The TensorFlow functionality with OpenCV is still a bit fragile. It may be a few more releases until OpenCV + TensorFlow models work well together (at least that’s what I’ve gathered from my own experience).
Eric
Thanks.
Do you have tutorials on exporting well trained network from caffe , if we want to deploy them in Raspberry?
Adrian Rosebrock
If your model is already trained via Caffe you can take the prototxt and model file and then use them on the Pi.
ASSAM ALZOOKERY
Can you share your code how are you using tensorflow?
Thank you
qq
good
jibola
I tried using this code to run mobilenet. i got the mobilenet model and protxt from the official git page. the results are all wrong. is this a code problem or model problem.
the squeezenet and googlenet work fine
Adrian Rosebrock
You should double-check what types of preprocessing the official MobileNet repo performed — you may need to update the preprocessing steps.
dongdong hu
please give me a demo
Adrian Rosebrock
This blog post includes a demo of running a deep neural network on input images using OpenCV. You can use the “Downloads” section of this blog post download the code + example images.
mgg
Thanks for your excellent work.
Adrian Rosebrock
Thank you mgg, I’m glad you are enjoying the PyImageSearch blog 🙂
Bryant Portilla Guamán
Hi Adrian, I like your work
I have a question
How can I draw a box of the object detected? with this example, I want to know the coords of the object…
Thank you
Adrian Rosebrock
The network used here is for image classification. What you are trying to perform is object detection. See this blog post as well as this one.
Artur
Hi Adrian,
I have an error
net = cv2.dnn.readNetFromCaffe(args[“prototxt”], args[“model”])
AttributeError: module ‘cv2’ has no attribute ‘dnn’
Plese help me to fix it. I use openCV 3.4.1
Adrian Rosebrock
It sounds like you may not have OpenCV 3.4.1. You need OpenCV 3.3+ for the “dnn” module and it appears that either:
1. You are not using OpenCV 3.4.1
2. Your install of OpenCV 3.4.1 does not include the “dnn” module for some particular reason — perhaps check your “cmake” output when you compiled and installed OpenCV.
Zee
I am having following error while executing “args = vars(ap.parse_args())”
usage: ipykernel_launcher.py [-h] -i IMAGE -p PROTOTXT -m MODEL -l LABELS
Adrian Rosebrock
If you’re new to Python command line arguments, that’s okay, but make sure you read this post first.
Zain
Adrian, thanks for your reply. I have already read your post related to command line arguments, but I am facing the same issue given below. I am working on WIndows Platform., is it something because of Operating system?
usage: ipykernel_launcher.py [-h] -n NAME
Adrian Rosebrock
No. It has nothing to do with your system. Please make sure you read the argument parsing tutorial I linked you to.
Mohit
Hi, thanks for the tutorial! In general, what are the advantages of using OpenCV’s Dnn module rather than just native Tensorflow? Are there any speed, memory, or other performance gains? To my knowledge, Tensorflow’s graph also pushes its forward pass in C++, rather than Python, so I would think the performance would be similar, right?
Thanks
Adrian Rosebrock
The forward passes would indeed be similar, although OpenCV itself, depending on how you compile it, can include some additional optimizations. It’s really about convenience and how your workflow works. If it’s already working with TensorFlow I wouldn’t feel the need to switch to the OpenCV pipeline.
Anil Bhaskar
Hi Adrian, that you sharing great post. I am following you posts and learning deep learning.
I am java developer and have very basic knowledge of python.
I have set up the env using anaconda and downloaded the source code and trying to run it using pyCharm/jupyter, but getting error like
usage: deep_learning_with_opencv.py [-h] -i IMAGE -p PROTOTXT -m MODEL -l
LABELS
deep_learning_with_opencv.py: error: argument -i/–image is required
Where should I pass the image path. I am unable to figure out. Thanks again.
Anil Bhaskar
Never mind, I got it. So silly.
sergis nicolaou
Hi,
When working with TensorFlow, what do i need to write in the arguments?
Thanks
sergis nicolaou
i forgot to mention that i have my own trained model
harish
Facing this issue !
Trying to run detect_faces_video.py program
net = cv2.dnn.readNetFromCaffe(args[“prototxt”], args[“model”])
AttributeError: ‘module’ object has no attribute ‘dnn’
Adrian Rosebrock
You need at least OpenCV 3.3 installed on your system. It sounds like you are using an older version of OpenCV. I would recommend you follow one of my OpenCV install guides to help you get OpenCV installed.
J S Sunil
How do I install dnn with opencv python on my linux laptop
Adrian Rosebrock
You can follow any one of my OpenCV install guides.
Mhamed
Hi adrian thank for your tuto , i’m working now on slef driving car so i’m losing my self in dousen of tuto without result , so my goal is to train my own model to detect trafic sign and the road .. and i don’t know the efficient way to do this , i tried tensorflow but it seems not working in raspberry pi because of the huge computation that can take when loading the pretrained model, what can you suggest for me please , thank you for helping
Adrian Rosebrock
Hey Mhamed, it’s great that you’re interested in self-driving cars. I actually cover how to train your own traffic sign detector inside Deep Learning for Computer Vision with Python. The book will also help you understand deep learning for computer vision in-depth. I would suggest you start there.
Claus
Hi Adrian,
thanks for your fine blogs.
This one has some possibilities to struggle while installing opencv >= 3.3 in your virtual machine.
If you “sudo apt-get update and upgrade” the system there will be installed a new Python library with version number 3.4.3 (was 3.4.0) before. The CMAKE struggles then because it requires “exact” 3.4.0. and fails with no Python3 support.
Running with the original delivered VM with no update to python3.4-dev as suggested in https://pyimagesearch.com/2015/07/20/install-opencv-3-0-and-python-3-4-on-ubuntu/
everything works…
Best regards, Claus
john
Hi everyone and thanks for this tutorial,
i wonder how one can have access to a conv layer to display activations output
(Let’s say i work with vgg16 and want this to display conv1_1 output?)
In Caffe, you do this with:
net.blobs[‘data’].data[…] = transformed_image
sw_conv1 = net.blobs[‘conv1_1’].data
but i don’t have a clue to do this with opencv
Best regards, john
arunodhayan
I couldn’t able to draw bounding box using Google net isn’t it impossible to draw
Adrian Rosebrock
I think you’re confusing “image classification” with “object detection”. See this tutorial for a gentle introduction to object detection.
Vlad
Hi Adrian,
Thank you very much for this great post.
I would be happy to know how can I get access to the intermediate layers as well? Is there any way to do it?
Thanks!
Vlad
Adrian Rosebrock
You can technically do that with OpenCV but it’s a real pain. I instead suggest using whatever native framework the deep learning model was trained on.
Walid
Thanks a lot
you mentioned “mean subtraction (104, 117, 123) to normalize the input”
Can you please elaborate how these numbers were calculated?
Adrian Rosebrock
Those are the mean RGB values across all images in the ImageNet dataset.
Walid
Great.. Thanks a lot for clarification
Sotades
Concerning those normalised values: did you calculate those values yourself, or were they provided in the ImageNet documentation somewhere?
If you calculated those values yourself, was there some code available to do that?
Adrian Rosebrock
Those were computed by averaging the pixel intensities across all images in the ImageNet training dataset. If you’re interested in learning how to do that, I cover that topic inside Deep Learning for Computer Vision with Python.
Daniel
I wanna learn deep learning
Adrian Rosebrock
Hey Daniel — if you’re interested in studying deep learning in-depth you should definitely read through Deep Learning for Computer Vision with Python. That book will teach you deep learning in-depth.
Daniel
I like deep leaning
Jonas
Hi Adrian, thanks for these informations.
I’m wondering about one thing: We are performing a forward pass thru the network, and DNN will return multiple outputs.
preds = net.forward()
idxs = np.argsort(preds[0])[::-1][:5]
In your code, you’re just taking the very first output “preds[0]” and discarding the rest.
My question is: Why is it giving us multiple outputs? And how can we be sure to take the first one only?
Thanks a lot 🙂
Adrian Rosebrock
The argsort code is sorting based on the probability of the prediction. We take the top-5 results. The first result can be accessed via
idxs[0]
Lalith
Hi Adrian,
How do I create my own prototxt and caffe files so that I can apply my own model parameters?
I am having Windows, do i need Linux operating system?
Adrian Rosebrock
If you would like to train your own custom deep learning object detectors you can follow this tutorial as well as Deep Learning for Computer Vision with Python.
Lama
Hi Adrian,
i wish to do the same but with people faces as a classes, for example i have two classes my name Lama and you Adrian. when it sees my image i want to put my name on the image, and if it sees you i want to put Adrian on the image. how to do that? can you guide me please
Adrian Rosebrock
I think you want to perform face recognition.
jijoo
Hello
this is a very very good and useful code.
can you tell us if we need to count the number of objects in the image?
how can we solve this? and what should we add?
thanks
Adrian Rosebrock
1. Initialize a Python dictionary object where the “key” is the label name and the “value” is an integer count
2. Loop over detected objects
3. Lookup label in dictionary
4. Increment count associated with label
5. Store new count in dictionary
Kondor
Hi Adrian! Thank you for another nice tutorial. When I run it my probability numbers are slightly different from yours (I only got 74% on Jemma, but 100% on both bald eagle and vending machine, some minor classes are different as well). Is this something expected? I thought that for a pre-trained model results would be repeatable …
Thank you!
Mike Button
Great tutorial, Adrian! Just wondering, have the download data sets changed since you made the tutorial? I can understand that the execution times are different due to the different machines/OS’s but I can’t figure out why the results and the probabilities are so different.
Adrian Rosebrock
No, the datasets used to train the models have not changed, but it may be a difference between OpenCV versions.