Last Updated on April 30, 2022
Table of Contents
- Intersection over Union for object detection
- What is Intersection over Union?
- Where are you getting the ground-truth examples from?
- Why do we use Intersection over Union?
- Implementing Intersection over Union in Python
- Comparing predicted detections to the ground-truth with Intersection over Union
- Alternative Intersection over Union implementations
- Summary
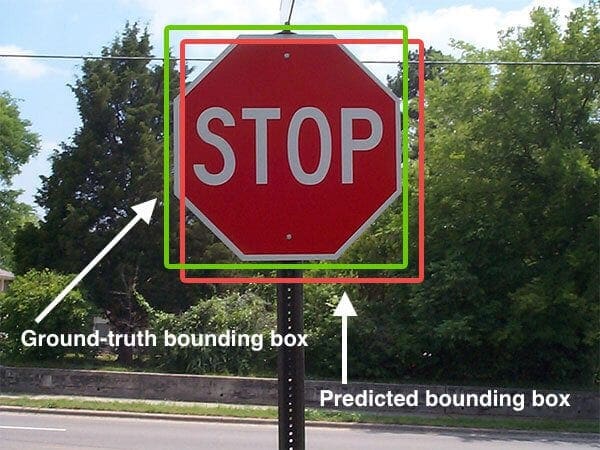
Intersection over Union (IoU) is used to evaluate the performance of object detection by comparing the ground truth bounding box to the preddicted bounding box and IoU is the topic of this tutorial.
A solid understanding of IoU requires practical applications. Access to a well-curated dataset allows learners to engage with real-world challenges, enhancing their understanding of object detection and how IoU is applied for accuracy.
Roboflow has free tools for each stage of the computer vision pipeline that will streamline your workflows and supercharge your productivity.
Sign up or Log in to your Roboflow account to access state of the art dataset libaries and revolutionize your computer vision pipeline.
You can start by choosing your own datasets or using our PyimageSearch’s assorted library of useful datasets.
Bring data in any of 40+ formats to Roboflow, train using any state-of-the-art model architectures, deploy across multiple platforms (API, NVIDIA, browser, iOS, etc), and connect to applications or 3rd party tools.
With a few images, you can train a working computer vision model in an afternoon. For example, bring data into Roboflow from anywhere via API, label images with the cloud-hosted image annotation tool, kickoff a hosted model training with one-click, and deploy the model via a hosted API endpoint. This process can be executed in a code-centric way, in the cloud-based UI, or any mix of the two.
Over 250,000 developers and machine learning engineers from companies such as Cardinal Health, Walmart, USG, Rivian, Intel, and Medtronic build computer vision pipelines with Roboflow. Get started today, no credit card required.
Today’s blog post is inspired from an email I received from Jason, a student at the University of Rochester.
Jason is interested in building a custom object detector using the HOG + Linear SVM framework for his final year project. He understands the steps required to build the object detector well enough — but he isn’t sure how to evaluate the accuracy of his detector once it’s trained.
His professor mentioned that he should use the Intersection over Union (IoU) method for evaluation, but Jason’s not sure how to implement it.
I helped Jason out over email by:
- Describing what Intersection over Union is.
- Explaining why we use Intersection over Union to evaluate object detectors.
- Providing him with some example Python code from my own personal library to perform Intersection over Union on bounding boxes.
My email really helped Jason finish getting his final year project together and I’m sure he’s going to pass with flying colors.
With that in mind, I’ve decided to turn my response to Jason into an actual blog post in hopes that it will help you as well.
To learn how to evaluate your own custom object detectors using the Intersection over Union evaluation metric, just keep reading.
- Update July 2021: Added section on alternative Intersection over Union implementations, including IoU methods that can be used as loss functions when training deep neural network object detectors.
- Update Apr 2022: Added TOC and linked the post to a new intersection over Union tutorial.
- Update Dec 2022: Removed link to the dataset as the dataset is no longer publicly available and refreshed the content.
Intersection over Union for object detection
In the remainder of this blog post I’ll explain what the Intersection over Union evaluation metric is and why we use it.
I’ll also provide a Python implementation of Intersection over Union that you can use when evaluating your own custom object detectors.
Finally, we’ll look at some actual results of applying the Intersection over Union evaluation metric to a set of ground-truth and predicted bounding boxes.
What is Intersection over Union?
Intersection over Union is an evaluation metric used to measure the accuracy of an object detector on a particular dataset. We often see this evaluation metric used in object detection challenges such as the popular PASCAL VOC challenge.
You’ll typically find Intersection over Union used to evaluate the performance of HOG + Linear SVM object detectors and Convolutional Neural Network detectors (R-CNN, Faster R-CNN, YOLO, etc.); however, keep in mind that the actual algorithm used to generate the predictions doesn’t matter.
Intersection over Union is simply an evaluation metric. Any algorithm that provides predicted bounding boxes as output can be evaluated using IoU.
More formally, in order to apply Intersection over Union to evaluate an (arbitrary) object detector we need:
- The ground-truth bounding boxes (i.e., the hand labeled bounding boxes from the testing set that specify where in the image our object is).
- The predicted bounding boxes from our model.
As long as we have these two sets of bounding boxes we can apply Intersection over Union.
Below I have included a visual example of a ground-truth bounding box versus a predicted bounding box:

In the figure above we can see that our object detector has detected the presence of a stop sign in an image.
The predicted bounding box is drawn in red while the ground-truth (i.e., hand labeled) bounding box is drawn in green.
Computing Intersection over Union can therefore be determined via:

Examining this equation you can see that Intersection over Union is simply a ratio.
In the numerator we compute the area of overlap between the predicted bounding box and the ground-truth bounding box.
The denominator is the area of union, or more simply, the area encompassed by both the predicted bounding box and the ground-truth bounding box.
Dividing the area of overlap by the area of union yields our final score — the Intersection over Union.
Where are you getting the ground-truth examples from?
Before we get too far, you might be wondering where the ground-truth examples come from. I’ve mentioned before that these images are “hand labeled”, but what exactly does that mean?
You see, when training your own object detector (such as the HOG + Linear SVM method), you need a dataset. This dataset should be broken into (at least) two groups:
- A training set used for training your object detector.
- A testing set for evaluating your object detector.
You may also have a validation set used to tune the hyperparameters of your model.
Both the training and testing set will consist of:
- The actual images themselves.
- The bounding boxes associated with the object(s) in the image. The bounding boxes are simply the (x, y)-coordinates of the object in the image.
The bounding boxes for the training and testing sets are hand labeled and hence why we call them the “ground-truth”.
Your goal is to take the training images + bounding boxes, construct an object detector, and then evaluate its performance on the testing set.
An Intersection over Union score > 0.5 is normally considered a “good” prediction.
Why do we use Intersection over Union?
If you have performed any previous machine learning in your career, specifically classification, you’ll likely be used to predicting class labels where your model outputs a single label that is either correct or incorrect.
This type of binary classification makes computing accuracy straightforward; however, for object detection it’s not so simple.
In all reality, it’s extremely unlikely that the (x, y)-coordinates of our predicted bounding box are going to exactly match the (x, y)-coordinates of the ground-truth bounding box.
Due to varying parameters of our model (image pyramid scale, sliding window size, feature extraction method, etc.), a complete and total match between predicted and ground-truth bounding boxes is simply unrealistic.
Because of this, we need to define an evaluation metric that rewards predicted bounding boxes for heavily overlapping with the ground-truth:
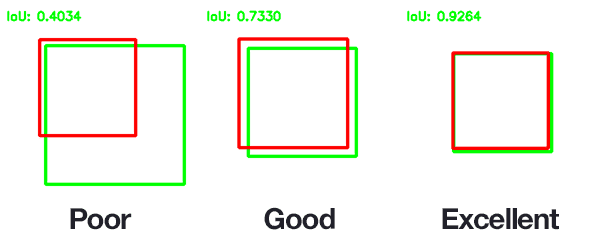
In the above figure I have included examples of good and bad Intersection over Union scores.
As you can see, predicted bounding boxes that heavily overlap with the ground-truth bounding boxes have higher scores than those with less overlap. This makes Intersection over Union an excellent metric for evaluating custom object detectors.
We aren’t concerned with an exact match of (x, y)-coordinates, but we do want to ensure that our predicted bounding boxes match as closely as possible — Intersection over Union is able to take this into account.
Implementing Intersection over Union in Python
Now that we understand what Intersection over Union is and why we use it to evaluate object detection models, let’s go ahead and implement it in Python.
Before we get started writing any code though, I want to provide the five example images we will be working with:
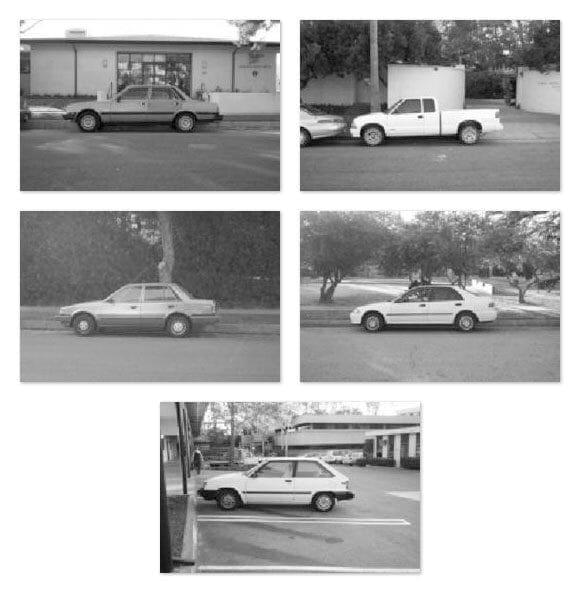
These images are part of the CALTECH-101 dataset used for both image classification and object detection.
This dataset was publicly available but as of December of 2022 it is no longer public.
Inside the PyImageSearch Gurus course I demonstrate how to train a custom object detector to detect the presence of cars in images like the ones above using the HOG + Linear SVM framework.
I have provided a visualization of the ground-truth bounding boxes (green) along with the predicted bounding boxes (red) from the custom object detector below:
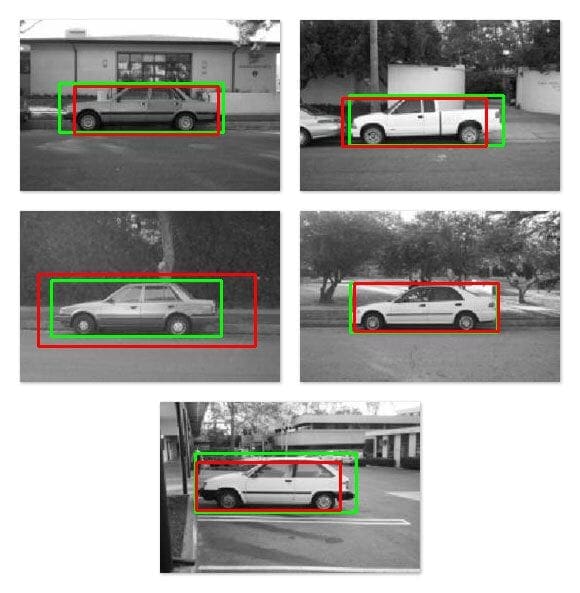
Given these bounding boxes, our task is to define the Intersection over Union metric that can be used to evaluate how “good (or bad) our predictions are.
With that said, open up a new file, name it intersection_over_union.py , and let’s get coding:
# import the necessary packages
from collections import namedtuple
import numpy as np
import cv2

# define the `Detection` object
Detection = namedtuple("Detection", ["image_path", "gt", "pred"])
We start by importing our required Python packages. We then define a Detection object that will store three attributes:
image_path: The path to our input image that resides on disk.gt: The ground-truth bounding box.pred: The predicted bounding box from our model.
As we’ll see later in this example, I’ve already obtained the predicted bounding boxes from our five respective images and hardcoded them into this script to keep the example short and concise.
For a complete review of the HOG + Linear SVM object detection framework, please refer to this blog post. And if you’re interested in learning more about training your own custom object detectors from scratch, be sure to check out the PyImageSearch Gurus course.
Let’s go ahead and define the bb_intersection_over_union function, which as the name suggests, is responsible for computing the Intersection over Union between two bounding boxes:
def bb_intersection_over_union(boxA, boxB):
	# determine the (x, y)-coordinates of the intersection rectangle
	xA = max(boxA[0], boxB[0])
	yA = max(boxA[1], boxB[1])
	xB = min(boxA[2], boxB[2])
	yB = min(boxA[3], boxB[3])

	# compute the area of intersection rectangle
	interArea = max(0, xB - xA + 1) * max(0, yB - yA + 1)

	# compute the area of both the prediction and ground-truth
	# rectangles
	boxAArea = (boxA[2] - boxA[0] + 1) * (boxA[3] - boxA[1] + 1)
	boxBArea = (boxB[2] - boxB[0] + 1) * (boxB[3] - boxB[1] + 1)

	# compute the intersection over union by taking the intersection
	# area and dividing it by the sum of prediction + ground-truth
	# areas - the intersection area
	iou = interArea / float(boxAArea + boxBArea - interArea)

	# return the intersection over union value
	return iou
This method requires two parameters: boxA and boxB , which are presumed to be our ground-truth and predicted bounding boxes (the actual order in which these parameters are supplied to bb_intersection_over_union doesn’t matter).
Lines 11-14 determine the (x, y)-coordinates of the intersection rectangle which we then use to compute the area of the intersection (Line 17).
The interArea variable now represents the numerator in the Intersection over Union calculation.
To compute the denominator we first need to derive the area of both the predicted bounding box and the ground-truth bounding box (Lines 21 and 22).
The Intersection over Union can then be computed on Line 27 by dividing the intersection area by the union area of the two bounding boxes, taking care to subtract out the intersection area from the denominator (otherwise the intersection area would be doubly counted).
Finally, the Intersection over Union score is returned to the calling function on Line 30.
Now that our Intersection over Union method is finished, we need to define the ground-truth and predicted bounding box coordinates for our five example images:
# define the list of example detections
examples = [
	Detection("image_0002.jpg", [39, 63, 203, 112], [54, 66, 198, 114]),
	Detection("image_0016.jpg", [49, 75, 203, 125], [42, 78, 186, 126]),
	Detection("image_0075.jpg", [31, 69, 201, 125], [18, 63, 235, 135]),
	Detection("image_0090.jpg", [50, 72, 197, 121], [54, 72, 198, 120]),
	Detection("image_0120.jpg", [35, 51, 196, 110], [36, 60, 180, 108])]
As I mentioned above, in order to keep this example short(er) and concise, I have manually obtained the predicted bounding box coordinates from my HOG + Linear SVM detector. These predicted bounding boxes (And corresponding ground-truth bounding boxes) are then hardcoded into this script.
For more information on how I trained this exact object detector, please refer to the PyImageSearch Gurus course.
We are now ready to evaluate our predictions:
# loop over the example detections
for detection in examples:
	# load the image
	image = cv2.imread(detection.image_path)

	# draw the ground-truth bounding box along with the predicted
	# bounding box
	cv2.rectangle(image, tuple(detection.gt[:2]),
		tuple(detection.gt[2:]), (0, 255, 0), 2)
	cv2.rectangle(image, tuple(detection.pred[:2]),
		tuple(detection.pred[2:]), (0, 0, 255), 2)

	# compute the intersection over union and display it
	iou = bb_intersection_over_union(detection.gt, detection.pred)
	cv2.putText(image, "IoU: {:.4f}".format(iou), (10, 30),
		cv2.FONT_HERSHEY_SIMPLEX, 0.6, (0, 255, 0), 2)
	print("{}: {:.4f}".format(detection.image_path, iou))

	# show the output image
	cv2.imshow("Image", image)
	cv2.waitKey(0)
On Line 41 we start looping over each of our examples (which are Detection objects).
For each of them, we load the respective image from disk on Line 43 and then draw the ground-truth bounding box in green (Lines 47 and 48) followed by the predicted bounding box in red (Lines 49 and 50).
The actual Intersection over Union metric is computed on Line 53 by passing in the ground-truth and predicted bounding box.
We then write the Intersection over Union value on the image itself followed by our console as well.
Finally, the output image is displayed to our screen on Lines 59 and 60.
Comparing predicted detections to the ground-truth with Intersection over Union
To see the Intersection over Union metric in action, make sure you have downloaded the source code + example images to this blog post by using the “Downloads” section found at the bottom of this tutorial.
After unzipping the archive, execute the following command:
$ python intersection_over_union.py
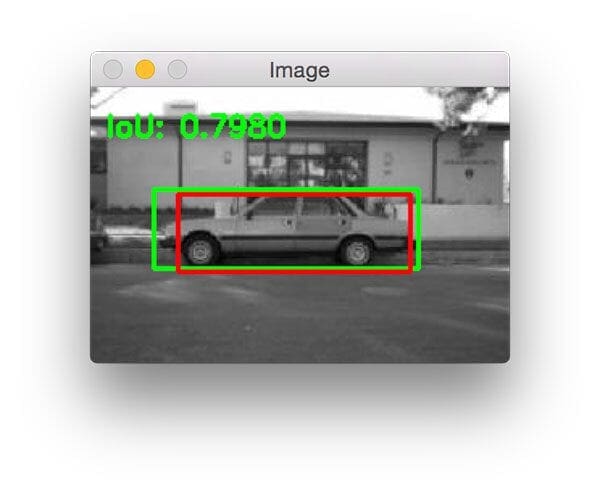
Our first example image has an Intersection over Union score of 0.7980, indicating that there is significant overlap between the two bounding boxes:
The same is true for the following image which has an Intersection over Union score of 0.7899:

Notice how the ground-truth bounding box (green) is wider than the predicted bounding box (red). This is because our object detector is defined using the HOG + Linear SVM framework which requires us to specify a fixed size sliding window (not to mention, an image pyramid scale and the HOG parameters themselves).
Ground-truth bounding boxes will naturally have a slightly different aspect ratio than the predicted bounding boxes, but that’s okay provided that the Intersection over Union score is > 0.5 — as we can see, this is still a great prediction.
The next example demonstrates a slightly “less good” prediction where our predicted bounding box is much less “tight” than the ground-truth bounding box:

The reason for this is because our HOG + Linear SVM detector likely couldn’t “find” the car in the lower layers of the image pyramid and instead fired near the top of the pyramid where the image is much smaller.
The following example is an extremely good detection with an Intersection over Union score of 0.9472:
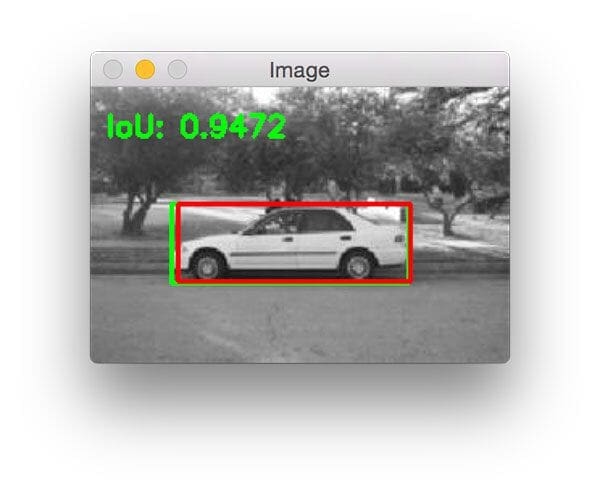
Notice how the predicted bounding box nearly perfectly overlaps with the ground-truth bounding box.
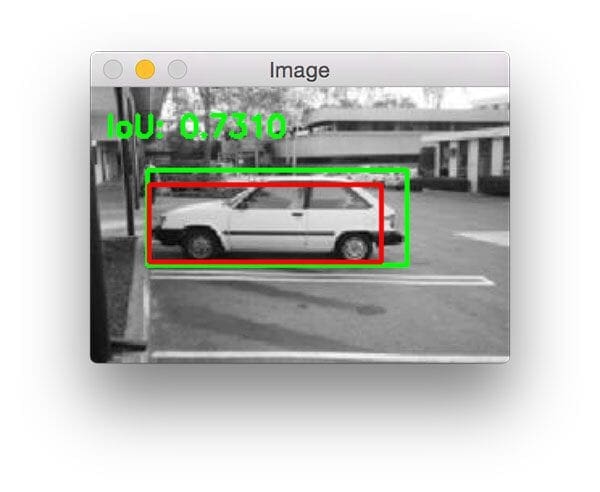
Here is one final example of computing Intersection over Union:
Alternative Intersection over Union implementations
This tutorial provided a Python and NumPy implementation of IoU. However, there are other implementations of IoU that may be better for your particular application and project.
For example, if you are training a deep learning model using a popular library/framework such as TensorFlow, Keras, or PyTorch, then implementing IoU using your deep learning framework should improve the speed of the algorithm.
The following list provides my suggested alternative implementations of Intersection over Union, including implementations that can be used as loss/metric functions when training a deep neural network object detector:
- TensorFlow’s MeanIoU function, which computes the mean Intersection over Union for a sample of object detection results.
- TensorFlow’s GIoULoss loss metric, which was first introduced in Generalized Intersection over Union: A Metric and A Loss for Bounding Box Regression by Rezatofighi et al. Just as you train a neural network to minimize mean squared error, cross-entropy, etc., this method acts as a drop-in replacement loss function, potentially leading to higher object detection accuracy.
- A PyTorch implementation of IoU (which I have not tested or used), but seems to be helpful to the PyTorch community.
- We have a great Mean Average Precision (mAP) Using the COCO Evaluator tutorial that will walk you through using intersection over union for evaluating YOLO performance. Learn the theoretical concepts of Mean Average Precision (mAP) and evaluate the YOLOv4 detector using the gold standard COCO Evaluator.
Of course, you can always take my Python/NumPy implementation of IoU and convert it to your own library, language, etc.
Happy hacking!
What's next? We recommend PyImageSearch University.
86+ total classes • 115+ hours hours of on-demand code walkthrough videos • Last updated: January 2026
★★★★★ 4.84 (128 Ratings) • 16,000+ Students Enrolled
I strongly believe that if you had the right teacher you could master computer vision and deep learning.
Do you think learning computer vision and deep learning has to be time-consuming, overwhelming, and complicated? Or has to involve complex mathematics and equations? Or requires a degree in computer science?
That’s not the case.
All you need to master computer vision and deep learning is for someone to explain things to you in simple, intuitive terms. And that’s exactly what I do. My mission is to change education and how complex Artificial Intelligence topics are taught.
If you're serious about learning computer vision, your next stop should be PyImageSearch University, the most comprehensive computer vision, deep learning, and OpenCV course online today. Here you’ll learn how to successfully and confidently apply computer vision to your work, research, and projects. Join me in computer vision mastery.
Inside PyImageSearch University you'll find:
- ✓ 86+ courses on essential computer vision, deep learning, and OpenCV topics
- ✓ 86 Certificates of Completion
- ✓ 115+ hours hours of on-demand video
- ✓ Brand new courses released regularly, ensuring you can keep up with state-of-the-art techniques
- ✓ Pre-configured Jupyter Notebooks in Google Colab
- ✓ Run all code examples in your web browser — works on Windows, macOS, and Linux (no dev environment configuration required!)
- ✓ Access to centralized code repos for all 540+ tutorials on PyImageSearch
- ✓ Easy one-click downloads for code, datasets, pre-trained models, etc.
- ✓ Access on mobile, laptop, desktop, etc.
Summary
In this blog post I discussed the Intersection over Union metric used to evaluate object detectors. This metric can be used to assess any object detector provided that (1) the model produces predicted (x, y)-coordinates [i.e., the bounding boxes] for the object(s) in the image and (2) you have the ground-truth bounding boxes for your dataset.
Typically, you’ll see this metric used for evaluating HOG + Linear SVM and CNN-based object detectors.
To learn more about training your own custom object detectors, please refer to this blog post on the HOG + Linear SVM framework along with the PyImageSearch Gurus course where I demonstrate how to implement custom object detectors from scratch. If you’d like to dive deeper, consider studying computer vision with our free course.
Finally, before you go, be sure to enter your email address in the form below to be notified when future PyImageSearch blog posts are published — you won’t want to miss them!

Download the Source Code and FREE 17-page Resource Guide
Enter your email address below to get a .zip of the code and a FREE 17-page Resource Guide on Computer Vision, OpenCV, and Deep Learning. Inside you'll find my hand-picked tutorials, books, courses, and libraries to help you master CV and DL!

