Table of Contents
- Run YOLO Model in the Browser with ONNX, WebAssembly, and Next.js
- What Is Browser-Based Inference and Why Does It Matter?
- Why Run YOLO in the Browser?
- No Server Required
- Instant Demos and Prototypes
- Low Latency and High Responsiveness
- Cost Efficiency
- Privacy by Default
- How Browser-Based Inference Works
- Configuring Your Development Environment
- Prerequisites
- Step 1: Create a New Next.js App
- Step 2: Downgrade to Compatible Versions and Add Required Packages
- Optional: Install ONNX Tools (for model conversion)
- Project Structure
- Exporting and Preparing Your YOLO ONNX Models
- Implementing the Inference Logic (utils.ts)
- Preprocessing with OpenCV.js
- Running Inference with ONNX Runtime Web
- Drawing Bounding Boxes with renderBoxes()
- Sequence Diagram: YOLO Inference Pipeline in utils.ts
- Drawing Bounding Boxes with renderBoxes.ts
- Bringing It All Together with page.tsx
- Browser Inference in Action: Demo + Performance
- Summary
Run YOLO Model in the Browser with ONNX, WebAssembly, and Next.js
In this tutorial, you’ll learn how to run YOLO object detection models directly in your browser using ONNX and WebAssembly (WASM). Instead of relying on Python scripts or GPU-powered servers, this approach allows you to harness the power of modern browsers for real-time inference — no backend needed.
To learn how to run YOLO object detection directly in your browser using ONNX and WebAssembly, just keep reading.
You’ll also build a slick frontend using Next.js and enhance it with OpenCV.js to preprocess images, onnxruntime-web for model execution, and custom canvas rendering to draw predictions in real time.
What Is Browser-Based Inference and Why Does It Matter?
Browser-based inference refers to running your machine learning model entirely on the client side — within the user’s web browser — using technologies such as WebAssembly (WASM) and JavaScript. Instead of sending data to a server, doing inference, and returning predictions, everything happens locally in the browser itself.
This approach has several advantages:
- Privacy-First: Since data never leaves the user’s device, it’s ideal for sensitive use cases.
- Zero Backend Costs: You don’t need a server or GPU — just a browser.
- Instant Feedback: No network latency; predictions show up in real-time.
- Cross-Platform: Compatible with any device that supports a modern browser (e.g., laptops, phones, or tablets).
In our case, we’ll use onnxruntime-web to run a YOLO model exported to Open Neural Network Exchange (ONNX) format. OpenCV.js handles image preprocessing, while WebAssembly ensures that computations run fast, even without native GPU acceleration.
This setup is different from running YOLO on a server (e.g., via Python). In server-based inference, the model runs in a Python backend, often with access to CUDA and PyTorch. In browser-based inference, your model is exported to ONNX and runs using a lightweight, platform-independent runtime like ONNX Runtime Web (ORT Web), powered by WASM.
Why Run YOLO in the Browser?
Running YOLO (You Only Look Once) in the browser may sound like a novelty, but it’s a powerful shift in how we think about deploying real-time object detection models. Here’s why.
No Server Required
Once your model is converted to ONNX and set up with ONNX Runtime Web (ORT Web), everything runs directly in the browser. You don’t need to spin up a Python server or rent GPUs.
Instant Demos and Prototypes
Want to share your model with someone? Just share a URL. They don’t need to install anything — not even Python. This makes browser-based inference perfect for demos, educational tools, and internal prototypes.
Low Latency and High Responsiveness
Because there’s no network round-trip, predictions happen faster, especially for small models (e.g., YOLOv8n or YOLOv11n). This results in a smoother user experience in tasks such as live video detection or interactive annotation.
Cost Efficiency
You aren’t paying cloud fees for every inference. That’s a big win if your app is seeing high traffic or needs to scale globally.
Privacy by Default
All processing stays on the device. If your model is analyzing road conditions, medical scans, or security camera footage, this ensures users’ data never leaves their machine.
In this tutorial, we’ll walk you through setting up YOLO in the browser using ONNX and WASM, and explore how all these benefits come together in practice.
How Browser-Based Inference Works
In traditional AI (Artificial Intelligence) pipelines, inference happens on a server — the browser sends an image, and the server responds with predictions. But browser-based inference flips this design by running the model entirely on the client side — no server required.
This is made possible by ONNX Runtime Web (ORT Web), WebAssembly (WASM), and OpenCV.js. Let’s break it down:
The Inference Lifecycle (End-to-End)
- Model Conversion to ONNX: We begin with a YOLO model (e.g., YOLOv8), which is exported to ONNX format using tools such as
model.export(format="onnx")from Ultralytics. - Loading in the Browser with ONNX Runtime Web: The ONNX model is executed in-browser using ORT Web, which runs via WebAssembly — a fast, binary format that lets us run near-native code in the browser.
- Client-Side Preprocessing with OpenCV.js: Using OpenCV.js (a WebAssembly build of OpenCV), we perform image preprocessing tasks such as resizing, padding, normalization, and channel reordering (BGR to RGB) entirely within the browser.
- Running the YOLO Model: The model’s raw outputs include bounding box coordinates in center-based format (
cx, cy, w, h), an objectness score, and class probabilities. - Applying NMS (Non-Max Suppression): Since the ONNX-exported model may not have NMS embedded — or its ops aren’t supported in-browser — we load a separate ONNX model just for NMS. This filters out redundant overlapping boxes based on IoU (Intersection over Union) and score thresholds.
- Rendering Results: Once final boxes are ready, we render them on an HTML5
<canvas>with bounding boxes, class labels, and confidence scores — all within the browser UI (User Interface).
Quick Tech Explainers
- WASM (WebAssembly): A low-level binary instruction format that runs in browsers with near-native speed, enabling ONNX inference directly on the client.
- OpenCV.js: A WebAssembly version of OpenCV for image manipulation and preprocessing tasks (e.g., resizing and normalization).
- WebGL (Web Graphics Library): An optional fallback backend for ONNX Runtime that leverages GPU acceleration in supported browsers.
- NMS (Non-Max Suppression) ONNX Model: A secondary model we load alongside YOLO to filter overlapping predictions — needed because native PyTorch-style NMS isn’t always Web-compatible.
Bonus: This entire pipeline runs locally, so no data ever leaves the user’s device — a major win for privacy and latency.
YOLO Inference Lifecycle in the Browser
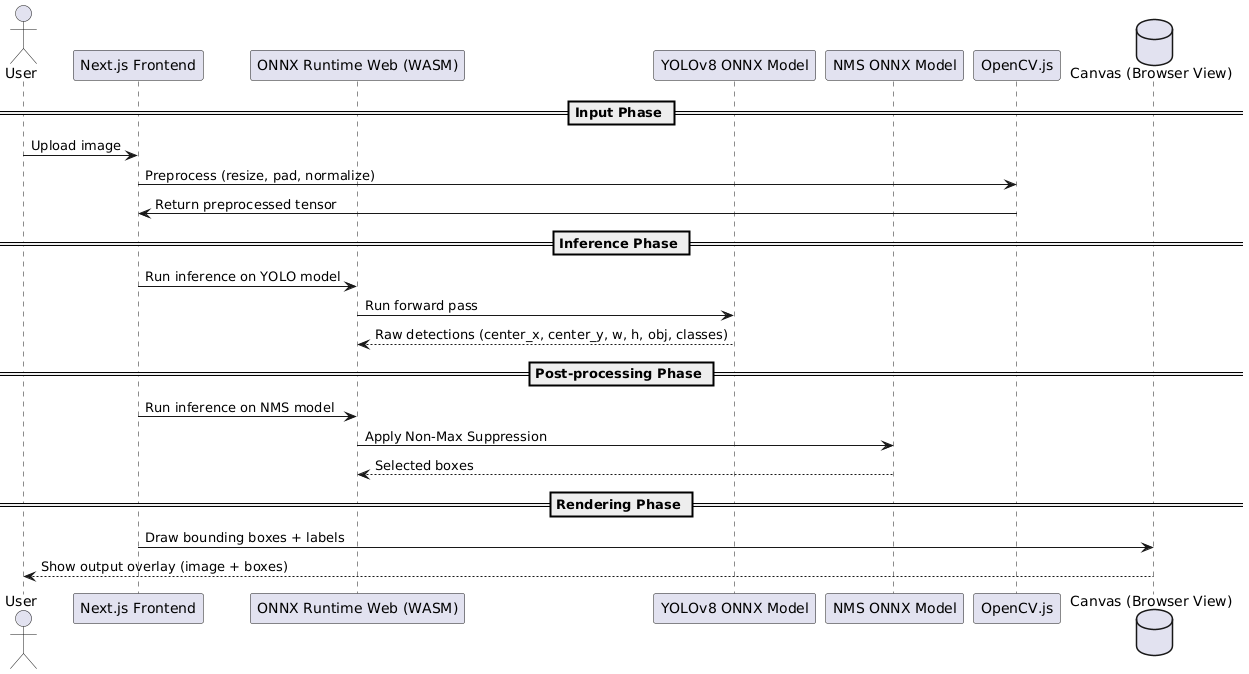
Figure 1 outlines the full pipeline for running YOLOv8 ONNX inference directly in your browser using WebAssembly and ONNX Runtime Web.
Next, we’ll explore how this applies to real-world tasks (e.g., object detection with YOLO models in the browser).
Configuring Your Development Environment
In this section, we’ll initialize a new Next.js project and configure it for running YOLO ONNX models directly in the browser using WebAssembly. We’ll also install the necessary tools for optional ONNX model conversion and NMS setup.
Prerequisites
Before getting started, be sure you have the following installed:
• Node.js (v18 or higher): Required for running and building Next.js apps. Be sure to Download Node.js.
• npm or yarn: Comes with Node.js by default. Either is fine, but we’ll use npm in this tutorial.
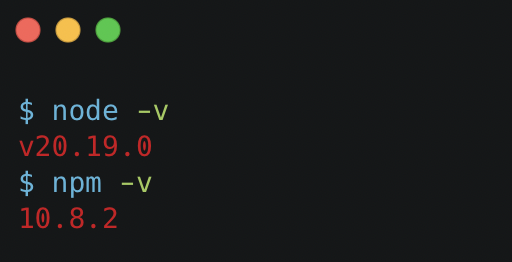
You can verify installation by running:
$ node -v
$ npm -v
Step 1: Create a New Next.js App
We originally planned to use create-next-app@13.4.13 to match the rest of the project setup. However, due to recent package constraints and dependency mismatches, we noticed that even when specifying version 13.4.13, the latest version (v15+) gets installed, along with newer versions of React and other dependencies.
We’ll install the latest version using:
$ npx create-next-app@latest
Select the recommended options when prompted (e.g., App Router, Tailwind CSS, TypeScript). Once the setup is complete, you’ll see a folder (e.g., my-app/) with everything initialized.
By default, your package.json will include dependencies such as the following:
"dependencies": {
  "react": "^19.0.0",
  "react-dom": "^19.0.0",
  "next": "15.3.2"
},
"devDependencies": {
  "typescript": "^5",
  "tailwindcss": "^4",
  "eslint": "^9",
  "eslint-config-next": "15.3.2"
}
However, this setup uses React 19 and Next.js 15, which are not compatible with OpenCV.js and ONNX Runtime Web used in this tutorial.
Step 2: Downgrade to Compatible Versions and Add Required Packages
We’ll now update your dependencies to the following:
- Downgrade React, Next.js, and Tailwind to stable versions
- Install missing packages required for browser-side inference
Open your project’s package.json and replace the entire "dependencies" and "devDependencies" sections with:
"dependencies": {
  "@techstark/opencv-js": "^4.8.0-release.4",
  "@types/node": "20.5.4",
  "@types/react": "18.2.21",
  "@types/react-dom": "18.2.7",
  "autoprefixer": "10.4.15",
  "copy-webpack-plugin": "^11.0.0",
  "eslint": "8.47.0",
  "eslint-config-next": "13.4.19",
  "next": "13.4.19",
  "onnxruntime-web": "^1.15.1",
  "postcss": "8.4.28",
  "react": "18.2.0",
  "react-dom": "18.2.0",
  "tailwindcss": "3.3.3",
  "typescript": "5.2.2"
}
Then run:
npm install
This step ensures:
- You’re using tested versions of React, Next.js, and Tailwind.
- You’ve installed additional packages such as
onnxruntime-web,opencv-js, and the necessary tooling for asset handling.
Optional: Install ONNX Tools (for model conversion)
Although we’ll provide pre-converted YOLO ONNX and NMS models, you can also convert your own using Python. To do so, install the following:
pip install onnx onnxruntime onnxsim onnx_graphsurgeon
This allows you to:
- Convert YOLO PyTorch models to ONNX
- Optimize and simplify ONNX models
- Create custom NMS models for browser inference
You’re now all set to begin building your in-browser YOLO object detection app! 🚀
Need Help Configuring Your Development Environment?

All that said, are you:
- Short on time?
- Learning on your employer’s administratively locked system?
- Wanting to skip the hassle of fighting with the command line, package managers, and virtual environments?
- Ready to run the code immediately on your Windows, macOS, or Linux system?
Then join PyImageSearch University today!
Gain access to Jupyter Notebooks for this tutorial and other PyImageSearch guides pre-configured to run on Google Colab’s ecosystem right in your web browser! No installation required.
And best of all, these Jupyter Notebooks will run on Windows, macOS, and Linux!
Project Structure
Before diving into code, let’s take a quick look at the structure of our YOLO browser-based inference app. This will help you understand how everything fits together — from model loading to image processing and visualization.
Start by accessing this tutorial’s “Downloads” section to retrieve the source code and example images.
From there, take a look at the directory structure:
my-app/
├── app/
│   └── page.tsx               # Main UI logic with file input and canvas rendering
├── lib/
│   ├── utils.ts               # Preprocessing and inference logic
│   └── renderBox.ts           # Utility to draw bounding boxes on canvas
├── public/
│   └── model/                 # Holds ONNX files for browser access
├── styles/                    # Tailwind CSS (auto-generated)
├── package.json               # Project dependencies and scripts
├── tsconfig.json              # TypeScript configuration
└── next.config.js             # Next.js custom settings
Let’s break down the key components:
- page.tsx: This is the main entry point. It sets up the image upload UI, initializes the ONNX models, and handles user interaction.
- utils.ts: Contains logic for preprocessing images with OpenCV.js, running ONNX inference, and performing NMS post-processing.
- renderBox.ts: Responsible for drawing detected bounding boxes and class labels on a
<canvas>element. - public/ folder: Acts as the static file host — ensure your
.onnx(i.e., YOLO ONNX and NMS ONNX models) files are stored here so they can be fetched in-browser.
This modular structure makes it easier to separate frontend logic (UI), inference logic (ONNX), and visualization logic (drawing).
Exporting and Preparing Your YOLO ONNX Models
Once your development environment is set up, the next step is to prepare the models required for browser inference. This includes the following:
- Exporting your YOLOv8 model to ONNX format
- Using a separate ONNX model for Non-Max Suppression (NMS)
Let’s walk through both steps.
Step 1: Export YOLOv8 to ONNX Format
We start by exporting a YOLOv8 model using the Ultralytics Python package. This can be an official model (e.g., yolov8n.pt) or a custom, fine-tuned version.
from ultralytics import YOLO

# Load a model
model = YOLO("yolov8n.pt")  # or use path to your custom model

# Export to ONNX
model.export(format="onnx")
This generates a file (e.g., yolov8n.onnx), which is optimized for in-browser inference using ONNX Runtime Web.
Why We Use a Separate NMS Model
While some ONNX exports include NMS as part of the graph, they often fail to work reliably in the browser because:
- WebAssembly (WASM) doesn’t support all ONNX ops used in PyTorch-exported NMS layers.
- Built-in NMS prevents dynamic tuning of thresholds (e.g., IoU or score) via JavaScript.
To make the pipeline fully browser-compatible and flexible, we use a separate ONNX model solely for NMS post-processing.
Step 2: Using a Pre-Built NMS ONNX Model
You don’t need to create the NMS ONNX file yourself — we’ve already done the work for you.
- Both the YOLOv8 ONNX model and the NMS ONNX model are provided in the GitHub repository accompanying this tutorial.
- If you’re interested in learning how to create the NMS model programmatically, the full Python script is available to PyImageSearch University members as part of the course.
This setup enables you to run YOLO inference entirely in the browser, with no backend server or cloud APIs required.
Implementing the Inference Logic (utils.ts)
Once your ONNX models are loaded in the browser, the real action begins: processing images, running predictions, filtering results, and visualizing detections. All of this is handled in a compact script: utils.ts.
Let’s break it down.
Preprocessing with OpenCV.js
import cv from "@techstark/opencv-js";
import { InferenceSession, Tensor } from "onnxruntime-web";
import { renderBoxes } from "./renderBox";
At the top of the utils.ts script, we import the core libraries and utilities needed for browser-based inference. The first line imports OpenCV.js, a WebAssembly build of OpenCV that enables us to manipulate and preprocess images directly in the browser (e.g., resizing, normalizing, or converting color spaces). Next, we import InferenceSession and Tensor from onnxruntime-web, which are used to load ONNX models and run inference using WebAssembly. Finally, we bring in a helper function called renderBoxes from a local file, which is responsible for rendering the final bounding boxes and labels on the image canvas after detection is complete.
const preprocessing = (
  source: HTMLImageElement,
  modelWidth: number,
  modelHeight: number
): [cv.Mat, number, number] => {
  const mat = cv.imread(source); // read image from HTML <img>
  const matC3 = new cv.Mat(mat.rows, mat.cols, cv.CV_8UC3);
  cv.cvtColor(mat, matC3, cv.COLOR_RGBA2BGR); // convert RGBA to BGR
This snippet defines the beginning of the preprocessing function. It accepts an HTML image element and resizes it to match the model’s input dimensions. First, it reads the image using cv.imread(), then converts it from the browser’s default RGBA format to the BGR format expected by most ONNX models. This ensures color channels are correctly aligned before normalization and resizing.
  const maxSize = Math.max(matC3.rows, matC3.cols);
  const xPad = maxSize - matC3.cols, xRatio = maxSize / matC3.cols;
  const yPad = maxSize - matC3.rows, yRatio = maxSize / matC3.rows;
  const matPad = new cv.Mat();
  cv.copyMakeBorder(matC3, matPad, 0, yPad, 0, xPad, cv.BORDER_CONSTANT);
This block ensures the input image becomes square by padding the shorter side with black pixels. maxSize computes the larger of the image’s height or width. The xPad and yPad values determine the amount of padding required to make both dimensions equal. The xRatio and yRatio track the scaling factor, which is useful later when rescaling predictions back to their original size. Finally, cv.copyMakeBorder() adds the padding, storing the square image in matPad.
  const input = cv.blobFromImage(
    matPad,
    1 / 255.0,
    new cv.Size(modelWidth, modelHeight),
    new cv.Scalar(0, 0, 0),
    true, // swap RB
    false
  );
Here, we create a preprocessed blob from the padded image, which is ready for model input. It resizes the image to the target YOLO input size, normalizes pixel values to [0, 1] by dividing by 255, swaps the red and blue channels (swapRB = true), and avoids cropping. The output input is a 4D cv.Mat tensor that can be passed directly to ONNX Runtime for inference.
  mat.delete(); matC3.delete(); matPad.delete(); // clean up memory
  return [input, xRatio, yRatio];
};
After preprocessing is complete, we clean up the intermediate OpenCV matrices (mat, matC3, and matPad) to free up memory in the browser. Finally, we return the preprocessed input tensor along with the xRatio and yRatio, which are used later to scale detection boxes back to the original image size.
Running Inference with ONNX Runtime Web
const detectImage = async (
  image: HTMLImageElement,
  canvas: HTMLCanvasElement,
  session: {net: InferenceSession, nms: InferenceSession},
  topk: number,
  iouThreshold: number,
  scoreThreshold: number,
  inputShape: number[]
) => {
The detectImage function is the core inference loop. It takes an HTML image element, a canvas to draw results on, a session object containing the YOLO and NMS ONNX models, and some inference config parameters.
The inputShape defines the expected input size for the model (typically [1, 3, 640, 640] for YOLO). This function preprocesses the image, runs the ONNX model, applies NMS to filter predictions, and sends the results for rendering.
  const [modelWidth, modelHeight] = inputShape.slice(2);
  const [input, xRatio, yRatio] = preprocessing(image, modelWidth, modelHeight);

  const tensor = new Tensor("float32", input.data32F, inputShape);
  const config = new Tensor("float32", new Float32Array([
    topk,
    iouThreshold,
    scoreThreshold
  ]));
This block handles preprocessing and prepares the input tensors for inference.
- First, it extracts
modelWidthandmodelHeightfrom the input shape. - Then it calls the
preprocessing()function to resize and normalize the image, returning the input tensor and scale ratios. tensoris created from the image data to match the ONNX model’s expected format.configholds NMS parameters:topkdetections to keep, the IOU threshold, and the confidence threshold — all required by the NMS ONNX model.
  const { output0 } = await session.net.run({ images: tensor });
  const { selected } = await session.nms.run({ detection: output0, config: config });
The first line runs the YOLO ONNX model (session.net) using the prepared input tensor and retrieves the raw predictions from the output layer output0.
The second line passes this raw output through the separate NMS model (session.nms), along with the NMS configuration, to filter overlapping boxes and retain only the most confident detections. The final result is stored in selected.
Drawing Bounding Boxes with renderBoxes()
  const boxes = [];

  for (let idx = 0; idx < selected.dims[1]; idx++) {
    const data = selected.data.slice(idx * selected.dims[2], (idx + 1) * selected.dims[2]);
    const box = data.slice(0, 4) as any;
    const scores = data.slice(4) as any;
    const score = Math.max(...scores);
    const label = scores.indexOf(score);
Once the NMS model returns the filtered detections in selected, the next step is to loop through each prediction and extract the relevant information. The boxes array is initialized to store the final detection results. For each prediction row, selected.data.slice(...) is used to extract the bounding box coordinates and class scores.
The first four values in the row represent the bounding box center-based format (cx, cy, w, h), and the remaining values are class confidence scores. Using Math.max(...), we identify the highest class score (i.e., the most confident prediction), and indexOf(score) returns the class ID label. This information is then structured into a box object and later rendered visually.
    const [x, y, w, h] = [
      (box[0] - 0.5 * box[2]) * xRatio,
      (box[1] - 0.5 * box[3]) * yRatio,
      box[2] * xRatio,
      box[3] * yRatio,
    ];

    boxes.push({
      label: label,
      probability: score,
      bounding: [x, y, w, h],
    });
  }
This block converts the bounding box from center-based format (cx, cy, w, h) to top-left-based format (x, y, w, h) and scales it to match the canvas size using xRatio and yRatio.
xandyrepresent the top-left corner of the box.wandhare the width and height, scaled for rendering.
Finally, it pushes the label, confidence score, and converted bounding box into the boxes array for visualization on the canvas.
  renderBoxes(canvas, boxes); // draw on canvas
  input.delete(); // cleanup
};
At the end of the detectImage function, the processed detection results are passed to the renderBoxes function, which draws the bounding boxes with class labels and confidence scores on the provided HTML canvas. This creates the visual output users see in the browser.
After rendering, the OpenCV Mat used for preprocessing is explicitly deleted using input.delete() to free up memory — a critical step when working in browser environments to avoid unnecessary memory usage or leaks.
Sequence Diagram: YOLO Inference Pipeline in utils.ts
This sequence diagram (Figure 3) illustrates the internal flow of the YOLO model as it executes within the browser. When the user uploads an image, it is first read and converted to the proper format using OpenCV.js. The image is then padded and resized before being normalized into a tensor that matches the model input.

utils.ts using OpenCV.js and ONNX Runtime Web in the browser (source: image by the author).Once preprocessing is complete, the ONNX Runtime Web engine runs inference on the YOLO ONNX model. The raw outputs are passed to a separate NMS ONNX model to suppress duplicate predictions. Finally, the selected boxes are rendered on the HTML canvas along with class labels and confidence scores — all on the client side, with no server involved.
This diagram summarizes all the functionality implemented in utils.ts, illustrating how each part of the code integrates with the browser inference lifecycle.
Drawing Bounding Boxes with renderBoxes.ts
As you saw earlier in utils.ts, we use the renderBoxes() function to draw the final detections on the HTML <canvas>. In this section, we provide a high-level overview of how it works behind the scenes.
Once the NMS model filters the final set of detections, we use the renderBoxes() utility to visually display the results on the HTML <canvas>. This function takes the list of predicted bounding boxes and labels and uses the 2D canvas context to:
- Draw semi-transparent filled rectangles for each detection
- Outline the boxes with color-coded borders
- Render the class label and confidence score as text above the box
To enhance clarity and aesthetics, we use a color palette inspired by Ultralytics. The Colors helper class cycles through this palette to assign a distinct color to each object class, ensuring that detections remain readable and visually consistent.
Figure 4 illustrates how renderBoxes.ts interacts with the Canvas API to generate the final output seen by the user.
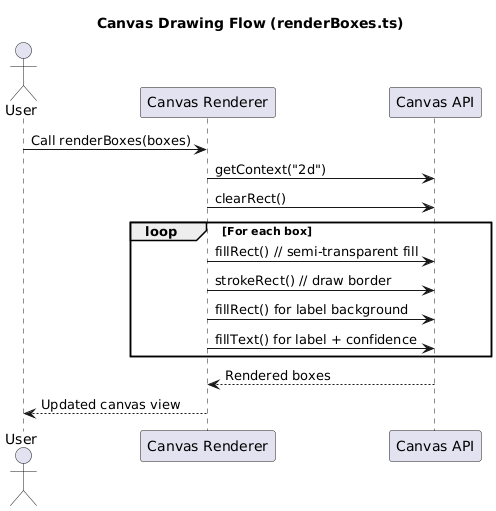
renderBoxes(), including fill, stroke, and label rendering for each bounding box (source: image by the author).This part of the pipeline is solely focused on user-facing feedback, making predictions visible and interpretable. You can find the full implementation of renderBoxes.ts in the accompanying repository.
Bringing It All Together with page.tsx
Once the model and inference logic are ready, we need a user-facing interface that ties everything together. This is handled in the page.tsx component, built using React (with the App Router structure in Next.js).
This script is the heart of our web UI — it manages the following:
- Loading the YOLO and NMS models inside the browser using ONNX Runtime Web
- Handling image upload and rendering previews via HTML
<canvas> - Measuring inference time on the client
- Calling
detectImage()(fromutils.ts) to run the full preprocessing + inference + rendering pipeline
Rather than go through all 150+ lines of code in detail, we’ll break down what happens in stages and summarize the flow using a sequence diagram below in Figure 5.
Key Logic Highlights
- Model Configuration: We specify the model names, input shape, thresholds, and top-K filtering using a
modelConfigobject. - Session Setup: The
onRuntimeInitializedcallback loads both the YOLO and NMS models usingInferenceSession.create()withwasmPathsconfigured. - Image Upload Flow: Once the user uploads an image, it is drawn on an input canvas and stored via
inputImageRef. - Triggering Inference: The
onLoad()event on the image triggers the full inference pipeline using thedetectImage()utility. We also record the time taken using theperformance.now()method. - Rendering Output: After inference and NMS, results are drawn on the overlay canvas, and inference time is displayed below the upload control.
YOLO Inference Flow in page.tsx
Figure 5 breaks down the end-to-end flow handled by page.tsx. When a user uploads an image, the following steps are triggered:
- The image is read into an
<img>element, and a preview is drawn on the canvas. - Once the image loads, the
onLoad()callback runs, kicking off inference. - The YOLO ONNX model runs using ONNX Runtime Web (WASM), producing raw detections.
- These detections are passed into the NMS ONNX model to filter out overlapping boxes.
- The selected results are sent to
renderBoxes()to draw colored boxes and labels on the canvas. - Finally, inference time is calculated and displayed to the user.
This diagram helps visualize how different components (e.g., the canvas, ONNX sessions, and utility functions) interact, all fully within the browser.

page.tsx component. It highlights how the canvas, ONNX sessions, and utility functions interact client-side using WebAssembly (source: image by the author).Now that we’ve walked through the entire codebase — from preprocessing to inference and rendering — it’s time to see the complete YOLO Web Inference app in action.
Browser Inference in Action: Demo + Performance
Once everything is set up — model loaded, preprocessing applied, and inference logic running — it’s time to test how fast and responsive browser-based object detection really is.
The animation (Figure 6) shows the full flow (i.e., selecting an image, running inference, applying NMS, and drawing the results directly on the canvas) all within your browser.
For this benchmark, we tested YOLOv8 Nano on a MacBook Pro with the following specs:
- Chip: Apple M3 Pro
- RAM: 36 GB
- Model: yolov8n.onnx (YOLOv8 Nano)
- Inference Time:
 220 milliseconds (avg)
 220 milliseconds (avg)
All inference was performed in the browser using ONNX Runtime Web with WebAssembly (WASM), with no server involved.
What’s impressive is that this time includes preprocessing, inference, NMS, and drawing, to provide us with an end-to-end, real-time pipeline that’s fully client-side.
What's next? We recommend PyImageSearch University.

86+ total classes • 115+ hours hours of on-demand code walkthrough videos • Last updated: March 2026
★★★★★ 4.84 (128 Ratings) • 16,000+ Students Enrolled
I strongly believe that if you had the right teacher you could master computer vision and deep learning.
Do you think learning computer vision and deep learning has to be time-consuming, overwhelming, and complicated? Or has to involve complex mathematics and equations? Or requires a degree in computer science?
That’s not the case.
All you need to master computer vision and deep learning is for someone to explain things to you in simple, intuitive terms. And that’s exactly what I do. My mission is to change education and how complex Artificial Intelligence topics are taught.
If you're serious about learning computer vision, your next stop should be PyImageSearch University, the most comprehensive computer vision, deep learning, and OpenCV course online today. Here you’ll learn how to successfully and confidently apply computer vision to your work, research, and projects. Join me in computer vision mastery.
Inside PyImageSearch University you'll find:
- ✓ 86+ courses on essential computer vision, deep learning, and OpenCV topics
- ✓ 86 Certificates of Completion
- ✓ 115+ hours hours of on-demand video
- ✓ Brand new courses released regularly, ensuring you can keep up with state-of-the-art techniques
- ✓ Pre-configured Jupyter Notebooks in Google Colab
- ✓ Run all code examples in your web browser — works on Windows, macOS, and Linux (no dev environment configuration required!)
- ✓ Access to centralized code repos for all 540+ tutorials on PyImageSearch
- ✓ Easy one-click downloads for code, datasets, pre-trained models, etc.
- ✓ Access on mobile, laptop, desktop, etc.
Summary
In this lesson, we explored how to bring real-time object detection into the browser using YOLO and ONNX Runtime Web. Instead of relying on a server for inference, we learned how to run everything entirely on the client side using WebAssembly (WASM) — making it fast, private, and portable.
We started by exporting a YOLOv8 model into ONNX format and explained why a separate Non-Max Suppression (NMS) model is needed for reliable in-browser post-processing. Using ONNX GraphSurgeon, we walked through the process of creating a custom NMS ONNX model compatible with ORT-Web.
We then configured a responsive frontend using Next.js and Tailwind CSS, integrating OpenCV.js for client-side preprocessing. The utils.ts script handled image normalization, model inference, NMS filtering, and result visualization — all in the browser. The renderBoxes.ts module brought the predictions to life by drawing labeled bounding boxes directly on a canvas.
Finally, you wrapped everything in a user-friendly frontend (page.tsx) that supports image uploads, runs inference in real-time, and displays performance metrics (e.g., inference time). The result is a complete and interactive YOLO demo running fully inside your browser — no GPU, no backend, just WebAssembly-powered AI at your fingertips.
Citation Information
Singh, V. “Run YOLO Model in the Browser with ONNX, WebAssembly, and Next.js,” PyImageSearch, P. Chugh, S. Huot, A. Sharma, and P. Thakur, eds., 2025, https://pyimg.co/wle2x
@incollection{Singh_2025_run-yolo-model-in-browser-with-onnx-webassembly-next-js,
  author = {Vikram Singh},
  title = {{Run YOLO Model in the Browser with ONNX, WebAssembly, and Next.js}},
  booktitle = {PyImageSearch},
  editor = {Puneet Chugh and Susan Huot and Aditya Sharma and Piyush Thakur},
  year = {2025},
  url = {https://pyimg.co/wle2x},
}
To download the source code to this post (and be notified when future tutorials are published here on PyImageSearch), simply enter your email address in the form below!

Download the Source Code and FREE 17-page Resource Guide
Enter your email address below to get a .zip of the code and a FREE 17-page Resource Guide on Computer Vision, OpenCV, and Deep Learning. Inside you'll find my hand-picked tutorials, books, courses, and libraries to help you master CV and DL!

Comment section
Hey, Adrian Rosebrock here, author and creator of PyImageSearch. While I love hearing from readers, a couple years ago I made the tough decision to no longer offer 1:1 help over blog post comments.
At the time I was receiving 200+ emails per day and another 100+ blog post comments. I simply did not have the time to moderate and respond to them all, and the sheer volume of requests was taking a toll on me.
Instead, my goal is to do the most good for the computer vision, deep learning, and OpenCV community at large by focusing my time on authoring high-quality blog posts, tutorials, and books/courses.
If you need help learning computer vision and deep learning, I suggest you refer to my full catalog of books and courses — they have helped tens of thousands of developers, students, and researchers just like yourself learn Computer Vision, Deep Learning, and OpenCV.
Click here to browse my full catalog.