Table of Contents
- Step-by-Step Guide to Open-Source Implementation of Generative Fill: Part 2
- Configuring Your Development Environment
- Need Help Configuring Your Development Environment?
- Implementation
- Essential Setup: Libraries and Imports for Generative Image Editing
- How to Prompt Language Models for Image Editing
- Purpose
- Initial Setup
- Output from the Language Model
- Optimizing Memory Management
- Testing the Language Model
- Image Segmentation with SAM (Segment Anything Model)
- Object Detection with OWL-ViT (Vision Transformer for Open-World Localization)
- Image Segmentation from Object Detection Bounding Boxes
- Inpaint the Image Using a Segmentation Mask and Diffusers
- Summary
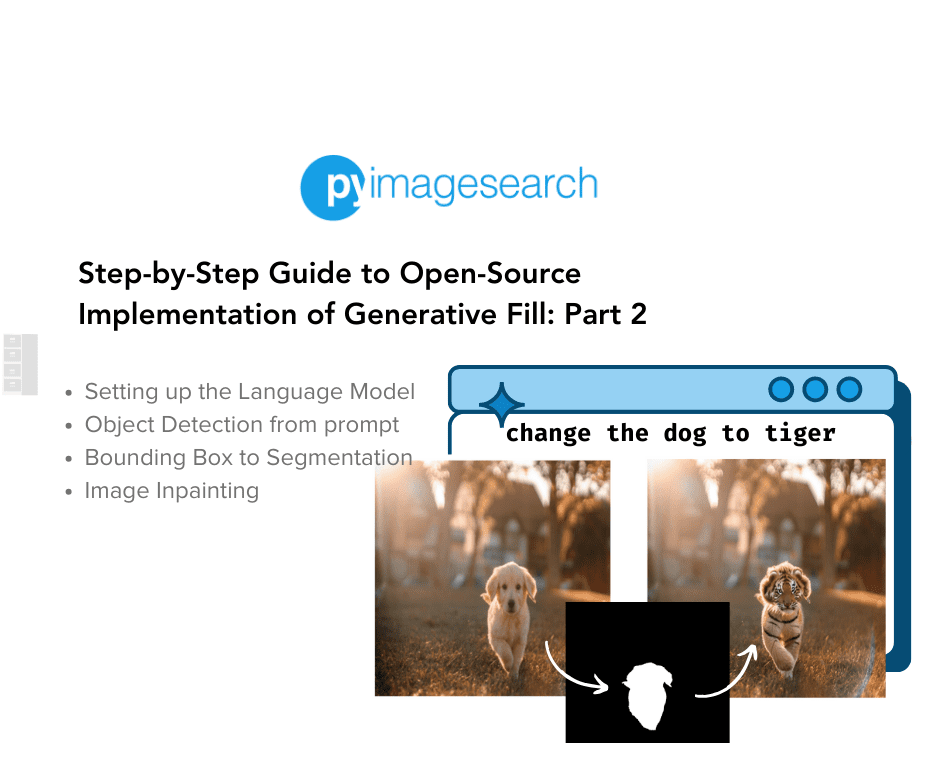
Step-by-Step Guide to Open-Source Implementation of Generative Fill: Part 2
In this tutorial, you will learn to edit text-based images using Open-Source models like Segment Anything (SAM), OWL-ViT (Vision Transformer for Open-World Localization), and SDXL (Stable Diffusion XL) inpainting.
This lesson is the last of a 2-part series on Open-Sourcing Generative Fill:
- Step-by-Step Guide to Open-Source Implementation of Generative Fill: Part 1
- Step-by-Step Guide to Open-Source Implementation of Generative Fill: Part 2 (this tutorial)
To learn how to create your own text-based image editing product, just keep reading.
Step-by-Step Guide to Open-Source Implementation of Generative Fill: Part 2
Welcome back! In Part 1, we prepared our image for editing. Now, we’ll breathe life into our text-based image manipulation pipeline. We’ll explore how to use large language models to intelligently modify your edit prompts, creating instructions that directly target image content.
We’ll then delve into segmentation techniques, learning how to isolate the specific parts of the image you want to change. Finally, we’ll create the inpainting pipeline, where our model seamlessly updates the image based on our enhanced prompts and the identified segments.
Configuring Your Development Environment
To follow this guide, you need to have the diffusers, accelerate, and transformers libraries installed on your system.
Luckily, these are all pip-installable:
$ pip install --upgrade -qq diffusers accelerate transformers
Need Help Configuring Your Development Environment?
All that said, are you:
- Short on time?
- Learning on your employer’s administratively locked system?
- Wanting to skip the hassle of fighting with the command line, package managers, and virtual environments?
- Ready to run the code immediately on your Windows, macOS, or Linux system?
Then join PyImageSearch University today!
Gain access to Jupyter Notebooks for this tutorial and other PyImageSearch guides pre-configured to run on Google Colab’s ecosystem right in your web browser! No installation is required.
And best of all, these Jupyter Notebooks will run on Windows, macOS, and Linux!
Implementation
We will learn about stitching together all the parts and creating an end-to-end pipeline for image editing.
We will do this by:
- Accepting an
edit_promptand an image as input - Using a Vision Model to caption the image
- Passing the
edit_promptthrough a language model to extract the source entity - Creating a
replacement_captionwhere the source entity of the original image is swapped with the target entity in theedit_prompt - Using the source entity to create a segmentation mask using
OWL-VITandSAM - Using the mask and the
replacement_captionfor image inpainting
Essential Setup: Libraries and Imports for Generative Image Editing
from transformers import (
    AutoModelForCausalLM,
    AutoTokenizer,
    Owlv2ForObjectDetection,
    Owlv2Processor,
    SamModel,
    SamProcessor,
)
from diffusers import AutoPipelineForInpainting
Let’s import our essential packages and deep dive into the code.
How to Prompt Language Models for Image Editing
def run_lm_model(model_id: str, caption: str, edit_prompt: str, device: str = "cuda"):
    language_model = AutoModelForCausalLM.from_pretrained(model_id, device_map="auto")
    tokenizer = AutoTokenizer.from_pretrained(model_id)

    messages = [
        {
            "role": "system",
            "content": "Follow the examples and return the expected output",
        },
        {
            "role": "user",
            "content": "Caption: a blue sky with fluffy clouds\nQuery: Make the sky stormy",
        },
        {
            "role": "assistant",
            "content": "A: sky\nB: a stormy sky with heavy gray clouds, torrential rain, gloomy, overcast",
        },
        {
            "role": "user",
            "content": "Caption: a cat sleeping on a sofa\nQuery: Change the cat to a dog",
        },
        {
            "role": "assistant",
            "content": "A: cat\nB: a dog sleeping on a sofa, cozy and comfortable, snuggled up in a warm blanket, peaceful",
        },
        {
            "role": "user",
            "content": "Caption: a snowy mountain peak\nQuery: Replace the snow with greenery",
        },
        {
            "role": "assistant",
            "content": "A: snow\nB: a lush green mountain peak in summer, clear blue skies, birds flying overhead, serene and majestic",
        },
        {
            "role": "user",
            "content": "Caption: a vintage car parked by the roadside\nQuery: Change the car to a modern electric vehicle",
        },
        {
            "role": "assistant",
            "content": "A: car\nB: a sleek modern electric vehicle parked by the roadside, cutting-edge design, environmentally friendly, silent and powerful",
        },
        {
            "role": "user",
            "content": "Caption: a wooden bridge over a river\nQuery: Make the bridge stone",
        },
        {
            "role": "assistant",
            "content": "A: bridge\nB: an ancient stone bridge over a river, moss-covered, sturdy and timeless, with clear waters flowing beneath",
        },
        {
            "role": "user",
            "content": "Caption: a bowl of salad on the table\nQuery: Replace salad with soup",
        },
        {
            "role": "assistant",
            "content": "A: bowl\nB: a bowl of steaming hot soup on the table, scrumptious, with garnishing",
        },
        {
            "role": "user",
            "content": "Caption: a book on a desk surrounded by stationery\nQuery: Remove all stationery, add a laptop",
        },
        {
            "role": "assistant",
            "content": "A: stationery\nB: a book on a desk with a laptop next to it, modern study setup, focused and productive, technology and education combined",
        },
        {
            "role": "user",
            "content": "Caption: a cup of coffee on a wooden table\nQuery: Change coffee to tea",
        },
        {
            "role": "assistant",
            "content": "A: cup\nB: a steaming cup of tea on a wooden table, calming and aromatic, with a slice of lemon on the side, inviting",
        },
        {
            "role": "user",
            "content": "Caption: a small pen on a white table\nQuery: Change the pen to an elaborate fountain pen",
        },
        {
            "role": "assistant",
            "content": "A: pen\nB: an elaborate fountain pen on a white table, sleek and elegant, with intricate designs, ready for writing",
        },
        {
            "role": "user",
            "content": "Caption: a plain notebook on a desk\nQuery: Replace the notebook with a journal",
        },
        {
            "role": "assistant",
            "content": "A: notebook\nB: an artistically decorated journal on a desk, vibrant cover, filled with creativity, inspiring and personalized",
        },
        {"role": "user", "content": f"Caption: {caption}\nQuery: {edit_prompt}"},
    ]

    text = tokenizer.apply_chat_template(
        messages, tokenize=False, add_generation_prompt=True
    )
    model_inputs = tokenizer([text], return_tensors="pt").to(device)
    with torch.no_grad():
        generated_ids = language_model.generate(
            model_inputs.input_ids, max_new_tokens=512, temperature=0.0, do_sample=False
        )

    generated_ids = [
        output_ids[len(input_ids) :]
        for input_ids, output_ids in zip(model_inputs.input_ids, generated_ids)
    ]

    output_generation = tokenizer.batch_decode(generated_ids, skip_special_tokens=True)[
        0
    ]

    output_generation_a, output_generation_b = output_generation.split("\n")
    to_replace = output_generation_a[2:].strip()
    replaced_caption = output_generation_b[2:].strip()

    delete_model(language_model)
    return to_replace, replaced_caption
Here, we describe our run_lm_model function.
Purpose
This function uses a large language model (LLM) to intelligently edit an existing image caption based on a text-based editing instruction (the edit_prompt).
Initial Setup
- It loads a language model
AutoModelForCausalLMand its tokenizerAutoTokenizerfrom the Hugging Face repository using the specifiedmodel_id. - A structured list of messages is created that simulates a conversation. Examples of captions and edits are provided to guide the model in performing the desired transformation.
Output from the Language Model
- The current caption and edit prompt are added to the example conversation. This complete conversation history is formatted and tokenized to be fed into the language model.
- The language model generates a response, which is expected to contain two parts:
- The text to be replaced in the original caption.
- The replacement text.
- The model’s output is cleaned up to extract these two elements.
The technique of prompting used here is called few-shot prompting, where a few high-quality examples are passed to the prompt along with the query to help the model understand what kind of response to provide.
In this case, we are prompting the model with examples that show how it should return the response. For example, when the user types in:
Caption: a small pen on a white table\nQuery: Change the pen to an elaborate fountain pen
The model is supposed to return:
A: pen\nB: an elaborate fountain pen on a white table, sleek and elegant, with intricate designs, ready for writing
This means the original object to be replaced will be identified and returned after the prefix “A:” and the changed prompt with the original object replaced with the new object will be returned after the prefix “B:”
The prefixes allow us to segregate the response and break it using simple string manipulation techniques.
Optimizing Memory Management
As before, the language model is deleted using delete_model to conserve resources.
Testing the Language Model
Now, let’s call the function to see if it returns the text to be replaced in the original caption and the suggested replacement.
# Language model
to_replace, replaced_caption = run_lm_model(
    model_id=config.LANGUAGE_MODEL_ID,
    caption=caption,
    edit_prompt=EDIT_PROMPT,
    device=DEVICE,
)
Let’s print the output.
print("#"*100)
print(f"Using llm: {config.LANGUAGE_MODEL_ID}")
print(f"Edit Prompt: {EDIT_PROMPT}")
print(f"Object to replace: {to_replace}")
print(f"Caption for inpaint: {replaced_caption}")
print("#"*100)
We see the language model-id, the edit-prompt, and the extracted entities.
####################################
Using llm: Qwen/Qwen1.5-0.5B-Chat
Edit Prompt: change the bottle to a wine
Object to replace: bottle
Caption for inpaint: a wine glass sitting on a bed, elegant and sophisticated, with a glass of red wine on top, a touch of elegance and sophistication.
####################################
Image Segmentation with SAM (Segment Anything Model)
As we mentioned previously, we would need to create a mask of the object for the inpainting pipeline to work. To create a mask, we first need to create a segmentation mask of this object inside the image. Here, we use the Segment Anything Model from Meta.
The Segment Anything Model (SAM), developed by Meta AI’s FAIR (Fundamental AI Research) lab, is a recent breakthrough in computer vision. This state-of-the-art model excels at segmenting objects in images, identifying their precise locations with exceptional detail. Unlike traditional segmentation models that require specific training for each object, SAM boasts “zero-shot performance,” meaning it can tackle various segmentation tasks without additional training data. SAM is open-source and available for experimentation
def run_segmentation_pipeline(
    detection_model_id: str,
    segmentation_model_id: str,
    to_replace: str,
    image: Image,
    device: str = "cuda",
):
    processor = Owlv2Processor.from_pretrained(detection_model_id)
    od_model = Owlv2ForObjectDetection.from_pretrained(detection_model_id).to(device)
    text_queries = [to_replace]
    inputs = processor(text=text_queries, images=image, return_tensors="pt").to(device)

    with torch.no_grad():
        outputs = od_model(**inputs)
        target_sizes = torch.tensor([image.size]).to(device)
        results = processor.post_process_object_detection(
            outputs, threshold=0.1, target_sizes=target_sizes
        )[0]

    boxes = results["boxes"].tolist()
    delete_model(od_model)

    seg_model = SamModel.from_pretrained(segmentation_model_id).to(device)
    processor = SamProcessor.from_pretrained(segmentation_model_id)

    input_boxes = [boxes]
    inputs = processor(image, input_boxes=input_boxes, return_tensors="pt").to(device)

    with torch.no_grad():
        outputs = seg_model(**inputs)

    mask = processor.image_processor.post_process_masks(
        outputs.pred_masks.cpu(),
        inputs["original_sizes"].cpu(),
        inputs["reshaped_input_sizes"].cpu(),
    )[0]

    mask = torch.max(mask[:, 0, ...], dim=0, keepdim=False).values
    segmentation_mask = Image.fromarray(mask.numpy())

    delete_model(seg_model)
    return segmentation_mask
The run_segmentation_pipeline function isolates the specific part of an image that needs to be modified based on the text you provide in to_replace.
However, SAM isn’t capable of isolating or segmenting parts of an image based on textual prompts (yet). So, we need a way to ground SAM with an object detection model that can take in a text input and provide bounding boxes. These bounding boxes are then passed as inputs to SAM for segmentation.
We will use the OWLv2 model for this. OWLv2 was proposed in Scaling Open-Vocabulary Object Detection. OWLv2 scales up OWL-ViT (Vision Transformer for Open-World Localization) using self-training, which uses an existing detector to generate pseudo-box annotations on image-text pairs. This results in large gains over the previous state-of-the-art for zero-shot object detection.
Object Detection with OWL-ViT (Vision Transformer for Open-World Localization)
First, specialized object detection models (Owlv2Processor and Owlv2ForObjectDetection) are loaded.
The object detection model analyzes the image along with the text description of what needs to be replaced (to_replace). This helps it identify the relevant region within the image.
The model outputs bounding boxes that enclose the object to be edited.
Image Segmentation from Object Detection Bounding Boxes
Next, an image segmentation model SamModel with its SamProcessor is loaded.
The bounding boxes determined earlier are used to focus the segmentation model only on the relevant part of the image.
The segmentation model generates a detailed mask that outlines the exact pixels belonging to the object that needs to be changed.
The function returns this segmentation_mask. This mask can be used later to isolate the object within the image for editing or replacement.
# Segmentation pipeline
segmentation_mask = run_segmentation_pipeline(
    detection_model_id=config.DETECTION_MODEL_ID,
    segmentation_model_id=config.SEGMENTATION_MODEL_ID,
    to_replace=to_replace,
    image=image,
    device=DEVICE,
)
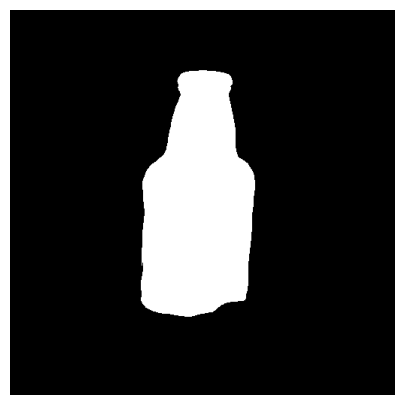
Let’s run the segmentation pipeline and visualize the outputs. The segmentation mask is shown in Figure 1.
print("#"*100)
print(f"Using detection model: {config.DETECTION_MODEL_ID}")
print(f"Using segmentation model: {config.SEGMENTATION_MODEL_ID}")
print("#"*100)
##################################################
Using detection model: google/owlv2-base-patch16-ensemble
Using segmentation model: facebook/sam-vit-base
##################################################
plt.figure(figsize=(5, 5))
plt.imshow(segmentation_mask)
plt.axis("off")
plt.show()
Inpaint the Image Using a Segmentation Mask and Diffusers
Finally, we arrive at the junction where we have all the pieces needed to run our inpainting pipeline.
Just to be clear, let us revise what these are:
- An input image where something needs to be replaced (inpainted)
- A mask of the area that needs to be replaced (inpainted)
- A prompt describing what needs to be inpainted in
The user supplied the input image. We have created the mask image using a combination of an Object Detection and a Segmentation Model. The Language Model supplies the prompt describing what needs to be inpainted. Let us see how we can stitch these together in an inpainting pipeline for Diffusers.
If you are new to image inpainting or want to learn more about these pipelines, check out our blog post on Image Inpainting with Diffusers: Inpaint Images: AI Photo Restoration.
def run_inpainting_pipeline(
    inpainting_model_id: str,
    image: Image,
    mask: Image,
    replaced_caption: str,
    image_size: Tuple[int, int],
    generator: torch.Generator,
    device: str = "cuda",
):
    pipeline = AutoPipelineForInpainting.from_pretrained(
        inpainting_model_id,
        torch_dtype=torch.float16,
        variant="fp16",
    ).to(device)

    prompt = replaced_caption

    negative_prompt = """lowres, bad anatomy, bad hands,
    text, error, missing fingers, extra digit, fewer digits,
    cropped, worst quality, low quality"""

    output = pipeline(
        prompt=prompt,
        image=image,
        height=image_size[0],
        width=image_size[1],
        mask_image=mask,
        negative_prompt=negative_prompt,
        guidance_scale=7.5,
        strength=1.0,
        generator=generator,
    ).images[0]
    delete_model(pipeline)
    return output
The run_inpainting_pipeline function takes an image, a segmentation mask (isolating the area to change), and a new text description (replaced_caption), and aims to modify the specified part of the image accordingly.
Preparing for Inpainting: Setup and Techniques
- An image inpainting pipeline (
AutoPipelineForInpainting) is loaded from the Hugging Face model repository. This pipeline is optimized for speed (usingtorch_dtype=torch.float16andvariant="fp16"). - The
promptis set toreplaced_caption, providing the textual description of the desired modification. - A
negative_promptis included to discourage the model from generating undesirable results (e.g., bad anatomy, text, etc.).
Executing Image Inpainting
- The core of the process happens with the
pipelinecall. It takes the image, the mask (to focus on the correct region), the prompts, and a few parameters to guide the modification process:guidance_scale: controls how closely the model adheres to the text prompt.strength: determines how much of the masked area should be newly generated versus blended from the original image.
- The pipeline produces a modified image.
Revealing the Final Image: Output and Cleanup
The generated image is returned, and the pipeline is deleted (delete_model) to free up memory.
# Inpainting pipeline
output = run_inpainting_pipeline(
    inpainting_model_id=config.INPAINTING_MODEL_ID,
    image=image,
    mask=segmentation_mask,
    replaced_caption=replaced_caption,
    image_size=config.IMAGE_SIZE,
    generator=GENERATOR,
    device=DEVICE,
)
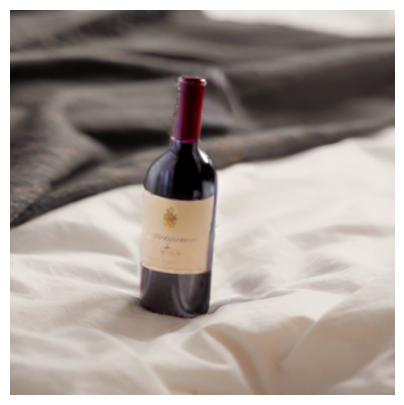
It is time to see the final result. The final image is shown in Figure 2.
print("#"*100)
print(f"Using diffusion model: {config.INPAINTING_MODEL_ID}")
print("#"*100)
########################################################
Using diffusion model: diffusers/stable-diffusion-xl-1.0-inpainting-0.1
########################################################
plt.figure(figsize=(5, 5))
plt.imshow(output)
plt.axis("off")
plt.show()
What's next? We recommend PyImageSearch University.

120+ total classes • 115+ hours hours of on-demand code walkthrough videos • Last updated: July 2026
★★★★★ 4.84 (128 Ratings) • 16,000+ Students Enrolled
I strongly believe that if you had the right teacher you could master computer vision and deep learning.
Do you think learning computer vision and deep learning has to be time-consuming, overwhelming, and complicated? Or has to involve complex mathematics and equations? Or requires a degree in computer science?
That’s not the case.
All you need to master computer vision and deep learning is for someone to explain things to you in simple, intuitive terms. And that’s exactly what I do. My mission is to change education and how complex Artificial Intelligence topics are taught.
If you're serious about learning computer vision, your next stop should be PyImageSearch University, the most comprehensive computer vision, deep learning, and OpenCV course online today. Here you’ll learn how to successfully and confidently apply computer vision to your work, research, and projects. Join me in computer vision mastery.
Inside PyImageSearch University you'll find:
- ✓ 120+ courses on essential computer vision, deep learning, and OpenCV topics
- ✓ 94+ Certificates of Completion
- ✓ 115+ hours hours of on-demand video
- ✓ Brand new courses released regularly, ensuring you can keep up with state-of-the-art techniques
- ✓ Pre-configured Jupyter Notebooks in Google Colab
- ✓ Run all code examples in your web browser — works on Windows, macOS, and Linux (no dev environment configuration required!)
- ✓ Access to centralized code repos for all 540+ tutorials on PyImageSearch
- ✓ Easy one-click downloads for code, datasets, pre-trained models, etc.
- ✓ Access on mobile, laptop, desktop, etc.
Summary
This second part brought our open-source generative fill journey to an exciting climax. Over the past year, we have seen a number of Open-Source Models become relevant and extremely useful for the community. Here, we understand how to combine several of these models and use their inference capabilities to create an end-to-end pipeline for something useful.
Let us wrap up by recalling what we achieved. We took an edit prompt and an image as inputs and created an edited image based on the prompt. Underneath this end-to-end pipeline, we used a Language Model, an Object Detection Model, a Segmentation Model, and finally, a Diffusion Model for inpainting.
The most interesting part, and probably the most overlooked aspect, is that we can choose to plug and play our own models into this pipeline or create a fine-tuned version of models capable of achieving a more focused output.
What other fun implementations would you like to see? Let us know on our socials @pyimagesearch
Citation Information
A. R. Gosthipaty and R. Raha. “Step-by-Step Guide to Open-Source Implementation of Generative Fill: Part 2,” PyImageSearch, P. Chugh, S. Huot, and K. Kidriavsteva, eds., 2024, https://pyimg.co/5h9t1
@incollection{ARG-RR_2024_Open-Source-Implementation-Generative-Fill-part2,
  author = {Aritra Roy Gosthipaty and Ritwik Raha},
  title = {Step-by-Step Guide to Open-Source Implementation of Generative Fill: Part 2},
  booktitle = {PyImageSearch},
  editor = {Puneet Chugh and Susan Huot and Kseniia Kidriavsteva},
  year = {2024},
  url = {https://pyimg.co/5h9t1},
}
Unleash the potential of computer vision with Roboflow - Free!
- Step into the realm of the future by signing up or logging into your Roboflow account. Unlock a wealth of innovative dataset libraries and revolutionize your computer vision operations.
- Jumpstart your journey by choosing from our broad array of datasets, or benefit from PyimageSearch’s comprehensive library, crafted to cater to a wide range of requirements.
- Transfer your data to Roboflow in any of the 40+ compatible formats. Leverage cutting-edge model architectures for training, and deploy seamlessly across diverse platforms, including API, NVIDIA, browser, iOS, and beyond. Integrate our platform effortlessly with your applications or your favorite third-party tools.
- Equip yourself with the ability to train a potent computer vision model in a mere afternoon. With a few images, you can import data from any source via API, annotate images using our superior cloud-hosted tool, kickstart model training with a single click, and deploy the model via a hosted API endpoint. Tailor your process by opting for a code-centric approach, leveraging our intuitive, cloud-based UI, or combining both to fit your unique needs.
- Embark on your journey today with absolutely no credit card required. Step into the future with Roboflow.

Join the PyImageSearch Newsletter and Grab My FREE 17-page Resource Guide PDF
Enter your email address below to join the PyImageSearch Newsletter and download my FREE 17-page Resource Guide PDF on Computer Vision, OpenCV, and Deep Learning.

Comment section
Hey, Adrian Rosebrock here, author and creator of PyImageSearch. While I love hearing from readers, a couple years ago I made the tough decision to no longer offer 1:1 help over blog post comments.
At the time I was receiving 200+ emails per day and another 100+ blog post comments. I simply did not have the time to moderate and respond to them all, and the sheer volume of requests was taking a toll on me.
Instead, my goal is to do the most good for the computer vision, deep learning, and OpenCV community at large by focusing my time on authoring high-quality blog posts, tutorials, and books/courses.
If you need help learning computer vision and deep learning, I suggest you refer to my full catalog of books and courses — they have helped tens of thousands of developers, students, and researchers just like yourself learn Computer Vision, Deep Learning, and OpenCV.
Click here to browse my full catalog.