Table of Contents
Planning and Writing a Research Paper
In the previous lesson of this series, we learned ways to ideate a solution to our research topic and plan the experiments effectively. After ideation and experiments comes the next important step: planning and writing a research paper. Writing a paper is like pitching an idea. You need to set a correct tone and narrate a story that focuses on your contributions and novelty and, at the same time, doesn’t overstate anything.
It should be complete with proper references and background so that even someone with little expertise in the field can grasp the main idea behind the work. No matter how breakthrough your research is, your paper will get rejected if you don’t make the above points clear and upfront.
Technical writing is not like writing essays and articles in high school. We often assume the reviewers will figure it out. But as Jim Kajiya says, “the most dangerous mistake you can make when writing your paper is assuming the reviewer will understand the point of your paper. The complaint is often heard that the reviewer did not understand what an author was trying to say.”
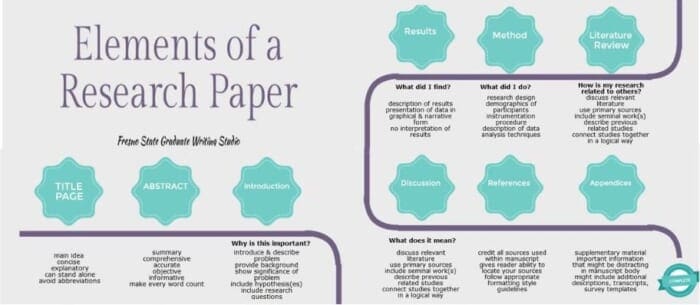
With this post, I want to share the lessons for paper writing that I learned while writing and reviewing for some top-tier conferences (e.g., CVPR, ECCV, WACV, ICLR, TPAMI, etc.). I hope these lessons will make the writing process more manageable. Figure 1 provides an overview of the elements of a research paper.
In this series, you will learn how to publish novel research.
This lesson is the 3rd of a 5-part series on How to Publish Novel Research:
- Choosing the Research Topic and Reading Its Literature
- Ideating the Solution and Planning Experiments
- Planning and Writing a Research Paper (this tutorial)
- Planning Next Steps When Things Don’t Work Out
- Ensuring Your Research Stays Visible and General Tips
To learn how to plan and write a research paper, just keep reading.
Planning and Writing a Research Paper
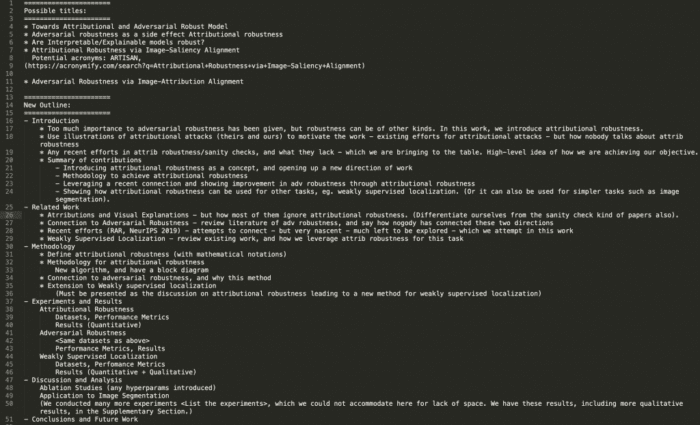
Before you start writing, it’s important to imagine and decide on the flow of the paper through an outline. It is one of the most important tools to implement before writing. Spending a couple of days creating it can save you from several hours of trouble deciding how to structure your work.
Figure 2 shows a sample outline I used in my ECCV submission. Start by deciding on a working title for your paper. Don’t leave it for the end. It need not be fancy at the start but should convey what you are selling. Next, list all important sections (introduction, related work, methodology, experiments, conclusions), subsections, and paragraphs and briefly mention their goal. The sections and paragraphs should connect to create a smooth flow for the reader. Doing so helps you understand and imagine the positioning of the work. Once done, you just need to follow it and elaborate on each point. Let’s look at planning and writing each of these sections in detail.
Section I — Introduction
The introduction is a crucial section that can motivate the reviewer to read the rest of the paper and not instantly make a “reject” decision. It should clearly state the relevance of the research topic, the motivation behind your approach, and the main contributions. According to Jim Kajiya, what you want to do in the introduction is state the “implications” of your solution. Even though it’s obvious to you, spelling it explicitly can avoid the risk of misunderstanding and rejection.
Usually, I follow a four- to five-paragraph structure for the introduction, which looks as follows:
- Para 1: What is the research problem? How is it relevant and interesting to the community? Why is it challenging?
- Para 2: How have the approaches and algorithms in the literature developed over the past years? What are different classes of algorithms being used? What is the current trend?
- Para 3: What is your motivation? What’s wrong with previously proposed solutions? What new ideas are you bringing to the table?
- Para 4: How are you approaching the problem? How is it novel compared to previous approaches?
- Para 5: Summary of contributions (usually 3-4 bullet points). What is your novelty? What improvements and benefits does your approach offer in experimentation and analysis?
Stanford InfoLab has also patented a similar five-point structure for Introductions:
- What is the problem?
- Why is it interesting and important?
- Why is it hard? (e.g., Why do naive approaches fail?)
- Why hasn’t it been solved before? (Or, what’s wrong with previously proposed solutions? How does mine differ?)
- What are the key components of my approach and results? Also, include any specific limitations.
And then a final paragraph or subsection: “Summary of Contributions.” It should list the major contributions in bullet form, mentioning which sections can be found.
An introductory figure can help you convey a broader understanding of your work to the reviewer. Think of it as a thumbnail that will help one visually remember your work. It makes the section visually appealing and lures the reviewers into reading your paper. The introductory figure can serve a fruitful purpose for readers who don’t have time to go through the entire paper. Maxwell Forbes provides an excellent tutorial on creating “Figure 1” of your paper.
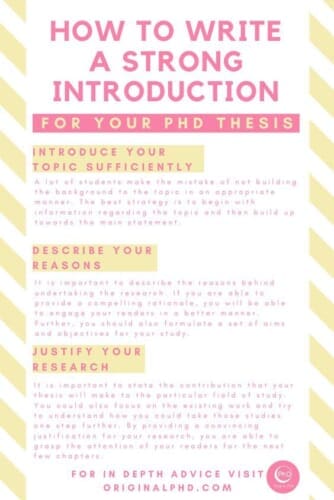
While writing, remember not to overclaim or overstate any contribution or novelty. Avoid over-criticizing others’ work just to stand out. Remember that novelty is to be judged by reviewers, not claimed by you. Hence don’t claim your approach as “novel” every time you mention it. Figure 3 summarizes how to write a strong introduction.
Section II — Related Work
This section should describe the literature, recent approaches, and trends in your problem space. You can divide the section into several paragraphs, each describing a separate category of related work. Remember to mention the recent, closest, any similar, or concurrent works and relate to your work by clearly explaining the aspects (motivation, idea, approach, application, or analysis) in which yours are novel or different. Cite as many papers as you can, and don’t over-criticize or make unjust comments about any particular work.
A debatable question is where to put the related work section after the introduction or before the conclusion. Both have pros and cons that you should consider before jumping to any conclusion.
After Introduction (mostly preferred)
It helps the reviewer clearly understand the work’s positioning and how it is different from prior efforts. However, it can sometimes become hard to relate without knowing the technicalities of the approach. Having an introductory figure can help mitigate this issue to a reasonable extent.
Before Conclusion
The reviewer now knows the technicalities of your approach and is in better shape to understand what aspects it is different from prior efforts. However, some can still wonder how the work differs from previous work till this point. So, it’s better to point out differences with important related works in the introduction whenever adopting this style.
Section III — Methodology
The methodology section describes your approach in detail, allowing the reviewer to evaluate the strengths and weaknesses of the work. By the time the reviewer finishes reading the section, they would have partially made up their minds for acceptance or rejection. They will read the rest of the paper to look for evidence to either support their decision or change their minds. Hence by the end of this section, the technical contribution and approach should be crystal clear.
I follow the following structure and notes to help create a proper flow and keep the reader engaged at every step.
Background and Preliminaries
This section aims to delineate material that’s not original but is needed to understand the approach. You don’t expect the reader or reviewer to read the important papers first to understand your approach. As said before, every section should be complete in itself. Make the notations and terminology very clear by stating the technicalities of your research problem. Explain the assumptions, variables, training and testing setup, cardinalities, and brief on important related works. For example,
If your work addresses the attributional robustness of deep neural networks (e.g., my ECCV paper), it is important to define the attributional robustness (via mathematical notations) to set the proper context for the reader. If it addresses problem settings (e.g., domain generalization, few-shot learning, or zero-shot learning), it is crucial to explain the training and testing setups.
Motivation
Next, start by stating your motivation. It should be clear and upfront before the reader proceeds to the technicalities. Motivation can be theoretical or empirical. In any case, try to back it with either proofs, references, or toy experiments.
Approach
Pick a unique heading rather than naming this subsection as “Approach.” If you have an acronym “XYZ” for your method, title it as “XYZ: Proposed Methodology” or “XYZ: <expanded form>” or “XYZ: <your novelty>.” Some examples:
- COCOA: Proposed Methodology
- Attributional Robustness Training (ART)
- SWAD: Domain Generalization by Seeking Flat Minima
- Charting the Right Manifold
Next, refer to the main methodology figure and present an overview of your approach by explaining the main idea briefly, components (e.g., feature extractor, classifier, auxiliary tasks), and steps (e.g., pre-training, training, inference, etc.) involved. This gives the reviewer an idea of what to expect and how each component/step relates to each other. Now you can explain each of your components/actions in detail. While writing, here are a few things to keep in mind:
- Cite references whenever you borrow something that is not your novelty (e.g., loss functions, architectures, data augmentation, etc.).
- Be consistent with your notations (e.g., using \mathbf{} for representing vectors and \hat{y} for predictions).
- Try to sound generic and avoid concrete implementation details as much as possible.
End the section by providing a summary of the approach via pseudo-code or an algorithm. Overleaf provides excellent documentation on how to write algorithms in LaTeX.
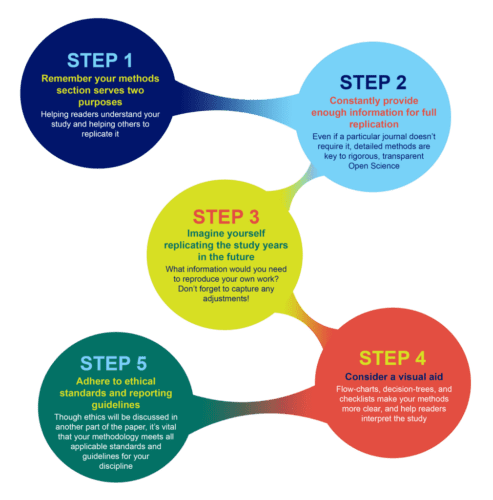
Figure 4 summarizes how to write a strong methodology section.
Sections IV and V — Experiments and Analysis
The presentation of your experiments section can significantly affect the reviewer’s impression of your paper. Hence, it is important to make your experiments and findings visually appealing.
Experimental Setup
- Start by briefly describing the datasets you will be using in your experiments and explaining the baselines.
- Mention the implementation details (e.g., architectures, hyper-parameters, libraries, etc.), the evaluation protocol, and metrics (FID, accuracy, inception score, precision, recall, etc.).
- Use references to emphasize that the datasets you are using for standard and evaluation protocols are the same as prior arts.
Main Results
- Refer and illustrate how to read your table and figures (explaining rows and columns, and labeling the x- and y-axes, etc.) and summarize your findings.
- Remember to get back to answer the hypotheses and questions.
- Rather than explaining the results, try to describe your insights.
- Be upfront and provide a clear rationale if you have any indecisive or pessimistic answers based on experiment results.
- Remember not to overstate and comment on anything that is not evident from your results.
Discussion and Analysis
Optionally, you can have a separate “Discussion and Analysis” subsection to discuss and provide additional results for a clear understanding of the approach. The more ablations and analysis you provide, the more chances the reviewer will be impressed. As mentioned in our previous post, you can include studies like component analysis, sensitivity to hyperparameters, t-SNE plots, attention or saliency maps, running time analysis, scalability in various aspects, etc.
Besides that, you can list the scope, limitations, and issues that your approach cannot address currently. Instead of hiding obvious limitations, it is often a good idea to list them and discuss possible solutions. Reviewers can often identify obvious limitations even if you don’t state them; then, they will criticize your work on these limitations.
Additionally, you can state possible applications of your approach that you haven’t tried but are feasible, effective, or straightforward.
Tables and Figures
Ensure that your tables and figures are crisp and clear. Have detailed captions describing the dataset used, evaluation protocol, abbreviations, number of runs, and key observations. Don’t forget to include standard deviations and highlight the best and second-best results. For figures, ensure that the text, legend, axis titles, and plot lines are abnormally large so that the reader doesn’t have to zoom in every time to find what each axis represents.
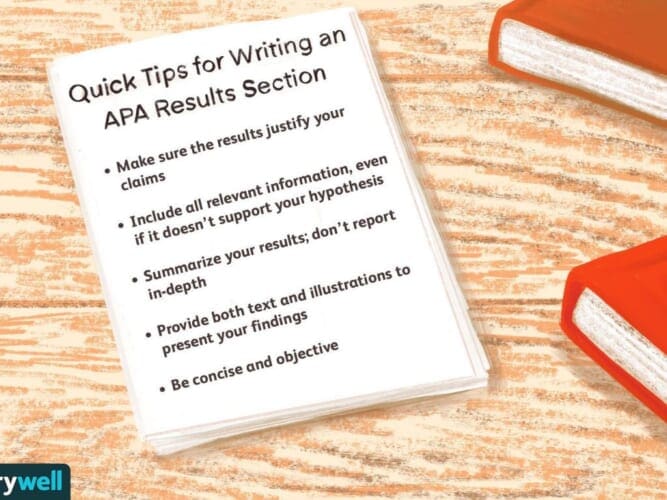
Figure 5 mentions some quick tips for writing a results section of a research paper.
Section VI — Conclusions and Future Work
This section should be a short paragraph starting with a summary of your motivation, main idea, key results, and broader impacts. The tone should be conclusive and not sound similar to the abstract or introduction. Next, you can briefly mention the limitations of your work and future works. As future works, you can mention follow-up work you are actively engaged in or plan to engage. Figure 6 mentions some characteristics of an effective research paper conclusion.

General Tips
Figure 7 displays some general guidelines for writing a successful research paper. Here are a few more tips regarding the same.

Citations
Include as many relevant references as it creates an impression that the work is well studied. Avoid using arXiv or any other unofficial sources for obtaining BibTeX entries. Instead, take them from the official proceedings of the conference, workshop, or journal where the work is accepted. Check over your final bibliography carefully and make sure every entry looks right.
Appendix or Supplementary
It’s usually a good idea to include additional results, analysis, details, proofs, video demos, or anonymized code as supplementary material or appendix. They should not have results obtained with an improved version of the method (e.g., following additional parameter tuning or training) or an updated or corrected version of the submission PDF. Further, they should not contain material necessary to understand the contribution.
Writing
Here are some general writing tips.
- Make sure to run a spell and grammar check before submitting.
- Tables and figures should be placed at the top of the page unless small enough to fit with flow or text or wrap around it.
- Don’t add references just for the sake of increasing their count. Ensure that they are relevant and convey the overall message.
- Use present tenses (e.g., “we propose,” “we observe”) instead of past tenses (e.g., “we proposed,” “we observed”).
- Utilize tools like draw.io, MS Excel, and MS PowerPoint to create professional-looking figures and graphs.
Argumentative vs. Analytical Research Papers
Research papers can broadly be divided into two types: argumentative and analytical (Figure 8). An argumentative research paper supports its thesis, much like a lawyer uses evidence to make their case. This type of paper aims to persuade its reader to adopt the view presented.

On the other hand, analytical papers analyze different viewpoints from multiple sources on a particular topic. The primary purpose of the analytical research paper is to present a few different opinions and draw logical conclusions.
From the definitions, it is clear that the presentation style we have considered so far is argumentative. If you are working on an analytical paper, you might consider adopting a different presentation style.
In such a writing style, your contributions should include the conclusions and insights you are bringing to the table. The style of an analytical paper differs from an argumentative style mainly in sections III, IV, and V. You can combine sections III, IV, and V into one and follow either a question-answer, cause-effect, problem-solution, or a comparison-contrast style. Divide the section into several subsections or paragraphs, presenting a different viewpoint.
For each subsection, start by elaborating the objective, approaches used, and experimental setup. Refer to the results and present your unbiased thoughts and views based on the results. Optionally you can include a few recommendations in the concluding paragraph. Here are a few examples for such analytical papers.
- Naseer et al. (2021) follow a question-answer style and answer several questions: Are Vision Transformers Robust to Occlusions? Can Vision Transformer Models Both Shape and Texture Characteristics? Does Positional Encoding Preserve the Global Image Context?
- Bhojanapalli et al. (2021) follow a comparison-contrast style by performing an extensive study of various robustness measures of ViT models and comparing the findings to ResNet baselines.
What's next? We recommend PyImageSearch University.
86+ total classes • 115+ hours hours of on-demand code walkthrough videos • Last updated: January 2026
★★★★★ 4.84 (128 Ratings) • 16,000+ Students Enrolled
I strongly believe that if you had the right teacher you could master computer vision and deep learning.
Do you think learning computer vision and deep learning has to be time-consuming, overwhelming, and complicated? Or has to involve complex mathematics and equations? Or requires a degree in computer science?
That’s not the case.
All you need to master computer vision and deep learning is for someone to explain things to you in simple, intuitive terms. And that’s exactly what I do. My mission is to change education and how complex Artificial Intelligence topics are taught.
If you're serious about learning computer vision, your next stop should be PyImageSearch University, the most comprehensive computer vision, deep learning, and OpenCV course online today. Here you’ll learn how to successfully and confidently apply computer vision to your work, research, and projects. Join me in computer vision mastery.
Inside PyImageSearch University you'll find:
- ✓ 86+ courses on essential computer vision, deep learning, and OpenCV topics
- ✓ 86 Certificates of Completion
- ✓ 115+ hours hours of on-demand video
- ✓ Brand new courses released regularly, ensuring you can keep up with state-of-the-art techniques
- ✓ Pre-configured Jupyter Notebooks in Google Colab
- ✓ Run all code examples in your web browser — works on Windows, macOS, and Linux (no dev environment configuration required!)
- ✓ Access to centralized code repos for all 540+ tutorials on PyImageSearch
- ✓ Easy one-click downloads for code, datasets, pre-trained models, etc.
- ✓ Access on mobile, laptop, desktop, etc.
Summary
Planning and writing a research paper is the next important step after ideation and experiments.
- Imagining the paper and creating an outline that briefly describes the goal of each section, subsection, and paragraph. Choose a working title that conveys the main idea and positioning of the work.
- Work on the introduction by structuring it into four to five paragraphs describing the problem statement and its importance, limitations briefly, and gaps in prior efforts, motivation, and approach. End the section with a list of contributions and an introductory figure.
- Related work should describe the literature, recent approaches, and trends in your problem space. Cite as many relevant papers as you can and avoid unjustified comments. Decide beforehand whether the section should come right after the introduction or before the conclusion.
- Spend time on the methodology section to clarify your technical contributions and novelty. Start by providing a background followed by motivation. Next, describe your approach in-depth via illustrations, equations, and toy examples. Try to sound generic and avoid concrete implementation details. End the section with a pseudo algorithm.
- Present the experiments and analysis section with visually appealing graphs, images, and tables. Start by defining the experimental setup (datasets, evaluation, baselines, metrics, etc.), summarizing your results, and describing your insights. Optionally, have a separate discussion and analysis section/subsection to discuss scope limitations and provide additional results or applications for a clear understanding of the approach.
- Provide a conclusion summarizing your motivation, main idea, key results, broader impacts, and possible future directions. Spend the effort to make all citations complete and consistent. Include additional results, analysis, details, proofs, video demos, anonymized code as supplementary material, or appendix.
I hope this lesson will assist you in planning and writing your research paper. Stay tuned for the next lesson on planning the next steps when things don’t work out.
Citation Information
Mangla, P. “Planning and Writing a Research Paper,” PyImageSearch, P. Chugh, R. Raha, K. Kudriavtseva, and S. Huot, eds., 2022, https://pyimg.co/qyafh
***@incollection{Mangla_2022_Planning,
  author = {Puneet Mangla},
  title = {Planning and Writing a Research Paper},
  booktitle = {PyImageSearch},
  editor = {Puneet Chugh and Ritwik Raha and Kseniia Kudriavtseva and Susan Huot},
  year = {2022},
  note = {https://pyimg.co/qyafh},
}

Unleash the potential of computer vision with Roboflow - Free!
- Step into the realm of the future by signing up or logging into your Roboflow account. Unlock a wealth of innovative dataset libraries and revolutionize your computer vision operations.
- Jumpstart your journey by choosing from our broad array of datasets, or benefit from PyimageSearch’s comprehensive library, crafted to cater to a wide range of requirements.
- Transfer your data to Roboflow in any of the 40+ compatible formats. Leverage cutting-edge model architectures for training, and deploy seamlessly across diverse platforms, including API, NVIDIA, browser, iOS, and beyond. Integrate our platform effortlessly with your applications or your favorite third-party tools.
- Equip yourself with the ability to train a potent computer vision model in a mere afternoon. With a few images, you can import data from any source via API, annotate images using our superior cloud-hosted tool, kickstart model training with a single click, and deploy the model via a hosted API endpoint. Tailor your process by opting for a code-centric approach, leveraging our intuitive, cloud-based UI, or combining both to fit your unique needs.
- Embark on your journey today with absolutely no credit card required. Step into the future with Roboflow.

Join the PyImageSearch Newsletter and Grab My FREE 17-page Resource Guide PDF
Enter your email address below to join the PyImageSearch Newsletter and download my FREE 17-page Resource Guide PDF on Computer Vision, OpenCV, and Deep Learning.

Comment section
Hey, Adrian Rosebrock here, author and creator of PyImageSearch. While I love hearing from readers, a couple years ago I made the tough decision to no longer offer 1:1 help over blog post comments.
At the time I was receiving 200+ emails per day and another 100+ blog post comments. I simply did not have the time to moderate and respond to them all, and the sheer volume of requests was taking a toll on me.
Instead, my goal is to do the most good for the computer vision, deep learning, and OpenCV community at large by focusing my time on authoring high-quality blog posts, tutorials, and books/courses.
If you need help learning computer vision and deep learning, I suggest you refer to my full catalog of books and courses — they have helped tens of thousands of developers, students, and researchers just like yourself learn Computer Vision, Deep Learning, and OpenCV.
Click here to browse my full catalog.