In this tutorial, we will learn how to apply Computer Vision, Deep Learning, and OpenCV to identify potential child soldiers through automatic age detection and military fatigue recognition.
Military service is something of personal importance to me, something I consider honorable and admirable. That’s precisely the reason why this project, leveraging technology to identify child soldiers, is something I feel strongly about — nobody should be forced to serve, and especially young children.
You see, the military has always been a big part of my family growing up, even though I did not personally serve.
- My great-grandfather was an infantryman during WWI
- My grandfather served as a cook/baker in the Army for over 25 years
- My dad served in the U.S. Army for eight years, studying infectious diseases toward the end/immediately following the Vietnam War
- My cousin joined the Marines right out of high school and did two tours in Afghanistan before he was honorably discharged
Even outside my direct family, the military was still part of my life and community. I went to high school in a rural area of Maryland. There wasn’t much opportunity post-high school, with only three real paths:
- Become a farmer — which many did, working on their respective family farms until they ultimately inherited it
- Try to make it in college — a reasonable chunk of people choose this path, but either they or their families incur massive debt in the process
- Join the military — get paid, learn practical skills that can transfer to real-world jobs, have up to $50K to pay for college through the GI Bill (which could also be partly transferred to your spouse or kids), and if deployed, get additional benefits (of course, at the risk of loss of life)
If you didn’t want to become a farmer or work in agriculture, that really only left two options — go to college or join the military. And for some, college just didn’t make sense. It wasn’t worth the expense.
If I’m recalling correctly, before I graduated from high school, at least 10 kids from my class enlisted, some of whom I knew personally and had classes with.
Growing up like I did, I have an immense amount of respect for the military, especially those who have served their country, regardless of what country they may be from. Whether you served in the United States, Finland, Japan, etc., serving your country is a big deal, and I respect all those that have.
I don’t have many regrets in my life, but truly, looking back, not serving is one of them. I really wish I had spent four years in the military, and each time I reflect on it, I still get pangs of regret and guilt.
That said, choosing not to serve was my choice.
The majority of us have a choice in our service — though of course there are complex social issues, such as poverty or ethical considerations, that go beyond the scope of this blog post. However, the bottom line is that young children should never be forced into enlisting.
There are parts of the world where kids don’t get to choose. Due to extreme poverty, terrorism, government propaganda, and/or manipulation, children are forced to fight.
This fighting doesn’t always involve a weapon either. In war, children can be used as spies/informants, messengers, human shields, and even as bargaining pieces.
Whether it be firing a weapon or serving as a pawn in a larger game, child soldiers incur lasting health effects, including but not limited to (source):
- Mental illness (chronic stress, anxiety, PTSD, etc.)
- Poor literacy
- Higher risk of poverty
- Unemployment as adults
- Alcohol and drug abuse
- Higher risk of suicide
Children serving in the military isn’t a new phenomenon either. It’s a tale as old as time:
- The Children’s Crusade in 1212 was infamous for enlisting children. Some died, but many others were sold into slavery
- Napoleon enlisted children in his army
- Children were used throughout WWI and WWII
- Enemy at the Gates, the 1973 nonfiction book and later 2001 film, told the story of The Battle of Stalingrad, and more specifically, a fictionalized Vasily Zaitsev, a famous Soviet sniper. In that book/movie, Sasha Filippov, a child, was used as a spy and informant. Sasha would routinely befriend Nazis and then feed information back to the Soviets. Sasha was later caught by the Nazis and killed
- And in the modern day, we are all too familiar with terrorist organizations such as Al-Qaeda and ISIS enlisting vulnerable kids into their efforts
While many of us would agree that using children during a war is unacceptable, the fact that children still end up participating in wars is a more complicated matter. When your life is on the line, when your family is hungry, when those around you are dying, it becomes a matter of life and death.
Fight or die.
It’s a sad reality, but it’s something that we can improve (and ideally resolve) through proper education, and slowly, incrementally, make the world a safer, better place.
In the meantime, we can use a bit of Computer Vision and Deep Learning to help identify potential child soldiers, both on the battlefield and in less than savory countries or organizations where they are being educated/indoctrinated.
Today’s post is the culmination of my past few months’ work after I was introduced to Victor Gevers (an esteemed ethical hacker) from the GDI.Foundation.
Victor and his team identified leaks in classroom facial recognition software that was being used to verify children were in attendance. When examining those photos, it appeared that some of these children were receiving military education and training (i.e., kids wearing military fatigues and other evidence that I’m not comfortable posting).
I’m not going to discuss the specifics of the politics, countries, or organizations involved — that’s not my place, and it’s entirely up to Victor and his team on how they will handle that particular situation.
Instead, I’m here to report on the science and the algorithms.
The field of Computer Vision and Deep Learning rightfully receives some deserved criticism for allowing powerful governments and organizations to create “Big Brother”-like police states where a watchful eye is always present.
That said, CV/DL can be used to “watch the watchers.” There will always be organizations and countries that try to surveil us. We can use CV/DL in turn as a form of accountability, keeping them responsible for their actions. And yes, it can be used to save lives when applied correctly.
To learn about an ethical application of Computer Vision and Deep Learning, specifically identifying child soldiers through automatic age and military fatigue detection, just keep reading!
An Ethical Application of Computer Vision and Deep Learning — Identifying Child Soldiers Through Automatic Age and Military Fatigue Detection
In the first part of this tutorial, we’ll discuss how I became involved in this project.
From there, we’ll take a look at four steps to identifying potential child soldiers in images and video streams.
Once we understand our basic algorithm, we’ll then implement our child soldier detection method using Python, OpenCV, and Keras/TensorFlow.
We’ll wrap up the tutorial by examining the results of our work.
Children in the military, child soldiers, and human rights — my attempt to help the cause
I first became involved in this project back in mid-January when I was connected with Victor Gevers from the GDI.Foundation.
Victor and his team discovered a data leak in software used for classroom facial recognition (i.e., a “smart attendance system” that automatically takes attendance based on face recognition).
This data leak exposed millions of children’s records that included ID card numbers, GPS locations, and yes, even the face photos themselves.
Any type of data leak is a concern, but a leak that exposes children is severe to say the least.
Unfortunately, the matter got worse.
Upon inspecting the photos from the leak, a concentration of children wearing military fatigues was found.
That immediately raised some eyebrows.
Victor and I connected and briefly exchanged emails regarding using my knowledge and expertise to help out.
Victor and his team needed a method to automatically detect faces, determine their age, and determine if the person was wearing military fatigues or not.
I agreed, provided that I could ethically share the results of the science (not the politics, countries, or organizations involved) as a form of education to help others learn from real-world problems.
There are organizations, coalitions, and individuals well more suited than me to properly handle the humanitarian side — and while I’m an expert in CV/DL, I am not an expert in politics or humanitarian efforts (although I do try my best to educate myself and make the best decisions I possibly can).
I hope you treat this article as a form of education. It is by no means a disclosure of countries or organizations involved, and I have made sure that none of the original training data or example images is provided in this tutorial. All original data has either been removed or properly anonymized.
How can we detect and identify potential child soldiers with computer vision and deep learning?
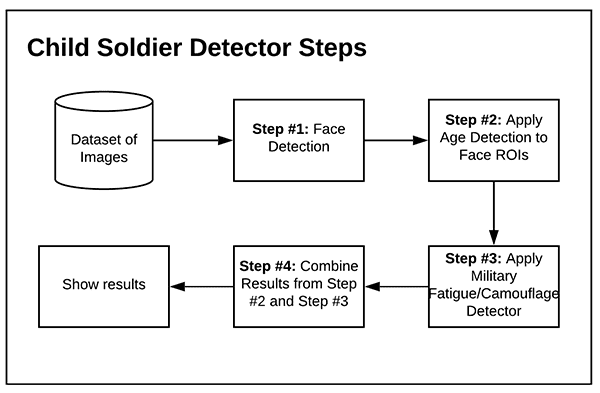
Detecting and identifying potential child soldiers is a four-step process:
- Step #1 – Face Detection: Apply face detection to localize faces in the input images/video streams
- Step #2 – Age Detection: Utilize deep learning-based age detectors to determine the age of the person detected via Step #1
- Step #3 – Military Fatigue Detection: Apply deep learning to automatically detect camouflage or other indications of a military uniform
- Step #4 – Combine Results: Take the results from Step #2 and Step #3 to determine if a child is potentially wearing military fatigues, which may be an indication of a child soldier, depending on the origin and context of the original image
If you’ve noticed, I’ve been purposely covering these topics on the PyImageSearch blog over the past 1-1.5 months, building up to this blog post.
We’ll do a quick review of each of the four steps below, but I suggest you use the links above to gain more detail on each of the steps involved.
Step #1: Detect faces in images or video streams
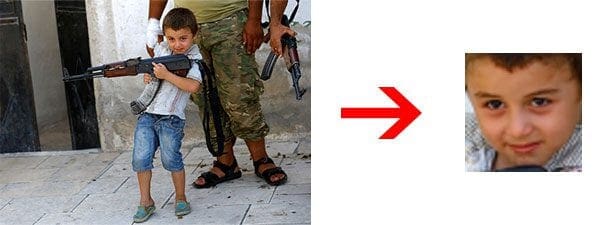
Before we can determine if a child is in an image or video stream, we first need to detect faces.
Face detection is the process of automatically locating where in an image a face is.
We’ll be using OpenCV’s deep learning-based face detector in this tutorial, but you could just as easily swap in Haar cascades, HOG + Linear SVM, or any number of other face detection methods.
Step #2: Take the face ROIs and perform age detection
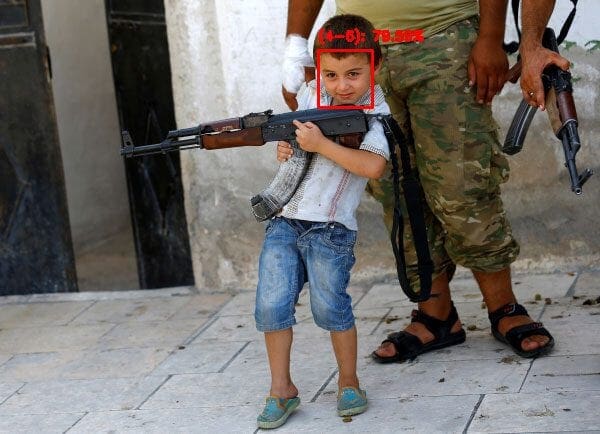
Once we have localized each of the faces in the image/video stream, we can determine their age.
We’ll be using the age detector trained by Levi and Hassner in their 2015 publication, Age and Gender Classification using Convolutional Neural Networks.
This age detection model is compatible with OpenCV, as discussed in this tutorial.
Step #3: Train a camouflage/military fatigue detector, and apply it to the image
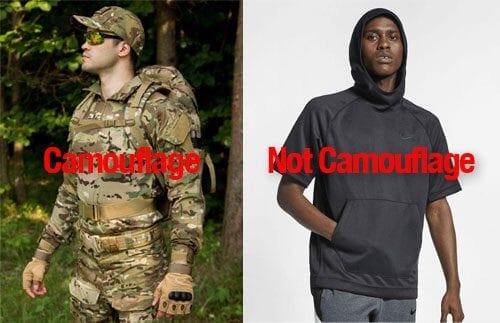
An indicator of a potential child soldier could be wearing military fatigues, which typically includes some sort of camouflage-like pattern.
Training a camouflage detector was covered in a previous tutorial — we’ll be using the trained model here today.
Step #4: Combine results of models, and look for children under 18 wearing military fatigues
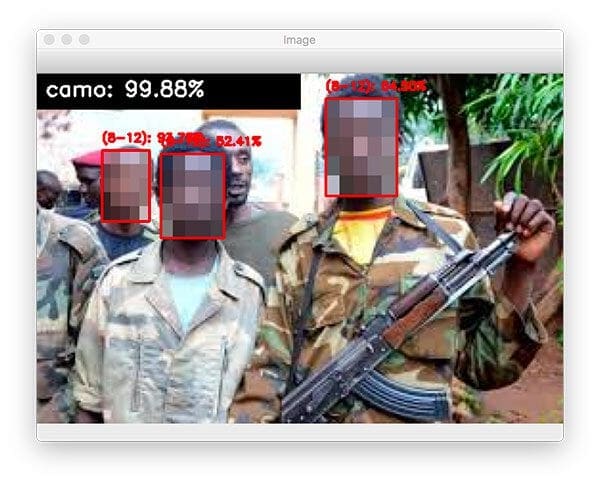
The final step is to combine the results from our age detector with our military fatigue/camouflage detector.
If we (1) detect a person under the age of 18 in the photo, and (2) there also appears to be camouflage in the image, we’ll log that image to disk for further review.
Configuring your development environment
To configure your system for this tutorial, I first recommend following either of these tutorials:
Either tutorial will help you configure you system with all the necessary software for this blog post with one exception. You also need to install the progressbar2
$ workon dl4cv
$ pip install progressbar2
Once your system is configured, you are ready to move on with the rest of the tutorial.
Project structure
Be sure to grab the files for today’s tutorial from the “Downloads” section. Our project is organized as follows:
$ tree --dirsfirst
.
├── models
│   ├── age_detector
│   │   ├── age_deploy.prototxt
│   │   └── age_net.caffemodel
│   ├── camo_detector
│   │   └── camo_detector.model
│   └── face_detector
│       ├── deploy.prototxt
│       └── res10_300x300_ssd_iter_140000.caffemodel
├── output
│   ├── ages.csv
│   └── camo.csv
├── pyimagesearch
│   ├── __init__.py
│   ├── config.py
│   └── helpers.py
├── parse_results.py
└── process_dataset.py

6 directories, 12 files
The models/ directory contains each of our pre-trained deep learning models:
- Face detector
- Age classifier
- Camouflage classifier
The output/ directory is where you would store your age and camouflage CSV data files if you had the data to complete this project (refer to the note below).
Our pyimagesearch module contains both our configuration file and a selection of helper functions to perform age and camouflage detection in images. The helpers.py script is where the complex deep learning inference takes place using each of our three models.
The process_dataset.py script is to be executed first. This file examines each of the ~56,000 images in our dataset and determines the presence of camouflage and the predicted age of each person’s face, resulting in two CSV files exported to the output/ directory.
Once all the data is processed (it depends on how much data you have), the parse_results.py file is used to visualize images while anonymizing faces for privacy concerns. You could easily alter this script to export this data for reporting purposes to humanitarian and governmental organizations.
Note: I cannot supply the original dataset used in this tutorial in the “Downloads” section of the guide as I normally would. That dataset is sensitive and cannot be distributed under any means.
Our configuration file
Before we get too far into our implementation, let’s first define a simple configuration file to store file paths to our face detector, age detector, and camouflage detector models, respectively.
Open up the config.py file in your project directory structure, and insert the following code:
# import the necessary packages
import os

# define the path to our face detector model
FACE_PROTOTXT = os.path.sep.join(["models", "face_detector",
	"deploy.prototxt"])
FACE_WEIGHTS = os.path.sep.join(["models", "face_detector",
	"res10_300x300_ssd_iter_140000.caffemodel"])

# define the path to our age detector model
AGE_PROTOTXT = os.path.sep.join(["models", "age_detector",
	"age_deploy.prototxt"])
AGE_WEIGHTS = os.path.sep.join(["models", "age_detector",
	"age_net.caffemodel"])

# define the path to our camo detector model
CAMO_MODEL = os.path.sep.join(["models", "camo_detector",
	"camo_detector.model"])
By making our config a Python file and by using the os
Our config contains:
- Face detector model paths (Lines 5-8); be sure to read my deep learning face detector tutorial
- Age detector paths (Lines 11-14); take a moment to read my deep learning age detection tutorial in which this model was introduced
- Camouflage detector model path (Lines 17 and 18); read all about camouflage clothing classification with deep learning
With each of these paths defined, we’re ready to define convenience functions in a separate Python file in the next section.
Convenience functions for face detection, age prediction, camouflage detection, and face anonymization
To complete this project, we’ll be using a number of computer vision/deep learning techniques covered in previous tutorials, including:
Let’s now define convenience functions for each technique in a central place for our child soldier detection project.
Note: For a more detailed review of face detection, face anonymization, age detection, and camouflage clothing detection, be sure to click on the corresponding link above.
Open up the helpers.py file in the pyimagesearch module, and insert the following code used to detect faces and predict age in the input image:
# import the necessary packages
import numpy as np
import cv2

def detect_and_predict_age(image, faceNet, ageNet, minConf=0.5):
	# define the list of age buckets our age detector will predict
	# and then initialize our results list
	AGE_BUCKETS = ["(0-2)", "(4-6)", "(8-12)", "(15-20)", "(25-32)",
		"(38-43)", "(48-53)", "(60-100)"]
	results = []
Our helper utilities only require OpenCV and NumPy (Lines 2 and 3).
Our detect_and_predict_age helper function begins on Line 5 and accepts the following parameters:
image: A photo containing one or many facesfaceNet: The initialized deep learning face detectorageNet: Our initialized deep learning age classifierminConf
Our AGE_BUCKETS (i.e., age ranges our classifier can predict) are defined on Lines 8 and 9.
We then initialize an empty list to hold the results of face localization and age prediction (Line 10). The remainder of this function will populate the results with face coordinates and corresponding age predictions.
Let’s go ahead and perform face detection:
	# grab the dimensions of the image and then construct a blob
	# from it
	(h, w) = image.shape[:2]
	blob = cv2.dnn.blobFromImage(image, 1.0, (300, 300),
		(104.0, 177.0, 123.0))

	# pass the blob through the network and obtain the face detections
	faceNet.setInput(blob)
	detections = faceNet.forward()
First, we grab the image dimensions for scaling purposes.
Then, we perform face detection, construct a blob, and send it through our detector CNN (Lines 15-20).
We’ll now loop over the face detections:
	# loop over the detections
	for i in range(0, detections.shape[2]):
		# extract the confidence (i.e., probability) associated with
		# the prediction
		confidence = detections[0, 0, i, 2]

		# filter out weak detections by ensuring the confidence is
		# greater than the minimum confidence
		if confidence > minConf:
			# compute the (x, y)-coordinates of the bounding box for
			# the object
			box = detections[0, 0, i, 3:7] * np.array([w, h, w, h])
			(startX, startY, endX, endY) = box.astype("int")

			# extract the ROI of the face
			face = image[startY:endY, startX:endX]

			# ensure the face ROI is sufficiently large
			if face.shape[0] < 20 or face.shape[1] < 20:
				continue
Lines 23-37 loop over detections, ensure high confidence, and extract a face ROI while ensuring it is sufficiently large for two reasons:
- First, we want to filter out false-positive face detections in the image
- Second, age classification results won’t be accurate for faces that are far away from the camera (i.e., perceivably small)
To finish out our face detection and age prediction helper utility, we’ll perform face prediction:
			# construct a blob from *just* the face ROI
			faceBlob = cv2.dnn.blobFromImage(face, 1.0, (227, 227),
				(78.4263377603, 87.7689143744, 114.895847746),
				swapRB=False)

			# make predictions on the age and find the age bucket with
			# the largest corresponding probability
			ageNet.setInput(faceBlob)
			preds = ageNet.forward()
			i = preds[0].argmax()
			age = AGE_BUCKETS[i]
			ageConfidence = preds[0][i]

			# construct a dictionary consisting of both the face
			# bounding box location along with the age prediction,
			# then update our results list
			d = {
				"loc": (startX, startY, endX, endY),
				"age": (age, ageConfidence)
			}
			results.append(d)

	# return our results to the calling function
	return results
Using our face ROI, we construct another blob — this time of a single face (Lines 44-46). From there, we pass it through our age predictor CNN and determine our age range and ageConfidence (Lines 50-54).
Lines 59-63 arrange face localization coordinates and associated age predictions in a dictionary. The last step of the detection processing loop is to add the dictionary to the results list (Line 66).
Once all detections have been processed and any/all predictions are ready, we return the results to the caller (Line 66).
Our next function will handle detecting camouflage in the input image:
def detect_camo(image, camoNet):
	# initialize (1) the class labels the camo detector can predict
	# and (2) the ImageNet means (in RGB order)
	CLASS_LABELS = ["camouflage_clothes", "normal_clothes"]
	MEANS = np.array([123.68, 116.779, 103.939], dtype="float32")

	# resize the image to 224x224 (ignoring aspect ratio), convert
	# the image from BGR to RGB ordering, and then add a batch
	# dimension to the volume
	image = cv2.resize(image, (224, 224))
	image = cv2.cvtColor(image, cv2.COLOR_BGR2RGB)
	image = np.expand_dims(image, axis=0).astype("float32")

	# perform mean subtraction
	image -= MEANS

	# make predictions on the input image and find the class label
	# with the largest corresponding probability
	preds = camoNet.predict(image)[0]
	i = np.argmax(preds)

	# return the class label and corresponding probability
	return (CLASS_LABELS[i], preds[i])
Our detect camo helper utility begins on Line 68 and accepts both an input image and initialized camoNet camouflage classifier. Inside the function, we:
- Initialize class labels — either “camouflage” or “normal” clothing (Line 71)
- Set our mean subtraction values (Line 72)
- Pre-process the input
imageby resizing to 224×224 pixels, swapping color channel ordering, adding a batch dimension, and performing mean subtraction (Lines 77-82) - Make camouflage classification predictions (Lines 86 and 87)
- Return the class label and associated probability to the caller (Line 90)
Our final helper is used to anonymize faces of potential child soldiers:
def anonymize_face_pixelate(image, blocks=3):
	# divide the input image into NxN blocks
	(h, w) = image.shape[:2]
	xSteps = np.linspace(0, w, blocks + 1, dtype="int")
	ySteps = np.linspace(0, h, blocks + 1, dtype="int")

	# loop over the blocks in both the x and y direction
	for i in range(1, len(ySteps)):
		for j in range(1, len(xSteps)):
			# compute the starting and ending (x, y)-coordinates
			# for the current block
			startX = xSteps[j - 1]
			startY = ySteps[i - 1]
			endX = xSteps[j]
			endY = ySteps[i]

			# extract the ROI using NumPy array slicing, compute the
			# mean of the ROI, and then draw a rectangle with the
			# mean RGB values over the ROI in the original image
			roi = image[startY:endY, startX:endX]
			(B, G, R) = [int(x) for x in cv2.mean(roi)[:3]]
			cv2.rectangle(image, (startX, startY), (endX, endY),
				(B, G, R), -1)

	# return the pixelated blurred image
	return image
For face anonymization, we’ll use a pixelated type of face blurring. This method is typically what most people think of when they hear “face blurring” — it’s the same type of face blurring you’ll see on the evening news, mainly because it’s a bit more “aesthetically pleasing” to the eye than a simpler Gaussian blur (which is indeed a bit “jarring”).
Beginning on Line 92, we define our anonymize_face_pixilate function and parameters. This function accepts a face ROI (image) and the number of pixel blocks.
Lines 94-96 grab our face image dimensions and divide it into MxN blocks. From there, we proceed to loop over the blocks in both the x and y directions (Lines 99 and 100). In order to compute the starting/ending bounding coordinates for the current block, we use our step indices, i and j (Lines 103-106).
Subsequently, we extract the current block ROI and compute the mean RGB pixel intensities for the ROI (Lines 111 and 112). We then annotate a rectangle on the block using the computed mean RGB values, thereby creating the “pixelated”-like effect (Lines 113 and 114).
Finally, Line 117 returns our pixelated face image to the caller.
You can learn more about face anonymization/blurring in this tutorial.
Great job implementing our child soldier detector helper utilities using OpenCV and NumPy!
Implementing our potential child soldier detector using OpenCV and Keras/TensorFlow
With both our configuration file and helper functions in place, let’s move on to applying them to a dataset of images that potentially contains child soldiers.
Open up the process_dataset.py script, and insert the following code:
# import the necessary packages
from pyimagesearch.helpers import detect_and_predict_age
from pyimagesearch.helpers import detect_camo
from pyimagesearch import config
from tensorflow.keras.models import load_model
from imutils import paths
import progressbar
import argparse
import cv2
import os

# construct the argument parser and parse the arguments
ap = argparse.ArgumentParser()
ap.add_argument("-d", "--dataset", required=True,
	help="path to input directory of images to process")
ap.add_argument("-o", "--output", required=True,
	help="path to output directory where CSV files will be stored")
args = vars(ap.parse_args())
We begin with imports. Our most notable imports come from the helpers file that we implemented in the previous section including both our detect_and_predict_age as well as our detect_camo functions. To use each of our helpers, we’ll have to load our pre-trained models from disk via the load_model method along with the paths in our config.
In order to list all image paths in our soldier dataset, we’ll use the paths module from imutils. Given that there are ~56,000 images in our dataset, we’ll use the progressbar package so that we can monitor progress of the lengthy dataset processing operation.
Our script requires two command line arguments:
--dataset--outputages.csvand acamo.csvwhen processing has finished
Given that our imports and command line args are ready, now let’s create both of our file pointers:
# initialize a dictionary that will store output file pointers for
# our age and camo predictions, respectively
FILES = {}

# loop over our two types of output predictions
for k in ("ages", "camo"):
	# construct the output file path for the CSV file, open a path to
	# the file pointer, and then store it in our files dictionary
	p = os.path.sep.join([args["output"], "{}.csv".format(k)])
	f = open(p, "w")
	FILES[k] = f
Line 22 initializes our FILES dictionary. From there, Lines 25-30 populate FILES with two CSV file pointers:
"ages"output/ages.csvfile pointer"camo": Holds theoutput/camo.csvfile pointer
Both file pointers are opened for writing in the process.
At this point, we’ll initialize three deep learning models:
# load our serialized face detector, age detector, and camo detector
# from disk
print("[INFO] loading trained models...")
faceNet = cv2.dnn.readNet(config.FACE_PROTOTXT, config.FACE_WEIGHTS)
ageNet = cv2.dnn.readNet(config.AGE_PROTOTXT, config.AGE_WEIGHTS)
camoNet = load_model(config.CAMO_MODEL)

# grab the paths to all images in our dataset
imagePaths = sorted(list(paths.list_images(args["dataset"])))
print("[INFO] processing {} images".format(len(imagePaths)))

# initialize the progress bar
widgets = ["Processing Images: ", progressbar.Percentage(), " ",
	progressbar.Bar(), " ", progressbar.ETA()]
pbar = progressbar.ProgressBar(maxval=len(imagePaths),
	widgets=widgets).start()
Lines 35-37 initialize our (1) face detector, (2) age predictor, and (3) camouflage detector models from disk.
We then use the paths module to grab all imagePaths in the dataset sorted alphabetically (Line 40).
Using the progressbar package, we initialize a new progress bar widget with the maxval set to the number of imagePaths in our dataset (~56,000 images) via Lines 44-47. The progress bar will be updated automatically in our terminal each time we call update on pbar.
We’re now to the heart of our dataset processing script. We’ll begin looping over all images to detect faces, predict ages, and determine if there is camouflage present:
# loop over the image paths
for (i, imagePath) in enumerate(imagePaths):
	# load the image from disk
	image = cv2.imread(imagePath)

	# if the image is 'None', then it could not be properly read from
	# disk (so we should just skip it)
	if image is None:
		continue

	# detect all faces in the input image and then predict their
	# perceived age based on the face ROI
	ageResults = detect_and_predict_age(image, faceNet, ageNet)

	# use our camo detection model to detect whether camouflage exists in
	# the image or not
	camoResults = detect_camo(image, camoNet)
Looping over imagePaths beginning on Line 50, we:
- Load an
imagefrom disk (Line 52) - Detect faces and predict ages for each face (Line 61)
- Determine whether camouflage is present, which likely indicates military fatigues are being worn (Line 65)
Next, we’ll loop over the age results:
	# loop over the age detection results
	for r in ageResults:
		# the output row for the ages CSV consists of (1) the image
		# file path, (2) bounding box coordinates of the face, (3)
		# the predicted age, and (4) the corresponding probability
		# of the age prediction
		row = [imagePath, *r["loc"], r["age"][0], r["age"][1]]
		row = ",".join([str(x) for x in row])

		# write the row to the age prediction CSV file
		FILES["ages"].write("{}\n".format(row))
		FILES["ages"].flush()
Inside our loop over ageResults for this particular image, we proceed to:
- Construct a coma-delimited
rowcontaining the image file path, bounding box coordinates, predicted age, and associated probability of the predicted age (Lines 73 and 74) - Append the
rowto theages.csvfile (Lines 77 and 78)
Similarly, we’ll check our camouflage results:
	# check to see if our camouflage predictor was triggered
	if camoResults[0] == "camouflage_clothes":
		# the output row for the camo CSV consists of (1) the image
		# file path and (2) the probability of the camo prediction
		row = [imagePath, camoResults[1]]
		row = ",".join([str(x) for x in row])

		# write the row to the camo prediction CSV file
		FILES["camo"].write("{}\n".format(row))
		FILES["camo"].flush()
If the camoNet has determined that there are "camouflage_clothes" present in the image (Line 81), we then:
- Assemble a comma-delimited
rowcontaining the image file path and the probability of the camouflage prediction (Lines 84 and 85) - Append the
rowto thecamo.csvfile (Lines 88 and 89)
To close our our loop, we update our progress bar widget:
	# update the progress bar
	pbar.update(i)

# stop the progress bar
pbar.finish()
print("[INFO] cleaning up...")

# loop over the open file pointers and close them
for f in FILES.values():
	f.close()
Line 92 updates our progress bar, at which point, we’ll process the next image in the dataset from the top of the loop.
Lines 95-100 stop the progress bar and close the CSV file pointers.
Great job implementing your dataset processing script. In the next section we’ll put it to work!
Processing our dataset of potential child soldiers
We are now ready to apply our process_dataset.py script to a dataset of images, looking for potential child soldiers.
I used the following command to process a dataset of ~56,000 images:
$ time python process_dataset.py --dataset VictorGevers_Dataset --output output
[INFO] loading trained models...
[INFO] processing 56037 images
Processing Images: 100% |############################| Time:  1:49:48
[INFO] cleaning up...

real	109m53.034s
user	428m1.900s
sys   306m23.741s
This dataset was supplied by Victor Gevers (i.e., the dataset that was obtained during the data leakage).
Processing the entire dataset took almost two hours on my 3 GHz Intel Xeon W processor — a GPU would have made it even faster.
Of course, I cannot supply the original dataset used in this tutorial in the “Downloads” section of the guide as I normally would. That dataset is private, sensitive, and cannot be distributed under any means.
After the script finished executing, I had two CSV files in my output directory:
$ ls output/
ages.csv	camo.csv
Here is a sample output of ages.csv:
$ tail output/ages.csv
rBIABl3RztuAVy6gAAMSpLwFcC0051.png,661,1079,1081,1873,(48-53),0.6324904
rBIABl3RzuuAbzmlAAUsBPfvHNA217.png,546,122,1081,1014,(8-12),0.59567857
rBIABl3RzxKAaJEoAAdr1POcxbI556.png,4,189,105,349,(48-53),0.49577188
rBIABl3RzxmAM6nvAABRgKCu0g4069.png,104,76,317,346,(8-12),0.31842607
rBIABl3RzxmAM6nvAABRgKCu0g4069.png,236,246,449,523,(60-100),0.9929517
rBIABl3RzxqAbJZVAAA7VN0gGzg369.png,41,79,258,360,(38-43),0.63570714
rBIABl3RzxyABhCxAAav3PMc9eo739.png,632,512,1074,1419,(48-53),0.5355053
rBIABl3RzzOAZ-HuAAZQoGUjaiw399.png,354,56,1089,970,(60-100),0.48260492
rBIABl3RzzOAZ-HuAAZQoGUjaiw399.png,820,475,1540,1434,(4-6),0.6595153
rBIABl3RzzeAb1lkAAdmVBqVDho181.png,258,994,826,2542,(15-20),0.3086191
As you can see, each row contains:
- The image file path
- Bounding box coordinates of a particular face
- The age range prediction for that face and associated probability
And below we have a sample of the output from camo.csv:
$ tail output/camo.csv
rBIABl3RY-2AYS0RAAaPGGXk-_A001.png,0.9579516
rBIABl3Ra4GAScPBAABEYEkNOcQ818.png,0.995684
rBIABl3Rb36AMT9WAABN7PoYIew817.png,0.99894327
rBIABl3Rby-AQv5MAAB8CPkzp58351.png,0.9577539
rBIABl3Re6OALgO5AABY5AH5hJc735.png,0.7973979
rBIABl3RvkuAXeryAABlfL8vLL4072.png,0.7121747
rBIABl3RwaOAFX21AABy6JNWkVY010.png,0.97816855
rBIABl3Rz-2AUOD0AAQ3eMMg8gg856.png,0.8256913
rBIABl3RztOAeFb1AABG-K96F_c092.png,0.50594944
rBIABl3RzxeAGI5XAAfg5J_Svmc027.png,0.98626024
This CSV file has less information, containing only:
- The image file path
- The probability indicating whether the image contains camouflage
We now have both our age and camouflage predictions.
But how do we combine these predictions to determine whether a particular image has a potential child soldier?
I’ll answer that question in the next section.
Implementing a Python script to parse the results of our detections
We now have two CSV files containing both the predicted ages of people in the images (ages.csv) as well as a file indicating whether an image contains camouflage or not (camo.csv).
The next step is to implement another Python script, parse_results.py. As the name suggests, this script parses both ages.csv and camo.csv, looking for images that contain both children (based on the age predictions) and soldiers (based on the camouflage detector).
You could easily output the child soldier data to another CSV file and provide it to a reporting agency if you were doing this type of work.
Rather than that, the script we’re going to develop simply anonymizes faces (i.e., applies our pixelated blur method) in the suspected child soldier image and displays the results on screen.
Let’s take a look at parse_results.py now:
# import the necessary packages
from pyimagesearch.helpers import anonymize_face_pixelate
import numpy as np
import argparse
import imutils
import cv2

# construct the argument parser and parse the arguments
ap = argparse.ArgumentParser()
ap.add_argument("-a", "--ages", required=True,
	help="path to input ages CSV file")
ap.add_argument("-c", "--camo", required=True,
	help="path to input camo CSV file")
args = vars(ap.parse_args())
You’ll first notice that we’re using our final helper — the anonymize_face_pixelate utility responsible for anonymizing a face from being recognized by the human eye. Each of the images we’ll view in an OpenCV GUI window is effectively anonymized for privacy concerns.
Our script requires both the --ages and --camo CSV file paths provided via command line arguments in your terminal command.
Let’s go ahead and open each of those CSV files and grab the data now:
# load the contents of the ages and camo CSV files
ageRows = open(args["ages"]).read().strip().split("\n")
camoRows = open(args["camo"]).read().strip().split("\n")

# initialize two dictionaries, one to store the age results and the
# other to store the camo results, respectively
ages = {}
camo = {}
Here, Lines 17 and 18 load the contents of our --ages and --camo CSV files into the ageRows and camoRows lists, respectively.
We also take a moment to initialize two dictionaries to store our age/camouflage results (Lines 22-23). We’ll soon populate these dictionaries to find the common datapoints (i.e., the intersection).
First, let’s populate ages:
# loop over the age rows
for row in ageRows:
	# parse the row
	row = row.split(",")
	imagePath = row[0]
	bbox = [int(x) for x in row[1:5]]
	age = row[5]
	ageProb = float(row[6])

	# construct a tuple that consists of the bounding box coordinates,
	# age, and age probability
	t = (bbox, age, ageProb)

	# update our ages dictionary to use the image path as the key and
	# the detection information as a tuple
	l = ages.get(imagePath, [])
	l.append(t)
	ages[imagePath] = l
Looping over ageRows beginning on Line 26, we:
- Parse the
rowfor the image path, bounding box, age, and age probability data (Lines 28-32) - Construct a tuple,
t, to hold the dictionary value data (Line 36) - Update
agesdictionary where theimagePathis the key and a list,lofttuples, is the value
Next, let’s populate camo:
# loop over the camo rows
for row in camoRows:
	# parse the row
	row = row.split(",")
	imagePath = row[0]
	camoProb = float(row[1])

	# update our camo dictionary to use the image path as the key and
	# the camouflage probability as the value
	camo[imagePath] = camoProb
In our loop over camoRows beginning on Line 45, we:
- Parse the
rowfor the image path and probability of camouflage in the image - Update the
camodictionary where theimagePathis the key and thecamoProbis the value
Given that we have our ages and camo dictionaries populated with our data, now we can find the intersection of these dictionaries:
# find all image paths that exist in *BOTH* the age dictionary and
# camo dictionary
inter = sorted(set(ages.keys()).intersection(camo.keys()))

# loop over all image paths in the intersection
for imagePath in inter:
	# load the input image and grab its dimensions
	image = cv2.imread(imagePath)
	(h, w) = image.shape[:2]

	# if the width is greater than the height, resize along the width
	# dimension
	if w > h:
		image = imutils.resize(image, width=600)

	# otherwise, resize the image along the height
	else:
		image = imutils.resize(image, height=600)

	# compute the resize ratio, which is the ratio between the *new*
	# image dimensions to the *old* image dimensions
	ratio = image.shape[1] / float(w)
Line 57 computes the intersection of our ages and camo data where inter will then contain all image paths that exist in both the age and camo dictionaries.
From here we can loop over the common image paths (Line 60) and begin processing the results.
In the loop, we begin by loading the image from disk and grabbing its dimensions (Lines 62 and 63). We then resize the image such that it either has a max width or max height of 600 pixels while maintaining aspect ratio (Lines 67-72).
Computing the ratio between the new image dimensions and the old image dimensions (Line 76) allows us the scale our face bounding boxes in the next code block.
Let’s loop over the age predictions for this particular image:
	# loop over the age predictions for this particular image
	for (bbox, age, ageProb) in ages[imagePath]:
		# extract the bounding box coordinates of the face detection
		bbox = [int(x) for x in np.array(bbox) * ratio]
		(startX, startY, endX, endY) = bbox

		# anonymize the face
		face = image[startY:endY, startX:endX]
		face = anonymize_face_pixelate(face, blocks=5)
		image[startY:endY, startX:endX] = face

		# set the color for the annotation to *green*
		color = (0, 255, 0)

		# override the color to *red* they are potential child soldier
		if age in ["(0-2)", "(4-6)", "(8-12)", "(15-20)"]:
			color = (0, 0,  255)

		# draw the bounding box of the face along with the associated
		# predicted age
		text = "{}: {:.2f}%".format(age, ageProb * 100)
		y = startY - 10 if startY - 10 > 10 else startY + 10
		cv2.rectangle(image, (startX, startY), (endX, endY), color, 2)
		cv2.putText(image, text, (startX, y),
			cv2.FONT_HERSHEY_SIMPLEX, 0.45, color, 2)
In one fell swoop, Line 79 grabs the bounding box coordinates, predicted age, and age probability in addition to beginning our loop over the list of tuples in the ages dictionary. Remember, at this point, we’re only concerned with images that have camouflage due to the previous intersection operation.
In the loop, we:
- Extract scaled face bounding box coordinates (Lines 81 and 82)
- Anonymize the
facevia (1) extracting the ROI, (2) pixelating it, and (3) replacing the face in the originalimagewith the pixelated face (Lines 85-87) - Set the
colorof the annotation as either green (predicted adult) or red (predicted child) per Lines 90-94 - Draw a bounding box surrounding the face along with the predicted age range (Lines 98-102)
Let’s take our visualization a step further and also annotate the probability of camouflage in the top left corner of the image:
	# draw the camouflage prediction probability on the image
	label = "camo: {:.2f}%".format(camo[imagePath] * 100)
	cv2.rectangle(image, (0, 0), (300, 40), (0, 0, 0), -1)
	cv2.putText(image, label, (10, 25), cv2.FONT_HERSHEY_SIMPLEX,
		0.8, (255, 255, 255), 2)

	# show the output image
	cv2.imshow("Image", image)
	cv2.waitKey(0)
Here, Line 105 builds a label string consisting of the camouflage probability. We annotate the top-left corner of the image with a black box and white label text (Lines 106-108).
Finally, Lines 111 and 112 display the current annotated and anonymized image until any key is pressed at which point we cycle to the next image.
Great work! Let’s analyze results in the next section.
Results: Using computer vision and deep learning for good
We are now ready to combine the results from our age prediction and camouflage output to determine if a particular image contains a potential child soldier.
To execute this script, I used the following command:
$ python parse_results.py --ages output/ages.csv --camo output/camo.csv
Note: For privacy concerns, even with face anonymization, I do not feel comfortable sharing the original images from the dataset Victor Gevers provided me with. I’ve included samples from other images online to demonstrate that the script is working properly. I hope you understand and appreciate why I made this decision.
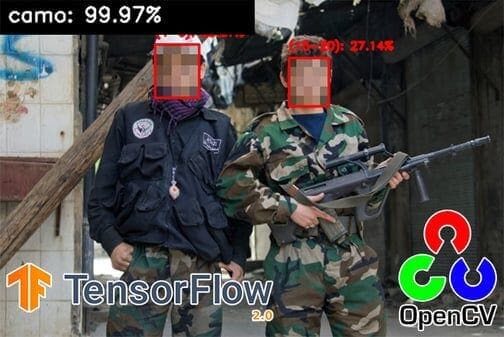
Below is an example of an image containing a potential child soldier:
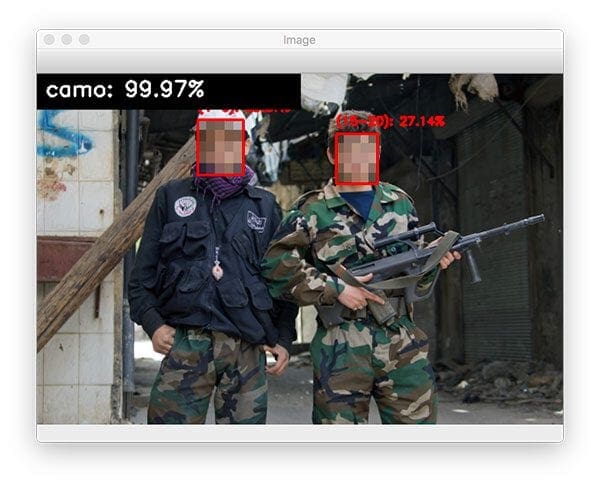
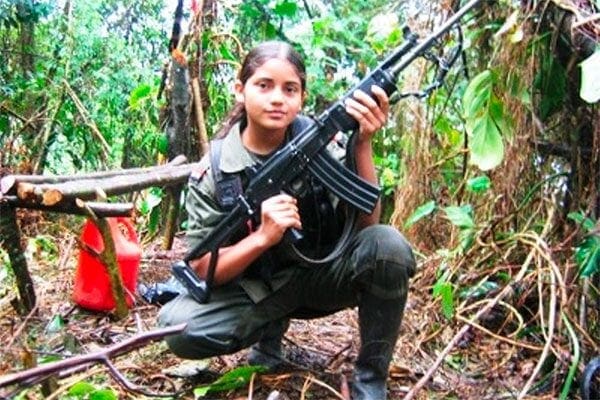
Here is a second image of our method detecting a potential child soldier:
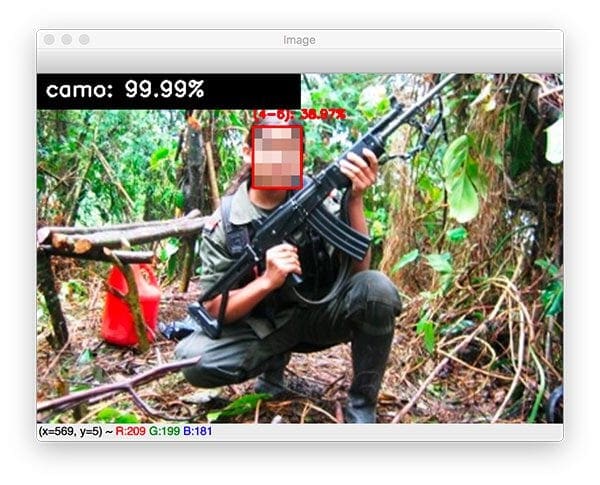
The age prediction is a bit off here.
I would estimate this young lady (refer to Figure 1 for the original image) to be somewhere in the range of 12-16; however, our age predictor model is predicts 4-6 — the limitation of the age prediction model is discussed in the “Summary” section below.
What's next? We recommend PyImageSearch University.
86+ total classes • 115+ hours hours of on-demand code walkthrough videos • Last updated: February 2026
★★★★★ 4.84 (128 Ratings) • 16,000+ Students Enrolled
I strongly believe that if you had the right teacher you could master computer vision and deep learning.
Do you think learning computer vision and deep learning has to be time-consuming, overwhelming, and complicated? Or has to involve complex mathematics and equations? Or requires a degree in computer science?
That’s not the case.
All you need to master computer vision and deep learning is for someone to explain things to you in simple, intuitive terms. And that’s exactly what I do. My mission is to change education and how complex Artificial Intelligence topics are taught.
If you're serious about learning computer vision, your next stop should be PyImageSearch University, the most comprehensive computer vision, deep learning, and OpenCV course online today. Here you’ll learn how to successfully and confidently apply computer vision to your work, research, and projects. Join me in computer vision mastery.
Inside PyImageSearch University you'll find:
- ✓ 86+ courses on essential computer vision, deep learning, and OpenCV topics
- ✓ 86 Certificates of Completion
- ✓ 115+ hours hours of on-demand video
- ✓ Brand new courses released regularly, ensuring you can keep up with state-of-the-art techniques
- ✓ Pre-configured Jupyter Notebooks in Google Colab
- ✓ Run all code examples in your web browser — works on Windows, macOS, and Linux (no dev environment configuration required!)
- ✓ Access to centralized code repos for all 540+ tutorials on PyImageSearch
- ✓ Easy one-click downloads for code, datasets, pre-trained models, etc.
- ✓ Access on mobile, laptop, desktop, etc.
Summary
In this tutorial, you learned an ethical application of Computer Vision and Deep learning — identifying potential child soldiers.
To accomplish this task, we applied:
- Age detection — used to detect the age of a person in an image
- Camouflage/fatigue detection — used to detect whether camouflage was in the image, indicating that the person was likely wearing military fatigues
Our system is fairly accurate, but as I discuss in my age detection post, as well as the camouflage detection tutorial, results can be improved by:
- Training a more accurate age detector with a balanced dataset
- Gathering additional images of children to better identify age brackets for kids
- Training a more accurate camouflage detector by applying more aggressive data augmentation and regularization techniques
- Building a better military fatigue/uniform detector through clothing segmentation
I hope you enjoyed this tutorial — and I also hope you didn’t find the subject matter of this post too upsetting.
Computer vision and deep learning, just like nearly any product or science, can be used for good or evil. Try to stay on the good side however you can. The world is a scary place — let’s all work together to make a better.
To download the source code to this post (including the pre-trained face detector, age detector, and camouflage detector models), just enter your email address in the form below!

Download the Source Code and FREE 17-page Resource Guide
Enter your email address below to get a .zip of the code and a FREE 17-page Resource Guide on Computer Vision, OpenCV, and Deep Learning. Inside you'll find my hand-picked tutorials, books, courses, and libraries to help you master CV and DL!


Comment section
Hey, Adrian Rosebrock here, author and creator of PyImageSearch. While I love hearing from readers, a couple years ago I made the tough decision to no longer offer 1:1 help over blog post comments.
At the time I was receiving 200+ emails per day and another 100+ blog post comments. I simply did not have the time to moderate and respond to them all, and the sheer volume of requests was taking a toll on me.
Instead, my goal is to do the most good for the computer vision, deep learning, and OpenCV community at large by focusing my time on authoring high-quality blog posts, tutorials, and books/courses.
If you need help learning computer vision and deep learning, I suggest you refer to my full catalog of books and courses — they have helped tens of thousands of developers, students, and researchers just like yourself learn Computer Vision, Deep Learning, and OpenCV.
Click here to browse my full catalog.