
In this tutorial, you will learn how to perform liveness detection with OpenCV. You will create a liveness detector capable of spotting fake faces and performing anti-face spoofing in face recognition systems.
A dataset containing real and spoof facial images is crucial for liveness detection. It enables the model to distinguish between genuine human faces and fakes, enhancing its security efficacy.
Roboflow has free tools for each stage of the computer vision pipeline that will streamline your workflows and supercharge your productivity.
Sign up or Log in to your Roboflow account to access state of the art dataset libaries and revolutionize your computer vision pipeline.
You can start by choosing your own datasets or using our PyimageSearch’s assorted library of useful datasets.
Bring data in any of 40+ formats to Roboflow, train using any state-of-the-art model architectures, deploy across multiple platforms (API, NVIDIA, browser, iOS, etc), and connect to applications or 3rd party tools.
Over the past year, I have authored a number of face recognition tutorials, including:
- OpenCV Face Recognition
- Face recognition with dlib, Python, and deep learning
- Raspberry Pi Face Recognition
However, a common question I get asked over email and in the comments sections of the face recognition posts is:
How do I spot real versus fake faces?
Consider what would happen if a nefarious user tried to purposely circumvent your face recognition system.
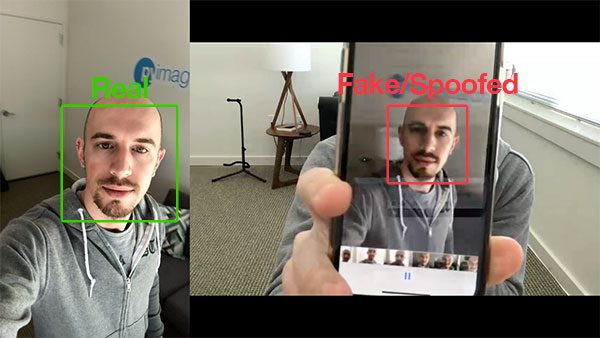
Such a user could try to hold up a photo of another person. Maybe they even have a photo or video on their smartphone that they could hold up to the camera responsible for performing face recognition (such as in the image at the top of this post).
In those situations it’s entirely possible for the face held up to the camera to be correctly recognized…but ultimately leading to an unauthorized user bypassing your face recognition system!
How would you go about spotting these “fake” versus “real/legitimate” faces? How could you apply anti-face spoofing algorithms into your facial recognition applications?
The answer is to apply liveness detection with OpenCV which is exactly what I’ll be covering today.
To learn how to incorporate liveness detection with OpenCV into your own face recognition systems, just keep reading!
Liveness Detection with OpenCV
2020-06-11 Update: This blog post is now TensorFlow 2+ compatible!
In the first part of this tutorial, we’ll discuss liveness detection, including what it is and why we need it to improve our face recognition systems.
From there we’ll review the dataset we’ll be using to perform liveness detection, including:
- How to build to a dataset for liveness detection
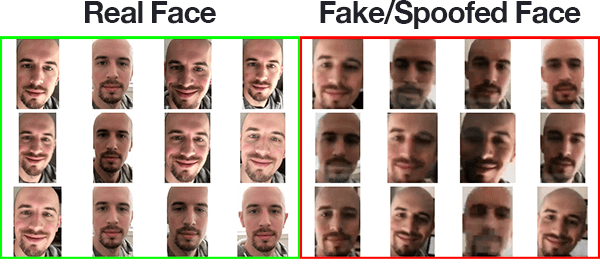
- Our example real versus fake face images
We’ll also review our project structure for the liveness detector project as well.
In order to create the liveness detector, we’ll be training a deep neural network capable of distinguishing between real versus fake faces.
We’ll, therefore, need to:
- Build the image dataset itself.
- Implement a CNN capable of performing liveness detector (we’ll call this network “LivenessNet”).
- Train the liveness detector network.
- Create a Python + OpenCV script capable of taking our trained liveness detector model and apply it to real-time video.
Let’s go ahead and get started!
What is liveness detection and why do we need it?
Face recognition systems are becoming more prevalent than ever. From face recognition on your iPhone/smartphone, to face recognition for mass surveillance in China, face recognition systems are being utilized everywhere.
However, face recognition systems are easily fooled by “spoofing” and “non-real” faces.
Face recognition systems can be circumvented simply by holding up a photo of a person (whether printed, on a smartphone, etc.) to the face recognition camera.
In order to make face recognition systems more secure, we need to be able to detect such fake/non-real faces — liveness detection is the term used to refer to such algorithms.
There are a number of approaches to liveness detection, including:
- Texture analysis, including computing Local Binary Patterns (LBPs) over face regions and using an SVM to classify the faces as real or spoofed.
- Frequency analysis, such as examining the Fourier domain of the face.
- Variable focusing analysis, such as examining the variation of pixel values between two consecutive frames.
- Heuristic-based algorithms, including eye movement, lip movement, and blink detection. These set of algorithms attempt to track eye movement and blinks to ensure the user is not holding up a photo of another person (since a photo will not blink or move its lips).
- Optical Flow algorithms, namely examining the differences and properties of optical flow generated from 3D objects and 2D planes.
- 3D face shape, similar to what is used on Apple’s iPhone face recognition system, enabling the face recognition system to distinguish between real faces and printouts/photos/images of another person.
- Combinations of the above, enabling a face recognition system engineer to pick and choose the liveness detections models appropriate for their particular application.
A full review of liveness detection algorithms can be found in Chakraborty and Das’ 2014 paper, An Overview of Face liveness Detection.
For the purposes of today’s tutorial, we’ll be treating liveness detection as a binary classification problem.
Given an input image, we’ll train a Convolutional Neural Network capable of distinguishing real faces from fake/spoofed faces.
But before we get to training our liveness detection model, let’s first examine our dataset.
Our liveness detection videos

To keep our example straightforward, the liveness detector we are building in this blog post will focus on distinguishing real faces versus spoofed faces on a screen.
This algorithm can easily be extended to other types of spoofed faces, including print outs, high-resolution prints, etc.
In order to build the liveness detection dataset, I:
- Took my iPhone and put it in portrait/selfie mode.
- Recorded a ~25-second video of myself walking around my office.
- Replayed the same 25-second video, this time facing my iPhone towards my desktop where I recorded the video replaying.
- This resulted in two example videos, one for “real” faces and another for “fake/spoofed” faces.
- Finally, I applied face detection to both sets of videos to extract individual face ROIs for both classes.
I have provided you with both my real and fake video files in the “Downloads” section of the post.
You can use these videos as a starting point for your dataset but I would recommend gathering more data to help make your liveness detector more robust and accurate.
With testing, I determined that the model is slightly biased towards my own face which makes sense because that is all the model was trained on. And furthermore, since I am white/caucasian I wouldn’t expect this same dataset to work as well with other skin tones.
Ideally, you would train a model with faces of multiple people and include faces of multiple ethnicities. Be sure to refer to the “Limitations and further work“ section below for additional suggestions on improving your liveness detection models.
In the rest of the tutorial, you will learn how to take the dataset I recorded it and turn it into an actual liveness detector with OpenCV and deep learning.
Configuring your development environment
To configure your system for this tutorial, I first recommend following either of these tutorials:
Either tutorial will help you configure you system with all the necessary software for this blog post in a convenient Python virtual environment.
Please note that PyImageSearch does not recommend or support Windows for CV/DL projects.
Project structure
Go ahead and grab the code, dataset, and liveness model using the “Downloads” section of this post and then unzip the archive.
Once you navigate into the project directory, you’ll notice the following structure:
$ tree --dirsfirst --filelimit 10
.
├── dataset
│   ├── fake [150 entries]
│   └── real [161 entries]
├── face_detector
│   ├── deploy.prototxt
│   └── res10_300x300_ssd_iter_140000.caffemodel
├── pyimagesearch
│   ├── __init__.py
│   └── livenessnet.py
├── videos
│   ├── fake.mp4
│   └── real.mov
├── gather_examples.py
├── train.py
├── liveness_demo.py
├── le.pickle
├── liveness.model
└── plot.png

6 directories, 12 files
There are four main directories inside our project:
dataset/: Our dataset directory consists of two classes of images:- Fake images of me from a camera aimed at my screen while playing a video of my face.
- Real images of me captured from a selfie video with my phone.
face_detector/: Consists of our pretrained Caffe face detector to locate face ROIs.pyimagesearch/: This module contains our LivenessNet class.videos/: I’ve provided two input videos for training our LivenessNet classifier.
Today we’ll be reviewing three Python scripts in detail. By the end of the post you’ll be able to run them on your own data and input video feeds as well. In order of appearance in this tutorial, the three scripts are:
gather_examples.py: This script grabs face ROIs from input video files and helps us to create a deep learning face liveness dataset.train.py: As the filename indicates, this script will train our LivenessNet classifier. We’ll use Keras and TensorFlow to train the model. The training process results in a few files:le.pickle: Our class label encoder.liveness.model: Our serialized Keras model which detects face liveness.plot.png: The training history plot shows accuracy and loss curves so we can assess our model (i.e. over/underfitting).
liveness_demo.py: Our demonstration script will fire up your webcam to grab frames to conduct face liveness detection in real-time.
Detecting and extracting face ROIs from our training (video) dataset
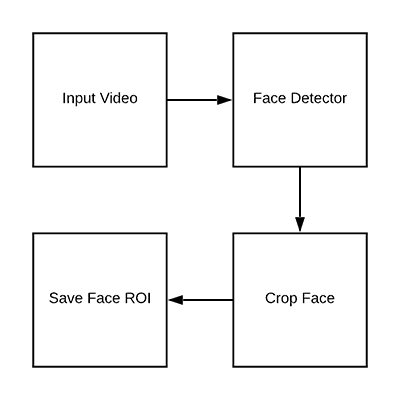
Now that we’ve had a chance to review both our initial dataset and project structure, let’s see how we can extract both real and fake face images from our input videos.
The end goal if this script will be to populate two directories:
dataset/fake/: Contains face ROIs from thefake.mp4filedataset/real/: Holds face ROIs from thereal.movfile.
Given these frames, we’ll later train a deep learning-based liveness detector on the images.
Open up the gather_examples.py file and insert the following code:
# import the necessary packages
import numpy as np
import argparse
import cv2
import os

# construct the argument parse and parse the arguments
ap = argparse.ArgumentParser()
ap.add_argument("-i", "--input", type=str, required=True,
	help="path to input video")
ap.add_argument("-o", "--output", type=str, required=True,
	help="path to output directory of cropped faces")
ap.add_argument("-d", "--detector", type=str, required=True,
	help="path to OpenCV's deep learning face detector")
ap.add_argument("-c", "--confidence", type=float, default=0.5,
	help="minimum probability to filter weak detections")
ap.add_argument("-s", "--skip", type=int, default=16,
	help="# of frames to skip before applying face detection")
args = vars(ap.parse_args())
Lines 2-5 import our required packages. This script only requires OpenCV and NumPy in addition to built-in Python modules.
From there Lines 8-19 parse our command line arguments:
--input: The path to our input video file.--output: The path to the output directory where each of the cropped faces will be stored.--detector: The path to the face detector. We’ll be using OpenCV’s deep learning face detector. This Caffe model is included with today’s “Downloads” for your convenience.--confidence: The minimum probability to filter weak face detections. By default, this value is 50%.--skip: We don’t need to detect and store every image because adjacent frames will be similar. Instead, we’ll skip N frames between detections. You can alter the default of 16 using this argument.
Let’s go ahead and load the face detector and initialize our video stream:
# load our serialized face detector from disk
print("[INFO] loading face detector...")
protoPath = os.path.sep.join([args["detector"], "deploy.prototxt"])
modelPath = os.path.sep.join([args["detector"],
	"res10_300x300_ssd_iter_140000.caffemodel"])
net = cv2.dnn.readNetFromCaffe(protoPath, modelPath)

# open a pointer to the video file stream and initialize the total
# number of frames read and saved thus far
vs = cv2.VideoCapture(args["input"])
read = 0
saved = 0
Lines 23-26 load OpenCV’s deep learning face detector.
From there we open our video stream on Line 30.
We also initialize two variables for the number of frames read as well as the number of frames saved while our loop executes (Lines 31 and 32).
Let’s go ahead create a loop to process the frames:
# loop over frames from the video file stream
while True:
	# grab the frame from the file
	(grabbed, frame) = vs.read()

	# if the frame was not grabbed, then we have reached the end
	# of the stream
	if not grabbed:
		break

	# increment the total number of frames read thus far
	read += 1

	# check to see if we should process this frame
	if read % args["skip"] != 0:
		continue
Our while loop begins on Lines 35.
From there we grab and verify a frame (Lines 37-42).
At this point, since we’ve read a frame , we’ll increment our read counter (Line 48). If we are skipping this particular frame, we’ll continue without further processing (Lines 48 and 49).
Let’s go ahead and detect faces:
	# grab the frame dimensions and construct a blob from the frame
	(h, w) = frame.shape[:2]
	blob = cv2.dnn.blobFromImage(cv2.resize(frame, (300, 300)), 1.0,
		(300, 300), (104.0, 177.0, 123.0))

	# pass the blob through the network and obtain the detections and
	# predictions
	net.setInput(blob)
	detections = net.forward()

	# ensure at least one face was found
	if len(detections) > 0:
		# we're making the assumption that each image has only ONE
		# face, so find the bounding box with the largest probability
		i = np.argmax(detections[0, 0, :, 2])
		confidence = detections[0, 0, i, 2]
In order to perform face detection, we need to create a blob from the image (Lines 53 and 54). This blob has a 300×300 width and height to accommodate our Caffe face detector. Scaling the bounding boxes will be necessary later, so Line 52, grabs the frame dimensions.
Lines 58 and 59 perform a forward pass of the blob through the deep learning face detector.
Our script makes the assumption that there is only one face in each frame of the video (Lines 62-65). This helps prevent false positives. If you’re working with a video containing more than one face, I recommend that you adjust the logic accordingly.
Thus, Line 65 grabs the highest probability face detection index. Line 66 extracts the confidence of the detection using the index.
Let’s filter weak detections and write the face ROI to disk:
		# ensure that the detection with the largest probability also
		# means our minimum probability test (thus helping filter out
		# weak detections)
		if confidence > args["confidence"]:
			# compute the (x, y)-coordinates of the bounding box for
			# the face and extract the face ROI
			box = detections[0, 0, i, 3:7] * np.array([w, h, w, h])
			(startX, startY, endX, endY) = box.astype("int")
			face = frame[startY:endY, startX:endX]

			# write the frame to disk
			p = os.path.sep.join([args["output"],
				"{}.png".format(saved)])
			cv2.imwrite(p, face)
			saved += 1
			print("[INFO] saved {} to disk".format(p))

# do a bit of cleanup
vs.release()
cv2.destroyAllWindows()
Line 71 ensures that our face detection ROI meets the minimum threshold to reduce false positives.
From there we extract the face ROI bounding box coordinates and face ROI itself (Lines 74-76).
We generate a path + filename for the face ROI and write it to disk on Lines 79-81. At this point, we can increment the number of saved faces.
Once processing is complete, we’ll perform cleanup on Lines 86 and 87.
Building our liveness detection image dataset
Now that we’ve implemented the gather_examples.py script, let’s put it to work.
Make sure you use the “Downloads” section of this tutorial to grab the source code and example input videos.
From there, open up a terminal and execute the following command to extract faces for our “fake/spoofed” class:
$ python gather_examples.py --input videos/fake.mp4 --output dataset/fake \
	--detector face_detector --skip 1
[INFO] loading face detector...
[INFO] saved datasets/fake/0.png to disk
[INFO] saved datasets/fake/1.png to disk
[INFO] saved datasets/fake/2.png to disk
[INFO] saved datasets/fake/3.png to disk
[INFO] saved datasets/fake/4.png to disk
[INFO] saved datasets/fake/5.png to disk
...
[INFO] saved datasets/fake/145.png to disk
[INFO] saved datasets/fake/146.png to disk
[INFO] saved datasets/fake/147.png to disk
[INFO] saved datasets/fake/148.png to disk
[INFO] saved datasets/fake/149.png to disk
Similarly, we can do the same for the “real” class as well:
$ python gather_examples.py --input videos/real.mov --output dataset/real \
	--detector face_detector --skip 4
[INFO] loading face detector...
[INFO] saved datasets/real/0.png to disk
[INFO] saved datasets/real/1.png to disk
[INFO] saved datasets/real/2.png to disk
[INFO] saved datasets/real/3.png to disk
[INFO] saved datasets/real/4.png to disk
...
[INFO] saved datasets/real/156.png to disk
[INFO] saved datasets/real/157.png to disk
[INFO] saved datasets/real/158.png to disk
[INFO] saved datasets/real/159.png to disk
[INFO] saved datasets/real/160.png to disk
Since the “real” video file is longer than the “fake” video file, we’ll use a longer skip frames value to help balance the number of output face ROIs for each class.
After executing the scripts you should have the following image counts:
- Fake: 150 images
- Real: 161 images
- Total: 311 images
Implementing “LivenessNet”, our deep learning liveness detector

The next step is to implement “LivenessNet”, our deep learning-based liveness detector.
At the core, LivenessNet is actually just a simple Convolutional Neural Network.
We’ll be purposely keeping this network as shallow and with as few parameters as possible for two reasons:
- To reduce the chances of overfitting on our small dataset.
- To ensure our liveness detector is fast, capable of running in real-time (even on resource-constrained devices, such as the Raspberry Pi).
Let’s implement LivenessNet now — open up livenessnet.py and insert the following code:
# import the necessary packages
from tensorflow.keras.models import Sequential
from tensorflow.keras.layers import BatchNormalization
from tensorflow.keras.layers import Conv2D
from tensorflow.keras.layers import MaxPooling2D
from tensorflow.keras.layers import Activation
from tensorflow.keras.layers import Flatten
from tensorflow.keras.layers import Dropout
from tensorflow.keras.layers import Dense
from tensorflow.keras import backend as K

class LivenessNet:
	@staticmethod
	def build(width, height, depth, classes):
		# initialize the model along with the input shape to be
		# "channels last" and the channels dimension itself
		model = Sequential()
		inputShape = (height, width, depth)
		chanDim = -1

		# if we are using "channels first", update the input shape
		# and channels dimension
		if K.image_data_format() == "channels_first":
			inputShape = (depth, height, width)
			chanDim = 1
All of our imports are from Keras (Lines 2-10). For an in-depth review of each of these layers and functions, be sure to refer to Deep Learning for Computer Vision with Python.
Our LivenessNet class is defined on Line 12. It consists of one static method, build (Line 14). The build method accepts four parameters:
width: How wide the image/volume is.height: How tall the image is.depth: The number of channels for the image (in this case 3 since we’ll be working with RGB images).classes: The number of classes. We have two total classes: “real” and “fake”.
Our model is initialized on Line 17.
The inputShape to our model is defined on Line 18 while channel ordering is determined on Lines 23-25.
Let’s begin adding layers to our CNN:
		# first CONV => RELU => CONV => RELU => POOL layer set
		model.add(Conv2D(16, (3, 3), padding="same",
			input_shape=inputShape))
		model.add(Activation("relu"))
		model.add(BatchNormalization(axis=chanDim))
		model.add(Conv2D(16, (3, 3), padding="same"))
		model.add(Activation("relu"))
		model.add(BatchNormalization(axis=chanDim))
		model.add(MaxPooling2D(pool_size=(2, 2)))
		model.add(Dropout(0.25))

		# second CONV => RELU => CONV => RELU => POOL layer set
		model.add(Conv2D(32, (3, 3), padding="same"))
		model.add(Activation("relu"))
		model.add(BatchNormalization(axis=chanDim))
		model.add(Conv2D(32, (3, 3), padding="same"))
		model.add(Activation("relu"))
		model.add(BatchNormalization(axis=chanDim))
		model.add(MaxPooling2D(pool_size=(2, 2)))
		model.add(Dropout(0.25))
Our CNN exhibits VGGNet-esque qualities. It is very shallow with only a few learned filters. Ideally, we won’t need a deep network to distinguish between real and spoofed faces.
The first CONV => RELU => CONV => RELU => POOL layer set is specified on Lines 28-36 where batch normalization and dropout are also added.
Another CONV => RELU => CONV => RELU => POOL layer set is appended on Lines 39-46.
Finally, we’ll add our FC => RELU layers:
		# first (and only) set of FC => RELU layers
		model.add(Flatten())
		model.add(Dense(64))
		model.add(Activation("relu"))
		model.add(BatchNormalization())
		model.add(Dropout(0.5))

		# softmax classifier
		model.add(Dense(classes))
		model.add(Activation("softmax"))

		# return the constructed network architecture
		return model
Lines 49-57 consist of fully connected and ReLU activated layers with a softmax classifier head.
The model is returned to the training script on Line 60.,
Creating the liveness detector training script
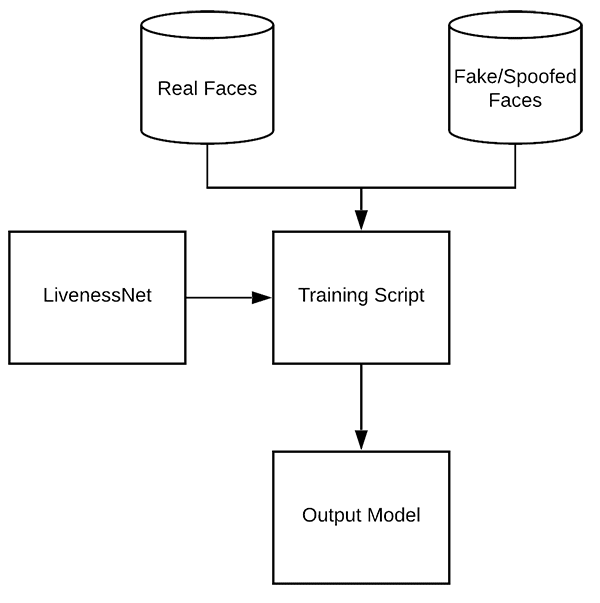
Given our dataset of real/spoofed images as well as our implementation of LivenessNet, we are now ready to train the network.
Open up the train.py file and insert the following code:
# set the matplotlib backend so figures can be saved in the background
import matplotlib
matplotlib.use("Agg")

# import the necessary packages
from pyimagesearch.livenessnet import LivenessNet
from sklearn.preprocessing import LabelEncoder
from sklearn.model_selection import train_test_split
from sklearn.metrics import classification_report
from tensorflow.keras.preprocessing.image import ImageDataGenerator
from tensorflow.keras.optimizers import Adam
from tensorflow.keras.utils import to_categorical
from imutils import paths
import matplotlib.pyplot as plt
import numpy as np
import argparse
import pickle
import cv2
import os

# construct the argument parser and parse the arguments
ap = argparse.ArgumentParser()
ap.add_argument("-d", "--dataset", required=True,
	help="path to input dataset")
ap.add_argument("-m", "--model", type=str, required=True,
	help="path to trained model")
ap.add_argument("-l", "--le", type=str, required=True,
	help="path to label encoder")
ap.add_argument("-p", "--plot", type=str, default="plot.png",
	help="path to output loss/accuracy plot")
args = vars(ap.parse_args())
Our face liveness training script consists of a number of imports (Lines 2-19). Let’s review them now:
matplotlib: Used to generate a training plot. We specify the"Agg"backend so we can easily save our plot to disk on Line 3.LivenessNet: The liveness CNN that we defined in the previous section.train_test_split: A function from scikit-learn which constructs splits of our data for training and testing.classification_report: Also from scikit-learn, this tool will generate a brief statistical report on our model’s performance.ImageDataGenerator: Used for performing data augmentation, providing us with batches of randomly mutated images.Adam: An optimizer that worked well for this model. (alternatives include SGD, RMSprop, etc.).paths: From my imutils package, this module will help us to gather the paths to all of our image files on disk.pyplot: Used to generate a nice training plot.numpy: A numerical processing library for Python. It is an OpenCV requirement as well.argparse: For processing command line arguments.pickle: Used to serialize our label encoder to disk.cv2: Our OpenCV bindings.os: This module can do quite a lot, but we’ll just be using it for it’s operating system path separator.
That was a mouthful, but now that you know what the imports are for, reviewing the rest of the script should be more straightforward.
This script accepts four command line arguments:
--dataset: The path to the input dataset. Earlier in the post we created the dataset with thegather_examples.pyscript.--model: Our script will generate an output model file — here you supply the path to it.--le: The path to our output serialized label encoder file also needs to be supplied.--plot: The training script will generate a plot. If you wish to override the default value of"plot.png", you should specify this value on the command line.
This next code block will perform a number of initializations and build our data:
# initialize the initial learning rate, batch size, and number of
# epochs to train for
INIT_LR = 1e-4
BS = 8
EPOCHS = 50

# grab the list of images in our dataset directory, then initialize
# the list of data (i.e., images) and class images
print("[INFO] loading images...")
imagePaths = list(paths.list_images(args["dataset"]))
data = []
labels = []

# loop over all image paths
for imagePath in imagePaths:
	# extract the class label from the filename, load the image and
	# resize it to be a fixed 32x32 pixels, ignoring aspect ratio
	label = imagePath.split(os.path.sep)[-2]
	image = cv2.imread(imagePath)
	image = cv2.resize(image, (32, 32))

	# update the data and labels lists, respectively
	data.append(image)
	labels.append(label)

# convert the data into a NumPy array, then preprocess it by scaling
# all pixel intensities to the range [0, 1]
data = np.array(data, dtype="float") / 255.0
Training parameters including initial learning rate, batch size, and number of epochs are set on Lines 35-37.
From there, our imagePaths are grabbed. We also initialize two lists to hold our data and class labels (Lines 42-44).
The loop on Lines 47-56 builds our data and labels lists. The data consists of our images which are loaded and resized to be 32×32 pixels. Each image has a corresponding label stored in the labels list.
All pixel intensities are scaled to the range [0, 1] while the list is made into a NumPy array via Line 60.
Now let’s encode our labels and partition our data:
# encode the labels (which are currently strings) as integers and then
# one-hot encode them
le = LabelEncoder()
labels = le.fit_transform(labels)
labels = to_categorical(labels, 2)

# partition the data into training and testing splits using 75% of
# the data for training and the remaining 25% for testing
(trainX, testX, trainY, testY) = train_test_split(data, labels,
	test_size=0.25, random_state=42)
Lines 64-66 one-hot encode the labels.
We utilize scikit-learn to partition our data — 75% is used for training while 25% is reserved for testing (Lines 70 and 71).
Next, we’ll initialize our data augmentation object and compile + train our face liveness model:
# construct the training image generator for data augmentation
aug = ImageDataGenerator(rotation_range=20, zoom_range=0.15,
	width_shift_range=0.2, height_shift_range=0.2, shear_range=0.15,
	horizontal_flip=True, fill_mode="nearest")

# initialize the optimizer and model
print("[INFO] compiling model...")
opt = Adam(lr=INIT_LR, decay=INIT_LR / EPOCHS)
model = LivenessNet.build(width=32, height=32, depth=3,
	classes=len(le.classes_))
model.compile(loss="binary_crossentropy", optimizer=opt,
	metrics=["accuracy"])

# train the network
print("[INFO] training network for {} epochs...".format(EPOCHS))
H = model.fit(x=aug.flow(trainX, trainY, batch_size=BS),
	validation_data=(testX, testY), steps_per_epoch=len(trainX) // BS,
	epochs=EPOCHS)
2020-06-11 Update: Formerly, TensorFlow/Keras required use of a method called .fit_generator in order to accomplish data augmentation. Now, the .fit method can handle data augmentation as well, making for more-consistent code. This also applies to the migration from .predict_generator to .predict. Be sure to check out my articles about fit and fit_generator as well as data augmentation.
Lines 74-76 construct a data augmentation object which will generate images with random rotations, zooms, shifts, shears, and flips. To read more about data augmentation, read my previous blog post.
Our LivenessNet model is built and compiled on Lines 80-84.
We then commence training on Lines 88-90. This process will be relatively quick considering our shallow network and small dataset.
Once the model is trained we can evaluate the results and generate a training plot:
# evaluate the network
print("[INFO] evaluating network...")
predictions = model.predict(x=testX, batch_size=BS)
print(classification_report(testY.argmax(axis=1),
	predictions.argmax(axis=1), target_names=le.classes_))

# save the network to disk
print("[INFO] serializing network to '{}'...".format(args["model"]))
model.save(args["model"], save_format="h5")

# save the label encoder to disk
f = open(args["le"], "wb")
f.write(pickle.dumps(le))
f.close()

# plot the training loss and accuracy
plt.style.use("ggplot")
plt.figure()
plt.plot(np.arange(0, EPOCHS), H.history["loss"], label="train_loss")
plt.plot(np.arange(0, EPOCHS), H.history["val_loss"], label="val_loss")
plt.plot(np.arange(0, EPOCHS), H.history["accuracy"], label="train_acc")
plt.plot(np.arange(0, EPOCHS), H.history["val_accuracy"], label="val_acc")
plt.title("Training Loss and Accuracy on Dataset")
plt.xlabel("Epoch #")
plt.ylabel("Loss/Accuracy")
plt.legend(loc="lower left")
plt.savefig(args["plot"])
2020-06-11 Update: Note that for TensorFlow 2.0+ we recommend explicitly setting the save_format="h5" (HDF5 format).
2020-06-11 Update: In order for this plotting snippet to be TensorFlow 2+ compatible the H.history dictionary keys are updated to fully spell out “accuracy” sans “acc” (i.e., H.history["val_accuracy"] and H.history["accuracy"]). It is semi-confusing that “val” is not spelled out as “validation”; we have to learn to love and live with the API and always remember that it is a work in progress that many developers around the world contribute to.
Predictions are made on the testing set (Line 94). From there a classification_report is generated and printed to the terminal (Lines 95 and 96).
The LivenessNet model is serialized to disk along with the label encoder on Lines 100-105.
The remaining Lines 108-118 generate a training history plot for later inspection.
Training our liveness detector
We are now ready to train our liveness detector.
Make sure you’ve used the “Downloads” section of the tutorial to download the source code and dataset — from, there execute the following command:
$ python train.py --dataset dataset --model liveness.model --le le.pickle
[INFO] loading images...
[INFO] compiling model...
[INFO] training network for 50 epochs...
Epoch 1/50
29/29 [==============================] - 0s 13ms/step - loss: 1.2583 - accuracy: 0.5511 - val_loss: 0.6862 - val_accuracy: 0.6026
Epoch 2/50
29/29 [==============================] - 0s 4ms/step - loss: 1.0099 - accuracy: 0.6089 - val_loss: 0.7426 - val_accuracy: 0.4487
Epoch 3/50
29/29 [==============================] - 0s 4ms/step - loss: 0.8485 - accuracy: 0.6933 - val_loss: 0.8468 - val_accuracy: 0.4487
...
Epoch 48/50
29/29 [==============================] - 0s 4ms/step - loss: 0.3170 - accuracy: 0.8800 - val_loss: 0.0666 - val_accuracy: 0.9872
Epoch 49/50
29/29 [==============================] - 0s 3ms/step - loss: 0.2724 - accuracy: 0.8889 - val_loss: 0.0413 - val_accuracy: 1.0000
Epoch 50/50
29/29 [==============================] - 0s 3ms/step - loss: 0.3573 - accuracy: 0.8533 - val_loss: 0.0293 - val_accuracy: 1.0000
[INFO] evaluating network...
              precision    recall  f1-score   support

        fake       1.00      1.00      1.00        35
        real       1.00      1.00      1.00        43

    accuracy                           1.00        78
   macro avg       1.00      1.00      1.00        78
weighted avg       1.00      1.00      1.00        78

[INFO] serializing network to 'liveness.model'...
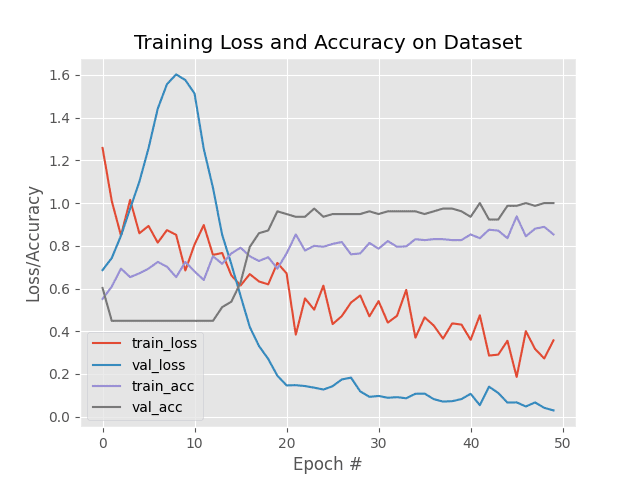
As our results show, we are able to obtain 100% liveness detection accuracy on our validation set with limited overfitting!
Putting the pieces together: Liveness detection with OpenCV

The final step is to combine all the pieces:
- We’ll access our webcam/video stream
- Apply face detection to each frame
- For each face detected, apply our liveness detector model
Open up the liveness_demo.py and insert the following code:
# import the necessary packages
from imutils.video import VideoStream
from tensorflow.keras.preprocessing.image import img_to_array
from tensorflow.keras.models import load_model
import numpy as np
import argparse
import imutils
import pickle
import time
import cv2
import os

# construct the argument parser and parse the arguments
ap = argparse.ArgumentParser()
ap.add_argument("-m", "--model", type=str, required=True,
	help="path to trained model")
ap.add_argument("-l", "--le", type=str, required=True,
	help="path to label encoder")
ap.add_argument("-d", "--detector", type=str, required=True,
	help="path to OpenCV's deep learning face detector")
ap.add_argument("-c", "--confidence", type=float, default=0.5,
	help="minimum probability to filter weak detections")
args = vars(ap.parse_args())
Lines 2-11 import our required packages. Notably, we’ll use
VideoStreamto access our camera feed.img_to_arrayso that our frame will be in a compatible array format.load_modelto load our serialized Keras model.imutilsfor its convenience functions.cv2for our OpenCV bindings.
Let’s parse our command line arguments via Lines 14-23:
--model: The path to our pretrained Keras model for liveness detection.--le: Our path to the label encoder.--detector: The path to OpenCV’s deep learning face detector, used to find the face ROIs.--confidence: The minimum probability threshold to filter out weak detections.
Now let’s go ahead an initialize the face detector, LivenessNet model + label encoder, and our video stream:
# load our serialized face detector from disk
print("[INFO] loading face detector...")
protoPath = os.path.sep.join([args["detector"], "deploy.prototxt"])
modelPath = os.path.sep.join([args["detector"],
	"res10_300x300_ssd_iter_140000.caffemodel"])
net = cv2.dnn.readNetFromCaffe(protoPath, modelPath)

# load the liveness detector model and label encoder from disk
print("[INFO] loading liveness detector...")
model = load_model(args["model"])
le = pickle.loads(open(args["le"], "rb").read())

# initialize the video stream and allow the camera sensor to warmup
print("[INFO] starting video stream...")
vs = VideoStream(src=0).start()
time.sleep(2.0)
The OpenCV face detector is loaded via Lines 27-30.
From there we load our serialized, pretrained model (LivenessNet ) and the label encoder (Lines 34 and 35).
Our VideoStream object is instantiated and our camera is allowed two seconds to warm up (Lines 39 and 40).
At this point, it’s time to start looping over frames to detect real versus fake/spoofed faces:
# loop over the frames from the video stream
while True:
	# grab the frame from the threaded video stream and resize it
	# to have a maximum width of 600 pixels
	frame = vs.read()
	frame = imutils.resize(frame, width=600)

	# grab the frame dimensions and convert it to a blob
	(h, w) = frame.shape[:2]
	blob = cv2.dnn.blobFromImage(cv2.resize(frame, (300, 300)), 1.0,
		(300, 300), (104.0, 177.0, 123.0))

	# pass the blob through the network and obtain the detections and
	# predictions
	net.setInput(blob)
	detections = net.forward()
Line 43 opens an infinite while loop block where we begin by capturing + resizing individual frames (Lines 46 and 47).
After resizing, dimensions of the frame are grabbed so that we can later perform scaling (Line 50).
Using OpenCV’s blobFromImage function we generate a blob (Lines 51 and 52) and then proceed to perform inference by passing it through the face detector network (Lines 56 and 57).
Now we’re ready for the fun part — liveness detection with OpenCV and deep learning:
	# loop over the detections
	for i in range(0, detections.shape[2]):
		# extract the confidence (i.e., probability) associated with the
		# prediction
		confidence = detections[0, 0, i, 2]

		# filter out weak detections
		if confidence > args["confidence"]:
			# compute the (x, y)-coordinates of the bounding box for
			# the face and extract the face ROI
			box = detections[0, 0, i, 3:7] * np.array([w, h, w, h])
			(startX, startY, endX, endY) = box.astype("int")

			# ensure the detected bounding box does fall outside the
			# dimensions of the frame
			startX = max(0, startX)
			startY = max(0, startY)
			endX = min(w, endX)
			endY = min(h, endY)

			# extract the face ROI and then preproces it in the exact
			# same manner as our training data
			face = frame[startY:endY, startX:endX]
			face = cv2.resize(face, (32, 32))
			face = face.astype("float") / 255.0
			face = img_to_array(face)
			face = np.expand_dims(face, axis=0)

			# pass the face ROI through the trained liveness detector
			# model to determine if the face is "real" or "fake"
			preds = model.predict(face)[0]
			j = np.argmax(preds)
			label = le.classes_[j]

			# draw the label and bounding box on the frame
			label = "{}: {:.4f}".format(label, preds[j])
			cv2.putText(frame, label, (startX, startY - 10),
				cv2.FONT_HERSHEY_SIMPLEX, 0.5, (0, 0, 255), 2)
			cv2.rectangle(frame, (startX, startY), (endX, endY),
				(0, 0, 255), 2)
On Line 60, we begin looping over face detections. Inside we:
- Filter out weak detections (Lines 63-66).
- Extract the face bounding
boxcoordinates and ensure they do not fall outside the dimensions of the frame (Lines 69-77). - Extract the face ROI and preprocess it in the same manner as our training data (Lines 81-85).
- Employ our liveness detector model to determine if the face is “real” or “fake/spoofed” (Lines 89-91).
- Line 91 is where you would insert your own code to perform face recognition but only on real images. The pseudo code would similar to
if label == "real": run_face_reconition()directly after Line 91). - Finally (for this demo), we draw the
labeltext and arectanglearound the face (Lines 94-98).
Let’s display our results and clean up:
	# show the output frame and wait for a key press
	cv2.imshow("Frame", frame)
	key = cv2.waitKey(1) & 0xFF

	# if the `q` key was pressed, break from the loop
	if key == ord("q"):
		break

# do a bit of cleanup
cv2.destroyAllWindows()
vs.stop()
The ouput frame is displayed on each iteration of the loop while keypresses are captured (Lines 101-102). Whenever the user presses “q” (“quit”) we’ll break out of the loop and release pointers and close windows (Lines 105-110).
Deploying our liveness detector to real-time video
To follow along with our liveness detection demo make sure you have used the “Downloads” section of the blog post to download the source code and pre-trained liveness detection model.
From there, open up a terminal and execute the following command:
$ python liveness_demo.py --model liveness.model --le le.pickle \
	--detector face_detector
Using TensorFlow backend.
[INFO] loading face detector...
[INFO] loading liveness detector...
[INFO] starting video stream...
Here you can see that our liveness detector is successfully distinguishing real from fake/spoofed faces.
I have included a longer demo in the video below:
Limitations, improvements, and further work
The primary restriction of our liveness detector is really our limited dataset — there are only a total of 311 images (161 belonging to the “real” class and 150 to the “fake” class, respectively).
One of the first extensions to this work would be to simply gather additional training data, and more specifically, images/frames that are not of simply me or yourself.
Keep in mind that the example dataset used here today includes faces for only one person (myself). I am also white/caucasian — you should gather training faces for other ethnicities and skin tones as well.
Our liveness detector was only trained on spoof attacks from holding up a screen — it was not trained on images or photos that were printed out. Therefore, my third recommendation is to invest in additional image/face sources outside of simple screen recording playbacks.
Finally, I want to mention that there is no silver bullet to liveness detection.
Some of the best liveness detectors incorporate multiple methods of liveness detection (be sure to refer to the “What is liveness detection and why do we need it?” section above).
Take the time to consider and assess your own project, guidelines, and requirements — in some cases, all you may need is basic eye blink detection heuristics.
In other cases, you’ll need to combine deep learning-based liveness detection with other heuristics.
Don’t rush into face recognition and liveness detection — take the time and discipline to consider your own unique project requirements. Doing so will ensure you obtain better, more accurate results.
What's next? We recommend PyImageSearch University.

86+ total classes • 115+ hours hours of on-demand code walkthrough videos • Last updated: April 2026
★★★★★ 4.84 (128 Ratings) • 16,000+ Students Enrolled
I strongly believe that if you had the right teacher you could master computer vision and deep learning.
Do you think learning computer vision and deep learning has to be time-consuming, overwhelming, and complicated? Or has to involve complex mathematics and equations? Or requires a degree in computer science?
That’s not the case.
All you need to master computer vision and deep learning is for someone to explain things to you in simple, intuitive terms. And that’s exactly what I do. My mission is to change education and how complex Artificial Intelligence topics are taught.
If you're serious about learning computer vision, your next stop should be PyImageSearch University, the most comprehensive computer vision, deep learning, and OpenCV course online today. Here you’ll learn how to successfully and confidently apply computer vision to your work, research, and projects. Join me in computer vision mastery.
Inside PyImageSearch University you'll find:
- ✓ 86+ courses on essential computer vision, deep learning, and OpenCV topics
- ✓ 86 Certificates of Completion
- ✓ 115+ hours hours of on-demand video
- ✓ Brand new courses released regularly, ensuring you can keep up with state-of-the-art techniques
- ✓ Pre-configured Jupyter Notebooks in Google Colab
- ✓ Run all code examples in your web browser — works on Windows, macOS, and Linux (no dev environment configuration required!)
- ✓ Access to centralized code repos for all 540+ tutorials on PyImageSearch
- ✓ Easy one-click downloads for code, datasets, pre-trained models, etc.
- ✓ Access on mobile, laptop, desktop, etc.
Summary
In this tutorial, you learned how to perform liveness detection with OpenCV.
Using this liveness detector you can now spot fake fakes and perform anti-face spoofing in your own face recognition systems.
To create our liveness detector we utilized OpenCV, Deep Learning, and Python.
The first step was to gather our real vs. fake dataset. To accomplish this task, we:
- First recorded a video of ourselves using our smartphone (i.e., “real” faces).
- Held our smartphone up to our laptop/desktop, replayed the same video, and then recorded the replaying using our webcam (i.e., “fake” faces).
- Applied face detection to both sets of videos to form our final liveness detection dataset.
After building our dataset we implemented, “LivenessNet”, a Keras + Deep Learning CNN.
This network is purposely shallow, ensuring that:
- We reduce the chances of overfitting on our small dataset.
- The model itself is capable of running in real-time (including on the Raspberry Pi).
Overall, our liveness detector was able to obtain 99% accuracy on our validation set.
To demonstrate the full liveness detection pipeline in action we created a Python + OpenCV script that loaded our liveness detector and applied it to real-time video streams.
As our demo showed, our liveness detector was capable of distinguishing between real and fake faces.
I hope you enjoyed today’s post on liveness detection with OpenCV.
To download the source code to this post and apply liveness detection to your own projects (plus be notified when future tutorials are published here on PyImageSearch), just enter your email address in the form below!

Download the Source Code and FREE 17-page Resource Guide
Enter your email address below to get a .zip of the code and a FREE 17-page Resource Guide on Computer Vision, OpenCV, and Deep Learning. Inside you'll find my hand-picked tutorials, books, courses, and libraries to help you master CV and DL!

