Last updated on December 30, 2022 with content updates.
In today’s blog post you are going to learn how to perform face recognition in both images and video streams using:
- OpenCV
- Python
- Deep learning

As we’ll see, the deep learning-based facial embeddings we’ll be using here today are both (1) highly accurate and (2) capable of being executed in real-time.
To learn more about face recognition with OpenCV, Python, and deep learning, just keep reading!
Having a face dataset is crucial for building robust face recognition systems. It allows the model to learn diverse features of human faces such as facial structure, skin tone, and expressions, which leads to improved performance in recognizing different individuals.
Roboflow has free tools for each stage of the computer vision pipeline that will streamline your workflows and supercharge your productivity.
Sign up or Log in to your Roboflow account to access state of the art dataset libaries and revolutionize your computer vision pipeline.
You can start by choosing your own datasets or using our PyimageSearch’s assorted library of useful datasets.
Bring data in any of 40+ formats to Roboflow, train using any state-of-the-art model architectures, deploy across multiple platforms (API, NVIDIA, browser, iOS, etc), and connect to applications or 3rd party tools.
- Update July 2021: Added alternative face recognition methods section, including both deep learning-based and non-deep learning-based approaches.
Face recognition with OpenCV, Python, and deep learning
Inside this tutorial, you will learn how to perform facial recognition using OpenCV, Python, and deep learning.
We’ll start with a brief discussion of how deep learning-based facial recognition works, including the concept of “deep metric learning.”
From there, I will help you install the libraries you need to actually perform face recognition.
Finally, we’ll implement face recognition for both still images and video streams.
As we’ll discover, our face recognition implementation will be capable of running in real-time.
Understanding deep learning face recognition embeddings
So, how does deep learning + face recognition work?
The secret is a technique called deep metric learning.
If you have any prior experience with deep learning you know that we typically train a network to:
- Accept a single input image
- And output a classification/label for that image
However, deep metric learning is different.
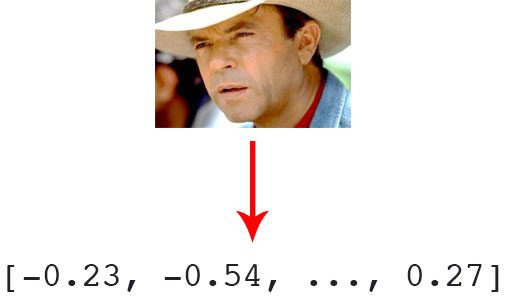
Instead of trying to output a single label (or even the coordinates/bounding box of objects in an image), we are instead outputting a real-valued feature vector.
For the dlib facial recognition network, the output feature vector is 128-d (i.e., a list of 128 real-valued numbers) that is used to quantify the face. Training the network is done using triplets:
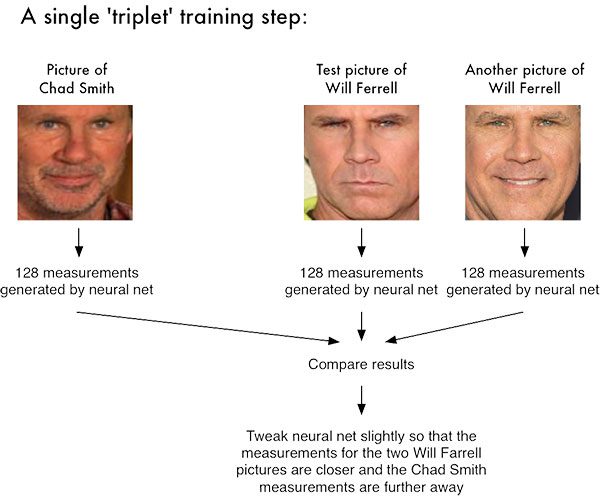
Here we provide three images to the network:
- Two of these images are example faces of the same person.
- The third image is a random face from our dataset and is not the same person as the other two images.
As an example, let’s again consider Figure 1 where we provided three images: one of Chad Smith and two of Will Ferrell.
Our network quantifies the faces, constructing the 128-d embedding (quantification) for each.
From there, the general idea is that we’ll tweak the weights of our neural network so that the 128-d measurements of the two Will Ferrells will be closer to each other and farther from the measurements for Chad Smith.
Our network architecture for face recognition is based on ResNet-34 from the Deep Residual Learning for Image Recognition paper by He et al., but with fewer layers and the number of filters reduced by half.
The network itself was trained by Davis King on a dataset of ≈3 million images. On the Labeled Faces in the Wild (LFW) dataset the network compares to other state-of-the-art methods, reaching 99.38% accuracy.
Both Davis King (the creator of dlib) and Adam Geitgey (the author of the face_recognition module we’ll be using shortly) have written detailed articles on how deep learning-based facial recognition works:
- High Quality Face Recognition with Deep Metric Learning (Davis)
- Modern Face Recognition with Deep Learning (Adam)
I would highly encourage you to read the above articles for more details on how deep learning facial embeddings work.
Install your face recognition libraries
In order to perform face recognition with Python and OpenCV we need to install two additional libraries:
The dlib library, maintained by Davis King, contains our implementation of “deep metric learning” which is used to construct our face embeddings used for the actual recognition process.
The face_recognition library, created by Adam Geitgey, wraps around dlib’s facial recognition functionality, making it easier to work with.
I assume that you have OpenCV installed on your system. If not, no worries — just visit my OpenCV install tutorials page and follow the guide appropriate for your system.
From there, let’s install dlib and the face_recognition packages.
Note: For the following installs, ensure you are in a Python virtual environment if you’re using one. I highly recommend virtual environments for isolating your projects — it is a Python best practice. If you’ve followed my OpenCV install guides (and installed virtualenv + virtualenvwrapper ) then you can use the workon command prior to installing dlib and face_recognition.
Installing dlib without GPU support
If you do not have a GPU you can install dlib using pip by following this guide:
$ workon # optional
$ pip install dlib
Or you can compile from source:
$ workon <your env name here> # optional
$ git clone https://github.com/davisking/dlib.git
$ cd dlib
$ mkdir build
$ cd build
$ cmake .. -DUSE_AVX_INSTRUCTIONS=1
$ cmake --build .
$ cd ..
$ python setup.py install --yes USE_AVX_INSTRUCTIONS
Installing dlib with GPU support (optional)
If you do have a CUDA compatible GPU you can install dlib with GPU support, making facial recognition faster and more efficient.
For this, I recommend installing dlib from source as you’ll have more control over the build:
$ workon <your env name here> # optional
$ git clone https://github.com/davisking/dlib.git
$ cd dlib
$ mkdir build
$ cd build
$ cmake .. -DDLIB_USE_CUDA=1 -DUSE_AVX_INSTRUCTIONS=1
$ cmake --build .
$ cd ..
$ python setup.py install --yes USE_AVX_INSTRUCTIONS --yes DLIB_USE_CUDA
Install the face_recognition package
The face_recognition module is installable via a simple pip command:
$ workon <your env name here> # optional
$ pip install face_recognition
Install imutils
You’ll also need my package of convenience functions, imutils. You may install it in your Python virtual environment via pip:
$ workon <your env name here> # optional
$ pip install imutils
Our face recognition dataset
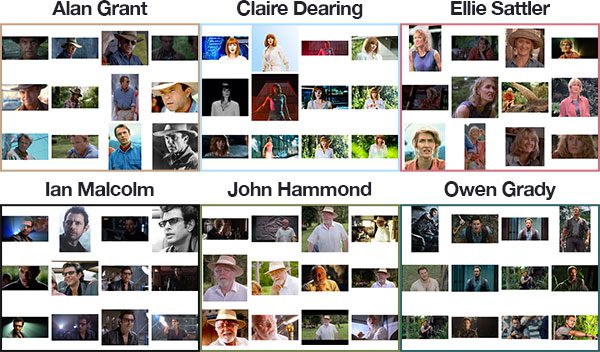
Since Jurassic Park (1993) is my favorite movie of all time, and in honor of Jurassic World: Fallen Kingdom (2018) being released this Friday in the U.S., we are going to apply face recognition to a sample of the characters in the films:
- Alan Grant, paleontologist (22 images)
- Claire Dearing, park operations manager (53 images)
- Ellie Sattler, paleobotanist (31 images)
- Ian Malcolm, mathematician (41 images)
- John Hammond, businessman/Jurassic Park owner (36 images)
- Owen Grady, dinosaur researcher (35 images)
This dataset was constructed in < 30 minutes using the method discussed in my How to (quickly) build a deep learning image dataset tutorial. Given this dataset of images we’ll:
- Create the 128-d embeddings for each face in the dataset
- Use these embeddings to recognize the faces of the characters in both images and video streams
Face recognition project structure
Our project structure can be seen by examining the output from the tree command:
$ tree --filelimit 10 --dirsfirst
.
├── dataset
│   ├── alan_grant [22 entries]
│   ├── claire_dearing [53 entries]
│   ├── ellie_sattler [31 entries]
│   ├── ian_malcolm [41 entries]
│   ├── john_hammond [36 entries]
│   └── owen_grady [35 entries]
├── examples
│   ├── example_01.png
│   ├── example_02.png
│   └── example_03.png
├── output
│   └── lunch_scene_output.avi
├── videos
│   └── lunch_scene.mp4
├── search_bing_api.py
├── encode_faces.py
├── recognize_faces_image.py
├── recognize_faces_video.py
├── recognize_faces_video_file.py
└── encodings.pickle

10 directories, 11 files
Our project has 4 top-level directories:
dataset/: Contains face images for six characters organized into subdirectories based on their respective names.examples/: Has three face images for testing that are not in the dataset.output/: This is where you can store your processed face recognition videos. I’m leaving one of mine in the folder — the classic “lunch scene” from the original Jurassic Park movie.videos/: Input videos should be stored in this folder. This folder also contains the “lunch scene” video but it hasn’t undergone our face recognition system yet.
We also have 6 files in the root directory:
search_bing_api.py: Step 1 is to build a dataset (I’ve already done this for you). To learn how to use the Bing API to build a dataset with my script, just see this blog post.encode_faces.py: Encodings (128-d vectors) for faces are built with this script.recognize_faces_image.py: Recognize faces in a single image (based on encodings from your dataset).recognize_faces_video.py: Recognize faces in a live video stream from your webcam and output a video.recognize_faces_video_file.py: Recognize faces in a video file residing on disk and output the processed video to disk. I won’t be discussing this file today as the bones are from the same skeleton as the video stream file.encodings.pickle: Facial recognition encodings are generated from your dataset viaencode_faces.pyand then serialized to disk.
After a dataset of images is created (with search_bing_api.py), we’ll run encode_faces.py to build the embeddings.
From there, we’ll run the recognize scripts to actually recognize the faces.
Encoding the faces using OpenCV and deep learning
face_recognition module method generates a 128-d real-valued number feature vector per face.Before we can recognize faces in images and videos, we first need to quantify the faces in our training set. Keep in mind that we are not actually training a network here — the network has already been trained to create 128-d embeddings on a dataset of ~3 million images.
We certainly could train a network from scratch or even fine-tune the weights of an existing model but that is more than likely overkill for many projects. Furthermore, you would need a lot of images to train the network from scratch.
Instead, it’s easier to use the pre-trained network and then use it to construct 128-d embeddings for each of the 218 faces in our dataset.
Then, during classification, we can use a simple k-NN model + votes to make the final face classification. Other traditional machine learning models can be used here as well.
To construct our face embeddings open up encode_faces.py from the “Downloads” associated with this blog post:
# import the necessary packages
from imutils import paths
import face_recognition
import argparse
import pickle
import cv2
import os
First, we need to import required packages. Again, take note that this script requires imutils, face_recognition, and OpenCV installed. Scroll up to the “Install your face recognition libraries” to make sure you have the libraries ready to go on your system.
Let’s handle our command line arguments that are processed at runtime with argparse :
# construct the argument parser and parse the arguments
ap = argparse.ArgumentParser()
ap.add_argument("-i", "--dataset", required=True,
	help="path to input directory of faces + images")
ap.add_argument("-e", "--encodings", required=True,
	help="path to serialized db of facial encodings")
ap.add_argument("-d", "--detection-method", type=str, default="cnn",
	help="face detection model to use: either `hog` or `cnn`")
args = vars(ap.parse_args())
If you’re new to PyImageSearch, let me direct your attention to the above code block which will become familiar to you as you read more of my blog posts. We’re using argparse to parse command line arguments. When you run a Python program in your command line, you can provide additional information to the script without leaving your terminal. Lines 10-17 do not need to be modified as they parse input coming from the terminal. Check out my blog post about command line arguments if these lines look unfamiliar.
Let’s list out the argument flags and discuss them:
--dataset: The path to our dataset (we created a dataset withsearch_bing_api.pydescribed in method #2 of last week’s blog post).--encodings: Our face encodings are written to the file that this argument points to.--detection-method: Before we can encode faces in images we first need to detect them. Or two face detection methods include eitherhogorcnn. Those two flags are the only ones that will work for--detection-method.
Now that we’ve defined our arguments, let’s grab the paths to the files in our dataset (as well as perform two initializations):
# grab the paths to the input images in our dataset
print("[INFO] quantifying faces...")
imagePaths = list(paths.list_images(args["dataset"]))

# initialize the list of known encodings and known names
knownEncodings = []
knownNames = []
Line 21 uses the path to our input dataset directory to build a list of all imagePaths contained therein.
We also need to initialize two lists before our loop, knownEncodings and knownNames , respectively. These two lists will contain the face encodings and corresponding names for each person in the dataset (Lines 24 and 25).
It’s time to begin looping over our Jurassic Park character faces!
# loop over the image paths
for (i, imagePath) in enumerate(imagePaths):
	# extract the person name from the image path
	print("[INFO] processing image {}/{}".format(i + 1,
		len(imagePaths)))
	name = imagePath.split(os.path.sep)[-2]

	# load the input image and convert it from BGR (OpenCV ordering)
	# to dlib ordering (RGB)
	image = cv2.imread(imagePath)
	rgb = cv2.cvtColor(image, cv2.COLOR_BGR2RGB)
This loop will cycle 218 times corresponding to our 218 face images in the dataset. We’re looping over the paths to each of the images on Line 28.
From there, we’ll extract the name of the person from the imagePath (as our subdirectory is named appropriately) on Line 32.
Then let’s load the image while passing the imagePath to cv2.imread (Line 36).
OpenCV orders color channels in BGR, but the dlib actually expects RGB. The face_recognition module uses dlib, so before we proceed, let’s swap color spaces on Line 37, naming the new image rgb.
Next, let’s localize the face and compute encodings:
	# detect the (x, y)-coordinates of the bounding boxes
	# corresponding to each face in the input image
	boxes = face_recognition.face_locations(rgb,
		model=args["detection_method"])

	# compute the facial embedding for the face
	encodings = face_recognition.face_encodings(rgb, boxes)

	# loop over the encodings
	for encoding in encodings:
		# add each encoding + name to our set of known names and
		# encodings
		knownEncodings.append(encoding)
		knownNames.append(name)
This is the fun part of the script!
For each iteration of the loop, we’re going to detect a face (or possibly multiple faces and assume that it is the same person in multiple locations of the image — this assumption may or may not hold true in your own images so be careful here).
For example, let’s say that rgb contains a picture (or pictures) of Ellie Sattler’s face.
Lines 41 and 42 actually find/localize the faces of her resulting in a list of face boxes. We pass two parameters to the face_recognition.face_locations method:
rgb: Our RGB image.model: Eithercnnorhog(this value is contained within our command line arguments dictionary associated with the"detection_method"key). The CNN method is more accurate but slower. HOG is faster but less accurate.
Then, we’re going to turn the bounding boxes of Ellie Sattler’s face into a list of 128 numbers on Line 45. This is known as encoding the face into a vector and the face_recognition.face_encodings method handles it for us.
From there we just need to append the Ellie Sattler encoding and name to the appropriate list (knownEncodings and knownNames).
We’ll continue to do this for all 218 images in the dataset.
What would be the point of encoding the images unless we could use the encodings in another script which handles the recognition?
Let’s take care of that now:
# dump the facial encodings + names to disk
print("[INFO] serializing encodings...")
data = {"encodings": knownEncodings, "names": knownNames}
f = open(args["encodings"], "wb")
f.write(pickle.dumps(data))
f.close()
Line 56 constructs a dictionary with two keys — "encodings" and "names".
From there Lines 57-59 dump the names and encodings to disk for future recall.
How should I run the encode_faces.py script in the terminal?
To create our facial embeddings open up a terminal and execute the following command:
$ python encode_faces.py --dataset dataset --encodings encodings.pickle
[INFO] quantifying faces...
[INFO] processing image 1/218
[INFO] processing image 2/218
[INFO] processing image 3/218
...
[INFO] processing image 216/218
[INFO] processing image 217/218
[INFO] processing image 218/218
[INFO] serializing encodings...
$ ls -lh encodings*
-rw-r--r--@ 1 adrian  staff   234K May 29 13:03 encodings.pickle
As you can see from our output, we now have a file named encodings.pickle — this file contains the 128-d face embeddings for each face in our dataset.
On my Titan X GPU, processing the entire dataset took a little over a minute, but if you’re using a CPU, be prepared to wait awhile for this script to complete!
On my Macbook Pro (no GPU), encoding 218 images required 21min 20sec.
You should expect much faster speeds if you have a GPU and compiled dlib with GPU support.
Recognizing faces in images
face_recognition Python module.Now that we have created our 128-d face embeddings for each image in our dataset, we are now ready to recognize faces in image using OpenCV, Python, and deep learning.
Open up recognize_faces_image.py and insert the following code (or better yet, grab the files and image data associated with this blog post from the “Downloads” section found at the bottom of this post, and follow along):
# import the necessary packages
import face_recognition
import argparse
import pickle
import cv2

# construct the argument parser and parse the arguments
ap = argparse.ArgumentParser()
ap.add_argument("-e", "--encodings", required=True,
	help="path to serialized db of facial encodings")
ap.add_argument("-i", "--image", required=True,
	help="path to input image")
ap.add_argument("-d", "--detection-method", type=str, default="cnn",
	help="face detection model to use: either `hog` or `cnn`")
args = vars(ap.parse_args())
This script requires just four imports on Lines 2-5. The face_recognition module will do the heavy lifting and OpenCV will help us to load, convert, and display the processed image.
We’ll parse three command line arguments on Lines 8-15:
--encodings: The path to the pickle file containing our face encodings.--image: This is the image that is undergoing facial recognition.--detection-method: You should be familiar with this one by now — we’re either going to use ahogorcnnmethod depending on the capability of your system. For speed, choosehogand for accuracy, choosecnn.
IMPORTANT! If you are:
- Running the face recognition code on a CPU
- OR you using a Raspberry Pi
- …you’ll want to set the
--detection-methodtohogas the CNN face detector is (1) slow without a GPU and (2) the Raspberry Pi won’t have enough memory to run the CNN either.
From there, let’s load the pre-computed encodings + face names and then construct the 128-d face encoding for the input image:
# load the known faces and embeddings
print("[INFO] loading encodings...")
data = pickle.loads(open(args["encodings"], "rb").read())

# load the input image and convert it from BGR to RGB
image = cv2.imread(args["image"])
rgb = cv2.cvtColor(image, cv2.COLOR_BGR2RGB)

# detect the (x, y)-coordinates of the bounding boxes corresponding
# to each face in the input image, then compute the facial embeddings
# for each face
print("[INFO] recognizing faces...")
boxes = face_recognition.face_locations(rgb,
	model=args["detection_method"])
encodings = face_recognition.face_encodings(rgb, boxes)

# initialize the list of names for each face detected
names = []
Line 19 loads our pickled encodings and face names from disk. We’ll need this data later during the actual face recognition step.
Then, on Lines 22 and 23 we load and convert the input image to rgb color channel ordering (just as we did in the encode_faces.py script).
We then proceed to detect all faces in the input image and compute their 128-d encodings on Lines 29-31 (these lines should also look familiar).
Now is a good time to initialize a list of names for each face that is detected — this list will be populated in the next step.
Next, let’s loop over the facial encodings:
# loop over the facial embeddings
for encoding in encodings:
	# attempt to match each face in the input image to our known
	# encodings
	matches = face_recognition.compare_faces(data["encodings"],
		encoding)
	name = "Unknown"
On Line 37, we begin to loop over the face encodings computed from our input image.
Then the facial recognition magic happens!
We attempt to match each face in the input image (encoding) to our known encodings dataset (held in data["encodings"]) using face_recognition.compare_faces (Lines 40 and 41).
This function returns a list of True /False values, one for each image in our dataset. For our Jurassic Park example, there are 218 images in the dataset and therefore the returned list will have 218 boolean values.
Internally, the compare_faces function is computing the Euclidean distance between the candidate embedding and all faces in our dataset:
- If the distance is below some tolerance (the smaller the tolerance, the more strict our facial recognition system will be) then we return
True, indicating the faces match. - Otherwise, if the distance is above the tolerance threshold we return
Falseas the faces do not match.
Essentially, we are utilizing a “more fancy” k-NN model for classification. Be sure to refer to the compare_faces implementation for more details.
The name variable will eventually hold the name string of the person — for now, we leave it as "Unknown" in case there are no “votes” (Line 42).
Given our matches list we can compute the number of “votes” for each name (number of True values associated with each name), tally up the votes, and select the person’s name with the most corresponding votes:
	# check to see if we have found a match
	if True in matches:
		# find the indexes of all matched faces then initialize a
		# dictionary to count the total number of times each face
		# was matched
		matchedIdxs = [i for (i, b) in enumerate(matches) if b]
		counts = {}

		# loop over the matched indexes and maintain a count for
		# each recognized face face
		for i in matchedIdxs:
			name = data["names"][i]
			counts[name] = counts.get(name, 0) + 1

		# determine the recognized face with the largest number of
		# votes (note: in the event of an unlikely tie Python will
		# select first entry in the dictionary)
		name = max(counts, key=counts.get)

	# update the list of names
	names.append(name)
If there are any True votes in matches (Line 45) we need to determine the indexes of where these True values are in matches. We do just that on Line 49 where we construct a simple list of matchedIdxs which might look like this for example_01.png:
(Pdb) matchedIdxs
[35, 36, 37, 38, 39, 40, 41, 42, 43, 44, 45, 46, 47, 48, 49, 50, 51, 52, 53, 54, 55, 56, 57, 58, 59, 60, 61, 62, 63, 64, 65, 66, 67, 68, 69, 71, 72, 73, 74, 75]
We then initialize a dictionary called counts which will hold the character name as the key and the number of votes as the value (Line 50).
From there, let’s loop over the matchedIdxs and set the value associated with each name while incrementing it as necessary in counts . The counts dictionary might look like this for a high vote score for Ian Malcolm:
(Pdb) counts
{'ian_malcolm': 40}
Recall that we only have 41 pictures of Ian in the dataset, so a score of 40 with no votes for anybody else is extremely high.
Line 61 extracts the name with the most votes from counts , in this case, it would be 'ian_malcolm'.
The second iteration of our loop (as there are two faces in our example image) of the main facial encodings loop yields the following for counts:
(Pdb) counts
{'alan_grant': 5}
That is definitely a smaller vote score, but still, there is only one name in the dictionary so we likely have found Alan Grant.
Note: The PDB Python Debugger was used to verify values of the counts dictionary. PDB usage is outside the scope of this blog post; however, you can discover how to use it on the Python docs page.
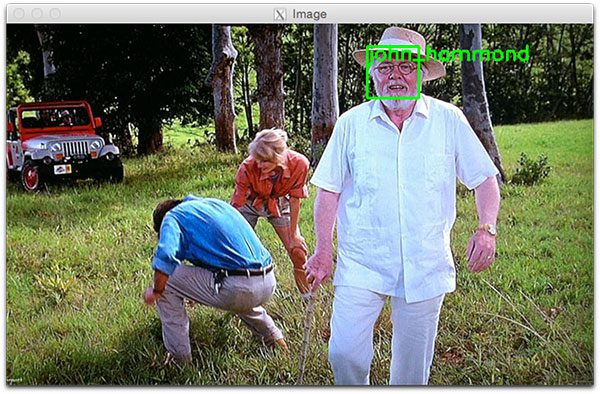
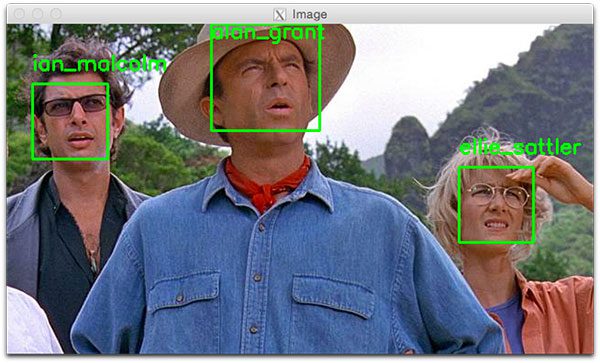
As shown in Figure 5 below, both Ian Malcolm and Alan Grant have been correctly recognized, so this part of the script is working well.
Let’s move on and loop over the bounding boxes and labeled names for each person and draw them on our output image for visualization purposes:
# loop over the recognized faces
for ((top, right, bottom, left), name) in zip(boxes, names):
	# draw the predicted face name on the image
	cv2.rectangle(image, (left, top), (right, bottom), (0, 255, 0), 2)
	y = top - 15 if top - 15 > 15 else top + 15
	cv2.putText(image, name, (left, y), cv2.FONT_HERSHEY_SIMPLEX,
		0.75, (0, 255, 0), 2)

# show the output image
cv2.imshow("Image", image)
cv2.waitKey(0)
On Line 67, we begin looping over the detected face bounding boxes and predicted names. To create an iterable object so we can easily loop through the values, we call zip(boxes, names) resulting in tuples that we can extract the box coordinates and name from.
We use the box coordinates to draw a green rectangle on Line 69.
We also use the coordinates to calculate where we should draw the text for the person’s name (Line 70) followed by actually placing the name text on the image (Lines 71 and 72). If the face bounding box is at the very top of the image, we need to move the text below the top of the box (handled on Line 70), otherwise, the text would be cut off.
We then proceed to display the image until a key is pressed (Lines 75 and 76).
How should you run the facial recognition Python script?
Using your terminal, first ensure you’re in your respective Python correct virtual environment with the workon command (if you are using a virtual environment, of course).
Then run the script while providing the two command line arguments at a minimum. If you choose to use the HoG method, be sure to pass --detection-method hog as well (otherwise it will default to the deep learning detector).
Let’s go for it!
To recognize a face using OpenCV and Python open up your terminal and execute our script:
$ python recognize_faces_image.py --encodings encodings.pickle \
	--image examples/example_01.png
[INFO] loading encodings...
[INFO] recognizing faces...

A second face recognition example follows:
$ python recognize_faces_image.py --encodings encodings.pickle \
	--image examples/example_03.png
[INFO] loading encodings...
[INFO] recognizing faces...
Recognizing faces in video
Now that we have applied face recognition to images let’s also apply face recognition to videos (in real-time) as well.
Important Performance Note: The CNN face recognizer should only be used in real-time if you are working with a GPU (you can use it with a CPU, but expect less than 0.5 FPS which makes for a choppy video). Alternatively (you are using a CPU), you should use the HoG method (or even OpenCV Haar cascades covered in a future blog post) and expect adequate speeds.
The following script draws many parallels from the previous recognize_faces_image.py script. Therefore I’ll be breezing past what we’ve already covered and just review the video components so that you understand what is going on.
Once you’ve grabbed the “Downloads”, open up recognize_faces_video.py and follow along:
# import the necessary packages
from imutils.video import VideoStream
import face_recognition
import argparse
import imutils
import pickle
import time
import cv2

# construct the argument parser and parse the arguments
ap = argparse.ArgumentParser()
ap.add_argument("-e", "--encodings", required=True,
	help="path to serialized db of facial encodings")
ap.add_argument("-o", "--output", type=str,
	help="path to output video")
ap.add_argument("-y", "--display", type=int, default=1,
	help="whether or not to display output frame to screen")
ap.add_argument("-d", "--detection-method", type=str, default="cnn",
	help="face detection model to use: either `hog` or `cnn`")
args = vars(ap.parse_args())
We import packages on Lines 2-8 and then proceed to parse our command line arguments on Lines 11-20.
We have four command line arguments, two of which you should recognize from above (--encodings and --detection-method). The other two arguments are:
--output: The path to the output video.--display: A flag which instructs the script to display the frame to the screen. A value of1displays and a value of0will not display the output frames to our screen.
From there we’ll load our encodings and start our VideoStream:
# load the known faces and embeddings
print("[INFO] loading encodings...")
data = pickle.loads(open(args["encodings"], "rb").read())

# initialize the video stream and pointer to output video file, then
# allow the camera sensor to warm up
print("[INFO] starting video stream...")
vs = VideoStream(src=0).start()
writer = None
time.sleep(2.0)
To access our camera we’re using the VideoStream class from imutils. Line 29 starts the stream. If you have multiple cameras on your system (such as a built-in webcam and an external USB cam), you can change the src=0 to src=1 and so forth.
We’ll be optionally writing processed video frames to disk later, so we initialize writer to None (Line 30). Sleeping for 2 complete seconds allows our camera to warm up (Line 31).
From there we’ll start a while loop and begin to grab and process frames:
# loop over frames from the video file stream
while True:
	# grab the frame from the threaded video stream
	frame = vs.read()

	# convert the input frame from BGR to RGB then resize it to have
	# a width of 750px (to speedup processing)
	rgb = cv2.cvtColor(frame, cv2.COLOR_BGR2RGB)
	rgb = imutils.resize(frame, width=750)
	r = frame.shape[1] / float(rgb.shape[1])

	# detect the (x, y)-coordinates of the bounding boxes
	# corresponding to each face in the input frame, then compute
	# the facial embeddings for each face
	boxes = face_recognition.face_locations(rgb,
		model=args["detection_method"])
	encodings = face_recognition.face_encodings(rgb, boxes)
	names = []
Our loop begins on Line 34 and the first step we take is to grab a frame from the video stream (Line 36).
The remaining Lines 40-50 in the above code block are nearly identical to the lines in the previous script with the exception being that this is a video frame and not a static image. Essentially we read the frame, preprocess, and then detect face bounding boxes + calculate encodings for each bounding box.
Next, let’s loop over the facial encodings associated with the faces we have just found:
	# loop over the facial embeddings
	for encoding in encodings:
		# attempt to match each face in the input image to our known
		# encodings
		matches = face_recognition.compare_faces(data["encodings"],
			encoding)
		name = "Unknown"

		# check to see if we have found a match
		if True in matches:
			# find the indexes of all matched faces then initialize a
			# dictionary to count the total number of times each face
			# was matched
			matchedIdxs = [i for (i, b) in enumerate(matches) if b]
			counts = {}

			# loop over the matched indexes and maintain a count for
			# each recognized face face
			for i in matchedIdxs:
				name = data["names"][i]
				counts[name] = counts.get(name, 0) + 1

			# determine the recognized face with the largest number
			# of votes (note: in the event of an unlikely tie Python
			# will select first entry in the dictionary)
			name = max(counts, key=counts.get)

		# update the list of names
		names.append(name)
In this code block, we loop over each of the encodings and attempt to match the face. If there are matches found, we count the votes for each name in the dataset. We then extract the highest vote count and that is the name associated with the face. These lines are identical to the previous script we reviewed, so let’s move on.
In this next block, we loop over the recognized faces and proceed to draw a box around the face and the display name of the person above the face:
	# loop over the recognized faces
	for ((top, right, bottom, left), name) in zip(boxes, names):
		# rescale the face coordinates
		top = int(top * r)
		right = int(right * r)
		bottom = int(bottom * r)
		left = int(left * r)

		# draw the predicted face name on the image
		cv2.rectangle(frame, (left, top), (right, bottom),
			(0, 255, 0), 2)
		y = top - 15 if top - 15 > 15 else top + 15
		cv2.putText(frame, name, (left, y), cv2.FONT_HERSHEY_SIMPLEX,
			0.75, (0, 255, 0), 2)
Those lines are identical too, so let’s focus on the video-related code.
Optionally, we’re going to write the frame to disk, so let’s see how writing video to disk with OpenCV works:
	# if the video writer is None *AND* we are supposed to write
	# the output video to disk initialize the writer
	if writer is None and args["output"] is not None:
		fourcc = cv2.VideoWriter_fourcc(*"MJPG")
		writer = cv2.VideoWriter(args["output"], fourcc, 20,
			(frame.shape[1], frame.shape[0]), True)

	# if the writer is not None, write the frame with recognized
	# faces to disk
	if writer is not None:
		writer.write(frame)
Assuming we have an output file path provided in the command line arguments and we haven’t already initialized a video writer (Line 99), let’s go ahead and initialize it.
On Line 100, we initialize the VideoWriter_fourcc. FourCC is a 4-character code and in our case, we’re going to use the “MJPG” 4-character code.
From there, we’ll pass that object into the VideoWriter along with our output file path, frames per second target, and frame dimensions (Lines 101 and 102).
Finally, if the writer exists, we can go ahead and write a frame to disk (Lines 106 and 107).
Let’s handle whether or not we should display the face recognition video frames on the screen:
	# check to see if we are supposed to display the output frame to
	# the screen
	if args["display"] > 0:
		cv2.imshow("Frame", frame)
		key = cv2.waitKey(1) & 0xFF

		# if the `q` key was pressed, break from the loop
		if key == ord("q"):
			break
If our display command line argument is set, we go ahead and display the frame (Line 112) and check if the quit key ("q") has been pressed (Lines 113-116), at which point we’d break out of the loop (Line 117).
Lastly, let’s perform our housekeeping duties:
# do a bit of cleanup
cv2.destroyAllWindows()
vs.stop()

# check to see if the video writer point needs to be released
if writer is not None:
	writer.release()
In Lines 120-125, we clean up and release the display, video stream, and video writer.
Are you ready to see the script in action?
To demonstrate real-time face recognition with OpenCV and Python in action, open up a terminal and execute the following command:
$ python recognize_faces_video.py --encodings encodings.pickle \
	--output output/webcam_face_recognition_output.avi --display 1
[INFO] loading encodings...
[INFO] starting video stream...
Below you can find an output example video that I recorded demonstrating the face recognition system in action:
Face recognition in video files
As I mentioned in our “Face recognition project structure” section, there’s an additional script included in the “Downloads” for this blog post — recognize_faces_video_file.py.
This file is essentially the same as the one we just reviewed for the webcam except it will take an input video file and generate an output video file if you’d like.
I applied our face recognition code to the popular “lunch scene” from the original Jurassic Park movie where the cast is sitting around a table sharing their concerns with the park:
$ python recognize_faces_video_file.py --encodings encodings.pickle \
	--input videos/lunch_scene.mp4 --output output/lunch_scene_output.avi \
	--display 0
Here’s the result:
Note: Recall that our model was trained on four members of the original cast: Alan Grant, Ellie Sattler, Ian Malcolm, and John Hammond. The model was not trained on Donald Gennaro (the lawyer) which is why his face is labeled as “Unknown”. This behavior was by design (not an accident) to show that our face recognition system can recognize faces it was trained on while leaving faces it cannot recognize as “Unknown”.
And in the following video I have put together a “highlight reel” of Jurassic Park and Jurassic World clips, mainly from the trailers:
As we can see, our face recognition and OpenCV code works quite well!
Can I use this face recognizer code on the Raspberry Pi?
Kinda, sorta. There are a few limitations though:
- The Raspberry Pi does not have enough memory to utilize the more accurate CNN-based face detector…
- …so we are limited to HOG instead
- Except that HOG is far too slow on the Pi for real-time face detection…
- …so we need to utilize OpenCV’s Haar cascades
And once you get it running you can expect only 1-2 FPS, and even reaching that level of FPS takes a few tricks.
The good news is that I’ll be back next week to discuss how to run our face recognizer on the Raspberry Pi, so stay tuned!
Alternative face recognition methods
The face recognition method we used inside this tutorial was based on a combination of Davis King’s dlib library and Adam Geitgey’s face_recognition module.
Davis has provided a ResNet-based siamese network that is super useful for face recognition tasks. Adam’s library provides a wrapper around dlib to make the face recognition functionality easier to use.
However, there are other face recognition methods that can be used, including both deep learning-based and traditional computer vision-based approaches.
To start, take a look at this tutorial on OpenCV Face Recognition which is a pure OpenCV-based face recognizer (i.e., no other libraries, such as dlib, scikit-image, etc., are required to perform face recognition). That said, dlib’s face recognizer does tend to be a bit more accurate, so keep that in mind when implementing face recognition models of your own.
For non-deep learning-based face recognition, I suggest taking a look at both Eigenfaces and Local Binary Patterns (LBPs) for face recognition:
These methods are less accurate than their deep learning-based face recognition counterparts, but tend to be much more computationally efficient and will run faster on embedded systems.
Face Recognition Application ideas
What can’t you build with face recognition? Seriously, it’s so useful to be able to recognize a person’s face.
Here are just a few ideas of what you can build
- Security
- Account logon
- Marketing applications
- Sales workflow
- Social media engagement meter
- Healthcare patient ID
- Voting ID
- Education safety and notification to parents and teachers
- Gaming ID and age determination to avoid collecting data on minors
- Library card replacement
What's next? We recommend PyImageSearch University.

86+ total classes • 115+ hours hours of on-demand code walkthrough videos • Last updated: April 2026
★★★★★ 4.84 (128 Ratings) • 16,000+ Students Enrolled
I strongly believe that if you had the right teacher you could master computer vision and deep learning.
Do you think learning computer vision and deep learning has to be time-consuming, overwhelming, and complicated? Or has to involve complex mathematics and equations? Or requires a degree in computer science?
That’s not the case.
All you need to master computer vision and deep learning is for someone to explain things to you in simple, intuitive terms. And that’s exactly what I do. My mission is to change education and how complex Artificial Intelligence topics are taught.
If you're serious about learning computer vision, your next stop should be PyImageSearch University, the most comprehensive computer vision, deep learning, and OpenCV course online today. Here you’ll learn how to successfully and confidently apply computer vision to your work, research, and projects. Join me in computer vision mastery.
Inside PyImageSearch University you'll find:
- ✓ 86+ courses on essential computer vision, deep learning, and OpenCV topics
- ✓ 86 Certificates of Completion
- ✓ 115+ hours hours of on-demand video
- ✓ Brand new courses released regularly, ensuring you can keep up with state-of-the-art techniques
- ✓ Pre-configured Jupyter Notebooks in Google Colab
- ✓ Run all code examples in your web browser — works on Windows, macOS, and Linux (no dev environment configuration required!)
- ✓ Access to centralized code repos for all 540+ tutorials on PyImageSearch
- ✓ Easy one-click downloads for code, datasets, pre-trained models, etc.
- ✓ Access on mobile, laptop, desktop, etc.
Summary
In this tutorial, you learned how to perform face recognition with OpenCV, Python, and deep learning.
Additionally, we made use of Davis King’s dlib library and Adam Geitgey’s face_recognition module which wraps around dlib’s deep metric learning, making facial recognition easier to accomplish.
As we found out, our face recognition implementation is both:
- Accurate
- Capable of being executed in real-time with a GPU
I hope you enjoyed today’s blog post on face recognition!
To download the source code to this post, and be notified when future tutorials are published here on PyImageSearch, just enter your email address in the form below!

Download the Source Code and FREE 17-page Resource Guide
Enter your email address below to get a .zip of the code and a FREE 17-page Resource Guide on Computer Vision, OpenCV, and Deep Learning. Inside you'll find my hand-picked tutorials, books, courses, and libraries to help you master CV and DL!

Hi Adrian,
Can we achieve the same in tensorflow framework? Is it possible to use dlib landmark and feature extractor models in tensorflow? I tried loading the model in tf session but it ofcourse failed during parsing.
Thanks!
You’re asking a few different questions here, so let me try to take apart the question and ask:
1. We are using dlib’s pre-trained deep metric facial embedding network to extract the 128-d feature vectors used to quantify each face.
2. Facial landmarks aren’t actually covered in this post. Maybe you’re referring to this one?
3. These models are not directly compatible with TensorFlow. You need dlib to use them out of the box.
So, basically, we can’t export this work to be used with the Intel Movidius stick, right?
No, not directly. You could use the same algorithms and techniques but you would need to train a Caffe or TensorFlow model that is compatible with the Movidius. That said, this method can run on the Pi (I’ll be sharing a blog post on it next week).
Thanks Adrian, will be waiting for your blog post.
How can I train a Caffee or TensorFlow model using the same techniques? Completely new to this space and stuck. I want to run face recognition model on intel movidius stick
I’ll actually be covering face recognition on the Movidius NCS in my upcoming book, stay tuned!
Hey @Adrian_Rosebrock kudos for this amazing work, really detailed and indepth explanation of every line well done. I have a question, if i want to use ip cam as a camera stream for python_video.py code, how do i do it? Much thanks
You’ll want to pass in the URL, query string parameters, etc. as the “src” to
VideoStream. Also take a look at the “cv2.VideoCapture” function as that is the underlying OpenCV method that “VideoStream” will utilize.hi i am getting this error: usage: encode_faces.py [-h] -i DATASET -e ENCODINGS [-d DETECTION_METHOD]
encode_faces.py: error: the following arguments are required: -i/–dataset, -e/–encodings. i am using python.3.5
Read up on command line arguments and you’ll be up and running in no time!
i tried the command line arguments as said in the blog, but Adrian , i am unable to correct the error , it will be kind of u to post a video on how to correct the error, i really want to learn it from an expert like u
I would kindly suggest you go back and read the argparse + command line arguments tutorial again. Command line arguments are a basic concept, one that you will often see in any computer science field. Take the time now to invest in your knowledge here. Walk before you run.
Hi Adrian,
This is indeed a great work. Learnt so much from your post.
I was wondering if you could help me out in finding the people in live webcam feed with reference data in place.
What do you mean by “reference data”?
how do we apply face recognition to realtime video stream from webcam. reference data is the database of images of people on whom we want to apply this face recognition.
That’s a really good job there Adrian.
I always love seeing new posts here and there’s always something new in deep learning I learn from you.
Thanks for your time and effort towards the community.
Thank you Sushant, I really appreciate that 🙂
Adrian, you should think about offering free courses in Coursera or edx(if you are not already doing it)
Keep up the good work
I’ve considered it but I really don’t think it’s going to happen. I prefer self-publishing my own content and having a better relationship with readers/students. I also really do not like how Udacity and the like treat their content creators. I don’t think it’s a very good relationship, and yes, while I could theoretically reach a larger audience, I don’t think it’s worth losing the more personal relationships here on the blog. Relationships and being able to communicate with others on a meaningful level is not something I would ever sacrifice.
Thank you for the wonderful post! Always wait for your post to learn new things
Thanks Ritika! 🙂
Sir,
Thanks a lot for this great tutorial. I have a question, in the encode_faces.py code we have a detection method flag which is by default cnn. I could not understand the statement ” Instead, it’s easier to use the pre-trained network and then use it to construct 128-d embeddings for each of the 218 faces in our dataset”. Where is the pretrained network or its weights?
I checked the GitHub source of face_recognition , I could only find the author telling that the network was trained on dlib using deep learning but could not find the Deep learning network used to train the network in the code repository. It seems that by calling the flag cnn I am actually getting access to the face recognition algorithm’s weight but could not understand how. In fact , I am not able to connect this blog post with the dl4cv practitioner bundle lesson three or five(I have reached only till this.).
This is way ahead of my knowledge and so sorry for asking a foolish question.
Anirban Ghosh
There are two networks if you use the “CNN” for face detection:
1. One CNN is used to detect faces in an image. You could use HOG + Linear SVM or a Haar cascade here.
2. The other CNN is the deep metric CNN. It takes an input face and computes the 128-d quantification of the face.
Thanks, Sir, your tutorials are just so great. It is my lack of knowledge that I have difficulty in understanding.
Rgds,
Anirban Ghosh
Thanks for this toturial
I want to simplify all of these steps for the user so that they can easily create different people to identify the face.for example i using raspberry pi…
For example the user can easily give different images to the system and identify the system of the individual(from another computer to raspberry pi)
Can you clarify what “simplify” means in this context? Are you talking about building a specific user interface or set of tools to facilitate face recognition on the Pi? Are you talking about reducing the computational complexity of this method such that it can run on the Pi?
Please answer me,please
Im your advocate
Nice tutorial! I Implemented basically the same pipeline with hypersphere embedding (https://arxiv.org/abs/1704.08063), but despite the promises, it works poorly on real data. The lighting conditions and the shadows seem to split my clusters even for intuitively easy cases. What are your experiences with dlib?
I’ve had wonderful experiences with dlib. The library is easy to use and well documented. Davis King, the creator, has done an incredible job with the library.
Dlib uses the facenet architecture, inspired by the openface implementation, as far I know. There is an embedding vs embedding competition in my eyes, I don’t care about the library.
Compared to OpenFace I’ve found dlib to be substantially easier to use and just as accurate. Between the two I would opt for dlib but that’s just my opinion.
Sir,
I kept on looking finally found that the dlib library is actually trained on a DL network. It is written in C++ and since I am also studying C++ on the side, this is something I understand(at least superfluously), now it is clear as to why we can just pass in the image for detecting the face in the image in encoding_image.py, as because the dlib library is trained on 3 million plus images and here we just used its weights for finding the faces in the images and appended the name to the appropriate 128-D vector embedding that was created. Need to learn more before I can have a complete grasp of this subject , any way great explanation, I had seen this GitHub repo of Adam Gitgey before but could not understand than how to use it. Today , I at least understand it a bit and it looks the concept is pretty similar to word embeddings used in NLP. Thanks anyways. for the nice tutorials.
Regards,
Anirban Ghosh.
Your understand is correct, Anirban. We must first detect the face in the image (using a deep learning based detector, HOG + Linear SVM detector, Haar cascade detector, etc.) and then pass the detected face region into the deep learning embedding network provided by dlib. This network then produces the 128-d embedding of the face.
Hi Adrian,
Thanks for explaining the Face recognition Technology with different combinations of algo.
Would it be possible for you to provide some more details on “128-d embedding of the face”.
I understand that the network calculate this , but I am curious to know taking what features of face is this calculated.
Does it is calculated like distance between nose to eyes , nose to lips , eyes to eyes etc.?
I want to understand what points / features exactly taken and how it becomes 128 vector only…..
Take a look at the original articles by Davis King and Adam Geitgey that I linked to in the “Understanding deep learning face recognition embeddings” section. Adam’s article in particular goes more into the details on the embedding.
Hi Adrian,
Thanks for guiding.
But the above article also didn’t go into details , what features are these embeddings signifies.
Is there any other tutorial or link you can guide me to
OR if you can give information on the features these embedding signifies.
I would suggest you read the FaceNet paper as well as the DeepFace paper.
Yes i mean is user interface application for interacting raspberry pi server..
I
There are a few ways to accomplish this, but if you’re talking strictly about building a user interface that doesn’t really have a whole lot to do with computer vision or deep learning (I’m also certainly not a GUI expert). If you’re interested in building user interfaces take a look at libraries such as Tkinter, Qt, and Kivy. From there you’ll want to take a look at different mechanisms to pass data back and forth between the client and server. A message massing library like ZeroMQ or RabbitMQ would be a good option.
Please use my pyfacy python package for Face Recognition with user friendly.
Refer link:
https://medium.com/@manivannan_data/pyfacy-face-recognition-and-face-clustering-8d467cba36de
Great tutorial Adrian.
I am anxiously waiting for your post every Monday.
Although, it would be very nice of you if you could show us how to train a Face recognition system from the scratch using a standard detection model (Yolo, MobileNet, SqueezeNet etc.) specifically build for low power single board computers i.e., Raspberry Pi using Keras and Tensorflow or Digits+Caffe etc.
I really appreciate your effort and time that you put into organizing these tutorials.
Thanks again!
I’ll be doing a face recognition + Raspberry Pi tutorial next week 😉
Nice post Adrian. I’m getting some error $ python encode_faces.py –dataset dataset –encodings encodings.pickle
Illegal instruction (core dumped)
How can I fix this?
It sounds like one of the libraries is causing a segfault of some sort. Try inserting “print” statements or using “pdb” to find the line that is causing the issue.
it is the problem with dlib library, I tried building with AVX_INSTRUCTIONS= 0, I was able to run a program but the process is to slow and laggy, my computer got frozen, I think it’s not running with GPU.
Your computer likely isn’t frozen, it’s just taking awhile to detect the faces. Try using the HOG + Linear SVM face detector rather than the CNN detector.
What changes should I do if I use HOG SVM method? I never used those before
Please refer to the post as I discuss the difference between the two methods. You change your
--detection-methodfromcnntohog. Again, refer to the post.Hey Adrian,
Thanks for the detailed explanations. I ran the above code on my laptop and it appears very slow, the webcam stream is almost frozen. The compare method will compare each detected face with all the encodings, that will a lot of time for each frame i think. Please let me know your thoughts for the same.
Thanks
It’s actually not the embedding and comparison that is taking most of the time, it’s detecting the face itself via CNN face detector. Try using HOG + Linear SVM by switching the
--detection-methodcommand line argument tohog. Additionally, you could use Haar cascades as well.What we need to do to use harcascade in instead of svm
Then you would need to manually update the code to use OpenCV’s pre-trained Haar cascade.
I can’t wait to get home to “play” with this information from your post. Your blog, and the Practical Python and OpenCV system i purchased are really helping me become educated in this field!
Thanks Bruce, I really appreciate that! Enjoy hacking with the code and always feel free to reach out if you have any questions.
The encode_face.py took its time, The issue is coming up when i run the recognise_face_video.py. The Frames are frozen. I am using a i5 with 8gb ram. What should be hardware specifications for a decent real time face recognition sytem?
Hey there Devarshi, make sure you read my reply to your original question. I have already answered it for you. The frame is not “frozen”, it’s that the CNN face detector is taking a long time to run on your CPU. Change the
--detection-methodtohogand it will run on your CPU.If you would like to use the more accurate CNN face detector rather than HOG + Linear SVM or Haar cascades you should have a GPU.
Got It! I misunderstood the previous comment. Thank you for correction. You are the best!
Thank you for this great tutarial.
Which one of face recognition architectures you used in this tutarial??facenet or deepface or other one??
I used the model discussed in the dlib library.
Thanks Adrian for all you time and effort . Very cool face recognition example !!!!
Thanks Steve!
Hello dear adrian…
excellent??
You are wonderful
Grade 1?
Thank you for the kind words 🙂
I am getting MemoryError: bad allocation when I am using detection-method=’cnn’.My laptop configuration is i7 processor with 8gb ram and 4GB graphics card
It is working fine with hog. Can you please suggest how can i use CNN face detector with such configuration
It looks like your machine is running out of memory. Can you confirm whether the error is for your RAM or for your GPU memory?
Error is for my RAM
That’s odd that you would be running out of physical RAM. 8GB should be sufficient. Are you using the exact same code + dataset I am using in the blog post?
I have the same error however I was able to solve it, for images only, by using the full path to the image and reducing the image size to a 448×320 75kb jpg.
I noticed that cnn takes a long time and appears to only be using one thread.I also do not notice any activitiy on the GPU (Win10 Task Manager GPU).
I tried face_detection_cli.py (face Reconition Site Packages) to test Multithreaded CPU with CNN on the original sized example_01.png and it worked with no memory error and appeared to be using multiple CPU threads.
I am unsure if the Memory Error: Bad Allocation is simple as my GPU only has 4gb dedicated memory and/or whether the integrated Intel HD Graphics 4600 is causing a problem with the Nvidia GTX 860M in my laptop.
Win 10 x64, 16GB, Intel HD 4600 + GTX 860M
I received this error also – I just needed to put the full path name in for the input image file and it worked fine.
I am still getting the MemoryError: bad allocation when running recognize_faces_video_file.py however and using full path name is not fixing that…
i7, 16gb, Win 10 x64, Geforce 860M 4gb
Dlib Use Cuda and Use AVX selected
Your GPU itself is likely running out of memory as it cannot hold both (1) the face detector and (2) the encoding model. I would suggest using the CPU + HOG method for face detection.
So I bit the bullet and managed to successfully follow your wonderful guide ‘Setting up Ubuntu 16.04 + CUDA + GPU for deep learning with Python’
On the very same laptop I now can run all using ‘cnn’ and Nvidia-smi (average) when running recognize_faces_video_file.py (with –display 1) shows;
GPU Util = 87%
GPU Mem usage Python = 697MiB
GPU Mem usage ‘other’ total = 400MiB
Therefore in conclusion for me Windows kinda worked but Ubuntu the way forward!
None of this would have been possible for me without your tutorials Adrian – thank you
NB Took me about 5 attempts to get Ubuntu up and running (and I can still dual boot to Windows 10 if needed)
Nice job Matt! 🙂
Great tutorial, clearly explained and easy to follow.
Thanks so much Simon! 😀
Does this algorithm work better than inception v3 model for image classification?
They are two totally different techniques used for two totally different applications. The Inception network is used for (typically) image classification. The network here is used to compute a 128-d quantification of a face. You can’t compare them or say which one is better, it would be like comparing apples and oranges.
I got an error on 2nd image
…
rgb = cv2.cvtColor(image, cv2.COLOR_BGR2RGB)
(-215) scn == 3 || scn == 4 in function cvtColor
Double-check your command line arguments. I believe the path to your input
--imagepath is incorrect. If it the path does not exist, thecv2.imreadfunction will return “None”.Do you solve this error?
Could you tell me how to solve it?
Hi Adrian
i test this with dlib without gpu and i was getting low fps,so i installed dlib with gpu and again low fps so how to use hog or other for better fps.Sorry for asking i am beginer.
Hey Kubet — what type of GPU are you using? Can you confirm that dlib is actually accessing your GPU?
Hi Adrian,
Thank you for the great posts as always.
I tried with HOG for face detection and it is still significantly slow compared to the other two face recognition programs you posted. However, I believe this is the most accurate one among the three approaches (Please correct me if I am wrong).
May I know how I can check whether dlib is accessing GPU or not?
Also, I am wondering if it is possible to use Movidius Neural Compute stick to speed up this program or the other 2 approaches?
The deep learning-based face detector will be the slowest but most accurate. Haar cascades will be faster but less accurate. HOG is a middle ground between the two. As far as I know dlib does not use the GPU for HOG but does for the deep learning-based detector.
I am getting this error when I use cnn –
MemoryError: std::bad_alloc
Any idea why is it so ? Because everything is working fine in hog
Your machine is running out of memory and it cannot load the CNN. You would need to use the HOG method.
Hi Awesome post.
Is there any way to get this to work on windows/anaconda env?
Many thanks
Sure. You would need to install OpenCV and dlib into your Anaconda environment. OpenCV should be available from the standard Anaconda repo. Both dlib and imutils are pip-installable as well.
I’ve managed to install OpenCV 3, dlib, and imutils, but I am having issues with face_recognition which doesn’t seem to be supported either via pip install or conda install
The face_recognition module is certainly supported via a pip install. Double-check your output and ensure there are no errors. If you are running into issues installing it on your Windows system I would suggest posting on the face_recognition GitHub page.
Thank you , I will try the installation steps, otherwise I am eagerly awaiting the rpi blog!
it worked for me finally! nice program man! thank you!
Congrats on getting the face recognition code up and running!
Why when running last code, on the video file, my MAC is moving soo slow. Is like time stad still. Is this due to my MAC’s memory? Thank you Adrian!
Please read the other comments. I’ve mentioned that if you are using a CPU you should be using the HOG + Linear SVM detection method instead of the CNN face detector to speedup the face detection process.
Adrian, I am wondering if you have experience with cloning the virtual environment? I just built this ENV per your instructions, and am wondering if I can clone it before I use, then I have a “boiler plate” version to copy from for similar projects. Having a baseline image of OpenCV, dlib and face_recognition to spin off new projects from would be great. I looked at the pip freeze and requirements.txt but when I ran that, it does not show the OpenCV or the dlib? If I am off track on this just let me know. I am thinking ahead to other projects with out having completing this one I know.
I don’t really like trying to “clone” a virtual environment. It’s too likely to introduce some sort of errors. Instead, I recommend using a pip freeze and requirements.txt as you noted. However, keep in mind that libraries that are hand compiled and hand installed WILL NOT appear in your pip freeze. You would need to either (1) recompile or reinstall or (2) my preferred method, sym-link the libraries into the site-packages directory of the new virtual environment.
Hello, the articles you publish are very useful even for beginners like me. I would like to know if you can use the facial recognition implemented in the code “recognize_faces_video.py” inside a main, that is: I need my raspberry to recognize ONLY my face and in case of recognition perform other operations.
Thanks in advance
Next week I’ll be discussing how to run this script on your Raspberry Pi. Be sure to keep an eye out for the post!
Guess you made my day!!!! Spent a day and a half compiling dlib without result, when i saw your post. Think it works now.
Thanks
Congrats on getting dlib installed, Bart!
Jesus this is a tutorial with a lot of depth. Thank you for that! I can’t find a use for it at my current job, but in my private life, I’ll try using this!
Thanks Oliver, I’m glad you liked it! 🙂
On the raspberry pi 3, it’s will be work in real time without freeze?
There are a bunch of considerations you’ll want to handle with the Raspberry Pi — I’ll be covering them in next week’s blog post.
I have used HOG detection method to speed up the face detection method and its working fine. but if i want to use ” cnn ” face detector so what configurations are needed for smoothly and fast face recognition process ?
You would want to (1) have a GPU and (2) install and configure dlib with GPU support (this post demonstrates how, refer to the install instructions). I personally recommend NVIDIA/CUDA compatible GPUs.
Hey, you got a typo in a comment.
# load the input image and convert it from RGB (OpenCV ordering)
# to dlib ordering (RGB)
image = cv2.imread(imagePath)
It should be “convert it from BGR…”
Good read, thanks.
Fixed, thanks for catching this!
Thank for great tutorial, my bro!
I installed dlib use GPU. But how to know whether dlib uses GPU or not when running encoding_face.py?
Thank so much
If you are using an NVIDIA GPU you can run
nvidia-smito check GPU utilization. If you are using another GPU you should refer to the docs for it.I’m using Nvidia Geforce GT 705 2GB. When running encoding_face.py with 51 input images + runnig nvidia-smi, i think my dlib did not use GPU. I didn’t see anything with nvidia-smi.
My syntax:
– nvidia-smi.exe
(correct if i wrong)
Are you using Windows? Sorry, I haven’t used Windows in 10+ years. I’m not sure how you would check GPU utilization on Windows. Also keep in mind that the face_recognition module only “unofficially” supports Windows so that might be part of the issue as well.
I ran pip install face_recognition successfully on Windows.
Is it OK If I build OpenCV not use GPU but build dlib use GPU?
That should not be a problem.
Hey Adrian!
Its really wonderful and helped me a lot:)
I am presently running with one issue.
When I have inserted the new dataset images with the size between 10-30KB it was working very fine.
However when I have given the images of 1.3MB “Encode Face” python code was not encoding all the images and in between it slows down.
I am not using any GPU system presently.
Do I need to use HOG + Linear SVM for this as well or is there any other issue ?
Cheers ,
Bhargav
Hey Bhargav — what do you mean by “not encoding all the images”? Are you referring to the
encode_faces.pyscript? Is it taking awhile to encode the faces in the training set? Does it exit with an error?Hi !
It does not exit with an error , however it does not go ahead when I am running encode_faces.py script.
I am not having GPU in my system , is that the reason for this ? If not then can you suggest what can be the possible reasons for this?
Note: While I am running the same code with slower images [3 to 10 KB] , that time it works fine. However the desired accuracy is not being achieved with these images and thus I want to feed high quality images in my dataset.
Be sure to check the activity monitor on your system, in particular the CPU usage. I have a feeling that the script is indeed running, it’s just taking a longer time to process more times. These systems are not magic. If you provide more data to the system it will take longer to process.
Given the hassles around trying to get some of this setup on Windows, is there an OpenCV/Python Docker image that you would recommend for trying out these tutorials?
Inside Practical Python and OpenCV I offer a VM that comes pre-configured with OpenCV/Python. I would suggest starting there (plus you can learn the fundamentals of OpenCV/Python as well).
Hi adrain,
I am having problems with installing dlib and face_recognition module on windows!
Can you help?
thanks
Hey Kartik, I don’t support Windows here on the PyImageSearch blog. I would highly recommend you use a Unix-based system such as Linux (ideally Ubuntu) or macOS. If you take a look at the face_recognition GitHub you’ll find install instructions but the library does not officially support Windows. A link is provided if you want to give it a try, but again, you should consider using Linux here.
Like always thanks for your great tutorial.
I am an avid reader of your blog. I have images of 6000 individuals who appear in the cctv images one time or the other. I want to experiment as explained in this post.
My questions is should i have each individuals name in the file as in indicated in the “dataset” section of “Face recognition project structure” where you listed the file limit to be 10 as indicated in the blog? kindly advise.
I think you might be confusing the
--filelimitswitch to thetreecommand. I usedtreeto show the project directory structure. I am not limiting each person to only 10 example images. I’m allowing all images for each individual to be used. You should do the same.Hey Adrian,
I’ve set up dlib with CUDA support but it seems my GPU might not be up to the task. I have a GeForce GTX 950M 2gb. After about encoding the fourth image I get a runtime error from CUDA: “Error while calling cudaMalloc(&data, n), reason: out of memory”. This makes sense since by the third image I’ve used over 50% of my graphics cards memory. I don’t see how this could possibly scale up to 218 images, even for high-end graphics cards. I have to be doing something wrong here. Any input would be greatly appreciated.
A 2GB card is likely not enough for this task, especially if you are trying to use the CNN face detector.
I also think you have a misunderstanding on how the face embeddings are extracted. All 218 images are not passed in at once, they are passed in as batches. In this case the batch size is trivially one, implying only one image at a time is fed through the network and only one image at a time would be pass through the network on the GPU.
Hey Adrain ,
I really would be glad to know from your side that, for the smooth running of these entire code structure what will be the minimum system requirement in terms of GPU , CPU and Processor .
Look forward to hear from you.
On my system I was running a 3 Ghz processor and 16GB of RAM for the HOG detector. When using the GPU, I had a 3.4Ghz processor, 64GB of RAM (you wouldn’t need that much), and a Titan X GPU. A GPU with at least 6GB of memory is preferable for deep learning tasks.
Cool stuff. I would like to see this with people who are not white. Would you still receive the same results? Just a thought…
The network was trained on millions of images, both white and non-white, and obtains over 99% accuracy on the LFW (mentioned in the post) which includes many non-white examples as well. That said, there is an unconscious bias in some datasets that can lead to models performing not as well on non-whites. Great question!
cnn does not work (gives me a MemoryError: bad allocation) and I try to use Hog but not work, when I run the python file recognize_faces_video.py nothing happens I have 8 GB ram with a usable 3.49 GB ram in a windows 10 32 bits
Could you be a bit more specific regarding “nothing happens”? Does a window open up on your screen but the frame does not process? Does the script automatically exit? Do you receive an error?
Adrian, Thanks a lot for your great blog post.
How many pics per actor do you need to make your streaming movie detection work?
I saw that you had like 22 per actor. Is one per actor even enough?
You can get away with one image per person for highly simplistic projects but you should aim to be much higher, ideally in the 20-100 range.
Whats the implication of using less images? Less chance of an accurate match?
Thanks a lot
You illustrated a detailed topic in a the most clear way
With your talent, I would understand the Relativity Theory if you post an article about it 🙂
Thanks Walid 🙂
Good post. Love seeing people using deep learning+machine learning techniques in clever ways.
Thanks so much Jeremiah!
Hi Adrian,
I am trying to use your code for facerecognition.
When using an image of my baby, it seems that your code doesnt run the conversion into BGR in order to make the boxes on the face and to save them into the pickle.
If i use your own dataset, with actors from that movie, the code will run. My question to you is, did you edit the photos before runnign the code.
If yes, what you did in order to run yoru face recognition code?
Thank you,
1. Regarding the photos of your baby (congrats!) are you saying that no faces are detected? It’s sounds like that is likely the problem. Did you try the HOG and CNN methods as well?
2. No image editing was performed at all on the code. They were downloaded to their respective directories and then I went in and manually removed irrelevant ones.
Have changed the model from cnn to hog, is working, but there are some error–>> Invalid SOS parameters for sequential JPEG. Should i edit the pics before running the code?
Those are not OpenCV/dlib errors. They are actually warnings from the libraries used to load the images. It should not be an issue.
After practicing this tutorial, i have a question. Why does each person have multiple 128-d measurements? Why do we summarize into 1?
If distance between each above 128-d measurements > 0,6 or similar, is the result wrong when inspecting the new input image?
Each face in an image ins quantified with as 128-d feature vector. These feature vectors cannot be combined into one, as again, each face input to the system is represented by a 128-d vector. As for your second question, if the distance between an input face and a set of faces in a dataset is too large, the face is marked as “Unknown”.
If distance between 2 encoding input >0,6?
I’m not sure what you are asking. Could you clarify?
Hi Adrian
Does the model need more training data like 30 or 40 images for each person?
I tested the model with addition of my images(total 10) to the existing dataset and tested the model. Model was not accurate and was not able to recognize my images correctly.
Regards
Gaurav
I typically recommend 20-100 images per person. The more you can get, the better. Ideally these images should be representative of where the system will be deployed (i.e., lighting conditions, viewing angle, etc.)
Hi adrian
i would like to add new images or delete images in database and when i do it then prior images that exist in the database are stored in encodings.pickle and only for new images encode_faces.py be done.
I want to reduce the time to save the encoding in the encoding.pickle.
Otherwise, a lot of time should be spent even adding a new image.
I would suggest you:
1. Use encode_faces.py as you normally would but each time you run it, create a new pickle file.
2. When you’re ready to recognize faces, loop over all pickle files, load them, and create a “data” variable that stores all information from all pickle files.
Hi Adrian
May I know how to combine multiple pickles into 1 variable?
Thank You
If you’ve never merged two lists I would recommend you read the following tutorial on StackOverflow.
From there:
1. Load both picked’d dictionaries
2. Append the lists together
3. Create a new dictionary on Lines 56-59 and write the appended lists to file
Can you please put an example appending the actual encoding.pickle files?
I will consider it but I cannot guarantee I will cover it. I’ll likely end up covering it in my Computer Vision + Raspberry Pi book though!
Can I save encodings in a database, for example mysql and update each time with new images?
You can save the encodings in whatever database you like, whether that’s a CSV file, JSON file, a mySQL database, a key-value database, etc. But if you add new images to the database you’ll need to “retrain” the model.
Why we need “retrain”? I think the model already trained. The model like feature extractor, isn’t it? We are only calculating feature vectors of each image. If we add new images to database, I think the 128-d feature vector should be calculate and append pickle file. Am I wrong? Thanks!
You are correct but keep in mind that Dauy’s original question was in context of using a database server instead of a pickle file. They would have to load those values back into the k-NN search.
Hi Adrian
Thank you so much your post
I have a problem I installed dlib easily but While I was installing face_recognition I have cmake error:
CMake must be installed to build the following extensions: dlib
On the other hand I have already cmake I cannot understand why I have this error
I am studying python 2.7* andwindows 10
Hey Gözde, I’m happy to help the best I can; however, I do not support Windows here on the PyImageSearch blog. I would strongly recommend that you use a Unix-based system such as Linux or macOS for developing computer vision/deep learning applications. Secondly, the face_recognition module does not officially support Windows either. You should post any errors related to the face_recognition module on the official GitHub page.
Hey Adrian,
Its always a motivation whenever I see your blogs
can you tell me . can this system be deployed were we have to do lakhs of persons facial recognition?
I’m not sure what you mean by “lakhs” — could you clarify?
lakhs is a ‘Hindi’ language word, 1 million = 10 lakhs
I can concur about the running out of memory error when using CNN. I can get through 26 images. When I switched to the HOG all 218 images were processed in 90 seconds.
Specs:
MacBook Pro (Mid 2014)
Processor: 2.5 GHz Intel Core i7
Memory: 16 GB
Graphics: NVIDIA GeForce GT 750M 2048 MB
Python: 3.6.5_1
cuDNN: v7.1
CUDA: v9.2
CUDA Driver: 396.64
GPU Driver: 387.10.10.10.35.106
Interesting. I wonder if there is some sort of memory leak issue going on. I would suggest posting the problem on dlib’s GitHub Issue page just to confirm this.
Hi Adrian,
Very wonderful tutorial.,Thanks a lot!!!
I want to customize the code so that it will tag the address,phone number along with the name of the recognized face..
how could i achieve this?
Please guide me.
Thanks in advance.
What does “tag” mean in this context? Once you recognize the face you can perform any other operations you wish. Keep in mind I focus mainly on computer vision and deep learning on this blog. Any database updates or modifications you want to make is 100% possible but you would need to code that up yourself.
Yeah i got it…Thank you for your advice.
Good day,
I tried to recognize my face using opencv and deeplearning. So,I took 10 photos of mine.and I put in dataset.photos are in jpg format.
When I was running encode_faces.py, I got error message that ‘invalid sos parameters for sequential jpeg’.could you tell me how to solve this problem?
Hmm, I haven’t encountered that particular error before. How did you capture your JPEG images?
Your tutorial is so good. It’s really helpful for my internship. By the way when i run encode_faces.py
I’m using same names of all your folders and also same dataset. Even the name “dataset” remained same.
I have got following error, Could you please help me out.
usage: encode_faces.py [-h] -i DATASET -e ENCODINGS [-d DETECTION_METHOD]
encode_faces.py: error: argument -i/–dataset is required
Be sure you read up on command line arguments and you’ll be okay 🙂
hey I’m getting following error while training on cnn model.
return cnn_face_detector(img, number_of_times_to_upsample)
MemoryError: std::bad_alloc
can you please help me? I have even tried GCP
Please see the other comments:
1. If you are using a GPU, your GPU does not have enough memory for the CNN face detector
2. If you are using a CPU, your system does not have enough RAM for the CNN face detector
Switch to the HOG detector and you’ll be able to execute the code.
Can you tell me what amount of memory and RAM is required?
one more thing. recognizing the faces seems working slow in real time. can you tell me how to speed that up.
Thanks
Parth — I’ve addressed your questions in the post and in other comments. I kindly ask you to read them.
Very interesting.
I was wondering: If a new character pops up in the new movie, how you would add pictures and encodings? Do you need to retrain on all images or is there a way to just append to the encodings file?
You wouldn’t need to retrain. There isn’t actually any “training” going on. We’re effectively just performing k-NN classification. Just extract the 128-d face embeddings for the new faces and update the pickle files.
Hi, Adrian
Can we get the ‘confidence’ of the recognition?
As we know, LBPH can output confidence.
The confidence is the distance between the faces. You’ll want to refer to the face_recognition docs to obtain it.
Hello, just want to share that experience with this code was a challenge. I tried implementing this from scratch on Ubuntu Beaver but ran into multiple issues when installing OpenCV. At the point where I would “make” it would fail. Also several required packages would not be found when installing with pip.
After several days of trying, I ended up installing Ubuntu 16.4.4 LTS – followed the steps to install OpenCV with such version, and even though it took several hours to install, I finally was able to get this model working. In case some one else may run into similar issues, this is how I resolved mine.
Thanks Adrian for your great content always
Congratulations on getting OPenCV installed! It can be a pain to compile OpenCV from scratch if this is your first time, but once you do it a few times, it gets significantly easier.
Hi, Adrian
OpenCV(3.4.1) Error: Assertion failed (scn == 3 || scn == 4) in cv::cvtColor
I have this problem.
How can I solve this?
Thank u!
Which face recognition method are you using? The one for images? Or the one for video streams? My guess is that your image/frame is “None” meaning that the path to the input image is invalid or OpenCV cannot access your webcam. Double-check your paths.
Hi adrian
Can we get the accuracy count of those recognized images.???
The face_recognition library doesn’t return the “accuracy” here as the accuracy is just the distance between the feature vectors. To obtain the distance you would want to extract the embeddings manually and then apply the k-NN distance calculation manually (the face_recognition library is doing all that for you under the hood).
Hello, I see your demo it really real time. But when I run it in my computer it is very slow. maybe 0.7 FPS.
Can you tell me why
Hey Thang, make sure you give the comments and blog post another read as I’ve already discussed this issue many times. If you are using the CNN face detector you will need a GPU for real-time performance. If you want to use your CPU make sure you use the HOG detector. You can supply a value of “hog” when you execute the script via command line arguments.
thank you very much
hi adrian,
First of all excellent post. I tried to run this project on my pi. after i executing the commands to encode the data set i got this error message.
how can i solve this,i am a beginner : (
It is okay if you are a beginner but I would ask you to read the other comments to the post. I’ve addressed this question both in the post and in the comments section. The gist is that you need to use the HOG face detector rather than the CNN face detector. Read the post and comments for more details.
Hi Adrian,
Thank you so much for the detailed explanation. I am having a problem with recognizing faces, I am using webcam embedded in my Laptop to collect dataset of images (using your other code) and then using this code to recognize people. It is not showing unknown for people who doesn’t have the images in dataset and it displays incorrect names from the dataset randomly. What could be the possible reason?
Try setting the tolerance parameter to a lower value, such as 0.4. That should help. Take a look at the documentation to the
face_recognition.compare_facesdocumentation as well.Hi Adrian,
Thank you for the response. Basically, I am working on a college project named “Home Surveillance System” that includes a Face recognition and physical features analysis to identify the intruders (unknown people).
First I planned to use use Raspberry Pi for that purpose but after reading your blog post about Raspberry Pi (which seems quite slow), I am planning to use only my Laptop for that purpose. Now I have to purchase a camera for this project, can you suggest me a good camera that would satisfy my needs and would be compatible with Python and OpenCV?
You might actually want to start by taking a look at the PyImageSearch Gurus course where I build a project that is nearly identical to what you are describing. In the course I demonstrate how to recognize “known” people vs. “intruders” and in the case of an intruder, send a txt message alert to your phone.
As far as cameras go, I really like the Logitech C920. It’s affordable, high quality, and plug and play compatible with the Pi.
Hi,
How can i try setting the tolerance parameter to a lower value?
I dont see it in your source code.
You’ll want to refer to the face_recognition library docs.
Hello Adrian,
thanks a lot for your effort in clarifying all those interesting topics.
Some questions related to the face_recognition module you are using here.
In the beginning you talk about the neural network needed to create the embeddings. To my understanding the face_recognition library does this:
– produces the embedding (calling dlib)
– provides the distance function between two images.
Moreover, together with the face_recognition the system downloads also the “model” which I suppose is the one that obtains 99+% accuracy on LFW.
In my case i have a dataset of about 2000 people with around 10 images each.
I created encodings setting the jitter param in face_recognition =10 (putting 100 makes the system too slow)
The point is that I am getting a lot of false positives even setting a quite low distance (e.g. 0.4)
Do you think there is a training “intermediate” step I can do to improve the results?
Thanks again 🙂
Your understanding is 100% spot on, nice job grasping it! As far as improving the accuracy of the system keep in mind that you are using just the produced face embeddings on images the network was not trained on. To fully improve the method you should train your own network using dlib on the faces you would like to recognize.
Its great tutorial. I follow ur tutorial from basic and now very comfortable in the code style you have. I would love to try this by my own and will give you the feedback soon.
regards
Thanks Leena, I’m glad you enjoyed the post.
Hi Adrian,
Thank you for wonderful tutorial!
I have some problems. I run it by macbook pro core i5, Intel Iris Graphics 540 1536 MB but it is very slow. Therefore, in file ecode_faces.py I replace “cnn” by “hog” and in file recognize_faces_video.py, I resize image to width=250. When but I run it real time, it is not correct all case.
Do you have any solutions for this problem?
And how can I print the accuracy of this model?
Thank you
You would need a “testing set” of faces you would like to recognize. You should know the faces in the images. Your algorithm can make predictions on these testing images. And from there you can derive how many were correct (i.e., the accuracy).
The image size may be too small at only 250px. Try increasing it to see if you can find a nice balance between speed and accuracy.
Hi Adrian,
I just have quick question. What is the difference between HOG and CNN detection method? They seem to have significant training and testing times between them with Hog being the faster of the two.
Thanks for the assistance!
1. HOG is faster but less accurate. HOG can also run on CPU in real-time.
2. CNN is slower but more accurate. CNN is slow on CPU for real-time. For real-time a GPU should be used.
Thanks for the clarification Adrian, super helpful as always.
In order to enable GPU support, where do I find the CMAKE_PREFIX_PATH to include my cudnn folder. This has been eluding me for hours.
Thanks again!
I have managed to solve it by organising the cuDNN files in the appropriate cuda directories and downgrading apple clang version to 8.1. it works now!
Thanks for the confidence!
Congrats on resolving the issue!
Hi Adrian,
Is there a certain threshold you would use for knowing frame rate is too slow for good results? Like above 10 FPS = good, but below 5 FPS = try something different…
Is there a certain frame rate where the memory of the computer just cannot keep up and ultimately you will not get good results? Or is video ‘choppiness’ just a good gauge/rule of thumb?? I am referring to video file analysis of a movie (.avi) like you are doing with Jurassic park in real time.
Thanks!
Ben
Hey Ben — I think you need to clarify what you mean by “good results” here as I’m not sure whether you are referring to:
1. The accuracy of the face recognition algorithm
2. Or the “quality” of the output video file
Hi Adrian,
I was attempting to learn a little bit more about how you mention in your blog post to resort to HOG & SVM, because the computer memory cannot keep up without GPU support.
If I have a trained algorithm with accuracy detecting in a real time, is there a certain frame rate where the algorithm will not detect very well because the video is choppy and it appears the computer is bogged down…?
Not really referring to the algorithm accuracy itself but just the computer memory issues … Can my results be poor because of poor frame rates even tho the overall accuracy of the algorithm is good…?
If so what frame rates are considered poor?
Thanks
The frame rate itself will not affect the accuracy of your system. The face recognition code will still see the same frames and the accuracy will be the same, but the throughput itself will be slower.
Hi Adrian,
Great Tutorial. I am trying to understand advantage of deep metric learning network here. Why not take the output of the face detection box and feed directly through a common classification network to label them?
Try it and see! And then compare your accuracy. You’ll find that your face recognition pipeline is much less accurate. By using triplet learning we can obtain embeddings that perform well.
Secondly, by using embeddings we can more easily apply transfer learning (like we did in this blog post) to recognize faces the network wasn’t trained on. If we used standard feature extraction using the network instead of the embeddings we again would not obtain as high accuracy.
Thanks Adrian for your reply. I will definitely give it a try, it is the best suggestion to learn. I am always looking for more ways to improve accuracy.
Your answer solidified the thoughts!
Thanks a lot. one question:can it detect copy images or real face picture? I need live face detection difference to copy image. Thanks.
I think what you are referring to is “liveliness detection” which is an entirely different facial application. I don’t have any tutorials on that topic on the moment but I will certainly consider it for the future.
Dear Adrian,
Thank you for this tutorial. I would like to ask several questions regarding it.
1) Do you have an idea,which methods for feature extraction and which kind of cnn / classifier used in face_recognition implementation?
2) Did you had a chance to test this framework on face images with different insolation? I.e. where the angle of light direction is different in training and recognition set. If so, could you please share the results?
3) Which face rec pretrained model would you recommend for tensorflow?
Thank you in advance.
1. Take a look at FaceNet and DeepFace.
2. Yes. Take a look at this post.
3. Refer to #1
Hi! Thanks for the response.
1. Basically I already get acquaintance of these publications. However it is not possible to conduct an experiment on own dataset, as both prototypes provide per-traned models and at least in publications there is no information regarding re-configuretion the model. More over they are using Inception model, as you said in your previous comment, it is more used for object recognition. In fact, is Inception is used in face_recognition (it is not clear from the code) ?
2. Great! Looks promising!
Thank you!
Just to clarify — the Inception architecture can be used for a variety of image recognition tasks. The Inception network was originally trained on the ImageNet dataset for classification. However, it can be used as a base model for object detection and other tasks. Typically we’ll remove layers from the Inception network and use the rich set of filters it has learned to accomplish whatever tasks the practitioner is using it for. We call this “transfer learning” as we’ll utilizing what the model learned from one task and applying it to another.
Hi Adrian.
Have been experimenting with Facenet for generating face embeddings. Saw your post on dlib and face_recognizer and read that it was built using the architecture of Deep Residual Learning for Image Recognition. Checked it out, but I still need to check against a bigger corpus of data to see how well they do. How do you think they compare considering both the papers came out in a short span of couple of months.
How are you quantifying “compare” on this context? A standard is the LFW dataset and all of those methods reportedly perform well on it.
Hi Adrian,
I love your blogs and have been following this since a few months. I was trying to implement this particular code but I am getting an error with the face_recognition module. I have installed it successfully using pip install face_recognition but when I try to import it, I get this error – ImportError: DLL load failed: The specified module could not be found.I have installed dlib successfully. I am running this on a windows 10 OS using anaconda and python 3.6. Please let me know how to fix this.
Windows is not officially supported by the face_recognition module. If you’re having trouble trying to install it be sure to post on their GitHub.
Hi Adrian,
Thank for the useful post. I tried this code on custom images, most of the time it works. Just a little problem , sometimes for two peoples it recognise as same person. Do you suggest some debugging ideas . ?
You might want to consider playing around with the minimum distance threshold when you compare the actual faces. This will make the face recognizer more “strict” but could potentially label known people as “unknown”.
Hi Adrian,
Thanks a lot for your great effort. I’ve been trying to find where I can change the minimum distance threshold but really couldn’t. Could you please tell how I can do this?
If you’re having trouble you should try this face recognition tutorial instead.
hey Adrian,
Say a new face were to be introduced into the dataset. When we run the “create encodings” script, if i’m not mistaken, it is rerunning on all of the images in the dataset, even the ones we already created embeddings for. Is there a way to create an encoding for ONLY the new images in the dataset? Would this require some sort of comparison between the existing pickle files in which everything is ignored except the newly-introduced face?
Thanks!!!
Your understanding is correct — the script would loop over all faces in your input dataset and recompute the embeddings for them. The simple fix would be to just:
1. Store your new images in a separate directory from the old ones
2. Run the script to generate a new pickle file and/or after generating the pickle file, load the original one, merge them, and write the new, merged dictionary back out to disk
I try it already but Face recognition is mistake.
Why face not match ? Please teach me
5 images per persons
Is laptop with Intel i5 4th generation, 4GB RAM and 2GB graphics suffice for running CNN ?
You can run the CNN detector on your CPU but I don’t believe your 2GB graphics card would be enough for the face detector to run on the GPU.
Hi Adrian,
I complied dlib with GPU support, but I keep getting the error “no CUDA-capable device is detected” in the call to cudaGetDevice(&the_device_id). Any advice?
My GPU and CUDA is working as I uses it with keras and tensorflow.
Thanks.
Hm, I’m not sure what the error may be there. I would suggest posting on the official dlib GitHub page.
How can I change the device? I have 2 and I want to use the second one
Hi Adrian
Thanks for the post.Got enough information from the post.I
I have query regarding the post , recently i have tried it for the animated pics but didn’t obtain the results.
Can i know the reason why?
thank you for the time you spent in enlightening us .waiting for you to do a post on
“TENSOR FLOW LITE” soon…….. 🙂
This code will not work with GIFs. You will need to extract the individual frames from the GIFs.
I want to use MySQLdb to store matched names in MySQL database. So I need to link python to MySQL.
I downloaded MySQLdb packages and used it in normal environment. But i cannot use it in virtual environment in which I installed opencv, dlib and face recognition packages.
could you please help me out.
In virtual env it is showing “No module named MySQLdb found”
Make sure you install your mySQL library into your Python virtual environment:
This StackOverflow thread should help you out.
Hi Adrian,
How do I run my own implementation of nms on this face recognition pipeline.
You technically can’t unless you want to utilize your own face detector or modify the dlib/face_recognition code used to predict face locations.
Great stuff Adrian.
Question: Is it possible to run several distinct types of recognition on a video stream? For example, I want to train some model to recognize several types of objects (example: dog, cakes etc) and I also want to use face recognition.
so here’s what I am asking. Is it possible to run a script to detect all of them concurrently? This means, the system would send me a trigger if the video contains a dog, or a cake, or a specific person I’ve targeted. They all don’t have to be in the same frames, but I would like the system to detect whichever it finds.
Another example would be to use a license plate recognition script along with a facial recognition. So when it finds a specified license plate, it would pop a trigger or if it recognizes a specific person.
Hope my question makes sense
Yes, this is possible. You would want to apply object detection to locate all objects in an image that you are interested in. This means you need to train your model on examples of dogs, cake, faces, etc. After a given object is detected you can pass it on to another model for recognition. For such a project you would want to use two models.
Thank you.
ps. for some reason, I’m not getting notifications of replies, so have to dig around for my posts to see if they were answered. is this an issue on my end?
That’s not something I control directly. It’s handled by WordPress. You may have entered a different email address and that is where the notifications are going. Alternatively, you might want to check your inbox/spambox and then whitelist the notification email address.
Hi Adrian,
Also, in this implementation, where, how is non max suppression implemented?
The NMS is actually implemented within the
face_locationsfunction. The dlib library is used under the hood which performs the NMS.Hello Adrian,
I’m using the hog encoding, and the process is very slow, my machine is i7 16gb ram and 512 gb ssd on windows10, is there anything i can do to speedup the processing please?
thanks
Hey Mehdi — could you quantify what “very slow” means in this context? What are your results and what would you ideally like to obtain?
Thanks Andrian for such a great explanation ?
Thank you for the kind words, Ashwani. I appreciate that 🙂
How can I make it so that I do not encode the images every time I want to add a new face to the dataset? How can I add those values to the pickle file without overwriting it if I do not add the new element and then compare the image with all the ones there are? Can this be done with a database so as not to be coding each image?
Hey Joel — I’ve actually already answered this question. See my reply to Dauy.
Thank you for your tutorial!!! I learn so much when exploring your Python scripts and the dlib library.
When I run the recognize_faces_video.py, it works very nicely. But then when I shutdown the window (press ‘q’), there is an error message:
FATAL: exception not rethrown
(core dumped) python recognize_faces_video.py –encodings encodings.pickle –output output/webcam_face_recognition_output.avi –display 1 –detection-method hog
What’s wrong with it? Thanks
Hey Benedict — it’s hard to say what the exact error message is here. Can you insert some “print” statements or use “pdb” to help determine exactly which line of code is throwing the error?
hello adrian thank you for sharing awesome tutorial,i want to use this project for two cameras and i using (Multiple cameras with the Raspberry Pi and OpenCV) tutorial,but i did not succeed
What parts should I change in the code?
thank you in advance
Hey Hami — I assume you are referring to my previous blog post on multiple cameras? If so, what didn’t work for you?
Hello Adrian, I am new to opencv and I am currently enrolled in your 17 day course.
I am currently doing a project where I would like to recognize the best photo, that is, if there are 6 photos and some of them come out of profile or some of them go out and remove them and only keep the one that is the best, that is, the front face and that photo another 5 discard them. Do you have an example, or how could I do it? I use orientation.
excuse my English
Hi Joel — how are you quantifying “best” in this situation? What makes one photo better than all the others?
Hello Adrian! simply that it comes out front and it may be that the person is smiling unlike their other photos, which can be in profile and the photo is bad or blurred, and choose the one that looks better.
That sounds like it may be pretty subjective, but you can detect blur using this post and you can learn how to detect smiles by going through the Starter Bundle of Deep Learning for Computer Vision with Python. I hope that helps point you in the right direction!
I want big project in face recognize thats way I want all topic which covere for project
please tell
and which topic have learn for fullfil the requirement of the face recognize project
tell me please
Hi Firoz — it’s great that you are interested in studying face recognition. Have you considered working through the PyImageSearch Gurus course? Inside the course I cover face recognition in detial — you’ll also be able to obtain the knowledge you need to successfully study computer vision and complete your project.
Hey Adrian, thank you so much for this tutorial. I had a small doubt. In your face recognition video, there has been few instances where the lawyer is recognized as someone else instead of unknown. Is there any parameter that I could tweak to reduce occurrence of false positives?
Certainly. We used a simple variant of the k-NN classifier for simplicity, but you could take the 128-d embeddings and then train a more advanced model on it, such as a Linear SVM, Logistic Regression, or non-linear model as well.
Hi Adrian
How would i go about training it with Linear SVM, Logistic Regression, or non-linear model .
I would like to try Sarun Rajan question to you.
Many thanks.
Joe
I cover the exact answer to that question in my face face recognition guide.
Hi Adrian,
So you are saying that using one of those methods instead k-nn will lead to a better face recognition, and using exactly the same steps presented here in the rest?
In most cases, yes.
No, it does not work
What changes should I make to make two cameras for facial recognition in a raspberry pi?
What specifically is not working, Hami? Keep in mind that I can only provide suggestions or guidance if you can describe the problem. In a previous comment I already linked you to my tutorial on accessing multiple cameras.
hi Adrian,
do you think it is possible (or is good practice?) to train an object detector to recognize a certain person’s face? for example take a pretrained model from TF Model Zoo Object detection API and train on top of it with a person’s face as inputs???
also, say you didn’t have enough pictures of someone but you want to recognize them,, can Data Augmentation be used to create more images by stretching and distorting them?? Or is this a bad idea because you are essentially changing the face?
I’m having trouble reasoning about whether or not this would work and if its a bad idea to do it since we aren’t trying to generalize to new objects like a dog detector or something
thank u
No, you would want to:
1. Run an object detector to detect a face
2. And then quantify that face using a network dedicated to facial recognition
Trying to treat an object detector as a face recognizer would lead to too many false-positives.
Data augmentation can help a bit. In fact, there is a built in “jitter” parameter to the face_recognition library. Be sure to refer to the docs.
thanks for the reply, Adrian. the face_rec docs are super useful, will try out the jitter parameter.
on the other question,, could you explain why a detector wouldn’t work for classifying a face if you trained it on enough pictures of that same face? how is “John’s face” (thought of as a specific object) different than say “soccer ball” when training a classifier?
At the end of the day training to recognize a specific arrangement of pixels aren’t you?
I will experiment with this to prove to myself but i’m just trying to get the reasoning behind why it doesn’t work from an expert.
thanks
Hi Adrian,
i want use this project into my django project but i don’t understanding how to use it.
Hey Adrian,
when i run pi_face_recognition the following error is appear
help will be appreciated!
error: argument -c/–cascade is required
Make sure you are correctly supplying the command line arguments to the script (which you are not). Make sure you read this link on how to use command line arguments.
Hello adrian,thanks for the great post,though i have used the correct command line arguments as you mentioned ,i got this error saying ,[the following arguments are required: -i/–image] …help me in this ,
P.S [i HAVE USED THIS COMMAND LINE :Desktop\face-recognition-opencv\recognize_faces_image.py –encodings encodings.pickle\–image examples ]
Please refer to my previous comment. Read up on command line arguments first. Follow the guide, practice, and you’ll be able to run the script. Keep in mind that basic knowledge of how the command line works is a requirement for more advanced tutorials such as this one.
Hi Adrian,
Thank you for the great post.
What ı want to understand is the 128-d embeddings that we create for each face in our dataset…. Are they created in a particular way because the network has already been trained with over 3-million images?. I mean, Is the result based on the prior training? I suppose during that prior training, the library we use deduces the way it will create distinctive features for the new images. By that token, perhaps we could even present here only one single face and the code will find out it.
The result is based on prior training. If you had a lot of example faces of people you wanted to recognize you could also train the network from scratch or fine-tuning the existing model. It’s significantly more work but can achieve higher accuracy.
Hey Adrian,
i am working on pi_face_recognition.py
here is my command line argument :
python pi_face_recognition.py –dataset 00005.png –encodings encodings.pickle –detection-method cnn
here is the output error:
ValueError: unsupported pickle protocol: 3
It seems like a Python version issue. Re-encode the faces which will generate a new LabelEncoder object. Once the new LabelEncoder is generated it should work perfectly.
I wanted to know, that if I want to build a face recognition script using my faces or my friend’s, then replacing the images in the part “Encoding the faces using OpenCV and deep Learning”, and encoding them will be the rights procedure??
Yes. Create your dataset of images first. Then encode the faces. From there all other steps are the same.
This is really a great, great piece of tutorial! Congratulations and thanks for sharing this goodness.
I have two questions:
1) is it possible to run recognize_faces_image.py not just on a single file but on a folder containing several images?
2) is it possible to print these results in a format similar to Name/Surname => image.png (csv file output would be great)?
This stuff is awesome for OSINT and a CSV/print output would enable the user to perform some social network analysis.
Lorenzo
1. Yes, you can do that. Check out the “imutils.list_images” function which was actually used in this blog post (Line 21). You would loop over all images in the directory and then apply face recognition to each.
2. Yes, you can write the results to disk. You would use simple Python file I/O.
Hello. When I run encode_faces.py , it stuck on the “serializing encodings” forever. I can run it on the laptop(which is ideapad320s) and when I run it on my desktop computer , it just stuck there. I am using cnn detection-method on both of them. I tried switching cnn to hog and it will work. And if I run recognize_faces_image.py on cnn method, it works too. So I don’t know what’s wrong.
Also, if I install dlib with GPU support, do I need to enable the GPU support? Sorry if my question is really dumb 🙁 I am new to opencv and need to make a project of face recognition so thank you so much for these tutorials
I don’t think it’s “stuck”. Can you open up your activity monitor to verify that your CPU is being utilized by the Python process? Secondly, try inserting some “print” statements to validate that the script is actually running. As I mentioned in many previous comments, including the post itself, the CNN face detector can run very slowly on the CPU. That is why when you switched to the HOG detector your script seemed “unstuck” (since it was running faster).
how to recognise faces for side profiles? Right now, face recognition only works as long as the subject is facing the camera.
This method assumes you have the full frontal view of the face. Side profiles would be less accurate.
Hello. I comment a few days ago and didn’t get reply. Maybe because I am asking a similar question with the other comments but I have read them already. And still didn’t make sense because my computer have 16gb ram and gtx1070 so I really don’t understand why I can run encode_faces.py in CNN but my low-end laptop can….Thank you.
I already answered your question — please make sure you review my answer to your previous comment.
Hi Adrian,
Thanks for the post. It’s really very helpful.
I’m facing a problem while installing face-recognition library. It seems like installation is just stuck there. yesterday I’ve waited for hours but there is no improvement, I thought maybe internet connection’s problem, so I exited. Today I’ve started again but the problem remains same.
Is there any other problems with the pi or libraries? Please Help.
You’re installing face_recognition on the Raspberry Pi? If so, it’s probably not “stuck”, it may be compiling. Have you installed all other dependencies? Try leaving your Pi on overnight.
yes I was installing in Raspberry Pi B3.
Now I’ve downloaded the whole document and paste it to the raspberry pi.
Thanks
Awesome, I’m glad that worked 🙂
Hello,
I am able to generate encodings, but when I run the recognition code, it restarts the runtime. I am running it on google colab.
I trained for first two folders only from the dataset and iam using example1.png to test.
[INFO] loading encodings…
[INFO] recognizing faces…
After this the runtime gets restarted.
Sorry, I have not tested this code directly on Google Colab. Try to insert some “print” statements to help you debug where exactly the problem is.
Thanks for your reply.
Hey can you please let me know how you managed to run the programs on google colab?
I’m also facing the same issue ..have you found out what’s causing this issue? or any solutions.
Hi adrian !! this is good too…
do you have plan to show as age estimation? thank you
I actually cover age estimation inside Deep Learning for Computer Vision with Python.
Hello ,
how to show image on web page using opencv.js ?
# show the output image
cv2.imshow(“Image”, image)
cv2.waitKey(0)
i want to show image on web page ?
Please help me.
Sorry, I do not have any experience with opencv.js. I imagine you need to create a “canvas” element and render the output frame there.
Thanks, I am a beginner and have benefited a lot. I would like to ask a question, my cpu is Intel(R) Core(TM) i7-6660U, there is an integrated GPU IRIS540, can I use this IRIS540 to share the work of cpu? just like Nvidia GPU.
Sorry, I haven’t tried with your specific setup. Given that it’s an integrated GPU I wouldn’t expect much of a performance boost.
Hi Adrian
One quick Query.
I have the used the tool pickel to generate the model file but the streaming speed from the webcam is extremely slow due to that the face recognition is also taking more time.
I running the code on a CPU
Is there anyway to increase the streaming speed.
Regards
Akhil
I’m not sure I fully understand your question. The face recognition component is what is slowing your pipeline down. The stream itself doesn’t have anything to do with it. To prove this to yourself, remove the face recognition code and you’ll see the frame throughput rate is significantly faster.
Hi,
In your face recognition live streaming code, I am printing the list “names” as I need only names not the video. Can you just remove the part of video storing so that recognizing becomes fast?
Sure, absolutely. Feel free to modify the code as you see fit. The best way to learn is by doing. Give it a try.
Hello Adrián, I congratulate you for the great contributions you give us with these examples of deep learning application, in particular I would like to ask you a question, could you train many people with this library? Maybe more than 100, 500 or 1000 people? , or would you have to train a model from scratch ?, that’s my doubt Adrian, thank you very much for your attention to the question.
I wouldn’t suggest trying to recognize that many people using this method. My general rule of thumb is once you get over 20-30 people you should be training or fine-tuning the network. If you try to recognize more than 20-30 people using a pre-trained network you’ll quickly start to get false positive identifications.
Hi Adrian
Are you saying that you need to train your own network from scratch to be able to use it with 30> people using dlibs CNN?
I am new to this area and just want to understand what are saying. Many thanks.
Regards
Joe
You would either need to train from scratch or fine-tuning an existing FaceNet, OpenFace, or dlib face recognition model.
Thank You So Much It Helps
You are welcome!
hi adrian, thanks for such a great tutorial.
i need to ask few questions, i need to train this face recognition task on my custom face dataset specially for videos but with deep learning. do you have a tutorial on it to train network on custom dataset from scratch? or is there any other resource to follow for this task.
thanks 🙂
Hey Rizwan — you don’t actually have to train a network from scratch or fine-tune it. The method you’re using here is leveraging deep learning to compute the 128-d embeddings for each face.
Hi. Thank you for tutorial.
Can you please tell me what is the best algorithm for detect facial key points.
Refer to this post.
Hey Adrian, thank u for ur awesome post. it was really helpful 🙂
I tried face-recognition on webcam and video sample with GPU environment.
accuracy was really high, but it’s way too slow…so, I tried all of things I can do for make it faster. installed dlib(GPU version), changed ‘CNN’ to ‘Hog’..but still….
Is there anything I can do for make it faster except things I already tried?
Can you verify that your GPU is being used for dlib? You should be able to monitor GPU usage via “nvidia-smi”. My guess is that your GPU is not being utilized.
Hi Adrian
I assume the below API uses the face_distance matrix , that means if the face_distance is less then 0.6 then mark as TRUE.
face_recognition.compare_faces(data[“encodings”], face_encoding)
With the known faces it’s working fine but with the UNKNOWN faces it always mis-classify the person.
My idea is to use the lower face_distance matrix (i.e : 0.55) but here I don’ know how to set that standard for the “compare_faces”
Can you please tell me how to do that OR suggest a better way to achieve the results for UNNOWN Faces
Regards
Akhil
Hi Adrian
I was able to set the tolerance level of 0.55 but still UNKNOWN faces problem is still there.
Regards
Akhil
Have you tried training a more powerful model on top of the 128-d face embeddings? See this tutorial for more information.
Hi Adrain,
Is there any possibility of appending the encodings.pickle file? When running the recognize_face_image file it recognize the names of the faces, which is lastly encoded. Is it possible to identify different persons in a group photo?
I actually answered this question in my reply to Dauy. Be sure to give it a read, I think it will help you.
Hi! I got it to work, but its doing a frame every 20 seconds. My CPU is only using one core at a time (99,9%, i7-7700HQ), and my GPU (gtx 1050 4gb) is not even being used. I have installed correctly dlib for cuda. What is happening?
Hey Jaime, it sounds like you may not have installed dlib with CUDA support. I would go back and double-check.
Hi Adrian Thanks for the great tuitorial but I am getting a very low accuracy ,I have trained on the CASIA-WebFace datasets ,there are around 5lakhs images for 10k different categories.
hey Adrian ,
Really your blog posts are great
why not i use this with my cpu …
Thank you sir…!!
Hey Adrian, can we crop the detected face which is in green box, then how can we do it.
You can use simple array slicing. This tutorial shows you how to extract the face ROI.
which version of python are you using?
You specify the image path via command line argument.
Hi Adrian, I have been following your work on Image processing for quite sometime, I am working on implementation of Face Recognition on FPGA which has the capability to use Python as well as VHDL or IP based design. As i wont be having GPU support I would be needing the software to be fast enough in FPGA, do you have any ideas regarding how that can be achieved ?
I would suggest talking with Kwabena Agyeman who has significantly more experience with FPGA than I do. He’ll be able to provide much more insight.
Hey Adrian,
Is there any way to run this on google collaboratory with GPU support, Can we remove the argparse and hardcode the path for dataset, encodings and the method.
Yes, you can hardcode them if you wish.
Hey Adrian,
Can you please explain how the 128d encodings are generated ? Like does the dataset that was used to train the NeuralNet in dlib have the images of the characters previously. If so why do we need more than 1 image for each label in enocde_faces.py?
Thanks in advance for the reply.
Please see the “Understanding deep learning face recognition embeddings” section to understand how the 128-d encodings are generated.
Hi, Adrian I finally get reached this Intuitive course to get familiar with computer vision, by the way, I have one question, does happen to have the possibility that making a bad recognition by the different resolution and quality of screen between encoding resources(within dataset folder) and example file (within example folder). This is just the random thought but I’m curious ’cause I could not get dive into deep on dlib network
It’s certainly possible that a low quality image would result in an incorrect recognition, especially if your model was only trained on high quality images.
Hi. I am only afforded a single profile photo for every person stored in the dataset to encode. As a result, the encoding and face recognition results is not accurate. Based on this affordance (of only a single profile photo per person for the dataset), is there a workaround / tweak that can be done to achieve desired accuracy during face comparison and recognition?
No, you need more data. See this post for more information.
Thank you for the reference, Adrian. And heartiest congratulations!
Thank you!
Hi Adrian,
I have been working on facial recognition for quite long and now i got this method for implementing. Can you tell what are the prerequisites for this code?
I have openCV (2.4.13) and python 2.7 installed in my system. I have downloaded the code however can you tell me how to start working with it. Your help will be highly appreciated.
I only tested this code with OpenCV 3; however, it should work with OpenCV 2.4. You will need to install dlib though so make sure you have dlib installed as well. OpenCV 2.4 is quite old at this point so you should consider upgrading to OpenCV 3.
Adding to the above info, the technique for facial recognition i am using is simple and not that appropriate in showing correct results, because if I create a dataset for even 4-5 people it recognizes the faces wrong.
Within your code are you creating the dataset or you are keeping the sample images for every user and using them for the later real time recognition??
what i want is Images of the people should already be stored in the dataset and when any person comes in front of camera it should recognize his/her face.
Also tell how to run your code
Please reply as soon as possible.
My dlib installation with GPU support complained about gcc version, so I added
-DCUDA_HOST_COMPILER=/usr/bin/gcc-6
and it seemed to work.
.. and this for the python install part, otherwise it gives the same error as above:
CC=/usr/bin/gcc-6 python setup.py install –yes USE_AVX_INSTRUCTIONS –yes DLIB_USE_CUDA
Hello adrian,
Thank you very much for the tutorial. Please clarify my doubt. We can detect and recognize a face appearing in front of webcam using python. How can we ensure that the face appearing in front of the webcam is real or spoof.
Actually detecting and recognizing a face is covered in this post. Determining if a face is “real” or “fake” is called liveliness detection — it is a concept I hope to cover in a future blog post.
Hello Adrian .. I really appreciate your work ! i Would like to talk to you about a project , So if you may connect with me ASAP, i will be really grateful ..
Thanks!
Hi Adrian,
Great tutorial. Congrats!
I tried on my MacBook with no change with your repo. I revised all paths upto my directory structure and didn’t get any error messages. But after the training when I tried to run recognize script, every time I saw “unknown” labels on the faces.
What should I do? What am I doing wrong? Could you please advise?
Thanks!
Hey Hasan — it sounds like the script is working properly but your faces are not being properly recognized. Make sure you see the “Drawbacks, limitations, and how to obtain higher face recognition accuracy” section of this followup face recognition post which includes methods on how to improve face recognition accuracy.
will do. thank you so much. by the way, congrats on the marriage! take care bro.
Thanks Hasan!
Amazing Man! Thank You so much for this.
You are very much welcome Yahya! 🙂
Hi Adrian
Congratulations for the great tutorial. It is possible to use this tutorial in Android? I did my research and I found that OpenCV is available to work with Andorid. But I don’t know about imutils, dlib or face_recognition modules
Cheers
This tutorial is not directly transferrable to Android. You would need to find or implement equivalents for imutils, dlib, and face_recognition.
I found Kivy, it let me to execute python code on android. Found Beeware too.
Hi Alvaro ,could you update with the results on porting dlib to android using beeware or kivy ,is it doable ?? ,i was also thinking the same
Hi Adrian,
I’m only getting 2FPS for real-time face recognition w/webcam (15FPS) for face on Windows, no GPU.
The detection part (hog), face_recognition.face_locations(), is 4FPS but is 14FPS when scaled frame down 2x.
The face encoding (resnet) into 128d vector, face_recognition.face_encodings(), is the bottleneck consuming 450ms per frame.
Is this expected? Is using GPU the only way to improve this? Thanks!
I’m not sure how large your input frames are, but it’s totally expected to see an increase of FPS throughput when you reduce the size of your input frames. The less data there is to process, the faster your algorithms can run.
The encoding of the detected face (resnet) into 128d vector, face_recognition.face_encodings(), is the bottleneck consuming 450ms per frame. Is there a way to improve this? This is causing the 2FPS .
Unfortunately there is not a way to improve the throughput rate without using a GPU. You could try using a smaller, less deep model but then you may sacrifice accuracy. You may also need to train the model yourself.
hello
how to run this project in pycharm with windows 7.
I would highly encourage you to use the command line rather than PyCharm. That said, you’ll want to import the code into a new PyCharm project, set your interpreter, and set your command line arguments.
Hi Adrian,
Thank you soo much for this, what a life saver!
I am running Geforce 1060 with 6GB of memory. I have dlib running GPU and all seems good until i hit an out of memory when executing
“python encode_faces.py –dataset dataset –encodings encodings.pickle ”
I get an error
“RuntimeError: Error while calling cudaMalloc(&data, new_size*sizeof(float)) in file /home/khalid/dlib/dlib/cuda/gpu_data.cpp:195. code: 2, reason: out of memory
”
and I confirmed that my GPU is filling up, I am quite surprised that 6GB is not enough to run this, does that mean I have to change my card to run face recognition using your images?
No, it just means that you cannot use the deep learning-based face detector. Use HOG instead and the script will work for you.
Hi Adrian,
I am trying to make a project to identify faces from a webcam and display information stored in a text file or excel sheet (like medicines that the person has to take) after the face has been identified.
What are the changes that has to be made to your code?
I’m using a system with GeForce 940MX and 2GB memory.
You can use drawing functions such as “cv2.putText” to draw information on a frame. If you’re new to computer vision and OpenCV I would suggest you read through Practical Python and OpenCV to help you learn the fundamentals — it will certainly help you complete your project.
Great article. Jurassic park is the greatest movie of all time :’)
Totally agree! 😀
good job
hi adrian, can we add percentage of confidence(?) to face recongnition so it can output the name and percetage of accuracy of naming the faces?
There isn’t a true “percentage”. We’re using a modified k-NN algorithm which doesn’t naturally lend itself well to probabilities. If you want to compute a probability refer to my other face recognition tutorial.
Hi Adrian,
Is there any chance of updating embeddings pickle file by adding encodings of only added images instead of running encodings for all the images from starting.
Yes, absolutely. I provide the solution in my reply to duay. Be sure to refer to the other comments as well.
Great article.
I would like to do face recognition on lensed photos like snapchat B612 etc. How can I approach this problem?…
I’m not sure what you mean by “lensed photos”, could you elaborate. Sorry, I don’t use Snapchat or B612 so I’m not familiar.
Adrian Rosebrock this is the best-explained article on CV
GOD bless you 😉
Thank you so much Hasnat! And I’m so happy to hear you got value out of the tutorial. Best of luck with your projects!
I am getting an error std::bad_alloc everytime i try to run this code and i can’t find what’s wrong with it. Can i get some help ?
It sounds like your machine is running out of memory. Are you using a GPU or CPU?
I’m running on Digital Ocean 4GB 2 CPU i still get this `MemoryError: std::bad_alloc` error while trying to train 124 dataset using `cnn model`. When I used `hog model` it went through but face recognition was not accurate. Please what is the minimum config for running the `cnn model` in cloud server.
Thank you Andrian.
Your machine is simply running out of memory likely due to your input images being too large. Reduce the size of the images by resizing them. I would suggest using
imutils.resizeorcv2.resize. If you’re new to command vision and image processing I would recommend reading through Practical Python and OpenCV to help you learn the basics.Do we need to provide our own hog detector?.
Would it is possible to get the hog file like I have found the “caf.caffe.model” file in your some other project source code
No, the HOG face detector is provided for you with dlib. You could use a different face detector like I do in this tutorial.
Hi Adrian,
Thanks for the post. Do you have a tutorial on how to fine-tune the network on the fly? i.e. if a face is recognized, fine tune it with the image it just recognized to increase accuracy…
I receive an error when running “python encode_faces.py –dataset dataset –encodings encodings.pickle”
…
MemoryError: bad allocation
I’m on Windows with an i5 process and 8GB ram. I see others with similar problems, but they occur in the step after this.
What can I do to solve this?
Take a look at this comment thread where the issue is discussed in more detail.
Thank you for your work. Really helpful to me.
I have a question about classification.
Is there a way to classify a person differently when an image of someone who has not been trained is entered?
For example, after I train my model about people A, B, C and then pass D’s face image into my model. Result I expect is none of them(A, B and C). How can I get what I want(or expect)?
Best regards
I trained my model with my mates(two men).
I passed a famous woman image into my model, the result was not “unknown”.
There is “unknown” category for unclassified person I know,
above result came from coincidence?(I tested 3 different famous women’ images
and their result was not “unknown”)
How can I improve or correct that?
Best regards
Be sure to refer to this tutorial where I discuss methods to improve your face recognition pipeline.
Hello Adrian,
I am following your Tutorials and explanations carefully, (english is not my native language) to be ready to “decide” which of your books should i buy.
I am ,already, C language programmer for Microcontrollers (microchip) with several years experienced and now I am learning Python too-.
Now I am more interested on images objects recognition on “real time” so maybe you could advise what is your best book or course option for me.
My idea is to mix electronics and this image recognition in a near future to control small experimental toy or a small trolley with wheels.
Thank you very much for your tutorial. i really like them and enjoy them.
Gaston Scazzuso
Hi Gaston — I would recommend taking a look at both:
1. Deep Learning for Computer Vision with Python, which discusses how to train your own highly accurate, deep learning based object detectors, including detailing each detector and which ones are suitable for real-time detection.
2. Additionally, you may be interested in the PyImageSearch Gurus course which will teach you more about computer vision and how to apply it to real-world applications.
I hope that helps point you in the right direction!
Why the fascination with Command Line Args? Wouldn’t plain ol’ jupyter notebook or some IDE like PyCharm will suffice? ‘Cause unnecessarily learning to use ArgsParser doesn’t make sense to me
You could certainly use a Jupyter notebook if you want. It’s just a preference but it’s also the lowest barrier to entry. No need to require additional libraries or even a super large IDE if it’s required. Keep in mind this is a computer vision blog and at least some basic knowledge of the command line is assumed. If you don’t want to use the command line I assume you have the knowledge to use another tool.
hello, I try to follow your code with nvidia jetson tx-2 but,
I can’t understand why gpu is not working.
surely, I installed all repository with cuda option.
but when I start the code, only cpu work.
(I checked CPU history and GPU history.)
do you know how to use GPU on Jetson TX-2?
I also have same problem. I have GTX 1070 in my system with all cuda installation but while running the code it’s take too too much amount of time while process the single image. I have also install GPU version id dlib.
You’ll want to double-check your install of dlib. Did you successfully compile dlib with CUDA support?
This problem was solved
Congrats on resolving the issue!
Hi Adrian May I know how much accuracy it is giving ?
The accuracy would need to be computed indenedently on your own dataset.
I recently got a new AMD PC with a RX 580 8GB Graphic Card and i am wondering if I could use dlib and face recognition with it
Cheers
A workaround to the graphics card “out of memory problem” is resizing the problematic images.
The error thrown was this (I’m using a GTX 1050 laptop card):
“RuntimeError: Error while calling cudaMalloc(&data, n) in file C:\MY_PATH\dlib\cuda\cuda_data_ptr.cpp:28. code: 2, reason: out of memory”
The first problematic image was Alan Grant #24, with a size of 1920 x 1026. After resizing it to 50% of its original width, I stopped getting the error for that particular image. So I crafted a small script to resize all images with a height or width larger than 900 px. You can find it here:
https://gist.github.com/ManuelZ/ed83af21814147a659f8b53acf5988e8
Thanks Manuel. Another option would be to simply resize the images via
imutils.resizeprior to performing face detection or computing the actual embeddings, that way the resizing is performed inside the script and you don’t have to create a new dataset of images.Hey Adrian
Thanks for your fantastic works and explanations, and I’ve got entire codes running smoothly
The only problem I encountered is the speed of the facial recognition process. No I don’t have a workable GPU, for now, and I think it’s the source of the problem. But I do have multiple CPU cores, which the number is 48. I have 48 cores.
Could I make good use of multiple CPU cores to speed up facial recognition? Does face_recognition support multiple CPU threads, or do I have to write my own codes to do that?
Thanks again
The face_recognition module uses dlib under the hood so you would want to refer to the dlib documentation to see if you can distribute the computation across multiple cores.
Hi Adrian,
You have been doing great and your posts have helped me a lot as though I am a beginner.
Could I ask you a favor ? Please try something that could create a 3D image from the photos that have been taken and use ‘predicting’ where the images are not available. Anyway, thank you for your posts. Hoping to see the improvements.
Thanks for the suggestion, Jiss! I’m not sure if or when I will cover such a topic but I will consider it for the future.
Hi Adrian, I am doing a job to university and my teacher gave me your website to help. But I have a question, he wants us to use Scikit-learn for deep-leaning. It is possible do use it here? And how? I really appreciate your help.
The scikit-learn library is a machine learning library, not a deep learning library. For deep learning you should be using a library like Keras, TensorFlow, or PyTorch (I recommend Keras). I think you may have misunderstood your teacher so you should clarify with them.
Yes, I missunderstood. Is there any chance that I can use the scikit-learn instead of dlib? Like replace it?
For this tutorial? No, you need dlib.
hey Adrian,
While running the encode_faces.py it take so long time and also my laptop is get hanged What is the reason of that??????
It is very computationally expensive computing the face embeddings. To speedup the process you may want to use a GPU.
hi, Adrian
why we don’t use gray images for neural networks?
You can use grayscale images for neural networks provided you actually trained your network on grayscale images.
Hi Adrian,
When I am testing it on horizontally taken video,It’s working fine but when I am testing it with Vertically taken video,It’s not working.Blank screen is coming instead of frame with rectangular boxes.
How can I resolve this?
Regards,
Sudhanshu Kumar
That is certainly strange behavior. Are these videos pre-recorded? Or is this a live stream?
These videos are pre-recorded.
Hm, I’m honestly not sure. It may be an issue with how your videos were recorded. Try with other videos from other pre-recorded sources. I think you’ll find it’s some sort of issue with how the videos were recorded and encoded. Sorry I couldn’t be of more help here!
Hi Adrian,
firstly greatly appreciate the tutorial as it is very helpful. could you help me out here, i want to log the names when a face is detected, how may i do that?
Log in what way? Write them to disk? If so I suggest you read up on basic file I/O with Python.
log, in the sense that maybe a text file is generated with the detected faces and the time stamp.
Got it. Use the
timePython module to grab the current timestamp. You should also look into basic Python file I/O.thank you so much, i’ll look into that.
who knows the range of values for each of the 128 elements of the vector?
The values are in the range of the unit hypersphere.
Hello greetings.
I’m a beginner in python and I’m having trouble understanding this problem. I read your other page and still can not find the solution.
https://pyimagesearch.com/2018/03/12/python-argparse-command-line-arguments/
I know the problem lies in this line: args = vars(ap.parse_args()).
The problem isn’t the line of code — the problem is that you’re not supplying the command line arguments. If you refer to the guide you just linked to it will help you understand command line arguments and how they work.
I have a question for my final project on face reco.
Can we apply this to computer log in account?
Most likely not. If a computer is logged out you wouldn’t be running the face recognition script without creating an OS-specific module, something that is not covered in this post.
Hello Adrian,
Great work there…….Nice tutorial! It worked with hog + svm. In identifying videos it takes frame by frame and detects and writes to disk again in video. How to just write to disk in frames (i.e., just images) instead of video (as writing video takes long time in my case 1.20 hrs). So that it would reduce time for identifying faces.
Thanks!!!
You can use the
cv2.imwritefunction to write individual frames to disk rather than an entire video.Hi Adrian,
This code is running too slow on AWS gpu. Could you please advise what can be done to make it it faster?
Regards,
Sudhanshu Kumar
Have you confirmed that your GPU is being utilized by dlib? Double-check and triple-check that dlib is accessing your GPU.
Hi Adrian Rosebrock, according to you, data collection is about how many photos per person for accuracy to be acceptable
See this tutorial, specifically the “You may need more data” section for my suggestions on number of images per person.
Hi Adrian,
Thanks for such a wonderful tutorial. You have done a great work. I have a question.
Can you tell me how much time will it take to detect and recognize 60 different faces in single photograph?
That’s entirely dependent on the speed of your CPU or GPU. I would suggest running some benchmark tests with 1-5 people on your own system and then using the timings to estimate how long it would take for 60 people.
How long did it take in your above case for two people?
Yeah I understand it totally depends on CPU or GPU. But can you tell me an approximate time it will take for i7?
I am asking this question because I am going to integrate this tool in my project. So, I want to confirm that whether its execution time is acceptable in my project.
Hi, i want to save name of person detected in a file, how to do that for this tutorial?
You can use the
cv2.imwritefunction to write images of a person to disk.Hi Sir
I will ask if the code is free?
thanks for the answer 🙂
Yes, the code in this tutorial is free, just use the “Downloads” section to download it.
Hello Adrian,
I want to know that every-time when a new person comes in-front of camera in case of video, do we have to execute this command every-time whenever a new person comes.The command is:
python encode_faces.py –dataset dataset –encodings encodings.pickle
I would suggest having the face recognition model running along with your camera monitor. Quantify each face and if the face is not recognized, add it to your database.
hi adrian how do you increase the fps for face recognition when i run the code for there is lag and recognition is slow
Are you using a CPU or a GPU? Try using a GPU for faster recognition. You may also want to resize your images (make them smaller). The smaller an image is, the less data there is to process, and therefore the faster the face recognition algorithm will run.
Hi Adrian,
Great blog! Very lucky that I’ve found it =)
I have several questions.
I need to find new face(s) from real-time stream in a database of 1000-1500 persons. For better accuracy each person should have about 20 pics. This means that I need to perform up to 30 000 comparisons for each frame.
1. Could you explain what is the hardest (in terms of resources) operation? To extract face from image and get embedding or to perform a comparison of 1-to-1 embeddings?
2. Does comparison of 1-to-10 equals to ten times of 1-to-1 (in terms of resources)?
3. What hardware resources do I need to accomplish such a task?
4. Is it possible to use CNN somehow in this case or my only way is to use HOG?
Thanks a lot in advance for your answer!
Face detection is easy compared to face recognition. Secondly, I’m a bit confused on whether you are trying to perform face verification or face recognition. Both are different topics. Face verification is easier and could potentially scale well. Face recognition is significantly harder. For 1,000-1,500 people I would recommend you fine-tune or train a face recognition model. Using the 128-d embeddings from a pre-trained network is not going to perform well.
I want to identify unknown person in a stream against the database of known persons. Just like in your example. But in my case I have a database (dataset) about 1000-1500 different persons. Could you suggest any tutorial or method of solving my task?
Thanks, Adrian!
As I mentioned, you should look into fine-tuning or training from scratch a FaceNet network (or equivalent). With 1,000-1,500 images per person the pre-trained network here is not going to work. At the present time I do not have any tutorials on fine-tuning FaceNet.
Hi Adrian,
Thanks for great tutorial.
For Face verification, let say, for 10.000 peoples, what best model we should use ? is it ok to use 128-d embeddings model ?
Yes, you would use the same model but you would need to actually train/fine-tune the model to obtain optimal performance on that many faces.
Hi Adrian
so if I understand you correctly, 128-d embeddings is a good choice for 20,000 to 30,000 employees but a pre-trained one is not a good option. after all, “the network has already been trained to create 128-d embeddings on a dataset of ~3 million images.” so we can say always you need to train the network based on your dataset for a recognition, but not for detection, am I right? Is this what you meant by in case of huge dataset, we need to fine-tune the network again. as a human being, we don’t need to train our brain to detect faces of first-time-met human beings, our mind is still able to detect people faces all the time!
Thank you
Hello Adrian,
Super tutorial! Thanks a lot!
Thanks Lerk, I’m glad you liked it!
Hi Adrian,
Regarding the GPU for dblib the following link and quote is from the outer “Davis E. King”
and in short using “gpu” for “dlib” is essentially based on whether the “CUDA & CUDNN”
installed correctly or not ( and absolutely besides / after having the required hardware” ).
And if the mentioned prerequisites are met “dlib” will use gpu and otherwise not .
Thanks ,
Shahin
https://github.com/davisking/dlib/issues/522
“davisking commented on Apr 5, 2017
When you compile it will print messages saying what it’s doing. It will say something like “Using CUDA” or that it’s not using CUDA because you are missing cuDNN or the CUDA dev kit.
So, by default, it will use the GPU unless you don’t have the CUDA tooling installed. If that’s the case it will print out messages that clearly indicate that’s happening and tell you what to do fix it.”
Hi Adrain,
I want 5-10 FPS speed for video processing.I am using single NVIDIA GPU inside AWS instance to get this speed but I am getting more than 2 FPS speed.Could you please suggest best configuration or any other method to get the required FPS?
I have already attempted your multiprocessing tutorial but that didn’t help on GPU.
Regards,
Sudhanshu Kumar
How large are your input dimensions (in terms of width and height)? Try reducing your images to be as small as possible. The smaller your input images are, the less data there is to process, and the faster the face detection + recognition steps will run.
Hey Adrian,
Great Tutorial!
What is the easiest way to extract all the unknown faces in a folder or as a list of embeddings and save it as a .pickle file?
I am having a hard time filtering just the unknowns.
Thanks a ton for the post
Are you looking to save the embeddings or the face images for the “unknown” faces?
Yes, How do I save all the unknown faces as separate images?
You can use the the “cv2.imwrite” function to write each face ROI to disk.
Hi Adrian,
I want to know how to check the confidence for the face recognized. Any suggestion on how to do that. Thanks in advance.
See this face recognition tutorial instead.
Hey Adrain,I want to recognize my own pet as you did with human faces.The technique you explained above can also applied to dogs? I just want my dog to be detected among all other dogs.Thanks!
You would need to train your own custom “dog face” recognition model. That would require building your own dataset and having a good understanding of triplet loss. I don’t have any tutorials on that subject right now but I will try to cover it in the future!
Hi Adrian
I have implemented the Facial recognition part and it is able to recognise faces with good accuracy. Now I would like to captire an image of the recognised photo and store it in a folder on my raspberry pi. Is that possible
Yes, you just need to use the “cv2.imwrite” function to save images to disk. It sounds like you may be new to computer vision and OpenCV. That’s okay, but I recommend you read through Practical Python and OpenCV to help you learn the basics first.
Hey Adrian, great blog and project, I’m currently in the process of discussing facial recognition for my Masters’ Thesis, I was just wondering as to what sort of recognition algorithm this project uses?
Take a look at the “Understanding deep learning face recognition embeddings” section of this tutorial where I describe the basics of the face recognition algorithm and provide links for further reading.
Hi Adrian,
Thanks for the tutorial, the accuracy is good but it is taking 30 to 50 seconds to recognize an image is there any solution to overcome
Refer to the tutorial — I mention that for faster speeds you’ll need to (1) use HOG rather than the CNN face detector and/or (2) use a GPU.
Hey Adrian,
I tried you tutorial, it is great! I have another question that I want to ask you, now I am doing my own face recognition project.
First, I trained my own face embedding extraction network, and it got 99.63% accuracy evaluated on LFW dataset. Then I replaced the dlib face encoding model with my own one, however the performance is very pool even in some easy cases.
Do you know the reason about it, or could you give me some advice to improve. Hope get your answer. Thanks advance@Adrian Rosebrock !
Hi Adrian,
Very good article! Thank you very match for sharing.
I have tested the sources on GPU using dataset with very large number of photos. The performance is good. However the accuracy isn’t so. What will you suggest to improve the accuracy?
Thanks and Regards,
You should read this tutorial to learn how to improve the face recognition accuracy.
Hi adrian
please help me in how to run the same programme on CUDA
Once you install dlib with CUDA support you will be able to utilize your GPU. See the “Installing dlib with GPU support (optional)” section for more details.
Hi Adrian
when i try and run python recognize_faces_video_file.py –encodings encodings.pickle –input videos\lunch_scene.mp4 –output output\lunch_scene_output.avi –display 0
to get an out put video it will create the video in the correct path but after 5 min it was only 224kb and had 1 seconed from the video is it suppose to be this slow or is there something wrong?
Has the script finished running? Or is it still processing the video file? Let it run to completion.
it hasent it took so long i just closed it i think its just running super slow and the live one just isnt responding
Hey Adrian great tutorial there…
I just want to point out that in encode_faces.py you can replace f.write(pickle.dumps(data)) to pickle.dump(data, f, protocol=None) which will be better I think.
Thanks
Hi Adrian,
Is it possible to change the extension of the output file to .mp4 ? If yes, How and where in the code?
Thanks and Regards,
That really depends on your OpenCV version and installed codecs. See this tutorial for more information.
Hello sir your work is wonderful .
I have one doubt how will I proceed if i want to add a new dataset because i have changed the folder named “alan grant” with “alan” but it still shows alan grant on image ?
Secondly command prompt does not stops even after the image window is closed ?
If you change the directory name you need to re-train your model. The model must be retrained.
hey in this tutorial you have recognize faces in video can we do same in still image?
how to do that?
This tutorial covers your question. See the “Recognizing faces in images” section.
Hi Adrian,
Thanks a lot for this great project. I have a question, is there a way this API can detect side face of anyone? I have tried training a quick dataset of messi (5 photos all frontal view) and then i tested with a side view for messi’s face but I got an unknown match.
Please advice how can this be done and if needs additional development.
It’s hard to perform face recognition on a side view of a person, especially if your training data doesn’t contain side views either. The problem with side views is that we don’t have all the face so the computed embedding won’t be as accurate. Typically we discard side views and only try to perform face recognition on center views if at all possible.
Thanks a lot for your reply. Another question please I want to run the service locally with automatic command, is there a document i can follow?
I want to automate the process without writing the commands myself.
I have checked some codes but all use a method name and as i can see this code should read line by line there is no single method that do everything.
Can you please advice
Take a look at shell scripts and crontab which will enable you to run multiple commands and even schedule them to run on reboot.
: cannot connect to X server error while running the recognise_face_images. how to fix?
Are you SSH’ing into your system? If so, be sure to enable X11 forwarding:
$ ssh -X username@your_ip_addresshi adrian,
I have executed the first script encode_face.py but after the message “[INFO] serializing encodings…” it is not getting back to the prompt. Does this mean that the script is still running?
does serializing takes a lot of time?
I don’t have GPU I am running it on CPU.
Yes, it means the script is still running. If you don’t have a CPU then the code will take awhile to execute.
How do I change the data set ? from “alan grant” to other names such as “Steve trivi”
also does changing the folder work?
great work btw the codes you write really helped me in a pinch of my 2nd semester research cheers mate 😀
Rename the directory, fill the directory with example images of that person, then extract features from the faces. From there you can recognize the new faces.
I am a beginner and I am currently doing a project at university based on facial recognition with python using OpenCV. So I wanted to know if it’s possible to embed the face recognition inside a website? That is, I want to use this concept of face recognition inside my website.
Yes, but that’s outside the scope of this tutorial. You’ll want to look at Python web frameworks such as Django or Flask. You can create an API that accepts an input image, performs face recognition, and then returns the result. That would be my suggestion.
Hi Adrian,
Thank you for this great application and your efforts.
My work environment is using Intel NUC which i7 processor and Intel Movidius compute stick.
So, my questions are,
Can we run application directly on this environment setup and how?
Also, i have Caffe model files. How can i use this caffe model file with your application?
And what model you use in your application?
I’ll actually be covering face recognition using the Raspberry Pi and Movidius NCS in my upcoming Raspberry Pi + Computer Vision book. Stay tuned!
Thank you. i will wait for your update.
Hi Adrain,
Thanks for your great work.
How to use trained caffe model with your application above?
I’m not sure I understand your question. This tutorial shows you how to use dlib’s face recognition model — what specifically involving Caffe are you trying to do?
Hi,
I have an trained caffe model with me. I thought it is possible to this caffe along with your application? Sorry i am completely new this stuff.
You mean use Caffe instead of OpenCV for the recognition process? If so, take a look at “pycaffe” which has the Python + Caffe bindings.
Dear Dr. Adrian, I read the tutorial and found it so easy to follow and implement. Thank you very much for that!!
For training it I used around 400 images of one person. Still when i ran face detection on a couple of his videos, it recognised many other people also as the same person.
So I went a step ahead for training (just for experiment). I grabbed all the frames in the video, cropped all the frames to that person’s images and trained the system again using around 200 images this time, but the same result 🙁
I re read the tutorial twice again just in case if I had missed anything but I am sure I have followed all the steps.
Can you please shed some light on why this could be happening?
Take a look at my other face recognition tutorial where I discuss reasons your face recognitions may be incorrect, including ways to improve on it.
Hi Dr.Adrian, Thanks for your posts particularly the facial recognition ones. Due to GPU issues in my laptop I’m planning to run the encode_faces.py in Google Cloud Engine. Is it possible to export the VM (vdi) file to GCP. any help would be appreciated. Thanks
Hey Man, can i use algorithm along with hardware such as door unlocking mechanism.
Yes, but you’ll want to refer to the documentation for any other sensors you are using.
Hi Adrian, Thanks for your brilliant blog.
I have a question .. how can I make this code spoof proof ? Means to say I want to recognize real live faces in real time, but this code even recognizes the faces if I show an image of mine from my phone on the webcam.
Can you please guide me that will be great favor from you.
Refer to my tutorial on liveness detection.
Hi we are using your code for monitoring the attendance of class but it is not able to detect the faces and if detected is giving incorrect output
Hey Saurabh — I’m actually covering how to build an attendance recognition system in my upcoming Computer Vision + Raspberry Pi book, stay tuned!
Hi!
I managed to repeat everything in the article, but as a result the video is displayed very slowly, jerky, everything is fast in your demo, why? 🙂
I have i7 12gb laptop
Are you running the CNN face detector on your CPU? If so, that’s why. Either use a GPU or switch to the HOG face detector.
Hi Adrian,
I am testing this algorithm for my research purposes, sometimes i see wrong faces are recognised(Example: Face ID: A is Recognised as Face ID:B), Can you please share me your ideas to solve this problem.
Do I to add more faces to the dataset.
Thanks
Guru
Refer to this tutorial where I share my suggestions on obtaining higher face recognition accuracy.
Hi Adrian,
1- Just quick check, this post is not really dependent on the previous one https://pyimagesearch.com/2018/06/11/how-to-build-a-custom-face-recognition-dataset/, right? The previous post is to collect data which can be used here, however, one get around this by using other data set like we did here in this post.
I am asking just to make sure that I am not missing something.
2-Is one of the differences between the post here: https://pyimagesearch.com/2018/09/24/opencv-face-recognition/ and this one is that the face alignment is automatically done for us in dlib?
1. You are correct. You can use whatever dataset you want with this code provided that you follow my directory structure.
2. No, face alignment must be done manually.
Hi! Maybe I can help some of them, who get “out of memory” error while encode_faces.py script running with GPU support. I have GeForce GTX 1070 8GB and got “out of memory” error when script worked with ian_malcolm/000000127.jpg and owen_grady/0000083.jpg. That pictures have largest number of pixels in dataset and when I removed them from dataset all working fine. It’s interesting that when I run the script with only one of those two pictures it worked fine too. So I think there is some sort of memory leak issue. When I ran script whith those two pictures at the beginning of dataset there were no errors . I sorted imagePaths by number of pixels replacing
imagePaths = list(paths.list_images(args[“dataset”]))
with
imagePaths = sorted(list(paths.list_images(args[“dataset”])), key=lambda imagePath: cv2.imread(imagePath).size, reverse=True)
and now script work without errors with all pictures in dataset.
They are just larger input images. All you need to do is resize the image before passing it through the network (provided you are hitting the “out of memory” error).
hello adrian,i have a problem.I want to recognize the name of a person, if for the first time the name of the person is ‘unknown’, Then the system again tries to identify the person, and if the second time is detected ‘unknown’ Let’s continue to write on the name of persons. In this case, we can have a better and not sensitive face recognition system.how i do it?
I get these names in this code each time I get a face, and then I write these names on the image. The problem is that I want to get the first time I got these names then second time get the names and compare with the previous step and then do the puttext operation.
please help me.
I would suggest implementing a “counter”. Count the number of times the same label was consecutively predicted by the model. That will reduce sensitivity.
Thanks for your guide.
Can you give me an example or link of this?
Hi Adrian,
While trying to install the dlib with GPU support, I’m getting following error saying the –yes option is removed.
“The –yes options to dlib’s setup.py don’t do anything since all these options
are on by default. So –yes has been removed. Do not give it to setup.py.”
I thinks this is coming because of the update in dlib library. But now which option should we use for installing dlib with GPU support is the question.
Can you please help with this?
Thanks in Advance.
Mukunda M.
Hi Adrian, When i run pi_face_recognition.py, ireceive error: Segmentation fault. I use sd 32gb of SamSung.
Your Raspberry Pi is running out of RAM, not space on the SD card. Follow this tutorial instead.
Is face alignment taken care of by eith HOG or CNN methods?
No, you need to manually perform face alignment. This tutorial on face alignment will help you.
Hi Adrian,
Thank you for all the work you do and for providing such useful and inspiring code gratis. I have successfully installed and am using your facial recognition system on my laptop and would like to be able to use it on a remote(cloud)server with the user being able to use their local webcam as the video stream. On the server running the scripts, of course, the video feed is not seen from the local webcam and I receive back the message V4L: can’t open camera by index 0. How can I feed my local camera to the script residing on the server and have the view returned to the local machine? Thank you again for the already existing code you have generously provided, and for any assistance you can provide on how to use local stream on remote server.
Hey Fred — I’ll be covering how to stream frames from a client to a server in my upcoming Computer Vision + Raspberry Pi book. Even if you’re not using a RPi the code can be used as a template to solve this exact problem.
Perfect. Thank you for your reply. I see the book is upcoming soon and I will be sure to purchase a copy. Love your style man!!
Thank you again,.
Thanks Fred!
rgb = cv2.cvtColor(frame, cv2.COLOR_BGR2RGB)
rgb = imutils.resize(frame, width=750)
r = frame.shape[1] / float(rgb.shape[1])
Here I was expecting to:
1- resize the converted frame not the original one? Is this correct?
2- The ration ‘r’ will always be one!
Can you please comment on this?
No, the ratio will not always be “1”. We resize the “rgb” image so the “frame” and “rgb” will have different spatial dimensions.
Hi Ali and Adrian – I ran through the post and it worked great. I too had a question about those lines:
[1] rgb = cv2.cvtColor(frame, cv2.COLOR_BGR2RGB)
[2] rgb = imutils.resize(frame, width=750)
[3] r = frame.shape[1] / float(rgb.shape[1])
In line 2 above, should that be ‘rgb’ instead of ‘frame’ so that it is the ‘rgb’ image is the one that is color converted and resized? Otherwise it looks like we throw away the color conversion on line [1].
Awesome article and I am really looking forward to your new book using the Raspberry PI!
Hi Adrian,
Could you please clarify on this statement “In line 2 above, should that be ‘rgb’ instead of ‘frame’ so that it is the ‘rgb’ image is the one that is color converted and resized? Otherwise it looks like we throw away the color conversion on line [1].”
I too have the same doubt.
Yes i think it should be
frame = imutils.resize(frame, width=750)
not ”rgb = imutils.resize(frame, width=750) “
Hi Adrian,
A question about generating encodings for new added faces, how can we encode newly added faces without losing the previously encoded ones? We don’t want to start every time encoding all of my data set to save time. Is this possible at all?
Hey Ali — I’ve addressed that question a few times in the comments section. This comment would be a good first start but make sure you give the others ones a read.
Hey Adrian! I hope u doing good.
Can you guide me about updating an existing model with new data?
Hi Adrian , is there a way to run these codes in colab? how do I run the command line arguments ?
See this tutorial on command line arguments where I show you how to modify the code to work in Jupyter Notebooks/Google Colab.
Hey Adrian
Top Notch work !!
Im building a emotion detector for my university degree and I was wondering if I swap the data sets from the actors to the emotions would it work ??
sincerely a student of your work
Hi Adrian,
I tried face recognition in a video file using “hog” and I think the results are a little off. How can I improve it ? and what can I do to get a value of accuracy or something to base it on ?
Thank you.
Keep in mind HOG is just a face detector. A face detector simply detects the bounding box of the face. The actual face recognition is performed using dlib and the face_recognition library.
Hi Adrian,
On top of this example, I want to identify name of the person who is the active speaker through lip movement.
Can you please provide the guideline on how to achieve this ?
I would suggest trying to use facial landmarks and then monitoring the lip points.
Hi Adrian,
I need your advice/suggestion on this:
which camera spec is more suitable for face recognition and tracking?
Wide angle/fish eye camera? Or narrow angle camera?
Like 3.6mm lens or 6mm lens?
Please help to choose. thanks.
I have created my own dataset and I ran the following command : python encode_faces.py –dataset mydataset –encodings myencodings.pickle . The encoding happens but after that since the past 10 hours it shows “serializing encodings” , should i restart ?
I think it takes a long time on a PC.
Let it run until there’s a concrete output.
Make sure that other things in your PC are working.
To compile Dlib on a MacBook Pro mid 2010 it was necessary to disable SSE4 Instructions:
Bellow are commands I used to compile:
git clone https://github.com/davisking/dlib.git
$ cd dlib
$ mkdir build
$ cd build
$ cmake .. -DUSE_AVX_INSTRUCTIONS=0 -DUSE_SSE2_INSTRUCTIONS=ON
$ cmake –build .
$ cd ..
$ python setup.py install —no USE_AVX_INSTRUCTIONS —no USE_SSE4_INSTRUCTIONS
Hi Adrian,
This post and blog are great and contributing me a lot.
I ran this code on my laptop with windows 10 Intel i5-7200U 2.7 GHZ CPU.
I used CNN but it was slow and finally I got “MemoryError: bad allocation”.
I want to use CNN and not HOG because it is more accurate model.
Is there something I can configure that will improve the performance ?
Thanks,
David
Please refer to the other comments on this post as the question has been discussed a number of times. Your machine is running out of memory. You should resize your input images first.
HI Adrian, I am wondering if we could apply transfer learning ie freezing and fine tuning with the above method to train CNN based network.
Thanks
SyedMamood
Yes, but I do not (currently) have any tutorials on that topic.
Hi Adrian,
Thanks for this great post.
Is the facerecognition package better than dlib face recognition using L1-distance of the face encoding?
The “face_recognition” package is using dlib under the hood so I’m not sure what you mean.
Hi Adrian,
I am getting the below error when i run this script on Ubuntu 18 with python 3.6,
Any idea how to fix this?
i have fixed this issue by re-running encode script on python script since i have copied the encoding.pickle file from python2.7 environment
I used Python 3 to create the “.pickle” file. If you are using Python 2.7 then you will need to regenerate it.
Hi Adrian,
I have understood the process but cannot find from where can I download pre-trained encodings. Not sure if I missed something in the post.
Thanks
The pre-trained model used to generate the 128-embeddings? It’s included in the “face_recognition” Python package.
Adrian how can we make an image search engine using faces? Just like the one you made here :
https://pyimagesearch.com/2014/12/01/complete-guide-building-image-search-engine-python-opencv/
How to you use/modify this code to do face search?
You would treat the 128-d embeddings as vectors and compute the euclidean distances between them. The smaller the distance, the more similar they are.
Hi Adrien!, I have a problem with the detection, some people who is not in my data set is recognized as one of my data set. Can I set some threshold in order to recognize this person as unknown, I am using hog method because I am going to implement the algorithm in a RaspBerry Pi. Thank you for the post, very kind of your part.
Please refer to this tutorial where I provide my tips and suggestions to increase face recognition accuracy.
Thank you very much Adrian! Keep the good job up! greetings!
Thanks Jahir!
i have a problem on unknown .instead of showing unknown it shows one of the name in the choices when it is the face of another person
See this tutorial where I provide suggestions on how to increase your face recognition accuracy.
Hi Adrian!
What version of Rasberry Pi I will need in order to make this project work?
Also , I want to buy a Rasberry Pi and a PI module camera , is anything else that I need to have?
Please follow my Raspberry Pi face recognition guide.
Hi, Really nice! But I have a problem:
ImportError: No module named ‘PIL’
Can someone help pls?
You need to install “pillow”:
$ pip install pillowHi Adrian,
Congratulations on the successful kickstarter launch 2.0. I’m looking forward to you completing this.
I’m working on facial recognition, where I will have at least one face of a person, and I’m augmenting that and creating at least 20 additional images, (rotation every 10 degrees), darkening it, lightening in, blurring a bit, adding noise etc, so I’m turning one image into around 30. In some cases, I may have more than one image per person. I’m using dlib gpu right now. But the accuracy is not quite what I expected. What is the best and fastest opensource face recognition I can use. I need to run my camera at at least 15-20 FPS and have nvidia GPU. I’m doing research into the face-recognition library you show here, also looking at dlib and just found out about Openface. How is that? I cannot use any cloud based apis. It has to be local. can you give me some pointers? PLease also email me because for some reason, I never get notifications of your replies here. Also using openCV4
Thanks
Thanks for the kind words, Ray.
You can apply data augmentation all you want, but if you only have 1 image per person, you can’t expect fantastic results.
Hello Adrian
I have gone through your work in details. My point of concern is that if i need to consider face recognition using dlib then which gpu is best suitable. I personally feel GEFORCE GTX 1660 Ti can handle the task but still need a opinion from you.
Thanks in advance.
Hi Adrian,Great post!! I had a couple of questions.
1. How can we calculate the accuracy using face_recognition?Is there a way to calculate a confusion matrix, etc to do that?
2. Can i use image augmentation in keras with this, if my facial dataset is small?
3. Can i use face_recognition and openCV to do real time face recognition?
1. You would need to manually compute the confusion matrix yourself. That’s not hard though, just loop over your test set and predict the values.
2. Yes, you can use image augmentation but it’s not going to help much. You should spend your time gathering more data.
3. See this tutorial.
Can you share a code to do Parth’s question 1 , please?
Sorry no, I don’t offer custom code. See this entry in my FAQ.
Ok, no problem, I try search how to do it
Hi Andrian
I have downloaded the code and run it down on my computer and it worked wonder, really appreciate your works, especially with people just starting to learn about computer vision like me. As of now, im trying to improve the accuracy of the scripts ( without changing any of the methods used like HOG, face detector in face_recognition… ) and im thinking of some few ways to do it. Hope you can take your time and give me some opinions on it.
-First is changing the tolerance in compare_faces(). In face_recognition the matching of the encoding between input image and dataset has already been done, so we cant tweak anything about that. Though they do allow you to change the tolerance of compare_faces(). The default tolerance is 0,6 and decrease it will make the result more strict.
-Second is by algorithm. In your codes you use the “vote”, in which you count the number of time the encoding of the input matches the encoding of the dataset. From my understanding, let say the input is person A, and we have the dataset with 50 images of person B, 50 images of person C, 50 images of person D. The encoding of A match B 35/50 times, matches C 5/50 times, D 4/50 times, then B will be selected as the matched since his count was the highest. That leads to a problem that im facing : when i run the scripts with faces of unknown people ( they are not in the dataset ), sometimes their encoding got “matched” with the dataset encoding. Maybe only small amount, like 2/50 for example, but it will still count and therefore output the wrong result. To fix that, im thinking of making a threshold. An example would be the number of count has be at least 30% (this is up to changes) of the total of number of image from that person . So if you only match like 6/50 times, result would be unknown.
-Third option would be getting more dataset. But from the way i see it, if we dont change the “vote” algorithm, it will still show the wrong result in unknown cases no matter how many images you use as dataset.
That’s what i came up for now, and i will really appreciate it if you can give me your thought about it. Also, i would like to hear your opinion on how to improve the accuracy of the current scripts.
Thanks for the comment, Hatsu. You should read this tutorial where I provide my tips and suggestions to improve face recognition accuracy.
Hey,
Thanks a lot for this great post.
I am using Windows 10, i5 processor with GPU.
All the doubt I have is that, Is it necessary to have cmake?
Actually, I installed the opencv 4.1.0 from the repository of python packages. I was working on that. I was using this for working for some spatial data.
In order to do this project done by you, is it necessary to have cmake in my system?
Reply from anyone is always considered and appreciated.
Thanks and cheers!
Hey Vishnu — is there any way you could try with a Unix system such as macOS or Linux? Please note that I don’t support Windows on the PyImageSearch blog.
thank you so much!! really thank you!!
I’m happy to help!
Hi Adrian
is there a way to capture the face and save it to file in recognize_faces_video.py
Yes, you can use use the “cv2.imwrite” function. If you are new to computer vision and OpenCV I would suggest you refer to Practical Python and OpenCV where I teach the fundamentals. I hope that helps!
Hey Adrian,
I’ve been browsing through some of your lessons. Great content! I’m running into an odd issue, though. The videos that I test are turned 90 degrees to the left. I’ve tried compensating for this by rotating them beforehand, but no luck. It appears that the facial detection and identification is occurring on the video after it is rotated, as it can’t identify any faces due to the unusual orientation. The facial detection is still functional, as the occasional erroneous square will show up for a short time. I’m using the HOG model. Thanks!
That’s super strange. I would rotate the frames back 90 degrees. It sounds like you tried that but maybe you reassigned your variables incorrectly and accidentally passed the original, unrotated image through the face detection and recognition models.
had the some issue…and fixed it by adding those two rotations to recognize_faces_video_file.py
rgb=cv2.rotate(rgb, cv2.ROTATE_90_COUNTERCLOCKWISE)
…..
frame=cv2.rotate(frame, cv2.ROTATE_90_COUNTERCLOCKWISE)
cv2.__version__
‘4.0.0’
Hello Adrian,
Than you for such a wonderful tutorial.
I had a question, will real-time face detection run smoothly on a NVIDIA Jetson Nano Dev kit?
eagerly awaiting your reply.
Thank you so much.
Yes, face detection can easily run in real-time on a Jetson Nano.
Hi Adrian,
How do we adjust tolerance in these scripts? Here’s the issue I’m running into:
If I have an image with family members, I’m getting a lot of incorrect detections. For example, I have myself and my son in the dataset. However, when I input my wife’s image, it recognizes as my son, when I input my daughter, it recognizes as my son as well.
I’ll try adding my wife into the dataset and see if that addresses the issue, but in a real life situation, I may not have that option.
also, would be really helpful to show the % match on the bounding boxes using this script. any suggestions?
Thanks
Refer to this tutorial.
Hi Adrian,
I was wondering why there is no pre-processing of the images made? Like removing noise/darkening/lightening/blurring etc by applying gaussian filters, histogram equalization, normalization etc to perform a better recognition of the image? Or all these processings are made under the hood by face_recognition library?
For face recognition the main preprocessing method used is face alignment. The CNN should learn robust, discriminative enough filters during training (just like how we don’t blur/equalize/etc. images when training a standard CNN).
Thank you, Adrian! And for an augmented dataset would there preprocessing be a bit more useful?
Hi Adrian,
I am actually not comfortable with the argparse. Can you please help me understand the code?
It’s okay if you are new to argparse, just read this tutorial first.
When we encode the faces it gives us vector, Although its being taken care by face_recognition.face_encodings, what is the logic behind it. If i want to create such encodings for another use case how would i do it?
I’m not sure what you mean by the “logic behind it”. The 128-d vector is the quantification of the face. See the “Understanding deep learning face recognition embeddings” section of the post for more details.
Hi Adrian,
I wonder why I get this “MemoryError: bad allocation” problem when running encode_faces.py. Because my machine has 32 GB, so I don’t think memory is a problem. And the curious thing is: it always happens after processing image 129 (of 218). Any idea?
It’s not the size of your memory card/HDD, it’s the amount of RAM on your machine. You’re running out of RAM, not disk space. Resize the image and make it smaller before applying face detection and face recognition.
Hi Adrian! Thanks for this tutorial – it was so much fun to go through!
I am having trouble playing my output video file. While the video and facial recognition work fine, there is no audio. I have tried a couple of things, including converting the video to a different format, making sure my video player can fix the avi file if needed, but none of it seems to work.
Do you have any suggestions?
OpenCV does not support audio, you cannot record, save, or play audio with OpenCV.
Hi Adrian! Thanks for the quick response!
What would I need to look into if I wanted to do facial recognition and combine audio as well?
Sorry, I don’t follow audio processing libraries. If you find anything notable please come back and share it with the rest of the readers as I’m sure they would be appreciative 🙂
Hi Adrian,
Thanks a ton for this great post, after tons to dingling and mingling and a lot of troubleshooting with this, I managed to make it run, however, I can’t run it on my GPU.
Im using a gtx1070ti GPU with CUDA 10.0, when i open python, I tried to check this by putting the following command:
dlib.DLIB_USE_CUDA and it returns false. So I set it to true by writing:
dlib.DLIB_USE_CUDA = True and it changes to true, but as soon as i quit python it to run the python script for the face detection it automatically reverts to false again.
I built dlib and included the cuda using cmake. however, when i use this command:
python setup.py install –yes USE_AVX_INSTRUCTIONS –yes DLIB_USE_CUDA
i get an error telling me that i should not use yes with install. so instead I run it using
python setup.py install
when I do that, the end of the script shows that CUDA is detected and DLIB will use CUDA. but that is not the case when i run it.
Appreciate your help here.
when I actually run the script it runs on the CPU and not the GPU, and it is quite slow on the gpu.
What is your output of “nvidia-smi” when the script is running? Is your GPU being utilized? It sounds like your GPU is not being properly used.
To be honest i was using windows. But now I installed ubuntu on my PC. I’ll update you on the progress
HI Adrian,
I still get the same problem of running out of memory. My setup is as follows:
Intel i7 8700K
16 GB (2X8) DDR4 3200MHZ RAM
2X Nvidia 1070 Ti (8GB Memory each) with an SLI Bridge
i tried it on ubuntu and windows and get the same exact issue. Im stuck now.
I tried reducing the dataset size and it for for two or three characters at most. but that’s it.
Hey Adrian! Really love the tutorial. Is there a way I could perform the training using real time video feed as my dataset?
I would instead suggest following this tutorial if you want to build a faces dataset from a video.
How can I train it with my own face data because when I give my own face data the encoding loop stops after 3 instead of the 128
Does it stop and error out? Or is it just taking awhile to process the image?
Hi Adrian – Thanks for the amazing tutorial on Face Recognition !!
I had a couple of questions regarding the creation of ‘Face Locations’ and ‘Face Encodings’ . I understand that if we use CNN model then an already built Deep Learning model is used to predict the encodings and another one to predict the bounding box around the faces. However, how do i build these from the scratch, say for another object – like a watch/bike/car/etc. ? (I know the basics of working with Deep Learning models) Any kind of pointers will help as well. Thanks.
Hi Sir,
Such a good article on FaceRec. This is the first hands-on DeepLearning project that I did after reading other courses. Clear explanation of each and every code block is the key part here.
I am really excited to do more and more projects on Computer Vision now. Thanks again!
(: D
Thanks Sourabha, I’m glad you enjoyed it!
Hi Adrian,
How could I optimizing and fine tuning the Net Model to improve the accuracy ? Is there some comments?
Thanks.
Will it help only for human face? Can i use on animal face to match the same face?
This method is only for human faces. You could do something similar for animal faces but you would need to train a model to do so.
Is there any tutorial on a way to do that? If not, is it an incredibly complicated process?
Sorry, I don’t have any tutorials on the topic. Perhaps in the future.
Hi Andrian,
Thanks for the wonderful content.
I would like to know wheather this model is compatible with TPU(Google Coral Dev Board) ?
The model is working slow in CPU. Is there anything to make this work on a TPU ?
Thanks and Reards,
Vismaya
Hi Adrian,
I trained with Bill gates, Steve Jobs and Jack Ma images. It works perfectly for them.But when I test with an unknown image of Donald Trump which is not in the trained data. It recognizes as Bill gates. It should say “unknown”. why it happens? and I have a question. “How to get the score value?” I hope that if we get the the score value, we can solve this problem via setting rules.
Thanks.
Make sure you read this tutorial.
Hi! I am able to track the western models but it failed to identify Japanese models. I want to email you my dataset and example images.
HI Adrian,
Thank you for your good and detailed post.
In order for me to implement RealTime face detection, do I just need to make my own dataset and put it alongside the existing one, or do I need to re train the dlib with my face’s dataset too ?
Regards
Hi sir,
my pc is MacBook Pro,and I use cpu to run those code.The result is good but the output file (.avi)
is not smooth.maybe use gpu can deal this problem? I am looking forward to your reply. thank you too much
HI Adrian,
My concern here is not running the encode_faces.py. It doesnt take a lot of time.
Although, when I run the real time face recognition, frames are pretty slow. Video kind of hangs.
As far as I understand the post, Its only encoding stage that requires a GPU. Why is the actual face recognition process slow in realtime.
My Specs are 16 GB RAM, with 256 SSD HD on an Intel core i7 8th Gen.
Regards
When I run encode_faces.py, I get the error MemoryError: std::bad_alloc
Any ideas on what could be causing this?
I’m googling the error and there doesnt seem to be a lot of information about it.
The answer is too little memory, which I figured out after reading all the comments 🙂
Nathan — kindly read the comments on this post. I’ve addressed that question multiple times. Thank you!
i do try to run the sample code without luck. Unfortunately when sharing information it would be good to also share items like:
– Environment
– Requirements, both hardware and software in addition to installing the software published
Since i still get the issue with “MemoryError: std::bad_alloc” although using it with 8GB ram and GPU installed. Built the software according to instructions with adaptions to what dlib installation requires and have changed built instructions to adviced instructions.
Too sad that when distributing a promising solution it fails although following instructions.
If anyone has gotten this to work, please let me know requirements and instructions that are correct.
How large are your input images/frames? Resize them first to avoid the memory issue.
Hi, Adrian, Can we change the method of classifier from k-NN to something like SVM or Linier Regression?
Hey Adrian,
I try to use the your face recognition on a Jetson Nano. All work great until I run the encode_faces.py, where appeare a message “killed”.
Any idea?
Thanks!
It sounds like your Jetson Nano may have ran out of memory OR there is some sort of segmentation fault with one of the libraries.
For the former, just resize your input image/frame and make it smaller before performing face detection or face recognition.
For the latter, try inserting “print” statements to narrow down on what line is causing the script to be killed.
Hi Andrian,
Thanks for the awesome tutorial. I’ve trained a model with 10 classes containing 50 photos of each person. But it is giving wrong predictions most of the times and whenever a person appears which is not in the training set it is not showing the “unknown” tag instead it is giving a wrong prediction from the trained names. Could you please help me on this ? How can I solve this ?
Thanks and Regards,
Kunal
Hey Kunal — refer to the comments section. I’ve addressed how to improve your face recognition model many, many times. Thank you!
Hi Kunal,
You can do that with the –tolerance parameter. The default tolerance
value is 0.6 and lower numbers make face comparisons more strict.
Hi Andrian,
Thank you very much for the detailed explanation! I am trying to run the same example dataset on Fedora OS configured with NVIDIA GTX 1070 GPU. You mentioned that you were able to run encoding within a min with Titan X GPU. But my system is taking more than an hour to finish the encoding. I am sure my GPU is being used as i see the Utilisation % changing (not more than 40% though) as it is processing a new image. Do you have any suggestions or guidance to either improve this or understand what exactly might be happening. Thanks in advance!
– Suresh.
How large are your input images, in terms of width and height? Try resizing them first before applying face detection or extracting the embeddings.
Thanks, Adrian! I really appreciate you responding to my query. This really shows your commitment. Kudos for that! My dlib was not properly built using GPU. Re-configuring it to use GPU did it correctly. Thanks again!
Awesome, congrats on resolving the issue!
Thanks for these awesome tutorial adrian, i have been trying to implement it with a json file that contains other details about the people in the dataset, but i am having problem getting it to work. could you please help me out on these
hello adrian thankyou for giving this step by step. and i want to check the probability of respective faces can you help me..?
If you need a model capable of producing probability you should follow this tutorial.
Hello Adrian, is it possible to add to this process in order to create a facial recognition lock? For example if there’s a solenoid it only opens if it recognizes a face? Thanks!
Sure. I would suggest you read Raspberry Pi for Computer Vision for a similar project.
how can i save the recognizing video
You can follow this tutorial.
Hi Adrian,
I am using this code for face search but it is taking O(n) (linear search). Is it possible for me to use a hash or a tree algorithm for me to improve the time complexity.
Yes, use this tutorial instead.
Hi,
Thanks for amazing tutorial,
Is there any pre-trained model for fingerprint / voice re-identification (attendance system). should we use alexnet or facenet for it, which one would be a better option…
Sorry, I don’t have any tutorials on those topics. I mainly just focus on Computer Vision.
i have the 8 faces encodings and now i want add the some more new faces. and i want to get the encodings of that newly added faces. how can i do that…..??
Hey Shreekant — take a look at the comments on this post, I’ve addressed that question multiple times.
Hi Adrinan,
I want to ask do you think it is possible to develop a facial recognition system so robost and accurate to server at least ten thousands people with current available packages or this would require research to enhance available algorithms?
I’m working on a face recognition system that uses the ip cameras to retrieve rtsp streams (opencv library) and apply my deep learning algorithms on these frames. The server system I listed below can only have 4 cameras and no more than the cpu usage allows for adding cameras. My first question is how to effectively increase the number of cameras with reasonable fps And the second question is how to choose the right hardware for these types of projects?
My system info is:cpu core i7 9700k,gpu 1080 ti,32gb ram.
I am running encode_faces.py on CPU and I see my CPU utilization only (25%) and RAM (50%). How can I utilize them more ?
Hi
can you please help me, i recently buy a new HP Omen laptop, Win10, i7 9th Gen, 4+ Ghz,16GB ram, GTX 1650, (running ur code on 512SSD)……. even the dlib is showing USE_CUDA value FALSE. but u told me even ur macbok pro it took 21 mins for me took more than 2 hours to encode 218images even i did encode when i apply ur recognize face codes ,, the webcam video stream freezes……….i noticed the CPU is just 18-20% utilized, even though i put the powersettings to full performance. kindly provide me a solution
Hi Adrian,
First of all, thank you for the awesome tutorial!
I have a quick doubt, when you said,
“On my Titan X GPU, processing the entire dataset took a little over a minute”
Which detection method did you use to train in the above case? cnn or hog
I have a RTX 2080 Ti on Ubuntu (and have installed dlib with gpu support), it’s taking around 17 seconds for single face image.
Could you please help me in this regard? Cheers!
Looks like CUDA libraries from nvidia were not installed. Installing it and reinstalling dlib. Cheers!
Awesome, congrats on resolving the issue!
Hi Adrian, thank you for this fantastic guide. I have a question: Why does face recognition have only 128d face embeddings instead of 300d? why own 128d?
Hi, Adrian, Do you have plan to post a blog about how to train a network from scratch for face recognition. I am looking forward to it.
I’ll be including how to train a custom face recognition model from scratch inside Deep Learning for Computer Vision with Python.
Hi Adrian, Thanks for the blog. It was very much helpful.
Could you please let me know , if there is a way to improve FPS(CPU).
Refer to the comments of this tutorial. The short answer is that you should be using a GPU.
Morning Mr.Adrian
This is awesome tutorial i like it. I just following this tutorials, but my laptop is running slow while trying to run encode faces (encode_faces.py file) with some parser arguments. My question :
* Does my laptop have a standard requirements for this tutorial? my laptop specifications:
>> intel Core i7
>> NVIDIA GeForce GTX 1050
>> RAM 8 GB
>> intel(R) HD Graphics 630
Does it enough for run this tutorial? If it doesn’t what i have to upgrade? Because my laptop is always running slow especially if i running recognize faces video and video file
Thanks in advance Mr. Adrian
You could try installing NVIDIA drivers and dlib with GPU support to help with the face detection and face embedding process.
Hi Adrian,
Thank you for your detailed post. May I know how IP camera can be accessed using the VideoStream package?
Hi Adrian- I have used the code to train data from my images and it works great with my solo picture. but when i try an example with group photo with friends, it kinda zooms the picture to a large size. is there any issue in regarding image quality or something else?
Sir, I am a great fan of yours. I have followed your work a lot from face detection to face recognition and object detection. Recently I made a project using your approach. Everyone liked it so much. Thanks a lot for providing us with such helpful material
Congrats on a successful project, Abdul!
how to calculate training time ???
Have you used Local Binary Pattern Histogram algorithm for face recognition ???
Yes, I actually review it inside the PyImageSearch Gurus course.
Excuse me, This code can work with AMD RX550 GPU or can work only with NVIDIA CUDA GPU.
Do you have any ideas for the face time attendance problem using Face recognition?
I cover how to implement a custom face recognition attendance system inside my book, Raspberry Pi for Computer Vision. Take a look.
Hi,
Amazed this post is getting comments, though it’s been over a year old!!
I have successfully created the pickle file with around 3000 images.
I have been experimenting with the jitter and tolerance and I’m at a point, where accuracy is fairly good, but the speed seems slow even on my 6GB GPU. With Nvidia-smi, I can see the python script is using just under 1 GB and GPU utilization is around 25%.
How can I print the processing FPS on the output video (or on the video display so I can do some actual measurement? That will help me at least measure performance. Thanks
Thanks Ray. The actual publish date of the post is irrelevant. I keep it updated and current.
Regarding your question you should refer to this tutorial. It includes an implementation of an “FPS” class you can use to measure FPS throughput rate.
Hi Adrian
You say that HOG should be used on a Rasp Pi. Because of the extra processing power and memory (4gb) of the Rasp Pi4, could CNN be run on the Pi4?
Many thanks in advance.
Joe
Realistically no, I don’t recommend it unless you are offloading the face detector CNN to a coprocessor such as a Movidius NCS or Google Coral.
Hello Adrian,
Awesome blog post, works like a charm. I tested my dataset which had images that were shaky, ones with improper lighting, images captured in motion. Worked without a glitch.
Thank you so much for such a useful post. You are a very good teacher for all computer vision enthusiasts out there.
God bless!
Thanks Sam! And congrats on building your own face recognition system.
Hi adrian,
i wanted to ask that which IDE are you using for writing the code?
I normally use PyCharm and/or Sublime text.
How can we match 2 faces using Deep learning? What approaches can we take? We have only 2 images to match
Is it possible to train faces of 50 people using opencv alone or how can we train data for 50 people.
Thanks in advance!
you are amazing
Thank you for the kind words, Mehdi 🙂
I’ve tried installing this but keep running into problems. Unfortunately, likely due to getting interrupted for a few days and having to start back up.
How can I uninstall everything mentioned here and start over with a clean environment? RaspberryPi 4
Thanks so much. Really looking forward to getting this up & running.
The easiest method would be to re-flash your micro-SD card with a fresh Raspbian .img.
now, how can I choose whether hog or cnn ? should I exchange the expression : detection_method into either hog or cnn ?
Please tell me what should I do exactly to choose hog method …. Thank You
Hi Adrian, thank you for this amazing tutorial, helped me a lot in learning facial recognition. I just have one question, how can I get the confidence score for each recognition? Thank you
My bad, you’ve already answered questions about confidence in the comment section. Maybe I’m looking for the term “score” when I searched. Please disregard this and my previous comment. Thanks
Hi Adrian,
Is it possible to run this code on multiple GPUs? I think we can select the GPU using `dlib.cuda.set_device` but not sure how to use multiple GPUS.
Hi Adrian,
Is this 2018 post up to date?
Is there any other with similar current content?
Thanks in advance.
Yes, this post is up to date.
sir ,what is 128d embedding?
which are the features used to create 128d?
That question is addressed in the “Understanding deep learning face recognition embeddings” section of this post.
hi Adrian, i just want to ask how can we make the facial recogntion recognize face from distance like >= 1.5 meters? do i need to buy a high-end camera to achieve this?
May i know whether there are any base papers that supports this project?
You should read the papers on OpenFace and FaceNet.
Nice tutorial!, but it is very misleading to call it a “more fancy” k-NN, it is more like a poor man’s k-NN.
Would be better to add that the current implementation performce poorly when the known faces are similar, and that a proper k-NN inplementation is left as an exerice for the reader. 🙂
Hi Ardian,
Is it possible when the unknown person is came ,it detects unknown and generating Id for him/her. If again same that unknown person will come,It have to show previous generated Id .
If possible please resolve my issue.Thanks in advance
That’s a form of “person re-identification” which is different from what this tutorial covers.
Hy man! I want to say that this is a fantastic tutorial. I have one little problem.
$ python encode_faces.py –dataset dataset –encodings encodings.pickle
At this point. The procces just freeze after 20,30 photos. What can i do to resolve this?
Also..i want to know if i can manually put photos with myself and let the script recognize me. What is the procces.
Thank you,
Have a nice day!
The script isn’t freezing, it’s just running on the images. It may take awhile if you are:
1. Using a CPU
2. Your images are large
Hi… Nice tutorial… I am new in this area, I just want to know some basic things… Is it possible to recognize face offline, using OpenCV… And I want to know more about 128-D embeddings…