Today’s blog post is inspired by PyImageSearch reader Ezekiel, who emailed me last week and asked:
Hey Adrian,
I went through your previous blog post on deep learning object detection along
with the followup tutorial for real-time deep learning object detection. Thanks for those.I’ve been using your source code in my example projects but I’m having two issues:
- How do I filter/ignore classes that I am uninterested in?
- How can I add new classes to my object detector? Is that even possible?
I would really appreciate it if you could cover this in a blog post.
Thanks.
Ezekiel isn’t the only reader with those questions. In fact, if you go through the comments section of my two most recent posts on deep learning object detection (linked above), you’ll find that one of the most common questions is typically (paraphrased):
How do I modify your source code to include my own object classes?
Since this appears to be such a common question, and ultimately a misunderstanding on how neural networks/deep learning object detectors actually work, I decided to revisit the topic of deep learning object detection in today’s blog post.
Specifically, in this post you will learn:
- The differences between image classification and object detection
- The components of a deep learning object detector including the differences between an object detection framework and the base model itself
- How to perform deep learning object detection with a pre-trained model
- How you can filter and ignore predicted classes from a deep learning model
- Common misconceptions and misunderstandings when adding or removing classes from a deep neural network
To learn more about deep learning object detections, and perhaps even debunk a few misconceptions or misunderstandings you may have with deep learning-based object detection, just keep reading.
A gentle guide to deep learning object detection
Today’s blog post is meant to be a gentle introduction to deep learning-based object detection.
I’ve done my best to provide a review of the components of deep learning object detectors, including OpenCV + Python source code to perform deep learning using a pre-trained object detector.
Use this guide to help you get started with deep learning object detection, but also realize that the object detection is highly nuanced and detailed — I could not possibly include every detail of deep learning object detection in a single blog post.
That said, we’ll start today’s blog post by discussing the fundamental differences between image classification and object detection, including if a network trained for image classification can be used for object detection (and under what circumstances).
Once we understand what object detection is, we’ll review the core components of a deep learning object detector, including the object detection framework along with the base model, two key components that readers new to object detection tend to misunderstand.
From there, we’ll implement real-time deep learning object detection using OpenCV.
I’ll also demonstrate how you can ignore and filter object classes you are not interested in without having to modify the network architecture or retrain the model.
Finally, we’ll wrap up today’s blog post by discussing how you can add or remove classes from a deep learning object detector, including my recommended resources to help you get started.
Let’s go ahead and dive in to deep learning object detection!
The difference between image classification and object detection
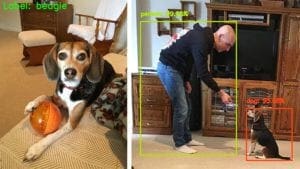
When performing standard image classification, given an input image, we present it to our neural network, and we obtain a single class label and perhaps a probability associated with the class label as well.
This class label is meant to characterize the contents of the entire image, or at least the most dominant, visible contents of the image.
For example, given the input image in Figure 1 above (left) our CNN has labeled the image as “beagle”.
We can thus think of image classification as:
- One image in
- And one class label out
Object detection, regardless of whether performed via deep learning or other computer vision techniques, builds on image classification and seeks to localize exactly where in the image each object appears.
When performing object detection, given an input image, we wish to obtain:
- A list of bounding boxes, or the (x, y)-coordinates for each object in an image
- The class label associated with each bounding box
- The probability/confidence score associated with each bounding box and class label
Figure 1 (right) demonstrates an example of performing deep learning object detection. Notice how both the person and the dog are localized with their bounding boxes and class labels predicted.
Therefore, object detection allows us to:
- Present one image to the network
- And obtain multiple bounding boxes and class labels out
Can a deep learning image classifier be used for object detection?
Okay, so at this point you understand the fundamental difference between image classification and object detection:
- When performing image classification, we present one input image to the network and obtain one class label out.
- But when performing object detection, we can present one input image and obtain multiple bounding boxes and class labels out.
That motivates the question:
Can we take a network already trained for classification and use it for object detection instead?
The answer is a bit tricky as it’s technically “Yes”, but for reasons not so obvious.
The solutions involve:
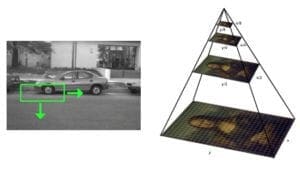
- Applying standard, computer-vision based object detection methods (i.e., non-deep learning methods) such as sliding windows and image pyramids — this method is typically used in your HOG + Linear SVM-based object detectors.
- Taking the pre-trained network and using it as a base network in a deep learning object detection framework (i.e., Faster R-CNN, SSD, YOLO).
Method #1: The traditional object detection pipeline
The first method is not a pure end-to-end deep learning object detector.
We instead utilize:
- Fixed size sliding windows, which slide from left-to-right and top-to-bottom to localize objects at different locations
- An image pyramid to detect objects at varying scales
- Classification via a pre-trained (classification) Convolutional Neural Network
At each stop of the sliding window + image pyramid, we extract the ROI, feed it into a CNN, and obtain the output classification for the ROI.
If the classification probability of label L is higher than some threshold T, we mark the bounding box of the ROI as the label (L). Repeating this process for every stop of the sliding window and image pyramid, we obtain the output object detectors. Finally, we apply non-maxima suppression to the bounding boxes yielding our final output detections:
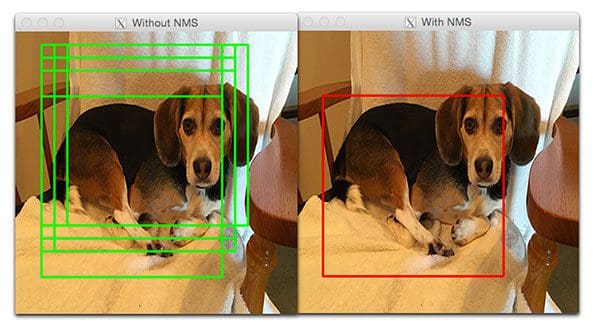
This method can work in some specific use cases, but in general it’s slow, tedious, and a bit error-prone.
However, it’s worth learning how to apply this method as it can turn an arbitrary image classification network into an object detector, avoiding the need to explicitly train an end-to-end deep learning object detector. This method could save you a ton of time and effort depending on your use case.
If you’re interested in this object detection method and want to learn more about the sliding window + image pyramid + image classification approach to object detection, please refer to my book, Deep Learning for Computer Vision with Python.
Method #2: Base network of an object detection framework
The second method to deep learning object detection allows you to treat your pre-trained classification network as a base network in a deep learning object detection framework (such as Faster R-CNN, SSD, or YOLO).
The benefit here is that you can create a complete end-to-end deep learning-based object detector.
The downside is that it requires a bit of intimate knowledge on how deep learning object detectors work — we’ll discuss this more in the following section.
The components of a deep learning object detector
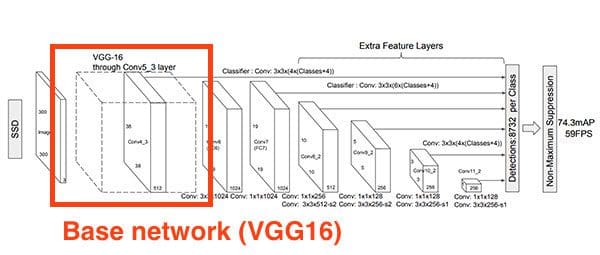
There are many components, sub-components, and sub-sub-components of a deep learning object detector, but the two we are going to focus on today are the two that most readers new to deep learning object detection often confuse:
- The object detection framework (ex. Faster R-CNN, SSD, YOLO).
- The base network which fits into the object detection framework.
The base network you are likely already familiar with (you just haven’t heard it referenced as a “base network” before).
Base networks are your common (classification) CNN architectures, including:
- VGGNet
- ResNet
- MobileNet
- DenseNet
Typically these networks are pre-trained to perform classification on a large image dataset, such as ImageNet, to learn a rich set of discerning, discriminating filters.
Object detection frameworks consist of many components and sub-components.
For example, the Faster R-CNN framework includes:
- The Region Proposal Network (RPN)
- A set of anchors
- The Region of Interest (ROI) pooling module
- The final Region-based Convolutional Neural Network
When using Single Shot Detectors (SSDs) you have components and sub-components such as:
- MultiBox
- Priors
- Fixed priors
Keep in mind that the base network is just one of the many components that fit into the overall deep learning object detection framework — Figure 4 at the top of this section depicts the VGG16 base network inside the SSD framework.
Typically, “network surgery” is performed on the base network. This modification:
- Forms it to be fully-convolutional (i.e., accept arbitrary input dimensions).
- Eliminates CONV/POOL layers deeper in the base network architecture and replaces them with a series of new layers (SSD), new modules (Faster R-CNN), or some combination of the two.
The term “network surgery” is a colloquial way of saying we remove some of the original layers of the base network architecture and supplant them with new layers.
You’ve likely seen low budget horror movies where the killer, likely carrying an ax or large knife, attacks their victim and unceremoniously hacks at them.
Network surgery is more precise and exacting than the typical B horror film killer.
Network surgery is also very tactical — we remove parts of the network we do not need and replace it with a new set of components.
Then, when we go to train our framework to perform object detection, both the weights of the (1) new layers/modules and (2) base network are modified.
Again, a complete review of how various deep learning object detection frameworks work (including the role the base network plays) is outside the scope of this blog post.
If you’re interested in complete review of deep learning object detection, including theory and implementation, please refer to my book, Deep Learning for Computer Vision with Python.
How do I measure the accuracy of a deep learning object detector?
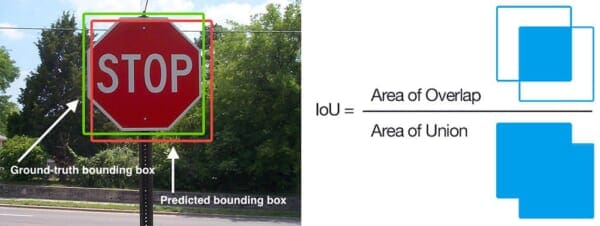
When evaluating object detector performance we use an evaluation metric called mean Average Precision (mAP) which is based on the Intersection over Union (IoU) across all classes in our dataset.
Intersection over Union (IoU)
You’ll typically find IoU and mAP used to evaluate the performance of HOG + Linear SVM detectors, Haar cascades, and deep learning-based methods; however, keep in mind that the actual algorithm used to generate the predicted bounding boxes does not matter.
Any algorithm that provides predicted bounding boxes (and optionally class labels) as output can be evaluated using IoU. More formally, in order to apply IoU to evaluate an arbitrary object detector, we need:
- The ground-truth bounding boxes (i.e., the hand-labeled bounding boxes from our testing set that specify where an image our object is).
- The predicted bounding boxes from our model.
- If you want to compute recall along with precision, you’ll also need the ground-truth class labels and predicted class labels.
In Figure 5 (left) I have included a visual example of a ground-truth bounding box (green) versus a predicted bounding box (red). Computing IoU can be determined by the equation illustration in Figure 5 (right).
Examining this equation you can see that IoU is simply a ratio.
In the numerator, we compute the area of overlap between the predicted bounding box and the ground-truth bounding box.
The denominator is the area of the union, or more simply, the area encompassed by both the predicted bounding box and the ground-truth bounding box.
Dividing the area of overlap by the area of union yields a final score — the Intersection over Union.
mean Average Precision (mAP)
Note: I decided to edit this section from its original form. I wanted to keep the discussion of mAP higher level and avoid some of the more confusing recall calculations but as a couple commenters pointed out this section wasn’t technically correct. Because of that I decided to update the post.
Since this is a gentle introduction to deep learning-based object detection I’m going to keep the explanation of mAP on the simplified side just so you understand the fundamentals.
Readers and practitioners new to object detection can be confused by the mAP calculation. This is partially due to the fact that mAP is a more complicated evaluation metric. It’s also the definition of calculation of mAP can even vary from one object detection challenge to another (when I say “object detection challenge” I’m referring to competitions such as COCO, PASCAL VOC, etc.).
Computing the Average Precision (AP) for a particular object detection pipeline is essentially a three step process:
- Compute the precision which is the proportion of true positives.
- Compute the recall which is the proportion of true positives out of all possible positives.
- Average together the maximum precision value across all recall levels in steps of size s.
To compute the precision we first apply our object detection algorithm to an input image. The bounding box scores are then sorted in descending order by their confidence.
We know from a priori knowledge (i.e., it’s a validation/testing example and we therefore know the total number of objects in the image) there are 4 objects in this image. We seek to determine how many “correct” detections our network made. A “correct” prediction here is one where we have a minimum IoU of 0.5 (this value is tunable depending on the challenge but 0.5 is a standard value).
Here is where the calculation starts to become a bit more complicated. We need to compute the precision at different recall values (also called “recall levels” or “recall steps”) .
For example, let’s pretend we are computing the precision and recall values for the top-3 predictions. Out of the top-3 predictions from our deep learning object detector, we made 2 correct. Our precision is then the proportion of true positives: 2/3 = 0.667. Our recall is the proportion of the true positives out of all the possible positives in the image: 2 / 4 = 0.5. We repeat this process for (typically) the top-1 to top-10 predictions. This process yields a list of precision values.
The next step is to compute the average for all your top-N values, hence the term Average Precision (AP). We loop over all recall values r, find the maximum precision p that we can obtain with our recall > r and then compute the average. We now have our average precision for a single evaluation image.
Once we have computed the average precision for all images in our testing/validation set we perform two more calculations:
- Compute the mean of the APs for each class, giving us a mAP for each individual class (for many datasets/challenges you’ll want to examine the mAP class-wise so you can spot if your deep learning object detector is struggling with a specific class)
- Take the mAPs for each individual class and then average them together, yielding the final mAP for the dataset
Again, mAP is more complicated than traditional accuracy so don’t be frustrated if you don’t understand it on the first pass. This is an evaluation metric you’ll want to study multiple times before you fully understand it. The good news is that deep learning object detection implementations handle computing mAP for you.
Deep learning-based object detection with OpenCV
We’ve discussed deep learning and object detection on this blog in previous posts; however, let’s review actual source code in this post as a matter of completeness.
Our example includes the Single Shot Detector (framework) with a MobileNet base model. The model was trained by GitHub user chuanqi305 on the Common Objects in Context (COCO) dataset.
For additional detail, check out my previous post where I introduced chuanqi305’s model with pertinent background information.
Let’s loop back to Ezekiel’s first question from the top of this post:
- How do I filter/ignore classes that I am uninterested in?
I’m going to answer that very question in the following example script.
But first you need to prepare your system:
- You need a minimum of OpenCV 3.3 installed in your Python virtual environment (provided you are using Python virtual environments). OpenCV 3.3+ includes the DNN module required to run the following code. Be sure to use one of the OpenCV installation tutorials on the following page while paying extra attention to which version of OpenCV you download + install.
- You should also install my imutils package. To install/update imutils in your Python virtual environment, simply use pip:
pip install --upgrade imutils.
When you’re ready, go ahead and create a new file named filter_object_detection.py and let’s begin:
# import the necessary packages
from imutils.video import VideoStream
from imutils.video import FPS
import numpy as np
import argparse
import imutils
import time
import cv2
On Lines 2-8 we import our required packages and modules, notably imutils and OpenCV. We will be using my VideoStream class to handle capturing frames from a webcam.
We’re armed with the necessary tools, so let’s continue by parsing command line arguments:
# construct the argument parse and parse the arguments
ap = argparse.ArgumentParser()
ap.add_argument("-p", "--prototxt", required=True,
	help="path to Caffe 'deploy' prototxt file")
ap.add_argument("-m", "--model", required=True,
	help="path to Caffe pre-trained model")
ap.add_argument("-c", "--confidence", type=float, default=0.2,
	help="minimum probability to filter weak detections")
args = vars(ap.parse_args())
Our script requires two command line arguments at runtime:
--prototxt: The path to the Caffe prototxt file which defines the model definition.--model: Our CNN model weights file path.
Optionally you may specify --confidence , a threshold to filter weak detections.
Our model can predict 21 object classes:
# initialize the list of class labels MobileNet SSD was trained to
# detect, then generate a set of bounding box colors for each class
CLASSES = ["background", "aeroplane", "bicycle", "bird", "boat",
	"bottle", "bus", "car", "cat", "chair", "cow", "diningtable",
	"dog", "horse", "motorbike", "person", "pottedplant", "sheep",
	"sofa", "train", "tvmonitor"]
The CLASSES list contains all class labels the network was trained on (i.e. COCO labels).
A common misconception of the CLASSES list is that you can:
- Add a new class label to the list
- Or remove a class label from the list
…and have the network automatically “know” what you are trying to accomplish.
That is not the case.
You cannot simply modify a list of text labels and have the network automatically modify itself to learn, add, or remove patterns on data it was never trained on. That is not how neural networks work.
That said, there is a quick hack you can use to filter and ignore predictions you are uninterested in.
The solution is to:
- Define a set of
IGNORElabels (i.e., the list of class labels the network was trained on that you want to filter and ignore). - Make a prediction on an input image/video frame.
- Ignore any predictions where the class label exists in the
IGNOREset.
Implemented in Python, the IGNORE set looks like this:
IGNORE = set(["person"])
Here we’ll be ignoring all predicted objects with class label "person" (the if statement used for filtering will be covered later in this code review).
You can easily add additional elements (class labels from the CLASSES list) to ignore to the set.
Next, we’ll generate random label/box colors, load our model, and start the video stream:
COLORS = np.random.uniform(0, 255, size=(len(CLASSES), 3))

# load our serialized model from disk
print("[INFO] loading model...")
net = cv2.dnn.readNetFromCaffe(args["prototxt"], args["model"])

# initialize the video stream, allow the cammera sensor to warmup,
# and initialize the FPS counter
print("[INFO] starting video stream...")
vs = VideoStream(src=0).start()
time.sleep(2.0)
fps = FPS().start()
On Line 27 a random array of COLORS is generated to correspond to each of the 21 CLASSES . We’ll use these colors later for display purposes.
Our Caffe model is loaded on Line 31 using the cv2.dnn.readNetFromCaffe function and both of our required command line arguments passed as parameters.
Then we instantiate the VideoStream object as vs , and start our fps counter (Lines 36-38). The 2-second sleep allows our camera plenty of time to warm up.
At this point we’re ready to loop over the incoming frames from the camera and send them through our CNN object detector:
# loop over the frames from the video stream
while True:
	# grab the frame from the threaded video stream and resize it
	# to have a maximum width of 400 pixels
	frame = vs.read()
	frame = imutils.resize(frame, width=400)

	# grab the frame dimensions and convert it to a blob
	(h, w) = frame.shape[:2]
	blob = cv2.dnn.blobFromImage(cv2.resize(frame, (300, 300)),
		0.007843, (300, 300), 127.5)

	# pass the blob through the network and obtain the detections and
	# predictions
	net.setInput(blob)
	detections = net.forward()
On Line 44 we grab a frame and then resize while preserving aspect ratio for display (Line 45).
From there, we extract the height and width as we’ll need these values later (Line 48).
Lines 48 and 49 generate a blob from our frame. To learn more about a blob and how it’s constructed using the cv2.dnn.blobFromImage function, refer to this previous post for all the details.
Next, we, send that blob through our neural net to detect objects (Lines 54 and 55).
Let’s loop over the detections:
	# loop over the detections
	for i in np.arange(0, detections.shape[2]):
		# extract the confidence (i.e., probability) associated with
		# the prediction
		confidence = detections[0, 0, i, 2]

		# filter out weak detections by ensuring the `confidence` is
		# greater than the minimum confidence
		if confidence > args["confidence"]:
			# extract the index of the class label from the
			# `detections`
			idx = int(detections[0, 0, i, 1])

			# if the predicted class label is in the set of classes
			# we want to ignore then skip the detection
			if CLASSES[idx] in IGNORE:
				continue
On Line 58 we begin our detections loop.
For each detection, we extract the confidence (Line 61) followed by comparing it to our confidence threshold (Line 65).
In the case that our confidence surpasses the minimum (the default of 0.2 can be changed via the optional command line argument), we’ll consider the detection a positive, valid detection and continue processing it.
First, we extract the index of the class label from detections (Line 68).
Then, going back to Ezekiel’s first question, we can ignore classes in the IGNORE set on Lines 72 and 73. If the class is to be ignored, we simply continue back to the top of the detections loop (and we don’t display labels or boxes for this class). This fulfills our “quick hack” solution.
Otherwise, we’ve detected an object in the whitelist and we need to display the class label and rectangle on the frame:
			# compute the (x, y)-coordinates of the bounding box for
			# the object
			box = detections[0, 0, i, 3:7] * np.array([w, h, w, h])
			(startX, startY, endX, endY) = box.astype("int")

			# draw the prediction on the frame
			label = "{}: {:.2f}%".format(CLASSES[idx],
				confidence * 100)
			cv2.rectangle(frame, (startX, startY), (endX, endY),
				COLORS[idx], 2)
			y = startY - 15 if startY - 15 > 15 else startY + 15
			cv2.putText(frame, label, (startX, y),
				cv2.FONT_HERSHEY_SIMPLEX, 0.5, COLORS[idx], 2)
In this code block, we are extracting bounding box coordinates (Lines 77 and 78) followed by drawing a label and rectangle on the frame (Lines 81-87).
The color of the label + rectangle will be the same for each unique class; objects of the same class will have the same color (i.e. all "boats" in the video would have the same color label and box).
Finally, still in our while loop, we’ll display our hard work on our screen:
	# show the output frame
	cv2.imshow("Frame", frame)
	key = cv2.waitKey(1) & 0xFF

	# if the `q` key was pressed, break from the loop
	if key == ord("q"):
		break

	# update the FPS counter
	fps.update()

# stop the timer and display FPS information
fps.stop()
print("[INFO] elapsed time: {:.2f}".format(fps.elapsed()))
print("[INFO] approx. FPS: {:.2f}".format(fps.fps()))

# do a bit of cleanup
cv2.destroyAllWindows()
vs.stop()
We display the frame and capture keypresses on Lines 90 and 91.
If the "q" key is pressed, we quit by breaking out of the loop (Lines 94 and 95).
Otherwise, we proceed to update our fps counter (Line 98) and continue grabbing and processing frames.
On the remaining lines, when the loop breaks, we display time + frames per second metrics and cleanup.
Running your deep learning object detector
In order to run today’s script, you’ll need to grab the files by scrolling to the “Downloads” section below.
Once you’ve extracted the files, open a terminal and navigate to downloaded code + model. From there, execute the following command:
$ python filter_object_detection.py --prototxt MobileNetSSD_deploy.prototxt.txt \
	--model MobileNetSSD_deploy.caffemodel
[INFO] loading model...
[INFO] starting video stream...
[INFO] elapsed time: 24.05
[INFO] approx. FPS: 13.18

In the GIF above you can see on the left that the “person” class is detected — this is due to me having an empty IGNORE . On the right you can see that I am not detected — this behavior is due to be adding the “person” class to the IGNORE set.
While our deep learning object detector is still technically detecting the “person” class, our post-processing code is able to filter it out.
Perhaps you encountered an error running the deep learning object detector?
Troubleshooting step one would be to verify that you have a webcam hooked up. If that’s not the problem, maybe you saw the following error message in your terminal:
$ python filter_object_detection.py
usage: filter_object_detection.py [-h] -p PROTOTXT -m MODEL [-c CONFIDENCE]
filter_object_detection.py: error: the following arguments are required: -p/--prototxt, -m/--model
If you see this message, then you didn’t pass “command line arguments” to the program. This is a common problem PyImageSearch readers have if they aren’t familiar with Python, argparse, and command line arguments. Check out the link if you are having trouble.
Here is the full version of the video with commentary:
How can I add or remove classes to my deep learning object detector?

As I mentioned earlier in this guide, you cannot simply add or remove class labels from the CLASSES list — the underlying network itself has not changed.
All you have done, at best, is modify a text file that lists out the class labels.
Instead, if you want to explicitly add or remove classes from a neural network you will either need to either:
- Train from scratch
- Perform fine-tuning
Training from scratch tends to be a time consuming, expensive operation so we try to avoid it when we can — but in some cases this is completely unavoidable.
The other option is to perform fine-tuning.
Fine-tuning is a form of transfer learning and is the process of:
- Removing the fully-connected layer responsible for classification/labeling
- Replacing it with a brand new, freshly and randomly initialized fully-connected layer
We may optionally modify other layers in the network as well (including freezing the weights of some layers and unfreezing them during the training process).
Exactly how to train your own custom deep learning object detector (including both fine-tuning and training from scratch) are advanced topics outside the scope of this blog post, but see the section below to help you get started.
What's next? We recommend PyImageSearch University.
86+ total classes • 115+ hours hours of on-demand code walkthrough videos • Last updated: January 2026
★★★★★ 4.84 (128 Ratings) • 16,000+ Students Enrolled
I strongly believe that if you had the right teacher you could master computer vision and deep learning.
Do you think learning computer vision and deep learning has to be time-consuming, overwhelming, and complicated? Or has to involve complex mathematics and equations? Or requires a degree in computer science?
That’s not the case.
All you need to master computer vision and deep learning is for someone to explain things to you in simple, intuitive terms. And that’s exactly what I do. My mission is to change education and how complex Artificial Intelligence topics are taught.
If you're serious about learning computer vision, your next stop should be PyImageSearch University, the most comprehensive computer vision, deep learning, and OpenCV course online today. Here you’ll learn how to successfully and confidently apply computer vision to your work, research, and projects. Join me in computer vision mastery.
Inside PyImageSearch University you'll find:
- ✓ 86+ courses on essential computer vision, deep learning, and OpenCV topics
- ✓ 86 Certificates of Completion
- ✓ 115+ hours hours of on-demand video
- ✓ Brand new courses released regularly, ensuring you can keep up with state-of-the-art techniques
- ✓ Pre-configured Jupyter Notebooks in Google Colab
- ✓ Run all code examples in your web browser — works on Windows, macOS, and Linux (no dev environment configuration required!)
- ✓ Access to centralized code repos for all 540+ tutorials on PyImageSearch
- ✓ Easy one-click downloads for code, datasets, pre-trained models, etc.
- ✓ Access on mobile, laptop, desktop, etc.
Summary
In today’s blog post you were gently introduced to some of the intricacies involved in deep learning object detection. We started by reviewing the fundamental differences between image classification and object detection, including how we can use a network trained for image classification for object detection.
We then reviewed the core components of a deep learning object detector:
- The framework
- The base model
The base model is typically a pre-trained (classification) network, normally trained on a large image dataset such as ImageNet to learn a robust set of discerning filters.
We can also train the base network from scratch but this usually takes a significantly longer amount of time for the object detector to reach reasonable accuracy.
You should, in most situations, start with a pre-trained base model instead of trying to train from scratch.
Once we acquired a solid understanding of deep learning object detectors, we implemented an object detector capable of running in real-time in OpenCV.
I also demonstrated how you can filter and ignore class labels that you are uninterested in.
Finally, we learned that actually adding or removing a class to a deep learning object detector is not as simple as adding/removing a label from the hardcoded class labels list.
The neural network itself doesn’t care if you modify a list of class labels — instead, you would need to either:
- Modify the network architecture itself by removing the fully-connected class prediction layer and fine-tuning
- Or train the object detection framework from scratch
For more deep learning object detection projects you will start with a deep learning object detector pre-trained on an object detection task, such as COCO. You then perform fine-tuning on the model to obtain your own detector.
Training an end-to-end custom deep learning object detector is outside the scope of this blog post, so if you’re interested in discovering how to train your own deep learning object detectors, please refer to my book, Deep Learning for Computer Vision with Python.
Inside the book, I have included a number of deep learning object detection examples, including training your own object detectors to:
- Detect traffic signs, such as stop signs, pedestrian crossing signs, etc.
- Along with the front and rear views of vehicles
To learn more about my deep learning book, just click here!
If you enjoyed today’s blog post, be sure to enter your email address in the form below to be notified when future tutorials are published here on PyImageSearch!

Download the Source Code and FREE 17-page Resource Guide
Enter your email address below to get a .zip of the code and a FREE 17-page Resource Guide on Computer Vision, OpenCV, and Deep Learning. Inside you'll find my hand-picked tutorials, books, courses, and libraries to help you master CV and DL!

