Welcome back! This is the fourth post in the deep learning development environment configuration series which accompany my new book, Deep Learning for Computer Vision with Python.
Today, we will configure Ubuntu + NVIDIA GPU + CUDA with everything you need to be successful when training your own deep learning networks on your GPU.
Links to related tutorials can be found here:
- Your deep learning + Python Ubuntu virtual machine
- Pre-configured Amazon AWS deep learning AMI with Python
- Configuring Ubuntu for deep learning with Python (for a CPU only environment)
- Setting up Ubuntu 16.04 + CUDA + GPU for deep learning with Python (this post)
- Configuring macOS for deep learning with Python (releasing on Friday)
If you have an NVIDIA CUDA compatible GPU, you can use this tutorial to configure your deep learning development to train and execute neural networks on your optimized GPU hardware.
Let’s go ahead and get started!
Setting up Ubuntu 16.04 + CUDA + GPU for deep learning with Python
If you’ve reached this point, you are likely serious about deep learning and want to train your neural networks with a GPU.
Graphics Processing Units are great at deep learning for their parallel processing architecture — in fact, these days there are many GPUs built specifically for deep learning — they are put to use outside the domain of computer gaming.
NVIDIA is the market leader in deep learning hardware, and quite frankly the primary option I recommend if you are getting in this space. It is worth getting familiar with their lineup of products (hardware and software) so you know what you’re paying for if you’re using an instance in the cloud or building a machine yourself. Be sure to check out this developer page.
It is common to share high-end GPU machines at universities and companies. Alternatively, you may build one, buy one (as I did), or rent one in the cloud (as I still do today).
If you are just doing a couple of experiments then using a cloud service provider such as Amazon, Google, or FloydHub for a time-based usage charge is the way to go.
Longer term if you are working on deep learning experiments daily, then it would be wise to have one on hand for cost savings purposes (assuming you’re willing to keep the hardware and software updated regularly).
Note: For those utilizing AWS’s EC2, I recommend you select the p2.xlarge, p2.8xlarge, or p2.16xlarge machines for compatibility with these instructions (depending on your use case scenario and budget). The older instances, g2.2xlarge and g2.8xlarge are not compatible with the version of CUDA and cuDNN in this tutorial. I also recommend that you have about 32GB of space on your OS drive/partition. 16GB didn’t cut it for me on my EC2 instance.
It is important to point out that you don’t need access to an expensive GPU machine to get started with Deep Learning. Most modern laptop CPUs will do just fine with the small experiments presented in the early chapters in my book. As I say, “fundamentals before funds” — meaning, get acclimated with modern deep learning fundamentals and concepts before you bite off more than you can chew with expensive hardware and cloud bills. My book will allow you to do just that.
How hard is it to configure Ubuntu with GPU support for deep learning?
You’ll soon find out below that configuring a GPU machine isn’t a cakewalk. In fact, there are quite a few steps and potential for things to go sour. That’s why I have built a custom Amazon Machine Instance (AMI) pre-configured and pre-installed for the community to accompany my book.
I detailed how to get it loaded into your AWS account and how to boot it up in this previous post.
Using the AMI is by far the fastest way to get started with deep learning on a GPU. Even if you do have a GPU, it’s worth experimenting in the Amazon EC2 cloud so you can tear down an instance (if you make a mistake) and then immediately boot up a new, fresh one.
Configuring an environment on your own is directly related to your:
- Experience with Linux
- Attention to detail
- Patience.
First, you must be very comfortable with the command line.
Many of the steps below have commands that you can simply copy and paste into your terminal; however it is important that you read the output, note any errors, try to resolve them prior to moving on to the next step.
You must pay particular attention to the order of the instructions in this tutorial, and furthermore pay attention to the commands themselves.
I actually do recommend copying and pasting to make sure you don’t mess up a command (in one case below backticks versus quotes could get you stuck).
If you’re up for the challenge, then I’ll be right there with you getting your environment ready. In fact, I encourage you to leave comments so that the PyImageSearch community can offer you assistance. Before you leave a comment be sure to review the post and comments to make sure you didn’t leave a step out.
Without further ado, let’s get our hands dirty and walk through the configuration steps.
Step #0: Turn off X server/X window system
Before we get started I need to point out an important prerequisite. You need to perform one of the following prior to following the instructions below:
- SSH into your GPU instance (with X server off/disabled).
- Work directly on your GPU machine without your X server running (the X server, also known as X11, is your graphical user interface on the desktop). I suggest you try one of the methods outlined on this thread.
There are a few methods to accomplish this, some easy and others a bit more involved.
The first method is a bit of a hack, but it works:
- Turn off your machine.
- Unplug your monitor.
- Reboot.
- SSH into your machine from a separate system.
- Perform the install instructions.
This approach works great and is by far the easiest method. By unplugging your monitor X server will not automatically start. From there you can SSH into your machine from a separate computer and follow the instructions outlined in this post.
The second method assumes you have already booted the machine you want to configure for deep learning:
- Close all running applications.
- Press
ctrl + alt + F2. - Login with your username and password.
- Stop X server by executing
sudo service lightdm stop. - Perform the install instructions.
Please note that you’ll need a separate computer next to you to read the instructions or execute the commands. Alternatively, you could use a text-based web browser.
Step #1: Install Ubuntu system dependencies
Now that we’re ready, let’s get our Ubuntu OS up to date:
$ sudo apt-get update
$ sudo apt-get upgrade
Then, let’s install some necessary development tools, image/video I/O, GUI operations and various other packages:
$ sudo apt-get install build-essential cmake git unzip pkg-config
$ sudo apt-get install libjpeg-dev libtiff5-dev libjasper-dev libpng12-dev
$ sudo apt-get install libavcodec-dev libavformat-dev libswscale-dev libv4l-dev
$ sudo apt-get install libxvidcore-dev libx264-dev
$ sudo apt-get install libgtk-3-dev
$ sudo apt-get install libhdf5-serial-dev graphviz
$ sudo apt-get install libopenblas-dev libatlas-base-dev gfortran
$ sudo apt-get install python-tk python3-tk python-imaging-tk
Next, let’s install both Python 2.7 and Python 3 header files so that we can compile OpenCV with Python bindings:
$ sudo apt-get install python2.7-dev python3-dev
We also need to prepare our system to swap out the default drivers with NVIDIA CUDA drivers:
$ sudo apt-get install linux-image-generic linux-image-extra-virtual
$ sudo apt-get install linux-source linux-headers-generic
That’s it for Step #1, so let’s continue on.
Step #2: Install CUDA Toolkit
The CUDA Toolkit installation step requires attention to detail for it to go smoothly.
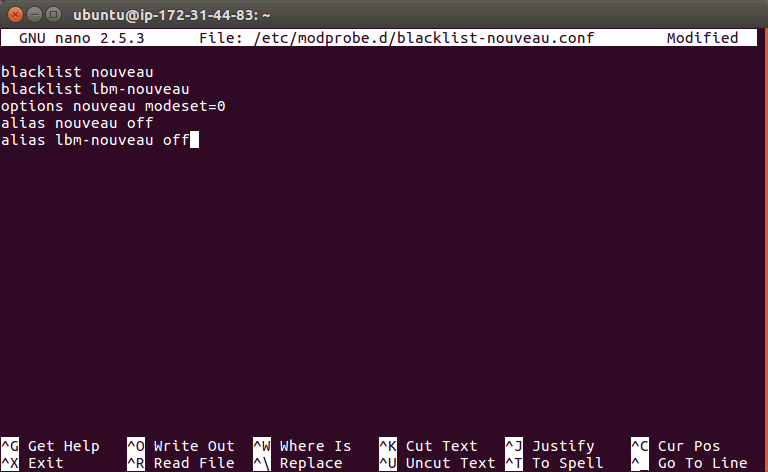
First disable the Nouveau kernel driver by creating a new file:
$ sudo nano /etc/modprobe.d/blacklist-nouveau.conf
Feel free to use your favorite terminal text editor such as vim or emacs instead of nano .
Add the following lines and then save and exit:
blacklist nouveau
blacklist lbm-nouveau
options nouveau modeset=0
alias nouveau off
alias lbm-nouveau off
Your session should look like the following (if you are using nano):
Next let’s update the initial RAM filesystem and reboot the machine:
$ echo options nouveau modeset=0 | sudo tee -a /etc/modprobe.d/nouveau-kms.conf
$ sudo update-initramfs -u
$ sudo reboot
You will lose your SSH connection at the reboot step, so wait patiently and then reconnect before moving on.
You will want to download the CUDA Toolkit v8.0 via the NVIDIA CUDA Toolkit website:
https://developer.nvidia.com/cuda-80-ga2-download-archive
Once you’re on the download page, select Linux => x86_64 => Ubuntu => 16.04 => runfile (local) .
Here is a screenshot of the download page:
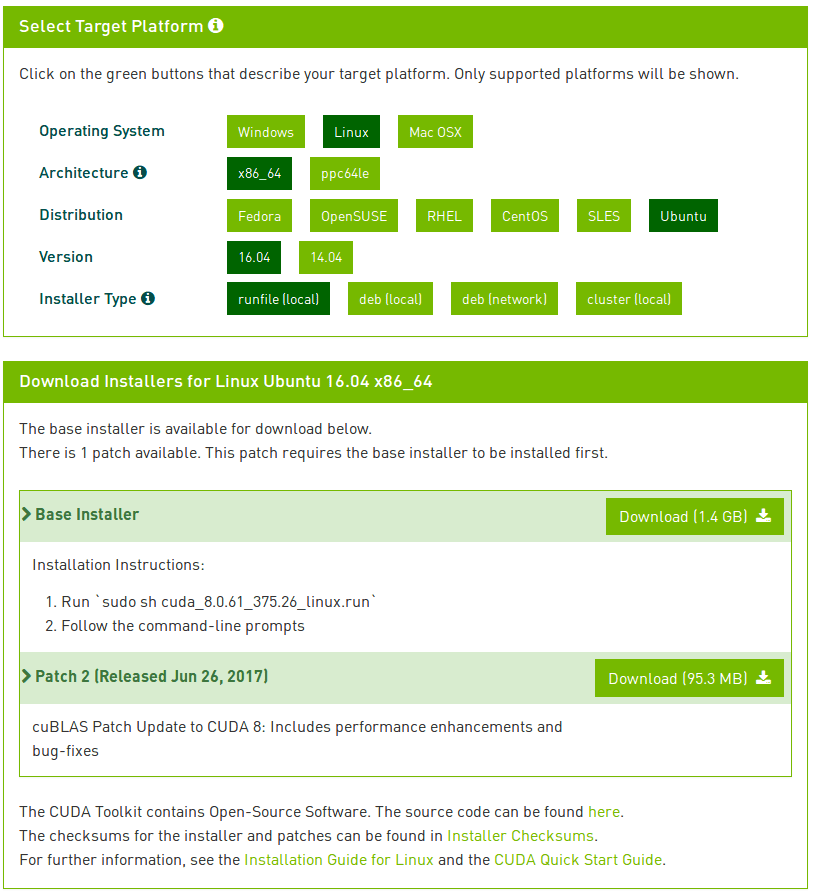
From there, download the -run file which should have the filename cuda_8.0.61_375.26_linux-run or similar. To do this, simply right-click to copy the download link and use wget on your remote GPU box:
$ wget https://developer.nvidia.com/compute/cuda/8.0/Prod2/local_installers/cuda_8.0.61_375.26_linux-run
Important: At the time of this writing there is a minor discrepancy on the NVIDIA website. As shown in Figure 2 under the “Base Installer” download, the filename (as is written) ends with .run . The actual downloadable file ends with -run . You should be good to go in copying my wget + URL command for now unless NVIDIA changes the filename again.
Note: You will need to click the “<=>” button in the code block toolbar above to expand the code block. This will enable you to copy the full URL to the -run file.
From there, unpack the -run file:
$ chmod +x cuda_8.0.61_375.26_linux-run
$ mkdir installers
$ sudo ./cuda_8.0.61_375.26_linux-run -extract=`pwd`/installers
The last step in the block above can take 30-60 seconds depending on the speed of your machine.
Now it is time to install the NVIDIA kernel driver:
$ cd installers
$ sudo ./NVIDIA-Linux-x86_64-375.26.run
During this process, accept the license and follow prompts on the screen.
From there, add the NVIDIA loadable kernel module (LKM) to the Linux kernel:
$ modprobe nvidia
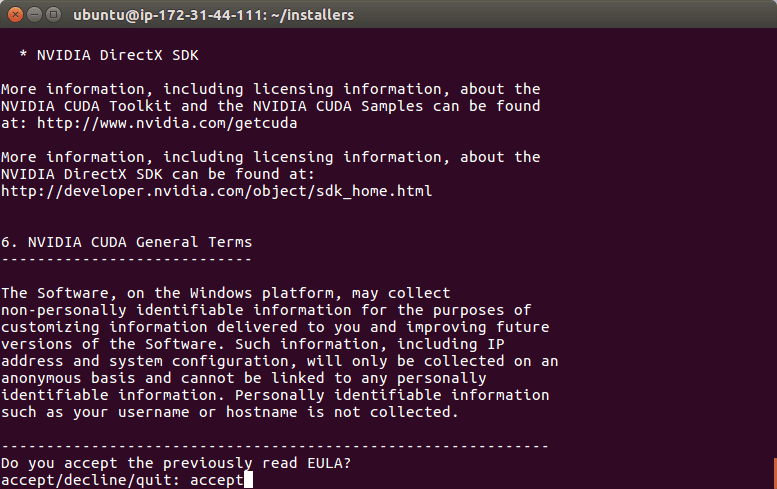
Install the CUDA Toolkit and examples:
$ sudo ./cuda-linux64-rel-8.0.61-21551265.run
$ sudo ./cuda-samples-linux-8.0.61-21551265.run
Again, accepting the licenses and following the default prompts. You may have to press ‘space’ to scroll through the license agreement and then enter “accept” as I’ve done in the image above. When it asks you for installation paths, just press <enter> to accept the defaults.
Now that the NVIDIA CUDA driver and tools are installed, you need to update your ~/.bashrc file to include CUDA Toolkit (I suggest using terminal text editors such as vim , emacs , or nano ):
# NVIDIA CUDA Toolkit
export PATH=/usr/local/cuda-8.0/bin:$PATH
export LD_LIBRARY_PATH=/usr/local/cuda-8.0/lib64/
Now, reload your ~/.bashrc (source ~/.bashrc ) and then test the CUDA Toolkit installation by compiling the deviceQuery example program and running it:
$ source ~/.bashrc
$ cd /usr/local/cuda-8.0/samples/1_Utilities/deviceQuery
$ sudo make
$ ./deviceQuery
deviceQuery, CUDA Driver = CUDART, CUDA Driver Version = 8.0, CUDA Runtime Version = 8.0, NumDevs = 1, Device0 = Tesla K80
Result = PASS
Note: Calling source on ~/.bashrc only has to be done once for our current shell session. Anytime we open up a new terminal, the contents of ~/.bashrc will be automatically executed (including our updates).
At this point, if you have a Result = PASS , then congratulations because you are ready to move on to the next step.
If you do not see this result, I suggest you repeat Step #2 and examine the output of each and every command carefully to ensure there wasn’t an error during the install.
Step #3: Install cuDNN (CUDA Deep Learning Neural Network library)
For this step, you will need to Create a free account with NVIDIA and download cuDNN.
For this tutorial, I used cuDNN v6.0 for Linux which is what TensorFlow requires.
Due to NVIDIA’s required authentication to access the download, you may not be able to use wget on your remote machine for the download.
Instead, download the file to your local machine and then (on your local machine) use scp (Secure Copy) while replacing <username> and <password> with appropriate values to update the file to your remote instance (again, assuming you’re accessing your machine via SSH):
scp -i EC2KeyPair.pem ~/Downloads/cudnn-8.0-linux-x64-v6.0.tgz \
	username@your_ip_address:~
Next, untar the file and then copy the resulting files into lib64 and include respectively, using the -P switch to preserve sym-links:
$ cd ~
$ tar -zxf cudnn-8.0-linux-x64-v6.0.tgz
$ cd cuda
$ sudo cp -P lib64/* /usr/local/cuda/lib64/
$ sudo cp -P include/* /usr/local/cuda/include/
$ cd ~
That’s it for Step #3 — there isn’t much that can go wrong here, so you should be ready to proceed.
Step #4: Create your Python virtual environment
In this section, we will get a Python virtual environment configured on your system.
Installing pip
The first step is to install pip , a Python package manager:
$ wget https://bootstrap.pypa.io/get-pip.py
$ sudo python get-pip.py
$ sudo python3 get-pip.py
Installing virtualenv and virtualenvwrapper
Using pip , we can install any package in the Python Package Index quite easily including virtualenv and virtualenvwrapper. As you know, I’m a fan of Python virtual environments and I encourage you to use them for deep learning as well.
In case you have multiple projects on your machine, using virtual environments will allow you to isolate them and install different versions of packages. In short, using both virtualenv and virtualenvwrapper allow you to solve the “Project X depends on version 1.x, but Project Y needs 4.x dilemma.
The folks over at RealPython may be able to convince you if I haven’t, so give this excellent blog post on RealPython a read.
Again, let me reiterate that it’s standard practice in the Python community to be leveraging virtual environments of some sort, so I suggest you do the same:
$ sudo pip install virtualenv virtualenvwrapper
$ sudo rm -rf ~/.cache/pip get-pip.py
Once we have virtualenv and virtualenvwrapper installed, we need to update our ~/.bashrc file to include the following lines at the bottom of the file:
# virtualenv and virtualenvwrapper
export WORKON_HOME=$HOME/.virtualenvs
export VIRTUALENVWRAPPER_PYTHON=/usr/bin/python3
source /usr/local/bin/virtualenvwrapper.sh
After editing our ~/.bashrc file, we need to reload the changes:
$ source ~/.bashrc
Now that we have installed virtualenv and virtualenvwrapper, the next step is to actually create the Python virtual environment — we do this using the mkvirtualenv command.
Creating the dl4cv virtual environment
In past install tutorials, I’ve presented the choice of Python 2.7 or Python 3. At this point in the Python 3 development cycle, I consider it stable and the right choice. You may elect to use Python 2.7 if you have specific compatibility requirements, but for the purposes of my book, we will use Python 3.
With that said, for the following command, ensure you set the -p flag to python3 .
$ mkvirtualenv dl4cv -p python3
You can name this virtual environment whatever you like (and create as many Python virtual environments as you want), but for the time being, I would suggest sticking with the dl4cv name as that is what I’ll be using throughout the rest of this tutorial.
Verifying that you are in the “dl4cv” virtual environment
If you ever reboot your Ubuntu system; log out and log back in; or open up a new terminal, you’ll need to use the workon command to re-access your dl4cv virtual environment. An example of the workon command follows:
$ workon dl4cv
To validate that you are in the dl4cv virtual environment, simply examine your command line — if you see the text (dl4cv) preceding your prompt, then you are in the dl4cv virtual environment:

Otherwise, if you do not see the dl4cv text, then you are not in the dl4cv virtual environment:

Installing NumPy
The final step before we compile OpenCV is to install NumPy, a Python package used for numerical processing. To install NumPy, ensure you are in the dl4cv virtual environment (otherwise NumPy will be installed into the system version of Python rather than the dl4cv environment).
From there execute the following command:
$ pip install numpy
Once NumPy is installed in your virtual environment, we can move on to compile and install OpenCV.
Step #5: Compile and Install OpenCV
First you’ll need to download opencv and opencv_contrib into your home directory. For this install guide, we’ll be using OpenCV 3.3:
$ cd ~
$ wget -O opencv.zip https://github.com/Itseez/opencv/archive/3.3.0.zip
$ wget -O opencv_contrib.zip https://github.com/Itseez/opencv_contrib/archive/3.3.0.zip
Then, unzip both files:
$ unzip opencv.zip
$ unzip opencv_contrib.zip
Running CMake
In this step we create a build directory and then run CMake:
$ cd ~/opencv-3.3.0/
$ mkdir build
$ cd build
$ cmake -D CMAKE_BUILD_TYPE=RELEASE \
    -D CMAKE_INSTALL_PREFIX=/usr/local \
    -D WITH_CUDA=OFF \
    -D INSTALL_PYTHON_EXAMPLES=ON \
    -D OPENCV_EXTRA_MODULES_PATH=~/opencv_contrib-3.3.0/modules \
    -D BUILD_EXAMPLES=ON ..
Note: I turned CUDA off as it can lead to compile errors on some machines. The CUDA optimizations would internally be used for C++ functions so it doesn’t make much of a difference with Python + OpenCV. Again, the primary use of CUDA in this blog post is to optimize our deep learning libraries, not OpenCV itself.
For CMake, it is important that your flags match mine for compatibility. Also, make sure that your opencv_contrib version is the exact same as the opencv version you downloaded (in this case version 3.3.0 ).
Before we move on to the actual compilation step, make sure you examine the output of CMake.
Start by scrolling to the section titled Python 3 .
Make sure that your Python 3 section looks like the figure below:
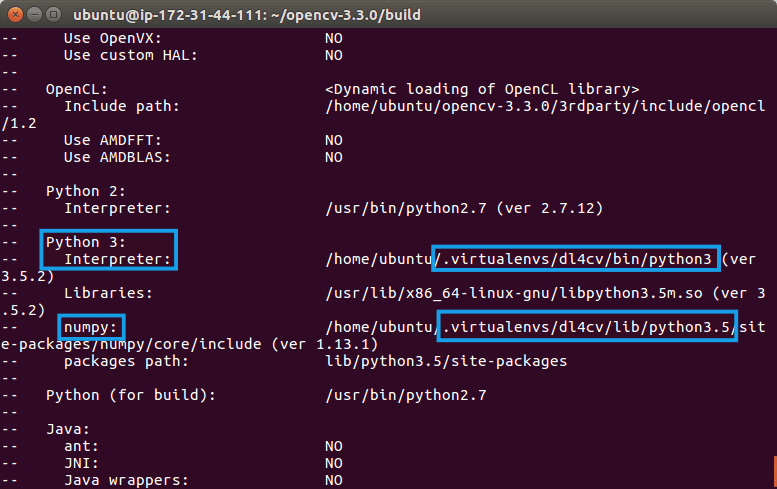
Ensure that the Interpreter points to our python3.5 binary located in the dl4cv virtual environment while numpy points to our NumPy install.
In either case if you do not see the dl4cv virtual environment in these variables’ paths, then it’s almost certainly because you are NOT in the dl4cv virtual environment prior to running CMake!
If this is the case, access the dl4cv virtual environment using workon dl4cv and re-run the command outlined above.
Compiling OpenCV
Now we are now ready to compile OpenCV :
$ make -j4
Note: If you run into compilation errors, you may run the command make clean and then just compile without the flag: make . You can adjust the number of processor cores you use the compile OpenCV via the -j switch (in the example above, I’m compiling OpenCV with four cores).
From there, all you need to do is to install OpenCV 3.3:
$ sudo make install
$ sudo ldconfig
$ cd ~
You can also delete your opencv and opencv_contrib directories to free up space on your system; however, I highly recommend that you wait until the end of this tutorial and ensured OpenCV has been correctly installed before you delete these files (otherwise you’ll have to download them again).
Symbolic linking OpenCV to your virtual environment
To sym-link our OpenCV bindings into the dl4cv virtual environment, issue the following commands
$ cd ~/.virtualenvs/dl4cv/lib/python3.5/site-packages/
$ ln -s /usr/local/lib/python3.5/site-packages/cv2.cpython-35m-x86_64-linux-gnu.so cv2.so
$ cd ~
Note: Make sure you click “<=>” button in the toolbar above to expand the code block. From there, ensure you copy and paste the ln command correctly, otherwise you’ll create an invalid sym-link and Python will not be able to find your OpenCV bindings.
Your .so file may be some variant of what is shown above, so be sure to use the appropriate file.
Testing your OpenCV 3.3 install
Now that we’ve got OpenCV 3.3 installed and linked, let’s do a quick sanity test to see if things work:
$ python
>>> import cv2
>>> cv2.__version__
'3.3.0'
Make sure you are in the dl4cv virtual environment before firing up Python. You can accomplish this by running workon dl4cv .
When you print the OpenCV version in your Python shell it should match the version of OpenCV that you installed (in our case OpenCV 3.3.0 ).
When your compilation is 100% complete you should see output that looks similar to the following:
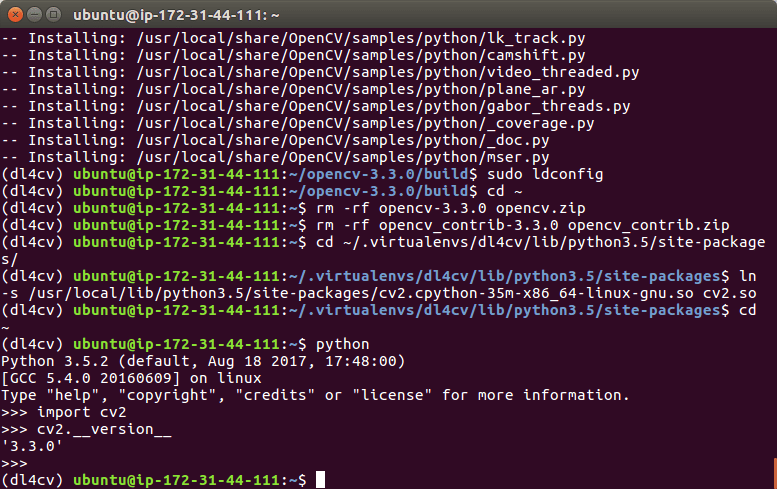
That’s it — assuming you didn’t have an import error, then you’re ready to go on to Step #6 where we will install Keras.
Step #6: Install Keras
For this step, make sure that you are in the dl4cv environment by issuing the workon dl4cv command.
From there we can install some required computer vision, image processing, and machine learning libraries:
$ pip install scipy matplotlib pillow
$ pip install imutils h5py requests progressbar2
$ pip install scikit-learn scikit-image
Next, install Tensorflow (GPU version):
$ pip install tensorflow-gpu
You can verify that TensorFlow has been installed by importing it in your Python shell:
$ python
>>> import tensorflow
>>>
Now we’re ready to install Keras:
$ pip install keras
Again, you can verify Keras has been installed via your Python shell:
$ python
>>> import keras
Using TensorFlow backend.
>>>
You should see that Keras has been imported with no errors and the TensorFlow backend is being used.
Before you move on to Step #7, take a second to familiarize yourself with the ~/.keras/keras.json file:
{
    "image_data_format": "channels_last",
    "backend": "tensorflow",
    "epsilon": 1e-07,
    "floatx": "float32"
}
Ensure that image_data_format is set to channels_last and backend is tensorflow .
Congratulations! You are now ready to begin your Deep learning for Computer Vision with Python journey (Starter Bundle and Practitioner Bundle readers can safely skip Step #7).
Step #7 Install mxnet (ImageNet Bundle only)
This step is only required for readers who purchased a copy of the ImageNet Bundle of Deep Learning for Computer Vision with Python. You may also choose to use these instructions if you want to configure mxnet on your system.
Either way, let’s first clone the mxnet repository and checkout branch 0.11.0 :
$ cd ~
$ git clone --recursive https://github.com/apache/incubator-mxnet.git mxnet --branch 0.11.0
We can them compile mxnet:
$ cd mxnet
$ make -j4 USE_OPENCV=1 USE_BLAS=openblas USE_CUDA=1 USE_CUDA_PATH=/usr/local/cuda USE_CUDNN=1
Followed by sym-linking to our dl4cv environment.
$ cd ~/.virtualenvs/dl4cv/lib/python3.5/site-packages/
$ ln -s ~/mxnet/python/mxnet mxnet
$ cd ~
Finally, you may fire up Python in your environment to test that the installation was successful:
$ python
>>> import mxnet
>>>
Note: Do not delete the mxnet directory in your home folder. Not only do our Python bindings live there, but we also need the files in ~/mxnet/bin when creating serialized image datasets.
Cheers! You are done and deserve a cold beer while you read Deep Learning for Computer Vision with Python (ImageNet bundle).
Note: To avoid significant cloud expenses (or power bills if your box is beneath your desk), I’d recommend that you power off your machine until you’re ready to use it.
What's next? We recommend PyImageSearch University.

120+ total classes • 115+ hours hours of on-demand code walkthrough videos • Last updated: July 2026
★★★★★ 4.84 (128 Ratings) • 16,000+ Students Enrolled
I strongly believe that if you had the right teacher you could master computer vision and deep learning.
Do you think learning computer vision and deep learning has to be time-consuming, overwhelming, and complicated? Or has to involve complex mathematics and equations? Or requires a degree in computer science?
That’s not the case.
All you need to master computer vision and deep learning is for someone to explain things to you in simple, intuitive terms. And that’s exactly what I do. My mission is to change education and how complex Artificial Intelligence topics are taught.
If you're serious about learning computer vision, your next stop should be PyImageSearch University, the most comprehensive computer vision, deep learning, and OpenCV course online today. Here you’ll learn how to successfully and confidently apply computer vision to your work, research, and projects. Join me in computer vision mastery.
Inside PyImageSearch University you'll find:
- ✓ 120+ courses on essential computer vision, deep learning, and OpenCV topics
- ✓ 94+ Certificates of Completion
- ✓ 115+ hours hours of on-demand video
- ✓ Brand new courses released regularly, ensuring you can keep up with state-of-the-art techniques
- ✓ Pre-configured Jupyter Notebooks in Google Colab
- ✓ Run all code examples in your web browser — works on Windows, macOS, and Linux (no dev environment configuration required!)
- ✓ Access to centralized code repos for all 540+ tutorials on PyImageSearch
- ✓ Easy one-click downloads for code, datasets, pre-trained models, etc.
- ✓ Access on mobile, laptop, desktop, etc.
Summary
Today we learned how to set up an Ubuntu + CUDA + GPU machine with the tools needed to be successful when training your own deep learning networks.
If you encountered any issues along the way, I highly encourage you to check that you didn’t skip any steps. If you are still stuck, please leave a comment below.
I want to reiterate that you don’t need a fancy, expensive GPU machine to get started on your deep learning for computer vision journey. Your CPU can handle the introductory examples in the book. To help you get started, I have provided an install tutorial here for Ubuntu CPU users. If you prefer the easy, pre-configured route, my book comes with a VirtualBox virtual machine ready to go.
I hope this tutorial helps you on your deep learning journey!
If you want to study deep learning in-depth, be sure to take a look at my new book, Deep Learning for Computer Vision with Python.
To be notified when future blog posts and tutorials are published on the PyImageSearch blog, be sure to enter your email address in the form below!

Join the PyImageSearch Newsletter and Grab My FREE 17-page Resource Guide PDF
Enter your email address below to join the PyImageSearch Newsletter and download my FREE 17-page Resource Guide PDF on Computer Vision, OpenCV, and Deep Learning.

