
Today’s blog post is inspired by Li Wei, a PyImageSearch reader who emailed me last week and asked:
Hi Adrian,
Thank you for the PyImageSearch blog. I read it each week and look forward to your new posts every Monday. I really enjoyed last week’s tutorial on credit card OCR.
I was wondering: Can this same technique be used for bank check OCR?
I’m working on a project that requires me to OCR bank account and routing numbers from check images, but I’m struggling to extract the digits/symbols. Could you do a blog post covering this?
Thank you.
Great question, Li Wei, thank you for asking.
The short answer is yes, you can use the same template matching techniques that we used for credit card OCR and apply it to bank check OCR…
…but there’s a catch.
As Li Wei found out, it’s much harder to extract the the routing number and account number digits and symbols from a check.
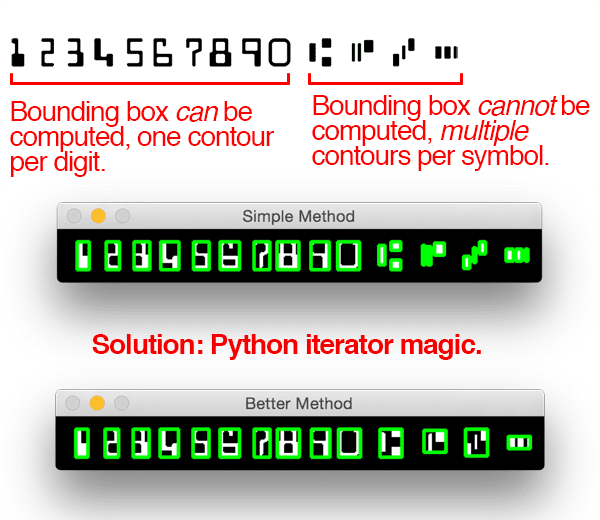
The reason is because bank checks used special fonts where a particular symbol consists of multiple parts — this implies that we need to devise a method that can automatically compute the bounding boxes for these symbols and extract them, just like in the image at the top of this post.
To get started building your own bank check OCR system with OpenCV and Python, just keep reading.
Bank check OCR with OpenCV and Python (Part I)
Since OCR’ing a bank check with OpenCV and Python is much more complicated than OCR’ing a credit card, I’ve decided to break this guide into two parts (just one post would have been far too lengthy).
In Part I (today’s blog post), we will discuss two topics:
- First, we’ll learn about the MICR E-13B font, used by countries including the United States, United Kingdom, Canada, and others for check recognition.
- Second, we’ll discuss how to extract both the digits and symbols from a MICR E-13B reference image. This will enable us to extract ROIs for each of the characters and later use them to OCR a bank check. We’ll accomplish this using OpenCV contours and a bit of Python iterator “magic”.
Next week in Part II of this series, I’ll review how we can actually recognize each of these extracted symbols and digits using our reference ROIs and template matching.
The MICR E-13B font

MICR (Magnetic Ink Character Recognition) is a financial industry technology for processing documents. You will often find this magnetic ink in the E-13B format on the bottom of account statements and checks.
The E-13B variant of MICR contains 14 characters:
- numerals: digits 0-9
- ⑆ transit: bank branch delimiter
- ⑇ amount: transaction amount delimiter
- ⑈ on-us: customer account number delimiter
- ⑉ dash: number delimiter (between routing and account number, for example)
For the four symbols shown above, we will later take advantage of the fact that each symbol contains solely three contours.
Now that we’ve learned about the MICR E-13B check font, let’s make some considerations before we dive into code.
Bank check character recognition is harder than it seems
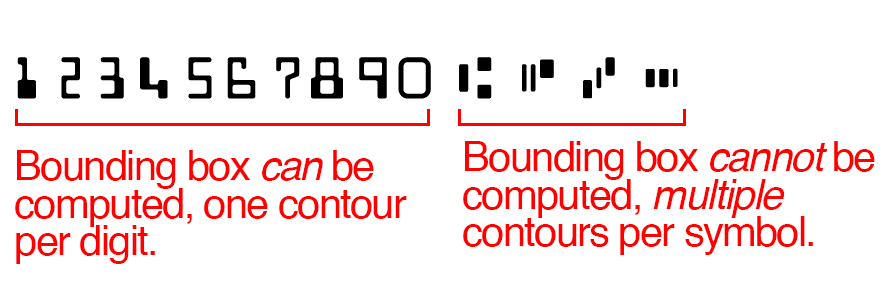
In our previous post credit card OCR post, we had the simpler task of computing bounding boxes of a single contour for each digit.
However, that’s not the case for MICR E-13B.
In the MICR E-13B font used on bank checks, digits still have one contour each.
However, the control symbols have three contours for each character, making the task slightly more challenging.
We can’t use a simple contour and bounding box approach. Instead, we need to devise our own method to reliably extract both digits and symbols.
In the following section, we’ll walk through the steps to accomplish this.
Extracting MICR digits and symbols with OpenCV
Given the challenges associated with extracting bank check characters, it seems we have our work cut out for us.
Let’s begin tackling this problem by opening up a new file, naming it bank_check_ocr.py , and inserting the following code:
# import the necessary packages
from skimage.segmentation import clear_border
from imutils import contours
import numpy as np
import argparse
import imutils
import cv2
Lines 2-7 handle our importing packages. Make sure that you have the following installed on your environment:
- OpenCV: Select the installation guide appropriate for your system from this page.
scikit-image: This is pip-installable viapip install -U scikit-image.numpy: Install viapip install numpyimutils: This is pip-installable viapip install --upgrade imutils. I add features to imutils often, so if you already have a copy, this would be a good time to update it with the--upgradeflag shown.
Tip: You can find installation tutorials by checking the “install” tag associated with my blog by going to https://pyimagesearch.com/tag/install.
Now that we’ve imported our relevant packages (and installed them if needed), let’s build a function to extract the characters from the MICR font:
def extract_digits_and_symbols(image, charCnts, minW=5, minH=15):
	# grab the internal Python iterator for the list of character
	# contours, then  initialize the character ROI and location
	# lists, respectively
	charIter = charCnts.__iter__()
	rois = []
	locs = []
Line 9 begins a (what will be quite lengthy) function for extracting the MICR digits and symbols. This function is broken down into five digestible chunks that’ll we’ll review in the remainder of this section.
For starters, our function takes 4 parameters:
image: The MICR E-13B font image (provided in the code downloads).charCnts: A list of containing the contours of the characters in the reference image (we’ll explain how to obtain these chapters later in the post).minW: An optional parameter which represents the minimum character width. This helps us account for when we encounter 2 or 3 small contours which, together, make up one MICR character. The default value is a width of 5 pixels.minH: The minimum character height. This parameter is optional and has a default value of 15 pixels. The usage rational is the same asminW.
On Line 13, we initialize an iterator for our charCnts list. List objects are inherently “iterable”, meaning that the available __iter__ and __next__ methods have been made by a generator.
Note: Since we don’t have any special requirements for our list iterator (other than the typical traversing from left to right), we use the one built in to the standard Python list. If we did have special needs, we might create a special class and a custom generator + iterator. Unfortunately, Python iterators do not have is a “hasNext” method like you may find in languages such as Java — rather, Python will throw an exception when there are no more items in the iterable object. We account for this exception with a try-catch block in this function.
Lines 14 and 15 initialize empty lists to hold our rois (regions of interest), and locs (ROI locations). We’ll return these lists in a tuple at the end of the function.
Let’s begin looping and see how iterators work:
	# keep looping over the character contours until we reach the end
	# of the list
	while True:
		try:
			# grab the next character contour from the list, compute
			# its bounding box, and initialize the ROI
			c = next(charIter)
			(cX, cY, cW, cH) = cv2.boundingRect(c)
			roi = None
In our function, we start an infinite loop on Line 19 — our exit condition will be part of the body of the loop (when we catch a StopIterator exception). To catch this exception, we need to open a try-catch block on Line 20.
For each iteration of the loop, we grab the next character contour by simply calling next(charIter) (Line 23).
Let’s compute the bounding rectangle around the contour, c , on Line 24. From this function call, we can extract the (x, y)-coordinates and width/height of the rectangle.
We initialize a roi on Line 25, which we will store the character image in shortly.
Next, we’ll check our bounding box width and height for size and take actions accordingly:
			# check to see if the width and height are sufficiently
			# large, indicating that we have found a digit
			if cW >= minW and cH >= minH:
				# extract the ROI
				roi = image[cY:cY + cH, cX:cX + cW]
				rois.append(roi)
				locs.append((cX, cY, cX + cW, cY + cH))
If the character counter’s dimensions are greater than or equal to the minimum width and height, respectively (Line 29), we take the following actions:
- Extract the
roifrom the image using the coordinates and width/height from our bounding rectangle call (Line 31). - Append
roitorois(Line 32). - Append a tuple to
locs(Line 33). This tuple consists of the (x, y)-coordinates of two corners of the rectangle. We will return this list of locations later.
Otherwise, we assume we are working with a MICR E-13B character symbol and need to apply a bit more advanced set of processing operations:
			# otherwise, we are examining one of the special symbols
			else:
				# MICR symbols include three separate parts, so we
				# need to grab the next two parts from our iterator,
				# followed by initializing the bounding box
				# coordinates for the symbol
				parts = [c, next(charIter), next(charIter)]
				(sXA, sYA, sXB, sYB) = (np.inf, np.inf, -np.inf,
					-np.inf)

				# loop over the parts
				for p in parts:
					# compute the bounding box for the part, then
					# update our bookkeeping variables
					(pX, pY, pW, pH) = cv2.boundingRect(p)
					sXA = min(sXA, pX)
					sYA = min(sYA, pY)
					sXB = max(sXB, pX + pW)
					sYB = max(sYB, pY + pH)

				# extract the ROI
				roi = image[sYA:sYB, sXA:sXB]
				rois.append(roi)
				locs.append((sXA, sYA, sXB, sYB))
The else block of the if-else has logic to analyze the special symbols containing multiple contours found in the MICR E-13B font. The first thing we do is build the parts of the symbol on Line 41. The list, parts , contains three contours: (1) the contour we already grabbed on Line 23, (2) the next contour, and (3) the next-next contour. That’s the way iterators work — each time we call next, we are provided with the subsequent item.
Just as we need to know the bounding box for a character with one contour, we need to know the bounding box for a character containing three contours. To accomplish this, initialize four bounding box parameters, sXA through sYB (Lines 42 and 43).
Now we’ll loop through the list of parts which ideally represents one character/symbol. Line 46 begins this loop and first we compute the bounding rectangle for the first item, p , on Line 49.
Using the bounding rectangle parameters, we compare and compute the minimums and maximums in relation to previous values (Lines 50-53). This is the reason we first initialized sXA through sYB to positive/negative infinity values — for code conciseness and readability this is a convenient way to do it.
Now that we’ve found the coordinates of the box surrounding the symbol, let’s extract the roi from the image, append the roi to rois , and append the box coordinates tuple to locs (Lines 56-58).
The remaining code block of our function handles our while-loop exit condition and return statement.
		# we have reached the end of the iterator; gracefully break
		# from the loop
		except StopIteration:
			break

	# return a tuple of the ROIs and locations
	return (rois, locs)
If calling next on charIter (our iterator object) throws a StopIteration exception, then we have reached reached the last contour in the last and are attempting to grab a contour that does not exist. In this case, we break out of our loop. This logic is shown on Lines 62 and 63.
Finally, we return rois and locs in a convenient tuple on Line 66.
Now we are ready to parse command line arguments and continue on with the script:
# construct the argument parse and parse the arguments
ap = argparse.ArgumentParser()
ap.add_argument("-i", "--image", required=True,
	help="path to input image")
ap.add_argument("-r", "--reference", required=True,
	help="path to reference MICR E-13B font")
args = vars(ap.parse_args())
On Lines 69-74 we establish two required command line arguments:
--image: Our query image. We won’t use this argument until next week’s post.--reference: Our reference MICR E-13B font image.
Next, we’ll create “names” for each of the symbols/characters and store them in a list.
# initialize the list of reference character names, in the same
# order as they appear in the reference image where the digits
# their names and:
# T = Transit (delimit bank branch routing transit #)
# U = On-us (delimit customer account number)
# A = Amount (delimit transaction amount)
# D = Dash (delimit parts of numbers, such as routing or account)
charNames = ["1", "2", "3", "4", "5", "6", "7", "8", "9", "0",
	"T", "U", "A", "D"]
The above block is rather simple — we are just establishing names for the symbols we encounter from left to right in the reference image. These charNames are specified in list form on Lines 83 and 84.
Note: Since OpenCV does not support drawing characters in unicode, we need to define “T” for transit, “U” for on-us, “A” for amount, and “D” dash.
Next, we’ll load our reference image into memory and perform some pre-processing:
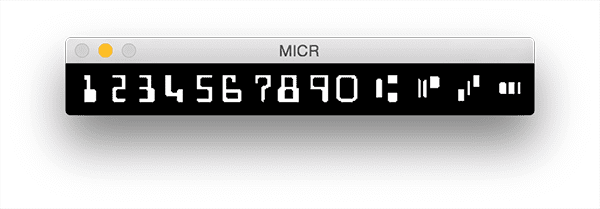
# load the reference MICR image from disk, convert it to grayscale,
# and threshold it, such that the digits appear as *white* on a
# *black* background
ref = cv2.imread(args["reference"])
ref = cv2.cvtColor(ref, cv2.COLOR_BGR2GRAY)
ref = imutils.resize(ref, width=400)
ref = cv2.threshold(ref, 0, 255, cv2.THRESH_BINARY_INV |
	cv2.THRESH_OTSU)[1]
In the above block we complete four tasks:
- Loading the
--referenceimage into memory asref(Line 89). - Converting to grayscale (Line 90).
- Resizing to a
width=400(Line 91). - Binary inverse threshold using Otsu’s method (Lines 92-93).
The result of these simple operations can be seen in Figure 3:
The rest of this code walk-through is broken down into two parts. First, I’ll show you a logical and simple contour method along with the resulting image. Then, we’ll move on to a more advanced method which takes advantage of the function we wrote at the top of the script — extract_digits_and_symbols .
For both parts, there are some common pieces of data we’ll use including ref (the reference image, which we just pre-processed) and refCnts (reference contours, which we are just about to extract).
# find contours in the MICR image (i.e,. the outlines of the
# characters) and sort them from left to right
refCnts = cv2.findContours(ref.copy(), cv2.RETR_EXTERNAL,
	cv2.CHAIN_APPROX_SIMPLE)
refCnts = imutils.grab_contours(refCnts)
refCnts = contours.sort_contours(refCnts, method="left-to-right")[0]

# create a clone of the original image so we can draw on it
clone = np.dstack([ref.copy()] * 3)

# loop over the (sorted) contours
for c in refCnts:
	# compute the bounding box of the contour and draw it on our
	# image
	(x, y, w, h) = cv2.boundingRect(c)
	cv2.rectangle(clone, (x, y), (x + w, y + h), (0, 255, 0), 2)

# show the output of applying the simple contour method
cv2.imshow("Simple Method", clone)
cv2.waitKey(0)
To extract the contours from the reference image, we make use of OpenCV’s cv2.findContours function (Lines 97 and 98).
Note: OpenCV 2.4, 3, and 4 return contours differently, so Line 99 has some logic to account for this.
Next, we sort the contours from left to right on Line 100.
We’re going to draw on the image, so we copy all channels to an image called clone on Line 103.
The last step to the simple contour method, before displaying the results, is to loop over the sorted contours (Line 106). In this loop, we compute the bounding box of each contour (Line 109) and then draw a rectangle around it (Line 110).
Results are displayed by showing the image (Line 113) and pausing here until a key is pressed (Line 114) — see Figure 4:

Do you see the problem with this approach? The issue is that we have 22 bounding boxes rather than the desired 14 bounding outlines (one for each character). Obviously this problem is solvable with a more advanced methodology.
The more advanced method is shown and described below:
# extract the digits and symbols from the list of contours, then
# initialize a dictionary to map the character name to the ROI
(refROIs, refLocs) = extract_digits_and_symbols(ref, refCnts,
minW=10, minH=20)
chars = {}
# re-initialize the clone image so we can draw on it again
clone = np.dstack([ref.copy()] * 3)
# loop over the reference ROIs and locations
for (name, roi, loc) in zip(charNames, refROIs, refLocs):
# draw a bounding box surrounding the character on the output
# image
(xA, yA, xB, yB) = loc
cv2.rectangle(clone, (xA, yA), (xB, yB), (0, 255, 0), 2)
# resize the ROI to a fixed size, then update the characters
# dictionary, mapping the character name to the ROI
roi = cv2.resize(roi, (36, 36))
chars[name] = roi
# display the character ROI to our screen
cv2.imshow("Char", roi)
cv2.waitKey(0)
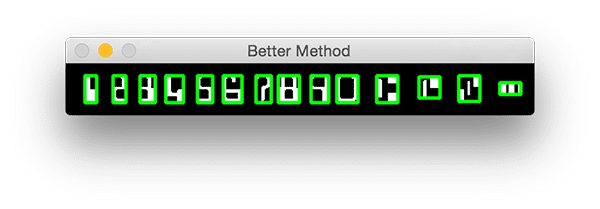
# show the output of our better method
cv2.imshow("Better Method", clone)
cv2.waitKey(0)
Remember that long function, extract_digits_and_symbols , we wrote at the beginning of this script? It is now being put to use on Lines 118 and 119.
Next, we initialize an empty dictionary, chars , which will hold the name and roi of each symbol.
We follow this action by overwriting the clone image (Line 123) with a new copy of ref (to get rid of the rectangles we just drew).
Lastly, we loop over the characters (Line 126). We have three lists which we can conveniently zip into a list of the same length containing 3-tuples. This 3-tuple list is what we’re looping through.
In the body of the for-loop, first we draw a rectangle for each character on our clone image (Lines 129-130).
Second, we resize the roi to 36 by 36 pixels (Line 134) and update our chars dictionary with the name and roi as the key-value pair.
The last step (mainly for debugging/developmental purposes), is to display each roi on the screen until a key is pressed.
The resulting “better method” image is shown to the screen (Line 142) until a key is pressed (Line 143), and that ends our script.
Figure 5 shows the outcome:
Digit and symbol extraction results
Now that we have coded our MICR E-13B digit and symbol extractor, let’s give it a try.
Be sure to use the “Downloads” section of this blog post to download the source code + example images.
From there, execute the following script:
$ python bank_check_ocr.py --image example_check.png \
	--reference micr_e13b_reference.png
As the GIF below demonstrates, we have correctly extracted each of the characters:

In Part II of this blog series, we’ll learn how to OCR each of these bank check characters using Python and OpenCV.
What's next? We recommend PyImageSearch University.
86+ total classes • 115+ hours hours of on-demand code walkthrough videos • Last updated: March 2026
★★★★★ 4.84 (128 Ratings) • 16,000+ Students Enrolled
I strongly believe that if you had the right teacher you could master computer vision and deep learning.
Do you think learning computer vision and deep learning has to be time-consuming, overwhelming, and complicated? Or has to involve complex mathematics and equations? Or requires a degree in computer science?
That’s not the case.
All you need to master computer vision and deep learning is for someone to explain things to you in simple, intuitive terms. And that’s exactly what I do. My mission is to change education and how complex Artificial Intelligence topics are taught.
If you're serious about learning computer vision, your next stop should be PyImageSearch University, the most comprehensive computer vision, deep learning, and OpenCV course online today. Here you’ll learn how to successfully and confidently apply computer vision to your work, research, and projects. Join me in computer vision mastery.
Inside PyImageSearch University you'll find:
- ✓ 86+ courses on essential computer vision, deep learning, and OpenCV topics
- ✓ 86 Certificates of Completion
- ✓ 115+ hours hours of on-demand video
- ✓ Brand new courses released regularly, ensuring you can keep up with state-of-the-art techniques
- ✓ Pre-configured Jupyter Notebooks in Google Colab
- ✓ Run all code examples in your web browser — works on Windows, macOS, and Linux (no dev environment configuration required!)
- ✓ Access to centralized code repos for all 540+ tutorials on PyImageSearch
- ✓ Easy one-click downloads for code, datasets, pre-trained models, etc.
- ✓ Access on mobile, laptop, desktop, etc.
Summary
As today’s blog post demonstrated, OCR’ing a bank check is more difficult than OCR’ing a credit card — this is mainly due to the fact that bank check symbols consist of multiple parts.
We cannot assume that each contour in our reference font image maps to an individual character.
Instead, we need to insert extra logic that examines the dimensions of each contour and determines if we are examining a digit or a symbol.
In the case that we have found a symbol, we need to grab the next two contours to build our bounding box (since a bank check control character consists of three distinct parts).
Now that we know how to extract bank check digits and symbols from an image, we can move on to actually OCR’ing the bank check using Python and OpenCV.
To be notified when the next bank check OCR goes post goes live, just enter your email address in the form below!
See you next week.

Download the Source Code and FREE 17-page Resource Guide
Enter your email address below to get a .zip of the code and a FREE 17-page Resource Guide on Computer Vision, OpenCV, and Deep Learning. Inside you'll find my hand-picked tutorials, books, courses, and libraries to help you master CV and DL!

