Have you ever worked with a video file via OpenCV’s cv2.VideoCapture
function and found that reading frames just felt slow and sluggish?
I’ve been there — and I know exactly how it feels.
Your entire video processing pipeline crawls along, unable to process more than one or two frames per second — even though you aren’t doing any type of computationally expensive image processing operations.
Why is that?
Why, at times, does it seem like an eternity for cv2.VideoCapture
and the associated .read
method to poll another frame from your video file?
The answer is almost always video compression and frame decoding.
Depending on your video file type, the codecs you have installed, and not to mention, the physical hardware of your machine, much of your video processing pipeline can actually be consumed by reading and decoding the next frame in the video file.
That’s just computationally wasteful — and there is a better way.
In the remainder of today’s blog post, I’ll demonstrate how to use threading and a queue data structure to improve your video file FPS rate by over 52%!
Looking for the source code to this post?
Jump Right To The Downloads SectionFaster video file FPS with cv2.VideoCapture and OpenCV
When working with video files and OpenCV you are likely using the cv2.VideoCapture
function.
First, you instantiate your cv2.VideoCapture
object by passing in the path to your input video file.
Then you start a loop, calling the .read
method of cv2.VideoCapture
to poll the next frame from the video file so you can process it in your pipeline.
The problem (and the reason why this method can feel slow and sluggish) is that you’re both reading and decoding the frame in your main processing thread!
As I’ve mentioned in previous posts, the .read
method is a blocking operation — the main thread of your Python + OpenCV application is entirely blocked (i.e., stalled) until the frame is read from the video file, decoded, and returned to the calling function.
By moving these blocking I/O operations to a separate thread and maintaining a queue of decoded frames we can actually improve our FPS processing rate by over 52%!
This increase in frame processing rate (and therefore our overall video processing pipeline) comes from dramatically reducing latency — we don’t have to wait for the .read
method to finish reading and decoding a frame; instead, there is always a pre-decoded frame ready for us to process.
To accomplish this latency decrease our goal will be to move the reading and decoding of video file frames to an entirely separate thread of the program, freeing up our main thread to handle the actual image processing.
But before we can appreciate the faster, threaded method to video frame processing, we first need to set a benchmark/baseline with the slower, non-threaded version.
The slow, naive method to reading video frames with OpenCV
The goal of this section is to obtain a baseline on our video frame processing throughput rate using OpenCV and Python.
To start, open up a new file, name it read_frames_slow.py
, and insert the following code:
# import the necessary packages from imutils.video import FPS import numpy as np import argparse import imutils import cv2 # construct the argument parse and parse the arguments ap = argparse.ArgumentParser() ap.add_argument("-v", "--video", required=True, help="path to input video file") args = vars(ap.parse_args()) # open a pointer to the video stream and start the FPS timer stream = cv2.VideoCapture(args["video"]) fps = FPS().start()
Lines 2-6 import our required Python packages. We’ll be using my imutils library, a series of convenience functions to make image and video processing operations easier with OpenCV and Python.
If you don’t already have imutils
installed or if you are using a previous version, you can install/upgrade imutils
by using the following command:
$ pip install --upgrade imutils
Lines 9-12 then parse our command line arguments. We only need a single switch for this script, --video
, which is the path to our input video file.
Line 15 opens a pointer to the --video
file using the cv2.VideoCapture
class while Line 16 starts a timer that we can use to measure FPS, or more specifically, the throughput rate of our video processing pipeline.
With cv2.VideoCapture
instantiated, we can start reading frames from the video file and processing them one-by-one:
# loop over frames from the video file stream while True: # grab the frame from the threaded video file stream (grabbed, frame) = stream.read() # if the frame was not grabbed, then we have reached the end # of the stream if not grabbed: break # resize the frame and convert it to grayscale (while still # retaining 3 channels) frame = imutils.resize(frame, width=450) frame = cv2.cvtColor(frame, cv2.COLOR_BGR2GRAY) frame = np.dstack([frame, frame, frame]) # display a piece of text to the frame (so we can benchmark # fairly against the fast method) cv2.putText(frame, "Slow Method", (10, 30), cv2.FONT_HERSHEY_SIMPLEX, 0.6, (0, 255, 0), 2) # show the frame and update the FPS counter cv2.imshow("Frame", frame) cv2.waitKey(1) fps.update()
On Line 19 we start looping over the frames of our video file.
A call to the .read
method on Line 21 returns a 2-tuple containing:
grabbed
: A boolean indicating if the frame was successfully read or not.frame
: The actual video frame itself.
If grabbed
is False
then we know we have reached the end of the video file and can break from the loop (Lines 25 and 26).
Otherwise, we perform some basic image processing tasks, including:
- Resizing the frame to have a width of 450 pixels.
- Converting the frame to grayscale.
- Drawing the text on the frame via the
cv2.putText
method. We do this because we’ll be using thecv2.putText
function to display our queue size in the fast, threaded example below and want to have a fair, comparable pipeline.
Lines 40-42 display the frame to our screen and update our FPS counter.
The final code block handles computing the approximate FPS/frame rate throughput of our pipeline, releasing the video stream pointer, and closing any open windows:
# stop the timer and display FPS information fps.stop() print("[INFO] elasped time: {:.2f}".format(fps.elapsed())) print("[INFO] approx. FPS: {:.2f}".format(fps.fps())) # do a bit of cleanup stream.release() cv2.destroyAllWindows()
To execute this script, be sure to download the source code + example video to this blog post using the “Downloads” section at the bottom of the tutorial.
For this example we’ll be using the first 31 seconds of the Jurassic Park trailer (the .mp4 file is included in the code download):
Let’s go ahead and obtain a baseline for frame processing throughput on this example video:
$ python read_frames_slow.py --video videos/jurassic_park_intro.mp4
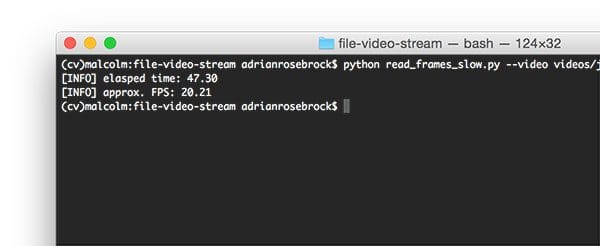
As you can see, processing each individual frame of the 31 second video clip takes approximately 47 seconds with a FPS processing rate of 20.21.
These results imply that it’s actually taking longer to read and decode the individual frames than the actual length of the video clip!
To see how we can speedup our frame processing throughput, take a look at the technique I describe in the next section.
Using threading to buffer frames with OpenCV
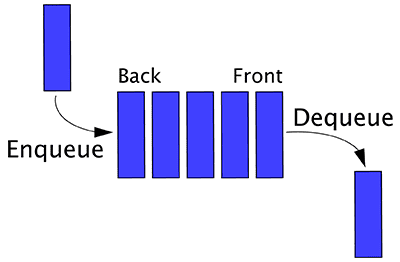
To improve the FPS processing rate of frames read from video files with OpenCV we are going to utilize threading and the queue data structure:
Since the .read
method of cv2.VideoCapture
is a blocking I/O operation we can obtain a significant speedup simply by creating a separate thread from our main Python script that is solely responsible for reading frames from the video file and maintaining a queue.
Since Python’s Queue data structure is thread safe, much of the hard work is done for us already — we just need to put all the pieces together.
I’ve already implemented the FileVideoStream class in imutils but we’re going to review the code so you can understand what’s going on under the hood:
# import the necessary packages from threading import Thread import sys import cv2 # import the Queue class from Python 3 if sys.version_info >= (3, 0): from queue import Queue # otherwise, import the Queue class for Python 2.7 else: from Queue import Queue
Lines 2-4 handle importing our required Python packages. The Thread
class is used to create and start threads in the Python programming language.
We need to take special care when importing the Queue
data structure as the name of the queue package is different based on which Python version you are using (Lines 7-12).
We can now define the constructor to FileVideoStream
:
class FileVideoStream: def __init__(self, path, queueSize=128): # initialize the file video stream along with the boolean # used to indicate if the thread should be stopped or not self.stream = cv2.VideoCapture(path) self.stopped = False # initialize the queue used to store frames read from # the video file self.Q = Queue(maxsize=queueSize)
Our constructor takes a single required argument followed by an optional one:
path
: The path to our input video file.queueSize
: The maximum number of frames to store in the queue. This value defaults to 128 frames, but you depending on (1) the frame dimensions of your video and (2) the amount of memory you can spare, you may want to raise/lower this value.
Line 18 instantiates our cv2.VideoCapture
object by passing in the video path
.
We then initialize a boolean to indicate if the threading process should be stopped (Line 19) along with our actual Queue
data structure (Line 23).
To kick off the thread, we’ll next define the start
method:
def start(self): # start a thread to read frames from the file video stream t = Thread(target=self.update, args=()) t.daemon = True t.start() return self
This method simply starts a thread separate from the main thread. This thread will call the .update
method (which we’ll define in the next code block).
The update
method is responsible for reading and decoding frames from the video file, along with maintaining the actual queue data structure:
def update(self): # keep looping infinitely while True: # if the thread indicator variable is set, stop the # thread if self.stopped: return # otherwise, ensure the queue has room in it if not self.Q.full(): # read the next frame from the file (grabbed, frame) = self.stream.read() # if the `grabbed` boolean is `False`, then we have # reached the end of the video file if not grabbed: self.stop() return # add the frame to the queue self.Q.put(frame)
On the surface, this code is very similar to our example in the slow, naive method detailed above.
The key takeaway here is that this code is actually running in a separate thread — this is where our actual FPS processing rate increase comes from.
On Line 34 we start looping over the frames in the video file.
If the stopped
indicator is set, we exit the thread (Lines 37 and 38).
If our queue is not full we read the next frame from the video stream, check to see if we have reached the end of the video file, and then update the queue (Lines 41-52).
The read
method will handle returning the next frame in the queue:
def read(self): # return next frame in the queue return self.Q.get()
We’ll create a convenience function named more
that will return True
if there are still more frames in the queue (and False
otherwise):
def more(self): # return True if there are still frames in the queue return self.Q.qsize() > 0
And finally, the stop
method will be called if we want to stop the thread prematurely (i.e., before we have reached the end of the video file):
def stop(self): # indicate that the thread should be stopped self.stopped = True
The faster, threaded method to reading video frames with OpenCV
Now that we have defined our FileVideoStream
class we can put all the pieces together and enjoy a faster, threaded video file read with OpenCV.
Open up a new file, name it read_frames_fast.py
, and insert the following code:
# import the necessary packages from imutils.video import FileVideoStream from imutils.video import FPS import numpy as np import argparse import imutils import time import cv2 # construct the argument parse and parse the arguments ap = argparse.ArgumentParser() ap.add_argument("-v", "--video", required=True, help="path to input video file") args = vars(ap.parse_args()) # start the file video stream thread and allow the buffer to # start to fill print("[INFO] starting video file thread...") fvs = FileVideoStream(args["video"]).start() time.sleep(1.0) # start the FPS timer fps = FPS().start()
Lines 2-8 import our required Python packages. Notice how we are using the FileVideoStream
class from the imutils
library to facilitate faster frame reads with OpenCV.
Lines 11-14 parse our command line arguments. Just like the previous example, we only need a single switch, --video
, the path to our input video file.
We then instantiate the FileVideoStream
object and start the frame reading thread (Line 19).
Line 23 then starts the FPS timer.
Our next section handles reading frames from the FileVideoStream
, processing them, and displaying them to our screen:
# loop over frames from the video file stream while fvs.more(): # grab the frame from the threaded video file stream, resize # it, and convert it to grayscale (while still retaining 3 # channels) frame = fvs.read() frame = imutils.resize(frame, width=450) frame = cv2.cvtColor(frame, cv2.COLOR_BGR2GRAY) frame = np.dstack([frame, frame, frame]) # display the size of the queue on the frame cv2.putText(frame, "Queue Size: {}".format(fvs.Q.qsize()), (10, 30), cv2.FONT_HERSHEY_SIMPLEX, 0.6, (0, 255, 0), 2) # show the frame and update the FPS counter cv2.imshow("Frame", frame) cv2.waitKey(1) fps.update()
We start a while
loop on Line 26 that will keep grabbing frames from the FileVideoStream
queue until the queue is empty.
For each of these frames we’ll apply the same image processing operations, including: resizing, conversion to grayscale, and displaying text on the frame (in this case, our text will be the number of frames in the queue).
The processed frame is displayed to our screen on Lines 40-42.
The last code block computes our FPS throughput rate and performs a bit of cleanup:
# stop the timer and display FPS information fps.stop() print("[INFO] elasped time: {:.2f}".format(fps.elapsed())) print("[INFO] approx. FPS: {:.2f}".format(fps.fps())) # do a bit of cleanup cv2.destroyAllWindows() fvs.stop()
To see the results of the read_frames_fast.py
script, make sure you download the source code + example video using the “Downloads” section at the bottom of this tutorial.
From there, execute the following command:
$ python read_frames_fast.py --video videos/jurassic_park_intro.mp4
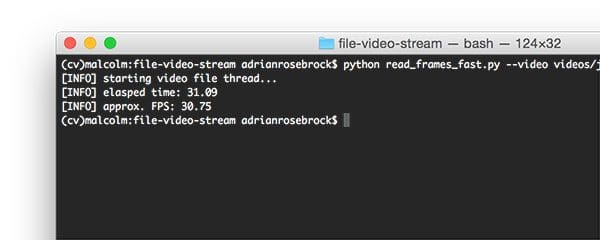
As we can see from the results we were able to process the entire 31 second video clip in 31.09 seconds — that’s an improvement of 34% from the slow, naive method!
The actual frame throughput processing rate is much faster, clocking in at 30.75 frames per second, an improvement of 52.15%.
Threading can dramatically improve the speed of your video processing pipeline — use it whenever you can.
What about built-in webcams, USB cameras, and the Raspberry Pi? What do I do then?
This post has focused on using threading to improve the frame processing rate of video files.
If you’re instead interested in speeding up the FPS of your built-in webcam, USB camera, or Raspberry Pi camera module, please refer to these blog posts:
- Increasing webcam FPS with Python and OpenCV
- Increasing Raspberry Pi FPS with Python and OpenCV
- Unifying picamera and cv2.VideoCapture into a single class with OpenCV
What's next? We recommend PyImageSearch University.
86 total classes • 115+ hours of on-demand code walkthrough videos • Last updated: October 2024
★★★★★ 4.84 (128 Ratings) • 16,000+ Students Enrolled
I strongly believe that if you had the right teacher you could master computer vision and deep learning.
Do you think learning computer vision and deep learning has to be time-consuming, overwhelming, and complicated? Or has to involve complex mathematics and equations? Or requires a degree in computer science?
That’s not the case.
All you need to master computer vision and deep learning is for someone to explain things to you in simple, intuitive terms. And that’s exactly what I do. My mission is to change education and how complex Artificial Intelligence topics are taught.
If you're serious about learning computer vision, your next stop should be PyImageSearch University, the most comprehensive computer vision, deep learning, and OpenCV course online today. Here you’ll learn how to successfully and confidently apply computer vision to your work, research, and projects. Join me in computer vision mastery.
Inside PyImageSearch University you'll find:
- ✓ 86 courses on essential computer vision, deep learning, and OpenCV topics
- ✓ 86 Certificates of Completion
- ✓ 115+ hours of on-demand video
- ✓ Brand new courses released regularly, ensuring you can keep up with state-of-the-art techniques
- ✓ Pre-configured Jupyter Notebooks in Google Colab
- ✓ Run all code examples in your web browser — works on Windows, macOS, and Linux (no dev environment configuration required!)
- ✓ Access to centralized code repos for all 540+ tutorials on PyImageSearch
- ✓ Easy one-click downloads for code, datasets, pre-trained models, etc.
- ✓ Access on mobile, laptop, desktop, etc.
Summary
In today’s tutorial I demonstrated how to use threading and a queue data structure to improve the FPS throughput rate of your video processing pipeline.
By placing the call to .read
of a cv2.VideoCapture
object in a thread separate from the main Python script we can avoid blocking I/O operations that would otherwise dramatically slow down our pipeline.
Finally, I provided an example comparing threading with no threading. The results show that by using threading we can improve our processing pipeline by up to 52%.
However, keep in mind that the more steps (i.e., function calls) you make inside your while
loop, the more computation needs to be done — therefore, your actual frames per second rate will drop, but you’ll still be processing faster than the non-threaded version.
To be notified when future blog posts are published, be sure to enter your email address in the form below!
Download the Source Code and FREE 17-page Resource Guide
Enter your email address below to get a .zip of the code and a FREE 17-page Resource Guide on Computer Vision, OpenCV, and Deep Learning. Inside you'll find my hand-picked tutorials, books, courses, and libraries to help you master CV and DL!
Steve Goldsmith
This didn’t work for me using a CHIP SoC. I saw exactly the same frame rate. A simpler method is to move the UVC code into a separate process (mjpg-streamer) and use a simple socket based client thus removing the need for VideoCapture. I get precise FPS and better overall performance this way. See my project https://github.com/sgjava/opencv-chip which includes the Python code and performance tests.
Adrian Rosebrock
Thanks for sharing Steve!
ghanendra
Hey Adrian, another awesome tutorial, Thanks a lot.
I have one problem, I ‘m working on getting frames from camera over network, can we use threaded frames there?
What if we are using cv2.capture in Tkinter? How to increase fps processing in Tkinter.
Adrian Rosebrock
I actually demonstrate how to use OpenCV and TKinter in this blog post. The post assumes you’re reading from a video stream, but you can swap it out for a file video easily.
Ghanendra
Hi Adrian, I think you missed my first question..
When I read frames from a video using cv2.VideoCapture, speed of reading the frames is much faster than the normal speed of the video. How to read frames from the video at constant rate?
Hi Adrian, I’m using TCP protocol over network to receive frames, fps is very low.
What can I do for that?
Adrian Rosebrock
OpenCV doesn’t actually “care” what the true FPS of the video is. The goal, in the case of OpenCV, is to read and process the frames as fast as possible. If you want to display frames at a constant rate you’ll need to insert
time.sleep
calls into the main loop. Again, OpenCV isn’t directly made for video playback.As or transmitting frames over a TCP protocol, that is more network overhead which will certainly reduce your overall FPS. You should look into gstreamer and FFMPEG to speedup the streaming process.
Ghanendra
Thank a lot Adrian.
Luis
Hey Adrian, good work as always, i have implemented this in a real time application in order to achieve some LPR cameras, however, i have to stream the feed to a web server. My camera has h264 support (logitech c920) but i haven’t found how to pull the raw h264 frames from camera using opencv. Do you have any experience with this? I’m sure this would increase even more my fps since no decoding-enconding would be requiered.
Adrian Rosebrock
Unfortunately, I do not have any direct experience with this. I would likely look into some combination of FFMPEG and gstreamer to see if you could stream the frames directly over your network.
skrtu
https://mike632t.wordpress.com/2014/11/04/video-streaming-using-netcat/
Adrian Rosebrock
Hi Florent — I just double-checked on my system. My Python 2.7 “fast” method does seem to be slightly faster than the Python 3.5 “fast” method. Perhaps there is a difference in the
Queue
data structure between Python versions that I am not aware of (or maybe the threading?).However, I am not able to replicate your slower method being substantially speedier than the fast, threaded method (Python 3.5):
$ python read_frames_slow.py –video videos/jurassic_park_intro.mp4
[INFO] elasped time: 44.06
[INFO] approx. FPS: 21.70
$ python read_frames_fast.py –video videos/jurassic_park_intro.mp4
[INFO] starting video file thread…
[INFO] elasped time: 38.52
[INFO] approx. FPS: 24.82
Regardless, it does seem like the Python 3 version is slower. This might be due to the Python 3 + OpenCV 3 bindings on a difference in the
Queue
data structure that I am not aware of.Adrian Rosebrock
This must be a Python 3 versioning difference then. I’ll have to do some research and see if there was a change in how Python 3 handles either the Queue data structure or threading.
Jon
Hi Adrian,
Would there be a way to use this technique to process videos much quicker? Say I had a video that was 1 hour long, could I then use threading to process the video in less than an hour? What happens if I try to use the VideoWriter to save the frames from the thread? Will the resulting video file play at a much faster speed than the original input video?
Adrian Rosebrock
I would suggest using 1 thread to read the frames from a video file and store them in a queue. Then, create as many processes as you have cores on your CPU and have them process the frames in parallel. This will dramatically speedup your throughput.
As for using
cv2.VideoWriter
, please refer to this blog post.Marc
Hello guys.
I put in the “filevideostream.py” the “queueSize=1024” instead of “queueSize=128” and for me the fast version has a considerable increase of fps.I don’t test it so much until now to find if is a suitable solution ,but i want to see your point of view 🙂 .
Kenny
Thanks Adrian! As always, there’s always something new to learn from you and fellow enthusiasts on your web! 🙂
Adrian Rosebrock
Thanks Kenny!
TomKom
Hi Adrian,
Do you think it’s feasible to change queue length dynamically?
I’ve got a script that does detection (1st frame) and then tracking (remaining 24 frames), in an endless loop, taking images from camera.
The problem I’m facing is that during detection some frames are ‘lost’ and the tracker is not able to pick up the object.
When using the queue it’s a bit more random as queue fills up quickly (quicker than the script takes them away from the front/bottom of the queue) so it’s constantly full. When detection happens, new frames are not added to the queue so they’re lost, though in a more random order now.
Do you have any recommendations for this issue?
Thank you,
Tom
Adrian Rosebrock
You can certainly change the queue length dynamically, but you would have to implement a thread-safe queue with a dynamic size yourself. Actually, I’m not sure about this, but if you instantiate
Queue()
without any data parameters it might allow for the queue to shrink and expand as needed.Peter Simonyi
Hi Adrian,
I have almost the same issue:
my code is capture a RTSP stream, works fine.
The RTSP FPS is 25, but image processing approx 1-2 FPS, so the stream will be corrupted, because I use native read() function.
I’m planning to modify the code:
– first thread for capture all frame to a queue
– second stream for processing the newest frame from the queue
My question, how can I get the newest frame from the queue?
Yes I know I cannot processing all frame, but I hope the RTSP stream decoding will be error free.
Adrian Rosebrock
I’m a bit confused about the point of the first thread. Why are you capturing all frames to a queue if you know you won’t be able to process them all since the system is running at 1-2 FPS?
Brandon
Great stuff as always, Adrian.
In some of my code, after I run
cap = cv2.VideoCapture(vidfile)
I then get things like file fps or number of frames using various cap.get calls, example:
fps = cap.get(cv2.CAP_PROP_FPS)
Or, to start the read at a specific frame I would run:
cap.set(cv2.CAP_PROP_POS_MSEC, startframe*1000/fps)
Is there a way to use get and set on the videoCapture object which with this method would be in FileVideoStream?
Thanks,
Brandon
Adrian Rosebrock
Great question Brandon. I personally don’t like using the
cap.get
andget.set
calls as they can be extremely temperamental based on your OpenCV version, codecs installed, or if you’re working with a webcam versus file on disk.That said, the best way to modify this code would be to update the construct to accept a pre-initialized
cv2.VideoCapture
object rather than having the constructor built it itself.Gilles
Hi Adrian,
Good article as always ! Recently, I came up with the exact same need, separate processing and input/output for a small script.
I guess that your example has a few drawbacks that I would like to point out :
– Never use sleep function (line 20.) to synchronize your threads. It is always a source of confusion and misconception. Because you are using the queue emptiness as an exit condition, you have to fill it before. I would suggest another approach where reading is performed by the main thread and the processing by another thread. You could use the Queue.join() Queue.task_done() as a way to synchronize threads. Usually this pattern is best achieved with a last message enqueued to kill the processing thread.
– Threading in python comes with some limitations. One of them is GIL (Global Interpreter Lock) which means that even if you are using many threads only one of them is running at once. This is a major drawback using threading in python. Obviously, if you are only relying on bindings (opencv here) you can overcome it (the GIL should be released in a c/c++ bindings). As an alternative, I would recommend the multiprocessing module.
– Depending on the application, I would consider using a smaller queue but more processing threads. Obviously, you rely on a tradeoff between reading time and processing time.
Thanks,
Gilles.
Adrian Rosebrock
Hi Gilles, great points. I used
time.sleep
in this case as a matter of simplicity, but yes, you are right. As for threading versus multiprocessing, for I/O operations it’s common to use simple threads. Is there a particular reason you’re recommending multiprocessing in this case?Gilles
As a rule of thumb, I would always recommend using multiprocessing rather than threading. In Python (as well as some other interpreted language), even if you are running multiple threads, only one of them goes at a time. This is called GIL (Global InterpreterLock). So, using many threads with pure Python code won’t bring you the expected parallel execution.On the other hand, multiprocessing relies on separate processes and interprocess communication. Each process runs its own python interpreter, allowing for parallel execution of pure python code.
Obviously, in the example you provided, using threading for I/O is not a big issue. The I/O occurs in opencv, and GIL is released when going deep in opencv (reaching c++ native code).
Last point, using multiprocessing can ease pure Python parallel execution easily and efficiently using multiprocessing.Pool and multiprocessing.Queue (same interface as standard Queue).
Gilles.
Adrian Rosebrock
Thanks for the tips Giles. I’ve always defaulted to threads for I/O heavy tasks and then processes for computation heavy tasks. I’ll start playing around with multi-processing for other tasks as well now.
Raghav
Hey Adrian! cool post as always. Just a typo though.. in the line “feeing up our main thread”, freeing is misspelt
Kim Willem van Woensel Kooy
Hey Adrian! I have learned much from your blog posts. I’m also looking for ways to speed up my VideoCapture-functions, so this post was excellent. But I’m wondering if it is possible to skip frames in a video file? I’m trying to detect motion with a simple pixel based matching (thresholding), and I want to make an if statement telling the program to skip the next 24 frames if no motion is detected. If motion is detected I want to process every frame until no motion is detected. See my problem?
I’m using VideoCapture.read() for looping through the frames.
Adrian Rosebrock
Instead of using
.read()
to read and decode each frame, you could actually use.grab
which is much faster. This would allow you to seek N frames into the video without having to read and decode each of the previous N – 1 frames. I’ve heard it’s also possible to use the.set
method as well, but I haven’t personally tried this.Chandramauli Kaushik
Something strange happened in my case:
read_frames_slow was playing the video perfectly.
read_frames_fast was playing the video slowly.
But the opposite should happen, right!!!!!
Here is the Terminal OUTPUT:
(cv) Chandramaulis-MacBook-Pro:increaseFPS Mauli$ python read_frames_fast.py –video videos/jurassic_park_intro.mp4
[INFO] starting video file thread…
2017-03-01 00:32:21.473 python[43433:374316] !!! BUG: The current event queue and the main event queue are not the same. Events will not be handled correctly. This is probably because _TSGetMainThread was called for the first time off the main thread.
Terminated: 15
(cv) Chandramaulis-MacBook-Pro:increaseFPS Mauli$ python read_frames_slow.py –video videos/jurassic_park_intro.mp4
2017-03-01 00:32:43.113 python[43481:374632] !!! BUG: The current event queue and the main event queue are not the same. Events will not be handled correctly. This is probably because _TSGetMainThread was called for the first time off the main thread.
Terminated: 15
Why is this happening?
Chandramauli Kaushik
BTW, I am using python 3.5.
Adrian Rosebrock
As the other comments have suggested, this seems to be an issue with Python 3 only. For Python 2.7, the threaded version is much faster. I’m not sure why it’s so much slower for Python 3.
Phil Birch
I came across a problem with your code with my awful slow hard dive. If another application has heavy use of the hard drive the queue drops to zero and your more() method will return False prematurely, ending the video reading before the end of the file. However there’s a quick fix. The get method from the Queue has a blocking option and instead of testing the queue length in more() test the self.stopped flag instead
def read(self):
# return next frame in the queue
return self.Q.get(block=True, timeout=2.0)
def more(self):
# return True if there are still frames in the queue
return not self.stopped
This also means you can remove the time.sleep(1.0) line from the main
Adrian Rosebrock
Thanks for sharing Phil!
ap
Python 3.5, I’m seeing same behavior as Chandramauli Kaushik, the FAST version is at least
I used a different video, here are the speeds
SLOW=60.29 FPS
FAST=16.28 FPS
Adrian Rosebrock
As mentioned in previous comments, this is definitely a Python 3 specific issue. I’m not sure why it happens only for Python 3.5 + OpenCV 3, but not Python 2.7 + OpenCV 3 or Python 2.7 + OpenCV 2.4. My guess is that there was a change in how the
Queue
data structure works in Python 3, but again, I’m not entirely sure.Dixon Dick
Using OpenCV 3.3.1 on a Raspberry Pi creates this exact situation.
Phil’s suggestion fixes the problem. Many thanks!
Dixon Dick
Phil, should this be a pull request?
Adrian Rosebrock
I will make sure this is updated in the next version of imutils. It may even be worthy of creating a dedicated blog post.
Matheus
Same thing here:
Python 3.6.0
OpenCV 3.2.0-dev
python3 read_frames_fast.py –video videos/jurassic_park_intro.mp4
[INFO] starting video file thread…
[INFO] elasped time: 64.48
[INFO] approx. FPS: 14.83
python3 read_frames_slow.py –video videos/jurassic_park_intro.mp4
[INFO] elasped time: 29.66
[INFO] approx. FPS: 32.23
That is very weird. The “slow” version is more than 2x faster. Quite Ironic!
Adrian Rosebrock
Indeed! It’s certainly a Python 3 specific issue.
Wim Valcke
Hi Adrian,
I have a solution to the problem with python3.
The reason is that the stream reader in the thread is continuously trying to push something into the queue in a direct tight while loop. On the other side the main thread is trying to get data from the queue. As locking is necessary, or the video thread or the main thread can access the queue.
As the video thread has less work then the main thread it’s continuously trying to push the data if at any moment we a free slot in the queue. But this limits the access from the main thread to get data out of it.
Just adding a small time.sleep(0.001) inside the while loop at the beginning gives a little breathing room for the main thread to get data of the queue.
Now we have a different story. On my system the slow version
[INFO] elasped time: 11.11
[INFO] approx. FPS: 86.03
fast version before the change
[INFO] elasped time: 48.18
[INFO] approx. FPS: 19.84
The fast version after the change
[INFO] elasped time: 8.13
[INFO] approx. FPS: 102.72
It’s a bit faster than the non thread version, reason is the overlapping time of reading a frame and processing a frame in different threads.
Moral of the story is that tight while loops are never a good idea when using threading.
This solution should work also for python 2.7.
I just have another remark. The main thread assumes that if the queue is empty, the video is at the end. If we would have a faster consumer than a producer this is a problem.
My suggestion is to add a method to FileVideoStream
def running(self):
# indicate that the thread is still running
return(not(self.stopped))
The current implementation changes self.stopped to True is the video file is at the end.
In the main application can be changed like this. Also the sleep of 1 second at the beginning (which was there to let the queue fill up) can be left out.
You nicely see the video showing and you see the queue size filling up in a few secs to max.
while fvs.running():
# grab the frame from the threaded video file stream, resize
# it, and convert it to grayscale (while still retaining 3
# channels)
frame = fvs.read()
frame = imutils.resize(frame, width=450)
frame = cv2.cvtColor(frame, cv2.COLOR_BGR2GRAY)
frame = np.dstack([frame, frame, frame])
All the best,
\Wim.
Adrian Rosebrock
Hi Wim — thanks for sharing. I would like to point out that the
Queue
data structure is thread safe in both Python 2.7 and Python 3. It’s also strange that the slowdown doesn’t happen with Python 2.7 — it only seems to happen with Python 3. Yourtime.sleep
call seems to do the trick as it likely prevents the semaphores from constantly being polled, but again, it still seems to be Python 3 specific.Richard Gao
Hi Wim,
If we have a fast producer and slow consumer, the main thread will missed some frames to process.
So my suggestion is:
while fvs.running or fvs.more():
# get the frame and process them
Igor
Hi, Adrian! Any upcoming fix for python3 ? On 3.6 same behavor as everybody has… I see that “slow” version is getting 120% CPU + 290Mb RAM on my Macbook, “fast” version takes 175% CPU and 990Mb RAM (Reading .MOV container with H.264 FullHD video). So Assuming higher CPU/memory usage there should be an effect, but it plays like 30-50% slower…
Adrian Rosebrock
As I mentioned in previous comments, I’m not sure what the issue is with Python 3 and why it takes so much longer than Python 2.7. I would appreciate it if another PyImageSearch reader could investigate this issue further as I’m pretty sure the issue is with the
Queue
data structure.Igor
Oh, and I have read all your posts, thanks! Very easy to read and understand for noob like me 🙂
May I have advise from you about this questions:
1. What is the best way to detect traffic signals? (I am using color tracking through HSV threshold and then detecting shape through HoughCircles . But I am getting a lot of false positives when red car is crossing or someone brake lights is on 🙂
2. What is the best way to detect standing/moving cars? Train Haar?
Thank you!
Adrian Rosebrock
1. To detect traffic signals I would train a custom object detector to recognize the traffic signal. From there you could apply color thresholding to determine which light is “on”.
2. This really depends on the data that you are working with. HOG + Linear SVM detectors might work here if the video is fixed and non-moving, but it will be harder to generalize across datasets. In that case you might consider a more advanced approach such as deep learning.
Cooper
I switched my script over from the usual VideoCapture to your threaded method and am only getting a 1-2% better FPS : /
Adrian Rosebrock
Which version of OpenCV and Python are oyu using?
Daniel
I was able to replicate the performance improvements with the demo script for Python 2.7. However, not within my own custom app code for some reason.
I ended up playing with a few file formats instead and learned the following from benchmarking via the FPS class.
Test Files:
101MB 1080p .mp4 (Drone raw file)
26MB 1080p .mov (Quicktime re-export from raw file)
18MB 1080p .m4v (Quicktime re-export from raw file)
Learnings:
– The smaller .mov file processed just as slowly as the raw .mp4 file.
– The smallest .m4v file processed 2x faster than the raw .mp4 file.
Frank
Hi, Adrian Rosebrock, very good works! I would like to asking you one question, is cv2.videocapture.read( ) method I/O bound or CPU bound? As far we know, decoding video is slow, so the read( ) method is blocked. If it is CPU bound, should we use multiprocessing?
Lee
Hi, Adrian! I am trying to use collections.deque to cache frames, because I don’t need to check if it is full, but when it run, I always get this: “IndexError: pop from an empty deque‘’. Maybe deque cache object slower than queue.Queue. I am not sure whether my program has problem.(Python: 3.5.2, Opencv: 3.2.0)
Adrian Rosebrock
Hi Lee — I’m not exactly sure what the issue is there. The error message states that the dequeue is empty. I would suggest checking your logic in the code to ensure the frame is getting added to the dequeue.
Sohaib
I am not sure what is happening but the slow script is giving me an FPS of 105.07 while the threaded one gives 20.63.
Did a newer version of opencv make a better implementation of .read()?
Adrian Rosebrock
I assume you’re using Python 3? If so, check the rest of the comments on this page. It appears that Python 3 uses a different implementation of the
Queue
class which dramatically slows down the frame reads. I’m not sure why this is and would request PyImageSearch readers with experience in Python 2.7 and Python 3 differences as well as multi-threading to investigate this.David
Hi Adrian,
I use your code with a little robot to overlay gps position, date, time, .. on camera video.
It works fine.
I just modified the class to include videowriter to record video on a USB3 stick.
I saw the difference between read() method in an another thread and in the main one. Well done.
Problem begins when I want to play the recorded video. For example, a 10s video is played in 7s… The overlayed time runs too faster regardless of fps set on videowriter().
Can you explain why ?
Thanks.
Adrian Rosebrock
Hi David — I actually discuss the cv2.VideoWriter class in more detail over here. While OpenCV does a really great job reading frames from video files it can be problematic writing the frames back out to disk. The short version is that I’m not really sure why this is happening even if you are adjusting your FPS parameters. I’m sorry I couldn’t be of more help here, but I would suggest looking into the video I/O libraries you have installed and see if there are any known issues with OpenCV.
Reza Ghoddoosian
Hi Adrian
I was wondering why you did not use queue for reading from a webcam with the same method in one of your tutorials
A i have understood, using a queue will make you use every single frame while, in contrast, without using queue you may lose a couple frames in between. maybe in a live stream your dont care about this but in a video file with a limited frame number you do. right?
Adrian Rosebrock
Yes, a queue will make you read every single frame, but that’s desirable for real-time applications. You could easily lag behind if your video processing pipeline is complex. Instead, you read the most recent frame from the camera buffer.
rahman
Hey Adrian
I encounter something odd. I work on a project that I want to read all frames and add it to a buffer. then I process buffer at once. when I use your fast code, it just read a few frames (between 140-145 ). can you suggest any solution?
Adrian Rosebrock
Hi Rahman — this method is intended to always keep the buffer full. If you pull a frame from it a new one will be added. It sounds like you are reaching a balance where new frames cannot be read faster than they are processed.
Rahman
Dear Adrian, Thank you for the answer
I found the reason why i encounter this issue. when the consumer is much faster than producer the queue becomes empty very soon and ” more() ” function thinks all frames are used and there is no frame to return. so the procedure ends. I do a little modification in code in order to fix this issue and solve it.
unfortunately for my application the fast and slow procedure finish in the same time but for applications that consumer(the algorithm that process frames) has a lot to do, this method can decrease the processing time .
Ps: I think if you want to have a fair compassion, you have to add initial (1) second- for sleep after defining an instance from filevideostram class- to the processing time in fast code
Sergei
I think if consumer is faster than producer,
you can modify mode function
def more(self):
# return True if there are still frames in the queue
return self.Q.qsize() > 0 or not self.stopped
but that can lead to race condition (more is called when stop is False and then we’ll try to get next frame stop becomes True because it was the last frame) so you can add dummy None to your queue as an indicator for end of the video, and when you’ll get None in your consumer you can say it’s the end
def stop(self):
# indicate that the thread should be stopped
self.Q.put(None)
self.stopped = True
Carl.C
Hi, Adrian!
Good article!
It’s so excited to find out there is a faster way to capture video. But I find the “fast version” is twice slower than the “slow version”.
I’ve saw the comments, it seems to be python3’s special problem?
To fix this problem, I changed the queueSize from 128 to 1280, and here’s the result.
(A different mp4 video, not Jurassic park)
(All this tests ran on SSD drive)
Slow Version
[INFO] elasped time: 5.93
[INFO] approx. FPS: 57.36
Fast Version
[INFO] elasped time: 12.86
[INFO] approx. FPS: 26.45
Fast Version with 1280 queueSize
[INFO] elasped time: 5.52
[INFO] approx. FPS: 61.63
It seems 128 frames queueSize is too small and when I run the altered version, max queueSize can achieve 300+.
Based on so repeated tests’ result, I just believe the “fast version” is definitely faster than the “slow version” regardless of python version, as long as it’s queueSize was unlimited.
But for low-end devices, like rasp pi, there is no faster way to capture video on python3?
Adrian Rosebrock
The slow down is due to Python 3’s queuing. I think I may have found a solution though! I need to test it further and if it works I’ll publish a separate post since this is a common question.
David
It’s a great news Adrian. Please, publish ASAP the solution ! 🙂
I hope you got the solution. I tried to cath frames faster with multiprocessing class, but the road is very dark for a none great python user.
David
Tyler A
I’m very much looking forward to the python3 queuing solution! I’ve built a fairly complex motion detection and video recording script using a few of your tutorials. The script runs at 15 fps on my mac mini (which matches the output of the ip cam), but when I tested on my raspberry pi that dropped to 2 fps.
Smitha
Hi Adrain, were you able to find the solution for python 3
Adrian Rosebrock
I have not been able to work on the Python 3 solution despite my best efforts. I would really appreciate others in the PyImageSearch community working on it as well if they are having problems with the script 🙂 I’d be happy to merge the solution into the “imutils” library as well!
Bodet
Hi
Do you have a script to send image from raspberry pi to PC or other raspberry PI, via socket library ?
Raspberry pi = server
PC or Raspberry pi = client
The image source is processed with opencv from picamera source before sent to the client.
The client must use opencv to modifiy the received image/frame.
Ludo
Adrian Rosebrock
Hey Bodet, I do not have a script on hand that does that. I will try to cover this in a future PyImageSearch tutorial.
Fatima
Hy Adrian .I am quite beginner. I am not getting that what is the meant by that line of code.
frame = np.dstack([frame, frame, frame])
Please slightly shed light on that.
Adrian Rosebrock
Our “frame” is grayscale (single channel). But we would like a RGB representation of a grayscale image, so we stack the image, depth-wise, three times. If you’re new to the world of computer vision and image processing be sure to take a look at my introductory book, Practical Python and OpenCV, where I teach the fundamentals. Using this book you’ll be able to get up to speed quickly 🙂
Aanaya Fatima
Hy Adrian,
I am just using your code from the file “read_frames_fast”. But I am getting error, which says
[usage: read_frames_fast.py [-h] -v VIDEO
read_frames_fast.py: error: the following arguments are required: -v/–video]
I am using exact your code.
I am not getting what does it mean.Please help me to get rid out of that. Waiting for your reply.
Adrian Rosebrock
You are receiving this error because you are not supplying the command line arguments to the script.
1. Make sure you read up on command line arguments before continuing.
2. And afterwards, notice how I am supplying the
--video
argument via the command line when executing the script:python read_frames_fast.py --video videos/jurassic_park_intro.mp4
Aanaya Fatima
I am doing passing the path like that: (i places that video at desktop)
ap = argparse.ArgumentParser()
ap.add_argument(“-v”, “–video C:\\Users\\Admin\\Desktop\\videos\\jurassic_park_intro.mp4″,
required=True,help=”path to input video file”)
args = vars(ap.parse_args())
fvs = FileVideoStream(args[“video”]).start()
time.sleep(1.0)
Please rectify me where I am missing.
Is it possible to directly pass the video path to FileVideoStream ???
Please help me.
[Extremely sorry for basic questions, as I am new to that field and trying best to learn things]
Adrian Rosebrock
The code does not need to be edited at all. There are zero changes required to the code. You supply the command line arguments via your terminal/command line when you execute the script.
Aanaya Fatima
If I am interested to pass the file path to FileVideoStream directly, then how I can do that?
I am trying to search on google that how to pas parameter to FileVideoStream, really i am unable to find satisfactory explanation.
I am interested to pass the file path directly to FileVideoStream, i dont wanna use argument parser. How I can do that?
Thanks in anticipation for your kindness and cooperation.
Adrian Rosebrock
You just supply the via a string:
fvs = FileVideoStream("path/to/your/video.mp4").start()
hassan
Hy Adrain,
I am also facing same problem, and really unable to get rid of it. I am directly passing the path to FileVideoStream, but my code is not entering in the while loop. (I am following exactly your code). For the sake of testing I printed (“hello word”) in while loop, which does not get print, when code is run. What can be the possible issue.
fvs = FileVideoStream(“O:/FYP/Final_Year/video.mp4”).start()
fps = FPS().start()
while fvs.more():
#Just for the sake of testing, I printed hello word here.
print(“hello word”)
frame = fvs.read()
Kindly help me to get understand that.
Thanks
Adrian Rosebrock
Hey Hassan — how did you install OpenCV on your system? It sounds like OpenCV was compiled without video support.
Phil
Hi Adrian, thanks for all your excellent tutorials! I’m using the imutils.VideoStream to capture from webcam, do cv2.absdiff and dilate, and output to imshow. I noticed that when I do this with VideoStream, it’ll drop one frame out of five or so. So the output is always “flickering”. But when I use the built in OpenCV.VideoCapture, the frame rate is much lower, but I don’t get any dropped frames. Is there some way to detect and ignore these “empty” frames coming out of VideoStream.read?
See this issue I filed: https://github.com/jrosebr1/imutils/issues/54 . It has example gists attached that show the issue.
Adrian Rosebrock
Hey Phil — we discussed the question in the GitHub Issue but I’ll copy and paste my response so other readers can learn from it:
This is a feature, not a bug. The
VideoStream
object will return whatever the current frame is from the stream, but not necessarily the next brand new frame.Our goal is to achieve as high frame throughout as possible; however, for incredibly simplistic frame processing pipelines as yours, the loop actually completes before a brand new frame is even available on the camera. The vast majority of frame processing pipelines are not as fast as yours and it’s not worth the slowdown of checking if the frame is actually brand new. Instead, we return it. I hope that helps clear up the issue.
Phil
That makes sense. Thanks for the response!
Yuvaraj
the video which you have added tracks face faster is it a pi camera with raspberry pi. Because i run the code which you provided its very slow for me and for first time it showed rectangle on object after that i re-runned again the code there is no response of single track i kept on for 10 mins.
Do i am doing anything in wrong way or pi is slow.
Yuvaraj
sorry i am asking about this link https://pyimagesearch.com/2018/02/26/face-detection-with-opencv-and-deep-learning/
Adrian Rosebrock
OpenCV’s deep learning face detector is too computationally heavy for the Raspberry Pi. If you want to use the Raspberry Pi you should use Haar cascades, as I do in this post. Otherwise, the face detection process will not be able to run in real-time.
shane
I began using this script to improve the framerate for streaming videos from youtube. It works great on normal videos, but will only play somewhere around 110 frames of a youtube LIVE video.
I’m not sure why it won’t work just as well on a Youtube LIVE video as it does on normal Youtube videos. Can anyone offer an explanation why it only grabs the first 110 or so frames?
Thanks
Selom Ofori
After solving a similar (probably same problem) I think the title of your post is confusing to people who run into this issue.
Explained simply, if you want to capture a 20fps video from the camera to file, you need to capture 20 frames per second. In a single threaded python script, the process goes
capture frame
convert
write to file
repeat.
however this block will not be able to do the task 20 times in a second, so you will miss frames and instead of capturing & saving 20 frames per second, you’re actually doing it at 5 frames per second.
With threading you capture the frames in a separate thread and put it in a Queue. You can significantly improve your loop to make 18-19 frames depending on the device you are running on. Of course you need another thread to empty the queue before you run out of memory.
To anyone tackling this problem, first write your video capture thread and see how many frames it can capture, if your system is underpowered you’ll know this is as fast as it can go. Then add your processing thread after. The processing thread will add a performance hit to your total frame capture rate but it won’t be as bad as a single threaded script
Adrian Rosebrock
You’re mentioning writing frames to disk in a separate file but I’m not using cv2.VideoWriter, the function responsible for writing frames to disk in OpenCV, so I’m a bit confused at the point you are making. Could you clarify?
Jon
Hi Adrian,
The code runs fine but when I’ve tried processing different videos and the processing time and FPS is always very similar for both methods. I have a quad core cpu and the “slow” version is processing a 1:00 25 fps video file at about 63 fps with both methods.
Any suggestions?
Adrian Rosebrock
Hey Jon — thanks for the comment although I’m not sure what your question is here. Are you asking how to speed up the frame processing pipeline?
Jon
Hi Adrian,
Yes, I figured I would have gotten a speed-up but is that because the “slow” version on my pc is already running at the maximum processing speed possible?
I will try it with some computationally expensive image processing operations and see if changes things between the two methods.
Adrian Rosebrock
That would be my initial guess, although this might be a threading issue with Python. Which version of Python are you using? Python 2.7 or Python 3?
Jon
Hi Adrian,
Yep that was it. I just ran a bunch of various resizing operations in a while loop after grabbing the frame and now I can start to see differences in performance with the faster version having speed-ups. I’m using Python 2.7 by the way. I’m going to test on a lower-end machine and see if the effect is more profound. Thanks for your help!
Adrian Rosebrock
No problem Jon, I’m happy to help 🙂
Kim
What would be the most efficient video format in which the video should be stored for best reading results?
Thanks for the tut! 🙂
Kim
Adrian Rosebrock
That really depends on which video codecs you have installed and any hardware optimizations on your system.
Adnan Addewala
hello Adrain,
Great tutorial, it significantly improved my fps on Jetson Tx2.
The place where I am stuck is working with two video simultaneously.
I am able to two load to queues with frames from two videos respectively, however, when starting the two threads (.start()) to perform the (Q.get()) in cv2.imshow, The videos run one after another rather than running simultaneously. I dont know if its because the GIL or some other reason. Is there any other way where two queues can be used to start who videos simultaneously?
Thanks,
Adrian Rosebrock
As far as I understand it, OpenCV’s GUI functions do not support direct threading. I’m not sure if this is an OpenCV GUI module limitation or something related to the GIL.
Guru
Hi Adrian,
Also, Can I use this code to check a continuous video stream using a webcam like
fvs = FileVideoStream(0).start(), the reason to ask this question is, when I tried to use the 0, the video window was closed in few seconds, Can you please let me know, If I have to do anything else to make the webcam video faster but till the time i press Ctrl C
Thanks
Guru
Adrian Rosebrock
This class expects you to pass in a valid file path. If you want to use an actual webcam you should be using the VideoStream class.
Zubair Ahmed
Hi Adrian
Excellent post as usual.
I have the same problem as some of the comments above, I’m using Python 3.6 and experience slow video performance, I have time.sleep() used like this
vid = FileVideoStream(path=args[“video”], queueSize=512).start()
time.sleep(1.0)
and like this
frame = vid.read()
time.sleep(0.01)
But none of this helps speed things up
Do you have any solution to this please?
Adrian Rosebrock
It’s a Python 3 issue. To be honest I’m not sure what the solution is. Something changed between how Python 2.7 and Python 3 handles the Queue class. I’ve requested that other PyImageSearch readers look into the problem as well in other comments in this post. The “time.sleep” is not the issue here, it’s the actual Python 2.7 vs. Python 3 Queue implementation. I would request that you and other readers look into the issue as well. I’d love to get this post updated.
moshel
Its because of the GIL (global interpreter lock). In your setup, i presume that the queue never fills so you don’t have this problem. If you read the frames from a very fast source or do really heavy processing, you will hit the problem. What happens is that in the update there is a tight, cpu only loop if q is full. Because of the interpreter lock, this loop more or less prevents the main thread from doing anything. Adding time.sleep(0.0001) after the loop with the “if not self.q.full()” loop (not inside it!) will solve the problem by yielding to the main thread
dj
hey , how can i make the video fast but not in gray scale , i wan tit colored only
Adrian Rosebrock
You can comment out Lines 31 and 32 where the grayscale conversion takes place. From there you will have full color.
Pranav
Hi Adrian,
I have a bunch of IP cameras. I want to read frames from them and recognize objects in each frame. I have the object recognition working for a single camera’s feed. I want to keep capturing the feed from each camera and when I switch to that camera, the recognized objects should be displayed. How should I architect this application? As of this writing, I have the capturing and recognition encapsulated into a single object. I plan to create individual instances of the class for each camera and then read the text that I get out of that class. Each instance will have its own thread. Is there a better way to do this? Do I really need a queue or can I use something else? I want only the current frame and do not need any buffering.
Note:
I have sent you an e-mail with a similar question but I have read some more and have framed my query better.
Note:
I am developing in a virtual machine on which I have installed opencv 3.4.1, python 3.6, tensor flow and keras. I am running this under ubuntu 18.04. The VM runs under the free version of vmware player version 14. My host OS is windows 10 and I have 8GB of ram all total in the host. I had tried doing this on the pi but the object recognition failed because tensor flow ran out of ram. I had tried the raspberry pi specific package so cannot tell what the problem was.
Adrian Rosebrock
I’m not sure what you mean by:
“I want to keep capturing the feed from each camera and when I switch to that camera, the recognized objects should be displayed”
Perhaps you could elaborate on this a bit as I’m not understanding.
hasan
Hello Dr.!
Thanks for the awsome tutorial. I stuck to a problem.
Is there a way which we can stream video file along with its audio by using opencv ?
Best Regards,
Adrian Rosebrock
I don’t believe OpenCV supports any audio streaming. You might need to look into a different library or tool for both audio and video.
Amit Nair
I am having one issue, I am using VideoStream() to get video from RTMP stream, now in a situation if camera goes down, and then back up, VideoStream is unable to come back up, is there a known solution to how this should be handled.
Adrian Rosebrock
Hey Amit, I haven’t tried using the VideoStream class to handle RTSP streams. I imagine additional logic will need to added to re-create the stream. I’ll try to cover RTSP in a future blog post, but as it stands currently, I do not have a solution off the top of my head. If you end up creating a solution please come back and share it with us 🙂
ToughMind
Hey Adrian, nice bolg. But after extracting the code zip, I only get two files and a video. There is no file containing class imutils, neither class FileVideoStream nor class FPS. What’s the problem?
Adrian Rosebrock
You need to install the “imutils” library via pip:
$ pip install imutils
ToughMind
thanks, I will try^_^
ToughMind
I want to get some frames from the video, not all of them, like 7 frames. I use the vid.set() and vid.read. I want to speed this up, do you have any advice? Thank you again.
Adrian Rosebrock
You can use threading as I do in this post to help speedup your pipeline.
Adrie Huesman
Hi Adrian, congrats on getting married!
I enjoyed this tutorial very much. It will help me getting the FPS up for a mobile robot running openCV. I noticed you use: python read_frames_fast.py. However for my robot I need super user privileges (for GPIO and/or I2C to control the motors) so sudo python read_frames_fast.py. However in that case the code simply doesn’t do anything any more. Any idea why this is so?
BTW I noticed that others (see website below) are using your imutils Python library as well!
Adrian Rosebrock
Hey Adrie — could you elaborate more on what you mean by the “code doesn’t do anything anymore”? Are you getting an error of some sort?
Ladislav
Hi Adrian,
I implemented your fast code into my own solution, which provides an offline motion detection from my IP cameras. In most cases it works fine, it’s really faster than my “conventional” code, but sometimes (randomly) it quits after just a few seconds with this error:
Exception in thread Thread-1 (most likely raised during interpreter shutdown):
Traceback (most recent call last):
File “/usr/lib/python2.7/threading.py”, line 801, in __bootstrap_inner
When I run it again on the same video file, it goes fine. Am I the only one who’s getting this behavior?
Adrian Rosebrock
Hey Ladislav — this is the first time I’ve heard of that error. It’s a threading issue of some sort but unfortunately I’m not sure what’s causing it.
Ladislav
Hi Adrian. I figured it out – It was an “faster consumer / slower producer” issue. After changing the code as suggested by Phil Birch and Sergei, it works like a charm! Thank You! Keep up this awesome work!
Here are my benchmark results (motion detection in 15min. video 1920×1080 @ 8fps from IP cam, CPU: i7-4790 @ 3.6GHz, Ubuntu 16.04):
h264:
original code: 45.55 seconds, threading code: 39.99 seconds
h265:
original code: 58.99 seconds, threading code: 44.69 seconds
Adrian Rosebrock
Awesome, congratulations on resolving the issue Ladislav!
June
Hi Ladislav, I am trying to save video in h.265 using Cv2.VideoWriter. May I know how did you get h265 worked? Thanks!
Sudhir
Hi Adrian, thanks for sharing so much of what you know. I had a question regarding the python VideoCapture API. When I read a udp stream using CAP_FFMPEG backend, the API takes almost 7 to 8 seconds to return! The same API in C++ takes less than 100ms. I was wondering if you had come across this and know what could be the issue here. I am trying this on Ubuntu 16.04, opencv 3.4.3 (also tried 3.4.1), Thanks for any pointers.
Adrian Rosebrock
Wow, 7-8 seconds? That definitely doesn’t seem right. I haven’t encountered that behavior before so unfortunately I’m not sure what the problem may be. Best of luck resolving it and if you do find a solution please come back and share it with us so we can all learn 🙂
Sudhir
There was a problem in how my C++ code was counting the time. Both C++ and python code takes 3-7 seconds for VideoCapture. Over udp, FFMPEG needs this time to figure out the format of the stream.
Gaby S
Hi Adrian, I have a issue, I took your code to use it in a video, and It worked well, the FPS has increased, but now even if I use a new script with any other code like: ‘Playing Video from file’ example, from docs.opencv.org, withouth your code, the video run faster than I recorded. I dont know how to reproduce the video in a normal speed again :(. I’m using python 3.
Rizwan
Hello Adrian,
You are always a life Saviour, But this time i am having oppsoite results as slow version is taking less time as compared to faster version.
I am doing some predictions on each video frame using a keras model and the slow version gives me 10fps approx , while faster version is not going above 6.5 fps.
amar
Hi Adrian,
I need your help. why cv2.VideoCapture having buffer. suppose we want to get latest frame how we can get?
Adrian Rosebrock
The buffer is used presuming you want to process every single frame inside the video file. Again, keep in mind that we are processing video files in this post but I get the impression you want to be working with video streams instead in which case you should refer to this guide.
Kaushalya Sandamali
Hello Adrian,
Thank You Very Much this tutorial. This tutorials is very useful for me.
I have a Questions. can you please tell me why we convert frames into gray scale? what are the advantages of converting to gray.
Adrian Rosebrock
It sounds like you are new to the world of computer vision and image processing. That’s totally okay but I would recommend reading through Practical Python and OpenCV to help you learn the fundamentals first (including when, how, and why to convert to grayscale).
Guru Vishnu
Hi Adrian,
Good Day!
Can you please let me know, if there is a method to reduce video bitrate using OpenCV Python, to reduce the video stream size, Since I need to stream a live video in a 2G internet Or is there any other better methods available to stream video in a 2G internet
Thanks
Guru
Lemon
Hello Adrain!
Have you found a python3 solution? I’m particularly confused about this now, dealing with native video is very slow, if you can’t do it with threads, are there other solutions?Thank you very much!
Marco Boarettto
Thank you for the awesome, post.
Just letting you guys know that by using deque from collections I got a higher FPS.
Adrian Rosebrock
Thanks for sharing, Marco!
Obisandjo
could you tell me the differences between cv2.Videocapture with Videostream from imutils? Thank you Adrian
Adrian Rosebrock
Sure. Just read this tutorial.
Muhammad Maaz
It seems like the slowness issue with python 3 has been solved in python 3.7.
Adrian Rosebrock
Thanks for sharing, Muhammad!
Hector Pacheco
Hi Adrian,
I hope you are fine. I am writing this because I have a big issue to solve and I do not really know how to do it. I have videos filmed with two different DVRs (same brand, different models). The analysis I am doing consists of frame subtraction to get pixel “movement” averages every 10 minutes of video. When I started with this, I did the Python code analysing videos I got from one DVR that recorded the videos at 15fps. For those videos, I need to “average” 9000 frames to get the 10 minutes unit pre-established. The problem appeared when analysing the videos from the second DVR I noticed that the videos were recorded at 25fps, needing 15000 frames to get the 10 minutes unit in this case, and (apparently) making the videos unable to be compared since they have almost the double quantity of frames for the same period of time.
I need to get these results for my research, and I have been looking everywhere to get something to make it possible, but unsuccessfully at the moment. Do you have any idea about how to solve this? Is it possible to “skip” some of the frames each second to standardise all the videos to 15fps?
I will be waiting for your feedback.
Cheers,
Hector.
Shaishav Gupta
Why it didn’t showed any difference when applied with yolo.
Adrian Rosebrock
Because it’s not the video I/O that’s slowing down the process. It’s the fact that YOLO is very computationally expensive, and from what I assume, is also running on your CPU. Try using a GPU.
Heba
HI, What About WebCamera Module?
Any Approaches to be faster please?
Adrian Rosebrock
That’s already discussed here.