Last updated on July 8, 2021.
That son of a bitch. I knew he took my last beer.
These are words a man should never, ever have to say. But I muttered them to myself in an exasperated sigh of disgust as I closed the door to my refrigerator.
You see, I had just spent over 12 hours writing content for the upcoming PyImageSearch Gurus course. My brain was fried, practically leaking out my ears like half cooked scrambled eggs. And after calling it quits for the night, all I wanted was to do relax and watch my all-time favorite movie, Jurassic Park, while sipping an ice cold Finestkind IPA from Smuttynose, a brewery I have become quite fond of as of late.
But that son of a bitch James had come over last night and drank my last beer.
Well, allegedly.
I couldn’t actually prove anything. In reality, I didn’t really see him drink the beer as my face was buried in my laptop, fingers floating above the keyboard, feverishly pounding out tutorials and articles. But I had a feeling he was the culprit. He is my only (ex-)friend who drinks IPAs.
So I did what any man would do.
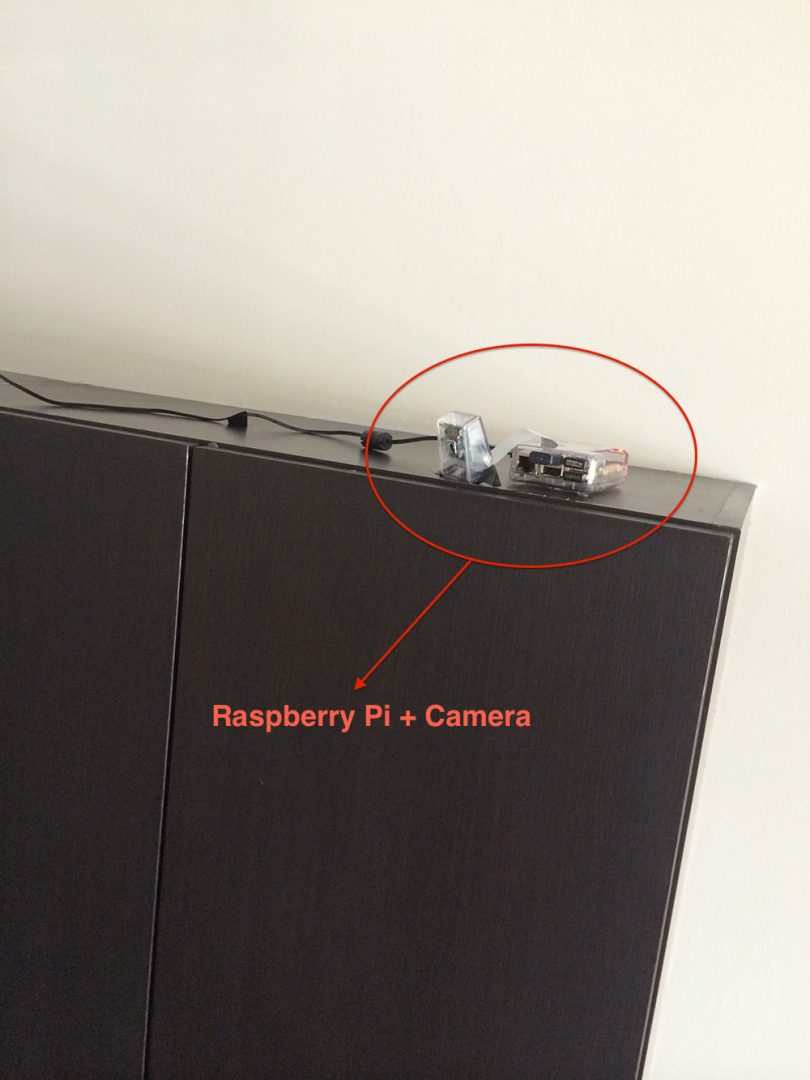
I mounted a Raspberry Pi to the top of my kitchen cabinets to automatically detect if he tried to pull that beer stealing shit again:
Excessive?
Perhaps.
But I take my beer seriously. And if James tries to steal my beer again, I’ll catch him redhanded.
A dataset of video sequences is fundamental for understanding basic motion detection and tracking. It allows us to observe how movement is detected and tracked over time.
Roboflow has free tools for each stage of the computer vision pipeline that will streamline your workflows and supercharge your productivity.
Sign up or Log in to your Roboflow account to access state of the art dataset libaries and revolutionize your computer vision pipeline.
You can start by choosing your own datasets or using our PyimageSearch’s assorted library of useful datasets.
Bring data in any of 40+ formats to Roboflow, train using any state-of-the-art model architectures, deploy across multiple platforms (API, NVIDIA, browser, iOS, etc), and connect to applications or 3rd party tools.
- Update July 2021: Added new sections on alternative background subtraction and motion detection algorithms we can use with OpenCV.
A 2-part series on motion detection
This is the first post in a two part series on building a motion detection and tracking system for home surveillance.
The remainder of this article will detail how to build a basic motion detection and tracking system for home surveillance using computer vision techniques. This example will work with both pre-recorded videos and live streams from your webcam; however, we’ll be developing this system on our laptops/desktops.
In the second post in this series I’ll show you how to update the code to work with your Raspberry Pi and camera board — and how to extend your home surveillance system to capture any detected motion and upload it to your personal Dropbox.
And maybe at the end of all this we can catch James red handed…
A little bit about background subtraction
Background subtraction is critical in many computer vision applications. We use it to count the number of cars passing through a toll booth. We use it to count the number of people walking in and out of a store.
And we use it for motion detection.
Before we get started coding in this post, let me say that there are many, many ways to perform motion detection, tracking, and analysis in OpenCV. Some are very simple. And others are very complicated. The two primary methods are forms of Gaussian Mixture Model-based foreground and background segmentation:
- An improved adaptive background mixture model for real-time tracking with shadow detection by KaewTraKulPong et al., available through the
cv2.BackgroundSubtractorMOGfunction. - Improved adaptive Gaussian mixture model for background subtraction by Zivkovic, and Efficient Adaptive Density Estimation per Image Pixel for the Task of Background Subtraction, also by Zivkovic, available through the
cv2.BackgroundSubtractorMOG2function.
And in newer versions of OpenCV we have Bayesian (probability) based foreground and background segmentation, implemented from Godbehere et al.’s 2012 paper, Visual Tracking of Human Visitors under Variable-Lighting Conditions for a Responsive Audio Art Installation. We can find this implementation in the cv2.createBackgroundSubtractorGMG function (we’ll be waiting for OpenCV 3 to fully play with this function though).
All of these methods are concerned with segmenting the background from the foreground (and they even provide mechanisms for us to discern between actual motion and just shadowing and small lighting changes)!
So why is this so important? And why do we care what pixels belong to the foreground and what pixels are part of the background?
Well, in motion detection, we tend to make the following assumption:
The background of our video stream is largely static and unchanging over consecutive frames of a video. Therefore, if we can model the background, we monitor it for substantial changes. If there is a substantial change, we can detect it — this change normally corresponds to motion on our video.
Now obviously in the real-world this assumption can easily fail. Due to shadowing, reflections, lighting conditions, and any other possible change in the environment, our background can look quite different in various frames of a video. And if the background appears to be different, it can throw our algorithms off. That’s why the most successful background subtraction/foreground detection systems utilize fixed mounted cameras and in controlled lighting conditions.
The methods I mentioned above, while very powerful, are also computationally expensive. And since our end goal is to deploy this system to a Raspberry Pi at the end of this 2 part series, it’s best that we stick to simple approaches. We’ll return to these more powerful methods in future blog posts, but for the time being we are going to keep it simple and efficient.
In the rest of this blog post, I’m going to detail (arguably) the most basic motion detection and tracking system you can build. It won’t be perfect, but it will be able to run on a Pi and still deliver good results.
Basic motion detection and tracking with Python and OpenCV
Alright, are you ready to help me develop a home surveillance system to catch that beer stealing jackass?
Open up a editor, create a new file, name it motion_detector.py , and let’s get coding:
# import the necessary packages
from imutils.video import VideoStream
import argparse
import datetime
import imutils
import time
import cv2

# construct the argument parser and parse the arguments
ap = argparse.ArgumentParser()
ap.add_argument("-v", "--video", help="path to the video file")
ap.add_argument("-a", "--min-area", type=int, default=500, help="minimum area size")
args = vars(ap.parse_args())

# if the video argument is None, then we are reading from webcam
if args.get("video", None) is None:
	vs = VideoStream(src=0).start()
	time.sleep(2.0)

# otherwise, we are reading from a video file
else:
	vs = cv2.VideoCapture(args["video"])

# initialize the first frame in the video stream
firstFrame = None
Lines 2-7 import our necessary packages. All of these should look pretty familiar, except perhaps the imutils package, which is a set of convenience functions that I have created to make basic image processing tasks easier. If you do not already have imutils installed on your system, you can install it via pip: pip install imutils .
Next up, we’ll parse our command line arguments on Lines 10-13. We’ll define two switches here. The first, --video , is optional. It simply defines a path to a pre-recorded video file that we can detect motion in. If you do not supply a path to a video file, then OpenCV will utilize your webcam to detect motion.
We’ll also define --min-area , which is the minimum size (in pixels) for a region of an image to be considered actual “motion”. As I’ll discuss later in this tutorial, we’ll often find small regions of an image that have changed substantially, likely due to noise or changes in lighting conditions. In reality, these small regions are not actual motion at all — so we’ll define a minimum size of a region to combat and filter out these false-positives.
Lines 16-22 handle grabbing a reference to our vs object. In the case that a video file path is not supplied (Lines 16-18), we’ll grab a reference to the webcam and wait for it to warm up. And if a video file is supplied, then we’ll create a pointer to it on Lines 21 and 22.
Lastly, we’ll end this code snippet by defining a variable called firstFrame .
Any guesses as to what firstFrame is?
If you guessed that it stores the first frame of the video file/webcam stream, you’re right.
Assumption: The first frame of our video file will contain no motion and just background — therefore, we can model the background of our video stream using only the first frame of the video.
Obviously we are making a pretty big assumption here. But again, our goal is to run this system on a Raspberry Pi, so we can’t get too complicated. And as you’ll see in the results section of this post, we are able to easily detect motion while tracking a person as they walk around the room.
# loop over the frames of the video
while True:
	# grab the current frame and initialize the occupied/unoccupied
	# text
	frame = vs.read()
	frame = frame if args.get("video", None) is None else frame[1]
	text = "Unoccupied"

	# if the frame could not be grabbed, then we have reached the end
	# of the video
	if frame is None:
		break

	# resize the frame, convert it to grayscale, and blur it
	frame = imutils.resize(frame, width=500)
	gray = cv2.cvtColor(frame, cv2.COLOR_BGR2GRAY)
	gray = cv2.GaussianBlur(gray, (21, 21), 0)

	# if the first frame is None, initialize it
	if firstFrame is None:
		firstFrame = gray
		continue
So now that we have a reference to our video file/webcam stream, we can start looping over each of the frames on Line 28.
A call to vs.read() on Line 31 returns a frame that we ensure we are grabbing properly on Line 32.
We’ll also define a string named text and initialize it to indicate that the room we are monitoring is “Unoccupied”. If there is indeed activity in the room, we can update this string.
And in the case that a frame is not successfully read from the video file, we’ll break from the loop on Lines 37 and 38.
Now we can start processing our frame and preparing it for motion analysis (Lines 41-43). We’ll first resize it down to have a width of 500 pixels — there is no need to process the large, raw images straight from the video stream. We’ll also convert the image to grayscale since color has no bearing on our motion detection algorithm. Finally, we’ll apply Gaussian blurring to smooth our images.
It’s important to understand that even consecutive frames of a video stream will not be identical!
Due to tiny variations in the digital camera sensors, no two frames will be 100% the same — some pixels will most certainly have different intensity values. That said, we need to account for this and apply Gaussian smoothing to average pixel intensities across an 21 x 21 region (Line 43). This helps smooth out high frequency noise that could throw our motion detection algorithm off.
As I mentioned above, we need to model the background of our image somehow. Again, we’ll make the assumption that the first frame of the video stream contains no motion and is a good example of what our background looks like. If the firstFrame is not initialized, we’ll store it for reference and continue on to processing the next frame of the video stream (Lines 46-48).
Here’s an example of the first frame of an example video:
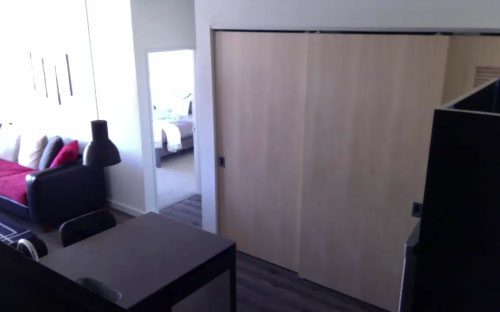
The above frame satisfies the assumption that the first frame of the video is simply the static background — no motion is taking place.
Given this static background image, we’re now ready to actually perform motion detection and tracking:
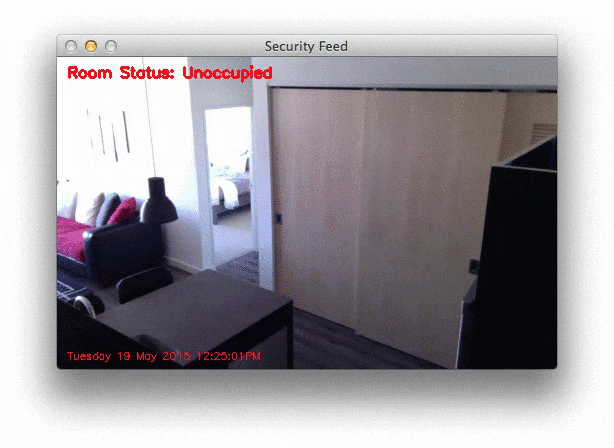
	# compute the absolute difference between the current frame and
	# first frame
	frameDelta = cv2.absdiff(firstFrame, gray)
	thresh = cv2.threshold(frameDelta, 25, 255, cv2.THRESH_BINARY)[1]

	# dilate the thresholded image to fill in holes, then find contours
	# on thresholded image
	thresh = cv2.dilate(thresh, None, iterations=2)
	cnts = cv2.findContours(thresh.copy(), cv2.RETR_EXTERNAL,
		cv2.CHAIN_APPROX_SIMPLE)
	cnts = imutils.grab_contours(cnts)

	# loop over the contours
	for c in cnts:
		# if the contour is too small, ignore it
		if cv2.contourArea(c) < args["min_area"]:
			continue

		# compute the bounding box for the contour, draw it on the frame,
		# and update the text
		(x, y, w, h) = cv2.boundingRect(c)
		cv2.rectangle(frame, (x, y), (x + w, y + h), (0, 255, 0), 2)
		text = "Occupied"
Now that we have our background modeled via the firstFrame variable, we can utilize it to compute the difference between the initial frame and subsequent new frames from the video stream.
Computing the difference between two frames is a simple subtraction, where we take the absolute value of their corresponding pixel intensity differences (Line 52):
delta = |background_model – current_frame|
An example of a frame delta can be seen below:
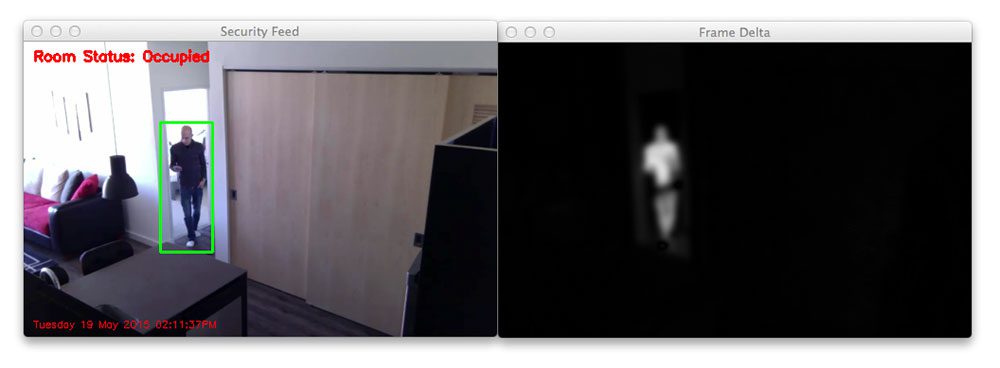
Notice how the background of the image is clearly black. However, regions that contain motion (such as the region of myself walking through the room) is much lighter. This implies that larger frame deltas indicate that motion is taking place in the image.
We’ll then threshold the frameDelta on Line 53 to reveal regions of the image that only have significant changes in pixel intensity values. If the delta is less than 25, we discard the pixel and set it to black (i.e. background). If the delta is greater than 25, we’ll set it to white (i.e. foreground). An example of our thresholded delta image can be seen below:
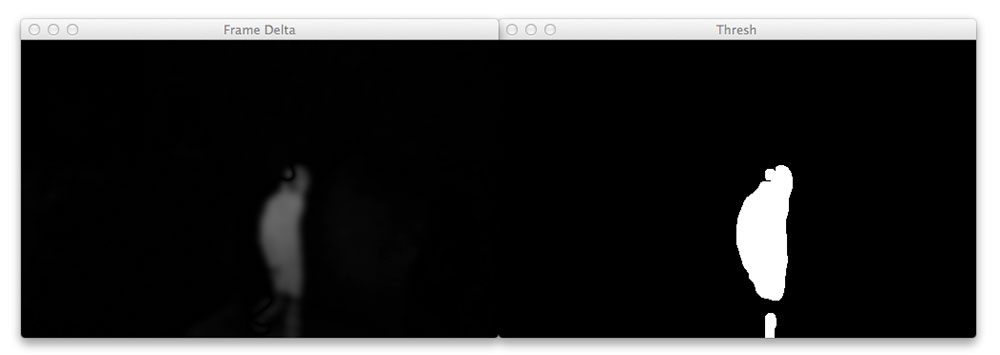
Again, note that the background of the image is black, whereas the foreground (and where the motion is taking place) is white.
Given this thresholded image, it’s simple to apply contour detection to to find the outlines of these white regions (Lines 58-60).
We start looping over each of the contours on Line 63, where we’ll filter the small, irrelevant contours on Line 65 and 66.
If the contour area is larger than our supplied --min-area , we’ll draw the bounding box surrounding the foreground and motion region on Lines 70 and 71. We’ll also update our text status string to indicate that the room is “Occupied”.
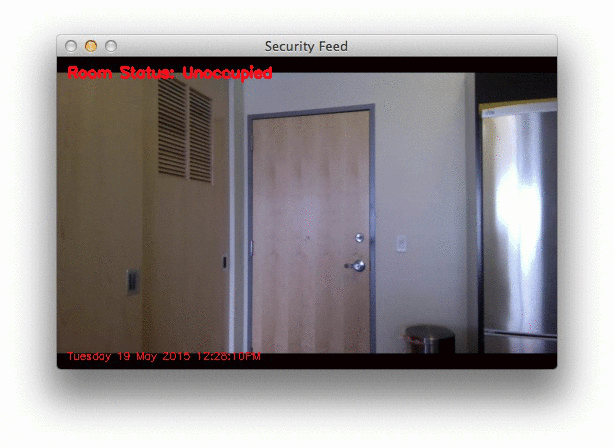
	# draw the text and timestamp on the frame
	cv2.putText(frame, "Room Status: {}".format(text), (10, 20),
		cv2.FONT_HERSHEY_SIMPLEX, 0.5, (0, 0, 255), 2)
	cv2.putText(frame, datetime.datetime.now().strftime("%A %d %B %Y %I:%M:%S%p"),
		(10, frame.shape[0] - 10), cv2.FONT_HERSHEY_SIMPLEX, 0.35, (0, 0, 255), 1)

	# show the frame and record if the user presses a key
	cv2.imshow("Security Feed", frame)
	cv2.imshow("Thresh", thresh)
	cv2.imshow("Frame Delta", frameDelta)
	key = cv2.waitKey(1) & 0xFF

	# if the `q` key is pressed, break from the lop
	if key == ord("q"):
		break

# cleanup the camera and close any open windows
vs.stop() if args.get("video", None) is None else vs.release()
cv2.destroyAllWindows()
The remainder of this example simply wraps everything up. We draw the room status on the image in the top-left corner, followed by a timestamp (to make it feel like “real” security footage) on the bottom-left.
Lines 81-83 display the results of our work, allowing us to visualize if any motion was detected in our video, along with the frame delta and thresholded image so we can debug our script.
Note: If you download the code to this post and intend to apply it to your own video files, you’ll likely need to tune the values for cv2.threshold and the --min-area argument to obtain the best results for your lighting conditions.
Finally, Lines 91 and 92 cleanup and release the video stream pointer.
Results
Obviously I want to make sure that our motion detection system is working before James, the beer stealer, pays me a visit again — we’ll save that for Part 2 of this series. To test out our motion detection system using Python and OpenCV, I have created two video files.
The first, example_01.mp4 monitors the front door of my apartment and detects when the door opens. The second, example_02.mp4 was captured using a Raspberry Pi mounted to my kitchen cabinets. It looks down on the kitchen and living room, detecting motion as people move and walk around.
Let’s give our simple detector a try. Open up a terminal and execute the following command:
$ python motion_detector.py --video videos/example_01.mp4
Below is a .gif of a few still frames from the motion detection:
Notice how that no motion is detected until the door opens — then we are able to detect myself walking through the door. You can see the full video here:
Now, what about when I mount the camera such that it’s looking down on the kitchen and living room? Let’s find out. Just issue the following command:
$ python motion_detector.py --video videos/example_02.mp4
A sampling of the results from the second video file can be seen below:
And again, here is the full vide of our motion detection results:
So as you can see, our motion detection system is performing fairly well despite how simplistic it is! We are able to detect as I am entering and leaving a room without a problem.
However, to be realistic, the results are far from perfect. We get multiple bounding boxes even though there is only one person moving around the room — this is far from ideal. And we can clearly see that small changes to the lighting, such as shadows and reflections on the wall, trigger false-positive motion detections.
To combat this, we can lean on the more powerful background subtractions methods in OpenCV which can actually account for shadowing and small amounts of reflection (I’ll be covering the more advanced background subtraction/foreground detection methods in future blog posts).
But for the meantime, consider our end goal.
This system, while developed on our laptop/desktop systems, is meant to be deployed to a Raspberry Pi where the computational resources are very limited. Because of this, we need to keep our motion detection methods simple and fast. An unfortunate downside to this is that our motion detection system is not perfect, but it still does a fairly good job for this particular project.
Finally, if you want to perform motion detection on your own raw video stream from your webcam, just leave off the --video switch:
$ python motion_detector.py
Alternative motion detection algorithms in OpenCV
The motion detection algorithm we implemented here today, while simple, is unfortunately very sensitive to any changes in the input frames.
This is primarily due to the fact that we are grabbing the very first frame from our camera sensor, treating it as our background, and then comparing the background to every subsequent frame, looking for any changes. If a change is detected, we record it as motion.
However, this method can quickly fall apart if you are working with varying lighting conditions.
For example, suppose you are monitoring the garage outside your house for intruders. Since your garage is outside, lighting conditions will change due to rain, clouds, the movement of the sun, nighttime, etc.
If you were to choose a single static frame and treat it as your background in such a condition, then it’s likely that within hours (and maybe even minutes, depending on the situation) that the brightness of the entire outdoor scene would change, and thus cause false-positive motion detections.
The way you get around this problem is to maintain a rolling average of the past N frames and treat this “averaged frame” as your background. You then compare the averaged set of frames to the current frame, looking for substantial differences.
The following tutorial will teach you how to implement the method I just discussed.
Alternatively, OpenCV implements a number of background subtraction algorithms that you can use:
- OpenCV: How to Use Background Subtraction Methods
- Background Subtraction with OpenCV and BGS Libraries
What's next? We recommend PyImageSearch University.

120+ total classes • 115+ hours hours of on-demand code walkthrough videos • Last updated: July 2026
★★★★★ 4.84 (128 Ratings) • 16,000+ Students Enrolled
I strongly believe that if you had the right teacher you could master computer vision and deep learning.
Do you think learning computer vision and deep learning has to be time-consuming, overwhelming, and complicated? Or has to involve complex mathematics and equations? Or requires a degree in computer science?
That’s not the case.
All you need to master computer vision and deep learning is for someone to explain things to you in simple, intuitive terms. And that’s exactly what I do. My mission is to change education and how complex Artificial Intelligence topics are taught.
If you're serious about learning computer vision, your next stop should be PyImageSearch University, the most comprehensive computer vision, deep learning, and OpenCV course online today. Here you’ll learn how to successfully and confidently apply computer vision to your work, research, and projects. Join me in computer vision mastery.
Inside PyImageSearch University you'll find:
- ✓ 120+ courses on essential computer vision, deep learning, and OpenCV topics
- ✓ 94+ Certificates of Completion
- ✓ 115+ hours hours of on-demand video
- ✓ Brand new courses released regularly, ensuring you can keep up with state-of-the-art techniques
- ✓ Pre-configured Jupyter Notebooks in Google Colab
- ✓ Run all code examples in your web browser — works on Windows, macOS, and Linux (no dev environment configuration required!)
- ✓ Access to centralized code repos for all 540+ tutorials on PyImageSearch
- ✓ Easy one-click downloads for code, datasets, pre-trained models, etc.
- ✓ Access on mobile, laptop, desktop, etc.
Summary
In this blog post we found out that my friend James is a beer stealer. What an asshole.
And in order to catch him red handed, we have decided to build a motion detection and tracking system using Python and OpenCV. While basic, this system is capable of taking video streams and analyzing them for motion while obtaining fairly reasonable results given the limitations of the method we utilized.
The end goal if this system is to deploy it to a Raspberry Pi, so we did not leverage some of the more advanced background subtraction methods in OpenCV. Instead, we relied on a simple yet reasonably effective assumption — that the first frame of our video stream contains the background we want to model and nothing more.
Under this assumption we were able to perform background subtraction, detect motion in our images, and draw a bounding box surrounding the region of the image that contains motion.
In the second part of this series on motion detection, we’ll be updating this code to run on the Raspberry Pi.
We’ll also be integrating with the Dropbox API, allowing us to monitor our home surveillance system and receive real-time updates whenever our system detects motion.
Stay tuned!

Download the Source Code and FREE 17-page Resource Guide
Enter your email address below to get a .zip of the code and a FREE 17-page Resource Guide on Computer Vision, OpenCV, and Deep Learning. Inside you'll find my hand-picked tutorials, books, courses, and libraries to help you master CV and DL!

Freakin awesome! Thanks for the tutorial, waiting for the part 2 😀
Thanks Fabio, I’m glad you enjoyed it! 🙂
This will work only for stationary camera right?? as for moving camera is there any code for motion detection??
Correct, this code is meant to work with only a stationary, non-moving camera. If you’re using a moving camera, this approach will not work. I do not have any code for motion detection with a moving camera.
For moving cameras, i would suggest having a cycle of the movement as the firstframe and reset camera position at every capture, comparing each position to the first frame at that camera position.
I want a program made that detects
The individual change in a pixel. From
A streamed video. Can you help.
Detecting changes in individual pixel values is as simple as subtracting the two images:
diff = frame1 - frame2The
diffvariable will then contain the changes in value for each pixel.File “motiondetector.py”, line 55, in
cv2.CHAIN_APPROX_SIMPLE)
ValueError: too many values to unpack
please help!
I would suggest you read the previous comments to this post as the question has been answered multiple times. Take a look at my response to “Alejandro Barredo” for the solution.
Hello Adrian I want to involve in a similar project but of continuous audio detection in a room and its continuous availability via Dropbox. Have you come across any ideas related to this.
Sorry, I don’t have much experience working with audio detection or audio classification so I can’t really comment here.
Very useful and easy to understand tutorial ! Had no clue on motion detection till now , was a really good intro to it!
Thank you! This is Awesome!
Can’t wait to implement on my Pi – Part 2
Glad you enjoyed it Andre! Part 2 is going to be really awesome as well.
Yet another great article on PyImageSearch. Thanks for the tutorial Adrian!
Thank you for the kind words David! 😀
Awesome work!! Thanks for the code 🙂
No problem, enjoy!
Hi, nice article. What was the camera you used? I’m looking for one right now and your choice of camera and the rasp pi might be suitable for my needs.
I’m using this camera board for the Raspberry Pi. It’s fairly cheap and does a really nice job.
If you convert the image to HSV instead of grayscale and just look at the H channel, would that improve performance? I suspect it would reject a lot of the shadow because shadows are typically only a variance in V. I think don’t think it would increase the cost significantly. I guess I should download your code and try myself.
Did it work?
Could work, but i think HSV is more for color detection.
With my camera, i find applying no blur and a binary threshold work the best
Thank you so this fantastic post.
I was wondering how does this code react towards a moving camera? Is there any robust and light weight method to detect moving objects with a moving camera, “camera mounted on a quad-copter” ?
Hey Moeen, if your camera is not fixed, such as a camera mounted on a quad-copter, you’ll need to use a different set of algorithms — this code will not work since it assumes a fixed, static background. For color based tracking you could use something like CamShift, which is a very lightweight and intuitive algorithm to understand. And for object/structural tracking, HOG + Linear SVM is also a good choice. My personal suggestion would be to use adaptive correlation filters, which I’ll be covering in a blog post soon.
hello,I’m doing a task for moving objects detecting and tracking under the dynamic background,so can you give me a good advice ?thanks
How “dynamic” is your background? How often does it change? If it doesn’t change rapidly, you might be able to use some of the more advanced motion detection methods I detailed at the top of this blog post. However, if your environment is totally unconstrained and is constantly changing, I would treat this as an object detection problem rather than a motion detection problem. A standard approach to object detection is to use HOG + Linear SVM, but there are many, many ways to detect objects in images.
Try masking the dynamic and/or non relevant background out before analyzing movement. That is what we did with motion detectors back in 90’s.
(Semi) auto detection of dynamic background needs a dynamic background video in order to be able to (assist creation of)/create that needed background mask.
Hi Adrian,
very nice tutorial. Thank you but I have a question. Isn’t that, technicaly speaking, presence detection? If you stop moving around your office and just stay still algorithm will box you. Same if you will place something on the table/floor. I understand motion as checking continously difference between each present and past frame. I used capture.sequence from picamera to capture 3 frames as 3 different arrays, than process them, diff and it gives me quite fair results.
Presence detection, motion detection, and background subtraction/foreground extraction all tend to get wrapped up into the same bucket in computer vision. They are slightly different twists on each other and used for different purposes. I have second new post coming out today on motion detection that you should definitely check out as its more true to motion detection than this post is.
Hello Adrian!
Thank you so much for the comprehensive tutorials! Best that I have seen. 🙂
Quick question: in this post (http://bit.ly/1EbNeyY), you say:
“You might guess that we are going to use the cv2.VideoCapture function here — but I actually recommend against this. Getting cv2.VideoCapture to play nice with your Raspberry Pi is not a nice experience (you’ll need to install extra drivers) and something you should generally avoid.”
However in this tutorial, you use cv2.VideoCapture.
Can you explain the change?
Thank you again!
~Evan
Hey Evan, the code in this post is actually not meant to be run on the Raspberry Pi — it’s meant to be run on your desktop/laptop. The motion detection and home surveillance code for the Raspberry Pi is actually available on over here.
Ah, ok. My bad.
The following above threw me off:
“So I did what any man would do.
I mounted a Raspberry Pi to the top of my kitchen cabinets to automatically detect if he tried to pull that beer stealing shit again:”
Yeah, perhaps I could have been a bit more clear on that. In the section below it I say:
Indicating that there is a second part to the series, but I can definitely see how it’s confusing.
Hi adrian. I just bought myself a raspberry pi 3 model b and a camera board. I have no knowledge on how to use it to run the basic motion detection on it, would u mind guiding me on the steps of how to actually use this raspberry pi 3 b???
It’s great to hear that you just purchased a Raspberry Pi 3 and camera board. If you’re just getting started I would suggest you work through Practical Python and OpenCV. This book will teach you the fundamentals of computer vision and image processing. The Quickstart Bundle and Hardcopy Bundle also include a pre-configured Raspbian .img file with OpenCV pre-installed. Just download the .img flash it to your SD card, and boot. It’s by far the fastest way to get up and running with OpenCV. Be sure to take a look!
Wow! Great tutorial. Thanks.
I am stepping through these tutorials on a Pi B+. I am able to get through this tutorial, the only major issue was that initially I had not installed imutils, but after installing it the code it works(kinda) the cursor simply moves to the next line, blinks a handful of times and then the prompt pops back up. I have dropped a few debug lines in the code to ensure the code is executing (and it is), it just doesn’t seem to be executing in a meaningful way. The camera for sure works (tested it after running the code). Any ideas as to what might be happening?
EDIT: Oops….. I just read the comment that says that this was not meant to be run on a pi….my bad
No worries Matthew! The reason the script doesn’t work is because it’s trying to use the
cv2.VideoCapturefunction to access the Raspberry Pi camera module, which will not work unless you have special drivers installed. To access the Raspberry Pi camera you’ll need thepicameramodule. I have created a motion detection system for the Raspberry Pi which you can read more about here. I hope that helps!Hello Mr Adrian,
When I’m trying to lunch the code, I am getting this error ” File “pi_surveillance.py”, line 8, in from picamera.array import PiRGBArray”
I am using a raspberry pi camera, and I used your guide on how to install opencv on rapsberry pi and I didn’t have any error.
What did I do wrong?
Thank you
Hey Almog, have you installed the “picamera[array]” module yet? Executing:
$ pip install "picamera[array]"will install the
picameramodule with NumPy support. You should also read this post on the basics of accessing the camera module of the Raspberry Pi.I started with your code and got something that is pretty good for detecting cars, and sometimes pedestrians too. https://www.youtube.com/watch?v=unMbtizfeUY&feature=youtu.be
With an outdoor scene, trees waving around etc. the trick is to update the background reference image without getting it contaminated by moving objects. I’d be happy to make my version available, but it is based on yours and I’m not sure if your code is open source.
Awesome, very nice work John! Feel free to share, I would be very curious to take a look at the code, as I’m sure the rest of the PyImageSearch readers would be as well!
Hi Adrian,
Ok, I put my code here: https://github.com/jbeale1/OpenCV/blob/master/motion3.py
also a post with picture here:
https://www.raspberrypi.org/forums/viewtopic.php?f=43&t=114550&p=784460#p784460
The code is very specific to that particular camera view; for example there is a line that restricts objects of interest to the upper half of the screen (based on yc coordinate), where the road is, to ignore pedestrians and moving tree shadows in the lower part of the frame.
Thanks so much for sharing John, I look forward to playing around with it! Great work! 🙂
Dear Adrian
where is the ‘imutils’ path?
I need to know folder that include this file on My Raspberry pi 2, after “pip install imutils”
I search and not found in /usr folder.
Check in the
site-packagesdirectory for the Python version that you are using.But in general, you don’t need to “know” where pip installs the files. You can simply start using them:
$ python>>> import imutils
>> ....
Hi, thanks for this great tutorial.
I am new to opencv (and python as well), and trying to follow your steps on this tutorial, but when I running the script, I got this error:
`from convenience import translate
ImportError: No module named ‘convenience’
`
I have installed the imutils, but seem something is missing in the package. Any idea why?
TC
Hey TC, what version of Python are you using?
I am using python 3.4 on a Linux Arch machine.
However I am able to fix the problem by replacing the
` from convenience import …`
to
`from imutils.convenience import ….`
in the `__init__.py`
However, I got another error when trying to execute the code (which I downloaded from your site):
` File “motion_detector.py”, line 61, in
cv2.CHAIN_APPROX_SIMPLE)
ValueError: too many values to unpack (expected 2)
`
ermm…missing one variables in this line ?
`(cnts, _) = cv2.findContours(thresh.copy(), cv2.RETR_EXTERNAL,
cv2.CHAIN_APPROX_SIMPLE)`
I figured it was Python 3. The
imutilspackage is only compatible with Python 2.7 — I’ll be updating it to Python 3 very soon. Also, at the top of this post I mention that the code detailed is for Python 2.7 and OpenCV 2.4.X. You’re using OpenCV 3.0 and Python 3, hence the error. Thecv2.findContoursfunction changed in OpenCV 3, so change your line to:(_, cnts, _) = cv2.findContours(thresh.copy(), cv2.RETR_EXTERNAL, cv2.CHAIN_APPROX_SIMPLE)and it will work.
yes..thank you very much. Now it’s working. The problem now is the tracking seem not accurate like the demos above. Is this has something to do with the camera model? Because now I am using the laptop builtin webcam.
Poor tracking could be due to any number of things, including camera quality, background noise, and more importantly — lighting conditions.
I see. Thanks for everything!
Thanks, Adrian 🙂
Hello Adrian,
Thank you for your tutorial. It has been very helpful to me. I also have to admit that John’s code has been useful as well.
I’m trying to make a vehicle detection and tracking program (nothing fancy – mainly for fun). So far I have been very satisfied with the program, but I feel like, that finding a difference between the current frame and the first one is not the best solution for me, because in some test videos it results in false detection, mainly because of huge changes between frames etc.
Maybe you can give any advice how to improve or fix this? Also – if you have other advices in terms of vehicle detection and tracking, I would be very glad to hear about them.
Anyway – Thank you in advance.
Hey Kaspars, take a look at my post on performing home surveillance using a (slightly) more robust algorithm on the Raspberry Pi. This method uses a running average as the background model to help prevent those false positives.
Okay, I will take a look.
Thank you once again. 🙂
Thanks a lot for this tutorial. Do you know what would be the best way to record that motion ? Like distance travelled (in pixel) or velocity ?
Hey Gabriel, I have not done any tutorials related to velocity, but it is certainly possible. But in the most simplistic form, the algorithm is quite simple if you define two identifiable markers in a video stream and know the distance between them (in feet, meters, etc.) Then, when an object moves from one marker to the other, you can record how long that travel took, and be able to derive a speed. Again, while I don’t have any tutorials related to velocity, I think this tutorial on computing the distance to an object might be interesting for you.
@tc
Can you send me code? I’m using python3. But i used sudo python3
So iI am focus only python3.
Hello , thank you for the tutorial , it was really very good.
I needed to do a system similar to his but with the use of ip camera . You know what should I do ? I could not get the video from an IP address.
Thank you so much
Hey Alexandre, you can still use this code with an IP camera, you just need to change the
cv2.VideoCapturefunction to accept the address of the camera. Another approach is to try to parse the stream of the camera directly. I personally have not done thsi before, but I hope it helps get you started.wow . thanks for the tutorial . and thanks for the time you spend to write these tutorials for us 🙂
thank you very very … much 😉
Hello Adrian,
I have installed imutils in the terminal under CV, if i am not under CV and try to install i get an error message. When i am in python editor and input “import imutils” i get an error stating no module named imutils. I am using Python 2.7.3. Please let me know what I am doing wrong.
Tony
You must be in the
cvvirtual environment to access any packages installed in that environment. Yourcvvirtual environment is entirely independent from all other packages installed on your system.Be sure to access your virtual environment by using the
workoncommand:$ workon cv$ python
>>> import imutils
...
Adrian,
Thanks for this, however, I get syntax errors every time i input “Firstframe = none” and “camera.release()” which starts over at >>> instead of … which means I have to do it over again but doesn’t change the outcome. Also, just curious. I noticed at some places if i put in the “# code” the following code doesn’t work and other spots if i don’t put it in the following code doesn’t work. Could you let me know if I need to input the “# code”?
Thanks, Tony.
Tony: This code is meant to be executed via command line, not via Python IDLE. Please download the source code using the form at the bottom of this post and execute it that way.
Hi Adrian
I’m having this same issue, and I also tried to run on cv mode without success, do you have any idea about what is happening?
Best regards
Are you referring to the imutils error? If so, you likely did not install imutils into the
cvvirtual environment:Hi Adrian,
Excellent tutorials, both this and the one detailing the use of the camera.
I am however worried about the performance of the motion detection, even on an RPi 2.
Due to the capturing process already using lots of CPU, I tried using different threads for capturing and for motion detection, to spread the load on the cores. Thing is, even at 4 FPS, the motion detection consistently lags behind the capturing thread.
What was your experience with this?
Code here: https://github.com/smarmie/rpi-art
Thanks.
4 FPS sounds a bit slow. Have you tried processing smaller frames? If you resize the frames to a smaller size, the less data you have to process, and thus the faster your algorithms will run.
Yes, I though about that. I don’t know which would have a better precision: capturing directly at a smaller resolution, or capturing at a higher resolution and resizing before processing?
Capturing directly at a smaller resolution should have better speed tradeoffs than capturing at a higher resolution and resizing afterwards (since you can skip the resizing/interpolation step). However, that would be something to test directly and view the results.
hello adrian
thank you for this tutorial, but i have a problem, i got message
File “/usr/local/lib/python2.7/dist-packages/imutils/convenience.py” line 37, in resize
(h, w) = image.shape[:2]
AttributeError: ‘NoneType’ object has no attribute ‘shape’
can you help me ?
Hey Ifran, if you’re getting an error related to the shape of the matrix being
None, then the problem is almost certainly that the frame is not being properly read from the webcam/video. Make sure the path you supplied to the video file is correct.do u solved this problem ? i have same problem and dont have idea how to solve. im new btw
Double check that you can access the builtin/USB webcam on your system. If you’re getting an error related to an image/frame being
None, then frames are not being properly read from your video stream. If you’re using the Raspberry Pi, you should use this tutorial instead.Hi Adrian,
Thanks for the tutorial!
I have a question, if we are detecting motion using a delta between the FirstFrame and the new one, and i’m guessing that we are doing something like this:
delta pixel=abs(firstFrame_pixel – newFrame_pixel).
if the new pixel will be black and the number that represent black is 0 so we will get the original pixel without ant change.
and how this pixel will be detect?
Thanks!
Yes, computing the absolute difference is a really simple method to change change in pixel values from frame to frame. I would take a look at Lines 50 and 51 where I compute the absolute difference and then threshold the absolute difference image. All pixels that have a difference > 25 are marked as “motion”.
hello adrian
thank you for the tutorial!!
i followed all tutorial from installing python, opencv and testing video.
but i have a problem opening ‘motion_detection.py’
nothing happens when i type ‘python motion_detection.py’
i recorded the problem.
i would be very thankful if you help me.
thank you!
https://youtu.be/rXeMjQXMtpU
It seems like for whatever reason OpenCV is not pulling frames from the video or camera feed, I’m not sure exactly why that is. When you compiled and installed OpenCV on your Raspberry Pi, did you see if it had camera/video support? I would suggest using the OpenCV install tutorial I have detailed on the PyImageSearch blog. Step 4 is really important since that is where you pull in the video pre-requisites.
Thank you for feedback!
I tried it and it says they are the newest version.
I wonder that ‘python test_video.py’ works very well
and ‘python motion_detector.py’ doesn’t work…
Oh, I see the problem now. The
test_video.pyscript uses thepicameramodule to access the Raspberry Pi camera. However, the code for this blog post uses thecv2.VideoCapturefunction which will only work if you have the V4L drivers installed. Instead, this post for motion detection for the Raspberry Pi.please provide solution for this problem.
Please see my previous comment — I have already addressed how to resolve the issue.
Hi Adrian,
Awesome website. I was going through the motion-detector.py script here and was having quite a bit of fun with it using my night-vision camera. It was interesting to see there was quite a bit of noise between frame to frame. Anyway, the point here is I was working well when all of a sudden after a reboot I am having this problem, the script doesn’t run. Essentially (grabbed) is False and the script breaks. I spent hours scouring this site and other web searches to see what went wrong. I gave up and reinstalled a new version on my Pi 3, the most recent Noobs. I went through https://pyimagesearch.com/2016/04/18/install-guide-raspberry-pi-3-raspbian-jessie-opencv-3/ and still it does not work. When I try to install the libv4l-dev it says the most recent version is installed. I am not sure what is going on but it was incredibly frustrating because I had it working once!
A couple other things: I was using an older version of raspbian (at least 6 months) when I first had it working. If I vaguely remember right I might have had an update pending after reboot. However, being sloppy I just kept working. I also installed programs like VLC. This was all before reinstalling a new version of Noobs.
Since this was a recent comment I am just wondering if there was something broken in a recent update. This is just a guess and the likely scenario is I am doing something wrong. But I had it working, reinstalled the OS, tried the instructions line by line, and still nothing. If you could provide any extra help/direction into the matter I would be much appreciative.
My previous comment can be amended. The solution was to run the command:
sudo modprobe bcm2835-v4l2
I then tested the v4l2 capture using the command
v4l2-ctl –overlay=1
and turned it off
v4l2-ctl –overlay=0
For whatever reason this fixed the problem. https://www.raspberrypi.org/forums/viewtopic.php?f=43&t=62364
This is not intuitive and maybe there is a better approach. But I hope someone with a similar problem may find this helpful.
Hi Jeff — thanks for sharing. I assume this was for the Raspberry Pi camera module?
please provide the link to solve this problem
Thanks for another great tutorial Adrian! Your tutorials have given me the ability to jump into working with OpenCV without much startup time.
I’m glad you enjoyed it Hanna! 🙂
Hi,
thanks for the great tutorial! it’s very helpful.
one question though, in this tutorial you use: camera = cv2.VideoCapture(0)
while in this tutorial:
https://pyimagesearch.com/2015/03/30/accessing-the-raspberry-pi-camera-with-opencv-and-python/
you said you prefer to use picamera module: (from comments)
“When accessing the camera through the Raspberry Pi, I actually prefer to use the picamera module rather than cv2.VideoCapture. It gives you much more flexibility, including obtaining native resolution. Please see the rest of this blog post for more information on manually setting the resolution of the camera”
so what changed here?
The main difference is that in the second post I am using the
picameraPython module to access the camera attached to the Raspberry Pi. Take a look at the source code of the post and you’ll notice I use thecapture_continuousmethod rather than thecv2.VideoCapturefunction to access the webcam. But again, that post is specific to the Raspberry Pi and the Pis camera module.I am getting an import error no module named pyimagesearch .transform.any ideas what I’ve done wrong
Hey Dan, did you download the source code to this post using the form at the bottom of the page? The .zip of the code download includes the
pyimagesearchmodule. I’m not sure where thetransformerror is coming from, I assume from theimutilspackage. So make sure you installimutils:$ pip install imutilsHello,
I’m trying to test this first part and im having a problem when compiling it:
Traceback (most recent call last):
File “***********”, line 60, in
(_,cnts) = cv2.findContours(thresh.copy(), cv2.RETR_EXTERNAL,cv2.CHAIN_APPROX_SIMPLE)
ValueError: too many values to unpack
I’ve looking for a solution but i couldnt
could you give me a push
Thank you
It sounds like you’re using OpenCV 3 which has made changes to the return signature of the
cv2.findContoursfunction. Change the line of code to:(_, cnts, _) = cv2.findContours(thresh.copy(), cv2.RETR_EXTERNAL,cv2.CHAIN_APPROX_SIMPLE)and the method will work with OpenCV 3.Você é o cará meu srsrs 😀
sir i have changed the code but still getting same error
Traceback (most recent call last):
File “motion_detector.py”, line 61, in
cv2.CHAIN_APPROX_SIMPLE)
ValueError: too many values to unpack (expected 2)
Are you using the code for the most recent blog post? If so, no changes are required. Just download and execute as is.
Cant wait to try this out, thanks man.
Hi, I tried to run this code on my python 2.7 with opencv 3.0 but its not working. I am student of Final year and doing fyp. We have a fyp of gesture wheel control chair. We are trying our hard to get more close in this project but some issues are coming.
Is it possible I can get some help from you. I shall be very thankful to you if you guide me.
thanks
Hey Talha — when you say the code is “not working”, what do you mean? Are you getting an error of some kind?
Hi, Thanks for the excellent post.
I was learning Object detection by Opencv and python using your code, Moving object in my video was small (rather human it’s an insect moving on white background) and video was captured by a 13 megapixel Mobile camera. When object starts to move it left a permanent foot print at the initial point and hence tracker will show two rectangle one at the side of origin and the other tracker move according to object current prostitution.
Why does it detect two contour instead of one which is actually tracking the movement.
The reason two contours are detected is because the original video frame did not contain the footprint. This is a super simplistic motion detection algorithm that isn’t very robust. For a more advanced method that will help solve this problem, please see this post.
I’m a Seattle Police software developer tasked with figuring out how to auto redact police videos to post on Youtube, see http://www.nytimes.com/2015/04/27/us/downside-of-police-body-cameras-your-arrest-hits-youtube.html Using your code from this post I was able to generate https://www.youtube.com/watch?v=w-g1fJs3LgE&feature=youtu.be which is a huge improvement on just blurring all the frames. I haven’t figured out how to blur inside the contour. Could you please provide an example of how to do that? So far this is the most reliable thing I’ve found yet. Both tracking an ROI and doing head detection are problematic.
Hey Tim — thanks for the comment. I’ll add doing a blog post on blurring inside head and body ROIs to my queue.
Thanks for the kind words Arm! 😀
Hey Adrian as usual a great post, Maybe Could You suggest some good books or blogs about opencv and java or c++ or android.???? Python is great but sometimes in Industry we need faster results, quickly executions THANKS
Hi!! Great Tutorial.. 🙂
I was wondering if you can do a tutorial on object detection and tracking from a moving
camera(UAV/drone). It would be highly appreciated.
Thanx!
I’ll certainly consider it for the future!
Hello. My name is Seungwon Ju from South Korea.
This is fascinating. I’m following your guide for my Highschool Research Presentation.
Thanks to you, I could make CCTV with my raspberry Pi without PIR sensor.
Thank you very much!
I’m happy you enjoyed the post Seungwon Ju — best of luck on your presentation!
Hello Adrian, thank you for sharing this tutorial, it really helped me for completing some tasks, nice to meet you and i’m waiting for the other tutorials 😀
Thanks Ahmed! 🙂
Hi Adrian, thank you for this great tutorial! i was looking for something like this.
I have to ask, how do you achieve it at such a speed?? i have your exact same configuration (or at least that’s what i think), but i can’t make it work as fast as you do. I started from scratch. I followed your tutorial on how to install opencv and python, then imutils and then this project. Do you have something else to improve the performance?? or i’m missing something??
P.d:sorry for my bad english 🙂
No worries, your english is great. To start, make sure you are using a Pi 2. That’s definitely a requirement for real-time video processing with the Raspberry Pi. Secondly, try to make the image you are processing for motion as small as possible. The smaller the image is, the less data there is, and thus the pipeline will run faster.
Also, keep an eye on the PyImageSearch blog over the next few weeks. I’ll be releasing some code that allows the frames to be read in a separate thread (versus the main thread). This can give some huge performance gains.
Hey, Adrian, thanks for your work.
I have a problem while trying to run the code. When i’m typing like:
python motion_detector.pyin order to get motion detection from the webcam, nothing is going on.
(i mean i can’t see any result, i think code just executes and that’s it)
And when i’m trying to execute your example (i downloaded it):
python motion_detector.py --video videos/example_02.mp4i get an error
Traceback (most recent call last):
   File "motion_detector.py", line 61, in
      cv2.CHAIN_APPROX_SIMPLE)
ValueError: to many values to unpack
Can you give me some advice?
Thanks
Hey Slava: please read through the comments before submitting. I’ve answered this question twice before on this post — see my reply to “Alejandro” and “TC” above for the
cv2.findContoursfix.As for a video stream not displaying up, ensure that your webcam is properly plugged in and OpenCV has been compiled with webcam support.
Hello Adrian Great tutorial, I’m using python 3 and opencv 3 I’ve succesfully install imutils.
the question is why every time I start the program it shows no result or error it just start and stop. I know I have to use python 2.7 and opencv 2.4.x but the raspberry I’m using is installed with opencv 3 and python 3 is there anyway to make it work in the system I’m using
You’re using your Raspberry Pi? I also assume you’re using the Raspberry Pi camera module and not a USB camera? If so, you’ll need to access the Pi camera module. An updated motion detection script that works with the Raspberry Pi can be found here.
Yeah, sorry, i found the answer in few mins after i wrote my question.
Anyway thank you for your reply, that you do not ignore the question that has already been answered.
No worries, I’m happy to hear you found the solution.
can you help me if i want to use another algorithm like phase only correlation or haar-like features, what I must suppose to do??
If you want to train your own Haar classifier, I would give this tutorial a try. I’ll be covering correlation tracking on the PyImageSearch blog in the future.
Another great alternative is to use HOG + Linear SVM, which tends to have a lower false-positive detection rate than Haar. I cover the implementation inside PyImageSearch Gurus.
Hey Adrian! I’m Mithun from India. I would like to know whether this can be used to do a project on accident detection using video camera.
It certainly could, but you might need to add a bit of machine learning to classify what is a car/truck, and if traffic is flowing in a strange pattern (indicating a car accident).
Thank you, great article and useful to me. I’ll wait for part 2. By the way, I’m doing a traffic monitoring device (detecting speeding, lane encroachment, red light). Raspberry can do that?
I personally haven’t traffic monitoring on the Pi, so I can’t give an exact answer. My guess is that it can do basic monitoring, but anything above a few FPS is likely unrealistic unless you want to code in C++. To be honest, I think you might need a more powerful system.
Hi great article and very useful could the code be changed to work with an IP Camera as I Don’t have an pi camera as of yet.
Yes, this could could certainly be used for a Raspberry Pi camera. I’ll try to do a blog post on this in the future.
Hi Adrian,
Lovely tutorial!!!
I have a quick question. I made a video shot with my phone cam and implementation is quite shadow sensitive. It detects small light changes on keyboard of my computer as movement for instance.
Any suggestions to reduce shadow/light sensitivty?
Lighting conditions are extremely important to consider when developing a computer vision application. As I discuss in the PyImageSearch Gurus course, the success of a computer vision app starts before a single line of code is even written — with the lighting and environment. It’s hard to write code to compensate for poor lighting conditions.
All that said, I will try to do some blog posts on shadow detection and perhaps even removal in the future.
Thanks for the tutorial. For some reason my setup is not working. I tested with raspistill and my camera has a live feed. Th program will run a few seconds with out output and quits. If I run a few lines of the code, I found that the camera fails to grab any frames with camera.read() and quits. Any ideas of why the camera may fail to grab frames?
That’s definitely some strange behavior on the
camera.readpart. Are you executing the code provided in the source code download of this post? Or executing it line-by-line in IDLE?Hi Adrian.
I use Rpi 3 and Rpi Camera Module v1.3. I cant run with live stream. I tried on terminal and Python2 idle. I didnt give error. Camera led didnt light. How can i run with live stream?
It sounds like your Raspberry Pi is having trouble accessing the camera module. I would start with this tutorial and work your way through it to help debug the issue.
I can run your code survilance cam with dropbox. But i cant run this code.
If you can run the home surveillance code, then I presume you’re using the Raspberry Pi camera module. This post assumes you’re using a USB webcam and the
cv2.VideoCapturefunction. You can either update this code to use the Raspberry Pi camera module, or better yet, unify access between USB and Pi camera modules.hi adrian
thanks for the great tutorial
I’ve got a problem… the code works, but only for the sample video…
I want to run it on my own raspberry pi camera video…
what should I do exactly?
is it possible to make it work real-time?
If you’re trying to use this code for the Raspberry Pi camera module, then you’ll need to update the code a bit. First, read this post on accessing the Raspberry Pi camera. Then, you might want to read this post on the VideoStream class, allowing you to access either a builtin/USB webcam or the Raspberry Pi camera module without changing a single line of code.
Can you please give me something with which I can track motion using my webcam. I don’t have raspberry pi.
Thanks in Advance
You can use the code detailed in the blog post you just commented on to track motion using a builtin/USB webcam. All you need is the
cv2.VideoCapturefunction, which this blog posts explains how to do. I also cover how to use thecv2.VideoCapturefunction for face detection and object tracking inside Practical Python and OpenCV.So I am getting this error and I am not sure what is going on. Could I get some help and your opinion on it? I get the same error with the downloaded Code along with just copying down the code myself.
ValueError: too many values to unpackPlease see my reply to “TC” above. You’ll also want to read this blog post on checking your OpenCV version. You’re using OpenCV 3, but the blog post assumes OpenCV 2.4. It’s a simple fix to resolve the issue once you give the post a read.
Hi Adrian,
Could you link us to some of your posts about image processing specific with the PiCamera.
I keep running into errors trying your codes except for the “accessing-the-raspberry-pi-camera-with-opencv-and-python” post which works flawlessly. But I’d like to see how we can build from that. Again any sort of image processing specific to the PiCamera.
I think the best blog post to review would be this post on utilizing the same code for both builtin/USB webcams and the PiCamera module. You can easily update the code in this blog post using the
VideoStreamclass.Outside of how you access the webcam or Pi camera module, there is no difference between how you process a frame.
If you’re looking for more examples on how to use the picamera module, Practical Python and OpenCV has a few examples as well.
Hello Adrain.
I am getting the following error:-
Traceback (most recent call last):
ValueError: too many values to unpack
Please help me solve this error.
Thanks.
Please read the previous comments before posting. Specifically, my replies to Alejandro and TC detail how to solve this problem.
I had a brain orgasm while reading. Thanks for awesome tutorial.
Hi Adrian,
This is great and thanks for your feedback for the first tutorials! Now in this one, when I execute the python script: python motion_detector.py, I get these error messages:
Traceback (most recent call last):
File “motion_detector.py”, line 58, in
cv2.CHAIN_APPROX_SIMPLE)
ValueError: too many values to unpack
Any idea what is the problem?
Thanks a bunch!
JP
Please read through the comments before posting — your question has already been answered multiple times. See my reply to “TC” and “Alejandro” above.
Hello,
I have try to implement this script with windows operating system. I have run script then does not display error but does not display any frame.
when i have run below command then display next promt but does not display any video frame as per your blog
C:\Python27>python motion_detector.py –video example_01.mp4
C:\Python27>
I’m not a Windows user (and I don’t recommend Windows for working with computer vision), but I would suggest (1) double checking that the path to the video file is valid and (2) ensuring that your Windows system has the valid codecs to read the .mp4 file.
Superb Work Sir, Thanks very much for this tutorial, It is really helpful and the code is easily understandable to a rookie in programming.
I’m happy I could help Shivam 🙂
Hi Adrian,
Firstly, thanks for a brilliant tutorial.
And secondly I was wondering whether you’d be willing to suggest a way of splitting input video? So what I mean is, for example, if there’s a 10minute clip with 30seconds of motion somewhere in the middle – I would want the output video to just be the 30s (+ a couple of seconds either side perhaps). I’ve worked out that this can be done using FFMPEG, but I’m not sure how to retrieve the in and out points from your code to feed into FFMPEG.
So I suppose that my questions are:
1) Is using FFMPEG a necessary/wise choice for splitting the video?
2) How do I get in and out points from your motion detection code?
Any advice you could give would be greatly appreciated.
Thanks
It sounds like you’re trying to create a simple video synopsis and extract only the most interesting parts of the video? If so, this post should help to accomplish that.
Its work , thanks Adrian . . .. you are pro
Thanks Reza! 🙂
hey adrian
Really awesome tutorial from your side
I am always appriciate your work
You are really god of opencv
I am facing one problem.
Like if I capture video from my camera as you put two tutorial videos; it works fine
But in the live camera it wan’t work properly.
What will be the solution?
What type of camera are you using? I would start with that question and then do a bit of research to see if it’s compatible with your system and/or OpenCV. I think the real problem is that your system is unable to access your webcam. Do some debugging and find out why that is. From there, you’ll be able to move forward.
no no
camera is working fine.
But at the start of the first frame; it shows occupied in my case.
so if there is no object movment inside the frame still it shows occupied.
awaiting for reply and thanks for the quick reply..
Hi Ankit — I think the issue is with your camera sensor warming up and causing the initial frame to be distorted. I would place a call to
time.sleep(2.0)aftercv2.VideoCaptureto ensure your camera sensor has had time to warm up. Another option is to apply a more advanced motion detection algorithm such as the one detailed in this blog post.Placing time.sleep(2.0) didn’t work for me.
Are you using a camera or a video file?
Hi Adrian,
Your article is very helpful and actually, all the content in this website is very useful. I wanted to ask is the part 2 out ?
Thanks Akhil! And by “Part 2”, do you mean the Raspberry Pi + motion detection post? If so, you can find it here.
Hi Adrian,
Thank you very much for this tutorial. I’m new to computer vision! I’m currently working on a project which involves background subtraction technique. Your code uses the first frame as a reference to next frames and that is how it detects motion. All what I need is to have a reference frame that changes over a specified period of time, and then do exactly what the rest of the code does. How do I modify your code (if that’s okay) to achieve that?
To be more specific; a reference frame that continuously changes over a specified period of time.
I actually cover how to solve this exact question in this post 🙂
Hi Adrian,
Thank you very much for this tutorial. I’m a student first time learning this.
i’m want to know this really can use motor servo to tracking? If tracking the background change everything will be the target.
i want to know anything can help me follow the object had be found
With this method, you won’t be able to use a servo since the algorithm assumes a static, non-moving background.
Hi Adrian. This is a simple question, but how do you rotate the camera 180 degrees in your code? Now it’s upside down the way my camera is setup. Normally with PiCamera I do the following:
camera.rotation = 180
and it works. But in your code if I do this after your line:
camera = cv2.VideoCapture(0)
I get an error message.
I would use the
cv2.flipfunction to flip the image upside down:frame = cv2.flip(frame, 0)Hi Adrian, how are you?
My code doesn’t work very well.
When I run the program it appears always “occupied”, even when the first frame contains only the background. My webcam is good quality (philips spc 1330). What do you think that is?
Thanks a bunch!
This likely due to your camera sensor still warming up when the first frame is grabbed. Either use
time.sleep(2.0)after the initial call tocv2.VideoCaptureto allow the sensor to warmup, or better yet, use the motion detection method utilized in this blog post.Thanks Adrian!
HI Adrian,
I just wanted to know the time complexity of this code, what complexity would this predefined functions be running in?
Which functions are you specifically referring to?
Hello, again, Adrian
It is possible to use a folder with background images to be used as the first frame?
Thanks a bunch
Absolutely! Instead of using a folder of images, I instead use the past N images from a video stream to model the background in this post, but you can easily update it to use a folder of images. The key to this method is to use the
cv2.addWeightedfunction.Hi bro. Really nice tutorial. İ really enjoyed that. Thank you for this well-worked tutorial ^_^
Greetings from Turkey
No problem, I’m glad you enjoyed it!
This has been wonderful to read/follow. Thanks for all the work you put into these, along with the descriptions to really help build and understanding of what’s actually taking place.
I do have one question, however – What would be the best way to have this change from “Occupied” to “Unoccupied” and reset the motion tracking process? Unless I’ve missed something above I don’t see how that would take place.
If you would like to totally reset the tracking progress, then you need to update the
firstFramevariable to be the currentframeat the time you would like to reset the background.Ahh, that makes perfect sense! I implemented this and some other changes and I have learned much.
I’m capturing the images now when certain triggers are met with cv2.imwrite(‘\localpath’, img) but now I need to figure out how to clear the “buffer” of the image that is written locally. Each time it does save to local disk it just keeps writing the same image over and over again. What I have tried so far seems to actually release the camera all together instead of just resetting the frame. Any suggestions?
I’m not sure what you mean by “clear the buffer of the image written locally”? Do you mean simply overwrite the image?
thank u sir,awesome tutorial,
based on which algorithm detection and tracking is performing here,is it meanshift algorithm or other???
Neither MeanShift nor CamShift is used in this blog post — the tracking is done simply by examining the areas of the frame that contain motion. However, you could certainly incorporate MeanShift or CamShift if you wanted.
hello sir awesome post,i tried the program by reading static video for detecting moving cars on road,code worked well,i need some detailed info like how the motion detection and tracking is going on ,like only by background subtraction method or some other algorithm,
i hope u will help me out.
So if I understand your question correctly, your goal is to create an algorithm that uses machine learning to detect cars in images? If so, I would recommend using the HOG + Linear SVM framework.
Hello Adrian!
Frist, thank you for use your Rpi source code!
I accept your code in my Rpi3
It is operating ordinarily
I want to expand their function!
I want to save the original image when covers background subtraction
How can I move imwrite() function??
Currently, Saved Image is include square.
once again, Thank you for your Rpi tutorial!
You can save the original frame to disk by creating a copy of the
frameonce it’s been read from the video stream:frameOrig = frame.copy()Then, you can utilize
cv2.imwriteto write the original frame to disk:cv2.imwrite("path/to/output/file.jpg", frameOrig)Thank you Adrian!
I solved the problem~~
and then, saved image is original frame
hmm…
I have new question… haha..;;
I want to reduce saving time
I think one method
Is it posible??
1. one thread operation -> if Image Detect; flag = 1
2. another thread operation -> if flag ==1; imwrite
I know that python is one thread
terminal python code value(flag) -> another terminal python code
what should I do??
Sure, you can absolutely pass saving the image on to another thread. This is a pretty standard producer/consumer relationship. Your main thread puts the frame to be written in a queue. And a thread reads from the queue and writes the frame to file.
Awesome tutorial! Totally loved it! easy to understand and very helpful! Thank you for this series! Please keep doing them!
Can u please provide the sample video ?
Please use the “Downloads” section of this blog post to download the source code to this post — it includes example videos that you can use.
Did anybody try to run this script on a raspberry pi nano?
The Pi Nano? Do you mean the Pi Zero? If so, I wouldn’t recommend it. The FPS would be quite low, as I discuss in this blog post.
i am using opencv 3.0.0 i followed all the steps in the motion detection but i got nothing i did not got error but my answer was NOTHING!!!!!!
If you did not receive an error message at all and the script automatically stopped, then OpenCV is having trouble accessing your webcam. Are you using a webcam? Or the Raspberry Pi camera module?
To gracefully exit, you may want to switch your last two lines. First close all windows, then release the camera. Otherwise, system will break with a segmentation fault.
I haven’t encountered this error before, but if that resolves the issue, thanks for pointing it out Kev!
How hard would it be to track detected motion regions between consecutive frames?
Using createBackgroundSubtractorMOG2() for example for use with more dynamic backgrounds doesn’t have the results it could have. In ‘Real-time bird detection based on background subtraction’ by Moein Shakeri and Hong Zhang, they deal with the problem by tracking objects between frames and if it is present for N frames then it’s probably a moving object.
I had a look at your post [https://pyimagesearch.com/2016/02/01/opencv-center-of-contour/] which was interesting and using moments, created lists for x and y coordinates thinking that i could compare elements in a list between successive frames but this happens:
current_frame_x [0, 159, 139, 31]
previous_frame_x [0, 141, 29]
there’s a new element ‘159’ so I cant compare elements like for like…
Is there a better way basically? I couldn’t figure it out!
There are multiple methods to track motion regions between frames. Correlation-based methods work well. But a simple method is to simply compute the centroids of the objects, store them, compute the centroids from the next frame — and then compute the Euclidean distances between the centroids. The centroids that have the smallest distances can be considered the “same” objects”.
Hi Adrian,
First of all, thanks for the great tutorial 😀
I’m working on a video surveillance system for my thesis and I need a background subtraction algorithm that permits to continously detect the objects even if they stop for a while. I have done various experiments with cv2.createBackgroundSubtractorMOG2() changing the parameter “history”, but, even if I set it to a very big value, even the objects that stop for just a second are recognized as background.
So, from this point of view, is it possible that your approach is better than those proposed by Zivkovic?
MOG and MOG2 are certainly good algorithms for background subtraction. This method certainly isn’t “better” — it’s just less computationally expensive. MOG and MOG2 are less suitable for resource constrained devices (such as the Raspberry Pi) since they don’t have enough “computational horsepower” to get the job done.
If you test the MOG2 algorithm on your video (that one in which you open the door and enter in the room), you can notice that detects many false positive, much more than the absolute difference between frames.
Probabily MOG2 is not the best indoor detection algorithm and so in this case the absolute difference performs better.
Hi
Thank you for the awesome tutorial. I implemented the techniques but i have difficulty in saving the Video feed on my Rspberry pi and Mac laptop. I tried writing the frames so it could save in the default directory but to no avail. My question is how do i save the video feed using python language and also hashing and signing the video feed to prevent modification. I look forward to a positive response soon.
I detail how to save webcam clips to file in this blog post. I hope that helps!
Any suggestions on how it can be use to detect speed of moving object?
You need to calibrate your camera so you can determine the number of pixels per measurable unit (such as pixels, centimeters, etc.) I detail how to calibrate your camera and use it for measuring the distance between objects in this blog post.
Once you can measure the distance between objects, you just need to keep track of the Frames Per Second of your pipeline. Dividing the distance traveled by the FPS rate will give you the speed.
Hi Adrian ,
thank you for the awesome tutorial .it is working fine but when iam trying to execute this python script through web server using php it’s not showing anything.Can you please help me out how to execute this python script with php.
My index.php looks like this :-
Hey Lokesh — can you elaborate more on what you mean by “executing the Python script with PHP”? You likely don’t want to do that. You can call the
systemfunction to call any arbitrary program (including a Python script), but that’s not a good idea, since your PHP script will hang until the Python script finishes.Iam trying to run this python script integrating with php .so that it wil capture the video from webcam when iam running through browser but when iam trying to do this it’s not opening the webcam.
This won’t work. Python does not interface with PHP and you can’t pass the result from Python to PHP (unless you figured out how to use message passing between the two scripts). Instead, you should use Python to create a web stream and then have PHP read the results from the web stream. That way, these will be two separate, independent processes.
Hi Adrian,
Well-done for your all studies. That is great job. What do you think about counting people? Did you try it before?
Nice day!
It’s certainly possible using this technique. But depending on the types of images/videos you’re working with, you might want to use OpenCV’s built-in person detector.
thank you so much!
Hi there,
I am doing something somewhat similar to this.
If you were to get the center of the rectangle in each frame, and then make a line joining these centers together (effectively tracking the moving person) how would you go about doing this?
I have been able to identify the centers in each frame but am struggling to create a list that stores all the history of the centres.
Hey James — I already explain how to do this in this blog post.
Can this work with sequence of images instead of live camera frames? What will be the changes? Need help…
Sure, this can absolutely work with a sequence of images instead of a live stream. Instead of looping over video frames, loop over your images from disk. Replace the
whileloop that loops infinitely over frames from the video stream with a loop that loops over all relevant image son your disk.Hello Adrian Your work is fabulous, i can’t believe it works amazingly.
One more question; I am using RPi 2 for streaming image frames wirelessly through wifi using MJPG Streamer method(till now i received video frames on a fix IP address and Specific port 8080) and now i need to open that frames in your code and apply the same object detection on the received frames. Can I do it, will you please help me out..??
It’s been a long time since I’ve had to pass an IP stream into
cv2.VideoCapture, but this is exactly how you would do it. I would suggest doing some research on IP streams and thecv2.VideoCapturefunction together. Otherwise, another approach would be to use a message passing library such as ZeroMQ or pyzmq and pass the serialized frames back and forth.it keeps saying that ‘frame’ and ‘gray’ are not defined. help please? otherwise, great tutorial.
Hey Andrew — it’s hard to know exactly why you might be running into that issue. Please make sure you have used the “Downloads” section of this tutorial to download the code to this post. If you are copying and pasting the code (or typing it in yourself), you might (unknowingly) be introducing errors to the code.
Thanks for letting search my own answer.
If the issue “to many Values to unpack” occurs.
I found my answer here:
http://stackoverflow.com/questions/25504964/opencv-python-valueerror-too-many-values-to-unpack
I have a big question, in your opinion what is the best technique to segment dense amount of people viewed from top. For example, people who get in a train door. Thank you!
That really depends on the quality of your video stream, the accuracy level required, lighting conditions, computational considerations, etc. For situations with controlled lighting conditions background subtraction methods will work very, very well. For situations where lighting can change dramatically or the “poses” you need to recognize people in can change, then you might need to utilize a machine learning-based approach. That said, I normally recommend starting off with simple background subtraction and seeing how far that gets you.
Excellent tutorial as always. Just a small question. So for cosmetics I used
feed = np.concatenate((frame, thresh), axis = 1)
cv2.imshow(“Feed”, feed)
Obviously, cannot concatenate since frame and thresh have different dimension. Is there a workaround?
Do your
frameandthreshhave the same height? If not, resize the images such that they have the same height so you can concatenate them vertically.Secondly,
threshis a single-channel binary image whileframeis a 3-channel RGB image. That's not an issue, all you need to do is create 3-channel version ofthresh:thresh = np.dstack([thresh] * 3)From there, you'll be able to concatenate the images.
hello adrian, I first want to say that your work is excellent, but doubt arises me, you can broadcast live, but I have a problem, the screen is suspended to take some time for idle keyboard or mouse, how I can avoid that?
Hey Cristian — can you elaborate more on what you mean by the screen being “suspended”? I’m not sure what you mean.
hello adrian, I mean when you stop moving the mouse or keyboard a good time and the screen turns off, but all processes continue, energy saving mode of many computers
This really depends on your computer. You would need to investigate any type of “System Preferences” and turn off any settings that would put your system into “Sleep” or “Hibernate” mode.
Hi Adrian,
Amazing posts you have…and that bundles, supper helpful 🙂
I have a question about that step were we calculate the delta from past frame and the current one. Can we know each pixel coordinate that have changed from one frame to another?
Best regards,
Tiago Martins
PS. – Please don’t stop 🙂
Can you elaborate more on what you mean by “know each pixel coordinate that have changed”? I assume you want to know every pixel value that has changed by some amount? If so, just tale a look at the
deltathresholded image. You can adjust the threshold to trivially be one, but the problem is that you’ll get a lot of “noise” by doing that.Hi adrian i’m really impressed by your motioni detecting project.
As i am a novice in opencv or python, i have some questions.
In our project we want to use this program on the alley so there could be parked cars or laid something else. In that case, the program maybe in ‘occupied condition’ because of cars or other things. Thus i want to add more function like change the first frame image as a new frame which the webcam is looking at if there is nothing detected newly by the camera. But in my opinion this is really difficult to make TT. Could you help or advise us??
If you want your motion detector to be adaptive to it’s surroundings, please see improved motion detection algorithm.
Hey Adrian,
I m trying to run this code on my laptop running windows 8. I have installed all the necessary packages but still it is giving me a ValueError:Too many values to unpack at line 57. Please, help me out of this error.
It sounds like you are using OpenCV 3, but this blog post requires OpenCV 2.4. No worries though, this is an easy fix. Please see my reply to “TC” above for the solution.
Really fantastic tutorial, thanks Adrian! It passes the “sleeping kids test”: could I get the whole thing running before my kids woke up? Yes! 🙂
Awesome, great job Julian!
its really best tutorial. I like it. in this programme I want to store the occupied object video please tell me which command I used to store the object occupied video
I assume you are referring to saving the video clips to file that contain motion? If so, please refer to this blog post.
hey,
great stuff! thanks for the tutorial!
i’m using a PI camera with v4l2 driver on wheezy. the script works very well with it. I tried it with the old and new camera modul. running it with the new camera modul it is not so easy to find a good threshold level.
also I wondered if I could run the script with the noir camera modul..? I guess not, but you got an Idea how I could run it?
I personally haven’t worked with the NoIR camera before. The thresholding is a little different but you can still apply the same basic principles.
I solved this problem by using reinstalling open CV
But now; when I do sudo python motion_detector.py
It gives no problem but it’s not showing anything.
Program is not running?
Any ideas?
Is the Python script starting and then immediately exiting? Are you trying to access your webcam or use the video file provided in the “Downloads” section of this tutorial?
Hi Adrian, thanks once again for the amazing tutorial, i have exactly same problem as “Berkay Aras” owns, when I do sudo python motion_detector.py
It gives no problem but it’s not showing anything.
Program is not running?
i am using Raspberry pi 2 with installed OpenCV 3.1.0 and picamera. i have no idea why i did not get anything, i am using Downloaded code from your blog.
any idea please!
it stop here after executing run command…..
pi@GbeTest:~ $ python test2.py –video videos/example_1.mp4
pi@GbeTest:~ $
It looks like the Python script is running just fine, but you aren’t able to read frames from the .mp4 file. I would suggest following this install instructions to ensure you have the proper video codecs installed.
Adrian, thanks for your reply. in your code, i think you grabbed the frame from your camera as shown here,
(grabbed, frame) = camera.read()
text = “Unoccupied”
how can i do that? if i want to grab it from file?
thanks for your help!
If you want to grab a video frame from a file just updated the
cv2.VideoCaptureinitialization to include the path to your input video:cv2.VideoCapture("path/to/my/video.mp4")Hey Adrian,
Thank you for sharing it with the community.
Is it possible to use this for object motion detection? Like, moving car or ball detection?
What will I have to change to detect the specific shape object without any false detection?
You can certainly use this for object detection, but you’ll need a little extra “special sauce”. I would use motion detection to detect “candidate regions” that need to be classified. From there, I would pass these regions into trained machine learning classifiers (such as HOG + Linear SVM, CNNs, etc.) for the final classification.
when I put a camera outdoors,does it detect rain as a motion.How can I avoid it to detect only humans and sense a motion.
For that I would suggest training a custom object detector. A good candidate would be the HOG + Linear SVM detector. I also cover human detection in this post.
Hi Adrian,
Used your codes and did Object tracking using camshaft algorithm -https://www.youtube.com/watch?v=T3e5z6qoCpA
It works nicely.
I just want to implement tracking Pan/tilt.
So could you please guide us to control 2 servos (x and y direction) according to camshaft tracking.
Thanxz lot
I don’t have any tutorials on utilizing servos, but I will certainly consider it for a future blog post.
Thanxz adrian
Hi Adrian,
I followed your tutorial and this is really awesome. Thank you so much for sharing your work! I have a question for you. How can I show the frame delta like you have done in some of your tutorial screen shots?
–
Josh
Hey Josh — thanks for the kind words, I’m happy I could help. To display the
deltaframe simply insert:cv2.imshow("Delta", delta)I would personally put that line with the other
cv2.imshowstatements.is this code run on linux by PC?, is it not on raspberry pi? because, i have error,
(CV) $ python motion_detector.py --video videos/video1.mkv Traceback (most recent call last): File "motion_detector.py", line 4, in import imutils ImportError: No module named imutilsYou need to install the
imutilspackage into the “cv” virtual environment:From there you’ll be able to execute your script without error.
hello sir
since iam begginer in computer vision or image processing
I wanted to detect our own custom objects.so please let me know if you have any source code or some useful information where i can resolve this problem.
Thank you sir in advance
I demonstrate how to use machine learning to train your own custom object detector inside the PyImageSearch Gurus course.
i am having a final project with “people motion detection with Raspberry” that means, after detect people with camera pi, sim900 will sent a message for owner. So i have 2 question:
1.Can i run this code for my project?
2.How can i use sim900 with raspberry?
I read your “home-surveillance-and-motion-detection-with-the-raspberry-pi-python-and-opencv”, but with dropbox, i want to run in no-wifi enviroment?. So i think i can do with this code – basic motion detection and tracking with python and open cv.
To use this code for your project use the “Downloads” section to download the source code. I provide an example of executing the script at the top of the source files.
From there you should use the accessing Raspberry Pi camera post to modify the code to work with your Raspberry Pi camera module.
I don’t have any experience with the “sim9000” (and honestly don’t know what it is off the top of my head). I presume you mean sending a txt message. If so, check out the Twilio API.
Thanks Adrian,
I try to test an sample video, it works cool.
https://youtu.be/HJBOOZVefXA
Nice job! 🙂
Hi Adrian
Thanks for the tutorial.
frame is returning None always even if i pass a local video file to cv2.VideoCapture. No errors per se
Adrian
I downloaded the code as is and ran , it now seems to exit while finding the contours (line 60) without any errors.
kindly advice
kindly ignore, looks like n open cv 2.7 which i am running, the cv2,findcontours returns 3 values, instead of 2 as originally expected in the code. t now moes past.
In OpenCV 2.4, the
cv2.findContoursfunction returns 2 values. In OpenCV 3, the function returns 3 values. You can learn more about the differences here.In that case your version of OpenCV was likely compiled with video codec support. I would suggest following one of my OpenCV install tutorials.
Thanks Adrian
It was not a codec issue. I had to place the opencv_ffmpeg DLLs in one of the PATH’s…
Secondly, for some reason it does not recognise relative paths for the video file. Have to provide full path.
Works like a charm (few false positives on a self made video) but great start.
thanks much
Nice, congrats on resolving the issue!
Hello Adrian! Good morning! Thank you very very much!
I am a student from china .Recently, i was stumped by the question that how to build a system which can count how many people in classroom .It’s your this tutorial that gave me ideas and approaches!
I’m so glad and lucky to find your website in this wonderful world !
But some questions still confuse me ..how motion detection can detect many individuals and count the quantity of people at the same time ? If this need some face detector or head and shoulders detector in opencv? Could you give me some ideas or solutions? Thank you very much
You can use motion detection to count the number of people in a room provided that the motion in the room is only because of people.
Otherwise, you should consider applying object detection of some kind. I demonstrate how to detect humans in images here.
Hey!
Amazing code. But when I try to execute it, the command line gives me a syntax error for
File “”, line 1.
I am not entirely sure where I am wrong, any help is appreciated!
Hey Chandough — I would suggest that you use the “Downloads” section of this tutorial to download the code and execute it. It seems like that you copied and pasted the code from the post into your own project. That’s totally fine, but it can lead to errors like these. This is why I suggest using the “Downloads” section to ensure the code is properly executing on your system.
Hi Adrian~
i saw video in your turtorial about facial recognition by camera
detail
camera analysis someone after if who is not match
computer sent message to your phone!
i have question here !
what kind of Api use? like twilio, textlocal etc…
and Are you paying? when computer send message to your phone?
if you are using free can you tell me?
I am using the Twilio API. To send pictures messages you would have to pay for the API.
Interested in whether you think this can run fast enough to track a rocket launch.
I’m considering automating a tracker to improve model rocket photography/video (3D-printed gearbox/tripod head driven by servos).
High-end of “small” rockets:
https://www.youtube.com/watch?v=2xuUloxHdBE
A bit bigger:
https://www.youtube.com/watch?v=2xuUloxHdBE
I realize the changing background is an issue – but if you look at the videos, once the camera head has tilted up, it doesn’t have to move much. I’m thinking I could create a system adapted for the rapid acceleration that only lasts the first fraction of a second.
Interested in any ideas.
The issue here isn’t so much the speed of the actual pipeline, it’s the FPS of your camera used to capture the video. If you can get a 60-120 FPS camera, sure, I think you could potentially use this method for tracking. The problem here is the changing background, so you should instead try color or correlation filters.
Hi Adrian, These are some amazing tutorials. Thank you for sharing it with us.
Could you tell us how to execute the code form the Python shell and not from cmd?
That would be of great help.
Thank you,
GK
Which Python shell are you referring to? The command line version of the Python shell? Or the GUI version? I don’t recommend using the GUI version of IDLE. You should use Jupyter Notebooks for that.
I was referring to the IDLE shell. I’d like the program to run when I hit “F5”, instead of executing it from the cmd. Would that be possible?
If you’d like, I can send you a detailed email on what I’m trying to do, and why I’d like the program that way.
Thank you
If that’s the case I would suggest using a more advanced IDE such as Sublime Text 2 or PyCharm. Both of these will allow you to run the program via a “hot key” and display the results within the IDE.
That’s wonderful. Thank you Adrian. Shall try it out right away.
Hi Adrian,
I tried both PyCharm, and Sublime Text 3, neither of the IDEs would run the program directly. I’m able to run it from the command prompt in the PyCharm, but I was hoping to run it with either “Ctrl+B” or “F5”. Would you be able to shed some light on this issue?
Thank you,
GK
To be honest, I always execute my programs via command line. I never execute them via the IDE, so I’m not sure what the exact issue would be.
hey.
I want to stream the USB cam from the raspberry pi and see it on the windows PC monitor(live)
can i achieve the same using just Linux commands??(I have never worked with python before).
i have installed putty recently and i am working on it.
I am a newbie. kindly suggest me.
BTW sorry, forgot to mention.
ELP-USB130W01MT-L21 is the model of the camera which i am using.
and i want the live video on windows PC but not over the web.
Thanks.
If all you want to do is see the frames on a separate machine other than the Pi just use X11 forwarding:
$ ssh -X pi@your_ip_addressFrom there, execute your script and you’ll see the results on your screen.
Hello Adrain.
I am planning to incorporate a live stream of motion detection, face detection and face recognition and currently i am having problems running the face detection code. When i tried to run a part of your code, it showed AttributeError: ‘module’ object has no attribute ‘cv’. I am usng opencv3 by the way.
Greatly appreciate your advice.
Thankyou
What is your exact error message? And what line of code is throwing the error?
flags=cv2.cv.CV_HAAR_SCALE_IMAGE
Thankyou for the fast reply
It looks like you’re using OpenCV 3. Change it to:
flags = cv2.CASCADE_SCALE_IMAGEI am thankful for your tutorials and how well you explain everything, thanks a lot!
Im on the last year of my engineering career and currently looking for a job! When I have the money, I will buy your book, because im interested on doing my thesis about opencv.
Again, thanks!
Thanks Danny, I’m happy the tutorials have been helpful to you 🙂
Hi,
There seems to a problem while working with the code you provided. It gives “too many arguments to unpack” error on line number 60 of your code. Please have a look at it.
I’m using python 2.7.6 and Opencv 3.1.0
Hey Akarsh — please be sure to look through the other comments before posting or at least ctrl+f for your error message. You can resolve the issue by looking at my reply to “TC” above.
thank you.
how i can count the people in the street, or the car in the street?
i hope you can add tuterial about calculate the distance by webcam.
best regards
I actually have a tutorial on distance from object to webcam already live. I would suggest starting there.
Hi Adrian,
I was revisiting this post and noticed that you coded a 21 x 21 pixel area for blurring, yet in the text you refer to a 11 x 11 pixel blurring region.
gray = cv2.GaussianBlur(gray, (21, 21), 0)
You scale the image width down to 500 pixels, so do you recommend using 4% (20/500) ratio to set up a blurring region (odd number of pixels of course).
I figure it was a typo, but couldn’t pass up the opportunity to pick your brain:)
Thanks again and I look forward to reading the new book.
This is a typo in the blog post, thanks for pointing it out. I have updated the text to correctly say 21×21.
As for your question, you typically choose a blurring size that fits the problem. In some cases this involves trial and error.
Hi Adrian,
What ever I do, still get the error ImportError: No module named imutils. Your answer workon cv is not working. Error bash: workon: not found.
I hope you get me out of this.
thanks in advance,
Ted
Hey Ted — it sounds like your virtual environment has not been configured correctly. If you are using Ubuntu/Linux you’ll want to make sure you have updated your
~/.bashrcfile. For Mac, update your~/.bash_profileThankyou, for all your responses about the quieries because it really helps me in completeing my entire project in detail
cv2.CHAIN_APPROX_SIMPLE)
ValueError: too many values to unpack
how to fix this
Please read the other comments to this post or doing a ctrl+f search for “ValueError” as I have already discussed this question multiple times in the comments section.
Hi Adrian,
I installed cv3.1.0 following your tutorial on raspberry-pi version 3 with no errors!
now i try to install your ‘Basic motion detection and tracking’ and found this error in line 56:
cv2.findContours(thresh.copy(), cv2.RETR_EXTERNAL,cv2.CHAIN_APPROX_SIMPLE)
ValueError: too many values to unpack (expected 2)
can you help me out?
btw, Thanks for the tutorials!
thanks, Henk
Please read the other comments before posting (or searching for the error message). I have already discussed this question.
hello sir ^^
I chose this topic as a project to me for my last year in information technlogy colleage
But I dont have full knowledge to do it …
can you help me ?
What part of this project are you struggling with? If you need to understand the basics of computer vision and OpenCV, definitely consider going through my book, Practical Python and OpenCV, which will help you understand the fundamentals of computer vision and image processing.
how to display the coordinates of the tracked contour and its centroid
thanks in advance
You can use the
cv2.putTextfunction to display any text you would like to the image.Hi – will this only work with specific FPS video streams?
I am just thinking if the video feed source is 30FPS, will the script run as fast as the video is feeding frames? Or will this result in a backlog of frames being processed?
Thanks,
This script will run as fast as it can decode and process the frames.
Hello Adrian,
I am getting an error no module named numpy. But python packages is updated
Suganya
It sounds like you may have forgotten to install NumPy on your system. If you are using a Python virtual environment make sure you have NumPy installed there as well:
Thank you.Its solved. I am using Opencv 3. It registers background as contour. Always the status is occupied
hi At first ,thank you for the helpful tutorials.I am getting some questions.When I run the program,it can’t show everthing.It seem the program was run out.And then I can input the next command.I don’t kown if the program is normal.Can you help me?
(cv)pi@raspberrypi:python_pj/basic-motion-detection $ python3 motion_detector.py
(cv)pi@raspberrypi:python_pj/basic-motion-detection $ python3 motion_detector.py –video videos
(cv)pi@raspberrypi:python_pj/basic-motion-detection $
It seems like your OpenCV was not compiled with video processing support. I would suggest following one of my tutorials to install OpenCV on your system with video support compiled.
I followed https://pyimagesearch.com/2016/04/18/install-guide-raspberry-pi-3-raspbian-jessie-opencv-3/ to install OpenCV on my Raspberry Pi.But I can access the video stream of Raspberry Pi using Python and OpenCV normally….
Are you trying to access a webcam video stream? Or a file video stream?
Hello there, i know that you have mentioned my error before but im not sure how to solve it. To be clear, my error is:
……………………………………………………………………….
Traceback (most recent call last):
File “motion_detector.py”, line 4, in
import imutils
ImportError: No module named imutils
…………………………………………………………………………
Im using OPen Cv 3.1.0 and python 2.7.9 on a Raspbian OS.
Thank you for your tutorial.
Hello again. I just realised that i can spot two different versions of python running on my system. Has something to do with that?
Thanks.
Are you executing the code inside a Python virtual environment? Or outside the environment? Determine which Python version you are using and then install imutils:
$ pip install --upgrade imutilsCan I set a video file as my first frame? If so, please help me what code i need. Thanks bro!
If you’re interesting in writing frames to video, take a look at this tutorial.
Trying to use this code to track squirrels in my backyard off a video feed. Code is working well. Unfortunately, despite trying different arguments for min size and threshold, there is too much stuff moving and it is putting bounding boxes around many, many items. This is despite me rewriting the first frame to the current frame about every 3 frames of the feed.
Maybe someone can point me in the right direction as to a methodology. I am trying to: 1. identify likely squirrel objects from a video feed. 2. Grab that image and put it through a CNN to determine squirrel or not. 3. If a squirrel, then track it. I have the tensorflow CNN working. Just not sure of the right approach for 1. and 3.
Right now the camera is stationary, but in the future I would like the camera to also be panning, if that makes a difference in the recommendation. Thanks in advance for any help.
If your goal is to recognize various objects and animals, then yes, machine learning is the right way to go here. Squirrels (and other animals) can look very different depending on their poses, in which case you will likely need CNNs for the classification. I would suggest using basic motion detection to give you the ROIs of objects to classify, then passing these ROIs into a CNN to obtain the classification.
Thank you for the response. Your website and examples have been a huge help. My CNN for classification is working well. The motion detection algorithm for an outdoor video is providing far too many ROIs to analyze as many things are moving. This will be especially true if the camera pans.
I tried simple blob detection converting images to HSV and filtering for grey (squirrel color) and that works well if the squirrel is on a green lawn and not so well when the squirrel is in woods (where there are many things colored grey). Trying adaptive correlation filters worked well on something like deer walking because they move slowly, but has been a bust because the squirrel moves in bursts and changes shape rapidly and the algorithm can’t keep up. I am considering trying YOLO next.
Terry,
After seeing your comment, I recalled a video from a few years ago at PyCon. The video is here: https://www.youtube.com/watch?v=QPgqfnKG_T4
In the video, the presenter describes analyzing the entropy of the squirrel blob (because they have a bushy tail, and hair on their body).
I hope this helps you.
Oh…and he demonstrates how he shoots the squirrels with water off of his birdfeeder! There’s a video on his youtube page of that as well!
David
Hi, Adrian, great job. I am trying to develop a system to count the number of people in a cafeteria. Tried your example but it misses a lot of people because of people being too close to each other. You mention a more sophisticated method in the article, can you link me to that as I could not find. Thanks and keep the good work.
There are many methods to detect/count objects in images/videos. My first suggestion would be to use HOG + Linear SVM.
I didn’t expect such an awesome post when I started reading this! Love how simplistic it is. Will definitely be buying a raspberry PI and a web cam to try this out (if it works I see myself ending up with many webcams and PIs… hehehe). I have to write a review article on motion detection for my course and this seems to be a solid explanation to start with. Thanks Adrian!
Thank you for the kind words George, I’m glad you enjoyed the post 🙂
Hi Adrian,
All your posts are useful to complete my project. Really I could find answer for all my queries from your page. Now I want to use some the packages installed in both python 2.7 and 3.4 in a single program. Is it possible. If so please guide me
I’m not sure what you mean by “use some package installed in both Python 2.7 and Python 3.4” in a single program. Can you elaborate on what you mean and what you are trying to accomplish?
Your program works fine with opencv version 3.1 but with version 3.2 I got this error
Traceback (most recent call last):
File “motion_detector.py”, line 61, in
cv2.CHAIN_APPROX_SIMPLE)
ValueError: too many values to unpack
Do you know which changes I need to made in the code in order to not get error?
Actually, this script will need to be updated for all OpenCV 3 versions. It will work out-of-the-box with OpenCV 2.4 (keep in mind this blog post was written well before OpenCV 3 was ever released).
You should also read the comments before posting or doing a ctrl + f search on this error message. See my reply to “TC” above to the solution to your problem.
Hey Adrian thank you a lot for your work !
I tried your code but I have a problem with the firstFrame ( To import the background image).
In fact when I run the code the Thresh windows is completly white …. I import the background :
FirstFrme=cv2.imwrite(“image.jpg”,frame)
I think that I am doing wrong to import the background image.
Thank you
It sounds like your background image is being marked entirely as motion. Are you using the code from the “Downloads” section of this blog post? Please use this as a starting point.
Thanks for the incredible post. It saved me a lot of time and I learned a lot in this post. I have a quick question, when I try to do the same task with a different video it gives me the following error:
Also, I made sure to put the video in the same folder and also I tried videos with .mp4, .avi, and .mov formatting and non of them except your own video worked out. I would appreciate your helps.
VIDEOIO(cvCreateFileCapture_AVFoundation (filename)): raised unknown C++ exception!
I figured what was the problem, the videos were not in the same folder
Congrats on resolving the issue Rouzbeh!
Thanks Adrian, I have another question. In the beginning of the post you mentioned that “The methods I mentioned above, while very powerful, are also computationally expensive. And since our end goal is to deploy this system to a Raspberry Pi at the end of this 2 part series, it’s best that we stick to simple approaches. We’ll return to these more powerful methods in future blog posts, but for the time being we are going to keep it simple and efficient.” Are you planning to have some post on the more powerful methods because I tired to look for it in the blog but I was not able to find it.
sorry for the typo, I meant tried in the previous comment.
Yes, I will be covering more advanced background subtraction/motion detection methods in future blog posts (I have not written them yet).
The motion detection of videos which your provide works on my raspberry pi 3, but you said that:” Finally, if you want to perform motion detection on your own raw video stream from your webcam, just leave off the –video switch:”
But when I run without video switch I don’t get any video output on screen and terminal in approximately one second finished execution of command which suggest that program do not detect motion of cam stream. Is this problem related with version of cv which is 3.2 in my case? Can you publish code which will do motion detection from video taken on raspberry pi 3 with open cv 3.2?
Are you using the Raspberry Pi camera module? If so, you’ll want to update the code to use the template referenced in this post.
Yes, I’m using camera module version 1.
Yes, I want to update the code to detect motion from camera module video in real time. Where can I find code which enables that?
As I mentioned in my previous reply to you, I don’t have the code pre-updated for you. But you can modify this source code to use the Raspberry Pi camera using this post. Alternatively, I recommend using this post which uses the Raspberry Pi camera by default.
Hi Adrian,
How can i use this code with my own camera?
Thank you very much
What type of camera are you using? USB? Built-in webcam?
Hey Adrian
I use your source code of motion detection from your link https://pyimagesearch.com/2015/05/25/basic-motion-detection-and-tracking-with-python-and-opencv/
the probleme is when the camera tries to detect me when i’m moving ,it tracks and makes contours of everything with dark colors
I’m using a USB camera pc with capture pictures 640×480
I need your help .Could you please help me
I would suggest using a more advanced method of motion detection, as described in this blog post.
Try showing the firstFrame. In my case, the first frame was darker.
The solution was to time.sleep(2) and to throw away the first frame. So before the loop i did _, frame = camera.read()
Hi,
Sorry I asked this question on the wrong post, was meant for https://pyimagesearch.com/2015/01/19/find-distance-camera-objectmarker-using-python-opencv/
Check your edge map and ensure the region you are trying to detect is being correctly found in the edge map (based on your comment, it sounds like it’s not).
Thank you Adrian for this Tutorial.
Functionality works fine, but accuracy was incorrect.
As soon as I run the program using mounted Webcam the bounding box for the contour (green) fits the whole window scene (imshow(frame)) with Room Status:Occupied the whole time, while there was no motion at all.
Hey Sam — it sounds like your camera sensor is still warming up, thus causing the entire region to be marked as motion. I would suggest looping over the first ~10-30 frames and ignoring them before trying to compute motion.
Thank you Adrian for your help.
Unfortunately, it is still the same… The entire region marked as motion (Green).
Maybe my Webcam!! I will keep trying to fix this problem….
What is weird I built basic motion detection with Java using same Webcam, and it was fine !!!!
That is indeed very strange. I would also suggest trying this post which computes a rolling average of the frames which is more robust to issues such as this.
Adrian,
Do you have any pointers for using HoughLinesP in conjunction with the createBackgroundSubtractor() method?
Hello Sir
I implement the code which is almost same as yours. My question is I want to know some Communication Protocol which can make transmission securely between client and server. Protocol such as (COAP and DTLS). In last I also want to know its implementation part.
Waiting for positive response…
Hi Jenith — this isn’t exactly a computer vision question, but I would suggest encoding the image and transmitting. I like ZeroMQ and RabbitMQ for these types of tasks.
Hello
First of all, thank you for this amazing code. I have been looking for something like this for a while.
I’m working in a laptop and for real time capture I would like to use an external USB Camera. How can I select that external camera instead of the laptop’s?
Thanks for your help 🙂
You simply change the index of
cv2.VideoCapture. Assuming your laptops built-in camera is the 0-th index, your USB webcam is like the first index:camera = cv2.VideoCapture(1)Hi,
I am getting an error :
Error opening file
I am using OpenCv 3.1 with Python 2.7.
Anyone has any idea how to fix the error?
Thanks in advance!
Thayjes
Your comment is awaiting moderation.
Sorry,
This is my error:
error opening file (/build/opencv/modules/videoio/src/cap_ffmpeg_impl.hpp python
It sounds like there is an issue with the video support in OpenCV. I would suggest following one of my tutorials to install OpenCV on your system.
ohh thanks for such a good tutorial. I was trying so save the video when any motion occur in web cam….how can i do this???
is there any way to convert that video to gif and save it to my lappy.
Please see this tutorial where I demonstrate how to save key event video clips to disk.
Hey Adrian, at first really great tutorial (just as any other you have on your website)
I’m facing one problem trying to run the python program. Nothing happens (python is probably breaking it)
I’m trying to run it from the file (even from those from you and with your code), not from the webcam.
When I’m “commenting” the
“If not grabbed:
break”
I’ve got the ‘NoneType’ error “object has no attribute ‘shape’ so it looks like the path to the file is wrong but…
I’ve also checked your object tracking tutorial (with the tennis ball) and there, running program with the same file works.
I’m confused, do you know what can be the cause of it? OpenCV installed properly just as you demonstrated.
Will be very grateful for advice.
It sounds like your system is unable to read the frame from the video, likely because your OpenCV install was not compiled with video support. You can read more about these types of NoneType errors with OpenCV here.
Hi Adrian,
Great tuto, it’s working for me. For my application I’d like to know if it’s possible to save only the moving part (the region in the green rectangle) ?
You can use the
cv2.imwriteto save individual frames. To save just the region in the green rectangle, simply extract the region of interest using NumPy array slicing. If you’re interested in learning more about the fundamentals of computer vision and image processing, be sure to take a look at Practical Python and OpenCV. My book will help you get up to speed quickly.thanks for uploading the project,
it helped me a lot…….
Fantastic, I’m happy to hear it Ajit 🙂
Hey Adrian,
Please help me to sort out the error. i am working on opencv_python3.2.0 on windows8.when i run the code, it doesn’t display anything in python shell. and when i execute the command $ python motion_detector.py –video videos/example_01.mp4 ,it gives error as SyntaxError: invalid syntax.
i am new to opencv. please help me how to run the code?
Hey Navin — it’s been a solid 10 years since I’ve used Windows, so I’m not sure what the exact issue could be. I don’t recommend using Windows for computer vision development. I would suggest using either macOS or Ubuntu, which I provide OpenCV install guides for. In either case, this sounds like a video codec issue. You’ll likely need to re-install OpenCV with video codec support.
Hii Adrian awesome tutorial! i have a problem ValueError: too many values to unpack (expected 2)
Im using Python 3.6 and openCV3 on windows ball tracking program is ok. Thanks in advance
Hi Henry — please read the other comments on this blog post before posting. I’ve already addressed this question a number of times. Please see my reply to “TC” and “Alejandro” in particular.
When I run the mtion_detector.py, I get an error saying ” no module named imutils” eventhough I have installed it? Please help
Are you using Python virtual environments? How did you install OpenCV?
I actually had a question about the running python in a vitural environment compared to python’s regular environment. I installed Python+OpenCV two different methods, your method and another one I found off youtube. Then ran the code using both the regular and virtual environment and didn’t see a significant change (except that on my other install it has opencv3; read the “Alejandro” post, thanks it worked perfectly).
Oh but for those who didn’t use your install method will be missing the imutils module, and I ran into errors using “pip install imutils”. But if you use “sudo pip install imutils” than it will install perfectly (for those who didn’t use your install method).
BTW, read your Practical Python+OpenCV book and loved it. Very easy to comprehend and appreciated how you explained everything. I was curious if you will be coming out with another book that specifically tailors towards camera tracking and more advanced topics?
Hi Julian, thanks for the comment. In terms of “significant change”, I’m not sure what you mean. Can you elaborate?
As for more advanced content, it sounds like you would be the perfect fit for the PyImageSearch Gurus course. Inside the course I cover much more advanced computer vision algorithms (and in more detail). Be sure to take a look!
I also have plans to write more books in the future, especially regarding tracking algorithms. But for the time being, be sure to start with PyImageSearch Gurus.
hi mr adrian
i followed your tutorial of “test_video” in raspberry and it worked very good and successfully.
but i cant run this tutorial (Basic motion detection and tracking with Python and OpenCV ). it dosen’t work . i write this line ” python motion_detector.py ” and it without any error go to the next line and nothing do .
Keep in mind that this tutorial assumes you are using a USB webcam. Are you using a USB webcam with your Raspberry Pi or the Pi camera module? In either case, considering using the VideoStream class to make the code compatible with both your Pi camera module and a USB camera.
I am working on robot simulation under ROS and I want to use this code for my robot but when I compile the code a syntax error occurs : line 13 unexpected token ‘)’
the problem is I’ve worked with c++ and don’t know py
so I would appreciate it if you could help me with running this code
Hi Pani — make sure you use the “Downloads” section of this blog post to download the source code and example video. This will ensure your code matches mine.
Hello!
First, thank you for this tutorial!
Only problem I get that the video is too fast even the examples when I run the program.
Have you got an idea why this happening?
The goal of OpenCV is to process as many frames as quickly as possible. The reason it seems “fast” to you is because OpenCV is capable of running this particular algorithm at a rate faster than the normal playback rate. If you want to slow it down, insert a
time.sleepcall at the end of the loop.Hi Adrian,
great tutorial !
But when i have read the title i don’t find an implementation of tracking.
The code is an implementation of detection but not tracking; in other words tracking is when, after a detection, you identify the object to detect and, frame by frame, you keep the information about it (location, speed, etc) and build a model to predict the position in the next video frame.
Algorithm models like kalman filter, optical flow, mean-shift or cam-shift.
I would appreciate your implementation in future tutorials or courses
Thanks to much
Albert
Hi Albert — please see this post for more information on object tracking.
does the raspberry pi not work with this code? what do you mean by you will show us how to update it to work with raspberry pi. thanks
Presuming you are using the Raspberry Pi camera module (not a USB webcam), you can use this tutorial to build a motion detection system using the Raspberry Pi.
Do you have sample code/ tutorial for swiping and zooming gestures.
I don’t know why I thought this was meant to be run on a pi. Spent a lot of time trying to figure out what I was doing wrong then read in the comment section you had a separate on for the pi! ahah well the joke is on me. Great tutorial thanks
Hi Steven — you are correct, the tutorial on this page is not meant for the Raspberry Pi; however, this one is.
I think you might be replying to the incorrect blog post? The home surveillance + Pi + Dropbox post is over here. In any case, I will be updating that blog post in the next two weeks to work with the latest Dropbox API release.
sorry , its working
Congrats on resolving the issue, Tonie!
own video not recording,already stored video to operate it.
Hi Denish — can you elaborate on your comment? Are you trying to apply motion detection to a video file? Or save the results of motion detection to a video file?
Hey..
i want to ask if i want to capture a specific pattern of motion in low light only then what will be the procedure ?
do i have to store such pattern in it already with whom it matches or stuff ?
Can you elaborate on what you mean by “pattern of motion”?
Like seizures..
and what if it is a live stream ?
then it needs to match it and alarm.
i hope you understood now
It sounds like you are referring to to “activity recognition”. This is a very open area of research in computer vision and machine learning. Unfortunately there is no “one size fits all” solution. Most approaches I’ve seen try to build very large datasets first. But again, I can’t recommend a general technique to you.
plus can i get your Skype id ?
Sorry, I don’t share my Skype ID.
Okay.
I just wanted some help but that’s fine.
Please realize that I receive over 100 emails and 50+ comments per day on the PyImageSearch blog. I can’t simply hand out my Skype ID, personal Facebook, etc.
Hi sir,
Actually iam new to the development field will you please help me the same code in android programatically
Is it possible to automatically differentiate between a human,an animal and a vehicle alongwith the picked up motion….can u throw some light and if possible code for the same.
Hi Raj — you can, but it involves machine learning. I would suggest training your own custom object detector. I cover this in more detail inside the PyImageSearch Gurus course.
Hi adrian, i have like copied the whole codes on an editor, but when i try to run it on the python shell, it just restarts and nothing actually happens. can you tell me what is wrong?
Hi Michael — instead of copying and pasting the code please use the “Downloads” section to download the code. This will ensure the project structure is correct and there are no spacing issues related to copying and pasting. From there, execute the script via your command line.
Hi Adrian, I have a project to do which requires me to detect motion and of multiple humans whereby the camera will be connected to a servo motor. It shud only detect motions of humans and nothing else. Like moving trees shud be neglected. As soon as there’s movement, the camera Stops via Servo motor and records the movement. Seems very complex to me as I have little knowledge on python. Can u help me out on this please?
If you need to detect just humans try using OpenCV’s built-in pedestrian detection.
I don’t have any tutorials on combining object tracking with a servo but I’ll absolutely consider this for the future.
Hi Adrian,
I want to send an email alert or ring an alarm if it detects any motion in the video. COuld you please help me out how can i do that ?
If you’re interested in ringing an alarm, this post. Sending an email can be accomplished a number of ways. I would actually recommend uploading the image to Amazon S3 and then including a link to it from the email. There are a lot of different libraries you can use for this. I actually prefer external services such SendGrid as it’s very reliable.
For what it’s worth, I demonstrate how to build your exact application (and send out txt messages) inside the PyImageSearch Gurus course.
Hi Adrian,
How to track objects only moving with certain speed in a video ?
Can you elaborate more on what you mean by “certain speed in a video”?
I don’t want to track all moving objects in a video. For example, if many people are walking in a street I want to track only if someone runs in the street. For that, I have to calculate the speed first.
Hi David — I will try to cover speed calculation in a future blog post. Thank you for the suggestion!
Hi Adrian,
Did u get a chance to write a blog post on this? I am eagerly waiting for this.
I have not, but I do have it in my “ideas list”.
Hi Adrian,
I am still waiting for your post on this.
I will try to do a blog post on it but I cannot guarantee if or when it will be. I’m happy to accept idea requests and suggestions but that is not a guarantee I will cover them. I’m happy to publish these free tutorials but please do not make assumptions on my time or assume that by commenting on this thread many times that I will absolutely cover it. I do my best to provide as many free tutorials as I can and I kindly ask for your respect in return. Thank you.
sir this code is for python2.7 or python 3 or open cv…must reply i m waiting for your response
The code in the post covers OpenCV 2.4 and Python 2.7. The comments detail how to use OpenCV 3 and Python 3. I’ll also be updating this post in the future.
Thanks for your response
Great tutorial, however when I run it the green box covers the entire screen and also the room status will only show occupied when the green box covers
Try inserting a
time.sleep(3.0)call before theforloop starts. It sounds like your camera sensor needs time to warm up. I would also suggest using a more advanced motion detection method — this tutorial will help you get started.Maybe, but my camera is still though maybe its not sitting possible maybe?
Yes, your camera does need to sit still. Can you rephrase your question please?
the case I use means that my camera sort of sits on a tilt maybe there is a slight movement. But my concern is that its assume that the entire screen is motion as a green border takes up all around the edges
It is possible that lighting conditions can cause this. Does the camera’s environment have consistent lighting?
For some reason imutils wont work. I download even did pip freeze and it shows up. when I launch a python shell it is imported fine but when I try to write a script it says it can’t be found.
Hey Robert — I assume you are using Python virtual environments? If so, make sure you are in the appropriate Python virtual environment (normally named “cv” if you follow a PyImageSearch + OpenCV install tutorial).
But when you run it in a python shell it imports it fine
yes I start by:
source ~/.profile
workon cv
cd ~/Python_programs
sudo python Script.py
however an error comes up saying no module called imutils found. But when I’m in my virtual environment and type python to get the shell up, when I type import imutils it works fine
Yes ive checked and I am in my virtual environment with it saying imutils is imported, just wont work with scripts. Does it have something to do with not supporting python 3.5 or raspian stretch?
Hi Robert. Try updating imutils in your environment:
$ pip install --upgrade imutilsthanks for this great tutorial !
it really helps me a lot for newbie like me, but i have a problem
i finish writing the script with exact name on your tutorial, but when i run the “python motion_detection.py –video videos/example_01.mp4” command, the video screen doesn’t pop out.
i already finish your previous tutorial, the access pi camera with python and opencv one. and it worked without problem and the video screen does pop out.
i need help to solve this,but i don’t know where the error is. i’ll be waiting for your response.
P.S. sorry for my bad english, 😀
Please keep in mind that this script assumes you are using a USB/built-in webcam, not the Raspberry Pi camera module. You can either (1) use a USB camera, (2) update the code to use the
picameramodule, or (3) use the VideoStream class.If you’re new to OpenCV and computer vision I would recommend working through Practical Python and OpenCV to help you get up to speed quickly and learn the fundamentals.
I hope that helps!
ahhh, so that’s why.
do you mind to explain me how to make this script work with Pi camera module, or at least give me clues what should i change to make it work ?
i’m completely blind doing this project since i want to learn by doing your tutorials.
Hi Febrian — please see my previous comment. I would suggest using the VideoStream class to make the code compatible with the Raspberry Pi. You should also refer to Practical Python and OpenCV if you need help learning the fundamentals.
$ sudo python motion_detector.py
Traceback (most recent call last):
File “motion_detector.py”, line 4, in
import imutils
ImportError: No module named imutils
$ pip install imutils
Requirement already satisfied: imutils in ./.virtualenvs/cv/lib/python2.7/site-packages
This is because you are trying to execute the script as sudo. To execute the script as root you’ll need to supply the full path to your “cv” Python binary:
$ sudo ~/.virtualenv/cv/bin/python motion_detector.pyhello! great tutorial!
I have a question, can you explain to me how the threshold works?
I am trying to run your code but Thresh’s frame background is always white and gets black when there is movement, unlike yours which is black and gets white when detecting movement.
Do you know why is that?
I have tested the program in both dark and bright rooms but still it is not working.
Hello! Great tutorial!
I have a problem running your code. From the ‘Thresh’ window i can see that almost everything in the background is white and the room is always occupied.
Also, it doesn’t take every movement.
Do you know what i am doing wrong?
I am running the code using my laptop’s camera.
I would suggest including a
time.sleep(3)call and allowing your camera sensor to warm up before you start polling frames from it.I have tried that already, and it worked for only once. After I tried to rerun the program, the room was always occupied again.
Hm, that’s is certainly a problem then! My suggestion would be to use a more advanced background subtraction method that uses a rolling average of frames. You can find an implementation here on the PyImageSearch blog.
Thnx, good to start with.
I also tried this,but doesn’t seem to track very well….
https://www.learnopencv.com/object-tracking-using-opencv-cpp-python/
My final goal is to track moving objects with a camera mounted on a ‘sentry gun’
Can you point me to the right path for that ?
I.e. which cv function is best suited for that ?
Thnx,
Mike
PS: I use OpenCV 3.3.1 on a Pi3, I hope there’s enough computing power to use more advanced cv methods.
This would really be pushing the limits of a Raspberry Pi. Make sure you optimize your OpenCV install.
From there, make sure you apply threaded video streaming to improve your I/O latency.
You mentioned it doesn’t seem to track well — can you elaborate on what specifically is not working well?
Thnx, your beer code runs fine, but in the URL mentioned in my previous post they use more advanced trackers. In the samplecode you can select which tracker to use. All of them fail, it doesn’t detect anything. Maybe the Pi can’t handle this ?
Al sentrygun projects I’ve seen so far use a fixed cam. I think it’s better to use a a cam that moves with the gun. All I need to do is move the cam so that the object is in the center of the image. Then fire it. But then I have to detect a moving object on a moving background.
Maybe something like this:
– detect moving object, direction and speed (need 2 framesfor that)
– move cam/gun towards the object
– check again with 2 frames while cam is steady.
– do that again until target is locked.
The trackers themselves need to be initialized with the bounding box (or mask, depending on the implementation) of the object you want to track. If the initial view of the object is not a good one, or if you do not pass in the bounding box of the object, the tracker will not work. Being unable to track even a single frame likely isn’t an issue with the Pi, it’s most likely an issue with the actual tracking algorithm and/or how you instantiated the object.
Hey Adrian,
thanks you a lot for that tutorial.
Is there a way to calculate the distances or postitions, the person walked?
For example setting one point as 0|0 and the other on 10|0 and a third one to 0|10.So that we know, that 10m in real life are for example 1000 pixles.
Would it be posible to calculate the position for each frame?
Thank you in advance!
Aladin
Absolutely. Please see this blog post for more information.
hello Adrian, actually i am making our project for eye motion detection of a paralyzed patient using eye motion detection…..so i want your help in making project .
so Adrain i request you to help.
thanks
This sounds like a wonderful project and incredibly useful. Unfortunately I am far too busy to take on any additional projects, but I would suggest you start with this tutorial on eye tracking. I haven’t implemented it but I know other PyImageSearch readers have had good luck with it. I hope that helps!
Hello Adrian Rosebrock, It is really very nice work done the only thing that is my concern is it possible that we could recognize only one object not all like if my cctv or webcam detects a dog or cat the application label that object.
You would need an object detector to detect and recognize each object. You can read about the fundamental of object detection here. I cover pre-trained deep learning object detection models in this blog post.
If you’re interested in training your own custom object detectors take a look at the PyImageSearch Gurus course and Deep Learning for Computer Vision with Python.
hey Adrian can we use the kinect camera instead of webcamera.
Yes, although if you’re using a Kinect I would assume you are trying to compute a depth map. In that case you should use the depth map directly instead of pure color tracking.
hi adrian, ur tutorial was nice working and great. i would like to know that is there any way to open the pi cam throught a day or week even if whether an object is detected or not
Hey Hashir, can you clarify what you mean by “open the Pi cam throughout a day or week”? I’m not sure I understand.
Hi Adrian,
What nice guidance.However when I tried to execute the code but nothing happens.Can you help me?Nothing happens means it doesnt display any result/output…I used prerecorded videos…But not sure how to specify it in the code….Really appreciate if you look upon this matter…Thank you 🙂
Is your script starting and then immediately exiting? If so the error is likely due to OpenCV being compiled without video support. Make sure you follow my install tutorials which demonstrate how to compile and install OpenCV with video support.
Okay thanks a lot Adrian.If you dont mind, can i know which part of the tutorial that shows the installation of OpenCV with video support? I am quite a newbie to this 😀
Take a look at the section on image I/O and video I/O.
Hey adrian,
I am using OpenCV 3.0.0 and python 2.7.6 version. I you have mentioned about the cv2.createBackgroundSubtractorMOG() in this blog, I tried to use it so as to check the difference between the results but I got an error saying ‘module’ object has no attributes named ‘createBackgroundSubtractorMOG()’ …. when I use MOG2 and KNN it worked. So, why it didn’t work for MOG class?
I’m not exactly sure what happened, but I believe OpenCV dropped support for one of the MOG implementations.
HI bro, can u explain me how to do vehicle velocity detection and tracking in simple steps (not on raspberry pi cam) as i use rtsp cam..Thanks in advance
Hi!
Very Informative tutorial !
Can you please tell me how it can be used for collision detection with object in video!
that is when we map object using contours, then how that object and center point of video collides can recognize collision ?
I would suggest computing the masks for each object then taking the bitwise AND of the masks via
cv2.bitwise_and. Then applycv2.countNonZeroto determine the number of pixels in the intersection. If there is significant overlap, you can label it as a collision.If you’re new to OpenCV and bitwise operations, be sure to take a look at my book, Practical Python and OpenCV where I discuss the fundamentals of computer vision and image processing.
I hope that helps point you in the right direction!
Thank you for suggestion, can you please show some code sample for same?
Sorry, I do not have any code samples for your exact project. I’m happy to help and point you in the right direction (see my previous comment). I know you can do it if you put your mind to it! I believe in your ability, Kaustubh 🙂
ok, thanks again, when I considered your suggestion, then I findout that this is for 2 diff objects in video, what I am trying to achive is to identify collision with person who is wearing the device(raspi with camera) and object in video, what I have to try for the same?
Hello Adrian,
How to improve upon the multiple bounding boxes that show up for single person. And status shows occupied although room is empty due to different lighting situations…
Thanks
I would suggest trying non-maxima suppression for the overlapping bounding boxes.
ValueError: too many values to unpack (expected 2) help me please
Which function returned that error message?
Hello sir, I am trying to find out length, width and height of a real time object from the conveyor belt. I know the distance between object and camera and the focal length of cameras. your object size measurement tutorial and this tutorial helped me a lot. thanks for your help to the newcomer. can you please suggest me how can I get the height or thickness of the object? and please give example about the value of flowing:
ap.add_argument(“-v”, “–video”, help=”path to the video file”)
ap.add_argument(“-a”, “–min-area”, type=int, default=500, help=”minimum area size”)
what should be the value of “-v”, “–video”, “-a”, “–min-area”?
thanks again your reply could save me and also could give the value of time.
Make sure you read this blog post on command line arguments to help you get started if you haven’t used them before. You’ll also need to change the value of
--min-areaexperimentally on your own images/video.This program works well. But every time I do the command line python pi.py files, then close it with the q command, and then start over, the 2nd time the command just doesnt work at all.
I have to wait like 10 seconds and then do the python command line and the program works again
Is this something with the opencv?
I get no error messages. The program just works sometimes and then doesnt do it other times.
Hi Adrian, great tutorial! Unfortunately the background subtraction method you described only works well for color video. I’m using kinect v1 so I’m dealing with depth map (my task is to deal with depth map only), and the result applied on depth map is really bad. So i’m just wondering if you know any hacks to make the background subtraction algorithm from opencv works on depth map also (I’m using python btw). Thanks again and great tutorial!
If you’re using a depth map it can be a bit tricker, but the good news is that you can obtain significantly better results if not done. I would take a look at this paper for more details.
Hello Sir
The tutorial was awesome. But the problem for me is that, whenever I try to run the code, it is not opening any security feed or thresh or frame delta. It is not showing any error also. What should I do to see the program’s output?
It sounds like OpenCV is having trouble accessing your webcam. Double-check that OpenCV can access your webcam before continuing.
Can you please help me with how to check that my open CV is accessing the camera? I am very new to this profile. Please help me.
If OpenCV cannot access your camera it will return “None” for any frame reads. You can read more about this behavior and potential solutions in this blog post.
Hi Adrian,
Sorry to bother you but is it possible to detect speed while tracking motion ?
Thanks
Sure, there are a number of ways to do this. One of the simplest methods to get you started is to use a simple camera calibration. If you know the size of an object (in measurable units) and the distance it has traveled between frames (in pixels) you can approximate speed.
Thank you for the awesome post, it worked well and I learned a lot. Definitely, had lot fo issues too but it comes the hard way right.
I would like to know how can I implement a similar program to be able to run in IDE (pyCharm Spider-Anaconda) and capability to run with a button press event using Tkinter?
Any suggestion will be very appreciated.
Regards
Shan
If you want to use an IDE perhaps start by referring to this blog post where I discuss how to configure a PyCharm environment.
I’m also not a GUI developer by any stretch of the imagination but I did do a tutorial on OpenCV + Tkinter. I hope that helps.
Hi,
Thanks for the amazing post.
I was wondering this program only changes the ROOM STATUS from UNOCCUPIED 2 OCCUPIED when the person enters the room.
what changes have to be brought to cause a reverse action i.e. when the person leaves the ROOM STATUS changes from OCCUPIED 2 UNOCCUPIED.
Try changing camera sleep time around 1 sec and min area around 1500 to make it work
Hi
Wonderful post.
I was wondering if any modification can be done to determine the orientation of the person i.e. whether the person is standing up or laying down.
This method, as it stands, cannot be used to detect whether a person is standing up or laying down. You would need to either:
1. Train an object detector to detect a person regardless of pose, extract features from the ROI, and then pass it through a standing up/laying down classifier
2. Train an object detector that detects if either a person is standing up or laying down
3. Applying person detection and then fit a pose estimator to the ROI
HI! Thank you so much for posting this!
I’m trying to build a script that if there’s a motion (text == “occupied”) that has been detected to start a voice recognition program (such as siri or google voice) but I’m unsure where to put the if statement because it then leads to other syntax errors in your program.
Any help?
Hey Chrishawn — if you are receiving syntax errors you’ll want to double-check your code as I assume you may have a whitespace issue or your function call is not correct. Double-check your code.
Hello adrien! I’m trying to build a Visual Docking Guidance System (VDGS). Can you help me please!
Thanks!
Sorry, I do not have any experience with such systems.
Hello Adrian, i refer your tutorials for pi+cv, its really good. Now i found an error. please help me to solve this –
Traceback (most recent call last):
File “/home/pi/motion_detector.py”, line 55, in
cv2.CHAIN_APPROX_SIMPLE)
ValueError: too many values to unpack
thank you.
Hey Vaisakh — please see the comments to the post as I have addressed this question a few times. You are using OpenCV 3 but this post was written for OpenCV 2.4 (well before OpenCV was released). I’ll be updating this post to use OpenCV 3 but in the meantime you’ll want to change the
cv2.findContourscall to be:(_, cnts, _) = cv2.findContours(thresh.copy(), cv2.RETR_EXTERNAL, cv2.CHAIN_APPROX_SIMPLE)Hi Adrian, great tutorial!
Is there a way to initialize the first frame with a person inside the room and cut off this contour later?
If the person leaves the room, the pixels in this area also have changed for any further frames.
I want to use this tracker with a pendulum and initialize when the pendulum is already swinging.
After initializing i get two areas with same size. The one in which the pendulum was in the first frame and the one in which it is in the actual frame.
Can I cut off the rigid contour?
Thank You.
Hey Gerrit — I’m not sure what you mean by “cut off its contour later”. Could you perhaps provide a visual example of what you’re trying to achieve?
Thank you so much for this very usefull tutorial.. look forward for more knowledge.. 🙂
Thanks so much, I’m glad you enjoyed it!
Hi Adrian,
I was wondering if you were able to get this code to map the paths as you did with the tennis ball
Hey Kwesi — you can easily combine the code from this post and the ball tracking post. Just use the same “deque” object that we used in the previous post. I have faith in you, you can do it!
Hello Adrian,
awesome job with the tutorial!
Unfortunately I’m experiencing an error. I went through the comments to see if someone had a similar problem, but couldn’t find something. Apologies if i missed a comment 🙂
My error following the execution:
…
AttributeError: module “cv2″ has no attribute”destroyALLWindows”
I am using Python 3.5 and OPENCV 3.1. Probably a compatibility issue?
I don’t have much experience and am kinda lost right now, hope you can help 🙂
Update:
I just downloaded your code to get a comparison if I did any mistakes. If I execute your code in the command line, I don’t get the previous error. But besides not getting an error, nothing really happens. After a few seconds of processing, the command line just jumps to the next line and that’s it. Did I miss something? If it is any help: I am running your code directly on the Pi 3 Model B.
PS: I succesfully went through all the steps you mentioned in: https://pyimagesearch.com/2015/03/30/accessing-the-raspberry-pi-camera-with-opencv-and-python/
Thank you in advance for your time
Your previous error was because you mistyped the function name. It’s “cv2.destroyAllWindows”, not “cv2.destroyALLWindows” — this is why I recommend everyone download the source code rather than trying to copy and paste or manually type.
As far as the execution of the script goes, are you working with video files or a video stream? If a video stream, are you using a Raspberry Pi camera module or a USB camera?
Hello Adrian,
Great tutorial as always.
I’m just curious. How much of the difference between this method and the method using the cv2.createBackgroundSubtractorMOG2() method?
The BackgroundSubtractor will automatically detect any changes in the background and subtract from it. Hence you can use it to detect motions as well
If there is actually a link here to download the code, I can’t find it.
There is a section labeled “Downloads”. It is just after the “Summary” section and right before the “Comments” section. You can use it to download the code.
hallo…
iam using camara with robo car using raspberry pi3, i want detect the person image and motion image compare with database (stored images) ,and say detected person image Authorized or not.
please send sorce code for this application. this is very ugent
I would suggest starting with this post on face recognition — from there you can develop the rest of your program surrounding it.
how do i use an alram in the code to indicate that there is motion
What type of alarm are you thinking of using?
Hey great tutorial can we use send an alert message when motion is detected or capture the image and send it to the user?
If yes,how can we do it?
I actually demonstrate how to implement that exact project inside the PyImageSearch Gurus course. Be sure to take a look!
hi Adrian, thanks for this wonderful tutorial. However, when I use your example.mp4 as input, the streaming is almost like slow-motion. Do you know why it could be? Thanks
How fast is your machine? My guess is that either (1) you’re using an old machine or (2) you don’t have the proper video codecs installed and thus it’s taking longer to decode each frame.
I’m using RPi3. The strange thing is it only happens when using input video sample example-01.mp4 or example-02.mp4. It’s okay when using live webcam. Thanks.
Hello, I’m using python2.7 when I start the script it returns me the following error:
python motion_detector.py –video videos/example_02.mp4
Unable to stop the stream: Inappropriate ioctl for device
Hi, Adrian. I’m using Putty to SSH to my RPi, and I get to the point of running `python motion_detector.py –video videos/example_01.mp4` and I get the error:
Unable to init server: Could not connect: Connection refused
(Security Feed:2294): Gtk-WARNING **: cannot open display:
Is there any way to fix this?
You need to enable X11 forwarding when SSH’ing into the Pi:
$ ssh -X pi@your_ip_addressGreat tutorial Andrian. I have human pose coordinates in a CSV file, for a particular activity. I have written a function which detects the activity(sitting, standing, bending) according to these coordinates. I have the activity in the form of a list. I would like to use this activity list as an input to draw() and show that on the frame/image. Is it possible with OpenCV? I would appreciate if you have any reference tutorial .
Hey! Big fan of your work, I made my own little surveillance system that notifies the user through a Telegram Bot, obviously very heavily inspired by this very post.
I have a question, in lines such as these:
1) frame = frame if args.get(“video”, None) is None else frame[1]
2) cnts = cnts[0] if imutils.is_cv2() else cnts[1]
What is the purpose of the [0]s or [1]s? And what do they represent?
I’m not quite sure how to formulate the question I have in mind, but I hope you’ll understand what I mean.
Thank you for the awesome tutorials!
Those are the array indexes. If you are new to Python and arrays I would suggest you read this guide.
Hi, Adrian
thank you very much for this wonderful video
I wanna ask some code
In line 60 cnts = cnts[0]if imutils.is_cv2() else cnts[1]
what is this objective of this sentence?
Thank you very much
We are checking to see which version of OpenCV we are using as the return signature of
cv2.findContoursis different between OpenCV 2.4, OpenCV 3, and OpenCV 4. You can read more about it here.I’m very appreciate for your tutorial ! Can I ask something what is this syntax means “imutils.is_cv2()”
Thanks!!
That function is simply checking if we are using OpenCV 2.4 or if we are using a newer version of OpenCV.
I made recently made some motion detection code in c reading data directly from a webcam that support mjpg streaming. One thing that I started with, a pir sensor, became useful for capturing new background images even after I stopped relying on it as the primary detector of motion. Particularly useful for cameras that are deployed in places where the background changes. I use mine as a peep hole for my house and automatic doorbell so I can know when packages arrive. People park cars, houses block the sun, day becomes night. Whenver the PIR sensor has been inactive for a long enough period I start updating the background images. Thank you for this. I am very happy to throw away all the junk code I wrote :).
Thanks for the comment, Felipe. And congratulations on implementing your project, great job!
Hey Adrian, thank you very much. I modified the code and made it to click and upload an image along with the time to my dropbox and also send a text message alert to my phone every time a person is detected.
Congrats on modifying the code, Edward! Nice job.
Hi, I have folowed the tutorial to install opencv4 on my raspberry and encountered no problem. Now I’m trying to follow this basi motion detection tutorial and I got the following error:
ImportError: No module named imutils.video
I confirm that I have installed the imutils through the command : sudo pip install imutils
Maybe somoone knows what is wrong?
Are you using Python virtual environments? If so, don’t use “sudo” (that will install into your global site-packages directory):
Hi Adrian, first of all thank you for all the tutorials and all the work you do! Your tutorials help me alot with my project.
I have an issue with above program. When I run it on my Raspberry Pi, I get the following error:
“…
…
AttributeError: module ‘imutils’ has no attribute ‘grab_contours’
…”
I’m not sure why this happens. Imutils is imported. I also tried “from imutils import convenience” but this also didn’t help… I was also not able to find any solution online. Do you know why this happens?
Thanks again for all your effort!
You need to upgrade your imutils library:
$ pip install --upgrade imutilsThanks a lot. This solved the issue!
Awesome, I’m glad that worked!
I’m getting “: cannot connect to X server”
I’ve ran:
sudo apt install python-pip
pip install opencv-contrib-python
pip install imutils
And when I run “$ python motion_detector.py –video videos/example_02.mp4 > log.log” I get the “cannot connect to X server” message.
Any idea what’s happening here?
Are you running the script on a separate machine, perhaps over SSH? If so, be sure to enable X11 forwarding:
$ shh -X username@your_ip_addressWhile I’m trying to run the code, it says “no module named cv2” while I just did download it with your guide. My python is 3.5.3 and cv2 is 4 as versions. How can I exactly run motion_detector.py while being in “workon cv” environment? I’m quite new to this area sorry for my silly questions.
And I did check the Troubleshooting FAQ part and couldn’t find any mistakes. At first I didn’t have any directory as “cv2” in build/lib, then I just pasted the one which is in usr/local/python. Not sure if this was a solution. Although it didn’t work.
Thank you very much for everything
Can you import the “cv2” bindings into your “cv” Python virtual environment? Try using a Python shell first — it sounds like OpenCV is not properly installed on your system.
Good post! Simple but effective! Thanks!
Thanks so much, I’m glad you enjoyed it!
Hi, Thanks for the super cool tutorial. I’ve adapted the code to take in a local mp4 file and detect whether an animal cage is empty or not.
It works upon testing with my laptop webcam, however with my local mp4 file, opencv starts up the video for a few seconds, and then eventually throws the following error:
AttributeError :’NoneType’ object has no attribute ‘shape’.
Thoughts?
I’ve tried listing both relative and absolute paths, with the same results. I’ve followed the installation instructions that you’ve written specfically the version of opencv with the python contributions, but no dice
Specifically the error occurs upon
frame = imutils.resize(frame, width = 720)
– it seems that python is failing to grab frames? Weird thing is it works for a few seconds before calling it quits
It sounds like OpenCV is not properly reading your video file. Either:
1. You install of OpenCV does not include the MP4 codec
2. Your path to the input video is incorrect (more likely). Double-check and triple-check your input file path.
hello, first I would like to thank you for still monitoring this thread!
second, does the program save a log of the video? and if so where does it save it?
if youve already answered this just point me to it, please.
Thanks!
This code does not save a video log. You can implement such functionality using this post.
Hey Adrian, This is quite impressive! Even still 4 years later! haha And I’m happy to see you’re still responding to questions after all this time!
I tried to find another question similar to mine in case it has been asked already, but I didn’t come across one.
Do you think it’s possible to take the image data from the threshold view and control a net made of LEDs with it? I’m thinking possibly capturing the image and having some software “read” it and output… but I’m really not sure…
Also I’m curious of how many changes the code can detect at once… if there were 100 people in the frame moving around would it keep up?
Thanks!
1. I’m not sure what you mean by “control a net made of LEDs with it”? Additionally, you may want to utilize a deep learning-based object detector for more accurate person detection.
2. See this tutorial.
Hello Adrian Rosebrock, First of all i want to say thankyou for the tutorial, everything working great, but i have a query to ask you, can you please email me? or reply here i’ll wait for your response.
The issue i am facing is that when i run the this program it takes “First frame” at first and then it never updates its “First Frame” which is making program keep detecting motion even i change camera position.
I want to update “first frame” on every second and the computer difference between first frame and the next frame and then it detects changes.
Suppose i start my program at 01:01:50 (HH:MM:SS) and it takes first frame on (01:01:50) then it is keep calculating difference with this frame only, what i want is it should keep update its first frame on every second.
Thank you.
And sorry for my bad english.
It sounds like your camera sensor hasn’t fully adjusted before grabbing the first frame. Try counting the number of frames the camera has read and then only updating it after the N-th frame (you’ll need to determine N yourself). By then the camera should have auto-adjusted which I think is the issue here.
hello, thank you very much for this great posy, thank you in advance, I just wanted to know how I can use the module of the camera directly, since I try to execute it in the pi3 but it does not do anything. in which way I can add or what line of code I have to modify, since I already try but I still do not give with the solution, otherwise when using it with an ip camera, usb works perfect. Thank you .
What type of camera are you using when the script does “nothing”?
Hello, I want to Image detection in web-app and when the accident is occure trigger message to the near emergency service. how can i do this.and how can i take image detection on my web-app.and then trigger is this possible without Raspbarry-pi possible or not ? can i do with Zango language or any other language like flask. Suggest me My project is when accident occur then it cover on the web-cam and then trigger message to the emergency service.
Hello
I want to load this code in raspberry.
Help me please
This tutorial would be a really good start for you.
Hi Adrian,
thank you for all your great tutorials.
how can I do if the movement is already there, like I want to detect a suspicious movement different from the usual movements. How can I recover multiple frames instead of first frame
How are you defining what a “suspicious movement” is versus a “normal movement”?
I knew that the initiative of learning how to code I python will come in handy one day. I will start designing my securtiy system on python as soon as my course is complete.
Best of luck with your course!
I want to do a real-time stream transmission from pi camera to pc is there a way?
Stay tuned for next weeks tutorial where I cover that exact topic!
Thank you Adrian. I was really looking for a medium to start learning image processing and object recognition for my raspberry pi based surveillance Project. This is the perfect place to start with.
Thanks Aditya 🙂
Hi Adrian! Thank you for these blog posts. They really helped a lot in my projects.
I was working on a model to detect static objects in a video- cars at rest in otherwise busy street etc. It would be great if you could help me with it.
Refer to this tutorial on object detection.
Thanks, again, for all you do. Do you have any idea why the program would process ~15 frames and then trigger the “if frame is None:” line (37)? I’ve downloaded the code and run it on your sample videos and it ran flawlessly. I’m now trying to have it analyze a ~12 minute .mp4 file shot with a GoPro Hero Silver 4. It reads in the file and I have it imshow the individual frames so I know it’s actually reading the file. It’s always after 15 frames (I’m not sure if it’s actually 14, 15 or 16 frames because of off-by-one issues) no matter how slowly I advance each frame (I added a cv2.waitKey(0) to try to trouble-shoot). Any guidance you can provide is appreciated
That’s odd. It might be a video codec issue of some sort or a problem reading the frame from file. I would check if the frame is “None” but instead of exiting the loop, try reading the next frame.
hi adrian, thanks for the post..
Im working on an application that does a 3d reconstruction of tracked objects from a moving mobile camera video file… Is there anyway to get the accurate co-ordinates of a stationary object from a video that typically lasts for around 4-5 seconds.
Sorry, I don’t have any tutorials on 3D reconstruction.
Hi Adrian,
Thank you for your post. It’s really impressive and helpful to my project. I am wondering how could we refresh the firstFrame if the observed scene changes constantly. For example, if I want to refresh it every 10 seconds.
You might just want to use an rolling frame average instead.
hi Adrian
how to adjust the motion sensitivity setting and take pictures when there is movement?
I’m a little more possessive of my IPA, can we hook this up to a tracking Auto cannon?
…. nice blog
Thanks Stephen 🙂
Hi Adrian,
I am using your tutorials to build a lightweight rescue system on the Pi. I am following this tutorial to figure out if a space is occupied or not. But I was wondering if there is a way to set a minimum time for the occupancy, like, if a person stays in the room for more than 1 minute, then trigger an alarm (to figure out if they have fallen down and need help). I would greatly appreciate any advice.
Sure, that’s absolutely possible. Just use either the “time” or “datetime” module. Grab the timestamp when a person enters the stream and then grab a new timestamp each time that same person is detected. If they linger for longer than N seconds, sound the alarm.
A few questions, 1. Is there/will there ever be a part 2? 2. To handle a situation where you are monitoring a yard where you go from day to night, have trees that may move in the wind, and want to exclude areas (street past the yard, the tree tops, etc.) would you need the advanced learning? 3. Could this work on a Pi, and if not, what is a small single board computer that would work? I want to make a simple 24/7 alarm, that just sends a notification to my phone if a person comes into my yard day or night, but I most care about night. There is a streetlight, so there is some ambient light. I am guessing you need another method other than light change detection for this, but trying to learn and waiting for the hobbyist bundle to be delivered.
Hey Fred — have you taken a look at Raspberry Pi for Computer Vision? That book teaches you how to build a surveillance application that sounds very similar to what you’re referring to. I would suggest starting there.
Hi Adrian, I want to make the project for detecting people who littering in the street using this motion. Any suggestion what should i do and what technique or library should i use for my project ? Thank you before
I would combine the techniques in Deep Learning for Computer Vision with Python with this tutorial on video classification.
Hi Adrian, I want to make the project for human fall detect. Any suggestion what should i do and what technique or library should i use for my project ? Thank you before
Hi Adrian,
This is an awesome project. Is it possible to measure the amount of movement? What I mean is if we can measure the amount of movement of a given object, we could specify it is moving more than it should like a machine. That would have industrial applications in the form of detecting out of the ordinary movement of machines or compressors for example.
Regards,
Vijay
Awesome post. In it, you mentioned that we were making the assumption that the first image only contained background, but because we were running it on a raspberry pi, we didn’t want to get more complicated with it.
What would we do if we wanted to get more complicated with it?
For a hackathon at work, I created an a system using computer vision that would detect how full our snack drawers were. I used a raspberry pi to send images to an endpoint, and had the endpoint calculate the differences to get the proper background by taking a hash table (a dict) of all the values that were coming in and using only the most frequently used values, or values around those values.
This is processor and resource intensive, and I’m curious if there is a better way of doing it using OpenCV.
Thank you!
See this tutorial which includes a more advanced implementation of background subtraction.
Works really well, thank you!!!
Thanks Chris!
Great Thanks for code and Thanks in Advance.
What is easiest way to do below
1) Imagine a video contains lots of objects
Ex: A soccer video which contains a soccer ball and soccer player who hits that soccer
ball and other soccer players
2) Reprocess video so that output video contains only soccer ball
Please advise.
Know that it is a simple question
But I am not able to find the solution
Thanks
Geo Thaliyath
Awesome explanation. Good job. its always great learning to follow your work.
Thanks Guzz!
Hi Adrian!
The tutorial code works well in my PC. But when I run the code, the result videos run very first even for the example videos. How can I change the speed?
OpenCV’s goal is to process images/videos as quickly as possible. I would recommend you write the video out to disk using OpenCV’s cv2.VideoWriter function.
Hi Adrian.
Many thanks for your job. These algorithms are really helpfull. But I ran into one problem. When I initialize this code, everything works fine, but then the green tracking rectangle splits into two new rectangles. One of them follows the object properly, but another just staying on the same point, where it was initialized for the first time. How to get rid of it?
It also has to be noted, that the object I am tracking exists on the image already from the first frame.
Thanks!
how do i supply a path for the pre-recorded video file?
You can use the command line arguments. Read the tutorial to see how to specify the command line arguments.
Hello Adrian,
Thank you for this nice website,
I am working in a project related to detecting the motion of a hand that is trying to write on a white board. Any ideas of help in that?
In other words i am looking for very accurate detection of the hand.
Thank you!