It’s too damn cold up in Connecticut — so cold that I had to throw in the towel and escape for a bit.
Last week I took a weekend trip down to Orlando, FL just to escape. And while the weather wasn’t perfect (mid-60 degrees Fahrenheit, cloudy, and spotty rain, as you can see from the photo above), it was exactly 60 degrees warmer than it is in Connecticut — and that’s all that mattered to me.
While I didn’t make it to Animal Kingdom or partake in any Disney adventure rides, I did enjoy walking Downtown Disney and having drinks at each of the countries in Epcot.
Sidebar: Perhaps I’m biased since I’m German, but German red wines are perhaps some of the most under-appreciated wines there are. Imagine having the full-bodied taste of a Chianti, but slightly less acidic. Perfection. If you’re ever in Epcot, be sure to check out the German wine tasting.
Anyway, as I boarded the plane to fly back from the warm Florida paradise to the Connecticut tundra, I started thinking about what the next blog post on PyImageSearch was going to be.
Really, it should not have been that long (or hard) of an exercise, but it was a 5:27am flight, I was still half asleep, and I’m pretty sure I still had a bit of German red wine in my system.
After a quick cup of (terrible) airplane coffee, I decided on a 2-part blog post:
-
Part #1: Image Pyramids with Python and OpenCV.
- Part #2: Sliding Windows for Image Classification with Python and OpenCV.
You see, a few months ago I wrote a blog post on utilizing the Histogram of Oriented Gradients image descriptor and a Linear SVM to detect objects in images. This 6-step framework can be used to easily train object classification models.
A critical aspect of this 6-step framework involves image pyramids and sliding windows.
Today we are going to review two ways to create image pyramids using Python, OpenCV, and sickit-image. And next week we’ll discover the simple trick to create highly efficient sliding windows.
Utilizing these two posts we can start to glue together the pieces of our HOG + Linear SVM framework so you can build object classifiers of your own!
Read on to learn more…
What are image pyramids?

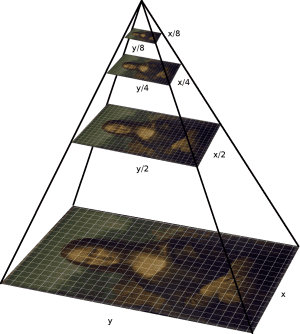
An “image pyramid” is a multi-scale representation of an image.
Utilizing an image pyramid allows us to find objects in images at different scales of an image. And when combined with a sliding window we can find objects in images in various locations.
At the bottom of the pyramid we have the original image at its original size (in terms of width and height). And at each subsequent layer, the image is resized (subsampled) and optionally smoothed (usually via Gaussian blurring).
The image is progressively subsampled until some stopping criterion is met, which is normally a minimum size has been reached and no further subsampling needs to take place.
Method #1: Image Pyramids with Python and OpenCV
The first method we’ll explore to construct image pyramids will utilize Python + OpenCV.
In fact, this is the exact same image pyramid implementation that I utilize in my own projects!
Let’s go ahead and get this example started. Create a new file, name it helpers.py , and insert the following code:
# import the necessary packages
import imutils

def pyramid(image, scale=1.5, minSize=(30, 30)):
	# yield the original image
	yield image

	# keep looping over the pyramid
	while True:
		# compute the new dimensions of the image and resize it
		w = int(image.shape[1] / scale)
		image = imutils.resize(image, width=w)

		# if the resized image does not meet the supplied minimum
		# size, then stop constructing the pyramid
		if image.shape[0] < minSize[1] or image.shape[1] < minSize[0]:
			break

		# yield the next image in the pyramid
		yield image
We start by importing the imutils package which contains a handful of image processing convenience functions that are commonly used such as resizing, rotating, translating, etc. You can read more about the imutils package here. You can also grab it off my GitHub. The package is also pip-installable:
$ pip install imutils
Next up, we define our pyramid function on Line 4. This function takes two arguments. The first argument is the scale , which controls by how much the image is resized at each layer. A small scale yields more layers in the pyramid. And a larger scale yields less layers.
Secondly, we define the minSize , which is the minimum required width and height of the layer. If an image in the pyramid falls below this minSize , we stop constructing the image pyramid.
Line 6 yields the original image in the pyramid (the bottom layer).
From there, we start looping over the image pyramid on Line 9.
Lines 11 and 12 handle computing the size of the image in the next layer of the pyramid (while preserving the aspect ratio). This scale is controlled by the scale factor.
On Lines 16 and 17 we make a check to ensure that the image meets the minSize requirements. If it does not, we break from the loop.
Finally, Line 20 yields our resized image.
But before we get into examples of using our image pyramid, let’s quickly review the second method.
Method #2: Image pyramids with Python + scikit-image
The second method to image pyramid construction utilizes Python and scikit-image. The scikit-image library already has a built-in method for constructing image pyramids called pyramid_gaussian , which you can read more about here.
Here’s an example on how to use the pyramid_gaussian function in scikit-image:
# METHOD #2: Resizing + Gaussian smoothing.
for (i, resized) in enumerate(pyramid_gaussian(image, downscale=2)):
	# if the image is too small, break from the loop
	if resized.shape[0] < 30 or resized.shape[1] < 30:
		break

	# show the resized image
	cv2.imshow("Layer {}".format(i + 1), resized)
	cv2.waitKey(0)
Similar to the example above, we simply loop over the image pyramid and make a check to ensure that the image has a sufficient minimum size. Here we specify downscale=2 to indicate that we are halving the size of the image at each layer of the pyramid.
Image pyramids in action
Now that we have our two methods defined, let’s create a driver script to execute our code. Create a new file, name it pyramid.py , and let’s get to work:
# import the necessary packages
from pyimagesearch.helpers import pyramid
from skimage.transform import pyramid_gaussian
import argparse
import cv2

# construct the argument parser and parse the arguments
ap = argparse.ArgumentParser()
ap.add_argument("-i", "--image", required=True, help="Path to the image")
ap.add_argument("-s", "--scale", type=float, default=1.5, help="scale factor size")
args = vars(ap.parse_args())

# load the image
image = cv2.imread(args["image"])

# METHOD #1: No smooth, just scaling.
# loop over the image pyramid
for (i, resized) in enumerate(pyramid(image, scale=args["scale"])):
	# show the resized image
	cv2.imshow("Layer {}".format(i + 1), resized)
	cv2.waitKey(0)

# close all windows
cv2.destroyAllWindows()

# METHOD #2: Resizing + Gaussian smoothing.
for (i, resized) in enumerate(pyramid_gaussian(image, downscale=2)):
	# if the image is too small, break from the loop
	if resized.shape[0] < 30 or resized.shape[1] < 30:
		break

	# show the resized image
	cv2.imshow("Layer {}".format(i + 1), resized)
	cv2.waitKey(0)
We’ll start by importing our required packages. I put my personal pyramid function in a helpers sub-module of pyimagesearch for organizational purposes.
You can download the code at the bottom of this blog post for my project files and directory structure.
We then import the scikit-image pyramid_gaussian function, argparse for parsing command line arguments, and cv2 for our OpenCV bindings.
Next up, we need to parse some command line arguments on Lines 9-11. Our script requires only two switches, --image , which is the path to the image we are going to construct an image pyramid for, and --scale , which is the scale factor that controls how the image will be resized in the pyramid.
Line 14 loads then our image from disk.
We can start utilize our image pyramid Method #1 (my personal method) on Lines 18-21 where we simply loop over each layer of the pyramid and display it on screen.
Then from Lines 27-34 we utilize the scikit-image method (Method #2) for image pyramid construction.
To see our script in action, open up a terminal, change directory to where your code lives, and execute the following command:
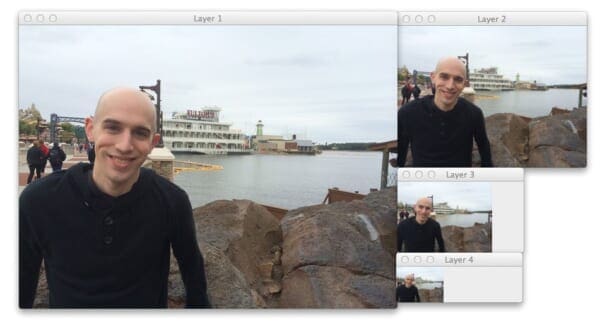
$ python pyramid.py --image images/adrian_florida.jpg --scale 1.5
If all goes well, you should see results similar to this:

Here we can see that 7 layers have been generated for the image.
And similarly for the scikit-image method:

The scikit-image pyramid generated 4 layers since it reduced the image by 50% at each layer.
Now, let’s change the scale factor to 3.0 and see how the results change:
$ python pyramid.py --image images/adrian_florida.jpg --scale 1.5
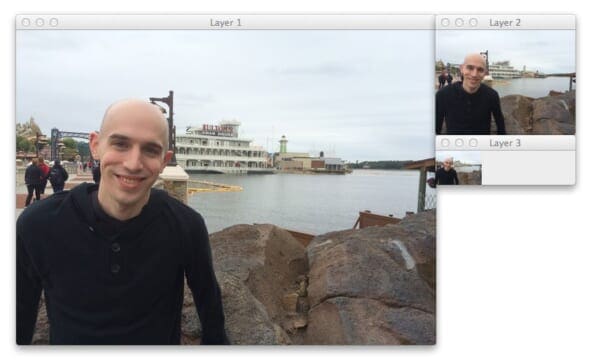
And the resulting pyramid now looks like:

Using a scale factor of 3.0 , only 3 layers have been generated.
In general, there is a tradeoff between performance and the number of layers that you generate. The smaller your scale factor is, the more layers you need to create and process — but this also gives your image classifier a better chance at localizing the object you want to detect in the image.
A larger scale factor will yield less layers, and perhaps might hurt your object classification performance; however, you will obtain much higher performance gains since you will have less layers to process.
What's next? We recommend PyImageSearch University.
86+ total classes • 115+ hours hours of on-demand code walkthrough videos • Last updated: February 2026
★★★★★ 4.84 (128 Ratings) • 16,000+ Students Enrolled
I strongly believe that if you had the right teacher you could master computer vision and deep learning.
Do you think learning computer vision and deep learning has to be time-consuming, overwhelming, and complicated? Or has to involve complex mathematics and equations? Or requires a degree in computer science?
That’s not the case.
All you need to master computer vision and deep learning is for someone to explain things to you in simple, intuitive terms. And that’s exactly what I do. My mission is to change education and how complex Artificial Intelligence topics are taught.
If you're serious about learning computer vision, your next stop should be PyImageSearch University, the most comprehensive computer vision, deep learning, and OpenCV course online today. Here you’ll learn how to successfully and confidently apply computer vision to your work, research, and projects. Join me in computer vision mastery.
Inside PyImageSearch University you'll find:
- ✓ 86+ courses on essential computer vision, deep learning, and OpenCV topics
- ✓ 86 Certificates of Completion
- ✓ 115+ hours hours of on-demand video
- ✓ Brand new courses released regularly, ensuring you can keep up with state-of-the-art techniques
- ✓ Pre-configured Jupyter Notebooks in Google Colab
- ✓ Run all code examples in your web browser — works on Windows, macOS, and Linux (no dev environment configuration required!)
- ✓ Access to centralized code repos for all 540+ tutorials on PyImageSearch
- ✓ Easy one-click downloads for code, datasets, pre-trained models, etc.
- ✓ Access on mobile, laptop, desktop, etc.
Summary
In this blog post we discovered how to construct image pyramids using two methods.
The first method to image pyramid construction used Python and OpenCV and is the method I use in my own personal projects. Unlike the traditional image pyramid, this method does not smooth the image with a Gaussian at each layer of the pyramid, thus making it more acceptable for use with the HOG descriptor.
The second method to pyramid construction utilized Python + scikit-image and did apply Gaussian smoothing at each layer of the pyramid.
So which method should you use?
In reality, it depends on your application. If you are using the HOG descriptor for object classification you’ll want to use the first method since smoothing tends to hurt classification performance.
If you are trying to implement something like SIFT or the Difference of Gaussian keypoint detector, then you’ll likely want to utilize the second method (or at least incorporate smoothing into the first).

Download the Source Code and FREE 17-page Resource Guide
Enter your email address below to get a .zip of the code and a FREE 17-page Resource Guide on Computer Vision, OpenCV, and Deep Learning. Inside you'll find my hand-picked tutorials, books, courses, and libraries to help you master CV and DL!

