A couple weeks ago I provided step-by-step install instructions to setup OpenCV 3.0 and Python 2.7+ on your Ubuntu machine.
However, one of the huge benefits of migrating to OpenCV 3.0 is the new Python 3.4+ support. In the previous 2.4.X releases of OpenCV, only Python 2.7+ was supported. But now, we can finally leverage Python 3.4+ in our new projects.
In the remainder of this blog post, I’ll detail how to install OpenCV 3.0 with Python 3.4+ bindings on your Ubuntu 14.04+ system. If you have followed along from the previous tutorial, you’ll notice that many of the steps are the same (or at least very similar), so I have condensed this article a bit. That said, be sure to pay special attention when we start working with CMake later in this tutorial to ensure you are compiling OpenCV 3.0 with Python 3.4+ support!
How to Install OpenCV 3.0 and Python 3.4+ on Ubuntu
UPDATE: The tutorial you are reading now covers how to install OpenCV 3.0 with Python 3.4+ bindings on Ubuntu 14.04. This tutorial still works perfectly, but if you want to install OpenCV on the newer Ubuntu 16.04 with OpenCV 3.1 and Python 3.5+, please use this freshly updated tutorial:
https://pyimagesearch.com/2016/10/24/ubuntu-16-04-how-to-install-opencv/
A few weeks ago I covered how to install OpenCV 3.0 and Python 2.7+ on Ubuntu, and while this was a great tutorial (since many of us are still using Python 2.7), I think it’s really missing out on one of the major aspects of OpenCV 3.0 — Python 3.4+ support!
That’s right, up until the v3.0 release, OpenCV only provided bindings to the Python 2.7 programming language.
And for many of us, that was okay. As scientific developers and researchers, it’s a pretty standard assumption that we’ll be sequestered to Python 2.7.
However, that’s starting to change. Important scientific libraries such as NumPy, SciPy, and scikit-learn are now providing Python 3 support. And now OpenCV 3.0 joins the ranks!
In general, you’ll find this tutorial very similar to the previous one on installing OpenCV 3.0 and Python2.7 on Ubuntu, so I’m going to condense my explanations of each of the steps as necessary. If you would like to full explanation of each step, please refer to the previous OpenCV 3.0 article. Otherwise, simply follow along with this tutorial and you’ll have OpenCV 3.0 and Python 3.4+ installed on your Ubuntu system in less than 10 minutes.
Step 1: Install prerequisites
Upgrade any pre-installed packages:
$ sudo apt-get update $ sudo apt-get upgrade
Install developer tools used to compile OpenCV 3.0:
$ sudo apt-get install build-essential cmake git pkg-config
Install libraries and packages used to read various image formats from disk:
$ sudo apt-get install libjpeg8-dev libtiff4-dev libjasper-dev libpng12-dev
Install a few libraries used to read video formats from disk:
$ sudo apt-get install libavcodec-dev libavformat-dev libswscale-dev libv4l-dev
Install GTK so we can use OpenCV’s GUI features:
$ sudo apt-get install libgtk2.0-dev
Install packages that are used to optimize various functions inside OpenCV, such as matrix operations:
$ sudo apt-get install libatlas-base-dev gfortran
Step 2: Setup Python (Part 1)
Let’s get pip
, a Python package manager, installed for Python 3:
$ wget https://bootstrap.pypa.io/get-pip.py $ sudo python3 get-pip.py
Note that I have specifically indicated python3
when installing pip
. If you do not supply python3
, then Ubuntu will attempt to install pip
on your Python 2.7 distribution, which is not our desired intention.
Alright, so I’ve said it before on the PyImageSearch blog, and I’ll see it again. You should really be using virtual environments for Python development!
We’ll be using virtualenv and virtualenvwrapper in this tutorial. These packages allow us to create entirely separate and independent Python environments, ensuring that we don’t junk up our system Python install (and more importantly, so we can have a separate Python environment for each of our projects).
Let’s use our fresh pip3
install to setup virtualenv
and virtualenvwrapper
:
$ sudo pip3 install virtualenv virtualenvwrapper
Again, notice how I am specifying pip3
instead of just pip
— I’m just making it explicitly obvious that these packages should be installed for Python 3.4.
Now we can update our ~/.bashrc
file (place at the bottom of the file):
# virtualenv and virtualenvwrapper export VIRTUALENVWRAPPER_PYTHON=/usr/bin/python3 export WORKON_HOME=$HOME/.virtualenvs source /usr/local/bin/virtualenvwrapper.sh
Notice how I am pointing VIRTUALENVWRAPPER_PYTHON
to where our Python 3 binary lives on our Ubuntu system.
To make these changes take affect, you can either open up a new terminal or reload your ~/.bashrc
file:
$ source ~/.bashrc
Finally, let’s create our cv
virtual environment where we’ll be doing our computer vision development using OpenCV 3.0 and Python 3.4:
$ mkvirtualenv cv
Step 2: Setup Python (Part 2)
We’re halfway done setting up Python. But in order to compile OpenCV 3.0 with Python 3.4+ bindings, we’ll need to install the Python 3.4+ headers and development files:
$ sudo apt-get install python3.4-dev
OpenCV represents images as NumPy arrays, so we need to install NumPy into our cv
virtual environment:
$ pip install numpy
If you end up getting a Permission denied error related to pip’s .cache
directory, like this:
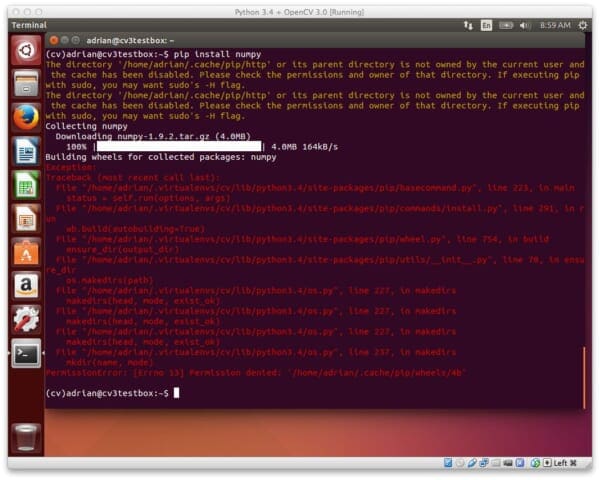
Then simply delete the cache directory and re-run the NumPy install command:
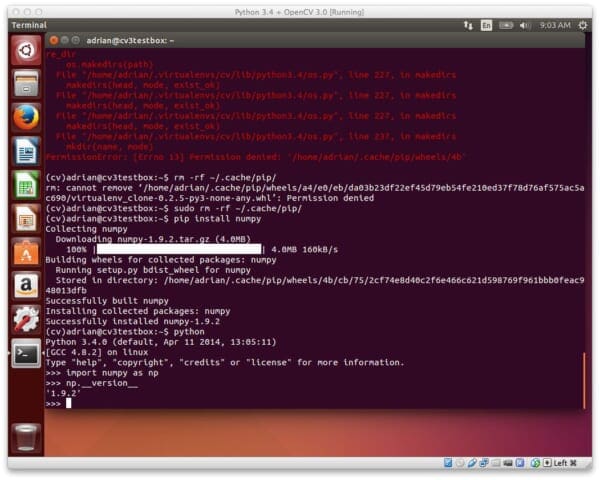
$ sudo rm -rf ~/.cache/pip/ $ pip install numpy
And you should now have a nice clean install of NumPy:
Step 3: Build and install OpenCV 3.0 with Python 3.4+ bindings
Alright, our system is all setup now! Let’s pull down OpenCV from GitHub and checkout the 3.0.0
version:
$ cd ~ $ git clone https://github.com/Itseez/opencv.git $ cd opencv $ git checkout 3.0.0
Update (3 January 2016): You can replace the 3.0.0
version with whatever the current release is (as of right now, it’s 3.1.0
). Be sure to check OpenCV.org for information on the latest release.
We’ll also need to grab the opencv_contrib repo as well (for more information as to why we need opencv_contrib
, take a look at my previous OpenCV 3.0 Ubuntu install post):
$ cd ~ $ git clone https://github.com/Itseez/opencv_contrib.git $ cd opencv_contrib $ git checkout 3.0.0
Again, make sure that you checkout the same version for opencv_contrib
that you did for opencv
above, otherwise you could run into compilation errors.
Time to setup the build:
$ cd ~/opencv $ mkdir build $ cd build $ cmake -D CMAKE_BUILD_TYPE=RELEASE \ -D CMAKE_INSTALL_PREFIX=/usr/local \ -D INSTALL_C_EXAMPLES=ON \ -D INSTALL_PYTHON_EXAMPLES=ON \ -D OPENCV_EXTRA_MODULES_PATH=~/opencv_contrib/modules \ -D BUILD_EXAMPLES=ON ..
Update (3 January 2016): In order to build OpenCV 3.1.0
, you need to set -D INSTALL_C_EXAMPLES=OFF
(rather than ON
) in the cmake
command. There is a bug in the OpenCV v3.1.0 CMake build script that can cause errors if you leave this switch on. Once you set this switch to off, CMake should run without a problem.
Let’s take a second to look at my CMake output:
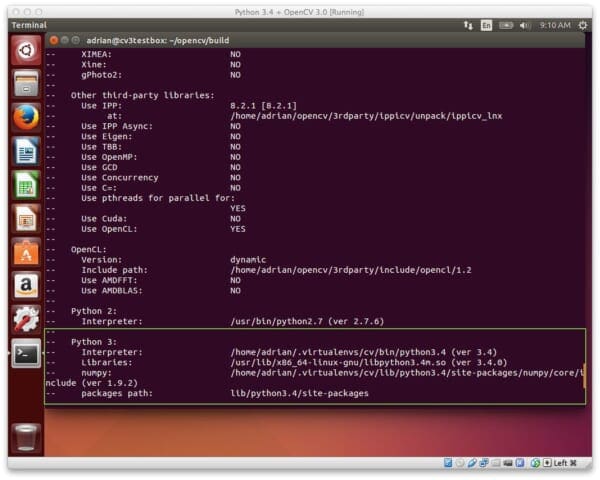
Notice how CMake has been able to pick up our Python 3 interpreter! This indicates that OpenCV 3.0 will be compiled with our Python 3.4+ bindings.
Speaking of compiling, let’s go ahead and kickoff the OpenCV compile process:
$ make -j4
Where the 4 can be replaced with the number of available cores on your processor to speedup the compilation time.
Assuming OpenCV 3.0 compiled without error, you can now install it on your system:
$ sudo make install $ sudo ldconfig
Step 4: Sym-link OpenCV 3.0
If you’ve reached this step, OpenCV 3.0 should now be installed in /usr/local/lib/python3.4/site-packages/
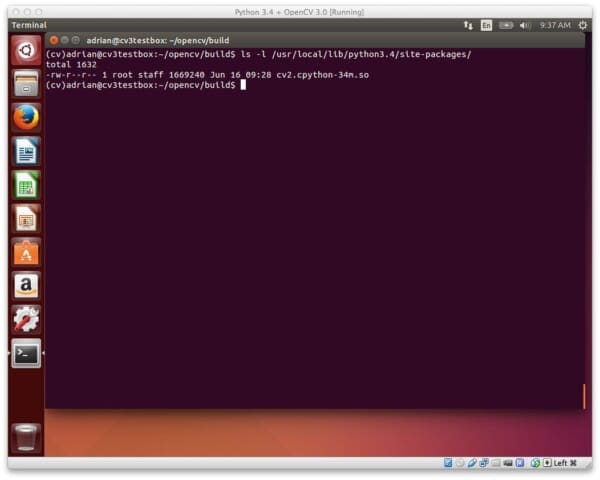
Here, our OpenCV bindings are stored under the name cv2.cpython-34m.so
Be sure to take note of this filename, you’ll need it in just a few seconds!
However, in order to use OpenCV 3.0 within our cv
virtual environment, we first need to sym-link OpenCV into the site-packages
directory of the cv
environment, like this:
$ cd ~/.virtualenvs/cv/lib/python3.4/site-packages/ $ ln -s /usr/local/lib/python3.4/site-packages/cv2.cpython-34m.so cv2.so
Notice how I am changing the name from cv2.cpython-34m.so
to cv2.so
— this is so Python can import our OpenCV bindings using the name cv2
.
So now when you list the contents of the cv
virtual environment’s site-packages
directory, you’ll see our OpenCV 3.0 bindings (the cv2.so
file):
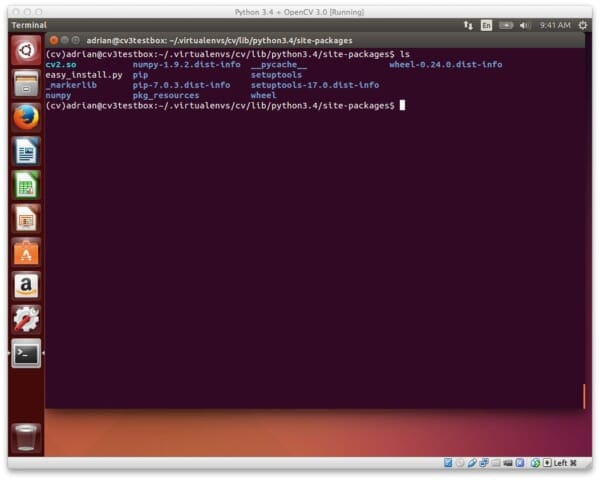
Again, this is a very important step, so be sure that you have the cv2.so
file in your virtual environment, otherwise you will not be able to import OpenCV in your Python scripts!
Step 5: Test out the OpenCV 3.0 and Python 3.4+ install
Nice work! You have successfully installed OpenCV 3.0 with Python 3.4+ bindings (and virtual environment support) on your Ubuntu system!
But before we break out the champagne and beers, let’s confirm the installation has worked. First, ensure you are in the cv
virtual environment, then fire up Python 3 and try to import cv2
:
$ workon cv $ python >>> import cv2 >>> cv2.__version__ '3.0.0'
Here’s an example of me importing OpenCV 3.0 using Python 3.4+ on my own Ubuntu system:
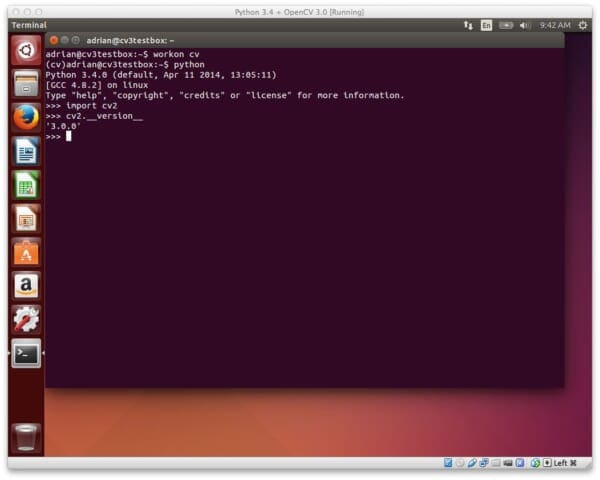
As you can see, OpenCV 3.0 with Python 3.4+ bindings has been successfully installed on my Ubuntu system!
What's next? We recommend PyImageSearch University.
86 total classes • 115+ hours of on-demand code walkthrough videos • Last updated: October 2024
★★★★★ 4.84 (128 Ratings) • 16,000+ Students Enrolled
I strongly believe that if you had the right teacher you could master computer vision and deep learning.
Do you think learning computer vision and deep learning has to be time-consuming, overwhelming, and complicated? Or has to involve complex mathematics and equations? Or requires a degree in computer science?
That’s not the case.
All you need to master computer vision and deep learning is for someone to explain things to you in simple, intuitive terms. And that’s exactly what I do. My mission is to change education and how complex Artificial Intelligence topics are taught.
If you're serious about learning computer vision, your next stop should be PyImageSearch University, the most comprehensive computer vision, deep learning, and OpenCV course online today. Here you’ll learn how to successfully and confidently apply computer vision to your work, research, and projects. Join me in computer vision mastery.
Inside PyImageSearch University you'll find:
- ✓ 86 courses on essential computer vision, deep learning, and OpenCV topics
- ✓ 86 Certificates of Completion
- ✓ 115+ hours of on-demand video
- ✓ Brand new courses released regularly, ensuring you can keep up with state-of-the-art techniques
- ✓ Pre-configured Jupyter Notebooks in Google Colab
- ✓ Run all code examples in your web browser — works on Windows, macOS, and Linux (no dev environment configuration required!)
- ✓ Access to centralized code repos for all 540+ tutorials on PyImageSearch
- ✓ Easy one-click downloads for code, datasets, pre-trained models, etc.
- ✓ Access on mobile, laptop, desktop, etc.
Summary
In this tutorial I have demonstrated how to install OpenCV 3.0 with Python 3.4+ bindings on your Ubuntu system. This article is very similar to our previous tutorial on installing OpenCV 3.0 and Python 2.7 on Ubuntu, but takes advantage of OpenCV 3.0’s new Python 3+ support, ensuring that we can use the Python 3 interpreter in our work.
While having Python 3.4+ support is really awesome and is certainly the future of the Python programming language, I would also advise you to take special care when considering migrating from Python 2.7 to Python 3.4. For many scientific developers, the move from Python 2.7 to 3.4 has been a slow, arduous one. While the big Python packages such as NumPy, SciPy, and scikit-learn have made the switch, there are still other smaller libraries that are dependent on Python 2.7. That said, if you’re a scientific developer working in computer vision, machine learning, or data science, you’ll want to be careful when moving to Python 3.4 as you could easily pigeonhole your research.
Over the coming weeks the OpenCV 3.0 install-fest will continue, so if you would like to receive email updates when new install tutorials are released (such as installing OpenCV 3.0 with Homebrew, installing OpenCV 3.0 on the Raspberry Pi, and more), please enter your email address in the form below.
Join the PyImageSearch Newsletter and Grab My FREE 17-page Resource Guide PDF
Enter your email address below to join the PyImageSearch Newsletter and download my FREE 17-page Resource Guide PDF on Computer Vision, OpenCV, and Deep Learning.
Sébastien Vincent
Hi Adrien,
Thanks a lot! I followed your tutorial, and at last, I’ve been able to install OpenCV3 with Python3.4 on my Ubuntu VM.
I have a related question : your instruction is to update the .bashrc with
“export VIRTUALENVWRAPPER_PYTHON=/usr/bin/python3”
so python3.4 will become the default interpreter in every future virtualenv.
Is it still possible to create virtual environments with python2.7?
Adrian Rosebrock
Hey Sébastien, you can still create virtual environments using Python 2.7. Using a command like this should work:
$ mkvirtualenv foo --python python2.7
Sébastien Vincent
Thanks!
Last question: is it safe to delete the opencv/build directory after install? Or must we keep it forever. Its size is 2.9Gb…
Adrian Rosebrock
As long as you have ran
sudo make install
, you can safely delete thebuild
directory.Sébastien Vincent
ok, thanks.
Alexander Holzer
And what about the opencv and opencv_contrib directories themselves?
It makes up a total of 5.2Gb for me on version 3.3.0
Adrian Rosebrock
Yes, once OpenCV is successfully installed you can delete both the
opencv
andopencv_contrib
directories.RetroAsgardian
I’m gonna keep it anyway. Linux with 1TB hard drive but I only use about 25GB of it xD
Wagon
I as well had to rename
to
Everything worked great installed version 3.1.0 on Ubuntu 14.04
Adrian you by far have the best tutorials out there. Super appreciate what you do.
Adrian Rosebrock
Thanks for the kind words 🙂 And congrats on getting OpenCV installed!
Shweta Philip
Hi I cannot find the cv2 files in dist-packages as well as site-packages and everything worked without error up to this step.
Adrian Rosebrock
If
make
exited without error then there was like an issue with your CMake configuration, specifically with the Python 3 section. I would double-check the “Python 3” output. Also, this tutorial has been updated via this one, so there is a chance that you are following the wrong tutorial.Ferdi Güler
Hi Adrian,
Such a good tutorial, would you mind explaining the installation steps if I choose to use standard virtual environment coming with Python3.4 (Python3 -m venv foo) instead of virtualenv?
Thanks
Adrian Rosebrock
Hey Ferdi, I’m actually unfamiliar with the virtual environment that comes with Python 3.4 (I’m just migrating to Python 3 myself — previously all I could use was Python 2.7). Do you have a link where I can read more about it?
Ferdi Güler
Hi Again, thanks for your reply. More information about Python’s native virtual environment can be found in the following link. It would be nice if can use it since it comes with Python 3.4 by default and there is no need to install any other 3rd party tools
https://docs.python.org/3/library/venv.html
Adrian Rosebrock
Awesome, thanks for passing along the link I’ll be sure to read up on it.
Abhrant Panigrahi
Sir, when I type import cv2 in the python interactive shell, it works great. But then when I try to import cv2 in Spyder, it shows import error. What can I do about it ?
Adrian Rosebrock
You likely need to set the Project Interpreter for your IDE, like I do in this tutorial.
chetan
Sir i am getting error as shown below. I have installed as per your instructions but still unable to install correctly. pls help me.
root@chetan-VirtualBox:~# workon cv
workon: command not found
root@chetan-VirtualBox:~# python
Python 2.7.6 (default, Jun 22 2015, 18:00:18)
[GCC 4.8.2] on linux2
Type “help”, “copyright”, “credits” or “license” for more information.
>>> import cv2
Traceback (most recent call last):
File “”, line 1, in
ImportError: No module named cv2
Adrian Rosebrock
Hey Chetan — if you are getting an error related to the
workon
command, then it’s most likely that your~/.bash_profile
file was not updated corrected or was not reloaded via thesource
command. Go back to the “Step 2: Setup Python (Part 1)” section and ensure you have updated your~/.bash_profile
file to reflect the changes I suggested.Meareg
Hello adrian, very nice step-by-step tutorial. Thanks man!! 🙂
I had to spend some time before figuring out I had to comment out export ‘PYTHONPATH=$PYTHONPATH:/usr/lib/local/python2.7/dist-packages’ (if such line exists in your ~/.bashrc file) and replace it with
‘PYTHONPATH=$PYTHONPATH:/usr/lib/local/python3.4/dist-packages’ or simply replace 2.7 with 3.4
This will allow our openCV3.0 compilation to choose the python3.4 interpreter specifically and to include the opencv3.0’s bindings for python3.4 as shown above in step 3’s cmake output.
Adrian Rosebrock
Nice catch!
Mike Ream
OK…here is what I did wrong….I had to exit in the middle of this process and when I came back into my terminal I was not on the cv environment when I did the cmake command. I tried running it again with no luck. I then removed the entire build directory and started again making sure I entered “workon cv” to be sure I was in the virtual environment. I followed the steps and all seems OK now.
Adrian Rosebrock
Nice, I’m glad it’s working for you Mike!
And yes, to all other readers: if you leave your computer, restart it, open up a new terminal, etc. be sure to use the workon command to re-enter your virtual environment.
Tony
thanks.
Mike Ream
Sorry for all the comments. I also get the following output when I type cv2.__version__: ‘3.0.0-dev’ . Are other people getting the dev version? I was surprised to get a different output.
Adrian Rosebrock
After pulling down the repository from GitHub did you run
git checkout 3.0.0
? It seems like you might have forgotten the checkout command.Mike Ream
Your suspicions were correct. I could have sworn that I ran the “git checkout 3.0.0″command, but I must have forgot it. After I followed the steps again, being more careful I do get the correct version installed.
Adrian Rosebrock
Fantastic, I’m glad it was just a git checkout issue 🙂
Tafadzwa
i’ve encountered an error whilst running “sudo pip3 install virtualenv virtualenvwrapper”…
The response,”Cannot fetch base index………”
Adrian Rosebrock
That sounds like an an issue with pip or your machine.
Tafadzwa
Thanks a lot…..After running the command “cmake -D CMAKE_BUILD_TYPE=RELEASE \
-D CMAKE_INSTALL_PREFIX=/usr/local \
-D INSTALL_C_EXAMPLES=ON \
-D INSTALL_PYTHON_EXAMPLES=ON \
-D OPENCV_EXTRA_MODULES_PATH=~/opencv_contrib/modules \
-D BUILD_EXAMPLES=ON ..” i have encountered this error,”CMake Error at 3rdparty/ippicv/downloader.cmake:75 (message):
ICV: Failed to download ICV package: ippicv_linux_20141027.tgz.
Status=22;”HTTP response code said error”
How can that be resolved??
Adrian Rosebrock
That sounds like an error related to your internet connection and not OpenCV. The ICV package needs to be downloaded and for whatever reason, the the download is failing — likely due to a connectivity issue (either on your end or OpenCV’s).
Nitin
If anyone found dist-package instead of site-package, then use these commands and i guess it will work…
Adrian Rosebrock
Thanks for sharing Nitin!
Thomas D.
Hello,
i use your guide today at xubuntu 16.04.1 LTS.
My link is now:
ln -s /usr/local/lib/python3.5/dist-packages/cv2.cpython-35m-x86_64-linux-gnu.so cv2.so
regards Thomas
Adrian Rosebrock
Thanks for sharing Thomas! I’ll actually have an updated tutorial covering Ubuntu 16.04 LTS online within the next couple of weeks.
taufikmas
i have do in my ubuntu peppermint7, work. but in raspberry not found same like your case.
Shiva
Oops, looks like I’d forgotten to update the .bashrc file! It works fine now.
My other query still stands!
Jonathan
Hello,
I’ve run through the compile and make processes with no warnings or errors. When I run sudo ldconfig from the build directory, there is no output. And when I try to look for the opencv *.so files, I cannot find them (neither in /usr/local/lib/python3.4/dist-packages or site-packages directories. Do you know what might be causing the problem ? What information can I provide to help you understand the issue ? Thanks in advance – and for the great tutorial !
Adrian Rosebrock
Hey Jonathan — be sure to check for
.so
files in thebuild/lib
directory. This has happened to me a few times before and then I just manually moved it to thesite-packages
directory.savolla
did you moved all those files???
Milos
Nice, works out of the box. Although, I installed virtual environment with just “virtualenv env –python python3.4”.
Adrian Rosebrock
Awesome, I’m glad the tutorial worked for you Milos! 🙂
Almazi
Thanks for this great tutorial which worked pretty good. But everytime I start terminal the “workon command: not found” then I have to go thru exporting the virtualenv and virtualenvwrapper. Why is it happening and is it normal? Is there any way to make a virtual terminal which will work for cv directly?
Thanks
Adrian Rosebrock
Hey Almazi — just to clarify: only the
workon
command is not found? Themkvirtualenv
andrmvirtualenv
commands work?Andrea
Hi Adrian, thanks a lot for your tutorial.
I’m having the same problem as Almazi, and I get also the same message when executing mkvirtualenv and rmvirtualenv, how can a deal with it?
Thanks in advance
Adrian Rosebrock
Hey Andrea — you might want to take a look at the “Troubleshooting” section of this post. While the instructions are for the Raspberry Pi, you can apply the same logic to fix the virtualenv commands.
peemji
I’m working on a SIFT project that need matplotlib as prerequisite but I can’t build(หรือ compile) it. Could you give me any example or instruction?
Adrian Rosebrock
Please see my reply to Sommai above.
Sommai Dev
I’m working on a SIFT project that need matplotlib as prerequisite but I can’t build it to virualane . Could you give me any example or instruction?
Adrian Rosebrock
Please see this tutorial on how to install matplotlib into the
cv
virtual environment.Evan
The best, most straightforward installation procedure I’ve ever read. THANKS!!!
Adrian Rosebrock
Thanks so much Evan, I’m glad it worked for you! 🙂
Baptiste
Works great in Terminal, but i can’t import cv2 in idle or spyder ? how do configure them to work in your virtual cv ? Thanks !
Adrian Rosebrock
I’m not familiar with the Sypder IDE, but if it’s anything like PyCharm, you just need to set the proper virtual environment for the project. Please see this post for more information.
Baptiste
It works !!! with Eclipse or Pycharm … I don’t understand why not with my spyder ? I Have yet some trouble to solve with matplotlib… (I will try your patch of your blog ) – Thank you very much !
waspinator
have you heard of Conda/Anaconda? It makes managing your packages and environments easier. I think it would be a better fit for computer vision researchers and practitioners than pip/virtualenv which are designed more for python programmers.
https://www.continuum.io/downloads
Adrian Rosebrock
Yes, I’ve heard of and used conda before. They actually used to include OpenCV in their pre-compiled packages but it was removed awhile back. I also don’t talk about it publicly, but the Continuum company and myself had a pretty big falling out (at least on my end of things). You won’t see me use their products on the blog.
Derrick
I agree
Jack
Hello,
I’m looking to connect my “cv” virtualenv that was created in this tutorial to PyCharm (as per one of your other tutorials) but I can’t figure out where the “cv” virtualenv is stored. As per this guide, where do I look to find that virtual environment? (also what is it’s final extension?)
Thanks a million,
Jack
Ahh, of course. I try to dig around as long as I can before posting stupid comments. I found the .virtualenvs dir inside my home directory then all I had to do was point the PyCharm interpreter at .virtualenvs/cv/bin/python3.4 (as reference for anyone else in my position).
Thanks for the guide!
-Jack
Adrian Rosebrock
I’m glad you figured it out Jack. Also, for future reference, I have a tutorial dedicated to setting up PyCharm with virtual environments.
saborae
Hey, I did as you instructed and I get the similar output on the cmake but after the packages path: site-packages, there’s another line that says python(for build): 2.7
Also, compiling with -j4, I get several warnings all .cpp or .hpp files. Anyway, the install works, with my camera, video files, all fine but now, how do I use opencv on my regular python install? should I redo all the steps without virtualenv?
Adrian Rosebrock
You can ignore the “for build” section, that part of the CMake script is buggy. As for using OpenCV in your regular Python install, just the
cv2.so
file into your regularsite-packages
directory (if it’s not already there). From there, you’ll be able to import OpenCV outside of the virtual environment.Hacklavya
I want to keep both
install-opencv-3-0-and-python-3-4-on-ubuntu/
and
install-opencv-3-0-and-python-2-7-on-ubuntu/
will this tutorial keep older one intact ?
Actually I want all following on my system, so that I can use according to need:-
1. opencv 3.0 & python 3.4
2. opencv 3-0 & python 2.7
3. opencv 2.4 & python 2.7
How can I have all the three ?
Adrian Rosebrock
It certainly is possible, but it’s non-trivial. The trick is to compile and install OpenCV 3.0 (for either Python version first). But that is the only time you run
make install
. Afterwards, you create separate Python virtual environments for the remaining two installs. Then you compile your respective Python versions. But only keep thebuild
directory after compiling. You can then sym-link in thecv2.so
bindings from the respectivebuild/lib
directories into the correct Python virtual environments.Like I said, it’s not easy to do — but it’s absolutely possible.
Tom Vandermolen
FYI, for those who are using Anaconda as their python install, here’s a site that goes through installing OpenCV 3 (worked for me):
https://rivercitylabs.org/up-and-running-with-opencv3-and-python-3-anaconda-edition/
Adrian Rosebrock
Thanks for sharing Tom!
srinath
Thanks a ton sir. This is what I was looking. I did everything what is in this blog and didn’t get the library file. I was thinking it had something to do with anaconda. But thanks a lot. Now how to update the package in future? Until and unless the user updates, we can’t do anything?
armin
hello
Can i install different versions of python on one machine too? e.g python 3.4 with opencv 3 in one virtual environment and python 2.7 with opencv 2.4 in other one?
Thanks.
Adrian Rosebrock
You can, but it’s not a trivial process. See my reply to Hacklavya above for more information.
alfian fermana
sudo python3 get-pip.py
i cant execute this . can you tell me how ASAP. thank you
I dont understand this line
“Note that I have specifically indicated python3 when installing pip . If you do not supply python3 , then Ubuntu will attempt to install pip on your Python 2.7 distribution, which is not our desired intention.”
how to do that? thank you please help
Adrian Rosebrock
Why can’t you execute the command? Are you getting an error message?
Ashwin
I am using ubuntu 14.04 and python2.7.6 was already in this. I installed opencv and python3.4.
opencv can be imported using python2.7 but cant be used by python3.4
Adrian Rosebrock
Double check your output of CMake and sure Python 3.4 was properly picked up. It sounds like OpenCV support was compiled for Python 2.7.
David
This tutorial is great, but I had one problem with it that wound up taking me a day to debug.
The current version of cmake installed by aptitude does not search for python libraries beyond version 3.3, which means it couldn’t find the libraries my 3.4 version of python.
The solution is add an option to cmake: “-DPYTHON_LIBRARIES=/usr/lib/x86_64-linux-gnu/libpython3.4m.so”
Once I added this configuration option, then cv2.cpython-34m.so magically appeared (albeit in “/dist-packages/”, not “/site-packages/”) and all was resolved.
Adrian Rosebrock
Thanks for sharing your solution David!
Matt
Thanks, Adrian! Nice work.
Adrian Rosebrock
Thanks Matt! 🙂
Alan
Brilliant writeup, and great job with the site. Not sure if you studied with him, but it has Ramit’s fingerprint all over it…in a good way!
On AWS Ubuntu, attempting to
import cv2
gave:The temporary fix for this is to associate null device with raw1394 (firewire, which we don’t need anyways).
Adrian Rosebrock
Thanks for sharing Alan! And which Ramit is that 😉 I assume Sethi?
Gustavo
Nice article… I will test it using Gnome Ubuntu 16.04 Alpha 2 🙂 Thanks
Liya
Hi Adrian,
It would be great if you can have a similar tutorial for setting up open cv on Red Hat OS.
Thanks
asitha
hi Adrian,
is it possible to install opencv 3 on a raspberry pi 2 which is running ubuntu?
Adrian Rosebrock
Yes, you can absolutely install OpenCV 3 on a Raspberry Pi that is running Ubuntu. The same instructions apply.
PeterPan
Hey Adrian,
great tutorial – thank you very much!
You could save a lot of time and disc space by just downloading and extracting the release archives of opencv and opencv_contrib instead of cloning the whole git repository.
For version 3.1.0, they can be found here:
https://github.com/Itseez/opencv/archive/3.1.0.tar.gz
https://github.com/Itseez/opencv_contrib/archive/3.1.0.tar.gz
Adrian Rosebrock
Thanks for sharing the tip!
Qubix
Thanks a lot for the tutorial . I managed to install everything in Kubuntu 15.10. Works great. However, I have a question. Why do you have to be inside of this cv environment (workon cv) to be able to import cv. If I just open up a terminal and write python3 , then import cv2, it does not work. Could you explain a bit just what that environment is and why this library does not work outside of it?
Adrian Rosebrock
For a more detailed discuss of Python virtual environments (and why they are important), I would suggest giving this article a read. The short answer is that virtual environments give you independent and sequestered environments for each of your projects — that way, you don’t have to worry about conflicting library versions from one project to the next.
luis mendoza
Hello could you helpme?
just after I writo: impor cv2:
I I get:
Traceback (most recent call last):
ImportError: No mudule named ‘cv2’
Adrian Rosebrock
If you’re having trouble importing the
cv2
bindings, please see the “Troubleshooting” section of this post.slava
Hey, Adrian.
How can i cancel all changes i did?
I want to try all steps from the beginning with a clear system?
Adrian Rosebrock
It depends on what steps you want to restart from. But in general, the best way to simply restart and clear the system is to re-install Ubuntu and start fresh.
Helios
I followed the tutorial and it worked for me.
But everytime when I need to use OpenCV, i should run “mkvirtualenv cv” and then use python.
Is there any way to avoid this virtual environment?
Adrian Rosebrock
Using Python virtual environments is a best practice and I highly recommend you use them. That said, if you want to skip using them, just ignore all steps that relate to virtualenv and virtualenvwrapper.
Paul
Thanks for this Adrian. A nice clean way to get things set up. I experimented inside a xubuntu 14.04 VM also, just to keep things even cleaner..
However, I found for modules other than the ones starting with x, like xfeatures2d, the other contrib modules don’t export to python2/3. I checked my ../build/modules/python3/pyopencv_generated_include.h for the modules, and they are not listed. I checked here to see why not all contrib modules are listed in that file: http://docs.opencv.org/3.1.0/da/d49/tutorial_py_bindings_basics.html#gsc.tab=0
Seems the headers are not properly tagged with export macros for opencv3…
Else, i’m doing something wrong…
Adrain, or anyone else, did you get all the contrib modules working? Does anyone have an example of objectnessBing working following this method?
Thanks
Adrian Rosebrock
Hey Paul — not all modules in
opencv_contrib
have Python bindings. This could be because the modules are now and experimental, or there has not been a request to create the Python bindings. Again, it’s normal for not all modules inopencv_contrib
to have Python bindings.Ashing
Hi Adrian,
Thanks a lot! I followed your tutorial, I installed openCV 3.1.0 with python3.5. on my Raspbarry pi 3 with ubuntu 16.04 mate.
I just met one error before .
Need to change the name “cv2.cpython-34m.so cv2.so” to “cv2.cpython-35m-arm-linux-gnueabihf.so” in my case.
Just said thank you again,OpenCV is really interesting .
Adrian Rosebrock
Thanks for sharing the update Ashing!
Yasin
Thanks a lot for the great tutorial!
One thing that confuses me: the package name.
So even though we are using opencv 3, we nees to import “cv2”?? Not “cv3”?
Thank you.
Adrian Rosebrock
Yep, it’s quite confusing! The name of the package for both OpenCV 2.4 and OpenCV 3 is
cv2
. I’m not sure why they didn’t change the name tocv3
for OpenCV 3, but that’s just how it is!oglop
Thank you It worked for python3!
Ahmed Henteti
Thank you
Aditya
Hey Adrian!
I installed 3.1.0 on Ubuntu 15.10 with this guide and it works like a charm! Thanks!
I have a question– Now after installing openCV with python, if I want to use it with C/C++ what do I need to do?
Adrian Rosebrock
I don’t formally support C/C++ code on the PyImageSearch blog, but you’ll need to use g++ to compile your code.
Abhishek Shetty
This works great. But I need to install pycuda with this opencv installation. What procedure should be followed?? Coz I need them both for same program.
Mayank
Hey Adrian!!
I am currently using opencv 2.4 with python 2.7. Now i want to upgrade to opencv 3 but is it recommended to upgrade python too. Will python 2.7 be not effective with OpenCV 3 ??
Adrian Rosebrock
You certainly don’t need to upgrade to Python 3 if you don’t want to. OpenCV 3 is just as compatible and effective with Python 2.7 as it is Python 3.
Alex
Thank you, only by your guide I’ve successfully installed OpenCV 3.1.0 on a clean Ubuntu 16.04 with Python 3.5, everything went smoothly. At first I tried Ubuntu 14.04 but something went wrong and there was no cv2*.so file in site-packages after installation.
Adrian Rosebrock
Congrats on getting OpenCV installed Alex!
Richard
Hi Adrian,
I am trying to install OpenCV along with the extra modules but is still running into issues with sift being not defined.
I have followed your instructions step by step and also calling sift with:
sift = cv2.xfeatures2d.SIFT_create()
I am still getting: ‘module’ object has no attribute ‘xfeatures2d;.
Please advise.
Much appreciation in advance.
Adrian Rosebrock
Double-check your output of CMake and ensure that
xfeatures2d
is listed in the set of OpenCV modules to be compiled. If it’s not, then it’s likely that your path to theopencv_contrib
directory is incorrect.John Boss
First of all great tutorial. I have done everything as mentioned in the blog. I am able to use cv2.imshow() with images. When I try to use cv2.imshow() in videocapture(I am using logitech webcam) no errors are generated but no window with video opens up. When I try to store one of those frame as images it works. So how do I get video feed window opened? (Note: I am using Linux Mint 17.3 xfce)
Adrian Rosebrock
How are you accessing your system? Natively with keyboard and monitor? Or via SSH or VNC? I also haven’t tried accessing a webcam via Linux Mint, so I’m not sure if that would cause a problem or not.
Linus
Thanks Adrian for this easy to understand tutorial, even for Ubuntu beginners like me!
Adrian Rosebrock
No problem, I’m happy I could help! 🙂
Jade
Thank you for your article, very useful I managed easily to install OpenCV working with Python thanks to your explanations 🙂
Adrian Rosebrock
Congrats on getting OpenCV installed, that’s awesome! 🙂
Tom C
Hi Adrian, thanks for the in-depth tutorial, but I ran into a problem and am interested to see if you might know what’s up here.
I’m attempting to install opencv 3.1.0 with python 3.4.3 on Ubuntu 14.04. After running `sudo make install` and `sudo ldconfig` (which gives no output) I end up with a bunch of libopencv_*.so files in /usr/local/lib/ (corresponding to different opencv modules, I believe) and all the same ones in opencv/build/lib/, however I have no cv2.cpython-34m.so in my /usr/local/lib/python3.4/dist-packages/ folder, nor a copy of it in the opencv/build/lib folder. I attempted to find it using `sudo updatedb && locate cv2.cpython-34m.so` in case it was created somewhere else, but had no success.
I saw that another commenter here had a similar issue, then upgraded to Ubuntu 16.04, and then was successful, but upgrading from 14.04 isn’t quite an option for me right now. Do you have any idea what I can do differently in compilation / configuration, or with my current results, in order to get opencv working?
Thanks,
Tom
Adrian Rosebrock
Hey Tom — if you don’t have a
.so
file for your OpenCV bindings inopencv/build/lib
, then it’s likely that the bindings were not built. Go back to your CMake step and check the list of libraries to be compiled. Ensure that “python3” is in that list.Ashish
Hey man just wanted to say you are doing awesome work providing education for free, thanks a ton.
Ashish
Hello Adrian i wanted to know what if i do not wish to work in some virtual environment but would rather work on an IDE such as pycharm , what should I do for that after i have gone through all steps mentioned here.
Adrian Rosebrock
If you would like to work in PyCharm, you can simply create a new PyCharm project and update the “Project Interpreter”, just like I do in this tutorial.
GK
I installed on xubuntu 14.04, all steps are the same. There are few modifications. After following all steps I found no cv2.cpython-34m.so file. Turned out, cmake could not find python libraries. So I had to add option
-D PYTHON_LIBRARIES=/usr/lib/python3.4/config-3.4m-i386-linux-gnu/libpython3.4m.so
to cmake configure. But surprisingly, it still didn’t work and cmake was failing to find python 3.4 lib headers. Only after I deleted CMakeCache.txt and executed cmake command, it was able to pick up py3.4 libs.
Adrian Rosebrock
Thanks for sharing your experience!
GK
I wanted to use OCR example and teserract to build as a part of Open cv. To do this you need to add libtesseract-dev, libtesseract-ocr and libleptonica-dev before configuring cmake.
chandan dwivedi
hi,
I am also getting cv2.__version__: ‘3.0.0-dev’ , I tried to run git checkout 3.0.0 but problem is that i have downloaded zip file from github so it shows “fatal: Not a git repository (or any of the parent directories): .git” will it cause any problem?
Adrian Rosebrock
This shouldn’t cause a problem, but keep in mind that you’re on the development branch. Since you downloaded the .zip rather than the repo, that is why the git command is not working.
Akashmahalik
for the command
mkvirtualenv cv it says command not found but till that step everything went correct
Adrian Rosebrock
Please see the “Troubleshooting” section of this post — it details suggestions on how to resolve this problem.
akash mahalik
what does “(place at the bottom of the file”) signify ? to which file shall we add this ?
Adrian Rosebrock
Open up your
~/.bashrc
file in your favorite text editor, scroll to the bottom, and append the relevant commands.akash
the above problem got solved but fot the command:
sudo apt-get install python3.4-dev
it says
E: Unable to locate package python3.4-dev
E: Couldn’t find any package by glob ‘python3.4-dev’
E: Couldn’t find any package by regex ‘python3.4-dev’
Adrian Rosebrock
Can you check which Python version you are using I’m willing to bet you are using Python 3.5, in which case the command would be:
$ sudo apt-get install python3.5-dev
akash
Is there anyway i can use Opencv2 without disturbing the environment for opencv3 ?
Adrian Rosebrock
Yes — please see my reply to “Hacklavya” above.
Arasch Lagies
Hi Adrian,
I want to run a python script using OpenCV in the virtual environment, but then have it continue running (in the background), after I log out. It seems like the script gets terminated when I log out. I tried the “&” at the end of the execution line…
Am I missing something?
Thanks for your help.
Arasch U Lagies
Hi Adrian,
Thanks, I guess I was not using the subshell right in ubuntu. This thread helped: http://askubuntu.com/questions/106351/running-programs-in-the-background-from-terminal
Adrian Rosebrock
Thanks for sharing!
Wiktor Drewniak
It didn’t create python library. Found the reason. It’s required to have CMake with CPack, so from CMake 3.1.
Best regards!
Yohan
I had the same problem, took me a while to find it. Updated CMake to 3.6.0 and it fixed the problem. Some changes to Python/OpenCV/Ubuntu might have made it necessary. Maybe the page could be updated to reflect this?
Thanks for the tutorial!
Adrian Rosebrock
Thanks for sharing Yohan, I’ll look into this.
Arnoldo
Good tutorial +10, i’d tried everything and it worked fine, sorry for my English, but is a good tutorial.
Adrian Rosebrock
I’m happy to hear it worked for you Arnoldo! 🙂
Rajeev Kumar Verma
Hello Adrian,
Thank a lot for this tutorial. Instructions were crisp and clear. I was able to install opencv with python3.4 without any issues.
-Rajeev
Adrian Rosebrock
Congrats on getting OpenCV installed on your system, Rajeev! 🙂
Mona Jalal
Thank you so much 🙂 It worked for me on Ubuntu 16.04 64bit with Python3.5.2 and opencv 3.0.0.0 checkout.
Adrian Rosebrock
Congrats, good job!
James C
I just installed OpenCV 3.1.0 into an Ubuntu 16.04 virtual machine. I had a weird issue in that after I ran the make install command, the appropriate cv2.xxx.so file hadn’t appeared in the /usr/local/lib site packages folder. After struggling to work out what the issue was (I checked the relevant make file, and I couldn’t see a problem), I just ran the cmake and make install commands again. After this second time, the file appeared, and I was able to follow the rest of the process fine.
No idea what the problem was, nor really what resolved it (I don’t know much about the cmake system), but if anyone else is having this trouble, maybe they should try running the commands a second time. Hopefully this helps!
amirul
Hello sir! Thanks for your great work! Everything on your site works like charms for me but have a little inquiry. I have recently taken interest in firewire devices while working with opencv-python. From what i’ve found, libdc1394 is the one handling firewire in ubuntu and that i have to include that while building opencv from source. As I’m just started learning programming early this year and not yet familiar with cmake, so could you give me some guidance or hint? And please pardon my bad english.
Adrian Rosebrock
Hey Amirul — thanks for the comment, although to be honest, I’m not sure what your specific question is?
Shravan Kumar
Hey Adrian,
Thank you, it successfully installed on my pc. But, how coud I enter into virtual environment from the next time onwards to use workon cv.
I have tried:
source ~/.bashrc
mkvirtualenv cv
but it is throwing an error that command could not found.
Could you please help me to fix this issue
Thank you
Adrian Rosebrock
Hey Shravan — if the
mkvirtualenv
command is not being found, then you’ll want to double-check your.bashrc
file. It seems that it might not have been updated properly.Jeffrey
I have a smooth pass following your installation steps. I am super excited! Thanks for sharing and I am going to share this with my friends on fb!
Adrian Rosebrock
Great job getting OpenCV installed on your system Jeffrey — and thanks for sharing the post with your friends 🙂
Mona Jalal
Hi Adrian, what do you suggest to do?
EDIT: the answer to my question: libtiff5-dev would work just as fine 🙂
Adrian Rosebrock
Nice job resolving the issue Mona Jalal! 🙂
Anupam
Thanks for the thorough tutorial!
I wanted the install for both python3 and python2.7. Python3 works fine now, could you please guide me how to get it working for python 2.7?
Adrian Rosebrock
Please see my reply to Hacklavya above where I discuss the general procedure on how to do this.
Isman siete
I don’t know if someone has post it yet or not, but I had some problems with pyenv and cmake, instead of virtualenv.
Some answers: http://stackoverflow.com/questions/33250375/compiling-opencv3-with-pyenv-using-python-3-5-0-on-osx
Thank you for the amazing tutorial!
Manu BN
When I follow the instruction then in Step 4 you hv said that the file location will be /usr/local/lib/python3.4/site-packages/. but in my installation it shows python3.5/dist-packages.
So if I change all the next steps to Python3.5 & dist-packages it dosent work
Any hints to solve the problem plz???
Adrian Rosebrock
You can manually copy the
cv2.so
file fromdist-packages
todist-packages
if you need to. I will be posting an updated tutorial covering Ubuntu 16.04 and Python 3.5 within the next 2 weeks so I would also suggest waiting for that tutorial.Gaurav Verma
Hey Adrian, have you posted the tutorial? Because I’m not able to locate cv2.so and also, not able to import cv2:
(terminal output removed due to formatting)
Adrian Rosebrock
Hey Gaurav — can you clarify which OpenCV version you are using? My latest guide is for Ubuntu 18.04.
Kelevra Robert
Hi, I reached the cmake step but after that when i ran the make-j4, i get fatal errors like math.h not found or stdlib.h not found, does any one have any ideas to what might be happening?
I’m on an ubuntu 14.04 system and ran all this with the git chekout 3.0.0
NOTE: Edited to remove terminal output that was destroying comment formatting.
Adrian Rosebrock
Hey Kelevra — try adding the following switch to your CMake command:
-D ENABLE_PRECOMPILED_HEADERS=OFF
I’m willing to be that should resolve the issue.
Atilla
Hi Adrian,
Thank you so much for your installation description. I am almost through, gone through all the steps, but when I want to open cv2 in python it does not find the module.
The question is, I am working with python 3.5, so have replaced that in part of the steps where it said python 3.4, else to install the devices in step 2 (part 2) was not possible *the devices are not available since I have python 3.5). Then there seem to be two problems, no /usr/local/lib/python3.5/site-packages/ file is created for python 3.5, there is only a dist-packages file. So when I eventually want to open the cv2 file, it cannot be found. Although I can open openCV and use the workon cv command in
cd ~/.virtualenvs/cv/lib/python3.5/site-packages/
so the change for python 3.5 is made there, but not in the usr file.
Any suggestions on how I can solve this problem?
Kind regards,
Atilla
Thanks a lot!
Adrian Rosebrock
Hi Atilla — if you are using Python 3.5 I would suggest using this tutorial instead.
Mehta Jaldhi
Hey i have a query regarding this..
See I have installed this opencv and python in my local user and it is working correctly..
My question is “What if I want to make it work in hduser? How can I set a path in that user?”
Adrian Rosebrock
If you have a separate user you can share a virtual environment. This isn’t recommended, but it can be done. Otherwise, I would suggest creating a separate virtual environment for your other user and sym-linking in the
cv2.so
bindings.Mehta Jaldhi
Okay but i tried to installed in another user but the error is saying that you have already installed it.
Now how i need to uninstall the opencv from my local user?
Adrian Rosebrock
Python, the associated virtual environments, and OpenCV should already be installed on your machine (if you successfully followed this tutorial). To create a virtual environment for your new user, you would have to:
1. Switch to that user.
2. Ensure their
.bashrc
file is updated correctly.3. Create a new virtual environment.
4. Install NumPy.
5. Sym-link in the OpenCV bindings.
Again, another option would be to use the already existing virtual environment for user A for user B as well (this might involve changing permissions though, I’ve never directly tried this).
Dominik
Hello Adrian!
Thanks a lot for this Tutorial!
But i’ve got a problem.
In the shell after workon cv etc.. all works fine like in this tutorial.
But if i set the Python SDK on usr/bin/python3.4 I`m not able to do “import cv2”.
It works fine in shell but my IDE (IntelliJ -Python Plugin) marks it red with “no module named cv2”.
Can u help?
Best,
Dominik
Adrian Rosebrock
I’m not an IntelliJ user, but it sounds like you need to set the Python interpreter for your project to be the virtual environment. I demonstrate how to do this with PyCharm here. I imagine a similar solution exists for IntelliJ.
Saul Spatz
Hi Adrian,
I followed your instructions, and successfully installed open CV 3.2.0 on Yosemite 10.10.5. However, I then learned that I need `ffmpeg` support, so I installed `ffmpeg` with Homebrew, and then tried to rebuild openCV, but it failed because of undefined symbols in `freetype`. I then tried to build openCV again without `ffmpeg`, but it failed with the same errors [This gist] (https://gist.github.com/saulspatz/73a8949deca50383d7961ae061d26416) shows the `cmake` command and the error messages. Perhaps I should note that I always ran `make clean` between build attempts.
I ran `nm freetype.cpp.o` and those symbols are undefined all right, but I was able to install openCV 3.2.0 on Ubuntu 16.04 (with `ffmpeg`) by following your instructions, and I see that the same symbols are undefined in `freetype.cpp.o` so the linker must be finding them in another file.
Before installing `ffmpeg`, I ran `brew upgrade` and I noticed that it upgraded `freetype`, so this may be the source of the problem, but I have have no clue what the problem is. Unfortunately, I don’t have much knowledge of makefiles this complex, so I don’t know what to look at next. How can I get more verbose output from the make process? I’d like to see what the `ld` command is. I’m guessing that when Homebrew upgraded `freetype`, it downloaded a prebuilt binary instead of building from source, so that some object file needed for the build is missing. If that’s the case, I still wouldn’t know what to do about it, but at least, I’d know what to google.
I really need openCV on the Mac. The Ubuntu installation is just a temporary stopgap. I will appreciate any advice you can give me.
P.S. I hope I’ve addressed the formatting problems this time. It would help klutzes like me if the site displayed previews of replies, but I don’t know how to accomplish that.
Adrian Rosebrock
Hey Saul — unfortunately without direct access to your machine I’m not sure what the exact error may be. I personally don’t use FFMPEG so I’m a bit unfamiliar with the intricacies it may introduce to the FFMPEG compile. While less than ideal, I would suggest re-installing Yosemite and then following the instructions from the very beginning. This will ensure you have a fresh machine to work on with no previous libraries causing problems.
nicoteiz
Hi Adrian! Can I use the same installation of openCV 3.1 for both python2 and python3? Y am using it with no problem, after installing the 3.1 version of opencv using your tutorial for python 2.7.
I tried just doing the last steps of symlinking to the other installation, but it seems not to work.
Do I have to do the whole installation again to be able to use it with python3?
Adrian Rosebrock
No, Python 2.7 and Python 3 are separate Python versions and therefore have separate interpreters and libraries. You will need to compile OpenCV twice — once for Python 2.7 and then for Python 3, taking care to copy the
cv2.so
file to the respectivesite-packages
directory for your Python versions.Kati
Hi Adrian! I followed your instruction but I had a problem at line:
~$ sudo python3 get-pip.py
because it gives me:
sudo: python3: command not found
I’m using Ubuntu 12.04 LTS with python 2.7.3. Do I have to install python3.4 before starting to install OpenCv?
Thanks!
Adrian Rosebrock
This tutorial is intended for Ubuntu 14.04, so if you’re using a prior version of Ubuntu you will need to install Python 3 on your system.
Kati
Hi Adrian! I solved the problem found yesterday by installing Ubuntu 14.04.
Now I have followed your great tutorial and i reached the end! 🙂
But I have a little problem… when I import cv2, it gives me:
Traceback (most recent call last):
File “”, line 1, in
ImportError: No module named ‘cv2’
Even another guy had a similar error (Chetan on July 31, 2015) but I followed your suggestion to him and I can’t resolve the problem.
But I try to look in the directory, as you’ve done, with
~/.virtualenvs/cv/lib/python3.4/site-packages ls
and, while for you cv2.so is sky blue, for me it is red!
Why? Could it be this the problem?
Thanks a lot!
Adrian Rosebrock
If the
cv2.so
file is red, then your sym-link is pointing to a file that doesn’t exist. Locate yourcv2.so
file on disk, then re-create the sym-link so that it points to the valid file path.Abdul Rahman Dabbour
Hello! I encountered the same problem, then I found myself to have made the mistake of not running this step earlier:
sudo make install
in the ~/opencv/build folder
I hope this helps!
BTW, thank you very much Mr. Rosebrock!
Joe
Thank you very much for this extensive tutorial. Works perfectly fine with current versions. OpenCV 3.2.0 installed fine with Python 3.5 on Ubuntu 16.04.2, I just modified the version numbers from your tutorial. Also I didn’t set -D INSTALL_C_EXAMPLES=OFF in step three and the compilation worked flawlessly. The bug in OpenCV 3.1.0 seems to have been fixed in 3.2.0.
🙂
Adrian Rosebrock
Thanks for sharing Joe! And congrats on getting OpenCV installed!
sheikha
I already installed opencv , but now only i realised that it only works in python 2.7 . When i run it in python 3 it shows error that ” no module named cv2″ but i need it in python3 . So should i follow ur steps without uninstalling the already existing opencv ? please help
Adrian Rosebrock
You don’t need to uninstall OpenCV, simply re-run CMake from within a Python 3 virtual environment. Re-compile. And then re-install. From there you’ll be good to go.
Claudio
Hi! Thanks for everything! Little question, I’ve got the same problem as sheikha, but my virtual environment doesn’t work, how can I open the “~/.bashrc” file to change it like indicated in step 1?
Cheers
Adrian Rosebrock
You can use your favorite text editor to edit
~/.bashrc
. For beginners, I would suggest using nano:$ nano ~/.bashrc
Vanshergzie
I’ve been having much problems on installation and compilation of opencv and python3 opencv on my system. But with this tutorial, I found it much easier. Danke
Adrian Rosebrock
Congrats on getting OpenCV installed Vanshergzie, nice job!
Faakhir Inam
Hi!
I am running into a little problem when I run the following code,
$ make -j4
I get a fatal error: stdlib.h: No such file or directory
After this the program terminates. Can you please help me out?
Adrian Rosebrock
I would make sure you have installed the “build-essentials” package. Don’t forget this line at the top of the tutorial:
$ sudo apt-get install build-essential cmake git pkg-config
Milan
Thank you so much . Finally I am able to set up openCV . Finally up and running 🙂
Adrian Rosebrock
Nice job Milan, congrats!
Omer Faruk BULBUL
Thanks a lot. Saved a lot of time
Adrian Rosebrock
Congrats on getting OpenCV installed Omer.
Rebecca
Hi Adrian,
Fantastic tutorial, thank you so much! I am only stuck on the last bit, and I think it is because I have previously installed Anaconda on my computer. When running in python import cv2 I get the following response:
ImportError: /home/una/anaconda3/lib/libstdc++.so.6: version `GLIBCXX_3.4.21′ not found (required by /home/una/.virtualenvs/cv/lib/python3.5/site-packages/cv2.so)
Can you help me fix this?
Thanks again,
Rebecca
Adrian Rosebrock
Hi Rebecca — it sounds like OpenCV might have been compiled against a different OpenCV version than the one you are trying to import it into. Double-check your CMake paths or try on a fresh install without Anaconda.
Claudio F
Hi Adrian. I followed your tutorial with python3.6.1 that has been installed from source just before. Every step of your tutorial worked, except the one where python3.6-dev should be installed. I get an error saying:
E: Unable to locate package python3.6-dev
E: Couldn’t find any package by regex ‘python3.6-dev’
do you have any idea what the problem is? with python 3.4 everything workes just fine…
thanks for your help
Adrian Rosebrock
Try updating your apt-get packages:
$ sudo apt-get update
And then continuing.
Andrei
Awesome instructions. Thanks!
Just in case someone has similar issues like I had …
I had issues with building OpenCV for Python because of my Anaconda install. Anaconda installation appended another Python source to the $PATH environmental variable. Because of that I was not getting the output you’ve shown in Figure 3, as the required packages were not found. After I removed the culprit from the $PATH variable, could follow the rest of the steps successfully.
Adrian Rosebrock
Thank you for sharing Andrei!
Umair
Sir provide me the source code in opencv python for fingerprint recognition ,,,,, i have lots of problems ,,,, i will be really thankfull to u for this kind act
Vladislav Rishe
For those, who are bumping into:
ImportError: libopencv_core.so.3.2: cannot enable executable stack as shared object requires: Invalid argument
under `Bash on Ubuntu on Windows` when it’s to make
import cv2
, I would recommend doing the following:$ sudo apt-get execstack
$ sudo execstack -c /usr/local/lib/libopencv_*
After doing this it should get back to normal. At least I was able to perform some basic operations with Open CV.
Thanks for such a detailed tutorial, Adrian!
Vladislav Rishe
One small correction: `$ sudo apt-get install execstack`, sure.
Adrian Rosebrock
Thank you for sharing, Vladislav!
Keags
Thanks for sharing!
During installation, i came across issues with missing OpenEXR header files. If anyone else faces this issue please take a look in /usr/include/OpenEXR and move the missing headers to /usr/local/include/OpenEXR.
Adrian Rosebrock
Thanks for sharing, Keags!
Shivam Garg
hi!
i completed the installation without any errors.
but i can’t import opencv using “import cv2”.
it shows the import error:no module named cv2.
Adrian Rosebrock
There are many reasons why you may run into import errors. Take a look at this blog post, specifically the “Troubleshooting” section as I detail the main reasons you may get an import error related to the “cv2” bindings.
Eugene
You should add –system-site-packages key to mkvirtualenv, I think. Because it took couple of hours for me to get why I can import numpy in default system but can’t int cv virtual environment that created by mkvirtualenv.
Adrian Rosebrock
Hi Eugene — I actually don’t recommend using the system wide
site-packages
directory. It sounds like you may have forgotten to install NumPy into your “cv” Python virtual environment:Joe Matusik
Hi Adrian,
Just wanted to say thanks for this guide. I was able to use your process to build a docker image with python 3.6.3, opencv 3.3.1 and opencv_contrib 3.3.1.
I’m an OpenCV noob so I can’t tell if everything is 100%, but the SIFT/SURFT example with test_image.jpg work with no errors or warnings.
Thanks!
Adrian Rosebrock
If the SIFT/SURF example is working then you have OpenCV installed with all the extras. Congrats on getting OpenCV installed!
Monojit Sarkar
Sir, I can import cv2 in my terminal, but not in my python idle.
How can I import cv2 in my python idle?
Adrian Rosebrock
The GUI version of IDLE does not respect Python virtual environments. If you want an IDLE-like environment I suggest installing Jupyter Notebooks inside your Python virtual environment (Jupyter Notebooks are superior to IDLE).
someone
Thank you, I followed your tutorial and got opencv+python3 working on my rPI zero!
Adrian Rosebrock
Congrats on getting OpenCV installed!
hong
Thank you sir, i have a question. I installed opencv through this post completely. but i need downgrade of opencv. so i want to re-build or remove cv, and i removed ‘build’ directory…..and attempt to
– pip uninstall
– sudo apt-get purge libopencv-* python-data python-opencv
but opencv don’t appear in pip list and although seems like success delete by apt-get purge, still possible ‘import cv2’ in python 🙁
how can i delete cv2 or re-build???
thank you for reading. please understand i don’t speak english well
Adrian Rosebrock
Hey Hong — OpenCV will not appear in the “pip” list. I’m not sure how you installed or uninstalled OpenCV on your system so if at all possible I would recommend re-installing Ubuntu on your system and installing OpenCV from scratch. This is the best method to ensure you follow the tutorial without error.
Pams
It has been a good tutorial, I used it! , but now I would like to change the version to opencv 3.3, what do I have to do? Thank you
Adrian Rosebrock
You will need to recompile + reinstall OpenCV using the OpenCV 3.3 source code. If you would like to keep your original environment you will need to create a new Python virtual environment before compiling + installing:
$ mkvirtualenv cv33
Kirprajay
Has anyone tried installing opencv3 with python3 on Ubuntu 18.04? I am really excited.
Adrian Rosebrock
The OpenCV + Ubuntu install method in this post will work with just a few changes to Ubuntu 18.04. I will be posting a new OpenCV + Ubuntu 18.04 install tutorial in the next 1-2 months.
Suhas Patil
Even though I’m new to Ubuntu, I was able to install Python and Open CV. It was seamless.
Thanks Adrian for step by step description.
I’m also interested in installing Machine Learning package. (scikit-learn) so that I can try out some projects that will be combination of image processing and machine learning. Could you please guide me with that?
Suhas Patil
Thank you Adrian…I’m able to install machine learning and other packages like numpy, scikit-image using this link:
https://pyimagesearch.com/2015/08/17/the-perfect-computer-vision-environment-pycharm-opencv-and-python-virtual-environments/
This link also has description for setting up PyCharm environment.
Adrian Rosebrock
Congrats on getting OpenCV + Python installed on your Ubuntu machine, Suhas! Great job 🙂
I have a number of OPenCV + scikit-learn tutorials here on PyImageSearch. This one on simple image classification would be a great start for you. I also like this one on Local Binary Patterns.
I would also recommend working through both Practical Python and OpenCV and the PyImageSearch Gurus course where I have many examples on image classification using machine learning and scikit-learn.
Micale
Hi ,Adrian .I have a question, in my ubuntu,i have use both python2 and python3,how can i install opencv for both python2 and python3 at the same time.Thanks.
Adrian Rosebrock
You will need to perform two compiles:
1. One for Python 2
2. And another for Python 3
Shubhayu
How is this process different from a pip install.
Particularly… pip3 install opencv-python
Adrian Rosebrock
Using just “opencv-python” will not give you the full install of OpenCV. It leaves out the “contrib” package. If you wanted to use pip then the package name would be “opencv-contrib-python”
Oscar Mejia
Hi Adrian, thanks for this tutorial!
I have been trying to follow the instructions but the cv2 library was not installed. I mean, I cannot find this file cv2.cpython-34m.so. I don’t know why the result swhow in the figure 3 no match with my result.
“Figure 3: It’s a good idea to inspect the output of CMake to ensure the proper Python 3 interpreter, libraries, etc. have been picked up.”
Thanks in advance.
Adrian Rosebrock
Hey Oscar — are you in the “cv” Python virtual environment? Make sure you are prior to executing “cmake”.
Oscar Mejia
Hey Adrian, thanks a lot for your time. It was my mistake, I was trying to follow the steps for Ubuntu but I needed install in raspberry with Raspbian stretch.
So, I installed the Opencv library following this tutorial:
https://pyimagesearch.com/2017/09/04/raspbian-stretch-install-opencv-3-python-on-your-raspberry-pi/
And it works for me. Thanks again for your time and support with these tutorials.
Have a good day!
Adrian Rosebrock
Congrats on getting OpenCV installed on your Pi, Oscar!
Akaaniyan
im not able to use surf and sift though the procedure seem to have included contrib packages
Adrian Rosebrock
Make sure you follow my most recent OpenCV + Ubuntu install guide — it will help you install OpenCV 4 with the contrib module enabled.
Haruo
Hi Adrain, I have successfully installed openCV 3.4.2 by following the exact same steps given in your tutorial.
Now, I would like to update to openCV 4 or the latest stable version. Do I need to uninstall 3.4.2 first? If so, how should I uninstall it. I am a novice in Ubuntu and python environment.
Thanks for your contribution.
Adrian Rosebrock
No, you don’t need to uninstall OpenCV 3.4.2. You can compile and install OpenCV 4.