Table of Contents
- Run an Apache Airflow DAG with Docker Compose and PostgreSQL
- Project Structure
- PDF Parsing and Text Chunking Logic for Airflow DAG
- Docker Orchestration and Runtime for Airflow and FastAPI
- Running the Apache Airflow and FastAPI Document Ingestion Pipeline
- Triggering and Monitoring Apache Airflow DAGs
- Verifying Document and Chunk Data in PostgreSQL
- Error Handling and Failure Recovery in Airflow Pipeline
- Design Principles: Idempotency, Observability, and Reproducibility in Airflow Pipelines
- Limits of Apache Airflow for Machine Learning Workloads
- Summary
Run an Apache Airflow DAG with Docker Compose and PostgreSQL
In Lesson 1, we designed a production-grade document ingestion pipeline using FastAPI, Apache Airflow, and PostgreSQL. We defined the data model, built an idempotent 5-task DAG, structured our project for separation of concerns, and established the architectural principles that make the system reliable.
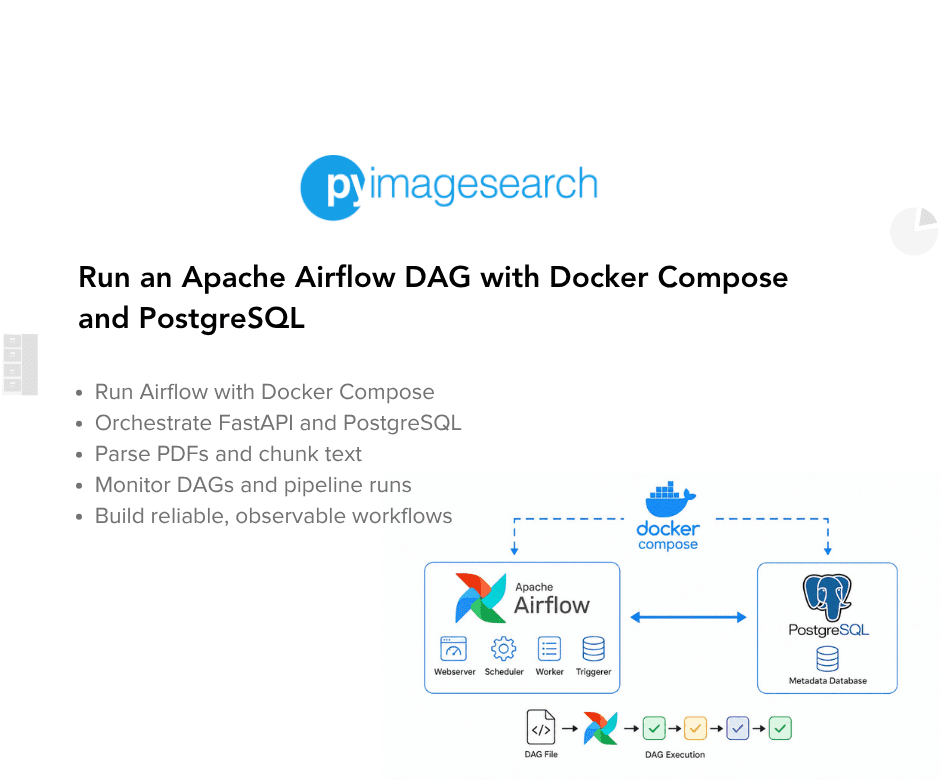
Now, in Lesson 2, we bring that architecture to life.
In this lesson, you will operationalize the ingestion pipeline by running it inside Docker, uploading real documents, triggering DAG runs, inspecting logs, and validating results directly in PostgreSQL. You will also explore failure scenarios, observability patterns, and the practical limits of using Airflow for ML-style workloads.
By the end of this lesson, you will not only understand how the pipeline works, but how to run it, debug it, monitor it, and reason about its behavior in production.
This lesson is the last in a 2-part series on building production-grade document ingestion pipelines for RAG systems:
- Apache Airflow Document Ingestion Pipeline for RAG Systems
- Run an Apache Airflow DAG with Docker Compose and PostgreSQL (this tutorial)
To learn how to deploy, execute, monitor, and validate a production-ready ingestion pipeline with Apache Airflow, just keep reading.
Would you like immediate access to 3,457 images curated and labeled with hand gestures to train, explore, and experiment with … for free? Head over to Roboflow and get a free account to grab these hand gesture images.
Need Help Configuring Your Development Environment?

All that said, are you:
- Short on time?
- Learning on your employer’s administratively locked system?
- Wanting to skip the hassle of fighting with the command line, package managers, and virtual environments?
- Ready to run the code immediately on your Windows, macOS, or Linux system?
Then join PyImageSearch University today!
Gain access to Jupyter Notebooks for this tutorial and other PyImageSearch guides pre-configured to run on Google Colab’s ecosystem right in your web browser! No installation required.
And best of all, these Jupyter Notebooks will run on Windows, macOS, and Linux!
Project Structure
In Lesson 1, we focused on architectural boundaries. Now we look at the same structure through a runtime lens: what runs where, and what each container actually executes.
├── airflow_project/        # Orchestration + runtime layer
│   ├── dags/              # Airflow DAG definitions
│   │   └── ingest_documents_dag.py  # Main DAG: PDF → chunks pipeline
│   │
│   ├── ingestion_service/ # FastAPI REST API for file uploads
│   │   ├── __init__.py
│   │   ├── main.py      # Upload endpoint with deduplication
│   │   └── requirements.txt  # FastAPI + Uvicorn dependencies
│   │
│   ├── docker-compose.yml  # Defines Postgres, Airflow, API services
│   ├── Dockerfile               # Airflow container image
│   ├── Dockerfile.service   # FastAPI service container image
│   └── init-db.sh              # PostgreSQL database initialization script
│
├── shared/      # Reusable business logic (no Airflow deps)
│   ├── data_models/ # Pydantic schemas (API validation layer)
│   │   ├── __init__.py
│   │   └── models.py  # Document, Chunk, PipelineRun schemas
│   │
│   ├── parsing/                # Document processing logic
│   │   ├── __init__.py
│   │   ├── pdf_parser.py # PyPDF text extraction (page-level)
│   │   ├── chunker.py    # Sliding window text chunking
│   │   └── deduplication.py # Content hash comparison utilities
│   │
│   ├── storage/            # Database interaction layer
│   │   ├── __init__.py
│   │   ├── database.py     # SQLAlchemy session management
│   │   └── models.py       # ORM models (tables definition)
│   │
│   ├── utils/               # Low-level helpers
│   │   ├── __init__.py
│   │   ├── hashing.py      # SHA-256 file & text hashing
│   │   └── logging.py      # Structured logging utilities
│   │
│   ├── __init__.py
│   └── requirements.txt  # Shared dependencies (SQLAlchemy, PyPDF, etc.)
When you run:
docker compose up --build
This structure turns into 5 running services.
What Runs Inside Each Container
Airflow Webserver and Scheduler
- Load DAGs from
dags/ - Import parsing and storage logic from
shared/ - Connect to PostgreSQL
- Read uploaded files from the shared volume
Ingestion Service
- Runs
main.py - Accepts PDF uploads
- Writes files into
/tmp/ml_orchestration/uploads - Inserts rows into PostgreSQL
PostgreSQL
- Stores Airflow metadata
- Stores
documents,chunks, andpipeline_runs
Why shared/ Is Mounted Everywhere
Both the Airflow containers and the ingestion service mount the shared/ directory.
This guarantees:
- The API and DAG use identical parsing logic
- Hashing behaves consistently
- Database models stay synchronized
No duplicated code.
No version drift.
The Shared Upload Volume
The /tmp/ml_orchestration/uploads volume is mounted into both:
- ingestion-service
- airflow containers
This is critical.
The API writes files.
Airflow reads the same files directly from disk.
There is no file transfer, no API polling, and no network hop.
This design eliminates an entire class of distributed file consistency problems.
Why This Matters in Practice
At runtime:
- The API handles fast, user-facing work.
- Airflow handles scheduled, asynchronous work.
- PostgreSQL persists state.
- The shared module ensures consistency.
- Docker isolates everything into reproducible containers.
Lesson 1 taught you how the system is designed.
Lesson 2 shows you how that design behaves when executed.
PDF Parsing and Text Chunking Logic for Airflow DAG
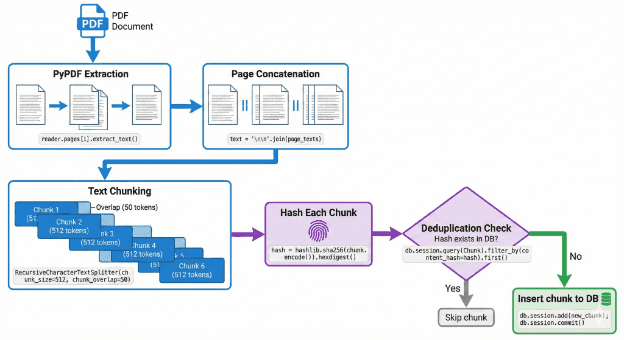
The DAG calls functions like parse_pdf() and chunk_text(), but these are not defined in the DAG file. They live in shared/parsing/ where both Airflow and future Argo Workflows can use them. Figure 1 shows the chunking pipeline.
Here is the PDF parsing code from shared/parsing/pdf_parser.py:
def parse_pdf(file_path: str) -> List[dict]:
    """
    Parse a PDF file and extract text page by page.

    Args:
        file_path: Path to PDF file

    Returns:
        List of dictionaries with page_number and text
    """
    logger.info(f"Parsing PDF: {file_path}")

    if not os.path.exists(file_path):
        raise FileNotFoundError(f"PDF file not found: {file_path}")

    try:
        reader = PdfReader(file_path)
        pages = []

        for i, page in enumerate(reader.pages):
            text = page.extract_text()
            metadata = reader.metadata or {}

            pages.append({
                'page_number': i + 1,
                'text': text,
                'metadata': {
                    'title': metadata.get('/Title', ''),
                    'author': metadata.get('/Author', ''),
                    'total_pages': len(reader.pages)
                }
            })

        logger.info(f"Extracted {len(pages)} pages from PDF")
        return pages

    except Exception as e:
        logger.error(f"Failed to parse PDF {file_path}: {str(e)}")
        raise
This function uses PyPDF’s PdfReader to load the PDF. It iterates over each page, calls extract_text(), and bundles the text with page metadata. The result is a list of dictionaries, one per page.
Notice we extract metadata like title and author if available. This can be useful for citations or provenance tracking later. We also include the total page count so downstream tasks know if they have partial data.
The error handling re-raises exceptions after logging. This ensures failures propagate to Airflow where they can trigger retries or mark the document as failed.
Here is the chunking code from shared/parsing/chunker.py:
def chunk_text(
    text: str,
    chunk_size: int = 512,
    overlap: int = 50,
    min_chunk_size: int = 100
) -> List[str]:
    """
    Split text into overlapping chunks.

    Args:
        text: Input text to chunk
        chunk_size: Target size in words (approximate token proxy)
        overlap: Number of overlapping words between chunks
        min_chunk_size: Minimum chunk size in words (discard smaller)

    Returns:
        List of text chunks
    """
    logger.info(f"Chunking text: {len(text)} chars, chunk_size={chunk_size}, overlap={overlap}")

    words = text.split()  # Simple whitespace splitting (production would use proper tokenizers)
    chunks = []
    start = 0

    while start < len(words):
        end = min(start + chunk_size, len(words))
        chunk_words = words[start:end]
        chunk = ' '.join(chunk_words)

        if len(chunk_words) >= min_chunk_size:
            chunks.append(chunk)

        start += (chunk_size - overlap)

    logger.info(f"Created {len(chunks)} chunks")
    return chunks
This function uses a sliding window approach — imagine sliding a frame across a long document, capturing a portion of text, then sliding forward while keeping some overlap with the previous frame.
We split the text into words using whitespace (production systems would use proper tokenizers like tiktoken, but whitespace splitting works as a reasonable approximation). We extract a window of chunk_size words, join them back into a string, and add to the chunks list. Then we slide the window forward by chunk_size - overlap words to create the next chunk.
The overlap is critical for retrieval quality. If an important sentence or concept spans a chunk boundary, the overlap ensures it appears in full within at least one chunk. Without overlap, you might split a key phrase across two chunks and miss it during semantic search.
We also have a min_chunk_size parameter. Very small chunks (just a few words) usually lack enough context to be semantically meaningful, so we discard them.
Here is the content hashing code from shared/utils/hashing.py:
def hash_content(content: str) -> str:
    """
    Compute SHA-256 hash of text content.

    Args:
        content: Text to hash

    Returns:
        Hexadecimal hash string
    """
    return hashlib.sha256(content.encode('utf-8')).hexdigest()


def hash_file(file_path: str) -> str:
    """
    Compute SHA-256 hash of file content.

    Args:
        file_path: Path to file

    Returns:
        Hexadecimal hash string
    """
    hash_obj = hashlib.sha256()

    with open(file_path, 'rb') as f:
        for chunk in iter(lambda: f.read(4096), b''):
            hash_obj.update(chunk)

    return hash_obj.hexdigest()
The hash_content() function encodes text as UTF-8 bytes and computes its SHA-256 hash. The hash_file() function reads a file in 4KB chunks (to handle large files without loading them entirely into memory) and computes the cumulative hash.
These hashes are what enable deduplication. Two identical chunks will always produce the same hash, so we can check for existence in the database before inserting.
Why Sharing This Logic Matters
By putting parsing and chunking in shared/, we ensure consistency across different orchestration systems. When we introduce Argo Workflows in a future lesson, it will use the exact same parse_pdf() and chunk_text() functions. This means documents processed by Airflow and documents processed by Argo will have identical chunk boundaries, identical hashes, and identical behavior.
This is critical for systems where you might migrate from one orchestrator to another or run hybrid setups.
Now let’s see how this all runs in Docker.
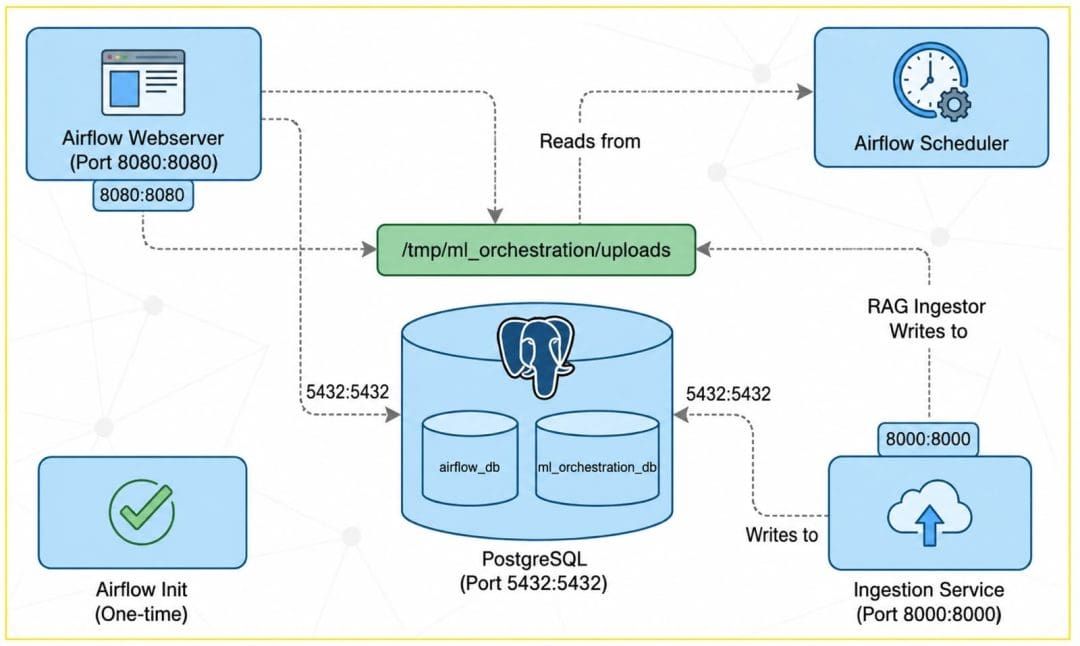
Docker Orchestration and Runtime for Airflow and FastAPI
We have examined the code. Now let’s see how Docker brings it all together. Figure 2 shows the container topology.
Here is the complete docker-compose.yml:
version: '3.8'

x-airflow-common:
  &airflow-common
  image: apache/airflow:2.7.3-python3.11
  environment:
    &airflow-common-env
    AIRFLOW__CORE__EXECUTOR: LocalExecutor
    AIRFLOW__DATABASE__SQL_ALCHEMY_CONN: postgresql+psycopg2://airflow:airflow@postgres/airflow
    AIRFLOW__CORE__FERNET_KEY: ''
    AIRFLOW__CORE__DAGS_ARE_PAUSED_AT_CREATION: 'false'
    AIRFLOW__CORE__LOAD_EXAMPLES: 'false'
    AIRFLOW__API__AUTH_BACKENDS: 'airflow.api.auth.backend.basic_auth,airflow.api.auth.backend.session'
    PYTHONPATH: /opt/airflow/shared
    ML_ORCHESTRATION_DB_URI: postgresql://mlops:mlops_password@postgres:5432/ml_orchestration
  volumes:
    - ./dags:/opt/airflow/dags
    - ./logs:/opt/airflow/logs
    - ./plugins:/opt/airflow/plugins
    - ../shared:/opt/airflow/shared
    - /tmp/ml_orchestration/uploads:/tmp/ml_orchestration/uploads
  user: "${AIRFLOW_UID:-50000}:0"
  depends_on:
    &airflow-common-depends-on
    postgres:
      condition: service_healthy

services:
  postgres:
    image: postgres:15
    environment:
      POSTGRES_USER: airflow
      POSTGRES_PASSWORD: airflow
      POSTGRES_DB: airflow
    volumes:
      - postgres-db-volume:/var/lib/postgresql/data
      - ./init-db.sh:/docker-entrypoint-initdb.d/init-db.sh
    healthcheck:
      test: ["CMD", "pg_isready", "-U", "airflow"]
      interval: 10s
      retries: 5
      start_period: 5s
    ports:
      - "5432:5432"

  airflow-webserver:
    <<: *airflow-common
    command: webserver
    ports:
      - "8080:8080"
    healthcheck:
      test: ["CMD", "curl", "--fail", "http://localhost:8080/health"]
      interval: 30s
      timeout: 10s
      retries: 5
      start_period: 30s
    restart: always

  airflow-scheduler:
    <<: *airflow-common
    command: scheduler
    healthcheck:
      test: ["CMD", "curl", "--fail", "http://localhost:8974/health"]
      interval: 30s
      timeout: 10s
      retries: 5
      start_period: 30s
    restart: always

  airflow-init:
    <<: *airflow-common
    entrypoint: /bin/bash
    command:
      - -c
      - |
        airflow db init
        airflow users create \
          --username admin \
          --firstname Admin \
          --lastname User \
          --role Admin \
          --email admin@example.com \
          --password admin
    environment:
      <<: *airflow-common-env
      _AIRFLOW_DB_UPGRADE: 'true'
      _AIRFLOW_WWW_USER_CREATE: 'true'
    user: "0:0"

  ingestion-service:
    build:
      context: .
      dockerfile: Dockerfile.service
    ports:
      - "8000:8000"
    environment:
      ML_ORCHESTRATION_DB_URI: postgresql://mlops:mlops_password@postgres:5432/ml_orchestration
      UPLOAD_DIR: /tmp/ml_orchestration/uploads
    volumes:
      - ./ingestion_service:/app/ingestion_service
      - ../shared:/app/shared
      - /tmp/ml_orchestration/uploads:/tmp/ml_orchestration/uploads
    depends_on:
      postgres:
        condition: service_healthy
    restart: always

volumes:
  postgres-db-volume:
  /tmp/ml_orchestration/uploads:
Let us break down the key parts.
The x-airflow-common anchor (starting with &) defines configuration shared by all Airflow containers. This is a YAML feature that lets us avoid repeating the same settings. The <<: *airflow-common syntax merges that configuration into each service.
Environment Variables
The AIRFLOW__CORE__EXECUTOR: LocalExecutor runs tasks in separate processes on the same machine (unlike SequentialExecutor which runs one task at a time, or CeleryExecutor which distributes across workers). Perfect for development and moderate workloads.
The AIRFLOW__DATABASE__SQL_ALCHEMY_CONN points to the PostgreSQL container using the service name postgres as the hostname — Docker Compose automatically creates a network where services can reach each other by name.
The PYTHONPATH: /opt/airflow/shared adds the shared module to Python’s import path, allowing the DAG to import from shared.storage, shared.parsing, etc. Without this, imports would fail.
The ML_ORCHESTRATION_DB_URI connects to our application database (ml_orchestration), which is separate from Airflow’s metadata database.
Volume Configuration
Volumes mount local directories into containers. The ./dags:/opt/airflow/dags mapping makes your local DAG files immediately visible to Airflow — edit locally, see changes in the container.
The critical volume is /tmp/ml_orchestration/uploads:/tmp/ml_orchestration/uploads, which mounts the same directory into both Airflow and the ingestion service. This shared storage lets Airflow read files the ingestion service writes, eliminating the “file not found” errors you would get with isolated containers.
Service Definitions
The postgres service runs PostgreSQL 15. It uses a volume (postgres-db-volume) for persistent storage. Without this volume, restarting the container would erase all data. The init-db.sh script is mounted into /docker-entrypoint-initdb.d/, which PostgreSQL runs automatically on first startup. This creates the ml_orchestration database and mlops user.
The healthcheck tests if PostgreSQL is ready. Other services wait for this health check to pass before starting.
The airflow-webserver service runs the Airflow UI. It inherits all settings from airflow-common and adds a webserver command. It exposes port 8080, which you access in your browser.
The airflow-scheduler service runs the scheduler, which triggers DAG runs according to the schedule interval. This is the component that wakes up every minute and checks if the DAG should run.
The airflow-init service is a one-time initialization container. It runs airflow db init to create Airflow’s metadata tables and airflow users create to set up the admin user. After this completes, the container exits. You do not interact with it after the first startup.
The ingestion-service service runs the FastAPI app. It builds from Dockerfile.service, which installs dependencies and runs uvicorn. It mounts the ingestion service code and shared module. It also mounts the uploads volume so it can write files.
Building the Ingestion Service Container
The Dockerfile.service defines how the FastAPI container is built. Here is the complete file:
# airflow_project/Dockerfile.service
FROM python:3.11-slim

WORKDIR /app

# Copy shared module first
COPY shared/ /app/shared/
RUN pip install --no-cache-dir -r /app/shared/requirements.txt

# Copy service dependencies
COPY airflow_project/ingestion_service/requirements.txt /app/requirements.txt
RUN pip install --no-cache-dir -r /app/requirements.txt

# Copy service code
COPY airflow_project/ingestion_service/ /app/ingestion_service/

# Set Python path to include shared module
ENV PYTHONPATH="/app:/app/shared"

EXPOSE 8000

CMD ["uvicorn", "ingestion_service.main:app", "--host", "0.0.0.0", "--port", "8000"]
This Dockerfile uses a multi-layer approach. First, we copy and install the shared module dependencies. This layer is cached and only rebuilt when shared dependencies change. Then we install the service-specific dependencies. Finally, we copy the application code.
The PYTHONPATH environment variable is critical. It tells Python where to find modules. By including both /app and /app/shared, we can import from both ingestion_service.main and shared.storage.models without issues.
The CMD runs uvicorn, the Asynchronous Server Gateway Interface (ASGI) server for FastAPI. The --host 0.0.0.0 makes the server accessible from outside the container (necessary for Docker port mapping). The --port 8000 matches the port we expose in docker-compose.yml.
Database Initialization Script
The init-db.sh script creates the ml_orchestration database and mlops user when PostgreSQL starts for the first time. Here is the complete script:
#!/bin/bash
# airflow_project/init-db.sh
set -e

# Create additional database and user for ML orchestration
# This script is idempotent - safe to run multiple times
psql -v ON_ERROR_STOP=1 --username "$POSTGRES_USER" --dbname "$POSTGRES_DB" <<-EOSQL
    -- Create database only if it doesn't exist
    SELECT 'CREATE DATABASE ml_orchestration'
    WHERE NOT EXISTS (SELECT FROM pg_database WHERE datname = 'ml_orchestration')\gexec

    -- Create user only if it doesn't exist
    DO
    \$\$
    BEGIN
        IF NOT EXISTS (SELECT FROM pg_catalog.pg_user WHERE usename = 'mlops') THEN
            CREATE USER mlops WITH PASSWORD 'mlops_password';
        END IF;
    END
    \$\$;

    -- Grant privileges (idempotent operation)
    GRANT ALL PRIVILEGES ON DATABASE ml_orchestration TO mlops;

    -- Connect to ml_orchestration and grant schema privileges
    \c ml_orchestration
    GRANT ALL ON SCHEMA public TO mlops;
    ALTER DEFAULT PRIVILEGES IN SCHEMA public GRANT ALL ON TABLES TO mlops;
    ALTER DEFAULT PRIVILEGES IN SCHEMA public GRANT ALL ON SEQUENCES TO mlops;
EOSQL

echo "ML orchestration database setup completed successfully"
This script demonstrates several important PostgreSQL patterns. The set -e command makes the script exit immediately if any command fails, preventing partial setup.
The SELECT 'CREATE DATABASE ...' WHERE NOT EXISTS ... \gexec pattern creates the database only if it does not already exist. This is idempotent — running the script multiple times produces the same result.
The DO $$ ... END $$ block is a PL/pgSQL anonymous code block that checks if the user exists before creating it. Again, this makes the script safe to rerun.
The GRANT ALL PRIVILEGES statements give the mlops user full access to the ml_orchestration database. The ALTER DEFAULT PRIVILEGES commands ensure that future tables and sequences created by any user are automatically accessible to mlops. This prevents permission errors when Airflow creates tables.
The \c ml_orchestration command switches the connection to the newly created database so we can grant schema-level privileges.
This initialization script runs automatically because docker-compose mounts it into /docker-entrypoint-initdb.d/. PostgreSQL executes all scripts in that directory on first startup.
Why This Structure Works
This setup gives us isolated, reproducible environments. Everything runs in containers. There is no “works on my machine” problem. The same docker-compose.yml runs identically on macOS, Linux, and Windows (with Docker Desktop).
The shared uploads volume is the key to inter-service communication. Both Airflow and the ingestion service see the same files. Airflow does not need to call the ingestion API to get files; it just reads from the shared directory.
The dependency management (depends_on with health checks) ensures services start in the correct order. PostgreSQL must be ready before Airflow tries to connect.
Now let’s see how to run this system from scratch.
Running the Apache Airflow and FastAPI Document Ingestion Pipeline
To start the system, open a terminal, navigate to airflow_project/, and run:
docker compose up --build
The --build flag ensures Docker rebuilds images if you changed any code. Docker will pull images, build containers, and start all services. You will see logs streaming from all 5 containers.
After about 30 seconds, you should see messages such as the following:
airflow-init-1         | Admin user admin created
airflow-webserver-1    | Listening at http://0.0.0.0:8080
airflow-scheduler-1    | Starting the scheduler
ingestion-service-1    | INFO:     Uvicorn running on http://0.0.0.0:8000
postgres-1             | database system is ready to accept connections
This means all services are up and healthy.
Verify the Setup
Open your browser and go to:
- Airflow UI:
http://localhost:8080 - Ingestion API Docs:
http://localhost:8000/docs
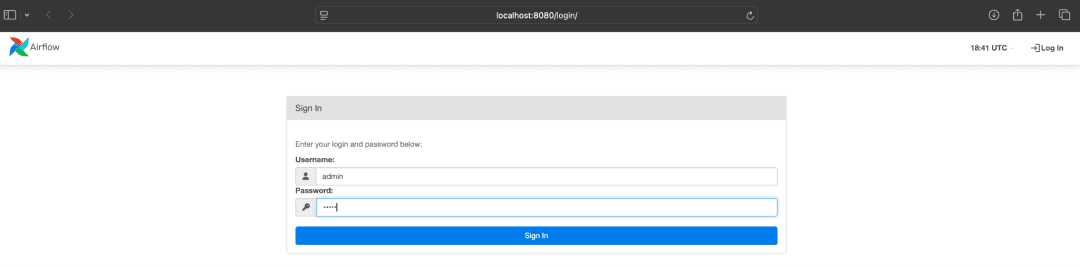
admin and password admin.Log into Airflow with username admin and password admin. You should see the DAGs page.
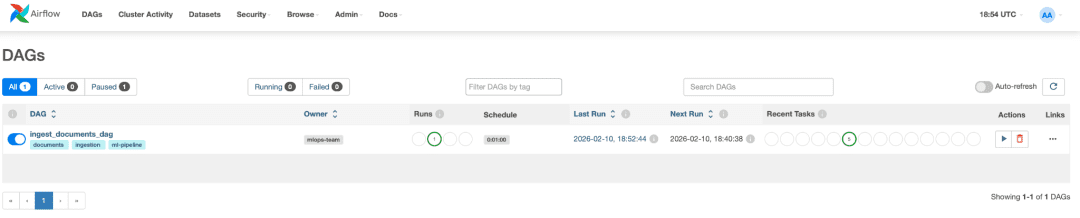
ingest_documents_dag enabled and successfully scheduled every minute.Find the ingest_documents_dag row. Make sure the toggle on the left is enabled (blue or green). This allows the scheduler to run the DAG.
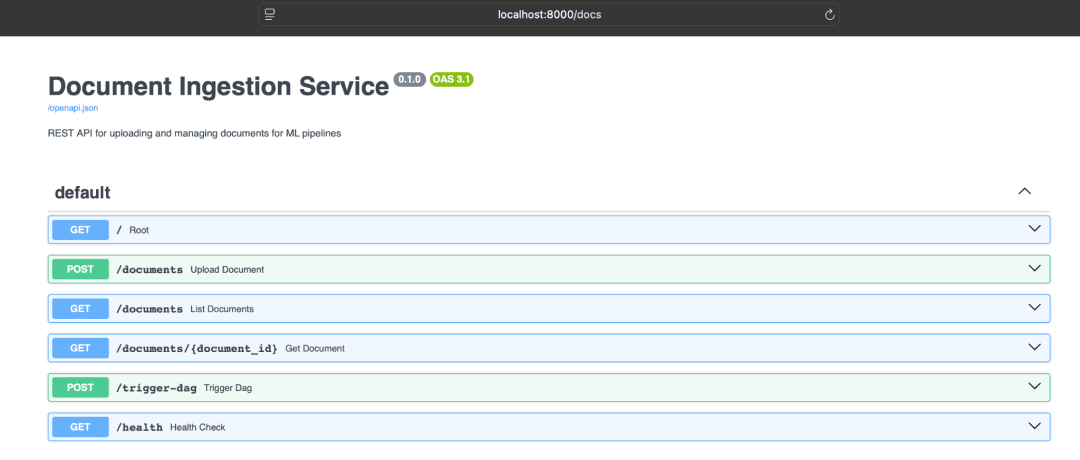
/docs showing the POST /documents endpoint.Go to http://localhost:8000/docs. This is the interactive API documentation powered by Swagger. You should see a green POST box labeled /documents.
If all 3 URLs load successfully, your system is running.
Stopping the System
To stop all containers, press Ctrl+C in the terminal where docker compose up is running. Then run:
docker compose down
This stops and removes containers but preserves volumes (your data persists). If you want to completely reset everything (delete all data), run:
docker compose down -v
The -v flag removes volumes, giving you a fresh start.
Now let us upload a document and trigger the pipeline.
Uploading Documents via the API
The ingestion service exposes a single endpoint: POST /documents. You can call it with curl or use the Swagger UI for convenience. Let us use Swagger for this demo.
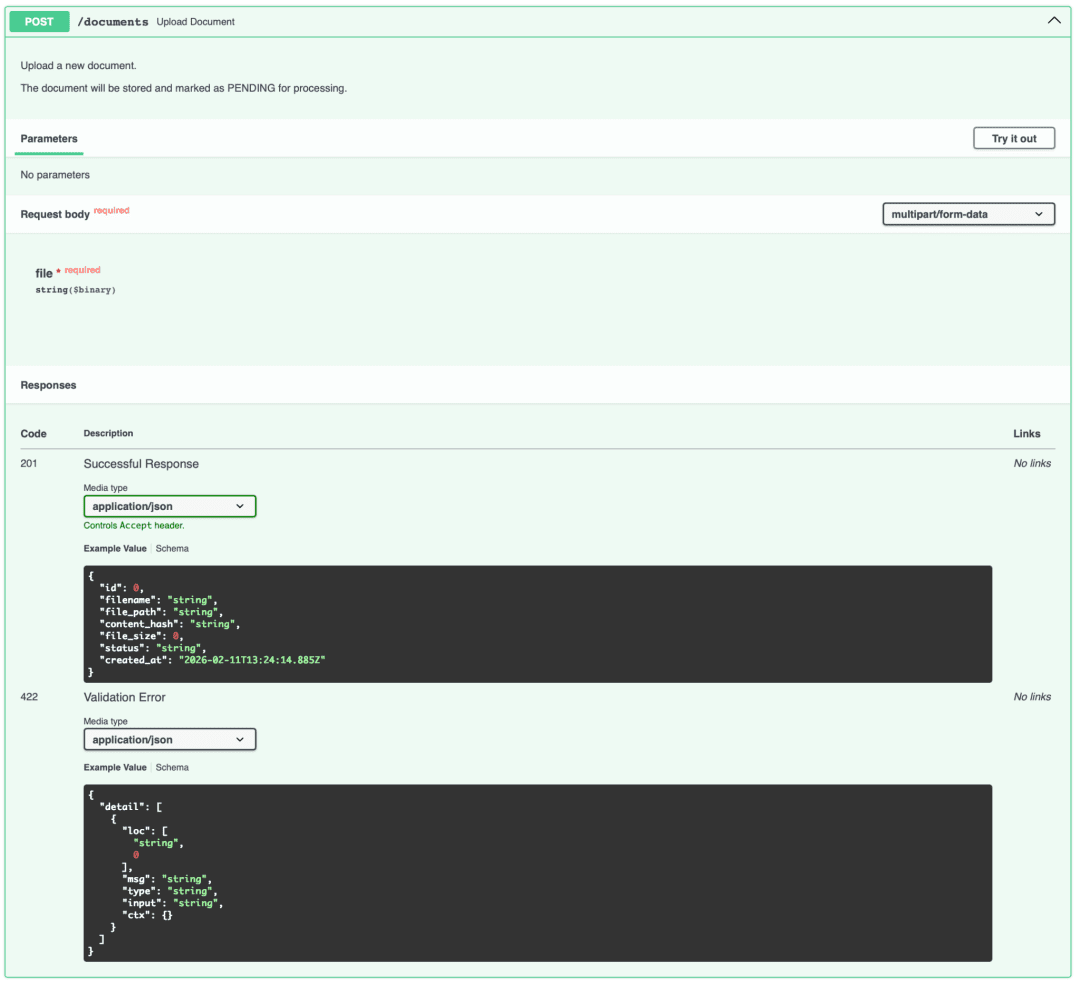
POST /documents endpoint expanded, showing the "Try it out" button and file upload field.In the Swagger UI (http://localhost:8000/docs), click the green POST /documents box to expand it. Click "Try it out" in the top right corner. You should see a file upload field.
Click "Choose File" and select any PDF from your computer. For testing, use a small PDF (a few pages). Click "Execute" to send the request.
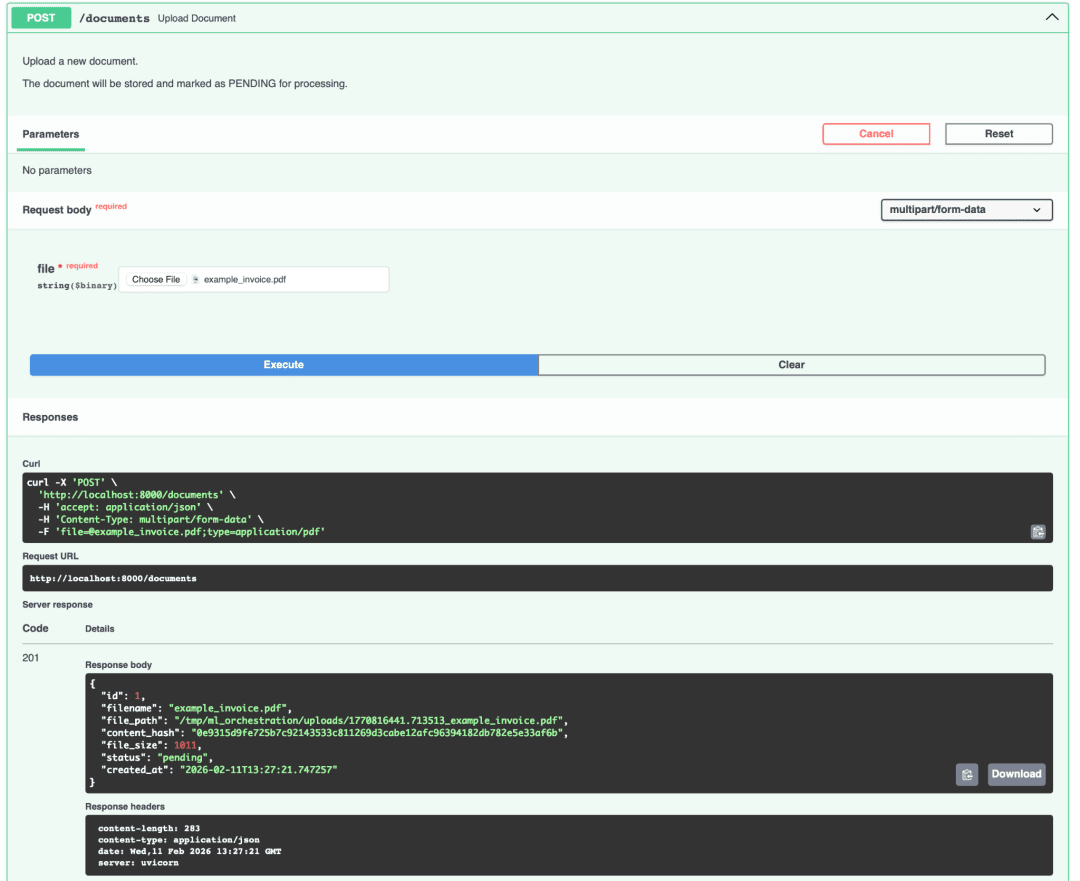
201 Created with the returned document JSON, including id, filename, status: PENDING, and content_hash.You should receive a 201 Created response with JSON similar to the following:
{
  "id": 1,
  "filename": "sample.pdf",
  "file_path": "/tmp/ml_orchestration/uploads/1769421678.801241_sample.pdf",
  "content_hash": "a7f3b2c8d9e1f2a3b4c5d6e7f8a9b0c1d2e3f4a5b6c7d8e9f0a1b2c3d4e5f6a7",
  "file_size": 23456,
  "mime_type": "application/pdf",
  "status": "PENDING",
  "created_at": "2026-01-25T10:30:00",
  "updated_at": "2026-01-25T10:30:00"
}
The important fields are id (1 in this case) and status (PENDING). This document is now in the database waiting for Airflow to process it.
If you upload the same file again, you will get a 409 Conflict error:
{
  "detail": "Document already exists with ID 1"
}
This is the deduplication logic working. The system detected the identical content hash and rejected the duplicate.
Using curl
If you prefer the command line, use curl
curl -X POST "http://localhost:8000/documents" \
  -H "Content-Type: multipart/form-data" \
  -F "file=@/path/to/your/document.pdf"
Replace /path/to/your/document.pdf with the actual path to your PDF.
Now that we have a pending document, let’s see Airflow process it.
Triggering and Monitoring Apache Airflow DAGs
The DAG runs automatically every minute. If you just uploaded a document, wait up to 60 seconds and the scheduler will trigger a run.
Manual Trigger (Optional)
If you do not want to wait, you can manually trigger the DAG. In the Airflow UI, click on ingest_documents_dag to open the DAG detail page.
You should see a graph view with your five tasks connected by arrows. On the top right, click the play button (triangle icon) and select “Trigger DAG”. This starts an immediate run.
Monitoring Execution
The DAG runs page shows all executions. Click on the latest run (top of the list). The status will progress from “running” (yellow) to “success” (green) or “failed” (red).
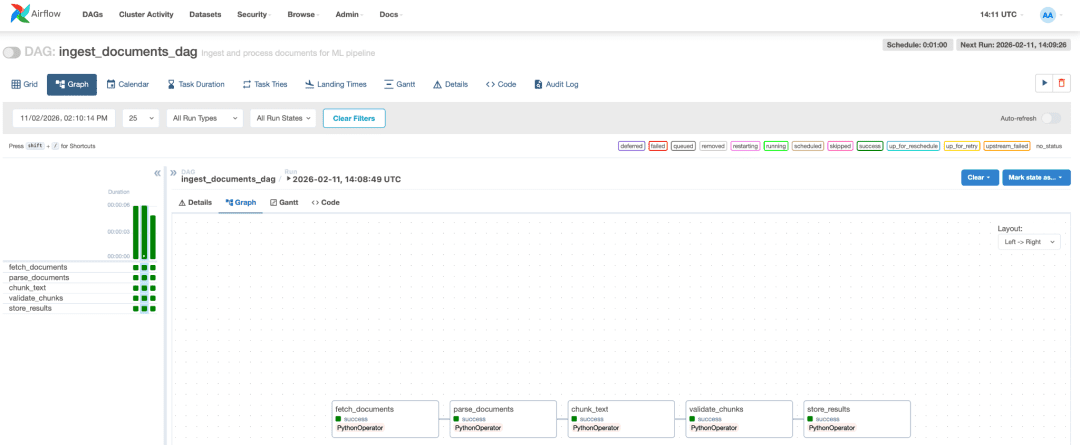
Each task should turn green as it completes. The entire run takes about 10-30 seconds, depending on your PDF size.
Viewing Logs
Click on any task box (e.g., parse_documents). A panel appears on the right. Click “Log” to see the task output.
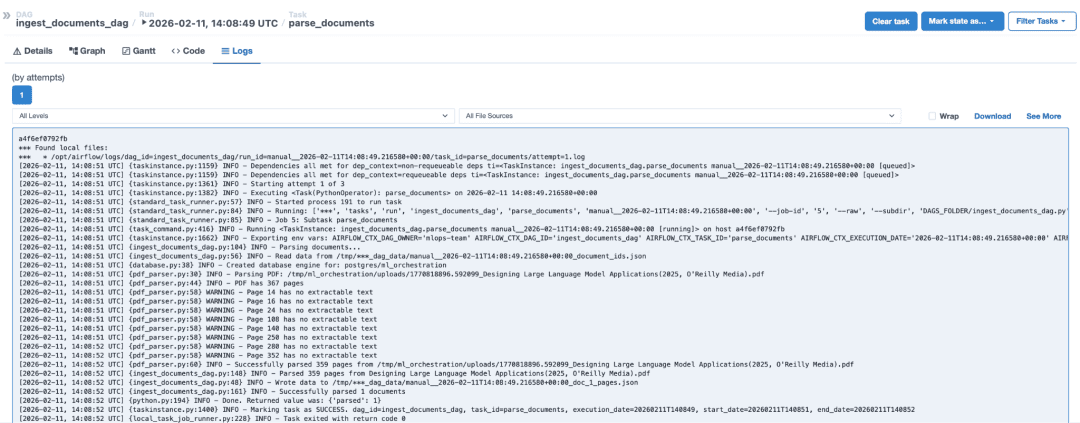
parse_documents, showing PDF parsing, page extraction warnings, and successful completion.You should see log messages similar to the following:
[2026-01-25, 10:31:00 UTC] {ingest_documents_dag.py:234} INFO - Parsing documents...
[2026-01-25, 10:31:00 UTC] {pdf_parser.py:15} INFO - Parsing PDF: /tmp/ml_orchestration/uploads/1769421678.801241_sample.pdf
[2026-01-25, 10:31:01 UTC] {pdf_parser.py:35} INFO - Extracted 5 pages from PDF
[2026-01-25, 10:31:01 UTC] {ingest_documents_dag.py:250} INFO - Parsed 5 pages from sample.pdf
These logs confirm the DAG is working. If a task fails, the log will show the exception and stack trace.
Now let us verify the data was written to the database.
Verifying Document and Chunk Data in PostgreSQL
The DAG writes to 3 tables: documents, chunks, and pipeline_runs. Let us query them to confirm everything worked.
Connect to PostgreSQL
Open a new terminal and run:
docker exec -it airflow_project-postgres-1 psql -U mlops -d ml_orchestration
This opens a PostgreSQL shell inside the postgres container. You are now connected as the mlops user to the ml_orchestration database.
Query Documents
SELECT id, filename, status, created_at FROM documents;

COMPLETED.You should see your document with status = COMPLETED.
Query Chunks
SELECT id, document_id, chunk_index, LENGTH(text) as text_length FROM chunks LIMIT 10;
You should see rows similar to the following:
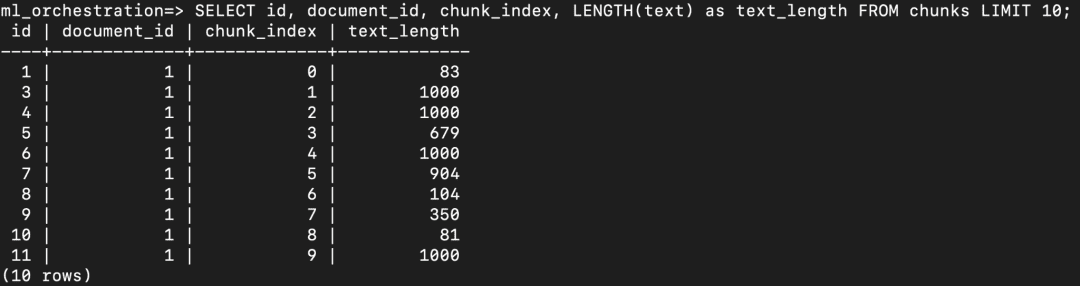
chunks table showing generated text chunks with their document_id, chunk_index, and text_length.Each row represents a chunk extracted from the document. The chunk_index indicates the order of chunks within the document. The text_length column shows the character length of each chunk. Since chunking is performed using a target word count (e.g., 512 words with overlap), the character length varies depending on word size and content structure.
Query Pipeline Runs
SELECT run_id, status, documents_processed, chunks_created FROM pipeline_runs;
You should see:

pipeline_runs table showing DAG run IDs, status, documents processed, and total chunks created.This shows one DAG run processed one document and created 23 chunks. The run_id includes the execution timestamp.
Exit PostgreSQL
Type \q and press Enter to exit the PostgreSQL shell.
You have now verified end-to-end functionality. A document was uploaded, parsed, chunked, validated, and marked complete. The data is in the database and ready for the next stage (embeddings).
Error Handling and Failure Recovery in Airflow Pipeline
Let us walk through a real failure scenario to understand how the system handles errors.
Scenario: A user uploads a corrupted PDF
- Upload Phase: The ingestion service receives the file, computes its hash, and saves it to
/tmp/ml_orchestration/uploads/. The file is inserted into the database withstatus=PENDING. The API returns201 Created. Everything looks normal. - Processing Phase: One minute later, the Airflow scheduler triggers the DAG. The
fetch_documentstask finds the corrupted PDF in thePENDINGstate and adds its ID to the processing list. - Parse Failure: The
parse_documentstask retrieves the file path and callsparse_pdf(). PyPDF attempts to read the file, encounters corrupted data, and raises aPdfReadError. The exception is caught in the try-except block. - Error Handling: Instead of letting the exception crash the entire task, we log the error, update the document’s status to
FAILED, commit the transaction, and continue processing the next document in the batch. Other valid PDFs in the same batch proceed normally. - Observability: The task completes successfully (from Airflow’s perspective), but logs show which specific document failed and why. The failed document remains in the database with
status=FAILEDand no chunks. You can query for failed documents and investigate. - Recovery: Once you fix the corrupted PDF (or replace it), you can manually reset its status back to
PENDING. The next DAG run will pick it up and try again.
This granular failure handling is why production systems use orchestrators. One bad file does not bring down the entire pipeline. You get observability into what failed, why it failed, and can fix issues incrementally.
Design Principles: Idempotency, Observability, and Reproducibility in Airflow Pipelines
This architecture demonstrates several important principles for production ML systems.
Separation of Concerns
We separated ingestion from processing. The FastAPI service accepts uploads quickly and returns. It does not block while parsing PDFs or chunking text. Users get fast feedback. Heavy processing happens asynchronously in Airflow.
This separation also means we can scale components independently. If upload traffic spikes, we can run more ingestion service replicas. If processing lags, we can add more Airflow workers.
Idempotency
Every task in the DAG is idempotent. You can rerun the DAG multiple times on the same documents without creating duplicates or corrupting data. This is essential for retries and recovery.
We achieve idempotency through:
- Content hashing: Documents with the same content hash are recognized as duplicates.
- Existence checks: Before creating chunks, we check if they already exist.
- File-based XCom: Parsing results are written to files. If a task reruns, it checks for existing files first.
- Status tracking: Documents have a
statusfield that prevents reprocessing completed items.
Observability
Every operation logs its progress. You can see exactly what the system is doing at any moment. Task logs show which documents were parsed, how many chunks were created, and which operations failed.
The pipeline_runs table provides metrics over time. You can query it to answer questions like “How many documents did we process last week?” or “What is our average chunk count per document?”
Reproducibility
The entire system is defined in code and configuration files. There are no manual setup steps beyond docker compose up. Anyone can clone the repository and run the same system.
The shared module ensures parsing and chunking logic is consistent. Documents processed today will have the same chunk boundaries as documents processed next month.
Failure Handling
The DAG does not abort if one document fails. It marks that document as FAILED and continues with others. This prevents one corrupted PDF from blocking an entire batch.
Airflow’s retry mechanism automatically retries failed tasks. If a transient error (network timeout, database deadlock) causes a failure, the task will retry up to 3 times before giving up.
Data Provenance
We track where every chunk came from. The chunk.document_id and chunk.chunk_index fields let us trace any chunk back to its source document and position. The pipeline_runs table records when and how documents were processed.
This is critical for debugging, auditing, and explaining model behavior. If your RAG system returns an incorrect answer, you can trace it back to the source chunk, the document it came from, and the DAG run that processed it.
Now let’s discuss the limits of this approach.
Limits of Apache Airflow for Machine Learning Workloads
Airflow excels at orchestrating data pipelines, but it has limits for ML workloads.
No GPU Support
Airflow tasks run in Python processes on CPU. If you want to generate embeddings using a transformer model, you need GPU acceleration. Airflow does not provide native GPU scheduling.
You could work around this by calling an external service (like a separate embedding API), but that adds complexity and latency.
Heavy Computation
Embedding generation for thousands of chunks can take minutes or hours. Airflow is not designed for long-running, compute-intensive tasks. Tasks that run for hours can clog the scheduler and make the UI sluggish.
Parallelism
The LocalExecutor runs tasks in parallel on a single machine. If you have 100 documents to process, Airflow will process them sequentially or in small batches limited by your CPU cores.
For true parallelism across multiple machines, you need the CeleryExecutor or KubernetesExecutor, which adds complexity.
Kubernetes Native Workloads
If you are running on Kubernetes, Airflow is an additional system to manage. It needs its own deployment, scheduler, database, and monitoring.
Argo Workflows, which we will cover in the next lesson, is Kubernetes-native. It runs as Kubernetes Jobs and integrates directly with Kubernetes features like resource limits, autoscaling, and GPU scheduling.
When to Use Apache Airflow
Airflow is perfect for:
- Data ingestion and ETL (Extract, Transform, Load)
- Scheduled batch processing
- Orchestrating API calls and database operations
- Tasks that run on CPU and do not require GPU
- Workflows with moderate parallelism
Airflow is not ideal for:
- GPU-accelerated ML training or inference
- Massive parallel processing (thousands of tasks)
- Real-time or low-latency workloads
- Kubernetes-native deployments where you want to avoid managing a separate orchestrator
For our RAG pipeline, Airflow handles document ingestion perfectly. It parses PDFs, chunks text, and validates quality. But for the next stage (generating embeddings), we will switch to Argo Workflows, which can run GPU-accelerated tasks on Kubernetes.
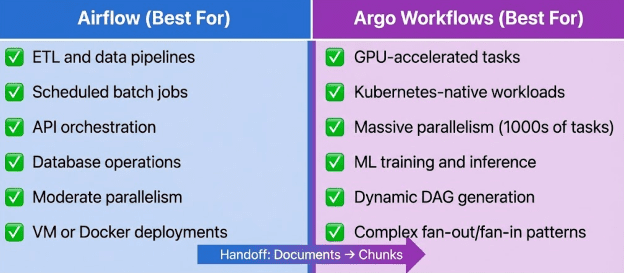
Airflow strengths (left column: ETL, scheduled jobs, API orchestration) and Argo strengths (right column: GPU tasks, massive parallelism, Kubernetes-native, DAGs with complex dependencies).What's next? We recommend PyImageSearch University.

120+ total classes • 115+ hours hours of on-demand code walkthrough videos • Last updated: July 2026
★★★★★ 4.84 (128 Ratings) • 16,000+ Students Enrolled
I strongly believe that if you had the right teacher you could master computer vision and deep learning.
Do you think learning computer vision and deep learning has to be time-consuming, overwhelming, and complicated? Or has to involve complex mathematics and equations? Or requires a degree in computer science?
That’s not the case.
All you need to master computer vision and deep learning is for someone to explain things to you in simple, intuitive terms. And that’s exactly what I do. My mission is to change education and how complex Artificial Intelligence topics are taught.
If you're serious about learning computer vision, your next stop should be PyImageSearch University, the most comprehensive computer vision, deep learning, and OpenCV course online today. Here you’ll learn how to successfully and confidently apply computer vision to your work, research, and projects. Join me in computer vision mastery.
Inside PyImageSearch University you'll find:
- ✓ 120+ courses on essential computer vision, deep learning, and OpenCV topics
- ✓ 94+ Certificates of Completion
- ✓ 115+ hours hours of on-demand video
- ✓ Brand new courses released regularly, ensuring you can keep up with state-of-the-art techniques
- ✓ Pre-configured Jupyter Notebooks in Google Colab
- ✓ Run all code examples in your web browser — works on Windows, macOS, and Linux (no dev environment configuration required!)
- ✓ Access to centralized code repos for all 540+ tutorials on PyImageSearch
- ✓ Easy one-click downloads for code, datasets, pre-trained models, etc.
- ✓ Access on mobile, laptop, desktop, etc.
Summary
In this lesson, you operationalized the document ingestion architecture built in Lesson 1. You ran the complete system inside Docker, configured environment variables and shared volumes, and verified inter-container communication between FastAPI, Airflow, and PostgreSQL.
You uploaded real PDF documents through the API, triggered DAG executions, monitored task progress in the Airflow UI, inspected logs, and validated results directly in PostgreSQL. You confirmed that documents moved from PENDING to COMPLETED, chunks were created correctly, and pipeline runs were recorded for observability and auditing.
You also explored real-world failure scenarios, including corrupted PDFs and partial processing failures, and saw how the system isolates errors without blocking the entire pipeline. Through this, you reinforced key production principles: separation of concerns, idempotency, observability, reproducibility, and data provenance.
Finally, you examined the practical limits of Apache Airflow for ML workloads and identified where GPU-based execution and Kubernetes-native systems may be more appropriate.
At this point, you now have a fully runnable, production-style ingestion system that you can extend with embedding generation, vector databases, and Retrieval-Augmented Generation workflows.
Citation Information
Singh, V. “Run an Apache Airflow DAG with Docker Compose and PostgreSQL,” PyImageSearch, S. Huot, A. Sharma, and P. Thakur, eds., 2026, https://pyimg.co/kxc7e
@incollection{Singh_2026_run-apache-airflow-dag-docker-compose-postgresql,
  author = {Vikram Singh},
  title = {{Run an Apache Airflow DAG with Docker Compose and PostgreSQL}},
  booktitle = {PyImageSearch},
  editor = {Susan Huot and Aditya Sharma and Piyush Thakur},
  year = {2026},
  url = {https://pyimg.co/kxc7e},
}
To download the source code to this post (and be notified when future tutorials are published here on PyImageSearch), simply enter your email address in the form below!

Download the Source Code and FREE 17-page Resource Guide
Enter your email address below to get a .zip of the code and a FREE 17-page Resource Guide on Computer Vision, OpenCV, and Deep Learning. Inside you'll find my hand-picked tutorials, books, courses, and libraries to help you master CV and DL!

Comment section
Hey, Adrian Rosebrock here, author and creator of PyImageSearch. While I love hearing from readers, a couple years ago I made the tough decision to no longer offer 1:1 help over blog post comments.
At the time I was receiving 200+ emails per day and another 100+ blog post comments. I simply did not have the time to moderate and respond to them all, and the sheer volume of requests was taking a toll on me.
Instead, my goal is to do the most good for the computer vision, deep learning, and OpenCV community at large by focusing my time on authoring high-quality blog posts, tutorials, and books/courses.
If you need help learning computer vision and deep learning, I suggest you refer to my full catalog of books and courses — they have helped tens of thousands of developers, students, and researchers just like yourself learn Computer Vision, Deep Learning, and OpenCV.
Click here to browse my full catalog.