Table of Contents
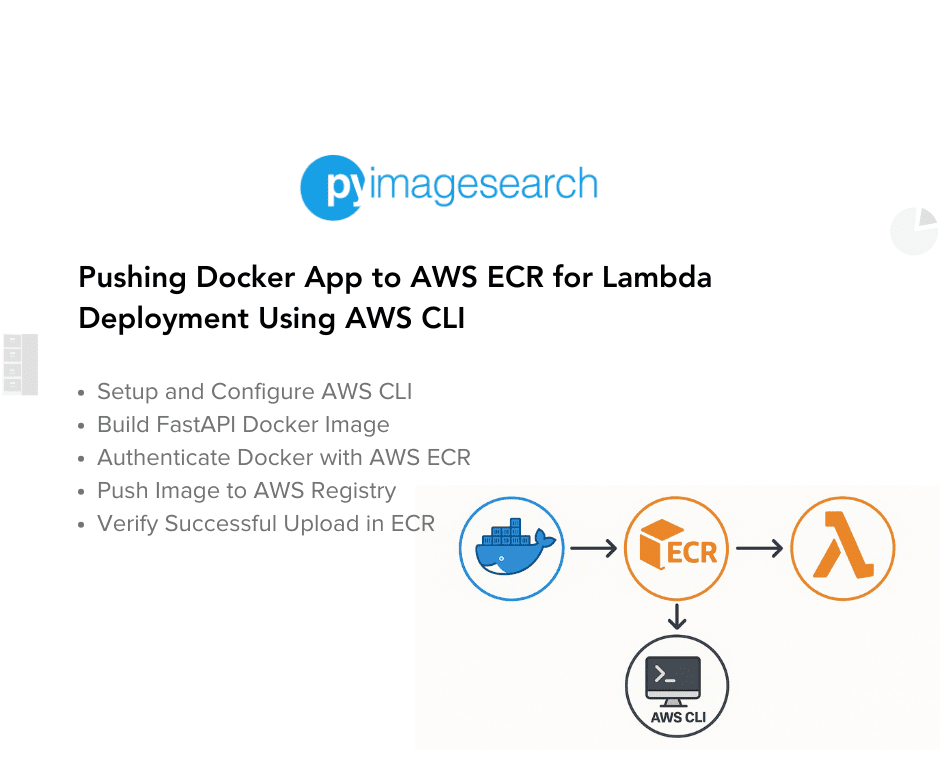
Pushing Docker App to AWS ECR for Lambda Deployment Using AWS CLI
In this tutorial, you will learn how to set up AWS CLI for secure authentication, build a Docker image for your FastAPI AI inference app, and push it to AWS Elastic Container Registry (ECR). This ensures your containerized application is ready for seamless deployment to AWS Lambda, enabling scalable, serverless AI inference.
This lesson is the last of a 4-part series on AWS Lambda:
- Introduction to Serverless Model Deployment with AWS Lambda and ONNX
- Converting a PyTorch Model to ONNX for FastAPI (Docker) Deployment
- FastAPI Docker Deployment: Preparing ONNX AI Models for AWS Lambda
- Pushing Docker App to AWS ECR for Lambda Deployment Using AWS CLI (this tutorial)
To learn how to set up AWS CLI, containerize your FastAPI AI app, and push it to AWS ECR for Lambda deployment, just keep reading.
Setting Up AWS CLI and Pushing the FastAPI AI App to AWS ECR for Lambda Deployment
In the previous lesson, we containerized our FastAPI AI inference app and tested it locally using Docker, ensuring consistent execution across environments. Since AWS Lambda supports container-based deployment, this step was essential for our serverless setup.
Key Takeaways from Lesson 3:
- Built a FastAPI-based AI inference server that loads an ONNX model for image classification.
- Ran the app locally with Uvicorn to validate functionality.
- Created a Dockerfile to package the FastAPI app into a container.
- Built and tested the Docker container, ensuring the app runs smoothly inside it.
- Verified the FastAPI inference endpoint using Postman, cURL, and browser requests.
By the end of Lesson 3, we had a fully functional FastAPI AI inference server running inside a Docker container.
Before deploying it to AWS Lambda, we need to store the container in AWS Elastic Container Registry (ECR) so Lambda can access it.
What Is AWS CLI and Why Do We Need It?
The AWS Command Line Interface (AWS CLI) is a powerful tool that enables developers to interact with AWS services directly from the command line rather than the AWS Management Console. It provides a unified command-line tool for efficiently managing AWS resources.
AWS CLI helps you execute commands for AWS services like Lambda, ECR, S3, IAM, EC2, API Gateway, and more without manually navigating the AWS Console.
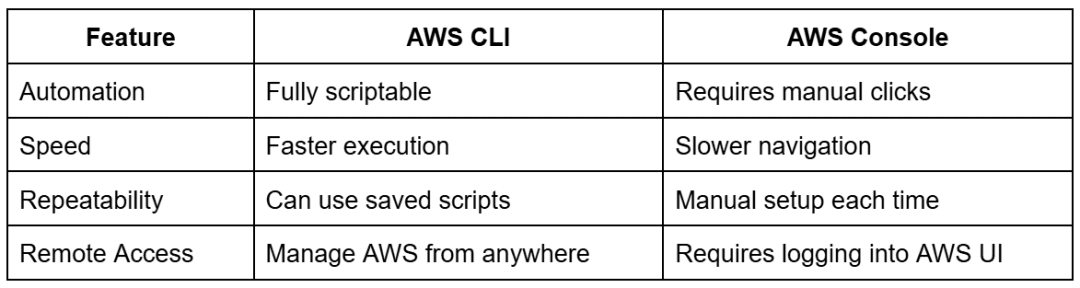
AWS CLI is especially useful for:
- Automation: Automate repetitive AWS tasks using scripts.
- Faster Execution: Running CLI commands is quicker than clicking through the AWS UI.
- Infrastructure as Code (IaC): The AWS CLI integrates with tools (e.g., Terraform and AWS CloudFormation).
- Remote Server Management: Run commands from any system without opening the AWS Management Console.
Why Do We Need AWS CLI in This Deployment?
In this lesson, we will use AWS CLI to:
- Authenticate with AWS by configuring credentials and permissions.
- Create a private AWS Elastic Container Registry (ECR) to store our Docker image.
- Push the FastAPI AI inference app’s Docker image to AWS ECR so AWS Lambda can access it.
- Verify our stored Docker images inside ECR without using the AWS Console.
- Interact with AWS Lambda later for deployment and testing.
Using AWS CLI will simplify our deployment process, making it more efficient and repeatable. Instead of manually setting up AWS services through the console, we can execute a few commands to achieve the same results.
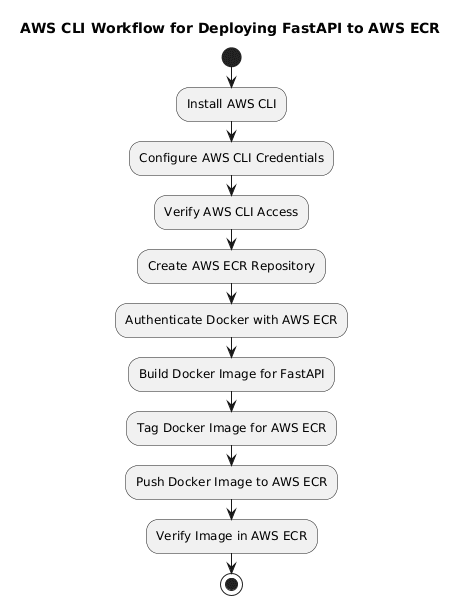
Figure 1 outlines the end-to-end AWS CLI workflow for deploying our FastAPI application to AWS ECR.
Why Is AWS CLI Better Than Using the AWS Console?
What Is ECR (Elastic Container Registry)?
AWS Elastic Container Registry (ECR) is a fully managed container image registry. It allows developers to store, manage, and deploy Docker container images without maintaining their own container repositories. ECR integrates seamlessly with AWS services such as AWS Lambda, ECS (Elastic Container Service), and EKS (Elastic Kubernetes Service), making it easy to deploy containerized applications in the AWS cloud.
With AWS ECR, you get:
- Scalability: Automatically scales with your container image storage needs.
- Security: Offers fine-grained access control with AWS IAM (Identity and Access Management).
- Reliability: Highly available storage for container images across AWS regions.
- Deep AWS Integration: Works with AWS services like Lambda, ECS, and CodeBuild.
Instead of using public registries (e.g., Docker Hub), AWS ECR provides a secure, private way to manage container images within AWS, reducing external dependencies and improving deployment security.
Public vs. Private Repositories in AWS ECR
AWS ECR supports two types of repositories: Public and Private. Understanding their differences helps in choosing the right option for your deployment.
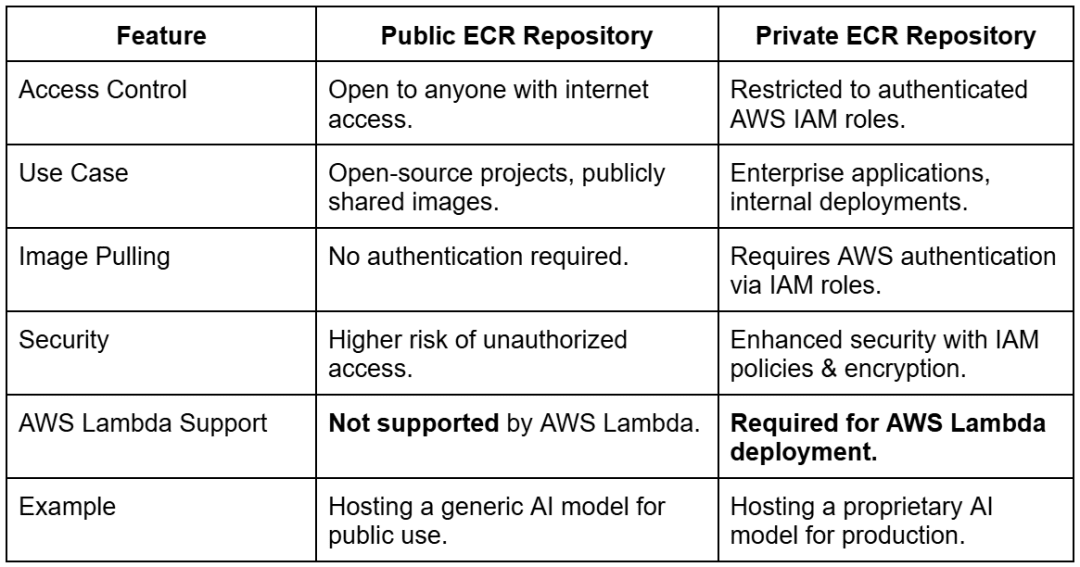
Since public repositories are accessible to anyone, they are best suited for open-source projects or sharing container images with the developer community. However, AWS Lambda does not support public repositories, meaning private ECR repositories are mandatory for Lambda-based deployments.
For secure, production-ready AI inference, private repositories ensure controlled access, security, and seamless integration with AWS Lambda.

Why Are We Using a Private AWS ECR Repository?
In this tutorial, we are using a private ECR repository because:
- Mandatory for AWS Lambda: Lambda only supports private ECR repositories, not public ones.
- Security and Access Control: Only authenticated AWS users (via IAM roles) can push/pull images.
- Restricted Access: The AI model should not be made publicly available.
- Seamless Integration with AWS Lambda: Ensures our FastAPI AI inference model can be deployed securely.
- Compliance and Privacy: Essential for enterprise applications that require strict data security.
Since AWS Lambda does not support public ECR repositories, we must use a private repository to store and deploy our containerized AI model. This guarantees secure access, prevents unauthorized use, and integrates smoothly with AWS Lambda.
What’s Next? Setting Up AWS CLI and Pushing the FastAPI AI App to AWS ECR for Lambda Deployment
Now that we understand AWS CLI, its role in managing AWS services, AWS ECR for storing container images, and why we use a private repository for security, it’s time to set up AWS CLI and push our FastAPI AI app to AWS ECR.
In the upcoming sections, we will:
- Install AWS CLI and set up authentication with AWS credentials.
- Verify AWS CLI access to ensure it can interact with AWS services.
- Create a private ECR repository to securely store our FastAPI container image.
- Build and push the FastAPI AI app Docker image to AWS ECR for Lambda deployment.
Once our containerized AI model is successfully stored in ECR, we will be ready to set up and deploy it to AWS Lambda in the next phase. Let’s begin!
Configuring Your Development Environment
To follow this guide, you need Docker installed on your machine. Since we are deploying a containerized AI inference model, Docker will be used to build, test, and push our image to AWS Elastic Container Registry (ECR).
Download and install Docker from:
After installation, verify that Docker is running by executing:
$ docker --version
You should see an output similar to:
Docker version 25.0.1, build 29cf629
If you’re new to Docker, refer to our guide on Getting Started with Docker.
Need Help Configuring Your Development Environment?

All that said, are you:
- Short on time?
- Learning on your employer’s administratively locked system?
- Wanting to skip the hassle of fighting with the command line, package managers, and virtual environments?
- Ready to run the code immediately on your Windows, macOS, or Linux system?
Then join PyImageSearch University today!
Gain access to Jupyter Notebooks for this tutorial and other PyImageSearch guides pre-configured to run on Google Colab’s ecosystem right in your web browser! No installation required.
And best of all, these Jupyter Notebooks will run on Windows, macOS, and Linux!
Project Structure
Before pushing our Docker image to AWS ECR, let’s quickly review which files from our project are actually used in this lesson. The directory structure below is shared across all lessons, but only a few components are required at this stage:
$ tree . -L 1
resnet-aws-serverless-classifier/
├── src/
│   ├── server.py            # Included in Docker image – FastAPI inference server
│   ├── convert.py           # Not used here – used in Lesson 2 for ONNX export
│   ├── onnxt.py             # Not used – ONNX Runtime CLI examples (later lessons)
│   ├── onnx_local.py        # Not used – Local ONNX runtime tests (later)
│   └── __init__.py
├── models/
│   ├── resnetv2_50.onnx     # Used – ONNX model loaded inside the Docker image
│   └── imagenet_classes.txt # Used – Label file for model predictions
├── data/
│   ├── cat.jpg / dog.jpg    # Optional – Used to test the API locally before pushing to ECR
│   ├── cat_base64.txt       # Not used – for Lambda JSON payloads (later)
│   ├── event.json / payload.json / response.json  # Not used – Lambda tests (later)
├── tests/                   # Not used in this lesson
├── frontend/                # Not used – used in Lessons 7–8
├── Dockerfile               # Not used – Lambda container build (next lesson)
├── Dockerfile.local         # Used – builds the local FastAPI Docker image
├── docker-compose.local.yml # Not used yet
├── dev.sh                   # Optional helper script
├── requirements.txt         # Used – installed inside Docker image
├── requirements-local.txt   # Used – FastAPI/Docker development dependencies
├── .dockerignore
├── .gitignore
└── README.md
We only use:
- src/server.py
- models/resnetv2_50.onnx
- models/imagenet_classes.txt
- data/cat.jpg, data/dog.jpg (optional)
- Dockerfile.local
- requirements.txt, requirements-local.txt
The remaining files belong to future lessons (Lambda testing, ONNX benchmarking, Next.js UI, etc.).
AWS CLI Installation and Setup
Before deploying our AI model to AWS Lambda, we need to configure the AWS Command Line Interface (CLI) to authenticate requests to AWS services (e.g., ECR and Lambda). The AWS CLI allows us to interact with AWS services directly from the terminal, making tasks like managing Lambda functions, pushing Docker images to AWS ECR, and setting up API Gateway much easier.
In this section, we will:
- Install AWS CLI on your local machine.
- Set up AWS credentials to authenticate with AWS services.
- Verify access to AWS Lambda, ECR, and other required services.
Step 1: Install AWS CLI
The AWS CLI is available for Windows, macOS, and Linux. Follow the official AWS CLI installation guide based on your OS.
Alternatively, you can install it directly using the command line:
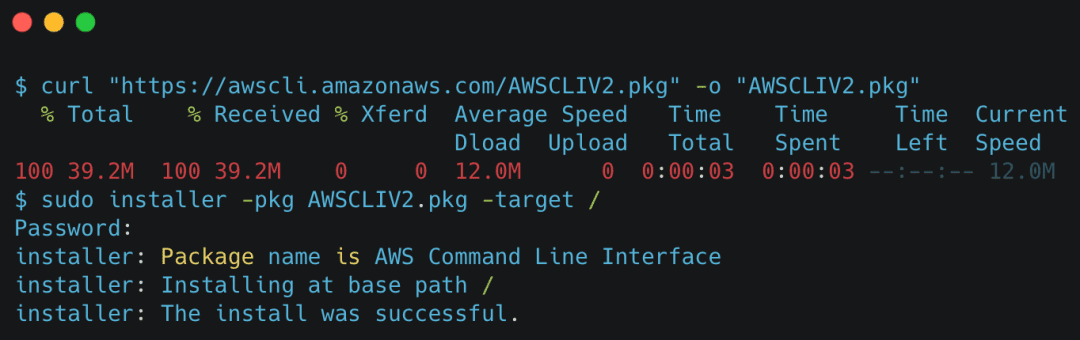
macOS:
curl "https://awscli.amazonaws.com/AWSCLIV2.pkg" -o "AWSCLIV2.pkg"
sudo installer -pkg AWSCLIV2.pkg -target /
Linux:
curl "https://awscli.amazonaws.com/awscli-exe-linux-x86_64.zip" -o "awscliv2.zip"
unzip awscliv2.zip
sudo ./aws/install
After installation, verify the AWS CLI version:

aws --version command (source: image by the author)Step 2: Create AWS Access and Secret Keys
To use AWS CLI, we need to provide authentication credentials. This requires an AWS Access Key ID and AWS Secret Access Key.
Where to Find Your AWS Access and Secret Key?
- Log in to your AWS Management Console.
- Click on your Profile Name (top-right corner).
- Select “Security Credentials” from the dropdown menu.
- Scroll down to the “Access Keys” section.
- Click “Create Access Key” → A new key pair (Access Key ID & Secret Access Key) will be generated.
- Copy and store these keys securely (as AWS will not show them again).
Important: AWS does not recommend creating access keys for the root user due to security risks. Ideally, you should make an IAM user with specific permissions. However, since this guide is focused on AWS Lambda deployment, we will cover IAM roles & best practices separately in a future lesson.
Security Note:
- Do not share your AWS credentials publicly or commit them to GitHub.
- If you ever suspect your credentials are compromised, delete the access key immediately from the AWS Security Credentials page.
Step 3: Configure AWS CLI with Your Credentials
After installing AWS CLI, we need to configure it with the necessary credentials to access AWS services.
Run the following command to start the configuration process:
aws configure
You will be prompted to enter the following details:
AWS Access Key ID [None]: XXXXXXXXXXXXXXXXXXXX
AWS Secret Access Key [None]: XXXXXXXXXXXXXXXXXXXXXXXXXXXXXX
Default region name [None]: ap-south-1
Default output format [None]: json
AWS Access Key ID and Secret Access Key can be obtained from the AWS IAM console under “My Security Credentials”.
Set the Default region name to the AWS region where you plan to deploy (e.g., ap-south-1) and choose the Default output format as json, table, or text (default: json).
Tip: You can always update credentials later by running the command below, but ensure they match the ones in the AWS Console.
aws configure set aws_access_key_id NEW_ACCESS_KEY
aws configure set aws_secret_access_key NEW_SECRET_KEY
Step 4: Verify AWS CLI Access
To confirm AWS CLI is correctly set up, run the following commands:
Check AWS Identity
aws sts get-caller-identity
Expected output:
{
    "UserId": "AIDXXXXXXXXXXX",
    "Account": "123456789012",
    "Arn": "arn:aws:iam::123456789012:user/root"
}
If this command fails, ensure that your AWS credentials are correctly configured.
Check Existing AWS Lambda Functions
aws lambda list-functions
Since we haven’t created any Lambda functions yet, the response should be:
{
    "Functions": []
}
Check AWS ECR Repositories
aws ecr describe-repositories
If no repositories exist yet, you’ll see an empty list:
{
    "repositories": []
}
This confirms that AWS CLI is properly configured and ready to interact with AWS services.
Now that AWS CLI is set up, we will build our FastAPI Docker image locally and push the container image to AWS ECR for Lambda deployment.
Building and Pushing the Docker Image to AWS ECR
Now that we have AWS CLI configured, it’s time to build our FastAPI Docker image and push it to AWS Elastic Container Registry (ECR). AWS ECR is a fully managed container registry that allows us to store, manage, and deploy Docker container images. Since AWS Lambda supports container-based deployments, we will use ECR to store our model’s container image before linking it to Lambda.
Step 1: Create an AWS ECR Repository
Before we can push our Docker image, we need to create a private ECR repository to store the container.
Run the following command to create a new ECR repository:
aws ecr create-repository --repository-name pis-fastapi-ai-inference --region ap-south-1
If the repository is created successfully, you will see output similar to the following:
{
    "repository": {
        "repositoryArn": "arn:aws:ecr:ap-south-1:123456789012:repository/pis-fastapi-ai-inference",
        "registryId": "123456789012",
        "repositoryName": "pis-fastapi-ai-inference",
        "repositoryUri": "123456789012.dkr.ecr.ap-south-1.amazonaws.com/pis-fastapi-ai-inference",
        "createdAt": "2025-03-14T04:47:157000+05:30",
        "imageTagMutability": "MUTABLE",
        "imageScanningConfiguration": { "scanOnPush": false }
    }
}
You can now view the newly created repository in the AWS console under the Private Registry section of ECR, as shown in Figure 5.

Note the repositoryUri (e.g., 123456789012.dkr.ecr.ap-south-1.amazonaws.com/pis-fastapi-ai-inference). We will use this URI to tag and push our Docker image.
If you ever need to list your ECR repositories, run:
aws ecr describe-repositories
Step 2: Authenticate Docker with AWS ECR
To push images to AWS ECR, we need to authenticate Docker with AWS CLI. Run the following command:
aws ecr get-login-password --region ap-south-1 | docker login --username AWS --password-stdin 123456789012.dkr.ecr.ap-south-1.amazonaws.com
If successful, you should see:
Login Succeeded
Step 3: Build the FastAPI Docker Image
Now, let’s build the Docker image for our FastAPI AI inference model.
Navigate to your project root directory (where your Dockerfile is located) and run:
docker build -t fastapi-ai-inference .
The above command does the following:
- Uses the Dockerfile in the current directory (
.) to build the image. - Tags the image as
fastapi-ai-inference. - Installs all required dependencies and sets up the FastAPI app.
Once complete, verify that the image was built successfully:
docker images
Expected output:
REPOSITORY               TAG       IMAGE ID       CREATED         SIZE
fastapi-ai-inference     latest    2d3a3f27c1a1   2 minutes ago   450MB
Step 4: Tag the Docker Image for AWS ECR
Before pushing the Docker image to Amazon ECR, it must be tagged with the full ECR repository URI so that Docker knows which remote registry to upload it to.
Run:
docker tag fastapi-ai-inference:latest 123456789012.dkr.ecr.ap-south-1.amazonaws.com/pis-fastapi-ai-inference:latest
You can verify the tag using:
docker images
You should now see two tagged references to the same image — one local tag and one ECR tag, as shown in Figure 6.

Step 5: Push the Docker Image to AWS ECR
Now, let’s push the tagged image to AWS ECR so that AWS Lambda can pull it later.
docker push 123456789012.dkr.ecr.ap-south-1.amazonaws.com/pis-fastapi-ai-inference:latest
This process might take a few minutes depending on your internet speed, and once complete, you should see output like:
The push refers to repository [123456789012.dkr.ecr.ap-south-1.amazonaws.com/pis-fastapi-ai-inference]
latest: Pushed
Step 6: Verify the Image in AWS ECR
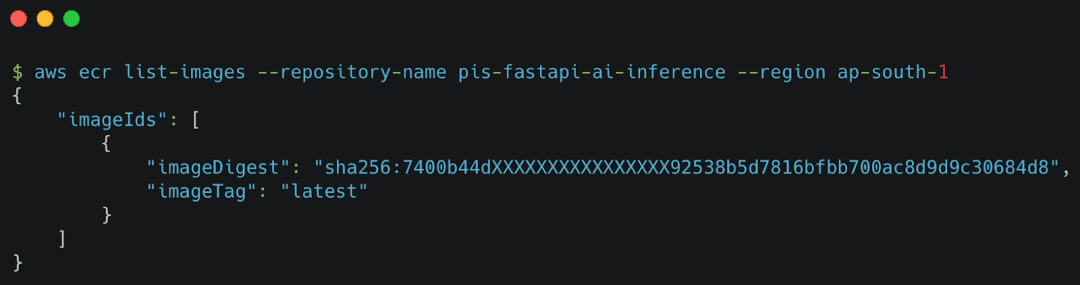
To confirm that the image is successfully stored in AWS ECR, run:
aws ecr list-images --repository-name pis-fastapi-ai-inference
Expected output:
{
    "imageIds": [
        {
            "imageTag": "latest",
            "imageDigest": "sha256:3a4d6b..."
        }
    ]
}
Alternatively, you can check manually in the AWS Console by opening the AWS Management Console, navigating to ECR (Elastic Container Registry), and clicking the pis-fastapi-ai-inference repository. You should see your Docker image listed, as shown in Figure 7.
Via AWS Console:

Via AWS CLI:
aws ecr list-images (source: by the author)If your images belong to different projects or serve various purposes, it’s best to create a new repository for each.
What's next? We recommend PyImageSearch University.

120+ total classes • 115+ hours hours of on-demand code walkthrough videos • Last updated: July 2026
★★★★★ 4.84 (128 Ratings) • 16,000+ Students Enrolled
I strongly believe that if you had the right teacher you could master computer vision and deep learning.
Do you think learning computer vision and deep learning has to be time-consuming, overwhelming, and complicated? Or has to involve complex mathematics and equations? Or requires a degree in computer science?
That’s not the case.
All you need to master computer vision and deep learning is for someone to explain things to you in simple, intuitive terms. And that’s exactly what I do. My mission is to change education and how complex Artificial Intelligence topics are taught.
If you're serious about learning computer vision, your next stop should be PyImageSearch University, the most comprehensive computer vision, deep learning, and OpenCV course online today. Here you’ll learn how to successfully and confidently apply computer vision to your work, research, and projects. Join me in computer vision mastery.
Inside PyImageSearch University you'll find:
- ✓ 120+ courses on essential computer vision, deep learning, and OpenCV topics
- ✓ 94+ Certificates of Completion
- ✓ 115+ hours hours of on-demand video
- ✓ Brand new courses released regularly, ensuring you can keep up with state-of-the-art techniques
- ✓ Pre-configured Jupyter Notebooks in Google Colab
- ✓ Run all code examples in your web browser — works on Windows, macOS, and Linux (no dev environment configuration required!)
- ✓ Access to centralized code repos for all 540+ tutorials on PyImageSearch
- ✓ Easy one-click downloads for code, datasets, pre-trained models, etc.
- ✓ Access on mobile, laptop, desktop, etc.
Summary
In this lesson, we explored the fundamentals of the AWS CLI and its role in efficiently managing AWS services from the terminal. We also covered AWS Elastic Container Registry (ECR), a managed service for storing container images, and the key differences between public and private ECR repositories, highlighting why a private repository is the best choice for secure AI model deployment.
With this foundational knowledge, we proceeded to set up AWS CLI, configure credentials, and verify access. We then created a private AWS ECR repository, built a Docker image for our FastAPI AI inference app, and successfully pushed it to AWS ECR.
At this stage, our containerized AI application is securely stored in AWS ECR and ready to be deployed to AWS Lambda. In the next lesson, we will set up AWS Lambda, link it to our ECR image, and test our deployed FastAPI AI model.
Citation Information
Singh, V. “Pushing Docker App to AWS ECR for Lambda Deployment Using AWS CLI,” PyImageSearch, P. Chugh, S. Huot, A. Sharma, and P. Thakur, eds., 2025, https://pyimg.co/mzxbn
@incollection{Singh_2025_Pushing-Docker-App-AWS-ECR-Lambda-Deployment-Using-AWS-CLI,
  author = {Vikram Singh},
  title = {{Pushing Docker App to AWS ECR for Lambda Deployment Using AWS CLI}},
  booktitle = {PyImageSearch},
  editor = {Puneet Chugh and Susan Huot and Aditya Sharma and Piyush Thakur},
  year = {2025},
  url = {https://pyimg.co/mzxbn},
}
To download the source code to this post (and be notified when future tutorials are published here on PyImageSearch), simply enter your email address in the form below!

Download the Source Code and FREE 17-page Resource Guide
Enter your email address below to get a .zip of the code and a FREE 17-page Resource Guide on Computer Vision, OpenCV, and Deep Learning. Inside you'll find my hand-picked tutorials, books, courses, and libraries to help you master CV and DL!

Comment section
Hey, Adrian Rosebrock here, author and creator of PyImageSearch. While I love hearing from readers, a couple years ago I made the tough decision to no longer offer 1:1 help over blog post comments.
At the time I was receiving 200+ emails per day and another 100+ blog post comments. I simply did not have the time to moderate and respond to them all, and the sheer volume of requests was taking a toll on me.
Instead, my goal is to do the most good for the computer vision, deep learning, and OpenCV community at large by focusing my time on authoring high-quality blog posts, tutorials, and books/courses.
If you need help learning computer vision and deep learning, I suggest you refer to my full catalog of books and courses — they have helped tens of thousands of developers, students, and researchers just like yourself learn Computer Vision, Deep Learning, and OpenCV.
Click here to browse my full catalog.