Table of Contents
- Getting Started with Python and FastAPI: A Complete Beginner’s Guide
- Introduction to FastAPI Python
- Setting Up FastAPI
- Your First Python FastAPI Endpoint
- Writing a Simple “Hello, World!” Endpoint
- Understanding Query Parameters
- Understanding Path Parameters
- FastAPI Docs: Exploring Swagger UI and ReDoc
- Exploring FastAPI POST Request and Testing Endpoints with FastAPI TestClient
- Adding a POST Request Endpoint
- Testing Endpoints with FastAPI’s TestClient
- Combining Both Concepts: POST Request and Testing
- Summary
Getting Started with Python and FastAPI: A Complete Beginner’s Guide
In this tutorial, you will learn the fundamentals of FastAPI, a modern and efficient Python web framework. We’ll guide you through setting up FastAPI from scratch, creating GET and POST endpoints, and validating data using Pydantic models. Additionally, you’ll explore how to test your API with FastAPI’s built-in TestClient and troubleshoot common errors, equipping you with the essential skills to build your first web API confidently.

This lesson is the 1st of a 2-part series on Deploying Machine Learning using FastAPI and Docker:
- Getting Started with Python and FastAPI: A Complete Beginner’s Guide (this tutorial)
- Lesson 2
To learn how to set up FastAPI, create GET and POST endpoints, validate data with Pydantic, and test your API with TestClient, just keep reading.
Introduction to FastAPI Python
What Is FastAPI?
FastAPI is a modern, high-performance web framework for building APIs using Python. Designed with efficiency and developer productivity in mind, it takes full advantage of Python’s type hints to provide automatic validation, serialization, and robust error handling. FastAPI is particularly well-suited for building RESTful APIs, microservices, and backend services for real-time applications.

Developed by Sebastián Ramírez, FastAPI builds on top of Starlette (for web handling and async support) and Pydantic (for data validation and parsing). It is optimized for speed and simplicity, offering an intuitive interface that enables developers to write reliable code quickly.
Core Features
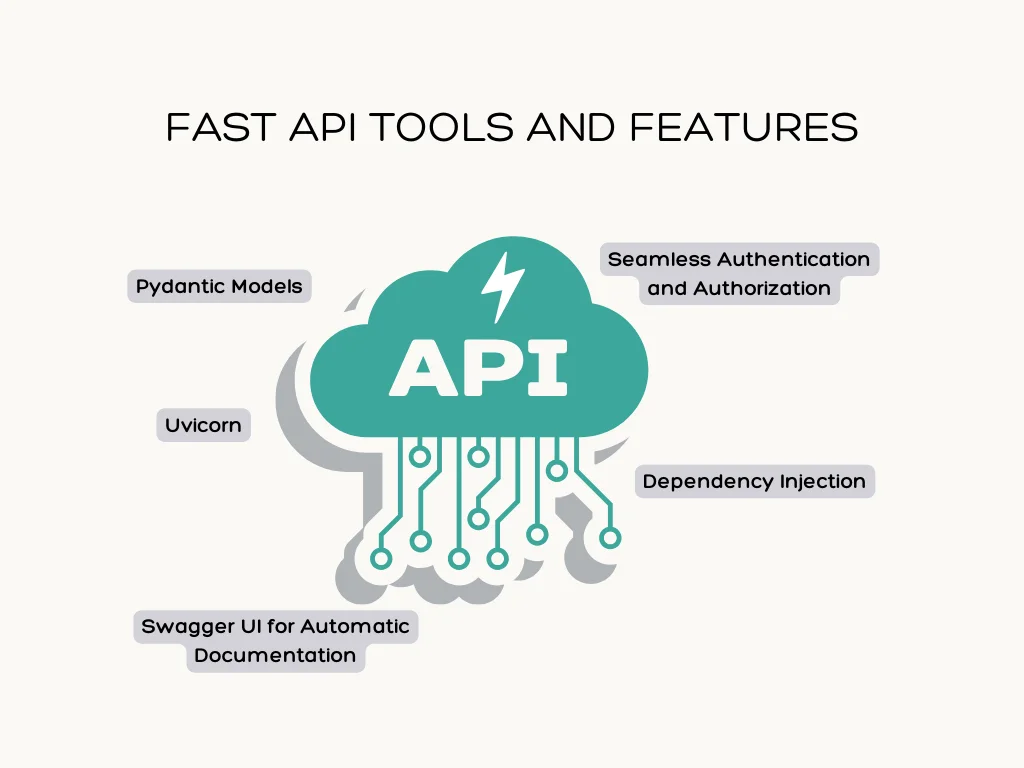
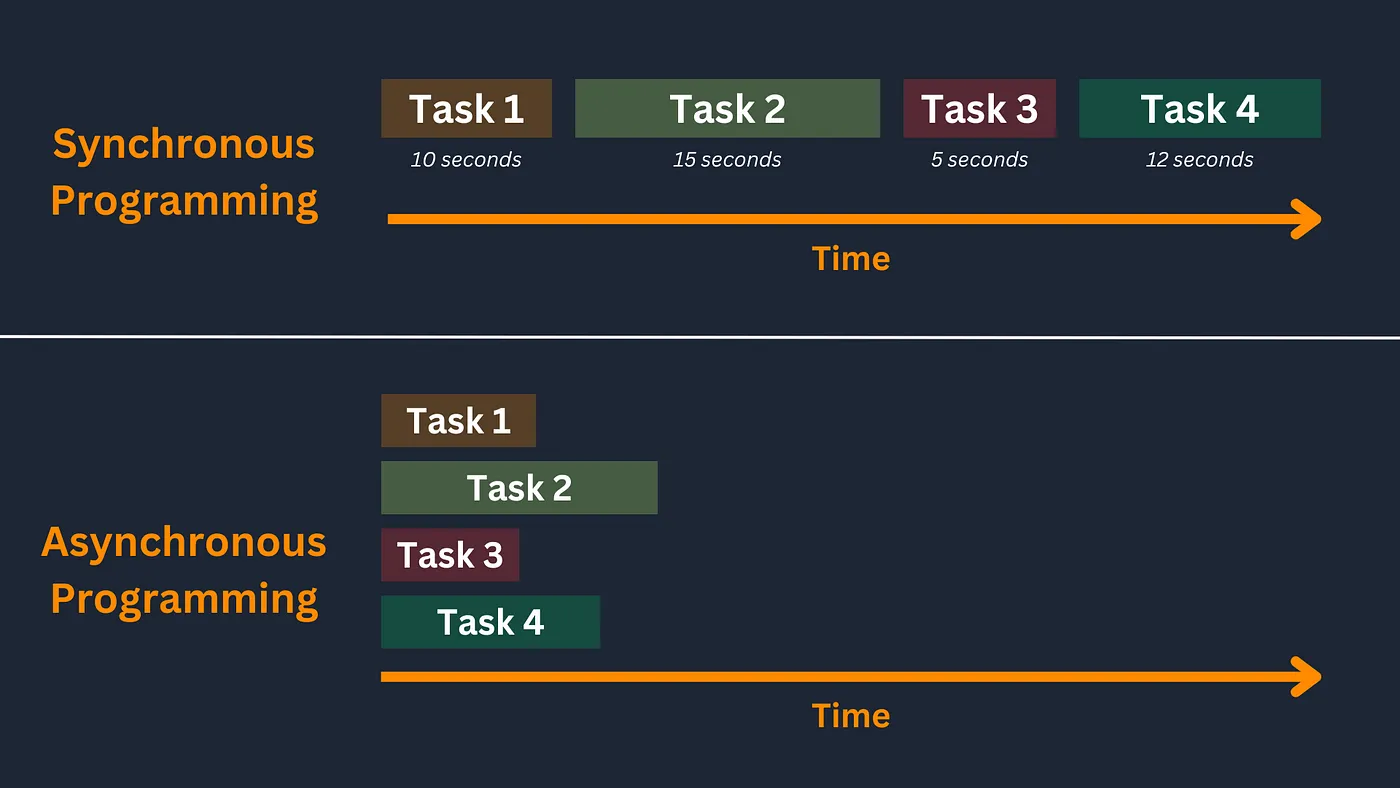
- Asynchronous Programming
- FastAPI supports Python’s async and await syntax, allowing it to handle a large number of concurrent requests efficiently.
- This makes it ideal for high-performance use cases like real-time chat applications or APIs for machine learning models.
- Automatic Interactive API Documentation
- Out of the box, FastAPI generates Swagger UI and ReDoc documentation for all API endpoints. These interactive tools make it easy to test APIs and explore their functionality directly from the browser.
- Type-Driven Development
- Leveraging Python’s type hints, FastAPI validates request inputs and responses automatically, reducing bugs and improving code reliability.
- Data Validation with Pydantic
- FastAPI integrates seamlessly with Pydantic, a library for data validation and serialization in Python. Pydantic ensures that incoming requests conform to defined schemas, which simplifies handling complex request bodies, query parameters, and more.
Let’s first look at how Pydantic works independently. Later, we’ll see how FastAPI uses Pydantic under the hood to validate and serialize data automatically.

In this example, the Item model validates that name is a string, price is a float, and is_offer is an optional boolean. If the input data doesn’t match this schema, Pydantic raises a validation error, ensuring the data is reliable. FastAPI relies on this mechanism for validating API inputs and outputs, as we’ll see in the next sections.
- Built-in Dependency Injection
- FastAPI provides a powerful dependency injection system, making it easy to manage shared resources like databases, authentication services, and configuration settings.
- Security and Authentication
- FastAPI comes with robust security and authentication features. It includes support for OAuth2 with JWT tokens and HTTP Basic auth. It even comes with cryptographic password hashing by default.
FastAPI combines simplicity, speed, and scalability, making it one of the most popular choices for modern Python web development. It’s an excellent framework for developers looking to create fast, secure, and feature-rich APIs with minimal effort.
Key Benefits of FastAPI
FastAPI stands out among Python web frameworks due to its unique blend of performance, ease of use, and developer-centric features. The following is a closer look at why FastAPI is the go-to choice for building modern APIs.
High Performance
- FastAPI is built on Starlette, which uses asynchronous programming to handle multiple requests simultaneously.
- This makes it ideal for real-time applications like chat apps, stock trading platforms, or live dashboards.
- Its performance is comparable to frameworks like Node.js and Go, making it one of the fastest Python frameworks available.
Reduced Development Time
- FastAPI automatically generates interactive API documentation using OpenAPI standards, allowing developers to explore and test endpoints effortlessly.
- By leveraging Python’s type hints, FastAPI eliminates the need for manual validation, significantly reducing boilerplate code.
- This efficiency enables teams to focus on building features rather than debugging or writing repetitive code.
Fewer Bugs
- With built-in data validation through Pydantic, FastAPI ensures that API inputs and outputs conform to specified data types.
- Type hinting allows developers to catch errors early during development, leading to more robust and error-free applications.
Scalability
- FastAPI’s asynchronous design supports seamless scaling, from small microservices to enterprise-level applications.
- It integrates well with modern tools like Docker, Kubernetes, and cloud platforms, making it easy to deploy and manage in production environments.
Ease of Use
- FastAPI’s syntax is intuitive and clean, making it beginner-friendly for developers new to web frameworks.
- For experienced developers, advanced features like dependency injection and asynchronous support offer immense flexibility and power.
- The extensive documentation ensures that developers at all levels can quickly get started and master the framework.
Setting Up FastAPI
Getting started with FastAPI is simple and beginner-friendly. In this section, we’ll walk you through installing FastAPI and Uvicorn and running your first API server. By the end of this section, you’ll have a fully functional FastAPI application ready to handle HTTP requests.
Installing FastAPI and Uvicorn
FastAPI requires an ASGI to process HTTP requests, and Uvicorn is one of the most popular and lightweight choices. Installing both is straightforward using pip.
Run the Installation Command
pip install fastapi uvicorn pytest
What This Does
- Installs FastAPI, the framework we’ll use to build our APIs.
- Installs Uvicorn, the Asynchronous Server Gateway Interface (ASGI) that will run the FastAPI app and serve it to clients.
- Installs PyTest, a testing framework that allows us to write and run test cases for our FastAPI endpoints efficiently.
Verify the Installation
Run the following command to ensure the installation is successful:
python -m uvicorn --help
Running a Basic Server
Once you’ve set up your project and installed the dependencies, it’s time to run your first FastAPI server.
Write a Basic FastAPI Application in main.py:
from fastapi import FastAPI

app = FastAPI()
@app.get("/")
async def read_root():
    return {"message": "Hello, World!"}
Start the Server Using Uvicorn:
Run the following command in your terminal:
uvicorn main:app --reload
Here’s what each part of the command does:
main: Refers to the Python file (main.py).app: Refers to the FastAPI instance (app = FastAPI()).--reload: Enables auto-reloading, so the server restarts automatically when you make changes to your code.
Access the Application:
Open a browser and navigate to http://127.0.0.1:8000. You should see: {"message": "Hello, World!"}
Why Do You Need FastAPI Uvicorn?
FastAPI relies on Uvicorn, a lightning-fast ASGI, to handle HTTP requests and serve responses. Unlike Flask, which uses WSGI (a standard for synchronous applications) and has a built-in development server, FastAPI is designed to work with ASGI (Asynchronous Server Gateway Interface), a more modern standard optimized for real-time and asynchronous applications.
FastAPI doesn’t include a built-in server to handle HTTP requests. This is where Uvicorn comes in — it serves as the bridge between your application and incoming HTTP traffic.
Think of a fancy restaurant. The chef (FastAPI) focuses only on cooking, while the waiters (Uvicorn) serve the food to customers. The separation allows for more scalability and efficiency.
Note: While Uvicorn is the most commonly used server for FastAPI, other ASGIs (e.g., Daphne or Hypercorn) can also be used. Uvicorn is lightweight, optimized, and a great default choice.
What Is Uvicorn?
Uvicorn is a fast ASGI that acts as a bridge between your FastAPI app and incoming HTTP requests. It:
- Starts the FastAPI server and listens for requests.
- Routes requests to your FastAPI app for processing.
- Sends responses back to the client.
Your First Python FastAPI Endpoint
FastAPI makes it incredibly easy to create your first endpoint and start serving HTTP requests. In this section, we’ll walk through building a basic “Hello, World!” endpoint, working with query and path parameters, and exploring FastAPI’s automatically generated interactive API documentation.
Writing a Simple “Hello, World!” Endpoint
Let’s start by creating a simple endpoint that responds to GET requests at the root URL (/) with a JSON message.
Code Example
from fastapi import FastAPI

app = FastAPI()

@app.get("/")
async def read_root():
    return {"message": "Hello, World!"}
@app.get("/") defines a GET endpoint at the root (/) of the application. The async def read_root() function handles requests to this endpoint. A GET request is the most common HTTP method used to retrieve data from a server.
When you visit the root URL, FastAPI calls the corresponding function (read_root) and returns a JSON response with the specified message "Hello, World!"
Test It
- Start the server using:
uvicorn main:app --reload
- Open your browser and navigate to
http://127.0.0.1:8000/to see the response:{"message":"Hello, World!"}

Creating your first endpoint in FastAPI is as simple as defining a Python function and attaching it to a route using a decorator. In this case, @app.get("/") specifies that this function should handle GET requests sent to the root URL (/). The function then responds with a JSON message, which is returned automatically by FastAPI.
Understanding Query Parameters
Query parameters allow users to send additional information as part of the URL. They appear after the ? in the URL and are structured as key=value pairs.
FastAPI allows you to handle query parameters effortlessly. Let’s add a new endpoint that takes a query parameter and returns its square.
@app.get("/square")
async def calculate_square(num: int):
    return {"number": num, "square": num ** 2}
Here, @app.get("/square") defines a GET endpoint at /square. The num: int parameter in the function is automatically read from the num query parameter in the request URL, and FastAPI validates that it is an integer. The return {"number": num, "square": num ** 2} statement sends a JSON response containing the input number and its square.
Query parameters are optional by default, meaning the endpoint can still function even if the parameter isn’t provided (though you may need to handle the absence of the parameter).
Now, when you navigate to http://127.0.0.1:8000/square?num=4, you’ll get the following:

Query parameters allow users to send additional details in the URL to control the response, such as filtering or sorting results. They’re commonly used for flexible input and are optional by default.
Understanding Path Parameters
Path parameters are part of the URL itself, making them essential when identifying a specific resource, like a user or a product. Unlike query parameters, path parameters are mandatory. If you don’t provide them, the endpoint won’t work.
Path parameters are used when the URL needs to include dynamic information, such as an ID or a name. For example, /users/123 includes a user ID in the path. FastAPI makes it easy to extract this value and use it in your function. If the ID is missing or invalid (e.g., not an integer), FastAPI will return an error automatically.
@app.get("/users/{user_id}")
async def read_user(user_id: int):
    return {"user_id": user_id}
Here, @app.get("/users/{user_id}") defines a GET endpoint with a dynamic user_id in the URL. FastAPI extracts user_id from the URL and validates it as an integer and returns the user ID in a JSON response.
Navigate to http://127.0.0.1:8000/users/123, and you’ll get:

Path parameters are crucial for identifying specific resources, such as users or products, in RESTful APIs. Unlike query parameters, they are part of the URL and mandatory for the endpoint to work.
FastAPI Docs: Exploring Swagger UI and ReDoc
One of FastAPI’s standout features is its ability to generate interactive API documentation automatically. Without requiring any extra configuration, your API endpoints are fully documented and ready for testing right from your browser.
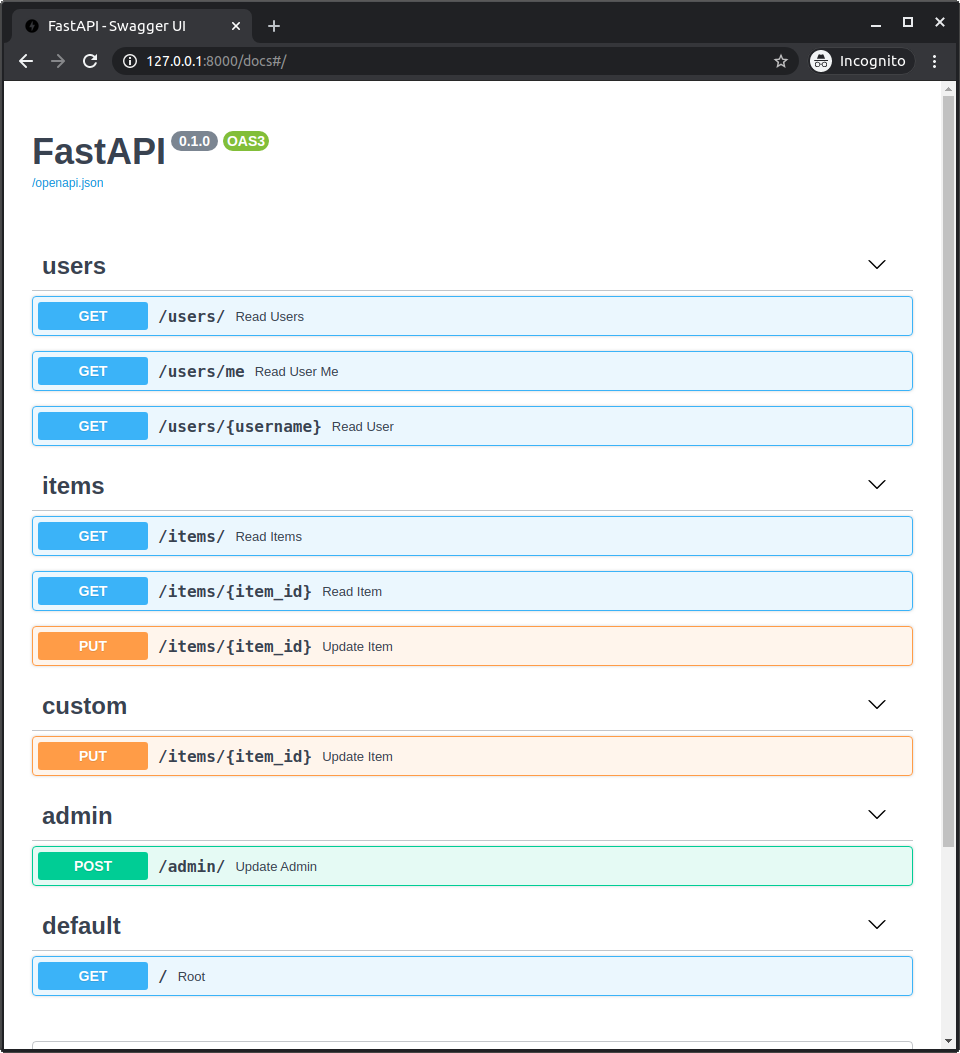
Swagger UI
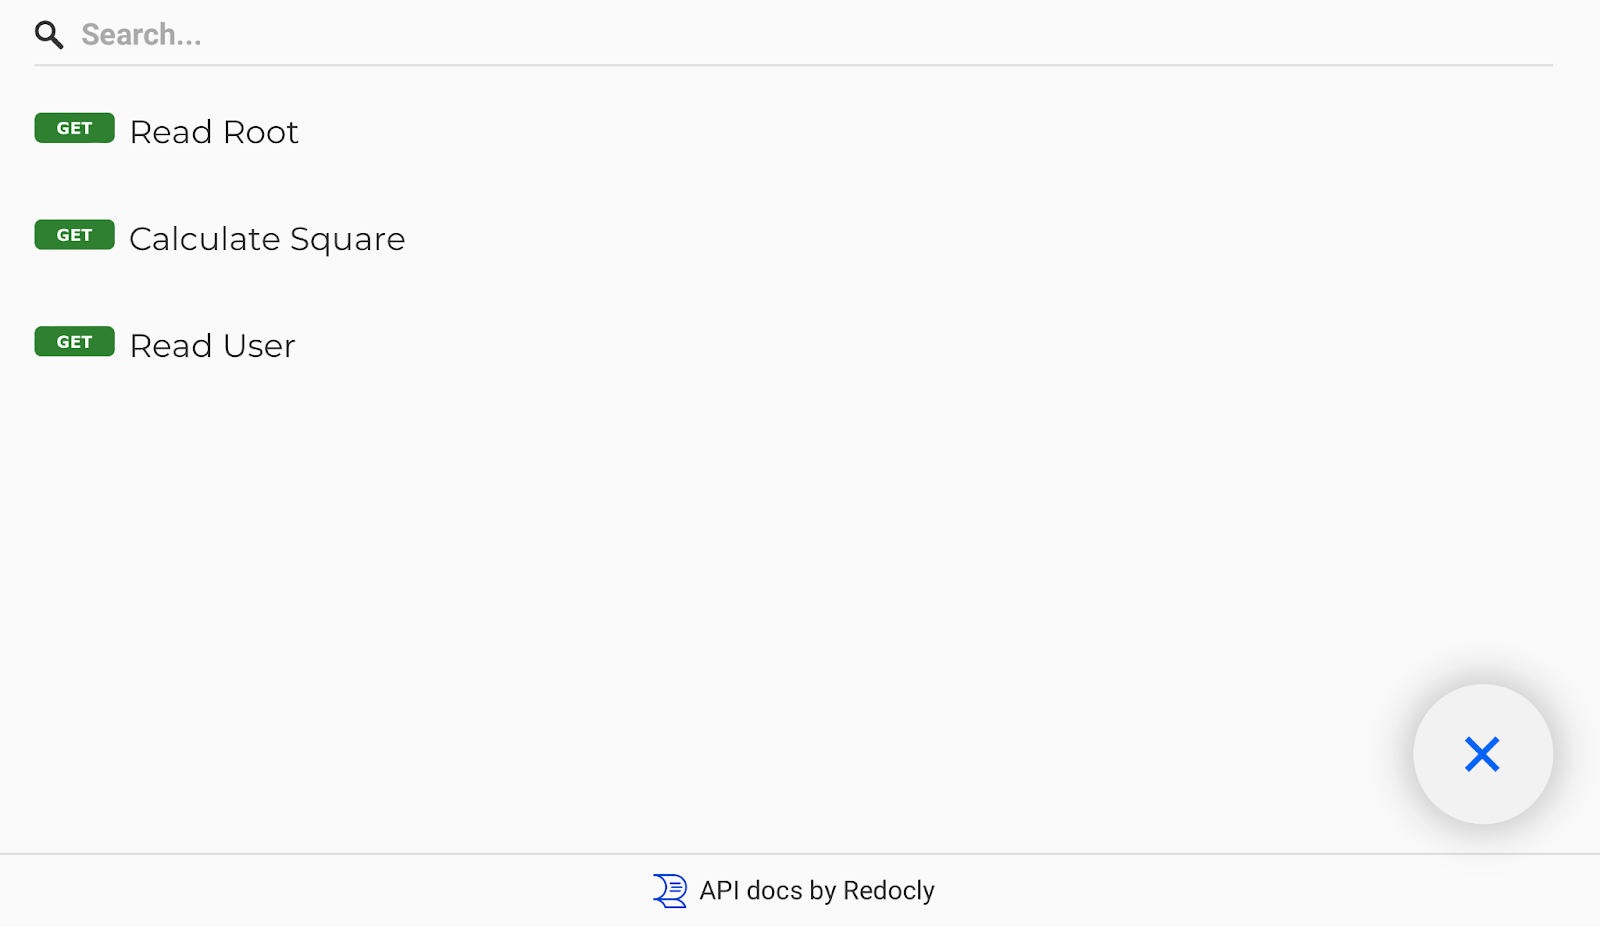
Swagger UI provides an interactive, user-friendly interface for exploring and testing your API endpoints. It’s a great tool for developers to validate API functionality quickly.
- Accessing Swagger UI
- Visit: http://127.0.0.1:8000/docs
- You’ll see all your endpoints listed along with their HTTP methods (e.g.,
GET,POST)
- Testing Endpoints
- Expand any endpoint, fill in the required inputs (if any), and click “Execute” to send a test request.
- View both the request details and the response output directly on the UI.

ReDoc
ReDoc offers a detailed, well-structured view of your API documentation, making it easier to understand the overall API structure.
- Accessing ReDoc
- Visit: http://127.0.0.1:8000/redoc.
- ReDoc provides a clean layout that highlights the API’s endpoints, schemas, and expected responses.
- Use Cases
- Ideal for documentation sharing with teams or clients.
- Great for understanding large, complex APIs with multiple endpoints.
Why These Features Are Useful
These automatically generated tools simplify API development and testing significantly:
- Hassle-Free Setup: Both Swagger UI and ReDoc are generated automatically, saving developers the effort of writing and maintaining API documentation manually.
- Quick Testing: Swagger UI enables you to interact with your endpoints directly from the browser, making it ideal for quick validation during development.
- Better Collaboration: ReDoc’s clean layout and organized structure help communicate your API design clearly to stakeholders.
Exploring FastAPI POST Request and Testing Endpoints with FastAPI TestClient
In this section, we’ll explore how to create a FastAPI POST request for adding resources and demonstrate how to test your endpoints using the built-in FastAPI TestClient. These practical examples will help you understand the essentials of working with HTTP methods and validating your APIs programmatically.
Adding a POST Request Endpoint
A POST request is used to create new resources, such as adding a new item to a database. Below is a basic example demonstrating how to create an item using a POST endpoint in FastAPI.
Code Example
from fastapi import FastAPI
from pydantic import BaseModel

app = FastAPI()

# Define a Pydantic model for input validation
class Item(BaseModel):
    name: str
    price: float
    description: str | None = None

@app.post("/items/")
async def create_item(item: Item):
    return {"message": "Item created successfully!", "item": item}
We start by defining a POST endpoint at /items/ with @app.post("/items/").
FastAPI leverages Pydantic for data modeling, one of the standout features of FastAPI, though it is not exclusive to it, which then allows FastAPI to validate incoming data automatically against the defined schema (e.g., type checks, format checks).
So, in this above example, we make use of Pydantic by defining an Item class (a Pydantic model) to validate incoming JSON requests automatically:
name: required stringprice: required floatdescription: optional string
Returns a success message and the validated item.
Test It
- Start the FastAPI app and use the interactive Swagger UI at http://127.0.0.1:8000/docs.
- Try sending a
POSTrequest to /items/ with this request body:
{
    "name": "Laptop",
    "price": 1000.00,
    "description": "A high-performance laptop"
}
- You’ll receive this response:
{
    "message": "Item created successfully!",
    "item": {
        "name": "Laptop",
        "price": 1000.0,
        "description": "A high-performance laptop"
    }
}
Testing Endpoints with FastAPI’s TestClient
FastAPI provides a built-in TestClient, which simplifies testing by allowing you to simulate HTTP requests directly within your codebase, without needing to start a server. The TestClient is a utility built on top of Python’s requests library, specifically designed for testing FastAPI applications.
It creates a mock environment that simulates real HTTP interactions, enabling you to test endpoints programmatically, verify input validation and response formats, and simulate different HTTP methods (e.g., GET, POST, PUT, and DELETE).
Here’s how to write a simple test for the /hello endpoint.
Test Code Example
from fastapi.testclient import TestClient
from main import app  # Import your FastAPI app

client = TestClient(app)

# Test for the /hello endpoint
def test_read_root():
    response = client.get("/")
    assert response.status_code == 200
    assert response.json() == {"message": "Hello, World!"}
The TestClient, part of FastAPI’s testing utilities and built on Python’s requests library, allows you to simulate HTTP requests to your FastAPI application without starting the server. Using client.get("/"), we send a simulated GET request to the / endpoint.
Following this, two assertions confirm the success of the test:
assert response.status_code == 200: Confirms that the HTTP response status is200 OK.assert response.json() == {"message": "Hello, World!"}: Validates that the returned JSON matches the expected output.
How to Run the Test
- Save the test code in a file (e.g.,
test_main.py). - Install
pytestif not already installed:pip install pytest. - Run the test:
$ pytest test_main.py
- You should see an output like this:
============================ test session starts ============================
collected 1 item
test_main.py .                                                        [100%]
============================ 1 passed in 0.02s ============================
Combining Both Concepts: POST Request and Testing
Let’s write a test for the /items/ endpoint to verify that it validates input and returns the correct response.
Test Code Example for /items/
def test_create_item():
    response = client.post("/items/", json={"name": "Book", "price": 15.5, "description": "A sci-fi novel"})
    assert response.status_code == 200
    assert response.json() == {
        "message": "Item created successfully!",
        "item": {
            "name": "Book",
            "price": 15.5,
            "description": "A sci-fi novel"
        }
    }
Similar to the previous test we demonstrated for the simple “Hello, World!” scenario, the test for the /items/ endpoint involves sending a simulated POST request to /items/ (rather than the root endpoint used in the “Hello, World!” example) with a JSON payload.
The two assertions verify that the response status is 200 OK and that the returned JSON matches the expected structure.
What's next? We recommend PyImageSearch University.

86+ total classes • 115+ hours hours of on-demand code walkthrough videos • Last updated: July 2026
★★★★★ 4.84 (128 Ratings) • 16,000+ Students Enrolled
I strongly believe that if you had the right teacher you could master computer vision and deep learning.
Do you think learning computer vision and deep learning has to be time-consuming, overwhelming, and complicated? Or has to involve complex mathematics and equations? Or requires a degree in computer science?
That’s not the case.
All you need to master computer vision and deep learning is for someone to explain things to you in simple, intuitive terms. And that’s exactly what I do. My mission is to change education and how complex Artificial Intelligence topics are taught.
If you're serious about learning computer vision, your next stop should be PyImageSearch University, the most comprehensive computer vision, deep learning, and OpenCV course online today. Here you’ll learn how to successfully and confidently apply computer vision to your work, research, and projects. Join me in computer vision mastery.
Inside PyImageSearch University you'll find:
- ✓ 86+ courses on essential computer vision, deep learning, and OpenCV topics
- ✓ 86 Certificates of Completion
- ✓ 115+ hours hours of on-demand video
- ✓ Brand new courses released regularly, ensuring you can keep up with state-of-the-art techniques
- ✓ Pre-configured Jupyter Notebooks in Google Colab
- ✓ Run all code examples in your web browser — works on Windows, macOS, and Linux (no dev environment configuration required!)
- ✓ Access to centralized code repos for all 540+ tutorials on PyImageSearch
- ✓ Easy one-click downloads for code, datasets, pre-trained models, etc.
- ✓ Access on mobile, laptop, desktop, etc.
Summary
FastAPI is a modern, high-performance web framework for building APIs in Python. This guide introduced the core concepts of FastAPI, including its benefits, such as automatic validation with Pydantic, built-in interactive API documentation, and high-speed asynchronous processing.
We covered:
- Installation and Setup: How to install FastAPI and Uvicorn and run your first API server.
- Creating Endpoints: Writing basic
GETandPOSTendpoints, using path and query parameters. - Data Validation: Leveraging Pydantic models for input validation.
- Testing APIs: Using FastAPI’s built-in
TestClientto validate API functionality programmatically.
With its intuitive syntax, powerful validation, and robust performance, FastAPI is an excellent choice for developers looking to build secure and efficient APIs quickly. Whether you’re a beginner or an experienced developer, FastAPI provides the tools to streamline API development while maintaining flexibility and scalability.
Citation Information
Martinez, H. “Getting Started with Python and FastAPI: A Complete Beginner’s Guide,” PyImageSearch, P. Chugh, S. Huot, A. Sharma, and P. Thakur, eds., 2025, https://pyimg.co/fvjye
@incollection{Martinez_2025_getting-started-python-fastapi-complete-beginners-guide,
  author = {Hector Martinez},
  title = {{Getting Started with Python and FastAPI: A Complete Beginner’s Guide}},
  booktitle = {PyImageSearch},
  editor = {Puneet Chugh and Susan Huot and Aditya Sharma and Piyush Thakur},
  year = {2025},
  url = {https://pyimg.co/fvjye},
}
To download the source code to this post (and be notified when future tutorials are published here on PyImageSearch), simply enter your email address in the form below!

Download the Source Code and FREE 17-page Resource Guide
Enter your email address below to get a .zip of the code and a FREE 17-page Resource Guide on Computer Vision, OpenCV, and Deep Learning. Inside you'll find my hand-picked tutorials, books, courses, and libraries to help you master CV and DL!

Comment section
Hey, Adrian Rosebrock here, author and creator of PyImageSearch. While I love hearing from readers, a couple years ago I made the tough decision to no longer offer 1:1 help over blog post comments.
At the time I was receiving 200+ emails per day and another 100+ blog post comments. I simply did not have the time to moderate and respond to them all, and the sheer volume of requests was taking a toll on me.
Instead, my goal is to do the most good for the computer vision, deep learning, and OpenCV community at large by focusing my time on authoring high-quality blog posts, tutorials, and books/courses.
If you need help learning computer vision and deep learning, I suggest you refer to my full catalog of books and courses — they have helped tens of thousands of developers, students, and researchers just like yourself learn Computer Vision, Deep Learning, and OpenCV.
Click here to browse my full catalog.