In our previous tutorial, you learned how to improve the accuracy of Tesseract OCR by supplying the appropriate page segmentation mode (PSM). The PSM allows you to select a segmentation method dependent on your particular image and the environment in which it was captured.

However, there are times when changing the PSM is not sufficient, and you instead need to use a bit of computer vision and image processing to clean up the image before you pass it through the Tesseract OCR engine.
To learn how to improve OCR results using basic image processing, just keep reading.
Improving OCR Results with Basic Image Processing
Exactly which image processing algorithms or techniques you utilize is heavily dependent on your exact situation, project requirements, and input images; however, with that said, it’s still important to gain experience applying image processing to clean up images before OCR’ing them.
This tutorial will provide you with such an example. You can then use this example as a starting point for cleaning up your images with basic image processing for OCR.
Learning Objectives
In this tutorial, you will:
- Learn how basic image processing can dramatically improve the accuracy of Tesseract OCR
- Discover how to apply thresholding, distance transforms, and morphological operations to clean up images
- Compare OCR accuracy before and after applying our image processing routine
- Find out where to learn to build an image processing pipeline for your particular application
Image Processing and Tesseract OCR
We’ll start this tutorial by reviewing our project directory structure. From there, we’ll look at an example image where Tesseract OCR, regardless of PSM, fails to correctly OCR the input image. We’ll then apply a bit of image processing and OpenCV to pre-process and clean up the input allowing Tesseract to successfully OCR the image. Finally, we’ll learn where you can brush up on your computer vision skills so that you can make effective image processing pipelines, like the one in this tutorial. Let’s dive in!
Configuring your development environment
To follow this guide, you need to have the OpenCV library installed on your system.
Luckily, OpenCV is pip-installable:
$ pip install opencv-contrib-python
If you need help configuring your development environment for OpenCV, I highly recommend that you read my pip install OpenCV guide — it will have you up and running in a matter of minutes.
Having problems configuring your development environment?

All that said, are you:
- Short on time?
- Learning on your employer’s administratively locked system?
- Wanting to skip the hassle of fighting with the command line, package managers, and virtual environments?
- Ready to run the code right now on your Windows, macOS, or Linux system?
Then join PyImageSearch University today!
Gain access to Jupyter Notebooks for this tutorial and other PyImageSearch guides that are pre-configured to run on Google Colab’s ecosystem right in your web browser! No installation required.
And best of all, these Jupyter Notebooks will run on Windows, macOS, and Linux!
Project Structure
Let’s get started by reviewing our project directory structure:
|-- challenging_example.png
|-- process_image.py
This project involves a challenging example image that I gathered on Stack Overflow (Figure 2). The challenging_example.png flat out doesn’t work with Tesseract as is (even with Tesseract v4’s deep learning capability). To combat this, we’ll develop an image processing script process_image.py that prepares the image for successful OCR with Tesseract.

When Tesseract by Itself Fails to OCR an Image
In this tutorial, we will be OCR’ing the image from Figure 2. As humans, we can easily see that this image contains the text “12-14,” but for a computer, it poses several challenges, including:
- A complex, textured background
- The background is inconsistent — it is significantly lighter on the left-hand side versus darker on the right-hand side
- The text in the background has a bit of a bevel on it, potentially making it harder to segment the foreground text from the background
- There are numerous black blobs toward the top of the image, also making it more challenging to segment the text
To demonstrate how hard it is to segment this image in its current state, let’s apply Tesseract to the original image:
$ tesseract challenging_example.png stdout
Warning: Invalid resolution 0 dpi. Using 70 instead.

Estimating resolution as 169
Using the default PSM (--psm 3; fully automatic page segmentation, but with no OSD), Tesseract is completely unable to OCR the image, returning an empty output.
If you were to experiment with the various PSM settings from the previous tutorial, you would see that one of the only PSMs that returns any output is --psm 8 (treating the image as a single word):
$ tesseract challenging_example.png stdout --psm 8
Warning: Invalid resolution 0 dpi. Using 70 instead.
 T2eti@ce
Unfortunately, Tesseract, regardless of PSM, is utterly failing to OCR this image as is, returning either nothing at all or total gibberish. So, what do we do in these situations? Do we mark this image as “impossible to OCR” and then move on to the next project?
Not so fast — all we need is a bit of image processing.
Implementing an Image Processing Pipeline for OCR
In this section, I’ll show you how a cleverly designed image processing pipeline using the OpenCV library can help us to pre-process and clean up our input image. The result will be a clearer image that Tesseract can correctly OCR.
I usually do not include image sub-step results. I’ll include image sub-step results here because we will perform image processing operations that change how the image looks at each step. You will see sub-step image results for thresholding, morphological operations, etc., so you can easily follow along.
With that said, open a new file, name it process_image.py, and insert the following code:
# import the necessary packages
import numpy as np
import pytesseract
import argparse
import imutils
import cv2

# construct the argument parser and parse the arguments
ap = argparse.ArgumentParser()
ap.add_argument("-i", "--image", required=True,
	help="path to input image to be OCR'd")
args = vars(ap.parse_args())
After importing our packages, including OpenCV for our pipeline and PyTesseract for OCR, we parse our input --image command line argument.
Let’s dive into the image processing pipeline now:
# load the input image and convert it to grayscale
image = cv2.imread(args["image"])
gray = cv2.cvtColor(image, cv2.COLOR_BGR2GRAY)

# threshold the image using Otsu's thresholding method
thresh = cv2.threshold(gray, 0, 255,
	cv2.THRESH_BINARY_INV | cv2.THRESH_OTSU)[1]
cv2.imshow("Otsu", thresh)
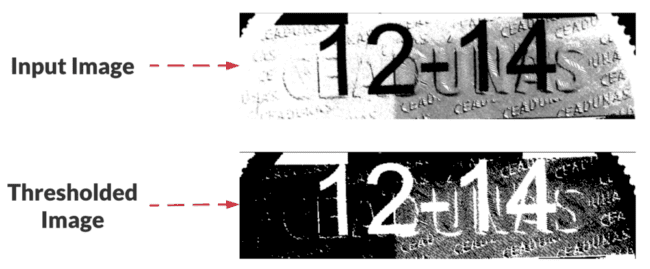
Here, we load the input --image and convert it to grayscale (Lines 15 and 16). Using our gray image, we then apply Otsu’s automatic thresholding algorithm as shown in Figure 3 (Lines 19 and 20). Given that we’ve inverted the binary threshold via the cv2.THRESH_BINARY_INV flag, the text we wish to OCR is now white (foreground), and we begin to see parts of the background removed.

We still have many ways to go before our image is ready to OCR, so let’s see what comes next:
# apply a distance transform which calculates the distance to the
# closest zero pixel for each pixel in the input image
dist = cv2.distanceTransform(thresh, cv2.DIST_L2, 5)

# normalize the distance transform such that the distances lie in
# the range [0, 1] and then convert the distance transform back to
# an unsigned 8-bit integer in the range [0, 255]
dist = cv2.normalize(dist, dist, 0, 1.0, cv2.NORM_MINMAX)
dist = (dist * 255).astype("uint8")
cv2.imshow("Dist", dist)

# threshold the distance transform using Otsu's method
dist = cv2.threshold(dist, 0, 255,
	cv2.THRESH_BINARY | cv2.THRESH_OTSU)[1]
cv2.imshow("Dist Otsu", dist)
Line 25 applies a distance transform to our thresh image using a maskSize of 5 x 5 — a calculation that determines the distance from each pixel to the nearest 0 pixel (black) in the input image. Subsequently, we normalize and scale the dist to the range [0, 255] (Lines 30 and 31). The distance transform starts to reveal the digits themselves, since there is a larger distance from the foreground pixels to the background. The distance transform has the added benefit of cleaning up much of the noise in the image’s background. For more details on this transform, refer to the OpenCV docs.
From there, we apply Otsu’s thresholding method again but this time to the dist map (Lines 35 and 36) the results of which are shown in Figure 4. Notice that we are not using the inverse binary threshold (we’ve dropped the _INV part of the flag) because we want the text to remain in the foreground (white).

Let’s continue to clean up our foreground:
# apply an "opening" morphological operation to disconnect components
# in the image
kernel = cv2.getStructuringElement(cv2.MORPH_ELLIPSE, (7, 7))
opening = cv2.morphologyEx(dist, cv2.MORPH_OPEN, kernel)
cv2.imshow("Opening", opening)
Applying an opening morphological operation (i.e., dilation followed by erosion) disconnects connected blobs and removes noise (Lines 41 and 42). Figure 5 demonstrates that our opening operation effectively disconnects the “1” character from the blob at the top of the image (magenta circle).

At this point, we can extract contours from the image and filter them to reveal only the digits:
# find contours in the opening image, then initialize the list of
# contours which belong to actual characters that we will be OCR'ing
cnts = cv2.findContours(opening.copy(), cv2.RETR_EXTERNAL,
	cv2.CHAIN_APPROX_SIMPLE)
cnts = imutils.grab_contours(cnts)
chars = []

# loop over the contours
for c in cnts:
	# compute the bounding box of the contour
	(x, y, w, h) = cv2.boundingRect(c)

	# check if contour is at least 35px wide and 100px tall, and if
	# so, consider the contour a digit
	if w >= 35 and h >= 100:
		chars.append(c)
Extracting contours in a binary image means that we want to find all the isolated foreground blobs. Lines 47 and 48 find all the contours (both characters and noise).
After we’ve found all of our contours (cnts) we need to determine which ones to discard and which to add to our list of characters. Lines 53–60 loop over the cnts, filtering out contours that aren’t at least 35 pixels wide and 100 pixels tall. Those that pass the test are added to the chars list.
Now that we’ve isolated our character contours, let’s clean up the surrounding area:
# compute the convex hull of the characters
chars = np.vstack([chars[i] for i in range(0, len(chars))])
hull = cv2.convexHull(chars)

# allocate memory for the convex hull mask, draw the convex hull on
# the image, and then enlarge it via a dilation
mask = np.zeros(image.shape[:2], dtype="uint8")
cv2.drawContours(mask, [hull], -1, 255, -1)
mask = cv2.dilate(mask, None, iterations=2)
cv2.imshow("Mask", mask)

# take the bitwise of the opening image and the mask to reveal *just*
# the characters in the image
final = cv2.bitwise_and(opening, opening, mask=mask)
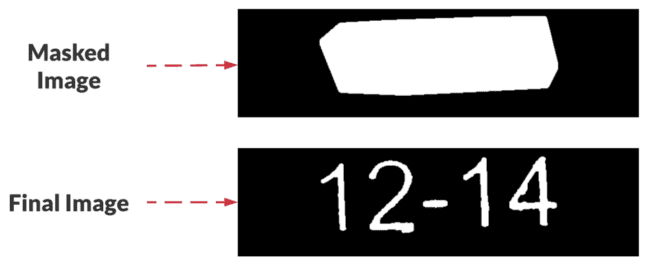
To eliminate all blobs around the characters, we:
- Compute the convex
hullthat will enclose all of the digits (Lines 63 and 64) - Allocate memory for a
mask(Line 68) - Draw the convex
hullof the digits (Line 69) - Enlarge (dilate) the
mask(Line 70)
The effect of these convex hull masking operations is depicted in Figure 6 (top). Computing the bitwise AND (between opening and mask) via Line 75 cleans up our opening image and produces our final image consisting of only the digits and no background noise Figure 6 (bottom).

mask of the character contours. Bottom: The final result after computing the bitwise AND of the opening and mask.That’s it for our image processing pipeline — we now have a clean image which will play nice with Tesseract. Let’s perform OCR and display the results:
# OCR the input image using Tesseract
options = "--psm 8 -c tessedit_char_whitelist=0123456789"
text = pytesseract.image_to_string(final, config=options)
print(text)

# show the final output image
cv2.imshow("Final", final)
cv2.waitKey(0)
Using our knowledge of Tesseract options from earlier tutorials, we construct our options settings (Line 78):
- PSM: “Treat the image as a single word”
- Whitelist: Digits 0–9 are the only characters that will appear in the results (no symbols or letters)
After OCR’ing the image with our settings (Line 79), we show the text on our terminal and hold all pipeline step images (including the final image) on the screen until a key is pressed (Lines 83 and 84).
Basic Image Processing and Tesseract OCR Results
Let’s put our image processing routine to the test. Open a terminal and launch the process_image.py script:
$ python process_image.py --image challenging_example.png
1214
Success! By using a bit of basic image processing and the OpenCV library, we were able to clean up our input image and then correctly OCR it using Tesseract, even though Tesseract was unable to OCR the original input image!
What's next? We recommend PyImageSearch University.
86+ total classes • 115+ hours hours of on-demand code walkthrough videos • Last updated: January 2026
★★★★★ 4.84 (128 Ratings) • 16,000+ Students Enrolled
I strongly believe that if you had the right teacher you could master computer vision and deep learning.
Do you think learning computer vision and deep learning has to be time-consuming, overwhelming, and complicated? Or has to involve complex mathematics and equations? Or requires a degree in computer science?
That’s not the case.
All you need to master computer vision and deep learning is for someone to explain things to you in simple, intuitive terms. And that’s exactly what I do. My mission is to change education and how complex Artificial Intelligence topics are taught.
If you're serious about learning computer vision, your next stop should be PyImageSearch University, the most comprehensive computer vision, deep learning, and OpenCV course online today. Here you’ll learn how to successfully and confidently apply computer vision to your work, research, and projects. Join me in computer vision mastery.
Inside PyImageSearch University you'll find:
- ✓ 86+ courses on essential computer vision, deep learning, and OpenCV topics
- ✓ 86 Certificates of Completion
- ✓ 115+ hours hours of on-demand video
- ✓ Brand new courses released regularly, ensuring you can keep up with state-of-the-art techniques
- ✓ Pre-configured Jupyter Notebooks in Google Colab
- ✓ Run all code examples in your web browser — works on Windows, macOS, and Linux (no dev environment configuration required!)
- ✓ Access to centralized code repos for all 540+ tutorials on PyImageSearch
- ✓ Easy one-click downloads for code, datasets, pre-trained models, etc.
- ✓ Access on mobile, laptop, desktop, etc.
Summary
In this tutorial, you learned that basic image processing could be a requirement to obtain sufficient OCR accuracy using the Tesseract OCR engine.
While the page segmentation modes (PSMs) presented in the previous tutorial are extremely important when applying Tesseract, sometimes the PSMs themselves are not enough to OCR an image. Typically this happens when the background of an input image is complex, and Tesseract’s basic segmentation methods cannot correctly segment foreground text from the background. When this happens, you need to start applying computer vision and image processing to clean up the input image.
Not all image processing pipelines for OCR will be the same. For this particular example, we could use a combination of thresholding, distance transforms, and morphological operations. However, your example images may require additional tuning of the parameters to these operations or different image processing operations altogether!
In our next tutorial, you will learn how to improve OCR results further using spell-checking algorithms.
To download the source code to this post (and be notified when future tutorials are published here on PyImageSearch), simply enter your email address in the form below!

Download the Source Code and FREE 17-page Resource Guide
Enter your email address below to get a .zip of the code and a FREE 17-page Resource Guide on Computer Vision, OpenCV, and Deep Learning. Inside you'll find my hand-picked tutorials, books, courses, and libraries to help you master CV and DL!


Comment section
Hey, Adrian Rosebrock here, author and creator of PyImageSearch. While I love hearing from readers, a couple years ago I made the tough decision to no longer offer 1:1 help over blog post comments.
At the time I was receiving 200+ emails per day and another 100+ blog post comments. I simply did not have the time to moderate and respond to them all, and the sheer volume of requests was taking a toll on me.
Instead, my goal is to do the most good for the computer vision, deep learning, and OpenCV community at large by focusing my time on authoring high-quality blog posts, tutorials, and books/courses.
If you need help learning computer vision and deep learning, I suggest you refer to my full catalog of books and courses — they have helped tens of thousands of developers, students, and researchers just like yourself learn Computer Vision, Deep Learning, and OpenCV.
Click here to browse my full catalog.