In this tutorial, you will learn how to perform image arithmetic (addition and subtraction) with OpenCV.

Remember way, way back when you studied how to add and subtract numbers in grade school?
Well, it turns out, performing arithmetic with images is quite similar — with only a few caveats, of course.
In this blog post, you’ll learn how to add and subtract images, along with two important differences you need to understand regarding arithmetic operations in OpenCV and Python.
To learn how to perform image arithmetic with OpenCV, just keep reading.
Image Arithmetic OpenCV
In the first part of this guide, we’ll discuss what image arithmetic is, including where you see image arithmetic in real-world applications.
From there, we’ll configure our development environment and review our project directory structure.
I’ll then show you two ways to perform image arithmetic:
- The first way is to use OpenCV’s
cv2.addandcv2.subtract - The second way is to use NumPy’s basic addition and subtraction operators
There are very important caveats you need to understand between the two, so be sure you pay attention as you review this tutorial!
What is image arithmetic?
Image arithmetic is simply matrix addition (with an added caveat on data types, which we’ll explain later).
Let’s take a second and review some very basic linear algebra. Suppose we were to add the following two matrices:
What would the output of the matrix addition be?
The answer is simply the element-wise sum of matrix entries:
Pretty simple, right?
So it’s obvious at this point that we all know basic arithmetic operations like addition and subtraction. But when working with images, we need to keep in mind the numerical limits of our color space and data type.
For example, RGB images have pixels that fall within the range [0, 255]. What happens if we examine a pixel with an intensity of 250 and try to add 10 to it?
Under normal arithmetic rules, we would end up with a value of 260. However, since we represent RGB images as 8-bit unsigned integers who can only take on values in the range [0, 255], 260 is not a valid value.
So what should happen? Should we perform a check of some sort to ensure no pixel falls outside the range of [0, 255], thus clipping all pixels to have a minimum value of 0 and a maximum value of 255?
Or do we apply a modulus operation and “wrap around” (which is what NumPy does)? Under modulus rules, adding 10 to 255 would simply wrap around to a value of 9.
Which way is the “correct” way to handle image additions and subtractions that fall outside the range of [0, 255]?
The answer is that there is no “correct way” — it simply depends on how you are manipulating your pixels and what you want the desired results to be.
However, be sure to keep in mind that there is a difference between OpenCV and NumPy addition. NumPy will perform modulus arithmetic and “wrap around.” On the other hand, OpenCV will perform clipping and ensure pixel values never fall outside the range [0, 255].
But don’t worry! These nuances will become more clear as we explore some code below.
What is image arithmetic used for?

Now that we understand the basics of image arithmetic, you may be wondering where we would use image arithmetic in the real world.
Basic examples include:
- Adjusting brightness and contrast by adding or subtracting a set amount (for example, adding 50 to all pixel values to increase the brightness of an image)
- Working with alpha blending and transparency, as we do in this tutorial
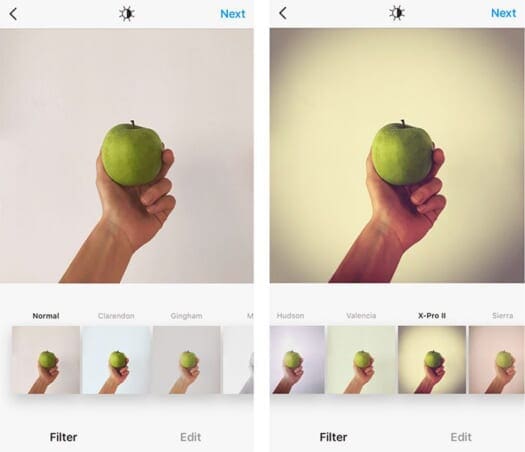
- Creating Instagram-like filters — these filters are simply mathematical functions applied to the pixel intensities
While you may be tempted to quickly gloss over this guide on image arithmetic and move on to more advanced topics, I strongly encourage you to read this tutorial in detail. While simplistic, image arithmetic is used in many computer vision and image processing applications (whether you realize it or not).
Configuring your development environment
To follow this guide, you need to have the OpenCV library installed on your system.
Luckily, OpenCV is pip-installable:
$ pip install opencv-contrib-python
If you need help configuring your development environment for OpenCV, I highly recommend that you read my pip install OpenCV guide — it will have you up and running in a matter of minutes.
Having problems configuring your development environment?

All that said, are you:
- Short on time?
- Learning on your employer’s administratively locked system?
- Wanting to skip the hassle of fighting with the command line, package managers, and virtual environments?
- Ready to run the code right now on your Windows, macOS, or Linux system?
Then join PyImageSearch Plus today!
Gain access to Jupyter Notebooks for this tutorial and other PyImageSearch guides that are pre-configured to run on Google Colab’s ecosystem right in your web browser! No installation required.
And best of all, these Jupyter Notebooks will run on Windows, macOS, and Linux!
Project structure
Ready to learn the fundamentals of image arithmetic with OpenCV?
Great, let’s get going.
Start by using the “Downloads” section of this tutorial to access the source code and example images:
$ tree . --dirsfirst
.
├── grand_canyon.png
└── image_arithmetic.py

0 directories, 2 files
Our image_arithmetic.py file will demonstrate the differences/caveats between addition and subtraction operations in OpenCV versus NumPy.
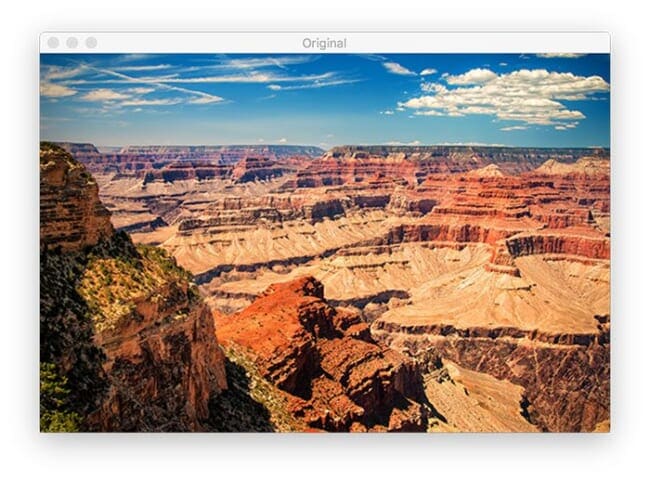
You’ll then learn how to manually adjust the brightness of an image, grand_canyon.png, using image arithmetic with OpenCV.
Implementing image arithmetic with OpenCV
We are now ready to explore image arithmetic with OpenCV and NumPy.
Open the image_arithmetic.py file in your project folder, and let’s get started:
# import the necessary packages
import numpy as np
import argparse
import cv2

# construct the argument parser and parse the arguments
ap = argparse.ArgumentParser()
ap.add_argument("-i", "--image", type=str, default="grand_canyon.png",
	help="path to the input image")
args = vars(ap.parse_args())
Lines 2-4 import our required Python packages. Notice how we are importing NumPy for numerical array processing.
Lines 7-10 then parse our command line arguments. We need only a single switch here, --image, which points to the image on disk where we’ll be applying image arithmetic operations. We’ll default the image path to the grand_canyon.png image on disk, but you can easily update the switch if you wish to use your own image(s).
Remember how I mentioned the difference between OpenCV and NumPy arithmetic above? Well, now we are going to explore it further and provide a concrete example to ensure we fully understand it:
# images are NumPy arrays stored as unsigned 8-bit integers (unit8)
# with values in the range [0, 255]; when using the add/subtract
# functions in OpenCV, these values will be *clipped* to this range,
# even if they fall outside the range [0, 255] after applying the
# operation
added = cv2.add(np.uint8([200]), np.uint8([100]))
subtracted = cv2.subtract(np.uint8([50]), np.uint8([100]))
print("max of 255: {}".format(added))
print("min of 0: {}".format(subtracted))
On Line 17, we define two NumPy arrays that are 8-bit unsigned integers. The first array has one element: a value of 200. The second array has only one element but a value of 100. We then use OpenCV’s cv2.add method to add the values together.
What do you think the output is going to be?
According to standard arithmetic rules, we would think the result should be 300, but remember that we are working with 8-bit unsigned integers that only have a range between [0, 255].
Since we are using the cv2.add method, OpenCV takes care of clipping for us and ensures that the addition produces a maximum value of 255.
When we execute this code, we can see the result on the first line in the listing below:
max of 255: [[255]]
Sure enough, the addition returned a value of 255.
Line 20 then performs subtraction using cv2.subtract. Again, we define two NumPy arrays, each with a single element, and of the 8-bit unsigned integer data type. The first array has a value of 50 and the second a value of 100.
According to our arithmetic rules, the subtraction should return a value of -50; however, OpenCV once again performs clipping for us. We find that the value is clipped to a value of 0. Our output below verifies this:
min of 0: [[0]]
Subtracting 100 from 50 using cv2.subtract returns a value of 0.
But what happens if we use NumPy to perform the arithmetic instead of OpenCV?
Let’s explore that now:
# using NumPy arithmetic operations (rather than OpenCV operations)
# will result in a modulo ("wrap around") instead of being clipped
# to the range [0, 255]
added = np.uint8([200]) + np.uint8([100])
subtracted = np.uint8([50]) - np.uint8([100])
print("wrap around: {}".format(added))
print("wrap around: {}".format(subtracted))
First, we define two NumPy arrays, each with a single element, and of the 8-bit unsigned integer data type. The first array has a value of 200, and the second has a value of 100.
If we use the cv2.add function, our addition would be clipped and a value of 255 returned; however, NumPy does not perform clipping — it instead performs modulo arithmetic and “wraps around.”
Once a value of 255 is reached, NumPy wraps around to zero and then starts counting up again until 100 steps have been reached. You can see this is true via the first line of output below:
wrap around: [44]
Line 26 defines two more NumPy arrays: one has a value of 50 and the other 100.
When using the cv2.subtract method, this subtraction would be clipped to return a value of 0; however, we know that NumPy performs modulo arithmetic rather than clipping. Instead, once 0 is reached during the subtraction, the modulo operation wraps around and starts counting backward from 255 — we can verify this from the output below:
wrap around: [206]
It is important to keep your desired output in mind when performing integer arithmetic:
- Do you want all values to be clipped if they fall outside the range [0, 255]? Then use OpenCV’s built-in methods for image arithmetic.
- Do you want modulus arithmetic operations and have values wrap around if they fall outside the range of [0, 255]? Then simply add and subtract the NumPy arrays as you usually would.
Now that we have explored the caveats of image arithmetic in OpenCV and NumPy, let’s perform the arithmetic on actual images and view the results:
# load the original input image and display it to our screen
image = cv2.imread(args["image"])
cv2.imshow("Original", image)
We start on Lines 31 and 32 by loading our original input image from disk and then displaying it to our screen:

With our image loaded from disk, let’s proceed to increasing the brightness:
# increasing the pixel intensities in our input image by 100 is
# accomplished by constructing a NumPy array that has the *same
# dimensions* as our input image, filling it with ones, multiplying
# it by 100, and then adding the input image and matrix together
M = np.ones(image.shape, dtype="uint8") * 100
added = cv2.add(image, M)
cv2.imshow("Lighter", added)
Line 38 defines a NumPy array of ones, with the same dimensions as our image. Again, we are sure to use 8-bit unsigned integers as our data type.
To fill our matrix with values of 100s rather than 1s, we simply multiply our matrix of 1s by 100.
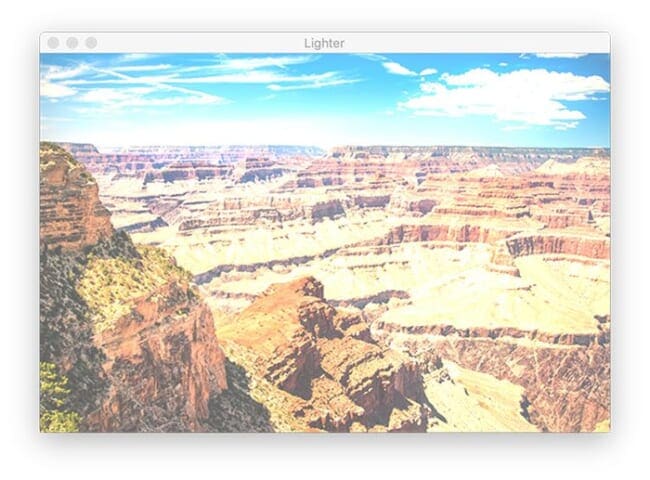
Finally, we use the cv2.add function to add our matrix of 100s to the original image, thus increasing every pixel intensity in the image by 100, but ensuring all values are clipped to the range [0, 255] if they attempt to exceed 255.
The result of our operation can be seen below:

100 to every pixel value. Notice how the image now looks washed out.Notice how the image looks more “washed out” and is substantially brighter than the original. This is because we increase the pixel intensities by adding 100 to them and pushing them toward brighter colors.
Let’s now darken our image by using cv2.subtract:
# similarly, we can subtract 50 from all pixels in our image and make it
# darker
M = np.ones(image.shape, dtype="uint8") * 50
subtracted = cv2.subtract(image, M)
cv2.imshow("Darker", subtracted)
cv2.waitKey(0)
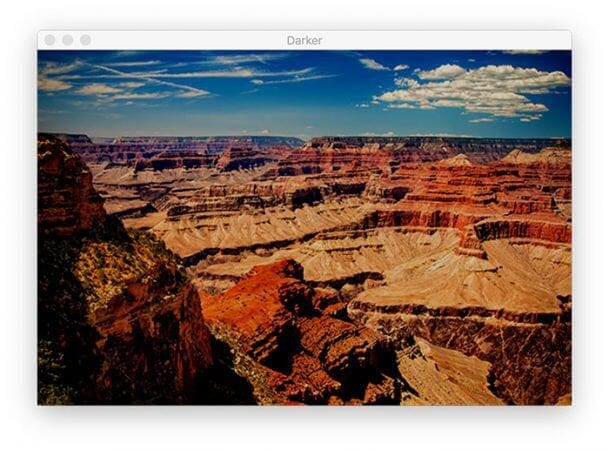
Line 44 creates another NumPy array filled with 50s and then uses cv2.subtract to subtract 50 from each pixel in the image.
Figure 5 shows the results of this subtraction:

Our image now looks considerably darker than the original photo of the Grand Canyon. Pixels that were once white now look gray. This is because we subtract 50 from the pixels and push them toward the darker regions of the RGB color space.
OpenCV image arithmetic results
To perform image arithmetic with OpenCV and NumPy, be sure you have gone to the “Downloads” section of this tutorial to access the source code and example images.
From there, open a shell and execute the following command:
$ python image_arithmetic.py
max of 255: [[255]]
min of 0: [[0]]
wrap around: [44]
wrap around: [206]
Your cropping output should match mine from the previous section.
What's next? We recommend PyImageSearch University.
86+ total classes • 115+ hours hours of on-demand code walkthrough videos • Last updated: January 2026
★★★★★ 4.84 (128 Ratings) • 16,000+ Students Enrolled
I strongly believe that if you had the right teacher you could master computer vision and deep learning.
Do you think learning computer vision and deep learning has to be time-consuming, overwhelming, and complicated? Or has to involve complex mathematics and equations? Or requires a degree in computer science?
That’s not the case.
All you need to master computer vision and deep learning is for someone to explain things to you in simple, intuitive terms. And that’s exactly what I do. My mission is to change education and how complex Artificial Intelligence topics are taught.
If you're serious about learning computer vision, your next stop should be PyImageSearch University, the most comprehensive computer vision, deep learning, and OpenCV course online today. Here you’ll learn how to successfully and confidently apply computer vision to your work, research, and projects. Join me in computer vision mastery.
Inside PyImageSearch University you'll find:
- ✓ 86+ courses on essential computer vision, deep learning, and OpenCV topics
- ✓ 86 Certificates of Completion
- ✓ 115+ hours hours of on-demand video
- ✓ Brand new courses released regularly, ensuring you can keep up with state-of-the-art techniques
- ✓ Pre-configured Jupyter Notebooks in Google Colab
- ✓ Run all code examples in your web browser — works on Windows, macOS, and Linux (no dev environment configuration required!)
- ✓ Access to centralized code repos for all 540+ tutorials on PyImageSearch
- ✓ Easy one-click downloads for code, datasets, pre-trained models, etc.
- ✓ Access on mobile, laptop, desktop, etc.
Summary
In this tutorial, we learned how to apply image addition and subtraction with OpenCV, two basic (but important) image arithmetic operations.
As we saw, image arithmetic operations are simply no more than basic matrix addition and subtraction.
We also explored the peculiarities of image arithmetic using OpenCV and NumPy. Remember that:
- OpenCV addition and subtraction clip values outside the range
[0, 255]to fit inside the unsigned 8-bit integer range… - …whereas NumPy performs a modulus operation and “wraps around”
These caveats are important to keep in mind. Otherwise, you may get unwanted results when performing arithmetic operations on your images.
To download the source code to this post (and be notified when future tutorials are published here on PyImageSearch), simply enter your email address in the form below!

Download the Source Code and FREE 17-page Resource Guide
Enter your email address below to get a .zip of the code and a FREE 17-page Resource Guide on Computer Vision, OpenCV, and Deep Learning. Inside you'll find my hand-picked tutorials, books, courses, and libraries to help you master CV and DL!


Comment section
Hey, Adrian Rosebrock here, author and creator of PyImageSearch. While I love hearing from readers, a couple years ago I made the tough decision to no longer offer 1:1 help over blog post comments.
At the time I was receiving 200+ emails per day and another 100+ blog post comments. I simply did not have the time to moderate and respond to them all, and the sheer volume of requests was taking a toll on me.
Instead, my goal is to do the most good for the computer vision, deep learning, and OpenCV community at large by focusing my time on authoring high-quality blog posts, tutorials, and books/courses.
If you need help learning computer vision and deep learning, I suggest you refer to my full catalog of books and courses — they have helped tens of thousands of developers, students, and researchers just like yourself learn Computer Vision, Deep Learning, and OpenCV.
Click here to browse my full catalog.