Table of Contents
- Integrating Streamlit with Snowflake for Live Cloud Data Apps (Part 1)
- Introduction: Why Connect Streamlit to Snowflake
- What Is Snowflake (and Why It Matters)
- Configuring Your Development Environment
- Project Structure Recap: Extending the Foundation for Snowflake
- Understanding the Helper Modules
- Citation Information
Integrating Streamlit with Snowflake for Live Cloud Data Apps (Part 1)
In this tutorial, you’ll learn how to connect your Streamlit app to Snowflake, a cloud data warehouse built for real-time analytics.
You’ll securely configure credentials, run SQL queries from Streamlit, visualize results, and even blend Snowflake tables with local data — creating a live, interactive data explorer powered entirely by Python.
This lesson is part of a series on Streamlit Apps:
- Getting Started with Streamlit: Learn Widgets, Layouts, and Caching
- Building Your First Streamlit App: Uploads, Charts, and Filters (Part 1)
- Building Your First Streamlit App: Uploads, Charts, and Filters (Part 2)
- Integrating Streamlit with Snowflake for Live Cloud Data Apps (Part 1) (this tutorial)
- Integrating Streamlit with Snowflake for Live Cloud Data Apps (Part 2)
To learn how to query, visualize, and export live warehouse data from Streamlit, just keep reading.
Introduction: Why Connect Streamlit to Snowflake
Welcome to the final lesson in the Streamlit tutorial series — the point where your local prototype evolves into a cloud-ready data application.
In the first two lessons, you learned how to build and extend a data explorer using static CSVs. That was perfect for learning Streamlit’s reactivity model, caching, and UI widgets. But in real analytics workflows, teams don’t analyze CSVs sitting on someone’s laptop — they connect to governed, live data sources that can scale securely across users and projects.
This is where Snowflake comes in. Snowflake is a cloud-based data warehouse built to handle massive datasets, enable secure sharing, and deliver blazing-fast SQL queries. By integrating it directly into your Streamlit app, you’ll transform your simple file-based dashboard into a dynamic data experience — one that interacts with actual business data in real time.
In this lesson, you’ll learn how to:
- Configure Snowflake credentials securely using environment variables or Streamlit’s built-in
secrets.toml. - Create reusable connection and query helpers in a dedicated module (
snowflake_utils.py). - Run ad-hoc (Part 1) and parameterized (Part 2) SQL queries directly from your Streamlit UI.
- Profile, visualize, and export warehouse data without leaving the app.
- Blend remote Snowflake tables with local data for hybrid insights.
- Apply lightweight caching to speed up repeated queries and reduce warehouse costs.
By the end of Part 2, you’ll have a fully functional Streamlit + Snowflake dashboard that connects securely, runs live queries, visualizes patterns, and exports results — all without needing a separate backend or API.
This is the same pattern you’ll use when building internal analytics portals, model-monitoring dashboards, or MLOps (machine learning operations) pipelines powered by governed warehouse data.
What Is Snowflake (and Why It Matters)
Before diving into code, let’s take a quick look at what makes Snowflake the go-to data warehouse for modern analytics and machine learning pipelines.
At its core, Snowflake is a fully managed cloud data platform — meaning you don’t have to worry about provisioning servers, maintaining storage, or scaling infrastructure. It separates compute (the “engine” that runs your queries) from storage (where your data lives), allowing you to scale each independently. When you need to run queries, you spin up a virtual warehouse; when you’re done, you can pause it to save costs.
This elasticity makes Snowflake ideal for applications that need to handle large, unpredictable workloads, such as Streamlit dashboards or MLOps tools that query model outputs on demand.
Some key advantages:
- Performance on demand: Queries scale automatically based on load, returning results in seconds even on massive datasets.
- Cost efficiency: You only pay when the warehouse is active — pause it to stop billing instantly.
- Seamless integration: Works natively with Python via the official
snowflake-connector-pythonpackage and advanced frameworks (e.g., Snowpark). - Security and governance: Features like role-based access control (RBAC), column-level masking, and time travel make it enterprise-grade by design.
- Collaboration and sharing: Teams can share live data securely across departments or organizations without duplicating files.
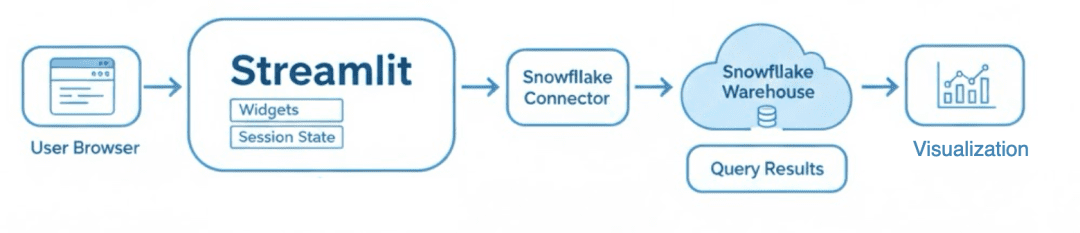
By connecting Streamlit to Snowflake, you bridge the gap between interactive data apps and enterprise-grade data infrastructure. Your app no longer relies on static uploads — it runs live SQL queries against a scalable warehouse, retrieves governed results, and displays them instantly to users.
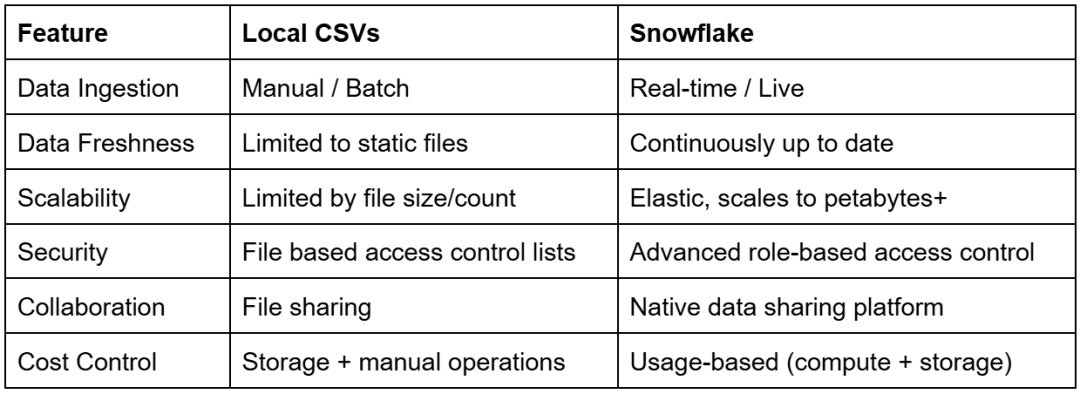
This comparison highlights why local CSV workflows break down at scale. Snowflake replaces manual file handling with a governed, elastic, and real-time data platform that supports secure collaboration, fine-grained access control, and cost-efficient analytics.
Would you like immediate access to 3,457 images curated and labeled with hand gestures to train, explore, and experiment with … for free? Head over to Roboflow and get a free account to grab these hand gesture images.
Configuring Your Development Environment
Before writing any code, let’s make sure your environment is ready to connect Streamlit with Snowflake. You’ll only need a few tools and a free Snowflake account to get started.
Step 1: Create a Snowflake Trial Account
If you don’t already have one, visit Snowflake’s free trial page and create a 30-day account.
Once signed in, open Snowsight (Snowflake’s modern web interface), where you can run SQL queries and manage compute resources.
Step 2: Resume or Create a Warehouse
- Go to Admin → Warehouses.
- Look for a default warehouse such as
COMPUTE_WH. If it’s paused, click Resume. - If none exists, create a new XS (Extra-Small) warehouse.
- Enable auto-suspend (60 seconds) to avoid unnecessary credit usage.
Step 3: Confirm Database and Schema
Snowflake trial accounts include a sample database:
SNOWFLAKE_SAMPLE_DATA → TPCH_SF1
TPCH_SF1 is Snowflake’s built-in sample schema based on the TPC-H benchmark dataset (scale factor 1), commonly used for demos and testing. You can safely query these tables without affecting your account or incurring significant costs.
Inside, you’ll find tables such as CUSTOMER, ORDERS, and LINEITEM.
We’ll use these to run test queries later in the Streamlit app.
Run this quick check in Snowsight:
USE WAREHOUSE COMPUTE_WH;
USE DATABASE SNOWFLAKE_SAMPLE_DATA;
USE SCHEMA TPCH_SF1;
SELECT CURRENT_TIMESTAMP();
If you see a UTC (Coordinated Universal Time) timestamp result, your warehouse and schema are configured correctly.
Step 4: Install Dependencies
Add the following packages to your requirements.txt (if not already present):
streamlit>=1.38,<2
pandas>=2.2,<3
snowflake-connector-python>=3.10,<4
Then install them:
pip install -r requirements.txt
Step 5: Configure Snowflake Credentials
You can store credentials as environment variables or, more conveniently, in Streamlit’s built-in secrets file.
Create a file named .streamlit/secrets.toml at your project root:
[snowflake]
user = "YOUR_USERNAME"
password = "YOUR_PASSWORD"
account = "AXOIRVL-GQ22654"
warehouse = "COMPUTE_WH"
database = "SNOWFLAKE_SAMPLE_DATA"
schema = "TPCH_SF1"
role = "ACCOUNTADMIN"
Note: Never commit this file to GitHub. It should remain private on your local system.
Once your Snowflake trial account, dependencies, and credentials are ready, you’re set to move on.
Next, let’s look at how our helper modules (i.e., config.py and snowflake_utils.py) securely handle connection logic behind the scenes.
Need Help Configuring Your Development Environment?

All that said, are you:
- Short on time?
- Learning on your employer’s administratively locked system?
- Wanting to skip the hassle of fighting with the command line, package managers, and virtual environments?
- Ready to run the code immediately on your Windows, macOS, or Linux system?
Then join PyImageSearch University today!
Gain access to Jupyter Notebooks for this tutorial and other PyImageSearch guides pre-configured to run on Google Colab’s ecosystem right in your web browser! No installation required.
And best of all, these Jupyter Notebooks will run on Windows, macOS, and Linux!
Project Structure Recap: Extending the Foundation for Snowflake
By the end of this lesson, your Streamlit project will have evolved from a simple prototype into a live data app capable of querying cloud warehouses. The structure remains familiar — modular, organized, and easy to extend — but now includes utilities for secure credential handling and database connectivity.
Here’s the complete directory layout, with new components highlighted:
streamlit_project/
├── lesson1_main.py
├── lesson2_main.py
├── lesson3_main.py              ← New: connects to Snowflake
├── pyimagesearch/
│   ├── __init__.py
│   ├── config.py                ← Now loads Snowflake credentials
│   ├── data_loader.py
│   ├── visualization.py
│   ├── snowflake_utils.py       ← New helper for warehouse queries
├── data/
│   └── iris_sample.csv
├── .streamlit/
│   ├── config.toml              ← App theming and layout
│   └── secrets.toml             ← Stores Snowflake credentials securely
├── requirements.txt
└── README.md
New and updated modules in this lesson:
pyimagesearch/snowflake_utils.py: Encapsulates authentication and query execution using the official Snowflake connector.pyimagesearch/config.py: Updated to read credentials fromst.secretsor environment variables, and expose asnowflake_enabledflag.lesson3_main.py: Your main Streamlit app that connects to Snowflake, runs SQL queries, visualizes data, blends local and remote datasets, and demonstrates caching (Part 2)..streamlit/secrets.toml: Holds your private Snowflake credentials for local development.
The rest of the project (i.e., data_loader.py, visualization.py, and __init__.py) carry forward unchanged from previous lessons, reinforcing consistent structure and reusability across the entire series.
Understanding the Helper Modules
Before we connect Streamlit to Snowflake, let’s pause and look at the two backbone modules that quietly do most of the heavy lifting (i.e., config.py and snowflake_utils.py).
These modules handle credential loading, database connection creation, and returning query results as Pandas DataFrames for visualization. Getting comfortable with them now will make the rest of the lesson effortless.
config.py: Managing Configuration and Credentials
Let’s start with config.py. This file defines the global configuration that every lesson in this series relies on. It’s small, simple, and incredibly useful.
The top of the file begins with a few imports that set the foundation:
from dataclasses import dataclass
import os
from typing import Optional

try:
    import streamlit as st
except Exception:
    st = None

try:
    from dotenv import load_dotenv  # type: ignore
    load_dotenv()
except Exception:
    pass
Here’s what’s happening:
We import Python’s built-in dataclass to define a configuration container with minimal boilerplate. The os module is used to read environment variables, while Optional from typing lets us define fields that might or might not be set — handy for credentials (e.g., roles or schemas) that can sometimes be omitted.
Then we make two optional imports.
First, Streamlit: wrapped in a try block to prevent import-time failures if Streamlit isn’t installed (e.g., when running utility tests or lesson scripts outside the Streamlit runtime). If the import fails, we simply assign st = None and continue.
Next comes an optional import of dotenv. If the python-dotenv package is installed, it loads environment variables from a local .env file. This is mostly for convenience — developers often keep credentials there while experimenting locally. The script will still work fine without it.
Now we reach the heart of the file: the Settings dataclass.
@dataclass(frozen=True)
class Settings:
    app_name: str = "Streamlit Tutorial Series"
    default_sample_path: str = os.path.join("data", "iris_sample.csv")

    snowflake_user: Optional[str] = None
    snowflake_password: Optional[str] = None
    snowflake_account: Optional[str] = None
    snowflake_role: Optional[str] = None
    snowflake_warehouse: Optional[str] = None
    snowflake_database: Optional[str] = None
    snowflake_schema: Optional[str] = None
This class centralizes all configuration in one place. The frozen=True flag means that once the settings object is created, none of its values can be changed — an important safeguard when Streamlit reruns scripts automatically.
At the top are generic app-level variables (e.g., app_name and the default Iris dataset path). The rest are Snowflake credentials that start as None and are dynamically populated.
Inside the class, there’s a special method called __post_init__, which runs right after initialization. This is where the real magic happens.
    def __post_init__(self):
        """Load Snowflake credentials from Streamlit secrets or environment variables."""
        # Load from Streamlit secrets first
        snowflake_secrets = {}
        if st is not None:
            try:
                snowflake_secrets = st.secrets["snowflake"]
            except Exception:
                pass
When Streamlit is available, it first looks for credentials stored in st.secrets["snowflake"], which is how Streamlit Cloud securely manages secrets. If those aren’t found, it falls back to reading from environment variables (e.g., SNOWFLAKE_USER, SNOWFLAKE_ACCOUNT, and so on).
This layered approach is designed to support both cloud and local development environments
        # Fallback to environment variables if secrets missing
        def get_value(key: str, env_key: str) -> Optional[str]:
            return snowflake_secrets.get(key) or os.getenv(env_key)
Next comes a small helper function called get_value().
Its purpose is simple: try to fetch a value from Streamlit secrets first, and if that fails, fall back to the corresponding environment variable. This pattern makes the configuration portable — it works the same way whether you’re deploying in the cloud or testing locally on your machine.
        object.__setattr__(self, "snowflake_user", get_value("user", "SNOWFLAKE_USER"))
        object.__setattr__(self, "snowflake_password", get_value("password", "SNOWFLAKE_PASSWORD"))
        object.__setattr__(self, "snowflake_account", get_value("account", "SNOWFLAKE_ACCOUNT"))
        object.__setattr__(self, "snowflake_role", get_value("role", "SNOWFLAKE_ROLE"))
        object.__setattr__(self, "snowflake_warehouse", get_value("warehouse", "SNOWFLAKE_WAREHOUSE"))
        object.__setattr__(self, "snowflake_database", get_value("database", "SNOWFLAKE_DATABASE"))
        object.__setattr__(self, "snowflake_schema", get_value("schema", "SNOWFLAKE_SCHEMA"))
With the get_value() helper in place, we can now populate all the Snowflake fields in the frozen dataclass. Because Settings is immutable, normal assignment isn’t allowed — instead, the code uses object.__setattr__() to set each attribute safely within the __post_init__ scope.
This section is the real heart of the configuration system. It ensures that even though the Settings object is frozen, all your credentials are loaded once — right when it’s created — and remain constant throughout the app’s lifecycle. Streamlit’s rerun model won’t reset or mutate these values, keeping your environment predictable and reducing accidental mutation.
At the end of the file, there’s one more useful property: snowflake_enabled.
    @property
    def snowflake_enabled(self) -> bool:
        """Return True if all required Snowflake credentials are available."""
        required = [
            self.snowflake_user,
            self.snowflake_password,
            self.snowflake_account,
            self.snowflake_warehouse,
            self.snowflake_database,
            self.snowflake_schema,
        ]
        return all(bool(x) for x in required)
This property is intended to be used by the app to decide whether to attempt a live Snowflake connection.
Finally, at the bottom, the file creates a single global instance of this dataclass:
settings = Settings()
This way, every script can import the same configuration with one line:
from pyimagesearch import settings
and immediately access values such as:
settings.snowflake_user
settings.snowflake_enabled

config.py loads credentials. Streamlit first reads secrets, then falls back to environment variables, constructs a settings object, and exposes it to the Streamlit app (source: image by the author).snowflake_utils.py: Handling Connection and Query Logic
Now that credentials are loaded, we need a way to connect to Snowflake and run queries. That’s where snowflake_utils.py comes in.
Like config.py, it starts with a few critical imports:
from dataclasses import dataclass
from typing import Optional
import pandas as pd

try:
    import snowflake.connector  # type: ignore
except Exception:
    snowflake = None
The imports here mirror the same philosophy: minimal, intentional, and safe.
We use dataclass again to structure our credentials cleanly. Optional lets us mark the role parameter as non-essential. Pandas is used because the Snowflake connector can return query results directly as a Pandas DataFrame, which is perfect for Streamlit.
Finally, the try/except around snowflake.connector prevents import errors in environments where Snowflake dependencies aren’t installed yet. Instead of breaking the whole app, it simply sets snowflake = None. Later, the app can catch this error and inform the user gracefully.
Next comes the SnowflakeCredentials dataclass:
@dataclass
class SnowflakeCredentials:
    user: str
    password: str
    account: str
    warehouse: str
    database: str
    schema: str
    role: Optional[str] = None
This class is a neat container for everything needed to connect to Snowflake. Without it, we’d have to pass 7 parameters into every connection call. The dataclass groups them neatly and provides type hints for clarity.
The real star of the module is the run_query function:
def run_query(creds: SnowflakeCredentials, query: str) -> pd.DataFrame:
    if "snowflake" not in globals() or snowflake is None:  # type: ignore
        raise RuntimeError("snowflake-connector-python is not installed.")
    ctx = snowflake.connector.connect(
        user=creds.user,
        password=creds.password,
        account=creds.account,
        warehouse=creds.warehouse,
        database=creds.database,
        schema=creds.schema,
        role=creds.role,
    )
    try:
        cs = ctx.cursor()
        try:
            cs.execute(query)
            df = cs.fetch_pandas_all()
        finally:
            cs.close()
    finally:
        ctx.close()
    return df
Let’s walk through it.
The function begins with a quick check to ensure the Snowflake connector is available. If not, it raises a clear error instead of failing later during connection.
The connection itself is straightforward: it uses the credentials stored in the SnowflakeCredentials dataclass to create a context (ctx). Inside that context, a cursor executes the SQL query. Once the data is retrieved, it’s fetched directly into a Pandas DataFrame using fetch_pandas_all(), which is one of the most convenient features of Snowflake’s Python connector.
Finally, both the cursor and connection are closed in a finally block — this ensures resources are cleaned up properly even if something goes wrong mid-query.
Together, config.py and snowflake_utils.py form a small but powerful foundation.
The first ensures credentials are loaded securely and predictably. The second provides a clean, reusable way to query Snowflake without scattering connection logic throughout your codebase.
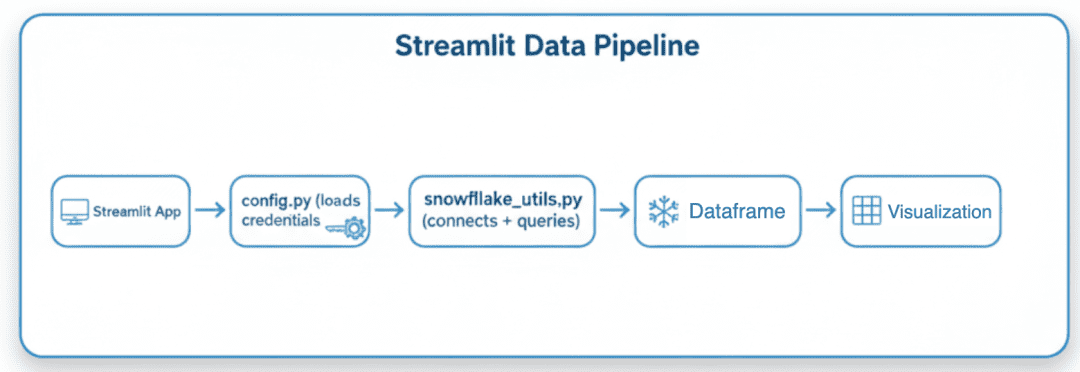
config.py, executes queries via snowflake_utils.py, and converts results into DataFrames for visualization (source: image by the author).Next, we’ll put these modules to work by building our Snowflake-connected Streamlit app, starting with how to check the connection and run your first live query.
This lesson is to be completed in Part 2.
What's next? We recommend PyImageSearch University.

86+ total classes • 115+ hours hours of on-demand code walkthrough videos • Last updated: March 2026
★★★★★ 4.84 (128 Ratings) • 16,000+ Students Enrolled
I strongly believe that if you had the right teacher you could master computer vision and deep learning.
Do you think learning computer vision and deep learning has to be time-consuming, overwhelming, and complicated? Or has to involve complex mathematics and equations? Or requires a degree in computer science?
That’s not the case.
All you need to master computer vision and deep learning is for someone to explain things to you in simple, intuitive terms. And that’s exactly what I do. My mission is to change education and how complex Artificial Intelligence topics are taught.
If you're serious about learning computer vision, your next stop should be PyImageSearch University, the most comprehensive computer vision, deep learning, and OpenCV course online today. Here you’ll learn how to successfully and confidently apply computer vision to your work, research, and projects. Join me in computer vision mastery.
Inside PyImageSearch University you'll find:
- ✓ 86+ courses on essential computer vision, deep learning, and OpenCV topics
- ✓ 86 Certificates of Completion
- ✓ 115+ hours hours of on-demand video
- ✓ Brand new courses released regularly, ensuring you can keep up with state-of-the-art techniques
- ✓ Pre-configured Jupyter Notebooks in Google Colab
- ✓ Run all code examples in your web browser — works on Windows, macOS, and Linux (no dev environment configuration required!)
- ✓ Access to centralized code repos for all 540+ tutorials on PyImageSearch
- ✓ Easy one-click downloads for code, datasets, pre-trained models, etc.
- ✓ Access on mobile, laptop, desktop, etc.
Citation Information
Singh, V. “Integrating Streamlit with Snowflake for Live Cloud Data Apps (Part 1),” PyImageSearch, P. Chugh, S. Huot, A. Sharma, and P. Thakur, eds., 2026, https://pyimg.co/hwmqa
@incollection{Singh_2026_Integrating-Streamlit-with-Snowflake,
  author = {Vikram Singh},
  title = {{Integrating Streamlit with Snowflake for Live Cloud Data Apps (Part 1)}},
  booktitle = {PyImageSearch},
  editor = {Puneet Chugh and Susan Huot and Aditya Sharma and Piyush Thakur},
  year = {2026},
  url = {https://pyimg.co/hwmqa},
}
To download the source code to this post (and be notified when future tutorials are published here on PyImageSearch), simply enter your email address in the form below!

Download the Source Code and FREE 17-page Resource Guide
Enter your email address below to get a .zip of the code and a FREE 17-page Resource Guide on Computer Vision, OpenCV, and Deep Learning. Inside you'll find my hand-picked tutorials, books, courses, and libraries to help you master CV and DL!

Comment section
Hey, Adrian Rosebrock here, author and creator of PyImageSearch. While I love hearing from readers, a couple years ago I made the tough decision to no longer offer 1:1 help over blog post comments.
At the time I was receiving 200+ emails per day and another 100+ blog post comments. I simply did not have the time to moderate and respond to them all, and the sheer volume of requests was taking a toll on me.
Instead, my goal is to do the most good for the computer vision, deep learning, and OpenCV community at large by focusing my time on authoring high-quality blog posts, tutorials, and books/courses.
If you need help learning computer vision and deep learning, I suggest you refer to my full catalog of books and courses — they have helped tens of thousands of developers, students, and researchers just like yourself learn Computer Vision, Deep Learning, and OpenCV.
Click here to browse my full catalog.