
Table of Contents
Build a VLC Playlist Generator with SmolVLM for Video Highlight Tagging
Video is everywhere — sports replays, game streams, trailers, and promo clips. Finding the most exciting moments in long footage still takes time and patience. Instead of manually scrubbing the timeline, we can automate the process and get to the good parts faster.

In this tutorial, we build a VLC Playlist Generator powered by a vision-language model (SmolVLM2) for Video Highlight Tagging. We upload a video, let the model describe what’s happening, derive highlight criteria, scan the video in short segments, and produce an XSPF playlist that jumps directly to each highlight in VLC (VideoLAN Client).
We explain the full pipeline step by step: installation, model setup, segment processing with FFmpeg, and the Gradio app that ties everything together. By the end, we’ll have a working app that turns any clip into a searchable highlight reel.
To learn how to build a VLC Playlist Generator with SmolVLM for Video Highlight Tagging, just keep reading.
Would you like immediate access to 3,457 images curated and labeled with hand gestures to train, explore, and experiment with … for free? Head over to Roboflow and get a free account to grab these hand gesture images.
Need Help Configuring Your Development Environment?

All that said, are you:
- Short on time?
- Learning on your employer’s administratively locked system?
- Wanting to skip the hassle of fighting with the command line, package managers, and virtual environments?
- Ready to run the code immediately on your Windows, macOS, or Linux system?
Then join PyImageSearch University today!
Gain access to Jupyter Notebooks for this tutorial and other PyImageSearch guides pre-configured to run on Google Colab’s ecosystem right in your web browser! No installation required.
And best of all, these Jupyter Notebooks will run on Windows, macOS, and Linux!
Configuring Your Development Environment
To follow this guide, you need to have the following libraries installed on your system.
!pip install --q torch accelerate huggingface_hub gradio transformers num2words decord opencv-python Pillow ffmpeg-python av
We install the torch library to handle tensor computation, and the accelerate library helps us optimize model performance. We install huggingface_hub to easily load pre-trained models like SmolVLM2 directly from the Hugging Face Hub without downloading them manually.
We use gradio to create an interactive web interface for our app. The transformers library provides access to the model and processor classes we’ll use to analyze videos. We install num2words, which the SmolVLM Processor requires to convert digits to words, and decord, opencv-python, and Pillow to handle video reading, frame extraction, and image processing. Finally, we install ffmpeg-python and av to slice videos into short clips and work with different video formats.
Setup and Imports
Once we have installed the necessary libraries, we can proceed with importing them.
import os
import json
import gradio as gr
import torch
import tempfile
from pathlib import Path
import subprocess
import logging
import xml.etree.ElementTree as ET
from xml.dom import minidom
from transformers import AutoProcessor, AutoModelForImageTextToText
We import os, json, and pathlib.Path to work with files and directories. These libraries help us manage paths, create temporary files, and read or write data easily. The tempfile module creates temporary directories that are automatically cleaned up after use.
We import torch to enable tensor operations and GPU acceleration when working with the SmolVLM2 model. The subprocess module allows us to run system-level commands such as FFmpeg for video slicing. We also import logging to display informative messages during video processing or debugging.
Next, we import xml.etree.ElementTree and xml.dom.minidom to generate and format XML files, which we’ll later use to create the XSPF playlist that holds the video highlights. We also import gradio to create an interactive interface for our app.
Finally, from the transformers library, we import AutoProcessor and AutoModelForImageTextToText, which make it easy to load the SmolVLM2 model and its corresponding processor directly from the Hugging Face Hub. The processor handles the preprocessing of images and text, while the model performs the actual vision-language understanding.
logging.basicConfig(level=logging.INFO)
logger = logging.getLogger(__name__)
We set up the logging configuration to track the progress and internal operations of our app.
The line logging.basicConfig(level=logging.INFO) initializes the logging system and sets the logging level to INFO. This means our app will display informative messages during execution — such as when a video is being processed, when highlights are generated, or when files are saved — while ignoring low-level debugging details.
Next, we create a logger instance using logging.getLogger(name). This assigns a unique logger name based on the current Python module. Throughout the project, we’ll use this logger to print structured, readable messages to the console rather than basic print statements, making it easier to debug and monitor the different stages of our video analysis workflow.
Helper Functions
def format_duration(seconds: float) -> str:
   hours = int(seconds // 3600)
   minutes = int((seconds % 3600) // 60)
   secs = int(seconds % 60)
   return f"{hours:02d}:{minutes:02d}:{secs:02d}"
We define a helper function, format_duration, that converts a time duration (in seconds) to a readable format: hours, minutes, and seconds.
Inside the function, we first calculate the number of hours by dividing the total seconds by 3600. Next, we compute the minutes using the remainder after removing full hours, and then calculate the remaining seconds.
Finally, we return a formatted string using the HH:MM:SS pattern, ensuring each value has exactly 2 digits (e.g., 02:05:09).
This function becomes useful later when we label video highlights, as it displays clean, timestamped durations for each segment rather than raw second values.
def get_video_duration_seconds(video_path: str) -> float:
   cmd = [
       "ffprobe",
       "-v", "quiet",
       "-print_format", "json",
       "-show_format",
       video_path
   ]
   result = subprocess.run(cmd, capture_output=True, text=True)
   info = json.loads(result.stdout)
   return float(info["format"]["duration"])
We define a function called get_video_duration_seconds to extract the total duration of a video file in seconds.
Inside the function, we build a command list named cmd that uses the ffprobe tool — a part of FFmpeg — to analyze the video. We set -v quiet to suppress unnecessary logs, -print_format json to get the output in JSON format, and -show_format to retrieve metadata such as duration, codec, and bit rate.
We then run this command with subprocess.run, which runs it in the terminal and captures the output. The result is stored as JSON in result.stdout, which we parse using json.loads().
Finally, we access the duration field inside info["format"] and convert it to a floating-point number. This gives us the total length of the video in seconds, which we’ll later use to segment the video into smaller clips for highlight detection.
Main VideoHighlightDetector Class
This is the core class of our app — VideoHighlightDetector — which performs all the heavy lifting, from analyzing videos to finding highlight-worthy moments. Let’s go through it step by step.
class VideoHighlightDetector:
   def __init__(
       self,
       model_path: str,
       device: str = "cuda",
       batch_size: int = 8
   ):
       self.device = device
       self.batch_size = batch_size

       # Initialize model and processor
       self.processor = AutoProcessor.from_pretrained(model_path)
       self.model = AutoModelForImageTextToText.from_pretrained(
           model_path,
           torch_dtype=torch.bfloat16
       ).to(device)
We begin with the __init__ method, which initializes our model, processor, and device configuration. We provide three arguments:
model_path: the Hugging Face model name or local directory (e.g.,HuggingFaceTB/SmolVLM2-2.2B-Instruct).device: the hardware to run inference on, usually"cuda"for GPU or"cpu"if GPU isn’t available.batch_size: defines how many video frames or segments can be processed at once.
Inside the method, we save the device and batch size as class attributes. We then load the processor and model using Hugging Face’s AutoProcessor and AutoModelForImageTextToText classes. The processor handles video and text preprocessing, while the model interprets both modalities to generate responses. We set the model’s data type to torch.bfloat16 for faster inference and reduced memory use, and move it to the specified device.
def analyze_video_content(self, video_path: str) -> str:
       system_message = "You are a helpful assistant that can understand videos. Describe what type of video this is and what's happening in it."
       messages = [
           {
               "role": "system",
               "content": [{"type": "text", "text": system_message}]
           },
           {
               "role": "user",
               "content": [
                   {"type": "video", "path": video_path},
                   {"type": "text", "text": "What type of video is this and what's happening in it? Be specific about the content type and general activities you observe."}
               ]
           }
       ]

       inputs = self.processor.apply_chat_template(
           messages,
           add_generation_prompt=True,
           tokenize=True,
           return_dict=True,
           return_tensors="pt"
       ).to(self.device)

       outputs = self.model.generate(**inputs, max_new_tokens=512, do_sample=True, temperature=0.7)
       return self.processor.decode(outputs[0], skip_special_tokens=True).lower().split("assistant: ")[1]
The analyze_video_content method gives the model an entire video and asks it to describe what’s happening overall.
We first define a system message — a short instruction that sets the assistant’s role (for example, “You are a helpful assistant that can understand videos”). Then we build a messages list by combining the system prompt and user input. The user input includes the video path and a textual prompt asking the model to describe the video.
We pass these messages to the processor’s apply_chat_template() method, which converts them into tokenized tensors that the model understands. We then call the model’s generate() method to produce a textual output, limiting it to 512 new tokens. Finally, we decode the output, clean it up, and return the main description text in lowercase.
This gives us a general understanding of what type of video we’re dealing with — for example, “a UFC fight promo showing two men sparring in a ring.”
def analyze_segment(self, video_path: str) -> str:
       """Analyze a specific video segment and provide a brief description."""
       messages = [
           {
               "role": "system",
               "content": [{"type": "text", "text": "Focus only on describing the key dramatic action or notable event occurring in this video segment. Skip general context or scene-setting details unless they are crucial to understanding the main action."}]
           },
           {
               "role": "user",
               "content": [
                   {"type": "video", "path": video_path},
                   {"type": "text", "text": "What is the main action or notable event happening in this segment? Describe it in one brief sentence."}
               ]
           }
       ]

       inputs = self.processor.apply_chat_template(
           messages,
           add_generation_prompt=True,
           tokenize=True,
           return_dict=True,
           return_tensors="pt"
       ).to(self.device)

       outputs = self.model.generate(**inputs, max_new_tokens=128, do_sample=True, temperature=0.7)
       return self.processor.decode(outputs[0], skip_special_tokens=True).split("Assistant: ")[1]
Next, the analyze_segment method performs the same operation but at the segment level. It focuses on short clips rather than the entire video.
The system prompt explicitly instructs the model to describe only the key action or notable event in the clip. The user prompt then provides the segment file path and asks for a one-line summary of the action.
Again, we tokenize the inputs, run generation, and decode the output. This method helps us label each short video segment with a clear, focused description, such as “a fighter lands a knockout punch” or “a player scores a goal.”
def determine_highlights(self, video_description: str, prompt_num: int = 1) -> str:
       """Determine what constitutes highlights based on video description with different prompts."""
       system_prompts = {
           1: "You are a highlight editor. List archetypal dramatic moments that would make compelling highlights if they appear in the video. Each moment should be specific enough to be recognizable but generic enough to potentially exist in other videos of this type.",
           2: "You are a helpful visual-language assistant that can understand videos and edit. You are tasked helping the user to create highlight reels for videos. Highlights should be rare and important events in the video in question."
       }
       user_prompts = {
           1: "List potential highlight moments to look for in this video:",
           2: "List dramatic moments that would make compelling highlights if they appear in the video. Each moment should be specific enough to be recognizable but generic enough to potentially exist in any video of this type:"
       }

       messages = [
           {
               "role": "system",
               "content": [{"type": "text", "text": system_prompts[prompt_num]}]
           },
           {
               "role": "user",
               "content": [{"type": "text", "text": f"""Here is a description of a video:\n\n{video_description}\n\n{user_prompts[prompt_num]}"""}]
           }
       ]

       print(f"Using prompt {prompt_num} for highlight detection")
       print(messages)

       inputs = self.processor.apply_chat_template(
           messages,
           add_generation_prompt=True,
           tokenize=True,
           return_dict=True,
           return_tensors="pt"
       ).to(self.device)

       outputs = self.model.generate(**inputs, max_new_tokens=256, do_sample=True, temperature=0.7)
       return self.processor.decode(outputs[0], skip_special_tokens=True).split("Assistant: ")[1]
The determine_highlights method determines which moments should be considered “highlights” based on the overall video description.
We define two pairs of system and user prompts, giving us flexibility in how we phrase the question. The first prompt asks the model to list archetypal dramatic moments, while the second prompts it to think like a video editor, focusing on rare and impactful events.
After forming the messages, we again process them using the processor and generate model outputs. The decoded text typically looks like a short list — for example, “1. knockout moments, 2. crowd celebrations, 3. slow-motion punches.”
This gives us a blueprint of what to look for in each segment.
   def process_segment(self, video_path: str, highlight_types: str) -> bool:
       messages = [
           {
               "role": "system",
               "content": [{"type": "text", "text": "You are a video highlight analyzer. Your role is to identify moments that have high dramatic value, focusing on displays of skill, emotion, personality, or tension. Compare video segments against provided example highlights to find moments with similar emotional impact and visual interest, even if the specific actions differ."}]
           },
           {
               "role": "user",
               "content": [
                   {"type": "video", "path": video_path},
                   {"type": "text", "text": f"""Given these highlight examples:\n{highlight_types}\n\nDoes this video contain a moment that matches the core action of one of the highlights? Answer with:\n'yes' or 'no'\nIf yes, justify it"""}]
           }
       ]

       inputs = self.processor.apply_chat_template(
           messages,
           add_generation_prompt=True,
           tokenize=True,
           return_dict=True,
           return_tensors="pt"
       ).to(self.device)

       outputs = self.model.generate(**inputs, max_new_tokens=64, do_sample=False)
       response = self.processor.decode(outputs[0], skip_special_tokens=True).lower().split("assistant: ")[1]
       return "yes" in response
Finally, the process_segment method evaluates each short video segment and determines whether it qualifies as a highlight.
The system prompt frames the model as a video highlight analyzer, asking it to compare the segment’s action with previously identified highlight types. The user prompt then provides both — the segment file path and a list of highlight examples — and asks the model to answer with a simple “yes” or “no.”
After processing and decoding the response, we check whether the output contains the word “yes.” If it does, the function returns True, indicating that the segment is a highlight; otherwise, it returns False.
Creating the XSPF Playlist
def create_xspf_playlist(video_path: str, segments: list, descriptions: list) -> str:
   """Create XSPF playlist from segments with descriptions."""
   # Get video filename with full path
   video_filename = os.path.basename(video_path)

   # Create the XML structure as a string
   xml_content = [
       '<?xml version="1.0" encoding="UTF-8"?>',
       '<playlist version="1" xmlns="http://xspf.org/ns/0/" xmlns:vlc="http://www.videolan.org/vlc/playlist/0/">',
       f'  <title>{video_filename} - Highlights</title>',
       '  <trackList>'
   ]

   for idx, ((start_time, end_time), description) in enumerate(zip(segments, descriptions)):
       track = [
           '    <track>',
           f'      <location>file:///{video_filename}</location>',
           f'      <title>{description}</title>',
           f'      <annotation>{description}</annotation>',
           '      <extension application="http://www.videolan.org/vlc/playlist/0">',
           f'        <vlc:id>{idx}</vlc:id>',
           f'        <vlc:option>start-time={int(start_time)}</vlc:option>',
           f'        <vlc:option>stop-time={int(end_time)}</vlc:option>',
           '      </extension>',
           '    </track>'
       ]
       xml_content.extend(track)

   xml_content.extend([
       '  </trackList>',
       '</playlist>'
   ])

   return '\n'.join(xml_content)
We define a function called create_xspf_playlist that generates an XSPF (XML Shareable Playlist Format) file containing all our detected highlight segments and their descriptions. VLC Media Player can open this playlist and jump directly to the highlight timestamps inside the original video.
We start by extracting the video filename using os.path.basename(video_path). This ensures that only the video’s name (without the full directory path) appears in our playlist file.
Next, we create an XML skeleton in a list named xml_content. The first few lines define the XML version, the XSPF namespace, and the <playlist> and <trackList> tags. We also include a <title> tag that appends “– Highlights” to the video’s name, clearly indicating that this playlist contains the highlight segments.
We then loop through each highlight segment and its corresponding description using enumerate(zip(segments, descriptions)).
For each pair, we create a <track> block that defines a single highlight. Inside it:
<location>points to the video file.<title>and<annotation>store the highlight description (for example, “Knockout punch” or “Goal celebration”).- The
<extension>tag includes VLC-specific options, such asstart-timeandstop-time, which tell VLC when the highlight begins and ends. - Each track is also given a unique ID using
<vlc:id>, allowing VLC to keep track of multiple highlight entries.
We extend our xml_content list with each track block as we iterate through all highlights.
Once all tracks are added, we close the <trackList> and <playlist> tags to complete the XML structure. Finally, we join all the lines with newline characters and return the full XML content as a single string.
Gradio Interface Logic
def create_ui(model_path: str):
   with gr.Blocks() as app:
       with gr.Row():
           gr.HTML("""
               <div style="display: flex; align-items: center; gap: 10px;">
                   <img src="https://upload.wikimedia.org/wikipedia/commons/3/38/VLC_icon.png" style="width: 40px; height: 40px;"/>
                   <h1 style="margin: 0;">VLC Highlight Clip Generator</h1>
               </div>
           """)

       gr.Markdown("Upload a video and get a list of highlights!")
This is where everything comes together — the create_ui function builds the Gradio interface for our VLC Highlight Clip Generator app and connects it to our model logic. Let’s break it down carefully.
We use gr.Blocks() to start building our interface. Inside it, we organize the layout into rows and columns for a clean, structured look.
At the top, we include an HTML block containing the VLC logo and a title — “VLC Highlight Clip Generator.” This small visual touch makes the interface more recognizable and polished.
Next, we display a short Markdown line: “Upload a video and get a list of highlights!”. This acts as the user prompt for what the app does.
       with gr.Row():
           with gr.Column(scale=1):
               input_video = gr.Video(
                   label="Upload your video (max 30 minutes)",
                   interactive=True
               )
               process_btn = gr.Button("Process Video", variant="primary")

           with gr.Column(scale=1):
               output_playlist = gr.File(
                   label="Highlight Playlist (XSPF)",
                   visible=False,
                   interactive=False,
               )
               status = gr.Markdown()

               analysis_accordion = gr.Accordion(
                   "Analysis Details",
                   open=True,
                   visible=False
               )

               with analysis_accordion:
                   video_description = gr.Markdown("")
                   highlight_types = gr.Markdown("")
We then divide the interface into two columns:
- Left column: Contains the video upload input (
gr.Video) and a Process Video button. The video input allows users to upload clips (up to 30 minutes long). - Right column: Displays results. We add a file output (
gr.File) for downloading the generated XSPF playlist and a Markdown field for showing progress or status messages.
We also create an Accordion component labeled “Analysis Details.” This will later reveal the model’s video summary and highlight criteria once processing begins. By default, it’s hidden until the model starts analyzing.
        def on_process(video):
           if not video:
               return [
                   None,
                   "Please upload a video",
                   "",
                   "",
                   gr.update(visible=False)
               ]

           try:
               duration = get_video_duration_seconds(video)
               if duration > 1800:  # 30 minutes
                   return [
                       None,
                       "Video must be shorter than 30 minutes",
                       "",
                       "",
                       gr.update(visible=False)
                   ]

               yield [
                   None,
                   "Initializing video highlight detector...",
                   "",
                   "",
                   gr.update(visible=False)
               ]

               detector = VideoHighlightDetector(model_path=model_path, batch_size=16)

               yield [
                   None,
                   "Analyzing video content...",
                   "",
                   "",
                   gr.update(visible=False)
               ]

               # Analyze video content
               video_desc = detector.analyze_video_content(video)
               formatted_desc = f"### Video Summary:\n{video_desc}"

               yield [
                   None,
                   "Determining highlight types...",
                   formatted_desc,
                   "",
                   gr.update(visible=True)
               ]

               highlights1 = detector.determine_highlights(video_desc, prompt_num=1)
               highlights2 = detector.determine_highlights(video_desc, prompt_num=2)
               formatted_highlights = f"### Highlight Criteria:\nSet 1:\n{highlights1}\n\nSet 2:\n{highlights2}"

               # Process video in segments
               segment_length = 10.0
               kept_segments1 = []
               kept_segments2 = []
               segment_descriptions1 = []
               segment_descriptions2 = []
               segments_processed = 0
               total_segments = int(duration / segment_length)

               for start_time in range(0, int(duration), int(segment_length)):
                   end_time = min(start_time + segment_length, duration)
                   progress = int((segments_processed / total_segments) * 100)

                   yield [
                       None,
                       f"Processing segments... {progress}% complete",
                       formatted_desc,
                       formatted_highlights,
                       gr.update(visible=True)
                   ]

                   # Create temporary segment
                   with tempfile.NamedTemporaryFile(suffix='.mp4') as temp_segment:
                       cmd = [
                           "ffmpeg",
                           "-y",
                           "-i", video,
                           "-ss", str(start_time),
                           "-t", str(segment_length),
                           "-c:v", "libx264",
                           "-preset", "ultrafast",
                           temp_segment.name
                       ]
                       subprocess.run(cmd, check=True)

                       # Process with both highlight sets
                       if detector.process_segment(temp_segment.name, highlights1):
                           description = detector.analyze_segment(temp_segment.name)
                           kept_segments1.append((start_time, end_time))
                           segment_descriptions1.append(description)

                       if detector.process_segment(temp_segment.name, highlights2):
                           description = detector.analyze_segment(temp_segment.name)
                           kept_segments2.append((start_time, end_time))
                           segment_descriptions2.append(description)

                   segments_processed += 1

               # Calculate percentages of video kept for each highlight set
               total_duration = duration
               duration1 = sum(end - start for start, end in kept_segments1)
               duration2 = sum(end - start for start, end in kept_segments2)

               percent1 = (duration1 / total_duration) * 100
               percent2 = (duration2 / total_duration) * 100

               print(f"Highlight set 1: {percent1:.1f}% of video")
               print(f"Highlight set 2: {percent2:.1f}% of video")
Inside the function, we define another function called on_process — this is the main event handler that runs whenever the user clicks the “Process Video” button.
Let’s walk through what happens step-by-step:
- Validation:
If the user hasn’t uploaded a video, we display an error message asking them to upload one. - Duration Check:
We useget_video_duration_seconds()to ensure the video is shorter than 30 minutes. This prevents long processing times. - Initialize Model:
We create aVideoHighlightDetectorinstance with the selected model path and batch size. - Analyze the Video:
We start by analyzing the entire video usingdetector.analyze_video_content(). This gives us a summary of the video content.
Then, we determine the highlight criteria using two different prompt styles throughdetector.determine_highlights(). These prompts generate two possible “highlight sets.” - Segment the Video:
We divide the video into 10-second clips using FFmpeg. Each segment is saved temporarily using Python’stempfilemodule. - Process Each Segment:
For every segment, we check if it matches the highlight descriptions from both sets. If yes, we calldetector.analyze_segment()to describe the segment and store both its timestamps and description.
Throughout this process, we dynamically update progress using Gradio’s yield feature, which enables live UI updates.
               # Choose the set with lower percentage unless it's zero
               if (0 < percent2 <= percent1 or percent1 == 0):
                   final_segments = kept_segments2
                   segment_descriptions = segment_descriptions2
                   selected_set = "2"
                   percent_used = percent2
               else:
                   final_segments = kept_segments1
                   segment_descriptions = segment_descriptions1
                   selected_set = "1"
                   percent_used = percent1
Once all segments are processed, we compute how much of the video each highlight set covers. We select the one that captures fewer but more meaningful moments, unless it detects none (in which case we fall back to the other set).
               if final_segments:
                   # Create XSPF playlist
                   playlist_content = create_xspf_playlist(video, final_segments, segment_descriptions)

                   # Save playlist to temporary file
                   with tempfile.NamedTemporaryFile(mode='w', suffix='.xspf', delete=False) as f:
                       f.write(playlist_content)
                       playlist_path = f.name

                   completion_message = f"Processing complete! Using highlight set {selected_set} ({percent_used:.1f}% of video). You can download the playlist."

                   yield [
                       gr.update(value=playlist_path, visible=True),
                       completion_message,
                       formatted_desc,
                       formatted_highlights,
                       gr.update(visible=True)
                   ]
               else:
                   yield [
                       None,
                       "No highlights detected in the video.",
                       formatted_desc,
                       formatted_highlights,
                       gr.update(visible=True)
                   ]

           except Exception as e:
               logger.exception("Error processing video")
               return [
                   None,
                   f"Error processing video: {str(e)}",
                   "",
                   "",
                   gr.update(visible=False)
               ]
           finally:
               torch.cuda.empty_cache()
If we’ve found valid highlights, we call create_xspf_playlist() to generate an XML playlist file containing all detected highlight timestamps and descriptions. We write this to a temporary .xspf file and provide it as a downloadable output in Gradio.
Finally, a completion message appears, showing which highlight set was chosen and what percentage of the video was used.
If no highlights are found, the app gracefully notifies the user.
The entire process is wrapped in a try-except-finally block. If anything goes wrong, we log the error using our earlier logger and return an appropriate message to the user. We also clear GPU memory at the end using torch.cuda.empty_cache() to free resources for the next run.
       process_btn.click(
           on_process,
           inputs=[input_video],
           outputs=[
               output_playlist,
               status,
               video_description,
               highlight_types,
               analysis_accordion
           ],
           queue=True,
       )

   return app
Lastly, we connect the Process Video button to the on_process function using process_btn.click(). We specify the input (input_video) and all outputs (output_playlist, status, video_description, highlight_types, and analysis_accordion).
When everything is linked, we return the app object.
In summary, create_ui() ties together the model, video processing, and Gradio frontend into one smooth user experience. With a single click, users can upload a video, watch the processing updates in real time, and download a ready-to-play highlight playlist for VLC — all powered by vision-language intelligence.
Launch the Gradio Application
if __name__ == "__main__":
   app = create_ui("HuggingFaceTB/SmolVLM2-2.2B-Instruct")
   app.launch()
Finally, we initialize our Gradio interface by calling the create_ui() function with the SmolVLM2-2.2B-Instruct checkpoint. This loads our fine-tuned Vision-Language model from Hugging Face Hub.
Once the app object is created, we launch it using the .launch() method, which starts the web-based interface where we can upload videos and generate highlight segments interactively.
This marks the final step in our highlight generation pipeline. Once launched, the Gradio app will analyze videos, detect highlight-worthy moments, and create XSPF playlists that can be opened directly in VLC.
Output
Here’s the Gradio app in action. We uploaded a video and generated two highlight sets. The processing was completed using Highlight Set 2, and the app produced a descriptive XSPF playlist fully compatible with VLC.
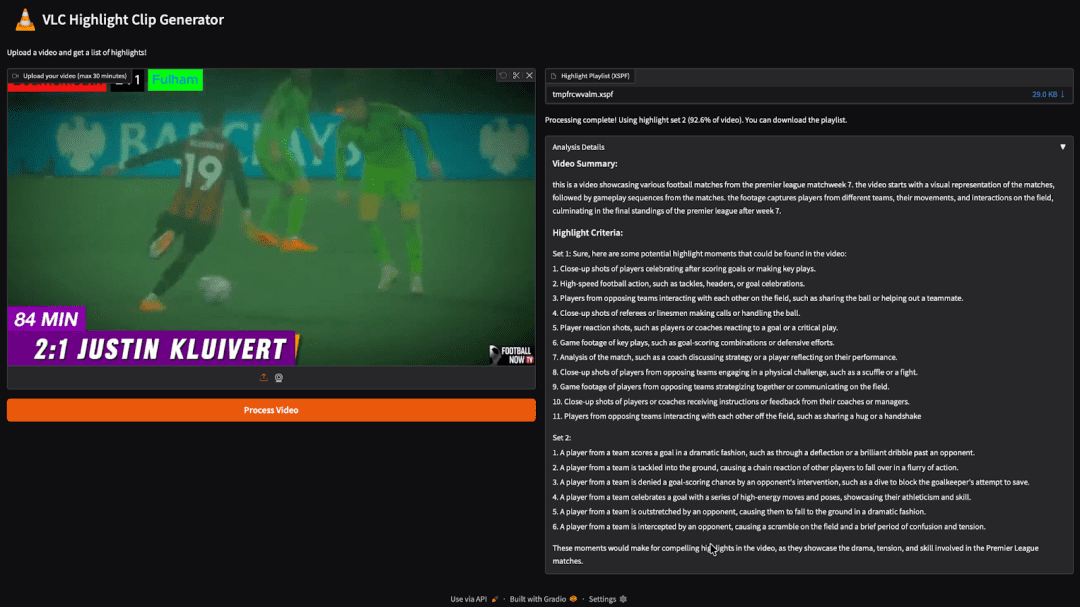
This playlist can be downloaded and directly opened in VLC Media Player. Once loaded, VLC lets us jump to each highlight segment with its corresponding description, making video navigation fast and effortless. It looks like this:
What's next? We recommend PyImageSearch University.
86+ total classes • 115+ hours hours of on-demand code walkthrough videos • Last updated: April 2026
★★★★★ 4.84 (128 Ratings) • 16,000+ Students Enrolled
I strongly believe that if you had the right teacher you could master computer vision and deep learning.
Do you think learning computer vision and deep learning has to be time-consuming, overwhelming, and complicated? Or has to involve complex mathematics and equations? Or requires a degree in computer science?
That’s not the case.
All you need to master computer vision and deep learning is for someone to explain things to you in simple, intuitive terms. And that’s exactly what I do. My mission is to change education and how complex Artificial Intelligence topics are taught.
If you're serious about learning computer vision, your next stop should be PyImageSearch University, the most comprehensive computer vision, deep learning, and OpenCV course online today. Here you’ll learn how to successfully and confidently apply computer vision to your work, research, and projects. Join me in computer vision mastery.
Inside PyImageSearch University you'll find:
- ✓ 86+ courses on essential computer vision, deep learning, and OpenCV topics
- ✓ 86 Certificates of Completion
- ✓ 115+ hours hours of on-demand video
- ✓ Brand new courses released regularly, ensuring you can keep up with state-of-the-art techniques
- ✓ Pre-configured Jupyter Notebooks in Google Colab
- ✓ Run all code examples in your web browser — works on Windows, macOS, and Linux (no dev environment configuration required!)
- ✓ Access to centralized code repos for all 540+ tutorials on PyImageSearch
- ✓ Easy one-click downloads for code, datasets, pre-trained models, etc.
- ✓ Access on mobile, laptop, desktop, etc.
Summary
In this tutorial, we built a VLC Playlist Generator powered by SmolVLM2, a compact yet powerful vision-language model for video highlight tagging. Using Gradio, FFmpeg, and Hugging Face Transformers, we automated highlight detection by analyzing video content and generating descriptive XSPF playlists compatible with VLC. This pipeline demonstrates how multimodal models like SmolVLM2 can be extended beyond image understanding to video analysis and summarization tasks.
Citation Information
Thakur, P. “Build a VLC Playlist Generator with SmolVLM for Video Highlight Tagging,” PyImageSearch, P. Chugh, S. Huot, G. Kudriavtsev, and Aditya Sharma, eds., 2025, https://pyimg.co/2aoen
@incollection{Thakur_2025_build-vlc-playlist-generator-w-smolvlm-for-video-highlight-tagging,
  author = {Piyush Thakur},
  title = {{Build a VLC Playlist Generator with SmolVLM for Video Highlight Tagging}},
  booktitle = {PyImageSearch},
  editor = {Puneet Chugh and Susan Huot and Georgii Kudriavtsev and Aditya Sharma},
  year = {2025},
  url = {https://pyimg.co/2aoen},
}
To download the source code to this post (and be notified when future tutorials are published here on PyImageSearch), simply enter your email address in the form below!

Download the Source Code and FREE 17-page Resource Guide
Enter your email address below to get a .zip of the code and a FREE 17-page Resource Guide on Computer Vision, OpenCV, and Deep Learning. Inside you'll find my hand-picked tutorials, books, courses, and libraries to help you master CV and DL!

Comment section
Hey, Adrian Rosebrock here, author and creator of PyImageSearch. While I love hearing from readers, a couple years ago I made the tough decision to no longer offer 1:1 help over blog post comments.
At the time I was receiving 200+ emails per day and another 100+ blog post comments. I simply did not have the time to moderate and respond to them all, and the sheer volume of requests was taking a toll on me.
Instead, my goal is to do the most good for the computer vision, deep learning, and OpenCV community at large by focusing my time on authoring high-quality blog posts, tutorials, and books/courses.
If you need help learning computer vision and deep learning, I suggest you refer to my full catalog of books and courses — they have helped tens of thousands of developers, students, and researchers just like yourself learn Computer Vision, Deep Learning, and OpenCV.
Click here to browse my full catalog.