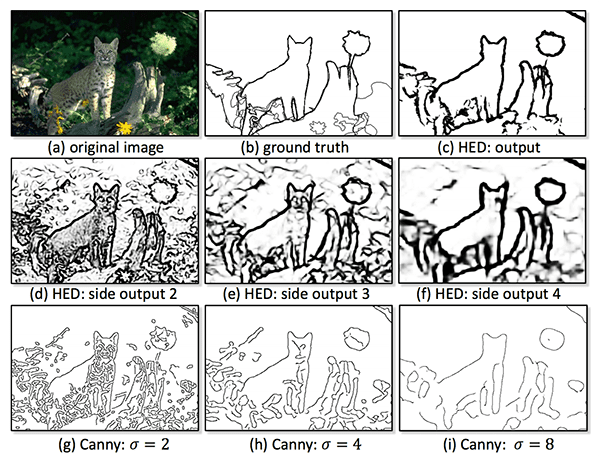
In this tutorial, you will learn how to apply Holistically-Nested Edge Detection (HED) with OpenCV and Deep Learning. We’ll apply Holistically-Nested Edge Detection to both images and video streams, followed by comparing the results to OpenCV’s standard Canny edge detector.
Edge detection enables us to find the boundaries of objects in images and was one of the first applied use cases of image processing and computer vision.
When it comes to edge detection with OpenCV you’ll most likely utilize the Canny edge detector; however, there are a few problems with the Canny edge detector, namely:
- Setting the lower and upper values to the hysteresis thresholding is a manual process which requires experimentation and visual validation.
- Hysteresis thresholding values that work well for one image may not work well for another (this is nearly always true for images captured in varying lighting conditions).
- The Canny edge detector often requires a number of preprocessing steps (i.e. conversion to grayscale, blurring/smoothing, etc.) in order to obtain a good edge map.
Holistically-Nested Edge Detection (HED) attempts to address the limitations of the Canny edge detector through an end-to-end deep neural network.
This network accepts an RGB image as an input and then produces an edge map as an output. Furthermore, the edge map produced by HED does a better job preserving object boundaries in the image.
To learn more about Holistically-Nested Edge Detection with OpenCV, just keep reading!
Holistically-Nested Edge Detection with OpenCV and Deep Learning
In this tutorial we will learn about Holistically-Nested Edge Detection (HED) using OpenCV and Deep Learning.
We’ll start by discussing the Holistically-Nested Edge Detection algorithm.
From there we’ll review our project structure and then utilize HED for edge detection in both images and video.
Let’s go ahead and get started!
What is Holistically-Nested Edge Detection?

The algorithm we’ll be using here today is from Xie and Tu’s 2015 paper, Holistically-Nested Edge Detection, or simply “HED” for short.
The work of Xie and Tu describes a deep neural network capable of automatically learning rich hierarchical edge maps that are capable of determining the edge/object boundary of objects in images.
This edge detection network is capable of obtaining state-of-the-art results on the Berkely BSDS500 and NYU Depth datasets.
A full review of the network architecture and algorithm outside the scope of this post, so please refer to the official publication for more details.
Project structure
Go ahead and grab today’s “Downloads” and unzip the files.
From there, you can inspect the project directory with the following command:
$ tree --dirsfirst
.
├── hed_model
│   ├── deploy.prototxt
│   └── hed_pretrained_bsds.caffemodel
├── images
│   ├── cat.jpg
│   ├── guitar.jpg
│   └── janie.jpg
├── detect_edges_image.py
└── detect_edges_video.py

2 directories, 7 files
Our HED Caffe model is included in the hed_model/ directory.
I’ve provided a number of sample images/ including one of myself, my dog, and a sample cat image I found on the internet.
Today we’re going to review the detect_edges_image.py and detect_edges_video.py scripts. Both scripts share the same edge detection process, so we’ll be spending most of our time on the HED image script.
Holistically-Nested Edge Detection in Images
The Python and OpenCV Holistically-Nested Edge Detection example we are reviewing today is very similar to the HED example in OpenCV’s official repo.
My primary contribution here is to:
- Provide some additional documentation (when appropriate)
- And most importantly, show you how to use Holistically-Nested Edge Detection in your own projects.
Let’s go ahead and get started — open up the detect_edge_image.py file and insert the following code:
# import the necessary packages
import argparse
import cv2
import os

# construct the argument parser and parse the arguments
ap = argparse.ArgumentParser()
ap.add_argument("-d", "--edge-detector", type=str, required=True,
	help="path to OpenCV's deep learning edge detector")
ap.add_argument("-i", "--image", type=str, required=True,
	help="path to input image")
args = vars(ap.parse_args())
Our imports are handled on Lines 2-4. We’ll be using argparse to parse command line arguments. OpenCV functions and methods are accessed through the cv2 import. Our os import will allow us to build file paths regardless of operating system.
This script requires two command line arguments:
--edge-detector: The path to OpenCV’s deep learning edge detector. The path contains two Caffe files that will be used to initialize our model later.--image: The path to the input image for testing. Like I said previously — I’ve provided a few images in the “Downloads”, but you should try the script on your own images as well.
Let’s define our CropLayer class:
class CropLayer(object):
	def __init__(self, params, blobs):
		# initialize our starting and ending (x, y)-coordinates of
		# the crop
		self.startX = 0
		self.startY = 0
		self.endX = 0
		self.endY = 0
In order to utilize the Holistically-Nested Edge Detection model with OpenCV, we need to define a custom layer cropping class — we appropriately name this class CropLayer .
In the constructor of this class, we store the starting and ending (x, y)-coordinates of where the crop will start and end, respectively (Lines 15-21).
The next step when applying HED with OpenCV is to define the getMemoryShapes function, the method responsible for computing the volume size of the inputs :
	def getMemoryShapes(self, inputs):
		# the crop layer will receive two inputs -- we need to crop
		# the first input blob to match the shape of the second one,
		# keeping the batch size and number of channels
		(inputShape, targetShape) = (inputs[0], inputs[1])
		(batchSize, numChannels) = (inputShape[0], inputShape[1])
		(H, W) = (targetShape[2], targetShape[3])

		# compute the starting and ending crop coordinates
		self.startX = int((inputShape[3] - targetShape[3]) / 2)
		self.startY = int((inputShape[2] - targetShape[2]) / 2)
		self.endX = self.startX + W
		self.endY = self.startY + H

		# return the shape of the volume (we'll perform the actual
		# crop during the forward pass
		return [[batchSize, numChannels, H, W]]
Line 27 derives the shape of the input volume as well as the target shape.
Line 28 extracts the batch size and number of channels from the inputs as well.
Finally, Line 29 extracts the height and width of the target shape, respectively.
Given these variables, we can compute the starting and ending crop (x, y)-coordinates on Lines 32-35.
We then return the shape of the volume to the calling function on Line 39.
The final method we need to define is the forward function. This function is responsible for performing the crop during the forward pass (i.e., inference/edge prediction) of the network:
	def forward(self, inputs):
		# use the derived (x, y)-coordinates to perform the crop
		return [inputs[0][:, :, self.startY:self.endY,
				self.startX:self.endX]]
Lines 43 and 44 take advantage of Python and NumPy’s convenient list/array slicing syntax.
Given our CropLayer class we can now load our HED model from disk and register CropLayer with the net:
# load our serialized edge detector from disk
print("[INFO] loading edge detector...")
protoPath = os.path.sep.join([args["edge_detector"],
	"deploy.prototxt"])
modelPath = os.path.sep.join([args["edge_detector"],
	"hed_pretrained_bsds.caffemodel"])
net = cv2.dnn.readNetFromCaffe(protoPath, modelPath)

# register our new layer with the model
cv2.dnn_registerLayer("Crop", CropLayer)
Our prototxt path and model path are built up using the --edge-detector command line argument available via args["edge_detector"] (Lines 48-51).
From there, both the protoPath and modelPath are used to load and initialize our Caffe model on Line 52.
Let’s go ahead and load our input image :
# load the input image and grab its dimensions
image = cv2.imread(args["image"])
(H, W) = image.shape[:2]

# convert the image to grayscale, blur it, and perform Canny
# edge detection
print("[INFO] performing Canny edge detection...")
gray = cv2.cvtColor(image, cv2.COLOR_BGR2GRAY)
blurred = cv2.GaussianBlur(gray, (5, 5), 0)
canny = cv2.Canny(blurred, 30, 150)
Our original image is loaded and spatial dimensions (width and height) are extracted on Lines 58 and 59.
We also compute the Canny edge map (Lines 64-66) so we can compare our edge detection results to HED.
Finally, we’re ready to apply HED:
# construct a blob out of the input image for the Holistically-Nested
# Edge Detector
blob = cv2.dnn.blobFromImage(image, scalefactor=1.0, size=(W, H),
	mean=(104.00698793, 116.66876762, 122.67891434),
	swapRB=False, crop=False)

# set the blob as the input to the network and perform a forward pass
# to compute the edges
print("[INFO] performing holistically-nested edge detection...")
net.setInput(blob)
hed = net.forward()
hed = cv2.resize(hed[0, 0], (W, H))
hed = (255 * hed).astype("uint8")

# show the output edge detection results for Canny and
# Holistically-Nested Edge Detection
cv2.imshow("Input", image)
cv2.imshow("Canny", canny)
cv2.imshow("HED", hed)
cv2.waitKey(0)
To apply Holistically-Nested Edge Detection (HED) with OpenCV and deep learning, we:
- Construct a
blobfrom our image (Lines 70-72). - Pass the blob through the HED net, obtaining the
hedoutput (Lines 77 and 78). - Resize the output to our original image dimensions (Line 79).
- Scale our image pixels back to the range [0, 255] and ensure the type is
"uint8"(Line 80).
Finally, we we’ll display:
- The original input image
- The Canny edge detection image
- Our Holistically-Nested Edge detection results
Image and HED Results
To apply Holistically-Nested Edge Detection to your own images with OpenCV, make sure you use the “Downloads” section of this tutorial to grab the source code, trained HED model, and example image files. From there, open up a terminal and execute the following command:
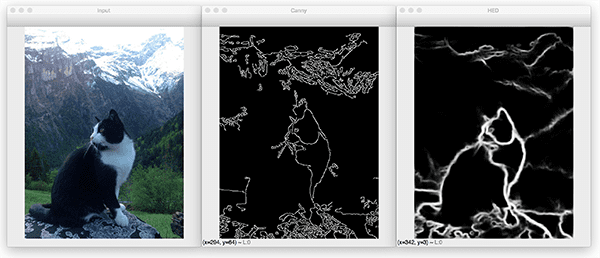
$ python detect_edges_image.py --edge-detector hed_model --image images/cat.jpg
[INFO] loading edge detector...
[INFO] performing Canny edge detection...
[INFO] performing holistically-nested edge detection...

On the left we have our input image.
In the center we have the Canny edge detector.
And on the right is our final output after applying Holistically-Nested Edge Detection.
Notice how the Canny edge detector is not able to preserve the object boundary of the cat, mountains, or the rock the cat is sitting on.
HED, on the other hand, is able to preserve all of those object boundaries.
Let’s try another image:
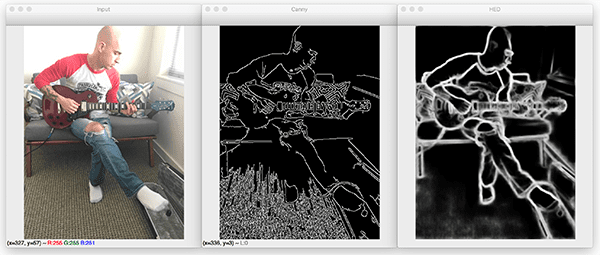
$ python detect_edges_image.py --edge-detector hed_model --image images/guitar.jpg
[INFO] loading edge detector...
[INFO] performing Canny edge detection...
[INFO] performing holistically-nested edge detection...

In Figure 3 above we can see an example image of myself playing guitar. With the Canny edge detector there is a lot of “noise” caused by the texture and pattern of the carpet — HED, on the other contrary, has no such noise.
Furthermore, HED does a better job of capturing the object boundaries of my shirt, my jeans (including the hole in my jeans), and my guitar.
Let’s do one final example:
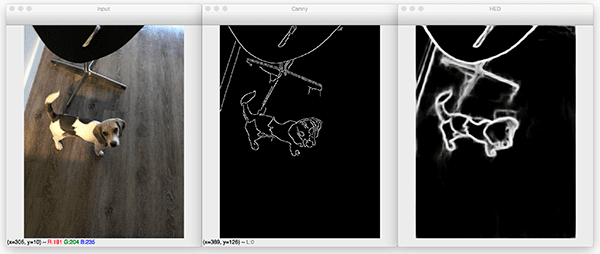
$ python detect_edges_image.py --edge-detector hed_model --image images/janie.jpg
[INFO] loading edge detector...
[INFO] performing Canny edge detection...
[INFO] performing holistically-nested edge detection...

There are two objects in this image: (1) Janie, the dog, and (2) the chair behind her.
The Canny edge detector (center) does a reasonable job highlighting the outline of the chair but isn’t able to properly capture the object boundary of the dog, primarily due to the light/dark and dark/light transitions in her coat.
HED (right) is able to capture the entire outline of Janie more easily.
Holistically-Nested Edge Detection in Video
We’ve applied Holistically-Nested Edge Detection to images with OpenCV — is it possible to do the same for videos?
Let’s find out.
Open up the detect_edges_video.py file and insert the following code:
# import the necessary packages
from imutils.video import VideoStream
import argparse
import imutils
import time
import cv2
import os

# construct the argument parser and parse the arguments
ap = argparse.ArgumentParser()
ap.add_argument("-d", "--edge-detector", type=str, required=True,
	help="path to OpenCV's deep learning edge detector")
ap.add_argument("-i", "--input", type=str,
	help="path to optional input video (webcam will be used otherwise)")
args = vars(ap.parse_args())
Our vide script requires three additional imports:
VideoStream: Reads frames from an input source such as a webcam, video file, or another source.imutils: My package of convenience functions that I’ve made available on GitHub and PyPi. We’re using myresizefunction.time: This module allows us to place a sleep command to allow our video stream to establish and “warm up”.
The two command line arguments on Lines 10-15 are quite similar:
--edge-detector: The path to OpenCV’s HED edge detector.--input: An optional path to an input video file. If a path isn’t provided then the webcam will be used.
Our CropLayer class is identical to the one we defined previously:
class CropLayer(object):
	def __init__(self, params, blobs):
		# initialize our starting and ending (x, y)-coordinates of
		# the crop
		self.startX = 0
		self.startY = 0
		self.endX = 0
		self.endY = 0

	def getMemoryShapes(self, inputs):
		# the crop layer will receive two inputs -- we need to crop
		# the first input blob to match the shape of the second one,
		# keeping the batch size and number of channels
		(inputShape, targetShape) = (inputs[0], inputs[1])
		(batchSize, numChannels) = (inputShape[0], inputShape[1])
		(H, W) = (targetShape[2], targetShape[3])

		# compute the starting and ending crop coordinates
		self.startX = int((inputShape[3] - targetShape[3]) / 2)
		self.startY = int((inputShape[2] - targetShape[2]) / 2)
		self.endX = self.startX + W
		self.endY = self.startY + H

		# return the shape of the volume (we'll perform the actual
		# crop during the forward pass
		return [[batchSize, numChannels, H, W]]

	def forward(self, inputs):
		# use the derived (x, y)-coordinates to perform the crop
		return [inputs[0][:, :, self.startY:self.endY,
				self.startX:self.endX]]
After defining our identical CropLayer class, we’ll go ahead and initialize our video stream and HED model:
# initialize a boolean used to indicate if either a webcam or input
# video is being used
webcam = not args.get("input", False)

# if a video path was not supplied, grab a reference to the webcam
if webcam:
	print("[INFO] starting video stream...")
	vs = VideoStream(src=0).start()
	time.sleep(2.0)

# otherwise, grab a reference to the video file
else:
	print("[INFO] opening video file...")
	vs = cv2.VideoCapture(args["input"])

# load our serialized edge detector from disk
print("[INFO] loading edge detector...")
protoPath = os.path.sep.join([args["edge_detector"],
	"deploy.prototxt"])
modelPath = os.path.sep.join([args["edge_detector"],
	"hed_pretrained_bsds.caffemodel"])
net = cv2.dnn.readNetFromCaffe(protoPath, modelPath)

# register our new layer with the model
cv2.dnn_registerLayer("Crop", CropLayer)
Whether we elect to use our webcam or a video file, the script will dynamically work for either (Lines 51-62).
Our HED model is loaded and the CropLayer is registered on Lines 65-73.
Let’s acquire frames in a loop and apply edge detection!
# loop over frames from the video stream
while True:
	# grab the next frame and handle if we are reading from either
	# VideoCapture or VideoStream
	frame = vs.read()
	frame = frame if webcam else frame[1]

	# if we are viewing a video and we did not grab a frame then we
	# have reached the end of the video
	if not webcam and frame is None:
		break

	# resize the frame and grab its dimensions
	frame = imutils.resize(frame, width=500)
	(H, W) = frame.shape[:2]
We begin looping over frames on Lines 76-80. If we reach the end of a video file (which happens when a frame is None ), we’ll break from the loop (Lines 84 and 85).
Lines 88 and 89 resize our frame so that it has a width of 500 pixels. We then grab the dimensions of the frame after resizing.
Now let’s process the frame exactly as in our previous script:
	# convert the frame to grayscale, blur it, and perform Canny
	# edge detection
	gray = cv2.cvtColor(frame, cv2.COLOR_BGR2GRAY)
	blurred = cv2.GaussianBlur(gray, (5, 5), 0)
	canny = cv2.Canny(blurred, 30, 150)

	# construct a blob out of the input frame for the Holistically-Nested
	# Edge Detector, set the blob, and perform a forward pass to
	# compute the edges
	blob = cv2.dnn.blobFromImage(frame, scalefactor=1.0, size=(W, H),
		mean=(104.00698793, 116.66876762, 122.67891434),
		swapRB=False, crop=False)
	net.setInput(blob)
	hed = net.forward()
	hed = cv2.resize(hed[0, 0], (W, H))
	hed = (255 * hed).astype("uint8")
Canny edge detection (Lines 93-95) and HED edge detection (Lines 100-106) are computed over the input frame.
From there, we’ll display the edge detection results:
	# show the output edge detection results for Canny and
	# Holistically-Nested Edge Detection
	cv2.imshow("Frame", frame)
	cv2.imshow("Canny", canny)
	cv2.imshow("HED", hed)
	key = cv2.waitKey(1) & 0xFF

	# if the `q` key was pressed, break from the loop
	if key == ord("q"):
		break

# if we are using a webcam, stop the camera video stream
if webcam:
	vs.stop()

# otherwise, release the video file pointer
else:
	vs.release()

# close any open windows
cv2.destroyAllWindows()
Our three output frames are displayed on Lines 110-112: (1) the original, resized frame, (2) the Canny edge detection result, and (3) the HED result.
Keypresses are captured via Line 113. If "q" is pressed, we’ll break from the loop and cleanup (Lines 116-128).
Video and HED Results
So, how does Holistically-Nested Edge Detection perform in real-time with OpenCV?
Let’s find out.
Be sure to use the “Downloads” section of this blog post to download the source code and HED model.
From there, open up a terminal and execute the following command:
$ python detect_edges_video.py --edge-detector hed_model
[INFO] starting video stream...
[INFO] loading edge detector...
In the short GIF demo above you can see a demonstration of the HED model in action.
Notice in particular how the boundary of the lamp in the background is completely lost when using the Canny edge detector; however, when using HED the boundary is preserved.
In terms of performance, I was using my 3Ghz Intel Xeon W when gathering the demo above. We are obtaining close to real-time performance on the CPU using the HED model.
To obtain true real-time performance you would need to utilize a GPU; however, keep in mind that GPU support for OpenCV’s “dnn” module is particularly limited (specifically NVIDIA GPUs are not currently supported).
In the meantime, you may want to consider using the Caffe + Python bindings if you need real-time performance.
What's next? We recommend PyImageSearch University.
86+ total classes • 115+ hours hours of on-demand code walkthrough videos • Last updated: July 2025
★★★★★ 4.84 (128 Ratings) • 16,000+ Students Enrolled
I strongly believe that if you had the right teacher you could master computer vision and deep learning.
Do you think learning computer vision and deep learning has to be time-consuming, overwhelming, and complicated? Or has to involve complex mathematics and equations? Or requires a degree in computer science?
That’s not the case.
All you need to master computer vision and deep learning is for someone to explain things to you in simple, intuitive terms. And that’s exactly what I do. My mission is to change education and how complex Artificial Intelligence topics are taught.
If you're serious about learning computer vision, your next stop should be PyImageSearch University, the most comprehensive computer vision, deep learning, and OpenCV course online today. Here you’ll learn how to successfully and confidently apply computer vision to your work, research, and projects. Join me in computer vision mastery.
Inside PyImageSearch University you'll find:
- ✓ 86+ courses on essential computer vision, deep learning, and OpenCV topics
- ✓ 86 Certificates of Completion
- ✓ 115+ hours hours of on-demand video
- ✓ Brand new courses released regularly, ensuring you can keep up with state-of-the-art techniques
- ✓ Pre-configured Jupyter Notebooks in Google Colab
- ✓ Run all code examples in your web browser — works on Windows, macOS, and Linux (no dev environment configuration required!)
- ✓ Access to centralized code repos for all 540+ tutorials on PyImageSearch
- ✓ Easy one-click downloads for code, datasets, pre-trained models, etc.
- ✓ Access on mobile, laptop, desktop, etc.
Summary
In this tutorial, you learned how to perform Holistically-Nested Edge Detection (HED) using OpenCV and Deep Learning.
Unlike the Canny edge detector, which requires preprocessing steps, manual tuning of parameters, and often does not perform well on images captured using varying lighting conditions, Holistically-Nested Edge Detection seeks to create an end-to-end deep learning edge detector.
As our results show, the output edge maps produced by HED do a better job of preserving object boundaries than the simple Canny edge detector. Holistically-Nested Edge Detection can potentially replace Canny edge detection in applications where the environment and lighting conditions are potentially unknown or simply not controllable.
The downside is that HED is significantly more computationally expensive than Canny. The Canny edge detector can run in super real-time on a CPU; however, real-time performance with HED would require a GPU.
I hope you enjoyed today’s post!
To download the source code to this guide, and be notified when future tutorials are published here on PyImageSearch, just enter your email address in the form below!

Download the Source Code and FREE 17-page Resource Guide
Enter your email address below to get a .zip of the code and a FREE 17-page Resource Guide on Computer Vision, OpenCV, and Deep Learning. Inside you'll find my hand-picked tutorials, books, courses, and libraries to help you master CV and DL!


