Last week I covered how to install OpenCV 3 with Python 2.7 bindings on macOS Sierra and above.
In today’s tutorial we’ll learn how to install OpenCV 3 with Python 3.5 bindings on macOS.
I decided to break these install tutorials into two separate guides to keep them well organized and easy to follow.
To learn how to install OpenCV 3 with Python 3.5 bindings on your macOS system, just keep reading.
macOS: Install OpenCV 3 and Python 3.5
As I mentioned in the introduction to this post, I spent last week covering how to install OpenCV 3 with Python 2.7 bindings on macOS.
Many of the steps in last week’s tutorial and today’s tutorial are very similar (and in some cases identical) so I’ve tried to trim down some of the explanations for each step to reduce redundancy. If you find any step confusing or troublesome I would suggest referring to the OpenCV 3 + Python 2.7 tutorial where I have provided more insight.
The exception to this is “Step #7: Configure OpenCV 3 and Python 3.5 via CMake on macOS” where I provide an extremely thorough walkthrough on how to configure your OpenCV build. You should pay extra special attention to this step to ensure your OpenCV build has been configured correctly.
With all that said, let’s go ahead and install OpenCV 3 with Python 3.5 bindings on macOS.
Step #1: Install Xcode
Before we can compile OpenCV on our system, we first need to install Xcode, Apple’s set of software development tools for the Mac Operating System.
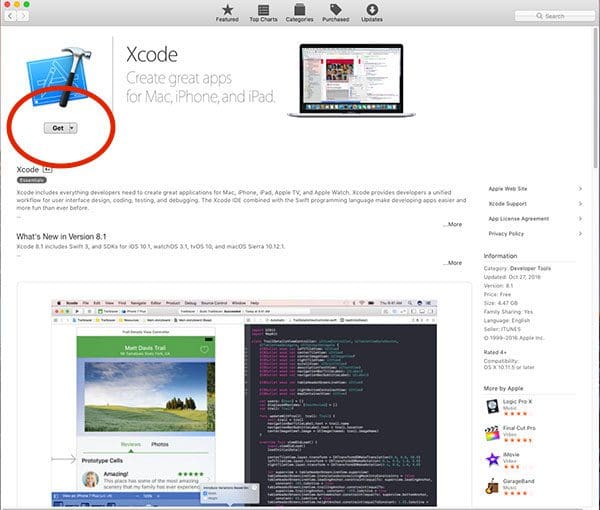
The easiest method to download Xcode is to open up the App Store application on your desktop, search for “Xcode” in the search bar, and then click the “Get” button:
After installing Xcode you’ll want to open up a terminal and ensure you have accepted the developer license:
$ sudo xcodebuild -license
We also need to install the Apple Command Line Tools. These tools include programs and libraries such as GCC, make, clang, etc. You can use the following command to install the Apple Command Line Tools:
$ sudo xcode-select --install
When executing the above command a confirmation window will pop up asking for you to confirm the install:
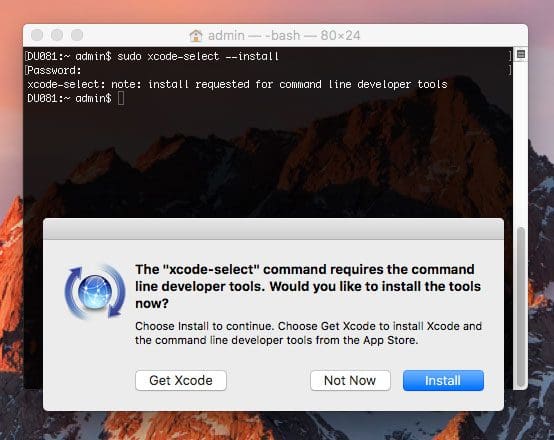
Click the “Install” button to continue. The actual installation process should take less than 5 minutes to complete.
Step #2: Install Homebrew
The next step is to install Homebrew, a package manager for macOS. You can think of Homebrew as the macOS equivalent of Ubuntu/Debian-based apt-get.
Installing Homebrew itself is super easy, just copy and paste the entire command below:
$ /usr/bin/ruby -e "$(curl -fsSL https://raw.githubusercontent.com/Homebrew/install/master/install)"
Once Homebrew is installed you should make sure the package definitions are up to date by running:
$ brew update
We now need to update our ~/.bash_profile
file (or create it if it doesn’t exist already). Open up the file using your favorite text editor (I’m using nano
in this case):
$ nano ~/.bash_profile
And then add the following lines to the file:
# Homebrew export PATH=/usr/local/bin:$PATH
This export
command simply updates the PATH
variable to look for binaries/libraries along the Homebrew path before the system path is consulted.
I have included a screenshot of what my ~/.bash_profile
looks like as reference below:
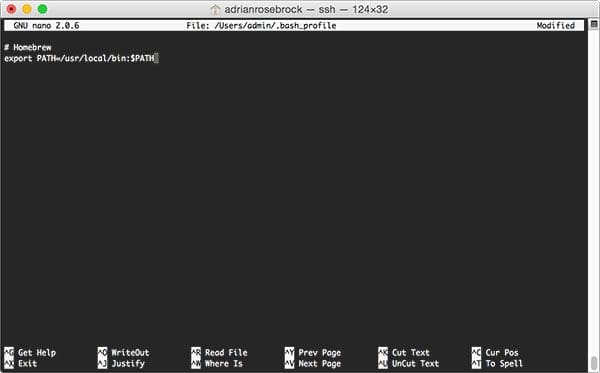
After updating your .bash_profile
file, save and exitor the editor followed by using source
to ensure the changes to the .bash_profile
are manually reloaded:
$ source ~/.bash_profile
This command only needs to be executed once. Anytime you open up a new terminal your .bash_profile
will automatically be source
‘d for you.
Step #3: Setup Homebrew for Python 3.5 and macOS
It is considered bad form to develop against the system Python as your main interpreter. The system version of Python should serve only one purpose — support system routines and operations. There is also the fact that macOS does not ship with Python 3 out of the box.
Instead, you should install your own version of Python that is independent from the system install. Using Homebrew, we can install Python 3 using the following command:
$ brew install python3
Note: Make sure you don’t forget the “3” in “python3”. The above command will install Python 3.5 on your system. However, if you leave off the “3” you’ll end up installing Python 2.7.
As a sanity check, it’s important to confirm that you are using the Homebrew version of Python 3 rather than the system version of Python 3. To accomplish this, simply use the which
command:
$ which python3 /usr/local/bin/python3
Important: Inspect this output closely. If you see /usr/local/bin/python3
then you are correctly using the Homebrew version of Python. However, if the output is /usr/bin/python3
then you are incorrectly using the system version of Python.
If you find yourself using the system version of Python instead of the Homebrew version you should:
- Ensure Homebrew installed without error.
- Check that
brew install python3
finished successfully. - You have properly updated your
~/.bash_profile
and reloaded the changes usingsource
. This basically boils down to making sure your~/.bash_profile
looks like mine above in Figure 3.
Step #4: Install Python virtual environments and NumPy
We’ve made good progress so far. We’ve installed a non-system version of Python 3 via Homebrew. However, let’s not stop there. Let’s install both virtualenv and virtualenvwrapper so we can create separate, independent Python environments for each project we are working on — this is considered a best practice when developing software in the Python programming language.
I’ve already discussed Python virtual environments ad nauseam in previous blog posts, so if you’re curious about how they work and why we use them, please refer to the first half of this blog post. I also highly recommend reading through this excellent tutorial on the RealPython.com blog that takes a deeper dive into Python virtual environments.
Install virtualenv and virtualenvwrapper
Installing both virtualenv
and virtualenvwrapper
is a snap using pip
:
$ pip install virtualenv virtualenvwrapper
After these packages have been installed we need to update our ~/.bash_profile
again:
$ nano ~/.bash_profile
Once opened, append the following lines to the file:
# Virtualenv/VirtualenvWrapper source /usr/local/bin/virtualenvwrapper.sh
After updating, your ~/.bash_profile
should look similar to mine:
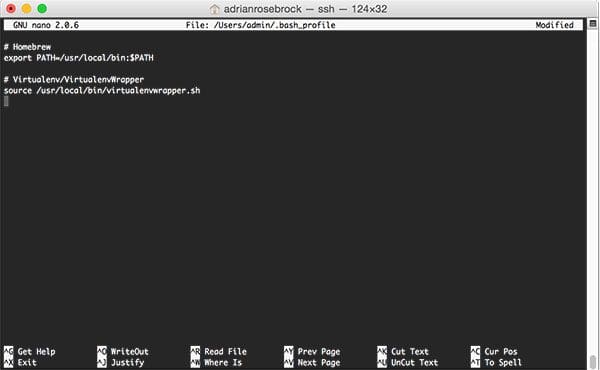
After updating your .bash_profile
, save it, exit, and then once again source
it:
$ source ~/.bash_profile
I’ll reiterate that this command only needs to be executed once. Each time you open up a new terminal window this file will automatically be source
‘d for you.
Create your Python 3 virtual environment
We can now use the mkvirtualenv
command to create a Python 3 virtual environment named cv
:
$ mkvirtualenv cv -p python3
The -p python3
switch ensures that a Python 3 virtual environment is created instead of a Python 2.7 one.
Again, the above command will create a Python environment named cv
that is independent from all other Python environments on your system. This environment will have it’s own site-packages
directory, etc., allowing you to avoid any type of library versioning issues across projects.
The mkvirtualenv
command only needs to be executed once. To access the cv
Python virtual environment after it has been created, just use the workon
command:
$ workon cv
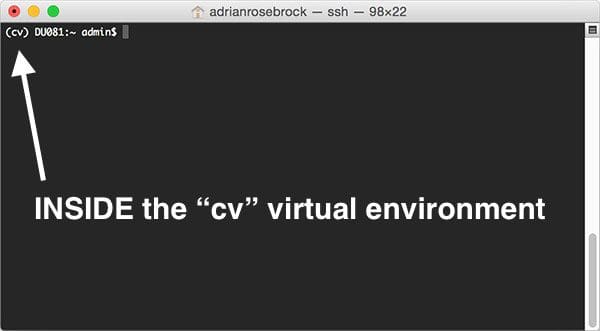
To validate that you are in the cv
virtual environment, just examine your command line. If you see the text (cv)
preceding the prompt, then you are are in the cv
virtual environment:
Otherwise, if you do not see the cv
text, then you are not in the cv
virtual environment:
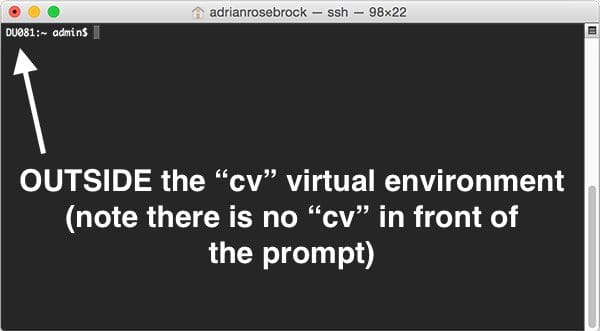
If you find yourself in this situation all you need to do is utilize the workon
command mentioned above.
Install NumPy
The only Python-based prerequisite that OpenCV needs is NumPy, a scientific computing package.
To install NumPy into our cv
virtual environment, ensure you are in the cv
environment (otherwise NumPy will be installed into the system version of Python) and then utilize pip
to handle the actual installation:
$ pip install numpy
Step #5: Install OpenCV prerequisites using Homebrew
OpenCV requires a few prerequisites to be installed before we compile it. These packages are related to either (1) tools used to build and compile, (2) libraries used for image I/O operations (i.e., loading various image file formats from disk such as JPEG, PNG, TIFF, etc.) or (3) optimization libraries.
To install these prerequisites for OpenCV on macOS execute the following commands:
$ brew install cmake pkg-config $ brew install jpeg libpng libtiff openexr $ brew install eigen tbb
Step #6: Download the OpenCV 3 source from GitHub
As I detailed in last week’s tutorial, OpenCV 3 on macOS needs to be compiled via the latest commit to GitHub instead of an actual tagged release (i.e., 3.0, 3.1, etc.). This is because the current tagged releases of OpenCV do not provide fixes for the QTKit vs. AVFoundation errors (please see last week’s blog post for a thorough discussion on this).
First, we need to download the OpenCV GitHub repo:
$ cd ~ $ git clone https://github.com/opencv/opencv
Followed by the opencv_contrib repo:
$ git clone https://github.com/opencv/opencv_contrib
Step #7: Configure OpenCV and Python 3.5 via CMake on macOS
This section of the tutorial is the most challenging and the one that you’ll want to pay the most attention to.
First, I’ll demonstrate how to setup your build by creating the a build
directory.
I then provide a CMake template that you can use to start the process of compiling OpenCV 3 with Python 3.5 bindings on macOS. This template requires you to fill in two values:
- The path to your
libpython3.5.dylib
file. - The path to your
Python.h
headers for Python 3.5.
I will help you find and determine the correct values for these paths.
Finally, I provide a fully completed CMake command as an example. Please note that is command is specific to my machine. Your CMake command may be slightly different due to the paths specified. Please read the rest of this section for details.
Setting up the build
In order to compile OpenCV with Python 3.5 bindings for macOS we first need to set up the build. This simply amounts to changing directories and creating a build
directory:
$ cd ~/opencv $ mkdir build $ cd build
OpenCV 3 + Python 3.5 CMake template for macOS
The next part, where we configure our actual build, gets a little tricky. In order to make this process easier I have constructed the following OpenCV 3 + Python 3.5 CMake template:
$ cmake -D CMAKE_BUILD_TYPE=RELEASE \ -D CMAKE_INSTALL_PREFIX=/usr/local \ -D OPENCV_EXTRA_MODULES_PATH=~/opencv_contrib/modules \ -D PYTHON3_LIBRARY=YYY \ -D PYTHON3_INCLUDE_DIR=ZZZ \ -D PYTHON3_EXECUTABLE=$VIRTUAL_ENV/bin/python \ -D BUILD_opencv_python2=OFF \ -D BUILD_opencv_python3=ON \ -D INSTALL_PYTHON_EXAMPLES=ON \ -D INSTALL_C_EXAMPLES=OFF \ -D BUILD_EXAMPLES=ON ..
Looking at this template I want to point out a few things to you:
BUILD_opencv_python2=OFF
: This switch indicates that we do not want to build Python 2.7 bindings. This needs to be explicity stated in the CMake command. Failure to do this can cause problems when we actually run CMake.BUILD_opencv_python3=ON
: We would like for OpenCV 3 + Python 3.5 bindings to be built. This instruction indicates to CMake that the Python 3.5 binding should be built rather than Python 2.7.PYTHON3_LIBRARY=YYY
: This is the first value that you need to fill in yourself. You need to replaceYYY
with the path to yourlibpython3.5.dylib
file. I will hep you find the path to this value in the next section.PYTHON3_INCLUDE_DIR=ZZZ
: This is the second value that you need to fill in. You will need to replaceZZZ
with the path to yourPython.h
headers. Again, I will help you determine this path.
Determining your Python 3.5 library and include directory
We will start by configuring your PYTHON3_LIBRARY
value. This switch should point to your libpython3.5.dylib
file. This file is located within many nested subdirectories of /usr/local/Cellar/python
. To find the exact path to the libpython3.5.dylib
file, just use the ls
command with a wildcard (auto-tab complete also works as well):
$ ls /usr/local/Cellar/python3/3.*/Frameworks/Python.framework/Versions/3.5/lib/python3.5/config-3.5m/libpython3.5.dylib /usr/local/Cellar/python3/3.5.2_3/Frameworks/Python.framework/Versions/3.5/lib/python3.5/config-3.5m/libpython3.5.dylib
Take note of the output of this command — this is the full path to your libpython3.5.dylib
file and will replace YYY
in the CMake template above.
Let’s move along to determining the PYTHON3_INCLUDE_DIR
variable. This path should point to the Python.h
header files for Python 3.5 used to generate the actual OpenCV 3 + Python 3.5 bindings.
Again, we’ll use the same ls
and wildcard trick here to determine the proper path:
$ ls -d /usr/local/Cellar/python3/3.*/Frameworks/Python.framework/Versions/3.5/include/python3.5m/ /usr/local/Cellar/python3/3.5.2_3/Frameworks/Python.framework/Versions/3.5/include/python3.5m/
The output of the ls -d
command is our full path to the Python.h
headers. This value will replace ZZZ
in the CMake template.
Filling in the CMake template
Now that we’ve determined the PYTHON3_LIBRARY
and PYTHON3_INCLUDE_DIR
values we need to update the CMake command to reflect these paths.
On my machine, the full CMake command to configure my OpenCV 3 + Python 3.5 build looks like:
$ cmake -D CMAKE_BUILD_TYPE=RELEASE \ -D CMAKE_INSTALL_PREFIX=/usr/local \ -D OPENCV_EXTRA_MODULES_PATH=~/opencv_contrib/modules \ -D PYTHON3_LIBRARY=/usr/local/Cellar/python3/3.5.2_3/Frameworks/Python.framework/Versions/3.5/lib/python3.5/config-3.5m/libpython3.5.dylib \ -D PYTHON3_INCLUDE_DIR=/usr/local/Cellar/python3/3.5.2_3/Frameworks/Python.framework/Versions/3.5/include/python3.5m/ \ -D PYTHON3_EXECUTABLE=$VIRTUAL_ENV/bin/python \ -D BUILD_opencv_python2=OFF \ -D BUILD_opencv_python3=ON \ -D INSTALL_PYTHON_EXAMPLES=ON \ -D INSTALL_C_EXAMPLES=OFF \ -D BUILD_EXAMPLES=ON ..
However, please do not copy and paste my exact CMake command — make sure you have used the instructions above to properly determine your PYTHON3_LIBRARY
and PYTHON3_INCLUDE_DIR
values.
Once you’ve filled in these values, execute your cmake
command and your OpenCV 3 + Python 3.5 build will be configured.
As an example, take a look at the Python 3
section output from my configuration:
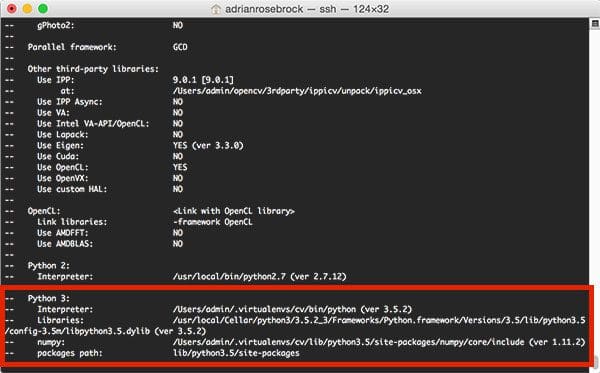
In particular, you’ll want to make sure that:
- The
Interpreter
points to the Python binary in yourcv
virtual environment. Libraries
points to yourlibpython3.5.dylib
file.- The
numpy
version being utilized is the one you installed in yourcv
virtual environment.
Step #8: Compile and install OpenCV 3 on macOS
After investigating your cmake
command and ensuring it exited without error (and that the Python 3
section was properly configured), you can now compile OpenCV:
$ make -j4
In this case, I am supplying -j4
to compile OpenCV using all four cores on my machine. You can tune this value based on the number of processors/cores you have.
OpenCV can take awhile to compile, anywhere from 30-90 minutes, depending on your system specs. I would consider going for a nice long walk while it compiles.
A successful compile will end with a 100% completion:
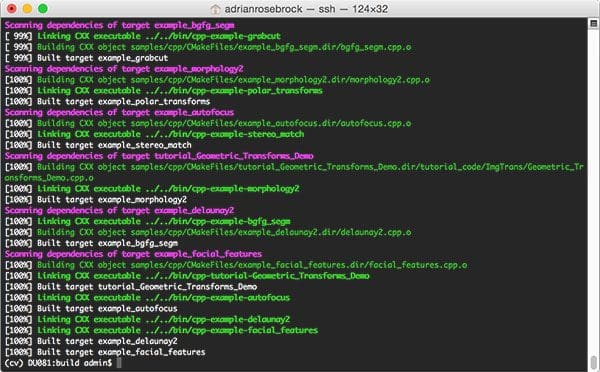
Assuming that OpenCV compiled without error, you can now install it on your macOS system:
$ sudo make install
Step #9: Rename and sym-link your OpenCV 3 + Python 3.5 bindings
After running sudo make install
your OpenCV 3 + Python 3.5 bindings should be located in /usr/local/lib/python3.5/site-packages
. You can verify this by using the ls
command:
$ cd /usr/local/lib/python3.5/site-packages/ $ ls -l *.so -rwxr-xr-x 1 root admin 3694564 Nov 15 11:28 cv2.cpython-35m-darwin.so
I’ve been perplexed by this behavior ever since OpenCV 3 was released, but for some reason, when compiling OpenCV with Python 3 support enabled the output cv2.so
bindings are named differently. The actual filename will vary a bit depending on your system architecture, but it should look something like cv2.cpython-35m-darwin.so
.
Again, I don’t know exactly why this happens, but it’s an easy fix. All we need to do is rename the file to cv2.so
:
$ cd /usr/local/lib/python3.5/site-packages/ $ mv cv2.cpython-35m-darwin.so cv2.so $ cd ~
After renaming cv2.cpython-35m-darwin.so
to cv2.so
we then need to sym-link our OpenCV bindings into the cv
virtual environment for Python 3.5:
$ cd ~/.virtualenvs/cv/lib/python3.5/site-packages/ $ ln -s /usr/local/lib/python3.5/site-packages/cv2.so cv2.so $ cd ~
Step #10: Verify your OpenCV 3 install on macOS
To verify that your OpenCV 3 + Python 3.5 installation on macOS is working you should:
- Open up a new terminal.
- Execute the
workon
command to access thecv
Python virtual environment. - Attempt to import the Python + OpenCV bindings.
Here are the exact steps you can use to test the install:
$ workon cv $ python Python 3.5.2 (default, Oct 11 2016, 04:59:56) [GCC 4.2.1 Compatible Apple LLVM 8.0.0 (clang-800.0.38)] on darwin Type "help", "copyright", "credits" or "license" for more information. >>> import cv2 >>> cv2.__version__ '3.1.0-dev' >>>
Note: Take note of the -dev
in the cv2.__version__
. This indicates that we are using the development version of OpenCV and not a tagged release. Once OpenCV 3.2 is released these instructions can be updated to simply download a .zip of the tagged version rather than having to clone down the entire repositories.
I’ve also included a screenshot below that utilizes these same steps. As you can see, I can access my OpenCV 3 bindings from Python 3.5 shell:
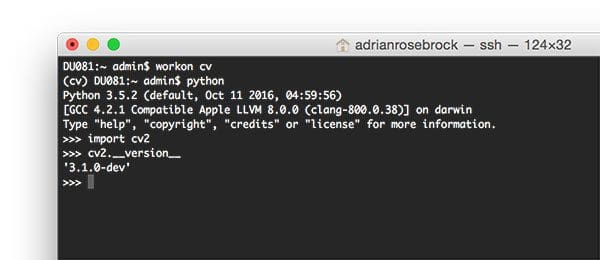
Congratulations, you have installed OpenCV with Python 3.5 bindings on your macOS system!
So, what’s next?
Congrats! You now have a brand new, fresh install of OpenCV on your macOS system — and I’m sure you’re just itching to leverage your install to build some awesome computer vision apps…
…but I’m also willing to bet that you’re just getting started learning computer vision and OpenCV, and probably feeling a bit confused and overwhelmed on exactly where to start.
Personally, I’m a big fan of learning by example, so a good first step would be to have some fun and read this blog post on detecting cats in images/videos. This tutorial is meant to be very hands-on and demonstrate how you can (quickly) build a Python + OpenCV application to detect the presence of cats in images.
And if you’re really interested in leveling-up your computer vision skills, you should definitely check out my book, Practical Python and OpenCV + Case Studies. My book not only covers the basics of computer vision and image processing, but also teaches you how to solve real-world computer vision problems including face detection in images and video streams, object tracking in video, and handwriting recognition.
So, let’s put that fresh install of OpenCV 3 on your macOS system to good use
What's next? We recommend PyImageSearch University.
86 total classes • 115+ hours of on-demand code walkthrough videos • Last updated: October 2024
★★★★★ 4.84 (128 Ratings) • 16,000+ Students Enrolled
I strongly believe that if you had the right teacher you could master computer vision and deep learning.
Do you think learning computer vision and deep learning has to be time-consuming, overwhelming, and complicated? Or has to involve complex mathematics and equations? Or requires a degree in computer science?
That’s not the case.
All you need to master computer vision and deep learning is for someone to explain things to you in simple, intuitive terms. And that’s exactly what I do. My mission is to change education and how complex Artificial Intelligence topics are taught.
If you're serious about learning computer vision, your next stop should be PyImageSearch University, the most comprehensive computer vision, deep learning, and OpenCV course online today. Here you’ll learn how to successfully and confidently apply computer vision to your work, research, and projects. Join me in computer vision mastery.
Inside PyImageSearch University you'll find:
- ✓ 86 courses on essential computer vision, deep learning, and OpenCV topics
- ✓ 86 Certificates of Completion
- ✓ 115+ hours of on-demand video
- ✓ Brand new courses released regularly, ensuring you can keep up with state-of-the-art techniques
- ✓ Pre-configured Jupyter Notebooks in Google Colab
- ✓ Run all code examples in your web browser — works on Windows, macOS, and Linux (no dev environment configuration required!)
- ✓ Access to centralized code repos for all 540+ tutorials on PyImageSearch
- ✓ Easy one-click downloads for code, datasets, pre-trained models, etc.
- ✓ Access on mobile, laptop, desktop, etc.
Summary
In this tutorial you learned how to compile and install OpenCV 3 with Python 3.5 bindings on macOS Sierra.
To accomplish this, we configured and compiled OpenCV 3 by hand using the CMake utility. While this isn’t exactly the most “fun” experience, it does give us complete and total control over the install.
If you’re looking for an easier way to get OpenCV installed on your Mac system be sure to stay tuned for next week’s blog post where I demonstrate how to install OpenCV on macOS using nothing but Homebrew.
To be notified when this blog post goes live, please enter your email address in the form below and I’ll be sure to ping you when the tutorial is published.
Join the PyImageSearch Newsletter and Grab My FREE 17-page Resource Guide PDF
Enter your email address below to join the PyImageSearch Newsletter and download my FREE 17-page Resource Guide PDF on Computer Vision, OpenCV, and Deep Learning.
Murtaza Dalal
Hi adrian,
I have a question regarding using c++ opencv. Are we supposed to have a separate virtual environment for that? What is the proper technique for installing and using c++ opencv on mac os Sierra? -the cake commands etc, as well as how to compile the c++ code for opencv. Do you think you could do a tutorial on that? Currently I’m just using c++ opencv on a virtual environment created from the python 2 tutorial and it works but I am not sure that I’m doing things correctly by using a python virtual environment for c++.
Adrian Rosebrock
C++ doesn’t have a concept of a virtual environment in the same context as Python. This guide demonstrates how to use Python with OpenCV bindings, but natively OpenCV is a C++ library. You simply compile it, install it, and then use gcc/g++ to link against it when compiling your C++ code.
hareen tej
hello sir, i followed your steps until i update the .bash_profile after installing virtualenv .
before when i used the line pip install virtualenv virtualenvwrapper it didn’t worked as its saying some exceptions . but however i installed by using pip install –user virtualenv virtualenvwrapper.
now when i source the ,bash_profile i get -bash: /usr/local/bin/virtualenvwrapper.sh: No such file or directory .
and also whenever i quit the terminal and reopen it i get the above line in the 2nd line.
Adrian Rosebrock
The reason you are getting the error each time you open a new terminal is because the
~/.bash_profile
file is automatically loaded. Since virtualenv and virtualenvwrapper are not properly configured you are receiving the error.Which version of Python (2.7 or 3) are you installing OpenCV for?
Taka
Thank you, it works great!
Adrian Rosebrock
Glad to hear it Taka! Congrats on getting OpenCV installed on your system.
Malcolm Swan
Hi Adrian,
From Step #5 on are we supposed to be in the virtual environment (cv) as in Step #4? I’ve just completed Step #6 and realised that I’m still in the virtual environment. If we’re supposed to exit the virtual environment before moving onto Step #5 will deleting and recreating the virtual environment get me back on track?
Thanks
Adrian Rosebrock
Once you have entered the virtual environment you don’t need to leave it — you can stay inside it.
If you ever need to access the virtual environment again, just use the
workon
command (don’t delete it and recreate it):$ workon your_virtual_env
Tom Lorent Bourdo
Hello, i have a problem during the step 7, my librairy isn’t having the right path as I stupidly used YYY and now can’t change it, do you have any idea of how could I get the path to my dylib file ?
Adrian Rosebrock
Hey Tom — just delete your
build
directory, re-create it, and then re-run CMake with the correct path to your .dylib file.Jacob
Thanks for this great tutorial! Everything worked well.
What are the next steps to get OpenCV working in Pycharm 2016.3?
Adrian Rosebrock
Once you have OpenCV installed, please refer to this tutorial on configuring PyCharm.
Nick Machairas
Hello Adrian, thank you for your thorough instructions. I followed your guide with the minor difference that for this specific application I did not want to work in a virtual environment. I made all necessary changes to PYTHON3_LIBRARY, PYTHON3_INCLUDE_DIR, PYTHON3_EXECUTABLE to point to the correct directories. What’s weird is that the `cv2.cpython-35m-darwin.so` was inside the OpenCV git repo instead of my local python site-packages folder. I renamed the .so file and placed it to the correct folder. This allows me to verify that opeCV is installed as in Step#10 above. I haven’t tested functionality yet, I’m about to start with one of your blog posts. I hope it will work.
Thanks again!
Adrian Rosebrock
Hey Nick — did you forget to run
make install
? It’s normal to seecv2.so
in your build directory prior to actually runningmake install
.Karen
Thanks so much for your extremely helpful tutorial, I’ve been hoping you posted this blog for weeks! Just have one final question when I try to verify OpenCV 3 install on my macOS (Sierra), when I open up python3 IDLE and try to import cv2 function, I get error message “No module named CV2”. How do I go about using opencv3 module?
Adrian Rosebrock
Are you using the terminal IDLE or the GUI IDLE? Keep in mind that the GUI version of IDLE does not respect Python virtual environments. You should be using the terminal IDLE instead (and from within the “cv” virtual environment).
Mansur
Hello Adrian
I am using the terminal IDLE from within the CV virtual environment and am getting the error “No Module named CV2”
Adrian Rosebrock
IDLE and Python virtual environments are not compatible. Please use the Python shell from the command line or Jupyter Notebooks if you like the look and feel of IDLE.
Heather
Hi Adrian, thanks so much for creating this site!
I attempted to follow these instructions exactly, including the part that describes how to construct the CMake command, but am having trouble using functions from opencv_contrib.
For example:
Any idea how to fix this?
Adrian Rosebrock
Double check your
OPENCV_EXTRA_MODULES_PATH
— it looks like the path you supplied to CMake was incorrect.Heather
Thank you for your response. The path was correct — I checked it a couple times. I suspect the build may have not fully completed although I didn’t see any obvious error messages. In any case, I pulled the latest changes and rebuilt everything (using the exact same CMake command) and this time it worked.
Adrian Rosebrock
Fantastic, I’m happy to hear it! 🙂
Matheus
Hi, Heather
Any sucess fixing this issue?
I’ve got the same problem =/
Peter
I’m also having the same problem
Peter
Hi, I just made it work.
It seems my cmake can’t find opencv_contri unless I trail the path with a ‘/’ (OPENCV_EXTRA_MODULES_PATH=~/opencv_contrib/modules/). Make sense since it’s a folder but even the README.md on GitHub doesn’t do that.
Also after ‘sudo make install’, the .so in ‘/usr/local/lib/python3.x/site-packages’ will be updated yet does not have any of the opencv_contri modules in it. However in the build folder a cv2.so just appeared and has all the opencv_contri things…
Adrian Rosebrock
The generated
cv2.so
file will have your opencv_contrib bindings in it.Heather
Adrian, one more issue that I’m having trouble troubleshooting: having trouble getting matplotlib to work with the virtual env set up described here. When I attempt “from matplotlib import pyplot as plt” I get:
RuntimeError: Python is not installed as a framework. The Mac OS X backend will not be able to function correctly if Python is not installed as a framework. See the Python documentation for more information on installing Python as a framework on Mac OS X. Please either reinstall Python as a framework, or try one of the other backends. If you are Working with Matplotlib in a virtual enviroment see ‘Working with Matplotlib in Virtual environments’ in the Matplotlib FAQ
I checked out the above doc but am still unsure how to proceed. Any pointers?
I tried specifying “matplotlib.use(“TkAgg”)” and then I no longer get the RuntimeError from the import statement, but when I try to call a matplotlib function, I get:
libc++abi.dylib: terminating with uncaught exception of type NSException
Process finished with exit code 134 (interrupted by signal 6: SIGABRT)
Adrian Rosebrock
This is an issue with matplotlib’s compatibility with Python virtual environments. I’m not sure when the issue will be resolved, but the easiest workaround is to simply install a previous version that is compatible with virtual environments:
$ pip install matplotlib==1.4.3
Heather
Ah, thank you SO much. That was driving me insane.
Burak Karakan
I can confirm that this is the exact solution to the issue. I tried various fixes, mostly related to the matplotlib backend engine fixes, but none of them solved the issue. Simply downgrading worked like a charm, thank you very much!
Adrian Rosebrock
Fantastic, I’m glad to hear it Burak!
Rob B
Thank you SO much!! I never would have got this working without your tutorial!
Adrian Rosebrock
No problem Rob, I’m happy I could help.
chunwai
Hi Adrian, I follow exactly the same steps but Terminal return (-bash: pip: command not found) when I try to install virtualenv and virtualenvwrapper by this command in step 4: pip install virtualenv virtualenvwrapper. However, if I use pip3, it works.
Adrian Rosebrock
You can install virtualenv and virtualenvwrapper via pip3, that should work just fine. Although if you do, you might need to manually set the VIRTUALENVPATH. You should refer to the virtualenv and virtualenvwrapper documentation for more information on this.
Oliver Obst
I also needed to set python3 for virtualenvwrapper, it is trying to use python otherwise.
# Virtualenv/VirtualenvWrapper
export VIRTUALENVWRAPPER_PYTHON=/usr/local/bin/python3
Adrian Rosebrock
Thanks for sharing Oliver!
haley
Thanks this helped.
Andrew
I can confirm that this was REQUIRED for sourching virtualenvwrapper, which, without this bit, would try the system python2.7.
Ayush Singhania
Hey,
Do I need to update this
# Virtualenv/VirtualenvWrapper
export VIRTUALENVWRAPPER_PYTHON=/usr/local/bin/python3
on the bash profile?
or run this on my terminal?
Adrian Rosebrock
I would suggest doing this in your
.bash_profile
so the export is executed each time you open up your terminal.Nishatul Majid
Hi, how do I manually set the VIRTUALENVPATH? Thanks.
Adrian Rosebrock
What do you mean by “manually” set it? You can use the “export” command as mentioned above.
Andre C
After updating to Sierra your tutorial worked well on my mac. Thank you!
Adrian Rosebrock
Glad to hear it Andre! 🙂
Matthew Mella
actually just how do I delete the build directory because I used yyy? thank you
Adrian Rosebrock
Assuming you are in the
build
directory now, just go up one directory and use therm -r
command:Son Le
If you encounter this error: “command not found: workon”, follow these steps:
$ export WORKON_HOME=~/.virtualenvs
$ VIRTUALENVWRAPPER_PYTHON=’/usr/bin/python3′ # or whenever your python3 is
$ source /usr/local/bin/virtualenvwrapper.sh
Jurgis
Hey Adrian thanks for the tut,
I was fiddling around for some time, carefully following your guide and everything would would until the Cmake part. it compiled everything correctly, but couldnt detect the python 3 libraries, so i went to the internet to search for alternative ways and found this website https://peekay.org/2016/03/24/opencv-osx-python-3-bindings/ and tried the authors code :
it seems to have worked and detected the python libraries, i’ll try finishing your tutorial and will see how it goes!
Jurgis
Adrian Rosebrock
Awesome, thank you for sharing Jurgis!
Raunaq
Thank you so much, Jurgis. The code you provided worked at the first try. I don’t know why the described way did not work but thanks anyway.
Anura
Hi Adrian,
By the time I was trying this tutorial, Python is in version 3.6. At Step 10 to verify OpenCV3 install, nothing appears after the command import cv2. Nothing appeared out of the ordinary in earlier steps. Any clue ?
Adrian Rosebrock
What do you mean by “nothing appears after the command import cv2”? Does Python crash? Do you get an error message of some kind?
Anura
Adrian,
Apologies. My bad. It does work. I was expecting cv2.__version__ to be an output when in fact it was a command. When I checked…it’s at ‘3.2.0-dev’
Adrian Rosebrock
No problem Anura, I’m happy we could resolve the problem 🙂
Judah
Thank you for this easy to follow guide!
Mike
Hi Adrian,
How would I go about uninstalling OpenCV if I installed it via this method?
Adrian Rosebrock
Remove all OpenCV-related files (you’ll see OpenCV in the filename) from
/usr/local/lib
.Victor
Thanks for your tutorial! I think I managed to get it installed and am looking forward to follow the rest of your tutorials. Cheers!
Adrian Rosebrock
Great job victor, congrats! 🙂
Mike
I run as a non-admin user on OSX. Does this install work for that? I temporarily run as root in the terminal when setting things like this up, as you almost always need root access. After setting up as root, will everything work for my standard user account?
Adrian Rosebrock
Once you compile and install OpenCV you will no longer need root access.
Tadhg Riordan
Can confirm working for python 3.6 with some slight directory changes for the cmake command. Thank you! 🙂
Adrian Rosebrock
This tutorial will work with Python 3.6 as long as you update the CMake command to point to your Python 3.6 files.
Tom Lorent Bourdo
Hey, do you have any ideas on how could I do to link my python openCV with anaconda not to work with the console anymore ? thanks for the great work !
Adrian Rosebrock
What do you mean by “not to work with the console anymore”?
Harsha
Hi Adrian, I have installed Opencv for python 2.7 using your post(https://pyimagesearch.com/2016/11/28/macos-install-opencv-3-and-python-2-7/) It worked great. Currently I also want to install opencv for python3. How can I install it ? as in do I need to compile using a fresh opencv download to a folder different than ~/opencv ?
Thanks in advance.
Adrian Rosebrock
You would need to create a new “build” directory, create a Python virtual environment for Python 3, run CMake, compile OpenCV, and then move the
cv2.so
file into yoursite-packages
directory.Chandramauli Kaushik
Thank you so much, I finally got OpenCV with python3.6.
Great page and tutorials.
Thanks :)))
Adrian Rosebrock
Great job Chandramauli!
Nome
Thanks for the great tutorial! I followed it and was able to get OpenCV working, until I encountered a strange error. I had been able to use VideoCapture no problem until I recently transferred everything over to a new hard drive. I copied over everything so it should ostensibly work the same. However, now OpenCV is unable to use VideoCapture and returns error: (-215). It sounds like it could be a ffmpeg issue, but any ideas how to fix it if I followed your installation tutorial?
Thanks!
Adrian Rosebrock
That is quite strange, but since you’re on new hardware you might want to consider simply re-compiling OpenCV. That would be my main suggestion to resolve the issue.
Nome
Not sure what went wrong, but sure enough re-compiling did the trick!
Adrian Rosebrock
Fantastic, I’m happy to hear re-compiling worked!
Rana
Hi,
is there a way to make it work without virtual environment?
Adrian Rosebrock
Are you trying to compile and install OpenCV without a virtual environment? Or access the OpenCV bindings from outside the virtual environment?
Tarun
I was able to install opencv in cv virtual environment successfully. However, i’d like to be able to import cv2 outside the specific virtual environment, in spyder or jupter notebook. How do I go about doing that? Thank you so much for your assitance.
Adrian Rosebrock
Did you install the
cv2.so
file into the globalsite-packages
for Python? If so, just install NumPy outside the virtual environment via$ sudo pip install numpy
and you should be able to import OpenCV outside the Python virtual environment.Marko
Hi, thanks. Couple of questions:
1. At the end of step 7, you say, “As an example, take a look at the Python 3 section output from my configuration:” – what is the command to access these config settings?
2. In what directory do I run the “make -j4” command?
Adrian Rosebrock
1. Take a look at the output of “CMake”.
2. You should run the
make -j4
command in thebuild
directory after CMake has (successfully) ran.Antonios
Hi Adrian.
In order to follow your way of working with Python & OpenCV on my MAC,
on step 2 – I installed & builded the nano text editor.
Then , you say “Save & exitor the editor followed by source …”.
My question is how to save ?
In case that I press (cmd + S), it will guide me to Save a something.txt file in the Documents file.
K.R.
Antonios
Antonios
Hi Adrian.
On step8 – you type $ make -j4, in order to run for all 4 cores,
but in my case I have 2 core system. Should I run $ make -j2 ?
K.R.
Antonios
Adrian Rosebrock
Correct, if you only have 2 cores on your system you should run
make -j2
.Antonios Kats
Hi Adrian, thank you very much for this tutorial.
I completed it and I’m so happy about it. I’ d like to ask you what would be the next step.
I tried to create a new python file by texting $ nano whatever.py (in the cv environment from the step#10, but didn’t work. I need your help 😉
Adrian Rosebrock
I’m not sure what you mean by “it didn’t work”. Did you receive an error message of some kind?
Antonios Kats
I just needed to install scipy in the working environment (cv).
Thanks for the help !
Sjoerd
Ok, so first of all: thnx for this amazing tutorial and the time you obviously devoted to it!
For me the worst challenge was to get OpenCV installed for my native python3.4 install on macOS 10.12.3 (there is a tutorial for this on your website as well, but it uses Homebrew which in turn automatically installs Python3.6 while I really need 3.4 for other reasons). But anyways, got that solved.
Then some small adaptions where needed but those are already mentioned in the earlier comments.
One thing though: when applying your code to my own dataset a lot of the ‘results’ where to big to display on my screen, so only parts of them where visible. I solved this by changing the last few lines of code in search.py to:
for (score, resultID) in results:
# load the result image and display it
cv2.namedWindow(‘Result’,cv2.WINDOW_NORMAL)
result = cv2.imread(args[“result_path”] + “/” + resultID)
resultresized = cv2.resize(result, (600,600))
cv2.imshow(“Result”, resultresized)
cv2.waitKey(0)
This will allow you to resize the outfit to fit your screen. I used 600 by 600 pixels as an example but off course one could also write a function to downscale the output to a minimum size while maintaining the original proportions.
Adrian Rosebrock
Thanks for the comment Sjoerd. Out of curiosity, which images were you trying to display that were too big to display to your screen? I normally try to keep the result images smaller for this reason.
Thibault
Hi,
I installed it on 3.6
I used the following cmake and it worked properly. you have to adjust it with your setup eventually.
it worked well.
The cv2.so file actually was installed directly in the virtual env with the name: cv2.cpython-36m-darwin.so
~/.virtualenvs/cv/lib/python3.6/site-packages
Misha
Wow your version worked on my Mac with 3.6 as well, while Adrian’s failed(
Thank you so much, Thibault!!!
Adrian Rosebrock
Thank you for sharing Thibault and Misha! I will create another tutorial for Python 3.6 + OpenCV 3 in the future.
hendrick
hi adrian
I failed when install python 3.6 + opencv 3 with fatal error.
do you have tutorials for this
thank you
Simon
This worked for me on my MAC, thank you!
nick
Awesome!!
but I just come across two question…
1, I don’t have a python file in the Cellar (I used my own python3.5 without using homebrew) .
2, after cmake, the config is succesufll but the Python3’s libraries parts show YYY rather than a path…
Can you help me fix it? Thanks a lot!
Adrian Rosebrock
You need to replace “YYY” with the actual path to your Python library.
Jonny Taylor
Hi,
Thanks for writing this tutorial. For future reference, a note about what I needed to do (Anaconda python 3 on OS X 10.9.5):
When building with the tagged 3.2.0 build I encountered the following error during the ‘make’ phase:
In file included from /Volumes/Development/opencv/modules/core/src/hal_internal.cpp:49:
/Volumes/Development/opencv/build/opencv_lapack.h:1:10: fatal error: ‘CBLAS_H_PATH-NOTFOUND/Accelerate/Accelerate.h’ file not found
#include “CBLAS_H_PATH-NOTFOUND/Accelerate/Accelerate.h”
I could not see any obvious error at the cmake stage (output here http://pastebin.com/3Qc8kYVV).
Instead, I tried building against the latest ‘master’ build for opencv and opencv_contrib (3.2.0-332-gc1007c7). When doing this, I encountered the following problem (https://github.com/opencv/opencv/issues/8129); the instruction to disable freetype solved that problem and I was able to compile successfully.
Lakshman
hi,
I completed the installation, and the cv2.so file is copied to /Library/Frameworks/Python.framework/Versions/3.5/lib/python3.5/site-packages as cv2.so. When i try to use the package by using import cv2, it is giving
import cv2
ImportError: dynamic module does not define module export function (PyInit_cv2)
Please help me out, how to resolve the issue
Environment and OS details below
OS: macOs – 10.11.6
Python: 3.5
Adrian Rosebrock
It sounds like CMake might have compiled OpenCV with Python 2.7 support rather than Python 3. Go back to the CMake step and check which bindings are being compiled.
Ellery
I get this warning when I run brew linkapps. Should I be worried?
—
$ brew linkapps python3
Warning: `brew linkapps` has been deprecated and will eventually be removed!
…
Adrian Rosebrock
Nope, everything is okay. You can ignore the warning.
Subhaya Tuladhar
Will this also work for python 3.6?
Adrian Rosebrock
Yes, simply update all Python 3.5 paths to be valid Python 3.6 paths.
Mohamad
Hey Adrian,
I followed your instructions but there is a problem with my Cmake output. When it’s finished, I checked the python3 libraries path and it haven’t found the library’s path. As the below:
Python 3:
— Interpreter: /usr/local/bin/python3 (ver 3.6.1)
— Libraries: NO
— numpy: /usr/local/lib/python3.6/site-packages/numpy/core/include (ver 1.12.0)
— packages path: /usr/local/lib/python3.6/site-packages
After that, when I run make -j8 , it gives me errors. How can I solve it?
Adrian Rosebrock
Either your
PYTHON3_LIBRARY
orPYTHON3_INCLUDE_DIR
is incorrect. Double-check them per the instructions I have included in this guide.Yash
Hello Adrian,
When I am trying to use the command ‘make-j4’ command, I get this error.
“make: *** No targets specified and no makefile found. Stop.”
What can I do??
Adrian Rosebrock
Your CMake command likely exited with an error. Go back to the CMake step, look for the error, and then resolve it. The CMake command is used to generate the Makefile required to build OpenCV.
Alkasm
Woohoo! I got it working with OpenCV 3.2.0 on Python 3.6.1.
This was my cmake command:
One step that was different in my case. I did the cmake and install step while I was still in the (cv) virtual environment and the .so file was already installed in ~/.virtualenvs/… so all I had to do was browse to there and rename it as shown.
Thanks, this tutorial was excellent and taught me a lot in the process!
Adrian Rosebrock
Thank you for sharing Alkasm!
Berthy
How exactly did you get this to work, Alkasm? I followed all the steps of the tutorial up until the cmake portion and instead borrowed from your commands. However, here’s a snippet of the output I’m getting:
Python 3:
Interpreter: /Users/leitan/.virtualenvs/cv/bin/python3 (ver 3.6)
And that’s the only line for Python 3. It still couldn’t find the PythonLibs. What is it that I’m doing differently?
LawSky
Thank u !!!!
I’m a Chinese student, It’s every hard for me to login and say something to u
but it much easier than set up opencv on my computer !!!!
All I want u to know is u are a good teacher, I’ll share this blog with my classmates.
Jose
Hi Adrian, many thanks for your great quality posts, I have been following several of them and learning a lot!
I wanted to pass here some of my experience in the installation process:
1. The first problem I faced was the inability of cmake to download the correct icv file. After some time downloading, it interrupted the process saying the file downloaded was different from the one expected. I searched around and found out that this is due to cmake being built with an old curl version, installed by default in the mac, that doesn’t support ssl. But using brew would install the newer ssl-supporting curl version only as a keg, not linked. Therefore you have to link it manually to /usr/local/ carefully, all the files in the folders include/, lib/ and bin/.
After doing this liking I removed and re-installed cmake, and this time it could download the correct icv file. And everything went right 🙂 …
2. Except that when using the cv2 library inside my cv environment and I executed cv2.imshow for example (I was following your cat faces tutorial) it did not open any gui window. I wonder what options has to be passed to cmake to enable gui?
3. I also followed your post of installing ocv3 using brew directly, and again this time when using imshow there was a reply of “init done opengl support available” but not gui window opens. I made sure to install gtk, qt, etc. But something is wrong in my arguments to cmake probably?
Best,
Adrian Rosebrock
Hi Jose — regarding
cv2.imshow
you need to place a call tocv2.waitKey(0)
immediately after in order to display the image to your screen.Jose
Hi Adrian, many thanks indeed, silly mistake 😉
Best wishes
Rajat Parajuli
Hey Adrain. So I just completed your tutorial and installed opencv 3.2 successfully, or so I thought. So when I try to display an image with Im show all I get is the title bar of the window. I have even posted it on stack overflow with no avail. Here’s the link to my question/problem on stackoverflow.
https://stackoverflow.com/questions/44228407
I tried imread and imwrite they however, seem to work.
Adrian Rosebrock
That is indeed some strange behavior. Can you do
print(image.shape)
and let me know the output? It seems for some strange reason that OpenCV isn’t loading your BMP image.Nyng
I’ve successfully installed OpenCV 3.2.0-dev with python 3.6.1 by following your tutorial!
Should I delete ~/opencv and ~/opencv_contrib after all these steps? Thanks!
Adrian Rosebrock
Yes, once OpenCV has been successfully installed you can delete the
opencv
andopencv_contrib
directories.Ram
Thanks for the tutorial. I am successfully able to compile and install openCV. I am suing Qt creator to write application. but I want to debug and step through the openCV source code. I like to know how to do it ? is there any instructions? Please let me know. Thanks
Adrian Rosebrock
It really depends on your IDE. My main suggestion would be to use PyCharm which has a lot of built-in tools for this type of debugging.
yichen
Thanks for this fantastic tutorial, I followed everything in this tutorial and they worked perfectly. I just bought your book practical python and opencv. And trying to test the code given, however, cv2.imshow() function doesn’t seem to work anywhere, it’s only showing the top bar, not event a black or grey background, just a topbar. Please help, currently, i have to use imwrite function to check if my codes are working correctly.
Versions:
OpenCV: The current github version, at June 16 2017. Which i’ve got no idea how to check the version code.
And Python 3.6.1
Adrian Rosebrock
Hi Yichen — can you try compiling and installing the official 3.2 release rather than the latest release on GitHub:
http://opencv.org/releases.html
I get the impression that the development branch of OpenCV might have a bug in it.
Andrew
Quick question: Where do I put my C-make template? I’m at Step 7, and I’m confuse because I don’t see where do I put my Cmake template or how to execute it.
Andrew
Nevermind figured it out.
Adrian Rosebrock
Congrats on resolving the issue, Andrew!
Fohlen
Actually now there is a homebrew formular in homebrew/science
Just
“`
brew tap homebrew/science
brew install opencv3
““
or `brew install –with-python3`
nevertheless, nice tutorial!
Adrian Rosebrock
Hi Fohlen — I actually cover how to install OpenCV via Homebrew, including some of the problems you might run into, in this post.
Vaidehi
After running the cmake command, in the python3 section I get the following:
Python 3:
— Interpreter: NO
How do I fix this?
Adrian Rosebrock
Make sure you are in the “cv” virtual environment and that you properly created the Python virtual environment using the
-p python3
switch. From there, delete your “build” directory, re-recreate it, and re-run CMake.Jonah Rosenblatt
Thank you so much Adrian for this insightful guide. I have been trying to install OpenCV for about a week, but am encountering the same problems. Virtualenvwrapper, for some reason, is not recognized, and neither is the dylib file, which is cannot be found. How do I fix this?
Adrian Rosebrock
Hi Jonah — it’s hard to say what the exact problem is. I would run
pip freeze
to verify that both virtualenv and virtualenvwrapper have been properly installed. Also double check that your~/.bash_profile
file was updated correctly.Sumith
Hi Adrian, I used your tutorial to install opencv-3.2.0-dev with python 3.6. I am using it on mac os sierra. I used opencv to read and show the image. But I am getting a window created but nothing is getting displayed in that window it’s blank.
Below is my code :
import cv2
cv2.namedWindow(‘image’)
result = cv2.imread(‘/Users/sumithkrishna/1.jpg’)
cv2.imshow(‘image’, result)
cv2.waitKey(0)
Am i getting it wrong somewhere.
Adrian Rosebrock
This is actually a known issue with the current development edition of OpenCV and macOS — the GUI/window functionality will not work. You will need to use the tagged 3.0, 3.1, or 3.2 release for macOS until the issue is resolved.
Christopher Allen-Poole
If you use MacPorts instead of Homebrew, libpython3.x.dylib can be found:
ls /opt/local/Library/Frameworks/Python.framework/Versions/3.*/lib/libpython3.*.dylib
Christopher Allen-Poole
Actually, this is the result of all of my troubleshooting of MacPorts. Hope to split it up into Stack Overflow questions eventually: http://allen-poole.com/blog/how-install-opencv-macports/
Adrian Rosebrock
Did you have both MacPorts and Homebrew installed on your machine? If so, that is likely the cause of the vast majority of your issues. You normally choose one or the other, not both. Having both installed can really mess with your $PATHs.
Thierry
Hi,
thank you for all. I do not understand all the commands made 😉 but it works fine.
Just a remark, concerning the use of “pip”. On my MacBook Pro late 2015 I was in front of a problem solved by the url below. There was a trouble on the command “pip install virtualenv virtualenvwrapper”. An installed version is failing the previous command. The solution is to use the “–ignore-installed six” option.
Regards, and thanks again.
https://stackoverflow.com/questions/33185147/on-os-x-el-capitan-i-can-not-upgrade-a-python-package-dependent-on-the-six-compa
Anthony
Hi Adrian,
I’ve reached Step 10 but when I type in the command “import cv2”, the output is
“Traceback (most recent call last): File “”, line 1, in ModuleNotFoundError: No module named ‘cv2′”.
Could this be related to the Step 7’s input? If so, is the fix to delete the build and start from the build directory again?
Thanks.
Adrian Rosebrock
Hi Anthony — there are a variety of reasons why the “cv2” module may not be found. Are you in the “cv” virtual environment? Did you double-check your CMake output to ensure that the “python3” module was in the list of modules to be compiled?
Andrew Baker
Last night I was able to work through the tutorial successfully with the latest versions of Python 3.6.2 and openCV 3.3.
My setup:
MacOS Sierra 10.12.6
Xcode 8.3.3
Command Line Tools (Xcode 8.2). It is very important you downgrade the CLT. The current version of the CLT does not support CUDA 8.0.61. If you don’t do this you will not successfully build.
NVCC 8.0.61
clang 800.0.42.1 -> comes with the install of CLT from 8.2
The build will take a long time ( > 1 hour). It will unexpectedly pause, mine did around 87%. Be patient. Do not abruptly end this build. It will finish.
Francesco Renzi
Hi! Thanks for the precious tutorial, it really helped a lot. Everything works great, aside from the fact the importing cv2 only works from a python console started within the folder where cv2.so is. Is there any way to make it accessible globally?
Adrian Rosebrock
Hi Francesco — congrats on getting OpenCV installed. You should be able to access the
cv2
bindings anywhere on your system as long as you are in the “cv” virtual environment. It sounds like you may have missed the sym-link step and/or you are not in the “cv” virtual environment.Vijay Krishna B
Unable to use pip.
Getting error pip: command not found
Tried this approach to install pip but not working
1.sudo easy_install pip
python get-pip.py
Adrian Rosebrock
Pip should already be installed on your system.
Sahil Goyal
Whenever I run ‘source ~/.bash_profile’ after installing virtualenv and virtualenvwrapper following error comes.
ERROR:-
/usr/bin/python: No module named virtualenvwrapper
virtualenvwrapper.sh: There was a problem running the initialization hooks.
If Python could not import the module virtualenvwrapper.hook_loader,
check that virtualenvwrapper has been installed for
VIRTUALENVWRAPPER_PYTHON=/usr/bin/python and that PATH is
set properly.
Could you please help ?
Adrian Rosebrock
Which Python version are you trying to use? Python 2.7? Or Python 3?
Sahil Goyal
I was able to install OpenCV 3.3 and it is running fine. But I want to ask how to use Xcode to write code for python.
Adrian Rosebrock
You can use Xcode to write Python code; however, I do not know if Xcode supports Python virtual environments. If you’re intending on writing Python code I would highly suggest that you use the PyCharm IDE.
Sahil Goyal
Just one last thing, how to configure Pycharm IDE so it recognises cv2 ?
Adrian Rosebrock
See this post.
Mauricio Gutierrez
I have same error in Python 3.6, any suggestion?
Adrian Rosebrock
I would suggest explicitly setting your
VIRTUALENVWRAPPER_PYTHON
inside your.bash_profile
, like this:anas sinjab
hello Adrian
thanks a lot for ur help
but i have a problem with Step #4: Install Python virtual environments and NumPy
after i downloded both and add
# Virtualenv/VirtualenvWrapper
source /usr/local/bin/virtualenvwrapper.sh
and run source ~/.bash_profile
it gives me -bash: /usr/local/bin/virtualenvwrapper.sh: No such file or directory
any suggestion ?
Adrian Rosebrock
Which Python version are you trying to use when installing OpenCV? Python 2.7? Or Python 3?
anas sinjab
i have both python on my system but i wanna use 3.6.2
the problem above has been solvd somwhow
but when i go to next step
$ mkvirtualenv cv -p python3
i get
ERROR: virtualenvwrapper could not find virtualenv in your path
any idea ??
Adrian Rosebrock
Hmm, are you using a bash shell? This StackOverflow thread might be of help.
Aiven
brilliant, thank you!
opcode
Thanks for the awesome instructions! I followed them on OSX Sierra with python 3.6.3 and got an error during the build, Python.h not found. I discovered that ../modules/python/common.cmake includes “${${PYTHON}_INCLUDE_PATH}” whereas the cmake prototype you provide has …INCLUDE_DIR. I added one more line to the cmake command
-D PYTHON3_INCLUDE_PATH=/usr/local/Cellar/python3//3.6.3/Frameworks/Python.framework/Versions/3.6/include/python3.6m/ \
which was the path in my case, reran cmake and make, and it built cleanly.
Sahil
I have installed Opencv 3 and I am using it with python for about month. But I want to try it with C++ (with Xcode) now, so what should I do to use the previously installed version of opencv 3. I am using macOS high sierra and Xcode 9.
Brian
Hi Adrian,
After running the cmake command, my terminal shows the result that “Libraries: NO” inside “Python 3”. How can I solve it? Thank you
Adrian Rosebrock
Hi Brian — can you confirm you are inside the “cv” virtual environment before run “cmake”? Secondly, I put together a self-configuring CMake command in this blog post. I would suggest you give that a try as well.
David Hoffman
If you run into the following issue:
$ sudo xcodebuild -license accept
xcode-select: error: tool 'xcodebuild' requires Xcode, but active developer directory '/Library/Developer/CommandLineTools' is a command line tools instance
…while accepting the XCode License, here is the solution:
$ sudo xcode-select -s /Applications/Xcode.app/Contents/Developer
$ sudo xcodebuild -license accept
Dinesh
I just have a quick question. Still a newbie here. So, I followed all the steps and got the cv2.so. When I do workon cv and I try importing cv, I must have the cv2.so file inside the particular folder I am working in. Maybe I missed a commentary somewhere but is that normal? So for example, if I switch to d folder inside My Document and try import cv2, it would not work until I copy over the cv2.so file inside. Again, sorry if I missed anything but again, is this normal? Thank you.
Adrian Rosebrock
This is not normal and is likely due to missing the sym-link step in Step 9. Go back to Step 9 and ensure the sym-link is created from your cv2.so file to the “site-packages” directory of your Python virtual environment. Once the sym-link is created you’ll be able to import your OpenCV bindings regardless of which directory you are in.
Kiran
Was successfully able to install OpenCV 3.3.1-dev, python-3.6.3 on my Mac OS X Sierra. Here is my CMake File.
And rest of the steps as mentioned by our beloved and true hero, Adrian!
Cheers 🙂
Adrian Rosebrock
Thanks for sharing, Kiran! And congratulations on getting OpenCV installed on your macOS machine 🙂
Chad
Are you using High Sierra? I verified that my PYTHON3_INCLUDE_DIR and PYTHON3_LIBRARY are identical to yours, but I still get the following errors:
— Python 3:
— Interpreter: /Users/admin/.virtualenvs/cv/bin/python (ver 3.6.3)
— Libraries: NO
— numpy: NO (Python3 wrappers can not be generated)
— packages path: /Users/admin/.virtualenvs/cv/lib/python3.6/site-packages
— Python (for build): /Users/admin/.virtualenvs/cv/bin/python
Adrian Rosebrock
Hi Chad — I am using “normal” Sierra, not High Sierra. I’ll be writing a separate blog post for High Sierra, but in the meantime you can use my self-configuring CMake command in this post.
Chad
Found it am using it. There are issues with where some of the stuff is stored: ./code/.virtualenvs/dl4cv/lib/python3.6/site-packages
Jaspreet Ranjit
Hi Chad, I am also using high sierra and ended up using the cmake command in this post: https://pyimagesearch.com/2017/09/29/macos-for-deep-learning-with-python-tensorflow-and-keras/
although it outputs the correct paths for Python 3, I still got-
Python (for build):/usr/bin/python2.7
Did you have this issue and do you know how to fix it.
Adrian Rosebrock
Ignore the “Python (for build)” section, it’s buggy. As long as your CMake output for your respective Python version is correctly filled out you should be fine 🙂
Anna
Hi,
so I’m trying to go through this guide, but my laptop fails to output the /usr/local/bin when I enter ‘which python’ in the terminal. I had a look at stack overflow (https://stackoverflow.com/questions/5157678/python-homebrew-by-default) but nothing of the recommended solutions worked for me. It does output the right path for python3.6, but not for python 2.7.
I’m sorry to bother you with this simple error!
Cheers, Anna
Adrian Rosebrock
This is due to a recent update with Homebrew. My suggestion would be to use the “python2” and “python3” commands directly instead of trying to alias the “python” commands. If you do:
You will get the correct output.
Jessie Free
Hello Adrian,
Thanks for a great tutorial. I’m having trouble in step 7 when I try to find the python library. The include directory returns a path but the python library
ls /usr/local/Cellar/python3/3.*/Frameworks/Python.framework/Versions/3.6/lib/python3.6/config-3.6m/libpython3.6.dylib returns “no such file or directory”. As a result, once I execute the cmake command, I get “NO” for libraries. Any thoughts on what might be going wrong? Thanks in advance.
Jessie Free
Just to add on, I have tried the cmake command in this website: https://peekay.org/2016/03/24/opencv-osx-python-3-bindings/
and your suggestion on this post: https://pyimagesearch.com/2017/09/29/macos-for-deep-learning-with-python-tensorflow-and-keras/
as well as the one in this blog post.
Adrian Rosebrock
Did you install Python via Homebrew? Did it install successfully? Use the “ls” command with auto-completion to help you derive the path to your Python libraries. Your path could be slightly different of mine depending on the major and minor version number of Python (since they are built into the path). The reason you’re getting “NO” for the libraries is because your Python path is incorrect.
Jonas
Hi, Did you come up with a solution to your problem? I’m also stuck here…
Frank
Did you figure it out? I am stuck at step7 also
kaisar khatak
Good post. I am up and running with opencv 3.4.0-dev in a python3 virtual environment on MacOS Sierra 10.12.6. It looks like opencv can open and render images. I might try the
“brew install opencv3” method in the future for practice…
PYTHON TEST SCRIPT:
import cv2
img = cv2.imread(“/Users/datadude/Downloads/some-image.jpg”)
cv2.imshow(“img”,img)
cv2.waitKey(0)
———————————
CMAKE Command:
cmake -DCMAKE_BUILD_TYPE=RELEASE \
-DCMAKE_INSTALL_PREFIX=/usr/local \
-DOPENCV_EXTRA_MODULES_PATH=~/opencv_contrib/modules \
-DPYTHON3_LIBRARY=/usr/local/Cellar/python3/3.6.4/Frameworks/Python.framework/Versions/3.6/lib/python3.6/config-3.6m-darwin/libpython3.6.dylib \
-DPYTHON3_INCLUDE_DIR=/usr/local/Cellar/python3/3.6.4/Frameworks/Python.framework/Versions/3.6/include/python3.6m \
-DPYTHON3_EXECUTABLE=$VIRTUAL_ENV/bin/python \
-DBUILD_opencv_python2=OFF \
-DBUILD_opencv_python3=ON \
-DINSTALL_PYTHON_EXAMPLES=ON \
-DINSTALL_C_EXAMPLES=OFF \
-DBUILD_EXAMPLES=ON ..
Adrian Rosebrock
Thanks for sharing, kaisar!
vignesh
is it nessasry to create a virtual environment
Adrian Rosebrock
You do not have to but it is a best practice when using Python.
Deven Reilly
Hey Adrian 🙂 I need ffmpeg but it never seems to be included. I’ve been following the instructions but every time I use Cmake it spits this out:
— Video I/O:
— DC1394: NO
— FFMPEG: NO
— avcodec: NO
— avformat: NO
— avutil: NO
— swscale: NO
— avresample: NO
— GStreamer: NO
— AVFoundation: YES
— gPhoto2: NO
How can I include it in the build? Thanks in advance.
Deven Reilly
Turns out I just had to brew install ffmpeg lol duh
Adrian Rosebrock
Congrats on resolving the issue, Deven! 🙂
Bryan
Hey Adrian,
I was trying to install this on my macOS, but it was not working by giving my PythonLibs not found whenever I would follow the path “/usr/local/Cellar…/libpython3.6m.dylib” but when I changed it to /Library/Frameworks…/libpython3.6m.dylib” it worked. Is this alright? I got the path of my library from sys.path.
Ghazal Sahebzamani
Hey Adrian,
Thanks for your detailed tutorial. Unfortunately, when I run the CMake command, it exits with errors. By opening the error log, I assume C++ 11 isn’t supported on my system although I have Xcode installed. I also tried installing gcc, but that seemed quite a challenge as well !
I also tried forcing Cmake to use C++ 11 by running this commands:
set(CMAKE_CXX_STANDARD 11)
but I get “syntax error near unexpected token `CMAKE_CXX_STANDARD”
Any idea what I should do?
BTW I’m using high sierra (10.13.2)
Thanks in advance.
Adrian Rosebrock
The error message seems to imply that you have an old version of gcc installed, although that wouldn’t make sense if you’re using the latest Xcode and High Sierra. What is the output of:
$ gcc --version
AJNahas
Hey Adrian,
I really appreciate this amazing tutorial. However, I have been encountering many errors – even after searching online, using pip3 and python3 for the latest versions, making sure every detail is correct, repeating everything over 7 times by uninstalling and installing homebrew – but to no avail.
May I ask that you please create a new tutorial based on the new python 3.6 and mac HighSierra? I, as well as many, would really appreciate that.
Thanks again.
Adrian Rosebrock
It is definitely in my queue to create a Python 3.6 + macOS High Sierra tutorial 🙂
Aashish
During this command
— make -j4
facing this issue
till this point everything installed correctly.
/Users/aashish-mac/opencv/modules/python/src2/cv2.cpp:7:10: fatal error: ‘Python.h’ file not found
Adrian Rosebrock
For whatever reason it looks like the Python headers are not installed on your system. Did you install both Xcode and Homebrew?
Romain C
Hi, I have this problem yet xcode and homebrew are installed
xcode :
Xcode 9.3
Build version 9E145
homebrew :
Homebrew 1.5.14
Homebrew/homebrew-core (git revision 1f9b; last commit 2018-04-07)
Thanks for your help
Adrian Rosebrock
Which version of macOS are you using?
Romain C
Hi, after following exactly what you wrote it worked. sorry for this and thanks a lot for this tutorial
Adrian Rosebrock
No worries at all, Romain. Congrats on resolving the issue.
Vish
I can’t thank you enough! best wishes dude! you made my day. that moment when I sew import cv2 work on Mac!!!
Adrian Rosebrock
Congrats on getting OpenCV installed on your macOS machine, Vish! Great job 🙂
Michael Zhang
Hi Adrian,
I’m new to OpenCV and get stuck at step #7… When I do “ls -d /usr/local/Cellar/python3/3.*/Frameworks/Python.framework/Versions/3.5/include/python3.5m/”, it prompts “No such file or directory”.
So I cd into “/usr/local/Cellar/”, and found that there is only folder name “python” but no “python3”. Inside of “python” folder, there are 3.6.4_4 and 3.6.5.
I did install python3 using brew. So how can I find the right path to libpython3.5.dylib?
Thanks,
Michael
Adrian Rosebrock
I’m not sure which one would be your Python 3 install. Try using “3.6.4_4” and if the “Python 3” section of “cmake” is not correctly filled out then go back and use “3.6.5”.
Joep Truijen
Hi Adrian, Im new.
I run into the same problem but continued with /python/ instead of /Python3/. I filled out “cmake” like this:
YYY
/usr/local/Cellar/python/3.6.5/Frameworks/Python.framework/Versions/3.6/lib/python3.6/config-3.6m-darwin/libpython3.6.dylib
ZZZ
/usr/local/Cellar/python/3.6.5/Frameworkds/Python.framework/Versions/3.6/include/python3.6m/ \
By doing so the python 3 section output from the configuration from (Figure 7) did not show the section python 2 and python 3, instead it showed Python (for build): /usr/local/bin/python2.7
Because it listed:
— Configuring done
— Generating done,
I continued until step #9 were I used the ls -l command in site-packages folder because there is no file named cv2.cpython-35m-darwin.so in it. Nothing like it.
(I hope this is clear information rather than to much of it)
Could really use your advice because I feel like I was so close :p
Thanks,
Joep
Adrian Rosebrock
Ignore the “Python (for build)” section — it’s buggy. Instead, just ensure your “Python 3” section is correctly filled out. Also, check your “build/lib” directory after you finish running “make”. Your OpenCV bindings should be in that directory.
A last suggestion would be to check your output from “cmake”, in particular the list of modules to be compiled. You should see “python3” listed as one of the modules.
Joep Truijen
Thank you, it worked, I think the problem was that with python3.6.5 you have to fill in the cmake command with:
-D PYTHON3_EXECUTABLE=/usr/local/bin/python3 \
Instead of:
-D PYTHON3_EXECUTABLE=/usr/local/bin/python \
Thank you for your work! its great!
Adrian Rosebrock
Awesome, I’m glad you were able to get OpenCV installed Joep! 🙂
Joep Truijen
can’t remember if I replied or not, but it worked! Don’t know if it was a typo or filling out the cmake “-D PYTHON3_EXECUTABLE= ” section with
/usr/local/bin/python3 \
as Greg Pierce suggested below, instead of
/usr/local/bin/python \
Thanks allot I already got my hands on some Average face scripts for my graduation project!
Adrian Rosebrock
Congrats on resolving the issue, Joep! And best of luck with your graduation project.
Jerome Guibert
Thanks for your article,
Let’s go to image processing on mac, and pi, and ..
🙂
Greg Pierce
Just in case someone was trying to do this on a Python 3.6.5 install with the latest OpenCV 3.4.1
cmake -D CMAKE_BUILD_TYPE=RELEASE \
-D CMAKE_INSTALL_PREFIX=/usr/local \
-D OPENCV_EXTRA_MODULES_PATH=/projects/opencv_contrib/modules \
-D PYTHON3_LIBRARY=/usr/local/Cellar/python3/3.6.5/Frameworks/Python.framework/Versions/3.6/lib/python3.6/config-3.6m-darwin/libpython3.6.dylib \
-D PYTHON3_INCLUDE_DIR=/usr/local/Cellar/python3/3.6.5/Frameworks/Python.framework/Versions/3.6/Headers/ \
-D PYTHON3_EXECUTABLE=/usr/local/bin/python3 \
-D BUILD_opencv_python2=OFF \
-D BUILD_opencv_python3=ON \
-D INSTALL_PYTHON_EXAMPLES=ON \
-D INSTALL_C_EXAMPLES=OFF \
-D BUILD_EXAMPLES=ON ..
Note, this build is done to support building inside and outside of virualenvs
Adrian Rosebrock
Thanks for sharing, Greg!
Manju
i did the exact thing bro. it worked out .
Roshan Sivakumar
Hi,
This is the warning i got when I was installing python3
Warning: python 3.6.5 is already installed, it’s just not linked
You can use `brew link python` to link this version.
Should I link it and why?
Adrian Rosebrock
It sounds like you already have Python 3 installed. Run:
$ which python3
To check the path (as we do in the blog post) to ensure it’s the Homebrew install vs. the system install of Python.
Gaurav Didwania
Hey Adrian, I have followed your tutorial but in the last step i am having trouble.
the ln command gives
ln: cv2.so: File exists
This I know is because i tries the installation once before with some error so the file from previous time exist.
How should I remove it.
Adrian Rosebrock
You can use the “rm” command to remove a file from your system.
Ryan
Hi Adrian,
I’m having an issue with Step #4.
Since I’m using python 3 (stored in: /usr/local/bin/python3), I installed pip via: `python3 get-pip.py` (note: using “python3”), and therefore I only have pip3 on my machine (not pip). In step #4 when I run `pip3 install virtualenv virtualenvwrapper`, it successfully downloads, but virtualenv appears to gets stored in: /usr/local/lib/python3.7/site-packages, NOT /usr/local/bin.
As a result, when I add `source /usr/local/bin/virtualenvwrapper.sh` to my bash_profile it fails when I then source the bash_profile:
“-bash: /usr/local/bin/virtualenvwrapper.sh: No such file or directory”
Do you have any recommendations on this?
Thanks!
Ryan
UPDATE: I noticed that when I run `sudo find / -name virtualenvwrapper.sh` it tells me that the shell script is saved here:
/usr/local/Cellar/python/3.7.0/Frameworks/Python.framework/Versions/3.7/bin/virtualenvwrapper.sh
any thoughts why this is not in the same dir as yours (/usr/local/bin)?
Thanks!
Adrian Rosebrock
Hey Ryan — check you check your .bash_profile file? If you add the following line to your virtualenv section:
export VIRTUALENVWRAPPER_PYTHON=/usr/local/bin/python3
It should work. Secondly, keep in mind the “bin” directory is for binaries and the “lib” directory is for “libraries” so your directory structure makes sense.
Sarthak Dandriyal
Adrian I am facing a problem with “Determining your Python 3.5 library and include directory”
I have installed python 3.7 and it is showing no directory found.
please help.
Adrian Rosebrock
Hey Sarthak, I would advise you to this updated macOS + OpenCV install tutorial. Additionally, you may be able to pip install opencv.
Bill Harvey
Mmm everything seemed to be going OK until after step 9 I checked to see if it all worked.
I can enter my virtual environment in terminal by using ‘workon cv’, when I enter python it returns python 3.7.1, but when I try to import cv2 I get the error Traceback (most recent call last):
File “”, line 1, in
ModuleNotFoundError: No module named ‘cv2’
Symlink seemed to work OK?
Mac OS X High Sierra Python 3.7.1
Adrian Rosebrock
I would recommend either:
1. Following this updated OpenCV + macOS install guide
2. Using a pip install of OpenCV.